

Page 1

Notruftelefon
Téléphone de secours
Telefono per chiamate d’emergenza
Emergency telephone
TC40
Bedienungsanleitung
Mode d’emploi
Istruzioni per l’uso
Operating Instructions
D
Page 2

2
TC40
Bedienungsanleitung 3. . . . . . . . . . . . . . . . . . . . . . . . . . . . . . . . . . . . . . . . . . . .
Mode d’emploi 15. . . . . . . . . . . . . . . . . . . . . . . . . . . . . . . . . . . . . . . . . . . . . . .
Istruzioni per l’uso 27. . . . . . . . . . . . . . . . . . . . . . . . . . . . . . . . . . . . . . . . . . . . .
Operating Instructions 39. . . . . . . . . . . . . . . . . . . . . . . . . . . . . . . . . . . . . . . . . .
Declaration of Conformity 52. . . . . . . . . . . . . . . . . . . . . . . . . . . . . . . . . . . . . . .
Page 3

1 Sicherheitshinweise 4. . . . . . . . . . . . . .
2 Telefon in Betrieb nehmen 5. . . . . . . . . .
3 Bedienelemente 6. . . . . . . . . . . . . . . . .
4 Wie bediene ich mein Telefon? 7. . . . . . .
5 Telefonieren 8. . . . . . . . . . . . . . . . . . . .
6 Nebenstellenanlagen / Zusatzdienste 10. .
7 Direktwahl 11. . . . . . . . . . . . . . . . . . . . .
8 Falls es Probleme gibt 12. . . . . . . . . . . . .
9 Pflegehinweise / Garantie 13. . . . . . . . . .
10 Stichwortverzeichnis 14. . . . . . . . . . . . . .
1
Inhaltsverzeichnis
3
Page 4
Sicherheitshinweise
1 Sicherheitshinweise
Lesen Sie diese Bedienungsanleitung sorgfältig durch.
Bestimmungsgemäße Verwendung
Dieses Telefon ist geeignet für das Telefonieren innerhalb eines
Telefonnetzes. Jede andere Verwendung gilt als nicht
bestimmungsgemäß. Eigenmächtige Veränderungen oder Umbauten sind
nicht zulässig. Öffnen Sie das Gerät in keinem Fall selbst und führen Sie
keine eigenen Reparaturversuche durch.
Aufstellungsort
Vermeiden Sie Belastungen durch Rauch, Staub, Erschütterungen,
Chemikalien, Feuchtigkeit, Hitze oder direkte Sonneneinstrahlung.
Hörgeräte−kompatibel
Das Telefon ist über den Premium−Hörer vorzüglich auf Hörgeräte
abgestimmt und mit den meisten am Markt befindlichen Hörgeräten
kompatibel. Durch die Vielzahl der angebotenen Modelle kann keine
einwandfreie Funktion mit jedem Hörgerät garantiert werden.
Achtung: Dieses Telefon kann sehr laute Lautstärken wieder-
geben, wenn der Verstärker aktiviert ist und der Lautstärkeregler
auf Maximum steht.
Große Vorsicht ist geboten beim Wechsel zwischen Benutzern
mit normalem Gehör und vermindertem Gehör.
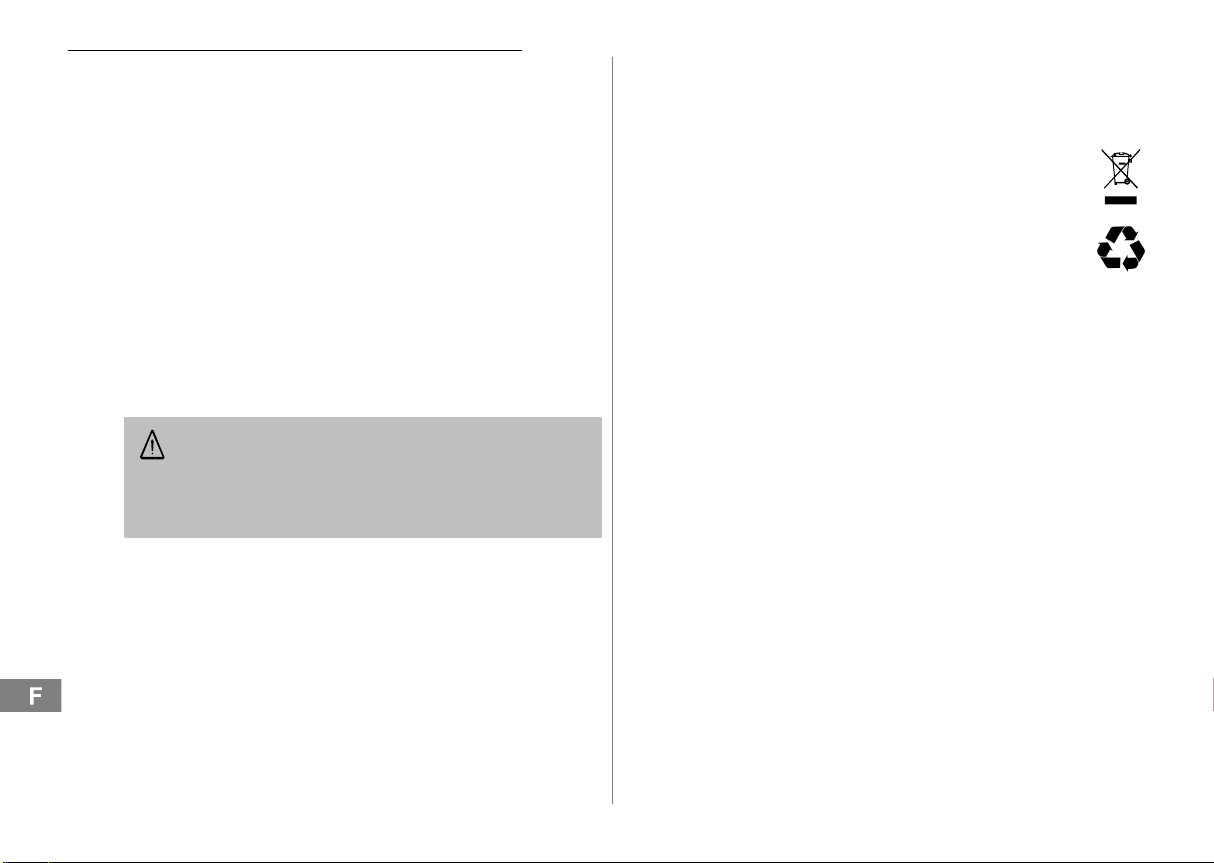
Entsorgung
Sie sind gesetzlich zur sachgerechten Entsorgung von
Gebrauchsgütern verpflichtet. Das nebenstehende Symbol auf
Ihrem Telefon bedeutet, dass elektrische und elektronische
Altgeräte und Batterien getrennt vom Hausmüll zu entsorgen
sind.
Elektrische oder elektronische Geräte entsorgen Sie bei einer
Sammelstelle eines geeigneten Entsorgungsträgers.
Batterien entsorgen Sie beim batterievertreibenden Handel
sowie bei zuständigen Sammelstellen, die entsprechende
Behälter bereitstellen.
Verpackungsmaterialien entsorgen Sie entsprechend den
lokalen Vorschriften.
4
Page 5

2 Telefon in Betrieb nehmen
Sicherheitshinweise
Achtung: Lesen Sie vor der Inbetriebnahme unbedingt die Si-
cherheitshinweise in Kapitel 1.
Verpackungsinhalt prüfen
Zum Lieferumfang gehören:
Inhalt
Telefon 1
Premium−Telefonhörer 1
Hörerspiralkabel 1
Telefonanschlusskabel 1
Wandmontagehalterung 1
Bedienungsanleitung 1
Basisgerät anschließen
Schließen Sie das Telefon wie auf der Skizze abgebildet an. Verwenden
Sie nur das mitgelieferte Telefonanschlusskabel, da das Gerät mit einem
anderen Telefonanschlusskabel eventuell nicht funktioniert.
2
Telefonhöreranschluss
TC40
Telefon in Betrieb nehmen
Wandmontage
Ihr Telefon ist zur Wandmontage geeignet. Für die Befestigung des
Telefons benötigen Sie zwei Schrauben.
Führen Sie die Führungsnasen (1) der Wandmontagehalterung (2) in die
Führungsnuten (3) auf der Rückseite des Telefons ein. Schieben Sie die
Wandmontagehalterung (2) 10 mm nach oben, bis sie hörbar einrastet.
Warnung: Im Bereich der zu bohrenden Löcher dürfen sich
keine Leitungen (Kabel, Rohre usw.) befinden.
Bohren Sie zwei Löcher im Abstand der vorgesehenen Aufhängungen und
lassen Sie die Schrauben 5 mm aus der Wand herausstehen. Setzen Sie
das Telefon an den Aufhängungen auf die Schrauben und schieben Sie es
etwas nach unten.
Drehen Sie die Höreraufhängung (4) in der Telefonhörerablage um 180°,
damit Sie den Telefonhörer einhängen können.
3
1
3
2
4
4
4
4
4
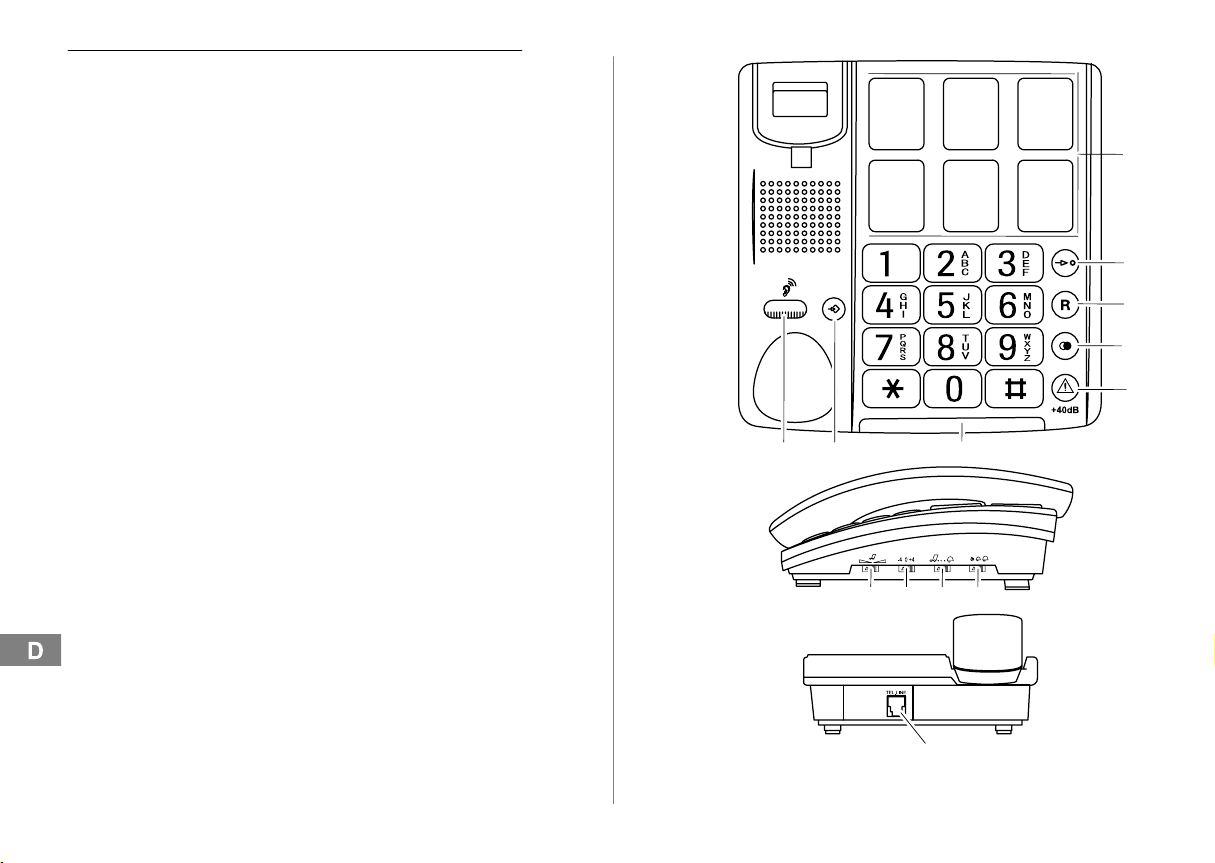
Telefonanschlussdose
5
Page 6
Bedienelemente
3 Bedienelemente
Telefon
1 Direktwahltasten
2 Kurzwahltaste
3 R−Taste
4 Wahlwiederholung,
Wahlpause
5 Hörerlautstärke verstärken
+40 dB
6 LED Telefon klingelt
7 Nummer speichern
Die Tasten werden in dieser Bedienungsanleitung mit einer einheitlichen
Kontur abgebildet. Abweichungen von Tastensymbolen Ihres Telefons
gegenüber den hier abgebildeten Tastensymbolen sind möglich.
8 Drehregler
Hörerlautstärke (verdeckt
unter Premium−Hörer)
9 Schieberegler
Klingellautstärke"
10 Schieberegler Klingelton"
11 Schieberegler
Sendelautstärke"
12 Schieberegler Klang"
13 Buchse für
Telefonanschlusskabel
1
2
453
7
11
12 10 9
68
3
4
5
13
6
Page 7

4 Wie bediene ich mein Telefon?
Darstellungen und Schreibweisen
Ziffern oder Buchstaben eingeben
Abgebildete Taste kurz drücken
2 x Abgebildete Taste 2 x kurz drücken
2 Sek. Abgebildete Taste 2 Sek. drücken
halten Abgebildete Taste halten
loslassen Abgebildete Taste loslassen
Telefon klingelt
Hörer abnehmen
Hörer auflegen
Wie bediene ich mein Telefon?
7
Page 8
Telefonieren
5 Telefonieren
Anruf annehmen
, Anruf annehmen
Gespräch beenden
Gespräch beenden
Anrufen
Hörer abnehmen
Rufnummer eingeben (max. 32 Ziffern)
Wahlwiederholung
Ihr Telefon speichert die zuletzt gewählte Rufnummer.
, zuletzt gewählte Rufnummer wählen
Direktwahl
Sie können die Direktwahltasten als normale Direktwahl oder als
Speicherplätze für den Notruf nutzen. Sie müssen Rufnummern als
Direktwahl gespeichert haben Seite 11.
Hörer abnehmen
M1 − M6 Gewünschte Direktwahltaste drücken
Kurzwahl
Sie haben die Möglichkeit 10 Telefonnummern so abzuspeichern, dass
diese jeweils nur durch den Druck von zwei Tasten gewählt werden
(Kurzwahl).
Kurzwahltasten programmieren
Hörer abnehmen
Speichertaste drücken
, Rufnummer eingeben (max. 16 Ziffern)
und bestätigen
Speicherplatznummer eingeben (hier
z. B. für Speicherplatz 0)
Hörer auflegen
Anrufen über Kurzwahltaste
Hörer abnehmen
Kurzwahltaste drücken
Speicherplatznummer eingeben (hier
z. B. für Speicherplatz 0)
Die gespeicherte Rufnummer wird automatisch gewählt.
Die gespeicherten Rufnummern auf den Kurzwahltasten können
nicht gelöscht werden. Beim Speichern neuer Rufnummern werden die alten Einträge überschrieben.
Verstärkung der Hörerlautstärke auf +40 dB
Die Hörerlautstärke kann durch Betätigen der −Taste auf + 40 dB
verstärkt werden.
Hörerlautstärke verstärken
Einstellen der Hörerlautstärke
Sie können die Hörerlautstärke mit einem Drehregler anpassen, wenn die
Verstärkung auf +40 dB aktiviert ist.
Lautstärke mit Drehregler anpassen
Klangregelung
Sie können den Klang im Hörer mit einem Schieberegler an der rechten
Gehäuseseite anpassen.
Klang mit Schieberegler anpassen
Die Klangregelung funktioniert nur, wenn die Verstärkung auf
+40 dB aktiviert ist.
Klingellautstärke
Sie können die Klingellautstärke mit einem Schieberegler an der rechten
Gehäuseseite anpassen.
Lautstärke mit Schieberegler anpassen
8
Page 9

Klingelton
Sie können den Klingelton mit einem Schieberegler an der rechten
Gehäuseseite ändern. Es stehen 3 Klingeltöne zur Auswahl.
Klingelton mit Schieberegler ändern
Sendelautstärke
Sie können die Sendelautstärke des Mikrofons im Hörer mit einem
Schieberegler an der rechten Gehäuseseite verringern oder erhöhen.
Lautstärke mit Schieberegler anpassen
Telefonieren
9
Page 10

Nebenstellenanlagen / Zusatzdienste
6 Nebenstellenanlagen / Zusatzdienste
R−Taste an Nebenstellenanlagen
Ist Ihr Telefon an einer Nebenstellenanlage angeschlossen, können Sie
über die R−Taste Funktionen, wie z. B. Anrufe weiterleiten und
automatischen Rückruf, nutzen. Lesen Sie bitte die Bedienungsanleitung
Ihrer Nebenstellenanlage. Ob Ihr Telefon an Ihrer Nebenstellenanlage
einwandfrei funktioniert, erfahren Sie bei dem Händler, bei dem die Anlage
gekauft wurde.
Wahlpause
Bei Nebenstellenanlagen ist es erforderlich, eine Amtskennzahl
vorzuwählen, um ein Freizeichen zu bekommen. Bei wenigen, älteren
Nebenstellenanlagen dauert es einige Zeit, bis das Freizeichen zu hören
ist. Für diese Nebenstellenanlagen kann nach der Amtskennzahl eine
Wahlpause eingefügt werden, um direkt weiterwählen zu können, ohne
das Freizeichen abzuwarten.
Wahlpause einfügen
Nach der Amtskennzahl wartet Ihr Telefon für ca. 3 Sekunden mit dem
Wählen der eigentlichen Rufnummer.
R−Taste und Zusatzdienste
Ihr Telefon unterstützt Zusatzdienste Ihres Netzbetreibers, wie
z. B. Makeln, Anklopfen und Konferenz. Über die R−Taste können Sie
diese Zusatzdienste nutzen. Zur Freischaltung von Zusatzdiensten
wenden Sie sich bitte an Ihren Netzbetreiber.
Flash−Zeit einstellen
Mit dem Schiebeschalter auf der Unterseite des Telefons können Sie die
gewünschte Flash−Zeit einstellen. Sie können zwischen 100 ms und
300 ms wählen.
3
10
Page 11
7 Direktwahl
Direktwahlnummern speichern
Sie können die Direktwahltasten M1 − M6 als normale Direktwahl oder als
Speicherplätze für den Notruf nutzen.
Hörer abnehmen
Speichern einleiten
, Rufnummer eingeben und bestätigen
M1 − M6 Gewünschte Direktwahltaste drücken
Eintrag ist gespeichert
Unter den transparenten Abdeckungen der 6 Direktwahltasten können Sie
Fotos oder Symbole hinterlegen.
Die gespeicherten Rufnummern auf den Direktwahltasten
können nicht gelöscht werden. Beim Speichern neuer Ruf−
nummern werden die alten Einträge überschrieben.
Bei einer Unterbrechung der Stromversorgung, die länger als ca.
1 Stunde dauert, gehen die Programmierungen der Direktwahltasten verloren!
Direktwahl starten
Hörer abnehmen
M1 − M6 Gewünschte Direktwahltaste drücken
4
(max. 16 Ziffern)
Direktwahl
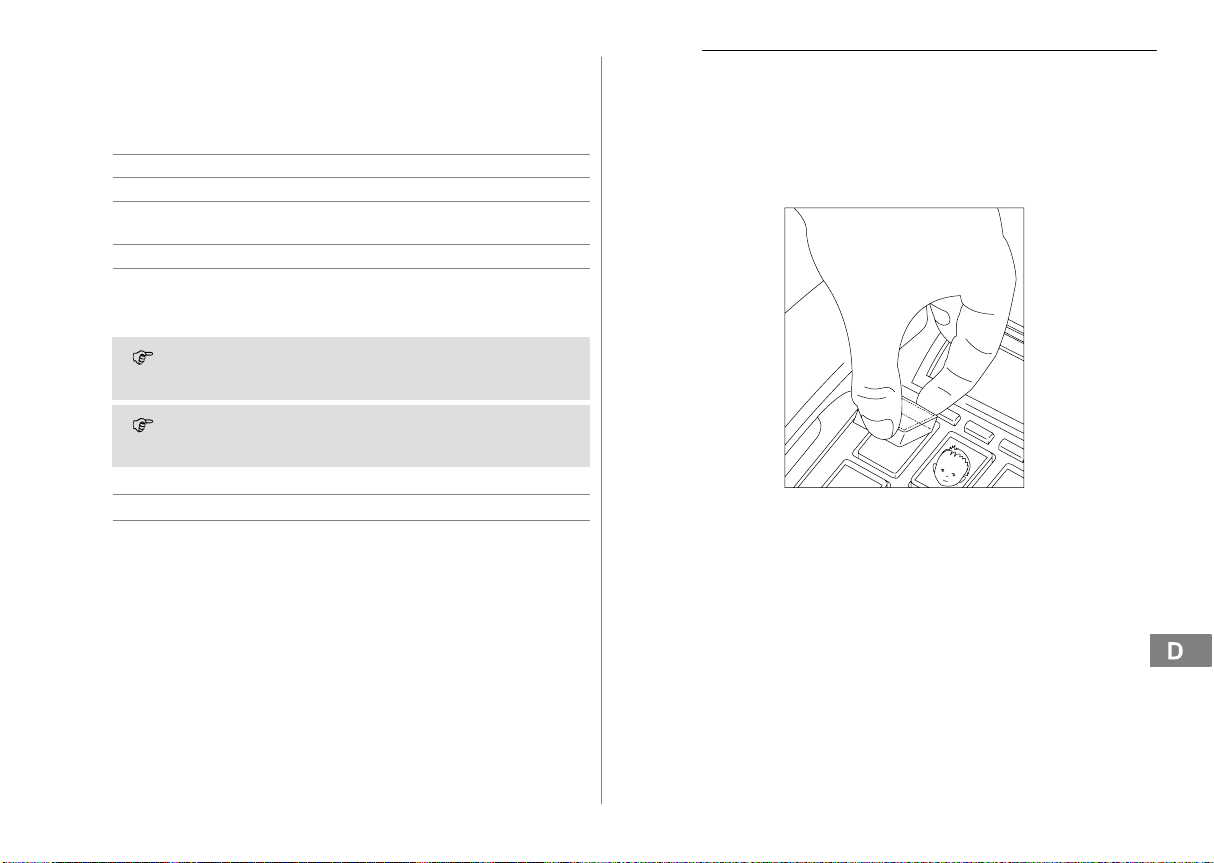
Abdeckung der Direktwahltasten entfernen
Fassen Sie mit Daumen und Zeigefinger die Abdeckung und entfernen
Sie diese wie auf der Abbildung dargestellt. Plazieren Sie das gewünschte
Bild oder Foto unter der Abdeckung und setzen Sie diese wieder auf die
Taste.
Abbildung ähnlich
11
Page 12

Falls es Probleme gibt
8 Falls es Probleme gibt
Service−Hotline
Haben Sie Probleme mit Ihrem Telefon, kontrollieren Sie zuerst die
folgenden Hinweise. Bei technischen Problemen können Sie sich an
unsere Service−Hotline unter Tel. 0900 00 1675 innerhalb der Schweiz
(Kosten Swisscom bei Drucklegung: CHF 2.60/min) wenden. Bei
Garantieansprüchen wenden Sie sich an Ihren Fachhändler. Die
Garantiezeit beträgt 2 Jahre.
Fragen und Antworten
Fragen Antworten
Kein Telefongespräch
möglich
− Die Telefonleitung ist nicht korrekt
angeschlossen oder gestört.
Verwenden Sie nur das mitgelieferte
Telefonanschlusskabel.
12
Page 13

9 Pflegehinweise / Garantie
Pflegehinweise
Reinigen Sie die Gehäuseoberflächen mit einem weichen und
fusselfreien Tuch.
Verwenden Sie keine Reinigungsmittel oder Lösungsmittel.
Garantie
SWITEL − Geräte werden nach den modernsten Produktionsverfahren
hergestellt und geprüft. Ausgesuchte Materialien und hoch entwickelte
Technologien sorgen für einwandfreie Funktion und lange Lebensdauer.
Ein Garantiefall liegt nicht vor, wenn die Ursache einer Fehlfunktion des
Geräts bei dem Telefonnetzbetreiber oder einer eventuell
zwischengeschalteten Nebenstellenanlage liegt. Die Garantie gilt nicht für
die in den Produkten verwendeten Batterien, Akkus oder Akkupacks. Die
Garantiezeit beträgt 24 Monate, gerechnet vom Tage des Kaufs.
Innerhalb der Garantiezeit werden alle Mängel, die auf Material− oder
Herstellungsfehler zurückzuführen sind, kostenlos beseitigt. Der
Garantieanspruch erlischt bei Eingriffen durch den Käufer oder durch
Dritte. Schäden, die durch unsachgemäße Behandlung oder Bedienung,
natürliche Abnutzung, durch falsches Aufstellen oder Aufbewahren, durch
unsachgemäßen Anschluss oder Installation sowie durch höhere Gewalt
oder sonstige äußere Einflüsse entstehen, fallen nicht unter die Garantieleistung. Wir behalten uns vor, bei Reklamationen die defekten Teile
auszubessern, zu ersetzen oder das Gerät auszutauschen.
Ausgetauschte Teile oder ausgetauschte Geräte gehen in unser Eigentum
über. Schadenersatzansprüche sind ausgeschlossen, soweit sie nicht auf
Vorsatz oder grober Fahrlässigkeit des Herstellers beruhen.
Sollte Ihr Gerät dennoch einen Defekt innerhalb der Garantiezeit
aufweisen, wenden Sie sich bitte unter Vorlage Ihrer Kaufquittung
ausschließlich an das Geschäft, in dem Sie Ihr SWITEL − Gerät gekauft
haben. Alle Gewährleistungsansprüche nach diesen Bestimmungen sind
ausschließlich gegenüber Ihrem Fachhändler geltend zu machen. Nach
Ablauf von zwei Jahren nach Kauf und Übergabe unserer Produkte
können Gewährleistungsrechte nicht mehr geltend gemacht werden.
Pflegehinweise / Garantie
Konformitätserklärung
Dieses Gerät erfüllt die Anforderungen der EU−Richtlinie:
1999/5/EG Richtlinie über Funkanlagen und
Telekommunikationsendeinrichtungen und die gegenseitige
Anerkennung ihrer Konformität. Die Konformität mit der o. a.
Richtlinie wird durch das CE−Zeichen auf dem Gerät bestätigt.
Für die komplette Konformitätserklärung nutzen Sie bitte den
kostenlosen Download von unserer Website www.switel.com
.
13
Page 14

Stichwortverzeichnis
10 Stichwortverzeichnis
A
Anruf annehmen, 8
Anrufen, 8
Anrufen über Kurzwahltaste, 8
B
Basisgerät, 5
Bedienelemente, 6
D
Darstellungen, 7
Direktwahl, 8, 11
Direktwahl starten, 11
Direktwahlnummern speichern, 11
F
Fehlerbehebung, 12
Flash−Zeit, 10
Foto einsetzen, 11
Fragen und Antworten, 12
G
Garantie, 13
Gespräch beenden, 8
H
Hörerlautstärke, 8
I
Inbetriebnahme, 5
K
Klangregelung, 8
Klingellautstärke, 8
Klingelton, 9
Konformitätserklärung, 13
Kurzwahl, 8
Kurzwahltasten programmieren, 8
N
Nebenstellenanlagen, 10
14
P
Pflegehinweise, 13
Probleme, 12
R
R−Taste an Nebenstellenanlagen, 10
R−Taste und Zusatzdienste, 10
S
Schreibweisen, 7
Sendelautstärke, 9
Service−Hotline, 12
Sicherheitshinweise, 4
T
Telefonieren, 8
V
Verpackungsinhalt, 5
Verstärkung der
Hörerlautstärke auf +40 dB, 8
W
Wahlpause, 10
Wahlwiederholung, 8
Wandmontage, 5
Wie bediene ich mein Telefon?, 7
Z
Zusatzdienste, 10
Page 15

1 Consignes de sécurité 16. . . . . . . . . . . . .
2 Mettre le téléphone en service 17. . . . . . .
3 Éléments de manipulation 18. . . . . . . . . .
4 Comment utiliser mon téléphone ? 19. . . .
5 Téléphoner 20. . . . . . . . . . . . . . . . . . . . .
6 Installations PABX / Services confort 22. .
7 Sélection directe 23. . . . . . . . . . . . . . . . .
8 En cas de problèmes 24. . . . . . . . . . . . . .
9 Remarques d’entretien / Garantie 25. . . . .
11 Index 26. . . . . . . . . . . . . . . . . . . . . . . . .
5
Table des matières
15
Page 16
Consignes de sécurité
1 Consignes de sécurité
Lisez très attentivement ce mode d’emploi.
Utilisation conforme aux prescriptions
Ce téléphone convient pour téléphoner à l’intérieur d’un réseau
téléphonique. Toute autre utilisation est considérée comme non conforme
à l’usage. Des modifications ou changements effectués d’un propre gré ne
sont pas autorisés. N’ouvrez en aucun cas l’appareil et n’effectuez aucun
essai de réparation vous−même.
Lieu d’installation
Evitez toute nuisance par la fumée, la poussière, les vibrations, les
produits chimiques, l’humidité, la grande chaleur ou l’ensoleillement direct.
Compatible avec les appareils auditifs
Grâce à son écouteur Premium, le téléphone est parfaitement adapté aux
appareils auditifs et compatible avec la plupart de ceux disponibles sur le
marché. En raison de la grande variété de modèles, nous ne pouvons
cependant pas garantir une fonction parfaite avec chaque appareil auditif.
Attention : Ce téléphone peut rendre des volumes sonores très
élevés lorsque l’amplificateur est activé et que le régulateur se
trouve sur Maximum.
Il est recommandé d’être prudent lorsque vous passez d’un utilisateur présentant une difficulté d’audition à un utilisateur à audition normale.
Élimination
La loi vous oblige à éliminer de manière appropriée les biens de
consommation. L’icône ci−contre sur votre téléphone signifie que
les appareils électriques et électroniques usagés ainsi que les
batteries doivent être éliminés séparément des ordures
ménagères.
Veuillez éliminer vos appareils usagés électriques ou
électroniques dans le centre de collecte d’un organisme
approprié d’évacuation des déchets.
Éliminez les piles auprès d’un revendeur spécialisé ainsi que
dans des centres de collecte qui tiennent à votre disposition les
collecteurs appropriés correspondants.
Éliminez les matériaux d’emballage conformément au
règlement local.
16
Page 17

2 Mettre le téléphone en service
Remarques concernant la sécurité
Attention : Avant de mettre votre appareil en service, lisez
impérativement les consignes de sécurité mentionnées au chapitre 1.
Vérifier le contenu de l’emballage
Les éléments suivants font partie de la livraison :
Contenu
Téléphone 1
Écouteur Premium 1
Câble spiralé de l’écouteur 1
Câble de raccordement téléphonique 1
Fixation pour montage mural 1
Mode d’emploi 1
Raccorder l’appareil de base
Raccordez le téléphone comme représenté sur le croquis. Veuillez
n’utiliser que le câble de raccordement téléphonique fourni avec l’appareil,
celui−ci ne pouvant éventuellement pas fonctionner avec un autre câble.
6
Raccordement de l’écouteur
TC40
Mettre le téléphone en service
Montage mural
Votre téléphone est conçu pour le montage mural. Vous avez besoin de
deux vis pour fixer le téléphone.
Introduisez les tenons de guidage (1) de la fixation pour montage mural
(2) dans les encoches (3) situées à l’arrière de votre téléphone. Poussez
la fixation (2) de 10 mm vers le haut jusqu’à ce que vous entendiez son
enclenchement.
Avertissement : Il ne doit pas se trouver de conduites (câbles,
tuyaux etc.) dans la zone de perforation des trous.
Perforez deux trous à une même distance l’un de l’autre que celle qui
sépare les suspensions prévues et laissez sortir les vis du mur de 5 mm.
Fixez maintenant le téléphone en posant les encoches sur les vis et
poussez−le légèrement vers le bas.
Tournez la suspension de l’écouteur (4) de 180° dans le logement de
l’écouteur afin de pouvoir accrocher ce dernier.
3
3
4
4
4
Prise de raccordement téléphonique
2
1
4
4
17
Page 18

Éléments de manipulation
3 Éléments de manipulation
Téléphone
1 Touches de sélection
directe
2 Touche de sélection
abrégée
3 Touche R
4 Touche BIS / Pause de
numérotation
5 Amplifier le volume
sonore de l’écouteur
+40 dB
6 DEL téléphone sonne
7 Enregistrer le numéro
Les touches sont représentées dans ce mode d’emploi avec un contour
uniforme. Il peut y avoir de légères différences entre les icônes des touches
de votre téléphone et celles représentées ici.
8 Régulateur tournant
volume sonore de
l’écouteur" (caché sour
l’écouteur Premium)
9 Régulateur à coulisse
volume sonore de la
sonnerie"
10 Régulateur à coulisse
sonnerie"
11 Régulateur à coulisse
volume d’émission" SLR
12 Régulateur à coulisse
tonalité"
13 Prise pour câble de
raccordement
téléphonique
1
2
453
7
11
12 10 9
68
3
4
5
18
13
Page 19

4 Comment utiliser mon téléphone ?
Représentations et notations
Saisir des numéros ou des lettres
Appuyer brièvement sur la touche
représentée
2 x Appuyer brièvement 2 fois sur la
touche représentée
2 sec. Appuyer 2 secondes sur la touche
représentée
Maintenir Maintenir appuyée la touche
représentée
Relâcher Relâcher la touche représentée
Le téléphone sonne
Décrocher
Raccrocher
Comment utiliser mon téléphone ?
19
Page 20

Téléphoner
5 Téléphoner
Prendre un appel
, Prendre un appel
Terminer la communication
Terminer la communication
Appeler
Décrocher
Saisir le numéro d’appel
(max. 32 chiffres)
Répétition des derniers numéros
Votre téléphone enregistre le dernier numéro d’appel composé.
, Composer le numéro composé en
dernier
Sélection directe
Vous pouvez utiliser les touches de sélection directe comme sélection
directe normale ou comme places de mémoire pour l’appel d’urgence.
Vous devez avoir mémorisé des numéros d’appel comme sélection directe
Page 23.
Décrocher
M1 − M6 Appuyer sur la touche de sélection
directe voulue
Sélection abrégée
Vous avez la possibilité de mémoriser 10 numéros de téléphone de la
sorte que vous puissiez les composer en n’appuyant que sur deux
touches (sélection abrégée).
Programmer les touches de sélection abrégée
Décrocher
Appuyer sur la touche de mémoire
, Saisir le numéro d’appel (max. 16
chiffres) et confirmer
Entrer lenuméro de place en mémoire
(ici par ex. pour la place de mémoire 0)
Raccrocher
Appeler via la touche de sélection abrégée
Décrocher
Appuyer sur la touche de sélection
abrégée
Entrer lenuméro de place en mémoire
(ici par ex. pour la place de mémoire 0)
Le numéro enregistré est composé automatiquement.
Vous ne pouvez pas effacer des numéros enregistrés sur les tou-
ches de sélection abrégée. Vous écrasez les anciens enregistrements lorsque vous enregistrez de nouveaux numéros.
Amplification du volume sonore de l’écouteur sur +40 dB
Vous pouvez intensifier le volume sonore de l’écouteur sur + 40 dB en
appuyant sur la touche .
Intensifier le volume sonore de
l’écouteur
Régler le volume sonore de l’écouteur
Si l’amplification sur + 40 dB est activée, vous pouvez adapter le volume
sonore de l’écouteur à l’aide d’un régulateur tournant.
Adapter le volume sonore avec le
régulateur tournant
Régulation du son
Vous pouvez adapter le son de l’écouteur à l’aide d’un régulateur à
coulisse placé sur le côté droit du boîtier.
Adapter le son avec le régulateur à
coulisse
20
Page 21

La régulation du son ne fonctionne que si l’amplification est ac-
tivée sur +40 dB.
Volume sonore de la sonnerie
Vous pouvez modifier le volume sonore de la sonnerie à l’aide d’un
régulateur à coulisse placé sur le côté droit du boîtier.
Adapter le volume sonore avec le
régulateur à coulisse
Sonnerie
Vous pouvez modifier la sonnerie à l’aide d’un régulateur à coulisse placé
sur le côté droit du boîtier. Vous disposez de 3 sonneries.
Modifier la sonnerie avec le régulateur
à coulisse
Volume d’émission
Vous pouvez diminuer ou augmenter le volume d’émission du microphone
se trouvant dans l’écouteur à l’aide d’un régulateur à coulisse placé sur le
côté droit du boîtier.
Adapter le volume sonore avec le
régulateur à coulisse
Téléphoner
21
Page 22

Installations PABX / Services confort
6 Installations PABX / Services confort
Touche R sur les installations à postes supplémentaires
Si votre téléphone est raccordé à une installation PABX, vous pouvez, via
la touche R, tirer profit de certaines fonctions comme par ex. le transfert
d’appels et le rappel automatique. Veuillez lire le mode d’emploi de votre
installation PABX. Le revendeur auprès duquel vous avez acheté
l’installation vous dira si votre téléphone fonctionne parfaitement sur votre
installation PABX.
Pause de numérotation
Dans le cas d’installations PABX, il est nécessaire de composer
auparavant un code réseau pour obtenir la tonalité. Sur quelques
installations à postes supplémentaires plus anciennes, vous devez
attendre quelques instants avant de pouvoir entendre la tonalité. Pour ces
installations PABX, une pause de numérotation peut être insérée après le
code réseau afin de pouvoir continuer à numéroter directement sans
attendre la tonalité.
Introduire une pause de numérotation
Après le chiffre de la ligne principale, votre téléphone attend env. 3
secondes avant de composer le numéro d’appel proprement dit.
Touche R et services confort
Votre téléphone supporte des services confort de votre opérateur tels que
le va−et−vient, la signalisation d’appel en instance et la conférence. Vous
pouvez les utiliser via la touche R. Contactez−le pour déconnecter ces
services.
Régler le temps de flash
Vous pouvez régler le temps de flash voulu à l’aide de l’interrupteur à
coulisse placé sous votre téléphone. Vous pouvez sélectionner entre 100
ms et 300 ms.
7
22
Page 23

7 Sélection directe
Enregistrer les numéros de sélection directe
Vous pouvez utiliser les touches de sélection directe comme sélection
directe normale ou comme places de mémoire pour l’appel d’urgence.
Décrocher
Introduire l’enregistrement
, Entrer le numéro d’appel
(max. 16 chiffres) et confirmer
M1 − M6 Appuyer sur la touche de sélection
directe voulue
L’enregistrement est sauvegardé
Vous pouvez placer des photos ou des icônes sous les protections
transparentes des 6 touches de sélection directe.
Vous ne pouvez pas effacer des numéros enregistrés sur les tou-
ches de sélection directe. Lorsque vous sauvegardez de
nouveaux numéros, les anciens enregistrements seront alors
écrasés.
Les programmations des touches de sélection directe sont per-
dues lorsqu’une interruption de courant dure environ plus d’1
heure !
Démarrer la sélection directe
Décrocher
M1 − M6 Appuyer sur la touche de sélection
directe voulue
8
Sélection directe
Retirer la protection des touches de sélection directe
Saisissez la protection entre le pouce et l’index et retirez−la comme
représenté sur la figure. Placez l’élément voulu sous la protection et
replacez celle−ci sur la touche.
Semblable à l’illustration
23
Page 24

En cas de problèmes
8 En cas de problèmes
Hotline de service
Si vous avez des problèmes avec votre téléphone, contrôlez d’abord les
remarques suivantes. S’il s’agit de problèmes techniques, vous pouvez
vous adresser à notre hotline de service en Suisse au numéro de tel. 0900
00 1675 (frais Swisscom à la date d’impression de ce manuel : CHF
2.60/min). Si vous jouissez de droits de garantie, adressez−vous à votre
revendeur. La durée de la garantie est de 2 ans.
Questions et réponses
Questions Réponses
Pas de communication
téléphonique possible
− Le téléphone n’est pas correctement
raccordé ou est perturbé. N’utilisez
que le câble de raccordement
téléphonique fourni avec l’appareil.
24
Page 25

9 Remarques d’entretien / Garantie
Remarques d’entretien
Nettoyez les surfaces du boîtier avec un chiffon doux et non
pelucheux.
N’utilisez pas de produits d’entretien ou de solvants.
Garantie
Les appareils SWITEL sont fabriqués selon les procédés de fabrication les
plus modernes et sont contrôlés. Des matériaux sélectionnés et des
technologies de pointe ont pour effet un fonctionnement irréprochable et
une longue durée de vie. La garantie ne rentre pas en jeu si l’exploitant du
réseau téléphonique ou une installation PABX éventuellement intercalée
est responsable du dysfonctionnement de l’appareil. La garantie ne
s’applique pas aux piles, piles rechargeables ou packs de piles
rechargeables utilisés dans les produits. La durée de la garantie est
de 24 mois à partir de la date d’achat.
Pendant la période de garantie, tous les défauts dus à des vices de
matériel ou de fabrication seront éliminés gratuitement. Le droit à la
garantie expire en cas d’intervention de l’acheteur ou de tiers. Les dommages provenant d’un maniement ou d’une manipulation incorrects, d’une
usure naturelle, d’une mauvaise mise en place ou d’une mauvaise conservation, d’un raccordement ou d’une installation incorrects ainsi que
d’un cas de force majeure ou autres influences extérieures sont exclus de
la garantie. En cas de réclamations, nous nous réservons le droit de
réparer, de remplacer les pièces défectueuses ou d’échanger l’appareil.
Les composants remplacés ou les appareils échangés deviennent notre
propriété. Les demandes de dommages et intérêts sont exclues tant
qu’elles ne reposent pas sur l’intention ou une négligence grossière du
fabricant.
Si votre appareil devait malgré tout présenter une défectuosité pendant la
période de garantie, veuillez vous adresser, muni de la quittance d’achat,
exclusivement au magasin dans lequel vous avez acheté votre appareil
SWITEL. Vous ne pouvez faire valoir vos droits à la garantie selon ces
dispositions qu’auprès de votre revendeur exclusivement. Deux ans après
l’achat et la remise de nos produits, il n’est plus possible de faire valoir les
droits à la garantie.
Remarques d’entretien / Garantie
Déclaration de conformité
Cet appareil répond aux exigences des directives de l’union
européenne (UE) :
1999/5/CE : Directive sur les installations de radio et de
télécommunication et la reconnaissance réciproque de leur
conformité. La conformité à la directive ci−dessus est confirmée
sur l’appareil par le symbole CE.
Pour obtenir la déclaration de conformité intégrale, veuillez
vous servir du téléchargement gratuit de notre site Internet
www.switel.com
.
25
Page 26

Index
10 Index
A
Amplification du volume sonore de
l’écouteur sur +40 dB, 20
Appareil de base, 17
Appeler, 20
Appeler via la touche de sélection
abrégée, 20
C
Comment utiliser mon téléphone ?, 19
Consignes de sécurité, 16
Contenu de l’emballage, 17
D
Déclaration de conformité, 25
Démarrer la sélection directe, 23
E
Éléments de manipulation, 18
Enregistrer les numéros de sélection
directe, 23
F
Flash−Zeit, 22
G
Garantie, 25
H
Hotline de service, 24
I
Installations PABX, 22
M
Mise en service, 17
Montage mural, 17
N
Notations, 19
P
Pause de numérotation, 22
Porter l’inscription, 23
Prendre un appel, 20
Problèmes, 24
Programmer les touches de sélection
abrégée, 20
Q
Questions et réponses, 24
R
Régulation du son, 20
Remarques d’entretien, 25
Répétition des derniers numéros, 20
Représentations, 19
S
Sélection abrégée, 20
Sélection directe, 20, 23
Services confort, 22
Sonnerie, 21
Suppression d’erreurs, 24
T
Téléphoner, 20
Terminer la communication, 20
Touche R et services confort, 22
Touche R sur les installations à postes
supplémentaires, 22
V
Volume d’émission, 21
Volume sonore de l’écouteur, 20
Volume sonore de la sonnerie, 21
26
Page 27

1 Indicazioni di sicurezza 28. . . . . . . . . . . .
2 Mettere in funzione il telefono 29. . . . . . .
3 Elementi di comando 30. . . . . . . . . . . . . .
4 Come funziona il mio telefono? 31. . . . . . .
5 Compiere telefonate 32. . . . . . . . . . . . . .
6 Impianti telefonici interni /
Servizi addizionali 34. . . . . . . . . . . . . .
7 Selezione diretta 35. . . . . . . . . . . . . . . . .
8 In presenza di problemi 36. . . . . . . . . . . .
9 Consigli per la cura / Garanzia 37. . . . . . .
11 Indice alfabetico 38. . . . . . . . . . . . . . . . .
9
Contenuto
27
Page 28

Indicazioni di sicurezza
1 Indicazioni di sicurezza
Leggere attentamente le presenti istruzioni per l’uso.
Utilizzo conforme alle disposizioni
Il presente telefono consente di svolgere telefonate all’interno di una rete
telefonica. Qualsiasi altro impiego è considerato come non conforme agli
usi previsti. Non sono consentite modifiche o trasformazioni non
autorizzate. Non aprire per nessuna ragione l’apparecchio
autonomamente, né compiere riparazioni di propria iniziativa.
Luogo di installazione
Evitare l’esposizione a fumo, polvere, vibrazioni, sostanze chimiche,
umidità, eccessivo calore o irradiazioni solari dirette.
Compatibilità con apparecchi acustici
Grazie al ricevitore Premium, il telefono è perfettamente compatibile con la
maggior parte di apparecchi acustici presenti sul mercato. A causa del
grande numero di modelli non è possibile garantire il perfetto
funzionamento del telefono in combinazione con qualsiasi apparecchio
acustico.
Attenzione: Il presente telefono è in grado di riprodurre volumi
elevati avendo attivato l’amplificatore e girato al massimo il regolatore di volume.
È pertanto necessario procedere con particolare cautela in caso
di passaggio del dispositivo tra utilizzatori con udito normale e
utilizzatori con udito ridotto.
Smaltimento
Sussiste l’obbligo legislativo al corretto smaltimento di beni di
consumo. Il simbolo riportato sul telefono e raffigurato qui a lato
indica che apparecchi usati elettrici ed elettronici e batterie
esauste non sono da smaltire assieme ai normali rifiuti domestici.
Procedere allo smaltimento di apparecchi elettrici o elettronici
presso un centro di raccolta incaricato con lo smaltimento
conforme.
Consegnare batterie esaurite per lo smaltimento presso i
rivenditori al dettaglio di batterie o i centri di raccolta che mettono
a disposizione appositi contenitori.
Smaltire confezioni ed imballaggi in base a quanto indicato
dalle norme in vigore a livello locale.
28
Page 29

2 Mettere in funzione il telefono
Indicazioni di sicurezza
Attenzione: Prima della messa in funzione, leggere attenta-
mente le indicazioni di sicurezza riportate al capitolo 1.
Verificare il contenuto della confezione
La confezione contiene:
Contenuto
Telefono 1
Ricevitore Premium 1
Cavo a spirale per ricevitore 1
Cavo di collegamento telefonico 1
Supporto per montaggio a parete 1
Istruzioni per l’uso 1
Collegare l’unità base
Procedere al collegamento del telefono seguendo quanto raffigurato sul
disegno. Utilizzare soltanto il cavo di collegamento telefonico fornito in
dotazione visto che l’apparecchio potrebbe non funzionare con un altro
cavo di collegamento telefonico.
10
Collegamento del ricevitore
TC40
Mettere in funzione il telefono
Montaggio a parete
Il telefono si presta altresì per il montaggio a parete. Il fissaggio del
telefono richiede due viti.
Introdurre i nasetti di guida (1) del supporto per montaggio a parete (2)
nelle scanalature (3) presenti sul retro del telefono. Spingere il supporto
per montaggio a parete (2) 10 mm verso sopra facendolo scattare in
posizione.
Avvertenza: È necessario sincerarsi che nel settore in cui è
prevista la trapanatura dei fori non vi siano linee e condutture
(cavi, tubi e così via).
Prevedere due fori con una distanza in rispetto dei dispositivi di aggancio
e lasciare sporgere le viti di 5 mm dal muro. Introdurre quindi il telefono sui
dispositivi di aggancio e spingere l’apparecchio verso sotto.
Girare il dispositivo di aggancio ricevitore (4) sulla superficie di appoggio
del ricevitore di 180° in modo da potervi agganciare il ricevitore del
telefono.
3
1
3
2
4
4
4
4
4
Presa telefonica
29
Page 30

Elementi di comando
3 Elementi di comando
Telefono
1 Tasti di selezione diretta
2 Tasto di selezione
abbreviata
3 Tasto R
4 Ripetizione di chiamata,
pausa di selezione
5 Aumento del volume del
ricevitore a +40 dB
6 LED telefono squilla
7 Salvare numero
8 Regolatore del volume del
ricevitore (nascosto sotto
al ricevitore Premium)
I tasti riportati nelle presenti istruzioni per l’uso sono raffigurati con un
contorno uniforme. Con riserva di modifiche per tasti e simboli visualizzati
sul display del telefono rispetto a tasti e simboli di display qui raffigurati.
9 Cursore scorrevole
Volume suoneria"
10 Cursore scorrevole
Suoneria"
11 Cursore scorrevole
Volume trasmissione"
SLR
12 Cursore scorrevole
Suono"
13 Presa per cavo di
collegamento telefonico
1
2
453
7
11
12 10 9
68
3
4
5
30
13
Page 31

4 Come funziona il mio telefono?
Rappresentazioni e modi di scrittura
Inserire cifre o lettere
Premere brevemente il tasto raffigurato
2 x Premere brevemente 2 x il tasto
raffigurato
2 sec Premere il tasto raffigurato per
2 secondi
Tenere Tenere premuto il tasto raffigurato
Rilasciare Rilasciare il tasto raffigurato
Telefono squilla
Sganciare il ricevitore
Agganciare il ricevitore
Come funziona il mio telefono?
31
Page 32

Compiere telefonate
5 Compiere telefonate
Ricevere una chiamata
, Ricevere una chiamata
Concludere una chiamata
Concludere una chiamata
Compiere telefonate
Sganciare il ricevitore
Inserire un numero di chiamata
Ripetizione di chiamata
Il telefono memorizza l’ultimo numero di chiamata selezionato.
, Comporre il numero di chiamata
Selezione diretta
I tasti di selezione diretta possono essere utilizzati per impostare una
normale selezione diretta o come posizioni di memoria per chiamate
d’emergenza. È necessario aver memorizzato numeri di chiamata sotto
forma di numeri di selezione diretta pagina 35.
Sganciare il ricevitore
M1 − M6 Premere il tasto di selezione diretta
Selezione abbreviata
È consentito memorizzare 10 numeri telefonici selezionabili in seguito
premendo semplicemente due tasti (selezione abbreviata).
Programmare tasti di selezione abbreviata
Sganciare il ricevitore
Premere il tasto memoria
, Inserire il numero di chiamata
Inserire il numero relativo alla
Agganciare il ricevitore
32
(max. 32 cifre)
selezionato per ultimo
desiderato
(max. 16 cifre) e confermare
posizione di memoria (qui ad es. per
posizione di memoria 0)
Compiere chiamate tramite tasto di selezione abbreviata
Sganciare il ricevitore
Premere il tasto di selezione
abbreviata
Inserire il numero relativo alla
posizione di memoria (qui ad es. per
posizione di memoria 0)
Il numero di chiamata memorizzato è selezionato automaticamente.
Non è possibile cancellare i numeri di chiamata memorizzati sui
tasti di selezione abbreviata. Le vecchie voci sono invece sovrascritte in sede di memorizzazione con nuovi numeri di chiamata.
Aumento del volume del ricevitore a +40 dB
Premendo il tasto il volume del ricevitore è aumentato passando
a + 40 dB.
Aumentare il volume del ricevitore
Impostare il volume del ricevitore
Un regolatore consente di impostare il volume del ricevitore in caso di
attivazione dell’amplificatore a +40 dB.
Impostare il volume mediante
regolatore
Regolazione del suono
Per regolare il suono del ricevitore, adoperare il cursore scorrevole
presente sulla destra dell’involucro.
Regolare il suono mediante
cursore scorrevole
La regolazione del suono funziona solo con amplificatore impo-
stato a +40 dB.
Page 33

Volume della suoneria
Per regolare il volume della suoneria, adoperare il cursore scorrevole
presente sulla destra dell’involucro.
Regolare il volume mediante cursore
scorrevole
Suoneria
Per modificare la suoneria, adoperare il cursore scorrevole presente sulla
destra dell’involucro. Sono 3 le suonerie tra cui è possibile scegliere.
Modificare la suoneria tramite cursore
scorrevole
Volume di trasmissione
Per aumentare o abbassare il volume di trasmissione, adoperare il
cursore scorrevole presente sulla destra dell’involucro.
Regolare il volume mediante cursore
scorrevole
Compiere telefonate
33
Page 34

Impianti telefonici interni / Servizi addizionali
6 Impianti telefonici interni / Servizi addizionali
Tasto R in impianti telefonici interni
Avendo collegato il telefono ad un impianto telefonico interno, il tasto R
consente di accedere a tutte le altre funzioni disponibili come per es.
trasferimento di chiamata e funzione di richiamata automatica. Si prega di
leggere le istruzioni per l’uso del proprio impianto telefonico interno. Il
rivenditore autorizzato è in grado di indicare se il telefono acquistato
funzionerà senza alcun problema nel proprio impianto telefonico interno.
Pausa di selezione
In presenza di impianti telefonici interni è necessario preselezionare un
numero di accesso alla rete esterna per ottenere un segnale di linea libera
prima di poter compiere una telefonata. Alcuni impianti telefonici interni di
vecchia data richiedono un intervallo di tempo di poco superiore prima di
trasmettere un segnale di libero. Per questi impianti telefonici interni è
possibile inserire una pausa di selezione dopo il numero di accesso alla
linea esterna in modo da poter proseguire con la selezione del numero
senza dover attendere il segnale di libero.
Inserire una pausa di selezione
Dopo aver selezionato il numero di accesso alla rete esterna, il telefono
attende ca. 3 secondi prima di procedere alla selezione del numero di
chiamata vero e proprio.
Tasto R e servizi addizionali
Il telefono supporta servizi addizionali messi a disposizione dal proprio
gestore di rete telefonica come ad es. le funzioni di chiamata in attesa,
avviso di chiamata e chiamata a conferenza. Il tasto R consente di
accedere a questi servizi addizionali. Rivolgersi al proprio gestore di rete
telefonica per ottenere l’abilitazione ai servizi addizionali.
Impostare il tempo flash
Tramite interruttore a scorrimento presente nella parte inferiore del
telefono è possibile impostare il tempo flash desiderato. È possibile
scegliere tra 100 ms e 300 ms.
11
34
Page 35

7 Selezione diretta
Salvare i numeri di selezione diretta
I tasti di selezione diretta possono essere utilizzati per impostare una
normale selezione diretta o come posizioni di memoria per chiamate
d’emergenza.
Sganciare il ricevitore
Avviare la memorizzazione
, Inserire il numero di chiamata e
M1 − M6 Premere il tasto di selezione diretta
Voce è salvata
Sotto alle superfici trasparenti dei 6 tasti di selezione diretta è possibile
inserire fotografie o simboli.
Non è consentito cancellare i numeri di chiamata memorizzati sui
tasti di selezione diretta. Le vecchie voci sono invece sovrascritte
in sede di memorizzazione con nuovi numeri di chiamata.
In caso di interruzione dell’alimentazione elettrica superiore a
ca. 1 ora, la programmazione dei tasti di selezione diretta è cancellata!
Avviare la selezione diretta
Sganciare il ricevitore
M1 − M6 Premere il tasto di selezione diretta
12
confermare (max. 16 cifre)
desiderato
desiderato
Selezione diretta
Rimuovere la copertura dei tasti di selezione diretta
Afferrare con pollice ed indice la copertura rimuovendola secondo quanto
illustrato. Posizionare l’elemento desiderato sotto la copertura
riapplicandola quindi di nuovo sul tasto.
Figura simile
35
Page 36

In presenza di problemi
8 In presenza di problemi
Linea diretta d’assistenza
In presenza di problemi con il telefono, seguire le indicazioni riportate qui
di seguito. In caso di problemi tecnici è possibile rivolgersi alla nostra
hotline di assistenza tecnica chiamando al numero 0900 00 1675 valido
per la Svizzera (spese da rete Swisscom alla data di stampa:
CHF 2,60/min). In caso di reclami entro il periodo di garanzia, rivolgersi al
rivenditore autorizzato. Il periodo di garanzia ricopre 2 anni.
Domande e risposte
Domande Risposte
Non è possibile condurre
una chiamata telefonica
− La linea telefonica non è collegata
correttamente oppure presenta un
guasto. Utilizzare esclusivamente il
cavo di collegamento telefonico
fornito.
36
Page 37

9 Consigli per la cura / Garanzia
Consigli per la cura
Pulire le superfici degli apparecchi con un panno morbido e
antipelucchi.
Non utilizzare mai detergenti o solventi.
Garanzia
Gli apparecchi SWITEL sono costruiti e collaudati in osservanza dei
processi di produzione più moderni. L’impiego di materiali selezionati e
tecnologie altamente sviluppate sono garanti di una perfetta funzionalità e
lunga durata in vita. La garanzia non viene considerata esecutiva qualora
la causa del malfunzionamento dell’apparecchio sia riconducibile al
gestore della rete telefonica oppure se questa è da attribuirsi ad un
impianto telefonico interno interposto. La garanzia non si estende a
batterie, accumulatori o pacchi batteria utilizzati all’interno degli
apparecchi. Il periodo di garanzia ricopre 24 mesi a partire dalla data di
acquisto.
Entro il periodo di garanzia si procederà all’eliminazione gratuita di tutti i
guasti dovuti a difetti di materiale o produzione. Il diritto di garanzia cessa
in caso di interventi da parte dell’acquirente o di terzi. Danni derivanti da
un impiego o esercizio non conforme agli usi previsti, a naturale usura, a
errato montaggio o errata conservazione, a collegamento o installazione
impropri, dovuti a forza maggiore o ad altri influssi esterni non sono coperti
da garanzia. In qualità di produttore ci riserviamo il diritto, in caso di
reclami, di riparare o sostituire le parti difettose o di rimpiazzare
l’apparecchio. Parti o apparecchi sostituiti passano di nostra proprietà.
Sono esclusi diritti di risarcimento per danni qualora non siano dovuti a
intenzione o colpa grave del costruttore.
Nel caso in cui il presente apparecchio dovesse ciò nonostante presentare
un difetto durante il periodo di garanzia, si prega di rivolgersi
esclusivamente al negozio di rivendita dell’apparecchio SWITEL assieme
al relativo scontrino di acquisto. In base alle presenti disposizioni, tutti i
diritti di garanzia dovranno essere fatti valere esclusivamente nei confronti
del rivenditore autorizzato. Decorso il termine di due anni dalla data di
acquisto e consegna dei nostri prodotti non sarà più possibile fare valere
alcun diritto di garanzia.
Consigli per la cura / Garanzia
Dichiarazione di conformità
Questo apparecchio risponde a quanto disposto dalla
Direttiva UE:
1999/5/CE concernente le apparecchiature radio, le
apparecchiature terminali di telecomunicazioni e il reciproco
riconoscimento della loro conformità. La conformità con la
Direttiva di cui sopra viene confermata dal marchio CE
applicato sull’apparecchio.
Per la dichiarazione di conformità completa si prega di voler
usufruire del servizio gratuito di download dal nostro sito
Internet www.switel.com
.
37
Page 38

Indice alfabetico
10 Indice alfabetico
A
Applicare una dicitura, 35
Aumento del volume del
ricevitore a +40 dB, 32
Avviare la selezione diretta, 35
C
Come funziona il mio telefono?, 31
Compiere chiamate tramite tasto di
selezione abbreviata, 32
Compiere telefonate, 32
Concludere una chiamata, 32
Consigli per la cura, 37
Contenuto della confezione, 29
D
Dichiarazione di conformità, 37
Domande e risposte, 36
E
Elementi di comando, 30
Eliminare guasti, 36
G
Garanzia, 37
I
Impianti telefonici interni, 34
Indicazioni di sicurezza, 28
L
Linea diretta d’assistenza, 36
M
Messa in funzione, 29
Modi di scrittura, 31
Montaggio a parete, 29
P
Pausa di selezione, 34
Problemi, 36
Programmare tasti
di selezione abbreviata, 32
R
Rappresentazioni, 31
Regolazione del suono, 32
Ricevere una chiamata, 32
Ripetizione di chiamata, 32
S
Salvare i numeri di selezione diretta, 35
Selezione abbreviata, 32
Selezione diretta, 32, 35
Servizi addizionali, 34
Suoneria, 33
T
Tasto R e servizi addizionali, 34
Tasto R in impianti telefonici interni, 34
Tempo flash, 34
U
Unità base, 29
V
Volume del ricevitore, 32
Volume della suoneria, 33
Volume di trasmissione, 33
38
Page 39

1 Safety Information 40. . . . . . . . . . . . . . . .
2 Putting the Telephone into Operation 41. . .
3 Operating Elements 42. . . . . . . . . . . . . . .
4 Operating the Telephone 43. . . . . . . . . . .
5 Telephoning 44. . . . . . . . . . . . . . . . . . . .
6 PABX / Supplementary Services 46. . . . . .
7 One−touch Dialling 47. . . . . . . . . . . . . . . .
8 In Case of Problems 48. . . . . . . . . . . . . .
9 Maintenance / Guarantee 49. . . . . . . . . . .
10 Index 50. . . . . . . . . . . . . . . . . . . . . . . . .
13
Contents
39
Page 40

Safety Information
1 Safety Information
Please read this operating instruction manual thoroughly.
Intended use
The telephone is suitable for telephoning within a public telephone
network system. Any other use is considered unintended use.
Unauthorised modification or reconstruction is not permitted. Under no
circumstances open the device or complete any repair work yourself.
Installation location
Prevent excessive exposure to smoke, dust, vibration, chemicals,
moisture, heat and direct sunlight.
Hearing aid compatible
Using the premium receiver, the telephone is perfectly adapted for hearing
aids and is compatible with most commercially available hearing aids.
However, due to the wide range of hearing aids available, there is no
guarantee that the telephone will function problem−free with every model.
Attention: This telephone is capable of producing very high vo-
lume levels when the amplifier is switched on and the volume
control is set to maximum.
Extreme caution should be taken if the handset is shared by
users with normal hearing and others with impaired hearing.
Disposal
You are obliged to dispose of consumable goods properly in
accordance with the applicable legal regulations. The adjacent
symbol on the telephone indicates that electrical and electronic
apparatus and batteries no longer required must be disposed of
separate from domestic waste.
Electrical and electronic devices must be disposed of at a
suitable collection point provided by the public waste authorities.
Batteries must be disposed of at the point of sale or at the
appropriate collection points provided by the public waste
authorities.
Packaging materials must be disposed of according to local
regulations.
40
Page 41

2 Putting the Telephone into Operation
Safety information
Attention: It is essential to read the Safety Information in
Chapter 1 before starting up.
Checking the package contents
The package contains:
Content
Telephone 1
Premium receiver 1
Helix cable for receiver 1
Telephone connection cable 1
Wall installation bracket 1
Operating instructions 1
Connecting the base unit
Connect the telephone as illustrated in the diagram. Only use the
telephone connection line supplied because the equipment may not
function if another telephone connection line is used.
14
Receiver connection
TC 40
Putting the Telephone into Operation
Wall installation
The telephone can also be installed on a wall. You require two screws in
order to fix the telephone on a wall.
Feed the guide tabs (1) on the wall−mounting bracket (2) in the slots (3) on
the rear side of the telephone. Slide the wall bracket (2) 10 mm upwards
until it audibly snaps into place.
Warning: Ensure that there are no cables or pipes etc. in the
wall where you want to drill the holes.
Drill two holes whose distance apart corresponds to the bracket to be
used, insert the screws and allow them to project 5 mm from the wall.
Position the telephone on the bracket, fit the screws in the slots and slide
the telephone downwards a little.
Turn the receiver hook (4) in the receiver cradle 180° so that the receiver
can be hooked in.
3
1
3
2
4
4
4
4
4
Telephone line socket
41
Page 42

Operating Elements
3 Operating Elements
Telephone
1 One−touch dialling buttons
2 Quick dial button
3 R−button
4 Redialling,
Dialling pause
5 Increase receiver
volume +40 dB
6 LED, incoming call
7 Save number
8 Receiver volume knob
(hidden under premium
receiver)
9 Ringing volume" slide
control
10 Ringing tone" slide
control
11 Sending loudness rating"
SLR slide control
12 Tone" slide control
13 Telephone connection
cable socket
1
2
453
3
4
5
42
The buttons in this operating manual are depicted with a uniform contour.
Variations in the symbols on the telephone buttons compared to those
depicted here are possible.
7
11
12 10 9
68
13
Page 43

4 Operating the Telephone
Display and explanation of operation sequences
Enter digits or letters
Press the button depicted briefly
2 x Press the button depicted twice, briefly
2 sec. Press the button depicted for 2 sec.
Press and hold Press and hold the button depicted
Release Release the button depicted
Telephone rings
Lift the receiver
Replace the receiver on−hook
Operating the Telephone
43
Page 44

Telephoning
5 Telephoning
Taking a call
, Take the call
Ending a call
End the call
Making a call
Lift the receiver
Enter the phone number (max. 32
digits)
Redialling
Your telephone stores the last phone number dialled.
, Dial the last number dialled
One−touch dialling
You can use the one−touch dialling buttons for normal direct dialling or as
memory locations for the emergency call function. Be sure to store phone
numbers for one−touch dialling first; Page 47.
Lift the receiver
M1 − M6 Press the required one−touch dialling
button
Quick dialling
It is possible to store 10 phone numbers so that they are dialled simply by
pressing two buttons (quick dialling).
Programming quickdial buttons
Lift the receiver
Press the Memory button
, Enter the phone number (max. 16
digits) and confirm it
Enter the required memory location
number (e.g. in this case for memory
location 0)
Replace the receiver on−hook
Dialling using quick dial buttons
Lift the receiver
Press the quick dial button
Enter the required memory location
number (e.g. in this case for memory
location 0)
The phone number stored is automatically dialled.
You cannot delete the phone numbers stored on the quick dial
buttons. Existing numbers are overwritten when new phone
numbers are stored.
Increasing the receiver volume to +40 dB
The receiver volume can be increased to +40 dB by pressing the button.
Increase the receiver volume
Setting the receiver volume
You can adjust the receiver volume using a rotary knob when the +40 dB
amplification is activated.
Adjust the volume with the knob
Tone control
You can adjust the tone produced in the receiver using a slide control on
the right−hand side of the housing.
Adjust the tone using the slide control
The tone control only works when the 40 dB amplification is acti-
vated.
Ringing volume
You can adjust the ringing volume using a slide control on the right−hand
side of the housing.
Adjust the volume using the slide
control
44
Page 45

Ringing tone
You can adjust the ringing tone using a slide control on the right−hand side
of the housing. There are 3 ringing tones for selection.
Change the ringing tone using the
slide control
Sending loudness rating
You can increase or reduce the sending loudness rating for the
microphone in the receiver by means of a slide control on the right−hand
side of the housing.
Adjust the volume using the slide
control
Telephoning
45
Page 46

PABX / Supplementary Services
6 PABX / Supplementary Services
R button on private branch exchanges
If the telephone is connected to a private branch exchange, functions such
as transferring calls and automatic call back can be used via the R button.
Please refer to the manual provided with your private branch exchange.
The sales outlet where you purchased the exchange can provide
information as to whether the telephone will work properly with the
exchange.
Dialling pause
When using private branch exchanges, it is necessary to dial an access
code to obtain the dialling tone for an outside line. When using some older
private branch exchanges, it takes a little time before the dialling tone
becomes audible. In the case of such private branch exchanges, a dialling
pause can be inserted after the number for an outside line in order to
continue dialling directly without having to wait for the dialling tone.
Insert a dialling pause
After dialling the number for the outside line, the telephone waits approx. 3
seconds before dialling the actual phone number.
R−button and supplementary services
Your telephone supports supplementary services provided by your
telephone network provider, such as brokering, call waiting and
conference facilities. These supplementary services can be used by
implementing the
R button. Contact your telephone network provider with regard to
enabling supplementary services.
Setting the Flash time
Set the required Flash time using the sliding switch located on the
underside of the telephone. You can select between 100 ms and 300 ms.
15
46
Page 47

7 One−touch Dialling
Saving one−touch dialling numbers
You can use the one−touch dialling buttons M1 − M6 for normal direct
dialling or as memory locations for the emergency call function.
Lift the receiver
Initiate the programming function
, Enter the phone number (max. 16
M1 − M6 Press the required one−touch dialling
The entry is saved
You can insert photos or symbols under the transparent covers of the 6
one−touch dialling buttons to label them.
You cannot delete the phone numbers assigned to the one−touch
dialling buttons. The existing phone numbers are overwritten
when new numbers are assigned to them.
In the case of a power failure over a period in excess of approx.
1 hour, the numbers programmed in the one−touch dialling buttons are lost!
Dialling with the one−touch dialling buttons
Lift the receiver
M1 − M6 Press the required one−touch dialling
16
digits)
button
button
One−touch Dialling
Removing the covers from the one−touch dialling buttons
Use your thumb and forefinger to grip the cover and remove it, as
illustrated in the diagram. Place the required label or photo under the
cover and replace it on the button.
Example illustration
47
Page 48

In Case of Problems
8 In Case of Problems
Service Hotline
Should problems arise with the telephone, please refer to the following
information first. In the case of technical problems, you can contact our
hotline service, Tel. 0900 00 1675 within Switzerland (cost via Swisscom
at time of going to print: CHF 2.60/min). In the case of claims under the
terms of guarantee, contact your sales outlet. There is a 2 year period of
guarantee.
Problems and solutions
Problems Solutions
No telephone calls possible − The telephone line is not connected
properly or is defective. Only use the
telephone connection cable supplied.
48
Page 49

9 Maintenance / Guarantee
Maintenance
Clean the housing surfaces with a soft, fluff−free cloth.
Never use cleaning agents or solvents.
Guarantee
SWITEL equipment is produced and tested according to the latest
production methods. The implementation of carefully chosen materials
and highly developed technologies ensure trouble−free functioning and a
long service life. The terms of guarantee do not apply where the cause of
equipment malfunction is the fault of the telephone network operator or
any interposed private branch extension system. The terms of guarantee
do not apply to the batteries or power packs used in the products. The
period of guarantee is 24 months from the date of purchase.
All deficiencies related to material or manufacturing errors within the
period of guarantee will be redressed free of charge. Rights to claims
under the terms of guarantee are annulled following tampering by the
purchaser or third parties. Damage caused as the result of improper handling or operation, normal wear and tear, incorrect positioning or storage,
improper connection or installation or Acts of God and other external influences are excluded from the terms of guarantee. In the case of
complaints, we reserve the right to repair defect parts, replace them or
replace the entire device. Replaced parts or devices become our property.
Rights to compensation in the case of damage are excluded where there
is no evidence of intent or gross negligence by the manufacturer.
If your device does show signs of a defect within the period of guarantee,
please contact the sales outlet where you purchased the SWITEL device,
producing the purchase receipt as evidence. All claims under the terms of
guarantee in accordance with this agreement can only be asserted at the
sales outlet. No claims under the terms of guarantee can be asserted after
a period of two years from the date of purchase and hand−over of the
product.
Maintenance / Guarantee
Declaration of Conformity
This device fulfils the requirements stipulated in the EU
directive:
1999/5/EC directive on radio equipment and
telecommunications terminal equipment and the mutual
recognition of their conformity. Conformity with the above
mentioned directive is confirmed by the CE symbol on the
device.
To view the complete Declaration of Conformity, please refer to
the free download available on our web site www.switel.com
.
49
Page 50

Index
10 Index
B
Base unit, 41
D
Declaration of Conformity, 49
Dialling pause, 46
Dialling using quick dial buttons, 44
Dialling with the one−touch
dialling buttons, 47
Display, 43
E
Ending a call, 44
Explanations, 43
F
Flash time, 46
G
Guarantee, 49
I
Increasing the receiver volume
to +40 dB, 44
Inserting labels, 47
M
Maintenance , 49
Making a call, 44
O
One−touch dialling, 44, 47
Operating elements, 42
Operating the telephone, 43
P
Package contents, 41
Private branch exchanges, 46
Problems, 48
Problems and solutions, 48
Programming quickdial buttons, 44
50
Q
Quick dial, 44
R
R button on private branch exchanges, 46
R−button and supplementary services, 46
Receiver volume, 44
Redialling, 44
Ringing tone, 45
Ringing volume, 44
S
Safety information, 40
Saving one−touch dialling numbers, 47
Sending loudness rating, 45
Service−Hotline, 48
Starting up, 41
Supplementary services, 46
T
Taking a call, 44
Telephoning, 44
Tone control, 44
Troubleshooting, 48
W
Wall installation, 41
Page 51

Notes
Notes
51
Page 52

Declaration of Conformity
Diese Anlage entspricht der europäischen R&TTE Richtlinie.
Für die komplette Konformitätserklärung nutzen Sie bitte den kostenlosen Download von unserer Website www.switel.com
Cet équipement est conforme à la directive européenne R&TTE.
Pour obtenir la déclaration de conformité intégrale, veuillez vous servir du téléchargement gratuit de notre site Internet www.switel.com
Quest’apparecchiatura è conforme alla direttiva europea R&TTE.
Per la dichiarazione di conformità completa si prega di voler usufruire del servizio gratuito di download dal nostro sito Internet www.switel.com
This equipment complies with the European R&TTE directive.
To view the complete Declaration of Conformity, please refer to the free download available at our web site: www.switel.com
17
.
.
.
.
Service Hotline
Bei technischen Problemen können Sie sich an unsere Service−Hotline unter Tel. 0900 00 1675 innerhalb der Schweiz
S’il s’agit de problèmes techniques, vous pouvez vous adresser à notre hotline de service en Suisse en appelant le numéro 0900 00 1675
In caso di problemi tecnici è possibile rivolgersi alla nostra hotline di assistenza tecnica chiamando al numero 0900 00 1675 valido per la Svizzera
In the event of technical problems, you can contact our hotline service, Tel. 0900 00 1675 within Switzerland
(Kosten Swisscom bei Drucklegung: CHF 2.60/min) wenden.
(frais Swisscom à la date d’impression de ce manuel : CHF 2.60/min).
(spese da rete Swisscom alla data di stampa: CHF 2.60 / min).
(cost via Swisscom at time of going to print: CHF 2.60/min).
Version 1.0 − 13.08.2009
 Loading...