

Page 1
TC 30 - Desktop telephone
2. Installation
Installation location
• The telephone should be placed on a level surface not too close to other electrical
equipment to avoid mutual influence.
• Prevent excessive exposure to smoke, dust, vibration, chemicals, moisture, heat and
direct sunlight.
• Do not use the handset in potentially explosive areas.
Plug the coiled handset cord into the handset.
Plug the other end into the jack on the left side
of the base unit.
Place the handset on the base unit.
IMPORTANT NOTE
The TC 30 requires 2 x 1.5 V AAA size Alkaline batteries installed
into the battery compartment before use. The caller display will
not work without batteries installed.
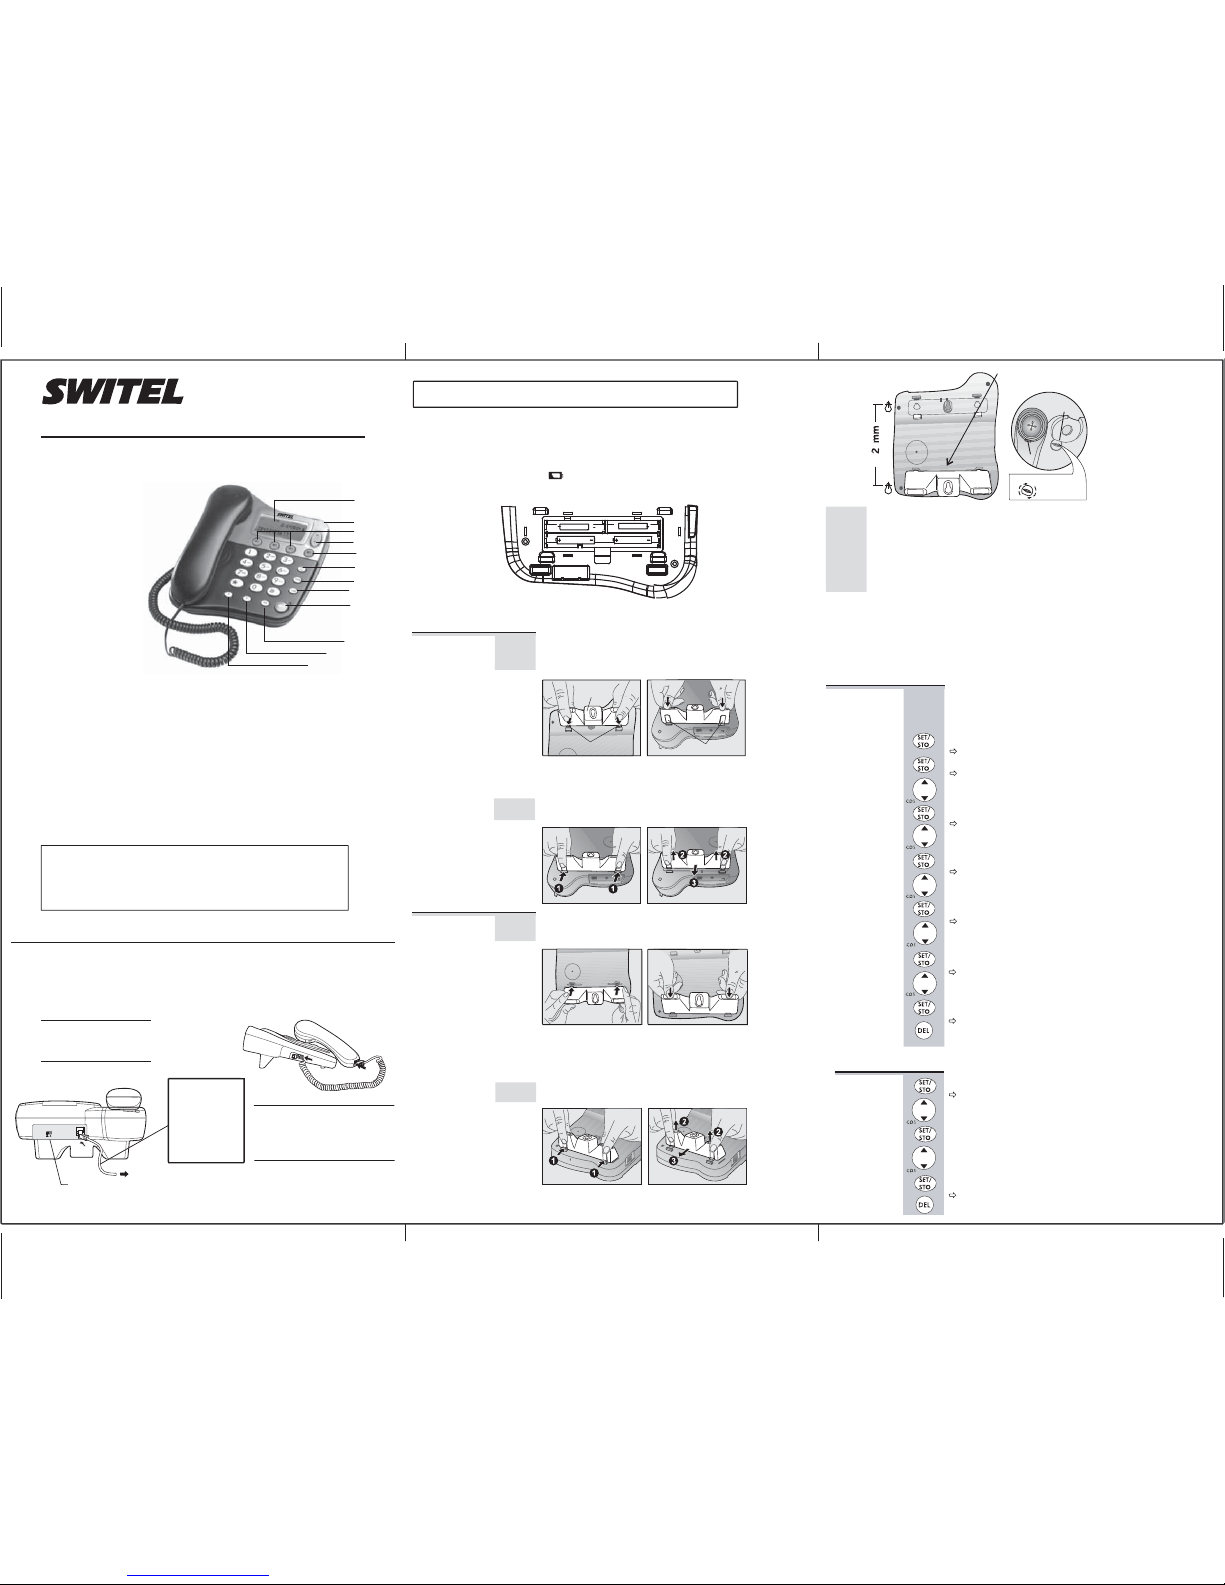
1. LCD screen
2. Ringer light indication
3. M1, M2, M3 Memory buttons
4. Scroll up & down buttons
5. Deelete button
6. Set/Store button
7. Memory button
8. Last Number Redial button
9. Speakerphone button
10. Mute button
11. R (Recall) button
12. Pause button
1
2
3
4
5
6
7
8
9
10
11
12
Make sure the plugs
click into place.
Installing (or replacing) the batteries
IMPORTANT! Before removing the battery compartment cover, always make sure,
that the base unit is disconnected from the telephone line.
SIZE AAA
SIZE AAA
To place the TC 30 on a desk, connect the stand to the
bottom of the phone in the slots near the rear of the base
as shown below.
Insert the rigid clips of the stand into the slots on the bottom of
the phone (near the rear of the base). Press down firmly until
the flexible clips click into place.
Desk mount
To remove the stand, (1) pinch the flexible clips, (2) pull back
the stand, and then (3) slide up and forward as shown below.
To remove the stand, (1) pinch the flexible clips, (2) pull back
the stand, and then (3) slide up and forward as shown below.
To place the TC 30 on a wall, connect the stand to the
bottom of the phone in the slots near the front of the base
as shown below.
Insert the rigid clips of the stand into the slots on the bottom of
the phone (near the front of the base). Press down firmly until
the flexible clips click into place.
Wall mount
stand
rigid clips flexible clips
0
nd
natone .com/
08453459677
3
onlin e
Mark two points on the wall that are 92 mm apart to lay the
fixing centers as shown below.
9
Set Date/Time You will need to set time and date so that it will be shown
correctly in the display. It is also used for showing the date and
time of incoming calls in the caller list.
In standby mode, press SET/STO.
The display shows SET 1 DATE.
Press SET/STO.
The year is flashing.
Press
and to set the year.
Press
SET/STO
.
The month is flashing.
Press
and to set the month.
Press
SET/STO
.
The day is flashing.
Press
and to set the day.
Press
SET/STO
.
The hours are flashing.
Press
and to set the hours.
Press
SET/STO
.
The minutes are flashing.
Press
and to set the minutes.
Press
SET/STO
.
The display shows SET 2 LCD. Continue programming or
press DELETE to return to standby mode.
1
2
3
4
5
6
7
8
9
10
11
12
Set LCD
contrast
1
2
3
4
5
to modular wall jack
Plug the telephone line cord's free end
into a modular wall jack. Plug the other
end into the jack on the rear side of the
base unit
Lift the handset and check for dial tone
in the earpiece.
Always use the
telephone line
cord supplied with
the phone. Other
telephone line
cords may not
work!
Ringer high/low switch
In the case of technical problems,
you can contact our hotline
service, Tel. 0900 00 1675 within
Switzerland (Costs for call from
Swisscom landline at time of going
to print: CHF 2.60/min). In the case
of claims under the terms of guarantee,
contact your sales outlet. There is a
2 year period of guarantee.
1. Unpacking
The package contains:
• Desktop phone TC 30
• Handset
• Coiled handset cord
• Telephone line cord
• User guide
Keep the packing
material for later use.
Keep your sales receipt,
which is your guarantee.
3. Desk / Wall mounting instruction 4. Setting up the phone
Press the SET/STO button to enter the menu and then use and to cycle through the
following options:
• SET 1 DATE • SET 2 LCD • SET 3 FLASH
Note: The system will time out if you leave more than 8 seconds between key presses.
BE CAREFUL to check that there are no electrical wires hidden in the wall. Fix two
screws (supplied with the unit) at the marked locations, leaving approx. 7 mm between
the wall and the screw head.
Hang the base unit on the screws using the wall mount slots.
You may need to remove the telephone from the wall and tighten the screws so that
the unit is securely fixed and does not wobble. Place the handset on the cradle with
the parking hook in the cradle arranged to fit in the parking recess under the earpiece.
Install two pieces of Alkaline AAA batteries into the compartment and place back the cover
before use.
Note: 1. Please do not use rechargeable batteries in this phone.
2. Batteries are not included.
3. The battery lifetime is typically about 6 months.
When the batteries are getting weak, will appear in the display screen. If you do not replace the batteries,
they will become totally discharged and the display screen will not work.
Rotate
Rasthaken
Rasthaken
parking hook
Aussparung
Aussparung
parking recess
Note: The base unit does not require batteries, but
without batteries the display will not work.
In standby mode, press SET/STO.
The display shows SET 1 DATE.
Select
SET 2 DISPLAY
using
or .
Press SET/STO
.
Adjust the contrast using
or .
Press SET/STO
.
The display shows SET 3 FLASH. Continue programming or
press DELETE to return to standby mode.
Page 2

Setting the
Flash time
Storing
telephone
numbers to the
direct memory
keys M1,
M2, M3
Dialling out
direct memory
Storing
telephone
numbers to
a two-touch
memory (0-9)
Dialling out
stored numbers
from the
two-touch
memory
Viewing the
caller list
Making a
call from the
caller list
Deleting
entries
If the CLIP feature (Calling Line Identification Presentation) is available at your connection,
the telephone number of the caller will be displayed for an incoming call.
Your telephone stores up to 30 entries in the caller list. In case of a full caller list a new
call will replace the oldest entry.
The entries show:
• The caller's telephone number (if available) • Date and time of the call
1
2
3
4
5
Making a
call
Taking a call
Ending a
call
Switching
between
handset and
speakerphone
Last number
redialling
Muting the
microphone
Inserting
a pause
Use on
a PBX
Setting the
speakerphone
volume
1
Lift the handset and wait for the dial tone.
The display shows 00-00. After a short time the call duration
appears.
Enter the telephone number.
The display shows the entered digits.
To end the call replace the handset.
The telephone rings:
Lift the handset or press the speakerphone button.
After a short time the call duration appears.
During a call:
Adjust the speakerphone volume using the slide switch
on the right hand side of the base unit.
Replace the handset or press the speakerphone
button (if activated).
During a “normal“ conversation press the speakerphone
button.
The speakerphone light will turn on. Replace the handset. Now
you can proceed your call “hands-free“.
For switching off the speakerphone mode lift up the handset to
enable “normal“ conversation.
Lift the handset or press the speakerphone button.
Press the last number redial button.
The phone automaticalle dials the last number you called.
During a call press the mute button.
When the microphone is off, the person on the other side
will no longer hear you.
For unmuting the microphone press the mute button again.
For some PBXs an acces number followed by a pause must
be dialled to get an exchange line
Press the pause button immediately after the access number,
to enter a pause of about 3.6 s. Then enter the desired telephone
number.
If you want to store a telephone number enter the pause button
after the access code. It will also be stored.
If you are using the telephone on a PBX, you will have to enter
“Recall“ for using special features. In some cases you will have to
adjust the flash time (see above). Please refer to the PBXs user
guide.
2
3
1
2
1
2
1
2
1
2
3
2
3
2
3
1
2
3
1
2
Condition of incoming call
Repeated call
New call
Caller's telephone number not available
Caller's telephone number withheld
A general error
There is a voice information in your voice mailbox
(additional feature / please contact your provider for more
information).
The display shows
REP
NEW
UNAVAILABLE
WITHHELD
ERROR
1
2
1
2
This telephone gives you the possibility to use special services
of your network provider. The usual setting for analog telephone
networks is 100 ms (default).
In standby mode press SET/STO.
The display shows SET 1 DATE.
Select
SET 3 FLASH
using
or .
Press SET/STO
.
Select the desired setting using and
(100, 300, 600 or 1000 ms).
Press
SET/STO
.
The display shows
SET 1 DATE
. Continue programming or
press
DELETE
to return to standby mode.
In standby mode, enter the telephone number,
you want to store.
Up to a maximum of 16 digits.
Press
SET/STO
.
Press one of the direct memory buttons M1, M2 or M3,
to which you want to store the telephone number.
Lift the handset or press the speakerphone button.
Press the desired direct memory button M1, M2 or M3.
The stored telephone number will be dialled.
In standby mode, enter the telephone number,
you want to store.
Up to a maximum of 16 digits.
Press
SET/STO
.
Press one of the digit keys 0 - 9,
to which you want to store the telephone number.
For dialling a telephone number from the two-touch
memory lift the handset or press the speakerphone button.
Press the memory button MEM.
Press the digit key, the telephone number is stored.
The stored telephone number will be dialled.
In standby mode, press
or .
The latest entry is displayed.
If there are no entries,
00 CALL
appears in the display.
Press or to scroll through the records.
The desired entry is shown:
Press the last number redial button
LNR
.
Lift the handset or press the speakerphone button.
The telephone number will be dialled.
The desired entry is shown:
Press the delete button
DEL
.
The entry will be deleted - the next entry is shown.
To delete all entries press and hold down the delete
button for approx. 3 s
All entries will be deleted.
5. Telephone Operation
6. Caller list
7. Guarantee
SWITEL equipment is produced and tested according to the latest production methods.
The implementation of carefully chosen materials and highly developed technologies ensure
trouble-free functioning and a long service life. The terms of guarantee do not apply where
the cause of equipment malfunction is the fault of the telephone network operator or any
interposed private branch extension system. The terms of guarantee do not apply to the
batteries or power packs used in the products.
The period of guarantee is 24 months from the date of purchase.
All deficiencies related to material or manufacturing errors within the period of guarantee will
be redressed free of charge. Rights to claims under the terms of guarantee are annulled following
tampering by the purchaser or third parties. Damage caused as the result of improper handling or
operation, normal wear and tear, incorrect positioning or storage, improper connection or
installation or Acts of God and other external influences are excluded from the terms of guarantee.
In the case of complaints, we reserve the right to repair defect parts, replace them or replace the
entire device. Replaced parts or devices become our property. Rights to compensation in the
case of damage are excluded where there is no evidence of intent or gross negligence by the
manufacturer.
If your device shows signs of defect during the period of guarantee, please return it to the sales
outlet in which you purchased the SWITEL device together with the purchase receipt. All claims
under the terms of guarantee in accordance with this agreement can only be asserted at the
sales outlet.
No claims under the terms of guarantee can be asserted after a period of two years from the
date of purchase and hand-over of the product.
8. Declaration of Conformity
This equipment complies with the European R&TTE directive.
To view the complete Declaration of Conformity, please refer to the
free download available at our web site:
www.switel.com
.
9. Maintenance
Clean the housing surfaces with a soft, fluff-free cloth.
Do not use any cleaning agents or solvents.
10. Intended use
The telephone is suitable for telephoning within a public telephone network system.
Any other use is considered unintended use. Unauthorised modification or reconstruction
is not permitted.
Under no circumstances open the device or complete any repair work yourself.
11. Disposal
In order to dispose of your device, take it to a collection point provided
by your local public waste authorities (e.g. recycling centre). The adjacent
symbol indicates that the device must not be disposed of in normal
domestic waste!
According to laws on the disposal of electronic and electrical devices,
owners are obliged to dispose of old electronic and electrical devices
in a separate waste container.
Batteries must be disposed of at the point of sale or at the appropriate
collection points provided by the public waste authorities.
Packaging materials must be disposed of according to local regulations.
12. Technical data
Temperature: Operation
0 ºC to 40 ºC
Storage
-20 ºC to 60 ºC
Dial mode: DTMF (Tone)
R-key: Flash (100, 300, 600, 1000 ms)
Version 1.0 – 19.05.09
 Loading...