

Page 1
Schnurlostelefon
Téléphone sans fil
Telefono senza fili
Cordless telephone
TAF 80
Bedienungsanleitung
Mode d’emploi
Istruzioni per l’uso
Operating Instructions
Page 2

2
Bedienungsanleitung 3. . . . . . . .
Mode d’emploi 19. . . . . . . . . . . .
Istruzioni per l’uso 35. . . . . . . . . .
Operating Instructions 51. . . . . . .
Declaration of Conformity 67. . . .
2
Page 3

1
Inhaltsverzeichnis
1 Sicherheitshinweise 5. . . . . . . . . . . . . . . . . . . . . . . . . . . . . . . . . . . .
Bestimmungsgemäße Verwendung 5. . . . . . . . . . . . . . . . . . . . . . . . . . . . . . . . . . .
Batterie 5. . . . . . . . . . . . . . . . . . . . . . . . . . . . . . . . . . . . . . . . . . . . . . . . . . . . . . .
Aufstellungsort 5. . . . . . . . . . . . . . . . . . . . . . . . . . . . . . . . . . . . . . . . . . . . . . . . . .
Netzteil 5. . . . . . . . . . . . . . . . . . . . . . . . . . . . . . . . . . . . . . . . . . . . . . . . . . . . . . .
Hinweise zur Entsorgung 5. . . . . . . . . . . . . . . . . . . . . . . . . . . . . . . . . . . . . . . . . .
Temperatur und Umgebungsbedingungen 6. . . . . . . . . . . . . . . . . . . . . . . . . . . . . .
Reinigung und Pflege 6. . . . . . . . . . . . . . . . . . . . . . . . . . . . . . . . . . . . . . . . . . . . .
2 Bedienelemente 7. . . . . . . . . . . . . . . . . . . . . . . . . . . . . . . . . . . . . .
3 Inbetriebnahme 8. . . . . . . . . . . . . . . . . . . . . . . . . . . . . . . . . . . . . . .
Sicherheitshinweise 8. . . . . . . . . . . . . . . . . . . . . . . . . . . . . . . . . . . . . . . . . . . . . .
Verpackungsinhalt prüfen 8. . . . . . . . . . . . . . . . . . . . . . . . . . . . . . . . . . . . . . . . . .
Batterie einsetzen (nicht im Lieferumfang) 8. . . . . . . . . . . . . . . . . . . . . . . . . . . . . .
Telefonkabel und Netzteil anschließen 8. . . . . . . . . . . . . . . . . . . . . . . . . . . . . . . . .
Sprache einstellen 8. . . . . . . . . . . . . . . . . . . . . . . . . . . . . . . . . . . . . . . . . . . . . . .
Grundeinstellung vornehmen 9. . . . . . . . . . . . . . . . . . . . . . . . . . . . . . . . . . . . . . .
4 Bedienung 11. . . . . . . . . . . . . . . . . . . . . . . . . . . . . . . . . . . . . . . . . .
Standardbegrüßung benutzen 11. . . . . . . . . . . . . . . . . . . . . . . . . . . . . . . . . . . . . . .
Begrüßungstext aufnehmen 11. . . . . . . . . . . . . . . . . . . . . . . . . . . . . . . . . . . . . . . .
Begrüßungstext löschen und zur Standardansage zurückkehren 11. . . . . . . . . . .
Anzahl der Klingelzeichen einstellen 11. . . . . . . . . . . . . . . . . . . . . . . . . . . . . . . . . .
Anruflänge 12. . . . . . . . . . . . . . . . . . . . . . . . . . . . . . . . . . . . . . . . . . . . . . . . . . . .
Allgemeine Bedienung 12. . . . . . . . . . . . . . . . . . . . . . . . . . . . . . . . . . . . . . . . . . . .
Ein−/Ausschalten 12. . . . . . . . . . . . . . . . . . . . . . . . . . . . . . . . . . . . . . . . . . . . .
Mithören eingehender Nachrichten 12. . . . . . . . . . . . . . . . . . . . . . . . . . . . . . . .
Aufnahme unterbrechen 12. . . . . . . . . . . . . . . . . . . . . . . . . . . . . . . . . . . . . . . .
Nachrichten abhören 12. . . . . . . . . . . . . . . . . . . . . . . . . . . . . . . . . . . . . . . . . . . . .
Laufende Nachricht wiederholen 12. . . . . . . . . . . . . . . . . . . . . . . . . . . . . . . . . .
Vorherige Nachricht wiederholen 12. . . . . . . . . . . . . . . . . . . . . . . . . . . . . . . . . .
Eine Nachricht überspringen 12. . . . . . . . . . . . . . . . . . . . . . . . . . . . . . . . . . . . .
Mehrere Nachrichten überspringen 12. . . . . . . . . . . . . . . . . . . . . . . . . . . . . . . .
Einzelne Nachricht löschen 13. . . . . . . . . . . . . . . . . . . . . . . . . . . . . . . . . . . . . .
Alle Nachrichten löschen 13. . . . . . . . . . . . . . . . . . . . . . . . . . . . . . . . . . . . . . . .
Notiz (MEMO) aufnehmen 13. . . . . . . . . . . . . . . . . . . . . . . . . . . . . . . . . . . . . . . . .
Telefongespräche aufnehmen 13. . . . . . . . . . . . . . . . . . . . . . . . . . . . . . . . . . . . . . .
3
Page 4

Inhaltsverzeichnis
5 Anruferliste (CLIP) 14. . . . . . . . . . . . . . . . . . . . . . . . . . . . . . . . . . . . .
Anruferliste einsehen 14. . . . . . . . . . . . . . . . . . . . . . . . . . . . . . . . . . . . . . . . . . . . .
Telefonnummer aus der Anruferliste anwählen 15. . . . . . . . . . . . . . . . . . . . . . . . . . .
Telefonnummer aus der Anruferliste löschen 15. . . . . . . . . . . . . . . . . . . . . . . . . . . .
Komplette Anruferliste löschen 15. . . . . . . . . . . . . . . . . . . . . . . . . . . . . . . . . . . . . .
6 Fernabfrage 16. . . . . . . . . . . . . . . . . . . . . . . . . . . . . . . . . . . . . . . . .
Berechtigungscode zur Fernabfrage 16. . . . . . . . . . . . . . . . . . . . . . . . . . . . . . . . . .
Die gebührenfreie Vor−Fernabfrage 16. . . . . . . . . . . . . . . . . . . . . . . . . . . . . . . . . . .
Möglichkeiten der Fernabfrage 16. . . . . . . . . . . . . . . . . . . . . . . . . . . . . . . . . . . . . .
Wenn der Speicher voll ist 17. . . . . . . . . . . . . . . . . . . . . . . . . . . . . . . . . . . . . . . . .
7 Wichtige Informationen 18. . . . . . . . . . . . . . . . . . . . . . . . . . . . . . . . .
Fehlersuche 18. . . . . . . . . . . . . . . . . . . . . . . . . . . . . . . . . . . . . . . . . . . . . . . . . . .
Garantie 18. . . . . . . . . . . . . . . . . . . . . . . . . . . . . . . . . . . . . . . . . . . . . . . . . . . . . .
4
Page 5

Sicherheitshinweise
1 Sicherheitshinweise
Bitte lesen Sie diese Bedienungsanleitung sorgfältig durch. Öffnen Sie das Gerät in keinem Fall
selbst und führen Sie keine eigenen Reparaturversuche durch. Bei Gewährleistungsansprüchen
wenden Sie sich bitte an Ihren Fachhändler. Im Zuge von Projektverbesserungen behalten wir uns
technische und optische Veränderungen am Artikel vor.
Bestimmungsgemäße Verwendung
Dieser Anrufbeantworter ist für den Betrieb an einem analogen Telefonanschluss (PSTN) innerhalb
Deutschlands entwickelt worden. Allerdings kann, wegen der Unterschiede zwischen den verschiedenen Telekommunikations−Netzbetreibern, keine Garantie für einwandfreie Funktion an jedem Telekommunikations−Endgeräteanschluss übernommen werden. Schließen Sie das Anschlusskabel
des Anrufbeantworters nur an eine dafür bestimmte Telefonsteckdose an. Wechseln Sie den Stecker
des Anschlusskabels nicht aus.
Batterie
Keine aufladbaren Batterien oder Akkupacks verwenden. Diese können möglicherweise einen Kurzschluss verursachen. Verwenden Sie beim Austauschen immer nur eine Blockbatterie 9 V. Batterien
nicht ins Feuer werfen oder ins Wasser tauchen.
Aufstellungsort
Am Aufstellungsort muss sich eine 230 Volt Netzsteckdose befinden.
Stellen Sie den Anrufbeantworter nicht in die unmittelbare Umgebung von anderen elektronischen
Geräten wie z. B. Mikrowellen oder HIFI−Geräten, da es sonst zu gegenseitiger Beeinflussung kommen kann. Halten Sie einen Abstand von mindestens einem Meter zu elektronischen Geräten ein.
Stellen Sie den Anrufbeantworter auf eine ebene und rutschfeste Fläche. Normalerweise hinterlassen die Füße des Anrufbeantworters keine Spuren auf der Aufstellfläche. Wegen der Vielzahl der
verwendeten Lacke und Oberflächen kann es jedoch nicht ausgeschlossen werden, dass durch die
Gerätefüße Spuren auf der Abstellfläche entstehen.
Netzteil
Verwenden Sie nur das mitgelieferte SWITEL Netzteil, da andere Netzteile den Anrufbeantworter
zerstören können. Netzteil nicht öffnen. Es besteht Lebensgefahr, wenn das Netzteil geöffnet wird,
solange es an das Stromnetz angeschlossen ist.
Hinweise zur Entsorgung
Die Umsetzung europäischen Rechtes in nationale Gesetze und Verordnungen verpflichtet Sie zur
sachgerechten Entsorgung von Gebrauchsgütern. Dies dient dem Schutz von Personen und Umwelt.
Das nebenstehende Symbol bedeutet, dass elektrische und elektronische
Altgeräte und Batterien getrennt vom Hausmüll zu entsorgen sind.
Alte oder ausgediente Geräte entsorgen Sie bei einer Sammelstelle eines
geeigneten Entsorgungsträgers.
Batterien und Akkumulatoren entsorgen Sie beim batterievertreibenden
Handel sowie zuständigen Sammelstellen, die entsprechende Behälter
bereitstellen.
Verpackungsmaterialien entsorgen Sie entsprechend den lokalen Vorschriften.
5
Page 6

Sicherheitshinweise
Temperatur und Umgebungsbedingungen
Der Anrufbeantworter ist für den Betrieb in geschützten Räumen mit einem Temperaturbereich von
10 °C bis 30 °C ausgelegt. Der Anrufbeantworter darf nicht in Feuchträumen wie Bad oder Waschküche aufgestellt werden. Vermeiden Sie die Nähe zu Wärmequellen wie Heizkörpern sowie die Belastungen durch Rauch, Staub, Erschütterungen, Chemikalien, Feuchtigkeit, Hitze oder direkte Sonneneinstrahlung.
Reinigung und Pflege
Reinigen Sie die Gehäuseoberflächen mit einem trockenen, weichen und fusselfreien Tuch. Verwenden Sie keine Reinigungsmittel oder aggressiven Lösungsmittel. Außer einer gelegentlichen Gehäusereinigung ist keine weitere Pflege erforderlich. Die Gummifüße des Anrufbeantworters sind
nicht gegen alle Reinigungsmittel beständig. Der Hersteller kann daher nicht für evtl. Schäden an
Möbeln o. Ä. haftbar gemacht werden.
6
Page 7

2 Bedienelemente
1. Schalter Sprachauswahl GER/FRE
2. Schalter Anrufannahme
3. Anschlussbuchse Netzteil
4. Anschlussbuchse Telefonkabel
5. LED Anzeige für neu eingegangene Anrufe
6. Auswahltasten der Anruferliste (CLIP)
7. Lautstärke (lauter)
8. Vorwärts / Tag− und Zeitansage prüfen
9. Löschen von Nachrichten, Memos und Ansagen
10. Menü
11. Lautstärke (leiser)
12. Pause / Abspielen von Nachrichten / LED: Ein/Aus, neue Nachrichten
13. Rückwärts / Aufnahme der Ansage
14. Ein−Aus / Stopp
15. Mitschneiden eines Gesprächs / Memos aufnehmen
16. Mikrofon / Lautsprecher
17. Löschen Anruferliste
18. Direktwahl
Bedienelemente
3
421
5
6
18
17
16
15
13
7
8
9
10
111214
7
Page 8

Inbetriebnahme
3 Inbetriebnahme
Sicherheitshinweise
Lesen Sie vor der Inbetriebnahme unbedingt die Sicherheitshinweise am Anfang dieser Be-
dienungsanleitung.
Verpackungsinhalt prüfen
Zum Lieferumfang gehören:
ein Anrufbeantworter
ein Telefonanschlusskabel eine Bedienungsanleitung
Batterie einsetzen (nicht im Lieferumfang)
Bevor Sie Ihren Anrufbeantworter mit dem Telefonnetz verbinden, legen Sie eine neue Batterie des
Typs Blockbatterie 9V Alkaline ein. Bei einem Stromausfall wird die Batterie benötigt, um die Daten
für ca. 24 Stunden zu sichern.
Sobald im Display die Anzeige \ erscheint, ist die Batterie verbraucht und muss ausge-
tauscht werden.
Achten Sie darauf, dass der Anrufbeantworter nicht mit dem Telefonnetz verbunden ist.
1. Öffnen Sie mit einem kleinen Schraubendreher das Batteriefach auf der Unterseite.
2. Verbinden Sie den Batteriestecker mit der Batterie und legen Sie die Batterie in das
Batteriefach.
3. Schließen Sie das Batteriefach.
Telefonkabel und Netzteil anschließen
1. Stecken Sie den kleinen Stecker des Netzteils in die entsprechende Buchse auf der Rückseite
des Anrufbeantworters.
2. Stecken Sie den kleinen Stecker des Telefonanschlusskabels in die entsprechende Buchse auf
der Rückseite des Anrufbeantworters.
3. Stecken Sie das Netzteil in eine vorschriftsmäßig installierte 230 Volt Netzsteckdose.
4. Verbinden Sie das Telefonanschlusskabel mit der Telefonsteckdose.
Ihr neuer Anrufbeantworter benötigt beim ersten Einschalten ca. 20 Sekunden, um alle
Funktionen zu initialisieren. Nach der ersten Initialisierung zeigt das Display die Meldung
LCD KONTRAST.
Sprache einstellen
An der Rückseite des Anrufbeantworters befindet sich ein Schiebeschalter (FRE/GER). Mit diesem
Schiebeschalter stellen Sie die gewünschte Sprache (Französisch oder Deutsch) ein.
ein Netzteil
8
Page 9

Inbetriebnahme
Grundeinstellung vornehmen
Bevor Sie den Anrufbeantworter in Betrieb nehmen, müssen einige Grundeinstellungen vorgenommen werden. Dazu gehört die Eingabe des aktuellen Datums, der Uhrzeit, Ihrer Ortsvorwahl und der
Landesvorwahl.
Erscheint die Meldung LCD KONTRAST nicht im Display oder wollen Sie die Uhrzeit korrigieren,
drücken Sie für 4 Sekunden die Taste .
1. Bestätigen Sie die Anzeige LCD KONTRAST mit der Taste c. Im Display erscheint die
aktuelle Kontrasteinstellung.
2. Mit den Auswahltasten und ändern Sie den Kontrast. Bestätigen Sie die Einstellung
mit c. Im Display erscheint TAG EINSTELLEN.
3. Bestätigen Sie mit c. Im Display erscheint der aktuell eingestellte Wochentag.
4. Durch Drücken der Auswahltaste oder stellen Sie den aktuellen Wochentag ein.
5. Bestätigen Sie mit c. Im Display erscheint die Meldung ZEIT EINSTELLEN.
6. Bestätigen Sie mit c. Im Display blinkt die Stundenanzeige.
7. Durch Drücken der Auswahltaste oder stellen Sie die Stunde ein.
8. Bestätigen Sie mit c. Im Display blinkt die Minutenanzeige.
9. Durch Drücken der Auswahltaste oder stellen Sie die Minuten ein.
10. Bestätigen Sie mit c. Im Display erscheint die Meldung DATUM EINSTELLEN.
11. Bestätigen Sie mit c. Im Display blinkt die Tagesangabe.
12. Durch Drücken der Auswahltaste oder stellen Sie den Tag ein.
13. Bestätigen Sie mit c. Im Display blinkt die Monatsangabe.
14. Durch Drücken der Auswahltaste oder stellen Sie den Monat ein.
15. Bestätigen Sie mit c. Im Display erscheint die Meldung ORTSVORWAHL.
16. Bestätigen Sie mit c. Der Cursor blinkt an der ersten Stelle. Durch Drücken der Auswahltaste
oder stellen Sie die erste Zahl Ihrer Ortsvorwahl ein.
17. Bestätigen Sie mit der Taste c und der Cursor blinkt an der zweiten Stelle.
18. Durch Drücken der Auswahltaste oder stellen Sie die zweite Zahl Ihrer
Ortsvorwahl ein.
19. Bestätigen Sie mit
Vorwahlen drücken Sie am Ende mehrmals die Taste c, bis die Meldung
LANDESVORWAHL im Display erscheint.
20. Bestätigen Sie mit der Taste c. Der Cursor blinkt an der ersten Stelle.
21. Geben Sie die gesamte Landesvorwahl "0049" nach dem gleichen Schema wie bei der
Ortsvorwahl ein.
22. Bestätigen Sie mit der Taste c. Die Eingabe ist nun beendet. Die aktuellen Daten werden im
Display angezeigt.
c und geben Sie nach diesem Schema alle Zahlen ein. Bei kurzen
9
Page 10

Inbetriebnahme
Möchten Sie die Grundeinstellungen verändern, halten Sie die Taste solange
gedrückt, bis im Display LCD KONTRAST erscheint. Mit den Auswahltasten
und bewegen Sie sich im Menü. Mit der Taste c wählen Sie den
gewünschten Menüpunkt.
Ist die Batterie komplett entladen, müssen die Grundeinstellungen neu eingegeben
werden.
Um eine Zahl aus der Orts− oder Landesvorwahl zu löschen, stellen Sie über die
Auswahltaste oder ein Minuszeichen (−) ein.
Mit der Taste können Sie das Menü jederzeit verlassen.
Wird 30 Sekunden lang keine Eingabe vorgenommen, wird die Programmierung
abgebrochen.
Durch Drücken der Taste /CHECK können Sie die Tag− und Zeitansage
überprüfen.
10
Page 11

4 Bedienung
Standardbegrüßung benutzen
Wenn Sie keinen eigenen Begrüßungstext aufgenommen haben, dann verwendet der Anrufbeantworter eine Standardbegrüßung. Die Stimme der Standardbegrüßung kann männlich oder weiblich
sein. Zur Auswahl der männlichen bzw. weiblichen Stimme drücken Sie zweimal kurz hintereinander
die Taste /REC.
Wortlaut der Standardbegrüßung: "Bitte hinterlassen Sie Ihre Nachricht nach dem Ton."
Begrüßungstext aufnehmen
1. Halten Sie die Taste /REC gedrückt. Ein Signalton erklingt.
2. Im Display erscheint die Meldung ANSAGE AUFNEHMEN.
Die Standardbegrüßung muss mindestens 3 Sekunden lang und darf nicht länger als 60 Se-
kunden sein. Die Dauer des Begrüßungstextes wird von der maximalen Aufnahmezeit abgezogen. Wenn Ihre Ansage z. B. 18 Sekunden dauert, dann bleiben 49 Minuten und 42 Sekunden für die eingehenden Nachrichten.
3. Sprechen Sie Ihren Begrüßungstext in das Mikrofon.
Halten Sie einen Abstand von ca. 15 cm ein.
4. Zum Beenden der Aufnahme lassen Sie die Taste /REC wieder los.
5. Der Begrüßungstext wird automatisch wiederholt und im Display erscheint die Meldung
ANSAGE ABSPIELEN. Sie können die Lautstärke durch Drücken der
Taste oder regeln.
Durch kurzes Drücken der Taste /REC können Sie Ihren Begrüßungstext jederzeit abspielen.
Begrüßungstext löschen und zur Standardansage zurückkehren
1. Drücken Sie die Taste /REC.
2. Drücken Sie die Taste während Sie Ihren Begrüßungstext hören.
Ihr Begrüßungstext wird gelöscht. Beim nächsten Anruf verwendet der Anrufbeantworter die Stan-
dardbegrüßung.
Anzahl der Klingelzeichen einstellen
An der Rückseite des Anrufbeantworters befindet sich ein Schiebeschalter (2 6 TS). Mit dem Schiebeschalter stellen Sie ein, nach wieviel Klingelzeichen der Anrufbeantworter das Gespräch annimmt.
Stellung Bedeutung
2 Der Anruf wird nach zweimal klingeln entgegengenommen.
6 Der Anruf wird nach sechsmal klingeln entgegengenommen.
TS Der erste Anruf wird nach sechsmal klingeln und alle weiteren Anrufe nach zweimal
klingeln entgegengenommen. Weiterhin können Sie in dieser Schalterstellung die
gebührenfreie Vor−Fernabfrage benutzen. Einzelheiten finden Sie im Kapitel Die
gebührenfreie Vor−Fernabfrage".
Bedienung
11
Page 12
Bedienung
Anruflänge
Die maximale Aufzeichnungsdauer eines Anrufes beträgt 60 Sekunden.
Spricht der Anrufer länger, ertönt ein Signalton und das Telefonat wird abgebrochen. Wenn während
der Aufnahme eine Pause von mehr als sieben Sekunden entsteht, wird das Telefonat automatisch
mit einem Signalton beendet.
Allgemeine Bedienung
Ein−/Ausschalten
1. Drücken Sie die Taste /. Der Anrufbeantworter ist eingeschaltet, die LED über der
Taste / leuchtet.
2. Zum Ausschalten drücken Sie erneut die Taste /.
Mithören eingehender Nachrichten
Der eingebaute Lautsprecher ermöglicht es Ihnen, eingehende Anrufe mitzuhören. Möchten Sie die
eingehenden Anrufe nicht mithören, verringern Sie die Lautstärke durch mehrmaliges Drücken der
Lautstärketaste .
Aufnahme unterbrechen
Wenn Sie den Telefonhörer während einer Aufnahme abheben, dann wird die Aufnahme unterbrochen und Sie können mit dem Anrufer sprechen.
Nachrichten abhören
Wenn die LED über der Taste / blinkt, wurden während Ihrer Abwesenheit neue
Nachrichten, Notizen (MEMO) oder Telefonmitschnitte aufgezeichnet.
1. Drücken Sie einmal die Taste /.
Ihr Anrufbeantworter spielt die aufgezeichneten Nachrichten ab. Die neueste Nachricht wird
zuerst abgespielt.
Wenn die LED nicht blinkt, werden die vorhandenen Nachrichten abgespielt.
2. Um das Abhören der Nachrichten zu unterbrechen, drücken Sie die Taste /.
3. Durch nochmaliges Betätigen von / wird das Abhören der Nachrichten fortgesetzt.
4. Drücken Sie die Taste /, um das Abhören der Nachrichten zu beenden.
Nachdem die letzte Nachricht abgespielt wurde, meldet sich das Gerät mit zwei Signaltönen.
Laufende Nachricht wiederholen
Drücken Sie die Taste /REC, wenn Sie die laufende Nachricht wiederholen möchten.
Vorherige Nachricht wiederholen
Drücken Sie die Taste /REC, bis ein Signalton erklingt. Die vorherige Nachricht wird wieder-
holt.
Eine Nachricht überspringen
Drücken Sie einmal die Taste /CHECK, um die laufende Nachricht zu überspringen. Der Anruf-
beantworter spielt die nächste Nachricht.
Mehrere Nachrichten überspringen
Drücken Sie mehrmals hintereinander die Taste /CHECK.
12
Page 13
Einzelne Nachricht löschen
Drücken Sie die Taste , während die zu löschende Nachricht abgespielt wird.
Alle Nachrichten löschen
Nachdem alle Nachrichten wiedergegeben wurden drücken und halten Sie die Taste , bis ein
Signalton erklingt.
Notiz (MEMO) aufnehmen
Sie können den Mitbenutzern des Anrufbeantworters eine Notiz aufnehmen.
1. Halten Sie die Taste gedrückt.
2. Das Display zeigt die Meldung AUFNAHME MEMO.
3. Nach dem Signalton beginnen Sie mit der Aufnahme der Notiz.
Z. B. "Hallo Alan, dein Essen findest du im Kühlschrank. Lass es dir schmecken."
4. Zum Beenden der Aufnahme lassen Sie die Taste wieder los.
5. Im Display erscheint die Anzeige MEMO.
Die Nachricht kann am Anrufbeantworter mit der Taste / oder am fremden Telefon über
die Fernabfrage abgehört werden.
Telefongespräche aufnehmen
Sie können die Unterhaltung beider Gesprächspartner aufzeichnen.
Wenn noch eine andere Funktion des Anrufbeantworters ausgeführt wird, dann drücken Sie
vor Beginn der Aufzeichnung die Taste /.
1. Heben Sie den Hörer ab, um das Gespräch anzunehmen.
2. Drücken Sie die Taste während des Gesprächs.
3. Das Display zeigt MITSCHNEIDEN.
Ihr Anrufbeantworter nimmt nun das Gespräch auf.
4. Drücken Sie erneut die Taste , um die Aufnahme zu beenden.
Drücken Sie die Taste /, um das aufgezeichnete Gespräch abzuspielen.
Bedienung
13
Page 14
Anruferliste (CLIP)
5 Anruferliste (CLIP)
Durch die Rufnummernanzeige im Display erkennen Sie bei eingehenden Gesprächen, wer Sie anruft. Voraussetzung dafür ist, dass diese Funktion an Ihrer Telefonleitung zur Verfügung steht.
Erscheint im Display die Meldung KEINE NUMMER, wurde die Rufnummer nur teilweise oder fehlerhaft empfangen.
Erscheint im Display die Meldung NICHT VERFÜGBAR, ist die Information der Rufnummer nicht
verfügbar. Es könnte sich um ein internationales Gespräch handeln.
Erscheint im Display die Meldung PRIVAT, hat der Anrufer das Senden seiner Rufnummer unter-
drückt oder die Nummer konnte nicht übermittelt werden.
Während Ihrer Abwesenheit werden bis zu 99 Anrufe mit Datum und Uhrzeit in der Anruferliste gespeichert. Ist die Anruferliste voll, wird der älteste Eintrag gelöscht.
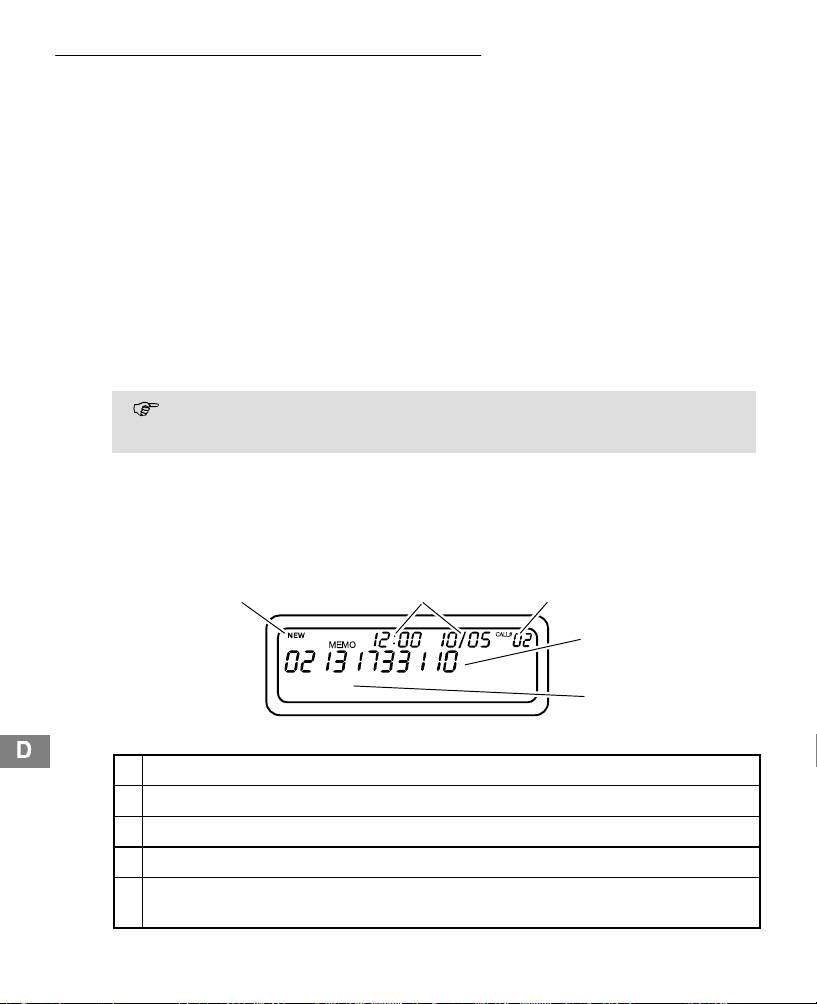
Wurden während Ihrer Abwesenheit Anrufe registriert, zeigt das Display die Anzahl der neu gespeicherten Rufnummern (z. B. NEU 02) und die LED blinkt. Weiterhin wird die Gesamtzahl der in der
Anruferliste gespeicherten Rufnummern angezeigt (z. B. ANRUFE 06). Das Display zeigt nicht die
Anzahl der aufgenommenen Nachrichten.
Die Rufnummernanzeige ist ein optionaler Service Ihres Netzanbieters. Steht dieser Ser-
vice nicht zur Verfügung, werden eingehende Anrufe nicht im Display angezeigt. Bitte wenden Sie sich an Ihren Netzanbieter für weitere Informationen.
Anruferliste einsehen
Durch Drücken der Taste neben dem Display sehen Sie die neuesten Rufnummern. Haben
Sie den letzten Speicherplatz der Anruferliste erreicht, zeigt das Display die Meldung "Ende der Li-
ste". Mit den Auswahltasten und blättern Sie in der Anruferliste. Folgende Informatio-
nen werden im Display angezeigt.
14
1 2
PRIVAT
1 Erscheint die Meldung NEW, wurde der angewählte Anruf noch nicht kontrolliert.
2 Uhrzeit und Datum des Anrufes.
3 Im Display erscheint unter CALL # die Nummer des angewählten Speicherplatzes.
4 Rufnummer des Anrufers (wenn verfügbar).
5 Anzeige PRIVAT oder NICHT VERFÜGBAR, wenn keine Rufnummer angezeigt werden
kann.
3
4
5
Page 15
Anruferliste (CLIP)
Wird 30 Sekunden lang keine Taste gedrückt, zeigt das Display wieder die aktuelle Uhrzeit, das Datum, die Anzahl der in der Anruferliste gespeicherten Rufnummern und die Anzahl der neu gespeicherten Rufnummern an.
Telefonnummer aus der Anruferliste anwählen
Sie können Telefonnummern aus der Anruferliste anwählen und über das parallel angeschlossene
Telefon eine Verbindung aufbauen.
1. Wählen Sie mit der Auswahltaste oder die gewünschte Rufnummer aus.
2. Drücken Sie die Taste c, im Display erscheint "WAEHLEN" und "HOERER ABNEHMEN".
3. Heben Sie den Telefonhörer des parallel angeschlossenen Telefons ab.
Telefonnummer aus der Anruferliste löschen
1. Wählen Sie mit der Auswahltaste oder die zu löschende Rufnummer aus.
2. Drücken Sie die Taste . Das Display zeigt "LOESCHEN?".
3. Halten Sie Taste gedrückt, bis im Display die Meldung "GELOESCHT" erscheint.
Komplette Anruferliste löschen
1. Wählen Sie mit der Auswahltaste oder eine beliebige Rufnummer aus.
2. Drücken und halten Sie die Taste , bis die Displayanzeige "ALLES LOESCHEN?"
erscheint. Lassen Sie die Taste los.
3. Drücken und halten Sie sofort wieder die Taste , bis im Display die Meldung "ALLES
GELOESCHT erscheint.
Haben Sie nicht alle Einträge vorher durchgesehen, werden nur die durchgesehenen Ein-
träge gelöscht.
15
Page 16

Fernabfrage
6 Fernabfrage
Die Fernabfrage erlaubt es, den Anrufbeantworter von einem beliebigen Telefon mit Tonwahlfunktion
aus anzurufen, um Nachrichten abzuhören und weitere Funktionen durchzuführen.
Berechtigungscode zur Fernabfrage
Ihr Anrufbeantworter besitzt eine persönliche Zugriffsberechtigung (Fernabfrage Code), so dass nur
Sie die eingegangenen Nachrichten per Fernabfrage abhören können. Der FERNABFRAGE
CODE" ist eine dreistellige Zahl und befindet sich auf der Unterseite Ihres Gerätes.
Die gebührenfreie Vor−Fernabfrage
Mit der gebührenfreien Vor−Fernabfrage können Sie kontrollieren, ob sich Nachrichten auf Ihrem Anrufbeantworter befinden.
An der Rückseite des Anrufbeantworters befindet sich ein Schiebeschalter (2 6 TS). Stellen Sie den
Schiebeschalter in die Position "TS". Wenn Sie von extern Ihr Gerät anwählen, meldet sich der Anrufbeantworter wie folgt:
Wenn sich neue Nachrichten auf Ihrem Anrufbeantworter befinden, dann wird Ihr Anruf nach
zweimal klingeln entgegengenommen.
Wenn sich keine neuen Nachrichten auf Ihrem Anrufbeantworter befinden, dann wird Ihr Anruf
nicht nach zweimal klingeln entgegengenommen.
Legen Sie den Telefonhörer nach dem dritten Klingelzeichen wieder auf. Da sich Ihr
Anrufbeantworter erst nach dem sechsten Klingelzeichen einschaltet, verursachen Sie keine
Gebühren.
Möglichkeiten der Fernabfrage
1. Rufen Sie Ihre Telefonnummer an und warten Sie, bis Ihr Anruf entgegengenommen wird.
2. Während Sie Ihren Begrüßungstext hören, geben Sie Ihren dreistelligen Fernabfrage Code über
die Tasten des Telefons ein.
3. Die Eingabe des richtigen Fernabfrage Codes wird mit zwei Signaltönen bestätigt.
4. Wählen Sie durch Drücken der unten aufgeführten Tastenkombinationen eine Funktion aus.
Zum Beenden der Fernabfrage legen Sie den Telefonhörer auf.
Wenn eine Pause von mehr als zehn Sekunden zwischen den Funktionen ist, dann wird die
Verbindung automatisch abgebrochen.
16
Neu aufgezeichnete Nachrichten abspielen Drücken Sie die Tastenfolge 1" und #"
Alle aufgezeichneten Nachrichten abspielen Drücken Sie die Tastenfolge 2" und #"
Laufende Nachricht löschen Drücken Sie die Tastenfolge 3" und #"
Vorherige Nachricht wiederholen Drücken Sie die Tastenfolge 4" und #"
Stopp/Abspielen beenden Drücken Sie die Tastenfolge 5" und #"
Laufende Nachricht überspringen Drücken Sie die Tastenfolge 6" und #"
Anrufbeantworter ein− oder ausschalten *1) Drücken Sie die Tastenfolge 7" und #"
Page 17
Fernabfrage
Begrüßungstext neu aufnehmen
Aufnahme beenden
Notiz (Memo) aufnehmen
Aufnahme beenden
Raumüberwachung *2)
Raumüberwachung beenden
Wenn Sie alle Nachrichten löschen wollen, drücken Sie bitte die Taste 3 und # nachdem Sie
die letzte Nachricht abgehört haben.
*1) Ist der Anrufbeantworter ausgeschaltet, müssen Sie es ca. 10 mal klingeln lassen, bis der Fernsteuermodus eingeschaltet wird.
*2) Sie können den Raum, in dem der Anrufbeantworter aufgestellt ist, temporär überwachen (Baby−
Überwachung). Alle 30 Sekunden hören Sie zwei Signaltöne. Wollen Sie die Überwachung fortsetzen, müssen Sie innerhalb von 10 Sekunden die Tasten 0 und # betätigen. Andernfalls wird die Verbindung automatisch unterbrochen.
Drücken Sie die Tastenfolge 8" und #"
Drücken Sie die Tastenfolge 5" und #"
Drücken Sie die Tastenfolge 9" und #"
Drücken Sie die Tastenfolge 5" und #"
Drücken Sie die Tastenfolge 0" und #"
Drücken Sie die Tastenfolge 5" und #"
Wenn der Speicher voll ist
Wenn der Speicher voll ist, akzeptiert der Anrufbeantworter keine weiteren Aufzeichnungen.
Verfahren Sie dann wie folgt:
1. Rufen Sie Ihre Nummer an. Der Anrufbeantworter klingelt 10 mal und danach hören Sie
SPEICHER VOLL".
2. Geben Sie über die Tasten des Telefons Ihren Fernabfrage Code ein. Zwei Signaltöne
signalisieren, dass der Code richtig ist.
3. Hören Sie zuerst Ihre Nachrichten ab. Danach löschen Sie einige oder alle Nachrichten.
17
Page 18

Wichtige Informationen
7 Wichtige Informationen
Fehlersuche
Haben Sie Probleme mit Ihrem Anrufbeantworter, kontrollieren Sie bitte die folgenden Hinweise. Bei
Garantieansprüchen wenden Sie sich bitte an Ihren Fachhändler.
Die Garantiezeit beträgt 2 Jahre.
Anrufbeantworter lässt sich nicht einschalten
Überprüfen Sie, ob der Netzadapter richtig in der Steckdose sitzt. Überprüfen Sie, ob sich Strom auf
der Steckdose befindet.
Im Display blinkt das Symbol \
Die Batterie ist verbraucht und muss ausgetauscht werden. Ihre Ansage, alle aufgenommenen
Nachrichten und die Tag− und Zeitansage werden bei einem Stromausfall gelöscht.
Es werden keine Nachrichten aufgezeichnet
Überprüfen Sie, ob das Telefonkabel richtig an der Telefonsteckdose angeschlossen ist.
Löschen Sie Nachrichten, um wieder Speicherplatz zu schaffen.
Garantie
SWITEL − Geräte werden nach den modernsten Produktionsverfahren hergestellt und geprüft. Ausgesuchte Materialien und hoch entwickelte Technologien sorgen für einwandfreie Funktion und
lange Lebensdauer. Ein Garantiefall liegt nicht vor, wenn die Ursache einer Fehlfunktion des Gerätes bei dem Telefonnetzbetreiber oder einer eventuell zwischengeschalteten Nebenstellenanlage
liegt. Die Garantie gilt nicht für die in den Produkten verwendeten Standard−Akkus oder Akkupacks.
Die Garantiezeit beträgt 24 Monate, gerechnet vom Tage des Kaufs.
Innerhalb der Garantiezeit werden alle Mängel, die auf Material− oder Herstellungsfehler zurückzuführen sind, kostenlos beseitigt. Der Garantieanspruch erlischt bei Eingriffen durch den Käufer oder
durch Dritte. Schäden, die durch unsachgemäße Behandlung oder Bedienung, durch falsches Aufstellen oder Aufbewahren, durch unsachgemäßen Anschluss oder Installation sowie durch höhere
Gewalt oder sonstige äußere Einflüsse entstehen, fallen nicht unter die Garantieleistung. Wir behalten uns vor, bei Reklamationen die defekten Teile auszubessern oder zu ersetzen oder das Gerät
auszutauschen. Ausgetauschte Teile oder ausgetauschte Geräte gehen in unser Eigentum über.
Schadenersatzansprüche sind ausgeschlossen, soweit sie nicht auf Vorsatz oder grober Fahrlässigkeit des Herstellers beruhen.
Sollte Ihr Gerät dennoch einen Defekt innerhalb der Garantiezeit aufweisen, wenden Sie sich bitte
unter Vorlage Ihrer Kaufquittung ausschließlich an das Geschäft, in dem Sie Ihr SWITEL − Gerät gekauft haben. Alle Gewährleistungsansprüche nach diesen Bestimmungen sind ausschließlich gegenüber Ihrem Fachhändler geltend zu machen. Nach Ablauf von zwei Jahren nach Kauf und Übergabe unserer Produkte können Gewährleistungsrechte nicht mehr geltend gemacht werden.
18
Page 19

2
Table des matières
1 Remarques concernant la sécurité 21. . . . . . . . . . . . . . . . . . . . . . . . .
Utilisation conforme aux prescriptions 21. . . . . . . . . . . . . . . . . . . . . . . . . . . . . . . . .
Pile 21. . . . . . . . . . . . . . . . . . . . . . . . . . . . . . . . . . . . . . . . . . . . . . . . . . . . . . . . . .
Lieu d’installation 21. . . . . . . . . . . . . . . . . . . . . . . . . . . . . . . . . . . . . . . . . . . . . . . .
Bloc secteur 21. . . . . . . . . . . . . . . . . . . . . . . . . . . . . . . . . . . . . . . . . . . . . . . . . . .
Remarques concernant l’élimination des appareils 21. . . . . . . . . . . . . . . . . . . . . . . .
Température et conditions d’environnement 22. . . . . . . . . . . . . . . . . . . . . . . . . . . . .
Nettoyage et entretien 22. . . . . . . . . . . . . . . . . . . . . . . . . . . . . . . . . . . . . . . . . . . .
2 Eléments de manipulation 23. . . . . . . . . . . . . . . . . . . . . . . . . . . . . . .
3 Mise en service 24. . . . . . . . . . . . . . . . . . . . . . . . . . . . . . . . . . . . . . .
Remarques concernant la sécurité 24. . . . . . . . . . . . . . . . . . . . . . . . . . . . . . . . . . .
Contrôler le contenu du paquet 24. . . . . . . . . . . . . . . . . . . . . . . . . . . . . . . . . . . . . .
Insérez une batterie (non comprise dans la livraison) 24. . . . . . . . . . . . . . . . . . . . . .
Connectez le câble téléphonique et le bloc d’alimentation. 24. . . . . . . . . . . . . . . . . .
Réglage de la langue 24. . . . . . . . . . . . . . . . . . . . . . . . . . . . . . . . . . . . . . . . . . . . .
Réglages de base 25. . . . . . . . . . . . . . . . . . . . . . . . . . . . . . . . . . . . . . . . . . . . . . .
4 Manipulation 27. . . . . . . . . . . . . . . . . . . . . . . . . . . . . . . . . . . . . . . . .
Utiliser l’annonce standard 27. . . . . . . . . . . . . . . . . . . . . . . . . . . . . . . . . . . . . . . . .
Enregistrer le message d’accueil 27. . . . . . . . . . . . . . . . . . . . . . . . . . . . . . . . . . . . .
Effacer le message d’accueil et retourner à l’annonce standard 27. . . . . . . . . . . .
Réglage du nombre de sonneries 27. . . . . . . . . . . . . . . . . . . . . . . . . . . . . . . . . . . .
Régler la longueur de l’appel 28. . . . . . . . . . . . . . . . . . . . . . . . . . . . . . . . . . . . . . .
Manipulation générale 28. . . . . . . . . . . . . . . . . . . . . . . . . . . . . . . . . . . . . . . . . . . .
MARCHE/ARRÊT 28. . . . . . . . . . . . . . . . . . . . . . . . . . . . . . . . . . . . . . . . . . . .
Écoute amplifiée de messages entrants 28. . . . . . . . . . . . . . . . . . . . . . . . . . . . .
Interrompre l’enregistrement 28. . . . . . . . . . . . . . . . . . . . . . . . . . . . . . . . . . . . .
Ecoute des messages 28. . . . . . . . . . . . . . . . . . . . . . . . . . . . . . . . . . . . . . . . . . . .
Écouter un message en cours 28. . . . . . . . . . . . . . . . . . . . . . . . . . . . . . . . . . . .
Répéter le message précédent 28. . . . . . . . . . . . . . . . . . . . . . . . . . . . . . . . . . .
Sauter un message 28. . . . . . . . . . . . . . . . . . . . . . . . . . . . . . . . . . . . . . . . . . .
Sauter plusieurs messages 28. . . . . . . . . . . . . . . . . . . . . . . . . . . . . . . . . . . . . .
Effacer individuellement des messages 29. . . . . . . . . . . . . . . . . . . . . . . . . . . . .
Suppression de tous les messages 29. . . . . . . . . . . . . . . . . . . . . . . . . . . . . . . .
Enregistrer une notice (MEMO) 29. . . . . . . . . . . . . . . . . . . . . . . . . . . . . . . . . . . . . .
Enregistrer la communication téléphonique 29. . . . . . . . . . . . . . . . . . . . . . . . . . . . .
19
Page 20

Table des matières
5 Liste d’appels (CLIP) 30. . . . . . . . . . . . . . . . . . . . . . . . . . . . . . . . . . .
Visualiser la liste d’appels 30. . . . . . . . . . . . . . . . . . . . . . . . . . . . . . . . . . . . . . . . . .
Sélectionner le numéro depuis le journal des appels 31. . . . . . . . . . . . . . . . . . . . . . .
Effacer un numéro de la liste d’appels 31. . . . . . . . . . . . . . . . . . . . . . . . . . . . . . . . .
Effacer toute la liste d’appels 31. . . . . . . . . . . . . . . . . . . . . . . . . . . . . . . . . . . . . . .
6 Consultation à distance 32. . . . . . . . . . . . . . . . . . . . . . . . . . . . . . . . .
Code d’authentification pour la consultation à distance. 32. . . . . . . . . . . . . . . . . . . .
La consultation préalable à distance gratuite 32. . . . . . . . . . . . . . . . . . . . . . . . . . . .
Possibilités de la consultation à distance 32. . . . . . . . . . . . . . . . . . . . . . . . . . . . . . .
Si la mémoire est pleine 33. . . . . . . . . . . . . . . . . . . . . . . . . . . . . . . . . . . . . . . . . . .
7 Informations importantes 34. . . . . . . . . . . . . . . . . . . . . . . . . . . . . . . .
Recherche d’erreurs 34. . . . . . . . . . . . . . . . . . . . . . . . . . . . . . . . . . . . . . . . . . . . . .
Garantie 34. . . . . . . . . . . . . . . . . . . . . . . . . . . . . . . . . . . . . . . . . . . . . . . . . . . . . .
20
Page 21

Remarques concernant la sécurité
1 Remarques concernant la sécurité
Veuillez lire ce mode d’emploi attentivement et complètement. N’ouvrez en aucun cas l’appareil et
n’effectuez aucun essai de réparation vous−même. En ce qui concerne le droit à la garantie, adressez−vous à votre revendeur. Dans le cadre des améliorations de produit, nous nous réservons le
droit d’apporter à l’article des modifications techniques et d’optique.
Utilisation conforme aux prescriptions
Ce répondeur a été conçu pour fonctionner sur un raccordement téléphonique (PSTN) analogique à
l’intérieur de l’Allemagne. Toutefois, en raison des différences entre les divers exploitants de
réseaux de télécommunication, on ne peut pas garantir un fonctionnement impeccable avec chaque
raccordement de périphérique de télécommunication. Ne raccordez le câble de raccordement du
répondeur qu’à une prise téléphonique déterminée. Ne remplacez pas la fiche du câble de raccordement.
Pile
N’utilisez pas de batteries rechargeables ni de packs. Celles−ci peuvent éventuellement provoquer
un court−circuit. Si vous les remplacez, n’utilisez qu’une batterie monobloc de 9 V. Ne jetez pas les
batteries dans le feu ou ne les plongez pas dans l’eau.
Lieu d’installation
Une prise réseau de 230 Volt doit se trouver sur le lieu d’installation.
Ne placez pas votre répondeur à proximité d’autres appareils électroniques tels que micro−ondes ou
des chaînes Hifi, les appareils pouvant pouvant avoir une interaction. Respectez donc une distance
d’au moins un mètre par rapport aux appareils électroniques.
Posez votre répondeur sur une surface plane et antidérapante. Normalement, les pieds de l’appareil
n’y laissent pas de traces. Toutefois, en raison de la diversité des laques et des surfaces utilisées, il
n’est pas exclu que les pieds de l’appareil puissent malgré tout en laisser.
Bloc secteur
N’utilisez que le bloc d’alimentation SWITEL livré avec l’appareil, d’autres modèles pouvant détruire
votre répondeur. Ne l’ouvrez pas. Il y a danger de mort si vous l’ouvrez tant qu’il est raccordé au
réseau.
Remarques concernant l’élimination des appareils
L’application du droit européen dans les lois et décrets nationaux vous obligent à éliminer comme il
se doit les biens de consommation. Ce respect sert à la protection des personnes et de l’environnement.
L’icône ci−contre signifie que les appareils électriques et électroniques
usagés ainsi que les batteries doivent être éliminés séparément des
ordures ménagères.
Veuillez éliminer vos appareils usagés ou ne servant plus dans le
centre de collecte d’un organisme approprié d’évacuation des déchets.
Éliminez batteries et accumulateurs auprès d’un revendeur de piles
ainsi que dans un centre de collecte compétent qui tiennent les collecteurs
adéquats à disposition.
Éliminez les matériaux d’emballage conformément au règlement local.
21
Page 22

Remarques concernant la sécurité
Température et conditions d’environnement
Ce répondeur a été concu pour fonctionner dans des pièces protégées dont la plage de température
est comprise entre
10 °C et 30 °C. Il ne doit pas être installé dans des pièces humides telles que salle de bains ou laverie. Évitez la proximité de sources de chaleur comme les radiateurs ainsi que les nuisances
causées par la fumée, la poussière, les vibrations, les substances chimiques, l’humidité, la chaleur
ou l’exposition directe au soleil.
Nettoyage et entretien
Nettoyez les surfaces du boîtier avec un chiffon sec, doux et non pelucheux. N’utilisez pas de produits d’entretien ou de solvants agressifs. Mis à part un nettoyage occasionnel du boîtier, aucun entretien n’est nécessaire. Les pieds en caoutchouc de votre répondeur ne résistent pas à tous les produits d’entretien. Le fabricant ne peut donc être tenu responsable d’éventuels dommages causés sur
des meubles ou autre chose de ce genre.
22
Page 23

Eléments de manipulation
2 Eléments de manipulation
1. Interrupteur de sélection de la langue GER/FRE
2. Régulateur à coulisse prise d’appel
3. Prise de raccordement bloc d’alimentation
4. Prise de raccordement câble de téléphone
5. Affichage par DEL pour de nouveaux appels entrants
6. Touches de sélection de la liste d’appels (CLIP)
7. Volume sonore (plus fort)
8. Avance/ Vérifier l’annonce du jour et de l’heure
9. Effacement de messages, de mémos et d’annonces
10. Menu
11. Volume sonore (moins fort)
12. Pause / Ecoute de messages / DEL : Activée /Désactivée, nouveaux messages
13. Retour/ Enregistrement de l’annonce
14. Marche/Arrêt / Stop
15. Enregistrement parallèle à une communication /
Enregistrer des mémos
16. Microphone/ Ecouteur
17. Effacement liste d’appels
18. Sélection directe
3
421
5
6
18
17
16
15
13
7
8
9
10
111214
23
Page 24

Mise en service
3 Mise en service
Remarques concernant la sécurité
Veuillez lire impérativement les consignes de sécurité mentionnées au début de ce mode
d’emploi avant de mettre votre appareil en service.
Contrôler le contenu du paquet
Les éléments suivants font partie de la livraison :
un répondeur
un câble de raccordement téléphonique un mode d’emploi
Insérez une batterie (non comprise dans la livraison)
Insérez une nouvelle pile de type monobloc 9V alcaline avant de raccorder votre répondeur au
réseau téléphonique. En cas de panne de courant, vous en avez besoin pour sauvegarder vos
données pendant env. 24 heures.
Dès que l’affichage \ apparaît, la pile est usée et doit être remplacée.
Veuillez observer que le répondeur ne soit pas relié au réseau téléphonique.
1. Ouvrez le compartiment batteries situé sur la face inférieure à l’aide d’un tournevis.
2. Raccordez la fiche pour batterie avec celle−ci et posez la dans son compartiment.
3. Fermez le compartiment à piles.
Connectez le câble téléphonique et le bloc d’alimentation.
1. Introduisez la petite fiche du bloc d’alimentation dans la prise correspondante située sur la face
arrière de votre répondeur.
2. Introduisez la petite fiche du câble de raccordement téléphonique dans la prise correspondante
située sur la face arrière de votre répondeur.
3. Branchez le bloc d’alimentation dans une prise de réseau de 230 volts installée selon les
spécifications.
4. Raccordez le câble de raccordement avec la prise téléphonique.
Au premier branchement, votre nouveau répondeur a besoin d’environ 20 secondes pour
initialiser toutes les fonctionnalités. Après la première initialisation, l’écran affiche le message CONTRASTE LCD.
Réglage de la langue
À l’arrière du répondeur se trouve un interrupteur à coulisse (FRE/GER). Cet interrupteur permet de
régler la langue désirée (français ou allemand).
un bloc d’alimentation
24
Page 25

Mise en service
Réglages de base
Avant de mettre votre répondeur en service, vous devez effectuer quelques réglages de base.
L’entrée de la date, de l’heure, de votre préfixe local et du préfixe national en font partie.
Si le message CONTRASTE LCD n’apparaît pas à l’écran ou si vous désirez corriger l’heure, appuyez pendant 4 secondes sur la touche .
1. Confirmez l’affichage CONTRASTE LCD avec la touche c. Le réglage du contraste actuel
apparaît sur l’écran.
2. Modifiez le contraste avec les touches de sélection et . Confirmez le réglage avec
c. L’écran affiche REGLAGE JOUR.
3. Confirmez avec c. Le réglage du jour de la semaine actuel apparaît sur l’écran.
4. Vous réglez le jour actuel de la semaine en appuyant sur la touche de sélection ou .
5. Confirmez avec c. L’écran affiche le message REGLAGE HEURE.
6. Confirmez avec c. L’affichage des heures clignote sur l’écran.
7. Vous réglez l’heure en appuyant sur la touche ou .
8. Confirmez avec c. L’affichage des minutes clignote sur l’écran.
9. Vous réglez les minutes en appuyant sur la touche ou .
10. Confirmez avec c. L’écran affiche le message REGLAGE DATE.
11. Confirmez avec c. L’indication du jour clignote sur l’écran.
12. Vous réglez le jour en appuyant sur la touche ou .
13. Confirmez avec c. L’indication du mois clignote sur l’écran.
14. Vous réglez le mois en appuyant sur la touche ou .
15. Confirmez avec c. L’écran affiche le message PREFIXE LOCAL.
16. Confirmez avec c. Le curseur clignote à la première position. Vous réglez le premier chiffre
de votre préfixe local en appuyant sur la touche ou .
17. Confirmez avec la touche c et le curseur clignote à la deuxième position.
18. Vous réglez le deuxième chiffre de votre préfixe local en appuyant sur la touche de sélection
ou .
19. Confirmez avec c et entrez tous les chiffres selon ce schéma. Pour les préfixes abrégés,
appuyez à la fin plusieurs fois sur la touche c jusqu’à ce que le message
apparaisse à l’écran.
20. Confirmez avec la touche c. Le curseur clignote à la première position.
21. Entrez tout le préfixe national "0049" selon le même schéma que le préfixe local.
22. Confirmez avec la touche c.
L’introduction est maintenant terminée. Les données actuelles sont affichées sur l’écran.
PREFIXE PAYS
25
Page 26

Mise en service
Si vous désirez modifier les réglages de base, maintenez la touche appuyée
jusqu’à ce que CONTRASTE LCD apparaisse à l’écran. Vous vous déplacez dans
le menu avec les touches de sélection et . Vous sélectionnez l’option
désirée avec la touche c.
Si la pile est complètement usée, vous devez de nouveau entrer les réglages de
base.
Pour effacer un chiffre du préfixe local ou du pays, paramétrez un signe moins (−) via
la touche ou .
Vous pouvez toujours quitter le menu avec la touche .
Si vous n’effectuez aucune introduction pendant 30 secondes, la programmation est
interrompue.
Vous pouvez vérifier l’annonce du jour et de l’heure en appuyant sur la touche
/SET.
26
Page 27

Manipulation
4 Manipulation
Utiliser l’annonce standard
Si vous n’avez pas enregistré de message d’accueil personnel, votre répondeur en utilise un standard. La voix de l’accueil standard peut être masculine ou féminine. Pour sélectionner la voix masculine ou féminine, appuyez rapidement deux fois de suite sur la touche / REC.
Texte de l’annonce standard: "Veuillez laisser un message après le bip sonore."
Enregistrer le message d’accueil
1. Maintenez la touche / REC appuyée. Une sonnerie retentit.
2. Le message ENREG ANNONCE apparaît sur l’écran.
Ce message doit durer au moins 3 secondes mais ne doit pas en dépasser 60. La durée de
l’annonce est retirée du temps d’enregistrement maximal. P. ex., si votre annonce dure 18
secondes, il restera 40 minutes et 42 secondes pour déposer les messages.
3. Veuillez dicter l’annonce dans le microphone.
Respectez une distance d’environ 15 cm.
4. Pour terminer l’enregistrement, relâchez la touche / REC.
5. Le message d’accueil est automatiquement répété et l’écran affiche REPROD. ANNONCE.
Vous pouvez régler le volume sonore en appuyant sur la touche ou .
En appuyant brièvement sur la touche / REC, vous pouvez toujours reécouter votre message.
Effacer le message d’accueil et retourner à l’annonce standard
1. Appuyez sur la touche / REC.
2. Appuyez sur la touche pendant que vous écoutez votre message d’accueil personnel.
Votre message d’accueil est effacé. Au prochain appel, votre répondeur utilisera l’annonce standard.
Réglage du nombre de sonneries
Un régulateur à coulisse se trouve à l’arrière de vote répondeur (2 6 TS). Ce régulateur vous permet
de régler le nombre des sonneries au bout duquel votre appareil prend automatiquement les appels.
Position Signification
2 L’appel est pris au bout de deux sonneries.
6 L’appel est pris au bout de six sonneries.
TS Le premier appel sera prix au bout de six sonneries et tous les autres appels au bout
de deux. Vous pouvez continuer d’utiliser la consultation préalable à distance gratuite dans cette position de régulateur. Vous trouverez des détails au chapitre La
consultation préalable à distance gratuite ".
27
Page 28

Manipulation
Régler la longueur de l’appel
La durée maximale de l’enregistrement d’un appel est de 60 secondes.
Si votre correspondant parle plus longtemps, une bip sonore retentit et la communication est interrompue. S’il y a une pause de plus de sept secondes pendant l’enregistrement, la commmunication
est automatiquement terminée par un signal sonore.
Manipulation générale
MARCHE/ARRÊT
1. Appuyez sur la touche /. Le répondeur est branché, la DEL située au−dessous de la
touche / est allumée.
2. Pour débrancher, appuyez une nouvelle fois sur la touche /.
Écoute amplifiée de messages entrants
Le haut−parleur intégré vous permet d’écouter des appels entrants. Si vous ne désirez pas écouter
les appels entrants, diminuez le volume en appuyant plusieurs fois sur la touche du volume sonore
.
Interrompre l’enregistrement
Si vous décrochez le combiné pendant l’enregistrement, ce dernier est interrompu et vous pouvez
parler avec le correspondant.
Ecoute des messages
Si la DEL située au−dessus de la touche /clignote, des messages, des notices
(MEMOS) ou des enregistrements tééphoniques ont été enregistrés.
1. Appuyez une fois sur la touche /.
Votre répondeur vous défile les messages enregistrés. Vous écoutez tout d’abord le message le
plus récent.
Si la DEL ne clignote pas, les messages sont écoutés.
2. Pour interrompre l’écoute des messages, appuyez sur la touche /.
3. En appuyant une nouvelle fois sur / , vous pouvez continuer d’écouter vos
messages.
4. Appuyez sur la touche / pour terminer l’écoute des messages.
Après avoir écouté le dernier message, l’appareil émet deux bip sonores.
Écouter un message en cours
Appuyez sur la touche /REC si vous désirez réécouter le message en cours.
Répéter le message précédent
Appuyez sur la touche /REC jusqu’à ce qu’un signal sonore se fasse entendre. Le message
précédent est répété.
Sauter un message
Appuyez une fois sur la touche /SET pour sauter le message en cours. Le répondeur passe au
prochain message.
Sauter plusieurs messages
Appuyez plusieurs fois de suite sur la touche /SET.
28
Page 29

Manipulation
Effacer individuellement des messages
Appuyez sur la touche pendant que le message devant être effacé est écouté.
Suppression de tous les messages
Après avoir écouté tous les messages, maintenez la touche appuyée jusqu’à ce qu’un signal
sonore se fasse entendre.
Enregistrer une notice (MEMO)
Vous pouvez enregistrer un message pour les co−utilisateurs de votre répondeur.
1. Maintenez la touche appuyée.
2. L’écran affiche le message ENREG MEMOIRE.
3. Après le bip sonore commence l’enregistrement du message.
Par ex. "Salut Alain, ton repas est dans le réfrigérateur. Bon appétit."
4. Pour terminer l’enregistrement, relâchez la touche / REC.
5. L’écran affiche MEMO.
Vous pouvez écouter le message sur le répondeur avec la touche / ou bien sur un
téléphone étranger via la consultation à distance.
Enregistrer la communication téléphonique
Vous pouvez enregistrer la communication de deux correspondants.
Si une autre fonction du répondeur est encore effectuée, appuyez alors sur la tou-
che/ avant le début de l’enregistrement.
1. Décrochez l’écouteur pour prendre la communication.
2. Appuyez sur la touche pendant la commmunication.
3. L’écran affiche ENREGISTREMENT.
Votre répondeur engistre alors votre communication.
4. Appuyez une nouvelle fois sur la touche pour terminer l’enregistrement.
Appuyez sur la touche / pour écouter votre communication enregistrée.
29
Page 30

Liste d’appels (CLIP)
5 Liste d’appels (CLIP)
L’affichage du numéro d’appel sur l’écran vous permet de visualiser les appels entrants. Pour cela, il
faut que cette fonctionnalité soit disponible sur votre ligne téléphonique.
Si le message SANS NUMERO s’affiche sur l’écran, c’est que ce numéro n’a été que partiellement
reçu ou reçu incorrectement.
Si ce message NON DISPONIBLE s’affiche sur l’écran, l’information sur le numéro n’est pas disponible. Il pourrait s’agir d’une communication internationale.
Si le message PRIVEE s’affiche sur l’écran, c’est que votre correspondant ne désire pas que son
numéro apparaisse ou que ce dernier n’a pas pu être identifié.
Jusqu’à 99 appels avec date et heure peuvent être enregistrés pendant votre absence dans le journal. Si celui−ci est plein, le message le plus ancien est effacé.
Si des appels ont été enregistrés pendant votre absence, l’écran affiche leur nombre (p. ex.
NOUV 02) et la DEL clignote. Le nombre total des numéros enregistrés dans le journal continue
d’être affiché (p. ex. APPELS 06). L’écran n’affiche pas le nombre des messages enregistrés.
L’affichage du numéro d’appel est un service optionnel de votre fournisseur de réseau. Si
ce service n’est pas disponible, les appels entrants ne sont pas visibles sur votre écran.
Veuillez vous adresser à votre fournisseur pour de plus amples informations.
Visualiser la liste d’appels
Vous visualisez les appels les plus récents en appuyant sur la touche située à côté de votre
écran. Quand vous avez atteint la dernière place de mémoire du journal, ce message s’affiche sur
l’écran "Fin de la liste". Vous faîtes défiler le journal avec les touches de sélection et .
Les informations suivantes sont affichées sur l’écran.
30
1 2
PRIVAT
1 Si le message NOUV apparaît, l’appel sélectionné n’a pas encore été contrôlé.
2 Heure et date de l’appel.
3 Le numéro de la place de mémoire sélectionnée apparaît sur l’écran sous CALL # .
4 Numéro du correspondant (si disponible).
5 Affichage PRIVEE ou NON DISPONIBLE lorsqu’aucun numéro ne peut être affiché.
3
4
5
Page 31

Liste d’appels (CLIP)
Si vous n’appuyez pas sur une touche pendant 30 secondes, l’écran affiche à nouveau l’heure actuelle, la date, le nombre des appels enregistrés dans le journal ainsi que le nombre des numéros
nouvellement enregistrés.
Sélectionner le numéro depuis le journal des appels
Vous pouvez sélectionner des numéros depuis le journal des appels et établir une communication
vial le téléphone raccordé parallèlement.
1. Sélectionnez avec la touche ou le numéro désiré.
2. Appuyez sur la touche c, l’écran affiche "COMPOSER" et "DECROC. COMBINE".
3. Décrochez le combiné du téléphone raccordé parallèlement.
Effacer un numéro de la liste d’appels
1. Sélectionnez avec la touche ou le numéro devant être effacé.
2. Appuyez sur la touche . L’écran affiche "EFFACER?".
3. Maintenez la touche appuyée jusqu’à ce que le message "RAYEES" apparaisse.
Effacer toute la liste d’appels
1. Sélectionnez avec la touche ou un numéro quelconque.
2. Appuyez sur la touche et maintenez la appuyée jusqu’à ce que "EFFACER TOUS?"
apparaisse. Relâchez la touche .
3. Appuyez immédiatement sur la touche et maintenez la appuyée jusqu’à ce que le
message "TOUTES RAYEES apparaisse.
Si vous n’avez pas consulté avant tous les enregistrements, seuls les enregistrements con-
sultés seront effacés.
31
Page 32

Consultation à distance
6 Consultation à distance
La consultation à distance permet d’appeler le répondeur d’un téléphone quelconque ayant la fonctionnalité numérotation par tonalité pour écouter des messages et effectuer d’autres fonctionnalités.
Code d’authentification pour la consultation à distance.
Votre répondeur possède un droit d’accès personnel (code consultation à distance) de telle sorte
que vous seul (e) pouvez écouter vos messages par consultation à distance. Le CODE INTERR.A
DIST." est un nombre de trois chiffres et il se trouve sur la face inférieure de votre appareil.
La consultation préalable à distance gratuite
La consultation préalable à distance gratuite vous permet de contrôler si vous avez de nouveaux
messages sur votre répondeur.
Un régulateur à coulisse se trouve à l’arrière de vote répondeur (2 6 TS). Placez le en position "TS".
Si vous sélectionnez votre appareil en externe, le répondeur répond comme suit:
Si des messages nouveaux se trouvent sur votre répondeur, votre appel sera pris au bout de
deux sonneries.
Si aucun message nouveau se trouve sur votre répondeur, l’appel n’est pas pris après deux
sonneries. Raccrochez au bout de la troisième sonnerie. Étant que votre répondeur se branche
seulement au bout de la sixième sonnerie, vous n’aurez pas de frais.
Possibilités de la consultation à distance
1. Appelez votre numéro de téléphone et attendez jusqu’à ce que votre appel soit pris.
2. Pendant que vous écoutez votre message d’accueil, entrez votre code de consultation à
distance à trois chiffres via les touches du téléphone.
3. L’introduction du code exact est confirmé par deux bips sonores.
4. Sélectionnez une fonction en appuyant sur les combinaisons de touches indiquées en bas.
Raccrochez pour terminer la consultation à distance.
Si vous faites une pause de plus de dix secondes entre les fonctionnalités, la communication est automatiquement interrompue.
32
Écouter l’enregistrement de nouveaux messages Appuyez sur les touches 1" et #"
Écouter l’enregistrement de tous les messages Appuyez sur les touches 2" et #"
Effacer le message en cours Appuyez sur les touches 3" et #"
Répéter le message précédent Appuyez sur les touches 4" et #"
Terminer Stop/Écoute Appuyez sur les touches 5" et #"
Sauter le message en cours Appuyez sur les touches 6" et #"
Débrancher ou brancher le répondeur *1) Appuyez sur les touches 7" et #"
Enregistrer un nouveau message d’accueil
Terminer l’enregistrement
Appuyez sur les touches 8" et #"
Appuyez sur les touches 5" et #"
Page 33

Consultation à distance
Enregistrer un mémo
Terminer l’enregistrement
Surveillance de pièce *2)
Terminer l’enregistrement
Si vous voulez effacer tous les messages, veuillez appuyer sur les touches 3 et # après avoir
écouté le dernier message.
*1) Si le répondeur est débranché, vous devez le faire sonner env. 10 fois jusqu’à ce que le mode de
commande à distance soit branché.
*2) Vous pouvez surveiller temporairement la pièce dans laquelle le répondeur est installé (surveillance bébé). Toutes les 30 secondes, vous entendez deux signaux sonores. Si vous désirez continuer à surveiller, vous devez actionner les touches 0 et # en l’espace de 10 secondes. Sinon, la liaison sera automatiquement interrompue.
Appuyez sur les touches 9" et #"
Appuyez sur les touches 5" et #"
Appuyez sur les touches 0" et #"
Appuyez sur les touches 5" et #"
Si la mémoire est pleine
Si la mémoire est pleine, le répondeur n’accepte plus d’enregistrements.
Procédez comme suit :
1. Appelez le numéro. Le répondeur sonne 10 fois et puis vous entendez MEMOIRE PLEINE".
2. Entrez votre code de consultation à distance via les touches de votre téléphone. Deux signaux
d’avertissement signalisent que le code est correct.
3. Ecoutez d’abord vos messages. Puis effacez en quelques−uns ou tous.
33
Page 34

Informations importantes
7 Informations importantes
Recherche d’erreurs
Si vous avez des problèmes avec votre répondeur, veuillez contrôler les consignes suivantes. En ce
qui concerne le droit à la garantie, veuillez vous adresser à votre revendeur.
La durée de la garantie est de 2 ans.
Vous ne pouvez pas brancher votre répondeur
Vérifiez si l’adaptateur réseau se trouve bien dans la prise. Vérifiez si la prise a du courant.
L’icône \ clignote sur l’écran
La batterie est déchargée et doit être remplacée. Votre annonce, tous les messages enregistrés et
l’annonce du jour et de l’heure sont effacés en raison d’une panne de courant.
Au message n’a été enregistré
Vérifiez si le câble de téléphone est bien raccordé à la prise téléphonique.
Effacez des messages pour vider la mémoire.
Garantie
Les appareils SWITEL sont fabriqués et testés selon les procédés de production les plus modernes.
Des matériels sélectionnés et des technologies de pointe ont pour effet un fonctionnement irréprochable et une longue durée de vie. La garantie ne rentre pas en jeu si l’exploitant du réseau téléphonique ou une installation à postes supplémentaires éventuellement intercalée est responsable du
dysfonctionnement de l’appareil. La garantie ne s’applique pas aux piles rechargeables standard ou
aux packs de piles rechargeables utilisés dans le produit. La durée de la garantie est de 24 mois, à
partir de la date d’achat.
Pendant la durée de la garantie, tous les défauts, dus à des vices de matériel ou de fabrication, seront éliminés gratuitement. Le droit à la garantie expire en cas d’intervention de l’acheteur ou de
tiers. Les dommages provenant d’un maniement ou d’une manipulation incorrects, d’une mauvaise
mise en place ou d’une mauvaise conservation de l’appareil, d’un raccordement non conforme ainsi
que d’un cas de force majeure ou autres influences extérieures, sont exclus de la garantie. En cas
de réclamations, nous nous réservons le droit de réparer ou de remplacer les pièces défectueuses
ou d’échanger l’appareil. Les composants remplacés ou les appareils échangés deviennent notre
propriété. Les demandes de dommages et intérêts sont exclues tant qu’elles ne reposent pas sur
l’intention ou une négligence grossière du fabricant.
Si votre appareil présente cependant un défaut pendant la période de garantie, veuillez vous adresser exclusivement au magasin où vous l’avez acheté en présentant votre bon d’achat. Vous ne pouvez faire valoir vos droits à la garantie selon ces dispositions qu’auprès de votre revendeur exclusivement. Deux ans après l’achat et la remise de nos produits, il n’est plus possible de faire valoir les
droits à la garantie.
34
Page 35

3
Sommario
1 Indicazioni di sicurezza 37. . . . . . . . . . . . . . . . . . . . . . . . . . . . . . . . .
Impiego conforme agli usi previsti 37. . . . . . . . . . . . . . . . . . . . . . . . . . . . . . . . . . . .
Batteria 37. . . . . . . . . . . . . . . . . . . . . . . . . . . . . . . . . . . . . . . . . . . . . . . . . . . . . . .
Luogo di installazione 37. . . . . . . . . . . . . . . . . . . . . . . . . . . . . . . . . . . . . . . . . . . . .
Alimentatore di rete 37. . . . . . . . . . . . . . . . . . . . . . . . . . . . . . . . . . . . . . . . . . . . . .
Avvertenze riguardo lo smaltimento 37. . . . . . . . . . . . . . . . . . . . . . . . . . . . . . . . . . .
Temperatura e ambiente circostante 38. . . . . . . . . . . . . . . . . . . . . . . . . . . . . . . . . .
Pulizia e cura 38. . . . . . . . . . . . . . . . . . . . . . . . . . . . . . . . . . . . . . . . . . . . . . . . . . .
2 Elementi di comando 39. . . . . . . . . . . . . . . . . . . . . . . . . . . . . . . . . . .
3 Messa in funzione 40. . . . . . . . . . . . . . . . . . . . . . . . . . . . . . . . . . . . .
Indicazioni di sicurezza 40. . . . . . . . . . . . . . . . . . . . . . . . . . . . . . . . . . . . . . . . . . . .
Verificare il contenuto della confezione 40. . . . . . . . . . . . . . . . . . . . . . . . . . . . . . . .
Inserire la batteria (non in dotazione) 40. . . . . . . . . . . . . . . . . . . . . . . . . . . . . . . . . .
Collegare il cavo telefonico e l’alimentatore di rete 40. . . . . . . . . . . . . . . . . . . . . . . .
Impostare la lingua 40. . . . . . . . . . . . . . . . . . . . . . . . . . . . . . . . . . . . . . . . . . . . . .
Compiere le impostazioni di base 41. . . . . . . . . . . . . . . . . . . . . . . . . . . . . . . . . . . .
4 Esercizio 43. . . . . . . . . . . . . . . . . . . . . . . . . . . . . . . . . . . . . . . . . . . .
Utilizzare l’annuncio di saluto standard 43. . . . . . . . . . . . . . . . . . . . . . . . . . . . . . . .
Registrare un annuncio di saluto 43. . . . . . . . . . . . . . . . . . . . . . . . . . . . . . . . . . . . .
Cancellare l’annuncio di saluto e fare ritorno all’annuncio di saluto standard 43. . .
Impostare il numero di squilli 43. . . . . . . . . . . . . . . . . . . . . . . . . . . . . . . . . . . . . . .
Impostare la lunghezza di chiamata 44. . . . . . . . . . . . . . . . . . . . . . . . . . . . . . . . . . .
Esercizio generale 44. . . . . . . . . . . . . . . . . . . . . . . . . . . . . . . . . . . . . . . . . . . . . . .
Attivare/Disattivare 44. . . . . . . . . . . . . . . . . . . . . . . . . . . . . . . . . . . . . . . . . . . .
Intercettazione di messaggi in arrivo 44. . . . . . . . . . . . . . . . . . . . . . . . . . . . . . .
Interrompere la registrazione 44. . . . . . . . . . . . . . . . . . . . . . . . . . . . . . . . . . . . .
Riprodurre dei messaggi 44. . . . . . . . . . . . . . . . . . . . . . . . . . . . . . . . . . . . . . . . . . .
Ripetere il messaggio attuale 44. . . . . . . . . . . . . . . . . . . . . . . . . . . . . . . . . . . .
Ripetere il messaggio precedente 44. . . . . . . . . . . . . . . . . . . . . . . . . . . . . . . . .
Saltare un messaggio 44. . . . . . . . . . . . . . . . . . . . . . . . . . . . . . . . . . . . . . . . . .
Saltare più messaggi 44. . . . . . . . . . . . . . . . . . . . . . . . . . . . . . . . . . . . . . . . . .
Cancellare singoli messaggi 45. . . . . . . . . . . . . . . . . . . . . . . . . . . . . . . . . . . . .
Cancellare tutti i messaggi 45. . . . . . . . . . . . . . . . . . . . . . . . . . . . . . . . . . . . . .
Registrare una notizia (promemoria) 45. . . . . . . . . . . . . . . . . . . . . . . . . . . . . . . . . .
Registrare chiamate telefoniche 45. . . . . . . . . . . . . . . . . . . . . . . . . . . . . . . . . . . . .
35
Page 36

Sommario
5 Elenco chiamate (CLIP) 46. . . . . . . . . . . . . . . . . . . . . . . . . . . . . . . . .
Visualizzare l’elenco chiamate 46. . . . . . . . . . . . . . . . . . . . . . . . . . . . . . . . . . . . . .
Selezionare un numero telefonico dall’elenco chiamate 47. . . . . . . . . . . . . . . . . . . . .
Cancellare un numero telefonico dall’elenco chiamate 47. . . . . . . . . . . . . . . . . . . . .
Cancellare l’elenco chiamate completo 47. . . . . . . . . . . . . . . . . . . . . . . . . . . . . . . .
6 Interrogazione a distanza 48. . . . . . . . . . . . . . . . . . . . . . . . . . . . . . . .
Codice di accesso per l’interrogazione a distanza 48. . . . . . . . . . . . . . . . . . . . . . . . .
Interrogazione a distanza preliminare gratuita 48. . . . . . . . . . . . . . . . . . . . . . . . . . .
Possibilità di interrogazione a distanza 48. . . . . . . . . . . . . . . . . . . . . . . . . . . . . . . .
Con memoria piena 49. . . . . . . . . . . . . . . . . . . . . . . . . . . . . . . . . . . . . . . . . . . . . .
7 Informazioni importanti 50. . . . . . . . . . . . . . . . . . . . . . . . . . . . . . . . . .
Ricerca di errori 50. . . . . . . . . . . . . . . . . . . . . . . . . . . . . . . . . . . . . . . . . . . . . . . . .
Garanzia 50. . . . . . . . . . . . . . . . . . . . . . . . . . . . . . . . . . . . . . . . . . . . . . . . . . . . . .
36
Page 37

Indicazioni di sicurezza
1 Indicazioni di sicurezza
Si prega di leggere attentamente le presenti istruzioni per l’uso. Non aprire per nessuna ragione
l’apparecchio autonomamente e svolgere riparazioni di propria iniziativa. Rivolgersi al rivenditore
autorizzato in caso di reclami entro il periodo di garanzia. Con riserva di modifiche tecniche ed ottiche dell’articolo dovute a migliorie di sviluppo.
Impiego conforme agli usi previsti
La presente segreteria telefonica è stata sviluppata per l’esercizio presso un allacciamento telefonico analogico (PSTN) entro i confini della Germania. Ciò nonostante, in particolare a causa di possibili differenze tra i vari gestori di reti telefoniche, non è possibile assumere alcuna garanzia riguardo il perfetto funzionamento dell’apparecchio terminale per tutti gli allacciamenti di
telecomunicazione. Inserire il cavo di allacciamento della segreteria telefonica soltanto in una presa
telefonica appositamente prevista. Non sostituire il connettore del cavo di allacciamento.
Batteria
Non utilizzare batterie ricaricabili o altri tipi di accumulatori. Queste potrebbero eventualmente causare un corto circuito. In caso di sostituzione si consiglia infatti di utilizzare soltanto una batteria a
blocco da 9 V. Non gettare le batterie nel fuoco o immergerle in acqua.
Luogo di installazione
Sul luogo di installazione è necessaria la presenza di una presa elettrica da 230 Volt.
Evitare di posizionare la segreteria telefonica nelle immediate vicinanze di altri apparecchi elettronici
come per es. forni a microonde o apparecchi HIFI, visto che altrimenti si possono verificare interferenze indesiderate. Mantenere una distanza minima di un metro da altri apparecchi elettronici.
Poggiare la segreteria telefonica su una superficie piana e antiscivolo. In linea di massima i piedini
della segreteria telefonica non lasciano tracce sulla superficie di appoggio. A causa del numero crescente di vernici e superfici diverse non è comunque possibile escludere che i piedini dell’apparecchio possano lasciare delle tracce sulla superficie di appoggio.
Alimentatore di rete
Si consiglia di utilizzare solo l’alimentatore di rete SWITEL fornito in dotazione, visto che altri alimentatori di rete potrebbero anche distruggere la segreteria telefonica. Non aprire l’alimentatore di rete.
Pericolo di vita in caso di apertura dell’alimentatore di rete fino a quando questo è ancora collegato
alla rete elettrica.
Avvertenze riguardo lo smaltimento
La conversione della legislazione europea in leggi e direttive nazionali impone il corretto smaltimento di beni di consumo. Questo avviene all’insegna della protezione di persone e ambiente.
Il simbolo raffigurato qui a lato indica che apparecchi usati elettrici ed elettronici e
batterie esauste non sono da smaltire assieme ai normali rifiuti domestici.
Procedere pertanto allo smaltimento di apparecchi vecchi o esausti presso un
centro di raccolta incaricato con il rispettivo smaltimento.
Consegnare batterie ed accumulatori per lo smaltimento presso i rivenditori al
dettaglio di batterie o i centri di raccolta che mettono a disposizione appositi contenitori.
Smaltire confezioni ed imballaggi in base a quanto indicato dalle norme in vigore
a livello locale.
37
Page 38

Indicazioni di sicurezza
Temperatura e ambiente circostante
La segreteria telefonica è concepita per il funzionamento in ambienti protetti con una temperatura
compresa tra 10 °C e 30 °C. Si consiglia di evitare l’uso della segreteria telefonica in ambienti esposti a umidità come bagno o locali di lavaggio. Evitare inoltre la vicinanza a fonti di calore come termosifoni ed evitare un’esposizione a fumo, polvere, vibrazioni, sostanze chimiche, umidità, calore e
raggi solari diretti.
Pulizia e cura
Pulire le superfici della custodia con un panno asciutto, morbido e antipilling. Non utilizzare mai detergenti o solventi aggressivi. Al di là di una pulizia di tanto in tanto della custodia esterna, non sono
necessari ulteriori interventi di pulizia e cura. I piedini in gomma della segreteria telefonica non sono
resistenti a qualsiasi detergente. Il costruttore non risponde di eventuali danni a mobili o simili.
38
Page 39

2 Elementi di comando
1. Interruttore di selezione lingua GER/FRE
2. Interruttore ricezione di chiamata
3. Adattatore di connessione alla rete
4. Adattatore di connessione al cavo telefonico
5. Segnalazione LED per nuove chiamate ricevute
6. Tasti di selezione dell’elenco chiamate (CLIP)
7. Volume (più alto)
8. Avanti / Verificare l’indicazione di data e ora
9. Cancellare messaggi
10. Menu
11. Volume (più basso)
12. Pausa / Riproduzione di messaggi / LED: ON/OFF, nuovi messaggi
13. Indietro / Registrazione dell’annuncio
14. ON / OFF / Stop
15. Registrare una chiamata in corso /
Registrare un promemoria
16. Microfono / Altoparlante
17. Cancellare elenco chiamate
18. Selezione diretta
Elementi di comando
3
421
5
6
18
17
16
15
13
7
8
9
10
111214
39
Page 40

Messa in funzione
3 Messa in funzione
Indicazioni di sicurezza
Leggere assolutamente prima della messa in funzione le indicazioni di sicurezza riportate
all’inizio delle presenti istruzioni per l’uso.
Verificare il contenuto della confezione
La confezione contiene:
una segreteria telefonica
un cavo di collegamento telefonico un manuale di istruzioni per l’uso
Inserire la batteria (non in dotazione)
Prima di collegare la segreteria telefonica alla rete telefonica, inserire una nuova batteria a blocco
alcalina da 9V. In caso di caduta di tensione si rende necessaria una batteria al fine di memorizzare i
dati per ca. 24 ore.
Non appena sul display appare l’indicazione \, la batteria è scarica e dovrà essere sosti-
tuita. Assicurarsi che la segreteria telefonica non sia collegata con la rete telefonica.
1. Aprire con l’ausilio di un piccolo cacciavite il vano batterie presente sul lato inferiore.
2. Collegare quindi la presa elettrica della batteria con la batteria e inserire questa nel rispettivo
vano.
3. Chiudere infine il vano batterie.
Collegare il cavo telefonico e l’alimentatore di rete
1. Inserire il connettore piccolo dell’alimentatore di rete nella rispettiva presa presente sul tergo
della segreteria telefonica.
2. Inserire il connettore piccolo del cavo di collegamento telefonico nella rispettiva presa presente
sul tergo della segreteria telefonica.
3. Inserire l’alimentatore di rete in una presa elettrica da 230 Volt installata in conformità alle
disposizioni.
4. Collegare il cavo di collegamento con la presa telefonica.
In sede di prima accensione, la nuova segreteria telefonica richiede ca. 20 secondi per in-
izializzare tutte le funzioni. Una volta conclusa la prima inizializzazione, sul display appare
il messaggio LCD KONTRAST.
Impostare la lingua
Sul retro delle segreteria telefonica si trova un interruttore a scorrimento (FRE/GER). L’interruttore a
scorrimento consente di impostare la lingua desiderara (francese o tedesco).
un alimentatore di rete
40
Page 41

Messa in funzione
Compiere le impostazioni di base
Prima di mettere in funzione la segreteria telefonica si rende necessario compiere alcune impostazioni di base. Queste riguardano l’immissione di data, ora, prefisso locale e prefisso internazionale
attuali.
In caso di mancata visualizzazione dell’indicazione LCD KONTRAST sul display o volendo correggere l’ora, premere per 4 secondi il tasto .
1. Confermare l’indicazione LCD KONTRAST con il tasto c. Sul display viene visualizzata
l’impostazione attuale del contrasto.
2. Con i tasti di selezione e è possibile modificare il contrasto. Confermare
l’impostazione con c. Sul display appare TAG EINSTELLEN.
3. Confermare con c. Sul display appare il giorno della settimana attualmente impostato.
4. Premendo il tasto di selezione o si ha modo di impostare il giorno della settimana
attuale.
5. Confermare con c. Sul display appare il messaggio ZEIT EINSTELLEN.
6. Confermare con c. Sul display lampeggia l’indicazione delle ore.
7. Premendo il tasto di selezione o si ha modo di impostare l’ora esatta.
8. Confermare con c. Sul display lampeggia l’indicazione dei minuti.
9. Premendo il tasto di selezione o si ha modo di impostare i minuti esatti.
10. Confermare con c. Sul display appare il messaggio DATUM EINSTELLEN.
11. Confermare con c. Sul display lampeggia l’indicazione del giorno.
12. Premendo il tasto di selezione o si ha modo di impostare il giorno corrente.
13. Confermare con c. Sul display lampeggia l’indicazione del mese.
14. Premendo il tasto di selezione o si ha modo di impostare il mese.
15. Confermare con c. Sul display appare il messaggio ORTSVORWAHL.
16. Confermare con c. Il cursore lampeggia alla prima posizione. Premendo il tasto di selezione
o è possibile impostare la prima cifra del proprio prefisso locale.
17. Confermare con il tasto c ed il cursore lampeggia quindi alla seconda posizione.
18. Premendo il tasto di selezione o è possibile impostare la seconda cifra del proprio
prefisso locale.
19. Confermare con c ed inserire le rimanenti cifre secondo questo schema. In presenza di
numeri di prefisso corti, premere ripetutamente il tasto c fino a quando il messaggio
LANDESVORWAHL è visualizzato sul display.
20. Confermare con il tasto c. Il cursore lampeggia alla prima posizione.
21. Immettere il prefisso internazionale "0049" per intero seguendo lo stesso schema utilizzato per
l’immissione del prefisso locale.
22. Confermare con il tasto c.
A questo punto l’immissione è conclusa. I dati attuali sono visualizzati sul display.
41
Page 42

Messa in funzione
Se si desiderano modificare le impostazioni di base, tenere premuto il tasto
fino a quando sul display è visualizzata l’indicazione LCD KONTRAST. Con i
tasti di selezione e ci si sposta all’interno del menu. Con il tasto c è
possibile selezionare il punto di menu desiderato.
In presenza di batteria completamente scarica, si rende necessario reinserire di
nuovo le impostazioni di base.
Per cancellare una cifra dal prefisso locale o internazionale, immettere con il tasto
di selezione o il segno meno (−).
Con il tasto è possibile uscire dal menu in qualsiasi momento.
In caso di mancata immissione per una durata di 30 secondi, la programmazione è
interrotta.
Premendo il tasto /CHECK si ha modo di riprodurre l’indicazione di data e ora.
42
Page 43

4 Esercizio
Utilizzare l’annuncio di saluto standard
In caso di mancata registrazione di un annuncio di saluto personale, la segreteria telefonica utilizza
un messaggio standard. La voce del saluto standard può essere maschile o femminile. È possibile
scegliere tra una voce maschile ed una femminile premendo brevemente per due volte consecutive
il tasto / REC.
Contenuto dell’annuncio di saluto standard: Bitte hinterlassen Sie Ihre Nachricht nach dem
Ton."
Registrare un annuncio di saluto
1. Tenere premuto il tasto / REC. Risuona un segnale acustico.
2. Sul display appare il messaggio ANSAGE AUFNEHMEN.
Il messaggio di saluto standard deve avere una lunghezza minima di 3 secondi e non super-
iore a 60 secondi. La durata dell’annuncio di saluto è sottratta alla durata di registrazione
massima disponibile. Se il proprio annuncio dura per es. 18 secondi, sulla segreteria rimangono a disposizione 49 minuti e 42 secondi per la memorizzazione di messaggi in arrivo.
3. Registrare l’annuncio di saluto personale attraverso il microfono.
Mantenere una distanza di ca. 15 cm.
4. Per concludere la registrazione, lasciare il tasto / REC.
5. L’annuncio di saluto è ripetuto automaticamente e sul display appare l’indicazione ANSAGE
ABSPIELEN. Il volume è regolabile premendo il tasto o .
Premendo brevemente il tasto / REC è possibile riprodurre l’annuncio di saluto in qualsiasi
momento.
Cancellare l’annuncio di saluto e fare ritorno all’annuncio di saluto standard
1. Premere il tasto / REC.
2. Premere il tasto durante la riproduzione dell’annuncio di saluto.
L’annuncio di saluto personale è quindi cancellato. All’arrivo della chiamata successiva, la segrete-
ria telefonica utilizzerà l’annuncio di saluto standard.
Impostare il numero di squilli
Sul retro della segreteria telefonica si trova un interruttore a scorrimento (2 6 TS). Con l’interruttore a
scorrimento è possibile impostare il numero di squilli dopo i quali la segreteria telefonica dovrà rispondere alla chiamata.
Posizione
2 La chiamata è risposta dopo soli due squilli.
6 La chiamata è risposta dopo sei squilli.
TS La prima chiamata è ricevuta dopo sei squilli e tutte le altre chiamate dopo due
squilli. Con questa posizione di interruttore è altresì possibile usufruire dell’interrogazione a distanza preliminare gratuita. Per maggiori dettagli si rimanda al capitolo
Interrogazione a distanza preliminare gratuita ".
Significato
Esercizio
43
Page 44

Esercizio
Impostare la lunghezza di chiamata
La durata di registrazione max. di una chiamata corrisponde a 60 secondi.
Se il chiamante parla oltre la durata impostata, si avverte un segnale acustico e la chiamata è interrotta. In presenza di una pausa in sede di registrazione di oltre sette secondi, la telefonata è conclusa automaticamente mediante segnale acustico.
Esercizio generale
Attivare/Disattivare
1. Premere il tasto /. La segreteria telefonica è attivata, il LED al di sopra del tasto
/ si accende.
2. Per disinserire premere di nuovo il tasto /.
Intercettazione di messaggi in arrivo
L’altoparlante integrato consente di intercettare chiamate in arrivo. Non volendo invece ascoltare
chiamate in arrivo, ridurre il volume premendo ripetutamente il tasto per la regolazione del volume
.
Interrompere la registrazione
Sollevando il ricevitore durante una registrazione in corso, la registrazione è interrotta con la possibilità di rispondere alla chiamata e parlare con il rispettivo interlocutore.
Riprodurre dei messaggi
Nel momento in cui il LED presente al di sopra del tasto / lampeggia, significa
che in fase di assenza sono stati registrati dei messaggi nuovi, delle notizie (promemoria)
o dei frammenti di telefonata.
1. Premere una volta il tasto /.
La segreteria telefonica riproduce i messaggi registrati. Il messaggio più recente è riprodotto per
primo.
Se il LED non lampeggia, i messaggi presenti sono riprodotti.
2. Per interrompere la riproduzione di messaggi, premere il tasto /.
3. Premendo il tasto / una seconda volta la riproduzione del messaggio è proseguita.
4. Premere il tasto / per concludere la riproduzione dei messaggi.
Alla fine della riproduzione dell’ultimo messaggio, dall’apparecchio risuonano due segnali acustici.
Ripetere il messaggio attuale
Premere il tasto /REC per ripetere la riproduzione del messaggio in corso.
Ripetere il messaggio precedente
Premere il tasto /REC fino ad avvertire un segnale acustico. Il messaggio precedente è ripetuto.
Saltare un messaggio
Premere una volta il tasto /CHECK per saltare il messaggio in corso di riproduzione. La segreteria telefonica riproduce il messaggio successivo.
Saltare più messaggi
Premere ripetutamente e consecutivamente il tasto /SET.
44
Page 45

Cancellare singoli messaggi
Premere il tasto durante la riproduzione del messaggio da cancellare.
Cancellare tutti i messaggi
Dopo la riproduzione di tutti i messaggi, tenere premuto il tasto fino ad avvertire un segnale
acustico.
Registrare una notizia (promemoria)
La funzione consente di registrare una notizia per gli altri utenti della segreteria telefonica.
1. Tenere premuto il tasto .
2. Sul display appare l’indicazione AUFNAHME MEMO.
3. Dopo il segnale acustico è possibile iniziare la registrazione della notizia.
Per es. "Ciao Alan, il tuo pasto è in frigorifero. Buon Appetito."
4. Per concludere la registrazione, lasciare il tasto .
5. Sul display viene visualizzata l’indicazione MEMO.
Il messaggio è riprodotto dalla segreteria telefonica premendo il tasto / o presso un qual-
siasi altro telefono mediante interrogazione a distanza.
Registrare chiamate telefoniche
È possibile registrare la conversazione di entrambi i partner di chiamata.
Se la segreteria telefonica si trovasse a svolgere un’altra funzione, premere prima di proce-
dere alla registrazione il tasto /.
1. Sollevare il ricevitore per accettare la chiamata.
2. Premere il tasto durante la chiamata.
3. Sul display appare MITSCHNEIDEN.
La segreteria telefonica risponde alla chiamata registrandola.
4. Premere di nuovo il tasto per concludere la registrazione.
Premere il tasto / per riprodurre la chiamata precedentemente registrata.
Esercizio
45
Page 46

Elenco chiamate (CLIP)
5 Elenco chiamate (CLIP)
Grazie alla funzione di visualizzazione del numero di chiamata è possibile individuare sul display il
chiamante in caso di telefonata in arrivo. Per poter usufruire di tale funzione è necessario che il proprio allacciamento telefonico sia abilitato al servizio.
Se sul display appare l’indicazione KEINE NUMMER, il numero di chiamata è stato ricevuto solo in
parte o in maniera errata.
Se sul display appare l’indicazione NICHT VERFÜGBAR, l’informazione non è disponibile per il numero di chiamata in questione. Si potrebbe anche trattare di una chiamata internazionale.
Se sul display appare l’indicazione PRIVAT, il chiamante ha soppresso la trasmissione del proprio
numero di chiamata oppure non è stato possibile trasmettere il numero.
In caso di assenza nell’elenco chiamate sono memorizzate fino a 99 chiamate con informazioni riguardo data e ora. Non appena l’elenco chiamate è pieno, si procede a cancellare ovvero a sovrascrivere la chiamata più remota.
Se l’apparecchio registra delle chiamate durante la propria assenza, il display indica il numero di
chiamate memorizzate (per es. NEU 02) ed il LED lampeggia. E’ inoltre visualizzato il numero complessivo dei numeri di chiamata memorizzati nell’elenco chiamate (per es. ANRUFE 06). Il display
non indica invece il numero di messaggi registrati.
La visualizzazione del numero di chiamata è un servizio opzionale offerto dal proprio ge-
store di rete telefonica. In mancanza di disponibilità di tale servizio, le chiamate in arrivo non
sono visualizzate sul display. Per ulteriori informazioni si prega di rivolgersi al proprio gestore di rete telefonica.
Visualizzare l’elenco chiamate
Premendo il tasto accanto al display sono visualizzati numeri di chiamata più recenti. Una volta raggiunta l’ultima posizione di memoria dell’elenco chiamate, sul display appare l’indicazione "Ende
der Liste". Con i tasti di selezione e si scorre nell’elenco chiamate. Le seguenti infor-
mazioni sono visualizzate sul display.
46
1 2
PRIVATO
3
4
5
Page 47

Elenco chiamate (CLIP)
1 In presenza dell’indicazione NEW la chiamata selezionata non è stata ancora controllata.
2 Ora e data della chiamata.
3 Sul display appare alla voce CALL # il numero della posizione di memoria selezionata.
4 Numero telefonico del chiamante (se disponibile).
5 Indicazione di PRIVAT o NICHT VERFUEGBAR se non è possibile visualizzare il numero di
chiamata.
Non premendo alcun tasto per 30 secondi, il display indica di nuovo l’ora attuale, oltre alla data, al
numero di chiamate memorizzate nell’elenco chiamate ed i numeri di chiamata nuovi.
Selezionare un numero telefonico dall’elenco chiamate
È possibile selezionare dei numeri telefonici dall’elenco chiamate e avviare un collegamento per
mezzo del telefono collegato in parallelo.
1. Selezionare con il tasto di selezione o il numero di chiamata desiderato.
2. Premere il tasto c. Sul display viene indicato "WAEHLEN" e "HOERER ABNEHMEN".
3. Sollevare il ricevitore del telefono collegato parallelamente.
Cancellare un numero telefonico dall’elenco chiamate
1. Selezionare con il tasto di selezione o il numero di chiamata da cancellare.
2. Premere il tasto . Sul display viene indicato "LOESCHEN?".
3. Tenere premuto il tasto fino a quando sul display appare l’indicazione "GELOESCHT".
Cancellare l’elenco chiamate completo
1. Selezionare con il tasto di selezione o un numero di chiamata qualsiasi.
2. Tenere premuto il tasto fino a quando sul display appare l’indicazione "ALLES
LOESCHEN?". Rilasciare il tasto .
3. Premere quindi subito dopo di nuovo il tasto fino a quando sul display appare
l’indicazione "ALLES GELOESCHT.
Sono cancellati solo i messaggi già riprodotti mentre i messaggi non ancora ascoltati pos-
sono essere riprodotti anche successivamente.
47
Page 48

Interrogazione a distanza
6 Interrogazione a distanza
L’interrogazione a distanza consente di chiamare la propria segreteria telefonica da un telefono
qualsiasi con procedura di selezione a toni per ascoltare eventuali messaggi e compiere altre funzioni.
Codice di accesso per l’interrogazione a distanza
La segreteria telefonica possiede un codice di autorizzazione personale (codice di interrogazione a
distanza) in modo da poter ascoltare messaggi nuovi tramite interrogazione a distanza. Il CODICE
DI INTERROGAZIONE A DISTANZA" è un numero composto da tre cifre ed è riportato sul lato inferiore del proprio apparecchio.
Interrogazione a distanza preliminare gratuita
Con la funzione di interrogazione a distanza preliminare gratuita è possibile verificare se sulla propria segreteria telefonica si trovano dei messaggi.
Sul retro delle segreteria telefonica si trova un interruttore a scorrimento (2 6 TS). Spostare l’interruttore a scorrimento in posizione "TS". Chiamando l’apparecchio da un telefono esterno, la segreteria
telefonica risponde come segue:
In presenza di nuovi messaggi sulla segreteria telefonica, l’apparecchio risponde alla chiamata
già al secondo squillo.
Senza alcun nuovo messaggio sulla segreteria telefonica, l’apparecchio non risponde invece
alla chiamata al secondo squillo.
Agganciare quindi il ricevitore del telefono al terzo squillo. Dato che la segreteria telefonica
risponde solo dopo il sesto squillo, non si verifica alcun addebito.
Possibilità di interrogazione a distanza
1. Chiamare il proprio numero telefonico, attendere fino a quando l’apparecchio risponde alla
chiamata.
2. Mentre si sente l’annuncio di saluto, immettere le tre cifre del codice di interrogazione a distanza
con i tasti del telefono.
3. L’immissione del codice di interrogazione a distanza corretto è confermato da due segnali
acustici.
4. Selezionare una funzione premendo una delle combinazioni di tasti riportate qui di seguito.
Per concludere l’interrogazione a distanza è sufficiente agganciare il ricevitore del telefono.
In caso di pausa tra le funzioni superiore a dieci secondi, il collegamento è interrotto automaticamente.
48
Riprodurre messaggi nuovi Premere la sequenza di tasti 1" e #"
Riprodurre tutti i messaggi registrati Premere la sequenza di tasti 2" e #"
Cancellare il messaggio in corso Premere la sequenza di tasti 3" e #"
Ripetere il messaggio precedente Premere la sequenza di tasti 4" e #"
Stop/Concludere la riproduzione Premere la sequenza di tasti 5" e #"
Page 49

Interrogazione a distanza
Saltare il messaggio attuale Premere la sequenza di tasti 6" e #"
Attivare o disattivare la segreteria telefonica *1) Premere la sequenza di tasti 7" e #"
Registrare un nuovo annuncio
Concludere la registrazione
Registrare una notizia (promemoria)
Concludere la registrazione
Monitoraggio del locale *2)
Concludere la registrazione
Volendo invece cancellare tutti i messaggi, premere il tasto 3 e # dopo aver riprodotto l’ul-
timo messaggio.
*1) Con segreteria telefonica disattivata è necessario compiere ca. 10 squilli fino a ottenere l’inserimento della modalità di comando a distanza.
*2) L’apparecchio consente di controllare temporaneamente il locale in cui si trova posizionata la segreteria telefonica (controllo bebè). Ogni 30 secondi si avvertono due segnali acustici. Volendo proseguire il controllo, premere i tasti 0 e # entro 10 secondi. Altrimenti il collegamento è interrotto automaticamente.
Con memoria piena
Con memoria piena la segreteria telefonica non accetta ulteriori registrazioni.
Procedere in tal caso come segue:
1. Comporre il proprio numero. La segreteria telefonica squilla 10 volte, dopodiché si sente
l’indicazione SPEICHER VOLL".
2. Inserire servendosi dei tasti del telefono il codice per l’interrogazione a distanza. Due segnali
acustici indicano che il codice inserito è corretto.
3. Innanzitutto sono riprodotti i propri messaggi. Dopodiché si ha modo di cancellare alcuni o tutti i
messaggi.
Premere la sequenza di tasti 8" e #"
Premere la sequenza di tasti 5" e #"
Premere la sequenza di tasti 9" e #"
Premere la sequenza di tasti 5" e #"
Premere la sequenza di tasti 0" e #"
Premere la sequenza di tasti 5" e #"
49
Page 50

Informazioni importanti
7 Informazioni importanti
Ricerca di errori
In presenza di problemi con la segreteria telefonica, si prega di verificare innanzitutto quanto riportato nelle seguenti indicazioni. Rivolgersi in caso di reclami entro il periodo di garanzia al rivenditore
autorizzato.
Il periodo di garanzia ricopre 2 anni.
Non è possibile attivare la segreteria telefonica
Controllare se l’adattatore di corrente è inserito correttamente nella presa. Controllare se la presa è
rifornita di corrente elettrica.
Sul display lampeggia il simbolo \
La batteria è scarica e dovrà essere sostituita. L’annuncio personale, tutti i messaggi registrati e l’indicazione di data e orario sono cancellati in caso di caduta di tensione.
Non è possibile registrare dei messaggi
Controllare se il cavo del telefono è inserito correttamente nella presa telefonica.
Cancellare dei messaggi per disporre nuovamente di spazio memoria.
Garanzia
Gli apparecchi SWITEL sono costruiti e collaudati in osservanza dei processi di produzione più moderni. L’impiego di materiali selezionati e tecnologie altamente sviluppate sono garanti di una perfetta funzionalità e lunga durata in vita. La garanzia non viene considerata esecutiva qualora la
causa del malfunzionamento dell’apparecchio è dovuta al gestore della rete telefonica oppure se
questa è da attribuirsi ad un impianto telefonico interno interposto. La garanzia non si estende alle
batterie standard o compatte ricaricabili utilizzate all’interno degli apparecchi. Il periodo di garanzia è
di 24 mesi a partire dalla data di acquisto.
Entro il periodo di garanzia si procederà all’eliminazione gratuita di tutti i guasti dovuti a difetti di materiale o produzione. Il diritto di garanzia cessa in caso di interventi da parte dell’acquirente o di terzi.
La presente garanzia non ricopre danni dovuti all’uso o all’esercizio non conformi a quanto previsto,
a montaggio o conservazione errati, a collegamento o installazione impropri così come a forza maggiore o a qualsiasi altro influsso esterno. Con riserva di apportare modifiche di miglioria, sostituire le
parti difettose oppure cambiare l’apparecchio completo in caso di reclami. Parti sostituite o apparecchi rimpiazzati divengono di nostra proprietà. Sono esclusi diritti di risarcimento per danni qualora
non siano dovuti a intenzione o colpa grave del costruttore.
Nel caso in cui il presente apparecchio dovesse ciò nonostante presentare un difetto durante il periodo di garanzia, si prega di rivolgersi esclusivamente al negozio di rivendita dell’apparecchio SWITEL assieme al relativo scontrino di acquisto. In base a quanto riportato nelle presenti disposizioni,
tutti i diritti di garanzia dovranno essere rivendicati nei confronti del rivenditore autorizzato. Decorso
il termine di due anni dalla data di acquisto e consegna dei nostri prodotti non sarà più possibile fare
valere alcun diritto di garanzia.
50
Page 51

Contents
1 Safety Information 53. . . . . . . . . . . . . . . . . . . . . . . . . . . . . . . . . . . . .
Intended use 53. . . . . . . . . . . . . . . . . . . . . . . . . . . . . . . . . . . . . . . . . . . . . . . . . . .
Battery 53. . . . . . . . . . . . . . . . . . . . . . . . . . . . . . . . . . . . . . . . . . . . . . . . . . . . . . .
Installation location 53. . . . . . . . . . . . . . . . . . . . . . . . . . . . . . . . . . . . . . . . . . . . . .
Power supply 53. . . . . . . . . . . . . . . . . . . . . . . . . . . . . . . . . . . . . . . . . . . . . . . . . . .
Information on disposal 53. . . . . . . . . . . . . . . . . . . . . . . . . . . . . . . . . . . . . . . . . . .
Temperature and ambient conditions 54. . . . . . . . . . . . . . . . . . . . . . . . . . . . . . . . . .
Cleaning and upkeep 54. . . . . . . . . . . . . . . . . . . . . . . . . . . . . . . . . . . . . . . . . . . . .
2 Operating Elements 55. . . . . . . . . . . . . . . . . . . . . . . . . . . . . . . . . . . .
3 Starting Up 56. . . . . . . . . . . . . . . . . . . . . . . . . . . . . . . . . . . . . . . . . .
Safety notes 56. . . . . . . . . . . . . . . . . . . . . . . . . . . . . . . . . . . . . . . . . . . . . . . . . . .
Checking the package contents 56. . . . . . . . . . . . . . . . . . . . . . . . . . . . . . . . . . . . . .
Inserting batteries (not included in material supplied) 56. . . . . . . . . . . . . . . . . . . . . .
Connecting the telephone line and power adapter plug 56. . . . . . . . . . . . . . . . . . . . .
Setting the language 56. . . . . . . . . . . . . . . . . . . . . . . . . . . . . . . . . . . . . . . . . . . . .
Defining the basic setting 57. . . . . . . . . . . . . . . . . . . . . . . . . . . . . . . . . . . . . . . . . .
4 Operation 59. . . . . . . . . . . . . . . . . . . . . . . . . . . . . . . . . . . . . . . . . . .
Using the default outgoing message 59. . . . . . . . . . . . . . . . . . . . . . . . . . . . . . . . . .
Recording an outgoing message 59. . . . . . . . . . . . . . . . . . . . . . . . . . . . . . . . . . . . .
Deleting your own outgoing message and reverting to the standard message 59. .
Setting the number of rings 59. . . . . . . . . . . . . . . . . . . . . . . . . . . . . . . . . . . . . . . . .
Setting the recording time 60. . . . . . . . . . . . . . . . . . . . . . . . . . . . . . . . . . . . . . . . . .
General operation 60. . . . . . . . . . . . . . . . . . . . . . . . . . . . . . . . . . . . . . . . . . . . . . .
Switching on/off 60. . . . . . . . . . . . . . . . . . . . . . . . . . . . . . . . . . . . . . . . . . . . . .
Listening−in to incoming messages 60. . . . . . . . . . . . . . . . . . . . . . . . . . . . . . . .
Interrupting a recording 60. . . . . . . . . . . . . . . . . . . . . . . . . . . . . . . . . . . . . . . . .
Playing back messages 60. . . . . . . . . . . . . . . . . . . . . . . . . . . . . . . . . . . . . . . . . . .
Repeat playback of current message 60. . . . . . . . . . . . . . . . . . . . . . . . . . . . . . .
Repeat playback of previous message 60. . . . . . . . . . . . . . . . . . . . . . . . . . . . . .
Skipping a message 60. . . . . . . . . . . . . . . . . . . . . . . . . . . . . . . . . . . . . . . . . . .
Skipping several messages 60. . . . . . . . . . . . . . . . . . . . . . . . . . . . . . . . . . . . . .
Deleting individual messages 61. . . . . . . . . . . . . . . . . . . . . . . . . . . . . . . . . . . .
Deleting all messages 61. . . . . . . . . . . . . . . . . . . . . . . . . . . . . . . . . . . . . . . . .
Recording a memo 61. . . . . . . . . . . . . . . . . . . . . . . . . . . . . . . . . . . . . . . . . . . . . . .
Recording a telephone call 61. . . . . . . . . . . . . . . . . . . . . . . . . . . . . . . . . . . . . . . . .
51
Page 52

Contents
5 Calls List (CLIP) 62. . . . . . . . . . . . . . . . . . . . . . . . . . . . . . . . . . . . . .
Viewing the calls list 62. . . . . . . . . . . . . . . . . . . . . . . . . . . . . . . . . . . . . . . . . . . . . .
Dialling a phone number from the calls list 63. . . . . . . . . . . . . . . . . . . . . . . . . . . . . .
Deleting a phone number from the calls list 63. . . . . . . . . . . . . . . . . . . . . . . . . . . . .
Deleting the entire calls list 63. . . . . . . . . . . . . . . . . . . . . . . . . . . . . . . . . . . . . . . . .
6 Remote Access 64. . . . . . . . . . . . . . . . . . . . . . . . . . . . . . . . . . . . . . .
Access code for remote access 64. . . . . . . . . . . . . . . . . . . . . . . . . . . . . . . . . . . . . .
Free of charge pre−remote access 64. . . . . . . . . . . . . . . . . . . . . . . . . . . . . . . . . . . .
Remote access options 64. . . . . . . . . . . . . . . . . . . . . . . . . . . . . . . . . . . . . . . . . . .
Insufficient memory capacity 65. . . . . . . . . . . . . . . . . . . . . . . . . . . . . . . . . . . . . . . .
7 Important Information 66. . . . . . . . . . . . . . . . . . . . . . . . . . . . . . . . . . .
Troubleshooting 66. . . . . . . . . . . . . . . . . . . . . . . . . . . . . . . . . . . . . . . . . . . . . . . . .
Guarantee 66. . . . . . . . . . . . . . . . . . . . . . . . . . . . . . . . . . . . . . . . . . . . . . . . . . . . .
52
Page 53

Safety Information
1 Safety Information
Please read this operating instruction manual thoroughly. Under no circumstances open the device
or complete any repair work yourself. In the case of claims under the terms of guarantee, contact
your sales outlet. We reserve the right to make technical and optical modifications to the product during the course of product improvement.
Intended use
This answering machine has been developed for use when connected to an analogue telephone
network connection (PSTN) within Germany. However, due to the different services offered by the
various telecommunication network providers, there is no guarantee that the equipment will function
trouble−free on every telecommunication terminal connection. Only connect the answering machine
connection cable to a telephone line socket designed for it. Never change the plug on the connection
cable.
Battery
Do not use rechargeable batteries or power packs. These could cause a short circuit. Only use a 9 V
compound battery as a replacement. Do not throw batteries into a fire or into water.
Installation location
The equipment must be set up in the vicinity of a 230 Volt mains power outlet.
Do not place the answering machine in the direct vicinity of other electronic equipment, such as mi-
crowave ovens or hi−fi systems, since they could cause mutual disturbance. Therefore, maintain a distance of at least one meter from other electronic equipment.
Place the answering machine on a level, non−slip surface. Normally, the footpads on the answering
machine do not leave any marks on the surface where it is located. However, due the diverse types
of paints and surfaces which come into question, it cannot be fully ruled out that the footpads will
leave marks on the surface on which it is located.
Power supply
Only use the SWITEL power adapter plug supplied because other power supplies could destroy the
answering machine. Do not open the power adapter plug. There is a risk of fatal injury if the power
adapter plug is opened and not disconnected from the power supply.
Information on disposal
The implementation of European law in national laws and directives obliges you to dispose of consumable goods appropriately. This serves to protect both persons and the environment.
The adjacent symbol indicates that electrical and electronic apparatus no
longer required must be disposed of separate from domestic waste.
Equipment which is old or has outlived its service life must be disposed
of at a suitable collection point provided by the public waste authorities.
Batteries and power packs must be disposed of at the point of sale or at the
appropriate collection points provided by the public waste authorities.
Packaging materials must be disposed of according to local regulations.
53
Page 54

Safety Information
Temperature and ambient conditions
The answering machine is designed for use in protected rooms with a temperature range from
10 °C to 30 °C. The answering machine should not be used in rooms exposed to moisture, such as
bathrooms or laundries. Prevent close proximity to sources of heat, such as radiators, as well as negative influences such as exposure to smoke, dust, vibration, chemicals, moisture, heat or direct
sunlight.
Cleaning and upkeep
Clean the housing surfaces with a soft, dry, fluff−free cloth. Never use cleaning agents or aggressive
solvents. Apart from occasionally cleaning the housing, no other upkeep is necessary. The rubber
footpads on the answering machine are not resistant to all cleaning agents. The manufacturer is not
liable for any claims for damage to furniture or such.
54
Page 55

2 Operating Elements
1. Language selection switch GER/FRE
2. Take call switch
3. Power adapter plug connection socket
4. Telephone line jack
5. LED indicating new calls available
6. Calls list selection button (CLIP)
7. Volume (louder)
8. Forward / Checking day and time announcement
9. Delete message, memos and outgoing messages
10. Menu
11. Volume (quieter)
12. Pause / Playback messages / Control lamp: on/off, new messages
13. Back / Record outgoing message
14. On/Off / Stop
15. Record memos and telephone calls
16. Microphone / Speaker
17. Delete calls list
18. Direct dialling
Operating Elements
3
421
5
6
18
17
16
15
13
7
8
9
10
111214
55
Page 56

Starting Up
3 Starting Up
Safety notes
It is essential to read the Safety Information at the beginning of this manual before starting
up.
Checking the package contents
The package contains:
an answering machine a power adapter plug
a telephone connection cable an operating manual
Inserting batteries (not included in material supplied)
Before connecting the answering machine to the telephone network, insert a new 9 V battery. In the
event of a power failure, the battery will ensure data is retained for approx. 24 hours.
As soon as the \ icon appears in the display, the battery is empty and must be replaced.
Pay attention that the answering machine is not connected to the telephone network at this point.
1. Use a small screwdriver to open the battery compartment on the underside.
2. Connect the battery plug to the battery and insert the battery in the battery compartment.
3. Close the battery compartment cover.
Connecting the telephone line and power adapter plug
1. Insert the small plug on the power adapter plug cable in the corresponding socket on the rear
side of the answering machine.
2. Insert the small plug on the telephone connection cable in the corresponding socket on the rear
side of the answering machine.
3. Plug the power adapter plug in a properly installed 230 Volt power outlet.
4. Connect the telephone connection cable supplied in the telephone line jack.
When switched on for the first time, the new answering machine requires approx. 20 se-
conds to initialize all the functions. After the first initialization, the message LCD KON-
TRAST appears in the display.
Setting the language
There is a sliding switch (FRE/GER) on the rear side of the answering machine. You can choose the
desired language (French or German) by using this switch.
56
Page 57

Defining the basic setting
Before putting the answering machine into operation, certain basic settings must be defined. This
includes entering the current date, time, local access code and international dialling code for Germany.
If the message LCD KONTRAST does not appear in the display or you want to correct the time,
press the button for 4 seconds.
1. Confirm the LCD KONTRAST display by pressing the c button. The current contrast setting
appears in the display.
2. Change the contrast using the selection buttons . Confirm the setting by pressing
c. TAG EINSTELLEN appears in the display.
3. Confirm by pressing c. The currently set weekday appears in the display.
4. Set the weekday required by pressing selection button or .
5. Confirm by pressing c. The message ZEIT EINSTELLEN appears in the display.
6. Confirm by pressing c. The hour indicator flashes in the display.
7. Set the hour required by pressing selection button or .
8. Confirm by pressing c. The minute indicator flashes in the display.
9. Set the minute required by pressing selection button or .
10. Confirm by pressing c. The message DATUM EINSTELLEN appears in the display.
11. Confirm by pressing c. The day indicator flashes in the display.
12. Set the day required by pressing selection button or .
13. Confirm by pressing c. The month indicator flashes in the display.
14. Set the month required by pressing selection button or .
15. Confirm by pressing c. The message ORTSVORWAHL appears in the display.
16. Confirm by pressing c. The cursor flashes at the first position.
Press the selection button or to set the first number of your local access code.
17. Confirm by pressing the c button and the cursor flashes at the second position.
18. Press the selection button or to set the second number of your local access code.
19. Confirm by pressing c and proceed in the same way to complete the number. In the case of
short access codes, press the c
LANDESVORWAHL appears in the display.
20. Confirm by pressing c. The cursor flashes at the first position.
21. Enter the international dialling code 0049" in the same way as for the local access code.
22. Confirm by pressing c.
Input is now completed. The current data appears in the display.
button several times on completion until the message
Starting Up
57
Page 58

Starting Up
If you ever want to change the basic settings, start Programming mode by pressing
the button for 4 seconds. Use the selection buttons and to
navigate in the menu. Press the c button to select the respective menu option.
If the battery becomes fully discharged, the basic settings must be entered again.
To delete a digit from the local access or international dialling code, use the
selection button or set a minus sign (−).
Press the button to exit from the menu at any time.
If there is no input for a period of 30 seconds, programming is automatically
cancelled.
Press the /CHECK button to check the day and time announcement.
58
Page 59

4 Operation
Using the default outgoing message
If you have not recorded an outgoing message, the answering machine automatically plays the default outgoing message. The default message can have a male or female voice. To select between a
male and female voice, press the /REC button twice in short succession.
Wording of the default outgoing message: Bitte hinterlassen Sie Ihre Nachricht nach dem Ton."
Recording an outgoing message
1. Press and hold the /REC button. An acoustic signal is issued.
2. The message ANSAGE AUFNEHMEN appears in the display.
The outgoing message must be at least 3 seconds long and not longer than 60 seconds.
The length of the outgoing message is deducted from the maximum recording time. When
your outgoing message is 18 seconds, for example, then 49 minutes and 42 seconds remain
for incoming messages.
3. Speak your outgoing message into the microphone.
Keep a distance of about 15 cm from it.
4. To end recording, simply release the /REC button.
5. The outgoing message is automatically played back and the message ANSAGE ABSPIELEN
appears in the display. The volume can be adjusted by pressing the two arrow keys and
.
You can play back your outgoing message at any time by pressing the /REC button briefly.
Deleting your own outgoing message and reverting to the standard message
1. Press the /REC button.
2. Press the button while the outgoing message is being played back.
Your outgoing message is deleted. The next time a call is received, the answering machine plays the
default outgoing message.
Setting the number of rings
On the rear side of the answering machine is a sliding switch (2 6 TS). Set the sliding switch to the
number of times the answering machine should ring before it takes a call.
Position
2 The call is taken after two rings.
6 The call is taken after six rings.
TS The first call is taken after six rings and all the other calls after two rings. This switch
position can be used to implement the toll−saving remote access function. Details are
provided in the Chapter Free of charge pre−remote access".
Significance
Operation
59
Page 60

Operation
Setting the recording time
The length of time for a recorded message is 60 seconds.
If the caller speaks for a longer period, an acoustic signal is issued and the call is disconnected. If
there is a pause in excess of seven seconds during recording, the call is automatically ended, accompanied by an acoustic signal.
General operation
Switching on/off
1. Press the / button. The answering machine is switched on, the LED above the
/ button lights up.
2. Press the / button again to switch the answering machine off.
Listening−in to incoming messages
The integrated loudspeaker enables you to listen to messages as they are being recorded. If you do
not want to listen−in to incoming calls, reduce the volume by pressing the Volume button as often as necessary.
Interrupting a recording
If you lift the receiver while an incoming message is being recorded, recording is stopped and you
can talk to the caller.
Playing back messages
When the LED above the / button is flashing, it means that new messages, memos or
call extracts have been recorded in your absence.
1. Press the / button once.
The answering machine plays the recorded messages. The new message recorded is played
back first.
If the LED is not flashing, all recorded messages that you have not yet deleted will be played
back. If no messages have been saved, you will hear several beep tones.
2. To interrupt playback of the messages, press the / button.
3. Press the / button again to resume playback of the messages.
4. To stop playback of the messages, press the / button.
After the last message has been played back, two acoustic signals are issued.
Repeat playback of current message
Press the /REC button to repeat playback of the current message.
Repeat playback of previous message
Press the /REC button until an acoustic signal is issued. The previous message is played back
again.
Skipping a message
Press the /CHECK button once to skip the message currently being played. The answering
machine plays the next message.
Skipping several messages
Press the /CHECK button several times in succession.
60
Page 61

Deleting individual messages
Press the button while the message to be deleted is being played.
Deleting all messages
After all messages have been played, press and hold the button until an acoustic signal is
issued.
Recording a memo
You can leave a memo for other answering machine users.
1. Press and hold the button.
2. The message AUFNAHME MEMO appears in the display.
3. Start to record your memo after the acoustic signal.
E. g. Hello Alan, the files you need are in my drawer. You can copy them if you want."
4. To end recording, simply release the button.
5. MEMO appears in the display.
The message can be played by pressing the / button of the answering machine or via the
remote access function using a foreign telephone.
Recording a telephone call
You can record a complete conversation, namely what both you and the caller say.
If any other answering machine function is in progress, press the / button before
beginning to record a call.
1. Lift the handset and take the call.
2. Press the button during the call.
3. MITSCHNEIDEN appears in the display.
The answering machine then records the telephone call.
4. Press the button again to end recording.
Press the / button to play back the call recorded.
Operation
61
Page 62

Calls List (CLIP)
5 Calls List (CLIP)
The call number display, which appears when a call is received, enables you recognise who is calling before actually taking the call. A condition for this is that the function is available on your telephone line.
If the message KEINE NUMMER appears in the display, the call number was only partially or incorrectly received.
If the message NICHT VERFÜGBAR appears in the display, call number information is not availa-
ble. This could signify an international call.
If the message PRIVAT appears in the display, the caller has suppressed the transmission of his
phone number or the number could not be transmitted.
During your absence, up to 99 calls can be stored in the calls list together with date and time. When
the calls list is full, the oldest entry is automatically deleted.
If new calls are registered during your absence, the display indicates the number of newly stored
phone numbers (e.g. NEU 02) and the LED flashes. In addition, the total number of phone numbers
in the calls list is also displayed (e.g. ANRUFE 06). The display does not indicate the number of recorded messages.
The caller number display function is an optional service offered by telephone network provi-
ders. If this service is not offered, the incoming calls are not displayed. Please contact your
telephone network provider for more details.
Viewing the calls list
Press the button beside the display to view the latest phone numbers. On reaching the last
memory location in the calls list, the message Ende der Liste" appears. Use the selection buttons
and to scroll through the calls list. The following information appears in the display.
62
1 2
PRIVAT
1 If the message NEW appears, the phone number selected has not been viewed before.
2 Time and date of call.
3 The number of the memory location selected appears in the display under CALL #.
4 Phone number of the caller (if available).
5 Messages PRIVAT or NICHT VERFÜGBAR if the phone number cannot be displayed.
3
4
5
Page 63

Calls List (CLIP)
If no button is pressed for 30 seconds, the current time, date, number of phone numbers in the calls
list and number of newly registered phone numbers return to the display.
Dialling a phone number from the calls list
Phone numbers can be selected from the calls list and dialled by the connected telephone.
1. Use the selection button or to select the required phone number.
2. Press the c button. The display will show WAEHLEN" andHOERER ABNEHMEN".
3. Lift the receiver of the telephone connected.
Deleting a phone number from the calls list
1. Use the selection button or to select the phone number to be deleted.
2. Press the button. LOESCHEN?" appears in the display.
3. Keep the button pressed until the message GELOESCHT" appears in the display.
Deleting the entire calls list
1. Use the selection button or to select any phone number.
2. Press and hold the button until the message ALLES LOESCHEN?" appears in the
display. Release the button.
3. Immediately press and hold the button again until the message ALLES GELOESCHT
appears in the display.
If you have not screened all calls, the screened calls will be deleted only.
63
Page 64

Remote Access
6 Remote Access
Remote access enables the answering machine to be contacted from any telephone which uses
tone dialling in order to listen to messages received and execute other functions.
Access code for remote access
The answering machine is provided with a personal identification number (remote access code) so
only you can listen to incoming messages via the remote access feature. The FERNABFRAGE
CODE" (remote access code) is a three−digit number and is located on the underside of the unit.
Free of charge pre−remote access
The toll−saving pre−remote access feature can be used to check whether messages have been received on your answering machine from a distant telephone.
On the rear side of the answering machine is a sliding switch (2 6 TS). Set the sliding switch to TS".
On contacting your answering machine from an external telephone, the answering machine responds as follows:
If your call is taken after 2 rings, there are new messages on the answering machine.
If there are no new messages on the answering machine, your call is not taken after two rings.
Replace the receiver after the third ring. Since the answering machine is activated after the sixth
ring, no charge will be made for the call.
Remote access options
1. Call your own phone number and wait for the answering machine to take the call.
2. While the outgoing message is being played, enter the three−digit remote access code using the
dialling keys on the phone.
3. Entry of the correct code is confirmed by two acoustic signals.
4. Press one of the key combinations below to select the respective function.
Replace the receiver to end the remote access function.
If there is a pause in excess of 10 seconds between function selections, the line is automatically disconnected.
Play newly recorded messages
Play all recorded messages Press key sequence 2" and #"
Delete current message Press key sequence 3" and #"
Repeat playback of previous message Press key sequence 4" and #"
Stop/End playback Press key sequence 5" and #"
Skip current message Press key sequence 6" and #"
Switch answering machine on or off *1) Press key sequence 7" and #"
Record new outgoing message
End recording
Press key sequence 1" and #"
Press key sequence 8" and #"
Press key sequence 5" and #"
64
Page 65

Remote Access
Record memo
End recording
Room monitoring *2)
End room monitoring
If you want to delete all messages, please press 3 and # after the last message has been
played.
*1) If answering machine is switched off, you have to let it ring approx 10 times until remote mode is
activated.
*2) You can monitor the room where the answering machine is located temporarily (Baby monitoring). Every 30 seconds you will hear two beep tones. If you want to continue listening, press the 0
and # button again within 10 seconds, otherwise the connection will be automatically terminated.
Press key sequence 9" and #"
Press key sequence 5" and #"
Press key sequence 0" and #"
Press key sequence 5" and #"
Insufficient memory capacity
If there is no memory left for new messages, the answering machine will no longer accept calls.
1. Call your number and let it ring 10 times. You will hear an announcement of SPEICHER
VOLL".
2. Enter your remote access code. You will hear two beep tones in confirmation and you now have
the possibility of recreating more memory space by deleting messages.
3. To do this, first listen to the messages and then delete individual messages or all messages.
65
Page 66

Important Information
7 Important Information
Troubleshooting
Should problems arise with the answering machine, refer to the following information. In the case of
claims under the terms of guarantee, contact your sales outlet.
There is a 2 year period of guarantee.
Answering machine cannot be switched on
Check that the power adapter plug is fitted properly in the mains socket. Check that power is available at the mains socket.
The \ icon flashes in the display
The battery is empty and must be replaced. Your outgoing message, all recorded messages and the
day and time announcement are deleted in the event of a power failure.
No messages are recorded
Check that the telephone line is properly connected in the telephone line socket.
Delete messages to create memory space.
Guarantee
SWITEL equipment is produced and tested according to the latest production methods. The implementation of carefully chosen materials and highly developed technologies ensure trouble−free functioning and a long service life. The terms of guarantee do not apply where the cause of equipment
malfunction is the fault of the telephone network operator or any interposed private branch extension
system. The terms of guarantee do not apply to the standard batteries or power packs used in the
products. The period of guarantee is 24 months from the date of purchase.
All deficiencies resulting from material or production faults which occur during the period of guarantee will be eliminated free of charge. Rights to claims under the terms of guarantee are annulled following intervention by the purchaser or third parties. Damage caused as a result of improper handling or operation, incorrect positioning or storing, improper connection or installation, Acts of God or
other external influence are not covered by the terms of guarantee. In the case of complaints, we reserve the right to repair or replace defect parts or provide a replacement device. Replacement parts
or devices become our property. Rights to compensation in the case of damage are excluded where
there is no evidence of intent or gross negligence by the manufacturer.
If your device shows signs of defect during the period of guarantee, please return it to the sales outlet in which you purchased the SWITEL device together with the purchase receipt. All rights to claims
under the terms of guarantee in accordance with this agreement must be asserted exclusively with
regard to your sales outlet. Two years after the purchase and transfer of our products, claims under
the terms of guarantee can no longer be asserted.
66
Page 67

Declaration of conformity
WE TELGO AG
OF Route d’Englisberg 11
CH−1763 Granges−Paccot
Declare under our own responsibility that the product
MODEL: TAF80
DESCRIPTION: Digital Answering Machine
Is in conformity with directives: R&TTE Directive (1999/5/EC)
COMPLIANCE IS ACHIEVED BY CONFORMITY TO THE FOLLOWING:
EN 550 22: 1998+A1+2, EN 61000−3−2: 2000+2, EN 61000−3−3: 1995+A1, EN 55024: 1998+A1+2,
EN 60950−1: 2001, TBR 21: 1998
TEST REPORT NUMBER:
EN60950−ET0607509, EMC−0610974, TBR−0607512S1
AUTHORISED BY:
Signed:
Name (printed): Selim Dusi
Position in company: Managing Director
Date of issue: 08.06.2006
Copies of this document will be held on file for a period of 10 years after the last production.
Supplier: TELGO AG, Route d’Englisberg 11
Product: TAF80
This product is intended for connection to analogue PSTN lines within Switzerland.
However, due to differences between the individual PSTNs provided in the different countries, the approval
does not, of itself, give an unconditional assurance of successful operation on every PSTN network termination point.
________________________
CH−1763 Granges−Paccot
4
Version 1.1 − 08.09.2006
 Loading...