

Page 1

Telefon
Téléphone
Telefono
Bedienungsanleitung
Mode d’emploi
Istruzioni per l'uso
Operating Instructions
T9
Page 2

T9
Bedienungsanleitung _______________ 1
Mode d’emploi ___________________ 11
Istruzioni per l'uso_________________ 19
Operating instructions _____________ 27
Declaration of Conformity __________ 35
Page 3

- Inhaltsverzeichnis -
3
1 Allgemeine Hinweise .....................4
2 Bedienelemente...........................5
3 Inbetriebnahme ...........................6
3.1 Sicherheitshinweise.........................6
3.2 Verpackungsinhalt prüfen..................6
3.3 Telefon anschliessen .......................6
3.4 Wandmontage ...............................6
4 Bedienung .................................8
4.1 Telefonieren..................................8
4.2 Wahlwiederholung ..........................8
4.3 Mikrofon stummschalten ...................9
4.4 Einstellbare Ruftonlautstärke..............9
4.5 Nebenstellenanlagen .......................9
5 Fehlersuche ............................. 10
Page 4

- Bedienelemente -
4
1 Allgemeine Hinweise
Aufstellort
Stellen Sie das Telefon nicht in die unmittelbare
Umgebung von anderen elektronischen Geräten wie
z. B. Mikrowellen oder HIFI-Geräten, da es sonst zu
gegenseitiger Beeinflussung kommen kann. Der
Aufstellort hat einen entscheidenden Einfluss auf
einen einwandfreien Betrieb des Telefons.
Stellen Sie das Telefon auf eine ebene und
rutschfeste Fläche. Normalerweise hinterlassen die
Füsse des Telefons keine Spuren auf der
Aufstellfläche. Wegen der Vielzahl der verwendeten
Lacke und Oberflächen kann es jedoch nicht
ausgeschlossen werden, dass durch die
Gerätefüsse Spuren auf der Abstellfläche entstehen.
Verwenden Sie das Telefon nicht in
explosionsgefährdeten Bereichen.
Übermässige Belastungen durch Rauch, Staub,
Erschütterungen, Chemikalien, Feuchtigkeit, Hitze
oder direkte Sonneneinstrahlung müssen vermieden
werden.
Temperatur und Umgebungsbedingungen
Das Telefon ist für den Betrieb in geschützten
Räumen mit einem Temperaturbereich von -10 °C
bis 50 °C ausgelegt. Das Telefon darf nicht in
Feuchträumen wie Bad oder Waschküche
aufgestellt werden. Vermeiden Sie die Nähe zu
Wärmequellen wie Heizkörpern und setzen Sie das
Gerät keiner direkten Sonnenbestrahlung aus.
Reinigung und Pflege
Die Gehäuseoberflächen können mit einem
trockenen, weichen und fusselfreien Tuch gereinigt
werden. Niemals Reinigungsmittel oder gar
aggressive Lösungsmittel verwenden. Ausser einer
gelegentlichen Gehäusereinigung ist keine weitere
Pflege erforderlich. Die Gummifüsse der
Basisstation sind nicht gegen alle Reinigungsmittel
beständig. Der Hersteller kann daher nicht für evtl.
Schäden an Möbeln o. ä. haftbar gemacht werden.
Page 5
- Bedienelemente -
5
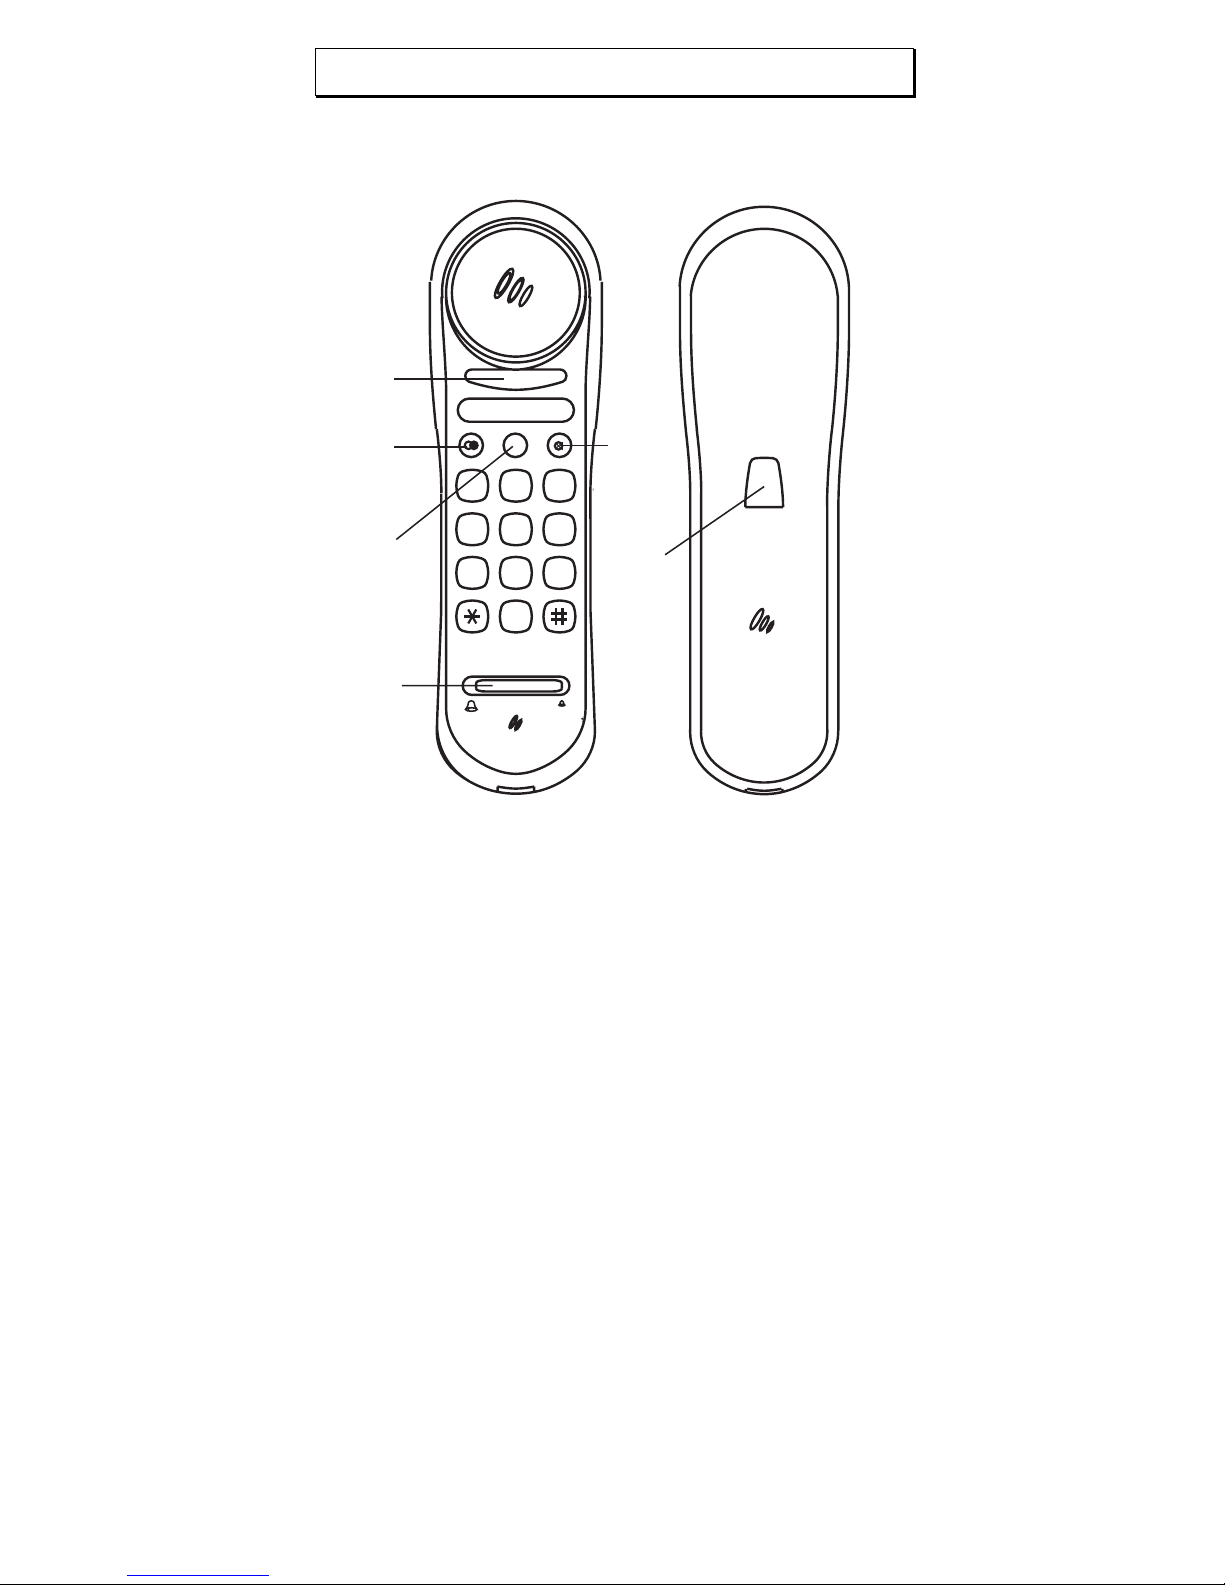
2 Bedienelemente
102
3
4
5
6
789
RINGER
R
1
2
3
4
5
6
1 Stummtaste
2 Ruftonlautstärke
3 R-Signaltaste
4 Wahlwiederholung
5 Hörerlautstärke
6 Optische Rufanzeige
Page 6
- Inbetriebnahme -
6
3 Inbetriebnahme
3.1 Sicherheitshinweise
ACHTUNG! Lesen Sie vor der Inbetriebnahme
unbedingt die Sicherheitshinweise am Anfang dieser
Anleitung.
3.2 Verpackungsinhalt prüfen
Zum Lieferumfang gehören:
eine Telefonbasis ein Telefonhörer
ein Telefonanschlusskabel ein Spiralkabel
eine Bedienungsanleitung
3.3 Telefon anschliessen
Verbinden Sie das beiliegende Telefonkabel mit der
Telefonsteckdose und der Telefonbuchse auf der
Unterseite des Telefons. Führen Sie dann das Kabel
durch die Kabelführung entweder nach oben oder
nach unten aus dem Telefongehäuse heraus.
Klemmen Sie das Kabel fest in den Kabelkanal. Das
Telefon arbeitet mit dem das TON-Wahlverfahren.
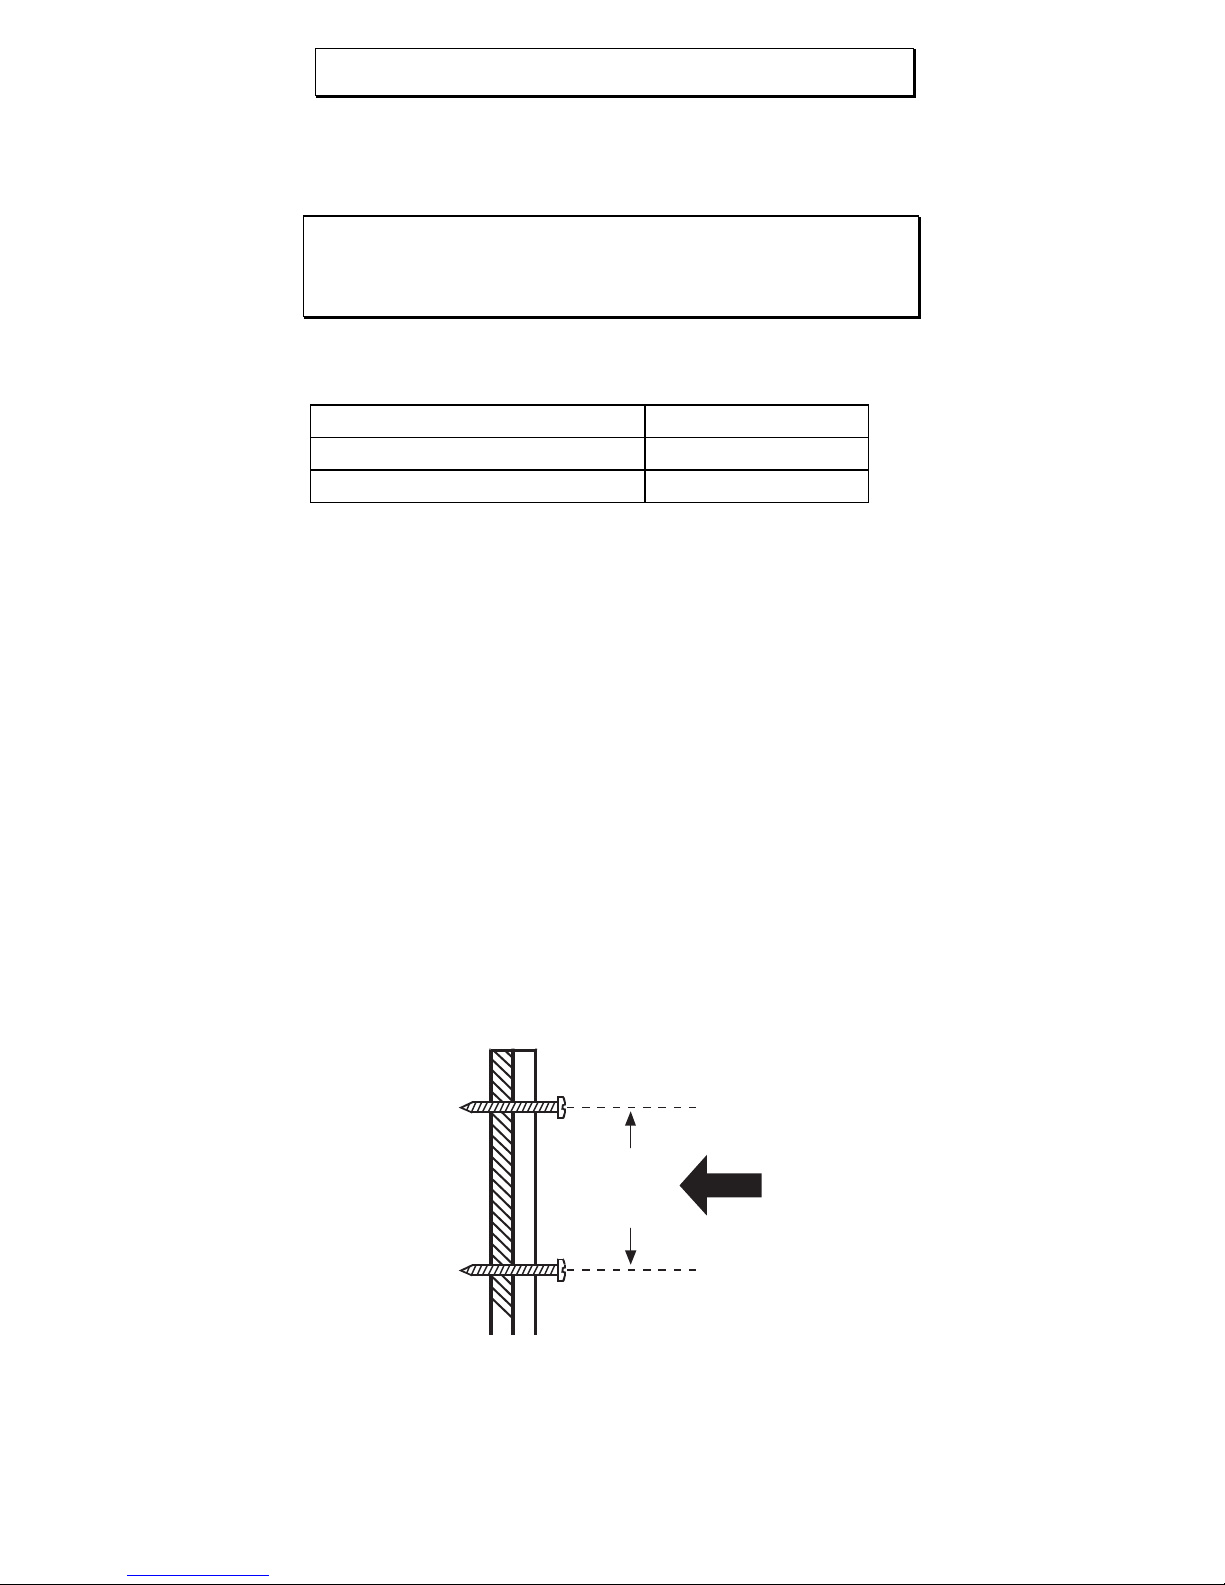
3.4 Wandmontage
Ihr Telefon ist auch zur Wandmontage geeignet.
Benutzen Sie zur Befestigung zwei Schrauben,
bohren Sie zwei Löcher im Abstand von 83 mm und
lassen Sie die Schrauben 5 mm aus der Wand
herausstehen. Stecken Sie nun das Telefon auf die
Schrauben und schieben Sie es etwas nach unten.
8.3cm
Page 7
- Inbetriebnahme -
7
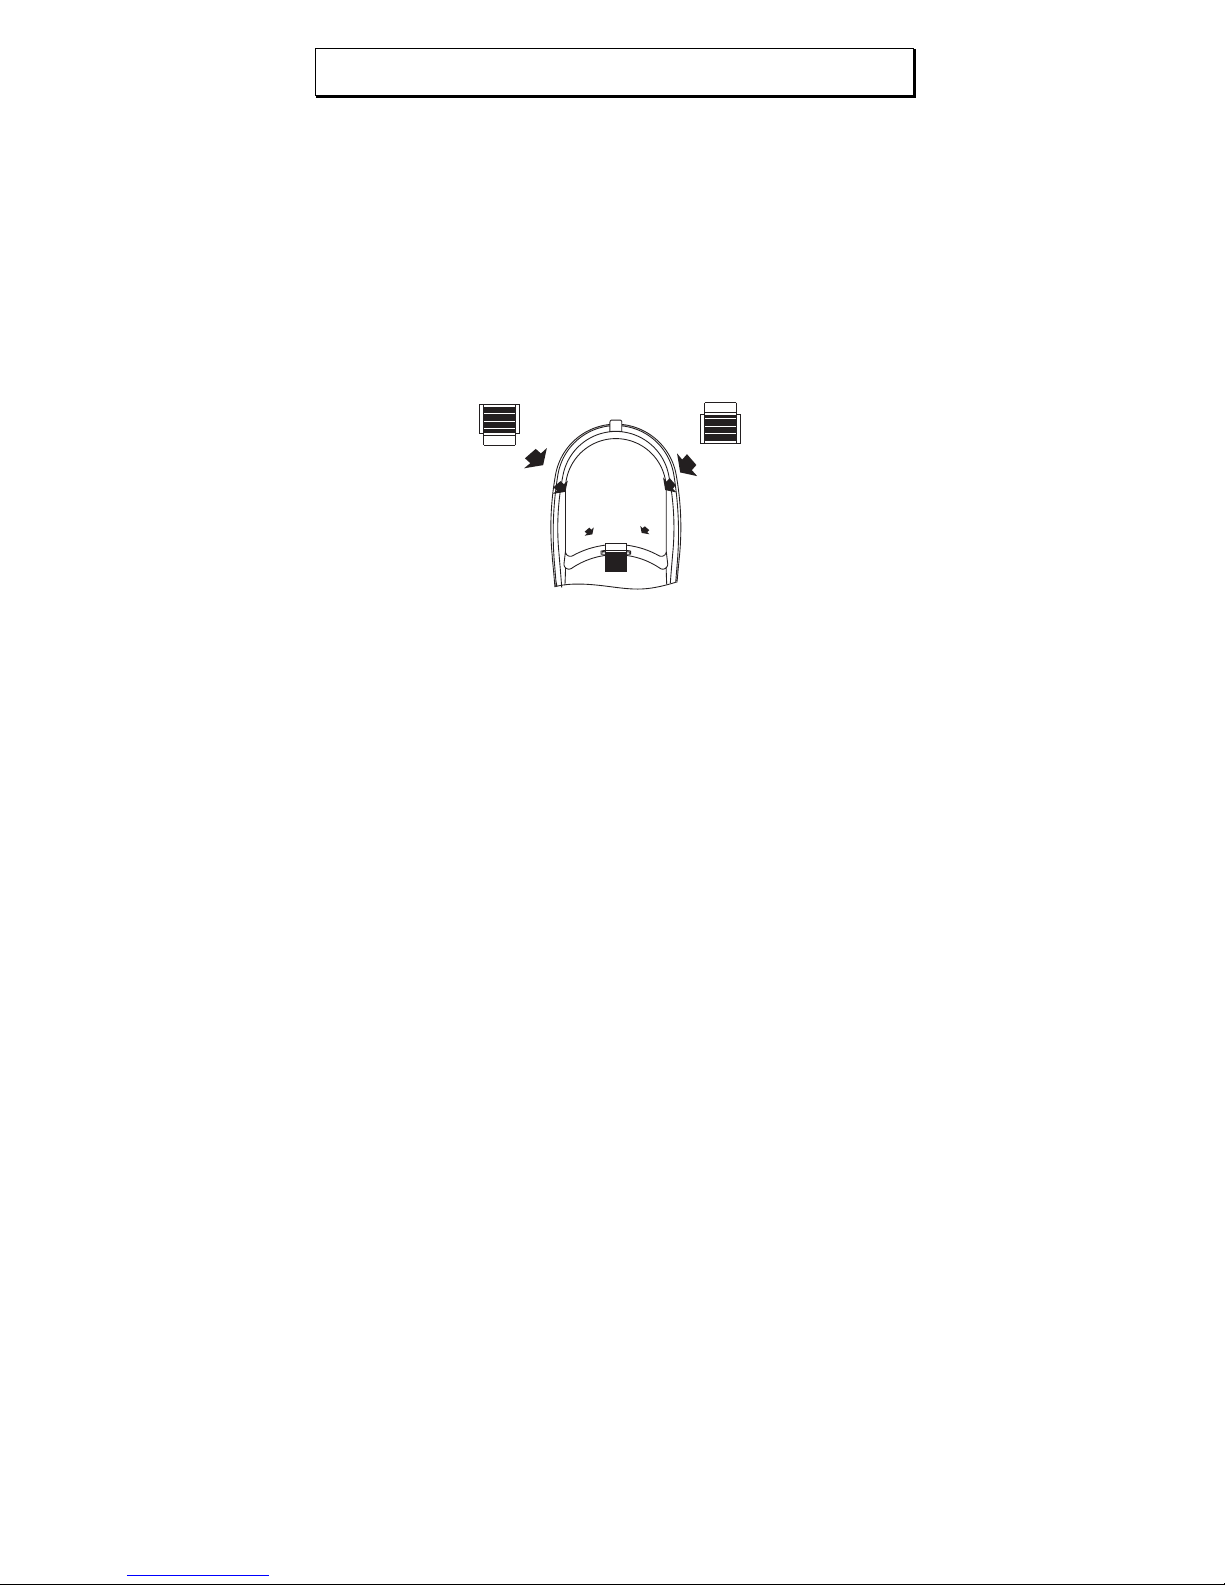
Damit der Hörer bei einer Wandmontage im
aufgelegten Zustand nicht herunterfällt, gibt es in der
Hörerablage eine kleine Einhängevorrichtung. Bei
Wandmontage muss der Einsatz so gedreht werden,
dass am oberen Ende ein kleiner Haken entsteht
(siehe b.). Bei normaler Benutzung muss dieser
Haken versengt sein (siehe a.).
a.
b.
Bei einer Wandmontage können Sie den Hörer an
das Telefon hängen, ohne dass die Verbindung
unterbrochen wird. Dazu befindet sich am Ende der
Hörerablage ein kleiner Einhängehaken.
Page 8
- Bedienung -
8
4 Bedienung
4.1 Telefonieren
Ihr Telefon kann wie jedes konventionelle Telefon
benutzt werden.
Bitte den Anweisungen folgen:
Nehmen Sie den Telefonhörer ab und warten Sie auf
das Freizeichen.
Wählen Sie nun die gewünschte Telefonnummer.
Um das Gespräch zu beenden, legen Sie den Hörer
wieder auf.
Anrufe entgegennehmen
Sobald Sie ein Anruf erreicht, hören Sie das
Rufsignal und der eingehende Anruf wird optisch am
Hörer signalisiert. Das Gespräch kann nun über den
Hörer entgegengenommen werden.
4.2 Wahlwiederholung
Ist ein Anschluss, den Sie gewählt haben, besetzt
oder konnten Sie niemanden erreichen, legen Sie
den Telefonhörer einfach wieder auf. Die zuletzt
gewählte Rufnummer bleibt automatisch im Telefon
gespeichert. Um die Wahlwiederholung zu nutzen,
gehen Sie wie folgt vor:
Heben Sie den Hörer ab und drücken Sie die
Wahlwiederholungstaste
. Die gespeicherte
Rufnummer der Wahlwiederholung wird nun
gewählt.
Page 9
- Bedienung -
9
4.3 Mikrofon stummschalten
Mit der Stummtaste können Sie während eines
Telefongespräches das Mikrofonabschalten. So ist
es möglich zu sprechen, ohne dass der
Gesprächspartner Sie hört. Der Lautsprecher im
Hörer bleibt eingeschaltet, und Sie können den
Gesprächspartner weiterhin verstehen.
Halten Sie die Stummtaste
während eines
Gesprächs gedrückt, und das Mikrofon im Hörer ist
ausgeschaltet.
Um das Mikrofon wieder einzuschalten, lassen Sie
die Stummtaste
wieder los.
4.4 Einstellbare Ruftonlautstärke
Um die Lautstärke des Tonrufes Ihren Bedürfnissen
anzupassen, stehen Ihnen zwei Lautstärken zur
Verfügung.
Für eine hohe Lautstärke schieben Sie den Schalter
RINGER nach links auf
und für einen leiseren
Tonruf nach rechts in die Stellung
.
4.5 Nebenstellenanlagen
Haben Sie Ihr Telefon mit einer Nebenstellenanlage
verbunden, können Sie alle Möglichkeiten, wie z.B.
Anrufe weiterleiten, automatischen Rückruf usw.
nutzen.
Die "R" Signaltaste (FLASH) verschafft Ihnen den
Zugang zu diesen Möglichkeiten. Ihr Telefon arbeitet
mit einer FLASH-Zeit von "100ms".
Ob Ihr Telefon an Ihrer Nebenstellenanlage
einwandfrei funktioniert, und welche weiteren
Möglichkeiten Sie dadurch erhalten, erfahren Sie bei
dem Händler, bei dem die Anlage gekauft wurde.
Page 10

- Fehlersuche -
10
5 Fehlersuche
Entfernen Sie alle zusätzlichen Telefonapparate und
verbinden Sie nur das Telefon direkt mit der
Telefonbuchse.
Sollte der Fehler immer noch auftreten, verbinden
Sie ein anderes Telefon (wenn vorhanden) mit der
Telefonbuchse. Die Ergebnisse zeigen Ihnen, ob der
Fehler am Gerät oder der Telefonleitung liegt.
Natürlich können Sie auch die Störungsstelle Ihres
Telefonnetzanbieters anrufen, die Ihnen weitere
Hinweise zum Überprüfen Ihrer Anlage gibt.
Page 11

- Sommaire -
11
1 Indications générales .................. 12
2 Éléments de commande............... 13
3 Mise en service ......................... 14
3.1 Consignes de sécurité.................... 14
3.2 Vérifier le contenu de l’emballage ...... 14
3.3 Raccorder le téléphone .................. 14
3.4 Montage mural............................. 14
4 Utilisation ................................ 16
4.1 Téléphoner ................................. 16
4.2 Rappel du dernier numéro composé... 16
4.3 Désactiver le micro........................ 17
4.4 Volume de sonnerie réglable............ 17
4.5 Autocommutateurs........................ 17
5 Recherche de défauts.................. 18
Page 12

- Éléments de commande -
12
1 Indications générales
Lieu d’installation
N’installez pas le téléphone à proximité directe
d’autres appareils électroniques tels que par ex. les
fours à micro-ondes ou les chaînes hi-fi car cela
pourrait provoquer des perturbations mutuelles. Le
lieu d’installation a une grande influence sur le
parfait fonctionnement du téléphone.
Placez le téléphone sur une surface plane et
antidérapante. Normalement, les pieds du téléphone
ne marquent pas la surface sur laquelle il est posé.
La multitude de vernis et de surfaces utilisés ne
permet cependant pas d’exclure l’éventualité de
traces laissées par les pieds de l’appareil sur la
surface sur laquelle il est posé. N’utilisez pas le
téléphone dans des zones menacées
d’explosion.Évitez les expositions excessives à la
fumée, à la poussière, aux secousses, à des
substances chimiques, à l'humidité, à la chaleur ou
l'exposition directe au soleil.
Température et conditions ambiantes
Le téléphone est conçu pour une utilisation dans des
locaux abrités avec une plage de températures de
-10 °C à 50 °C.Le téléphone ne doit pas être installé
dans des pièces humides telles que la salle de bains
ou la buanderie. Évitez de placer l’appareil à
proximité de sources de chaleur tels que les
radiateurs et évitez une exposition directe au soleil.
Nettoyage et entretien
Vous pouvez utiliser un chiffon sec, doux et nonpelucheux pour nettoyer les surfaces du boîtier.
N'utilisez jamais de produit nettoyant ou de solvants
agressifs. Aucun entretien n’est nécessaire hormis
le nettoyage de temps en temps du boîtier. Les
pieds en caoutchouc de la base ne sont pas
résistants à tous les produits nettoyants. Par
conséquent, le fabricant ne peut être tenu
responsable d’éventuelles détériorations survenant
aux meubles ou autres.
Page 13

- Bedienelemente -
13
2 Éléments de commande
102
3
4
5
6
789
RINGER
R
1
2
3
4
5
6
1 Touche secret
2 Volume de sonnerie
3 Touche de signal R
4 Rappel du dernier numéro composé
5 Volume du combiné
6 Signalisation optique des appels
Page 14

- Mise en service -
14
3 Mise en service
3.1 Consignes de sécurité
ATTENTION ! Veuillez impérativement lire, avant la
mise en service, les consignes de sécurité
mentionnées au début du présent mode d’emploi.
3.2 Vérifier le contenu de
l’emballage
Le contenu de l’emballage :
Une base Un combiné
un cordon téléphonique Un câble spiralé
un mode d’emploi
3.3 Raccorder le téléphone
Reliez le cordon téléphonique fourni à la prise
téléphonique et à la prise située sur la face
inférieure du téléphone. Faites ensuite sortir du
boîtier du téléphone le câble par le passe-câble soit
vers le haut, soit vers le bas. Coincez le câble dans
le canal de câble. Le téléphone fonctionne avec le
mode TONALITÉS.
3.4 Montage mural
Votre téléphone convient également pour un
montage mural. Utilisez deux vis pour la fixation,
percez deux trous espacés de 83 mm et laissez les
vis dépasser de 5 mm du mur. Placez ensuite le
téléphone sur les vis en le faisant glisser légèrement
vers le bas.
8.3cm
Page 15

- Mise en service -
15
Le support du combiné est muni d’un petit dispositif
d’accrochage pour éviter au combiné en montage
mural de tomber lorsqu’il est raccroché. Pour le
montage mural, tourner l’insertion de manière à ce
qu’un petit crochet se forme sur l’extrémité
supérieure. Lors d’une utilisation normale, ce
crochet doit être enfoncé (voir a.).
a.
b.
Dans le cas d’un montage mural, vous pouvez
accrocher le combiné au téléphone sans que la
liaison ne soit interrompue. Un petit crochet de
suspension se trouve placé à cet effet à l’extrémité
du support du combiné.
Page 16

- Utilisation -
16
4 Utilisation
4.1 Téléphoner
Votre téléphone s'utilise comme n’importe quel
téléphone classique.
Veuillez suivre les instructions suivantes :
Décrochez le combiné et attendez la tonalité.
Composez ensuite le numéro de téléphone souhaité.
Raccrochez le combiné pour mettre fin à la
communication.
Répondre aux appels
Dès que vous recevez un appel, le signal d’appel
retentit et l’appel entrant est signalé optiquement sur
le combiné. Vous pouvez alors répondre à l’appel au
moyen du combiné.
4.2 Rappel du dernier numéro
composé
Raccrochez le combiné lorsque le numéro de
téléphone que vous avez composé sonne occupé ou
ne répond pas. Le téléphone enregistre
automatiquement le dernier numéro de téléphone
composé. Veuillez procéder de la manière suivante
pour utiliser la fonction de rappel du dernier numéro
composé :
Décrochez le combiné et appuyez sur la touche de
rappel du dernier numéro composé
. Le numéro
de téléphone enregistré dans la mémoire de rappel
du dernier numéro composé est alors composé.
Page 17

- Utilisation -
17
4.3 Désactiver le micro.
La touche secret vous permet de désactiver le
micro en cours de communication. Vous pouvez
ainsi parler sans être entendu de votre
correspondant. Le haut-parleur du combiné reste
activé, ce qui vous permet de continuer à entendre
votre correspondant.
Maintenez la touche secret
enfoncée en cours de
communication et le micro du combiné est alors
désactivé.
Pour réactiver le micro, relâchez la touche secret
.
4.4 Volume de sonnerie réglable
Vous disposez de deux volumes pour adapter le
volume de la sonnerie à vos besoins.
Pour augmenter le volume, faites coulisser
l’interrupteur RINGER vers la gauche sur
et
pour obtenir un son de sonnerie plus faible,
poussez-le vers la droite sur la position
.
4.5 Autocommutateurs
Si vous avez raccordé votre téléphone à un
autocommutateur, vous pouvez bénéficier de toutes
les possibilités telles que p. ex. le transfert d’appels,
le rappel automatique, etc. grâce à la touche de
signal « R » (FLASH). Le téléphone fonctionne avec
la durée de FLASH de « 100ms ».
Renseignez-vous auprès du vendeur de votre
installation pour savoir si votre téléphone fonctionne
parfaitement avec votre autocommutateur et
connaître les autres possibilités dont vous pouvez
bénéficier.
Page 18

- Recherche de défauts -
18
5 Recherche de défauts
Ôtez tous les appareils téléphoniques
supplémentaires et reliez uniquement le téléphone
directement à la prise téléphonique. Si le
dysfonctionnement persiste, reliez un autre
téléphone (si vous en avez un) à la prise
téléphonique. Les résultats vous indiquent s’il s’agit
d’un défaut de l’appareil ou de la ligne téléphonique.
Vous pouvez également bien entendu appeler le
service dérangement de votre opérateur
téléphonique qui vous fournira d’autres indications
pour tester votre installation.
Page 19

- Indice -
19
1 Informazioni generali .................... 20
2 Elementi di comando.................... 21
3 Messa in funzione ....................... 22
3.1 Informazioni di sicurezza.................. 22
3.2 Controllare il contenuto
dell'imballaggio ............................. 22
3.3 Collegamento del telefono................ 22
3.4 Montaggio alla parete ..................... 22
4 Funzionamento .......................... 24
4.1 Telefonare................................... 24
4.2 Ripetizione della chiamata................ 24
4.3 Ammutolazione del microfono............ 25
4.4 Volume regolabile del segnale di
chiamata..................................... 25
4.5 Impianti interni di centralino .............. 25
5 Ricerca di errori .......................... 26
Page 20

- Elementi di comando -
20
1 Informazioni generali
Luogo d'installazione
Non disporre il telefono nelle immediate vicinanze di
apparecchi elettronici, come ad esempio forni a
microonde o impianti stereofonici, poiché in questa
circostanza non sarebbero da escludere delle
interferenze reciproche. Il luogo d'installazione ha un
influsso determinante per un funzionamento perfetto
ed irreprensibile del telefono. Disporre il telefono
sopra una superficie livellata e non scivolante.
Normalmente i piedini di gomma del telefono non
lasciano alcune tracce sulla superficie d'appoggio. A
causa degli innumerevoli tipi di smalto utilizzati sulle
superfici, non è, tuttavia, possibile escludere
sempre, che sulla superficie d'appoggio rimangano
delle tracce dei piedini di gomma dell'apparecchio.
Non utilizzare mai il telefono in zone esposte al
pericolo di deflagrazioni.
Evitare di gran lunga di esporre l'apparecchio ad
eccessive sollecitazioni, come ad esempio fumo,
polvere, urti, sostanze chimiche, umidità, calore o
diretta esposizione ai raggi solari.
Temperatura e condizioni ambientali
Il telefono è concepito per funzionare in ambienti
protetti in un campo di temperatura di -10 °C fino
50°C. Il telefono non deve essere installato in
ambienti umidi, come ad esempio in bagno o nella
lavanderia. Evitare possibilmente fonti di calore,
come riscaldamenti, termosifoni, ecc., e non esporre
l'apparecchio direttamente ai raggi solari.
Pulizia e manutenzione
Le superfici del contenitore possono essere pulite
con un panno pulito, asciutto e privo di peluria. Non
utilizzare mai dei detergenti o delle soluzioni
aggressive. Oltre ad una pulizia occasionale del
contenitore dell'apparecchio non è necessaria
alcuna particolare manutenzione. I piedini di gomma
della stazione base non sono resistenti contro tutti i
detergenti. Pertanto, il costruttore non potrà
assumersi alcuna responsabilità per eventuali danni
causati ai mobili o simili.
Page 21

- Elementi di comando -
21
2 Elementi di comando
102
3
4
5
6
789
RINGER
R
1
2
3
4
5
6
1 tasto d'ammutolazione
2 volume del segnale di chiamata
3 tasto di segnale R
4 ripetizione della chiamata
5 volume della cornetta
6 spia ottica di chiamata
Page 22

- Messa in funzione -
22
3 Messa in funzione
3.1 Informazioni di sicurezza
ATTENZIONE ! Prima della messa in funzione è
assolutamente necessario leggere le informazioni di
sicurezza riportate all'inizio di queste istruzioni per
l'uso.
3.2 Controllare il contenuto
dell'imballaggio
La dotazione comprende:
una base per il telefono una cornetta
telefonica
un cavo telefonico di
collegamento
un cavo a spirale
istruzioni per l'uso
3.3 Collegamento del telefono
Collegare il presente cavo telefonico con la presa
della linea telefonica e la boccola telefonica situata
nella parte inferiore del telefono. Fare passare
successivamente il cavo attraverso il passacavo, o
verso l'alto oppure verso il basso dal contenitore del
telefono. Serrare poi il cavo nella canalina. Il Vostro
telefono lavora nella modalità di selezione a
FREQUENZE.
3.4 Montaggio alla parete
Il Vostro telefono è anche adatto per essere montato
alla parete. Per il fissaggio occorre utilizzare le due
viti fornite in dotazione, eseguire due fori nella
parete ad una distanza di 83 mm, dove avvitare
successivamente le viti, lasciandole sporgere di
circa 5 mm dalla parete. Inserire a questo punto il
telefono sulle viti e spingerlo lievemente verso il
basso.
Page 23

- Messa in funzione -
23
8.3cm
Per evitare che la cornetta possa cascare quando si
trova montata alla parete in stato attaccato, nel
ripiano della cornetta è stato previsto un piccolo
dispositivo di sospensione. Per il montaggio alla
parete è necessario girare l'inserto in maniera tale
che nell'estremità superiore risulti un piccolo gancio
(si veda b.). Nell'utilizzo normale è necessario che
questo gancio sia abbassato (si veda a.).
a.
b.
In un montaggio alla parete potete attaccare la
cornetta al telefono, senza interrompere il
collegamento telefonico. A tal fine nell'estremità
finale del piano della cornetta è stato previsto un
gancio di sospensione.
Page 24

- Impiego -
24
4 Funzionamento
4.1 Telefonare
Il vostro apparecchio può essere impiegato come un
qualunque altro telefono convenzionale.
Prego attenersi alle seguenti istruzioni:
Sollevare la cornetta del telefono ed attendere il
segnale di linea libera.
Comporre a questo punto il numero di telefono
desiderato.
Per terminare la conversazione, riattaccare come di
consueto la cornetta.
Ricezione delle telefonate
Non appena si riceve una telefonata, si sente il
segnale di chiamata e la telefonata viene segnalata
tramite la spia ottica sulla cornetta. A questo punto
potete rispondere, sollevando come sempre la
cornetta del telefono.
4.2 Ripetizione della chiamata
Se un numero di telefono chiamato risulta occupato
o non è stato possibile raggiungere l'utente
desiderato, riattaccate semplicemente la cornetta.
L'ultimo numero telefonico composto rimane
automaticamente memorizzato nel Vostro telefono.
Per impiegare la ripetizione della chiamata, occorre
procedere nel modo seguente:
Sollevare la cornetta del telefono e premere quindi il
tasto di ripetizione della chiamata
. Il numero
memorizzato nella funzione di ripetizione della
chiamata viene ora chiamato automaticamente.
Page 25

- Impiego -
25
4.3 Ammutolazione del microfono
Tramite il tasto d'ammutolazione potete
disinserire il microfono dell'apparecchio durante una
conversazione telefonica. In tal modo è possibile
parlare con altre persone, senza essere ascoltati
dall'utente in linea. L'altoparlante della cornetta
rimane, tuttavia, inserito, in modo da poter ascoltare
ulteriormente l'utente in linea.
Mantenere premuto il tasto d'ammutolazione
durante una conversazione, per disattivare il
microfono nella cornetta.
Per inserire di nuovo il microfono, basta premere
nuovamente il tasto
.
4.4 Volume regolabile del segnale di
chiamata
Per adattare il volume del segnale di chiamata
(squillo) alle vostre esigenze individuali sono
disponibili due livelli.
Per aumentare il volume occorre spingere il
comando RINGER verso sinistra sulla posizione
e, per abbassarlo, verso destra sulla posizione
.
4.5 Impianti interni di centralino
Se avete collegato il Vostro telefono ad un impianto
interno di centralino, potete sfruttare tutte le
comodissime possibilità, quali ad esempio
deviazione delle chiamate, richiamo automatico,
ecc. Il tasto di segnale "R" (FLASH) Vi permette di
accedere a tutte queste diverse possibilità e comode
funzioni. Il telefono lavora con un periodo FLASH di
"100ms".
Potete comunque domandare al Vostro rivenditore
di fiducia specializzato, che Vi ha venduto l'impianto
interno di centralino, se il Vostro telefono funziona
perfettamente ed in modo irreprensibile e quali
ulteriori possibilità poter sfruttare con questo
sistema.
Page 26

- Ricerca di errori -
26
5 Ricerca di errori
Sconnettere tutti gli apparecchi telefonici
supplementari e collegare solamente il telefono
direttamente alla presa telefonica installata. Qualora
dovesse ancora verificarsi l'errore, provate a
collegare un altro telefono (se disponibile) a questa
presa telefonica. I rispettivi risultati mostrano
direttamente, se l'errore si trova nel vostro
apparecchio oppure nella linea telefonica.
Naturalmente potete anche telefonare all'ufficio per
segnalazione guasti del Vostro gestore telefonico,
che potrà fornire delle ulteriori informazioni per la
verifica del Vostro impianto.
Page 27

- Contents -
27
1 General Information .................... 28
2 User controls ............................ 29
3 Setting up ................................ 30
3.1 Safety Information......................... 30
3.2 Check contents of pack .................. 30
3.3 Connecting the telephone ............... 30
3.4 Wall mounting.............................. 30
4 Operation ................................ 32
4.1 Making a call ............................... 32
4.2 Redial ....................................... 32
4.3 Muting the microphone................... 33
4.4 Adjustable ring tone volume............. 33
4.5 Private exchanges ........................ 33
5 Troubleshooting......................... 34
Page 28

- User controls -
28
1 General Information
Position
Do not set up the telephone in the immediate vicinity
of other electrical equipment such as microwaves or
hi-fi systems, as this may result in mutual
interference. The location has a decisive influence
on the trouble-free operation of the telephone.
Place the telephone on a flat and non-slip surface.
The feet of the telephone do not normally leave any
marks on the surface. However, due to the large
number of varnishes and surfaces in use, it may not
be possible to prevent marks occurring on the
surface due to the feet of the unit.
Do not use the telephone in areas where there is a
risk of explosion.
Excessive exposure to smoke, dust, vibrations,
chemicals, moisture, heat or the direct rays of the
sun must be avoided.
Temperature and Ambient Conditions
The telephone is designed for use in protected
rooms with a temperature range of -10 °C to 50 °C.
The base station must not be installed in damp
rooms such as a bathroom or laundry room. Avoid
proximity to sources of heat such as radiators and
do not expose the unit to direct sunlight.
Cleaning and care
The surface of the case can be cleaned with a soft,
dry, lint-free cloth. Never use cleaning agents,
particularly aggressive solvents. No attention is
necessary apart from cleaning the case
occasionally. The rubber feet of the base station are
not resistant to all cleaning agents. The
manufacturer can therefore not accept any liability
for possible damage to furniture or the like.
Page 29

- User controls -
29
2 User controls
102
3
4
5
6
789
RINGER
R
1
2
3
4
5
6
1 Mute button
2 Ring tone volume
3 R signal button
4 Redial
5 Receiver volume
6 Visual call indicator
Page 30

- Setting up -
30
3 Setting up
3.1 Safety Information
NOTE: Before setting up, it is essential that you read
the safety information at the beginning of this
manual.
3.2 Check contents of pack
The following items are supplied:
one telephone base one telephone receiver
one telephone connecting
cable
one spiral cable
one instruction manual
3.3 Connecting the telephone
Connect the telephone cable supplied to the
telephone socket and the telephone jack on the
underside of the telephone. Then feed the cable out
of the telephone housing through the cable guide
either towards the top or the bottom. Secure the
cable firmly in the cable duct. The telephone works
using the tone dialling system.
3.4 Wall mounting
Your telephone is also suitable for wall mounting.
Use two screws for fixing to the wall. Drill two holes
83 mm apart, and leave the screws protruding 5 mm
from the wall. Now place the telephone over the
screws and push down slightly.
8.3cm
Page 31

- Setting up -
31
For situations where the unit is mounted on the wall,
a small hook is provided in the receiver rest to
prevent the receiver from falling when replaced. For
wall mounting, the insert must be rotated to provide
a small hook at the top end (see b.). In normal use,
this hook must be at the bottom (see a.).
a.
b.
When the telephone is mounted on a wall, you can
hang the receiver on the telephone without cutting
off the call. A small hook is located at the end of the
receiver rest for this purpose.
Page 32

- Operation -
32
4 Operation
4.1 Making a call
Your telephone can be used like any conventional
telephone.
Please follow the instructions:
Lift the receiver and wait until you hear the dialling
tone.
Now dial the required telephone number.
To end the call simply replace the receiver.
Receiving calls
When a call comes through, you will hear the ringing
tone and the incoming call will be visually signalled
on the receiver. The call can now be accepted using
the receiver.
4.2 Redial
If a connection that you have dialled is engaged or
you were unable to get through to anybody, simply
replace the receiver. The last number dialled
remains stored in the telephone automatically. To
use the redial facility, proceed as follows:
Lift the receiver and press the redial button
. The
stored redial number will now be dialled.
Page 33

- Operation -
33
4.3 Muting the microphone
The microphone can be turned off during a call by
using the mute button
. It is thus possible to speak
without the other person hearing you. The
loudspeaker in the handset remains switched on and
you can continue to hear the other person.
Hold the mute button
pressed during a call, and
the microphone in the receiver will be switched off.
To switch the microphone on again, press the mute
button
once more.
4.4 Adjustable ring tone volume
Two volume levels are provided to enable you to
adjust the volume of the ring tone to suit your
requirements.
For a high volume, slide the RINGER switch to the
left to
, and for a quieter ring tone, to the right to
the
position.
4.5 Private exchanges
If you have connected your telephone to a private
exchange, you can use all the facilities such as call
transfer, automatic recall, etc. The "R" signal button
gives you access to these facilities. The FLASH time
"100ms" will be required on a private exchange.
You can find out from the dealer from whom the
equipment was purchased whether your telephone
will work on your private exchange without any
problems and what further facilities you will receive
from this.
Page 34

- Troubleshooting -
34
5 Troubleshooting
Remove all extra telephone equipment and connect
only the telephone directly to the telephone socket.
If the fault is still present, connect another telephone
(if available) to the telephone socket. The results will
show you whether the fault lies with the unit or with
the telephone line.
Page 35

- Declaration -
35
We TELGO AG
Adress: Route d'Englisberg 11
CH-1763 Granges Paccot
Switzerland
Declare under our own responsability that the
product
MODEL: SWITEL T9
DESCRIPTION: CORDED PHONE
Is in conformity with directives: 89/336/EEC,
73/23/EEC, 93/68/EEC
Compliance is achieved by conformity to the
following:
EN 60950:2000(3
RD
EDITION), EN 41003:1998,
EN 55022, EN 55024
Test report number:
G2M20208-0555-L, G2M20111-0806-L, G2M204110942-E-16
Authorised by:
Signed _______________
Name (printed): Selim Dusi
Position in company: Director
Date of issue: 15. March 2005
Copies of this document will be held on file for a
period of 10 years after the last production.
Supplier: TELGO AG
Route d'Englisberg 11
CH-1763 Granges Paccot
Product: SWITEL T9
This product is intended for connection to analogue
PSTN lines within Switzerland.
However, due to differences between the individual
PSTN’s provided in the different countries, the
approval does not, of itself, give an unconditional
assurance of successful operation on every PSTN
network termination point.
Page 36

www.switel.com
 Loading...