

Page 1

Schnurlos Telefon
Téléphone sans fil
Telefono senza fili
Cordless phone
Bedienungsanleitung
Mode d’emploi
Istruzioni per l'uso
Operating Instructions
D6017
Page 2

2
D6017
Bedienungsanleitung ______________ 3
Die Displayanzeigen sind in den Sprachen Deutsch,
Französisch, Englisch und Italienisch einstellbar. Siehe dazu
Kapitel 3.7.
Mode d’emploi___________________ 29
Les messages peuvent être affichés à l’écran en allemand, en
français, en anglais et en italien. Voir à cet effet le chapitre 3.7.
Istruzioni per l'uso _______________ 55
Le visualizzazioni del display possono essere selezionate nelle
lingue tedesco, francese, inglese ed italiano. Si veda a tal fine al
capitolo 3.7.
Operating instructions ____________ 81
The display messages can be set up in German, French,
English and Italian. For more information see Chapter 3.7.
Declaration of conformity ________ 106
Page 3

- Inhaltsverzeichnis -
3
1 Allgemeine Hinweise.......................................................................................... 5
2 Bedienelemente .................................................................................................. 6
3 Inbetriebnahme................................................................................................... 7
3.1 Sicherheitshinweise............................................................................................................7
3.2 Verpackungsinhalt prüfen...................................................................................................7
3.3 Basisstation anschließen....................................................................................................7
3.4 Standard-Akkus einbauen..................................................................................................7
3.5 Aufladen der Standard-Akkus ............................................................................................7
3.6 Gürtelclip anbringen ...........................................................................................................8
3.7 Displaysprache einstellen...................................................................................................8
3.8 Uhrzeit und Datum einstellen .............................................................................................8
4 Bedienung........................................................................................................... 9
4.1 Das Display ........................................................................................................................9
4.2 Anrufe entgegennehmen....................................................................................................9
4.3 Anrufe führen....................................................................................................................10
4.4 Gespeicherte Rufnummern aus dem Telefonbuch anwählen ..........................................10
4.5 Anzeige der Gesprächsdauer...........................................................................................10
4.6 Hinweise zur Reichweite ..................................................................................................10
4.7 Mikrofon im Handapparat stummschalten........................................................................11
4.8 Einstellen der Hörerlautstärke..........................................................................................11
4.9 Wahlwiederholung............................................................................................................11
4.10 Handapparat ein-/ausschalten .........................................................................................11
4.11 Tastatursperre ..................................................................................................................12
4.12 Paging von der Basisstation zum Handapparat ...............................................................12
5 Das Telefonbuch............................................................................................... 13
5.1 Rufnummern in das Telefonbuch eingeben .....................................................................13
5.2 Gespeicherte Rufnummern im Telefonbuch ändern ........................................................14
5.3 Gespeicherte Rufnummern aus dem Telefonbuch löschen .............................................14
5.4 Telefonbucheinträge kontrollieren....................................................................................15
6 Rufnummernanzeige (CLIP)............................................................................. 16
6.1 Die Anruferliste.................................................................................................................16
6.2 Rufnummer aus der Anruferliste in das Telefonbuch speichern ......................................17
6.3 Einzelne Rufnummer aus der Anruferliste löschen ..........................................................17
7 Nebenstellenanlagen........................................................................................18
7.1 Pause benutzen ...............................................................................................................18
Page 4

- Inhaltsverzeichnis -
4
8 Sonderfunktionen............................................................................................. 19
8.1 Rufsignale am Handapparat einstellen (Klingelmelodien) ...............................................19
8.2 Lautstärke des Tonrufs am Handapparat.........................................................................20
8.3 Rufsignale an der Basisstation einstellen (Klingelmelodien)............................................20
8.4 Lautstärke des Tonrufs an der Basisstation.....................................................................20
8.5 Anrufe automatisch entgegennehmen .............................................................................21
8.6 Hörerlautstärke anpassen ................................................................................................21
8.7 Displaynamen ändern ......................................................................................................21
8.8 Hinweistöne ein-/ausschalten...........................................................................................22
8.9 PIN-Code ändern .............................................................................................................22
8.10 Displaysprache einstellen.................................................................................................23
8.11 FLASH-Zeit einstellen ......................................................................................................23
8.12 Länge der Pause einstellen..............................................................................................23
8.13 Werkseinstellungen wieder herstellen..............................................................................23
8.14 Menüstruktur ....................................................................................................................25
9 Fehlerbeseitigung............................................................................................. 26
10 Technische Daten ............................................................................................. 27
Page 5

- Allgemeine Hinweise -
5
1 Allgemeine Hinweise
Aufladbare Batterien
Keine anderen aufladbaren Batterien oder Akkupacks verwenden. Diese können möglicherweise
einen Kurzschluss verursachen.
Verwenden Sie beim Austauschen immer nur wiederaufladbare Batterien des Typs AAA 1,2
Volt, 600mA.
Batterien nicht ins Feuer werfen oder ins Wasser tauchen. Alte oder defekte Batterien nicht mit
dem normalen Hausmüll entsorgen.
Sollte sich der Handapparat beim Laden erwärmen, so ist dies normal und ungefährlich.
Laden Sie den Handapparat nicht mit fremden Aufladegeräten, da sonst Beschädigungen
auftreten können.
Aufstellort
Am Aufstellort muss sich eine Netzsteckdose 230Volt befinden. Stellen Sie die Basisstation nicht
in die unmittelbare Umgebung von anderen elektronischen Geräten wie z. B. Mikrowellen oder
HIFI-Geräten, da es sonst zu gegenseitiger Beeinflussung kommen kann. Der Aufstellort hat
einen entscheidenden Einfluss auf einen einwandfreien Betrieb des Telefons.
Stellen Sie die Basisstation auf eine ebene und rutschfeste Fläche. Normalerweise hinterlassen
die Füsse der Basisstation keine Spuren auf der Aufstellfläche. Wegen der Vielzahl der
verwendeten Lacke und Oberflächen kann es jedoch nicht ausgeschlossen werden, dass durch
die Gerätefüsse Spuren auf der Abstellfläche entstehen.
Verwenden Sie den Handapparat nicht in explosionsgefährdeten Bereichen.
Übermässige Belastungen durch Rauch, Staub, Erschütterungen, Chemikalien, Feuchtigkeit,
Hitze oder direkte Sonneneinstrahlung müssen vermieden werden.
Medizinischer Hinweis
Das Telefon arbeitet mit einer sehr geringen Sendeleistung. Diese geringe Sendeleistung
schliesst eine gesundheitliche Gefährdung nach dem derzeitigen Stand von Forschung und
Technik aus. Es hat sich aber gezeigt, dass eingeschaltete tragbare Telefone medizinische
Geräte beeinflussen können. Halten Sie deshalb bei medizinischen Geräten einen Abstand von
mindestens einem Meter ein.
Entsorgung
Ist die Gebrauchszeit der wiederaufladbaren Batterien oder der gesamten Anlage abgelaufen,
entsorgen Sie diese bitte umweltfreundlich gemäss den gesetzlichen Bestimmungen.
Temperatur und Umgebungsbedingungen
Das Telefon ist für den Betrieb in geschützten Räumen mit einem Temperaturbereich von 10 °C
bis 30 °C ausgelegt.
Die Basisstation darf nicht in Feuchträumen wie Bad oder Waschküche aufgestellt werden.
Vermeiden Sie die Nähe zu Wärmequellen wie Heizkörpern und setzen Sie das Gerät keiner
direkten Sonnenbestrahlung aus.
Reinigung und Pflege
Die Gehäuseoberflächen können mit einem trockenen, weichen und fusselfreien Tuch gereinigt
werden. Niemals Reinigungsmittel oder gar aggressive Lösungsmittel verwenden. Ausser einer
gelegentlichen Gehäusereinigung ist keine weitere Pflege erforderlich. Die Gummifüsse der
Basisstation sind nicht gegen alle Reinigungsmittel beständig. Der Hersteller kann daher nicht
für evtl. Schäden an Möbeln o. ä. haftbar gemacht werden.
Page 6
- Bedienelemente -
6
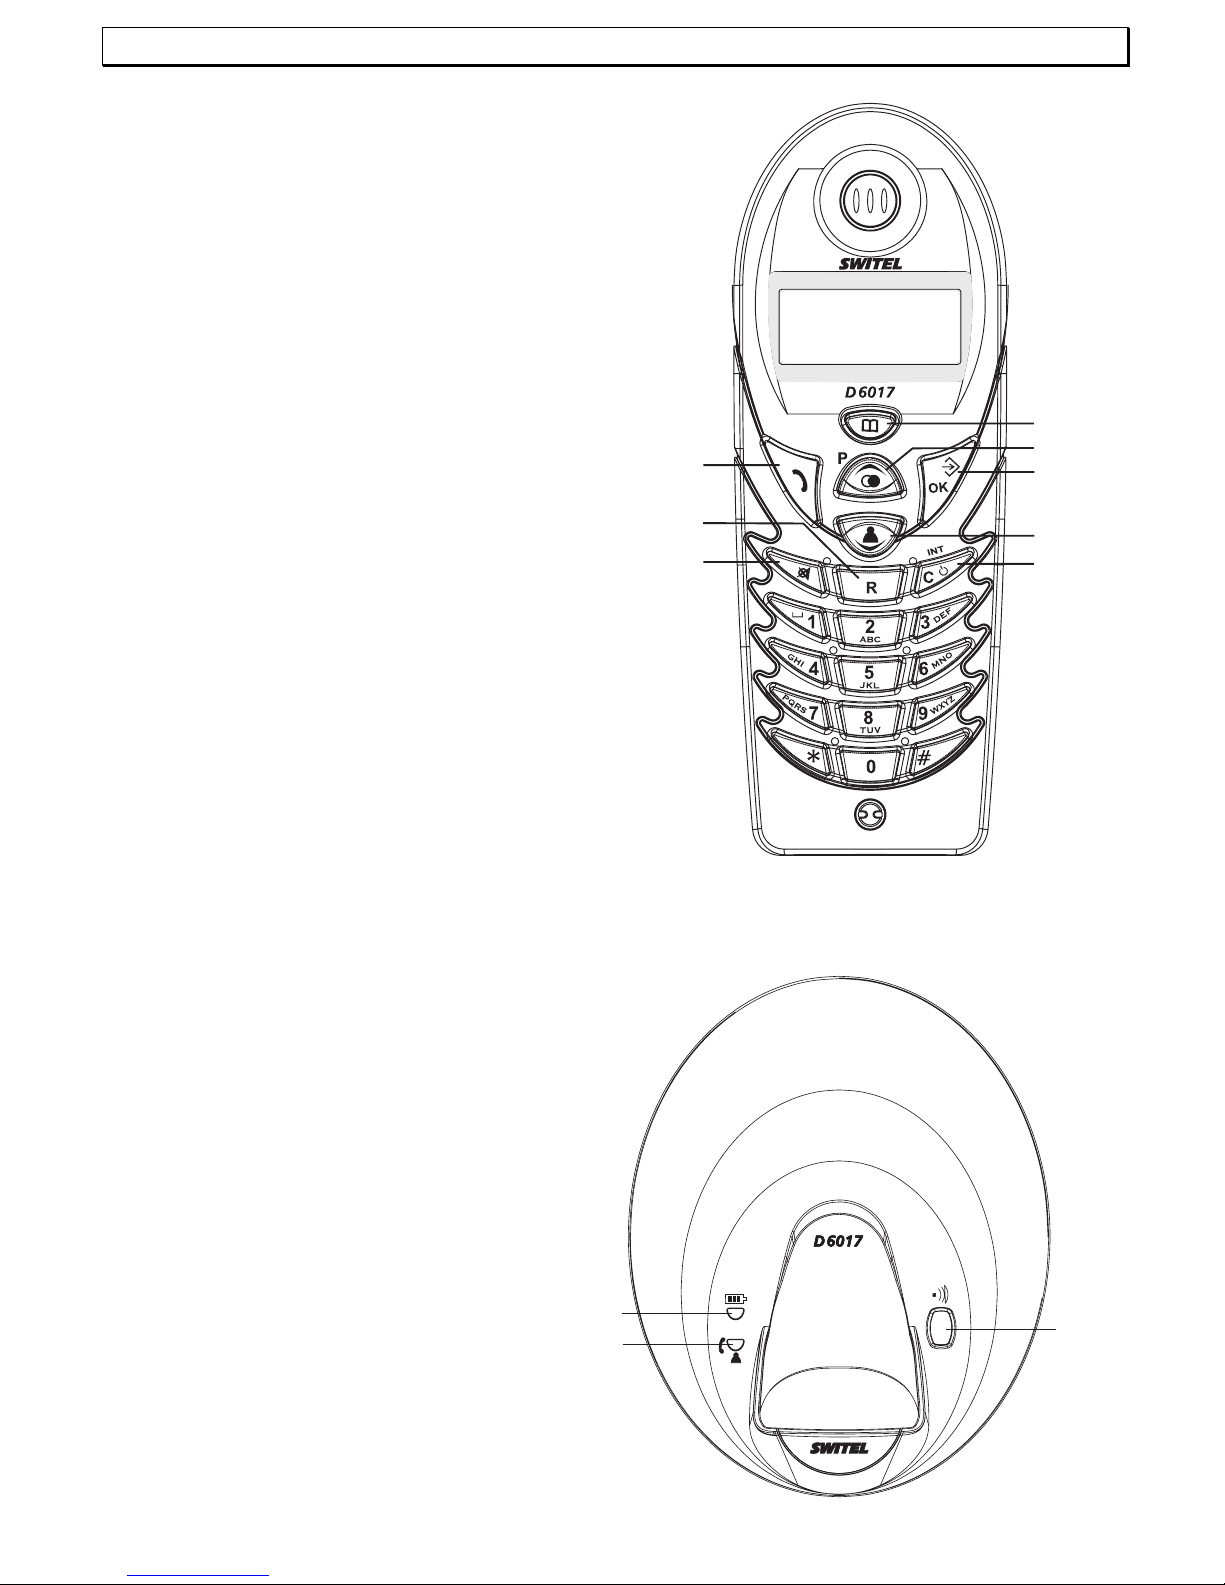
2 Bedienelemente
Handapparat
1 Telefonbuch
2 Wahlwiederholung / Auswahltaste
3 Menü-Taste/OK
4 Anruferliste CLIP / Auswahltaste
5 Löschtaste / Menü verlassen / Interne Gespräche /
Handapparat ein- ausschalten
6 Stummtaste
7 R-Signaltaste
8 Gesprächstaste
Basisstation
1 PAGE-Taste
2 Gesprächs- und CLIP-Anzeige
3 Ladekontrollleuchte
1
2
3
4
5
6
7
8
1
2
3
Page 7
- Inbetriebnahme -
7
3 Inbetriebnahme
3.1 Sicherheitshinweise
ACHTUNG! Lesen Sie vor der Inbetriebnahme unbedingt die Sicherheitshinweise am Anfang
dieser Bedienungsanleitung.
3.2 Verpackungsinhalt prüfen
Zum Lieferumfang gehören:
eine Basisstation ein Stromanschlusskabel
ein Handapparat drei Standard-Akkus
ein Telefonanschlusskabel eine Bedienungsanleitung
einen Gürtelclip
3.3 Basisstation anschließen
Stellen Sie das Telefon in der Nähe Ihrer Telefonanschlussdose und einer Netzsteckdose auf.
1. Stecken Sie den Stecker des Netzteils in die Buchse auf der Unterseite der Basisstation
und das Steckernetzteil in eine vorschriftsmäßig installierte Netzsteckdose mit 230V. Das
Steckernetzteil der Basisstation muss immer angeschlossen sein. Verwenden Sie aus
Sicherheitsgründen nur das mitgelieferte Steckernetzteil.
2. Verbinden Sie das beiliegende Telefonkabel mit der Telefonsteckdose und der
Telefonbuchse auf der Unterseite der Basisstation. Verwenden Sie nur das neue
beiliegende Telefonkabel.
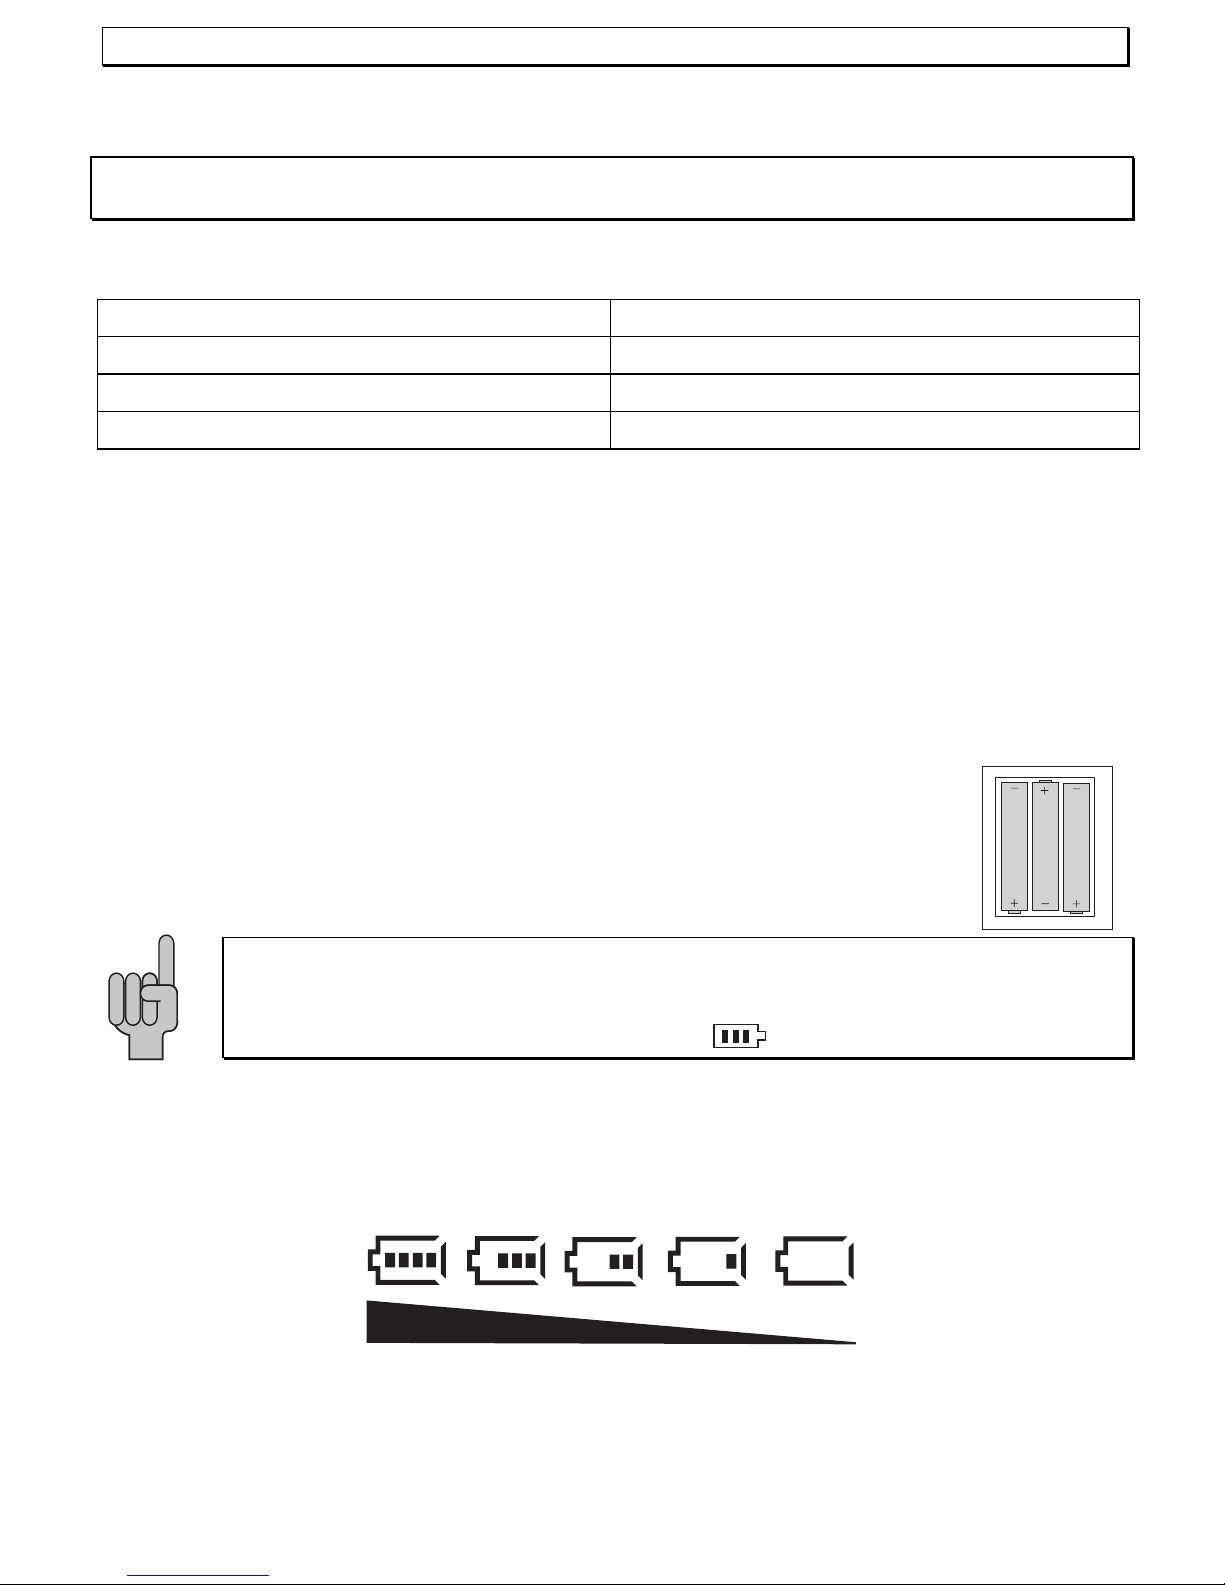
3.4 Standard-Akkus einbauen
Um die mitgelieferten wiederaufladbaren Standard-Akkus in den Handapparat
einzulegen, drücken Sie auf den Batteriefachdeckel am oberen Rand und
schieben Sie ihn nach unten. Legen Sie nun die Standard-Akkus ein und achten
Sie auf die richtige Polung. Schließen Sie den Batteriefachdeckel.
Wichtiger Hinweis: Stellen Sie den Handapparat mit dem Display nach vorne für
mindestens 16 Stunden auf die Basisstation. Bei nicht richtig geladenen
Standard-Akkus kann es zu Fehlfunktionen des Telefons kommen. An der
Basisstation leuchtet die Ladekontrollleuchte .
3.5 Aufladen der Standard-Akkus
Die wiederaufladbaren Standard-Akkus Ihres Telefons besitzen eine Standby-Zeit bei
Zimmertemperatur von max. 100 Stunden und eine maximale Gesprächsdauer von bis zu 8
Stunden. Die aktuelle Batteriekapazität wird im Display angezeigt:
Zum Laden der Standard-Akkus stellen Sie den Handapparat mit dem Display nach vorne in die
Basisstation.
Page 8

- Inbetriebnahme -
8
3.6 Gürtelclip anbringen
Schieben Sie den Gürtelclip in die Führung, bis er auf den Seiten hörbar einrastet.
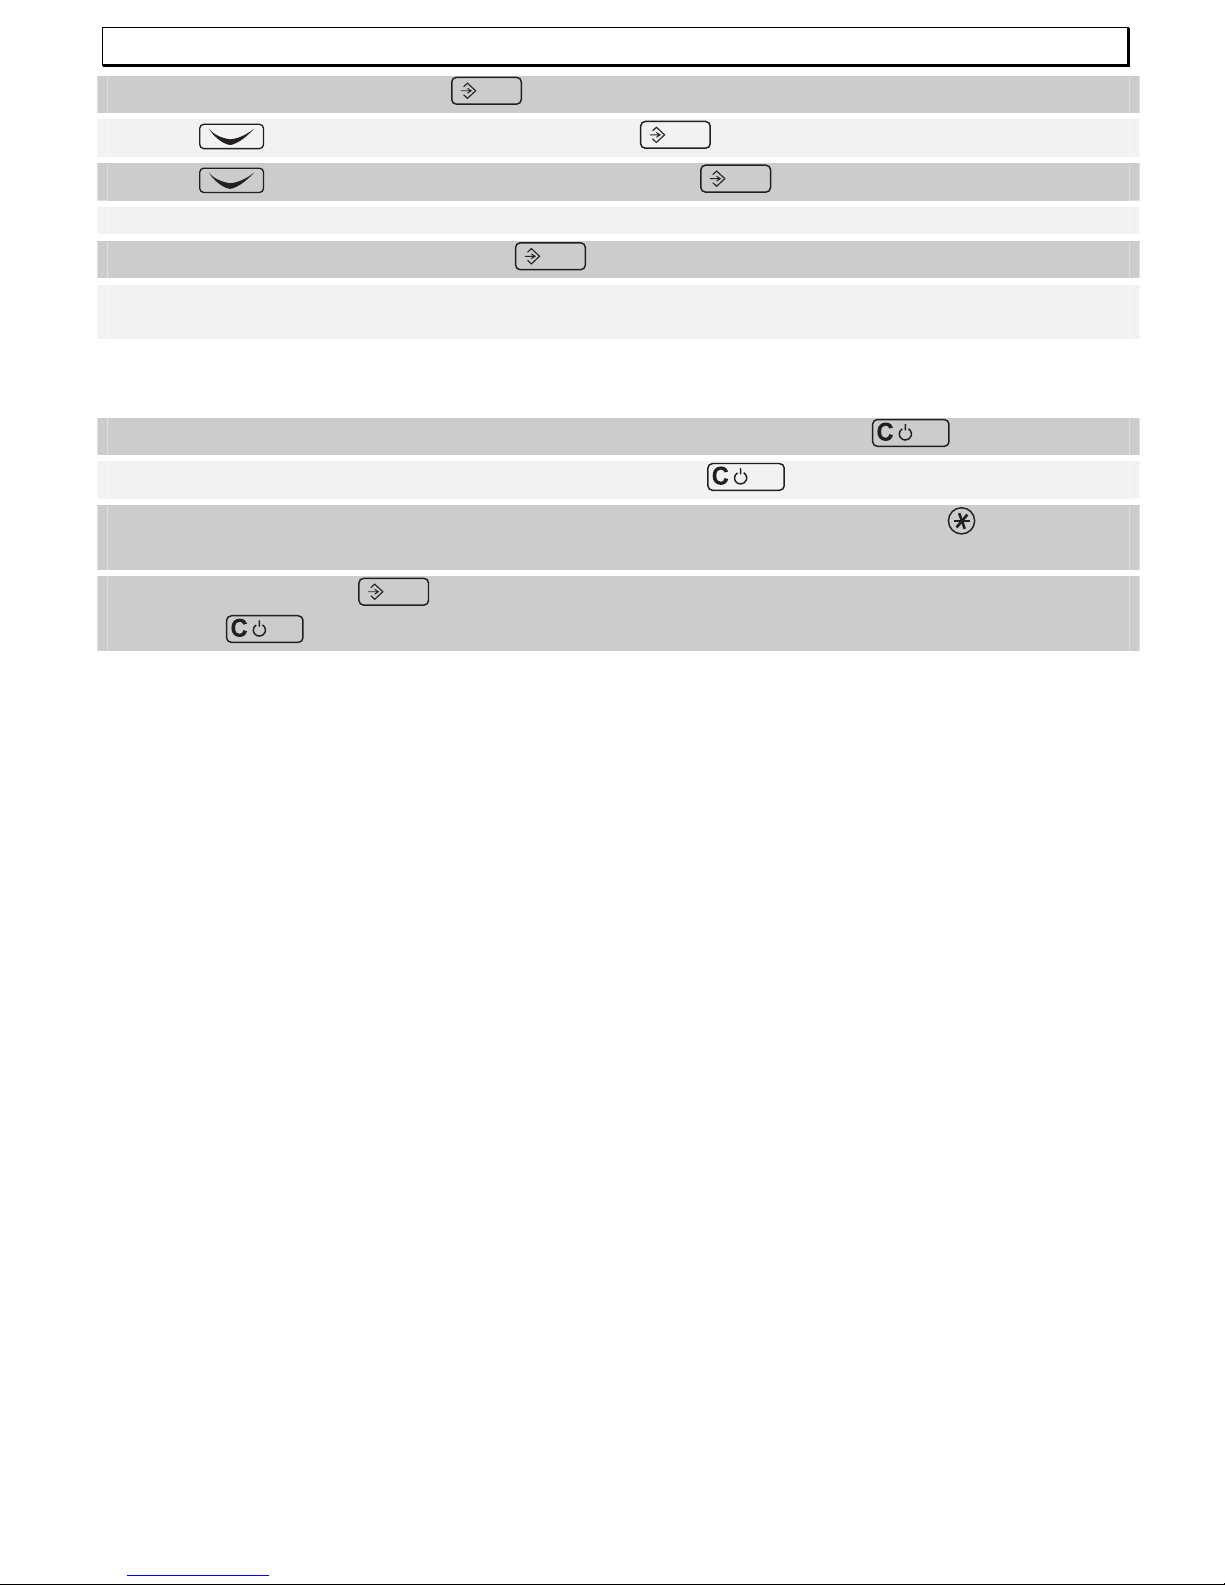
3.7 Displaysprache einstellen
Die Displayanzeigen sind in den Sprachen Deutsch, Italienisch, Englisch, Französisch und
Spanisch einstellbar.
1. Drücken Sie die Menütaste
OK
.
2. Mit
das Menü HANDAPP wählen und mit
OK
bestätigen.
3. Mit
die Funktion SPRACHE wählen und mit
OK
bestätigen.
4. Mit
und
eine Sprache wählen und mit
OK
bestätigen.
5. Durch Festhalten der Taste
INT
verlassen Sie den Eingabemodus.
3.8 Uhrzeit und Datum einstellen
Bevor Sie das Telefon benutzen sollten Sie die Uhrzeit und das aktuelle Datum einstellen. Die
aktuelle Uhrzeit wird im Hauptdisplay angezeigt.
1. Drücken Sie die Menütaste
OK
.
2. Mit
das Menü HANDAPP wählen und mit
OK
bestätigen.
3. Mit
die Funktion DATUM-ZEIT wählen und mit
OK
bestätigen.
4. Geben Sie nun hintereinander den Tag, den Monat und die Uhrzeit ein:
Beispiele: 09. März - 8.52 Uhr => 09 03 08 52
21. November – 16.08 Uhr => 21 11 16 08
5. Bestätigen Sie mit der Taste
OK
6. Durch Festhalten der Taste
INT
verlassen Sie den Eingabemodus.
Page 9

- Bedienung -
9
4 Bedienung
4.1 Das Display
Im normalen Betriebszustand zeigt das Display den Namen des Handapparates an. Der
voreingestellte Name kann jederzeit geändert werden. Siehe dazu 8.7. Das Display zeigt Ihnen
weiterhin alle wichtigen Funktionen mit verschiedenen Symbolen an.
Konstant: Sie führen ein Gespräch.
Konstant: Sie führen ein externes Gespräch.
Blinkt: Es erreicht Sie ein externer Anruf.
Konstant: Sie befinden sich in der Anruferliste (CLIP).
Blinkt: Es sind neue Anrufe in der Anruferliste (CLIP) gespeichert.
Konstant: Bei der Benutzung des Telefonbuchs.
MENU
Konstant: Sobald die Programmierung aktiviert ist.
Konstant: Die Tastatursperre ist eingeschaltet.
Konstant: Die Verbindung zur Basisstation ist gut.
Blinkt: Die Reichweite zur Basisstation ist überschritten.
Konstant: Die Rufnummer ist länger als 12 Stellen.
4.2 Anrufe entgegennehmen
Erreicht Sie ein Anruf, ertönt der Tonruf am Handapparat und an der Basisstation. Wegen der
Funkübertragung klingelt der Handapparat etwas später als die Basisstation. Im Display blinkt
die Anzeige
. Drücken Sie die Gesprächstaste
am Handapparat und die
Verbindung wird hergestellt.
Hinweis: Während der Handapparat klingelt, können Sie mit den Tasten
und
die
Ruftonlautstärke verändern.
Um das Gespräch zu beenden, stellen Sie den Handapparat zurück in die Basisstation oder
drücken Sie die Gesprächstaste
am Handapparat.
Hinweise: Informationen zur Anzeige der Rufnummern im Display entnehmen Sie
bitte dem Kapitel 6.
Wenn die automatische Rufannahme eingeschaltet ist, wird der Anruf automatisch
entgegengenommen, sobald Sie den Handapparat von der Basisstation nehmen. Wie Sie die
automatische Rufannahme ein- oder ausschalten, erfahren Sie im Kapitel 8.5.
Page 10
- Bedienung -
10
4.3 Anrufe führen
1. Geben Sie die gewünschte Telefonnummer mit max. 25 Stellen über das Tastenfeld ein.
Da das Display maximal 12 Zahlen anzeigen kann, werden bei längeren
Telefonnummern nur die letzten 12 Zahlen angezeigt.
Hinweis: Haben Sie eine falsche Zahl eingegeben, können Sie durch mehrmaliges Drücken der
Taste
INT
die Telefonnummer löschen. Durch langes Drücken der Taste
INT
wird die
Rufnummer komplett gelöscht.
2. Drücken Sie die Gesprächstaste
und die gewünschte Verbindung wird hergestellt.
Hinweis: Sie können auch zuerst die Gesprächstaste
drücken und erhalten damit das
Freizeichen. Durch Eingabe der Zahlen Ihrer gewünschten Rufnummer wählt Ihr Telefon die
Rufnummer direkt an. Eine Korrektur einzelner Zahlen der Rufnummer, wie oben erwähnt, ist bei
dieser Form des Gesprächaufbaus nicht möglich.
4.4 Gespeicherte Rufnummern aus dem Telefonbuch anwählen
Nachdem Sie einige Telefonnummern gespeichert haben, können Sie diese sehr schnell und
einfach abrufen.
1. Telefonbuchtaste
drücken. Das Display zeigt nun die erste gespeicherte
Telefonnummer in alphabetischer Reihenfolge.
2. Mit den Tasten
und
können Sie nun alle gespeicherten Rufnummern
anwählen. Um eine Rufnummer direkt alphabetisch anzuwählen, drücken Sie den
entsprechenden Buchstaben.
3. Drücken Sie nun die Gesprächstaste
und die angezeigte Telefonnummer wird
automatisch gewählt.
4.5 Anzeige der Gesprächsdauer
Während eines Gesprächs wird die Gesprächszeit im Display in Minuten und Sekunden
angezeigt. 15 Sekunden nach dem Wählen wird im Display von Anzeige der gewählten Nummer
auf Anzeige der Gesprächsdauer umgeschaltet. Nach Beendigung des Gesprächs bleibt die
Anzeige noch für einige Sekunden im Display erhalten.
4.6 Hinweise zur Reichweite
Die Reichweite des Handapparates beträgt ca. 50 Meter in geschlossenen Räumen und ca. 300
Meter im Freien. Bei einer guten Verbindung zur Basisstation leuchtet im Display das Symbol
.
Haben Sie sich zu weit von der Basisstation entfernt, blinkt das Symbol
und Sie hören
Warntöne. Gehen Sie in diesem Fall wieder näher an die Basisstation, da ansonsten das
Gespräch unterbrochen wird. Diese Warntöne lassen sich, wie im Kapitel 8.8 beschrieben,
abschalten.
Page 11
- Bedienung -
11
4.7 Mikrofon im Handapparat stummschalten
Mit der Taste
können Sie während eines Telefongespräches das Mikrofon des
Handapparates abschalten. So ist es möglich zu sprechen, ohne dass der Gesprächspartner Sie
hört. Der Lautsprecher im Handapparat bleibt eingeschaltet, und Sie können den
Gesprächspartner weiterhin verstehen.
1. Drücken Sie einmal die Taste
während eines Gesprächs. Im Display erscheint die
Anzeige .
2. Um das Mikrofon wieder einzuschalten, drücken Sie erneut die Taste
. Die Anzeige
erlischt und Sie können das Gespräch normal fortsetzen.
4.8 Einstellen der Hörerlautstärke
Ist Ihnen die Hörerlautstärke zu leise oder zu laut, können Sie diese Ihren Bedürfnissen
anpassen.
Mit den Tasten
und
können Sie während eines Gesprächs die Lautstärke
anpassen. Im Display wird die gewählte Lautstärke mit LAUTST 1 bis 5 angezeigt.
4.9 Wahlwiederholung
Die Wahlwiederholung nutzen Sie, wenn der angerufene Teilnehmer besetzt ist oder sich nicht
meldet. Ihr Telefon speichert die 10 zuletzt gewählten Rufnummern.
1. Drücken Sie die Taste
und die zuletzt gewählte Telefonnummer wird im Display
angezeigt.
2. Mit der Taste
können nun weitere Rufnummern der Wahlwiederholung angewählt
werden. Mit der Taste
blättern Sie in der Liste wieder zurück.
3. Drücken Sie nun die Gesprächstaste
und die angezeigte Telefonnummer wird
automatisch gewählt.
Hinweis: Ist eine Rufnummer der Wahlwiederholung im Telefonbuch gespeichert, erscheint
automatisch der Name und nicht die Rufnummer im Display.
4.10 Handapparat ein-/ausschalten
Durch längeres Festhalten der Taste
INT
können Sie den Handapparat ausschalten. Ist der
Handapparat ausgeschaltet, wird kein Batteriestrom verbraucht. Es können keine Gespräche
empfangen werden.
Drücken Sie einmal die Taste
INT
, um den Handapparat wieder einzuschalten. Das Display
zeigt die Meldung BASIS 1 und der Handapparat ist nach kurzer Zeit wieder eingeschaltet.
Sobald Sie den Handapparat wieder auf die Basisstation stellen, schaltet sich dieser
automatisch ein.
Page 12
- Bedienung -
12
4.11 Tastatursperre
Tragen Sie den Handapparat öfter bei sich, können Sie die Tastatur sperren, damit nicht
ungewollt Tasten gedrückt werden. Bei eingeschalteter Tastatursperre können eingehende
Gespräche normal entgegengenommen werden.
Tastatursperre einschalten
Drücken Sie am Handapparat die Tasten
OK
und
. Im Display erscheint das Symbol
.
Tastatursperre ausschalten
Um die Tastatursperre aufzuheben, drücken Sie die Tasten
OK
und
.
4.12 Paging von der Basisstation zum Handapparat
Wenn Sie sich nicht mehr erinnern können, wo Sie Ihren Handapparat liegen gelassen haben,
drücken Sie die Taste
der Basisstation. Sie werden für 30 Sekunden die Tonsignale des
Handapparates hören und ihn so leicht wiederfinden. Mit einer beliebigen Taste am Handapparat
oder der Taste
der Basisstation können Sie die Tonsignale vorher beenden.
Page 13
- Telefonbuch -
13
5 Das Telefonbuch
In das Telefonbuch können 25 Rufnummern inklusive eines Namens gespeichert werden. Die
maximale Länge einer Rufnummer beträgt 25 Stellen.
5.1 Rufnummern in das Telefonbuch eingeben
1. Menütaste
OK
drücken. Das Display zeigt die Meldung TEL-BUCH.
2. Drücken Sie erneut die Taste
OK
. Das Display zeigt die Meldung ZUFUEGEN.
3. Bestätigen Sie wieder mit der Menütaste
OK
. Das Display zeigt die Meldung NAME.
4. Geben Sie nun den zugehörigen Namen (max. 12 Buchstaben) über das Zahlenfeld ein.
Hinweise zur Namenseingabe erhalten Sie im nächsten Abschnitt.
5. Bestätigen Sie den Namen der Menütaste
OK
. Das Display zeigt die Meldung NUMMER.
6. Geben Sie die gewünschte Telefonnummer über das Zahlenfeld ein.
7. Bestätigen Sie wieder mit der Menütaste
OK
. Das Display zeigt wieder die Meldung
ZUFUEGEN.
8. Möchten Sie weitere Rufnummern speichern, fahren Sie mit Punkt 3. fort. Durch Festhalten
der Taste
INT
verlassen Sie den Eingabemodus.
Hinweis: Ist die Speicherkapazität von 25 Rufnummern erreicht, zeigt das Display beim
nächsten Speichern die Meldung VOLL. Um wieder Platz zu schaffen, müssen zuerst wieder
andere Rufnummern gelöscht werden.
Erklärung der Namenseingabe
Zur Eingabe des Namens sind die Zahlentasten mit Buchstaben beschriftet. Durch mehrmaliges
Drücken der entsprechenden Taste können Grossbuchstaben sowie Zahlen eingegeben werden.
Beispiel: Sie möchten den Namen "Peter" eingeben.
Drücken Sie: 1 x Taste 7, 2 x Taste 3, 1 x Taste 8, 2 x Taste 3, 3 x Taste 7
- Um ein Leerzeichen einzugeben, drücken Sie einmal die Taste n.
- Durch zweimaliges Drücken der Taste n kann zusätzlich ein Bindestrich eingegeben werden.
- Um den gleichen Buchstaben zweimal einzugeben, drücken Sie den entsprechenden
Buchstaben und warten Sie dann bis der Cursor automatisch eine Stelle weiter springt.
- Falsche Eingaben können mit der Taste
INT
gelöscht werden.
Page 14

- Telefonbuch -
14
5.2 Gespeicherte Rufnummern im Telefonbuch ändern
1. Menütaste
OK
drücken. Das Display zeigt TEL-BUCH.
2. Drücken Sie erneut die Taste
OK
. Das Display zeigt ZUFUEGEN.
3. Drücken Sie nun die Taste
. Das Display zeigt AENDERN.
4. Bestätigen Sie wieder mit der Menütaste
OK
. Das Display zeigt nun in alphabetischer
Reihenfolge die gespeicherten Rufnummern.
5. Wählen Sie jetzt über die Tasten
und
die Rufnummer aus, die Sie ändern
möchten. Um eine Rufnummer direkt alphabetisch anzuwählen, drücken Sie den
entsprechenden Buchstaben.
6. Bestätigen Sie die Auswahl mit der Menütaste
OK
. Das Display zeigt wiederum den
Namen an. Zusätzlich blinkt hinter dem letzten Buchstaben der Cursor.
7. Ändern Sie nun den Namen über das Zahlenfeld ab. Hinweise zur Namenseingabe erhalten
Sie im Kapitel 5.1.
8. Nachdem Sie die gewünschten Änderungen vorgenommen haben, bestätigen Sie wieder
mit der Menütaste
OK
. Das Display zeigt nun die Rufnummer an.
9. Ändern Sie nun die Rufnummer über das Zahlenfeld ab. Durch mehrmaliges Drücken der
Taste
INT
werden die einzelnen Zahlen der Rufnummer gelöscht.
10. Nachdem Sie die gewünschten Änderungen vorgenommen haben, bestätigen Sie wieder
mit der Menütaste
OK
. Das Display zeigt die Meldung AENDERN.
11. Möchten Sie weitere Rufnummern ändern, fahren Sie mit Punkt 4. fort. Durch Festhalten
der Taste
INT
verlassen Sie den Programmiermodus.
5.3 Gespeicherte Rufnummern aus dem Telefonbuch löschen
1. Menütaste
OK
drücken. Das Display zeigt TEL-BUCH.
2. Drücken Sie erneut die Taste
OK
. Das Display zeigt ZUFUEGEN.
3. Drücken Sie nun zweimal die Taste
. Das Display zeigt LOESCHEN.
4. Bestätigen Sie mit der Menütaste
OK
.
5. Wählen Sie jetzt über die Tasten
und
die Rufnummer aus, die Sie löschen
möchten. Um eine Rufnummer direkt alphabetisch anzuwählen, drücken Sie den
entsprechenden Buchstaben.
6. Nachdem Sie die gewünschte Rufnummer gefunden haben, bestätigen Sie mit der
Menütaste
OK
und das Display zeigt nun die Rufnummer an.
7. Bestätigen Sie mit der Menütaste
OK
und das Display zeigt die Meldung OK.
8. Bestätigen Sie wieder mit der Menütaste
OK
und der Telefonbucheintrag ist gelöscht.
Das Display zeigt wieder die Meldung LOESCHEN. Durch das Festhalten der Taste
INT
wird der Löschvorgang abgebrochen.
9. Haben Sie die Rufnummer gelöscht, erscheint im Display die Meldung LOESCHEN.
Möchten Sie weitere Rufnummern löschen, fahren Sie mit Punkt 4. fort. Durch Festhalten
der Taste
INT
verlassen Sie den Löschmodus.
Page 15
- Telefonbuch -
15
5.4 Telefonbucheinträge kontrollieren
1. Menütaste
OK
drücken. Das Display zeigt die Meldung TEL-BUCH.
2. Drücken Sie erneut die Taste
OK
. Das Display zeigt die Meldung ZUFUEGEN.
3. Drücken Sie nun dreimal die Taste
. Das Display zeigt LISTE.
4. Bestätigen Sie mit der Menütaste
OK
.
5. Mit den Tasten
und
können Sie nun den gewünschten Telefonbucheintrag
anwählen. Um eine Rufnummer direkt alphabetisch anzuwählen, drücken Sie den
entsprechenden Buchstaben.
6. Drücken Sie mehrmals die Taste
OK
. Das Display zeigt abwechselnd die
Telefonnummer und den Namen an.
7. Durch Festhalten der Taste
INT
verlassen Sie den Eingabemodus.
Page 16
- Rufnummernanzeige CLIP -
16
6 Rufnummernanzeige (CLIP)
In der Schweiz ist diese Funktion nicht bei jedem Netzanbieter
verfügbar.
Achtung! Die Rufnummernanzeige ist ein optionaler Service Ihres
Telefonproviders. Ihr Telefon zeigt die Rufnummern im Display, wenn Ihr
Telefonprovider diesen Service anbietet. Die Anzeige des Datums und der Uhrzeit
wird nicht von allen Telefonprovidern übertragen. Bitte Fragen Sie Ihren
Telefonprovider für weitere Informationen. Auch bei manchen Nebenstellenanlagen ist
eine Übertragung der Rufnummer oder auch des Datums und der Uhrzeit nicht
möglich.
Mit der Rufnummernanzeige können Sie bei eingehenden Gesprächen erkennen, wer Sie anruft.
Wenn diese Funktion an Ihrer Telefonleitung zur Verfügung steht, zeigt Ihnen das Display bereits
die Rufnummer des Anrufers, wenn das Telefon klingelt.
Haben Sie diese Rufnummer in Ihrem Telefonbuch gespeichert, wird anstatt der Rufnummer der
Name angezeigt.
Alle Anrufe werden in einer Anruferliste gespeichert, so dass Sie auch während Ihrer
Abwesenheit keinen Anruf verpassen werden. Insgesamt können 24 Rufnummern in der Liste
gespeichert werden. Sobald die Liste voll ist, wird immer die älteste Rufnummer aus der Liste
gelöscht. Wurden während Ihrer Abwesenheit neue Rufnummern in der Anruferliste
gespeichert, blinkt im Display das Symbol
.
6.1 Die Anruferliste
Um die Rufnummern der Anruferliste im Display zu sehen, gehen Sie bitte wie folgt vor:
1. Drücken Sie die Taste
und die zuletzt empfangene Rufnummer wird im Display
angezeigt. Ist die Anruferliste leer, zeigt das Display die Meldung LEER.
2. Mit den Tasten
und
können nun weitere Rufnummern der Anruferliste
angewählt werden.
Hinweise: Über die Menütaste
OK
können Informationen abgerufen werden.
- Ist die Rufnummer länger als 12 Stellen, werden die restlichen Zahlen angezeigt.
- Zeigt die Rufnummer, wenn der Anrufer bereits mit Namen im Telefonbuch gespeichert ist.
- Zeigt das Datum und die Uhrzeit, wenn diese Daten vom Anrufer übertragen wurden.
- Zeigt wie oft der Anrufer bereits angerufen hat.
- Stehen keine weiteren Daten zur Verfügung, zeigt das Display die Meldung ZUFUEGEN ?.
- Mit der Taste
INT
können Sie wieder zur Liste zurückkehren.
3. Möchten Sie eine Rufnummer der Anruferliste direkt zurückrufen, drücken Sie einfach die
Gesprächstaste
und die Nummer wird sofort angewählt.
4. Durch Festhalten der Taste
INT
verlassen Sie die Anruferliste.
Page 17
- Rufnummernanzeige CLIP -
17
6.2 Rufnummer aus der Anruferliste in das Telefonbuch speichern
Eine in der Anruferliste gespeicherte Telefonnummer kann direkt in das Telefonbuch gespeichert
werden.
1. Drücken Sie die Taste
und die zuletzt empfangene Rufnummer wird im Display
angezeigt.
2. Mit den Taste
und
wählen Sie nun die Rufnummern der Anruferliste, die Sie
in das Telefonbuch speichern möchten.
3. Drücken Sie die Taste
OK
, bis im Display die Meldung ZUFUEGEN ? erscheint.
4. Bestätigen Sie wieder mit der Menütaste
OK
. Das Display zeigt die Meldung NAME.
5. Geben Sie nun den zugehörigen Namen (max. 12 Buchstaben) über das Zahlenfeld ein.
6. Bestätigen Sie wieder mit der Menütaste
OK
und die Rufnummer ist im Telefonbuch
gespeichert.
7. Durch Festhalten der Taste
INT
verlassen Sie die Anruferliste.
Hinweis: Sobald die Rufnummer im Telefonbuch gespeichert wurde, wird diese Rufnummer aus
der Anruferliste gelöscht.
6.3 Einzelne Rufnummer aus der Anruferliste löschen
1. Drücken Sie die Taste
und die zuletzt empfangene Rufnummer wird im Display
angezeigt.
2. Mit den Tasten
und
wählen Sie nun die Rufnummern der Anruferliste, die Sie
löschen möchten.
3. Drücken Sie die Taste
OK
, bis im Display die Meldung ZUFUEGEN ? erscheint.
4. Drücken Sie die Taste
. Im Display erscheint die Meldung LOESCHEN.
5. Bestätigen Sie wieder mit der Menütaste
OK
und die Rufnummer ist aus der Anruferliste
gelöscht oder verlassen Sie den Löschmodus durch Festhalten der Taste
INT
.
Page 18
- Nebenstellenanlagen -
18
7 Nebenstellenanlagen
Haben Sie Ihr Telefon mit einer Nebenstellenanlage verbunden, können Sie alle Möglichkeiten,
wie z.B. Anrufe weiterleiten, automatischen Rückruf usw. nutzen. Die „R“ Signaltaste verschafft
Ihnen den Zugang zu diesen Möglichkeiten. An einer Nebenstellenanlage werden verschiedene
FLASH-Zeiten benötigt. Wie Sie die FLASH-Zeit verändern können, erfahren Sie unter 8.11. Die
Werkseinstellung beträgt 100ms. Ob Ihr Telefon an Ihrer Nebenstellenanlage einwandfrei
funktioniert, erfahren Sie bei dem Händler, bei dem die Anlage gekauft wurde.
7.1 Pause benutzen
Bei Nebenstellenanlagen ist es erforderlich, eine bestimmte Nummer zu wählen (z. B. “9” oder
“0”), um ein Freizeichen für eine Amtsleitung auf den Apparat zu bekommen. Bei wenigen,
älteren Nebenstellenanlagen dauert es einige Zeit bis das Freizeichen zu hören ist. Speziell für
diese Nebenstellenanlagen kann nach der Amtsholung eine automatische Pause eingefügt
werden, so dass Sie direkt weiter wählen können, ohne das Freizeichen abzuwarten.
Die Länge der Pause kann zwischen 1 und 3 Sekunden verändert werden. Siehe dazu 8.12.
Pause beim manuellen Wählen eingeben
Drücken Sie zwischen der Kennziffer für die Amtsholung und der eigentlichen Telefonnummer
für ca. 2 Sekunden die Wahlwiederholungstaste
. Im Display erscheint die Anzeige P.
Die Pause kann auch bei Rufnummern für das Telefonbuch mit gespeichert werden.
Page 19

- Sonderfunktionen -
19
8 Sonderfunktionen
Alle weiteren Programmierfunktionen sind über ein sehr benutzerfreundliches Menü zu
erreichen. Hier einen kleine allgemeine Anleitung, wie Sie sich im Menü zurechtfinden können:
Mit der Taste
OK
wird die Programmierung gestartet. Während der Programmierung
leuchtet die Anzeige MENU im Display.
Mit den Tasten
und
können Sie die gewünschte Ebene aussuchen.
Mit der Taste
OK
wird diese Ebene geöffnet.
Mit den Tasten
und
können Sie dann wieder die gewünschte Funktion
aussuchen, um dann wieder mit der Menütaste
OK
zu bestätigen.
Mit der Taste
INT
gelangen Sie jeweils eine Ebene zurück.
Jeder Speichervorgang wird automatisch abgebrochen, wenn innerhalb von 60 Sekunden keine
Eingabe erfolgt.
Durch Festhalten der Taste
INT
können Sie die Programmierung jederzeit wieder verlassen,
ohne Änderungen vorzunehmen.
Im Kapitel 8.14 erhalten Sie eine komplette Übersicht des Menüs.
8.1 Rufsignale am Handapparat einstellen (Klingelmelodien)
Ihr Handapparat kann sich mit 8 verschiedenen Tonruf-Melodien melden, wenn Sie ein Anruf
erreicht. Betreiben Sie das Telefonsystem mit mehreren Handapparaten, können Sie für externe
und interne Anrufe unterschiedliche Melodien einstellen.
1. Drücken Sie die Menütaste
OK
.
2. Mit
das Menü HANDAPP wählen und mit
OK
bestätigen.
3. Mit
die Funktion EXT MEL (Tonruf bei externen Anrufen) oder INT MEL (Tonruf bei
internen Anrufen/nur bei zwei Handapparaten) wählen und mit
OK
bestätigen.
4. Mit
und
die gewünschte Melodie auswählen und mit
OK
bestätigen.
5. Wählen Sie nun weitere Menüfunktionen oder verlassen Sie das Menü durch Festhalten der
Taste
INT
.
Page 20
- Sonderfunktionen -
20
8.2 Lautstärke des Tonrufs am Handapparat
Die Lautstärke des Tonrufs am Handapparat kann in 5 Stufen eingestellt werden. Mit der
Funktion Crescendo klingelt der Handapparat zuerst leise und dann immer lauter. Möchten Sie
einmal nicht gestört werden, können Sie den Tonruf auch ganz abschalten. Ist der Tonruf
ausgeschaltet, werden eingehende Anrufe nur noch an der Basisstation und über das Display
am Handapparat signalisiert.
1. Drücken Sie die Menütaste
OK
.
2. Mit
das Menü HANDAPP wählen und mit
OK
bestätigen.
3. Mit
die Funktion RUF LAUT wählen und mit
OK
bestätigen.
4. Mit
und
die gewünschte Lautstärke wählen oder den Tonruf mit TON AUS
abschalten und mit
OK
bestätigen.
5. Wählen Sie nun weitere Menüfunktionen oder verlassen Sie das Menü durch Festhalten der
Taste
INT
.
8.3 Rufsignale an der Basisstation einstellen (Klingelmelodien)
Auch die Basisstation kann sich mit 5 verschiedenen Tonruf-Melodien melden, wenn Sie ein
Anruf erreicht.
1. Drücken Sie die Menütaste
OK
.
2. Mit
das Menü SETUP wählen und mit
OK
bestätigen.
3. Mit
die Funktion BA MEL wählen und mit
OK
bestätigen.
4. Mit
und
die gewünschte Melodie auswählen und mit
OK
bestätigen.
5. Wählen Sie nun weitere Menüfunktionen oder verlassen Sie das Menü durch Festhalten der
Taste
INT
.
8.4 Lautstärke des Tonrufs an der Basisstation
Die Lautstärke des Tonrufs an der Basisstation kann in 5 Stufen eingestellt werden. Möchten Sie
einmal nicht gestört werden, können Sie den Tonruf auch ganz abschalten.
1. Drücken Sie die Menütaste
OK
.
2. Mit
das Menü SETUP wählen und mit
OK
bestätigen.
3. Mit
die Funktion RUFLAUT wählen und mit
OK
bestätigen.
4. Mit
und
die gewünschte Lautstärke wählen oder den Tonruf mit TON AUS
abschalten und mit
OK
bestätigen.
5. Wählen Sie nun weitere Menüfunktionen oder verlassen Sie das Menü durch Festhalten der
Taste
INT
.
Page 21

- Sonderfunktionen -
21
8.5 Anrufe automatisch entgegennehmen
Eingehende Anrufe werden automatisch entgegengenommen, wenn Sie den Handapparat von
der Basisstation nehmen. Möchten Sie, dass Anrufe nur über die Taste
entgegengenommen werden, können Sie die automatische Annahme ausschalten.
1. Drücken Sie die Menütaste
OK
.
2. Mit
das Menü HANDAPP wählen und mit
OK
bestätigen.
3. Mit
die Funktion AUTO ANM wählen und mit
OK
bestätigen.
4. Mit
und
EIN oder AUS wählen und mit
OK
bestätigen.
5. Wählen Sie nun weitere Menüfunktionen oder verlassen Sie das Menü durch Festhalten der
Taste
INT
.
8.6 Hörerlautstärke anpassen
Die Hörerlautstärke können Sie hier Ihrer Umgebungslautstärke in fünf Stufen anpassen.
1. Drücken Sie die Menütaste
OK
.
2. Mit
das Menü HANDAPP wählen und mit
OK
bestätigen.
3. Mit
die Funktion HOER LAU wählen und mit
OK
bestätigen.
4. Mit
und
die gewünschte Lautstärke von 1 bis 5 wählen und mit
OK
bestätigen.
5. Wählen Sie nun weiteren Menüfunktionen oder verlassen Sie das Menü durch Festhalten
der Taste
INT
.
8.7 Displaynamen ändern
Im normalen Betrieb erscheint im Display die Anzeige „D6017“. Haben Sie mehrere
Handapparate an einer Basisstation angemeldet, kann es nützlich sein, jedem Handapparat
einen eigenen Namen zu geben. Die Nummer vor dem Namen zeigt, mit welcher Nummer der
Handapparat intern zu erreichen ist.
1. Drücken Sie die Menütaste
OK
.
2. Mit
das Menü HANDAPP wählen und mit
OK
bestätigen.
3. Mit
die Funktion NAME wählen und mit
OK
bestätigen.
4. Geben Sie über das Zahlenfeld den gewünschten Namen ein. Durch mehrmaliges Drücken
der Taste
INT
werden bereits eingegebene Buchstaben gelöscht.
5. Bestätigen Sie mit
OK
.
6. Wählen Sie nun weitere Menüfunktionen oder verlassen Sie das Menü durch Festhalten der
Taste
INT
.
Page 22
- Sonderfunktionen -
22
8.8 Hinweistöne ein-/ausschalten
Hier können verschiedene Warntöne ein- oder ausgeschaltet werden.
Tastenklick
Jeder Tastendruck wird vom Handapparat mit einem Tastenklick bestätigt. Der Tastenklick kann
ein- oder ausgeschaltet werden.
Warnton bei zu geringer Batteriekapazität
Bei zu geringer Batteriekapazität erinnert Sie ein Warnton, dass Sie den Handapparat laden
müssen.
Reichweitenwarnung
Haben Sie sich zu weit von der Basisstation entfernt, erinnert Sie ein Warnton, dass Sie den
Kontakt zur Basisstation verlieren werden.
1. Drücken Sie die Menütaste
OK
.
2. Mit
das Menü HANDAPP wählen und mit
OK
bestätigen.
3. Mit
die Funktion TON wählen und mit
OK
bestätigen.
4. Mit
und
eine der Funktionen TASTENTO, BATTERIE oder REICHWEI wählen und
mit
OK
bestätigen.
5. Mit
und
den gewählten Warnton ein- oder ausschalten und mit
OK
bestätigen.
6. Wählen Sie nun weitere Menüfunktionen oder verlassen Sie das Menü durch Festhalten der
Taste
INT
.
8.9 PIN-Code ändern
Einige Funktionen des Telefonsystems werden mit einem PIN Code vor unerlaubter Benutzung
geschützt. Der PIN-Code kann aus bis zu acht Zahlen bestehen. Im Lieferzustand wurde der
PIN-Code „0000“ eingestellt. Um den PIN-Code zu ändern gehen Sie wie folgt vor:
1. Drücken Sie die Menütaste
OK
.
2. Mit
das Menü SETUP wählen und mit
OK
bestätigen.
3. Mit
die Funktion PINCODE wählen und mit
OK
bestätigen.
4. Geben Sie nun den aktuellen, vierstelligen PIN-Code über das Zahlenfeld ein
(Werkseinstellung 0 0 0 0) und bestätigen Sie mit
OK
.
5. Geben Sie nun den neuen PIN-Code über das Zahlenfeld ein und bestätigen Sie mit
OK
.
6. Geben Sie nun den neuen PIN-Code zur Bestätigung erneut ein und bestätigen Sie mit
OK
.
7. Wählen Sie nun weitere Menüfunktionen oder verlassen Sie das Menü durch Festhalten der
Taste
INT
.
Wird der alte Pin-Code nicht richtig eingegeben, wird der Vorgang abgebrochen.
Page 23

- Sonderfunktionen -
23
8.10 Displaysprache einstellen
Die Displayanzeigen sind in den Sprachen Deutsch, Italienisch, Englisch, Französisch und
Spanisch einstellbar.
1. Drücken Sie die Menütaste
OK
.
2. Mit
das Menü HANDAPP wählen und mit
OK
bestätigen.
3. Mit
die Funktion SPRACHE wählen und mit
OK
bestätigen.
4. Mit
und
eine Sprache wählen und mit
OK
bestätigen.
5. Durch Festhalten der Taste
INT
verlassen Sie den Eingabemodus.
8.11 FLASH-Zeit einstellen
1. Drücken Sie die Menütaste
OK
.
2. Mit
das Menü SETUP wählen und mit
OK
bestätigen.
3. Mit
die Funktion FLASH wählen und mit
OK
bestätigen.
4. Mit
und
die Flashzeit FLASH 1 (80ms), FLASH 2 (100ms), FLASH 3 (180ms),
FLASH 4 (300ms) oder FLASH 5 (600ms) wählen und mit
OK
bestätigen.
5. Durch Festhalten der Taste
INT
verlassen Sie den Eingabemodus.
8.12 Länge der Pause einstellen
1. Drücken Sie die Menütaste
OK
.
2. Mit
das Menü SETUP wählen und mit
OK
bestätigen.
3. Mit
die Funktion PAUSE wählen und mit
OK
bestätigen.
4. Mit
und
die Zeit PAUSE 1 (1s), PAUSE 2 (1,5s), PAUSE 3 (2s) oder PAUSE
4 (3s) wählen und mit
OK
bestätigen.
5. Durch Festhalten der Taste
INT
verlassen Sie den Eingabemodus.
8.13 Werkseinstellungen wieder herstellen
Mit dieser Funktion werden der Handapparat und die Basisstation wieder auf die
Werkseinstellungen zurückgesetzt. Das Telefonbuch, die Anruferliste (CLIP) und alle
Rufnummern der Wahlwiederholung werden gelöscht.
Werkseinstellungen:
S
p
rache: Deutsch Name Handapparat: D6017
Warnton Batterie: Ein Automatische Rufannahme ein
Warnton Reichweite: Ein Tonrufmelodie extern: 2
Tastenklick: Ein Tonrufmelodie intern: 3
Hörerlautstärke: 4 Tonruflautstärke Handapparat: 4
Pin Code: 0 0 0 0 Tonrufmelodie Basis : 3
Pause: 3 Sek. Tonruflautstärke Basis : 4
FLASH-Zeit: 100ms
Page 24
- Sonderfunktionen -
24
1. Drücken Sie die Menütaste
OK
.
2. Mit
das Menü SETUP wählen und mit
OK
bestätigen.
3. Mit
die Funktion VOREINST wählen und mit
OK
bestätigen.
4. Über das Zahlenfeld den PIN Code eingeben (Werkseinstellung 0000).
5. Bestätigen Sie mit der Menütaste
OK
.
6. Nach kurzer Zeit sind die Werkseinstellungen wieder hergestellt. Das Display zeigt wieder
den Bereitschaftsmodus an.
Hinweis: Haben Sie den PIN Code vergessen, können Sie die Werkseinstellungen auch ohne
den PIN Code wieder einstellen.
1. Schalten Sie den Handapparat durch längeres Festhalten der Taste
INT
aus.
2. Schalten Sie den Handapparat wieder mit der Taste
INT
und sehen Sie auf das Display.
3. Sobald alle Symbole im Display zu sehen sind, drücken Sie kurz die Taste
. Im Display
erscheint die Meldung VOREINST erscheint.
4. Bestätigen Sie mit
OK
und die Werkseinstellungen werden wieder hergestellt. Mit der
Taste
INT
können Sie den Vorgang abbrechen.
Page 25
- Sonderfunktionen -
25
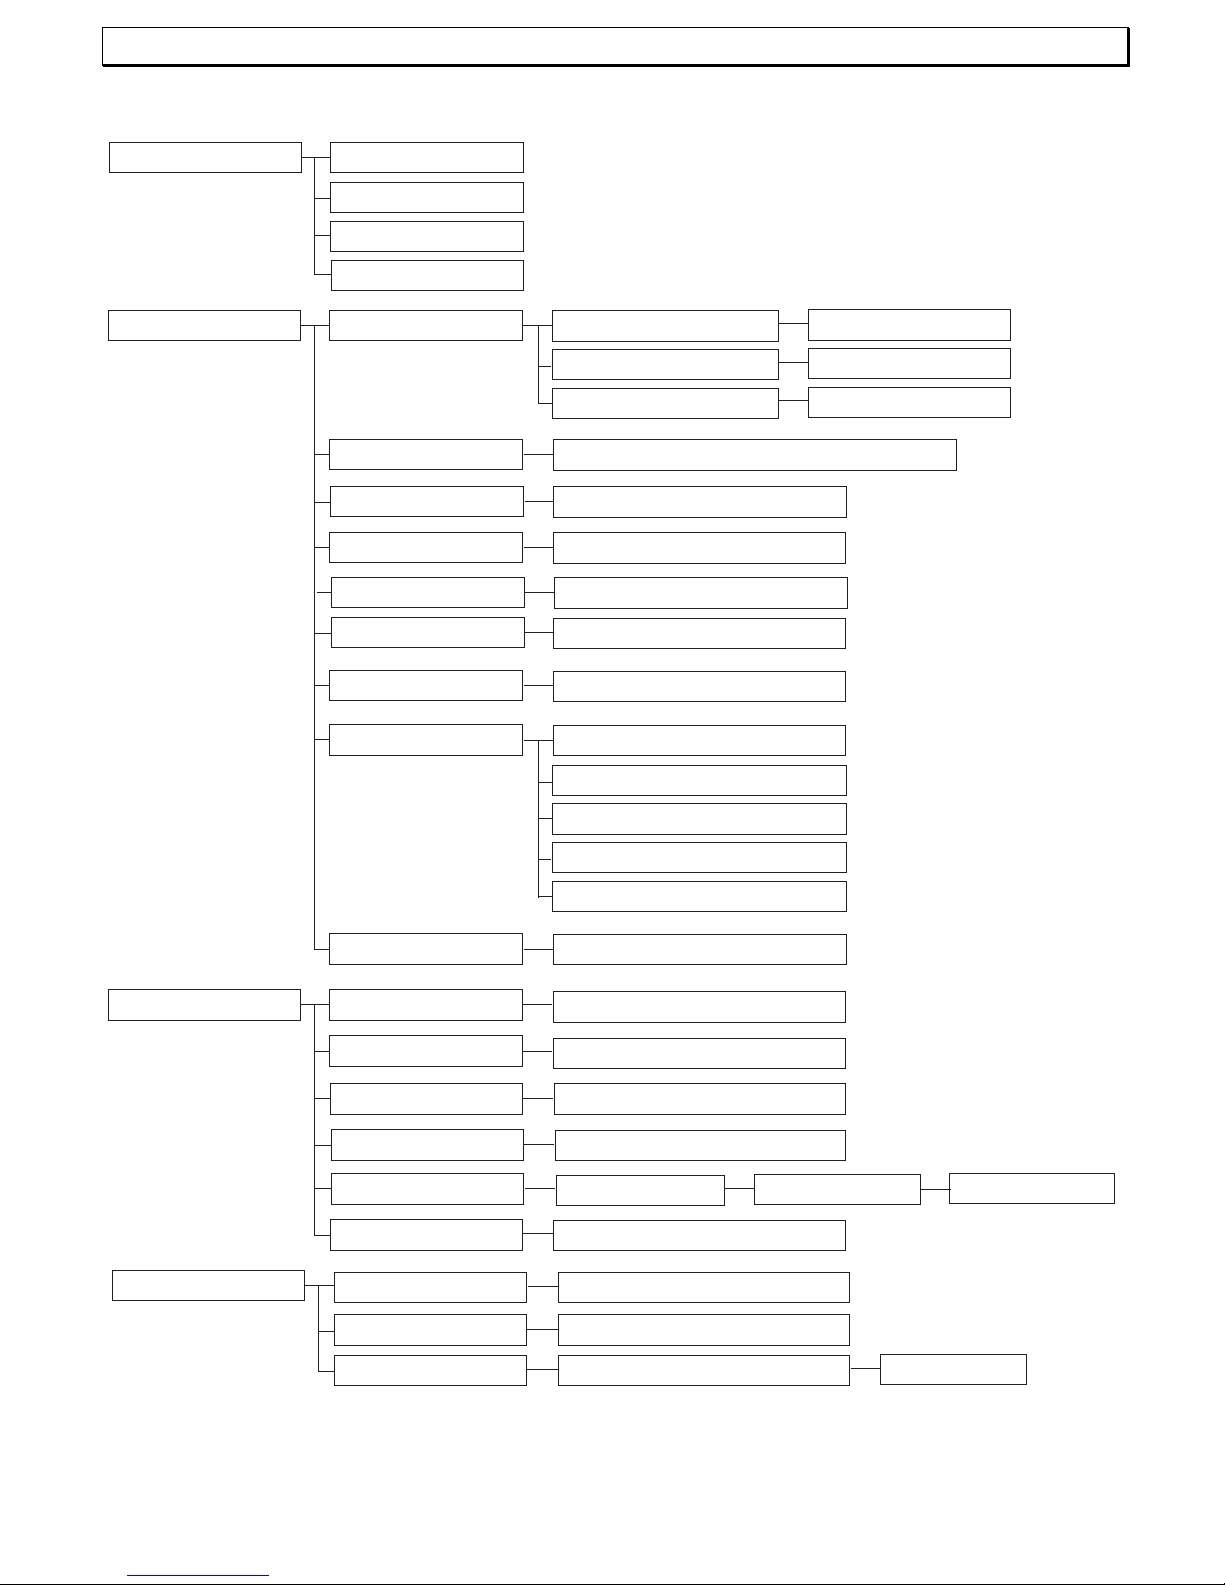
8.14 Menüstruktur
Tel-Buch
Zufuegen
Aendern
Loeschen
Liste
Menue Anmeld
Handapp
Ton
Batterie
Reichwei
Tastento
OK
Ein - Aus
Ein - Aus
Ein - Aus
Ruf Laut
Laust 1...5, Crescendo, Ton aus
Ext Mel
Melodie 1...8
Melodie 1...8
Laust 1...5
Int Mel
Hoer Lau
Auto Anm
Name
Datum-Zeit
.........
04/02 16:25
Sprache
Deutsch
Espanol
Francais
Italiano
English
Anmelden
Ba-Wahl
H-Abmeld
BS1234
Pin
Auto, Basis1234
SetUp Ruf Laut
Lautst 1...5, Ton aus
Ba-Mel
Melodie 1...5
PIN
Pincode
PIN
Neue Pin
Wiederh
Voreinstellg
Pause
Pause 1...4
Flash
Flash 1...5
Ein - Aus
Page 26
- Fehlerbeseitigung -
26
9 Fehlerbeseitigung
Haben Sie Probleme mit Ihrem Telefon, kontrollieren Sie bitte die folgenden Hinweise. Bei
Garantieansprüchen wenden Sie sich bitte an Ihren Fachhändler. Die Garantiezeit beträgt 2
Jahre. Für die wiederaufladbaren Batterien gilt eine Garantiezeit von 12 Monaten.
Kein Telefongespräch
möglich
Die Telefonleitung ist nicht korrekt angeschlossen oder gestört.
Verwenden Sie nur das mitgelieferte Telefonkabel.
Testen Sie mit einem anderen Telefon, ob Ihr Telefonanschluss in
Ordnung ist.
Das Steckernetzteil ist nicht eingesteckt oder es liegt ein totaler
Stromausfall vor.
Die aufladbaren Standard-Akkus sind leer oder defekt.
Sie haben sich zu weit von der Basisstation entfernt.
Verbindung abgehackt,
fällt aus
Sie haben sich zu weit von der Basisstation entfernt.
Falscher Aufstellungsort der Basisstation.
Keine Wahl möglich Das Telefon arbeitet mit dem Tonwahlverfahren. Bitte überprüfen Sie
Ihren Telefonanschluss.
Das System reagiert
nicht mehr oder befindet
sich in einem
undefinierten Zustand.
Setzen Sie alle Funktionen in den Werkszustand zurück. Ziehen Sie
vorher kurzzeitig das Steckernetzteil aus der Steckdose.
Werkseinstellung siehe Kapitel 8.13.
Die Ladekontrollleuchte
leuchtet nicht.
Stellen Sie den Handapparat richtig auf die Basisstation, reinigen Sie
die Kontaktflächen am Handapparat und an der Basisstation mit
einem weichen, trockenen Tuch.
Im Display blinkt nach
ein paar Stunden das
Batterie-Symbol.
Legen Sie den Handapparat für 16 Stunden auf die Basisstation.
Hilft dies nicht, erneuern Sie die aufladbaren Standard-Akkus .
Display-Anzeige dunkel Verursacht durch direkte Sonnenbestrahlung, Handapparat abkühlen
lassen.
Uhrzeit und Datum
verstellt
Es lag ein Stromausfall der Basisstation vor. Bitte neu eingeben.
Page 27
- Technische Daten -
27
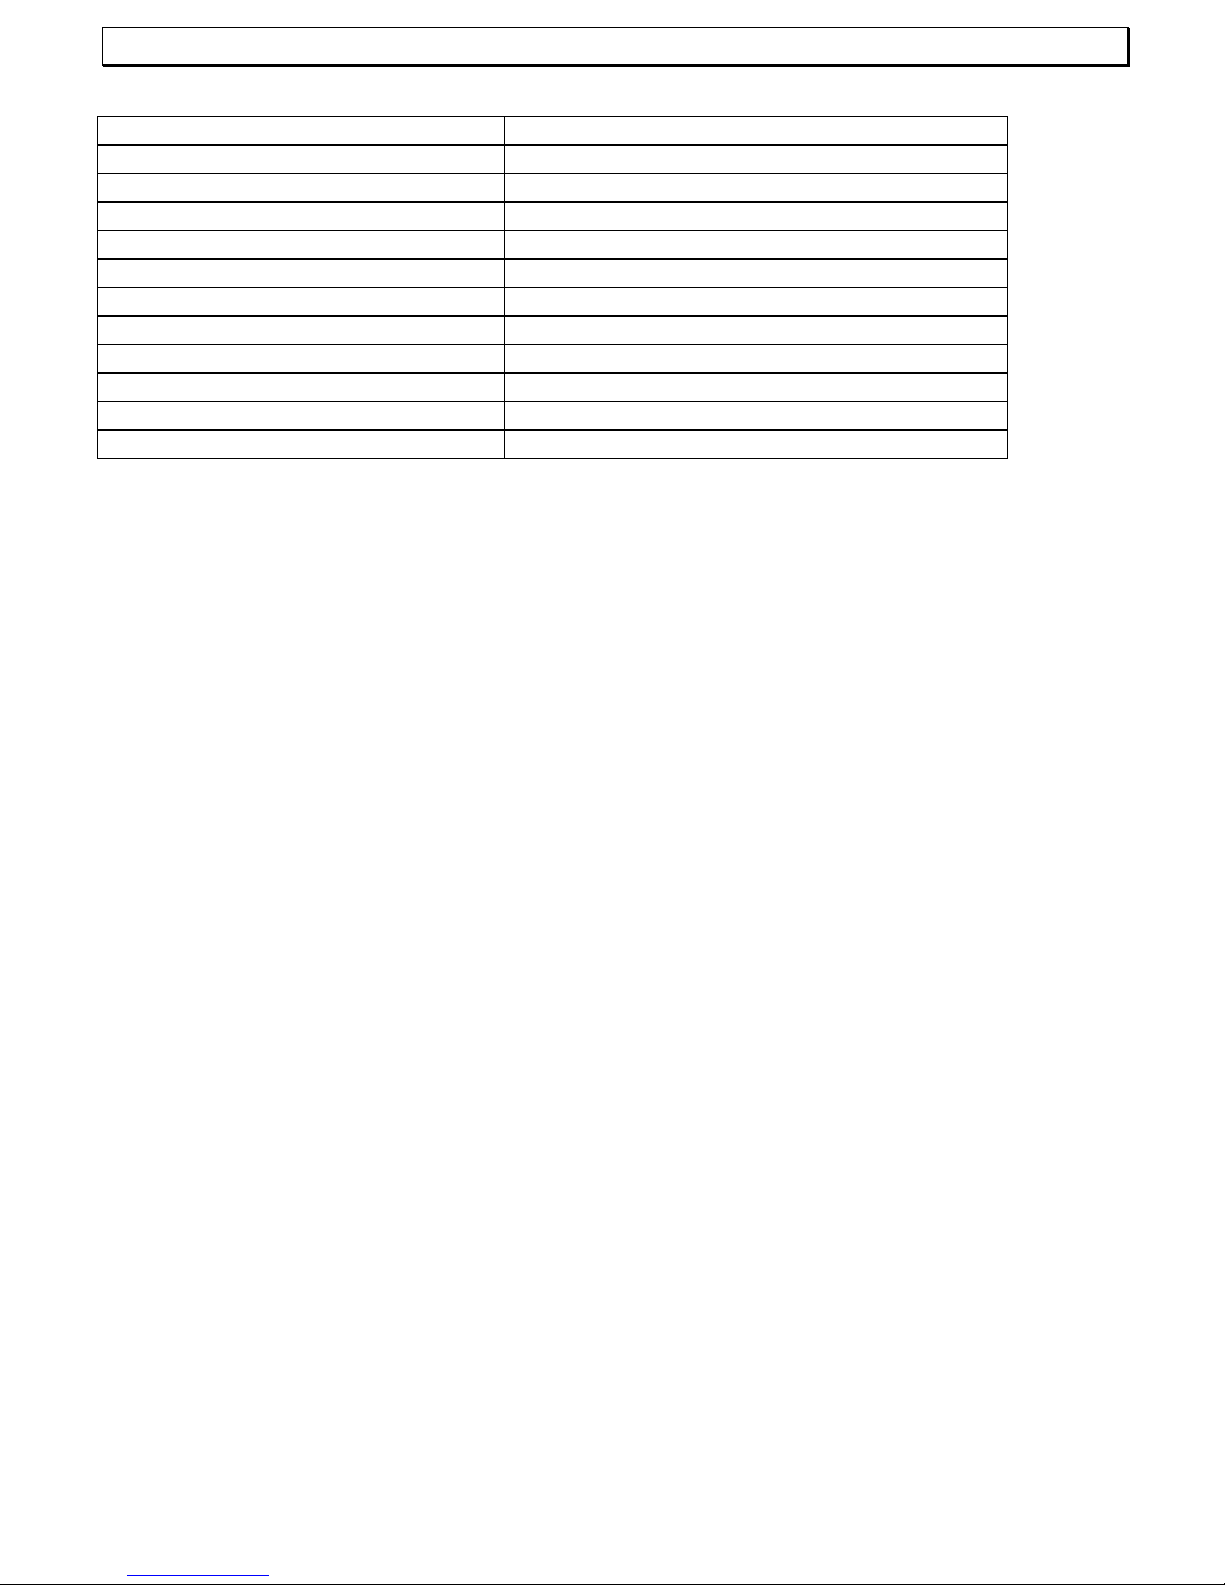
10 Technische Daten
Standard DECT-GAP
Kanalzahl 1880 bis 1990 MHz
Stromversorgung Basisstation 220/230V, 50 Hz
Reichweite Innen bis zu 50m
Reichweite Aussen bis zu 300m
Standby bis zu 100 Stunden
Max. Gesprächsdauer bis zu 8 Stunden
Aufladbare Standard-Akkus 3 x 1,2V/600mAh, Typ AAA
Wählverfahren MFV
Zulässige Umgebungstemperatur 10°C bis 30°C
Zulässige relative Luftfeuchtigkeit 20 bis 75%
Signaltastenfunktion 90ms oder 250ms
Page 28

28
Page 29

- Sommaire -
29
1 Remarques générales ...................................................................................... 31
2 Éléments de commande................................................................................... 32
3 Mise en service ................................................................................................. 33
3.1 Consignes de sécurité......................................................................................................33
3.2 Contrôler le contenu de l’emballage.................................................................................33
3.3 Raccorder la base ............................................................................................................33
3.4 Remplacer des batteries ..................................................................................................33
3.5 Charge des batteries ........................................................................................................33
3.6 Installer le clip ceinture.....................................................................................................34
3.7 Régler la langue d’affichage à l’écran ..............................................................................34
3.8 Régler l’heure et la date ...................................................................................................34
4 Utilisation .......................................................................................................... 35
4.1 L’écran..............................................................................................................................35
4.2 Répondre aux appels .......................................................................................................35
4.3 Appeler .............................................................................................................................36
4.4 Composer les numéros de téléphone enregistrés dans le répertoire ..............................36
4.5 Affichage de la durée de communication .........................................................................36
4.6 Indications concernant la portée ......................................................................................36
4.7 Désactiver le micro du combiné .......................................................................................37
4.8 Réglages du volume de l’écouteur...................................................................................37
4.9 Rappel du dernier numéro composé................................................................................37
4.10 Activer / désactiver le combiné.........................................................................................37
4.11 Verrouillage du clavier......................................................................................................38
4.12 Paging de la base vers le combiné ..................................................................................38
5 Le répertoire...................................................................................................... 39
5.1 Entrer des numéros de téléphone dans le répertoire.......................................................39
5.2 Modifier des numéros de téléphone du répertoire............................................................40
5.3 Effacer des numéros de téléphone du répertoire .............................................................40
5.4 Contrôler des numéros de téléphone enregistrés dans le répertoire ...............................41
6 Affichage des numéros de téléphone (CLIP) ................................................. 42
6.1 La liste des appelants.......................................................................................................42
6.2 Enregistrer dans le répertoire des numéros de téléphone de la liste des appelants .......43
6.3 Effacer des numéros de téléphone de la liste des appelants...........................................43
7 Autocommutateurs........................................................................................... 44
7.1 Utiliser une pause.............................................................................................................44
Page 30

- Sommaire -
30
8 Fonctions spéciales ......................................................................................... 45
8.1 Régler les signaux de sonnerie sur le combiné (mélodies de sonnerie)..........................45
8.2 Volume de la sonnerie du combiné..................................................................................46
8.3 Régler les signaux de sonnerie sur la base (mélodie de sonnerie) .................................46
8.4 Volume de la sonnerie de la base....................................................................................46
8.5 Réception automatique des appels..................................................................................47
8.6 Ajuster le volume de l’écouteur ........................................................................................47
8.7 Modifier les noms d’écran ................................................................................................47
8.8 Activer/désactiver les signaux sonores d’indication .........................................................48
8.9 Modifier le code PIN.........................................................................................................48
8.10 Régler la langue d’affichage à l’écran ..............................................................................49
8.11 Régler la durée de FLASH ...............................................................................................49
8.12 Régler la longueur de la pause ........................................................................................49
8.13 Rétablir les réglages par défaut .......................................................................................50
8.14 Structure du menu............................................................................................................51
9 Suppression des erreurs ................................................................................. 52
10 Caractéristiques techniques............................................................................ 53
Page 31

- Remarques générales -
31
1 Remarques générales
Batteries rechargeables
Ne pas utiliser d’autres batteries rechargeables ou bloc de batterie qui risqueraient
éventuellement de provoquer un court-circuit.
Pour le remplacement, utilisez toujours uniquement des batteries rechargeables de type AAA
1,2 volts, 600mA.
Ne pas jeter les batteries au feu, ni les plonger dans l’eau. Ne pas jeter les batteries usées ou
défectueuses en même temps que les ordures ménagères.
Le réchauffement du combiné se produisant éventuellement lors de sa charge est normal et
sans danger.
Ne chargez pas le combiné à l’aide de chargeurs d’autres marques car cela risquerait de
provoquer des détériorations.
Lieu d’installation
Le lieu d’installation doit être pourvu d’une prise de courant de 230 volts. N’installez pas la base
à proximité directe d’autres appareils électroniques tels que par ex. les fours à micro-ondes ou
les chaînes hi-fi car cela pourrait provoquer des perturbations mutuelles. Le lieu d’installation a
une grande influence sur le parfait fonctionnement du téléphone.
Placez la base sur une surface plane et antidérapante. Normalement, les pieds de la base ne
marquent pas la surface sur laquelle elle est posée. La multitude de vernis et de surfaces utilisés
ne permet cependant pas d’exclure l’éventualité de traces laissées par les pieds de l’appareil sur
la surface sur laquelle il est posé.
N’utilisez pas le combiné dans des zones menacées d’explosion.
Évitez les expositions excessives à la fumée, à la poussière, aux secousses, à des substances
chimiques, à l'humidité, à la chaleur ou l'exposition directe au soleil.
Remarque d’ordre médical
Le téléphone fonctionne avec une très faible puissance d’émission. Selon le niveau actuel de la
recherche et de la technique, cette faible puissance d’émission exclue une mise en danger de la
santé. Il a cependant été établi que les téléphones portables allumés peuvent perturber des
appareils médicaux. Respectez en conséquence une distance minimale d’un mètre avec les
appareils médicaux.
Élimination
Lorsque les batteries rechargeables ou l’installation entière arrivent en fin de vie, veuillez les
éliminer en respectant l’environnement conformément aux dispositions légales.
Température et conditions ambiantes
Le téléphone est conçu pour une utilisation dans des locaux abrités avec une plage de
températures de 10 °C à 30 °C.
La base ne doit pas être installée dans des pièces humides telles que la salle de bains ou la
buanderie. Évitez de placer l’appareil à proximité de sources de chaleur telles que les radiateurs
et évitez une exposition directe au soleil.
Nettoyage et entretien
Vous pouvez utiliser un chiffon sec, doux et non-pelucheux pour nettoyer les surfaces du boîtier.
N'utilisez jamais de produit nettoyant ou de solvants agressifs. Aucun entretien n’est nécessaire
hormis le nettoyage du boîtier de temps en temps. Les pieds en caoutchouc de la base ne sont
pas résistants à tous les produits nettoyants. Par conséquent, le fabricant ne peut être tenu
responsable d’éventuelles détériorations survenant aux meubles ou autres.
Page 32

- Éléments de commande -
32
2 Éléments de commande
Combiné
1 Répertoire
2 Rappel du dernier numéro composé /
Touche de sélection
3 Touche de menu / OK
4 La liste des appelants (CLIP) / Touche de
sélection
5 D’effacement / Quittez de menu /
Communications internes / Activer /
désactiver le combiné
6 Touche secret
7 Touche de signal R
8 Touche de communication
Base
1 Touche PAGE
2 Voyant de communication et
CLIP
3 Voyant de contrôle de charge
1
2
3
4
5
6
7
8
1
2
3
Page 33

- Mise en service -
33
3 Mise en service
3.1 Consignes de sécurité
ATTENTION ! Veuillez impérativement lire, avant la mise en service, les remarques générales
faites au début du présent mode d’emploi.
3.2 Contrôler le contenu de l’emballage
Le contenu de l’emballage :
Une base Un cordon d’alimentation électrique
Un combiné Trois batteries
Un cordon téléphonique Un mode d’emploi
Un clip ceinture
3.3 Raccorder la base
Installez le téléphone à proximité d’une prise téléphonique et d’une prise de courant.
1. Enfoncez la fiche du bloc d'alimentation dans la prise située sur la face inférieure de la
base et le bloc d'alimentation dans une prise de courant de 230 V installée conformément
aux dispositions réglementaires. Le bloc d’alimentation de la base doit toujours être
raccordé. Pour des raisons de sécurité, utilisez uniquement le bloc d’alimentation fourni.
2. Reliez le cordon téléphonique fourni à la prise téléphonique et à la prise située sur la face
inférieure de la base. Utilisez uniquement le cordon téléphonique neuf fourni.
3.4 Remplacer des batteries
Les batteries rechargeables (AAA, 1,2V, 600mAh) possèdent une autonomie en
veille de 100 heures maximum et une durée de communication maximale pouvant
atteindre 10 heures. Ouvrez le compartiment des batteries pour mettre en place
ou remplacer les batteries et placez les nouvelles batteries dedans en respectant
la polarité adéquate, puis refermez le compartiment des batteries. Utilisez
uniquement des batteries rechargeables de type AAA 2 x 1,2V.
Remarque importante : Laissez le combiné posé sur la base avec l’écran vers
l’avant pendant au moins 16 heures. Des batteries incorrectement chargées
peuvent provoquer des dysfonctionnements du téléphone. L’icône de capacité de
batterie clignote à l’écran au cours de la procédure de charge du combiné. Le
voyant de contrôle de la base
sera toujours allumé dès que le combiné est
posé.
3.5 Charge des batteries
Les batteries rechargeables de votre téléphone sont dotées à température ambiante d’une
autonomie en veille de max. 100 heures et d’une durée de communication maximale de 8
heures. La capacité de batterie actuelle est affichée à l’écran :
Pour charger les batteries, placez le combiné dans la base avec l’écran vers l’avant.
Page 34

- Mise en service -
34
3.6 Installer le clip ceinture
Enfoncez le clip ceinture dans la coulisse jusqu’à ce qu’il s’enclenche sur les côtés de manière
perceptible.
3.7 Régler la langue d’affichage à l’écran
Les messages peuvent être affichés à l’écran en allemand, italien, anglais, français et en
espagnol.
1. Appuyer sur la touche de menu
OK
.
2. Sélectionner le menu COMBINE à l’aide la touche
, puis valider à l’aide de la touche
OK
.
3. Sélectionner la fonction LANGUE à l’aide la touche
, puis valider à l’aide de la touche
OK
.
4. Sélectionner une langue à l’aide des touches
et
, puis valider à l’aide de la touche
OK
.
5. Quittez le mode d’entrée en appuyant sur la touche
INT
.
3.8 Régler l’heure et la date
Il est souhaitable de régler l’heure et la date actuelle avant d’utiliser le téléphone. L’heure
actuelle est indiquée sur l’écran d’affichage principal.
1. Appuyez sur la touche de menu
OK
.
2. Sélectionnez le menu COMBINE à l’aide de la touche
, puis validez avec la touche
OK
.
3. Sélectionnez la fonction DATE-HEURE à l’aide de la touche
, puis validez avec la
touche
OK
.
4. Entrez consécutivement le jour, le mois et l’heure :
Exemples : 09 mars – 8h52 => 09 03 08 52
21 novembre – 16h08 => 21 11 16 08
5. Validez à l’aide de la touche
OK
.
6. Quittez le mode d’entrée des données en appuyant sur la touche
INT
.
Page 35

- Utilisation -
35
4 Utilisation
4.1 L’écran
En mode de fonctionnement normal, l’écran affiche le nom du combiné. Le nom préréglé peut
être modifié à tout moment. Voir à cet effet le point 8.7
Toutes les fonctions importantes sont en outre signalées à l’écran par diverses icônes.
Allumée : vous êtes en communication.
Allumée : vous êtes en communication externe.
Clignote : vous recevez un appel externe.
Allumée : vous vous trouvez dans la liste des appelants (CLIP).
Clignote : de nouveaux appels sont enregistrés dans la liste des appelants (CLIP).
Allumée : lors de l’utilisation du répertoire.
MENU
Allumée : dès que la programmation est activée.
Allumée :Le verrouillage du clavier est activé.
Constant : la liaison avec la base est bonne.
Clignote : la portée avec la base est dépassée.
Constant : le numéro de téléphone comporte plus de 12 chiffres.
4.2 Répondre aux appels
Lorsque vous recevez un appel, la sonnerie retentit sur le combiné et sur la base. La
transmission radio fait que le combiné sonne avec un léger retard par rapport à la base. Le
message
clignote à l’écran. Appuyez sur la touche de communication
du combiné
et la liaison est établie.
Remarque : Vous pouvez modifier le volume de la sonnerie pendant que le combiné sonne à
l’aide des touches
et
.
Pour mettre fin à la communication, replacez le combiné dans la base ou appuyez sur la touche
de communication
du combiné.
Remarques : Pour obtenir des informations sur l’affichage des numéros de téléphone
à l’écran, veuillez vous reporter au chapitre 6.
Lorsque la réception automatique des appels est activée, l’appel est automatiquement
réceptionné dès que vous décrochez le combiné de la base. Reportez-vous au chapitre 8.5 pour
savoir comment activer la réception automatique des appels.
Page 36

- Utilisation -
36
4.3 Appeler
1. Entrez au clavier le numéro de téléphone souhaité comportant au max. 25 chiffres. Les
chiffres des touches enfoncées s’affichent à l’écran. L’écran ne pouvant afficher qu’au
maximum 12 chiffres, seuls les 12 derniers chiffres sont affichés en cas de numéro de
téléphone plus long.
Remarque : Si vous avez entré un chiffre erroné, vous pouvez effacer le numéro de téléphone
en appuyant plusieurs fois sur la touche
INT
. Vous pouvez effacer entièrement le numéro de
téléphone en appuyant longuement sur la touche
INT
.
2. Appuyez sur la touche de communication
et la liaison souhaitée est établie.
Remarque : Vous pouvez également appuyer d’abord sur la touche de communication
et obtenir ainsi la tonalité. Votre téléphone compose directement le numéro de téléphone
souhaité lorsque vous entrez les chiffres de ce numéro. Cette forme d’établissement de la
communication ne permet pas la correction individuelle des chiffres du numéro de téléphone
mentionnée ci-dessus.
4.4 Composer les numéros de téléphone enregistrés dans le répertoire
Après avoir enregistré quelques numéros de téléphone, vous pouvez les activer très rapidement
et aisément.
1. Appuyez sur la touche de répertoire
. L’écran affiche alors dans l’ordre alphabétique
le premier numéro de téléphone enregistré.
2. Les touches
et
vous permettent de composer tous les numéros de téléphone
enregistrés.
Pour composer directement dans l’ordre alphabétique un numéro de téléphone, appuyez sur
les lettres correspondantes.
3. Appuyez ensuite sur la touche de communication
et le numéro de téléphone affiché
est automatiquement composé.
4.5 Affichage de la durée de communication
La durée de communication est affichée à l’écran en minutes et en secondes en cours de
communication. Elle s’affiche à l’écran à la place du numéro composé 15 secondes après la
composition du numéro de téléphone. L’indication reste affichée à l’écran pendant quelques
secondes après la fin de la communication.
4.6 Indications concernant la portée
La portée du combiné atteint env. 50 mètres dans des pièces fermées et env. 300 mètres
dehors. L’icône
est allumée à l’écran lorsque la liaison avec la base est bonne.
L’icône
clignote à l’écran lorsque vous vous êtes trop éloigné de la base et des signaux
d’avertissement retentissent. Rapprochez-vous dans ce cas de la base, car la communication
sera autrement interrompue. Vous pouvez désactiver ces signaux sonores d’avertissement
comme décrit au chapitre 8.8.
Page 37

- Utilisation -
37
4.7 Désactiver le micro du combiné
La touche
vous permet de désactiver le micro du combiné en cours de communication
téléphonique. Vous pouvez ainsi parler sans être entendu de votre correspondant. Le hautparleur du combiné reste activé, ce qui vous permet de continuer à entendre votre
correspondant.
1. Appuyez une fois sur la touche
en cours de communication. L’icône apparaît à
l’écran.
2. Pour réactiver le micro, appuyez à nouveau sur la touche
. L’icône s’éteint et
vous pouvez poursuivre normalement la communication.
4.8 Réglages du volume de l’écouteur
Si vous trouvez que le volume de l’écouteur est trop faible ou trop fort, vous pouvez l’adapter à
vos besoins.
Vous pouvez régler le volume en cours de communication à l’aide des touches
et
. Le
volume sélectionné est indiqué à l’écran par VOLUME 1 à 5.
4.9 Rappel du dernier numéro composé
Vous pouvez utiliser la fonction de rappel du dernier numéro composé lorsque la ligne de votre
correspondant est occupée ou si celui-ci ne répond pas. Votre téléphone enregistre les 10
derniers numéros composés.
1. Appuyez sur la touche
et le dernier numéro de téléphone composé s’affiche à
l’écran.
2. D’autres numéros de téléphone de la fonction de rappel du dernier numéro composé
peuvent ensuite être composés en appuyant plusieurs fois sur la touche
. La
touche
vous permet de faire défiler en arrière les numéros de la liste.
3. Appuyez ensuite sur la touche de communication
et le numéro de téléphone
affiché est automatiquement composé.
Remarque : Lorsqu’un numéro de téléphone de la fonction de rappel du dernier numéro
composé est enregistré dans le répertoire, le nom s’affiche automatiquement à l’écran et non
pas le numéro de téléphone.
4.10 Activer / désactiver le combiné
Vous pouvez désactiver le combiné en appuyant longuement sur la touche
INT
. Le combiné
n’utilise pas l’énergie des batteries lorsqu’il est désactivé. Aucun appel ne peut être réceptionné.
Appuyez une fois sur la touche
INT
pour réactiver le combiné. L’écran affiche le message
BASE et le combiné est réactivé peu de temps après. Il se réactive automatiquement dès que le
combiné est à nouveau posé sur la base.
Page 38

- Utilisation -
38
4.11 Verrouillage du clavier
Si vous portez fréquemment le combiné sur vous, vous pouvez verrouiller le clavier afin d’éviter
tout enfoncement involontaire des touches. Les appels entrants peuvent être réceptionnés
normalement lorsque le verrouillage du clavier est activé.
Activer le verrouillage du clavier.
Appuyez sur des touches
OK
et
du combiné. L’icône s’affiche à l’écran.
Désactiver le verrouillage du clavier
Pour annuler le verrouillage du clavier, appuyez sur des touches
OK
et .
4.12 Paging de la base vers le combiné
S’il vous est impossible de vous souvenir de l’endroit où se trouve votre combiné, appuyez sur la
touche
de la base. Le combiné émet des signaux sonores pendant 30 secondes qui vous
permettront ainsi de le retrouver aisément. Vous pouvez mettre fin prématurément aux signaux
sonores, en appuyant sur une touche quelconque du combiné ou sur la touche
de la base.
Page 39

- Le répertoire -
39
5 Le répertoire
Vous pouvez enregistrer dans le répertoire 25 numéros de téléphone avec les noms. La
longueur maximale d’un numéro de téléphone est de 25 chiffres.
5.1 Entrer des numéros de téléphone dans le répertoire
1. Appuyez sur la touche de menu
OK
. L’écran affiche le message REPERTOIRE.
2. Appuyez de nouveau sur la touche
OK
. L’écran affiche le message AJOUTER.
3. Validez de nouveau à l’aide de la touche de menu
OK
. L’écran affiche le message NOM.
4. Entrez alors au clavier le nom correspondant (max. 12 lettres). La section suivante vous
indique comment entrer le nom.
5. Validez le nom à l’aide de la touche de menu
OK
. L’écran affiche le message NUMERO.
6. Entrez au clavier le numéro de téléphone souhaité.
7. Validez de nouveau à l’aide de la touche de menu
OK
. L’écran affiche de nouveau le
message AJOUTER.
8. Si vous souhaitez enregistrer d’autres numéros de téléphone, poursuivez avec le point 3.
Quittez le mode d’entrée en appuyant sur la touche
INT
.
Remarque : Lorsque la capacité de mémoire de 25 numéros de téléphone est pleine, l’écran
indique le message PLEINE lors de l’enregistrement suivant. Pour disposer à nouveau de place,
il faut d’abord effacer d’autres numéros de téléphone.
Explication pour entrer le nom
Les touches de chiffres du clavier comportent des lettres servant à entrer le nom. En appuyant
plusieurs fois sur la touche correspondante, vous pouvez entrer des lettres majuscules ainsi que
des chiffres.
Exemple : Vous souhaitez entrer le nom « Peter ».
Appuyez sur : 1 x touche 7, 2 x touche 3, 1 x touche 8, 2 x touche 3, 3 x touche 7.
- Appuyez une fois sur la touche n pour entrer un espace.
- En appuyant deux fois sur la touche n, vous pouvez en plus entrer un trait d’union.
- Pour entrer deux fois la même lettre, appuyez sur la lettre correspondante et attendez que le
curseur se place automatiquement sur la position suivante.
- Vous pouvez effacer les entrées erronées à l’aide de la touche
INT
.
Page 40

- Le répertoire -
40
5.2 Modifier des numéros de téléphone du répertoire
1. Appuyez sur la touche de menu
OK
. L’écran affiche REPERTOIRE.
2. Appuyez de nouveau sur la touche
OK
. L’écran affiche AJOUTER.
3. Appuyez à présent sur la touche
. L’écran affiche MODIFIER.
4. Validez de nouveau à l’aide de la touche de menu
OK
. L’écran affiche alors dans l’ordre
alphabétique les numéros de téléphone enregistrés.
5. Sélectionnez à présent à l’aide des touches
et
le numéro de téléphone que
vous souhaitez modifier. Pour composer directement dans l’ordre alphabétique un numéro de
téléphone, appuyez sur les lettres correspondantes.
6. Validez la sélection à l’aide de la touche de menu
OK
. L’écran affiche de nouveau le nom.
Le curseur clignote en plus derrière la dernière lettre.
7. Modifiez alors au clavier le nom. Pour savoir comment entrer le nom, reportez-vous au
chapitre 5.1.
8. Après avoir procédé aux modifications souhaitées, validez de nouveau à l’aide de la touche
de menu
OK
. L’écran affiche alors le numéro de téléphone.
9. Modifiez alors au clavier le numéro de téléphone. Chaque chiffre du numéro de téléphone
s’efface en appuyant plusieurs fois sur la touche
INT
.
10. Après avoir procédé aux modifications souhaitées, validez de nouveau à l’aide de la touche
de menu
OK
. L’écran affiche le message MODIFIER.
11. Si vous souhaitez modifier d’autres numéros de téléphone, poursuivez avec le point 4. Quittez
le mode de programmation en appuyant sur la touche
INT
.
5.3 Effacer des numéros de téléphone du répertoire
1. Appuyez sur la touche de menu
OK
. L’écran affiche REPERTOIRE.
2. Appuyez de nouveau sur la touche
OK
. L’écran affiche AJOUTER.
3. En appuyant deux fois sur la touche
. L’écran affiche EFFACER.
4. Validez à l’aide de la touche de menu
OK
.
5. Sélectionnez à présent à l’aide des touches
et
le numéro de téléphone que
vous souhaitez effacer. Pour composer directement dans l’ordre alphabétique un numéro de
téléphone, appuyez sur les lettres correspondantes.
6. Lorsque vous avez trouvé le numéro de téléphone souhaité, validez à l’aide de la touche de
menu
OK
et l’écran affiche alors le numéro.
7. Validez à l’aide de la touche de menu
OK
et l’écran affiche le message CONFIRMER?.
8. Validez de nouveau à l’aide de la touche de menu
OK
et l’inscription de répertoire est
effacée. L’écran affiche de nouveau le message EFFACER. La procédure d’effacement
s’interrompt en appuyant sur la touche
INT
.
9. Le message EFFACER s’affiche à l’écran lorsque vous avez effacé le numéro de téléphone.
Si vous souhaitez effacer d’autres numéros de téléphone, poursuivez avec le point 4. Quittez
le mode d’effacement en appuyant sur la touche
INT
.
Page 41

- Le répertoire -
41
5.4 Contrôler des numéros de téléphone enregistrés dans le répertoire
1. Appuyez sur la touche de menu
OK
. L’écran affiche le message REPERTOIRE.
2. Appuyez de nouveau sur la touche
OK
. L’écran affiche le message AJOUTER.
3. En appuyant trois fois sur la touche
. L’écran affiche LISTE.
4. Validez à l’aide de la touche de menu
OK
.
5. Vous pouvez à présent sélectionner l’inscription souhaitée dans le répertoire à l’aide des
touches
et
. Pour composer directement dans l’ordre alphabétique un numéro
de téléphone, appuyez sur les lettres correspondantes.
6. Appuyez plusieurs fois sur la touche
OK
. Le numéro de téléphone et le nom s’affichent
en alternance à l’écran.
7. Quittez le mode d’entrée en appuyant sur la touche
INT
.
Page 42

- Affichage des numßeros de téléphone (CLIP) -
42
6 Affichage des numéros de téléphone (CLIP)
En suisse, cette fonction n’est pas proposée par tous les opérateurs de
réseau.
Attention ! L’affichage des numéros de téléphone est un service proposé en
option par votre opérateur de téléphonie. Votre téléphone affiche les numéros de
téléphone à l’écran lorsque votre opérateur de téléphonie propose ce service.
L’affichage de la date et de l’heure n’est pas transmise par tous les opérateurs de
téléphonie. Veuillez vous adresser à votre opérateur de téléphonie pour recevoir de
plus amples informations. De même, certains autocommutateurs ne permettent pas la
transmission du numéro de téléphone ou de la date et de l’heure.
La présentation du numéro de téléphone vous permet, pour chaque appel entrant, de connaître
l’identité de l’appelant. Si votre ligne téléphonique vous permet d’utiliser cette fonction, l’écran
vous indique le numéro de téléphone de l’appelant dès que le téléphone sonne.
Si vous avez enregistré ce numéro de téléphone dans votre répertoire, le nom s’affiche à la
place du numéro de téléphone.
Tous les appels sont enregistrés dans une liste des appelants pour que vous ne ratiez aucun
appel durant votre absence. 24 numéros de téléphone au total peuvent être enregistrés dans la
liste. Le numéro de téléphone le plus ancien est toujours effacé de la liste dès que celle-ci est
pleine. Si de nouveaux numéros de téléphone ont été enregistrés dans la liste des appelants
durant votre absence, l’écran affiche l’icône
.
6.1 La liste des appelants
Procédez de la manière suivante pour visualiser à l’écran les numéros de téléphone de la liste
des appelants :
1. Appuyez sur la touche et le numéro du dernier appel entrant s’affiche à l’écran.
Lorsque la liste des appelants est vide, l’écran affiche VIDE.
2. Les touches
et
vous permettent de sélectionner d’autres numéros de
téléphone de la liste des appelants.
Remarques : La touche de menu
OK
permet d’appeler des informations.
- Si le numéro de téléphone comporte plus de 12 chiffres, les chiffres restants sont affichés.
- Affiche le numéro de téléphone lorsque l’appelant est déjà enregistré dans le répertoire avec le
nom.
- Affiche la date et l’heure lorsque ces informations ont été transmises par l’appelant.
- Indique le nombre d’appels déjà effectués par l’appelant.
- Lorsqu’aucune autre information n’est disponible, l’écran affiche le message AJOUTER ?.
- La touche
INT
vous permet de retourner à la liste.
3. Si vous souhaitez rappeler directement un numéro de téléphone de la liste des appelants, il
vous suffit d’appuyer sur la touche de communication
et le numéro est
immédiatement composé.
4. Quittez la liste des appelants en appuyant sur la touche
INT
.
Page 43

- Affichage des numßeros de téléphone (CLIP) -
43
6.2 Enregistrer dans le répertoire des numéros de téléphone de la liste des
appelants
Vous pouvez enregistrer directement dans le répertoire un numéro de téléphone de la liste des
appelants.
1. Appuyez sur la touche
et le numéro du dernier appel entrant s’affiche à l’écran.
2. À l’aide des touches
et
, sélectionnez à présent les numéros de téléphone de
la liste des appelants que vous souhaitez enregistrer dans le répertoire.
3. Appuyez sur la touche
OK
jusqu’à ce que le message AJOUTER ? s’affiche à l’écran.
4. Validez de nouveau à l’aide de la touche de menu
OK
. L’écran affiche le message NOM.
5. Entrez alors au clavier le nom correspondant (max. 12 lettres).
6. Validez de nouveau à l’aide de la touche de menu
OK
et le numéro de téléphone est
enregistré dans le répertoire.
7. Quittez la liste des appelants en appuyant sur la touche
INT
.
Remarque : le numéro de téléphone est effacé de la liste des appelants dès qu’il a été
enregistré dans le répertoire.
6.3 Effacer des numéros de téléphone de la liste des appelants
1. Appuyez sur la touche et le numéro du dernier appel entrant s’affiche à l’écran.
2. À l’aide des touches
et
, sélectionnez à présent les numéros de téléphone de
la liste des appelants que vous souhaitez effacer.
3. Appuyez sur la touche
OK
jusqu’à ce que le message AJOUTER ? s’affiche à l’écran.
4. Appuyez sur la touche
. L’écran affiche le message EFFACER ?.
5. Validez de nouveau à l’aide de la touche de menu
OK
et le numéro de téléphone est
effacé de la liste des appelants ou quittez le mode d’effacement en appuyant sur la touche
INT
.
Page 44

- Autocommutateurs -
44
7 Autocommutateurs
Si vous avez raccordé votre téléphone à un autocommutateur, vous pouvez bénéficier de toutes
les possibilités telles que par ex. le transfert d'appels, le rappel automatique, etc. grâce à la
touche de signal « R ». Plusieurs durées de FLASH sont requises sur un autocommutateur. Pour
savoir comment modifier la durée de FLASH, reportez-vous à 8.11. Le réglage par défaut est
100ms. Renseignez-vous auprès du vendeur de votre installation pour savoir si votre téléphone
fonctionne parfaitement avec votre autocommutateur.
7.1 Utiliser une pause
Des autocommutateurs requièrent la composition d’un certain numéro (p. ex. « 9 » ou « 0 »)
pour obtenir la tonalité indiquant l’obtention sur l’appareil de la ligne principale. Pour quelques
anciens modèles d’autocommutateurs, il faut attendre un peu avant d’obtenir la tonalité. Il est
possible spécialement pour ces autocommutateurs d’introduire une pause automatique après
l’obtention de la ligne principale afin que vous puissiez continuer à composer sans attendre la
tonalité.
Vous pouvez choisir de modifier la longueur de la pause entre 1 et 3 secondes. Voir à cet
effet 8.12.
Entrer une pause lors de la composition manuelle de numéros de téléphone
Appuyez durant env. 2 secondes sur la touche de rappel du dernier numéro composé
entre le numéro d’accès pour l’obtention de la ligne principale et le numéro de téléphone
proprement dit. Le message P s’affiche à l’écran.
La pause peut également être enregistrée avec les numéros de téléphone du répertoire.
Page 45

- Fonctions spéciales -
45
8 Fonctions spéciales
Un menu très convivial pour l’utilisateur permet d’accéder à toutes les autres fonctions de
programmation. Voici un petit mode d’emploi général pour vous repérer dans le menu :
La touche
OK
permet de lancer la programmation. L’icône MENU est allumée à l’écran
durant la programmation
.
Vous pouvez choisir le niveau souhaité à l’aide des touches
et
.
Ce niveau s’ouvre à l’aide de la touche
OK
.
Vous pouvez ensuite à nouveau rechercher la fonction souhaitée à l’aide des touches
et
, puis valider de nouveau à l’aide de la touche de menu
OK
.
La touche
INT
vous permet de revenir au niveau précédent.
Chaque procédure d’enregistrement est automatiquement interrompue en l’absence d’entrée
dans un délai de 60 secondes.
En appuyant sur la touche
INT
, vous pouvez de nouveau à tout moment quitter la
programmation sans effectuer de modifications.
Le chapitre 8.14 vous fournit un aperçu complet du menu.
8.1 Régler les signaux de sonnerie sur le combiné (mélodies de sonnerie)
Votre combiné dispose de 8 mélodies de sonnerie différentes pour signaler que vous recevez un
appel. Si vous utilisez le système téléphonique avec plusieurs combinés, vous pouvez régler des
mélodies distinctes pour les appels externes et les appels internes.
1. Appuyer sur la touche de menu
OK
.
2. Sélectionner le menu COMBINE à l’aide la touche
, puis valider à l’aide de la touche
OK
.
3. Sélectionner la fonction MEL EXT(sonnerie pour les appels externes) ou MEL INT (sonnerie
pour les appels interne/seulement si deux combinés) à l’aide la touche
, puis valider à
l’aide de la touche
OK
.
4. Sélectionner la mélodie souhaitée à l’aide des touches
et
, puis valider à l’aide de
la touche
OK
.
5. Sélectionnez ensuite d’autres fonctions de menu ou quittez le menu en appuyant sur la touche
INT
.
Page 46

- Fonctions spéciales -
46
8.2 Volume de la sonnerie du combiné
Le volume de la sonnerie du combiné peut être réglé sur 5 niveaux. Avec la fonction
Crescendo, le son de la sonnerie du combiné est d’abord faible, puis augmente
progressivement. Vous pouvez également désactiver complètement la sonnerie lorsque vous ne
souhaitez pas être dérangé. Lorsque la sonnerie est désactivée, les appels entrants sont
seulement signalés sur la base et sur l’écran du combiné.
1. Appuyer sur la touche de menu
OK
.
2. Sélectionner le menu COMBINE à l’aide la touche
, puis valider à l’aide de la touche
OK
.
3. Sélectionner la fonction VOL SON à l’aide la touche
, puis valider à l’aide de la touche
OK
.
4. Sélectionner le volume souhaité à l’aide des touches
et
ou désactiver la
sonnerie avec SILENCE, puis valider à l’aide de la touche
OK
.
5. Sélectionnez ensuite d’autres fonctions de menu ou quittez le menu en appuyant sur la touche
INT
.
8.3 Régler les signaux de sonnerie sur la base (mélodie de sonnerie)
La base dispose également de cinq mélodies de sonnerie différentes pour signaler que vous
recevez un appel.
1. Appuyer sur la touche de menu
OK
.
2. Sélectionner le menu REGLAGES à l’aide la touche
, puis valider à l’aide de la touche
OK
.
3. Sélectionner la fonction MEL BASE à l’aide la touche
, puis valider à l’aide de la
touche
OK
.
4. Sélectionner la mélodie souhaitée à l’aide des touches
et
, puis valider à l’aide
de la touche
OK
.
5. Sélectionnez ensuite d’autres fonctions de menu ou quittez le menu en appuyant sur la
touche
INT
.
8.4 Volume de la sonnerie de la base
Le volume de la sonnerie de la base peut être réglé sur 5 niveaux. Vous pouvez également
désactiver complètement la sonnerie lorsque vous ne souhaitez pas être dérangé.
1. Appuyer sur la touche de menu
OK
.
2. Sélectionner le menu REGLAGES à l’aide la touche
, puis valider à l’aide de la touche
OK
.
3. Sélectionner la fonction VOL BASE à l’aide la touche
, puis valider à l’aide de la
touche
OK
.
4. Sélectionner le volume souhaité à l’aide des touches
et
ou désactiver la
sonnerie avec SILENCE, puis valider à l’aide de la touche
OK
.
5. Sélectionnez ensuite d’autres fonctions de menu ou quittez le menu en appuyant sur la
touche
INT
.
Page 47

- Fonctions spéciales -
47
8.5 Réception automatique des appels
Les appels entrants sont automatiquement réceptionnés lorsque vous décrochez le combiné de
la base. Vous pouvez désactiver la réception automatique si vous souhaitez répondre aux
appels uniquement en appuyant sur la touche
.
1. Appuyer sur la touche de menu
OK
.
2. Sélectionner le menu COMBINE à l’aide la touche
, puis valider à l’aide de la touche
OK
.
3. Sélectionner la fonction DEC AUTO à l’aide la touche
, puis valider à l’aide de la
touche
OK
.
4. Sélectionner MARCHE ou ARRET à l’aide des touches
et
, puis valider à l’aide
de la touche
OK
.
5. Sélectionnez ensuite d’autres fonctions de menu ou quittez le menu en appuyant sur la
touche
INT
.
8.6 Ajuster le volume de l’écouteur
Vous disposez de cinq niveaux de réglage du volume de l’écouteur en fonction du volume
sonore ambiant.
1. Appuyer sur la touche de menu
OK
.
2. Sélectionner le menu COMBINE à l’aide la touche
, puis valider à l’aide de la touche
OK
.
3. Sélectionner la fonction VOL ECOU à l’aide la touche
, puis valider à l’aide de la
touche
OK
.
4. Sélectionner le volume souhaité de 1 à 5 à l’aide des touches
et
, puis valider
à l’aide de la touche
OK
.
5. Sélectionner ensuite d’autres fonctions de menu ou quitter le menu en appuyant sur la
touche
INT
.
8.7 Modifier les noms d’écran
En mode normal, le message « D6017 » s’affiche à l’écran. Si vous avez déclaré plusieurs
combinés à une base, il peut être utile de donner un nom à chaque combiné. Le numéro indiqué
avant le nom est celui avec lequel le combiné peut être appelé en interne.
1. Appuyer sur la touche de menu
OK
.
2. Sélectionner le menu COMBINE à l’aide la touche
, puis valider à l’aide de la touche
OK
.
3. Sélectionner la fonction NOM à l’aide la touche
, puis valider à l’aide de la touche
.
4. Entrer au clavier le nom souhaité. Les lettres déjà entrées s’effacent en appuyant plusieurs
fois sur la touche
INT
.
5. Validez à l’aide de la touche
OK
.
6. Sélectionnez ensuite d’autres fonctions de menu ou quittez le menu en appuyant sur la
touche
INT
.
Page 48

- Fonctions spéciales -
48
8.8 Activer/désactiver les signaux sonores d’indication
Divers signaux sonores d’avertissement peuvent être activés ou désactivés.
Clic des touches
Le combiné valide chaque pression de touche par un clic. Vous pouvez activer ou désactiver le
clic de touches.
Signal sonore d’avertissement en cas de capacité de batterie trop faible
Lorsque la capacité des batteries est trop faible, un signal d’avertissement retentit pour vous
rappeler de charger le combiné.
Avertissement de dépassement de la portée
Si vous vous êtes trop éloigné de la base, un signal sonore d’avertissement vous rappelle que
vous allez perdre le contact avec la base.
1. Appuyer sur la touche de menu
OK
.
2. Sélectionner le menu COMBINE à l’aide la touche
, puis valider à l’aide de la touche
OK
.
3. Sélectionner la fonction BIP à l’aide la touche
, puis valider à l’aide de la touche
OK
.
4. Sélectionner à l’aide des touches
et
l’une des fonctions TOUCHE, BATT
BAS ou HORS PORTEE et valider avec
OK
.
5. Activer ou désactiver le signal sonore d’avertissement sélectionné à l’aide des touches
et
, puis valider à l’aide de la touche
OK
.
6. Sélectionnez ensuite d’autres fonctions de menu ou quittez le menu en appuyant sur la
touche
INT
.
8.9 Modifier le code PIN
Quelques fonctions du système téléphonique sont protégées par un code PIN contre une
utilisation non autorisée. Le code PIN peut comporter jusqu’à huit chiffres. Votre téléphone est
livré avec le réglage de code PIN « 0000 ». Procédez de la manière suivante pour modifier le
code PIN :
1. Appuyer sur la touche de menu
OK
.
2. Sélectionner le menu REGLAGES à l’aide la touche
, puis valider à l’aide de la touche
OK
.
3. Sélectionner la fonction CODE PIN à l’aide la touche
, puis valider à l’aide de la
touche
OK
.
4. Entrer à présent au clavier le code PIN actuel (réglage par défaut 0 0 0 0) et valider à l’aide
de la touche
OK
.
5. Entrer ensuite au clavier le nouveau code PIN et valider à l’aide de la touche
OK
.
6. Entrer encore une fois le nouveau code PIN pour le valider et valider à l’aide de la touche
OK
.
7. Sélectionnez ensuite d’autres fonctions de menu ou quittez le menu en appuyant sur la
touche
INT
.
La procédure est interrompue en cas d’entrée erronée de l’ancien code PIN.
Page 49

- Fonctions spéciales -
49
8.10 Régler la langue d’affichage à l’écran
Les messages peuvent être affichés à l’écran en allemand, italien, anglais, français et en
espagnol.
1. Appuyer sur la touche de menu
OK
.
2. Sélectionner le menu COMBINE à l’aide la touche
, puis valider à l’aide de la touche
OK
.
3. Sélectionner la fonction LANGUE à l’aide la touche
, puis valider à l’aide de la touche
OK
.
4. Sélectionner une langue à l’aide des touches
et
, puis valider à l’aide de la
touche
OK
.
5. Quittez le mode d’entrée en appuyant sur la touche
INT
.
8.11 Régler la durée de FLASH
1. Appuyer sur la touche de menu
OK
.
2. Sélectionner le menu REGLAGES à l’aide la touche
, puis valider à l’aide de la touche
OK
.
3. Sélectionner la fonction TOUCHE R à l’aide la touche
, puis valider à l’aide de la
touche
OK
.
4. Sélectionner à l’aide des touches
et
la durée de flash TOUCHE R 1 (90ms),
TOUCHE R 2 (100ms), TOUCHE R 3 (180ms), TOUCHE R 4 (300ms) ou TOUCHE R 5
(600ms) et valider à l’aide de
OK
.
5. Quittez le mode d’entrée en appuyant sur la touche
INT
.
8.12 Régler la longueur de la pause
1. Appuyer sur la touche de menu
OK
.
2. Sélectionner le menu REGLAGES à l’aide la touche
, puis valider à l’aide de la touche
OK
.
3. Sélectionner la fonction PAUSE à l’aide la touche
, puis valider à l’aide de la touche
OK
.
4. Sélectionner à l’aide des touches
et
la durée de flash PAUSE 1 (1s), PAUSE
2 (1,5s), PAUSE 3 (2s), ou PAUSE (3s) et valider à l’aide de
OK
.
5. Quittez le mode d’entrée en appuyant sur la touche
INT
.
Page 50

- Fonctions spéciales -
50
8.13 Rétablir les réglages par défaut
Cette fonction permet de rétablir les réglages par défaut du combiné et de la base. Le répertoire,
la liste des appelants (CLIP) ainsi que tous les numéros de téléphone enregistrés dans la
fonction de rappel du dernier numéro composé sont effacés.
Réglages par défaut :
Lan
g
ue : allemand Nom du combiné : D6017
Signal d’avertissement batterie : activé Réception automatique des appels activée
Signal d’avertissement portée : activé Mélodie de sonnerie externe : 2
Clic de touches : activé Mélodie de sonnerie interne : 3
Volume de l’écouteur : 4 Volume de sonnerie combiné : 4
Code PIN : 0 0 0 0 Mélodie de sonnerie base : 3
Pause : 3 sec. Volume de sonnerie base : 4
Durée de FLASH : 100ms
1. Appuyer sur la touche de menu
OK
.
2. Sélectionner le menu REGLAGES à l’aide la touche
, puis valider à l’aide de la touche
OK
.
3. Sélectionner la fonction RESET à l’aide la touche
, puis valider à l’aide de la touche
OK
.
4. Entrer au clavier le code PIN (réglage par défaut 0000).
5. Valider à l’aide de la touche de menu
OK
.
6. Les réglages par défaut sont rétablis au bout d’un bref instant. L’écran se remet en mode
attente.
Remarque : Si vous ne vous souvenez plus du code PIN, vous pouvez rétablir les réglages par
défaut même sans code PIN.
1. Désactivez le combiné en appuyant longuement sur la touche
INT
.
2. Activez à nouveau le combiné à l’aide de la touche
INT
et regardez l’écran.
3. Dès que toutes les icônes sont visibles à l’écran, appuyez brièvement sur la touche
. Le
message RESET s’affiche à l’écran.
4. Validez à l’aide de la touche
OK
et les réglages par défaut sont rétablis. Vous pouvez
interrompre la procédure à l’aide de la touche
INT
.
Page 51

- Fonctions spéciales -
51
8.14 Structure du menu
Repertoire
Ajouter
Modifier
Effacer
Liste
Menu Enregis
Combine
Bip
Batt Bas
Hors Portee
Touche
Marche - Arret
Marche - Arret
Marche - Arret
Marche - Arret
OK
Vol Sonn
Volume 1...5,Crescendo, Silence
Mel Ext
Melodie 1...8
Melodie 1...8
Volume 1...5
Mel Int
Vol Ecou
Dec Auto
Nom
Date/Heure
.........
04/02 16:25
Langue
Deutsch
Espanol
Francais
Italiano
English
Enregistrer
Sel Base
Sub Comb
BS1234
Code
Auto,Base1234
Reglages Vol Base
Volume 1...5, Silence
Mel Base
Melodie 1...5
Code
Code Pin
Code
Nouveau
Repeter
Reset
Pause
Pause 1...4
Touche R
Touche R 1...5
Page 52

- Suppression des erreurs -
52
9 Suppression des erreurs
Si vous avez des problèmes avec votre téléphone, veuillez suivre les indications ci-après.
Veuillez vous adresser à votre revendeur en cas de droits à la garantie. La garantie dure 2 ans.
Les batteries rechargeables bénéficient d’une garantie de 12 mois.
Aucune communication
possible
La ligne téléphonique n’est pas correctement raccordée ou est en
dérangement.
Utilisez uniquement le cordon téléphonique fourni.
Testez à l’aide d’un autre téléphone le fonctionnement de votre
raccordement téléphonique.
Le bloc d’alimentation n’est pas branché ou il y a une panne de
secteur.
Les batteries rechargeables sont vides ou défectueuses.
Vous vous êtes trop éloigné de la base.
Liaison entrecoupée ou
interrompue
Vous vous êtes trop éloigné de la base.
Lieu d’installation de la base incorrect.
Composition de numéros
de téléphone impossible
Le téléphone fonctionne avec le mode tonalités. Veuillez vérifier
votre raccordement téléphonique.
Le système ne réagit plus
ou se trouve dans un état
indéfini.
Rétablissez les réglables par défaut de toutes les fonctions.
Retirez brièvement au préalable le bloc d’alimentation de la prise
de courant.
Réglage par défaut voir chapitre 8.13.
Le voyant de contrôle de
charge ne s’allume pas
Posez correctement le combiné sur la base, nettoyez les surfaces
de contact du combiné et celles de la base à l’aide d’un chiffon
sec et doux.
L’icône de batterie clignote
à l’écran au bout de
quelques heures
Laissez le combiné posé sur la base pendant 10 heures. Si cela
n’a rien changé, remplacez les batteries rechargeables.
Affichage d’écran sombre Provoqué par le rayonnement soleil direct, laissez l’appareil se
refroidir.
Heure et date déréglées Il y a eu une coupure d’alimentation de la base. Veuillez entrer à
nouveau les données.
Page 53

- Caractéristiques techniques -
53
10 Caractéristiques techniques
Standard DECT
Nombre de canaux 1880 à 1990 MHz
Alimentation électrique Base 220/230V, 50 Hz
Portée à l’intérieur jusqu’à 50m
Portée dehors jusqu’à 300m
Autonomie en veille jusqu’à 100 heures
Durée max. de communication jusqu’à 8heures
Batteries rechargeables 3 x 1,2V/600mA, type AAA
Mode de sélection MFV
Température ambiante admissible 10°C à 30°C
Humidité relative admissible 20 à 75%
Fonction de touche signal 90ms, 250ms
Page 54

54
Page 55

- Informazioni generali -
55
1 Informazioni generali....................................................................................... 57
2 Elementi di comando....................................................................................... 58
3 Messa in funzione............................................................................................ 59
3.1 Informazioni di sicurezza.................................................................................................59
3.2 Controllo del contenuto della confezione ........................................................................59
3.3 Collegamento della stazione base ..................................................................................59
3.4 Le batterie scambiano.....................................................................................................59
3.5 Carica delle batterie ........................................................................................................59
3.6 Applicazione del clip della cintura ...................................................................................60
3.7 Selezione della lingua nel display ...................................................................................60
3.8 Regolazione dell'ora e della data ....................................................................................60
4 Impiego............................................................................................................. 61
4.1 Il display ..........................................................................................................................61
4.2 Ricezione delle telefonate ...............................................................................................61
4.3 Conversazioni telefoniche ...............................................................................................62
4.4 Selezione del numero di telefono memorizzato dalla rubrica telefonica .........................62
4.5 Indicazione della durata di conversazione ......................................................................62
4.6 Informazioni riguardanti il raggio d'azione.......................................................................62
4.7 Ammutolazione del microfono nell'unità portatile ............................................................63
4.8 Regolazione del volume della cornetta ...........................................................................63
4.9 Ripetizione della chiamata ..............................................................................................63
4.10 Inserimento/disinserimento dell'unità portatile ................................................................63
4.11 Blocco della tastiera ........................................................................................................64
4.12 Paging dalla stazione base all'unità portatile ..................................................................64
5 La rubrica telefonica........................................................................................ 65
5.1 Immissione di numeri nella rubrica telefonica .................................................................65
5.2 Modifica dei numeri memorizzati nella rubrica telefonica................................................65
5.3 Cancellazione del numero di telefono dalla rubrica telefonica ........................................66
5.4 Controlli del numero di telefono dalla rubrica telefonica..................................................67
6 Indicazione del numero degli interlocutori (CLIP)........................................ 68
6.1 La lista delle chiamate.....................................................................................................68
6.2 Memorizzazione dei numeri telefonici dalla lista delle chiamate nella
rubrica telefonica.............................................................................................................69
6.3 Cancellazione di singoli numeri telefonici dalla lista delle chiamate ...............................69
7 Impianti interni di centralino........................................................................... 70
7.1 Utilizzo della pausa .........................................................................................................70
Page 56

- Informazioni generali -
56
8 Funzioni speciali.............................................................................................. 71
8.1 Regolazione dei segnali di chiamata nell'unità portatile (melodie della
suoneria) .........................................................................................................................71
8.2 Volume del segnale di chiamata dell'unità portatile ........................................................72
8.3 Regolazione dei segnali di chiamata nella stazione base...............................................72
8.4 Volume del segnale di chiamata della stazione base......................................................73
8.5 Ricezione automatica delle chiamate..............................................................................73
8.6 Adattamento del volume della cornetta...........................................................................73
8.7 Modifica dei nomi nel display ..........................................................................................74
8.8 Attivazione / disattivazione dei segnali acustici d'avvertimento ......................................74
8.9 Modifica del codice PIN...................................................................................................75
8.10 Selezione della lingua nel display ...................................................................................75
8.11 Regolazione del periodo FLASH.....................................................................................76
8.12 Regolazione la lunghezza della pausa............................................................................76
8.13 Ripristino alle impostazioni di fabbrica ............................................................................76
8.14 Struttura del menu...........................................................................................................78
9 Rimedio in caso di errori................................................................................. 79
10 Dati tecnici ....................................................................................................... 80
Page 57

- Informazioni generali -
57
1 Informazioni generali
Batterie ricaricabili
Non utilizzare altre batterie ricaricabili o degli accumulatori universali. Questi potrebbero causare
eventualmente un corto circuito.
Per il cambio delle batterie è necessario utilizzare esclusivamente batterie ricaricabili del tipo
AAA 1,2 Volt, 600mA.
Non gettare mai le batterie nel fuoco o immergerle nell'acqua. Le batterie vecchie o difettose non
devono mai essere smaltite nei normali rifiuti urbani.
Nel caso l'unità portatile dovesse riscaldarsi durante il procedimento di ricarica degli
accumulatori, non dovete assolutamente preoccuparvi, dato che ciò è del tutto normale e non
costituisce alcun pericolo.
Non ricaricare mai l'unità portatile con delle unità di ricarica estranee, poiché, altrimenti, non
sarebbero da escludere dei danneggiamenti.
Luogo d'installazione - Nel luogo d'installazione deve trovarsi una presa di corrente da
230Volt. Non disporre la stazione base nelle immediate vicinanze di apparecchi elettronici, quali
ad esempio forni a microonde o impianti stereofonici, poiché in questa circostanza non
sarebbero da escludere delle interferenze reciproche. Il luogo d'installazione ha un influsso
determinante per un funzionamento perfetto ed irreprensibile del telefono.
Disporre la stazione base sopra una superficie piana e non scivolante. Normalmente i piedini di
gomma della stazione base non lasciano alcune tracce sulla superficie d'appoggio. A causa
degli innumerevoli tipi di smalto utilizzati sulle superfici, non è, tuttavia, possibile escludere
sempre, che sulla superficie d'appoggio rimangano delle tracce dei piedini di gomma
dell'apparecchio.
Non utilizzare mai l'unità portatile in zone esposte al pericolo di deflagrazioni.
Evitare di gran lunga di esporre l'apparecchio ad eccessive sollecitazioni, quali ad esempio
fumo, polvere, urti, sostanze chimiche, umidità, calore o diretta esposizione ai raggi solari.
Informazione medica - L'apparecchio telefono lavora con una potenza di trasmissione
notevolmente ridotta. Conformemente alle prescrizioni nonché allo stato attuale delle ricerche
scientifiche e della tecnica, con questa ridotta potenza di trasmissione sono da escludere
comunque dei danni alla salute. Tuttavia, è stato dimostrato, che i telefonini portatili in stato
inserito possono causare delle notevoli interferenze in prossimità di apparecchiature
elettromedicali. Pertanto, si raccomanda di mantenere una minima distanza di almeno un metro
dalle apparecchiature elettromedicali.
Smaltimento - Quando le batterie ricaricabili si sono completamente esaurite, sarà necessario
provvedere ad uno smaltimento appropriato e conforme alle prescrizioni vigenti per la protezione
ambientale.
Temperatura e condizioni ambientali - L'apparecchio telefono è concepito per funzionare in
ambienti protetti in un campo di temperatura di 10 °C fino 30 °C.
La stazione base non deve essere installata in ambienti umidi, come ad esempio in bagno o
nella lavanderia. Evitare possibilmente fonti di calore, quali riscaldamenti, termosifoni, ecc. e non
esporre l'apparecchio direttamente ai raggi solari.
Pulizia e manutenzione - Le superfici del contenitore possono essere pulite con un panno
pulito, asciutto e privo di peluria. Non utilizzare mai dei detergenti o delle soluzioni aggressive.
Oltre ad una pulizia occasionale del contenitore dell'apparecchio non è necessaria alcuna
particolare manutenzione. I piedini di gomma della stazione base non sono comunque resistenti
contro tutti i tipi di detergenti. Pertanto, il costruttore non potrà assumersi alcuna responsabilità
per eventuali danni causati ai mobili o simili.
Page 58

- Elementi di comando -
58
2 Elementi di comando
Unità portatile
1 Rubrica telefonica
2 Ripetizione della chiamata / Tasto di selezione
3 Tasto menu / OK
4 La lista delle chiamate (CLIP) / Tasto di
selezione
5 Cancellazione / Abbandonare menu /
Conversazioni interne /
Inserimento/disinserimento dell'unità portatile
6 Tasto d'ammutolazione
7 Tasto di segnale R
8 Tasto di conversazione
Stazione base
1 Tasto PAGE
2 Spia di conversazione e CLIP
3 Spia di controllo della carica
1
2
3
4
5
6
7
8
1
2
3
Page 59

- Messa in funzione -
59
3 Messa in funzione
3.1 Informazioni di sicurezza
ATTENZIONE! Prima della messa in funzione è assolutamente necessario leggere le
informazioni di sicurezza generali riportate all'inizio di queste istruzioni per l'uso.
3.2 Controllo del contenuto della confezione
La dotazione comprende:
una stazione base un cavo d'alimentazione
un'unità portatile tre batterie
un cavo telefonico di collegamento istruzioni per l'uso
un clip della cintura
3.3 Collegamento della stazione base
Disporre l'apparecchio telefono in prossimità di una presa telefonica e di una presa di corrente.
1. Inserire la spina dell'alimentatore di rete nella boccola situata nella parte inferiore della
stazione base e l'alimentatore di rete in una presa di corrente da 230V installata
conformemente alle prescrizioni vigenti sul luogo. L'alimentatore di rete della stazione
base deve essere sempre collegato alla presa di corrente. Per motivi di sicurezza è
necessario utilizzare esclusivamente l'alimentatore di rete fornito.
2. Collegare il presente cavo telefonico con la presa della linea telefonica e la boccola
telefonica situata nella parte inferiore della stazione base. Utilizzare esclusivamente il
nuovo cavo telefonico fornito in dotazione.
3.4 Le batterie scambiano
Le batterie ricaricabili (AAA, 1,2V, 600mAh) possiedono una capacità in standby di
massimo 100 ore e una capacità di conversazione massima di 10 ore. Aprite il
coperchio dell'alloggiamento delle batterie per introdurle oppure sostituirle.
Introdurre a questo punto le batterie, rispettando la corretta polarità, e chiudere di
nuovo il coperchio dell'alloggiamento. Utilizzare esclusivamente batterie ricaricabili
del tipo AAA 2 x 1,2V.
Informazione importante: Appoggiare l'unità portatile sopra la stazione base
con il display rivolto in avanti per la durata di almeno 16 ore. Nel caso di una
carica non corretta delle batterie, non sono da escludere delle disfunzioni nel
telefono. Durante il processo di carica dell'unità portatile, nel display lampeggia il
simbolo d'indicazione della capacità delle batterie. La spia di controllo della stazione
base
si illumina sempre, non appena vi appoggiate sopra l'unità portatile.
3.5 Carica delle batterie
Le batterie ricaricabili dell'apparecchio telefono
sono previste per funzionare con un periodo
standby a temperatura ambiente di max. 100 ore
ed una durata di conversazione massima di 8 ore.
La capacità attuale delle batterie viene indicata
nel display.
Per ricaricare le batterie basta immettere l'unità portatile nella stazione base con il display rivolto
in avanti.
Page 60

- Messa in funzione -
60
3.6 Applicazione del clip della cintura
Spingere il clip della cintura nella guida, fino a farlo scattare in posizione in ambedue i lati.
3.7 Selezione della lingua nel display
Le visualizzazioni del display possono essere selezionate nelle lingue tedesco, italiano, inglese e
spagnolo.
1. Premere il tasto menu
OK
.
2. Selezionare il menu PORTATILE mediante il tasto
e confermare successivamente
con il tasto
OK
.
3. Selezionare ora la funzione LINGUA tramite il tasto
e confermare successivamente
con il tasto
OK
.
4. Selezionare a questo punto la lingua desiderata tramite i tasti
e
e confermare
successivamente con il tasto
OK
.
5. Mantenendo premuto il tasto
INT
, potete abbandonare il livello d'immissione.
3.8 Regolazione dell'ora e della data
Prima di utilizzare il telefono, si raccomanda di regolare l'ora e la data attuali. L'ora attuale viene
indicata nel display principale.
1. Premere il tasto menu
OK
.
2. Selezionare il menu MOBILE mediante il tasto
e confermare successivamente con il
tasto
OK
.
3. Selezionare ora la funzione PAUSE ORA tramite il tasto
e confermare
successivamente con il tasto
OK
.
4. Digitare adesso consecutivamente il giorno, il mese e la data:
Esempi: 09. Marzo - ore 8.52 => 09 03 08 52
21. Novembre - ore 16.08 => 21 11 16 08
5. Confermare tramite il tasto
OK
.
6. Mantenendo premuto il tasto
INT
, potete abbandonare il livello d'immissione.
Page 61

- Impiego -
61
4 Impiego
4.1 Il display
In condizioni di funzionamento normali, nel display viene visualizzato il nome dell'unità portatile.
Il nome preimpostato può comunque essere cambiato in qualsiasi momento. Si veda a tal fine al
capitolo 8.7. Inoltre, nel display vengono visualizzate tutte le informazioni più importanti con
diversi simboli.
Illuminato: conversazione attualmente in corso.
Illuminato: conversazione esterna attualmente in corso.
Lampeggiante: chiamata esterna in arrivo.
Illuminato: Vi trovate nella lista delle chiamate (CLIP).
Lampeggiante: nella lista delle chiamate (CLIP) sono memorizzate delle nuove
telefonate.
Illuminato: durante l'impiego della rubrica telefonica.
MENU
Illuminato: non appena viene attivato il livello di programmazione.
Illuminato: Blocco della tastiera attivato.
Costante: il collegamento alla stazione è buono.
Lampeggiante: il raggio d'azione dalla stazione base è stato superato.
Costante: il numero telefonico e più lungo di dodici posizioni.
4.2 Ricezione delle telefonate
In una chiamata in arrivo si sente il segnale acustico (squillo) nell'unità portatile e nella stazione
base. A causa della radiotrasmissione, l'unità portatile squilla sempre con un certo ritardo
rispetto alla stazione base. Nel display lampeggia l'indicazione
. Premere il tasto di
conversazione
nell'unità portatile, per stabilire così il collegamento.
Avvertenza: Mentre squilla l'unità portatile, tramite i tasti
e
potete anche regolare
il volume del segnale di chiamata.
Per terminare la conversazione, immettere come di consueto l'unità portatile nella stazione base
oppure premere il tasto di conversazione
nella stazione base.
Note: Le informazioni per la visualizzazione del numero telefonico sul display sono da
apprendere al capitolo 6.
Nell'attivazione della funzione di ricezione automatica delle chiamate, la telefonata viene
automaticamente ricevuta, non appena sollevate l'unità portatile dalla stazione base. La modalità
d'attivazione della funzione di ricezione automatica delle chiamate è da apprendere al capitolo
8.5.
Page 62

- Impiego -
62
4.3 Conversazioni telefoniche
1. Digitare il numero di telefono desiderato nella tastiera numerica con massimo 25 posizioni.
Le cifre digitate vengono visualizzate nel display. Poiché il display può visualizzate al
massimo 12 posizioni, nei numeri telefonici più lunghi verranno indicate soltanto le ultime
12 cifre.
Avvertenza: Se avete accidentalmente digitato un numero telefonico non corretto, allora potete
cancellare il numero sbagliato, premendo ripetutamente il tasto
INT
. Mantenendo premuto
più a lungo il tasto
INT
, il numero telefonico viene completamente cancellato.
2. Premere il tasto di conversazione
ed il collegamento desiderato viene subito
stabilito.
Avvertenza: Potete anche premere prima il tasto di conversazione
, per ottenere in tal
modo un immediato segnale di linea libera. Digitando le cifre corrispondenti al Vostro numero
telefonico desiderato, il telefono può comporre direttamente il numero da chiamare. In questa
modalità di stabilire un collegamento non è, tuttavia, possibile eseguire una correzione delle
singole cifre del numero telefonico, come descritto sopra.
4.4 Selezione del numero di telefono memorizzato dalla rubrica telefonica
Dopo che avete memorizzato alcuni numeri telefonici, potete richiamarli molto rapidamente con
facilità.
1. Premere il tasto della rubrica telefonica
. A questo punto nel display viene
visualizzato in ordine alfabetico il primo numero telefonico memorizzato.
2. Tramite i tasti
e
potete ora chiamare tutti i numeri telefonici memorizzati.
Per chiamare direttamente in ordine alfabetico un numero telefonico, premere la rispettiva
lettera.
3. Premere a questo punto il tasto di conversazione
ed il numero telefonico
visualizzato viene ora chiamato automaticamente.
4.5 Indicazione della durata di conversazione
Durante una conversazione la durata rispettiva viene visualizzata nel display in minuti e secondi.
15 secondi dopo la selezione, il display commuta direttamente dalla visualizzazione del numero
telefonico composto all'indicazione della durata della conversazione. Al termine della
conversazione l'indicazione rimane ancora visualizzata nel display per la durata di alcuni
secondi.
4.6 Informazioni riguardanti il raggio d'azione
Il raggio d'azione dell'unità portatile corrisponde a ca. 50 metri in ambienti chiusi e a ca. 300
metri all'aperto. In una buona trasmissione con la stazione base, nel display si illumina il simbolo
. Quando Vi allontanate eccessivamente dalla stazione base, allora nel display incomincia a
lampeggiare il simbolo
e sentite dei rispettivi segnali acustici d'avvertimento. In questo caso
è necessario riavvicinarsi alla stazione base, poiché, altrimenti, verrebbe subito interrotta la
conversazione. Questi segnali acustici d'avvertimento possono anche essere disattivati, come
descritto al capitolo 8.8.
Page 63

- Impiego -
63
4.7 Ammutolazione del microfono nell'unità portatile
Tramite il tasto
potete disinserire il microfono dell'unità portatile durante una
conversazione telefonica. In tal modo è possibile parlare con altre persone, senza essere
ascoltati dall'utente in linea. L'altoparlante dell'unità portatile rimane, tuttavia, inserito, in modo da
poter ascoltare ulteriormente l'utente in linea.
1. Premere il una volta il tasto
durante una conversazione. Dopodiché nel display
viene visualizzata l'indicazione .
2. Per inserire di nuovo il microfono, basta premere nuovamente il tasto
.
L'indicazione visualizzata nel display scompare e dopodiché potete proseguire
normalmente la conversazione.
4.8 Regolazione del volume della cornetta
Se il volume della cornetta Vi dovesse sembrare troppo basso o troppo alto, potete anche
adattarlo individualmente alle Vostre esigenze.
Tramite i tasti
e
potete adattare come volete il volume della cornetta durante una
conversazione. Nel display il volume della cornetta regolato viene visualizzato con VOLUME 1
fino 5.
4.9 Ripetizione della chiamata
La funzione di ripetizione della chiamata può essere utilizzata nei casi in cui la persona chiamata
non risponde al telefono. Il Vostro telefono memorizza sempre gli ultimi 10 numeri telefonici
composti.
1. Premendo a questo punto il tasto
, l'ultimo numero telefonico composto viene
visualizzato nel display.
2. Premendo il tasto
, potete ora selezionare ulteriori numeri telefonici presenti nella
memoria della funzione di ripetizione della chiamata. Tramite il tasto
potete
sfogliare la lista in avanti oppure indietro.
3. Premere a questo punto il tasto di conversazione
ed il numero telefonico
visualizzato viene ora chiamato automaticamente.
Nota: Se nella memoria della funzione di ripetizione della chiamata vi è memorizzato un numero
di telefono della rubrica telefonica, nel display verrà automaticamente visualizzato il rispettivo
nome e non il numero telefonico.
4.10 Inserimento/disinserimento dell'unità portatile
L'unità portatile può essere disinserita semplicemente, mantenendo premuto più a lungo il tasto
INT
. Dopo il disinserimento dell'unità portatile, ovviamente non viene più consumata la
corrente delle batterie. In questo stato non si possono, però, ricevere alcune telefonate.
Premere una volta il tasto
INT
, per reinserire di nuovo l'unità portatile. Nel display viene ora
visualizzato il messaggio BASE e l'unità portatile viene reinserita nuovamente dopo breve
tempo. L'unità portatile si inserisce automaticamente non appena la riappoggiate sulla stazione
base.
Page 64

- Impiego -
64
4.11 Blocco della tastiera
Se portate spesso appresso l'unità portatile, avete anche la possibilità di interdire la tastiera, al
fine di evitare che i tasti vengano premuti involontariamente. Nella funzione di blocco della
tastiera inserita, le chiamate dall'esterno possono essere ricevute come di consueto.
Attivazione del blocco tastiera
Mantenere premuto nell'unità portatile i tasti
OK
e . Nel display viene visualizzato il
simbolo
.
Disattivazione del blocco tastiera
Per annullare nuovamente il blocco della tastiera, basta premere nuovamente i tasti
OK
e
.
4.12 Paging dalla stazione base all'unità portatile
Se qualche volta Vi siete dimenticati, dove avete lasciato per ultimo l'unità portatile, basta
semplicemente premere il tasto
della stazione base. A questo punto, per la durata di 30
secondi, si sentono dei segnali acustici, provenienti dall'unità portatile, che Vi permettono
facilmente di ritrovare l'apparecchio. Mediante un qualsiasi tasto a piacere nell'unità portatile
oppure tramite il tasto
della stazione base si possono disattivare anticipatamente i segnali
acustici di localizzazione.
Page 65

- La rubrica telefonica -
65
5 La rubrica telefonica
Nella rubrica telefonica si possono memorizzare fino 25 numeri telefonici con l'assegnazione del
rispettivo nome dell'utente. La massima lunghezza di un numero telefonico corrisponde a 25
posizioni.
5.1 Immissione di numeri nella rubrica telefonica
1. Premere il tasto menu
OK
. Il display visualizza ora il messaggio RUBRICA.
2. Premere nuovamente il tasto
OK
. Il display visualizza ora il messaggio NUOVA.
3. Confermare nuovamente con il tasto menu
OK
. Il display visualizza ora il messaggio
NOME?.
4. Digitare a questo punto il nome desiderato (massimo 12 lettere) attraverso la tastiera
numerica. Le informazioni inerenti all'immissione dei nomi sono da apprendere al prossimo
paragrafo.
5. Confermare il nome desiderato con il tasto menu
OK
. Il display visualizza ora il
messaggio NUMERO ?.
6. Digitare il numero di telefono desiderato attraverso la tastiera numerica.
7. Confermare nuovamente con il tasto menu
OK
. Il display visualizza ora il messaggio
NUOVA.
8. Se desiderate memorizzare ulteriori numeri telefonici, dovete proseguire con il punto 3.
Mantenendo premuto il tasto
INT
, potete abbandonare il livello d'immissione.
Nota: Quando avete raggiunto la capacità di memorizzazione dei 25 numeri telefonici, alla
prossima memorizzazione di un numero nel display viene visualizzato il messaggio MEM
ESAURITA. In questo caso sarà innanzitutto necessario cancellare degli altri numeri telefonici
meno importanti, per liberare nuovo spazio di memoria.
Spiegazione della modalità d'immissione dei nomi
Per l'immissione dei nomi i tasti numerici sono anche previsti con delle lettere. Premendo
ripetutamente il rispettivo tasto, potete digitare lettere in maiuscolo nonché cifre.
Esempio: Volete digitare il nome "Peter".
Premere: 1 x il tasto 7, 2 x il tasto 3, 1 x il tasto 8, 2 x il tasto 3 e 3 x il tasto 7
- Per immettere uno spazio, occorre premere una volta il tasto n.
- Premendo due volte il tasto n, si può inserire anche un trattino.
- Per immettere due volte la stessa lettera, occorre premere le rispettive lettere ed attendere
successivamente, finché il cursore passa automaticamente avanti di una posizione.
- Le immissioni sbagliate possono essere nuovamente cancellate tramite il tasto
INT
.
5.2 Modifica dei numeri memorizzati nella rubrica telefonica
1. Premere il tasto menu
OK
. Nel display viene visualizzato RUBRICA.
2. Premere nuovamente il tasto
OK
. Nel display viene visualizzato NUOVA.
3. Premere a questo punto il tasto
. Nel display viene visualizzato MODIFICA.
4. Confermare nuovamente con il tasto menu
OK
. A questo punto nel display vengono
visualizzati in ordine alfabetico i numeri telefonici memorizzati.
Page 66

- La rubrica telefonica -
66
5. Selezionare adesso tramite i tasti
e
il numero che desiderate modificare. Per
chiamare direttamente in ordine alfabetico un numero telefonico, premere la rispettiva lettera.
6. Confermare la selezione con il tasto menu
OK
. Nel display viene visualizzato
nuovamente il nome. A questo punto dietro l'ultima lettera lampeggia anche il cursore.
7. Modificare a questo punto il nome desiderato attraverso la tastiera numerica. Le informazioni
inerenti all'immissione dei nomi sono da apprendere al capitolo 5.1.
8. Una volta completate le modifiche desiderate, è necessario confermare ancora una volta con
il tasto menu
OK
le impostazioni effettuate. A questo punto nel display viene visualizzato
il numero telefonico.
9. Modificare a questo punto il numero telefonico desiderato attraverso la tastiera numerica.
Premendo ripetutamente il tasto
INT
, potete cancellare le singole cifre del numero
telefonico.
10. Una volta completate le modifiche desiderate, è necessario confermare ancora una volta con
il tasto menu
OK
le impostazioni effettuate. Il display visualizza ora il messaggio
MODIFICA.
11. Se desiderate modificare ulteriori numeri telefonici, dovete proseguire con il punto 4.
Mantenendo premuto il tasto
INT
, potete abbandonare il livello di programmazione.
5.3 Cancellazione del numero di telefono dalla rubrica telefonica
1. Premere il tasto menu
OK
. Nel display viene visualizzato RUBRICA.
2. Premere nuovamente il tasto
OK
. Nel display viene visualizzato NUOVA.
3. Premendo due volte il tasto
. Nel display viene visualizzato CANCELLA.
4. Confermare ora con il tasto menu
OK
.
5. Selezionare adesso tramite i tasti
e
il numero telefonico che desiderate
cancellare. Per chiamare direttamente in ordine alfabetico un numero telefonico, premere la
rispettiva lettera.
6. Una volta che avete trovato il numero telefonico desiderato, è necessario confermare
ancora una volta con il tasto menu
OK
la selezione dello stesso e sul display viene
quindi visualizzato il numero telefonico.
7. Confermare ora con il tasto menu
OK
e sul display viene quindi visualizzato il
messaggio OK?.
8. Confermare nuovamente la selezione con il tasto menu
OK
. In seguito a ciò il numero
telefonico viene cancellato dalla rubrica telefonica. Il display visualizza di nuovo il
messaggio CANCELLA. Mantenendo premuto il tasto
INT
, potete interrompere il
procedimento di cancellazione.
9. Dopo che avete cancellato il numero telefonico, nel display verrà visualizzato il messaggio
CANCELLA. Se desiderate cancellare ulteriori numeri telefonici, dovete proseguire con il
punto 4. Mantenendo premuto il tasto
INT
, potete abbandonare il livello di
cancellazione.
Page 67

- La rubrica telefonica -
67
5.4 Controlli del numero di telefono dalla rubrica telefonica
1. Premere il tasto menu
OK
. Il display visualizza ora il messaggio RUBRICA.
2. Premere nuovamente il tasto
OK
. Il display visualizza ora il messaggio NUOVA.
3. Premendo trois volte il tasto
. Nel display viene visualizzato LISTA.
4. Confermare ora con il tasto menu
OK
.
5. Tramite i tasti
e
potete ora selezionare la voce desiderata nella rubrica
telefonica. Per chiamare direttamente in ordine alfabetico un numero telefonico, premere la
rispettiva lettera.
6. Premere parecchie volte il tasto
OK
. Nel display viene visualizzato alternativamente il
numero telefonico e il nome.
7. Mantenendo premuto il tasto
INT
, potete abbandonare il livello d'immissione.
Page 68

- Indicazione del numero degli interlocutori CLIP -
68
6 Indicazione del numero degli interlocutori (CLIP)
In Svizzera non tutti i gestori di reti di comunicazione offrono questa funzione.
Attenzione! L'indicazione del numero degli interlocutori è un servizio opzionale
della Vostra società telefonica. Il Vostro telefono visualizza il numero telefonico nel
display, purché la Vostra società telefonica offra questo servizio. L'indicazione della
data e dell'ora non viene trasmessa da tutte le società telefoniche. Richiedete ulteriori
informazioni al Vostro consulente telefonico. Anche in alcuni impianti interni di
centralino la trasmissione del numero telefonico o della data e dell'ora non è possibile.
Grazie all'indicazione del numero degli interlocutori potete subito riconoscere da chi provengono
le chiamate in arrivo. Se questa funzione è disponibile nel Vostro allacciamento telefonico, non
appena squilla il telefono, nel display viene immediatamente visualizzato il numero telefonico
della persona che chiama.
Se avete memorizzato questo numero di telefono nella Vostra rubrica telefonica, al posto del
numero verrà indicato il nome dell'interlocutore.
Tutte le telefonate vengono memorizzate in una rispettiva lista, in modo tale da non perdere
nessuna chiamata neanche durante l'assenza. Complessivamente possono essere memorizzati
24 numeri telefonici nella lista. Non appena la lista è piena, verrà sempre cancellato
rispettivamente l'ultimo numero della lista, cioè quello più vecchio. Se durante la Vostra
assenza è stato memorizzato un nuovo numero telefonico nella lista delle chiamate, nel display
lampeggia il simbolo
.
6.1 La lista delle chiamate
Per vedere il numero telefonico dell'interlocutore nel display, occorre procedere nel modo
seguente:
1. Premere il tasto
ed il numero ricevuto per ultimo viene visualizzato nel display. Se la
lista delle chiamate è vuota, nel display verrà visualizzato il messaggio MEM VUOTA.
2. Tramite i tasti
e
potete ora chiamare ulteriori numeri telefonici memorizzati
nella lista delle chiamate.
Note: Tramite il tasto menu
OK
potete richiamare delle informazioni.
- Se il numero telefonico dovesse essere più lungo di 12 posizioni, allora verranno indicate
soltanto le cifre rimanenti.
- Indica il numero telefonico, se l'interlocutore è già stato memorizzato nella rubrica telefonica
con il nome.
- Indica la data e l'ora, se questi dati sono stati trasmessi dall'interlocutore.
- Indica quante volte è stato già chiamato questo numero.
- Se non sono disponibili alcuni ulteriori dati, sul display verrà visualizzato il messaggio
AGGIUNGI ?.
- Tramite il tasto
INT
potete ritornare in qualsiasi momento alla lista.
3. Se desiderate richiamare direttamente un numero telefonico dalla lista delle chiamate, basta
premere semplicemente il tasto di conversazione
ed il numero viene
immediatamente chiamato.
4. Mantenendo premuto il tasto
INT
, potete abbandonare la lista delle chiamate.
Page 69

- Indicazione del numero degli interlocutori CLIP -
69
6.2 Memorizzazione dei numeri telefonici dalla lista delle chiamate nella rubrica
telefonica
Un numero telefonico memorizzato nella lista delle chiamate può essere direttamente salvato
nella rubrica telefonica.
1. Premere il tasto
ed il numero ricevuto per ultimo viene visualizzato nel display.
2. Tramite i tasti
e
potete ora comporre i numeri telefonici della lista delle
chiamate che volete memorizzare nella rubrica telefonica.
3. Premere ripetutamente il tasto
OK
, finché nel display non viene visualizzato il
messaggio NUOVA.
4. Confermare nuovamente con il tasto menu
OK
. Il display visualizza ora il messaggio
NOME?.
5. Digitare a questo punto il nome desiderato (massimo 12 lettere) attraverso la tastiera
numerica.
6. Confermare nuovamente la selezione con il tasto menu
OK
. In seguito a ciò il numero
telefonico viene memorizzato nella rubrica telefonica.
7. Mantenendo premuto il tasto
INT
, potete abbandonare la lista delle chiamate.
Nota: Non appena il numero telefonico è stato memorizzato nella rubrica telefonica, questi verrà
cancellato dalla lista delle chiamate.
6.3 Cancellazione di singoli numeri telefonici dalla lista delle chiamate
1. Premere il tasto ed il numero ricevuto per ultimo viene visualizzato nel display.
2. Tramite i tasti
e
potete ora comporre i numeri telefonici della lista delle
chiamate che volete cancellare.
3. Premere ripetutamente il tasto
OK
, finché nel display non viene visualizzato il
messaggio NUOVA.
4. Premere il tasto
. Il display visualizza ora il messaggio CANCELLA ?.
5. Confermare nuovamente con il tasto menu
OK
, per cancellare quindi il numero
telefonico dalle lista delle chiamate oppure uscire dal modo di cancellazione, mantenendo
premuto il tasto
INT
.
Page 70

- Impianti interni di centralino -
70
7 Impianti interni di centralino
Se avete collegato il Vostro telefono ad un impianto interno di centralino, potete sfruttare tutte le
più moderne possibilità oggigiorno offerte dai gestori delle reti telefoniche, come ad esempio la
deviazione delle telefonate, il richiamo automatico, ecc. Il tasto di segnale “R” Vi permette di
accedere a tutte queste comodissime possibilità e funzioni. In un impianto interno di centralino
sono richiesti diversi periodi FLASH. La modalità di modifica del periodo FLASH è da
apprendere in 8.11. L'impostazione di fabbrica corrisponde a 100ms. Potete comunque
domandare al Vostro rivenditore di fiducia specializzato, che Vi ha venduto l'impianto interno di
centralino, se il Vostro telefono funziona perfettamente ed in modo irreprensibile e quali ulteriori
possibilità poter sfruttare con questo sistema.
7.1 Utilizzo della pausa
In alcuni impianti interni di centralino è necessario comporre prima un determinato numero (ad
esempio ”9” oppure ”0”), per ottenere quindi un segnale d'accesso alla rete esterna nel telefono
dopo una breve pausa. Alcuni impianti di centralino più vecchi possono impiegare un certo
periodo prima di ottenere un segnale di linea libera. Specialmente per questi impianti interni di
centralino dopo il numero d’accesso alla rete esterna si può introdurre una pausa automatica,
per permettere una diretta composizione del numero telefonico, senza dover attendere il segnale
di linea libera.
La lunghezza della pausa può essere regolata da 1 e 3 secondi. Si veda a tal fine Fehler!
Verweisquelle konnte nicht gefunden werden..
Immissione della pausa nella selezione manuale
Mantenere premuto per circa 2 secondi il tasto di ripetizione della chiamata
tra il numero di
riferimento per l'accesso alla rete esterna ed il numero telefonico reale. Dopodiché nel display
viene visualizzata l'indicazione P.
La pausa può essere memorizzata anche nella rubrica telefonica insieme ai numeri telefonici.
Page 71

- Funzioni speciali -
71
8 Funzioni speciali
Tutte le altre funzioni di programmazione sono accessibili attraverso un menu molto facile da
usare. Qui Vi illustriamo una piccola guida generale su come potete muovervi nel menu:
Tramite il tasto
OK
potete avviare il livello di programmazione. Durante la
programmazione lampeggia l'indicazione MENU nel display.
Mediante i tasti
e
potete selezionare il livello desiderato.
Questo livello viene aperto con il tasto
OK
.
Dopodiché con i tasti
e
potete nuovamente selezionare la funzione
desiderata, per poi confermarla di nuovo con il tasto menu
OK
.
Tramite il tasto
INT
potete ritornare rispettivamente indietro di un livello.
Ogni procedimento di memorizzazione viene automaticamente annullato, se entro i
prossimi 60 secondi non viene più premuto un tasto.
Mantenendo premuto il tasto
INT
, potete di nuovo uscire in qualsiasi momento dal
livello di programmazione, senza effettuare alcune modifiche.
Al capitolo 8.14 vi è riportata una completa panoramica del menu.
8.1 Regolazione dei segnali di chiamata nell'unità portatile (melodie della
suoneria)
La vostra unità portatile può segnalare le chiamate dall'esterno con 8 melodie diverse degli
squilli. Se impiegate il sistema telefonico con parecchie unità portatili, per le telefonate esterne
ed interne potete impostare diverse melodie per i segnali di chiamata.
1. Premere il tasto menu
OK
.
2. Selezionare il menu PORTATILE mediante il tasto
e confermare successivamente
con il tasto
OK
.
3. Selezionare ora tramite il tasto
la funzione MELODIA EXT (segnale di chiamata per
telefonate esterne) oppure MELODIA INT (segnale di chiamata per telefonate interne / solo
con due unità portatili) e confermare successivamente con il tasto
OK
.
4. Selezionare a questo punto la melodia desiderata tramite i tasti
e
e confermare
successivamente con il tasto
OK
.
5. Selezionate adesso ulteriori funzioni menu oppure uscite dal menu, mantenendo premuto il
tasto
INT
.
Page 72

- Funzioni speciali -
72
8.2 Volume del segnale di chiamata dell'unità portatile
Il volume del segnale di chiamata dell'unità portatile può essere regolato in 5 stadi. Tramite la
funzione Crescendo l'unità portatile squilla prima a basso volume e poi progressivamente più
forte. Se qualche volta desiderate non essere disturbati, potete anche disinserire completamente
il segnale di chiamata. Se avete disinserito il segnale di chiamata, le telefonate in arrivo vengono
segnalate acusticamente soltanto nella stazione base e per mezzo del display dell'unità portatile.
1. Premere il tasto menu
OK
.
2. Selezionare il menu PORTATILE mediante il tasto
e confermare successivamente
con il tasto
OK
.
3. Selezionare ora tramite il tasto
la funzione VOL SUONERIA e confermare
successivamente con il tasto
OK
.
4. Selezionare a questo punto il volume desiderato tramite i tasti
e
oppure
disinserire il segnale di chiamata con SPENTA e confermare successivamente con il tasto
OK
.
5. Selezionate adesso ulteriori funzioni menu oppure uscite dal menu, mantenendo premuto il
tasto
INT
.
8.3 Regolazione dei segnali di chiamata nella stazione base
Anche la stazione base può segnalare le chiamate dall'esterno con 5 diverse melodie di
suoneria all'arrivo di una telefonata.
1. Premere il tasto menu
OK
.
2. Selezionare il menu IMPOSTAZIONI tramite il tasto
e confermare successivamente
con il tasto
OK
.
3. Selezionare a questo punto la funzione MELODIA BASE tramite i tasti
e
e
confermare successivamente con il tasto
OK
.
4. Selezionare a questo punto la melodia desiderata tramite i tasti
e
e
confermare successivamente con il tasto
OK
.
5. Selezionate adesso ulteriori funzioni menu oppure uscite dal menu, mantenendo premuto il
tasto
INT
.
Page 73

- Funzioni speciali -
73
8.4 Volume del segnale di chiamata della stazione base
Il volume del segnale di chiamata della stazione base può essere regolato in tre livelli. Se
qualche volta desiderate non essere disturbati, potete anche disinserire completamente il
segnale di chiamata.
1. Premere il tasto menu
OK
.
2. Selezionare il menu IMPOSTAZIONI tramite il tasto
e confermare successivamente
con il tasto
OK
.
3. Selezionare a questo punto la funzione VOLUME BASE tramite il tasto
e confermare
successivamente con il tasto
OK
.
4. Selezionare a questo punto il volume desiderato tramite i tasti
e
oppure
disinserire il segnale di chiamata con VOL SPENTO e confermare successivamente con il
tasto
OK
.
5. Selezionate adesso ulteriori funzioni menu oppure uscite dal menu, mantenendo premuto il
tasto
INT
.
8.5 Ricezione automatica delle chiamate
Le chiamate dall'esterno vengono ricevute automaticamente, non appena sollevate l'unità
portatile dalla stazione base. Se invece desiderate ricevere le telefonate solo tramite il tasto
, allora potete disinserire la funzione di ricezione automatica delle chiamate.
1. Premere il tasto menu
OK
.
2. Selezionare il menu PORTATILE mediante il tasto
e confermare successivamente
con il tasto
OK
.
3. Selezionare a questo punto la funzione RISPS AUTOMAT tramite il tasto
e
confermare successivamente con il tasto
OK
.
4. Selezionare il ATTIVO oppure DISATTIVO tramite i tasti
e
e confermare
successivamente con il tasto
OK
.
5. Selezionate adesso ulteriori funzioni menu oppure uscite dal menu, mantenendo premuto il
tasto
INT
.
8.6 Adattamento del volume della cornetta
Il volume della cornetta può essere adattato individualmente alle circostanze locali in cinque livelli.
1. Premere il tasto menu
OK
.
2. Selezionare il menu PORTATILE mediante il tasto
e confermare successivamente
con il tasto
OK
.
3. Selezionare ora la funzione VOL AURICOL tramite il tasto
e confermare
successivamente con il tasto
OK
.
4. Selezionare ora il volume desiderato tra il livello 1 fino 5 tramite i tasti
e
e
confermare successivamente con il tasto
OK
.
5. Selezionate adesso ulteriori funzioni menu oppure uscite dal menu, mantenendo premuto il
tasto
INT
.
Page 74

- Funzioni speciali -
74
8.7 Modifica dei nomi nel display
Nel funzionamento normale il display visualizza l'indicazione „D6017“. Se avete registrato
parecchie unità portatili ad una stazione base, può essere utile assegnare ad ogni unità portatile
un nome proprio. Il numero prima il nome indica con quale numero potete raggiungere la
rispettiva unità portatile per le chiamate interne.
1. Premere il tasto menu
OK
.
2. Selezionare il menu PORTATILE mediante il tasto
e confermare successivamente
con il tasto
OK
.
3. Selezionare ora la funzione NOME tramite il tasto
e confermare successivamente
con il tasto
OK
.
4. Digitare a questo punto il nome desiderato attraverso la tastiera numerica. Premendo
ripetutamente il tasto
INT
, potete cancellare le singole lettere che sono già state
immesse.
5. Confermare con il tasto
OK
.
6. Selezionate adesso ulteriori funzioni menu oppure uscite dal menu, mantenendo premuto il
tasto
INT
.
8.8 Attivazione / disattivazione dei segnali acustici d'avvertimento
Qui potete attivare ossia disattivare i diversi segnali acustici d'avvertimento.
Clic dei tasti
Ogni volta che premete un tasto, nell'unità portatile sentite un segnale acustico, detto clic tasti.
Questo cosiddetto clic dei tasti può essere naturalmente inserito oppure disinserito, a piacere.
Segnale d'avvertimento in caso di capacità insufficiente delle batterie
Nel caso di una capacità insufficiente delle batterie, un rispettivo segnale acustico
d'avvertimento Vi segnala la necessità di ricaricare le batterie dell'unità portatile.
Avvertimento in caso di superamento del raggio d'azione
Quando Vi allontanate eccessivamente dalla stazione base, un rispettivo segnale acustico
d'avvertimento Vi segnala, che state per perdere il contatto con la stazione base.
1. Premere il tasto menu
OK
.
2. Selezionare il menu PORTATILE mediante il tasto
e confermare successivamente
con il tasto
OK
.
3. Selezionare a questo punto la funzione TONI tramite i tasti
e
e confermare
successivamente con il tasto
OK
.
4. Selezionare ora le funzioni TONI TASTI, BT SCARICA oppure FUORI CAMPO tramite i
tasti
e
e confermare successivamente con il tasto
OK
.
5. Attivare ossia disattivare ora il segnale acustico d'avvertimento selezionato tramite i tasti
e
e confermare successivamente con il tasto
OK
.
6. Selezionate adesso ulteriori funzioni menu oppure uscite dal menu, mantenendo premuto il
tasto
INT
.
Page 75

- Funzioni speciali -
75
8.9 Modifica del codice PIN
Alcune funzioni del sistema telefonico sono protette per mezzo di un codice PIN contro l'uso non
autorizzato. Il codice PIN può consistere al massimo di otto cifre. In fabbrica è stato
preimpostato il codice PIN “0000”. Per modificare il codice PIN occorre procedere nel modo
seguente:
1. Premere il tasto menu
OK
.
2. Selezionare il menu IMPOSTAZIONI tramite il tasto
e confermare successivamente
con il tasto
OK
.
3. Selezionare ora la funzione MODIFICA PIN tramite il tasto
e confermare
successivamente con il tasto
OK
.
4. Digitare a questo punto il codice PIN attuale attraverso la tastiera numerica (impostazione
di fabbrica “0 0 0 0”) e confermare successivamente con
OK
.
5. Digitare ora il nuovo codice PIN attraverso la tastiera numerica e confermare
successivamente con
OK
.
6. Per confermare definitivamente l'impostazione, è necessario digitare ancora una volta il
nuovo codice PIN attraverso la tastiera numerica e confermare successivamente con
OK
.
7. Selezionate adesso ulteriori funzioni menu oppure uscite dal menu, mantenendo premuto il
tasto
INT
.
In un'immissione sbagliata del codice PIN il procedimento di programmazione viene
automaticamente annullato.
8.10 Selezione della lingua nel display
Le visualizzazioni del display possono essere selezionate nelle lingue tedesco, italiano, inglese e
spagnolo.
1. Premere il tasto menu
OK
.
2. Selezionare il menu PORTATILE mediante il tasto
e confermare successivamente
con il tasto
OK
.
3. Selezionare ora la funzione LINGUA tramite il tasto
e confermare successivamente
con il tasto
OK
.
4. Selezionare a questo punto la lingua desiderata tramite i tasti
e
e confermare
successivamente con il tasto
OK
.
5. Mantenendo premuto il tasto
INT
, potete abbandonare il livello d'immissione.
Page 76

- Funzioni speciali -
76
8.11 Regolazione del periodo FLASH
1. Premere il tasto menu
OK
.
2. Selezionare il menu IMPOSTAZIONI tramite il tasto
e confermare successivamente
con il tasto
OK
.
3. Selezionare a questo punto la funzione DURATA R tramite il tasto
e confermare
successivamente con il tasto
OK
.
4. Selezionare a questo punto tramite i tasti
e
il periodo DURATA R 1 (90ms),
DURATA R 2 (100ms), DURATA R 3 (180ms), DURATA R 4(300ms) oppure DURATA R 5
(600ms) e confermare successivamente con il tasto
OK
.
5. Mantenendo premuto il tasto
INT
, potete abbandonare il livello d'immissione.
8.12 Regolazione la lunghezza della pausa
1. Premere il tasto menu
OK
.
2. Selezionare il menu IMPOSTAZIONI tramite il tasto
e confermare successivamente
con il tasto
OK
.
3. Selezionare a questo punto la funzione DURATA P tramite il tasto
e confermare
successivamente con il tasto
OK
.
4. Selezionare a questo punto tramite i tasti
e
il periodo DURATA P 1 (1s),
DURATA P 1 (1,5s), DURATA R P (2s) oppure DURATA P 4 (3s) e confermare
successivamente con il tasto
OK
.
5. Mantenendo premuto il tasto
INT
, potete abbandonare il livello d'immissione.
8.13 Ripristino alle impostazioni di fabbrica
Mediante questa funzione potete ripristinare l'unità portatile e la stazione base nuovamente allo
stato di consegna. Con il ripristino vengono cancellati la rubrica telefonica, la lista delle chiamate
(CLIP) e tutti i numeri telefonici memorizzati nella funzione di ripetizione delle chiamate.
Impostazioni di fabbrica:
lingua: tedesco nome dell'unità portatile: D6017
segnale d'avvertimento batterie: ON ricezione automatica delle chiamate ON
segnale d'avvertimento raggio
d'azione: ON
melodia del segnale di chiamata esterna: 2
clic dei tasti: ON melodia del segnale di chiamata interna: 3
volume della cornetta: 4 volume del segnale di chiamata dell'unità portatile: 4
codice PIN: 0 0 0 0 melodia del segnale di chiamata della base: 3
pausa: 3 sec. volume del segnale di chiamata della base: 4
periodo FLASH 100ms
Page 77

- Funzioni speciali -
77
1. Premere il tasto menu
OK
.
2. Selezionare il menu IMPOSTAZIONI tramite il tasto
e confermare successivamente
con il tasto
OK
.
3. Selezionare ora la funzione RESET tramite il tasto
e confermare successivamente
con il tasto
OK
.
4. Digitare il codice PIN attraverso la tastiera numerica (impostazione di fabbrica 0000).
5. Confermare ora con il tasto menu
OK
.
6. Dopo breve tempo le impostazioni vengono ripristinate allo stato di consegna. Nel display
viene visualizzato nuovamente il normale modo di disponibilità.
Nota: Se avete dimenticato sbadatamente il codice PIN, le impostazioni di fabbrica potranno
essere ripristinate anche senza il codice PIN.
1. Spegnere l’unità portatile, mantenendo premuto a lungo il tasto
INT
.
2. Riaccendere quindi l'unità portatile con il tasto
INT
e vedere l'indicazione visualizzata sul
display.
3. Non appena vengono visualizzati tutti i simboli sul display, premere brevemente il tasto
.
Nel display viene visualizzato il messaggio RESET.
4. Confermare con il tasto
OK
per ripristinare di nuovo le impostazioni di fabbrica. Tramite il
tasto
INT
potete annullare in qualsiasi momento la programmazione.
Page 78

- Funzioni speciali -
78
8.14 Struttura del menu
Rubrica
Nuova
Modifica
Cancella
Lista
Affilianzioni
Portatile
Toni
BT Scarica
Fuori Campo
Toni Tasti
OK?
Attivo - Disattivo
Attivo - Disattivo
Attivo - Disattivo
Vol Suoneria
Volume 1...5, Ascendente, Spenta
Melodia Est
Melodia 1...8
Melodia 1...8
Volume 1...5
Melodia Int
Vol Auricol
Risp Automat
Nome
Data/Ora
.........
04/02 16:25
Lingua
Deutsch
Espanol
Francais
Italiano
English
Affilia
Seleziona BS
Disaffilia
BS1234
Pin?
Auto,Base1234
Impostazioni Volume Base
Volume 1...5, Spenta
Melodia Base
Melodiq 1...5
Pin?
Modifica Pin
Pin?
Nuova
Ripeti
Reset
Durata P
Durata P 1...4
Durata R
Durata R 1...5
Attivo - Disattivo
Page 79

- Rimedio in caso di errori -
79
9 Rimedio in caso di errori
Nel caso di eventuali complicazioni con il Vostro telefono, si prega di attenersi innanzitutto alle
seguenti istruzioni.Per le richieste di garanzia Vi preghiamo di rivolgerVi al Vostro rivenditore di
fiducia. La validità della garanzia corrisponde a 2 anni. Per le batterie ricaricabili si concede una
garanzia di 12 mesi.
Nessuna possibilità di
conversazione
La linea telefonica non è correttamente collegata oppure è
disturbata.
Utilizzare esclusivamente il cavo telefonico fornito in
dotazione.
Eseguire un test con un altro telefono, per verificare il
funzionamento corretto del Vostro allacciamento telefonico.
L'alimentatore di rete non è correttamente inserito nella
presa di corrente o mancanza totale di corrente (black-out).
Le batterie ricaricabili sono difettose oppure esaurite.
Vi siete allontanati eccessivamente dalla stazione base.
Collegamento interrotto,
avaria
Vi siete allontanati eccessivamente dalla stazione base.
Luogo d'installazione della stazione base non ottimale.
Nessuna possibilità di
selezione
Il Vostro telefono lavora nella modalità di selezione a
frequenze. Perciò, si raccomanda innanzitutto di verificare il
vostro allacciamento telefonico.
Il sistema non reagisce più o
si trova in uno stato indefinito.
Ripristinare tutte le funzioni allo stato di consegna.
Estrarre prima l'alimentatore di rete dalla presa di corrente
per breve tempo.
Per l'impostazione di fabbrica si veda al capitolo 8.13.
La spia di controllo del
procedimento di carica non si
illumina.
Appoggiare correttamente l'unità portatile sulla stazione
base, pulire le superfici di contatto dell'unità portatile e della
stazione base con un panno morbido ed asciutto.
Dopo un paio d'ore nel display
lampeggia il simbolo della
batteria.
Appoggiare l'unità portatile sulla stazione base per la durata
di almeno 10 ore.
Nel caso ciò non fosse il rimedio, occorre cambiare le
batterie ricaricabili.
Indicazione scura del display La causa è da attribuire ad una diretta esposizione ai raggi
solari, lasciare raffreddare l'unità portatile.
Ora e data spostate È venuta a mancare la corrente nella stazione base.
Riprogrammare questi dati.
Page 80

- Dati tecnici -
80
10 Dati tecnici
Standard DECT
Numero canale 1880 fino 1990 MHz
Alimentazione di corrente stazione base 220/230V, 50 Hz
Raggio d'azione in edifici fino a 50m
Raggio d'azione all'aperto fino a 300m
Standby fino a 100 ore
Max. durata di conversazione fino a 8 ore
Batterie ricaricabili 3 x 1,2V/600mA, tipo AAA
Modalità di selezione MF
Temperatura ambientale ammessa 10°C fino 30°C
Relativa umidità d'aria ammessa 20 fino 75%
Funzione dei tasti di segnalazione 90ms, 250ms
Page 81

- Contents -
81
1 General Information.......................................................................................... 83
2 User controls .................................................................................................... 84
3 Setting up.......................................................................................................... 85
3.1 Safety information ............................................................................................................85
3.2 Check contents of pack....................................................................................................85
3.3 Connecting the base station.............................................................................................85
3.4 Fitting standard batteries..................................................................................................85
3.5 Charging the standard batteries .......................................................................................85
3.6 Fitting the belt clip ............................................................................................................86
3.7 Setting the display language ............................................................................................86
3.8 Setting the time and date .................................................................................................86
4 Operation........................................................................................................... 87
4.1 The display.......................................................................................................................87
4.2 Receiving calls .................................................................................................................87
4.3 Making calls......................................................................................................................88
4.4 Dialling stored numbers from the phone book..................................................................88
4.5 Call duration display.........................................................................................................88
4.6 Range information ............................................................................................................88
4.7 Muting the microphone in the handset .............................................................................89
4.8 Adjusting the receiver volume ..........................................................................................89
4.9 Redial facility ....................................................................................................................89
4.10 Switching the handset on and off .....................................................................................89
4.11 Keypad lock......................................................................................................................90
4.12 Paging from the base station to the handset....................................................................90
5 The phone book................................................................................................ 91
5.1 Entering numbers in the phone book ...............................................................................91
5.2 Changing numbers stored in the phone book ..................................................................92
5.3 Deleting stored numbers from the phone book ................................................................92
5.4 Check the phonebook entries...........................................................................................93
6 Caller display (CLID)......................................................................................... 94
6.1 The caller list ....................................................................................................................94
6.2 Storing telephone numbers from the Caller List in the phone book .................................95
6.3 Deleting individual telephone numbers from the caller list ...............................................95
7 Private exchanges ............................................................................................ 96
7.1 Using Pause.....................................................................................................................96
Page 82

- Contents -
82
8 Special functions.............................................................................................. 97
8.1 Setting the ring tone on the handset (ring melodies) .......................................................97
8.2 Ring tone volume on the handset.....................................................................................98
8.3 Setting the ring tones on the base station (ring melodies) ...............................................98
8.4 Ring tone volume on the base station..............................................................................98
8.5 Accepting calls automatically ...........................................................................................99
8.6 Adjusting the speaker volume ..........................................................................................99
8.7 Changing display names..................................................................................................99
8.8 Activating/Deactivating warning tones............................................................................100
8.9 Changing the PIN code ..................................................................................................100
8.10 Setting the display language ..........................................................................................100
8.11 Setting the FLASH time..................................................................................................101
8.12 Setting the length of the pause.......................................................................................101
8.13 Restoring factory settings...............................................................................................101
8.14 Menu structure ...............................................................................................................103
9 Troubleshooting ............................................................................................. 104
10 Technical data................................................................................................. 105
Page 83

- General information -
83
1 General Information
Standard rechargeable batteries - do not use any other rechargeable batteries or battery
packs. These could possibly cause a short circuit.
When changing batteries, always use standard batteries, Type AAA 1.2V 600mA.
Do not throw standard batteries into the fire or immerse in water. Do not dispose of old or
defective standard batteries with the normal household waste.
It is normal for the handset to become warm when charging and is not dangerous.
Do not use other manufacturer's charging equipment for charging the handset, as otherwise
damage could occur.
Position
There must be a 230 Volt mains socket near to where the telephone is positioned. Do not set up
the base station in the immediate vicinity of other electrical equipment such as microwaves or hifi systems, as this may result in mutual interference. The location has a decisive influence on the
trouble-free operation of the telephone.
Place the base station on a flat and non-slip surface. The feet of the base station do not normally
leave any marks on the surface. However, due to the large number of varnishes and surfaces in
use, it may not be possible to prevent marks occurring on the surface due to the feet of the unit.
Do not use the handset in areas where there is a risk of explosion.
Excessive exposure to smoke, dust, vibrations, chemicals, moisture, heat or the direct rays of
the sun must be avoided.
Information regarding medical equipment - The telephone works with a very low transmission
power. This low transmission power prevents any risk to health according to the current state of
research and technology. However, it has been shown that portable telephones can interfere
with medical equipment when switched on. Therefore, please maintain a distance of at least one
metre from medical equipment.
Disposal
If the useful life of the standard batteries or the complete equipment has expired, please dispose
of these carefully in accordance with the statutory requirements and in a manner friendly to the
environment.
Temperature and Ambient Conditions
The telephone is designed for use in protected rooms with a temperature range of 10 °C to 30
°C.
The base station must not be installed in damp rooms such as a bathroom or laundry room.
Avoid proximity to sources of heat such as radiators and do not expose the unit to direct sunlight.
Cleaning and care - The surface of the case can be cleaned with a soft, dry, lint-free cloth.
Never use cleaning agents, particularly aggressive solvents. No attention is necessary apart
from cleaning the case occasionally. The rubber feet of the base station are not resistant to all
cleaning agents. The manufacturer can therefore not accept any liability for possible damage to
furniture or the like.
Page 84

- User controls -
84
2 User controls
Handset
1 Phone book
2 Redial / Selection button
3 Menu button / OK
4 Caller list CLID / Selection button
5 Delete / Exit menu / Internal calls /
On – Off handset
6 Mute button
7 R signal button
8 Call button
Base station
1 PAGE button
2 Call and CLIP indicator
3 Charge monitoring lamp
1
2
3
4
5
6
7
8
1
2
3
Page 85

- Setting up -
85
3 Setting up
3.1 Safety information
NOTE: Before setting up, it is essential that you read the Safety Information at the beginning of
this operating manual.
3.2 Check contents of pack
The following items are supplied:
one base station one power supply with cable
one handset three standard batteries
one telephone connecting cable one instruction manual
one belt clip
3.3 Connecting the base station
Position the telephone near to your telephone connection socket and to a mains socket.
1. Insert the plug of the power supply into the socket on the underside of the base station and
plug the power supply into a properly installed 230 V mains socket. The plug-in power
supply for the base station must always be connected. For safety reasons, use only the
plug-in mains power supply provided.
2. Connect the telephone cable supplied to the telephone socket and the telephone jack on
the underside of the base station. Use only the new telephone cable provided.
3.4 Fitting standard batteries
To fit the standard rechargeable batteries supplied into the handset, press on the
upper edge of the battery compartment and slide it downwards. Now insert the
batteries taking care to ensure that the polarity is correct. Close the battery
compartment cover.
Important note: Place the handset in the base station with the display to the front for
at least 16 hours. The telephone may malfunction if the batteries are not properly
charged. The charging light on the base station will come on.
3.5 Charging the standard batteries
The rechargeable batteries for your telephone have a stand-by time of max. 100 hours at room
temperature and a maximum talk time of up to 8 hours. The current battery capacity is shown in
the display.
To charge the batteries, place the handset in the base station with the display to the front.
Page 86

- Setting up -
86
3.6 Fitting the belt clip
Slide the belt clip into the guide until it audibly engages at the sides.
3.7 Setting the display language
The display messages can be set up in German, Italian, English, French and Spanish.
1. Press the menu button
OK
.
2. Select the HANDSET menu with
and confirm with
OK
.
3. Select the LANGUAGE function with
and confirm with
OK
.
4. Select a language with
and
and confirm with
OK
.
5. Exit the entry mode by holding the
INT
button pressed.
3.8 Setting the time and date
Before using the telephone, you should set the current time and date. The present time will be
shown in the main display.
1. Press the menu button
OK
.
2. Select the HANDSET menu with
and confirm with
OK
.
3. Select the DATE-TIME function with
and confirm with
OK
.
4. Now enter the day, month and time one after the other:
Examples: 09 March - 08.52 hours => 09 03 08 52
21 November – 16.08 hours => 21 11 16 08
5. Confirm with the
OK
button.
6. Exit the entry mode by holding the
INT
button pressed.
Page 87

- Operation -
87
4 Operation
4.1 The display
In the normal operating mode, the display shows the name of the handset. The pre-set name
can be changed at any time. For more information, refer to 8.7. In addition, the main functions
are shown in the display by means of various symbols.
Lit: You are making a call.
Lit: You are making an external call.
Flashing: You are receiving an external call.
Lit: You are in the caller list (CLID).
Flashing: There are new calls stored in the caller list (CLID).
Lit: When the phone book is being used.
MENU
Lit: Whenever programming is activated.
Lit: The keypad lock is activated.
Lit: The connection to the base station is satisfactory.
Flashing: Base station out of range.
Lit: The number is longer than 12 digits.
4.2 Receiving calls
When a call arrives, the ringing tone sounds on the handset and on the base station. The
handset will ring a little later than the base station due to the radio transmission. The message
. will flash in the display. Press the call button
on the handset and the connection
will be made.
Note: While the handset is ringing, you can adjust the ringer volume by means of the
and
buttons.
To end the call, replace the handset in the base station or press the call button
on the
handset.
Notes: Please refer to Chapter 6 for information on how to show the caller's number
in the display.
When the automatic call accept feature is selected, the call is automatically accepted as soon as
you lift the handset from the base station. You can find out in Chapter 8.5 how to switch the
automatic call accept feature on or off.
Page 88

- Operation -
88
4.3 Making calls
1. Enter the required telephone number with a maximum of 25 digits using the number pad.
As the display is only capable of showing 12 digits, in the case of longer phone numbers
only the last 12 digits are displayed.
Note: If you have entered a number incorrectly, you can delete the number by repeatedly
pressing the
INT
button. The number is completely deleted by pressing the
INT
button
for a long time.
2. Press the call button
and the required connection will be made.
Note: You can also get a dialling tone by first pressing the call button
. On entering the
digits of your required phone number, your telephone will dial the number directly. With this
method of making a call, it is not possible to correct individual digits in the number in the manner
described above.
4.4 Dialling stored numbers from the phone book
After you have stored a few phone numbers, you can call these up very quickly and easily.
1. Press the phone book button
. The display will now show the first number stored in
alphabetical order.
2. You can now select all of the stored numbers with the and
buttons.
To choose a phone number directly alphabetically, press the appropriate letter.
3. Now press the call button
and the telephone number displayed will be automatically
dialled.
4.5 Call duration display
The call duration in minutes and seconds is shown in the display during a call. Fifteen seconds
after dialling, the display will switch from showing the number dialled to showing the duration of
the call. The call duration will still be retained in the display for a few seconds after the call has
been ended.
4.6 Range information
The range of the handset is ca. 50 metres in closed rooms and ca. 300 metres outdoors. When
there is a good contact with the base station, the
symbol will come on in the display.
If you are too far away from the base station, the
symbol will flash and you will hear warning
tones. In this case, move nearer to the base station once more, as otherwise the call will be
interrupted. These warning tones can be switched off as described in Chapter 0.
Page 89

- Operation -
89
4.7 Muting the microphone in the handset
You can turn off the handset microphone during a call by using the
button. It is thus
possible to speak without the other person hearing you. The loudspeaker in the handset remains
switched on and you can continue to hear the other person.
1. Press the
button once during a call. The message will appear in the display.
2. To switch the microphone on again, press the
button once more. The message
will go off and you can continue the call as normal.
4.8 Adjusting the receiver volume
If the receiver volume is too quiet or too loud for you, you can change this to suit your
requirements.
You can adjust the volume during a call by means of the
and
buttons. The
selected volume will be shown in the display with the message EAR VOL 1 to 5.
4.9 Redial facility
You can use the redial facility if the person called is engaged or does not reply. Your telephone
remembers the last 10 numbers dialled.
1. Press the
button and the last phone number dialled will be shown in the display.
2. Further redial numbers can now be selected using the
button. The
button is
used to page back through the list.
3. Now press the call button
and the telephone number displayed will be automatically
dialled.
Note: If the redial number is stored in the phone book, the name will automatically appear in the
display instead of the phone number.
4.10 Switching the handset on and off
You can switch off the handset by pressing and holding the
INT
button. If the handset is
switched off, no battery power will be used. It will not be possible to receive calls.
Press the
INT
button once to switch the handset on again. The display will show the
message BASE 1 and the handset will switch on again after a short time. The handset will switch
itself on automatically as soon as you replace it on the base station.
Page 90

- Operation -
90
4.11 Keypad lock
If you frequently carry the handset with you, you can lock the keypad so that buttons are not
pressed unintentionally. Incoming calls can be received as normal when the keypad lock is
switched on.
Activating the keypad lock
Press the
OK
and buttons on the handset. The symbol will appear in the display.
Deactivating the keypad lock
To deactivate the keypad lock, press the
OK
and
button.
4.12 Paging from the base station to the handset
If you cannot remember where you have left the handset, press the
button on the base
station. You will hear the handset audible signals for 30 seconds and thus be able to find it again
easily. You can cancel the audible signals earlier by pressing any button on the handset or the
button on the base station.
Page 91

- Phone book -
91
5 The phone book
25 numbers including a name can be stored in the phone book. The maximum length for a
number is 25 characters.
5.1 Entering numbers in the phone book
1. Press the menu button
OK
. The display shows the message PHONEBOOK.
2. Press the
OK
button again. The display shows the message ADD.
3. Again confirm with the
OK
button. The display shows the message NAME?.
4. Now enter the associated name (max. 12 letters) using the number pad. You will find
information on how to enter names in the next section.
5. Confirm the name with the menu button
OK
. The display will show the message
NUMBER?.
6. Enter the required telephone number using the number pad.
7. Again confirm with the
OK
button. The display will again show the message ADD.
8. If you want to enter more numbers, proceed as under Item 3. Exit the entry mode by holding
the
INT
button pressed.
Notes on the phone book: Always enter the dialling code for all phone numbers so that the
telephone can also associate incoming local calls with aIf the memory capacity of 25 numbers
has been reached, the next time you try to store a number the display will show the message
MEM FULL. In order to recreate more space, other numbers must be deleted first.
How to enter names
The number keys are also printed with letters for entering names. By repeatedly pressing the
appropriate button, upper case letters as well as numbers can be entered.
Example: You want to enter the name "Peter".
Press: 1 x button 7, 2 x button 3, 1 x button 8, 2 x button 3, 3 x button 7
- To enter a space, press the n button once.
- A hyphen can be entered by pressing the n button twice.
- To enter the same letter twice, press the appropriate letter and then wait until the cursor
automatically jumps to the next position.
- Incorrect entries can be deleted with the
INT
button.
Page 92

- Phone book -
92
5.2 Changing numbers stored in the phone book
1. Press the menu button
OK
. The display will show PHONEBOOK.
2. Press the
OK
button again. The display will show ADD.
3. Now press the
button. The display will show EDIT.
4. Again confirm with the
OK
button. The display will now show the stored numbers in
alphabetical order.
5. Now choose the number that you want to change using the
and
buttons. To
choose a phone number directly alphabetically, press the appropriate letter.
6. Confirm the selection with the menu button
OK
. In turn, the display will show the name
and the cursor will appear flashing after the last letter.
7. Now change the name using the number pad. You will find information on entering names in
Chapter 5.1.
8. After you have completed the required changes, confirm again with the menu button
OK
.
The display will now show the number.
9. Now change the number using the number pad. The individual digits of the phone number can
be deleted by repeatedly pressing the
INT
button.
10. After you have completed the required changes, confirm again with the menu button
OK
.
The display will show the message EDIT.
11. If you want to change more numbers proceed as under Item 4. Exit the programming mode by
holding the
INT
button pressed.
5.3 Deleting stored numbers from the phone book
1. Press the menu button
OK
. The display will show PHONEBOOK.
2. Press the
OK
button again. The display will show ADD.
3. Now press the
button twice. The display will show DELETE.
4. Confirm with the menu button
OK
.
5. Now choose the phonebook entry that you want to delete using the
and
buttons. To choose a phone number directly alphabetically, press the appropriate letter.
6. After you have found the required entry, confirm with the menu button
OK
and the
display will now show the number.
7. Confirm with the menu button
OK
and the display will show the message CONFIRM?.
8. Confirm again with the menu button
OK
and the phone book entry will be deleted. The
display again shows the message DELETE. The delete procedure is cancelled by holding
the
INT
button pressed.
9. When you have deleted the number, the message DELETE will appear in the display. If you
want to delete more numbers, proceed as under Item 4. Exit the delete mode by holding the
INT
button pressed.
Page 93

- Phone book -
93
5.4 Check the phonebook entries
1. Press the menu button
OK
. The display will show PHONEBOKK.
2. Press the
OK
button again. The display will show ADD.
3. Now press three times the
button. The display will show LIST.
4. Press the
OK
button again.
5. Use the
and
buttons to check the phonebook entries. To choose a phone
number directly alphabetically, press the appropriate letter.
6. Press the
OK
several times. The display shows alternating the phone number and the
name.
7. To exit from the delete mode, hold down the
INT
button.
Page 94

- Caller display CLID -
94
6 Caller display (CLID)
In Switzerland, this function is not available with all network providers.
NOTICE!
The calling number indication is an optional service from your telephone
provider. Your telephone will show the calling number in the display if your
provider makes this service available. Not all providers pass on the date and time
information. Please ask your telephone provider for detailed information. Some
PBXs are also not able to pass on the whole or part of the calling number
information.
In the case of incoming calls, you can see who is calling you by means of the caller display
facility. If this function is available on your telephone, the display will show you the caller's
telephone number when the telephone rings.
If you have stored this number in your phone book, the name will be displayed instead of the
phone number.
All calls are stored in a caller list so that you will not miss any calls even in your absence. A total
of 24 phone numbers can be stored in the list. When the list is full, the oldest number is always
deleted from the list. If new numbers are stored in the list during your absence, the
symbol
will flash in the display.
6.1 The caller list
To view the phone numbers on the caller list, please proceed as follows:
1. Press the
button and the last phone number received will be shown in the display. If the
caller list is empty, the display will show the message EMPTY.
2. Further numbers in the caller list can now be selected by means of the
and
buttons.
Notes: Information can be called up using the
OK
button.
- If the phone number is longer than 12 digits, the remaining numbers will be displayed.
- Displays the number when the name of the caller is already stored in the phone book.
- Displays the date and time when this information is transmitted by the caller.
- Shows how often the caller has already called.
- If no further data are available, the display will show the message ADD?.
- You can return to the list once more by pressing the
INT
button.
3. If you want to call back a number on the caller list directly, simply press the call button
and the number will be dialled immediately.
4. Exit the caller list by holding the
INT
button pressed.
Page 95

- Caller display CLID -
95
6.2 Storing telephone numbers from the Caller List in the phone book
A phone number stored in the caller list can be saved directly to the phone book.
1. Press the button and the last phone number received will be shown in the display.
2. Now select the telephone number from the caller list that you want to put into the phone book
by using the
and
buttons.
3. Press the
OK
button until the message ADD appears in the display.
4. Again confirm with the
OK
button. The display will show the message NAME?.
5. Now enter the associated name (max. 12 letters) using the number pad.
6. Again confirm with the menu button
OK
and the number will be stored in the phone book.
7. Exit the caller list by holding the
INT
button pressed.
Note: As soon as the number has been stored in the phone book, this number will be deleted
from the caller list.
6.3 Deleting individual telephone numbers from the caller list
1. Press the
button and the last phone number received will be shown in the display.
2. Now select the telephone number from the caller list that you want to delete by using the
and
buttons.
3. Press the
OK
button until the message ADD appears in the display.
4. Press the
button. The display shows the message DELETE?.
5. Again confirm with the menu button
OK
and the number will be deleted from the caller list
or you can exit the Delete mode by pressing and holding the
INT
button.
Page 96

- Private exchanges -
96
7 Private exchanges
If you have connected your telephone to a PBX, you can use all the special functions such as
call forwarding and automatic call-back. These can be accessed using the "R" button. Different
FLASH times are required when using on a private exchange. You can find out how to change
the FLASH time under 8.11. The factory setting is 100 ms. To check whether your telephone will
function correctly with your PBX, consult the supplier of the PBX.
7.1 Using Pause
With private exchanges, it is necessary to dial a certain number (e.g. "9" or "0") in order to obtain
a dialling tone for an outside line on the extension. With some, older private exchanges, it takes
some time before the dialling tone can be heard. Especially for these private exchanges, an
automatic pause can be inserted after connecting to the outside line so that you can dial directly
without waiting for the dialling tone.
The length of the pause can be varied between 1 and 3 seconds. For more information, see
8.12.
Entering a pause when dialling manually
Press the redial button
for approximately 2 seconds between the number for the outside
line and the actual telephone number. The symbol P will appear in the display.
The pause can also be saved with numbers in the phone book.
Page 97

- Special functions -
97
8 Special functions
All further programming functions can be accessed by means of a very user-friendly menu. Here
are a few general instructions to help you find your way around the menu:
Programming is started by means of the
OK
button. The MENU symbol comes on in the
display during programming.
You can find the required level using the
and
buttons.
This level is opened using the
OK
button.
In turn, you can find the required function using the
and
buttons and again
confirm with the
OK
button.
You can go back one level each time by pressing the
INT
button.
Each save procedure will be cancelled automatically if no input is made within 60 seconds.
You can leave programming mode at any time without making any changes by pressing and
holding the
INT
button.
You will find a complete overview of the menu in Chapter 8.14.
8.1 Setting the ring tone on the handset (ring melodies)
Your handset can respond with 8 different ringing tones when a call comes through. If you are
using the telephone system with several handsets, you can set different ring tones for external
and internal calls.
1. Press the menu button
OK
.
2. Select the HANDSET menu with
and confirm with
OK
.
3. Select the function EXT MELODY (ring tone for external calls) or INT MELODY (ring tone for
internal calls/with two handsets only) with the
buttons and confirm with
OK
.
4. Select the required melody with
and
and confirm with
OK
.
5. Now select further menu functions or exit the menu by pressing and holding the
INT
button.
Page 98

- Special functions -
98
8.2 Ring tone volume on the handset
The volume of the ring tone on the handset can be adjusted in three steps. With the Crescendo
function, the handset first rings quietly and then progressively louder. If at any time you do not
want to be disturbed, you can also turn the ring tone off altogether. If the ring tone is turned off,
incoming calls will only be signalled at the base station and by means of the display on the
handset.
1. Press the menu button
OK
.
2. Select the HANDSET menu with
and confirm with
OK
.
3. Select the function RING VOLwith the
buttons and confirm with
OK
.
4. Select the required volume using
and
or switch the ring tone off with VOLUME
OFF and confirm with
OK
.
5. Now select further menu functions or exit the menu by pressing and holding the
INT
button.
8.3 Setting the ring tones on the base station (ring melodies)
The base station can also respond with 5 different ringing tones when a call comes through.
1. Press the menu button
OK
.
2. Select the BASE menu with
and confirm with
OK
.
3. Select the RING MELODY function with
and confirm with
OK
.
4. Select the required melody with
and
and confirm with
OK
.
5. Now select further menu functions or exit the menu by pressing and holding the
INT
button.
8.4 Ring tone volume on the base station
The volume of the ring tone on the base station can be adjusted in 5 steps. If at any time you do
not want to be disturbed, you can also turn the ring tone off altogether.
1. Press the menu button
OK
.
2. Select the BASE menu with
and confirm with
OK
.
3. Select the RING VOL function with
and confirm with
OK
.
4. Select the required volume using
and
or switch the ring tone off with VOL OFF
and confirm with
OK
.
5. Now select further menu functions or exit the menu by pressing and holding the
INT
button.
Page 99

- Special functions -
99
8.5 Accepting calls automatically
Incoming calls are accepted automatically when you lift the handset from the base station. If you
only want calls to be accepted by means of the
button, you can deactivate the automatic
acceptance facility.
1. Press the menu button
OK
.
2. Select the HANDSET menu with
and confirm with
OK
.
3. Select the AUTO ANS function with
and confirm with
OK
.
4. Select ON or OFF with
and
and confirm with
OK
.
5. Now select further menu functions or exit the menu by pressing and holding the
INT
button.
8.6 Adjusting the speaker volume
The speaker volume can be adjusted in five steps to take account of the surrounding noise level.
1. Press the menu button,
OK
.
2. Use
to select the HANDSET menu, then press
OK
.
3. Use
to select the EAR VOL function, then press
OK
.
4. Use
and
to select a volume from 1 to 5 and then press
OK
.
5. You can then select further menu functions or exit by holding down
INT
.
8.7 Changing display names
In normal operation, the message "D6017" appears in the display. If you have logged on several
handsets to one base station, it can be useful to give each handset its own name. The number
before the name shows with which number the handset can be called internally.
1. Press the menu button
OK
.
2. Select the HANDSET menu with
confirm with
OK
.
3. Select the HS NAME function with
and confirm with
OK
.
4. Now enter the required name using the number pad. Letters already entered can be deleted
by repeatedly pressing the
INT
button.
5. Confirm with
OK
.
6. Now select further menu functions or exit the menu by pressing and holding the
INT
button.
Page 100

- Special functions -
100
8.8 Activating/Deactivating warning tones
Here, various warning tones can be activated or deactivated.
Button click - Each time a button is pressed, the handset confirms with a button click. The
button click can be switched on or off.
Warning tone for low battery - If the battery capacity is too low, a warning tone will remind you
that you must charge the handset.
Range warning - If you are too far away from the base station, a warning tone will remind you
that you are losing contact with the base station.
1. Press the menu button
OK
.
2. Select the HANDSET menu with
and confirm with
OK
.
3. Select the TONES function with
and confirm with
OK
.
4. Select one of the functions KEYTONE, LOW BATT or RANGE with
and
and
confirm with
OK
.
5. Switch the selected warning tone on or off with
and
and confirm with
OK
.
6. Now select further menu functions or exit the menu by pressing and holding the
INT
button.
8.9 Changing the PIN code
Some functions of the telephone system are protected against unauthorised use by a PIN code.
The PIN code can consist of up to eight numbers. As supplied, the PIN code is set to "0000". To
change the PIN code, proceed as follows:
1. Press the menu button
OK
.
2. Select the BASE menu with
and confirm with
OK
.
3. Select the CHANGE PIN function with
and confirm with
OK
.
4. Now enter the current PIN code using the number pad (factory setting 0 0 0 0) and confirm
with
OK
.
5. Now enter the new PIN code using the number pad and confirm with
OK
.
6. Now enter the new PIN code once more for confirmation and confirm with
OK
.
7. Now select further menu functions or exit the menu by pressing and holding the
INT
button.
If the old PIN code is not entered correctly, the process will be aborted.
8.10 Setting the display language
The display messages can be set up in German, Italian, English, French and Spanish.
1. Press the menu button
OK
.
2. Select the HANDSET menu with
and confirm with
OK
.
3. Select the LANGUAGE function with
and confirm with
OK
.
4. Select a language with
and
and confirm with
OK
.
5. Exit the entry mode by holding the
INT
button pressed.
 Loading...