

Page 1
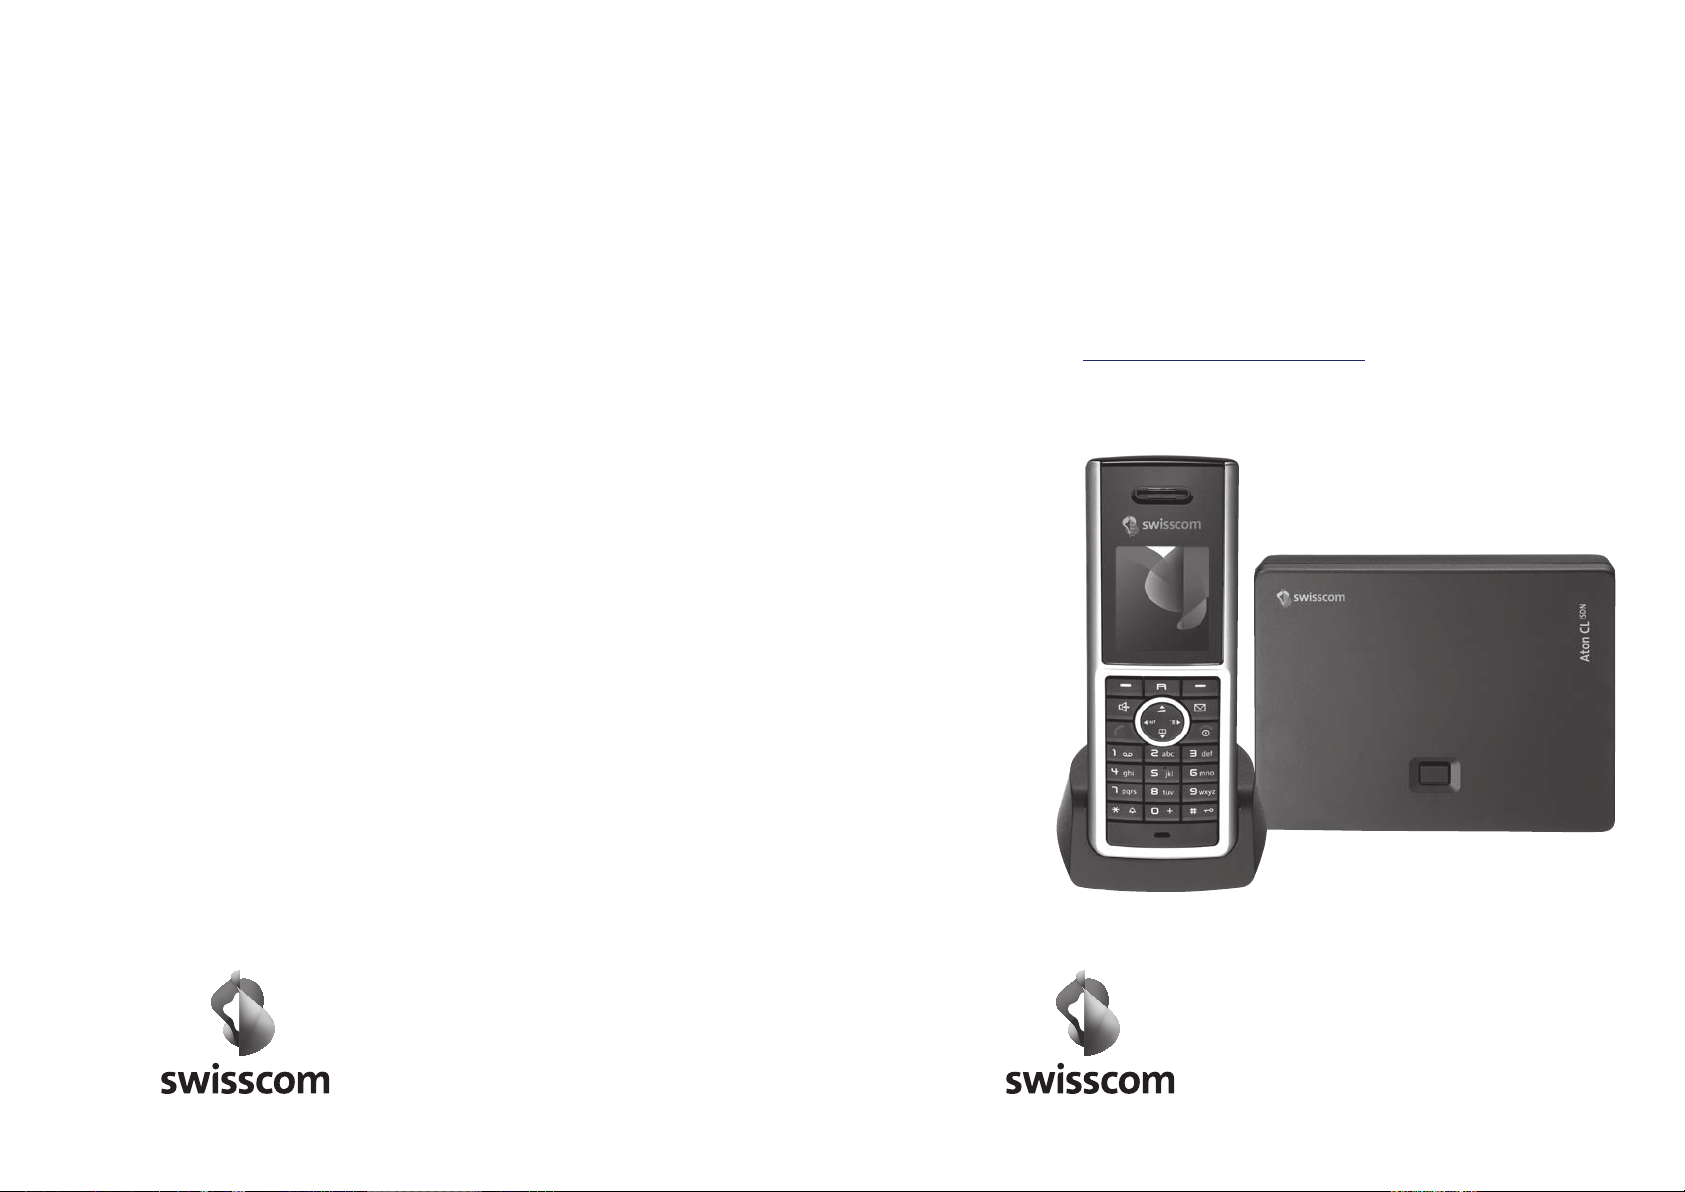
Aton CL401
Bedienungsanleitung
Mode d’emploi
Istruzioni per l’uso
ISDN
dt/fr/it 05.2008
Page 2
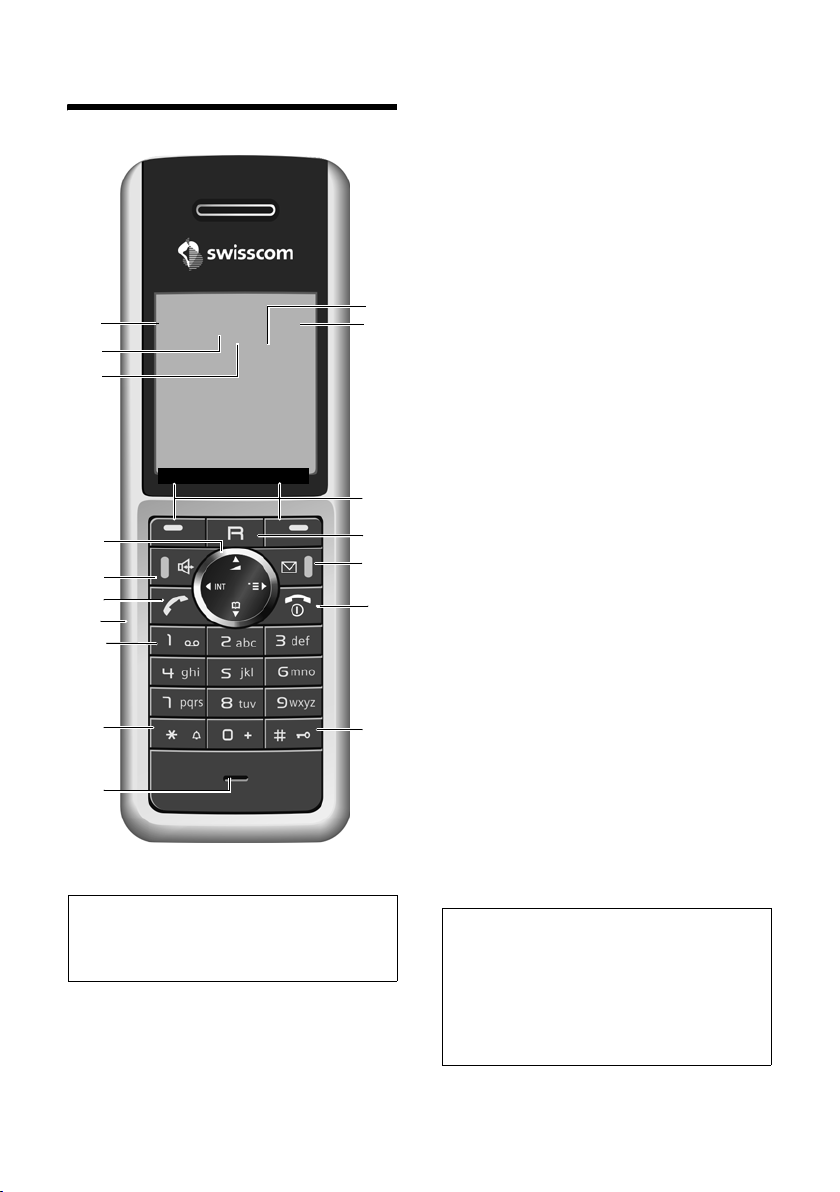
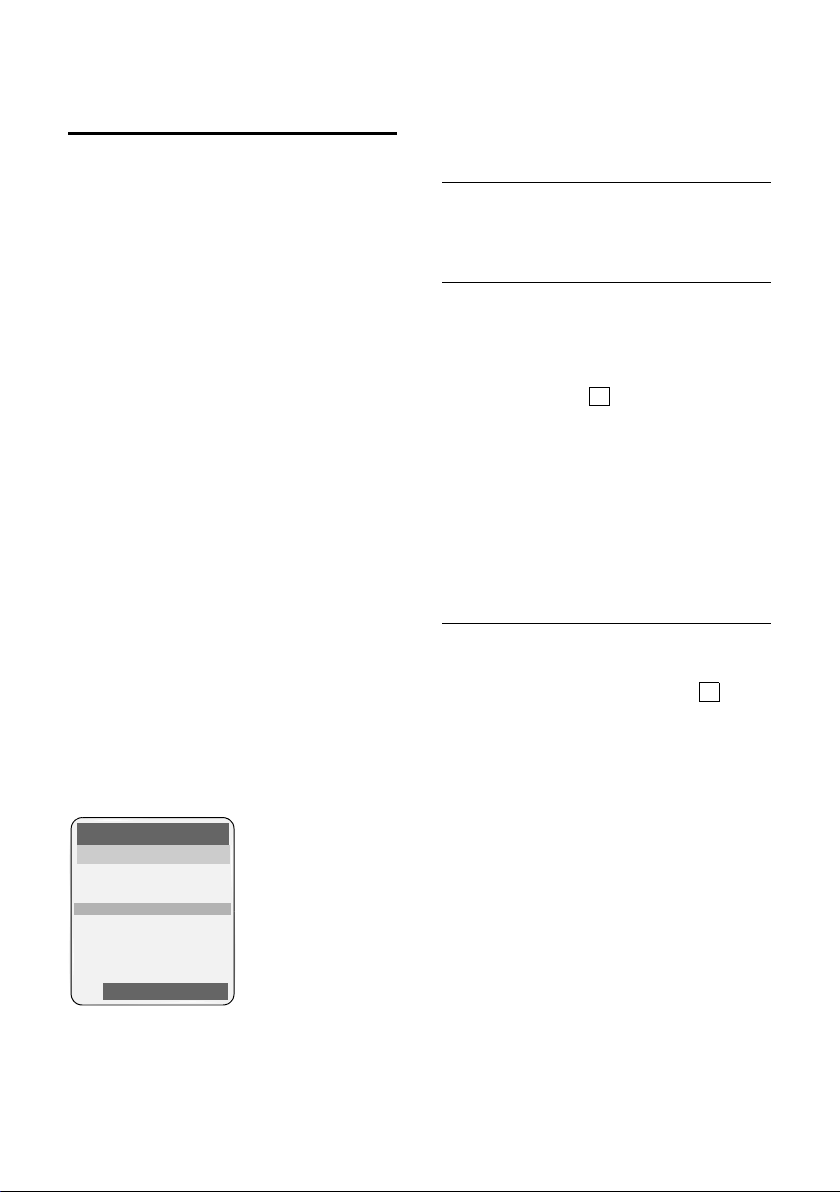
The handset at a glance
17
Ð
16
15
15.11.07 09:45
Hotline SMS
14
13
12
11
10
9
8
.
Please note:
The handset is not registered to your
ISDN
Aton CL
page 10.
base station; please refer to
òV
½
INT 1
1 Display (screen) in idle status
2 Charge status of the batteries
= e V U (flat to full)
= flashes: batteries almost flat
e V U flashes: batteries charging
3 Display keys (page 11)
4 Recall key
- Consultation call (flash)
- Insert a dialling pause (press and hold)
5 Message key
Access to calls and message lists;
Flashes: new message or new call
1
2
3
4
5
6
7
6 End call key, On/Off key
End call, cancel function, go back one menu
level (press briefly), back to idle status
(press and hold), activate/deactivate
handset (press and hold in idle status)
7 Hash key
Keypad lock on/off (press and hold in idle
status);
Toggle between upper/lower case and digits
8 Microphone
9 Star key
Ringer melody on/off (press and hold),
With an open connection: switch between
dial pulsing/touch tone dialling
(press briefly);
Open special characters table
10 Key 1
Dial network mailbox (press and hold)
11 Connection socket for headset
12 Tal k key
Answer a call, open last number redial list
(press briefly), start dialling (press and hold)
When writing an SMS: send SMS
13 Handsfree key
Switch between earpiece and handsfree
mode;
Lights up: handsfree activated
Flashes: incoming call
14 Control key (page 11)
15 Bluetooth activated (page 51)
16 Eco range activated (page 13)
17 Signal strength
Ð i Ñ Ò (high to low)
| flashes: no reception
Please note:
The Aton CLx308/CL401
here is just used as an example. Depending on
whether you are using an Aton CL102 or an
Aton CL303 handset, the key arrangement and
the menu will be different. For information
about this, please refer to the user guide for
the relevant handset.
ISDN
handset shown
1
Page 3

The base station at a glance
Registration/paging key
(page 39)
2
Page 4

Contents
Contents
The handset at a glance . . . . . . . . 1
The base station at a glance . . . . 2
Safety precautions . . . . . . . . . . . . 5
Aton CL401ISDN –
more than just a telephone . . . . . 7
First steps . . . . . . . . . . . . . . . . . . . . 7
Pack contents . . . . . . . . . . . . . . . . . . . . 7
Installing the base station and
charging cradle . . . . . . . . . . . . . . . . . . . 7
Setting up the handset for use . . . . . . . 8
Operating the handset . . . . . . . . 11
Control key . . . . . . . . . . . . . . . . . . . . . 11
Display keys . . . . . . . . . . . . . . . . . . . . 11
Reverting to idle status . . . . . . . . . . . . 12
Menu guidance . . . . . . . . . . . . . . . . . 12
"Swisscom Hotline" . . . . . . . . . . . . . . . 13
Correcting incorrect entries . . . . . . . . 13
Eco range . . . . . . . . . . . . . . . . . . . 13
Setting up the base station –
installation assistant . . . . . . . . . . 13
What is an MSN? . . . . . . . . . . . . . . . . . 13
Launching the installation assistant and
making the base station settings . . . . 14
Menu tree . . . . . . . . . . . . . . . . . . 16
Making calls . . . . . . . . . . . . . . . . . 18
Making an external call . . . . . . . . . . . 18
Ending a call . . . . . . . . . . . . . . . . . . . . 18
Accepting a call . . . . . . . . . . . . . . . . . 18
Rejecting a call . . . . . . . . . . . . . . . . . . 18
Calling Line Identification . . . . . . . . . 19
Handsfree talking . . . . . . . . . . . . . . . . 19
Muting . . . . . . . . . . . . . . . . . . . . . . . . 19
Defining the settings for
the next call . . . . . . . . . . . . . . . . . . . . 20
Ringback when the number is
busy (CCBS)/ when there is
no reply (CCNR) . . . . . . . . . . . . . . . . . 20
Identify caller . . . . . . . . . . . . . . . . . . . 21
Functions during a call . . . . . . . 22
Making calls to several
participants . . . . . . . . . . . . . . . . . . . . . 22
Transferring calls . . . . . . . . . . . . . . . . . 23
Dealing with a waiting external call –
CW (Call Waiting) . . . . . . . . . . . . . . . . 23
Using the directory and
lists . . . . . . . . . . . . . . . . . . . . . . . 24
Directory . . . . . . . . . . . . . . . . . . . . . . . 24
Last number redial list . . . . . . . . . . . . 27
Opening lists with the message key . . 28
Making cost-effective calls . . . . 30
Displaying call duration and charges . 30
SMS (text messages) . . . . . . . . . 31
Writing/sending an SMS . . . . . . . . . . . 31
Receiving an SMS . . . . . . . . . . . . . . . . 33
SMS with vCard . . . . . . . . . . . . . . . . . . 35
Notification by SMS . . . . . . . . . . . . . . . 35
Setting SMS centres . . . . . . . . . . . . . . 36
SMS on a PABX . . . . . . . . . . . . . . . . . . 36
Activating/deactivating SMS function . 36
SMS troubleshooting . . . . . . . . . . . . . 37
Using the network mailbox . . . 38
Configuring fast access for the
network mailbox . . . . . . . . . . . . . . . . . 38
Viewing the network mailbox report . 38
Using several handsets . . . . . . . 39
Registering handsets . . . . . . . . . . . . . . 39
Deregistering handsets . . . . . . . . . . . . 39
Locating a handset ("paging") . . . . . . 39
Changing the base station . . . . . . . . . 40
Making internal calls . . . . . . . . . . . . . . 40
Changing the name of a handset . . . . 41
Changing a handset's internal
number . . . . . . . . . . . . . . . . . . . . . . . . 41
Using a handset as a room monitor . . 42
Handset settings . . . . . . . . . . . . 43
Quick access to functions
and numbers . . . . . . . . . . . . . . . . . . . . 43
Changing the display language . . . . . 44
Setting the display . . . . . . . . . . . . . . . 45
Setting the screensaver . . . . . . . . . . . . 45
3
Page 5

Contents
Setting the display backlight . . . . . . . 45
Activating/deactivating auto answer . 45
Changing the handsfree/
earpiece volume . . . . . . . . . . . . . . . . . 46
Changing ringer tones . . . . . . . . . . . . 46
Activating/deactivating muting
for the first ringer tone . . . . . . . . . . . . 47
My stuff . . . . . . . . . . . . . . . . . . . . . . . 48
Activating/deactivating advisory tones 49
Setting the alarm clock . . . . . . . . . . . . 49
Setting an appointment (calendar) . . 50
Displaying missed appointments
and anniversaries . . . . . . . . . . . . . . . . 51
Using Bluetooth devices . . . . . . . . . . . 51
Your own area code setting . . . . . . . . 53
Restoring the handset default
settings . . . . . . . . . . . . . . . . . . . . . . . . 53
Making ISDN settings . . . . . . . . . 54
Setting up/deleting an ISDN phone
number (MSN) . . . . . . . . . . . . . . . . . . 54
Assigning an MSN . . . . . . . . . . . . . . . 54
Setting up a busy signal for when the
MSN is being used (Busy on Busy) . . . 55
Activating/deactivating
call waiting – CW . . . . . . . . . . . . . . . . 55
Withholding identification of your
number for all calls (CLIR) . . . . . . . . . 55
Diverting calls . . . . . . . . . . . . . . . . . . . 56
Setting the base station . . . . . . . 57
Protecting against unauthorised
access . . . . . . . . . . . . . . . . . . . . . . . . . 57
Activating/deactivating music on hold 57
Repeater support . . . . . . . . . . . . . . . . 57
Restoring the base station to the
factory settings . . . . . . . . . . . . . . . . . . 57
Connecting the base station
to a PABX . . . . . . . . . . . . . . . . . . . 58
Saving an access code
(outside line code) . . . . . . . . . . . . . . . 58
Dialling options . . . . . . . . . . . . . . . . . 58
Appendix . . . . . . . . . . . . . . . . . . 60
Care . . . . . . . . . . . . . . . . . . . . . . . . . . . 60
Contact with liquid . . . . . . . . . . . . . . . 60
Faults and self-help with
troubleshooting . . . . . . . . . . . . . . . . . 60
Warranty/Maintenance/Repair/
Approval . . . . . . . . . . . . . . . . . . . . . . . 62
Repair/Maintenance . . . . . . . . . . . . . . 62
Approval . . . . . . . . . . . . . . . . . . . . . . . 62
Specifications . . . . . . . . . . . . . . . . . . . 63
Notes on the user guide . . . . . . 64
Example of a menu input . . . . . . . . . . 64
Example of multiple line input . . . . . . 64
Writing and editing text . . . . . . . . . . . 65
Accessories . . . . . . . . . . . . . . . . . 66
Mounting the base station
to the wall . . . . . . . . . . . . . . . . . 67
Index . . . . . . . . . . . . . . . . . . . . . . 68
4
Page 6
Safety precautions
Warning:
Read the safety precautions and the user guide before use.
Explain their contents and the potential hazards associated with using the telephone to your children.
Only use the mains adapter supplied, as indicated on the underside of the
$
base station or charging cradle.
Only use the recommended, rechargeable batteries (page 63), i.e. never use
a conventional (non-rechargeable) battery or other battery types as this could
result in significant health risks and personal injury.
Batteries should not be disposed of in general household waste. Observe the
local waste disposal regulations, details of which can be obtained from your
local authority or the dealer you purchased the product from.
The operation of medical appliances may be affected. Be aware of the technical
conditions in your particular environment, e.g. doctor's surgery.
Do not hold the rear of the handset to your ear when it is ringing or when
the handsfree function is activated. Otherwise you risk serious and permanent
damage to your hearing.
The handset may cause an unpleasant humming noise in hearing aids.
ƒ
Do not install the base station or charging cradle in bathrooms or shower rooms.
The base station and charging cradle are not splash proof (page 60).
Do not use your phone in environments with a potential explosion hazard
(e.g. paint shops).
If you give your telephone to someone else, make sure you also give them
the operating manual.
Please remove faulty base stations from use or have them repaired by our
Service, as they could interfere with other wireless services.
5
Page 7
Information about disposal
At the end of its service life, this product must not be disposed of with normal
household waste, but must be handed in at the place of purchase or at a collection point for recycling electrical and electronic devices in accordance with the
ordinance governing the return, acceptance and disposal of electrical and electronic equipment (VREG).
The materials can be recycled according to their identification. By reusing and
recycling materials along with other methods of recycling used equipment, you
can make an important contribution to protecting the environment.
Please note:
– Not all of the functions described in this user guide are available in all countries. CLIP (Calling Line
Identification Presentation), SMS (Short Message Services): these functions are dependent on the
network provider.
– "EATONI" predictive text: "EATONI" predictive text is not supported by this device.
6
Page 8

Aton CL401ISDN – more than just a telephone
Aton CL401
ISDN
–
more than just a telephone
Your ISDN connection offers you two telephone lines simultaneously. Your phone,
which has a clearly laid out colour display
(65k colours), doesn't just offer you the
option of sending and receiving SMS messages via the fixed line network and of saving up to 250 phone numbers (page 24) –
it can do much more besides:
u You can reduce the transmission power
by activating eco range (page 13).
u You can programme the keys of your
phone with important numbers or frequently used functions. The number is
then dialled or the function started by
simply pressing a key (page 43).
u You can designate important people as
VIPs so you can identify important calls
from the ringer (page 25).
u You can assign pictures to your con-
tacts. You can then tell who is calling
you from the picture on your handset's
display.
Precondition: Calling Line Identification
(CLIP, page 19).
u You can save appointments (page 50)
and anniversaries (page 26) in your
phone and it will remind you of them in
advance.
u You can use Bluetooth™ for wireless
communication with other devices that
use this technology.
Bluetooth™ can be used for
– headsets (page 9)
– exchanging directory entries with
your mobile phone (page 26)
Have fun using your new phone!
First steps
Pack contents
u One Aton CL
mains adapter,
u one Aton CLx308/CL401
u one phone cord,
u two batteries,
u one battery cover,
u one belt clip,
u one user guide,
u one headset.
Installing the base station and charging cradle
The base station and charging cradle are
designed for use in enclosed dry rooms
with a temperature range of +5 °C to
+45 °C.
Set up the base station in a central location in your flat or house.
Instructions on how to mount the base
station on the wall can be found at the
end of this user guide.
Please note:
u Never expose the telephone to heat
sources, direct sunlight or other electri-
cal appliances.
u Protect your telephone from moisture,
dust, corrosive liquids and vapours.
Range and reception strength
Range:
u Up to 250 m outdoors
u Up to 40 m indoors
The range is reduced when eco range is
activated (see page 13).
ISDN
base station with
ISDN
handset,
7
Page 9
First steps
Reception strength:
The display shows the quality of the radio
contact between the base station and
handset:
u Good to poor: ÐiÑÒ
u No reception: | flashes
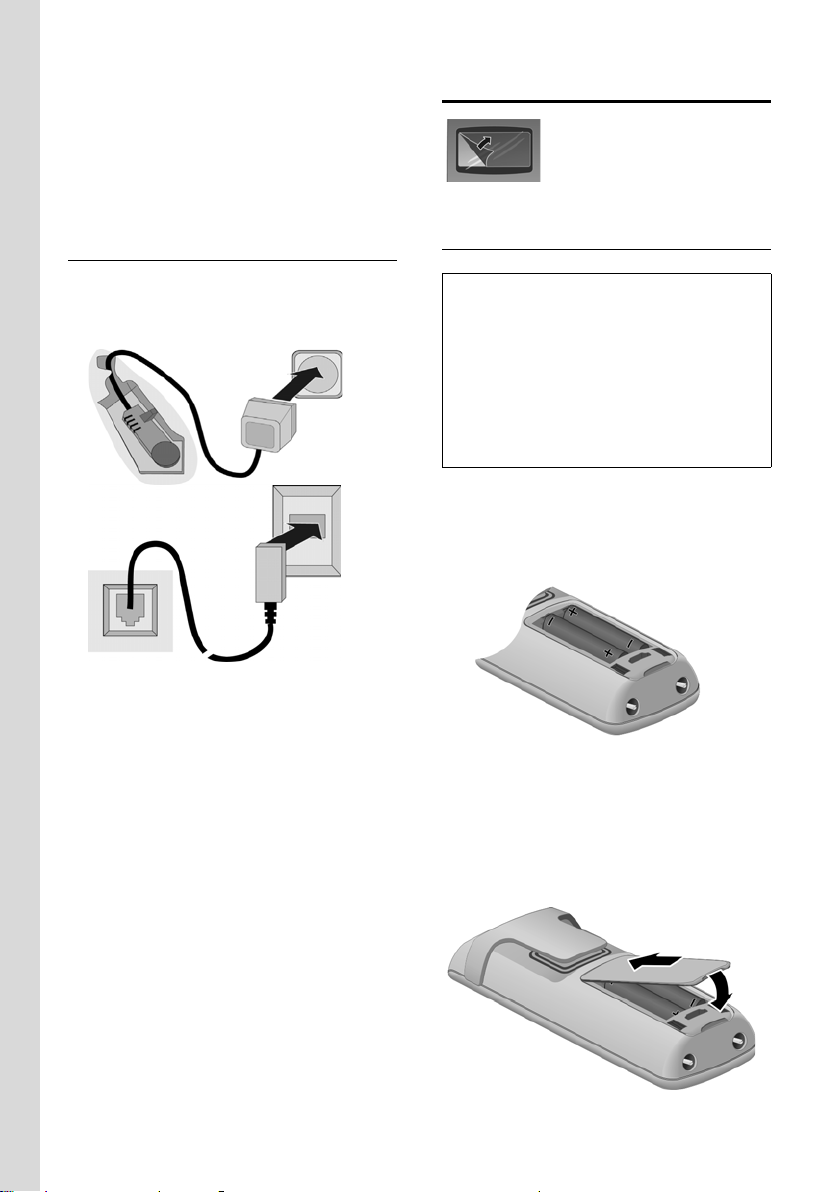
Connecting the base station
¤ First connect the mains unit and then
the phone jack as shown below and
place the cable in the cable channels.
1
1
1
1
2
3
Setting up the handset for use
The display is protected
by a plastic film.
Please remove the protective film!
Inserting the batteries
Warning:
Use only the recommended rechargeable batteries (page 63). Never use a conventional
(non-rechargeable) battery or other battery
types as this could result in significant health
risks and personal injury. For example, the
batteries could explode. The phone could also
malfunction or be damaged as a result of using
batteries that are not of the recommended
type.
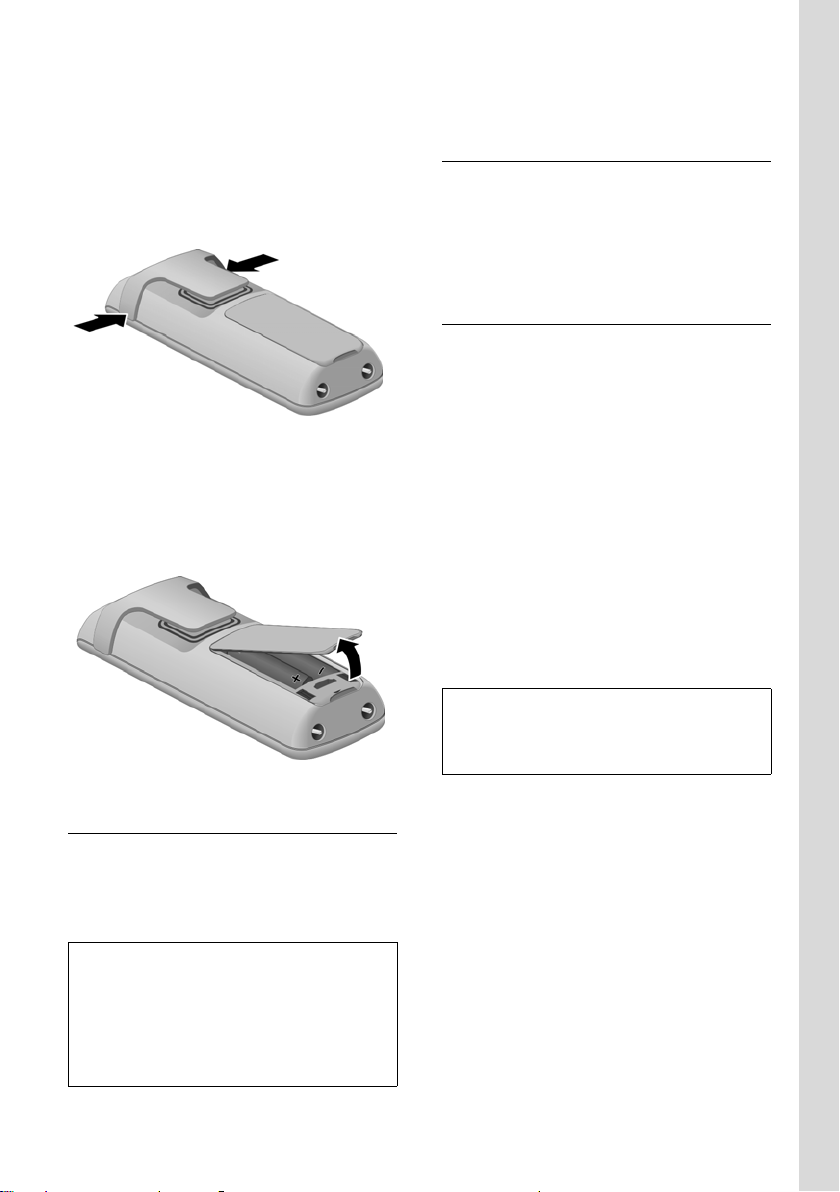
¤ Insert the batteries the right way round
(see figure).
The polarity is indicated in/on the battery
compartment.
1 Mains adapter 230 V
2 Phone jack with phone cord
Please note:
The mains adapter must always be connected, as the phone will not operate
without mains connection.
8
Closing the battery cover
¤ First, align the protrusions on the side
of the battery cover with the notches
on the inside of the housing.
¤ Then press the cover until it clicks into
place.
Page 10
First steps
Attaching the belt clip
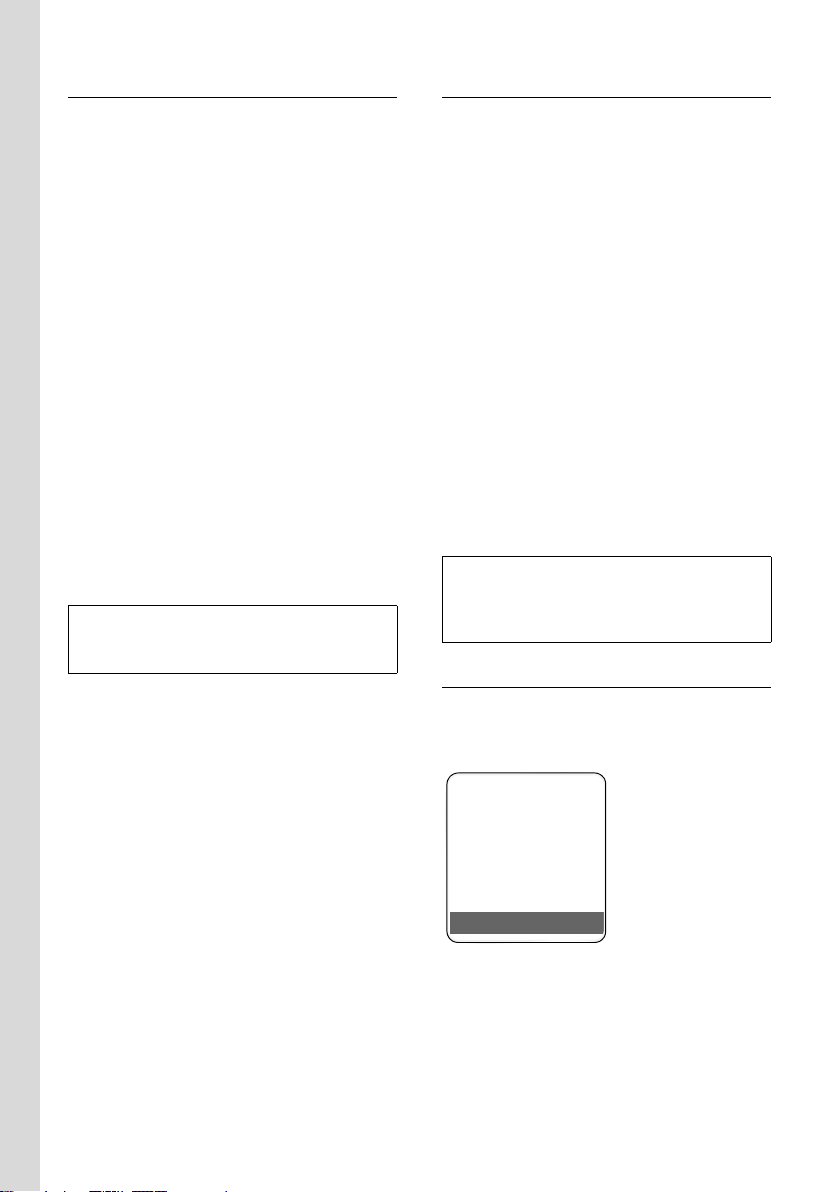
There are notches for attaching the belt
clip on the side of the handset at the same
height as the display.
¤ Press the belt clip onto the back of the
handset so that the protrusions on the
belt clip engage with the notches.
Opening the battery cover
¤ If fitted, remove the belt clip.
¤ Place your fingertip in the cavity on the
casing and pull the battery cover
upwards.
Should you have any questions and problems see page 60.
Headset socket
You can connect various headset types
(with 2.5 mm jack connector), including:
HAMA Plantronics M40, MX100 and
MX150 as well as the enclosed headset.
Initial charging and discharging of the batteries
If the handset is activated, the flashing
battery icon e in the top right of the display indicates that the batteries are being
charged.
During handset operation, the battery
icon indicates the charge status of the batteries (page 1). The correct charge level
can only be displayed if the batteries are
first fully charged and discharged.
¤ To do this, leave the handset in the
charging cradle without interruption
for seven hours.
¤ Once the batteries are fully charged,
remove the handset from the cradle
and do not put it back again until the
batteries are fully discharged.
Please note:
After the first battery charge and discharge,
you may place your handset in the charging
cradle after every call.
Placing the handset in the charging cradle
¤ Plug the charging cradle mains adapter
into a mains power socket.
¤ Place the handset in the charging cra-
dle with the display facing forwards.
Please note:
– If the handset has turned itself off because
the batteries are flat and is then placed in
the charging cradle, it will turn itself on
automatically.
– Only place the handset in the base station
or charging cradle that is intended for it.
Please note:
u Always repeat the charging and dis-
charging procedure if you remove the
batteries from the handset and reinsert
them.
u The batteries may warm up during
charging. This is not dangerous.
u After a while, the charge capacity of
the batteries will decrease for technical
reasons.
9
Page 11
First steps
Registering the handset
You can register up to six handsets to your
base station.
A handset can be registered on up to four
base stations.
You must initiate handset registration on
the handset and on the base station.
On the handset
v or Menu ¢ Ð ¢ Handset
¢ Register H/Set
s Select base station, e.g. Base 1
and press
~ Enter the system PIN of the
base station (the default is
0000) and press
lowing flashes in the display,
e.g. Base 1.
On the base station
Within 60 sec. press and hold the registration/paging key on the base station
(page 2) (approx. 3 sec.).
Please note:
You can change the name of the handset
(page 41).
§OK§.
§OK§. The fol-
Setting the date and time
The date and time must be set in order to,
for example, have the correct time for
incoming calls and be able to use the
alarm clock and calendar.
¤ If you have not yet set the date and
time, press the display key
the input field.
To change the time, open the input field
with:
¢ Ð ¢ Date/Time
v
§Time§ to open
¤ Change multiple line input:
Date:
Enter the day, month and year in 8-digit
format.
Time:
Enter the hours and minutes in 4-digit
format, e.g. Q M 5
for 7:15.
§Save§ Press the display key.
Please note:
Date and time may be set automatically via the
network. The date and time are updated with
each outgoing call.
Display in idle status
Once the phone is registered and the time
set, the idle status is shown as in this
example:
ÐV
10
Swisscom
15.11.07 07:15
Hotline SMS
Page 12
First steps
Operating the handset
Activating/deactivating the handset
a In idle status, press and hold
the end call key (confirmation
tone).
Activating/deactivating the keypad lock
# Press and hold the hash key.
You will hear the confirmation tone. The
Ø icon appears in the display when the
keypad lock is activated.
The keypad lock is deactivated automatically if someone calls you. It is reactivated
when the call is finished.
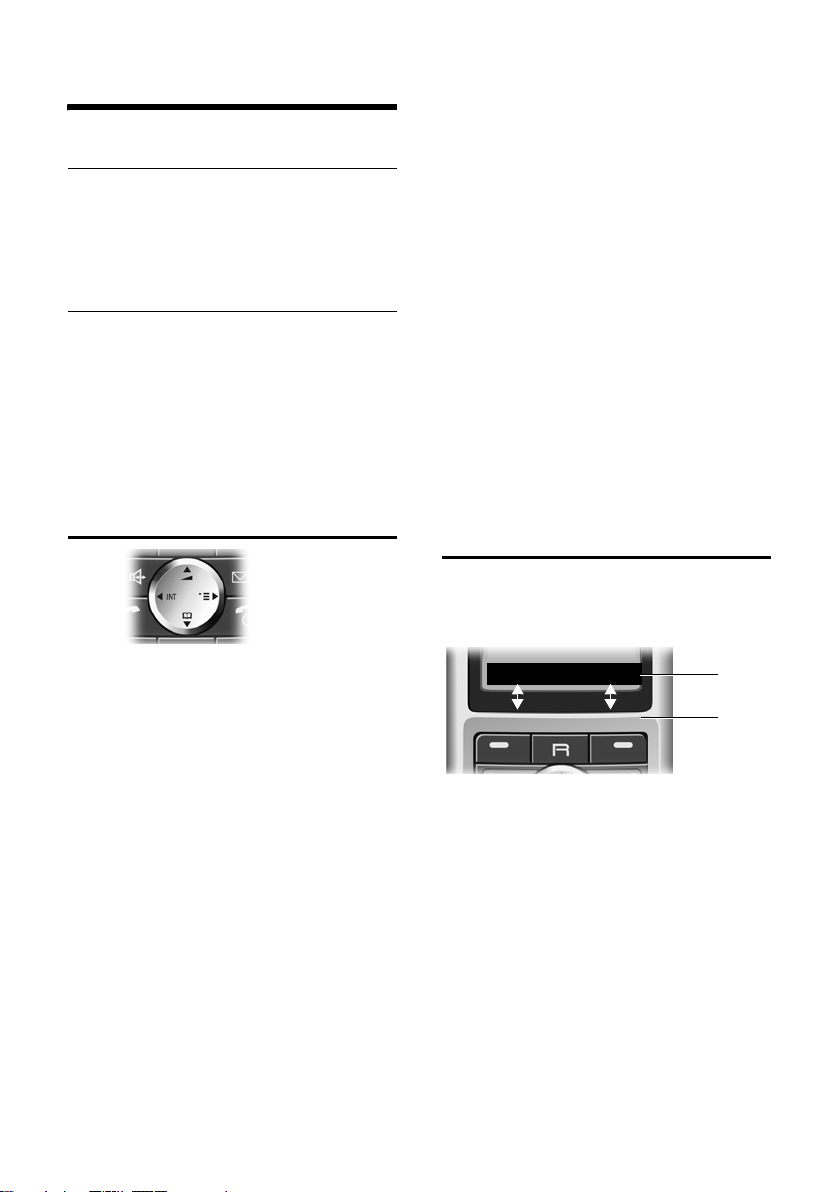
Control key
In the main menu and in input fields
You can use the control key to move the
cursor up t, down s, right v or left
u.
In lists and submenus
t / s Scroll up/down line by line.
v Open the submenu or confirm
the selection.
u Go back one menu level or
cancel.
During an external call
s Open the directory.
u Initiate internal consultation
call and mute.
t Adjust the loudspeaker vol-
ume for earpiece and handsfree mode.
Display keys
The function of the display keys changes
depending on the particular operating situation. Example:
In the description below, the side of the
control key (up, down, right, left) that you
have to press in the different operating situations is marked in black, e.g. v for
"press right on the control key".
The control key has a number of different
functions:
When the handset is in idle status
s Open the directory.
v Open the main menu.
u Open the list of handsets.
t Call up the menu for setting
the handset's call volume
(page 46), ringer melodies
(page 46) and advisory tones
(page 49).
Hotline SMS
1 Current display key functions are shown in
the bottom display line.
2 Display keys
The most important display icons are:
§§§§Hotline§§§§ Left display key, as long as it
has not been assigned a different function (page 43).
} Left display key following a
handset reset. If you would
like to have Hotline or another
function on this key, you will
have to reprogramme it.
§Options§ Open a context-dependent
menu.
1
2
11
Page 13

First steps
W Delete key: deletes one char-
acter at a time from right to
left.
Î Go back one menu level or
cancel operation.
ΠFetch e-mail address from the
directory.
Ó Copy number into directory.
• Open the last number redial
list.
Reverting to idle status
You can revert to idle status from anywhere in the menu as follows:
¤ Press and hold the end call key a.
Or:
¤ Do not press any key: after 2 minutes
the display will automatically revert to
idle status.
Changes that you have not confirmed or
saved by pressing
Save Entry
An example of the display in idle status is
shown on page 1.
§OK§ will be lost.
§OK§, §Yes§, §Save§, §Send§ or
Menu guidance
Your telephone's functions are accessed
using a menu that has a number of levels.
Main menu (first menu level)
¤ Press v with the handset in idle status
to open the main menu.
The main menu functions are shown in
the display with colour icons.
To access a function, i.e. to open the corresponding submenu (next menu level):
¤ Navigate to the function using the con-
trol key q/r. The name of the func-
tion is displayed in the display header.
Press the display key
§OK§.
Submenus
The functions in the submenus are displayed as lists.
To access a function:
¤ Scroll to the function with the control
key q and press
Or:
§OK§.
¤ Enter the corresponding digit combina-
tion (page 16).
Briefly press the end call key a once to
return to the previous menu level/cancel
the operation.
Illustration in the user guide
The operating steps are shown in abbreviated form.
Example
The illustration:
v ¢ Ð ¢ Date/Time
means:
v Press the key to display the
main menu.
Ð Use the control key q/r to
scroll through the Settings submenu and press
Date/Time Scroll to the function with the
control key q and press
Other types of illustrations:
c / Q / * etc.
Press the matching key on the
handset.
~ Enter digits or letters.
You will find detailed examples of menu
entries and multiple line input in the
appendix to this user guide, page 64.
§OK§.
§OK§.
12
Page 14

First steps
"Swisscom Hotline"
§§§§Hotline§§§§ Press the display key.
Select Hotline. You will be directly connected to the Swisscom Contact Centre.
The access number is pre-programmed as
0800 800 800 cannot be changed.
Please note:
Swisscom Contact Centre 0800 800 800
We will be happy to advise you on this freephone number if you have any questions relating to telecommunications: fixed line networks, mobiles, DSL Broadband, Bluewin TV,
any questions relating to billing and much
more.
Correcting incorrect entries
You can correct incorrect characters in the
text by navigating to the incorrect entry
using the control key. You can then:
u press X to delete the character to the
left of the cursor,
u insert characters to the left of the cur-
sor,
u overwrite the (flashing) character
when entering the time and date etc.
Eco range
Eco range reduces power consumption by
using a mains adapter with low power
consumption and also reduces the transmission power of the base station.
This can be set manually via your handset. Several handsets can be used simultaneously.
Your handset also reduces the transmission power depending on the distance to
the base station.
Activating/deactivating eco range
v ¢ Ð ¢ Base ¢Add. Features
¢ Eco Mode
§OK§ Press the display key
‰
(=activated).
If eco range is activated, the
played at the top of the screen.
½ icon is dis-
Please note:
– Activating eco range reduces the range of
the base station.
– Eco range and any repeater support (see
page 57) cancel each other out, i.e. both
functions cannot be used at the same time.
– If external handsets (GAP) and handsets
from earlier versions are used, your handset will not automatically reduce the transmission power to the base station.
Setting up the base station –
installation assistant
A few settings are needed before you start
using your telephone. The installation
assistant is designed to help you with this.
If you place the first handset in the charging cradle before the MSN settings have
been entered, the message key begins to
flash after around 20 minutes (page 1).
¤ Press the message key f to start the
installation assistant.
You can also call up the installation assistant at any time from your handset
(page 14).
The following settings can be made one
after the other.
u Determining or entering MSNs for your
phone connection
u Setting the receive MSN
u Setting the send MSN
What is an MSN?
MSN = Multiple Subscriber Number. You
can request up to 10 different telephone
numbers for the ISDN multiple connection. An MSN is one of the phone num-
bers assigned to you without an area
code (dialling code).
13
Page 15

First steps
Your telephone uses the MSN entirely as
you require. The following differentiation
is made:
u Receive MSN: numbers you can be
called on. You can assign the receive
MSNs to specific internal subscribers
(terminals). Incoming calls are only
diverted to the terminals to which the
relevant receive MSN has been
assigned. Examples of terminals are
handsets or answer machines.
u Send MSN: numbers that are identified
to the person you are calling. The network provider calculates charges based
on the send MSNs. You can assign a
fixed send MSN to each internal subscriber.
Potential internal subscribers are:
Handsets, to which you can assign the
internal numbers 1 to 6.
Example of how to assign MSNs
You have reque sted fou r MSNs , two for
business use (MSN1, MSN2) and two for
private use (MSN3, MSN4). Four handsets
are connected to one base station.
Two handsets (INT 1 and 2) should be
used for business purposes, and two
handsets (INT 3 and 4) should be used
for private purposes.
Internal
subscriber
Business:
Handsets:
INT 1, 2
Private:
Handset:
INT 3
Handset:
INT 4
Receive MSN Send MSN
MSN1 MSN2 MSN1
MSN3 MSN3
MSN4 MSN4
Launching the installation
assistant and making the base
station settings
v ¢ Ð ¢ Base ¢ISDN ¢ Assistant
§Yes§ Press the display key to launch
the installation assistant.
Please note:
u If the installation assistant is activated,
no other handset can access the
Settings menu of the base station.
u To quit the installation assistant before
the process is complete, press and
hold the end call key a. All changes
you have already saved using
retained.
u To skip a setting, press s or the display
§No§.
key
u To return to a previous setting,
press t.
Determining own numbers (MSN)
Several numbers (MSNs) were provided by
the network provider when you received
your ISDN connection confirmation.
You can save up to 10 numbers.
If an MSN has not been entered on your
telephone, you can retrieve the numbers
from the exchange.
Auto-detect own numbers (MSNs)?
§Yes§ to confirm.
Press
The display will indicate that MSNs have
been found. The MSNs are entered and
can subsequently be changed (page 15).
If it was not possible to determine any
MSNs, your exchange does not support
this function. You will receive an error
message to this effect.
§OK§ are
14
Page 16

First steps
Entering own numbers (MSNs) manually
and entering names for the MSNs
Enter own numbers (MSNs)?
§Yes§ to confirm.
Press
~ Enter MSN. If the MSNs were
determined automatically, the
number will already be
entered.
t~ If necessary, scroll to the first
line and enter the name
(optional).
§OK§ Press the display key.
The entry is saved.
This is automatically repeated for all
MSNs. Press the ” display key to skip a
setting. The MSNs entered will automatically be assigned to all handsets as receive
MSNs.
Setting the receive MSN
The receive MSN is used to answer incoming calls. The MSNs allocated to your ISDN
connection can be allocated to various terminals according to your preferences. You
can assign a terminal multiple receive
MSNs.
Set Receive MSNs?
§Yes§ to confirm.
Press
Allocation Type: <MSN Selection>
The header line shows the
internal number of the terminal for which the assignment
is to apply, e.g. INT 2. Press
§Change§ to confirm.
The list of entered MSNs is displayed. The
assigned receive MSNs are marked with ‰.
By default, all MSNs that are set up will be
assigned to all handsets as receive MSNs.
q Select MSN and press
change the assignment.
Repeat this process for all MSNs whose
assignment you wish to change.
Î Press the display key to termi-
nate the assignment for this
terminal.
§OK§ to
Repeat the process for all terminals registered to your telephone.
Setting the send MSN
Each internal subscriber or terminal can be
specifically assigned one of the available
send MSNs. This MSN is identified to the
participant called and the network provider bills the call charges to it.
Set Send MSNs?
§Yes§ to confirm.
Press
Allocation Type: <MSN Selection>
The header line shows the
internal number of the terminal for which the assignment
is to apply, e.g. INT 2. Press
§Change§ to confirm.
The list of entered MSNs is displayed.
The assigned send MSN is marked with ‰.
q Select MSN and press
§OK§.
Î Press the display key to termi-
nate the assignment for this
terminal.
Repeat the process for all terminals registered to your telephone. The installation
assistant is now complete. The display
shows Installation complete.
a Press and hold (idle status).
Your phone is now ready for use.
If you have any queries about using your
phone, please read the tips on troubleshooting ("Questions and Answers",
page 60) or contact our customer service
department (Customer Care, page 62).
15
Page 17
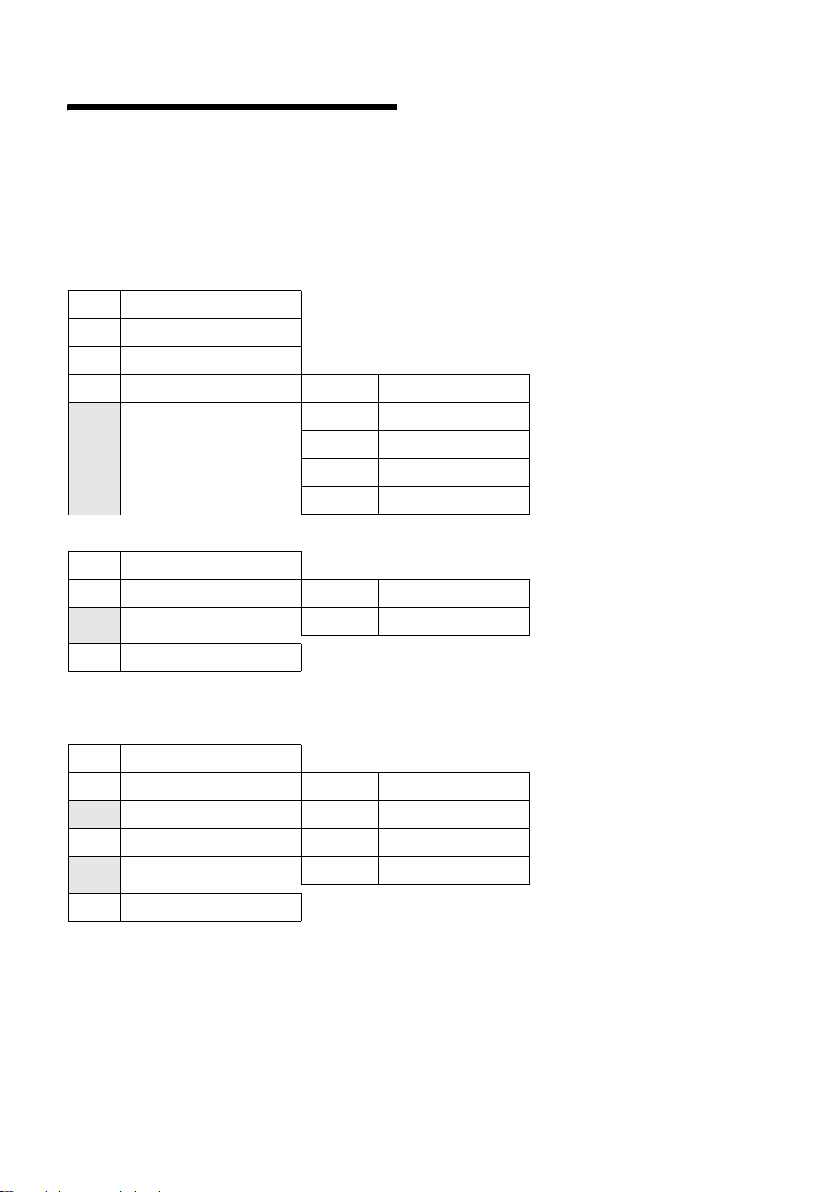
Menu tree
Instead of scrolling to locate a menu function, you can select a function more quickly by
opening the menu and keying in a digit combination (or shortcut).
Example: vN22 for "Set ringer tone for external calls".
With the telephone in idle status, press v (open main menu):
1 SMS î
You have activated an SMS mailbox without a PIN
1-1 New SMS (page 31)
1-2 Incoming 0 (page 34)
1-3 Outgoing 0 (page 32)
1-4 Settings 1-4-1 Service Centres (page 36)
1-4-2 Notify Number (page 35)
1-4-3 Notify Type (page 36)
1-4-4 Status Report * (page 32)
1-4-5 Subscribe to SMS *
2 Sel. Services
2-1 Next Call (page 20)
2-2 Call Divert 2-2-1 To External (page 56)
2-3 Ringback (page 21)
3 Calls List
4 Add. Features
4-3 Room Monitor (page 42)
4-4 Data Transfer 4-4-2 Bluetooth (page 51)
4-5 Call Charges 4-5-1 Overview (page 30)
4-6 Missed Alarms (page 51)
5Alarm Clock
6 Calendar
* Currently not supported on the Swisscom network.
ê
2-2-2 To Internal (page 56)
Ì (page 28)
í
4-4-3 Directory (page 25)
4-5-2 Settings (page 30)
ì (page 49)
ç (page 50)
16
Page 18
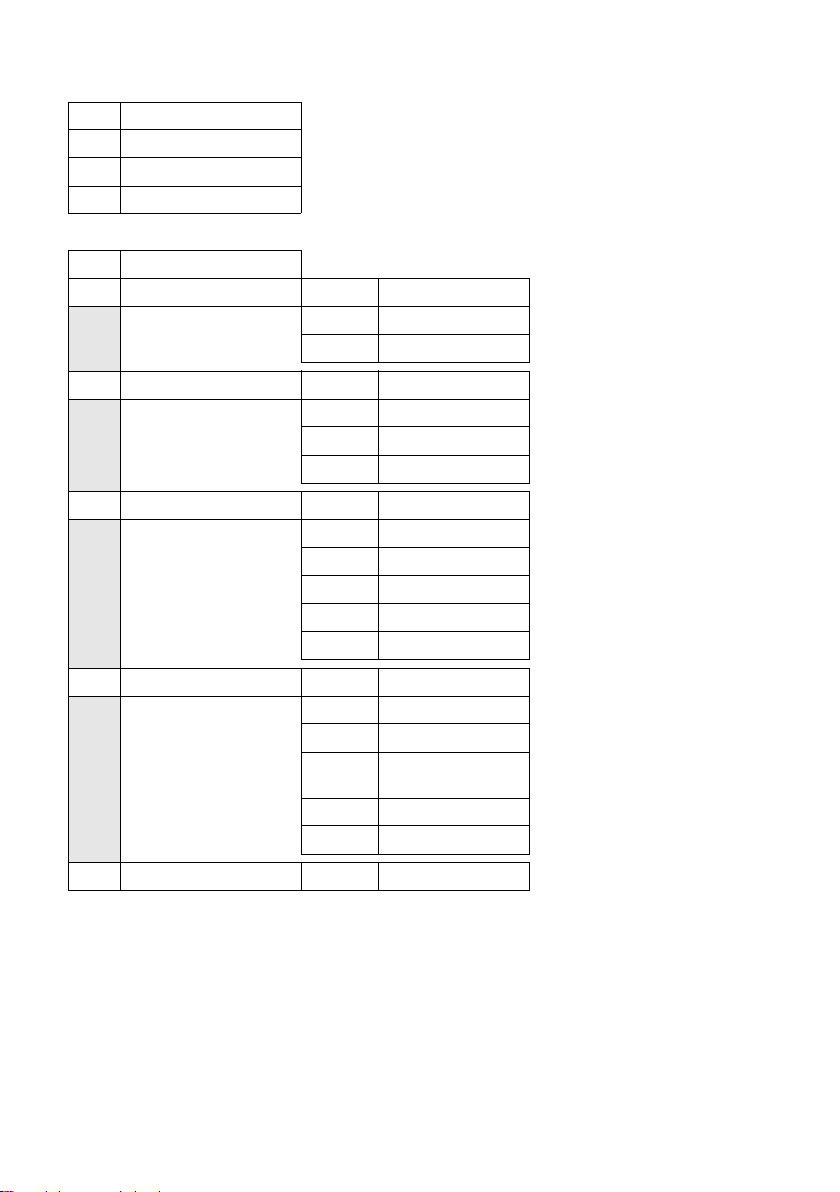
7 Resource Dir. Ï
7-1 Screensavers (page 48)
7-2 Caller Pictures (page 48)
7-3 Sounds (page 48)
7-4 Capacity (page 48)
8 Settings
8-1 Date/Time (page 10)
8-2 Audio Settings 8-2-1 Handset Volume (page 46)
8-3 Display 8-3-1 Screen Saver (page 45)
8-4 Handset 8-4-1 Language (page 44)
8-5 Base 8-5-2 Music on hold (page 57)
Ð
8-2-2 Ringer Settings (page 46)
8-2-3 Advisory Tones (page 49)
8-3-2 Colour Scheme (page 45)
8-3-3 Contrast (page 45)
8-3-4 Backlight (page 45)
8-4-2 Auto Answer (page 45)
8-4-3 Register H/Set (page 39)
8-4-4 Select Base (page 40)
8-4-5 Area Codes (page 53)
8-4-6 Reset Handset (page 53)
8-5-3 System PIN (page 57)
8-5-4 Base Reset (page 57)
8-5-5 Add. Features (page 13, page 57, page 58,
page 58)
8-5-7 ISDN (page 54)
8-5-8 Calls List Type (page 28)
8-6 Voice Mail 8-6-1 Set Key 1 (page 38)
17
Page 19

Making calls
Making an external call
External calls are calls using the public telephone network.
~c Enter the number and press
the talk key.
Or:
c~ Press and hold the talk key
c and then enter the
number.
You can cancel the dialling operation with
the end call key a.
During the call, the call duration is displayed or, if call charge display is activated
(page 30), the call charge unit is displayed.
Please note:
Dialling with the directory or last number
redial list (page 28/page 27) saves you from
repeatedly keying in phone numbers.
Continuing a call on a Bluetooth headset
Precondition: Bluetooth is activated; a
connection has been established between
the Bluetooth headset and the handset
(see page 51).
Press the talk key on the Bluetooth headset; it may take up to 5 seconds to establish a connection to the handset.
For further details about your headset, see
the user guide issued with it.
Accepting a call
The handset indicates an incoming call in
three ways: by ringing, by a display on
the screen and by the flashing handsfree
key d.
You can accept the call by:
¤ Pressing the talk key c.
¤ Pressing the handsfree key d.
¤ Pressing the display key §Accept§.
If the handset is in the charging cradle and
the Auto Answer function is activated
(page 45), the handset will take a call
automatically when you lift it out of the
cradle.
To deactivate the ringer, press the
display key. You can take the call as long as
it is displayed on the screen.
Accepting a call on a Bluetooth headset
Precondition: Bluetooth is activated; a
connection has been established between
the Bluetooth headset and the handset
(see page 51).
Only press the talk key on the headset
when the headset rings; it can take up to
5 seconds.
For further details about your headset, see
the user guide issued with it.
Rejecting a call
Press the display key §Reject§.
The call is rejected for the entire MSN
group.
§Silence§
Ending a call
a Press the end call key.
18
Page 20

Calling Line Identification
Handsfree talking
When you receive a call, the caller's
number is displayed on the screen if the
following conditions are met:
u Your network provider supports CLIP,
CLI.
– CLI (Calling Line Identification):
the caller's number is transmitted.
– CLIP (Calling Line Identification
Presentation): the caller's number
is displayed.
u You have arranged CLIP with your net-
work provider.
u The caller has arranged CLI with the
network provider.
*
Call display with CLIP/CLI
If the number of the caller is saved in your
directory, you will see their name, and if
you have assigned a CLIP picture to that
caller, this will also be displayed. If you
have changed the name of the MSN called
(page 54), this will be displayed.
Å
1234568890
for 5432
Reject Silence
1 Ringer tone icon
2 Number or name of caller
3 Receive MSN that is being called
The following is displayed in place of the
number:
u External, if no number is transmitted.
u Withheld, if the caller has withheld Call-
ing Line Identification.
u Unavailable, if the caller has not
arranged Calling Line Identification.
1
2
3
In handsfree mode, instead of holding the
handset to your ear you can put it down,
for example on the table in front of you.
This allows others to participate in the call.
Activating/deactivating handsfree mode
Activating while dialling
~d Enter the number and press
the handsfree key.
¤ You should inform your caller before
you use the handsfree function so that
they know someone else is listening.
Switching between earpiece and
handsfree mode
d Press the handsfree key.
Activate/deactivate handsfree during a
call.
If you wish to place the handset in the
charging cradle during a call:
¤ Press and hold the handsfree key d
while placing the handset in the base
station. If the handsfree key d does
not light up, press the key again.
For instructions on how to adjust the loudspeaker volume, see page 46.
Muting
You can deactivate the microphone in
your handset during an external call. The
other party hears hold music.
u Press the control key on the
left to mute the handset.
” Press the display key to reacti-
vate the microphone.
You can turn the hold music on and off
(page 57).
* In the Swisscom ISDN network, CLIP is
transmitted automatically.
19
Page 21

Defining the settings for the next call
Depending on your network provider, you
can make the following settings for the
next call:
u Withhold the number (CLIR), provided
the "Withhold calling line identification
on a case-by-case basis" feature is supported by your network provider.
u The setting will revert to the default
when the call ends and your number
will be displayed once again, even if
you dial the same number again from
the last number redial list.
u To find out how to withhold your
number for all calls, see page 55.
u Determine the send MSN. You have
determined an individual send MSN for
a handset (page 54), but you want to
select a different MSN as the send MSN
for the next call.
u Activate/deactivate the Keypad
(page 59).
Making settings
v ¢ ê ¢ Next Call
¤ Change multiple line input:
Anonymous
Select Yes or No.
MSN
Select send MSN. The next call uses this
MSN, which is also transmitted to the
participant you are calling as number
information.
Keypad
Select Yes or No.
§Dial§ Press the display key.
~ Enter number.
c / §Dial§ Press the talk key or display
key.
Ringback when the number is busy (CCBS)/ when there is no reply (CCNR)
If the person you are calling does not
answer or their line is busy, you can initiate ringback.
Precondition: The exchange supports this
feature.
Activating ringback
§Ringbck.§ Press the display key and wait
for confirmation from the
exchange.
Time of the ringback:
u Ringback when busy – CCBS:
CCBS = Completion of calls to busy sub-
scriber. The ringback will take place as
soon as the subscriber in question ter-
minates the current call.
Ringback when there is no reply –
CCNR:
CCNR = Completion of calls no reply.
The ringback will take place as soon as
the subscriber in question has made a
call.
Please note:
u The ringback request is automatically
cancelled after about 2 hours (depend-
ing on the exchange).
u If you are making a call at the time of
the ringback, the ringback will be post-
poned until you have ended your call.
u Ringbacks are not diverted if an internal
call diversion is active.
Activating ringback for external
consultation calls
You want to establish an external consultation call (page 22). The consultation call
participant's line is busy. You can activate
a ringback:
§Options§ Open menu.
Ringback Select and press §OK§.
20
Page 22

Accepting a ringback
The handset is ringing and the screen displays the ringback number.
Establishing a connection
c Press the talk key.
You will hear the ringing tone. The other
participant is being called. The connection
is established.
Cancelling ringback
If you no longer require a ringback, you
can cancel it before the connection is
established:
§Delete§ Press the display key.
Testing/cancelling ringback
v ¢ ê
Ringback Select and press §OK§ (‰ = ring-
back active). The current ringback number is shown on the
display.
§OK§ Press the display key. Ringback
remains active.
Or:
§Delete§ Press the display key. The ring-
back function is cancelled.
Setting up the identify caller function
If you have requested the identify caller
function, increase the time until the connection is terminated:
¢ N5O 4
v
Q §OK§ Increase the time until the
connection is terminated to 30
seconds.
or
§OK§ Set the time until the connec-
tion is terminated to 3 seconds.
Determining the caller
Perform the following steps during the call
or immediately after the caller has hung
up. You must not press the end call key
a!
§Options§ ¢ Identify Caller
The caller is identified by the exchange.
You will receive a list from your network
provider at a later date detailing the
caller's number and the time and date.
Your network provider will provide you
with more detailed information.
Identify caller
Identify caller is used to identify annoying
or threatening callers.
Precondition: You have requested the
identify caller function from your network
provider. Activate this function during the
call or immediately after the caller has
hung up. You must not end the call yourself.
Please contact your network provider first
if you experience any problems.
21
Page 23
Functions during a call
Making calls to several participants
If you wish to call several participants,
please initiate a consultation call first. You
can then speak to the other participants
either one at a time ("toggling", page 22)
or at the same time ("conference call",
page 23).
Consultation call
There are two types of consultation call:
u External consultation call: you call
another external participant during an
external call.
u Internal consultation call: you call an
internal participant during an external
call.
Initiating an external consultation call
S Press the recall key.
Or:
§Ext.Call§ Press the display key.
~ Enter the number of the new
external participant.
Please note:
You can also make the call via the directory or
other lists (page 24).
Initiating an internal consultation call
u Press the control key. The call
to the first participant is put on
hold.
~ Enter the number of the inter-
nal participant you want.
Please note:
You can also use q to select an internal
number (e.g. INT 1) and press c / §OK§.
The consultation call participant does not
answer
§End§ Press the display key. You
return to the first participant.
Consultation call participant's line is busy
You will hear the busy tone. You can initiate ringback (page 20).
¤ Return to the participant on hold
The consultation call participant answers
There is now an active connection with
the new participant, while the first participant is on hold.
You have the following options:
u Toggling (page 22)
u Conference call (page 23)
u Transferring the call (page 23).
Toggling
You can speak with two participants, one
at a time.
Precondition: You have set up a consultation call (page 22) or accepted a waiting
call (page 23).
ts You switch between the two
participants.
Ending a consultation call/toggling
§Options§ Open menu.
End Active Call
Select and press
The active call is terminated.
You return to the waiting
participant.
Or:
a Press the end call key. The
active connection is terminated. You will automatically
be called by the external participant on hold.
If the active participant terminates the
connection, you will hear the busy tone.
§OK§.
¤ Switch to the participant on hold.
If the participant on hold terminates the
connection, the active call remains open.
22
Page 24

Conference call
You speak with two participants at the
same time. You can establish a conference
call as follows:
u With two external participants or
u one internal participant and one exter-
nal participant.
Precondition: You have set up a consultation call (page 22) or accepted a waiting
call (page 23).
Establishing a conference call
§Conf.§ Press the display key.
Ending a conference call
a Press (idle status).
If at least one connection is external and
ECT is activated , the two other conference
call participants will be connected with
each other. If this is not the case, all calls
are terminated.
Ending a conference consultation call
(page 22)
§EndConf§ Press the display key.
The conference call ends; you are returned
to toggle mode (page 22). The connection
to the external participant is active.
Transferring calls
Transferring a call to another handset
You are making an external call and
would like to transfer it to another handset.
¤ Set up an internal consultation call
(page 22).
a Press the end call key (even
before the other party has
answered) to transfer the call.
Dealing with a waiting external
call – CW (Call Waiting)
Precondition: Call waiting has been set
up (page 55).
You will hear the call waiting tone (short
beep) if you receive an external call during
another call. The caller's number or name
will appear in the display if Calling Line
Identification is enabled.
You have the following options:
Accepting the waiting call – consultation
call
§Accept§ Press the display key. You
answer the waiting call and
the first call is put on hold.
Both parties are shown on the
display; the current one is
marked.
You can toggle (page 22), create a conference call (page 23) or transfer the call
(page 23).
Please note:
If the answer machine is activated, this will
accept the waiting call if you do not answer.
Rejecting a waiting call
§Reject§ Press the display key.
You reject the call. The call is no longer signalled. The caller will hear the busy tone.
Changing participants
a End the current call. The wait-
ing call becomes the "normal"
call.
c Press the talk key to accept the
call.
23
Page 25
Using the directory and lists
The options are:
u Directory
u Last number redial list
u SMS list
u Calls list
u List of missed calls
A total of 250 entries can be saved in the
directory.
You can create a personalised directory for
your own individual handset. You can also
send lists/entries to other handsets
(page 25).
Directory
Please note:
For quick access to a number from the directory, you can assign the number to a key.
Directory
In the directory, you can save
u Up to three numbers and associated
first names and surnames
u VIP designation and VIP ringer tone
(optional)
u E-mail address (optional)
u CLIP pictures (optional)
u Anniversaries with reminder
¤ With the handset in idle status, open
the directory by pressing the s key.
Length of the entries (directory)
3 numbers: each max. 32 digits
First name and surname: each max. 16
characters
E-mail address: max. 57 characters
Storing a number in the directory
s ¢ New Entry
¤ Change multiple line input:
First Name / Surname:
Enter a name in at least one of the
fields.
Phone (Home) / Phone (Office) / Phone (Mobile)
Enter a number in at least one of the
fields.
E-mail
Enter e-mail address.
Annivers.:
Select On or Off.
With setting On:
Enter Anniversary (Date) and Annivers.
(Time) (page 26) and select reminder
type: Annivers. (Signal).
Caller Picture
If required, select a picture to be dis-
played when the caller calls (see My
stuff, page 48).
Precondition: Calling Line Identification
(CLIP).
¤ Save changes: (page 65).
Order of directory entries
Directory entries are generally sorted
alphabetically by surname. Spaces and
digits take first priority. If only the first
name was entered in the directory, this is
incorporated into the sort order instead of
the surname.
The sort order is as follows:
1. Space
2. Digits (0–9)
3. Letters (alphabetical)
4. Other characters
To get round the alphabetical order of the
entries, insert a space or a digit in front of
the first letter of the surname. These
entries will then move to the beginning of
the directory.
24
Page 26

Selecting a directory entry
s / C Opening a directory.
You have the following options:
u Use s to scroll through the entries
until the required name is selected.
u Enter the first character of the name (in
the directory: first character of the surname or of the first name if only the
first name has been entered), or scroll
to the entry using s.
Dialling with the directory
s / C ¢ s (select entry)
c Press the talk key. The number
is dialled.
Managing directory entries
s / C ¢ s (select entry)
Viewing entries
§View§ Press the display key. The
entry is displayed.
Back with
§OK§.
Editing entries
§View§ §Edit§ Press display keys one after the
other.
¤ Carry out changes and save.
Using other functions
s / C ¢ s (select entry)
¢ §Options§ (open menu)
The following functions can be selected
with q:
Display Number
To edit or add to a saved number, or to
save it as a new entry, press Ó
after the number is displayed.
Edit Entry
Edit selected entry.
Delete Entry
Delete selected entry.
VIP Entry (directory only)
Mark a directory entry as a VIP (Very
Important Person) and assign a specific
ringer to it. You can then recognise
important calls from the ringer.
Precondition: Calling Line Identifica-
tion (page 19).
Copy Entry
Send a single entry to a handset
(page 25).
Delete List
Delete all entries in the directory.
Copy List
Send complete list to a handset
(page 25).
Available Memory
Display the number of entries that are
still available in the directory.
Using quick dial keys
¤ Press and hold the required quick dial
key (page 43).
Sending the directory to another handset
Preconditions:
u The sending and receiving handsets
must both be registered to the same
base station.
u The other handset and the base station
can send and receive directory entries.
s / C
(open menu)
¢ s (select entry) ¢ §Options§
¢ Copy Entry / Copy List
¢ to Internal
s Select the internal number of
the receiving handset and
§OK§.
press
You can transfer several individual entries
one after the other by responding
the Copy next entry? prompt.
§Yes§ to
25
Page 27

A successful transfer is confirmed by a
message and confirmation tone on the
receiving handset.
Please note:
You can also send the complete directory via
data transfer, without opening the directory:
v ¢ í ¢ Data Transfer ¢ Directory
Please note:
u Entries with identical numbers are not
overwritten on the receiving handset.
u The transfer is cancelled if the phone
rings or if the memory of the receiving
handset is full.
Transferring the directory as a vCard with Bluetooth
In Bluetooth mode (see page 51), you can
transfer directory entries in vCard format,
e.g. to exchange entries with your mobile
phone.
¢ s (select entry) ¢ §Options§
s
(open menu)
¢ Copy Entry / Copy List
¢ vCard via Bluetooth
The list of "Known Devices" (see page 52)
is displayed.
s Select device and press
Receiving a vCard with Bluetooth
If a device from the "Known Devices" list
(see page 52) sends a vCard to your handset, this occurs automatically and you are
informed about it via the display.
If the sending device does not appear in
the list, you will be asked on the display to
enter the device PIN for the sending
device:
~ Enter the PIN for the sending
Bluetooth device and press
§OK§.
The transferred vCard is available as a
directory entry.
§OK§.
Copying a displayed number to the directory
Numbers displayed in a list, e.g. the calls
li st o r th e la st n umb er r edi al l ist , in an S MS
or during a call can be copied to the directory.
A number is displayed:
§Options§ ¢ Copy to Directory
¤ Complete the entry, see page 24.
Copying a number or e-mail address from the directory
In many operating situations, you can
open the directory to copy a number or email address, for example. Your handset
need not be in idle status.
¤ Depending on the operating situation,
open the directory with s or Ò.
q Select an entry (page 25).
Saving an anniversary in the directory
For each number in the directory, you can
save an anniversary and specify a time at
which a reminder call should be made on
the anniversary (delivery status: Annivers.:
Off).
Anniversaries are automatically recorded
in the calendar (page 50).
¢ s (select entry; page 25)
s
§View§ §Edit§ Press display keys one after the
other.
s Scroll to the Annivers.: line.
v Select On.
¤ Change multiple line input:
Anniversary (Date)
Enter day/month/year in 8-digit format.
Annivers. (Time)
Enter the hour/minute for the reminder
call in 4-digit format.
Annivers. (Signal)
Select the type of signal for the
reminder.
26
Page 28

¤ Save changes: (page 65).
Please note:
A time must be specified for reminder calls. If
you select a visual signal, a time is not required
and is automatically set to 00.00.
Deactivating anniversaries
s ¢ s (select entry; page 25)
§View§ §Edit§ Press display keys one after the
other.
s Scroll to the Annivers.: line.
v Select Off.
§Save§ Press the display key.
Reminder call on an anniversary
A reminder call is signalled on the handset
using the selected ringer.
You now have the following options:
§SMS§ Write an SMS.
§OFF§ Press the display key to
acknowledge and end the
reminder call.
Viewing missed anniversaries
In idle status, you are reminded of an
elapsed and unacknowledged anniversary
by the one-off display of
§Appoint.§.
¤ View appointment:
§Appoint.§ Press the display key.
You now have the following options:
§SMS§ Write an SMS.
§Delete§ Delete reminder.
After deleting, press the display key ” or
Back in idle status,
no longer displayed.
You can also view missed anniversaries
afterwards (see page 51).
§Go Back§:
§Appoint.§ is
Last number redial list
The last number redial list contains the
twenty numbers last dialled with the
handset (max. 32 digits). If one of the
numbers is in the directory, the corresponding name will be displayed.
Manual last number redial
c Press the key briefly.
s Select entry.
c Press the talk key again.
The number is dialled.
When a name is displayed, you can display
the corresponding phone number by
pressing the display key
Managing entries in the last number redial list
c Press the key briefly.
s Select entry.
§Options§ Open menu.
The following functions can be selected
with q:
Copy to Directory
Copy an entry to the directory
(page 24).
Automatic Redial
The selected number is automatically
dialled at fixed intervals (at least every
20 seconds). The handsfree key flashes
and "open listening" is activated.
– Party answers: press the Talk key
c. The function is ended.
– Party does not answer: the call is ter-
minated after approx. 30 seconds.
The function is ended after pressing
any key or after ten unsuccessful
attempts.
Display Number (as in the directory,
page 25)
Delete Entry (as in the directory, page 25)
Delete List (as in the directory, page 25)
§View§.
27
Page 29
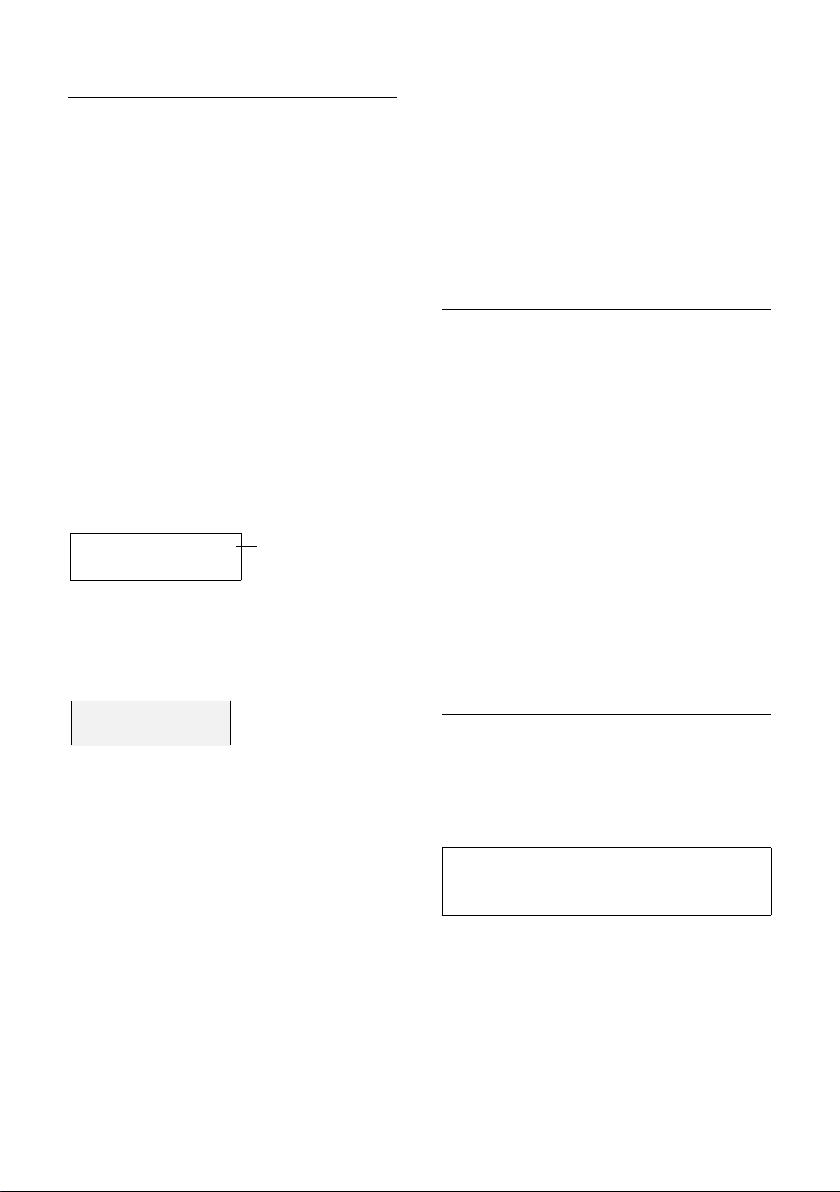
Opening lists with the message key
If only one list contains entries, no list
selection is offered and the relevant list is
displayed immediately.
You can use the message key f to open
the following list selection:
u SMS list
u Network mailbox, if your network pro-
vider supports this function and the
fast access is set for the network mailbox (page 38).
u Calls list
These lists display the calls and SMS messages belonging to the receive MSNs
assigned to the handset.
An advisory tone sounds as soon as a new
message arrives in a list. The f key
flashes (it goes off when the key is
pressed). In idle status, the display shows
an icon for the new message:
Icon New message...
Ã
Á
À
... on the network mailbox
... in the calls list
... in the SMS list
The number of new entries is shown
beneath the corresponding icon.
List selection
If you press the message key f, only the
lists that contain messages are shown
(exception: network mailbox). Lists with
new messages are identified in bold:
Incoming SMS message list
All received SMS messages are saved in
the incoming message list, page 34.
Calls list
Precondition: Calling Line Identification
(CLIP, page 19)
Depending on the type of list set, the calls
list contains
u accepted calls ( )
u missed calls
‰
Depending on the type of list set, all numbers of the last 30 incoming calls are saved
or just the missed calls are saved.
You can also call up the calls list via the
menu:
¢ Calls List
v
Setting the calls list type
v ¢ Ð ¢ Base ¢Calls List Type
Missed Calls / All Calls
Select and press
a Press and hold (idle status).
The calls list entries are retained when you
change the list type.
‰
§OK§ (=on).
Messages & Calls
Calls List: (4)
Combox: (2)
SMS: (1)
”
OK
Select a list with q. To open, press v
§OK§.
or
28
Page 30

List entry
New messages are displayed at the top.
Example of list entries:
All Calls
Susi Sorglos
29/11/07 12:20 ‰
Louise Miller
29.11.07 11:15
Delete Options
u List type (in header)
u Status of entry
Bold: New entry
u Number or name of caller
You can add the caller's number to the
directory (page 26).
u Date and time of call (if set, page 10)
u Type of entr y:
– accepted calls ( )
– missed calls
Pressing the display key
marked entry.
After pressing the display key
can select more functions with q:
SMS Enquiry
You can receive information about the
caller via SMS.
Copy to Directory
Copying a displayed number to the
directory.
Delete List
Delete complete list.
When you quit the calls list, all entries are
set to the status "old", i.e. the next time
you call the list up they will no longer be
shown in bold.
‰
§Delete§ deletes the
§Options§ you
Checking receive MSN
You can have the receive MSN displayed
for every call.
¤ Select entry.
§Options§ Open menu.
Called MSN Select and press §OK§.
The called MSN is displayed. If you have
changed the name of the MSN (page 54),
this is displayed. Click on
return to the calls list.
§OK§ or ” to
29
Page 31

Making cost-effective calls
After making a call, you can view the costs
on the handset. You can view the duration
of your calls (in minutes) or display the
charges (in CHF).
Displaying call duration and charges
Whether or not the call duration and costs
are displayed depends on whether the
metering pulse is transmitted and the unit
set to CHF 00.10.
u If the charge is set at 00.00, the units
are displayed for a call.
u If the charge per unit and the currency
are set, the costs of a call are displayed.
Please note:
Charges are transmitted automatically by the
central office. The factor is CHF 0.10. If
another factor is entered (e.g. 0.20), this factor
is ov er wr it ten by th e fa ct or o f 0 .1 0 t ra nsm it te d
from the central office during every outgoing
call.
You can check the ongoing units /total charges
and the charges for the last call made on each
handset, depending on the setting. The total
charges include the charges accrued by this
handset. If you do not receive any rate information from your network provider, the call
duration is displayed.
Displaying/deleting call charges
v ¢ í ¢ Call Charges ¢(system PIN
if required)
The Total all Calls charges for all calls on all
MSNs from the Since date are displayed.
¢ Overview
¤ With q, switch to the accounts for the
individual MSNs that are set up on the
base station. The following data is dis-
played for each MSN:
Last Call
Charges for the last call on the specified
MSN. If the last call was a conference
call or if you have toggled, only the
charges for one connection are dis-
played.
Tot al
Charges for all calls on the specified
MSN.
Delete amount for individual accounts or
charge overview
q Scroll to the desired overview.
§Delete§ Press the display key.
Please note:
There may be a difference between the
charges displayed and those invoiced by the
network provider. The invoice from the network provider is always legally binding.
Setting the charge per unit and the currency
v ¢ í ¢ Call Charges ¢Settings
¤ Change multiple line input:
Cost per Unit:
Enter cost per unit, e.g.
QQQL for 6 pence.
Currency:
Enter currency symbol.
¤ Save changes (page 65).
Please note:
Any previously saved call charges are deleted if
the cost per unit is changed.
30
Page 32

SMS (text messages)
Your phone is supplied ready for sending
SMS messages immediately.
Please note:
When supplied, the access number
(062 210 00 0) for the Swisscom SMS centre
is pre-programmed.
Preconditions:
u Calling Line Identification is enabled for
your phone line.
u Your network provider supports SMS on
the fixed line network (information on
th is ca n be o bt aine d f rom y our n etwo rk
provider).
u The SMS centre number is already
entered.
SMS messages are exchanged between
SMS centres operated by service providers. You must enter the SMS centre
through which you wish to send and
receive SMS messages into your phone.
You can receive SMS messages from every
SMS centre that is entered, provided you
have registered with your service provider.
Your SMS messages are sent via the
Service Centr. that is shown as the active
send service centre. However, you can
activate any other SMS centre as the active
send service centre to send a current message (page 36).
The following SMS centres are pre-programmed for Switzerland:
– Centre 1: 062210000* (Swisscom)
Please contact your provider with any
questions relating to the SMS service.
If no SMS service centre is entered,
the SMS menu only contains the entry
Settings. Enter an SMS Service Centre
(page 36).
Information on writing an SMS can be
found in the appendix:
u For how to enter text, see page 65.
Rules
u An SMS can be up to 612 characters.
u If there are more than 160 characters,
the SMS is sent as a linked SMS (up to
4 SMS messages with 153 characters
each).
Please note:
u From a handset, you can only access
(read/edit/delete) SMS messages that
have been received or sent from an
MSN set up for the handset. To find out
how to assign MSNs to your handset,
see page 54.
u If your phone is connected to a PABX,
please read page 36.
u If you wish to receive an SMS via sev-
eral MSNs, you must register each MSN
separately with your service provider.
u The send/receive MSN must corre-
spond to the number that is registered
at your SMS centre (page 36).
Writing/sending an SMS
Writing an SMS
v ¢ î
New SMS Select and press §OK§.
~ Write an SMS.
Sending an SMS
c Press the talk key
or:
§Options§ Press the display key.
Send Select and press §OK§.
SMS Select and press §OK§.
~ / s / C
Select number with dialling
code (even if you are in that
area) from the directory or
enter directly. For sending
SMS to an SMS mailbox: add
the mailbox ID to the end of
the number.
31
Page 33

§Send§ Press the display key. The SMS
is sent.
Please note:
– If you are interrupted by an external call
while writing an SMS, the text is automatically saved in the draft message list.
– If the memory is full, or if the SMS function
on the base station is being used by
another handset, the operation is cancelled. An appropriate message appears in
the display. Delete SMS messages you no
longer require or send the SMS later.
Setting input language
¤ Write an SMS (page 31).
§Options§ Press the display key.
Select Language
Select and press
s Select input language and
§OK§.
press
a Press the end call key briefly
twice to return to the input
field.
The input language setting only applies to
the current SMS.
SMS status report
Precondition: Your network provider supports this feature.
If you have activated the status report, you
will receive an SMS with a confirmation
message after sending.
*
Activating/deactivating a status report
v ¢ î ¢ Settings
Status Report
Select and press
§OK§.
‰
§OK§ (=on).
Reading/deleting status report/saving
number to directory
¤ Open the incoming message list
(page 34) and then:
q Select SMS with State OK or
State not OK status.
§Read§ Press the display key.
u Delete:
§Options§ Delete Entry §OK§.
u Copy to directory:
§Options§ Copy to Directory §OK§.
u Delete entire list:
§Options§ Delete List §OK§.
Draft message list
You can save an SMS in the draft message
list, and edit and send it later. Your handset's draft message list contains all saved
SMS messages of the assigned send MSN.
Saving an SMS in the draft message list
¤ Write an SMS (page 31).
§Options§ Press the display key.
Save Entry Select and press §OK§.
Opening the draft message list
v ¢ î ¢ Outgoing
The first list entry is displayed, e.g.
1234568890
21.11.07 09:45
Reading or deleting individual SMS
messages
¤ Open the draft message list and then:
q Select SMS.
§Read§ Press the display key. The
entry will be displayed. Scroll
line by line using q.
Or delete the SMS with
§Options§ ¢ Delete Entry ¢ §OK§.
* Currently not supported on the Swiss-
com network.
32
Writing/changing an SMS
¤ You are reading an SMS in the draft
message list.
§Options§ Open menu.
Page 34

You have the following options:
New SMS
Write a new SMS and then send
(page 31) or save it.
Edit
Edit the text of the saved SMS and then
send it (page 31).
Character Set
Text is shown in the selected character
set.
Deleting draft message list
¤ Open the draft message list and then:
§Options§ Open menu.
Delete all Select, press §OK§ and confirm
§Yes§. The list is cleared.
with
a Press and hold (idle status).
Sending SMS messages to an e-mail address
If your service provider supports the SMS
to e-mail feature, you can also send your
SMS messages to e-mail addresses.
The e-mail address must be at the beginning of the text. You must send the SMS to
the e-mail service of your SMS send centre.
v
Π/ ~
~ Enter the SMS text.
§Options§ Press the display key.
Send Select and press §OK§.
*
¢ î ¢ New SMS
Load the e-mail address from
the directory or enter it
directly. End the entry with a
space or colon (depending on
the service provider).
E-mail Select and press
number of the e-mail service is
not entered (page 36), enter
the number of the e-mail service.
§Send Press the display key.
Sending SMS messages as a fax
You can also send an SMS to a fax
machine.
Precondition: Your network provider supports this feature.
§OK§. If the
**
¤ Write an SMS (page 31).
§Options§ Press the display key.
Send Select and press §OK§.
Fax Select and press §OK§.
s / ~ Select number from the direc-
tory or enter directly. Enter the
number with area code (even
if you are in the same area).
§Send Press the display key.
Receiving an SMS
All received SMS messages are saved in
the incoming message list. Linked SMS
messages are displayed as one message. If
this is too long or is not transferred completely, it is split into individual messages.
Since an SMS remains in the list even after
it has been read, you should regularly
delete SMS messages from the list.
The display tells you if the SMS memory is
full.
¤ Delete SMS messages you no longer
require (page 34).
¤ You can only delete SMS messages that
were sent to MSNs for your handset. If
the memory is taken up by SMS mes-
sages that have been sent to other
MSNs, a notification to this effect will
appear on the display.
* Dependent on the provider; currently
not supported on the Swisscom network.
** Dependent on the provider; currently
not supported on the Swisscom network.
33
Page 35
Incoming message list
The incoming message list contains:
u All SMS messages with an MSN that
matches a send or receive MSN for your
handset. If no MSNs have been set up,
all SMS messages received are shown
on all handsets. The most recent SMS
appears at the top of the list.
u SMS messages that could not be sent
due to an error.
New SMS messages are signalled on all
Aton CLx308 handsets by the À icon in
the display, the flashing message key f
and an advisory tone.
Opening the incoming message list with
the
f key
f Press.
The incoming message list is displayed as
follows (example):
SMS: (2)
1 Bold: number of new entries
Regular: number of read entries
Open list with §OK§.
An entry in the list is displayed as in the
following example:
1234568890
21.11.07 09:45
1
Opening the incoming message list via the
SMS menu
v ¢ î ¢ Incoming
Reading or deleting individual SMS
messages
¤ Open the incoming message list.
¤ Continue as described in "Reading or
deleting individual SMS messages",
page 32.
After you have read a new SMS, it is given
the status "Old" (is no longer shown in
bold).
Deleting the incoming message list
All new and old SMS messages in the list
are deleted.
¤ Open the incoming message list.
§Options§ Open menu.
¤ To continue, see "Deleting draft mes-
sage list", page 33.
Replying to or forwarding SMS messages
¤ Read the SMS (page 34):
§Options§ Press the display key.
You have the following options:
Reply
Write and send a reply SMS directly
(page 31).
Edit
Edit the text in the SMS and then send
it (page 31).
Forwarding an SMS
¤ You are reading an SMS (page 34):
§Options§ Press the display key.
Forward Select and press §OK§. For fur-
ther information, see page 31.
Copying a number to the directory
Copying the sender's number
¤ Open the incoming message list and
select entry (page 34).
§Options§ Press the display key. For fur-
ther information, see page 26.
Please note:
An attached mailbox identifier is added to the
directory.
Copying/dialling numbers from an
SMS text
¤ Read the SMS (page 34) and scroll to
the telephone number.
The digits are reverse-highlighted.
Ó Press the display key. For fur-
ther information, see page 26.
34
Page 36

Or:
c Press the talk key to dial the
number.
If you wish to use the number to send an
SMS:
¤ Save the number with the local area
code (dialling code) in the directory.
Changing the character set
¤ Read the SMS (page 34):
§Options§ Press the display key.
Character Set
Text is shown in the selected character
set.
Checking the receive MSN
You can check to which receive MSN the
SMS was sent.
¤ Open the incoming message list.
§Options§ Open menu.
Called MSN
Select and press
receive MSN is displayed.
§OK§ / ” Press the display key to return
to the incoming message list.
§OK§. The
SMS with vCard
An attachment is reverse-highlighted in
an SMS.
Opening/storing the vCard
The vCard is an electronic business card. A
vCard can include:
u Name
u Private number
u Business number
u Mobile phone number
u Birthday
Opening the vCard
¤ Read the SMS (page 34) that contains
the attachment :.
§Show§ Press the display key.
To return to the SMS text:
a Press briefly.
Saving a number
Different numbers in a vCard can be saved
individually one after another.
¤ Open the SMS to read it (page 34).
¤ Open the vCard attachment.
q Select number.
§Save§ Press the display key.
When you save a number, the directory is
opened automatically. The number and
name are copied. If a birthday is entered
on the vCard, the date is copied to the
directory as an anniversary.
¤ If necessary, edit the entry in the direc-
tory and save it. You will return to the
vCard automatically.
Notification by SMS
You can arrange to be notified about
missed calls by SMS.
Precondition: For missed calls, the caller's
number (CLI) must have been transmitted.
Notification is sent to your mobile phone
or another device with SMS functionality.
You only need to save the phone number
to which notification should be sent (notification number) and set the notification
type.
Saving the notification number
v ¢ î ¢ Settings ¢Notify Number
~ Enter the number to which the
SMS should be sent.
§Save§ Press the display key.
a Press and hold (idle status).
Warning:
Do not enter your own fixed network number
for the notification of missed calls. This can
lead to chargeable endless looping.
35
Page 37

Setting the notification type
v ¢ î ¢ Settings ¢Notify Type
¤ Change multiple line input if necessary:
Missed Calls:
Select On if you require SMS notification.
¤ Save changes (page 65).
Setting SMS centres
Please note:
When supplied, the access number (062 210
00 0) for the Swisscom SMS centre is pre-programmed.
Entering/changing SMS centres
¤ You should find out about the services
and special functions offered by your
service provider before you make a
new application and/or before you
delete pre-configured call numbers.
¢ î ¢ Settings ¢Service Centres
v
s Select SMS centre (e.g. Service
Centr. 1) and press
§OK§.
¤ Change multiple line input:
Active Send:
Select Yes if SMS messages are to be
sent via the SMS centre. For the SMS
centres 2 to 4, the setting only applies
to the next SMS.
SMS:
Press the display key
number of the SMS service.
E-mail:
Press the display key
number of the e-mail service.
§Edit§. Enter the
§Edit§. Enter the
¤ Save changes (page 65).
Sending an SMS via another SMS
centre
¤ Activate the SMS centre (2 to 4) as the
active send service centre.
¤ Send the SMS.
This setting only applies to the next SMS
to be sent. Thereafter, the setting returns
to Service Centr. 1.
SMS on a PABX
u You can only receive an SMS when the
Calling Line Identification is for-
warded to the extension of the PABX
(CLIP). The CLIP evaluation of the
number of the SMS centre takes place
in your Aton.
u If required, you must prefix the number
for the SMS centre with the access code
(depending on your PABX).
If in doubt, test your PABX, e.g. by
sending an SMS to your own number:
once with and once without the access
code.
u When you send SMS messages, your
sender number may be sent without
your extension number. In this case the
recipient cannot reply to you directly.
Sending and receiving SMS messages on
ISDN PABXs is only possible via the MSN
number assigned to your base station.
Activating/deactivating SMS function
If you deactivate the SMS function, you
cannot send or receive any SMS messages
with your phone.
The settings you have made for sending
and receiving SMS messages (e.g. the
numbers of the SMS centres) and the
entries in the incoming and draft message
lists are saved even after you turn off your
phone.
v Open menu.
36
Page 38
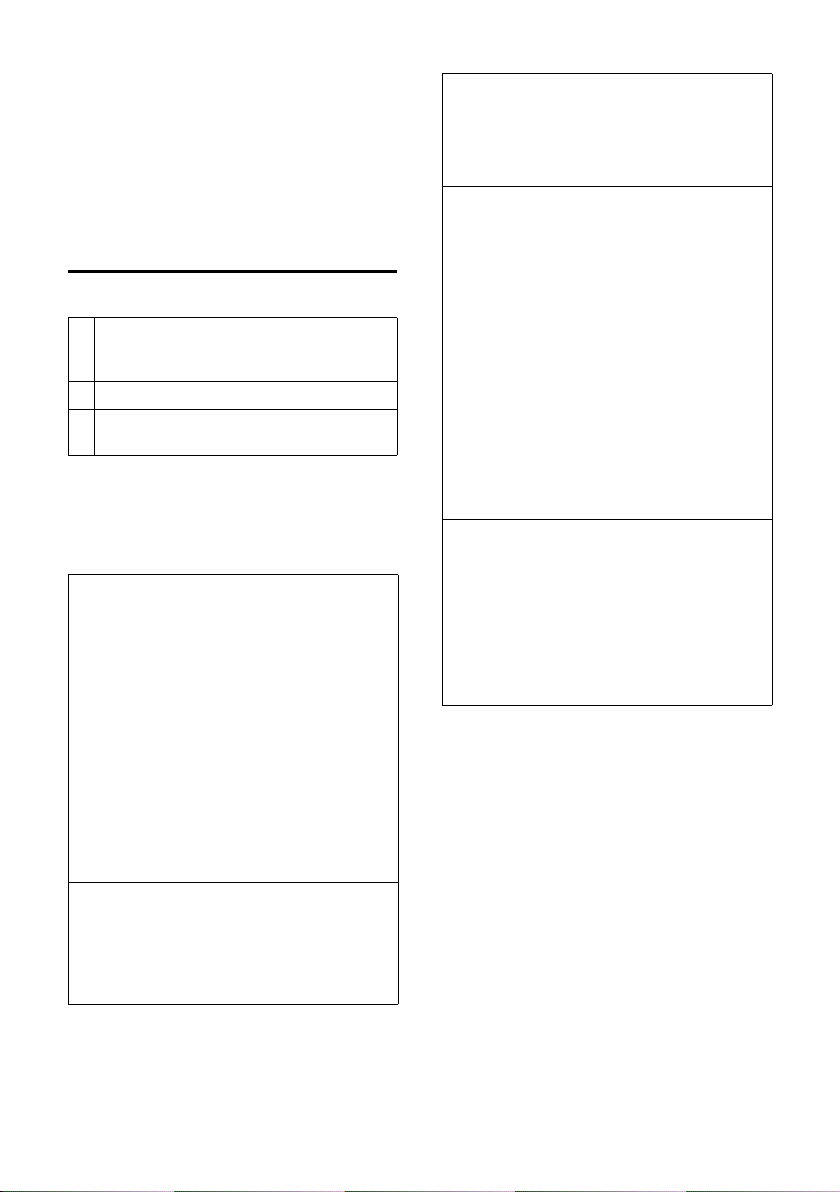
N5O2L
Enter the digits.
§OK§ Deactivate SMS function.
Q
Or:
§OK§ Activate SMS function (default
setting).
SMS troubleshooting
Error codes when sending
E0 Calling Line Identification permanently
withheld (CLIR) or Calling Line Identification not activated.
FE Error occurred during SMS transfer.
FD Connection to SMS centre failed; see self-
help.
Self-help with errors
The following table lists error situations
and possible causes and provides notes on
troubleshooting.
You cannot send messages.
1. The "Calling Line Identification Presentation" feature (CLIP) is not working.
¥ Ask your service provider to check this
service.
2. SMS transmission has been interrupted
(e.g. by a call).
¥ Re-send the SMS.
3. The network provider does not support this
feature.
4. No number or an invalid number is entered
for the SMS centre set as the active send
service centre.
¥ Enter the number (page 36).
You receive an incomplete SMS.
1. Your phone's memory is full.
¥ Delete old SMS messages (page 34).
2. The service provider has not yet sent the
rest of the SMS.
You have stopped receiving SMS messages.
Call diversion is activated with When: All Calls
or call diversion for All Calls is activated for
the network mailbox.
¥ Change the call diversion.
The SMS is played back.
1. The "display call number" service is not activated.
¥ Ask your service provider to activate this
function (chargeable).
2. Your mobile phone operator and your fixed
line network SMS service provider have not
agreed on a co-operation.
¥ Obtain information from your fixed line
network SMS service provider.
3. Your terminal has been recorded by your
SMS provider as having no fixed line network SMS functionality, i.e. you are no
longer registered with the provider.
¥ Have the device (re-)registered to
receive SMS messages.
Messages are only received during the day.
The terminal is recorded in your SMS provider's database as having no fixed network
SMS functionality, i.e. you are no longer
registered with the provider.
¥ Obtain information from your fixed line
network SMS service provider.
¥ Have the device (re-)registered to
receive SMS messages.
37
Page 39

Using the network mailbox
The network mailbox is your network provider's answer machine within the network. You cannot use the network mailbox unless you have requested it from
your network provider.
Calling the network mailbox
Press and hold. You are con-
nected straight to the network
mailbox.
d Press handsfree key d if
required. You will hear the network mailbox announcement.
Configuring fast access for the network mailbox
With fast access, you can dial the network
mailbox directly.
Fast access is set for the network mailbox.
You only need to enter the number of the
network mailbox.
Configuring fast access for the network
mailbox and entering the network mailbox
number
v ¢ Ð ¢ Voice Mail ¢Set Key 1
Network Mailb.
Select and press
~ Enter the number for the net-
work mailbox.
§Save§ Press the display key.
a Press and hold (idle status).
The setting for fast access applies to all
Aton CLx308 handsets.
‰
§OK§ (=on).
Viewing the network mailbox report
When a message is recorded, you receive
a call from the network mailbox. If Calling
Line Identification is working, the display
shows the network mailbox number. If
you take the call, the new messages are
played back. If you do not take the call, the
network mailbox number will be saved in
the missed calls list and the message key
flashes (page 28).
38
Page 40

Using several handsets
Registering handsets
You can register up to six handsets to your
base station.
A handset can be registered on up to four
base stations.
Please note:
Following successful registration, all
MSNs are used as receive MSNs and the
first MSN is used as a send MSN for this
handset.
Registering other handsets
You can register other handsets and handsets for other devices with GAP functionality as follows.
On the handset
¤ Start to register the handset as
described in its user guide.
On the base station
Press and hold (approx. 3 sec.) the registration/paging key on the base station
(page 1).
Deregistering handsets
Manual registration to Aton CL401
You must activate manual registration of
the handset on both the handset and the
base station.
Once it has been registered, the handset
returns to idle status. The handset's internal number is shown in the display e.g. INT
1. If not, repeat the procedure.
ISDN
On the handset
v ¢ Ð ¢ Handset ¢Register H/Set
s Select base station, e.g. Base 1
and press
~ Enter the system PIN of the
base station (the default is
0000) and press
for example, see Base 1 flashing in the display.
§OK§.
§OK§. You will,
On the base station
Within 60 sec. press and hold (approx.
3 sec.) the registration/paging key on the
base station (page 1).
You can deregister any registered handset
using any other registered handset.
u Open list of internal parties.
The handset you are currently
using is indicated by < .
s Select the internal party you
wish to deregister.
§Options§ Open menu.
De-reg. H/Set No.
Select and press
~ Enter the current system PIN
and press
§Yes§ Press the display key.
§OK§.
Locating a handset ("paging")
You can locate your handset using the
base station.
¤ Briefly press the registration/paging
key on the base station (page 1).
¤ All handsets will ring simultaneously
("paging"), even if the ringer tones are
deactivated.
Ending paging
¤ Briefly press the registration/paging
key on the base station or press the talk
key c on the handset.
§OK§.
39
Page 41

Changing the base station
If your handset is registered to more than
one base station, you can set it to a particular base station or to the base station
that has the best reception (Best Base).
¢ Ð ¢ Handset ¢Select Base
v
s Select one of the registered
base stations or Best Base and
§OK§.
press
Making internal calls
Internal calls to other handsets registered
to the same base station are free of
charge.
Calling a specific handset
u Initiate internal call.
~ Enter the number of the hand-
set.
Or:
u Initiate internal call.
s Select handset.
c Press the talk key.
Transferring a call to another handset
You can transfer an external call to
another handset (connect).
u Open the list of handsets.
The external participant hears
hold music if activated (see
page 57).
s Select a handset or Call All and
§OK§.
press
When the internal participant answers:
¤ If necessary announce the external call.
a Press the end call key.
The external call is transferred to the other
handset.
If the internal participant does not answer
or the line is busy, press the display key
§End§ to return to the external call.
When transferring a call you can also press
the end call key a before the internal
participant answers.
Then, if the internal participant does not
answer or the line is busy, the call will
automatically return to you (the display
will show Recall).
Calling all handsets ("group call")
u Initiate internal call.
* Press the star key.
or
Call All Select menu option and
c Press the talk key.
All handsets are called.
Ending a call
a Press the end call key.
40
Internal consultation/conference calls
When you are conducting an external
call, you can call an internal participant at
the same time for consultation or hold a
conference call between all 3 participants.
You are conducting an external call:
u Open the list of handsets.
The external participant hears
hold music if activated (see
page 57).
s Select handset and press
The internal participant is
called.
If the internal participant does not answer
or the line is busy, press the display key
§End§, to return to the external call.
§OK§.
Page 42

If the internal participant answers,
either:
§Options§ Press the display key.
End Active Call
Select and confirm.
You are reconnected with the
external participant.
or:
§Conference§ Press the display key.
All 3 participants are connected with each other.
Ending a conference call
a Press the end call key.
If an internal participant presses the end
call key a, the other handset remains
connected to the external participant.
Accepting/rejecting call waiting
If you receive an external call during an
internal call, you will hear the call waiting
tone (short tone). With Calling Line Identification, the caller's number will appear in
the display.
Accepting an external waiting call during
an internal call
§Accept§ Press the display key.
You accept the waiting call and the internal call is put on hold. Both parties are
shown on the display; the current one is
marked.
You can toggle (page 22) or set up a conference call (page 23).
Rejecting the external call
§Reject§ Press the display key.
The call waiting tone is turned off. You
remain connected with the internal participant. The ringer can still be heard on
other registered handsets.
Changing the name of a handset
The names "INT 1", "INT 2" etc. are
assigned automatically at registration.
You can change these names. The name
must be no more than 10 characters. The
changed name is displayed in every handset's list.
u Open list of handsets. Your
own handset is indicated by <.
s Select handset.
§Edit§ Press the display key.
~ Enter name.
§Save§ Press the display key.
Changing a handset's internal number
A handset is automatically assigned the
lowest free number on registration. If all
slots are occupied, number 6 is overwritten if this handset is in idle status. You can
change the internal number of all registered handsets (1–6).
u Open the list of handsets. Your
own handset is indicated by <.
§Options§ Open menu.
Edit H/Set No.
Select and press
handsets is displayed.
s The current number flashes.
Select a handset.
~ Enter the new internal number
(1–6). The handset's old
number is overwritten.
§Save§ Press the display key to save
the input.
a Press and hold (idle status).
You will hear the error tone (descending
tone sequence) if you assign an internal
number twice.
§OK§. The list of
¤ Repeat the procedure with a free
number.
41
Page 43

Using a handset as a
room monitor
If the room monitor is activated, a previously saved destination number is called
as soon as a set noise level is reached. You
can save an internal or external number in
your handset as the destination number.
All of the handset keys are deactivated,
with the exception of the display keys.
The room monitor call to an external
number stops after around 90 seconds.
The room monitor call to an internal
number (handset) stops after approx. 3
minutes (depending on the base station).
When the room monitor is activated,
all keys are locked except the end call key.
The handset's speaker is muted.
When the room monitor is activated,
incoming calls to the handset are indicated without a ringer and are only
shown on the screen. The display and keypad are not illuminated and advisory
tones are also turned off.
If you accept an incoming call, the room
monitor is suspended for the duration of
the call, but the function remains activated.
If you deactivate then reactivate the handset, the room monitor remains activated.
Warning!
– Please note that the "room monitor" does
not function in certain situations, e.g. if
the mobile phone number specified by
the user is busy or has no reception, if
the mains power supply fails or if batteries are empty.
– You should always check the operation
of the room monitor before use. For
example, test its sensitivity. Check the
connection if you are diverting the room
monitor to an outside number.
– When the function is switched on, the
handset's operating time is considerably
reduced. If necessary, place the handset in
the charging cradle. This ensures that the
batteries do not run down.
– Ideally the handset should be positioned 1
to 2 metres away from the baby. The microphone must be directed towards the baby.
– The connection to which the room monitor
is forwarded must not be blocked by an
activated answer machine.
Activating the room monitor and entering the destination number
v ¢ í ¢ Room Monitor
¤ Change multiple line input:
Room M.:
Select On to activate.
Call to:
External number: Select the number
from the directory (press display key
Ò) or enter it directly.
Internal number:
§Options§ ¢ INT
¢ §OK§ ¢s (select handset or Call All
if all registered handsets are to be
¢ §OK§.
called)
A message and the last four digits of
the destination number or internal destination number are displayed in the
idle status.
Level:
Set noise level sensitivity (Low or High).
¤ Press §Save§ to save the settings.
42
Page 44

Cancel/deactivate room monitor
Press the end call key a to cancel the
call when the room monitor is activated.
In the idle status press the display key
§OFF§ to deactivate the room monitor
mode.
Changing the set destination number
v ¢ í ¢ Room Monitor
s Scroll to the Call to: line.
X or §Delete§
Delete existing number.
¤ Enter and save number as described in
"Activating the room monitor and
entering the destination number"
(page 42).
Deactivating the room monitor remotely
Preconditions: The phone must support
touch tone dialling and the room monitor
should be set for an external destination
number.
¤ Accept the call from the room monitor
and press keys 9 ;.
The room monitor function will deactivate
after the call ends. There will be no further
room monitor calls. The other room monitor settings (e.g. no ringer) on the handset
will remain activated until you press the
display key
To reactivate the room function with the
same phone number:
§OFF§ on the handset.
¤ Turn on the activation again and save
§Save§ (page 42).
with
Handset settings
Your handset is preconfigured, but you
can change the settings to suit your individual requirements.
Quick access to functions and numbers
The default setting of the left display key is
preset with the Swisscom
tact Centre). The phone number 0800 800
800 cannot be changed. You can dial the
number by pressing the key.
You can assign a number or a function to
each of the digit keys Q and 2 to
O. The right display key has a function
pre-assigned by default. You can change
the assignment.
The number is then dialled or the function
started by simply pressing a key.
Assigning a new digit key/left display key
Following a handset
reset, } appears on the left display
key. The key can be reprogrammed. Reprogramming is identical to assigning a digit
key.
Precondition: The digit key has not yet
been assigned a number or function and
§§§§Hotline§§§§ is no longer assigned to the left
display key.
¤ Press the } display key or press
and hold the digit key.
The list of possible key assignments is
opened. The following can be selected:
Quick Dial
Assign a number from the directory to
the key.
The directory is opened.
¤ Select an entry and press §OK§.
If you delete or edit the entry in the
directory, this will not affect the assignment to the number key or display key.
§§§§Hotline§§§§ (Con-
43
Page 45

Hotline
Swisscom Contact Centre phone
number 0800 800 800.
INT
Internal calls (see page 40).
SMS
Assign menu for SMS functions to a key
(see page 31).
SMS Notific.
Assign menu for activating SMS notification to a key (page 35).
Room Monitor
Assign menu for setting and activating
the room monitor to a key (see
page 42).
Alarm Clock
Assign menu for setting and activating
the alarm clock to a key (see page 49).
Calendar
Open calendar/enter new appointment.
Bluetooth
Assign the Bluetooth menu to a key.
If a function or number has already been
assigned to the left display key, the
selected function or name for the phone
number (or its abbreviation) in the directory will be displayed in the lowest display
line above the display key.
Starting the function, dialling the number
If the handset is in idle status, press and
hold the digit key or press the display key
briefly.
Depending on the key assignment:
u Numbers are dialled directly.
u The function menu is opened.
Changing key assignments
Display key
¤ Press and hold the right display key.
¤ Press and hold the left display key, as
long as
The list of possible key assignments is
opened.
§§§§Hotline§§§§ is not assigned.
¤ Proceed as is described when first
assigning the key with a shortcut
(page 43).
Please note:
§§§§Hotline§§§§ Swisscom Contact Centre
We will be happy to advise you on this freephone number if you have any questions relating to telecommunications: fixed line networks, mobiles, DSL Broadband, Bluewin TV,
any questions relating to billing and much
more.
0800 800 800
Digit key
¤ Press the digit key briefly.
§Change§ Press the display key. The list
of possible key assignments is
displayed.
¤ Proceed as is described when first
assigning the key with a shortcut
(page 43).
Changing the display language
You can view the display texts in different
languages.
¢ Ð ¢ Handset ¢Language
v
The current language is indicated by .
s Select a language and press
§OK§.
a Press and hold (idle status).
If you accidentally choose a language you
do not understand:
v N 4
Press keys in sequence.
s Select the correct language
and press
§OK§.
‰
44
Page 46

Setting the display
You have a choice of four colour schemes
and several different contrasts.
¢ Ð ¢ Display
v
Colour Scheme
Select and press
s Select a colour scheme and
§OK§ ( = current col-
press
our).
a Press briefly.
Contrast Select and press
r Select contrast.
§Save§ Press the display key.
a Press and hold (idle status).
§OK§.
‰
§OK§.
Setting the screensaver
You can set a picture from the Resource
Dir. (page 48) or the time to be displayed
as a screensaver when the handset is in
idle status. This will replace the idle status
display. It may conceal the date, time and
name.
The screensaver is not displayed in certain
situations, e.g. during a call or if the handset is deregistered.
If a screensaver is activated, the Screen
Saver menu option is marked with .
¢ Ð ¢ Display ¢Screen Saver
v
The current setting is displayed.
‰
¤ Change multiple line input:
Activation:
Select On (screensaver is displayed) or
Off (no screensaver).
Selection:
If required, change the screensaver
(see below).
¤ Save changes: (page 65).
If the screensaver conceals the display,
briefly press a to show the idle display
with time and date.
Changing the screensaver
v ¢ Ð ¢ Display ¢Screen Saver
s Scroll to the Selection line.
§View§ Press the display key. The
active screensaver is displayed.
s Select screensaver and press
§OK§.
¤ Save changes (page 65).
Setting the display backlight
Depending on whether or not the handset
is in the charging cradle, you can activate
or deactivate the backlight. If it is activated, the display is permanently
dimmed.
¢ Ð ¢ Display ¢Backlight
v
The current setting is displayed.
¤ Change multiple line input:
In Charger
Select On or Off.
Without Charger
Select On or Off.
Please note:
With the On setting, the standby time of the
handset can be significantly reduced.
§Save§ Press the display key.
a Press and hold (idle status).
Activating/deactivating auto answer
If you activate this function, when you
receive a call you can simply lift the handset out of the charging cradle without having to press the talk key c.
¢ Ð ¢ Handset
v
Auto Answer
Select and press
a Press and hold (idle status).
‰
§OK§ (=on).
45
Page 47

Changing the handsfree/ earpiece volume
You can set the loudspeaker volume for
handsfree talking to five different levels
and the earpiece volume to three different
levels.
In idle status:
¢ Handset Volume
t
r Set the earpiece volume.
s Scroll to the Speaker: line.
r Set the handsfree volume.
§Save§ Press display key if necessary
to save the setting permanently.
Setting the volume during a call:
t Press the control key.
r Select volume.
§Save§ Press display key if necessary
to save the setting permanently.
The setting will automatically be saved
after approx. 3 seconds, if not then press
the display key
If t is assigned with another function,
e.g. toggling (page 22):
§Options§ Open menu.
Vol ume Select and press §OK§.
Configure setting (see above).
Please note:
You can also set the call volume, the ringer
tones and the advisory tones via the menu
(see page 17).
§Save§.
Changing ringer tones
u Volume:
You can choose between five volumes
(1–5; e.g. volume 2 = ˆ) and
the "crescendo" ring (6; volume
increases with each ring =
‰).
u Ringer tones:
You can select various ringer tones,
melodies or any sound from My stuff
(page 48).
You can set different ringer tones for the
following functions:
u Ext. Calls: for external calls
u Internal Calls: for internal calls
u Appointments: for set appointments
(page 50)
u All: the same ringer tone for all func-
tions
Settings for external calls
During setup (page 54), each receive MSN
is automatically assigned a ringer tone.
You can change this assignment.
In idle status:
¢ Ringer Settings ¢ Ext. Calls
t
Setting the volume
Vol ume Select and press §OK§.
r Set volume (1–6).
¤ Save the changes.
Setting ringers
Melody Select and press §OK§.
q Select MSN, e.g. MSN 1 and
§OK§.
press
r Select melody.
§Save§ Press the display key to save
the setting.
46
Page 48

Settings for internal calls
Set the volume and melody depending on
the type of signalling required.
In idle status:
¢ Ringer Settings
t
q Select the Internal Calls setting
and press
r Set volume (1–6).
s Scroll to the next line.
r Select melody.
§Save§ Press the display key to save
the setting.
§OK§.
Same ringer tone for all functions
In idle status:
t ¢ Ringer Settings ¢ All
¤ Set volume and ringer (see "Settings for
internal calls").
§Save§ Press the display key.
§Yes§ Confirm the prompt to save
your settings.
a Press and hold (idle status).
Please note:
You can also set the call volume, the ringer
tones and the advisory tones via the menu
(see page 17).
Reactivating the ringer
* Press and hold the star key.
Deactivating the ringer for the current call
§Silence§ Press the display key.
Activating/deactivating the alert tone
In place of the ringer tone you can activate
an alert tone. When you get a call, you will
hear a short tone ("Beep") instead of the
ringer tone.
* Press and hold the star key
and within 3 seconds:
§Beep§ Press the display key. A call will
now be signalled by one short
alert tone. º appears in the
display.
Activating/deactivating muting for the first ringer tone
v Open menu.
N5O O
Press keys.
§OK§ Make the first ringer audible.
Q
Or:
§OK§ Suppress the first ringer.
Activating/deactivating the ringer
You can deactivate the ringer on your
handset before you answer a call or when
the handset is in idle status; the ringer can
be deactivated permanently or just for the
current call. The ringer tone cannot be reactivated while an external call is in
progress.
Deactivating the ringer permanently
* Press and hold the star key.
The Ú icon appears in the display.
47
Page 49
My stuff
My stuff on the handset manages sounds
that you can use as ringers, and pictures
(CLIP pictures and screensavers) that you
can use as caller pictures or as screensavers. Precondition: Calling Line Identification (CLIP). My stuff can manage the following media types:
Icon Sound Format
Ù Ringer tones Standard
Ö Monophonic Standard
× Polyphonic .mid
Picture
(CLIP picture, screensaver)
The icon is displayed in front of the name
in My stuff. Various mono and polyphonic
sounds and pictures are preconfigured on
your handset.
You can listen to the available sounds and
view the pictures.
Playing back sounds/viewing CLIP pictures
v ¢ Ï ¢ Screensavers / Caller Pictures
/ Sounds (select entry)
§Play§ / §View§ Press the display key. Sounds
are played back or pictures are
displayed. Press the q key to
switch between entries.
§End§ / ” Press the display key. Playback
of the sound or display of the
picture ends.
While you are playing back
sounds, you can also interrupt
playback with the u key.
a Press and hold (idle status).
BMP
(128 x 100
or
128 x 160
pixels)
If you have saved a picture in an invalid
data format, you will see an error message
after selecting the entry. Cancel the operation with Î. Delete the picture
§Delete§.
with
Sounds: Setting the volume
During playback:
§Volume§ Press the display key.
r Set volume.
§Save§ Press the display key.
Renaming/deleting a picture
You have selected an entry.
§Options§ Open menu.
If a picture cannot be deleted (è), these
options are not available. Depending on
the situation, you can select the following
functions:
Delete Entry
The selected entry is deleted.
Delete List
All entries in the list that can be deleted
are deleted.
Rename
Change the name (max. 16 characters)
and press
§Save§. The entry is stored with
the new name.
Checking the memory
You can check how much memory is available for screensavers and CLIP pictures.
¢ Ï ¢ Capacity
v
” Back: Press the display key.
48
Page 50

Activating/deactivating advisory
tones
Your handset uses advisory tones to tell
you about different activities and statuses.
The following advisory tones can be activated/deactivated independently of each
other:
u Key click: every key press is confirmed.
u Acknowledge tones:
– Confirmation tone (ascending tone
sequence): at the end of an entry/
setting and when an SMS or a new
entry arrives in the calls list
– Error tone (descending tone
sequence): when you make an
incorrect entry
– Menu end tone: when scrolling at
the end of a menu
u Battery tone: the batteries need to be
charged.
In idle status:
¢ Advisory Tones
t
¤ Change multiple line input:
Key Tones:
Select On or Off.
Confirm.:
Select On or Off.
Battery:
Select On, Off or In Call. The battery
warning tone is only activated/deactivated and only sounds during a call.
¤ Save changes: (page 65).
You cannot deactivate the confirmation
tone for placing the handset in the charging cradle.
Please note:
You can also set the call volume, the ringer
tones and the advisory tones via the menu
(see page 17).
Setting the alarm clock
Precondition: The date and time have
already been set (page 10).
Activating/deactivating the alarm clock and setting the wake-up time
v ¢ ì
¤ Change multiple line input:
Activation:
Select On or Off.
Time:
Enter the wake-up time in 4-digit format.
Occurance:
Select Daily or Monday-Friday.
Vol ume :
Set the volume (1–6).
Melody:
Select melody.
¤ Save change: (page 65).
The ì icon and wake-up time are displayed in the idle status.
A wake-up call with the selected ringer
tone is signalled on the handset. The
wake-up call sounds for 60 seconds. ì is
shown in the display. If no key is pressed,
the wake-up call is repeated twice at five
minute intervals and then turned off.
During a call, the wake-up call is signalled
by a short tone.
Deactivating the wake-up call/ repeating after a pause (snooze mode)
Precondition: A wake-up call is sounding.
§OFF§ Press the display key. The
wake-up call is deactivated.
or
§Snooze§ Press the display key or any
key. The wake-up call is deactivated and then repeated after
5 minutes. After the second
repetition the wake-up call is
deactivated completely.
49
Page 51

Setting an appointment (calendar)
You can have your handset remind you of
up to 30 appointments (volume and melody, see page 46).
Saving an appointment
Precondition: The date and time have
already been set (page 10).
¢ ç
v
r/q Select the day in the graphical
calendar and press
on which appointments have
already been saved are highlighted in black).
The list of saved appointments for the day
is displayed. If you have already saved 30
appointments, then you must first delete
an existing appointment.
<New Entry>
Select and press
§OK§. (Days
§OK§.
¤ Change multiple line input:
Appoint.:
Select On or Off.
Date:
Enter day/month/year in 8-digit format.
Time:
Enter hours/minutes in 4-digit format.
Notes:
Enter text (max. of 16 characters). The
text appears as the appointment name
in the list and will be displayed on the
screen during the appointment
reminder. If you do not enter any text,
only the date and time of the appointment are displayed.
§Save§ Press the display key.
a Press and hold (idle status).
An appointment reminder is signalled
with the selected ringer tone (page 46).
The appointment reminder sounds for 60
seconds. The entered text, date and time
are displayed.
During a call, the appointment reminder is
signalled by a short tone.
Managing appointments
v ¢ ç
r/q Select the day in the graphical
calendar and press
on which appointments have
already been saved are highlighted in black in the calendar).
q Select appointment for the
day.
§Options§ Open menu
Back with ”
You have the following options:
View Entry
View selected appointment.
Open the
deleting and activating/deactivating.
Edit Entry
Edit selected appointment.
Delete Entry
Delete selected appointment.
Activate / Deactivate
Activate/deactivate the selected
appointment.
Delete List
Delete all appointments.
§Options§ menu for editing,
§OK§. (Days
§.
Deactivating or accepting an appointment reminder
Precondition: An appointment reminder
is sounding.
§§OFF§§ Press the display key to deacti-
vate the appointment
reminder.
Or:
§SMS§ Press the display key to accept
the appointment reminder
with an SMS.
50
Page 52

Displaying missed appointments and anniversaries
Missed appointments/anniversaries
(page 26) are displayed in the Missed
Alarms list if:
u You do not accept an appointment/
anniversary.
u The appointment/anniversary was sig-
nalled during a phone call.
u The handset is deactivated at the time
of the appointment/anniversary.
u Automatic redial was activated at the
time of an appointment/anniversary
(page 27).
Th e mo st r ece nt e ntr y is at t he h ead of t he
list.
If there is a new appointment/anniversary
in the list, the display shows
Pressing the display key will also open the
Missed Alarms list.
To open the list from the menu:
¢ í ¢ Missed Alarms
v
Select appointment/anniversary.
Information about the
appointment/anniversary is
displayed. A missed appointment is displayed with the
appointment name and a
missed anniversary is displayed with the last name and
first name. The date and time
will also be given.
§Delete§ Delete appointment
§SMS§ Write an SMS
a Press and hold (idle status).
If 10 entries are already stored in the list,
the next appointment reminder will delete
the oldest entry.
§Appoint.§.
Using Bluetooth devices
Your Aton CLx308 handset can communicate wirelessly via Bluetooth™ with other
devices that use this technology.
Before you can use your Bluetooth
devices, you must first activate Bluetooth
and then register the devices to the handset.
You can register 1 Bluetooth headset to
the handset. You can also register up to 5
data devices (PC, PDA) to send and receive
directory entries as vCards or exchange
data with the computer.
In order to transfer phone numbers via
Bluetooth, it is essential that area codes
(international and local area codes) are
saved on the phone (see page 53).
You will find a description of how to operate your Bluetooth devices in the user
guides for these devices.
Please note:
– You can only operate headsets on your
handset that have the headset profile.
– It can take up to 5 seconds to create a con-
nection between your handset and a Bluetooth headset. This applies both when a call
is accepted using the headset or transferred
to the headset, and when a number is
dialled from the headset.
– The A2DP standard (Advanced Audio
Distribution Profile) is not supported.
Activating/deactivating Bluetooth mode
v ¢ í ¢ Data Transfer ¢ Bluetooth
¢ Activation
Press §OK§ to activate or deactivate Bluetooth mode ( = activated).
In idle status, the ò icon on the handset
shows that Bluetooth mode is activated:
ÐòV
‰
51
Page 53

Registering Bluetooth devices
The distance between the handset in Bluetooth mode and the activated Bluetooth
device (headset or data device) should be
no more than 10 m.
Please note:
– If you register a headset, any headset that is
already registered will be overwritten.
– If you would like to use a headset with your
handset that is already registered to
another device (e.g. to a mobile phone),
please deactivate this connection before
you start the registration process to the
Aton.
¢ í ¢ Data Transfer ¢ Bluetooth
v
¢ Search Headset / Search Data Device
The search can take up to 30 seconds.
Once the device has been found, its name
will be shown on the display.
§Options§ Press the display key.
Trust Device Select and press §OK§.
~ Enter the PIN for the Bluetooth
device you want to register
and press
The device is saved in the list of known
devices.
Cancelling/repeating current search
To cancel search:
§Cancel§ Press the display key.
Repeat search if necessary:
§Options§ Select and press §OK§.
Repeat Search
Select and press
§OK§.
§OK§.
Editing the list of known (trusted)
devices
Open list
v ¢ í ¢ Data Transfer ¢ Bluetooth
¢ Known Devices
A corresponding icon appears next to each
device name in the list displayed:
Icon Meaning
ô
õ
Viewing entries
Open list ¢ s (select entry)
§Options§ Press the display key.
View Entry Select and press §OK§.
Deregistering Bluetooth devices
Open list ¢ s (select entry)
§Options§ Press the display key.
Delete Entry Select and press §OK§.
a Back: Press and hold key.
Please note:
If you deregister an activated Bluetooth device,
it may try to reconnect as an "unregistered
device".
Changing the name of a Bluetooth device
Open list ¢ s (select entry)
§Options§ Press the display key.
Rename Select and press §OK§.
~ Change the name.
§Save§ Press the display key.
a Back: Press and hold key.
Bluetooth headset
Bluetooth data device
Device name and address are
displayed.
Back with
§OK§.
52
Page 54

Rejecting/accepting an unregistered
Bluetooth device
If a Bluetooth device that is not registered
in the list of known devices tries to connect with the handset, you will be
prompted on the display to enter the PIN
for the Bluetooth device (bonding).
u Reject
§Go Back§ Press the display key.
u Accept
~ Enter the PIN for the Bluetooth
device you want to accept and
§OK§.
press
If you have accepted the device, you
can use it temporarily (i.e. as long as it
is within receiving range or until you
deactivate the handset) or save it to the
list of known devices.
Once the PIN has been confirmed, save
to the list of known devices:
§Yes§ Press the display key.
–
–
§No§ Press the display key:
use temporarily.
Changing the Bluetooth name of the handset
You can change the handset name used to
identify it on the display of another Bluetooth device.
¢ í ¢ Data Transfer ¢ Bluetooth
v
¢ Own Device Name
§Change§ Press the display key
~ Change the name.
§Save§ Press the display key.
a Back: Press and hold key.
Your own area code setting
In order to transfer phone numbers (e.g.
in vCards), it is essential that your area
code (international and local area code) is
saved on the phone.
Some of these numbers are already preset.
¢ Ð ¢ Handset ¢Area Codes
v
Check that the (pre)set area code is correct.
¤ Change multiple line input:
q Select/change input field.
r Navigate in the input field.
X If necessary, delete number:
press the display key.
~ Enter number.
§Save§ Press the display key.
Example:
Area Codes
International code:
00 - 41
Local area code:
0 - [ 44 ]
X
Restoring the handset default settings
You can reset individual settings and
changes that you have made. Entries in
the directory, the calls list, the SMS lists,
and the handset's registration to the base
station as well as the content of My stuff
are retained.
¢ Ð ¢ Handset ¢Reset Handset
v
§Yes§ Press the display key.
a Press and hold (idle status).
Save
53
Page 55

Making ISDN settings
Please note:
u Some settings cannot be made simulta-
neously by several handsets. If this is
the case, you will hear a negative
acknowledge tone.
u The abbreviations in brackets after the
titles indicate the ISDN feature concerned. Some features may only be
used if they have been authorised by
the network provider (there may be an
extra charge).
Setting up/deleting an ISDN phone number (MSN)
Your ISDN connection offers you two telephone lines (B channels) that you can use
simultaneously. On your base station, you
can set up to 10 own numbers (MSN). You
will be assigned these numbers by your
network provider.
Please note:
There are several ways of assigning an MSN to
ISDN extension systems. For more information
on this topic, please refer to the manual
belonging to your extension system.
§Edit§ Press the display key.
~ Enter number (max. 20 digits)
(without area code = prefix).
s~ If necessary, scroll to the first
line and enter the name (max.
16 digits) (optional).
§Save§ Press the display key.
Deleting an MSN
v ¢ Ð ¢ Base ¢ISDN ¢ Configure
¢ (system PIN if necessary)
MSN
q Select MSN, e.g. MSN 1.
§Delete§ Press the display key.
If the MSN you have deleted was the send
MSN (page 55) of an internal subscriber
then a new send MSN (the MSN with the
lowest ranked number) will automatically
be assigned to this internal subscriber.
Assigning an MSN
You can assign individual MSNs to the
registered devices. This determines
u which number makes a registered
terminal ring (receive MSN),
u under which number an internal
subscriber dials (send MSN).
Setting up MSN/changing a name
If you have not yet stored all the numbers
with the installation assistant (page 14),
you can enter them now. All numbers
that are stored retrospectively are automatically assigned to all registered
handsets as receive MSNs.
Each new number you set up is automatically given its own ringer tone, which you
can change individually (page 46).
Precondition: Call divert has not been set
up for the MSN to be changed (page 56).
¢ Ð ¢ Base ¢ISDN ¢ Configure
v
¢ (system PIN if necessary)
MSN
q Select MSN, e.g. MSN 1.
54
Assigning a receive MSN
If you only want to assign the handsetspecific incoming MSNs:
u Open the list of internal
subscribers.
q Select internal number for the
handset, e.g. INT 1.
§Options§ Open menu.
Config. Device
Select and press
~ If required, enter PIN and
§OK§.
press
Receive MSN
Select and press
q Select MSN and press §OK§,
e.g. MSN 1.
§OK§.
§OK§.
Page 56

a Press and hold (idle status).
Assigning a send MSN
You can define one send MSN for each
internal subscriber. This MSN is shown to
the person you call and the call is also
charged to this MSN.
u Open the list of internal
subscribers.
q Select internal number,
e.g. INT 1.
§Options§ Open menu.
Config. Device
Select and press
~ If required, enter PIN and press
§OK§.
Send MSN Select and press §OK§.
q Select MSN and press §OK§,
e.g. MSN 1.
a Press and hold (idle status).
§OK§.
Setting up a busy signal for when the MSN is being used (Busy on Busy)
This setting allows callers to get a busy
tone immediately when an external call is
already being made on this MSN, irrespective of the Call Waiting setting (page 55).
¢ Ð ¢ Base ¢ISDN
v
Busy on Busy
Select and press
§OK§ (‰ = on).
Activating/deactivating
call waiting – CW
This function can be set up separately for
each handset. When call waiting is activated, the caller will hear the ringing tone
if you are already making a call. This call is
announced acoustically and visually on
your handset screen.
When call waiting is deactivated, the caller
will hear the busy tone if you are already
making a call and you are the only sub-
scriber assigned to this MSN.
"Dealing with a waiting external call –
CW (Call Waiting)", see page 23.
u Open the list of internal sub-
scribers
q Select internal number,
e.g. INT 1.
§Options§ Open menu.
Config. Device
Select and press
~ If required, enter PIN and press
§OK§.
Call Waiting Select and press §OK§ (‰ = on).
§OK§.
Withholding identification of your number for all calls (CLIR)
Precondition: The "Withhold calling line
identification on a case-by-case basis" feature is supported by your network provider.
CLIR = Calling Line Identification Restriction, display of own telephone number
suppressed.
If you do not wish the person you are calling to know your phone number, you can
withhold Calling Line Identification.
Your phone is set by default to display your
number to the person you are calling.
To find out how to withhold the number
for a subsequent call, see page 20.
¢ Ð ¢ Base ¢ISDN
v
Always anon.
Select and press
a Press and hold (idle status).
§OK§ (‰ = on).
55
Page 57

Diverting calls
Diverting calls internally
Only one diversion destination can be set
for internal call diversion. If you are diverting to a party who has activated internal
call diversion, your divert will still end with
this party.
The diverted call will always ring at the
party you diverted it to.
The following settings are each confirmed
by a message in the display and an
acknowledge tone.
Setting up call diversion
v ¢ ê ¢ Call Divert ¢(system PIN if
necessary)
¢ To Internal
¤ Change multiple line input:
Call Divert
Select On or Off.
Dest.
Press the display key
internal parties is displayed. Your own
handset and Call All are not displayed.
q Select party and press §OK§.
Ring Delay
You can define when call diversion
should occur. You can set 0 (= immediate call diversion), 10, 20 or 30 seconds.
§Edit§. The list of
¤ Save the changes.
a Press and hold (idle status).
Diverting calls externally
For each receive MSN you can save a destination number for each of the following
three conditions:
All Calls – When Busy – No Answer
The three conditions can be activated
simultaneously.
Calls diverted to an external number are
entered in a list. Calls currently being
diverted are marked with ‰.
The following settings are each confirmed
by a message in the display and an
acknowledge tone.
Setting up call diversion
v ¢ ê ¢ Call Divert ¢(system PIN if
necessary)
No call diversion is set up:
§New§ Press the display key.
The list displays calls that have been
diverted. To set up an additional call diversion:
§Options§ Open menu.
New Entry Select and press §OK§.
¢ To Exte rnal
¤ Change multiple line input:
Activation:
Select On or Off.
For:
Select MSN, e.g. MSN 1.
Dest.:
Press the display key
(max. 20 digits) and press the display
§Save§.
key
When:
Select condition, e.g. All Calls.
§Edit§. Enter number
¤ Save the changes.
Editing entries
¤ Open the list of calls currently being
diverted.
q Select call diversion.
§Change§ Press the display key.
¤ Make changes as described under
"Setting up call diversion" and save.
Cancelling external call diversion
¤ Open the list of calls currently being
diverted.
q Select call diversion.
§Options§ Open menu.
Delete Entry Select and press §OK§.
56
Page 58
Setting the base station
The base station settings are made using a
registered handset.
Protecting against unauthorised access
Protect the system settings of the base station with a PIN known only to yourself.
The system PIN must be entered when, for
example, registering/deregistering a
handset to/from the base station or when
restoring the default settings.
Changing the system PIN
You can change the 4-digit system PIN set
on the base station (default setting: 0000)
to a 4-digit PIN known only by you.
¢ Ð ¢ Base ¢System PIN
v
~ Enter the current system PIN
and press
~ Enter new system PIN. For
security, the PIN is shown as
four stars (
s~ Jump to the next line, re-enter
new system PIN and press
a Press and hold (idle status).
§OK§.
****
).
§OK§.
Activating/deactivating music on hold
v ¢ Ð ¢ Base ¢Music on hold
Press §OK§ to activate or deactivate music
on hold ( = on).
‰
Repeater support
With a repeater you can increase the range
and reception strength of your base station. You will need to activate repeater
mode. This will terminate any calls that
are in progress at the time.
Precondition: A repeater is registered.
The eco range is deactivated.
¢ Ð ¢ Base ¢Add. Features
v
¢ Repeater Mode
§Yes§ Press the display key.
When repeater mode is active, the menu
item is marked with .
Please note:
Repeater support and eco range (see page 13)
cancel each other out, i.e. both functions cannot be used at the same time.
Restoring the base station to the factory settings
‰
Resetting the system PIN
If you have forgotten your system PIN you
can reset the base station to the original
code 0000:
Disconnect the power cord from the base
station. Hold down the registration/paging key on the base station while reconnecting the power cable to the base station. Release the key after a while.
The base station has now been reset and
the system PIN 0000 set.
Please note:
All handsets are deregistered and must be reregistered.
When the settings are restored
u eco range is deactivated
u handsets are still registered
u the system PIN is not reset
v ¢ Ð ¢ Base ¢Base Reset
~ Enter the current system PIN if
necessary and press
§Yes§ Press the display key.
Cancel the restoring process by pressing
a or the display key
a Press and hold (idle status).
§No§.
§OK§.
57
Page 59

Connecting the base station
Dialling options
to a PABX
The following settings are only necessary
when your PABX requires them; see the
PABX user guide.
Please note:
There are several ways of assigning an MSN to
ISDN extension systems. For more information
on this topic, please refer to the user guide
belonging to your extension system.
You cannot send or receive SMS messages
on PABXs that do not support Calling Line
Identification.
Saving an access code (outside line code)
Precondition: You may have to enter an
access code for external calls in your PABX,
e.g. "0".
¢ Ð ¢ Base ¢Add. Features
v
¢ Access Code
~ Enter or change access code,
max. 4 digits.
¤ Save the changes.
If an access code is saved, the following
applies:
u The access code is prefixed automati-
cally when dialling from the following
lists: SMS centre numbers, calls list.
u The access code must be entered when
dialling manually and when manually
entering directory or emergency/direct
dial numbers.
u If you copy the recipient's number from
the directory when sending an SMS,
you have to delete the access code.
u To delete an existing access code, place
the cursor to the right of the access
code using u/v and delete the code
using X.
The KEYPAD function allows you to control
certain features by entering sequences of
characters and digits.
The KEYPAD function must be activated
when you connect your Aton CL401
to an ISDN PABX that is controlled using
KEYPAD protocol. The digits/characters
0–9, * and # are sent as keypad information elements. Please ask your service provider about the information and codes you
can transmit.
ISDN
Setting options
You can switch between the Auto. Tone
Dial, Auto. Keypad and Dial of * and # set-
tings.
Auto. Tone Dial
Once normal dialling has been activated, * and # are not transmitted during dialling and if * and # are entered it
is not possible to switch to the keypad.
Auto. Keypad
Once * o r # have been entered, this setting automatically switches signalling
during dialling to the keypad. This automatic switchover is needed for giving
commands to the exchange or PABX.
Dial of * and #
Once Dial of * and # has been activated, the * and # characters are transmitted during dialling as commands to
the exchange or PABX.
Regardless of the setting options above,
after dialling or during a call, the phone
automatically switches to touch tone dialling (DTMF), e.g. for remote control of an
answer machine.
¢ Ð ¢ Base ¢Add. Features
v
¢ Dialling Mode
q Select setting and press §OK§,
e.g. Auto. Tone Dial (‰ =on).
58
Page 60

Activating/deactivating the keypad during a conversation
In addition to the permanent settings
described above, you can also switch temporarily to the keypad.
The setting only applies to the current
external call and is automatically deactivated after the call is ended.
Depending on whether Auto. Keypad is
activated, you may need to activate or
deactivate Keypad during the call.
§Options§ Open menu.
Keypad Select and press §OK§ (‰ = on).
The following settings are only necessary
when your PABX requires them; see the
PABX user guide.
Please note:
There are several ways of assigning an MSN to
ISDN extension systems. For more information
on this topic, please refer to the user guide
belonging to your extension system.
You cannot send or receive SMS messages
on PABXs that do not support Calling Line
Identification.
59
Page 61
Appendix
Faults and self-help with
troubleshooting
Care
¤ Wipe the base station, charging cradle
and the handset with a damp cloth (do
not use solvent) or an antistatic cloth.
Never use a dry cloth. This can cause
static.
Contact with liquid
If the handset should come into contact
with liquid:
1. Turn the handset off and remove the
batteries immediately.
2. Allow the liquid to drain from the handset.
3. Pat all parts dry, then place the handset
with the battery compartment open
and the keypad facing down in a dry,
warm place for at least 72 hours (not
in a microwave, oven etc.).
4. Do not switch on the handset again
until it is completely dry.
When it has fully dried out, you will normally be able to use it again.
!
Not every problem signifies a fault in your
telephone. In some cases, problems can
be resolved by briefly interrupting the
power supply to the base station (unplug
the power supply unit and then plug it in
again) or removing the battery cells from
the handset and reinserting them. The following information is designed to help
you with specific problems.
Important: Some problems or faults can
only be resolved if you take the complete
device (base station, handset and connection cable) to the place of purchase.
Registration or connection problems with a
Bluetooth headset
¥ The A2DP standard (Advanced Audio
Distribution Profile) is not supported.
¥ Reset the Bluetooth headset (see the user
guide for your headset).
¥ Delete registration data from the handset
when deregistering the device
(see page 52).
¥ Repeat the registration process
(see page 52).
The display is blank.
1. The handset is not switched on.
¥ Press and hold the end call key a.
2. The batteries are flat.
¥ Charge or replace the batteries (page 8).
"Fault!" or "Not possible!" appears in the display.
ISDN jack may not be plugged in.
£ Plug in the ISDN jack.
The keys of a handset do not respond when
pressed.
The keypad lock is activated.
¥ Press and hold the hash key
(page 11).
#
60
Page 62
"Base station x" flashes on the display.
1. The handset is outside the range of the
base station.
¥ Move the handset closer to the base sta-
tion.
The base station's range is reduced because
eco range is activated.
¥ Deactivate eco range (page 13) or
reduce the distance between the handset and the base station.
2. The handset has been deregistered.
¥ Register the handset (page 39).
3. The base station is not turned on.
¥ Check the base station's mains adapter
(page 8).
"Base Search" flashes in the display.
The handset is set to Best Base and no base station is turned on or within range.
¥ Move the handset closer to the base sta-
tion.
¥ Check the base station's mains adapter
(page 8).
Handset does not ring.
1. The ringer is deactivated.
¥ Activate the ringer (page 47).
2. Call diversion set to All Calls.
¥ Deactivate call diversion (page 56).
3. MSN is not assigned to internal subscriber
or is incorrect.
¥ Specify receive MSN (page 54).
The handset does not ring as set.
The MSN is assigned a different ringer tone.
¥ Set the external ringer on the handset
(page 46).
Handset does not ring after setting up the
ISDN phone number (MSN).
The area prefix has been stored with the MSN.
£ Save MSN without area code.
Some of the ISDN functions do not work as
specified.
ISDN functions are not enabled.
£ Check with your network provider.
You cannot hear a ringer/dialling tone from
the fixed line network.
ISDN cable may be faulty.
¥ Replace ISDN cable.
Error tone sounds after system PIN prompt
You have entered the wrong system PIN.
¥ Reset the system PIN to 0000 (page 57).
Forgotten the system PIN.
¥ Reset the system PIN to 0000 (page 57).
Call charges are not displayed.
1. Your network provider does not support
this feature.
2. There are no units.
¥ The units (0.10) are not transferred.
3. Charges per unit are set to "00.00".
¥ Set the charge per unit (page 30).
¥ A fee factor of CHF 0.10 is automatically
transferred in the Swisscom ISDN network.
The other party cannot hear you.
You have pressed the
set is "muted".
u (INT) key. The hand-
¥ Activate the microphone again (page 19).
The number of the caller is not displayed
despite CLIP.
Calling Line Identification is not enabled.
¥ CLIP does not work.
You hear an error tone when keying an
input
(a descending tone sequence).
Action has failed/invalid input.
¥ Repeat the operation.
Watch the display and refer to the user
guide if necessary.
For call diversion, the divert conditions are
not displayed.
Internal call diversion is activated.
¥ Activate external call diversion.
¥ Ask your network provider to enable this
feature.
You cannot listen to messages on the network mailbox.
Your PABX is set for dial pulsing.
¥ Set your PABX to touch tone dialling.
61
Page 63
Warranty/Maintenance/Repair/
Approval
Warranty
The warranty period is 2 years as of the
date of purchase. For warranty repair, the
warranty card, filled out and stamped by
the place of purchase must accompany
the faulty device. Excluded from the warranty are damages due to improper use,
wear and tear or tampering by others. The
warranty does not include consumable
materials and faults that have only an
insignificant affect on the value or usability of the product. In case of errors, please
contact your place of purchase.
Repair/Maintenance
If Technical Assistance is made available
(also during the warranty period
fault action is charged (route lump sum
price as well as expenses for time). The
repair costs are additional outside the warranty period.
*
)), the
Batteries
Battery cells are considered consumed
material, which is not covered by the warranty service. Faulty batteries are not
replaced free of charge. This applies to
rented as well as purchased devices.
Help
If you have any general questions about
products, services etc., please contact
your Swisscom Information Centre
(toll-free number 0800 800 800).
Rental devices
If your phone does not operate properly,
notify Technical Assistance (phone
number 0800 800 800).
The repair
charge.
*
and the fault action are free of
Purchased devices
Repair services are performed free of
charge within the warranty period in
accordance with the regulation of the
warranty certificate. If a repair is necessary, the device must be returned to the
place of purchase.
* An exception is damage to wearing parts
(cable, labels, batteries etc.) and due to
improper handling (damage from dropping,
infiltrated fluids etc.).
Approval
This device is intended to be operated on
the Swiss ISDN network.
Country-specific requirements have been
taken into consideration.
Swisscom hereby declare that this device
meets the essential requirements and
other relevant regulations laid down in
Directive 1999/5/EC.
The Declaration of Conformity can be found on
the following website:
www.swisscom.com
under the heading "Online Shop", Telephones,
Conformity Declaration.
Bluetooth ò Qualified Design Identity
The Bluetooth QD ID for your Aton CL308
is: B012741.
62
Page 64
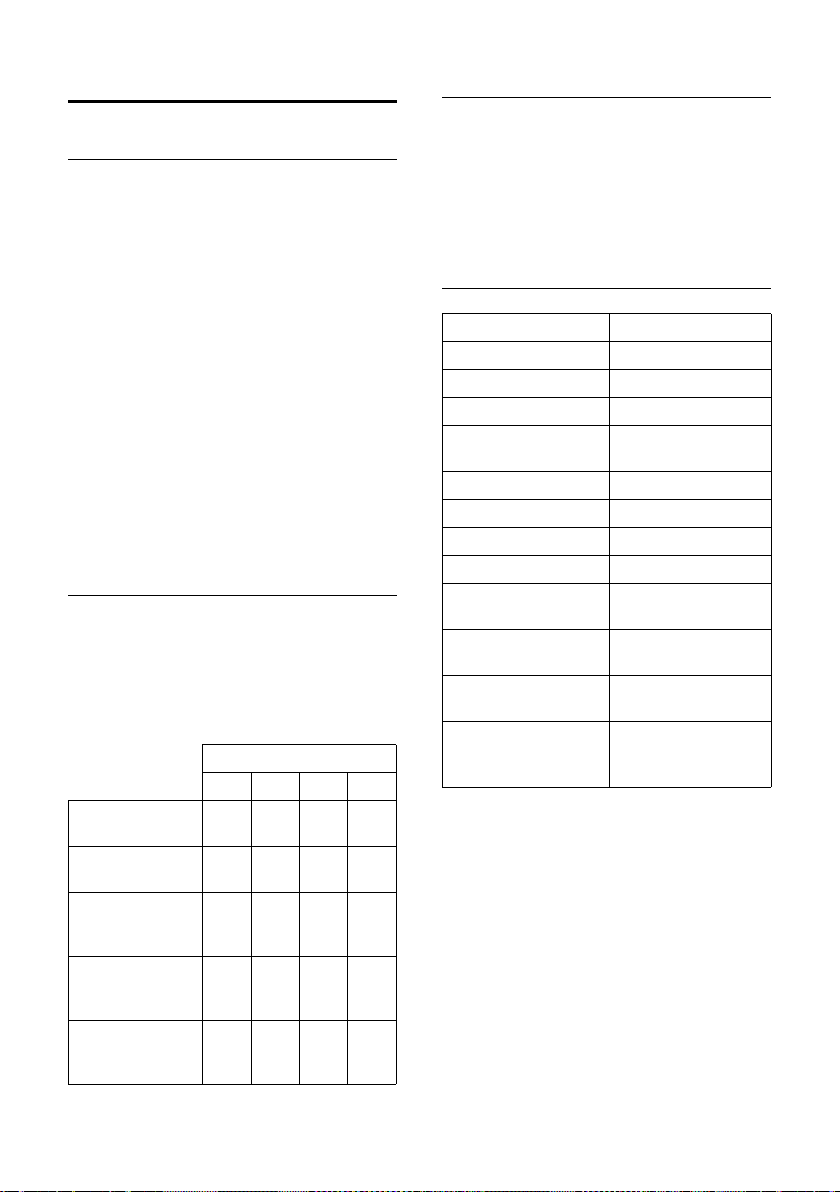
Specifications
Recommended batteries
Technology:
Nickel-metal-hydride (NiMH)
Size: AAA (Micro, HR03)
Voltage: 1.2 V
Capacity: 600–1200 mAh
We recommend the following battery
types, because these are the only ones
that guarantee the specified operating
times, full functionality and long service
life:
u Sanyo NiMH 800
u GP 850 mAh
u Yuasa Technologies AAA 800
The device is supplied with two recommended batteries.
Handset operating times/charging times
The operating time of your phone
depends on the capacity and age of the
batteries and the way they are used. (All
times are maximum possible times and
apply when the display backlight is
switched off).
Capacity (mAh)
600 800 1000 1200
Standby time
(hours)
Talktime
(hours)
Operating time for
1.5 hrs of calls per
day (hours)
Charging time,
charging cradle
(hours)
Charging time,
base station
(hours)
130 180 220 265
7 101214
70 90 115 135
691113
57810
Base station power consumption
Base station power consumption
In standby mode
– Handset in charging cradle
– Handset outside charging
cradle
During a call approx. 1.5 W
approx. 1.6 W
approx. 1.3 W
General specifications
DECT standard is supported
GAP standard is supported
No. of channels 60 duplex channels
Radio frequency range 1880–1900 MHz
Duplex method Time multiplex,
Channel grid 1728 kHz
Bit rate 1152 kbit/s
Modulation GFSK
Language code 32 kbit/s
Transmission power 10 mW, average
Range up to 250 m outdoors,
Base station
power supply 230 V ~/50 Hz
Environmental conditions in operation
10 ms frame length
power per channel
up to 40 m indoors
+5 °C to +45 °C;
20% to 75% relative
humidity
63
Page 65
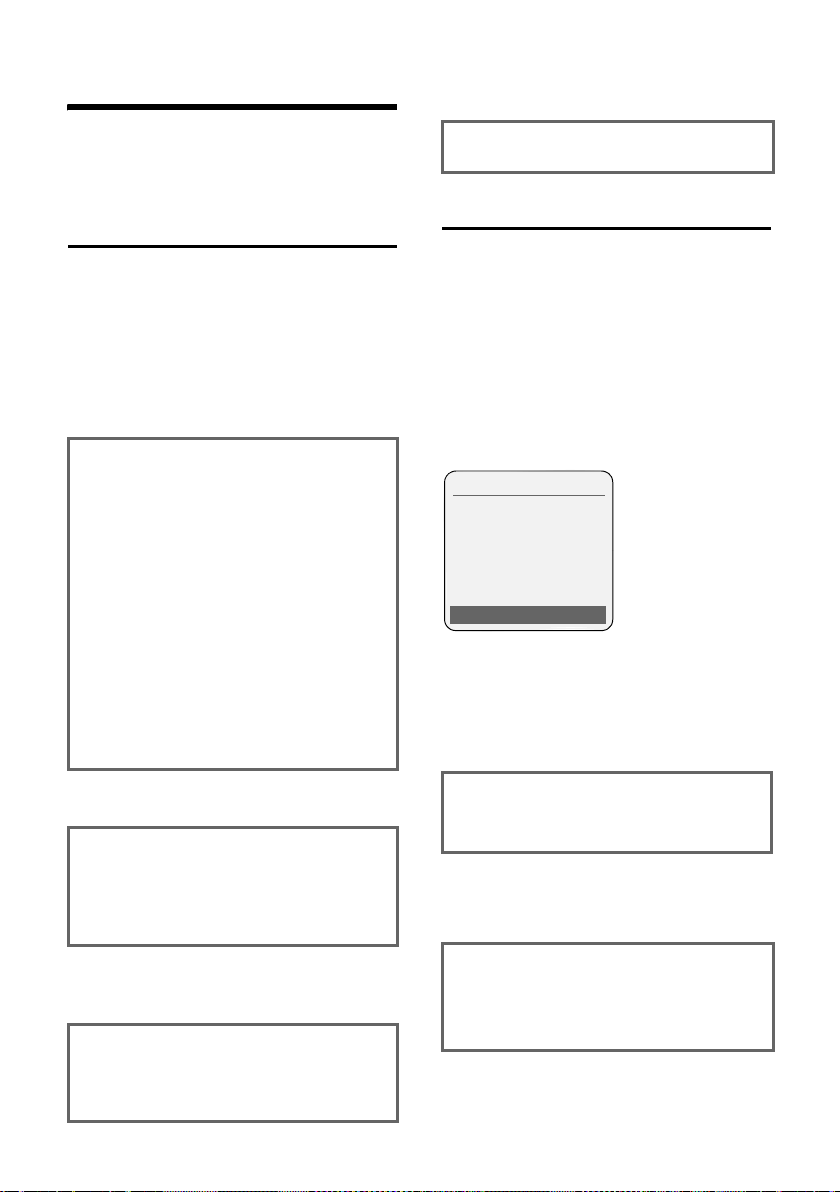
Notes on the user guide
This section explains the meaning of certain typographical conventions that are
used in this user guide.
a Press and hold (idle status).
¤ Press and hold the end call key until the
handset returns to idle status.
Example of a menu input
The steps you need to perform are shown
in abbreviated form in the user guide. This
is illustrated below using the example of
"Setting the contrast for the display". The
things you have to do are explained in the
boxes.
¢ Ð ¢ Display
v
¤ With the handset in idle status, press
on the right of the control key (v) to
open the main menu.
¤ With the q/r control key, select the
Ð icon.
Settings appears in the display header.
¤ Press the §OK§ display key to confirm the
Settings function.
The Settings submenu is displayed.
¤ Press on the bottom of control key q
repeatedly until the Display menu function is selected.
¤ Press v or press the display key §OK§ to
confirm the selection.
Contrast Select and press
§OK§.
¤ Press on the bottom of control key q
repeatedly until the Contrast menu
function is selected.
¤ Press v or press the display key §OK§ to
confirm the selection.
r Select contrast and press the
display key
§Save§.
¤ Press on the right or left of the control
key to set the contrast.
¤ Press the display key §Save§ to confirm
the selection.
Example of multiple line input
In many situations you can change settings or enter data in several lines of a display.
In this user guide, icons are used to guide
you step by step through multiple line
input. This is illustrated below using the
example of "Setting the date and time".
The things you have to do are explained in
the boxes.
You will see the following in the display
Date/Time
Date:
[15.11.2007]
Time:
11: 11
Ý Save
(example):
Date:
Enter the day, month and year in 8digit format.
The second line is marked with [ ] to
show it is active.
¤ Enter the date using the digit keys.
Time:
Enter hours/minutes in 4-digit format.
¤ Press the s key.
The four th line is marked with [ ] to show
it is active.
¤ Enter the date using the digit keys.
64
Page 66

¤ Save the changes.
¤ Press the display key §Save§.
¤ Then press and hold the a key.
The handset switches to idle status.
Writing and editing text
The following rules apply when writing
text:
u Control the cursor with u v t s.
u Characters are inserted to the left of
the cursor.
u Press the star key
of special characters. Select the
required character, press the display
§Insert§ to insert the character at the
key
cursor position.
u The first letter of the name of directory
entries is automatically capitalised, followed by lower case letters.
Writing an SMS/name (without predictive text)
Press the relevant key several times to
enter the corresponding letters/characters.
to show the table
*
When you press and hold a key, the characters of that key appear in the display and
are highlighted one after the other. When
you release the key, the highlighted character is inserted into the input field.
Setting upper/lower case or digits
Press the hash key # briefly to switch
from "Abc" mode to "123" and from "123"
to "abc" and from "abc" to "Abc" (upper
case: 1st letter upper case, all others lower
case). Press the hash key # before
entering the letter.
You can see in the display whether upper
case, lower case or digits is selected.
Standard characters
1x 2x 3x 4x 5x 6x 7x 8x 9x 10x
2)
1)
1
2 abc2дбавгз
3 def 3ëéèê
4 gh i4ïíìî
5 jkl5
L mno6цсутфх
M pqr s7ß
N tuv8üúùû
O wxy z 9 ÿ ýæøå
Q .,?!0
1) Space
2) Line break
65
Page 67
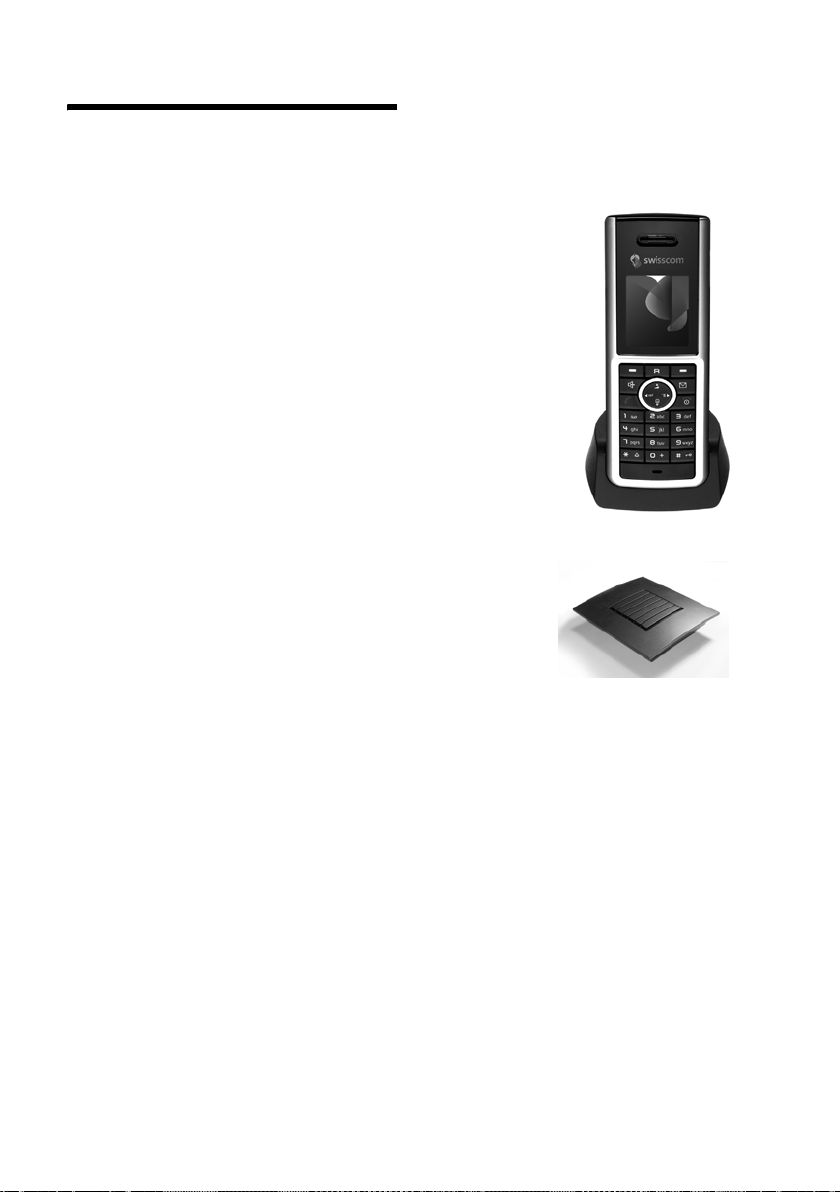
Accessories
Handsets
Upgrade your device to a cordless PABX:
Aton CLx308 handset with charging cradle
u Illuminated graphical colour display (65k colours)
u Illuminated keypad
u Handsfree talking
u Polyphonic ringer tones
u Directory for around 250 entries
u Picture CLIP
u SMS (precondition: CLIP must be enabled)
u Headset socket incl. headset
u Bluetooth
u Room monitor
RTX 4002 Repeater
The repeater can be used to increase the reception range
from your handset to the base station.
All accessories and batteries are available from your phone retailer.
Only use original accessories. This will avoid possible health risks and damage to property,
and also ensure that all the relevant regulations are complied with.
66
Page 68
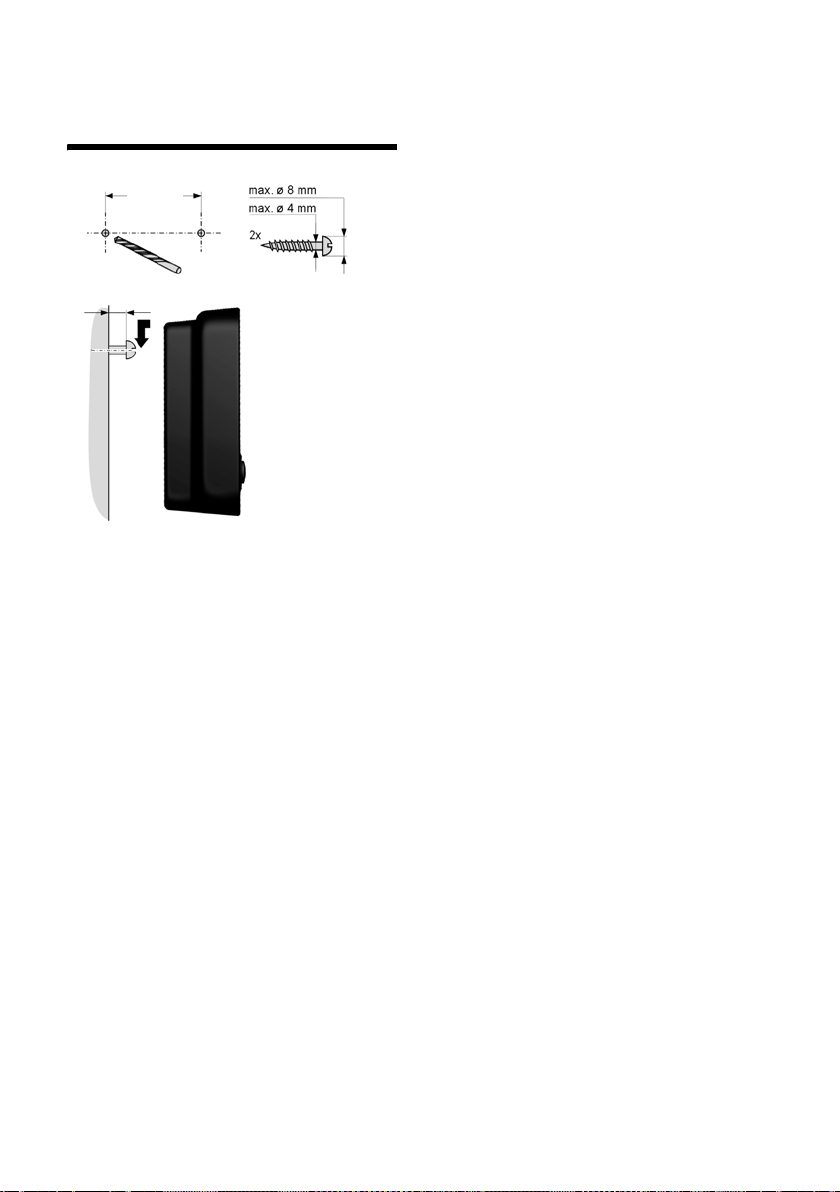
Mounting the base station to the wall
100 mm
approx. 9 mm
67
Page 69

Index
A
Access code. . . . . . . . . . . . . . . . . . . . 58
for a PABX
Access protection
Accessories
Acknowledge tones
Activating
advisory tones
appointment
Bluetooth mode
call acceptance
call waiting
handset
identify caller
keypad lock
muting ringer
room monitor
Advisory tones
Alarm clock
Alert tone
Anniversary
deactivating
missed
saving in directory
Appendix, see Attachment
Appointment
Appointment/anniversary
display missed
Appointments
activating/deactivating
deleting
managing
Approval
Area code
setting own area code
Assigning
key
number (MSN)
numerical keys
receive MSN
send MSN
Attachment (SMS)
Automatic
call acceptance
last number redial
. . . . . . . . . . . . . . . . . . . 58
. . . . . . . . . . . . . . . . 57
. . . . . . . . . . . . . . . . . . . . 66
. . . . . . . . . . . . . . 49
. . . . . . . . . . . . . . . . 49
. . . . . . . . . . . . . . . . . 50
. . . . . . . . . . . . . . . 51
. . . . . . . . . . . . . . . . 45
. . . . . . . . . . . . . . . . . . . 55
. . . . . . . . . . . . . . . . . . . . . 11
. . . . . . . . . . . . . . . . . 21
. . . . . . . . . . . . . . . . . . 11
. . . . . . . . . . . . . . . . . 47
. . . . . . . . . . . . . . . . . 42
. . . . . . . . . . . . . . . . . . 49
. . . . . . . . . . . . . . . . . . . . 49
. . . . . . . . . . . . . . . . . . . . . 47
. . . . . . . . . . . . . . . . . . . . 26
. . . . . . . . . . . . . . . . . . 27
. . . . . . . . . . . . . . . . . . . 27, 51
. . . . . . . . . . . . . 26
. . . . . . . . . . . . . . . . . . . 50
. . . . . . . . . . . . . . . . 51
. . . . . . . . . . 50
. . . . . . . . . . . . . . . . . . . . . 50
. . . . . . . . . . . . . . . . . . . . 50
. . . . . . . . . . . . . . . . . . . . . . 62
. . . . . . . . . . . 53
. . . . . . . . . . . . . . . . . . . . . . . . . 43
. . . . . . . . . . . . . . . . 54
. . . . . . . . . . . . . . . . 43
. . . . . . . . . . . . . . . . . . 54
. . . . . . . . . . . . . . . . . . . . 55
. . . . . . . . . . . . . . . 35
. . . . . . . . . . . . . 18, 45
. . . . . . . . . . . . . . 27
B
Base station
best base station
changing
connecting
connecting and installing
connecting to PABX
power consumption
. . . . . . . . . . . . . . . . . . . . . . . 7
range
restoring to factory settings
. . . . . . . . . . . . . . . . . . 14, 57
setting
setting up
system PIN
Battery
charging
display
icon
inserting
recommended batteries
tone
Birthday, see Anniversary
Bluetooth
accepting a call
changing device name
deregistering devices
list of known devices
registering devices
transferring directory
Bluetooth connection
setting own area code
Busy on Busy
. . . . . . . . . . . . . . . . . . . 1, 9
. . . . . . . . . . . . . . . . . . . . 1, 9
. . . . . . . . . . . . . . . . . . . . . . 1, 9
. . . . . . . . . . . . . . . . . . . . . . . 49
(vCard)
. . . . . . . . . . . . . . 40
. . . . . . . . . . . . . . . . . . . . 40
. . . . . . . . . . . . . . . . . . . 8
. . . . . . . . . 7
. . . . . . . . . . . . 58
. . . . . . . . . . . . 63
. . . . . . 57
. . . . . . . . . . . . . . . . . . . 13
. . . . . . . . . . . . . . . . . . 57
. . . . . . . . . . . . . . . . . . . . . 8
. . . . . . . . . 63
. . . . . . . . . . . . . . . 18
. . . . . . . 52, 53
. . . . . . . . . . . 52
. . . . . . . . . . . 52
. . . . . . . . . . . . . 52
. . . . . . . . . . . . . . . . . . 26
. . . . . . . . . . 53
. . . . . . . . . . . . . . . . . . 55
C
Calendar. . . . . . . . . . . . . . . . . . . . . . 50
Call
accepting
accepting (Bluetooth)
call acceptance
call duration
call duration/units
diversion
ending
external
internal
rejecting
transferring
transferring (connecting)
. . . . . . . . . . . . . . . . . . . 18
. . . . . . . . . . . 18
. . . . . . . . . . . . . . . 45
. . . . . . . . . . . . . . . . . 18
. . . . . . . . . . . . . 30
. . . . . . . . . . . . . . . . . . . . 56
. . . . . . . . . . . . . . . . . . . . . 18
. . . . . . . . . . . . . . . . . . . . . 18
. . . . . . . . . . . . . . . . . . . . . 40
. . . . . . . . . . . . . . . . . . . . 18
. . . . . . . . . . . . . . . . . . 23
. . . . . 40, 41
68
Page 70

Call waiting
accepting
activating/deactivating
internal call
rejecting
Calling
external
internal
Calling Line Identification
withholding
withholding for all calls
Calls list
Care of the telephone
CCBS
CCNR
. . . . . . . . . . . . . . . . . . . . . . . . . . . 56
CF
Changing
destination number
device name (Bluetooth)
display language
earpiece volume
handsfree volume
internal number of a handset
name of a handset
ringer
system PIN
Character set
Charge status display
Charges for a call
CLI, CLIP
CLIP picture
. . . . . . . . . . . . . . . . . . . . . . . 20, 55
CLIR
Conference
internal
Configuring the Network mailbox
Confirmation tone
Connecting, base station to PABX
Consultation call
internal
internal/external
Control key
Correcting incorrect entries
Customer Care
Customer service
. . . . . . . . . . . . . . . . . . . . . . . 23, 55
CW
. . . . . . . . . . . . . . . . . . . . 23
. . . . . . . . . . 55
. . . . . . . . . . . . . . . . . . 41
. . . . . . . . . . . . . . . . . . . . . 23
. . . . . . . . . . . . . . . . . . . . . 18
. . . . . . . . . . . . . . . . . . . . . 40
. . . . . . . 18, 19
. . . . . . . . . . . . . . . . . . 20
. . . . . . . . . . 55
. . . . . . . . . . . . . . . . . . . . . . . 28
. . . . . . . . . . . . 60
. . . . . . . . . . . . . . . . . . . . . . . . . 20
. . . . . . . . . . . . . . . . . . . . . . . . . 20
. . . . . . . . . . . . 43
. . . . . . 52, 53
. . . . . . . . . . . . . . . 44
. . . . . . . . . . . . . . . 46
. . . . . . . . . . . . . . 46
. . . . . 41
. . . . . . . . . . . . . 41
. . . . . . . . . . . . . . . . . . . . . . . 46
. . . . . . . . . . . . . . . . . . . 57
. . . . . . . . . . . . . . . . 33, 35
. . . . . . . . . . . . . .1
. . . . . . . . . . . . . . . . 30
. . . . . . . . . . . . . . . . . . . . . . 19
. . . . . . . . . . . . . . 19, 24, 48
. . . . . . . . . . . . . . . . . . . . 23
. . . . . . . . . . . . . . . . . . . . . 40
. . . . . . . . . . . . . . . 49
. . . . . . . . . . . . . . . . . . . . . 40
. . . . . . . . . . . . . . . 22
. . . . . . . . . . . . . . . . . . 1, 11
. . . . . . . . 13
. . . . . . . . . . . . . . . . . . 62
. . . . . . . . . . . . . . . . 62
D
Deactivating
advisory tones
appointment
. . . . . . . . . . . . . . . . 49
. . . . . . . . . . . . . . . . . 50
. . . . 38
. . . . 58
appointment reminder. . . . . . . . . . 50
call acceptance
call waiting
handset
keypad lock
muting ringer
room monitor
Delete key
Deleting
characters
. . . . . . . . . . . . . . . . . . . . . . . 54
MSN
Deregistering (handset)
Deregistering devices (Bluetooth)
Destination number (room monitor)
Determining an MSN
Dialling
directory
quick dial
with quick dial
Directory
Display
Display keys
Diverting (calls)
Draft message list (SMS)
. . . . . . . . . . . . . . . . . . . . . 24
copying number from text
managing entries
opening
order of entries
saving anniversary
saving entry
saving the sender’s number
(SMS)
sending entry/list to handset
transferring a vCard (Bluetooth)
using to enter numbers
backlight
changing display language
contrast
in idle status
memory (directory)
memory (My stuff)
missed appointments/
anniversaries
network mailbox report
number (CLI/CLIP)
screensaver
. . . . . . . . . . . . . . . . . . . . . 45
setting
wrong language
assigning
. . . . . . . . . . . . . . . 45
. . . . . . . . . . . . . . . . . . 55
. . . . . . . . . . . . . . . . . . . . . 11
. . . . . . . . . . . . . . . . . . 11
. . . . . . . . . . . . . . . . 47
. . . . . . . . . . . . . . . . 43
. . . . . . . . . . . . . . . . . . 11, 12
. . . . . . . . . . . . . . . . . . . 13
. . . . . . . . . . . 39
. . . 52
. . . . . . . . . . . . . 14
. . . . . . . . . . . . . . . . . . . . 25
. . . . . . . . . . . . . . . . . . . . 43
. . . . . . . . . . . . . . . . 25
. . . . . . . 26
. . . . . . . . . . . . . . 25
. . . . . . . . . . . . . . . . . . . . 11
. . . . . . . . . . . . . . . 24
. . . . . . . . . . . . . 26
. . . . . . . . . . . . . . . . . 24
. . . . . . . . . . . . . . . . . . . 34
. . . . . 25
. . . 26
. . . . . . . . . 26
. . . . . . . . . . . . . . . . . . . . 45
. . . . . . . 44
. . . . . . . . . . . . . . . . . . . . . 45
. . . . . . . . . . . . . . . . . 12
. . . . . . . . . . . . 25
. . . . . . . . . . . . 48
. . . . . . . . . . . . . . 51
. . . . . . . . . 38
. . . . . . . . . . 18, 19
. . . . . . . . . . . . . . . . . . 45
. . . . . . . . . . . . . . 44
. . . . . . . . . . . . . . . . . 1, 11
. . . . . . . . . . . . . . . . . . . . 43
. . . . . . . . . . . . . . . . 56
. . . . . . . . . . 32
. 42
69
Page 71

E
Earpiece mode. . . . . . . . . . . . . . . . . .19
Earpiece volume
Eco range
E-mail address
copying from the directory
End call key
Ending, call
Ending, see Deactivate
Entry
saving (network mailbox)
selecting (menu)
selecting from directory
Error tone
Example
menu input
multiple line input
. . . . . . . . . . . . . . . . 46
. . . . . . . . . . . . . . . . . . . . . 13
. . . . . . . . . . . . . . . . . . 33
. . . . . . . 26
. . . . . . . . . . . . . . . . . . 1, 18
. . . . . . . . . . . . . . . . . . . . 18
. . . . . . . . 38
. . . . . . . . . . . . . . 64
. . . . . . . . . 25
. . . . . . . . . . . . . . . . . . . . . 49
. . . . . . . . . . . . . . . . . . 64
. . . . . . . . . . . . . 64
F
Fast access
network mailbox
Fax (SMS)
. . . . . . . . . . . . . . . . . . . . . 33
. . . . . . . . . . . . . . . 38
G
Group call . . . . . . . . . . . . . . . . . . . . . 40
H
Handset
activating/deactivating
advisory tones
changing internal number
changing name
changing the number
changing to a different
base station
changing to best reception
contact with liquid
deregistering
display backlight
display language
earpiece volume
handsfree volume
idle status
. . . . . . . . . . . . . . . . . . . . . . . . . 11
list
locating
muting
. . . . . . . . . . . . . . . . 49
. . . . . . . . . . . . . . . . . 39
. . . . . . . . . . . . . . . . . . . 12
. . . . . . . . . . . . . . . . . . . . . 39
. . . . . . . . . . . . . . . . . . . . . . 19
. . . . . . . . . . 11
. . . . . . . . 41
. . . . . . . . . . . . . . . 41
. . . . . . . . . . . 41
. . . . . . . . . . . . . . . 40
. . . . . . . 40
. . . . . . . . . . . . . 60
. . . . . . . . . . . . . . . 45
. . . . . . . . . . . . . . . 44
. . . . . . . . . . . . . . . 46
. . . . . . . . . . . . . . 46
paging . . . . . . . . . . . . . . . . . . . . . 39
registering
registering to a different
restoring to factory settings
screensaver
setting
setting up
signal strength
transferring a call
using room monitor
using several
Handset operating time
in room monitor mode
Handsfree key
Handsfree talking
Hash key
Headset socket
Hearing aids
. . . . . . . . . . . . . . . . 10, 39
base station
. . . . . . . . . . . . . . 40
. . . . . . 53
. . . . . . . . . . . . . . . . . . 45
. . . . . . . . . . . . . . . . . . . . . 43
. . . . . . . . . . . . . . . . . . . . 8
. . . . . . . . . . . . . . . . . 7
. . . . . . . . . . . 23, 40
. . . . . . . . . . . . 42
. . . . . . . . . . . . . . . . . 39
. . . . . . . . . . 42
. . . . . . . . . . . . . . . . . . . 1
. . . . . . . . . . . . . . . 19
. . . . . . . . . . . . . . . . . . . . 1, 11
. . . . . . . . . . . . . . . . . . 9
. . . . . . . . . . . . . . . . . . . . 5
I
Icon
alarm clock
battery
display
for new messages
keypad lock
new SMS
ringer
Idle status
display
returning to
Incoming message list (SMS)
Incorrect input (correction)
Input language (SMS)
Installation assistant
MSN
Installing, base station
Internal
conference
consulting
making calls
Internal call
call waiting
ISDN numbers, see MSN
ISDN settings
. . . . . . . . . . . . . . . . . . 49
. . . . . . . . . . . . . . . . . . . . . . 9
. . . . . . . . . . . . . . . . . . . . . 11
. . . . . . . . . . . . . 28
. . . . . . . . . . . . . . . . . . 11
. . . . . . . . . . . . . . . . . . . . 34
. . . . . . . . . . . . . . . . . . . . . . 47
. . . . . . . . . . . . . . . . . . . . . 12
. . . . . . . . . . . . . . . . . . 12
. . . . 33, 34
. . . . . . . . 13
. . . . . . . . . . . . 32
. . . . . . . . . . . . . 13
. . . . . . . . . . . . . . . . . . . . . . . 15
. . . . . . . . . . . . 7
. . . . . . . . . . . . . . . . . . 40
. . . . . . . . . . . . . . . . . . . 40
. . . . . . . . . . . . . . . . . 40
. . . . . . . . . . . . . . . . . . . . 40
. . . . . . . . . . . . . . . . . . 41
. . . . . . . . . . . . . . . . . . 54
70
Page 72

K
Key 1 (fast access) . . . . . . . . . . . . . . . .1
Keypad lock
Keys
control key
delete key
display keys
end call key
fast access
handsfree key
hash key
message key
on/off key
quick dial
recall key
star key
talk key
. . . . . . . . . . . . . . . . . . . . 11
. . . . . . . . . . . . . . . . . 1, 11
. . . . . . . . . . . . . . . . . 11, 12
. . . . . . . . . . . . . . . . 1, 11
. . . . . . . . . . . . . . . . 1, 18
. . . . . . . . . . . . . . . . . . . .1
. . . . . . . . . . . . . . . . . .1
. . . . . . . . . . . . . . . . . . . 1, 11
. . . . . . . . . . . . . . . . . . .1
. . . . . . . . . . . . . . . . . . . . .1
. . . . . . . . . . . . . . . . . . . . 25
. . . . . . . . . . . . . . . . . . . . .1
. . . . . . . . . . . . . . . . . . . . . .1
. . . . . . . . . . . . . . . . . . . 1, 18
L
Language, display . . . . . . . . . . . . . . . 44
Last number redial
Linking, see SMS
. . . . . . . . . . . . . . . . . . . . . . . . 60
Liquid
List
calls list
handsets
known devices (Bluetooth)
missed calls
network mailbox
SMS draft message list
SMS incoming message list
SMS list
Locating, handset
Lock
activating/deactivating keypad lock
. . . . . . . . . . . . . . . . . . . . . 28
. . . . . . . . . . . . . . . . . . . . . 28
. . . . . . . . . . . . . . . 27
. . . . . . . . . . . . . . . . . . . . 11
. . . . . . . 52
. . . . . . . . . . . . . . . . . . 29
. . . . . . . . . . . . . . . 28
. . . . . . . . . . 32
. . . . . . . 34
. . . . . . . . . . . . . . . 39
. 11
M
Mains adapter . . . . . . . . . . . . . . . . . . . 5
Making calls
answering a call
cost-effective calls
external
internal
multiple participants
Manual last number redial
Medical appliances
Memory
directory
My stuff
. . . . . . . . . . . . . . . . . . . . . 18
. . . . . . . . . . . . . . . . . . . . . 40
. . . . . . . . . . . . . . . 18
. . . . . . . . . . . . . 30
. . . . . . . . . . . . 22
. . . . . . . . . 27
. . . . . . . . . . . . . . . .5
. . . . . . . . . . . . . . . . . . . . 25
. . . . . . . . . . . . . . . . . . . . . 48
Menu
end tone
menu guidance
menu input
opening
overview
Message key
open list
opening lists
Microphone
Missed
anniversary
appointment
calls
MSN
assigning number
deleting
determining
entering
receive MSN
send MSN
setting up
Multiple line input
Music on hold
setting
Muting
first ring
handset
My stuff
. . . . . . . . . . . . . . . . . . . . 49
. . . . . . . . . . . . . . . 12
. . . . . . . . . . . . . . . . . . 64
. . . . . . . . . . . . . . . . . . . . 11
. . . . . . . . . . . . . . . . . . . . 16
. . . . . . . . . . . . . . . . . . . . 1
. . . . . . . . . . . . . . . . . . . . 34
. . . . . . . . . . . . . . . . . 28
. . . . . . . . . . . . . . . . . . . . 1
. . . . . . . . . . . . . . . . . . 51
. . . . . . . . . . . . . . . . . 51
. . . . . . . . . . . . . . . . . . . . . . . 29
. . . . . . . . . . . . . 54
. . . . . . . . . . . . . . . . . . . . . 54
. . . . . . . . . . . . . . . . . 14
. . . . . . . . . . . . . . . . . . . . 15
. . . . . . . . . . . . . . . . . 15
. . . . . . . . . . . . . . . . . . . 15
. . . . . . . . . . . . . . . 64
. . . . . . . . . . . . . . . 19, 57
. . . . . . . . . . . . . . . . . . . . . 57
. . . . . . . . . . . . . . . . . . . . 47
. . . . . . . . . . . . . . . . . . . . . 19
. . . . . . . . . . . . . . . . . . . . . . 48
N
Name of a handset . . . . . . . . . . . . . . 41
Notification by SMS
Number
as destination for room monitor
assigning (MSN)
copying from an SMS text
copying from directory
copying to directory
displaying caller’s number
(CLIP)
entering network mailbox number
entering with directory
saving in the directory
suppressing display (CLIR)
. . . . . . . . . . . . . . 35
. . . 42
. . . . . . . . . . . . . . 54
. . . . . . . 34
. . . . . . . . . . 26
. . . . . . . . . . . . 26
. . . . . . . . . . . . . . . . 18, 19
. 38
. . . . . . . . . . 26
. . . . . . . . . . 24
. . . . . . . 55
O
On/Off key . . . . . . . . . . . . . . . . . . . . . 1
Order in directory
. . . . . . . . . . . . . . . 24
71
Page 73

P
PABX
connecting base station
saving access code
. . . . . . . . . . . . . . . . . . . . . . . . 36
SMS
Pack contents
Paging
Paging key
Picture
CLIP
deleting
renaming
PIN change
system PIN
Power consumption
base station
Protecting the phone against access
. . . . . . . . . . . . . . . . . . .7
. . . . . . . . . . . . . . . . . . . . . . . . 39
. . . . . . . . . . . . . . . . . . . . . .2
. . . . . . . . . . . . . . . . . . . . . 24, 48
. . . . . . . . . . . . . . . . . . . . . 48
. . . . . . . . . . . . . . . . . . . . 48
. . . . . . . . . . . . . . . . . . . 57
. . . . . . . . . . . . . . . . . . 63
. . . . . . . . . 58
. . . . . . . . . . . . . 58
. . . . . . . . . . . . . . 63
. . 57
Q
Questions and answers . . . . . . . . . . .60
Quick dial
. . . . . . . . . . . . . . . . . . 24, 43
R
Range . . . . . . . . . . . . . . . . . . . . . . . . . 7
Recall key
Receive MSN
assigning
setting
Reception booster, see Repeater
Registering
devices (Bluetooth)
handset
Registration key
Rejecting a call
Reminder call
Repeater
Ringback
accepting
activating
cancelling
checking
setting up when MSN busy
when busy/no reply
Ringer
changing
muting
setting melody
setting volume
Room monitor
. . . . . . . . . . . . . . . . . . . . . .1
. . . . . . . . . . . . . . . . . . . . 54
. . . . . . . . . . . . . . . . . . . . . . 15
. . . . . . . . . . . . . 52
. . . . . . . . . . . . . . . . . . 10, 39
. . . . . . . . . . . . . . . . . .2
. . . . . . . . . . . . . . . . . . 18
. . . . . . . . . . . . . . . . . . . 27
. . . . . . . . . . . . . . . . . . . . . . 57
. . . . . . . . . . . . . . . . . . . . 21
. . . . . . . . . . . . . . . . . . . . 20
. . . . . . . . . . . . . . . . . . . . 21
. . . . . . . . . . . . . . . . . . . . 21
. . . . . . . 55
. . . . . . . . . . . . 20
. . . . . . . . . . . . . . . . . . . . 46
. . . . . . . . . . . . . . . . . . . . . . 47
. . . . . . . . . . . . . . . . 46
. . . . . . . . . . . . . . . . 46
. . . . . . . . . . . . . . . . . . 42
S
Saving (access code) . . . . . . . . . . . . . 58
Screensaver
Searching in directory
Send MSN
assigning
determining
setting
Sending
directory entry to handset
Sensitivity (room monitor)
Setting
date
melody
screensaver
time
Setting up
base station
busy signal
handset
Shortcut
Signal strength
Signal tone, see Advisory tones
. . . . . . . . . . . . . . . . . . . . . . . . . 31
SMS
active send service centre
checking receive MSN
deleting
draft message list
forwarding
incoming message list
input language
linked
list
notification by SMS
notification number
notification type
reading
receiving
receiving vCard
replying to and forwarding
rules
saving number
self help with error messages
sending as a fax
sending to an e-mail address
status report
to a PABX
troubleshooting
. . . . . . . . . . . . . . . . . . . 45
. . . . . . . . . . . . 25
. . . . . . . . . . . . . . . . . . . . 55
. . . . . . . . . . . . . . . . . 20
. . . . . . . . . . . . . . . . . . . . . 15
. . . . . . . 25
. . . . . . . . . 42
. . . . . . . . . . . . . . . . . . . . . . . 10
. . . . . . . . . . . . . . . . . . . . . 46
. . . . . . . . . . . . . . . . . . 45
. . . . . . . . . . . . . . . . . . . . . . . 10
. . . . . . . . . . . . . . . . . . 13
. . . . . . . . . . . . . . . . . . 55
. . . . . . . . . . . . . . . . . . . . . . 8
. . . . . . . . . . . . . . . . . . . . . . 16
. . . . . . . . . . . . . . . . . . 7
. . . . . . . 31
. . . . . . . . . . 35
. . . . . . . . . . . . . . . . . . . . . 32
. . . . . . . . . . . . . 32
. . . . . . . . . . . . . . . . . . 34
. . . . . . . . . . 34
. . . . . . . . . . . . . . . 32
. . . . . . . . . . . . . . . . . . . . . . 31
. . . . . . . . . . . . . . . . . . . . . . . . 28
. . . . . . . . . . . . 35
. . . . . . . . . . . . 35
. . . . . . . . . . . . . . 36
. . . . . . . . . . . . . . . . . . . . . 32
. . . . . . . . . . . . . . . . . . . . 33
. . . . . . . . . . . . . . . 35
. . . . . . . 34
. . . . . . . . . . . . . . . . . . . . . . . 31
. . . . . . . . . . . . . . . . 34
. . . . . 37
. . . . . . . . . . . . . . . 33
. . . . . 33
. . . . . . . . . . . . . . . . . 32
. . . . . . . . . . . . . . . . . . . . 36
. . . . . . . . . . . . . . . 37
72
Page 74

using data (SMS) . . . . . . . . . . . . . .35
writing
SMS centre
changing number
setting
Snooze mode
Sound, see Ringer
Specifications
Star key
System settings
. . . . . . . . . . . . . . . . . . . 31, 65
. . . . . . . . . . . . . . 36
. . . . . . . . . . . . . . . . . . . . . . 36
. . . . . . . . . . . . . . . . . . . 49
. . . . . . . . . . . . . . . . . . 63
. . . . . . . . . . . . . . . . . . . . . . . .1
. . . . . . . . . . . . . . . . . 57
T
Tal k key . . . . . . . . . . . . . . . . . . . . . 1, 18
Text message, see SMS
Tog glin g
Tro ubl esho oti ng
. . . . . . . . . . . . . . . . . . . . . . 22
. . . . . . . . . . . . . . . . . 60
. . . . . . . . . . . . . . . . . . . . . . . . 37
SMS
U
Unknown . . . . . . . . . . . . . . . . . . . . . 19
. . . . . . . . . . . . . . . . . . . . . . . 19
caller
Using data (SMS)
. . . . . . . . . . . . . . . . 35
V
vCard
receiving
Viewing the network mailbox report
VIP (directory entry)
Volume
earpiece
earpiece volume
handset handsfree volume
loudspeaker
ringer
setting
. . . . . . . . . . . . . . . . . . . . 35
. . 38
. . . . . . . . . . . . . . 25
. . . . . . . . . . . . . . . . . . . . . 46
. . . . . . . . . . . . . . . 46
. . . . . . . 46
. . . . . . . . . . . . . . . . . . 46
. . . . . . . . . . . . . . . . . . . . . . . 46
. . . . . . . . . . . . . . . . . . . . . . 47
W
Warning tone, see Advisory tones
Withholding
Calling Line Identification
Writing
editing text
SMS
. . . . . . . . . . . . . . . . . . . 65
. . . . . . . . . . . . . . . . . . . . . . . . 31
. . . . . . . . 20
73
 Loading...