

Page 1
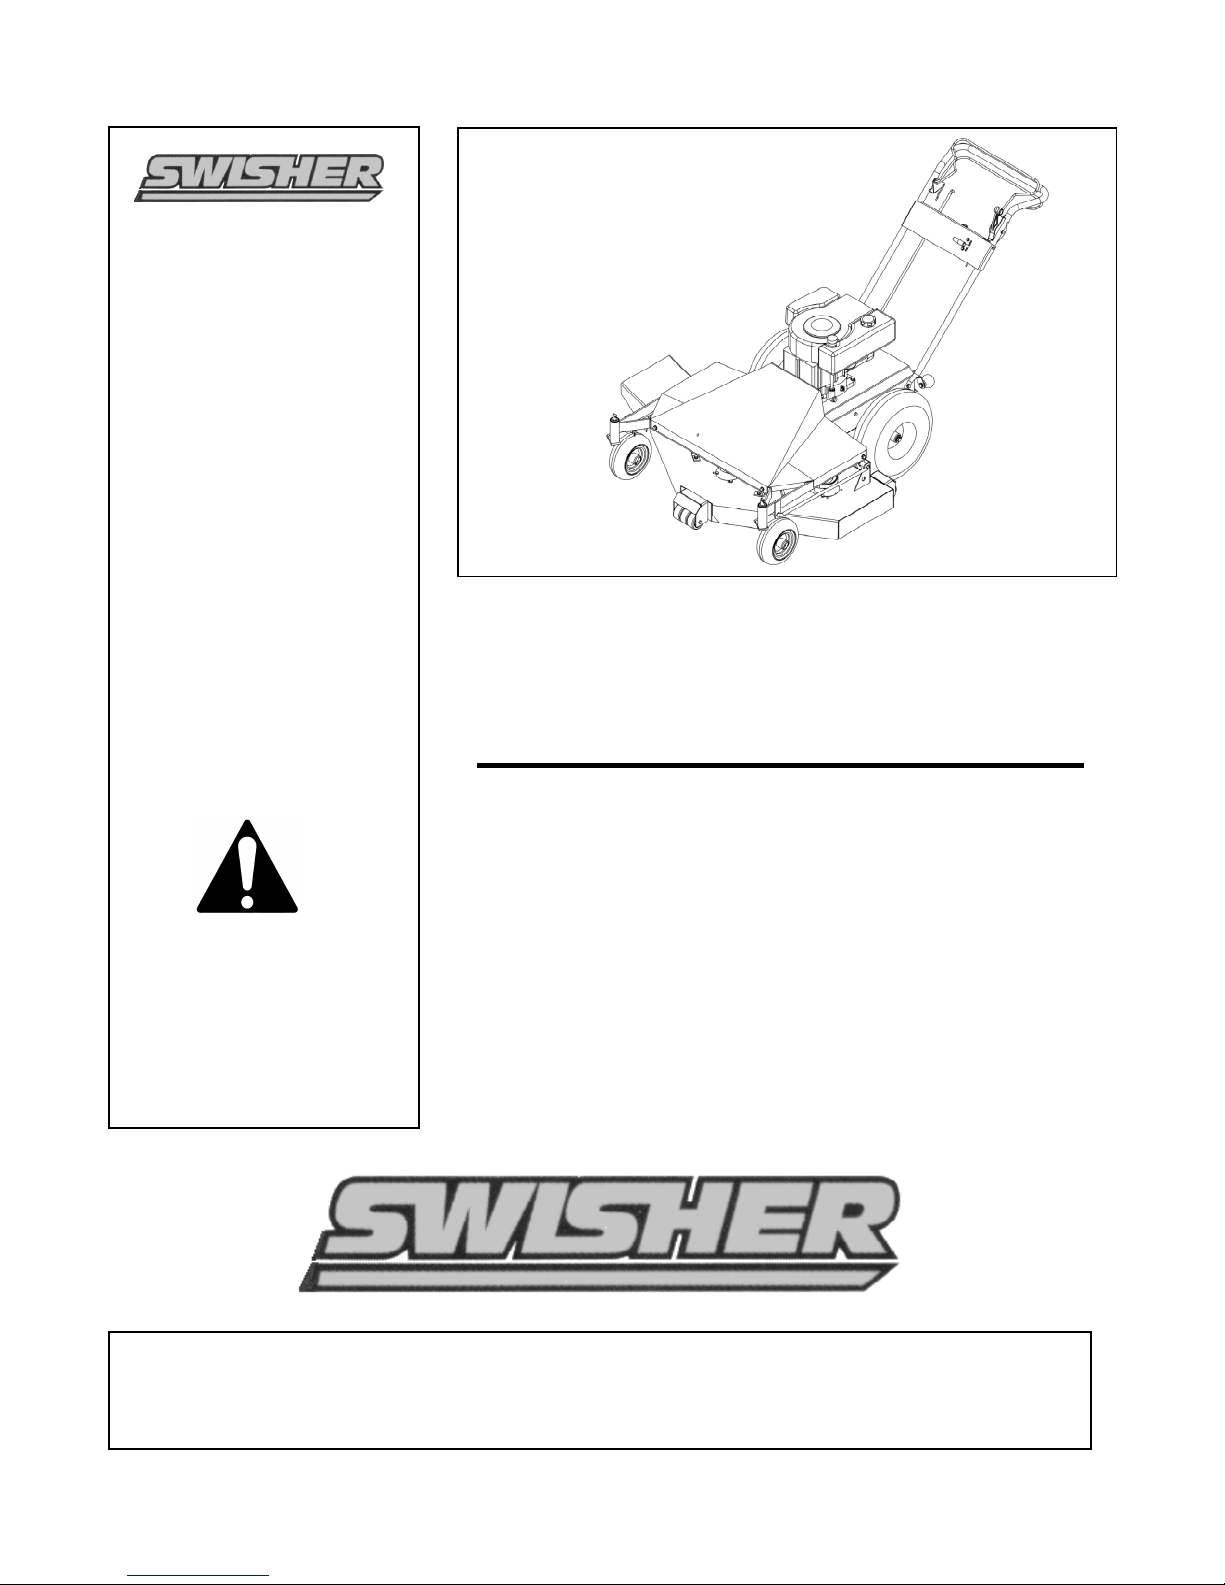
THE FINISHING TOUCH
42” FINISH CUT MOWER SELF PROPELLED
WALK BEHIND
OWNER’S
MANUAL
1602 CORPORATE DRIVE, P.O. BOX 67, WARRENSBURG, MISSOURI 64093
PHONE (660) 747-8183 FAX (660) 747-8650
MODEL NO.
Manufacturing quality lawn care equipment since 1945
Assembly
Operation
Service and Adjustment
Repair Parts
Made In The
USA
Rev. 12.18.2002
Read and follow all Safety
Rules and Instructions
before operating this
equipment.
WB80042F
Visit us at: www.swisherinc.com
ONWB842
Page 2
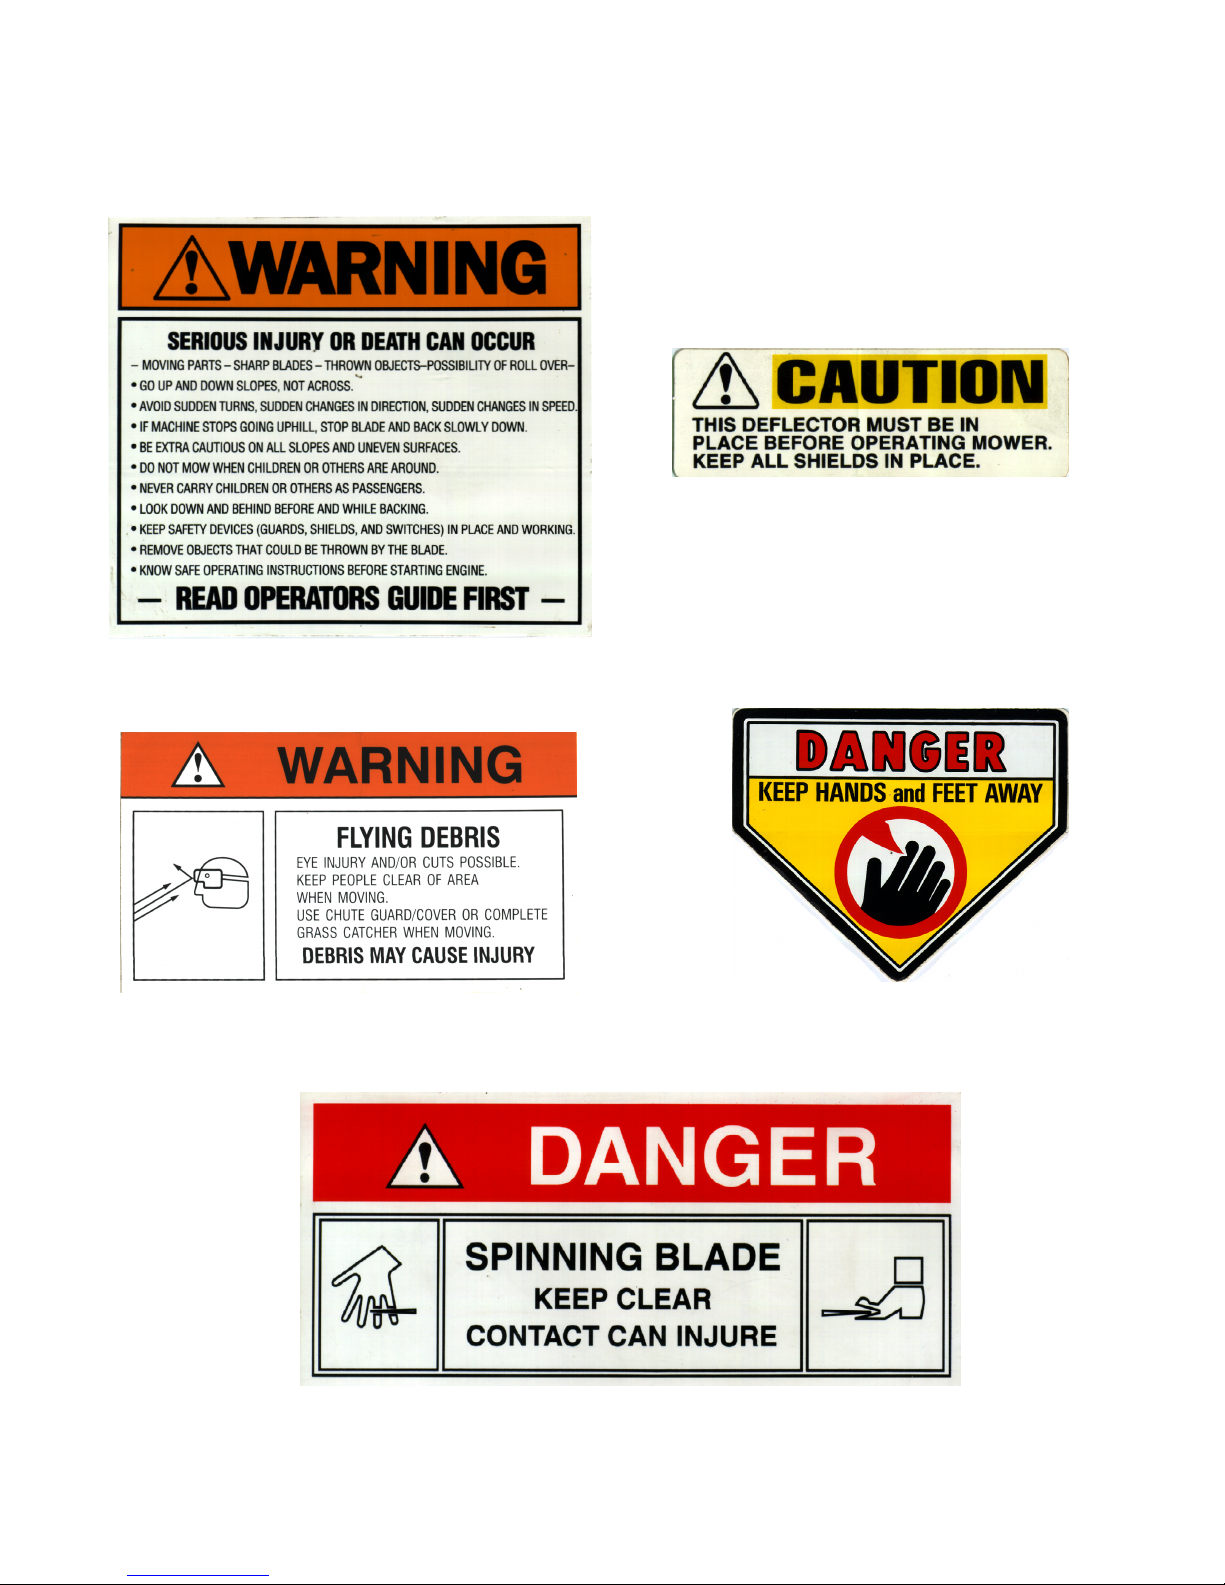
SAFETY AND OPERATIONAL DECALS
Replace decal immediately if damaged. Order by part number from Swisher Mower and Machine Co. Inc.
OD30 – WARNING DECAL
OD29 – SPINNING BLADE DECAL
OD43 – FLYING DEBRIS DECAL
OD36 – DEFLECTOR DECAL
OD55 –
DANGER DECAL
Page 3
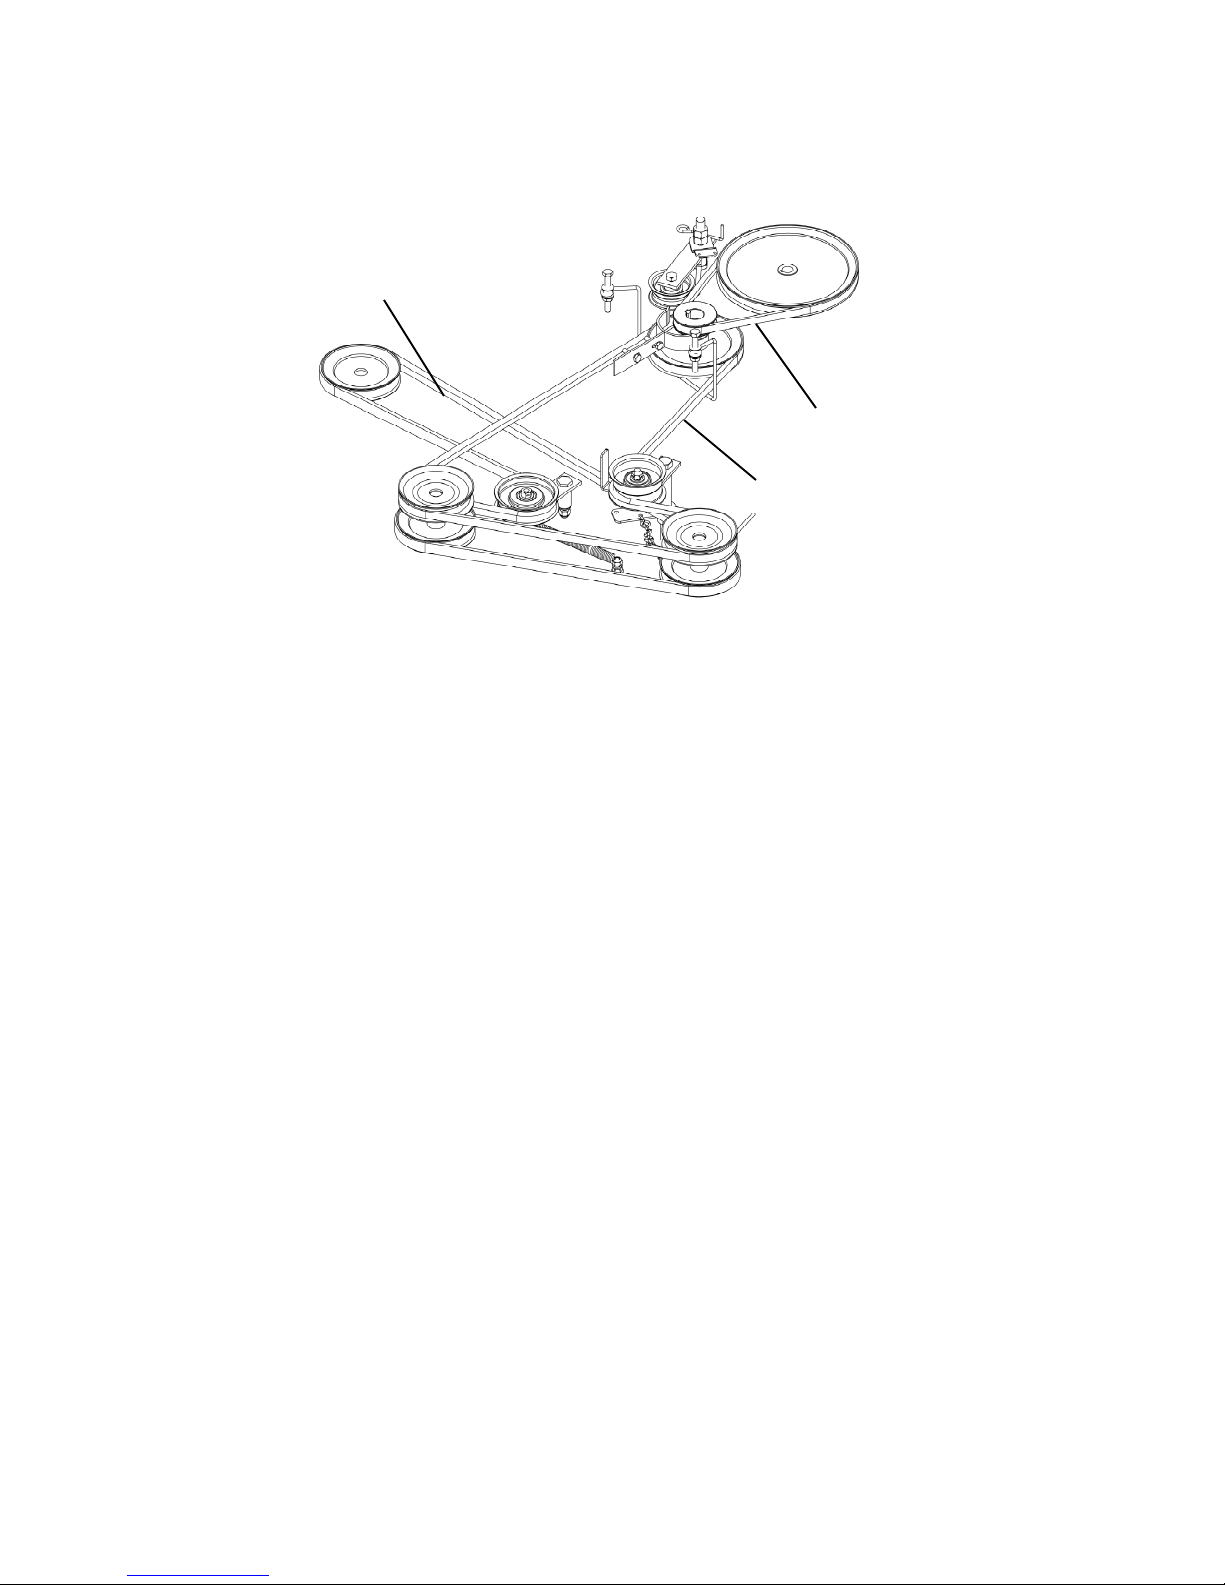
SERVICE AND ADJUSTMENTS
BELTS CONFIGURATION
Stop engine, let all moving parts come to a complete stop. Disconnect spark plug.
TRANSMISSION BELT
BLADE SPINDLE
BELT
BLADE DRIVE BELT
BLADE SPINDLE BELT REPLACEMENT
REMOVAL
•
Stop engine, let all moving parts come to a complete stop. Disconnect spark
plug.
•
Remove belt cover.
•
Remove Blade Drive Belt. (See Blade Drive Belt replacement.)
•
Pull tension idler away from Blade Spindle Belt to relieve tension.
•
Remove belt.
INSTALLATION
•
Pull tension idler away from belt.
•
Install belt according to above configuration.
•
Install Blade Drive Belt as shown.
•
Install belt cover and tighten hardware.
BLADE DRIVE BELT REPLACEMENT
REMOVAL
•
Stop engine, let all moving parts come to a complete stop. Disconnect spark
plug.
•
Disengage all blade controls by releasing the bails.
•
Remove belt cover.
•
Rotate belt off pulleys and pull belt through motor belt guide.
INSTALLATION
•
Route belt as shown.
•
Adjust engage idler tension. Belt should be snug during engagement of blade
latch. Too much tension will not allow the blade latch to function properly.
•
Tighten nuts on blade engage cable when finished.
•
Install belt cover and tighten hardware.
Page 4

WHEEL DRIVE BELT REPLACEMENT
REMOVAL
•
Stop engine, let all moving parts come to a complete stop. Disconnect spark
plug.
•
Remove belt cover.
•
Remove Blade Drive Belt, (See “Blade Drive Belt replacement”)
•
Locate belt guide for wheel drive belt and loos en.
•
Remove wheel drive belt.
INSTALLATION
•
Install belt as shown.
•
Adjust belt guide snug against motor pulley and back off ?”.
•
Tighten belt guide hardware.
•
Install Blade Drive Belt (see “Blade Drive Belt installation”).
•
Install belt cover and tighten hardware.
WHEEL BRAKE ADJUSTMENT
Adjustment may be necessary if the unit does not stay in position on a hill with the
operator bails released, or if the brake drags while in neutral with the “GROUND
CONTROL” bail engaged.
PROCEDURE
•
Stop engine, let all moving parts come to a complete stop. Disconnect spark
plug.
•
Release “GROUND CONTROL” bail.
•
Adjust nuts forward or backward. When the “GROUND CONTROL” bail is
disengaged there should be constant tension on the brake arm.
•
All tension should be off brake arm when “GRO UND CONTROL” bail is
engaged.
•
Tighten adjustment nut when finished and re -attach spring, if necessary.
WHEEL DRIVE BELT ADJUSTMENT
Adjustment may be necessary if loss of traction occurs due to belt slippage.
PROCEDURE
•
Adjust “GROUND CONTROL” cable in or out to achieve maximum traction.
•
Too much tension will not allow the “GROUND CONTROL” bail to fully
activate.
•
Too little tension will allow the belt to slip, resulting in loss of traction.
•
“GROUND CONTROL” bail should fully close against handlebars when
functioning properly.
Adjust Nuts
Check for loosened bolts, nuts,
springs, etc. often. Replace
filters, spark plugs as needed.
Keep blades in good working
order.
Page 5

OVERALL ASSEMBLY
When ordering painted parts, please indicate with
corresponding letters: C = Red Parts
TK = Textured Black Parts
Page 6

REPLACEMENT PARTS
When ordering painted parts, please indicate with corresponding letters: C = Red Parts;
TK = Textured Black Parts (ex. 4207TK, 4237C)
Item # Description Part # Item # Description Part #
1 Motor Base 4270 46 Tension Spring 682S
2 Wire Link BRS6H 47 1/2 x 1 9/16 Shoulder Bolt NB220
3 Link Spring T2SM 48 5/16 SAE Washer NB275
4 5/16-18 Serrated Flange Nut NB170 49 3/8-16 Grade 2 Nut NB212
5 5/16-18 x 21/2 Grade 5 Bolt NB138 50 5/16-18 Nylock Nut NB181
6 Shift Linkage 4282 51 Tension Idler Kit 4263
7 Blade Driver Housing B99 52 Blade Engage Pulley 7509
8 Brake Spring BT297 53 Blade Drive Belt 4220
9 Brake Pad BP370 54 Blade Spindle Belt 4219
10 Blade Engage Idler 4262 55 Wheel Drive Belt 2414
11 1/2 -13 Nut NB213Z 56 Transmission Belt Guide 2451
12 Brake Pad Clip BP370S 57 1/4-20 Flange Nut NB524
13 5/16 Flat Washer NB556 58 Blade Drive Belt Guide 4234
14 3/8 -16 2-way Locknut NB280 59 8HP B&S Engine N/A
15 5" Chain Links AS080 60 Upper Engine Spacer 689L
16 3/8-16 x 2 Grade 2 bolt NB231 61 1/4 x 1/2 Key Stock 4258
17 1/2-13 x 5 Grade 5 bolt NB155 62 Upper Engine Pulley 2411
18 Blade Engage Idler Kit 4280 63 Lower Engine Spacers BB105SL
19 1/8 x 1 Cotter Pin NB126 64 1/4 x 1 Key Stock 9031
20 Center & Left Blade Driver Kit 9080 65 Lower Engine Pulleey 688
21 Blade Bearing B98 66 Belleville Washer 699
22 Center & Left Blade Shaft 9075 67 7/16-20 x 1 1/2 Grade 5 Bolt NB637
23 Washer B98W 68 Height Adjust Arm 4275
24 1/4-20 x 1 Grade 5 Bolt NB250 69 Front / Rear Torsion Connector 4235
25 1/4-20 Nylock Nut NB180 70 Front Torsion Bar 4233
26 15" Blade 4221 71 Rear Torsion Bar 4236
27 Serrated Belleville Washer NB607 72 3/4 x 18 GA Washer NB179
28 3/8 - 24 x 1 1/4 Grade 5 Bolt NB166 73 5/16-18 x 3/4 Serrated Flange Bolt NB596
29 Blade Mounting Plate 9008 74 Plastic Belt Cover 4257
30 3/8-24 2 Way Lock Nut NB216 75 3/8-16 x 3 Eye Bolt NB635
31 3/8-24 x 1 Grade 5 Bolt NB238N 76 3/8-16 Nylock Nut NB182
32 Lower Blade Pulley B4104 77 Front Tire & Wheel 4218
33 Pulley Spacer 6104RS 78 Caster 4266
34 Upper Blade Pulley (Center & Left Only) B104 79 5/8 x 10 GA Washer NB149
35 3/4-16 2 Way Lock Nut NB629 80 5/8 Flanged Bearing F157B
36 Right Blade Shaft 9077 81 Grass Chute 4261
37 Right Blade Driver Kit 9079 82 5/16-18 x 8 1/2 Grade 2 Bolt NB136
38 Transmission Idler Pulley B27 83 Grass Chute Spring CH5S
39 Transmission Idler 4276 84 Plastic Roller AS001
40 3/8-16 x 1 1/2 Grade 5 Bolt NB107 85 5/16-18 x 5 1/2 Grade 5 Bolt NB521
41 1/2-13 x 2 1/2 Grade 5 Bolt NB588 86 1/2 x 14 GA Washer NB177
42 3/8 SAE Washer NB272 87 5/16-18 x 4 Carriage Bolt NB101
43 Transmission Idler Kit 4281 88 Hanger Bracket 4216
44 Tension Idler Pulley B527 89 1/2-13 2 Way Jam Lock Nut NB121
45 Tension Idler 6681 90 Rear Tire & Wheel 4217
Page 7

REPLACEMENT PARTS
Item # Description Part #
91 Sway Bar 4207
92 3/16 x 1 1/2 Keystock 2434
93 3/4 E-Clip NB621
94 3/4 x 10 GA Washer NB184
95 5/16-18 x 1/2 Set Screw NB192
96 4 Speed Transmission 4256
97 1/4 SAE Washer NB274
98 Shift Link 4223
99 1/4-28 x 3/4 Grade 5 Bolt NB620
100 Brake Mount 4273
101 Brake Mount Kit 4271
102 Transaxle Brake Pivot 4247
103 Transaxle Brake Link 4264
104 1/4-20 x 3/4 Eye Bolt V139EB
105 5/16-18 x 1 Grade 5 Bolt NB501
106 Gear Shift Spring TR148S
107 Rear Cover 4299
108 5/16-18 x 1 1/4 Serr. Flange Bolt NB253
109 Thrust Bearing T151
110 Plastic Knob 4857
111 Crank Handle 4274
112 Transmission Pulley 2410
113 3/8 Hardened Washer NB196
114 Wiring Harness 4268
115 Throttle Control 4226
116 1/4-20 x 1 1/2 Grade 2 Bolt NB104
117 1/4-20 x 1/2 Self-tapping Bolt NB114
118 ON/OFF Key Switch KSM
119 Throttle Console 4292
120 Gear Shifter 4260
121 Blade Engage Latch 4295
122 1/4-20 x 2 1/2 Grade 5 Serr. Flange Bolt NB208
123 Operator Handle 2402
124 Transmission Cable 2432
125 Operator Presence Bail (Upper) 4294
126 Ground Control Bail (Lower) 4291
127 3/16 x 1 Roll Pin NB123
128 Belt Guide 4283
129 Oil Drain Cap AS123
130 Oil Drain Valve AS122
131 5/16-18 x 1 1/2 Serr. Flange Bolt NB254
132 3/16 x 3/4 # 9 Woodruff Keystock NB638
133 Frame 4269
134 Deck 4250
When ordering painted parts, please indicate with corresponding letters: C = Red Parts;
TK = Textured Black Parts (ex. 4207TK, 4237C)
Page 8

OWNER’S
MANUAL
MODEL NO.
Each cutter has its own model number. Each engine has its
own model number. The model number for the cutter will be
found on the right hand side of the motor base. The model
number for the engine will be found on the top of the blower
fan housing.
All cutter parts listed herein may be ordered directly from
Swisher Mower & Machine Co. Inc. or your nearest Swisher
dealer.
All engine parts may be ordered from the nearest dealer of the
engine supplied with your cutter.
WHEN ORDERING PARTS, PLEASE HAVE THE
FOLLOWING INFORMATION AVAILABLE:
* PRODUCT – FINISHING TOUCH
* SERIAL NUMBER - _______________
* MODEL NUMBER - _______________
* ENGINE MODEL NUMBER - _______________
TYPE - _______________
* PART NUMBER
* PART DESCRIPTION
TELEPHONE - 1-800-222-8183
FAX - 1-660-747-8650
SWISHER MOWER & MACHINE CO. INC.
1602 CORPORATE DRIVE P.O. BOX 67
WARRENSBURG, MO 64093
SWISHER MOWER & MACHINE CO. INC.
PRINTED IN U.S.A.
WB80042F
THE FINISHING TOUCH
42” FINISH CUT MOWER SELF PROPELLED
WALK BEHIND
Visit us at: www.swisherinc.com
 Loading...