


OWNER’S MANUAL
STARTING SERIAL #: 99-307001
MODEL NO. T1260 T1360 T1460
IMPORTANT
Read and follow all Safety Precautions and Instructions before operating this equipment.
Rev.04-288
60” UNIVERSAL TRAILMOWER
Assembly
Operation
Service and Adjustment
Repair Parts
P.O. BOX 67, WARRENSBURG, MISSOURI 64093 PHONE 660-747-8183 FAX 660-747-8650 |
Made In The |
|
USA |
||
Manufacturing quality lawn care equipment since 1945 |
ONT60
LIMITED WARRANTY
The manufacturer’s warranty to the original consumer purchaser is: This product is free from defects in materials and workmanship for a period of one (1) year from the date of purchase by the original consumer purchaser. We will repair or replace, at our discretion, parts found to be defective due to materials or workmanship. This warranty is subject to the following limitations and exclusions:
1) Engine Warranty |
All engines utilized on our products have a separate |
|
warranty extended to them by the individual engine |
|
manufacturer. Any engine service difficulty is the |
|
responsibility of the engine manufacturer and in no |
|
way is Swisher Mower Co., Inc. or its agents |
|
responsible for the engine warranty. The Briggs & |
|
Stratton Engine Service Hot-Line is 1-800-233- |
|
3723. The Tecumseh Engine Service Hot-Line is 1- |
|
800-558-5402. |
2) Commercial Use |
The warranty period for this product used for |
|
commercial or rental is limited to ninety (90) days |
|
from the date of original purchase. |
3) Limitations |
This warranty applies only to products which have |
|
been properly assembled, adjusted, and operated in |
|
accordance with the instructions contained within |
|
this manual. This warranty does not apply to any |
|
product of Swisher Mower Co., Inc., that has been |
|
subject to alteration, misuse, abuse, improper |
|
assembly or installation, shipping damage, or to |
|
normal wear of the product. |
4) Exclusions |
Excluded from this warranty are normal wear, |
|
normal adjustments, and normal maintenance. |
In the event you have a claim under this warranty, you must return the product to an authorized service dealer. All transportation charges, damage, or loss incurred during transportation of parts submitted for replacement or repair under this warranty shall be borne by the purchaser. Should you have any questions concerning this warranty, please contact us toll-free at 1-800-222-8183. The model number, serial number, date of purchase, and the name of the authorized Swisher dealer from whom you purchased the mower will be needed before any warranty claim can be processed.
2

SAFETY PRECAUTIONS
This Safety Alert Symbol indicates important messages in this manual. When you see this symbol, carefully read the message that follows and be alert to the possibility of personal injury.
Read this manual completely. This machine can amputate hands, feet, and throw objects. Failure to observe the following safety instructions could result in serious injury or death.
•Read the manual. Learn to operate this machine safely.
•Always disconnect the spark plug wire and place the wire where it cannot contact the spark plug, to prevent accidental starting the engine when setting up, transporting, adjusting or making repairs.
•Keep all shields and guards in place.
•Understand the speed, steering and stability of this machine. Know the positions and operations of all controls before you operate this machine. Check all of the controls in a safe area before starting to work with this machine.
•Allow only responsible adults who are familiar with these instructions to operate this machine. Never allow children to operate this machine.
•Clear the area of objects such as rocks, toys, wire, etc. that can be picked up and thrown by the blade.
•Be sure the area is clear of other people before mowing. Be aware of the mower discharge direction and do not point at anyone. Stop the machine if anyone enters the mowing area. Children are often attracted to the machine and the mowing activity. Never assume that children will remain where you last saw them.
Keep children under the watchful care of another responsible adult.
•No riders!
•Do not put hands or feet near or under rotating parts. Keep clear of the discharge opening at all times.
•Do not mow in reverse. Always look down and behind before and while backing.
3

• |
T u rn o ff th e b lad es w h en n ot m o w ing . B efore leav ing the m ach in e, tu rn o ff th e blad es and |
|
sto p th e en gin e. |
• |
W atch fo r traffic w hen o p erating n ear o r crossing road w ays. |
• |
D o n o t o p erate th e m o w er if it has been d ro pp ed o r dam aged in an y m ann er or if th e m o w er |
|
v ibrates ex cessiv ely. E x cessiv e v ibration is an in d ication o f d am age. R ep air m ow er as |
|
n ecessary. |
• |
D ress pro p erly. D o n o t o p erate th e m o w er w h en b arefo ot o r w earin g o p en san d als. W ear |
|
o n ly solid sh o es w ith goo d tractio n w h en m ow ing . |
• |
D o n o t o p erate th e m ach in e w h ile un d er th e in flu en ce o f alco h o l o r dru gs. |
• |
D o n o t o p erate o n slo p es greater th an 1 5 d egrees. |
• |
N ever tam per w ith safety d ev ices. C h eck th eir pro p er o peratio n regularly. |
• |
S top and insp ect th e eq uip m en t if you strik e an ob ject. R ep air, if n ecessary, b efore restartin g. |
• |
N ever m ak e ad ju stm en ts o r rep airs w ith th e en gin e ru n nin g . |
• |
M ow er b lades are sh arp an d can cu t. W rap th e blades o r w ear glo v es, and u se ex tra cau tio n |
|
w hen serv icin g th em . |
|
SAFETY DECALS |
|
Replace decals immediately if damaged.Order by part number from Swisher Mowers |
OD43Flying Debris Decal
OD45Warning Decal |
OD55Danger Decal |
|
OD33Speed Decal
OD11No step Decal |
OD29Danger Decal |
|
4
REQUIRED ASSEMBLY
FRONT WHEEL CASTER ASSEMBLY
1.Remove single nut and washers from caster shaft.
2.Place one washer on the shaft of the caster/wheel sub-assembly.
3.Slide same shaft through the bearing/frame with wheel towards the ground.
4.Place the other washer on the shaft; it should be resting on the top bearing.
5.Thread nyloc jam nut onto shaft.
6.Tighten nut snuggly, making sure shaft threads enter the nyloc of the nut. Overtightening of this nut will bind caster.
7.Repeat process for other front side.
REAR WHEEL ASSEMBLY
1.Remove cotter pin from axle.
2.Slide washer [ NB149 ] if necessary and wheel[ valve stem out] onto axle and replace cotter pin.
3.Bend cotter pin so it will not fall out.
4.Repeat process for other wheel.
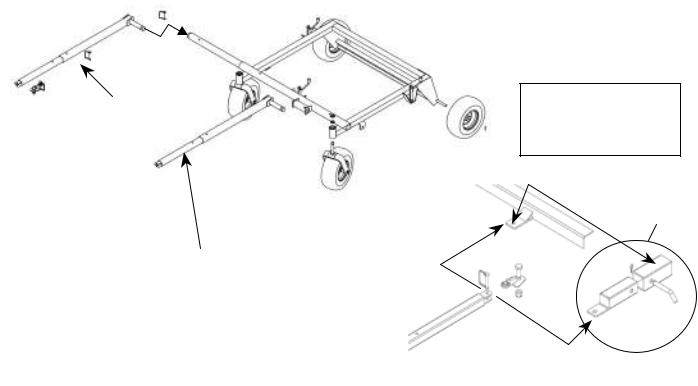
OFFSET & CENTER TOW HITCH BAR ASSEMBLY
1.Lay out parts according to the diagram.
2.Insert part 661A into part 662 and pin with the hitch pin (H11).
3.Insert part 661 into part 661A. Choose from the 3 holes to set the desired hitch length. Pin with a hitch pin.
4.Part 662 slides into the front tube of the frame. Again, choose from the 3 holes to arrange desired offset. Pin with a hitch pin (H11).
5.Eliminate step 3 for hitching from the center bracket. Only one method can be used at a time.
|
|
A |
|
1 |
|
6 |
|
|
6 |
|
|
|
1 |
6 |
|
6 |
|
 H11
H11
6 |
|
6 |
|
|
2 |
OFFSET TOWING POSITION
ATV or Utility Vehicle Attachment Instructions
Existing Rear Hitch.
Bent Pin, Hair Pin
and Receiver supplied by others.
CENTER TOWING
POSITION
5

OPERATING YOUR TRAILMOWER
The operation of any mower can produce foreign objects to be thrown into the eyes, resulting in severe eye damage. Always wear certified safety glasses or wide-vision safety goggles over spectacles before staring any cutting machine and while operating such a machine.
The operation of any cutter produces sound waves that are damaging to the human ear. Ear protection is recommended.
CAUTION!
Tragic accidents can occur if the operator is not alert to the presence of children. Children are often attracted to the machine and the mowing activity. Never assume that children will remain where you last saw them.
INTENDED USE
This TrailMower is designed to produce a quality finish cut on lawns, golf courses, etc. It is not designed to clear brush or cut saplings. Your TrailMower should be towed behind an ATV, a golf cart, lawn tractor, or similar approved vehicle. It is not meant for speeds exceeding 5 MPH.
ATTACHING TRAILMOWER TO TOW VEHICLE
•Place mower behind vehicle and back vehicle up to desired attaching position.
•When offsetting TrailMower do so to side opposite the discharge of the tow vehicle.
•Bolt swivel hitch (H10) to vehicle tow receiver.
•Attach tow hitch (661) to the swivel hitch with hitch pin (H11). Make certain hitch pin goes completely through each piece and is clipped to prevent accidental separation.
•Attach red safety tether (H9C) to both the towing vehicle and to the TrailMower toggle switch (685SP), located on the throttle housing (6155). Its purpose is to manually stop mower engine or to stop mower engine in case the two machines become separated.
•It is extremely important the safety tether is secured properly to both the toggle switch and the towing vehicle.
STARTING THE ENGINE
See engine manufacturer’s instructions for the type and amount of oil and fuel used. TrailMowers with electric start engines will need a battery (sold separately). Swisher recommends using a standard “U 1 R” lawn & garden battery.
•Engine must be level to accurately check and fill oil. Do not overfill.
6
 Loading...