

Page 1
1. DISASSEMBLE THE STOCK COOLING SOLUTION
First, remove the stock cooling solution;. Then clean off the GPU core,
memory modules, and voltage regulators with alcohol, or preferably
with an electronic degreaser such as ArctiClean.
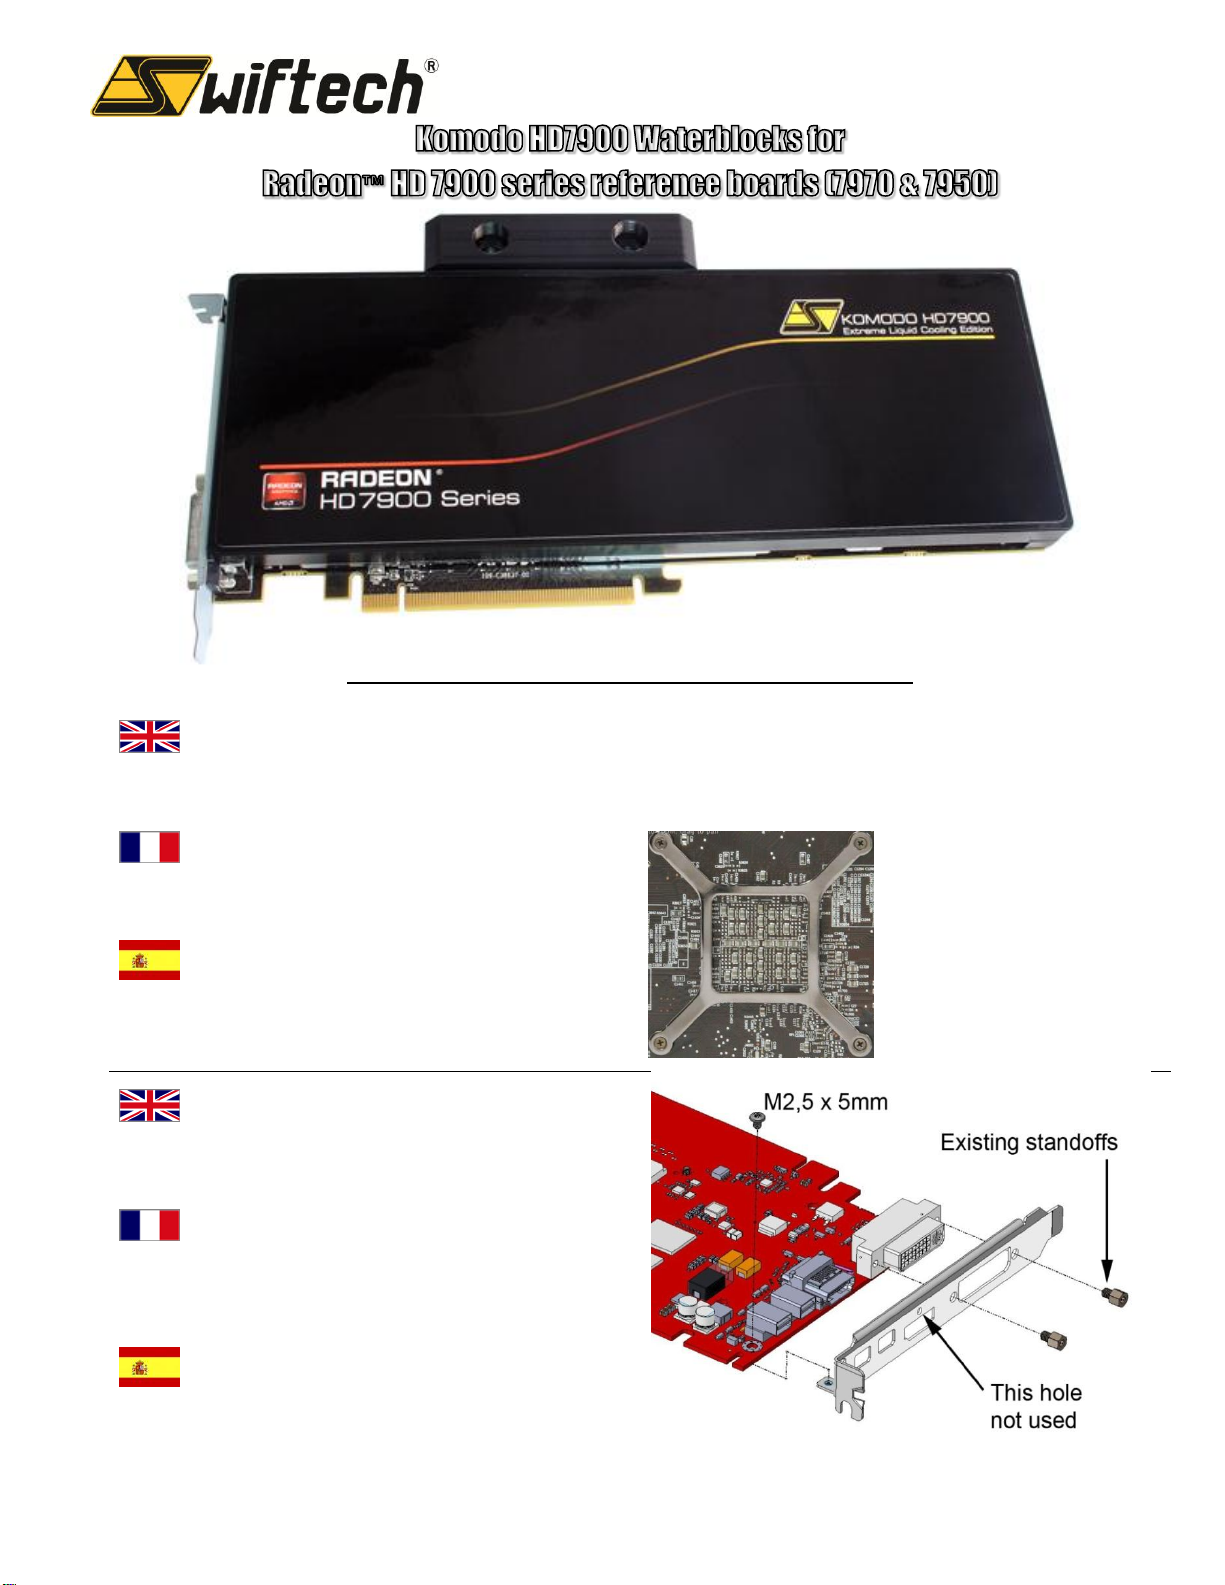
Keep this bracket
preciously, it must be
re-used for installation
of your Komodo
water-block!
Garder ce braquet
précieusement! Il
doit être re-utilisé
pour l'installation de
votre water-block
Komodo!
Mantenga este
equipo a salvo! Se
debe volver a
utilizarse para la
instalación de su
Komodo bloque!
1. DÉMONTER LA SOLUTION DE REFROIDISSEMENT
D’ORIGINE
Tout d’abord, démontez le ventirad d’origine ; ensuite, nettoyez
soigneusement les modules de mémoire et régulateurs de voltage.
Use the included alternate GPU
screw-pack if the AMD cross-bracket
shown above is not available (see
separate installation schematic)
Utilisez le paquet de vis de
remplacement au cas où vous n’avez
pas ce braquet.
Utilice el paquete de tornillos de
remplazo en caso de que usted no
tiene este equipo
1. ELIMINAR LA SOLUCIÓN DE ENFRIAMIENTO
En primer lugar, desmontar el disipador de origen y a continuación,
limpiar cuidadosamente los módulos de memoria y reguladores de
voltaje.
2. PCI BRACKET INSTALLATION
If you intend to use this card in single-slot mode, you must install the
PCI bracket first!
2. INSTALLATION DU BRAQUET PCI
Si vous avez l'intention d'utiliser cette carte dans le mode single-slot,
vous devez installer le support PCI en premier!
2. INSTALACIÓN DEL EQUIPO DE PCI
Si va a usar esta tarjeta en el modo de una sola ranura, debe instalar
el soporte PCI primero!
INSTALLATION GUIDE – GUIDE D’INSTALLATION – GUÍA D’INSTALACION
Copyright Swiftech® 2012 – All rights reserved – Last revision date: 3-22-12 – Rouchon Industries Inc., dba Swiftech® –151 West Victoria St., Long Beach, CA 90805 – Toll
free 888-857-9438 – Tel. (310) 763-0336, Fax (310) 763-7095 - E Mail: help@swiftech.com – URL: http://www.swiftech.com - Information subject to change without notice
Page 2
3. PREPARE THE WATERBLOCK
Peel-off the protective plastic sheet from ALL pre-applied thermal pads.
3. PREPAREZ LE BLOC DE REFROIDISSEMENT LIQUIDE
Décollez le film protecteur de tous les pads thermiques. Attention à ne
pas en oublier un afin de vous assurer un refroidissement de qualité !
3. PREPARAR EL WATERBLOCK
Despegue la película de protección de todos los pads térmicos. ¡No
olvidarlo ninguno! Así obtendrá una refrigeración de calidad.
4. PREPARE THE GRAPHICS CARD
Apply the provided thermal paste to the GPU core as shown here.
4. PRÉPARATION DE LA CARTE GRAPHIQUE
Appliquez la graisse thermique fournie sur le GPU comme montré ci-
joint.
4. PREPARACIÓN DE LA TARJETA GRÁFICA
Aplicar la grasa térmica sobre el GPU como se muestra en el diagrama
anterior
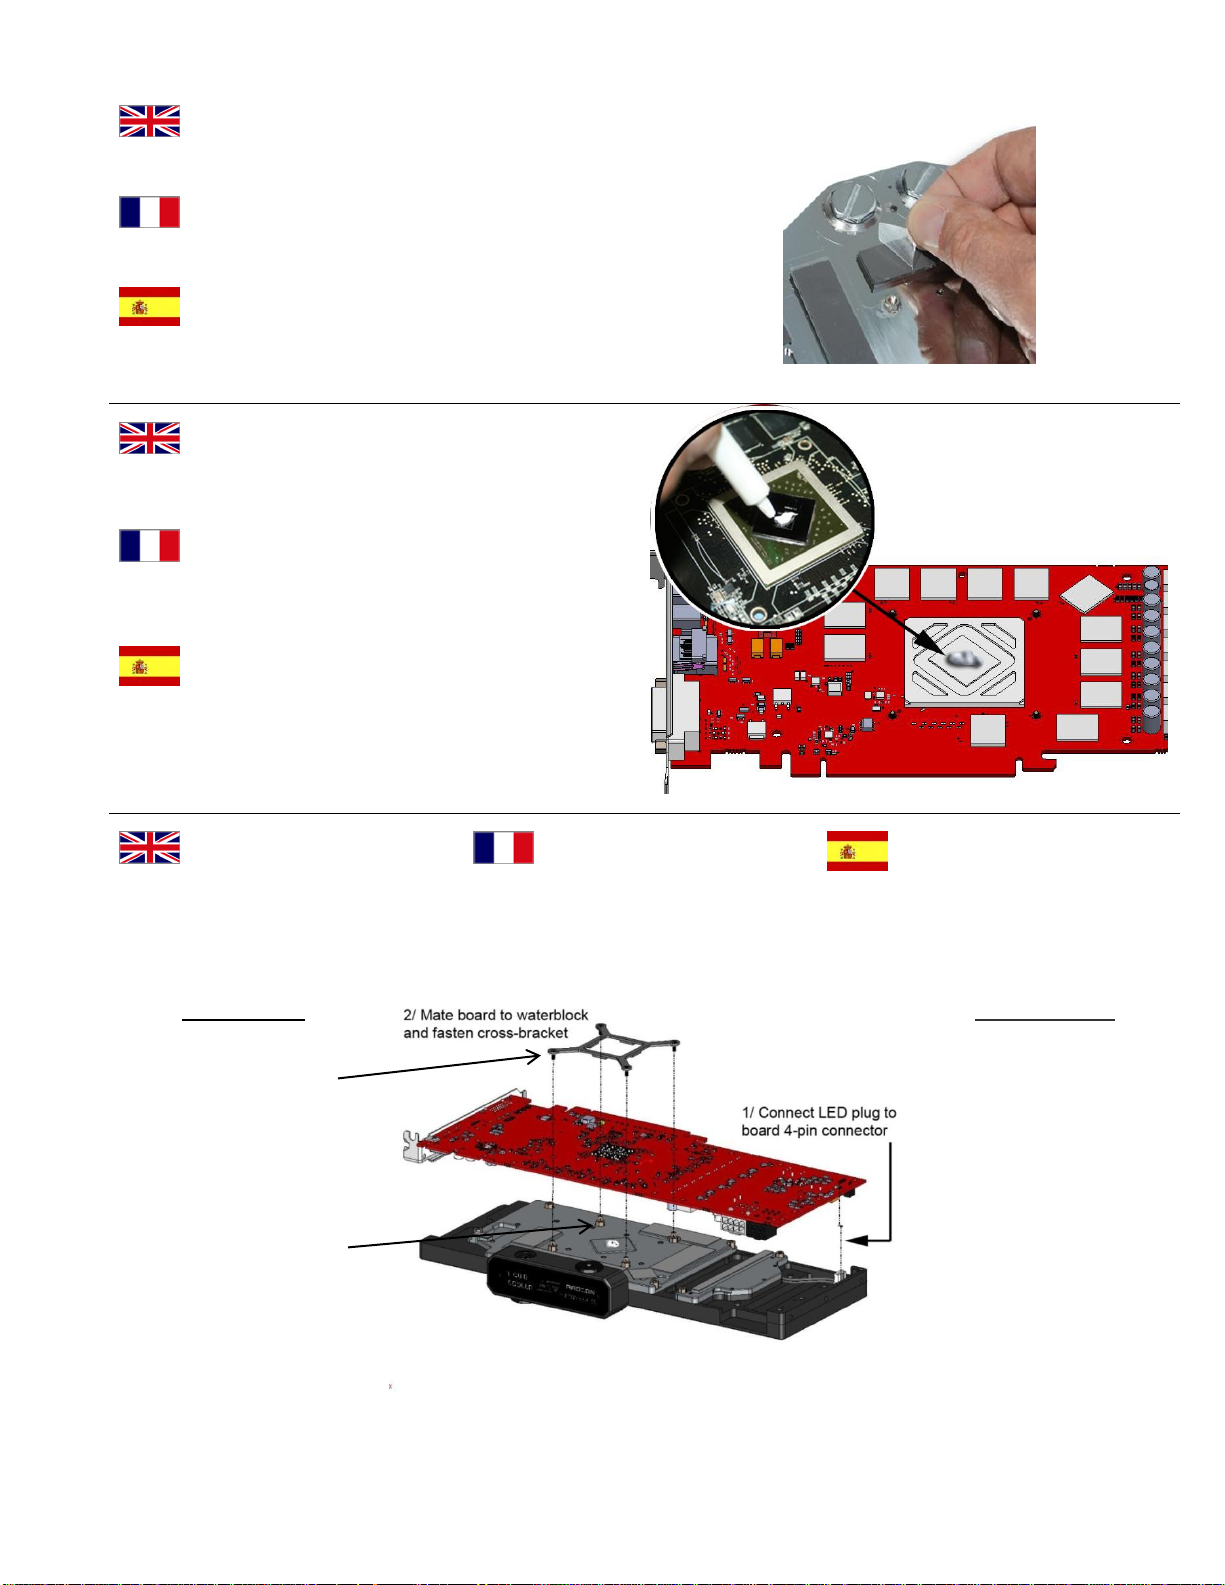
5. ATTACH THE GRAPHICS CARD
TO THE WATERBLOCK
1. Connect the LED plug to the card’s
4-pin connector
2. Mate the card to the waterblock
3. Fasten the stock cross-bracket to
the water-block in a cross pattern.
5. FIXEZ LA CARTE GRAPHIQUE
AU WATERBLOCK
1. Brancher la prise LED du bloc au
connecteur 4 broches de la carte
2. Coupler la carte au waterblock
3. Attacher le braquet d'orgine en serrant les
vis en croix.
5. CONECTAR LA TARJETA
GRÁFICA AL BLOQUE DE AGUA
1. Conecte el bloque de LED en el conector de
4 pines de la tarjeta
2. Acoplar el bloque de agua a la tarjeta
3. Conecte el equipo apretando los tornillos en
forma de cruz.
Important Notes
If this cross-bracket is not
available, then use the
included alternate GPU
screw-pack (see separate
installation schematic)
Make sure that the 4
standoffs surrounding the
GPU are tightly fastened to
the waterblock prior to
installation. Tighten them
firmly if necessary.
Notes importantes
Si le braquet n’est pas
disponible, utilisez les vis de
remplacement qui sont
incluses dans un paquet
séparé.
Assurez-vous que les 4
standoffs autour du GPU sont
bien serrés avant d’installer le
block. Les resserrer si
nécessaire.
Page 3

6. FASTEN THE ONE SCREW
SHOWN BELOW
6. FIXER LA VIS INDIQUEE CI-
DESSOUS
6. FIJAR EL TORNILLO COMO SE
MUESTRA A CONTINUACIÓN
7. INSTALL THE BACK PLATE
1. Mate the back-plate to the card
while aligning the mounting holes
2. Fasten all seven M2x6 machine
screws
3. Finish with the 3 coarse thread M2,2
screws
7. INSTALLATION DE LA PLAQUE
ARRIERE
1. Déposer la plaque arrière sur la carte
graphique en prenant soin d'aligner les trous
de montage
2. Fixez les sept vis de M2x6mm
3. Terminer avec les 3 vis de M2,2 x 6,5mm
7. INSTALACIÓN DE LA PLACA
TRASERA
1. Coloque la placa posterior de la tarjeta
gráfica, teniendo cuidado de alinear los orificios
de montaje
2. Conecte el M2x6mm siete tornillos
3. Terminar con tres tornillos M2, 2 x 6,5 mm
WARNING:
1. DO NOT REMOVE THE PLASTIC INSULATION SHEET FROM THE BACK-PLATE!
2. INSPECT THE BACK OF THE GRAPHICS CARD PCB FOR EXCESSIVELY PROTRUDING OR BENT PINS (*) THAT COULD SHORT OUT IF
CONTACTING THE BACK-PLATE.
(*) the contact leads from capacitors or other components soldered thru the board
Page 4

You can now install the provided plugs (G1/4 thread) using a 5/8” socket or a screw driver; make sure to firmly fasten the plugs until they
completely bottom out or leaks will ensue. Tube fittings are not included with the block and provided in option by the Swiftech resellers. Only use
fittings with G1/4 male thread.
ALWAYS TEST YOUR BLOCK FOR LEAKS PRIOR TO POWERING UP YOUR SYSTEM!
Vous pouvez à présent installer les bouchons fournis (pas de vis G1/4). Utilisez une clef à tube de 16mm ou un tournevis en vous
assurant de serrer les bouchons bien à fond, sous peine de fuites. Les embouts ne sont pas inclus avec le bloc, et sont offerts en option par les
revendeurs Swiftech. Toujours utiliser des embouts au pas de vis mâle de G1/4.
TOUJOURS TESTER VOTRE BLOC DE REFROIDISSEMENT LIQUIDE POUR DES FUITES EVENTUELLES AVANT DE LE METTRE EN
SERVICE DANS VOTRE SYSTEME!
Ahora puede instalar los tapones de siempre (rosca G1/4). Use una llave de tubo de 16mm o un destornillador, asegurándose de apretar
los tapones en la parte inferior, bajo pena de fugas. Las propinas no están incluidas en el bloque, y se ofrecen como una opción por los
distribuidores Swiftech. Utilice siempre la rosca G1/4.
¡PROBAR SIEMPRE SU BLOQUE DE ENFRIAMIENTO LÍQUIDO CONTRA POSIBLES FUGAS ANTES DE PONERLO EN SERVICIO EN SU
SISTEMA!
DISCLAIMER: While all efforts have been made to provide the most comprehensive tutorial possible, Swiftech® assumes no liability expressed or implied
for any damage(s) occurring to your components as a result of using Swiftech® cooling products, either due to mistake or omission on our part in the above instructions,
or due to failure or defect in the Swiftech® cooling products. In addition, Swiftech™ assumes no liability, expressed or implied, for the use of this product, and more
specifically for any, and all damages caused by the use of this product to any other device in a personal computer, whether due to product failure, leak, and electrical
short, and or electro-magnetic emissions. WARRANTY: Our products are guaranteed for 12 months from the date of delivery to the final user against defects in
materials or workmanship. During this period, they will be repaired or have parts replaced provided that: (I) the product is returned to the agent from which it was
purchased; (II) the product has been purchased by the end user and not used for hire purposes; (III) the product has not been misused, handled carelessly, or other
than in accordance with any instructions provided with respect to its use. This guarantee does not confer rights other than those expressly set out above and does not
cover any claims for consequential loss or damage. This guarantee is offered as an extra benefit and does not affect your statutory rights as a consumer.
IMPORTANT ! Malgré tous nos efforts pour vous offrir un guide technique le plus explicite possible, des erreurs ou omissions sont possibles. La Société
Swiftech® ne pourra pas être tenue pour responsable pour tous dommages survenus aux composants suite à l’utilisation des produits de refroidissement Swiftech®,
dommages dus à des erreurs ou oublis de notre part dans les instructions ci-dessus mais également dus à un mauvais fonctionnement ou un défaut des produits
Swiftech®. Les images utilisées ci-après ne sont pas nécessairement contractuelles. GARANTIE : Nos produits bénéficient d’une garantie de 12 mois à partir de la
date d’achat, garantie couvrant les défauts de matériaux ou de fabrication. Pendant cette période, les produits seront réparés ou remplacés si les conditions suivantes
sont respectées : (I) le produit doit être retourné au revendeur où il a été acheté; (II) le produit a été acheté et utilisé par l’utilisateur final, il n’a pas été loué ; (III) le
produit n’a pas été mal utilisé, manipulé sans attention ou sans respect des règles d’utilisation mentionnées. Cette garantie ne confère pas d’autres droits que ceux
clairement cités plus haut et ne couvre aucune demande de dommages et intérêts. Cette garantie est offerte comme un extra et n’affecte pas vos droits statutaires de
consommateur.
¡IMPORTANTE! A pesar de todos los esfuerzos para ofrecerle una guía técnica lo más explicita posible, errores u omisiones peden surgir. La sociedad
Swiftech® no será responsable para cualquier daño de los componentes resultando de la utilización de los productos de enfriamiento Swiftech®, provocados por
errores u omisiones en las instrucciones arriba, io debidos a un funcionamiento incorrecto o a un defecto de los productos Swiftech®. Las imágenes utilizadas no son
contractuales. GARANTÍA: Nuestros productos se benefician de una garantía de 12 meses a partir de la fecha de compra, garantía que cobra los defectos de material
o de fabricación. Durante este periodo, los productos serán reparados o sustituidos si osn conformes a las condiciones siguientes: (I) el producto debe ser enviado al
distribuidor donde ha sido comprado; (II) el producto ha sido comprado y utilizado por el usuario final, no ha sido alquilado; (III) el producto ha sido utilizado
correctamente, manipulado con cuidado, respetando las reglas de utilización indicadas arriba. Esta garantía no otorga más derechos que los mencionados arriba, y no
cobra ninguna petición de daños y perjuicios. Esta garantía está oferta como un extra y no afecta los derechos estatutarios del consumidor.
INSTALLATION COMPLETE!
 Loading...