

Sweex PU103 Quick start guide
English version
English version
PU103 Sweex 2 Port Serial ATA RAID PCI Card
Introduction
First of all, many thanks for purchasing the Sweex 2 Port Serial ATA RAID PCI Card. This card enables you to easily add two Serial ATA ports to your
PC. You can opt to use this card externally, internally or a combination thereof.
To ensure this product operates correctly, we advise you to carefully read this manual first. If despite this manual you still experience problems during
installation or operation of this product, go to www.sweex.com and look under the heading service & support.
Hardware
Take the following precautionary measures prior to installing the hardware:
1. Ensure the PC is switched off and disconnected from the mains.
2. Also, disconnect the printer and monitor cables (they have their own power supplies) to make absolutely sure the PC is not live.
3. Now unscrew the computer casing.
4. Subsequently, remove any static electricity you may carry on your body. Do this by touching a (neutral) pipe of the central heating system or an
unpainted water pipe, among other things. Please note that you must not use a magnetic screwdriver for this. Before you proceed any further,
briefly touch the iron frame of the PC casing. Make sure that you minimise contact with any contact points of the PC, PCI Card or the memory.
5. Find a vacant PCI slot and remove the metal guard plate part of the computer casing in front of the relevant slot. On occasion the card does not
allow for it to be inserted in the PCI slot smoothly. Should this be the case, do not force anything, but try another available slot.
6. Once the card has been successfully installed, check whether all other cards are still properly inserted in the PCI slots. It is possible that the other PCI
cards are lifted up slightly when installing a new PCI card; as a result, the relevant cards or even the entire PC may no longer operate correctly.
7. Replace the casing on the computer base and correctly reconnect all cables.
8. Switch on the PC again.
Activating RAID options
Following installation of the Sweex 2 Port Serial ATA RAID PCI Card in the PC, you must active the RAID if you wish to use this.
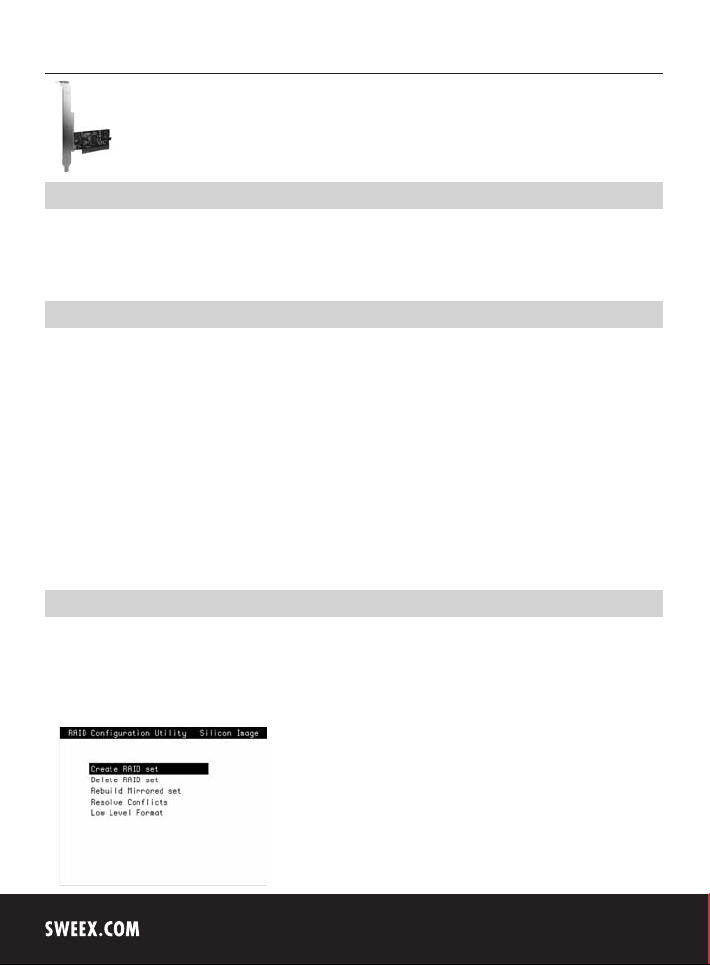
After having been inserted, the card - upon restarting the PC - indicates that the so-called “BIOS” of the card can be accessed. Press “CTRL + S” or
“F4” when you see this screen.
The following screen appears:
4

English version
Create a RAID set
Here, select the option “Create RAID set”. A menu will appear, giving the option between “Striped” (RAID-0) and “Mirrored” (RAID-1).
RAID-0 (Striped)
A number of disks are placed in an array (group of disks) and regarded as one large disk. The data is divided into small (dozens of Kbytes) blocks
(also called ‘stripes’) and written onto the various disks in turns. This results in a speed increase, because multiple disks can simultaneously retrieve
or write data. Theoretically, the speed increase could be directly proportional to the number of disks; in practice however, this is usually not achieved.
RAID-0 offers no error correction. If a disk fails, all data of the disk array is lost!
The smallest disk (in terms of capacity) in the array determines the size of all RAID systems. For instance, if a 50GB, 100GB and a 250GB disk are
placed in a RAID-0 array, the controller will offer the PC a disk of 150GB (50GB x 3).
RAID-1 (Mirrored)
RAID-1 stores the data on several disks twice (or more). When a disk fails, the computer system will not be affected by this and will continue
to operate as normal. In that case, the controller will run all data using the other disk(s). Of course the controller will give the user a hint that
something is wrong – but the system continues to operate as normal. For the PC, the logical disk is as big as the smallest disk from the set.
If 1-on-1 mirroring is applied with two 160GB disks, the system will only see one 160GB disk.
Again, the smallest disk determines the ultimate storage capacity of the entire RAID system.
Now choose RAID Array. In the next menu, select “Auto Configuration”. Confirm your choice by clicking “Y” (Yes).
The RAID-0 or RAID-1 array has now been created.
Remove a RAID set
In order to remove a created RAID set, select the option “Delete RAID set”. Confirm your choice by clicking “Y” (Yes).
Installation under Windows 2000 and XP
We advise you to ensure the operating system is up-to-date before starting the installation. This can be easily checked by starting up Internet Explorer
and selecting the option “Windows Update” in the “Extra” menu.
5
 Loading...