

Page 1

www.swedx.com
User’s Guide
SWEDX Blade
SWB-XX-A2
Design and specifications are subject to change without notice.
Page 2

SWEDX wave SWEDX TV-Stand
SWEDX offers a wide
range of accessories
with professional design
and functionality for
Digital Signage and
LED-TVs
ﺔﯾﻟزﻧﻣ ﺎﻣﻧﯾﺳ
SWEDX Soundbar
Super Slim LED-TV
Wall-mount Retractable
SWEDX Matrix Screens
Design and specifications are subject to change without notice.
SWEDX shelves
Wooden Wall-mount
Page 3

Index Page
Index 3
Introduction 4
Safety precaution 4
Basic operations 5
Contents 6
Inputs 6
Remote Control Notice 7
Remote Control Buttons 8
Main Operations 9
Volume Control 9
OSD Menu Operation 9
OSD Menu Structure 9
Menus in USB Mode/SC Card (IM) 10
PLAY SETTI NGS MENU 10
FUNCTION MODE 10
MEDIA TYPE 10
SLIDE MODE 10
SLIDE TIME 10
BG MUSIC 10
PICTURE SCALING 10
ROLL SETTING 11
ADVANCED MENU 11
LANGUAGE 11
AUTO PLAY 11
REPEAT MODE 11
PLAY LOG 11
CLOCK MENU 12
CURRENT CLOCK 12
TIMER MODE 12
CLOCK SHOW 12
CLOCK TEXT COLOR 12
PICTURE&OTHER MENU 13
BRIGHTNESS 13
CONTRAST 13
COLOR 13
SHARPNESS 13
ASPECT RATIO 13
OSD ROTATE 13
SOUND SETTINGS 13
USB/SD DATA UPDATE 13
Storage device protection 14
Description of Swedx Simple (SD Card IM)) 15
Supported file formats and codecs 16
Menus in AV, YPBPR and HDMI mode 17
PICTURE MENU 17
PICTURE MODE 17
COLOR TEMPERATURE 17
ASPECT RATIO 17
NOISE REDUCTION 17
SCREEN 17
SOUND MENU 17
SOUND MODE 17
BALANCE 17
AUTO VOLUME 17
SURROUND SOUND 17
SPDIF MODE 17
EQ 17
TIME MENU 18
CLOCK 18
TIMER SET 18
OPTION MENU 18
LANGUAGE 18
RESTORE FACTORY DEFAULT 18
Description of SWEDX Wave 19
SWEDX Wave Key operations 19
Description of SWEDX Wave HDMI 20
SWEDX Wave Key HDMI operations 20
Warranty and Service 21
Design and specifications are subject to change without notice.
3
Page 4

Introduction
SWEDX introduces the thinnest kiosk display in
the world, SWEDX Blade.
SWEDX Blade is optimal for displaying different
types of advertisements/information. The design
possibilities are unlimited thanks to support for
both images and videos. The thin design reflects
the elegance of SWEDX Blade. The Full HD
screen ensures optimal display of the content
Safety precaution
• Do not place the product on unstable places,
from which it may fell off.
• Do not expose the product to extreme
temperature and humid environment.
• Avoid subjecting the product to direct sunlit
and other heat sources.
• Do not put the product into any liquid.
• Do not put anything inside the product, or
place liquid container on it.
• In thunder rainy days (especially with
lightening), please unplug the power cables.
• Do not step on the power cable, or tangle
them together
• Avoid overload of the exterior electric outlet
to prevent fire hazard of electric shock.
• Clean the product with dry and soft cloth.
• lf your product is broken, do not repair it by
yourself, but contact the maintenance
personnel.
• lf the remote control is left unused for a
longtime, please take the batteries out and
store them in dry places.
• Avoid dropping the remote control.
• lf the product is installed for exhibition
purpose, please do not place the overheated
part on the ground or carpet to prevent
accident.
Please install the product at proper position.
Please install it under the guidance of
professional staff.
This device complies with Part 15 of the FCC
Rules. Operation is subject to the following two
conditions:
1. This device may not cause harmful
interference.
2. This device must accept any interference
received, including interference that may
cause undesired operation.
This equipment is predeterminated to work
constantly (unless adding switch on this
equipment)
Please disconnect the power cord if this
equipment will not be used for a long time.
Design and specifications are subject to change without notice.
4
Page 5

Basic operations
• Use AC 100-240V 50-60 Hz power outlet for
the product power supply.
• lf the screen of the product is not on, please
press the power button on the remote control.
• lf you want to shut off the product temporary,
please press the power button on the remote
control.
• lf you want to turn off the product completely,
please disconnect the power cable.
• ln HDMI and VGA mode the product will
enter idle state if there is no signal input
within 300 seconds (HDMI) and 30 seconds
(VGA). The product will turn on when the
signal is received.
• The setting and tuning of picture and sound
will be saved when the product is shut off,
which will be working in the pre-shut off state
when the product is turned on again.
• lf PC signal source is used, please first set
the resolution of the PC display card as the
following modes: (1920x1080 60 Hz for Full
HD models and 1366x768 for HD models).
• lf there is progressive output of the signal
used by the user, signal source with
progressive output is recommended.
Preparation
• Put the product on a stable surface.
• Do not fix the product with others fixations than
those provided or suggested by the
manufacturer.
• Do not place any material on the product.
• Do not block or cover the ventilation
openings on the product.
• The product must be plugged with a tension
source of 100-240 volts and 50-60 Hz.
• Power cord and cables must be properly
routed and protected to prevent from
stepping on them.
• Keep the power cord away from any heat
source. Possible fire hazard.
Heating sources and humidity
• Keep the product dry and away from
humidity.
• Keep the product away from heat sources.
Cleaning and maintenance
• Unplug the product before cleaning it. Do not
use solvents or liquids to clean the product.
• Only clean the product with a soft and dry
cloth.
• In case of troubleshooting, do not use spare
parts other than those suggested by the
manufacturer. Using inadequate spare parts
can lead to electric shocks, short-circuits fire
or others incidents. Please contact a
technical authorized by SWEDX brand.
Departure in holidays
• Unplug the product during lightning storms or
when unused for long periods of time.
WARNING
RISK OF ELE CTRIC SHO CK
DO NO T OPEN
CAUTION:
TO R ED UCE THE RIS K OF EL ECTR IC S HOC K, DO N OT
REM OVE C OVE R(O R BA CK) . RE FER SER VI CIN G TO
QUA LIFI ED S ERV ICE PE RSO NN EL
WARNING:
TO REDUCE THE RISK OF FIRE OR
ELECTRIC SHOCK, DO NOT EXPOSE THIS
APPARATUS TO RAIN OR MOISTURE.
Design and specifications are subject to change without notice.
5
Page 6

Contents
Included items are:
2 x CR2025 Batteries
INFO
9
G
C
P
E
H
.
L
I
S
T
OK
F
A
V
VOL
CH
ARC
AUDIO
HDMI
SUB.T
USB
V/
R
ADIO
AV
TV
Remote Control 3 x Screws
Main unit
Base
Hex Allen key
CAUTION
Danger of explosion if battery is incorrectly
replaced. Replace only with the same or
equivalent type.
CR 2025 Battery
CAUTION
The batteries shall not be exposed to
excessive heat such as sunshine, fire or the like.
CR 2025 Battery
Inputs
1. AV
Input for audio/video sources
*Component and AV shares the same audio input
2. YpBpR
Input for component sources (YpBpR)
3. Headphone
Output for headphone devices
4. Conn. B
Input for Conn. B from control buttons
Only for use with SWEDX Wave buttons
5. Conn. A
Input for Conn. A from control buttons
Only for use with SWEDX Wave buttons
6. SD Card (IM)
Input for Main memory (USB or SD-card). This
input is used to play the content (photos or
videos)
7. USB1
Input for USB 1. This input is used for firmware
update and content update (see USB/SD data
update)
8. HDMI
Input for HDMI sources
9. PC
Input for PC or VGA sources
10. PC Audio
Input for PC audio when PC input is connected
11. Coaxial
Output for digital audio signal (coaxial)
Inputs
CAUTION
AV
1
SD Card(IM)
6
Do not connect any HDMI devices to the screen through Conn. A or Conn. B.
This may cause damage to the LED screen and the HDMI device. Conn. A
and B are exclusively intended to be connected to SWEDX Wave buttons.
YpBpR Head phone Conn. B
2
3
4 5
HDMIUSB1
7 8
Design and specifications are subject to change without notice.
6
Conn. A
PC-RGB
9 10
VGA/PC
Audio
Coax.
11
Page 7

Remote Control Notice
The remote control included is based on 2.4 GHz
and infrared. To swtich between 2.4 GHz and
infrared do the following:
Press and hold for 5 seconds. The
red LED lamp will flash and alter the current
mode. When pressing any key on the remote
control the correspondent LED lamp will lit. When
the LED lamp is red then the remote is in 2.4
GHz mode. When the LED limp is blue then the
remote is in Infrared mode.
Recent screens models from SWEDX are all
based on 2.4 GHz while older screen models are
based on Infrared. This remote control is
compatible with both models.
When the remote is in 2.4 GHz mode it can be
used without targeting the screen since the
receiver is built in. Each screen has a preconfigured remote control meaning that if you
have several screens the remote control will not
function on each other.
9
L
.
I
S
H
T
C
F
OK
A
V
G
P
E
If for some reason you need to re-program the
remote with the screen (in this case the Blade) do
the following
1. Connect the screen (in this case the Blade) to
power outlet
2. Press buttons on the remote control
OK
simultn eously for about 5 seconds.
The RED lamp on the top edge of the remote will
flash indicating that the remote is programmed
with the particular screen.
VOL
ARC AUDIO SUB. TV/RADIO
USB
HDMI
Design and specifications are subject to change without notice.
7
CH
AV TV
Page 8
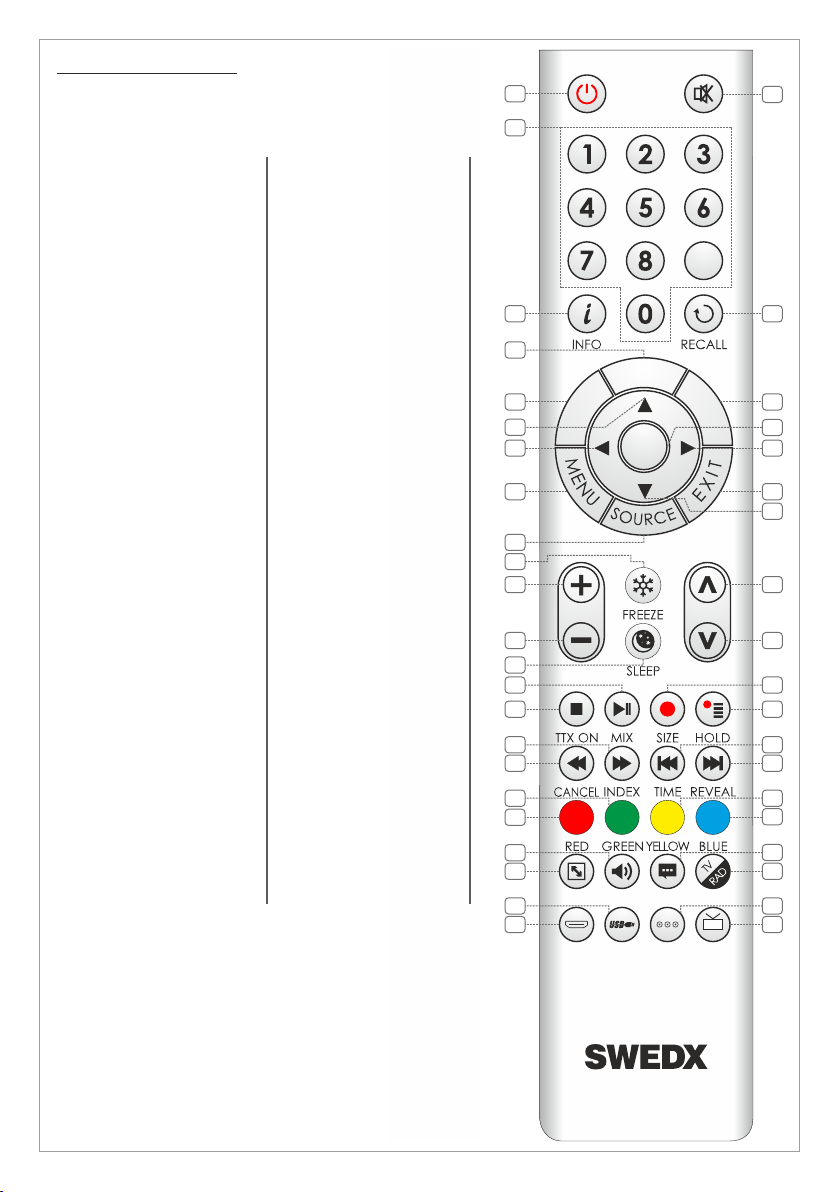
Remote control buttons
1. On/Off button
2. Number buttons for
direct channel access
3. Display additional
information
4. List TV-channels
5. EPG (Electronic
Program Guide)
6. Navigation button UP
7. Navigation/adjust button
LEFT
8. Menu display. In OSD
sub-menu press to
access previous menu
9. Available sources
selection
10. Picture freeze
11. Volume increase
12. Volume decrease
13. Enter sleep mode in
certain chosen time
14. Start/Pause play,
Start/Paus time
shift/alter Teletext mix
15. Stop play/activate
Teletext
16. Fast forward/Teletext
index
17. Fast backward/ Teletext
cancel
18. Fast-text topic selection
in Teletext GREEN
19. Fast-text topic selection
in Teletext RED
20. Choose Audio/ language
in DTV/USB media
player
21. Aspect Ratio selection
22. Shortcut to USB
23. Shortcut to HDMI1,2,3
24. Mute the built-in
speakers
25. Previous TV channel in
DTV/TV
26. Display favorite channels
list
27. Confirm/activate
button
28. Navigation/adjust
button RIGHT
29. Exit the OSD
30. Navigation button
DOWN
31. Next channel. When
the channel list is
displayed, it scrolls
down to next page in
the list
32. Previous channel.
When the channel list
is displayed, it scrolls
up to previous page in
the list
33. Instant Recording/
Teletext size selection
34. Display Recorded
List/Hold Teletext
35. Previous Title/Display
time in Teletext
36. Next Title and Reveal
Teletext
37. Fast-text topic
selection in Teletext
Yellow
38. Fast-text topic
selection in Teletext
Blue
39. Activate subtitles in
DTV/USB media
player
40. Alter TV/Radio
Channels mode
41. Shortcut to AV
42. Shortcut to DTV/TV
Note: This remote control
is used for several
devices. Apply the
functions which are
compatible with the
device you have
purchased.
1
2
3
4
5
6
7
8
9
10
11
12
13
14
15
16
17
18
19
20
21
22
23
G
P
E
VOL
ARC AUDIO SUB. TV/RADIO
USB
HDMI
C
H
OK
.
L
I
S
T
AV TV
24
9
25
F
A
CH
V
26
27
28
29
30
31
32
33
34
35
36
37
38
39
40
41
42
Design and specifications are subject to change without notice.
8
Page 9
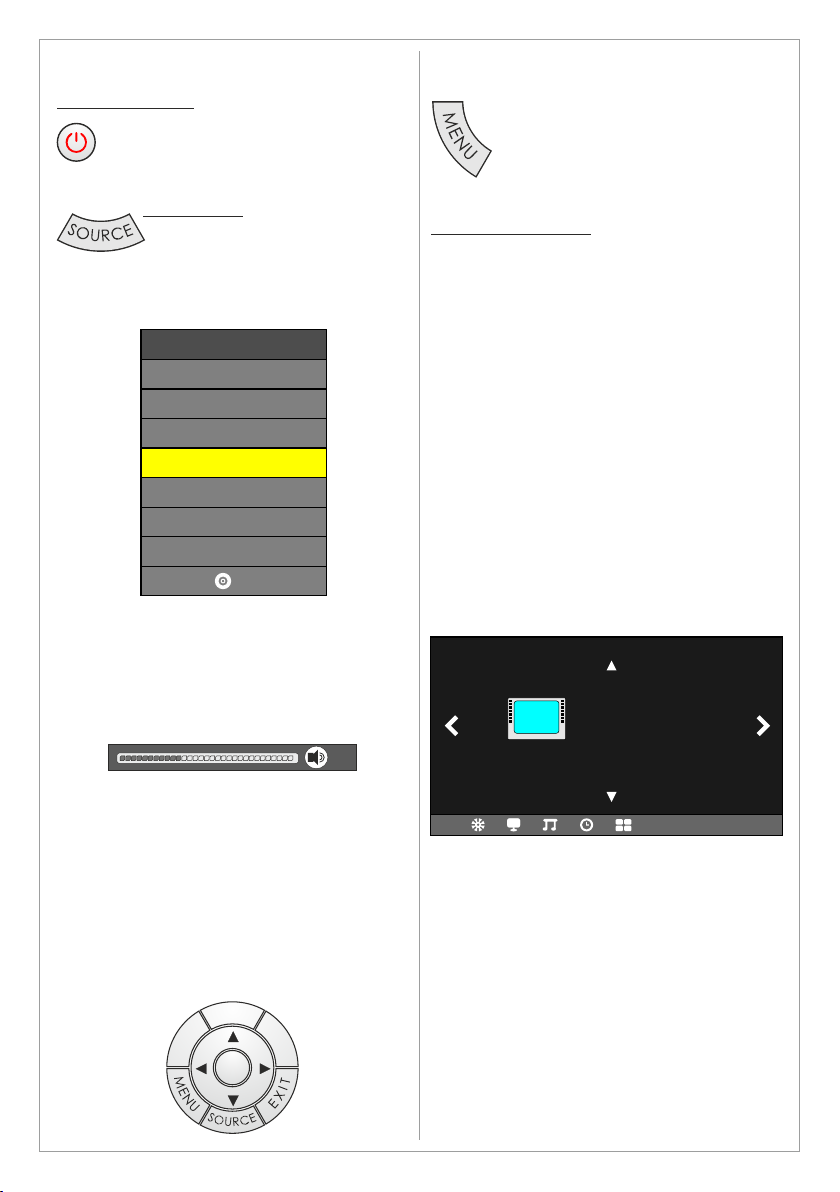
Main Operations
Turning On And Off
Press Power button on the remote control
or the On/Off button on the control
buttons. The product will turn on and will
be ready to be used.
Select Source
Press Source button on the remote
control. Then you can see the
source list menu shown below.
Press Navigation Up/down button on the remote
control to select the source and confirm by
pressing Enter.
Input Source
AV
YPBP R
PC-RG B
HDMI
USB1
SD Card (IM )
OK
Volume Control
OSD Menu Structure
• OSD (On Screen Display) allows users to
control or adjust various features and
settings in accordance with his/her
preferences.
•Press the MENU button on the
remote control to see the main
OSD menu.
OSD Menu Operation:
• Main Menu: Press the MENU button on the
remote control to enter the main OSD menu.
First, choose Main menu item you need with
the buttons ◄ & ►.
To select a Main menu items, just press Enter
or Navigation button ▼ on the Remote
Control.
• Sub Menu: Each menu item has its own sub
menu items to set.
• Sub Menu items:
A: If there is no value to adjust it means there
is a sub menu which you can access by
pressing Enter and modify the menu values.
Select sub-menu item with ▲ & ▼ buttons on
the remote control and press Enter button to
enter the submenu or change the value.
B: If there is no ► part, the item has
adjustable values. Use the ◄ & ► buttons to
adjust the values.
C: If the sub-menu item is grey colored, it
means this item is not available in the
particular mode.
Press VOL+ / VOL- button on the remote control
to adjust the
volume level.
Press MUTE button on the remote control when
you need to mute the sound.
20
OSD Menu Operation
• Press MENU button on the remote control to
access the OSD Menu. Pressing the same
button again will move you backward in the
OSD structure.
• Press ENTER button to confirm/select.
• Use LEFT & RIGHT buttons to navigate or
change the parameters of the current
sub-menu.
• Use UP & DOWN buttons to navigate in the
OSD Menu.
• Press EXIT button to exit the OSD Menu.
L
.
I
S
H
T
C
F
OK
A
V
G
P
E
Picture Mode
Color Temperature
Picture
Design and specifications are subject to change without notice.
9
Aspect Ratio
Noise Reduction: Middle
Screen
Page 10
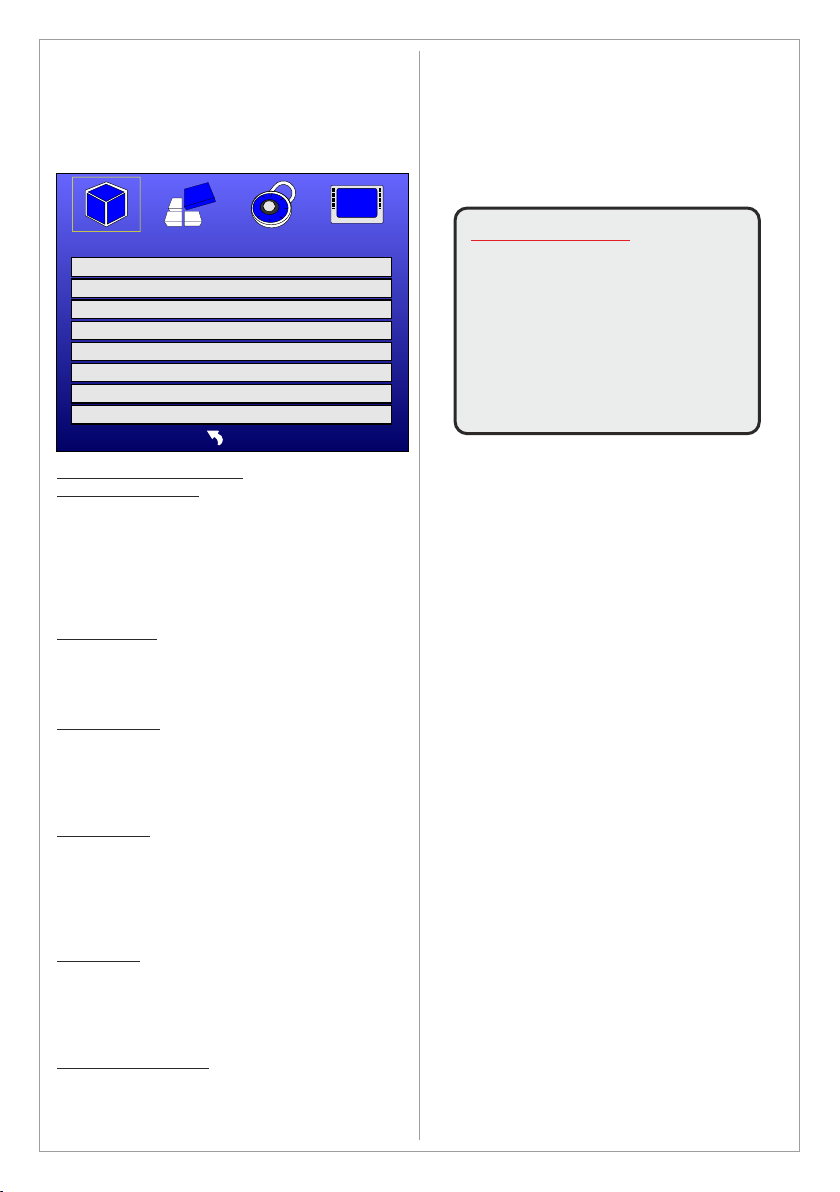
When the device is in USB/SD Card (IM) modes,
the OSD Menus differ from OSD Menus in all
other modes such as HDMI, AV, PC-RGB and
YPBPR.
Full will Scale the image to full screen.Menus in USB/SD Card (IM) Mode
PLAY SET TING S
FUNC TION MODE SI MPLE
MEDI A TYPE
SLID E MOD E 0
SLID E TIME 5sec
BG MU SIC On
PICT URE S CALI NG FULL
ROLL S ETTI NG
MENU
MOVI E
>
PLAY SETTINGS MENU
FUNCTION MODE
Option: Wave Key, Wave Key HDMI, Simple
Choose the function mode of the product. 3
function modes are available. For SWEDX Blade
please choose Simple Mode.
Refer to pages 15-17 function modes for details.
MEDIA TYPE
Options: Movie, Picture
Choose if the product will use movies or pictures
to be displayed.
SLIDE MODE
Options: 0-20
The slide mode will decide the transition effect
used when sliding pictures. 21 modes are
available.
Important Notice
In order for the modifications in
settings and functions to apply
the device will restart
automatically when changing
the Function Mode. This will
happen when you exit the
OSD Menu.
SLIDE TIME
Options: 5sec, 15sec, 30sec, 1min, 5min,
10min, 30min, 1hour, 3hours, 12hours, 24
hours.
The slide time will decide the time duration before
next sliding occurs.
BG MUSIC
Options: On, Off
In Simple mode, you can activate BG MUSIC to
play audio in the background while displaying the
images.
PICTURE SCALING
Option: Original, Full
Choose the picture scaling.
Original will display the image according to its
resolution without scaling.
Design and specifications are subject to change without notice.
10
Page 11
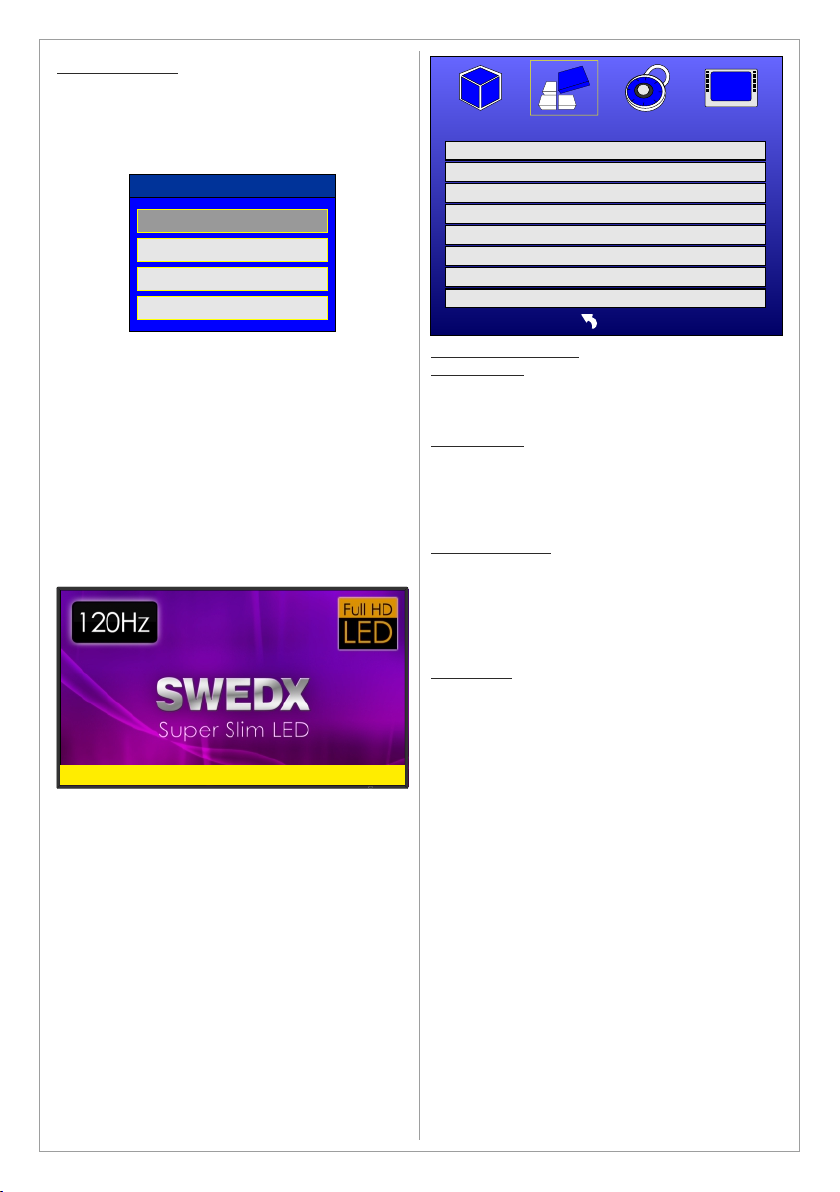
ROLL SETTING
Options:
Roll Text: On, Off
Text Color: White, Yellow, Blue, Red, Black
BG Color: Yellow, Red, Blue, Transparent
Roll Speed: Low, Middle, High
ROLL S ETTI NG
ROLL T EXT Off
TEXT COLO R WHIT E
BG CO LOR
ROLL S PEED MIDDL E
BLUE
In all modes it is possible to display text rolling at
the screen’s bottom.
Create a text file and label it Telop.txt
Copy the file to the internal memory
Activate Roll Text (ON)
In the Roll Setting you can choose the text color,
background color (or transparent) and the rolling
speed using the options above.
In order to display the characters correctly the
text file should be saved in Unicode encoding
ADVANC ED
LANG UAGE ENGL ISH
AUTO PLAY
REPE AT MODE ALL
PLAY LOG Off
MENU
On
ADVANCED MENU
LANGUAGE
Option: English, Japanese, Chinese
Choose the OSD language
AUTO PLAY
Options: On, Off
In Simple mode, choose to start displaying the
picture automatically (On) or start displaying the
pictures manually (Off).
REPEAT MODE
Options: All, Once, Cancel
In Photo Frame mode, choose to repeat the
picture displaying, All for continuous repeating,
Once for one time repeating, Cancel to not repeat
the displaying.
Rolling text... Rolling text... Rolling text... Rolling text...
PLAY LOG
Options: On, Off
When activated (On) a log file will be created
containing information about the displayed files
with time stamp
Design and specifications are subject to change without notice.
11
Page 12
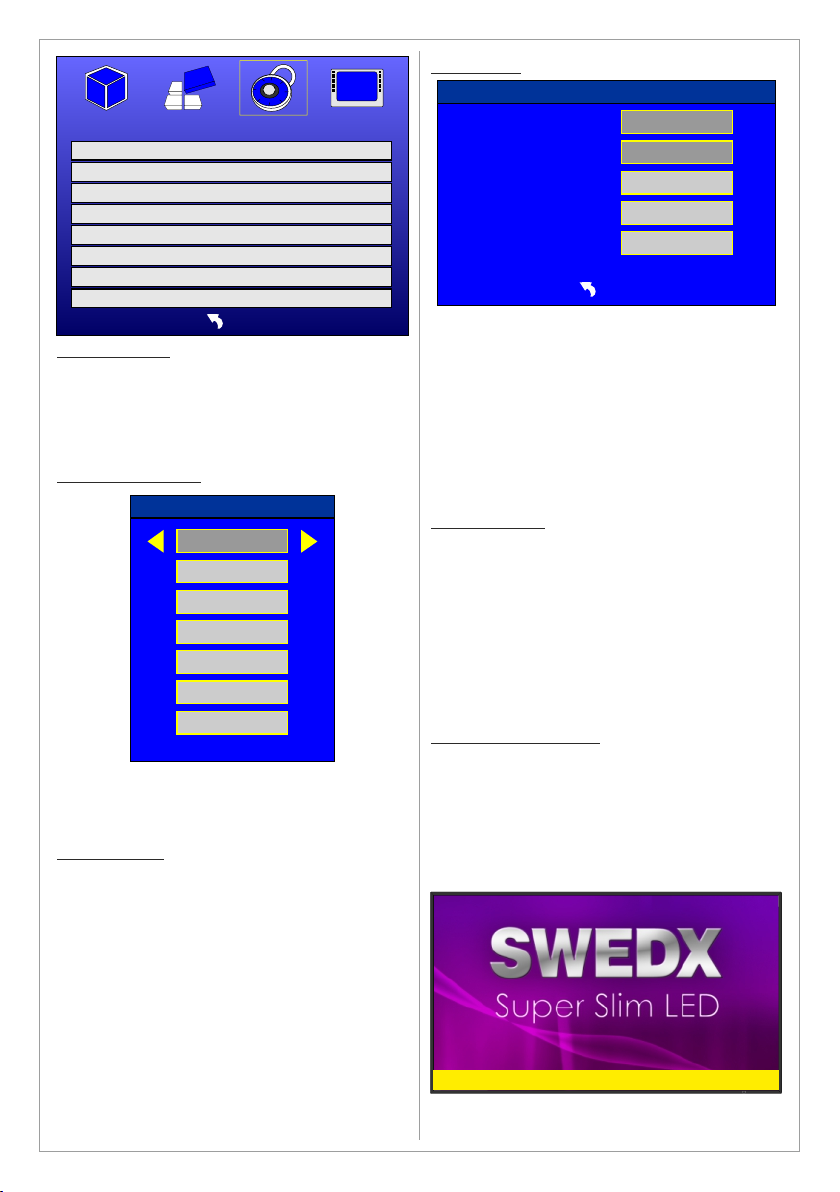
CLOC K
CURR ENT CL OCK >
TIME R MOD E
TIME R SET
CLOC K SHO W Off
CLOC K TEXT COLOR B LUE
MENU
Time Period
>
CLOCK MENU
The device is equipped with built-in battery to
save the time information even if the device is
disconnected from power source. The device is
also equipped with advance timer functions with
up to 5 timer sets.
CURRENT CLOCK
CURR ENT C LOCK
YEAR 2014
--
--
--
--
--
SAVE
Set the current time in Year, Month, Hours,
Minutes ans Seconds. Setting correct time is
essential in order to use the timer function.
TIMER SET
TIME R SET
Everyday
TIME R 1
Off
ON
OFF
00 : 00
00 : 00
MENU
The timer set will define the time when the device
will turn On and Off.
Up to 5 timer sets can be defined.
Define the Timer sets according to the
instructions below:
Choose the Timer set (1-5)
Choose to activate the current chosen set by
turning it On
Define the ON time in hours and minutes
Define the OFF time in hours and minutes
CLOCK SHOW
Options: Off, Time, Date
The Clock Show will display the current time in
the upper left corner of the screen.
Off: No time will be displayed
Time: The time will be displayed in the following
format:
HH:MM
Date: The date and the time will be displayed in
the following format:
YYYY MM DD HH:MM
CLOCK TEXT COLOR
Options: White, Black, Red, Blue, Yellow
Choose the color for the clock text.
TIMER MODE
Options:
Off
Once
Everyday
Time Period (in the time period it is possible to
set 5 different timer sets for each day of the
week)
The timer mode will define when the timer will be
active. For example if you choose Every Day
then the timer will be active turning On and Off
the product daily according to the Timer Set
settings.
2014 01 01 10:15
Rolling text... Rolling text... Rolling text... Rolling text...
Design and specifications are subject to change without notice.
12
Page 13
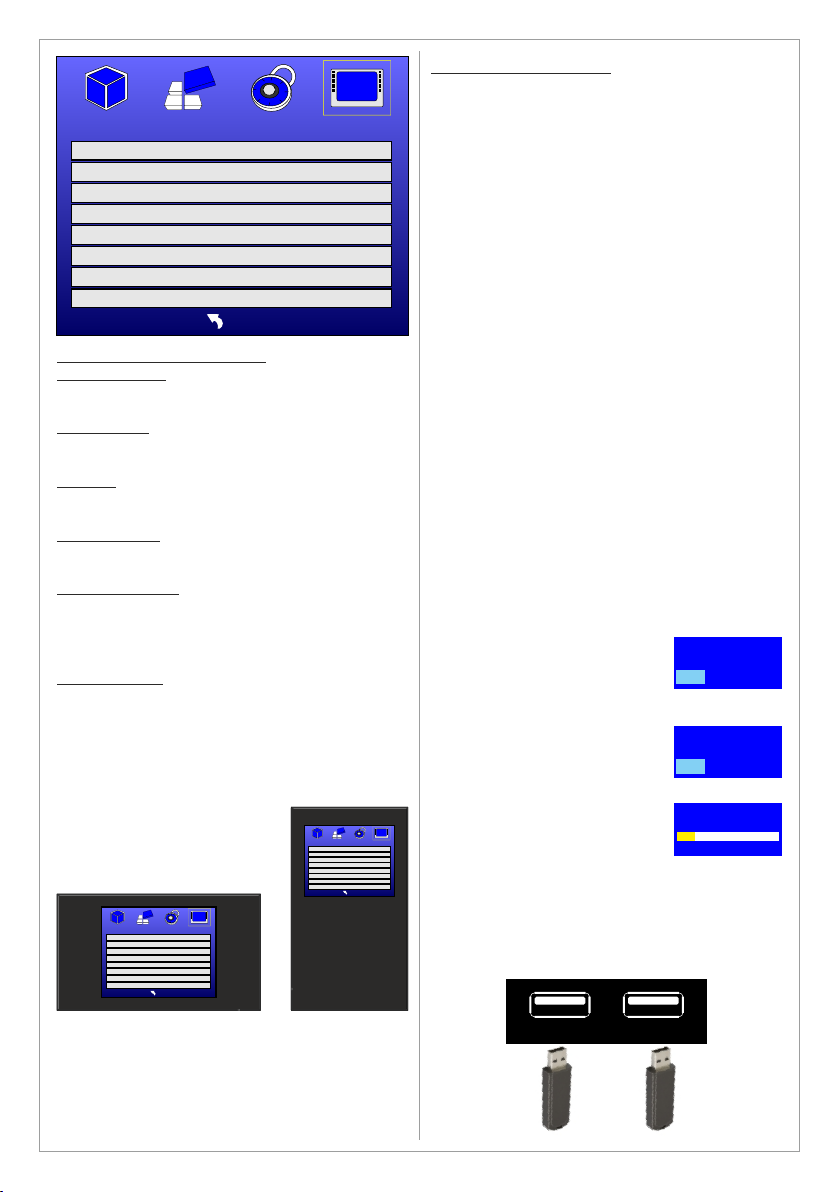
PICT URE&O THERS
BRIG HTNE SS 50
CONT RAST
COLO R
SHAR PNES S 50
ASPE CT RATIO AUTO
OSD R OTATE
SOUN D SET TINGS
USB/S D DATA UPDATE
MENU
50
50
LAND SCAP E
>
On
PICTURE&OTHERS MENU
BRIGHTNESS
Adjust the brightness between 0-100.
CONTRAST
Adjust the contrast between 0-100.
COLOR
Adjust the color intensity between 0-100.
SHARPNESS
Adjust the sharpness between 0-100.
ASPECT RATIO
Options: Auto, 16:9, 4:3
Choose the aspect ratio for the displayed
content.
OSD ROTATE
Options: Landscape, Portrait
Landscape will display the OSD menu in
horizontal mode.
Portrait will display the OSD menu in vertical
mode which is suitable in case of rotating the
screen.
PICTURE&OTHERS
CURRENT CLOCK >
TIMER MODE
TIMER SET
CLOCK SHOW Off
CLOCK TEXT COLOR BLUE
MENU
PICTURE&OTHE RS
CURRENT CLOC K >
TIMER MODE
TIMER SET
CLOCK SHOW Off
CLOCK TEXT COL OR BLUE
Mon. - Sat.
>
MENU
USB/SD DATA UPDATE
Option: On, Off
The device is equipped with 2 USB ports (SD
Card (IM) and USB 1).
The SD Card (IM) port is defined to host the
storage device (USB Flash memory or any other
storage device) that will contain the media
(videos or photos) that will be displayed on the
screen.
The USB 1 port is defined to host the storage
device (USB Flash memory or any other storage
device) that will contain the media (videos or
photos) that will be copied to the storage device
connected to the SD Card (IM). This port is also
used to update the device firmware.
To copy/update new files from USB 1 to the SD
Card (IM) follow the following steps (storage
device should be connected to the SD CARD
(IM) memory at this stage:
Activate the USB/SD Data Update (On)
Create a TEXT file and label it Autocopy.txt,
the file should be empty
Copy the Autocopy.txt file and all other files
you want to transfer to SD Card (IM) to a
USB flash memory
Insert the USB flash memory to USB 1 input
Restart the device (Power OFF and then
Power ON)
SD DATA UPDATE window
will appear, choose YES to
start the update procedure
In the new window choose
SD DATA UPDATE
9
NOYES
YES to format the storage
device connected to SD Card
(IM) port
When the formatting is
SD CA RD FOR MAT
9
NOYES
completed the device will
start copying the files from
the USB 1 to SD Card (IM)
Mon. - Sat.
>
When the copying is
completed deactivate the
Pasting...
FILE 001 / 12
16%
SD/USB Data Update by
turning it Off and remove the
storage device from USB 1
See next page for illustration how to use this
function with SWEDX Blade optimally
Landscape
Portrait
SD Card(IM)
Design and specifications are subject to change without notice.
136
USB1
Page 14
USB1
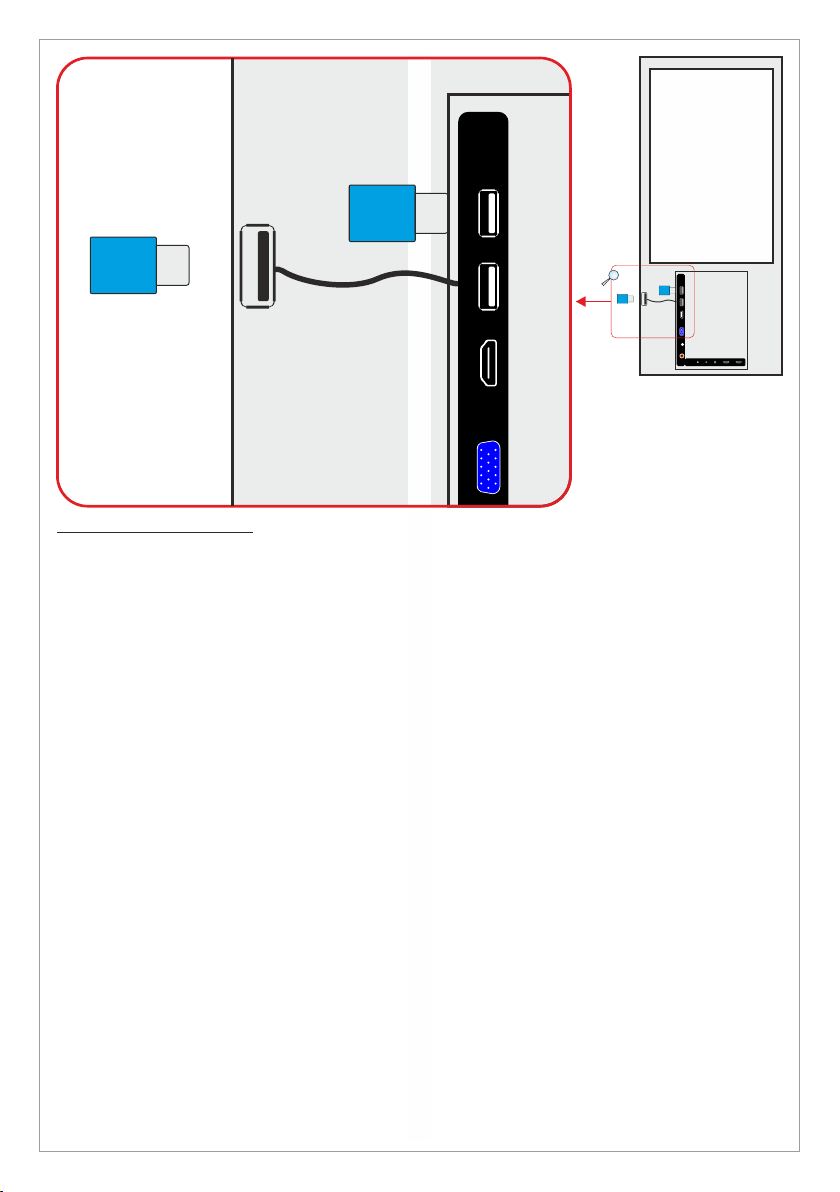
Storage device protection
The external USB port located at the Blade side
(see illustration above) is connected to the USB
1 port in the Blade controller and is intended to
be used to copy files to the storage device
connected to the SD Card (IM) port.
Since the storage device connected to SD Card
(IM) port is located inside the Blade then it is safe
and cannot be accessed without authorization to
ensure the function of the product and avoid
sabotage.
SD Card(IM)
HDMIUSB1
PC-RGB
SD Card(IM)
USB1
HDMIUSB1
PC-RGB
VGA/PC
Audio
Coax.
AV YpBpR Head phone Conn. B Conn. A
Follow the procedure stated on the previous page
to copy files from the external USB port to the
storage device connected to the SD Card (IM)
port.
Design and specifications are subject to change without notice.
14
Page 15
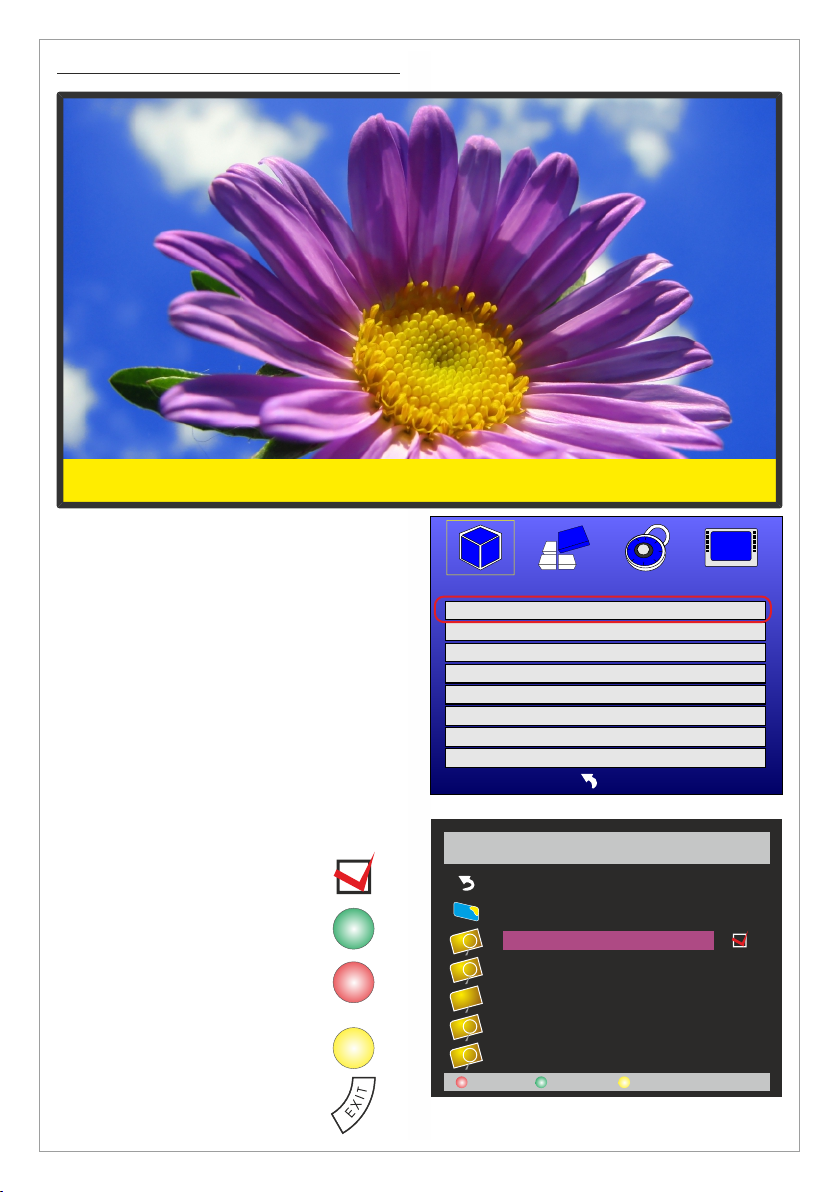
Description of SWEDX Simple (SD Card (IM))
2013 01 01 10:15
Rolling text... Rolling text... Rolling text... Rolling text...
In Simple mode you can use the screen to
display a play list of images or videos. The
following features are available:
You can create a play list of images or videos
to be displayed
You can choose the duration time for the
images (only for images)
You can choose the transition effect when
sliding the images (only for images)
You can choose to have background music
You can choose to display marquee text
You can choose to display date and time
To create a play list follow the steps below:
In the play list displayed on the screen mark the
images you want to add to the play list by
marking the image file and pressing OK on the
remote control. When the image is
marked a CHECK icon will appear to
the left of the file name.
You can mark all images by pressing
the GREEN button on the remote
control.
You can delete all markings by
pressing the RED button on the
remote control.
When you have marked all images
you want to add to the play list press
the YELLOW button on the remote
control to save the list.
Press EXIT button on the remote to
start displaying the play list.
FUNC TION MODE SIM PLE
MEDI A TYPE
SLID E MOD E 0
SLID E TIME 5sec
BG MU SIC On
PICT URE S CALIN G FULL
PICT URE R OTATE
ROLL S ETTI NG
DEL ALL ADD ALL
PLAY SET TING S
MENU
PLAY LIST
Return
Folder
image1.jpg
image2.jpg
image4.jpg
image5.jpg
image6.jpg
Save
PICT URE
90
>
1 / 1
Design and specifications are subject to change without notice.
15
Page 16
Video
Format
Video codec
Audio
codec
Resolution
Frame Rate
Mbit/s
AVI
MJPEG
Mp3,
WMA,
AAC,
Mp2,
PCM
1080p@30fps
23.976~30
≤ 10Mbps
DIVX 3.11/DIVX4/DIVX5
≤ 10Mbps
XVID/MPEG-2/MPEG4/H.264
≤ 20Mbps
Mp4
MPEG-2/MPEG4/H.264
TS
MPEG2
≤ 40Mbps
TRP
MPG
MPEG-1/MPEG-2
≤ 20Mbps
MOV
MPEG-4/H.264
MKV
Mp2
DAT
MPEG-1
352x288
≤ 16Mbps
VOB
MPEG-2
720x576
Image
Format
Max resolution
Recommended
resolution
Colors
BMP
9600x9600 px
1920x1080 px
16, 256, 16 bit, 24 bit, 32 bit
JPEG
15360x15360 px
1920x1080 px
PNG
9600x6400 none interlace
1200x800 interlace
1920x1080px
Audio
Mp3
WMV
M4A, AAC
Supported file formats and codecs
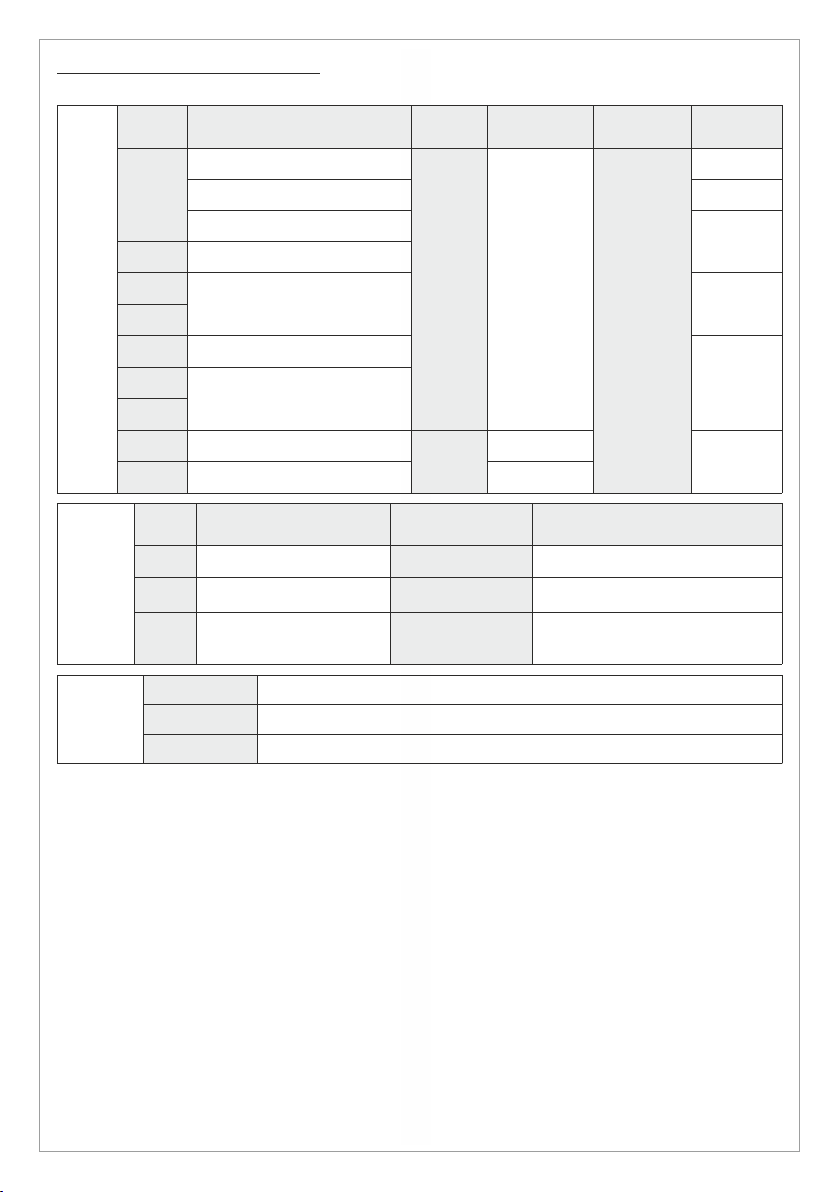
The built-in media player (in USB 1 or SD Card (IM) mode) supports the following file formats:
Design and specifications are subject to change without notice.
16
Page 17
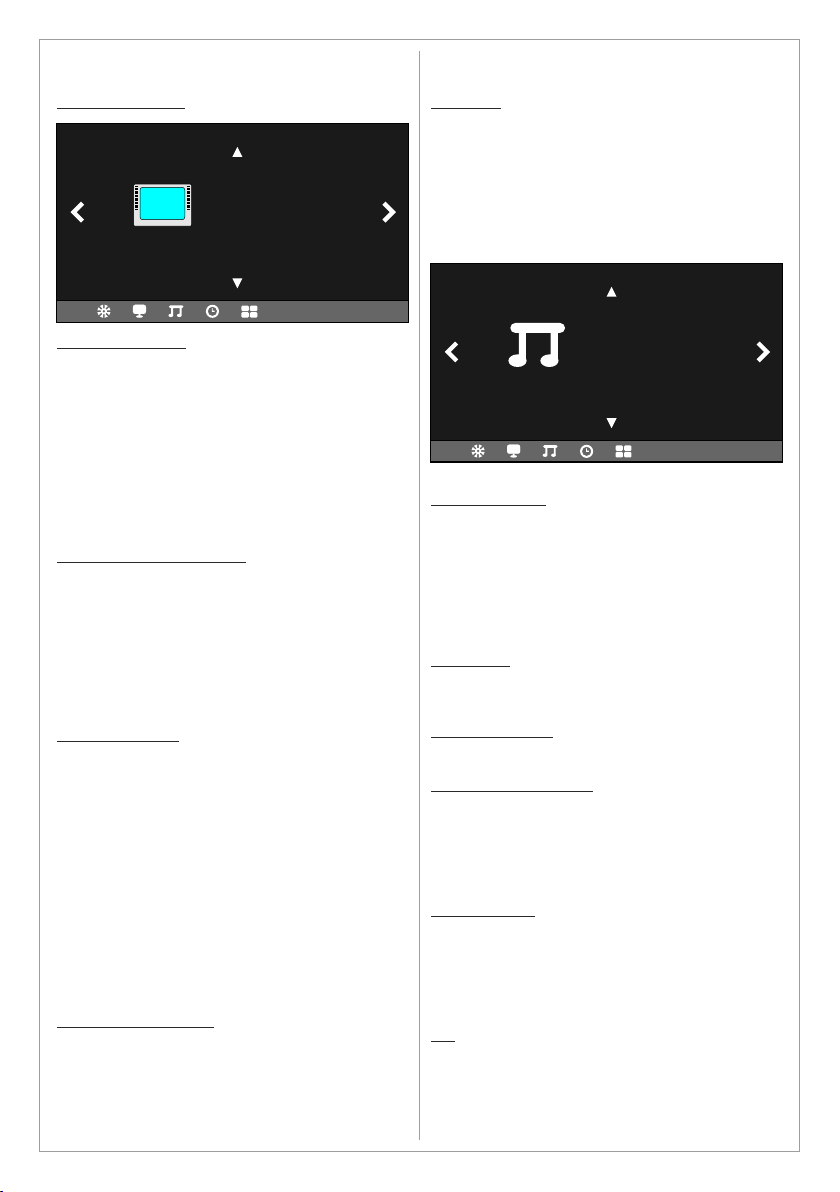
Menus in AV, YPBPR and HDMI mode
Default
PICTURE MENU
Picture Mode
Color Temperature
PICTU RE
Aspect Ratio
Noise Reduction: Middle
Screen
PICTURE MODE
In this menu you can choose the picture settings.
Choose between 3 predefined settings
(Standard, Mild, Dynamic) or define your own
settings under the User mode. The values that
can be adjusted are:
Contrast between 1-100
Brightness between 1-100
Color between 1-100
Sharpness between 1-100
Tint between 1-100 (only in NTSC signal)
COLOR TEMPERATURE
In this menu you can choose the color
temperature settings. Choose between 3
predefined settings (Standard, Warm, Cool) or
define your own settings under the User mode.
The values that can be adjusted are:
Red between 1-100
Green between 1-100
Blue between 1-100
ASPECT RATIO
In this menu you can choose the aspect ratio
settings. The following predefined aspect ratios
are available:
1
Auto
4:3
16:9
1
Zoom1
1
Zoom2
Just Scan
Panorama
Point to point
2
2
1. Not available in PC-RGB mode.
2. Available only in HDMI mode.
NOISE REDUCTION
In this menu you can choose the settings for
noise reduction. Choose between
Off
Low
Middle
High
SCREEN
In this menu you can choose the screen settings
when the device is in PC-RGB mode. The values
that can be adjusted are:
Horizontal Position
Vertical Position
Size
Phase
Sound Mode
Balance
SOUND
Surround Sound
SPDIF MODE
EQ
SOUND MENU
SOUND MODE
In this menu you can choose the sound settings.
Choose between 4 predefined settings
(Standard, Music, Movie, Sports) or define your
own settings under the User mode. The values
that can be adjusted are:
Treble between 1-100
Bass between 1-100
BALANCE
In this menu you can choose the sound balance
between Left and Right speakers.
AUTO VOLUME
Not supported in this device
SURROUND SOUND
In this menu you can choose the surround sound
settings. Choose between:
Off
Surround
SRS TrusSurround XT
SPDIF MODE
In this menu you can choose how the digital
audio signal is sent out from the device through
the COAX. (output 11). Choose between:
Auto
PCM (Pulse-code modulation)
EQ
In this menu you can adjust the balance between
sound frequencies. You can adjust the following:
120Hz, 500Hz, 1.5KHz, 5KHz, 10KHz
Design and specifications are subject to change without notice.
17
Page 18
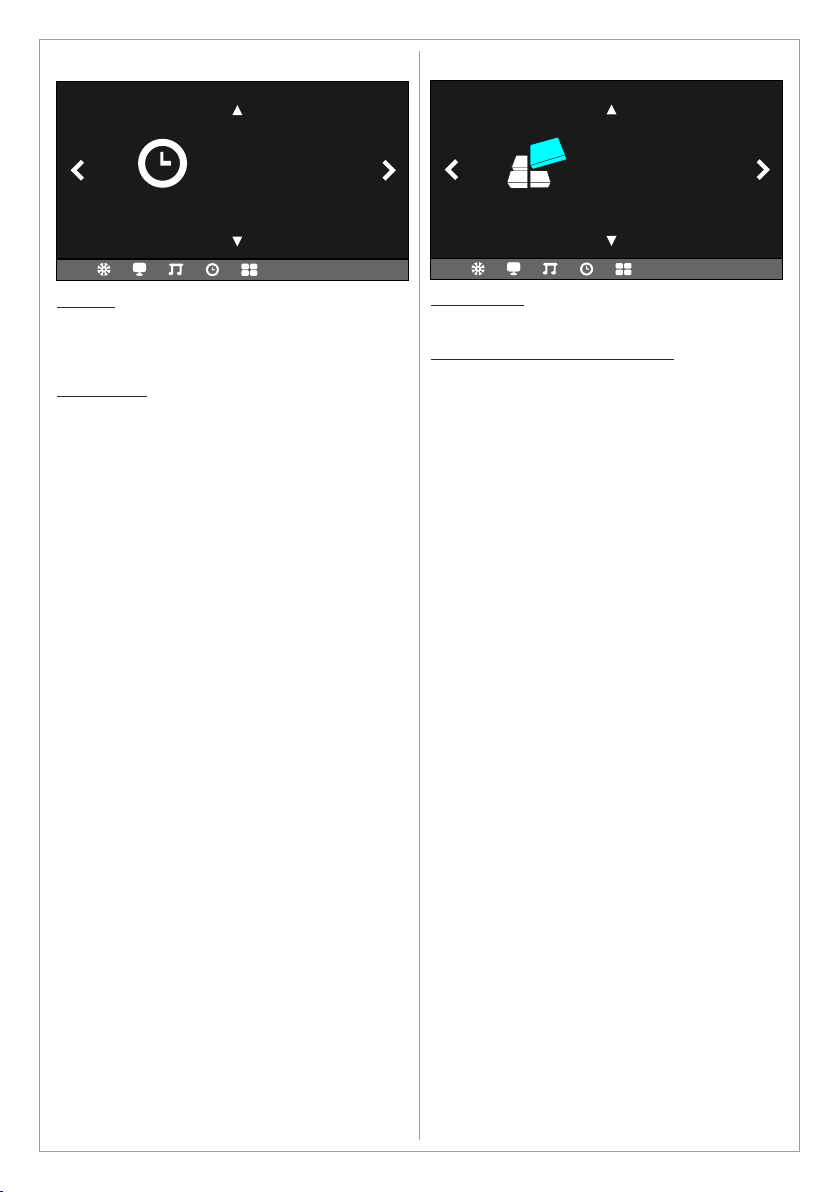
TIME MENU
OPTION MENU
Clock
Timer Set
TIME
CLOCK
In this menu you can set the device’s time. It is
essential to set the correct time in order to use
the timer function.
TIMER SET
Options:
Options:
Off
Once
Everyday
Time Period
Refer to page 12 for Timer Set
OSD Language
OPTIO N
Restore Factory Default
LANGUAGE
Choose the language for the OSD Menu.
RESTORE FACTORY DEFAULT
This menu will restore all settings to the factory
settings and erase all adjustments made by the
user. When using this option you will be asked for
confirmation to restore the settings.
Design and specifications are subject to change without notice.
18
Page 19
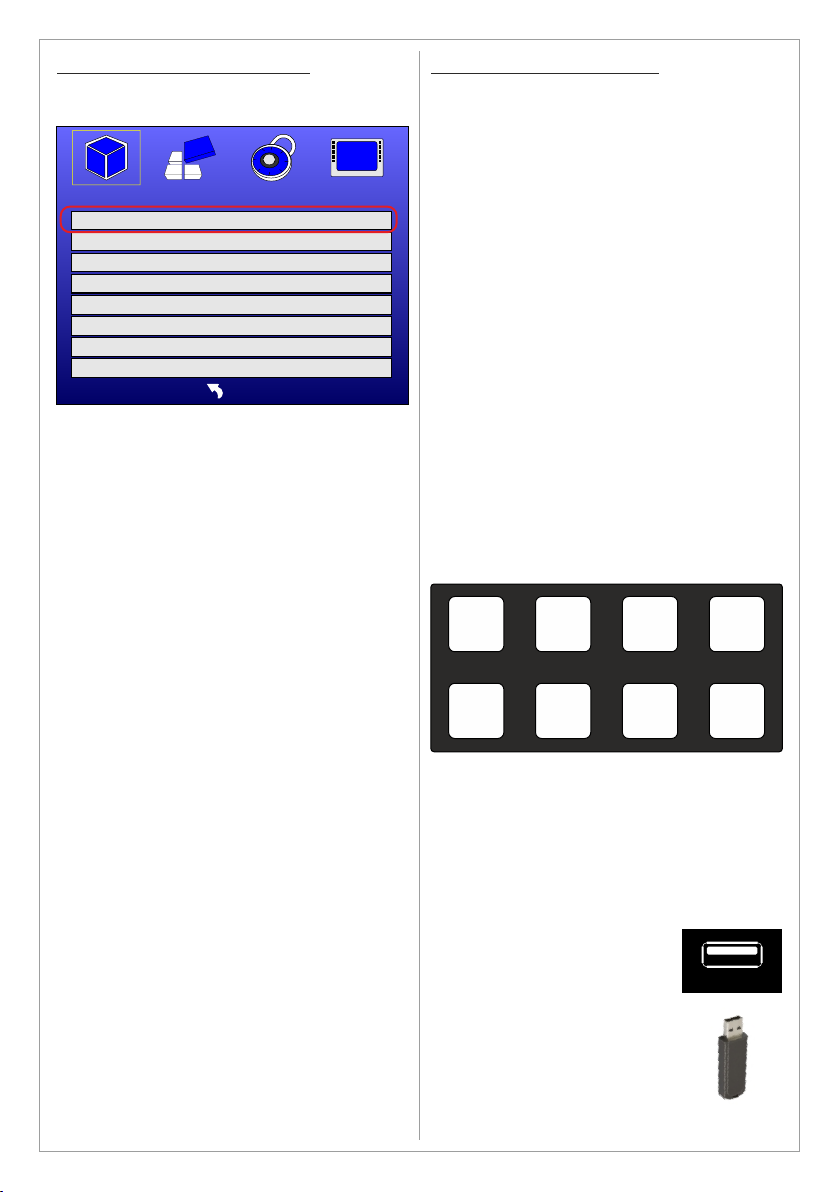
Description of SWEDX Wave Key
Not applicable for SWEDX Blade
SWEDX Wave Key operations
1. Create 9 videos/images files and label it
according the list below.
The main video/image file which is displayed and
repeated continuously until a control button is
interacted should be labelled
PLAY SET TING S
FUNC TION MODE WAVE KEY
MEDI A TYPE
SLID E MOD E 0
SLID E TIME 5sec
BG MU SIC On
PICT URE S CALI NG FULL
PICT URE R OTATE
ROLL S ETTI NG
MENU
Wave is a new innovative way to attract
audiences. It is a combination of a LED screen
and 8 control buttons. Each button is associated
with a video/image file stored on the Micro SD
Card (internal memory)
Touching the button or waving the hand above
the buttons will load and display the associated
video/image automatically. When the video
displaying is completed SWEDX wave will load
the main video/image and display it repeatedly
until a button is interacted.
Thanks to SWEDX Wave technology the buttons
can also be placed behind any material such as,
glass, fabric, wood etc. The interaction is still
there creating Jaw-dropping effect.
SWEDX wave applies to wide range of business
field such as exhibitions, banks, hotels,
restaurants, travel agencies etc. In fact the list is
endless of ideas of using SWEDX wave to
display products and services and attract all kind
of audiences and customers.
Activate Wave Mode:
To activate the device to function in Wave Key
mode follow these steps:
Press SOURCE
Choose SD Card (IM)
Press OK
Press MENU
Choose PLAY SETTINGS menu
Choose FUNCTION MODE
Change with ARROWS or OK button to WAVE
Key
Exit the MENU
MOVI E
90
>
00.***
(*** is the file format which can be AVI, MPG or
other supported video files, or JPG, GIF, PNG
for image files (see the supported file list).
The other video files should be labelled as below
01.***
02.***
03.***
04.***
05.***
06.***
07.***
08.***
The video/image files are associated with the
control buttons according to the drawing below
01.*** 02.*** 03.*** 04.***
05.*** 06.***
The video/image files must be copied to the
ROOT of an USB Flash Memory.
While displaying a video/image associated to a
control button you can PAUSE the displayed
video/image by touching or wave above the
associated button. To RESUME displaying the
video/image touch or wave above the same
button again.
To display another video/image
just touch or wave above any
control button (it is not necessary
to wait until the current
video/image displaying is completed).
07.***
08.***
SD Card(IM)
Design and specifications are subject to change without notice.
19
Page 20
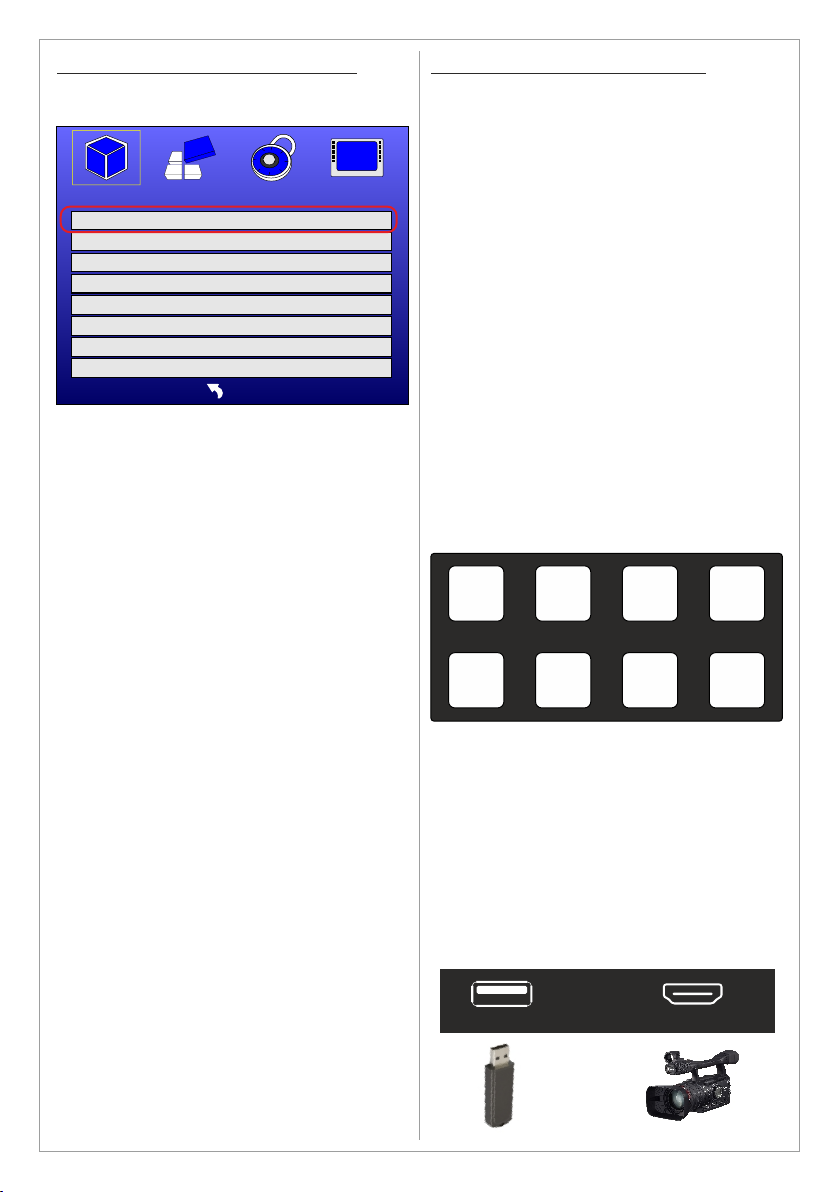
Description of SWEDX Wave Key HDMI
Not applicable for SWEDX Blade
PLAY SET TING S
FUNC TION MODE WAVE KEY H DMI
MEDI A TYPE
SLID E MOD E 0
SLID E TIME 5sec
BG MU SIC On
PICT URE S CALI NG FULL
PICT URE R OTATE
ROLL S ETTI NG
MENU
Wave is a new innovative way to attract
audiences. It is a combination of a LED screen
and 8 control buttons. Each button is associated
with a video/image file stored on the Micro SD
Card (internal memory)
Touching the button or waving the hand above
the buttons will load and display the associated
video/image automatically. When the video
displaying is completed SWEDX wave will load
the main video/image and display it repeatedly
until a button is interacted.
MOVI E
90
>
SWEDX Wave Key HDMI operations
The difference between Wave Key and Wave
Key HDMI is that the main content will be
displayed from and HDMI source connected to
the HDMI port instead of the storage device
connected to the SD Card (IM) port. When
interacting a key the associated image/video
stored on the storage device will be displayed
and after that the screen will switch to the HDMI
port and display what is connected to it.
1. Connect a HDMI device to the HDMI port and
start it (HDMI device can be a computer, android
dongle, DVD player etc.
2. Create 8 videos/images files and label it
according the list below.
01.*** 02.*** 03.*** 04.***
05.*** 06.*** 07.*** 08.***
(*** is the file format which can be AVI, MPG or
other supported video files, or JPG, GIF, PNG
for image files (see the supported file list).
The video/image files are associated with the
control buttons according to the drawing below
01.*** 02.*** 03.*** 04.***
Thanks to SWEDX Wave technology the buttons
can also be placed behind any material such as,
glass, fabric, wood etc. The interaction is still
there creating Jaw-dropping effect.
SWEDX wave applies to wide range of business
field such as exhibitions, banks, hotels,
restaurants, travel agencies etc. In fact the list is
endless of ideas of using SWEDX wave to
display products and services and attract all kind
of audiences and customers.
Activate Wave Key Mode:
To activate the device to function in Wave Key
HDMI mode follow these steps:
Press SOURCE
Choose SD Card (IM)
Press OK
Press MENU
Choose PLAY SETTINGS menu
Choose FUNCTION MODE
Change with ARROWS or OK button to WAVE
Key HDMI
Exit the MENU
05.*** 06.***
07.***
The video/image files must be copied to the
ROOT of an USB Flash Memory.
While displaying a video/image associated to a
control button you can PAUSE the displayed
video/image by touching or wave above the
associated button. To RESUME displaying the
video/image touch or wave above the same
button again.
To display another video/image just touch or
wave above any control button (it is not
necessary to wait until the current video/image
displaying is completed).
SD Card(IM)
Design and specifications are subject to change without notice.
20
HDMI
08.***
Page 21

Warranty and Service
The following terms apply only to new "in the
original carton" SWEDX products marketed and
distributed by SWEDX, which are purchased and
used by the original consumer purchaser.
Depending on the model, your terms and
conditions may be different from those shown
below, and this information is subject to change
without prior notice. Unless specifically stated
otherwise, used and reconditioned products that
are resold have no warranty from SWEDX and
are considered sold "AS-IS", however, the selling
dealer may offer additional service options.
Warranty for SWEDX products:
Check with your dealer for the warranty period.
What the warranty covers:
SWEDX warrants your SWEDX display(s)
against defects in material and workmanship
during the warranty period from SWEDX factory
delivery date shown in the shipping documents. If
a product proves to be defective in material or
workmanship during the warranty period,
SWEDX will, at its sole option repair or replace
the product with a similar product, provided the
purchaser adheres to certain return authorization
procedures and guidelines. SWEDX reserves the
right to charge customer in case of warranty
conditions not are fulfilled.
Who the warranty protects:
This warranty is valid only for the first purchaser.
other defacement.
4. Physically damaged products by purchaser,
such as broken PCB, Housing, damaged
LED Module.
5. No Defect Found (product returned to
SWEDX as defective but failure is not
duplicated by SWEDX's test method.)
6. The product is not in accordance with the
fault in the application
7. Timber is a lifelike natural material which can
cause some little changes in the precision of
the produced product such as small openings
line beside the connecting point and some
other small changes which are out of
SWEDX control and don't make any effect
for the product functionality.
Dead on Arrival (DOA)
If the product fails within the manufacturer's DOA
period, a replacement product will be offered.
Before contacting us:
In many cases, your product may not need repair.
Before you contact us, please consult the
troubleshooting section in your user's manual or
SWEDX's FAQ web pages at
http://www.swedx.com to see if you can easily
remedy the problem yourself.
What the warranty does not cover:
1. Any product which the serial number has
been defaced, modified or removed.
2. Damage, deterioration or malfunction
resulting from:
A. Accident, misuse, neglect, fire, water,
lightning, or other acts of nature,
unauthorized product modification, or
failure to follow instructions supplied
with the product.
B. Repair or attempted repair by anyone
not authorized by SWEDX.
C. Any damage of the product due to
shipment.
D. Removal or installation of the product.
E. Causes external to the product, such
as electric power fluctuations or failure.
F. Use of supplies or parts not meeting
SWEDX specifications.
G. Normal wear and tear.
H. Any other cause which does not relate
to a product defect.
3. Cosmetic damage by purchaser, such as
markings, discoloration, scratches, dents,
anti-theft devices markings, gouges or any
Design and specifications are subject to change without notice.
21
Page 22

How to get service:
For information on obtaining warranty service,
contact SWEDX dealer (the place where you
bought your product) in first choice. If for any
reason you can not contact your dealer, please
contact SWEDX Customer Service by visiting
http://www.swedx.com.
SWEDX technical support services:
During the period of product warranty, we support
your basic configuration, setup and
troubleshooting questions, and when required,
we provide you with all instructions on how to
return your product for repair. For support
inquiries, please visit http://www.swedx.com.
SWEDX reserves the right to make final
decisions regarding problem determination and
the appropriate service option. Exchange units
assume the remaining warranty of the original
product. Please refer to your SWEDX Limited
Warranty Statement for complete terms and
conditions, as some models have other terms
and conditions. Some limitations and restrictions
apply and these programs are subject to change
without prior notice.
Limitation of liability
If your SWEDX product fails to work as
warranted above, your sole and exclusive
remedy shall be repaired or replaced. SWEDX's
maximum liability under this limited warranty is
expressly limited to the lesser of the price you
have paid for the product or the cost of repairing
or replacement of any hardware components that
malfunction in conditions of normal use. SWEDX
is not liable for any damages caused by the
product or the failure of the product to perform,
including any lost profits or savings or special,
incidental, or consequential damages. SWEDX is
not liable for any claim made by a third party or
made by you for a third party.
This limitation of liability applies whether
damages are sought, or a claim made, under this
limited warranty or as a tort claim (including
negligence and strict product liability), a contract
claim, or any other claim. This limitation of liability
cannot be waived or amended by any person.
This limitation of liability will be effective even if
you have advised SWEDX.
Design and specifications are subject to change without notice.
22
Page 23

www.swedx.com
Design and specifications are subject to change without notice.
 Loading...