

Page 1
Ultimate
Optical Zoom
Security Camera
MVFBCAM150514T
INSTRUCTION MANUAL
MANUAL DE INSTRUCCIONES
MANUEL D’UTILISATION
EN
ES
FR
Page 2

2
ENGLISH
Congratulations on your purchase of this PRO-CAM from Swann! You’ve chosen well: we think this is
one of the finest vari-focal CCTV video cameras available. The adjustable lens and on-screen menu
system make the PRO-CAM ideal for monitoring any kind of space in almost any lighting conditions...
even no light at all, as it can see up to 40m/130ft in complete darkness!
Our two cents: you’ve spent the money on a great camera. It’s worth spending a bit of time making
sure it’s set up right. This manual will take you through what you need to do to get the camera
delivering high quality images, and will let you know a little about how you can tweak it further.
The Process: An Overview
1. Choose a spot for your camera. This will be influenced by what you need to monitor, the places
nearby which could support a camera, the lighting conditions of the environment and so on.
2. Connect the camera to a monitor. We suggest connecting it directly to a monitor during setup,
and to your DVR (or other recording device) afterwards. Having a monitor on hand in the same
location as the camera is a real time saver during setup.
3. Set the zoom. This will set the viewing angle of the lens, which determines how much the camera
can see (page 3).
4. Set the focus. This will allow you to choose which parts of what the camera can see is in focus.
In actuality, you’ll probably go back and forth between steps 3 and 4 until you’re happy with the
image (page 3).
5. Connect the camera to your DVR (or other recording/monitoring device) - see page 4.
Choosing a Location
The PRO-CAM is very flexible, and can be installed practically anywhere. Some of the things you’ll
have to consider when choosing a location are:
• What you want to monitor, and where you’ll get the best view of it.
• How you’re going to connect the camera to your monitoring system.
• How to keep the camera out of harm’s way. Up high in protected corners is a good option.
Rules is Rules
Regardless of all the tweaking of the lens and image processing you do, there are a few immutable
things that are true for all cameras, CCTV or otherwise.
• The closer the camera is to what you want to see, the more detail you’re going to get. You can
make some alteration by tweaking the zoom, but there’s no substitute for proximity.
• Areas with varied lighting conditions are hard to view completely, with any camera. If the bright
bits are exposed correctly, then the shadows will “black out”. If the shadowy areas are exposed
correctly, then the bright bits will overexpose and “white out”. Aiming the camera at an evenly lit
area will always give the best results.
Adjusting Focus and Zoom
• To access the zoom and focus, remove the two protective caps from the rear of the camera by
unscrewing counter-clockwise.
• Use a flat-blade screwdriver to turn the exposed control rod. The zoom is located on the top left,
and focus on the lower right.
• Be sure to securely replace the protective caps after adjusting the zoom and focus, otherwise
the camera will no longer be weather-proof.
About the Camera
Page 3
3
ENGLISH
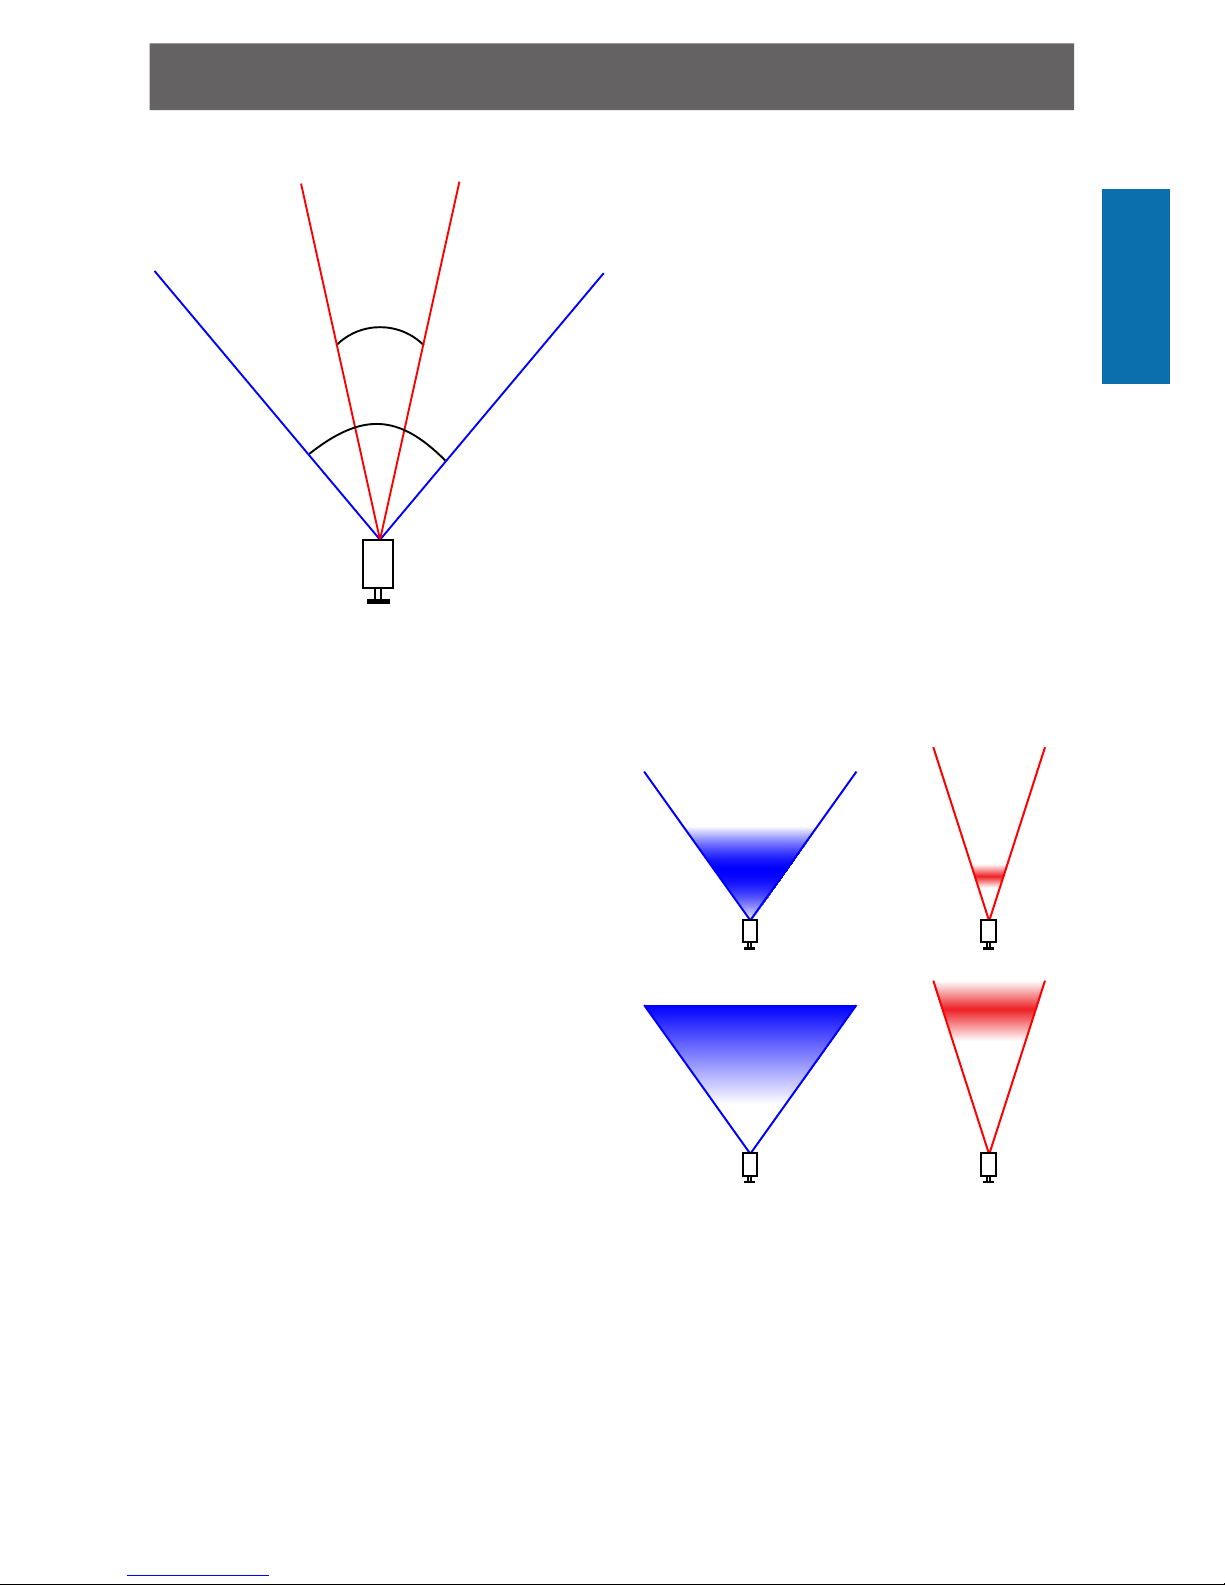
Adjusting the Lens
The zoom and focus controls are located on the
rear of the camera.
ZOOM: The left hand dial controls the level of
zoom. You can vary the viewing angle between
23° and 81°. This is an approximately 4x
(2.8mm-12mm) optical zoom, which operates
in a similar manner to the zoom on your digital
camera. Basically, zooming in makes everything
appear to be larger, at the expense of the
viewing area.
Check out the diagram to the left for a visual
representation of the zooming process.
The smaller viewing angle (marked 23°)
represents the camera’s view when “zoomed
in”, and the larger angle (81°) represents the
camera’s view when “zoomed out”.
You can set the zoom to either of these
extremities, or anywhere in between.
When you change the zoom, you’ll also
have to change the focus. Why? Lenses are
complicated, and all the bits are joined together.
Changing the zoom will also change the focus.
FOCUS: The right hand dial controls the focus.
Adjusting the focus control is kind of like trying
on a different pair of glasses - it can make sharp
things look blurry and blurry things look sharp.
It’s not quite magic, but it’s pretty close.
Basically, once you’ve set the zoom, twist the
focus knob until what you want to see doesn’t
look blurry anymore. If you can’t turn the knob
any more one way, go back the other.
You can only have so much in focus at once photographers refer to the size of the area in
focus as the “depth of field”.
The diagram to the right shows a couple of
different focusing options. The shaded areas
represent the depth of field. As you can see,
there is no hard edge, some things are “more”
in focus than others.
Note that this is for illustrative purposes only - there are many factors which contribute to depth of
field which vary from location to location.
A: The lens is at its widest, and focused on an
area relatively close to the camera. The depth of
field is quite large.
B: The lens at its widest with focus set to
“infinity”. Anything in the shaded section will
be in focus, and this focus extends to infinity
(that is, things in the far distance will also be in
focus). However, things in the distance might be
too small to see the detail you require.
C: The lens at its tightest, focused on an area
close to the camera. As you can see, the more
the lens is zoomed, the smaller the depth of
field becomes.
D: The lens at its tightest with focus further from
the camera. At this distance, the actual depth
of field is much larger, but it doesn’t extend to
infinity like it does when the lens is wide.
81°
23°
A C
B D
Page 4
4
ENGLISH
3
1
2
4
5
6
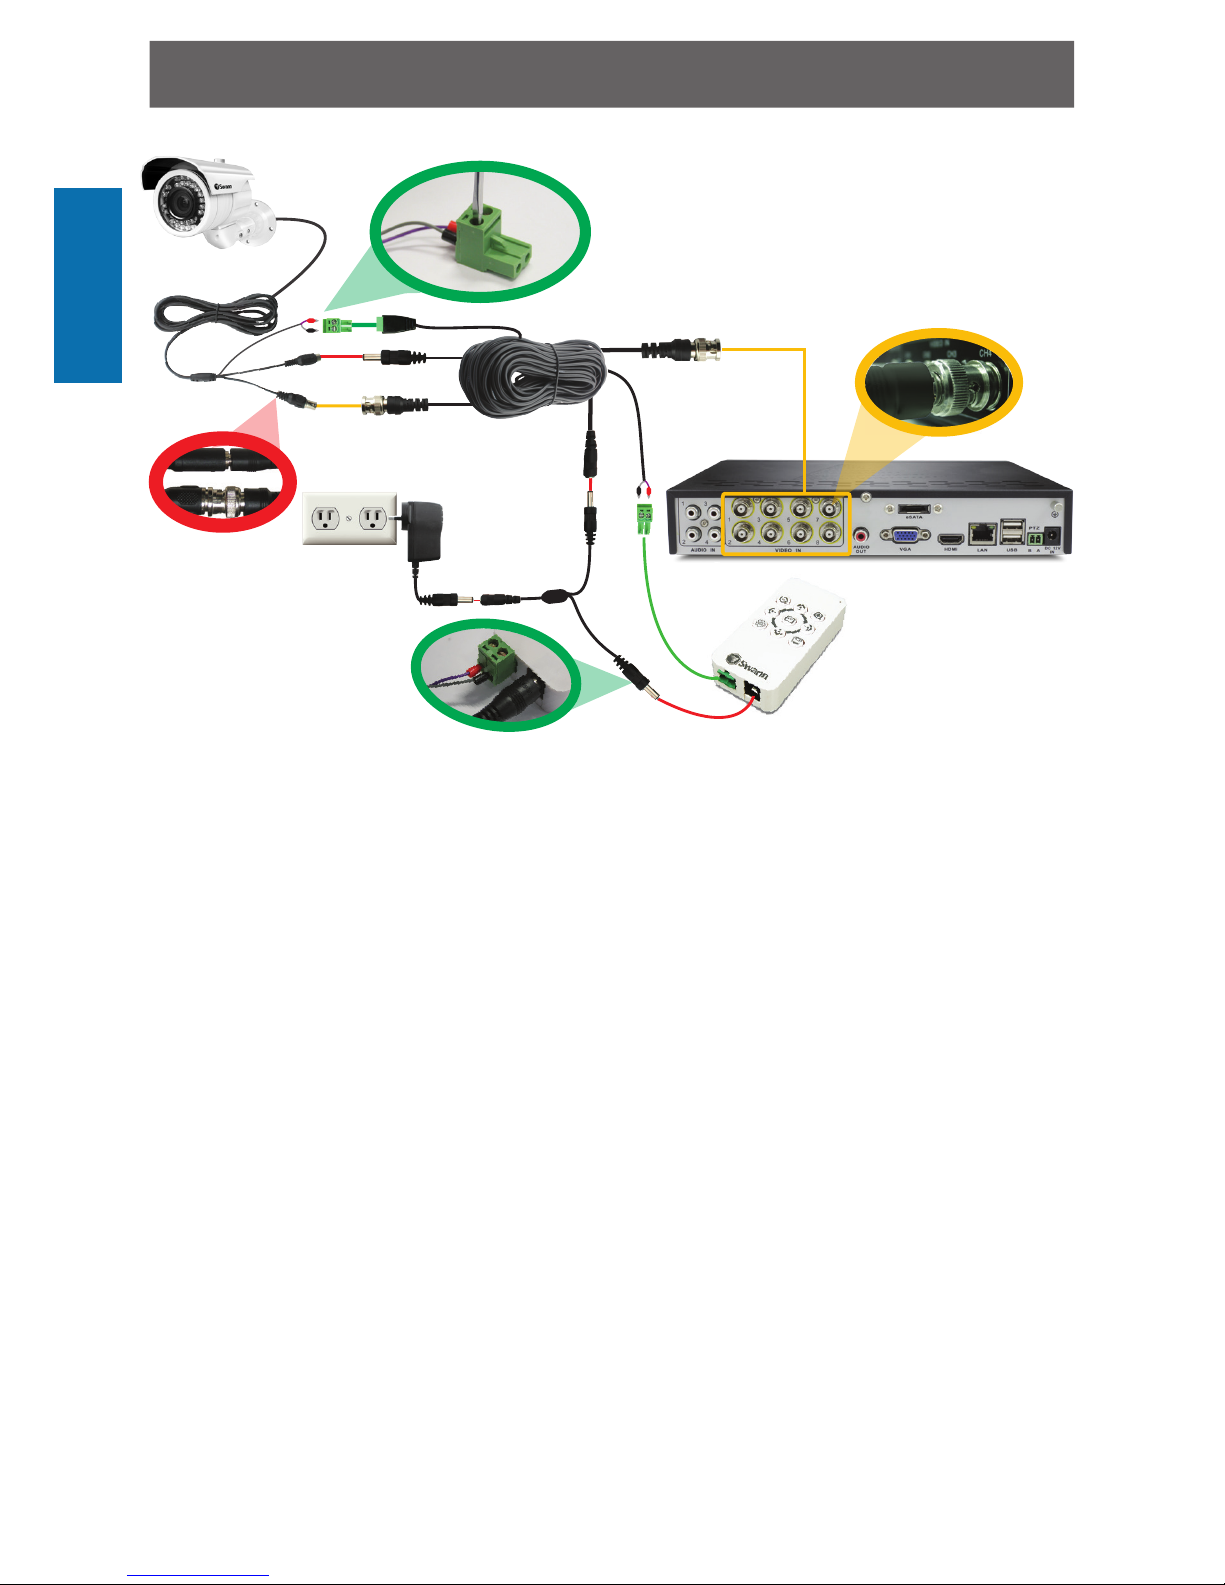
1. Connect the camera’s DC and BNC cables to the extension cable, twist the BNC
connector to lock it together securely.
2. (Optional) If you intend to use the OSD controller, connect the camera’s green RS485
plug to the extension cable. You may first need to attach the RS485 plug to the wires
on the cables as shown in the diagram above.
3. Connect the the other end of the BNC extension cable to an unused channel on the
back of your DVR and twist the connector to lock it on securely.
4. Connect the extension cable’s DC socket to one end of the power splitter cable.
5. (Optional) To use the OSD controller, plug the extension cable’s RS485 plug (note red
connector to A/+ and black connector to B/- on the controller socket) and the other end
of the power splitter to the OSD controller’s RS485 port and DC in power jack.
6. Connect the power splitter cable to the power adapter, and plug the power adapter into
a wall outlet.
Note: Once the camera is set up and working well it is a good idea to wrap some electrical
tape around the connections between the camera cable and the BNC extension cable
to keep moisture out and preserve the electrical integrity of the connection.
Connection Guide
Page 5
5
ENGLISH
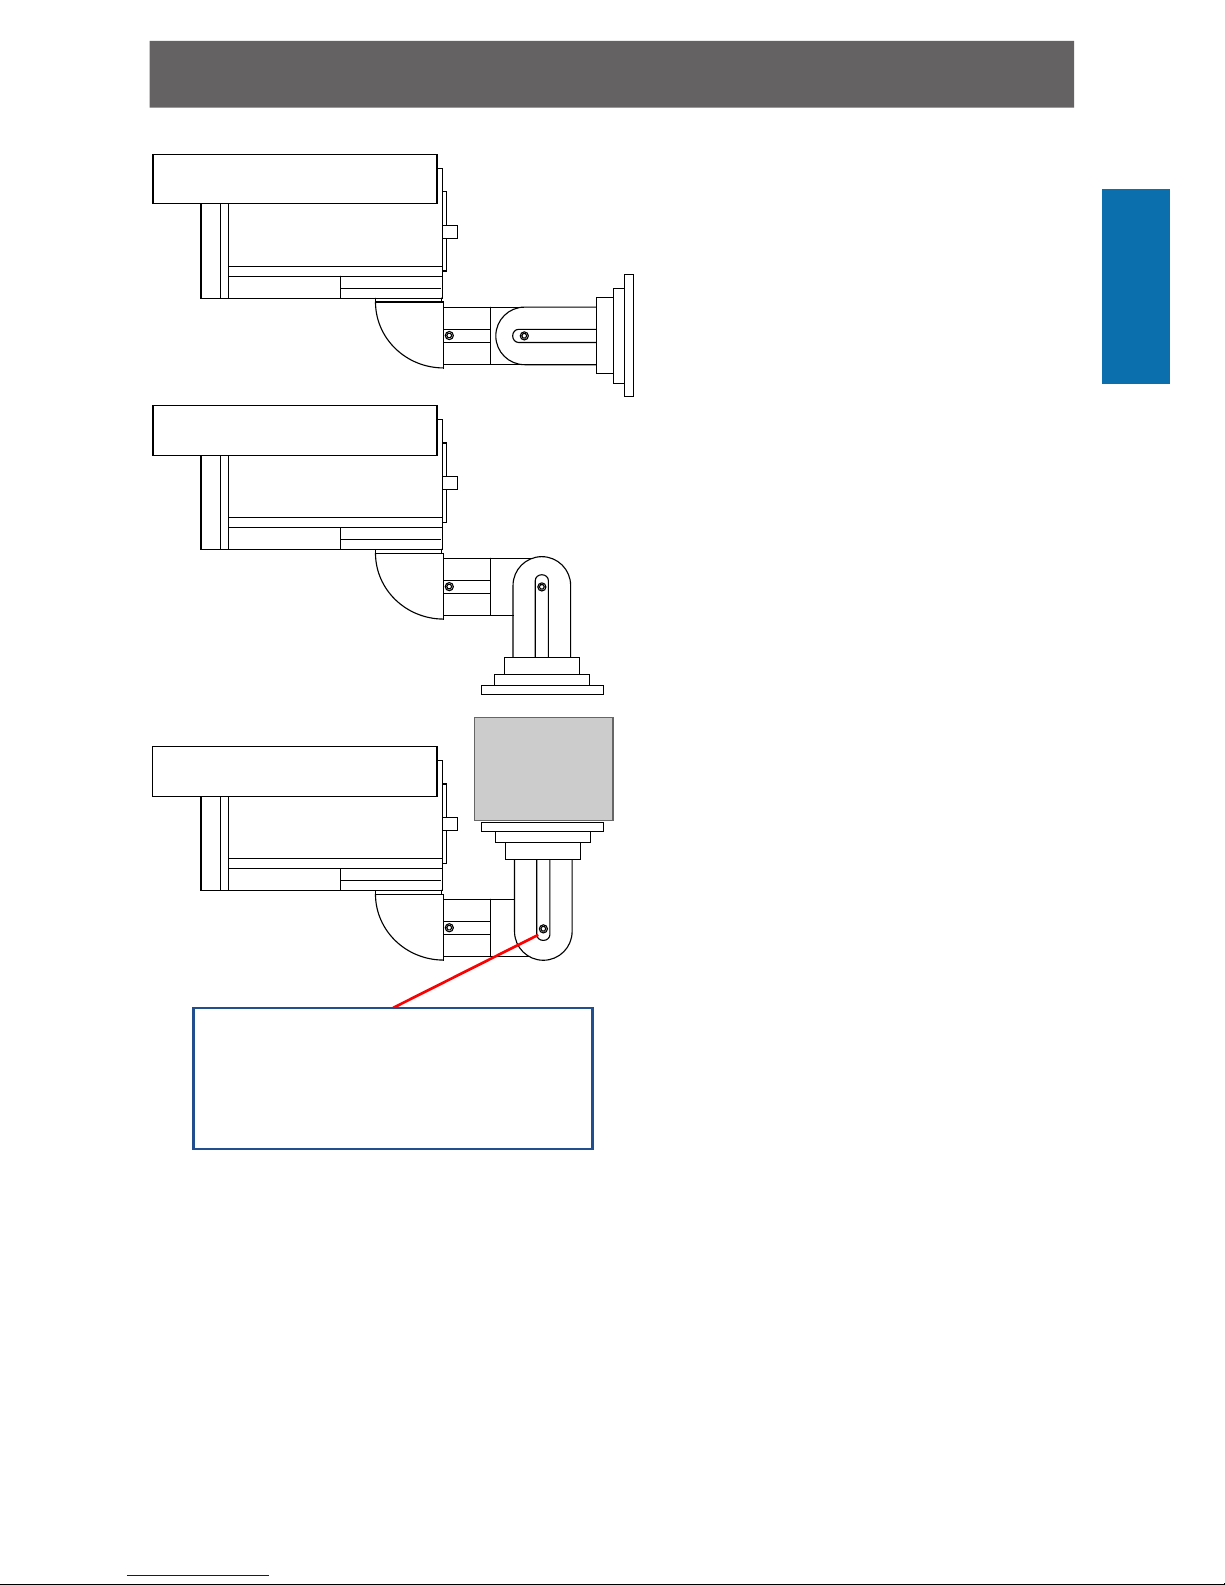
Mounting
There are three ways that you can mount
the PRO-CAM: to a wall (1, recommended)
or to a horizontal surface, either above
(2) or suspended (3, requires additional
hardware).
To mount the camera, use the supplied
mounting hardware (screws). If you’re
mounting onto a wooden surface, you
can drive the screws directly into the
wood. You may need to drill guide holes
first, particularly if mounting the camera
onto hardwood. If mounting on masonry
or similar surface, use the included wall
plugs.
We recommend mounting the camera
onto a wall or other vertical surface this is what the stand has been designed
for. See diagram 1.
You can also mount the camera above
a flat surface (2). This is useful if, for
example, you wanted to mount the
camera on a roof overlooking a yard.
If necessary, you can mount the camera
onto a ceiling or other horizontal surface
(3) by using a mounting block or bracket
(represented on the diagram to the left by
the grey box). We don’t recommend doing
this as it’s the most difficult mounting
option and will require additional
hardware and skill to execute. Be sure
to use a bracket or block with sufficient
strength. Mounting in this way will make
it more difficult to access the zoom and
focus controls.
Option 1
Option 2
Option 3
You can change the angle of the stand
by loosening the screw on the hinge,
shown here. Tighten it once the camera
is in the desired position.
Page 6

6
ENGLISH
Troubleshooting
Problem: At night, all I see is white.
Solution: The camera is most likely looking through a window. At night, the infrared light
the camera uses to see in the dark can ‘bounce back’ off a reflective surface (such as
glass, water, spider webs, some ceramics and so on) and effectively blind the camera.
If you want to see outside, mount the camera outside - we made it weatherproof for a
reason!
Problem: I see only a blank screen where my image should be.
Solution: Check the wiring to the camera, and ensure the camera is being supplied
power from the included power adapter. Try using a different video lead, or connecting
the camera to a different television or monitor. Be sure there are no devices interrupting
your signal, such as a DVR or VCR that isn’t outputting the signal correctly.
Problem: I can’t see anything at night.
Solution: The maximum range of the night vision is just that, the maximum range. If
there’s nothing in this range, you won’t see anything. Also, some dark objects (like the
proverbial black cat) may not reflect enough light to be seen except as a silhouette if
the background is brighter. Some objects which can easily be seen in visible light don’t
reflect much infrared light.
Problem: Everything looks blurry/soft.
Solution: You probably need to adjust the focus (the knob on the right). This is simply a
matter of removing the right protective cap on the rear of the camera, and turning the
control knob one way until you find the best focus point or it won’t turn any more. Then,
turn it back the other way. If there is no “sweet spot” then this indicates one of two things.
Note: You might be trying to focus on something outside the “depth of field” - objects
need to be at least a certain distance from the camera for you to be able to focus on
them. Typically, this will be only a few feet (about 1m) but this distance can increase
dramatically if the lens is zoomed in, or in low light conditions. Be sure to replace the
protective cap once you’ve set the focus!
Advanced Feature: On Screen Display (OSD)
The OSD is an optional use, advanced feature that allows you to change settings for:
Wide Dynamic Range (reduces the difference between light and dark areas of a scene)
3D Noise Reduction (reduces digital image “noise” in low light images)
Back Light Compensation (adjusts the image if strong light source is in the scene
background)
Auto White Balance (another way of adjusting the image to compensate for different lighting
and colour conditions in a camera scene)
Numerous other image tuning and camera setting options.
The camera will work perfectly well if you never attach the OSD controller - it will regulate
all its settings automatically and will suit most applications.
The OSD controls are many and varied so if you would like to make some changes or have a
particular need for your camera that requires some fine tuning, simply read the OSD guide
included in your pack or you can download the guide to the OSD from our website:
www.swann.com/osdpro
Page 7

7
ENGLISH
Helpdesk / Technical Support Details
Limited Warranty Terms & Conditions
USA toll free
1-800-627-2799
USA Exchange & Repairs
1-800-627-2799 (Option 1)
(M-F, 9am-5pm US PT)
AUSTRALIA toll free
1300 138 324
NEW ZEALAND toll free
0800 479 266
UK
0203 027 0979
Swann Technical Support
All Countries E-mail: tech@swann.com
Telephone Helpdesk
Swann Communications warrants this product against defects in workmanship and material for a
period of one (1) year from it’s original purchase date. You must present your receipt as proof of date
of purchase for warranty validation. Any unit which proves defective during the stated period will
be repaired without charge for parts or labour or replaced at the sole discretion of Swann. The end
user is responsible for all freight charges incurred to send the product to Swann’s repair centres.
The end user is responsible for all shipping costs incurred when shipping from and to any country
other than the country of origin.
The warranty does not cover any incidental, accidental or consequential damages arising from
the use of or the inability to use this product. Any costs associated with the fitting or removal of
this product by a tradesman or other person or any other costs associated with its use are the
responsibility of the end user. This warranty applies to the original purchaser of the product only
and is not transferable to any third party. Unauthorized end user or third party modifications to any
component or evidence of misuse or abuse of the device will render all warranties void.
By law some countries do not allow limitations on certain exclusions in this warranty. Where
applicable by local laws, regulations and legal rights will take precedence.
For Australia: Our goods come with guarantees which cannot be excluded under Australian
Consumer Law. You are entitled to a replacement or refund for a major failure and for compensation
for any other reasonably foreseeable loss or damage. You are also entitled to have the goods
repaired or replaced if the goods fail to be of acceptable quality and the failure does not amount to
major failure.
FCC Verification
This equipment has been tested and found to comply with the limits for Class B digital device,
pursuant to part 15 of the FCC Rules. These limits are designed to provide reasonable protection
against harmful interference in a residential installation. This equipment generates, uses and can
radiate radio frequency energy and, if not installed and used in accordance with the instructions,
may cause harmful interference to radio or television reception, which can be determined by turning
the equipment off and on, the user is encouraged to try to correct the interference by one or more
of the following measures:
Reorient or relocate the receiving antenna
Increase the separation between the equipment and the receiver
• Connect the equipment into an outlet on a circuit different from that to which the receiver is
connected
• Consult the dealer or an experienced radio/TV technician for help
WARNING: Modifications not approved by the party responsible for compliance could void user’s
authority to operate the equipment.
Page 8

8
ESPAÑOL
Acerca de la cámara
¡Felicitaciones por su compra de esta PRO-CAM de Swann! Ha elegido bien: creemos que es una
de las mejores cámaras de video de CCTV varifocales disponibles. La lente ajustable y el sistema
de menú en pantalla hacen que la cámara PRO-CAM sea ideal para supervisar cualquier tipo de
espacio en casi cualquier condición de iluminación... incluso sin nada de luz, ¡ya que puede ver
hasta 40 m / 130 pies en la oscuridad total!
El montaje, conexión y configuración de su cámara PRO-CAM puede ser un proceso engorroso.
No es una cámara lista para usar, aunque la mayoría de los ajustes avanzados pueden dejarse en
automático, si eso le conviene.
Nuestra reflexión: usted ha invertido dinero en una excelente cámara. Vale la pena pasar un par
de horas asegurándose de instalarla correctamente. Este manual lo guiará por todos los pasos
necesarios para que su cámara produzca imágenes de alta calidad, y le permitirá saber algunas
cosas para poder aprovecharla un poco más.
El proceso: panorama general
1. Seleccione un lugar para su cámara. Esto dependerá de qué necesita supervisar, los lugares
cercanos que pueden soportar una cámara, las condiciones de iluminación del entorno, etc.
2. Conecte la cámara al monitor. Sugerimos conectarla directamente a un monitor durante la
instalación y luego a su grabadora de DVD (u otro dispositivo de grabación). Tener un monitor
a mano en la misma ubicación que la cámara realmente ahorra tiempo durante la instalación.
3. Configure el zoom. Esto ajustará el ángulo de visión de la lente, que determina cuánto puede
ver la cámara (página 9).
4. Configure el foco. Esto le permitirá seleccionar qué partes de lo que ve la cámara se enfocan.
En realidad, probablemente deba repetir los pasos 3 y 4 hasta estar satisfecho con la imagen
(página 9).
5. Conecte la cámara a su grabadora de DVD (u otro dispositivo de grabación/supervisión). Ver
página 10.
Selección de la ubicación
La cámara PRO-CAM es muy flexible y puede instalarse prácticamente en cualquier parte. Algunas
de las cosas que deberá considerar al seleccionar una ubicación son:
• Qué desea supervisar y dónde obtendrá la mejor vista de ello.
• Cómo conectará la cámara a su sistema de supervisión.
• Cómo proteger la cámara de daños. Un lugar elevado en un rincón protegido es una buena
opción.
Las reglas son las reglas
Independientemente de todos los ajustes de la lente y el procesamiento que pueda realizar con las
imágenes, hay algunas cosas invariables que son verdaderas para todas las cámaras, ya sean de
CCTV o de otro tipo.
• Cuanto más cerca está la cámara del objeto que desea ver, más detalle obtendrá. Puede
realizar alguna alteración ajustando el zoom, pero no hay nada que supere la proximidad del
objeto.
• Las áreas con condiciones variadas de iluminación son difíciles de ver en su totalidad,
con cualquier cámara. Si los puntos luminosos se exponen correctamente, las sombras
“desaparecerán”. Si las áreas de sombras se exponen correctamente, las partes luminosas
quedarán expuestas y se “resaltarán”. Apuntar la cámara a una zona con iluminación uniforme
siempre proporcionará los mejores resultados.
Page 9

9
ESPAÑOL
Los controles de zoom y foco se ubican en la parte
posterior de la cámara.
ZOOM: La perilla izquierda controla el nivel del zoom.
Puede variar el ángulo de visión entre 23° y 81°. Se trata
de un zoom óptico de aproximadamente 4x (2.8mm12mm), que funciona de forma similar al zoom de su
cámara digital. Básicamente, al acercarse todo parece
más grande, a costas del área de visión.
Verifique el diagrama sobre la izquierda para obtener
una representación visual del proceso de acercamiento.
El menor ángulo de visión (marcado a 23°) representa la
visión de la cámara al “acercar”, y el ángulo mayor (81°)
representa la visión de la cámara al “alejar”.
Puede establecer el zoom en cualquiera de estos dos
extremos o en cualquier punto intermedio.
Cuando modifica el zoom, deberá modificar también el
foco. ¿Por qué? Las lentes son complicadas, y todos los elementos se relacionan entre sí. Modificar
el zoom también modificará el foco.
FOCO: La perilla de la derecha controla el foco.
Ajustar el control de foco es similar a probar
un nuevo par de anteojos: puede hacer que
los objetos claros se vean borrosos y que los
objetos borrosos se vean claros. No es magia,
pero se le parece bastante.
Básicamente, una vez que ha configurado el
zoom, gire la perilla de foco hasta que lo que
desea ver ya no se vea borroso. Si ya no puede
girar más la perilla, vuelva a la otra perilla.
Sólo se puede enfocar una zona por vez; los
fotógrafos se refieren al tamaño del área
enfocada como la “profundidad de campo”.
El diagrama de la derecha muestra un par
de opciones diferentes de foco. Las áreas
sombreadas representan la profundidad
de campo. Como puede ver, no hay límites
definidos, algunos objetos están “más” en foco
que otros.
Observe que esto se incluye para fines ilustrativos solamente, hay numerosos factores que
contribuyen a la profundidad de campo que varían de un sitio a otro.
A: La lente está en su punto más ancho y
enfocada en un área relativamente cercana a la
cámara. La profundidad de campo es bastante
grande.
B: La lente se encuentra en su punto más ancho
con el foco en “infinito”. Todos los objetos en
la sección sombreada estarán en foco, y este
foco se extiende hacia el infinito (es decir, los
elementos en la distancia también estarán
dentro del foco). Sin embargo, los elementos en
la distancia podrían ser demasiado pequeños
para verlos con el detalle requerido.
C: La lente se encuentra en su punto de ancho
mínimo, enfocada en el área cercana a la
cámara. Como puede ver, cuanto más se acerca
la lente, menor será la profundidad de campo.
D: La lente se encuentra en su punto de ancho
mínimo, con el foco en su punto más alejado
de la cámara. A esta distancia, la profundidad
de campo real es mucho mayor, pero no se
extiende hacia el infinito como lo hace con la
lente ampliada.
A C
B D
81°
23°
Ajuste de la lente
Page 10
10
ESPAÑOL
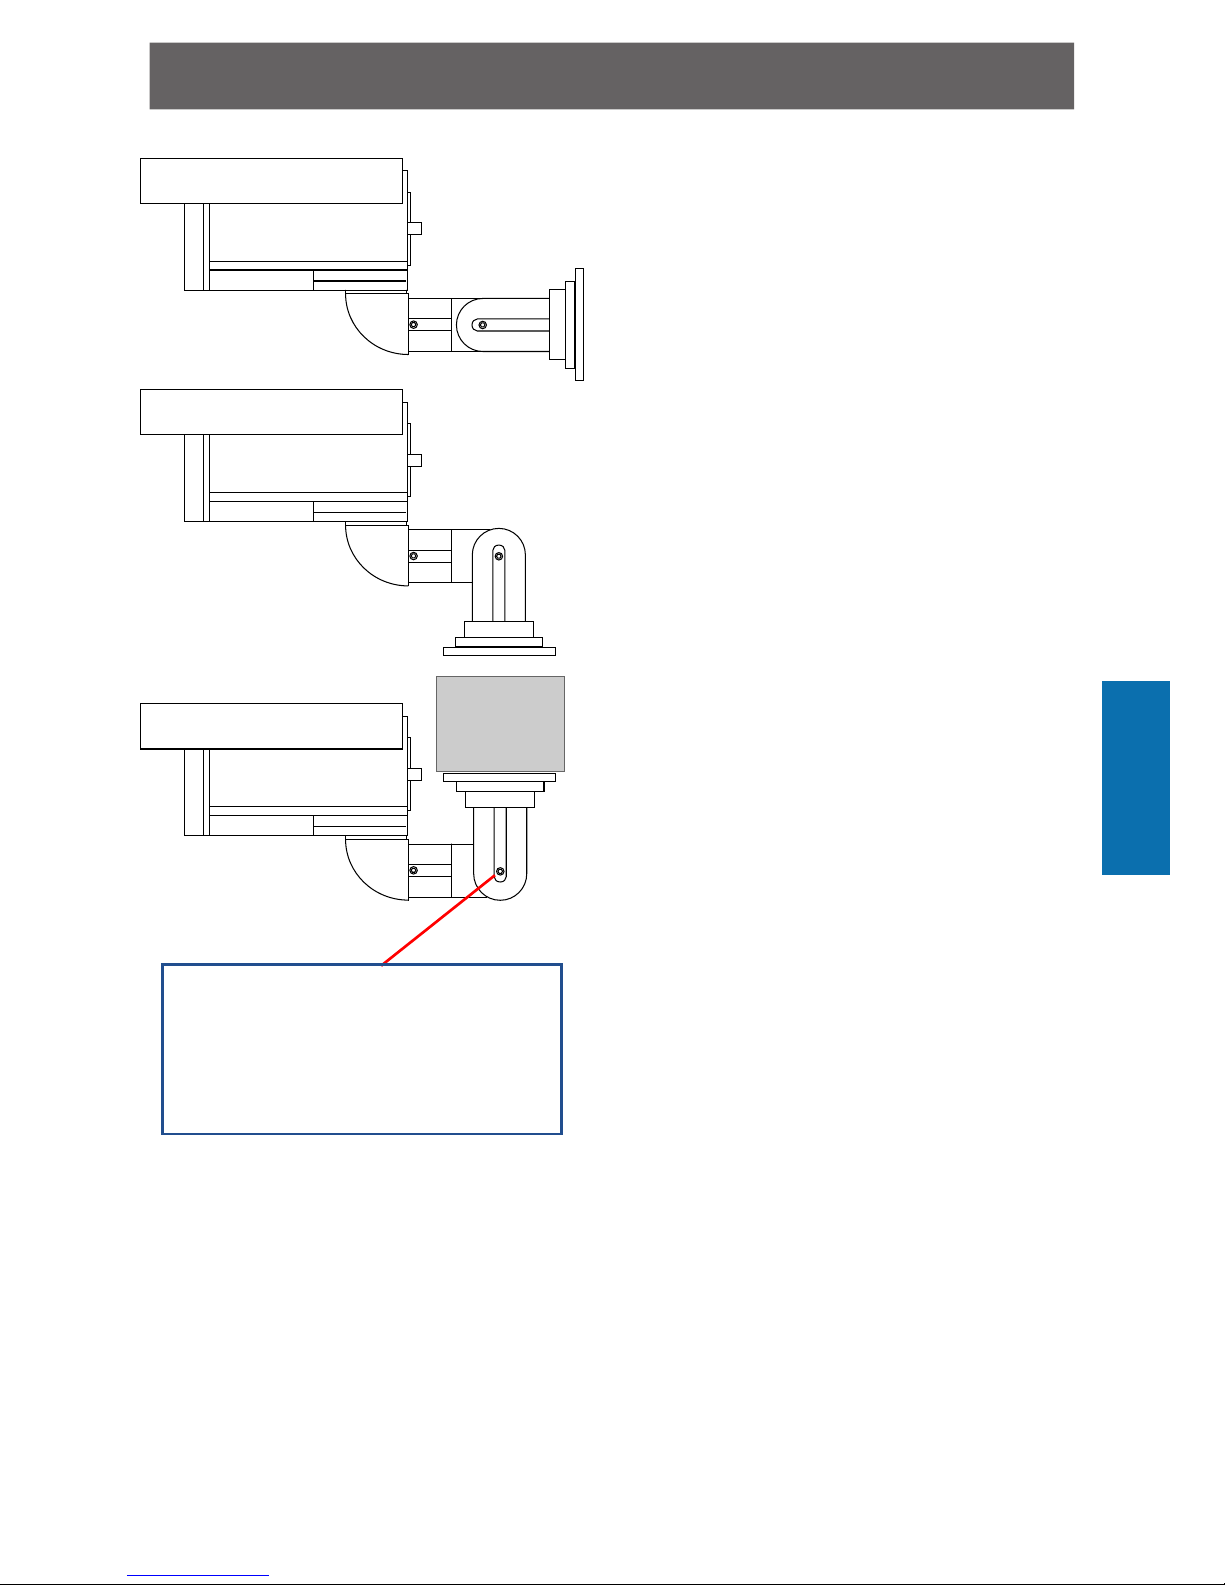
Montaje de la Cámara
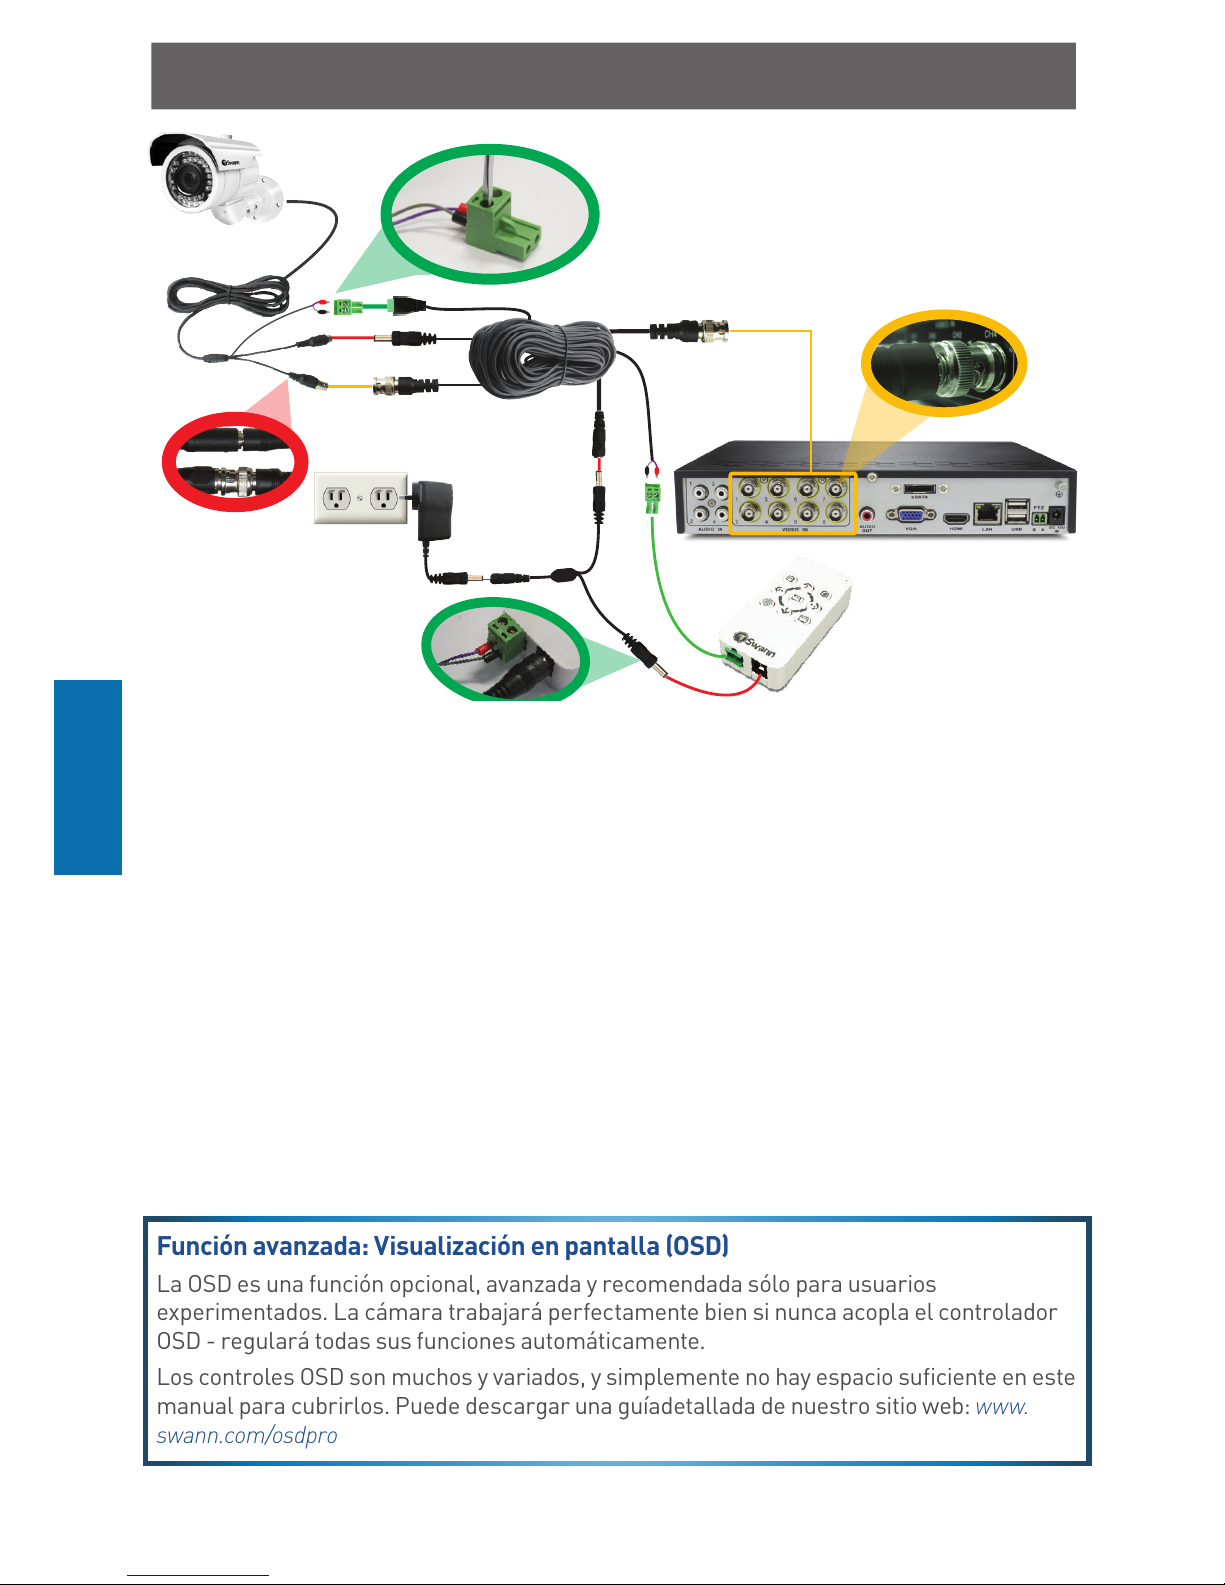
Función avanzada: Visualización en pantalla (OSD)
La OSD es una función opcional, avanzada y recomendada sólo para usuarios
experimentados. La cámara trabajará perfectamente bien si nunca acopla el controlador
OSD - regulará todas sus funciones automáticamente.
Los controles OSD son muchos y variados, y simplemente no hay espacio suficiente en este
manual para cubrirlos. Puede descargar una guíadetallada de nuestro sitio web: www.
swann.com/osdpro
3
1
2
4
5
6
1. Conecte los cables DC y BNC de la cámara al cable de extensión.
2. (Opcional) Si intenta utilizar el controlador OSD, conecte el enchufe verde RS485
al cable de extensión. Podría necesitar acoplar primero el enchufe RS485 a los
alambres en los cables como se muestra en el siguiente diagrama.
3. Para conectar a un DVR, conecte el cable de extensión BNC a un canal abierto en la
parte trasera de su DVR.
4. Conecte el enchufe DC del cable de extensión a un extremo del cable divisor de
potencia.
5. (Opcional) Para utilizar el controlador OSD, conecte el enchufe del cable de extensión
RS485 y el otro extremo del divisor de potencia al puerto RS485 del controlador OSD y
la hembra del DC.
6. Conecte el cable divisor de potencia al adaptador, y enchufe el adaptador a la salida de
pared.
Page 11
11
ESPAÑOL
Solución de Problemas
Hay tres formas en que puede montar la PROCAM: sobre una pared (1, recomendada) o una
superficie horizontal, ya sea en altura (2) o
suspendida (3, requiere elementos adicionales).
Para montar la cámara, use los elementos
de montaje provistos (tornillos). Si monta
la cámara sobre una superficie de madera,
puede colocar los tornillos directamente
sobre la madera. Es posible que primero deba
perforar orificios, particularmente si monta
la cámara sobre madera dura. Si coloca la
cámara sobre mampostería o una superficie
similar, utilice los tacos provistos.
Recomendamos montar la cámara sobre una
pared u otra superficie vertical; es para este fin
que se ha diseñado el soporte. Ver diagrama 1.
También puede montar la cámara por encima
de una superficie plana (2). Esto es útil, por
ejemplo, si desea montar la cámara sobre un
techo mirando hacia un patio.
De ser necesario, puede montar la cámara
en el techo u otra superficie horizontal (3)
utilizando un bloque de montaje o soporte
(representado en el diagrama de la izquierda
con el cuadro gris). No recomendamos esto,
ya que es la opción de montaje más difícil y
requerirá elementos adicionales y habilidad
para realizarlo. Asegúrese de usar un soporte o
bloque con fuerza suficiente. El montaje de esta
forma dificultará el acceso al menú en pantalla
y los controles de zoom/foco.
Opción 1
Opción 2
Opción 3
Puede cambiar el ángulo del soporte
aflojando el tornillo de la bisagra, como
se muestra aquí. Ajústelo una vez que
la cámara se encuentre en la posición
deseada.
Page 12

12
ESPAÑOL
Solución de Problemas
Problema: De noche, sólo se ve una imagen blanca.
Solución: La cámara probablemente está enfocando una ventana. De noche, la luz
infrarroja que usa la cámara para ver en la oscuridad puede “rebotar” en una superficie
reflexiva (como el vidrio, agua, telas de araña, algunas cerámicas, etc.) y efectivamente
cegar la cámara. Si desea ver hacia afuera, monte la cámara en el exterior, ¡por algo la
hicimos impermeable!
Problema: Verifique el cableado de la cámara y asegúrese de que la cámara reciba
alimentación del adaptador de energía provisto. Intente usar otro cable de video o conectar
la cámara a un televisor o monitor diferente. Asegúrese de que no haya dispositivos que
interfieran con la señal, tales como una grabadora de DVD o video que no emite la señal
correctamente.
Problema: No veo nada de noche.
Solución: El rango máximo de visión nocturna es exactamente eso, el rango máximo. Si no
hay nada en este rango, no verá nada. Asimismo, algunos objetos oscuros (como el famoso
gato negro) pueden no reflejar la suficiente luz como para ser vistos excepto como una
silueta si el fondo es más brillante. Algunos objetos que pueden verse fácilmente con luz
visible no reflejan mucha luz infrarroja.
Problema: Todo luce borroso/tenue.
Solución: Probablemente necesita ajustar el foco (la perilla de la derecha). Simplemente
se trata de girarlo hacia un lado hasta encontrar el mejor punto de foco o hasta llegar al
tope. Luego, gire hacia el otro lado. Si no encuentra un “punto agradable” indica una de dos
cosas:
• Su lente puede estar sucia. Limpie la parte delantera con un paño para la limpieza
de lentes (disponible en todas las tiendas de cámaras). Evite el uso de solventes o
productos químicos de limpieza, ya que dejan residuos.
• Deje una cierta distancia de la cámara para poder enfocar los objetos. Típicamente,
debe ser de tan sólo unos pies (alrededor de 1 m) pero esta distancia puede aumentar
dramáticamente si la lente se acerca o en condiciones de luz baja.
Page 13

13
ESPAÑOL
© Swann Communications 2014
Verificación de la FCC:
NOTA: Este equipo ha sido probado y se encontró que cumple con los límites para aparatos digitales Clase B,
de acuerdo con la parte 15 de la FCC. Estos límites están diseñados para proveer protección razonable contra
interferencia dañina en una instalación residencial. Este equipo genera, usa y puede irradiar energía de
radiofrecuencia, si no se instala y se usa de acuerdo con las instrucciones, puede causar interferencia dañina en
la recepción de radio o televisión, lo cual se puede determinar encendiendo y apagando el equipo, se alienta al
usuario intentar corregir la interferencia mediante una o más de las siguientes medidas:
• Reoriente o cambia de ubicación la antena receptora.
• Incremente la separación entre el equipo y el receptor.
• Conecte el equipo a una toma en un circuito diferente al que está conectado el receptor.
• Consulte al distribuidor o a un técnico en radio/televisión con experiencia por ayuda.
Estos dispositivos cumplen con la parte 15 del Reglamento de la FCC. El funcionamiento está sujeto a las dos
siguientes condiciones:
(1) Estos aparatos no deben causar interferencia dañina, y
(2) Estos aparatos deben aceptar cualquier interferencia recibida, incluyendo interferencia que pueda causar un
funcionamiento no deseado
Información sobre la garantía
Swann Communications garantiza este producto por defectos de fabricación y material,por un período de un (1) año a
partir de la fecha original de compra. Usted deberá presentar su recibo como prueba de la fecha de compra para validar
la garantía. Cualquier unidad que se compruebe defectuosa durante el período antes citado será reparada sin cobrar los
repuestos o la mano de obra, o será sustituida, a discreción exclusiva de Swann. La reparación o sustitución se garantizará
por noventa días o por el período que falte de la garantía original de un año, el que resulte más largo de los dos. El usuario
nal asume los costos de etes incurrido para enviar el producto a los centros de reparación de Swann. El usuario nal se
responsabiliza de los costos de envío en que incurran cuando envía desde y hacia cualquier país distinto al país de origen.
La garantía no cubre daños accidentales, circunstanciales o que resulten del uso o la imposibilidad de utilizar este
producto. Cualquier costo asociado con la adaptación o remoción de este producto por parte de un vendedor o de
otra persona, o cualquier costo asociado con el uso del mismo son responsabilidad del usuario nal. Esta garantía aplica
exclusivamente al comprador original del producto, y no es transferible a terceros.
Si el usuario nal o un tercero hacen modicaciones no autorizadas a cualquier componente o si hay evidencia de mal uso
o abuso del dispositivo, se anularán todas las garantías.
Detalles del servicio de asistencia
Información sobre la garantía
Número de llamada sin cargo
EE.UU.
1-800-627-2799
Cambio y reparaciones EE. UU.
1-800-627-2799 (Option 1)
(M-F, 9am-5pm US PT)
Número de llamada sin cargo
AUSTRALIA
1300 138 324
Número de llamada sin cargo
NUEVA ZELANDA
0800 479 266
UK
0203 027 0979
Soporte Técnico Swann
Correo electrónico para todos los países: tech@swann.com
Teléfono del servicio de asistencia
Swann Communications garantiza este producto por defectos de fabricación y material,por un
período de un (1) año a partir de la fecha original de compra. Usted deberá presentar su recibo
como prueba de la fecha de compra para validar la garantía. Cualquier unidad que se compruebe
defectuosa durante el período antes citado será reparada sin cobrar los repuestos o la mano de
obra, o será sustituida, a discreción exclusiva de Swann. La reparación o sustitución se garantizará
por noventa días o por el período que falte de la garantía original de un año, el que resulte más largo
de los dos. El usuario final asume los costos de fletes incurrido para enviar el producto a los centros
de reparación de Swann. El usuario final se responsabiliza de los costos de envío en que incurran
cuando envía desde y hacia cualquier país distinto al país de origen.
La garantía no cubre daños accidentales, circunstanciales o que resulten del uso o la imposibilidad
de utilizar este producto. Cualquier costo asociado con la adaptación o remoción de este producto
por parte de un vendedor o de otra persona, o cualquier costo asociado con el uso del mismo son
responsabilidad del usuario final. Esta garantía aplica exclusivamente al comprador original del
producto, y no es transferible a terceros.
Si el usuario final o un tercero hacen modificaciones no autorizadas a cualquier componente o si
hay evidencia de mal uso o abuso del dispositivo, se anularán todas las garantías.
Verificación de la FCC:
NOTA: Este equipo ha sido probado y se encontró que cumple con los límites para aparatos digitales
Clase B, de acuerdo con la parte 15 de la FCC. Estos límites están diseñados para proveer protección
razonable contra interferencia dañina en una instalación residencial. Este equipo genera, usa y
puede irradiar energía de radiofrecuencia, si no se instala y se usa de acuerdo con las instrucciones,
puede causar interferencia dañina en la recepción de radio o televisión, lo cual se puede determinar
encendiendo y apagando el equipo, se alienta al usuario intentar corregir la interferencia mediante
una o más de las siguientes medidas:
• Reoriente o cambia de ubicación la antena receptora.
• Incremente la separación entre el equipo y el receptor.
• Conecte el equipo a una toma en un circuito diferente al que está conectado el receptor.
• Consulte al distribuidor o a un técnico en radio/televisión con experiencia por ayuda.
Estos dispositivos cumplen con la parte 15 del Reglamento de la FCC. El funcionamiento está sujeto
a las dos siguientes condiciones:
(1) Estos aparatos no deben causar interferencia dañina, y
(2) Estos aparatos deben aceptar cualquier interferencia recibida, incluyendo interferencia que
pueda causar un funcionamiento no deseado
Page 14

14
FRANÇAIS
À propos de la caméra
Félicitations pour votre achat de cette caméra PRO-CAM de Swann! Vous avez fait un bon choix : nous
croyons que c’est une des meilleures caméras vidéo CCTV à focale variable sur le marché. L’objectif
ajustable et le système de menu à l’écran font de la PRO-CAM une caméra idéale pour n’importe quel
type d’espace dans presque toutes les conditions d’éclairage… et ce, même avec aucune lumière,
puisqu’elle peut voir jusqu’à une distance de 40 m/130 pi dans la noirceur totale!
Le processus de monter, connecter et configurer votre PRO-CAM peut être un peu long. Ce n’est pas
une caméra « prête à l’emploi », bien que la majorité des réglages avancés puissent être laissés à
automatique, si cela vous convient.
Notre avis : vous avez dépensé les sous pour une excellente caméra. Elle vaut la peine de passer
quelques heures pour s’assurer qu’elle est bien configurée. Ce manuel passera à travers tout ce que
vous devez faire pour que la caméra livre des images de haute qualité, et vous informera un peu sur
comment vous pouvez l’ajuster encore plus.
Le processus : Un aperçu
1. Choisissez un emplacement pour votre caméra. Ce choix sera influencé par ce que vous devez
surveiller, les emplacements à proximité qui peuvent supporter une caméra, les conditions
d’éclairage de l’environnement et ainsi de suite.
2. Connectez la caméra à un moniteur. Nous suggérons de le connecter directement à un
moniteur durant la configuration, et à votre enregistreur vidéo numérique (DVR) (ou autre
appareil d’enregistrement) par la suite. Avoir un moniteur à portée de main dans le même
emplacement que la caméra sauve vraiment du temps durant la configuration.
3. Configurez le zoom. Cela configure l’angle de prise de vue de l’objectif, ce qui détermine ce que
la caméra peut voir (page 15).
4. Configurez la mise au point. Cela vous permettra de choisir quelles parties de ce que la
caméra peut voir sont mises au point. En fait, vous ferez probablement un va-et-vient entre les
étapes 3 et 4 jusqu’à ce que vous soyez satisfait de l’image (page 15).
5. Connectez la caméra à votre DVR (ou autre appareil d’enregistrement/de surveillance) - voir
page 16.
Choisir un emplacement
La PRO-CAM est très flexible et peut être installée pratiquement n’importe où. Certaines choses à
considérer lors du choix de l’emplacement incluent :
• Ce que vous voulez surveiller, et d’où vous aurez la meilleure vue.
• Comment vous allez connecter la caméra à votre système de surveillance.
• Comment garder la caméra hors de danger. Haut dans des coins protégés est une bonne
option.
Les règles sont les règles
Peu importe les ajustements que vous faites à l’objectif et au traitement de l’image, il existe des
choses immuables qui sont vraies pour toutes les caméras, CCTV ou autre.
• Plus la caméra est proche de ce que vous voulez voir, plus vous obtiendrez de détails. Vous
pouvez effectuer certaines altérations en ajustant le zoom, mais il n’y a aucun substitut pour
la proximité.
• Les zones avec des conditions d’éclairage variées sont difficiles à voir complètement,
peu importe la caméra. Si les éléments clairs sont exposés correctement, les ombres «
s’occulteront ». Si les zones ombrées sont exposées correctement, les éléments clairs vont
se surexposer et se « blanchiront ». Viser la caméra vers une zone éclairée de façon uniforme
donnera toujours les meilleurs résultats.
• Ces trucs « d’accentuation d’image » qu’ils font dans Les Experts ou 24 heures chrono, ce
sont des mensonges. Vous ne pouvez faire un zoom indéfini sur une image vidéo. Les plaques
d’immatriculation ne sont lisibles qu’à une distance de quelques mètres (une douzaine de
pieds environ). Si la tête de quelqu’un est représentée par trois pixels, c’est tout. Désolé. C’est
ça la technologie, ce n’est pas de la magie. La PRO-CAM est une excellente caméra CCTV, mais
ce n’est qu’une caméra vidéo après tout - elle ne peut pas voir tellement mieux que vous le
pouvez! Par contre, ça rend les séries télé plus intéressantes.
Page 15

15
FRANÇAIS
Ajuster l’objectif
Les commandes de zoom et de mise au point sont
situées à l’arrière de la caméra.
ZOOM : Le cadran gauche contrôle le niveau de
zoom. Vous pouvez faire varier l’angle de prise
de vue entre 23° et 81°. C’est un zoom optique
d’approximativement 4x (2.8mm-12mm), qui
fonctionne de manière semblable au zoom sur
votre caméra numérique. En somme, un zoom
avant affiche tout plus gros, au détriment de la
zone de visualisation.
Référez-vous au diagramme à gauche pour une
représentation visuelle du processus de zoom.
L’angle de visualisation le plus petit (marqué 23°)
représente la vue de la caméra lors d’un « zoom
avant », et l’angle le plus large (81°) représente la
vue de la caméra lors d’un « zoom arrière ».
Vous pouvez régler le zoom à l’une ou l’autre de ces
extrémités, ou n’importe où entre les deux.
Lorsque vous modifiez le zoom, vous devrez aussi
modifier la mise au point. Pourquoi? Les objectifs sont compliqués, et tous les éléments sont
interconnectés. Modifier le zoom modifiera aussi la mise au point.
MISE AU POINT : Le cadran droit contrôle la mise au point.
Ajuster la commande de mise au point est semblable
à essayer une différente paire de lunettes – cela
peut faire paraître des objets nets flous et des objets
flous nets. Ce n’est pas vraiment de la magie, mais
presque.
En somme, une fois que vous avez configuré le zoom,
tournez le bouton de mise au point jusqu’à ce que
vous voulez voir n’est plus flou. Si vous ne pouvez plus
tourner le bouton dans un sens, revenez dans l’autre.
Il y a une limite de mise au point que vous pouvez
avoir à un moment donné – les photographes font
référence à la grandeur de la zone de mise au point
par « profondeur de champ ».
Le diagramme à droite affiche différentes options de
mise au point. Les zones ombrées représentent la
profondeur de champ. Comme vous pouvez le voir, il
n’y a pas de contour net, certaines choses sont « plus
» mises au point que d’autres.
Veuillez noter que ceci n’est donné qu’à titre
indicatif seulement – il existe plusieurs facteurs qui
contribuent à la profondeur de champ, et ils peuvent varier d’un endroit à l’autre.
A: L’objectif est à son plus large, et mis au point
sur une zone relativement proche de la caméra.
La profondeur de champ est assez large.
B: L’objectif est à son plus large avec la mise
au point configurée à « infini ». Tout ce qui se
trouve dans la section ombrée sera mis au
point, et cette mise au point s’étend à l’infini
(c’est-à-dire, les choses éloignées seront
aussi mises au point). Par contre, les choses
éloignées pourraient être trop petites pour
que vous puissiez voir les détails que vous avez
besoin.
C: L’objectif est à son plus étroit, mis au point
sur une zone proche de la caméra. Comme vous
pouvez le voir, plus l’objectif est en zoom avant,
plus la profondeur de champ devient petite.
D: L’objectif est à son plus étroit avec la mise au
point plus loin de la caméra. À cette distance,
la profondeur de champ actuelle est beaucoup
plus large, mais elle ne s’étend pas à l’infini
comme elle le fait lorsque l’objectif est large.
A C
B D
81°
23°
Page 16

16
FRANÇAIS
Guide de Connexion
Fonction avancée : Affichage à l’écran (OSD)
L’OSD est une fonction avancées optionnelle et recommandée seulement pour les
utilisateurs expérimentés. La caméra fonctionnera parfaitement si vous n’attachez jamais
le contrôleur OSD - il règlera tous les règlages automatiquement.
Il y a plusieurs différents contrôles OSD, et il n’y a simplement pas assez d’espace dans ce
manuel pour tout couvrir. Vous pouvez télécharger un guide complet pour l’OSD à partir de
notre site Web: www.swann.com/osdpro
3
1
2
4
5
6
1. Connectez les câbles CC et BNC de la caméra au câble de prolongement.
2. (Facultatif) Si vous prévoyez utiliser le contrôleur OSD, connectez la prise verte RS485
de la caméra au câble de prolongement, Vous pouvez d’abord attacher la prise RS485
aux fils des càbles tel qu’indiqué dans le diagramme ci-dessus.
3. Pour connecter un DVR, connectez le câble de prolongement BNC à un canal ouvert à
l’arrière de votre DVR.
4. Conenctez la prise CC du câble de prolongement à l’une des extrémités du câble
répartiteur de puissance.
5. (Facultatif) Pour utiliser le contrôleur OSD, branchez la prise RS485 du câble de
prolongement et l’autre extrémité du câble répartiteur de puissance dans le port
RS485 du contrôleur OSD et le CC dans la prise d’alimentation.
6. Connectez le câble répartiteur de puissance à l’adaptateur d’alimentation, et branchez
l’adaptateur d’alimentation dans une prise murale.
Page 17

17
FRANÇAIS
Montage
Il y a trois façons que vous pouvez monter la
PRO-CAM : au mur (1, recommandé) ou sur
une surface horizontale, soit au-dessus (2) ou
suspendu (3, requiert du matériel additionnel).
Pour monter la caméra, utilisez le matériel
de montage (vis) fourni. Si vous la montez sur
une surface en bois, vous pouvez insérer les
vis directement dans le bois. Il est possible
que vous ayez à percer des avant-trous au
préalable, particulièrement si vous montez la
caméra sur du bois franc. Si vous la montez sur
de la maçonnerie ou sur une surface similaire,
utilisez les chevilles murales incluses.
Nous recommandons de monter la caméra sur
un mur ou une autre surface verticale – c’est
pour cela que le praticable a été conçu. Voir le
diagramme 1.
Vous pouvez aussi monter la caméra au-dessus
d’une surface plate (2). Cela est utile, par
exemple, si vous voulez monter la caméra sur
un toit avec une vue sur une cour.
Si nécessaire, vous pouvez monter la caméra
sur un plafond ou sur une autre plateforme
horizontale (3) en utilisant un bloc ou un
support de montage (représenté sur le
diagramme à gauche par la boîte grise).
Nous ne recommandons pas cette option
car c’est l’option de montage la plus difficile
et elle requiert du matériel et des aptitudes
additionnels pour la réaliser. Assurez-vous
d’utiliser un support ou un bloc assez solide. Le
montage de cette manière rendra plus difficile
l’accès aux commandes d’affichage à l’écran et
de zoom/mise au point.
Diagrammes non à l’échelle
Option 1
Option 2
Option 3
Vous pouvez modifier l’angle du praticable
en desserrant les vis sur la charnière, tel
qu’affiché ici. Resserrez-les une fois que la
caméra est dans la position désirée.
Page 18

18
FRANÇAIS
Dépannage
Problème : La nuit, je ne vois que du blanc.
Solution : La caméra regarde probablement à travers une fenêtre. La nuit, la lumière
infrarouge que la caméra utilise pour voir dans le noir peut ‘rebondir’ sur une surface
réflective (comme du verre, de l’eau, des toiles d’araignée, certaines céramiques et ainsi
de suite), et ainsi aveugler la caméra. Si vous voulez voir à l’extérieur, montez la caméra à
l’extérieur – n’ayez crainte, elle n’est pas résistante aux intempéries pour rien!
Problème : Je ne vois qu’un écran vide à l’endroit où mon image devrait s’afficher.
Solution : Vérifier le câblage de la caméra, et assurez-vous que la caméra reçoit du
courant de l’adaptateur de courant fourni. Essayez d’utiliser un fil vidéo différent, ou de
connecter la caméra à une télévision ou à un moniteur différent. Assurez-vous qu’il n’y a
aucun appareil qui interrompt votre signal, comme un enregistreur vidéo numérique (DVR)
ou un magnétoscope qui ne produit pas le signal correctement.
Problème : Je ne vois rien la nuit.
Solution : La portée maximale de la vision nocturne n’est que ça, la portée maximale.
S’il n’y a rien à l’intérieur de cette portée, vous ne verrez rien. De plus, certains objets
sombres (comme le légendaire chat noir) ne refléteront peut-être pas assez de lumière
pour être vus, sauf comme une silhouette si l’arrière-plan est plus clair. Certains objets qui
peuvent facilement être vus dans la lumière visible ne reflètent pas beaucoup de lumière
infrarouge.
Problème : Tout paraît flou/mou.
Solution : Vous devez probablement ajuster la mise au point (le bouton à droite). C’est
simplement une question de le tourner dans un sens jusqu’à ce que vous trouviez le bon
point de mise au point ou qu’il ne tourne plus. Ensuite, tournez-le dans l’autre sens. S’il n’y
a aucun « point idéal », cela signifie l’une de deux choses.
1. Votre objectif est peut-être sale. Nettoyez l’avant de l’objectif avec un chiffon pour
objectif (disponible dans tous les magasins de caméra). Évitez d’utiliser des solvants
ou des nettoyants chimiques car ils peuvent laisser des résidus.
2. Vous essayez peut-être de mettre au point sur quelque chose à l’extérieur de la «
profondeur de champ » - les objets doivent se situer à une certaine distance minimale
de la caméra pour que vous soyez en mesure de mettre au point sur eux. Typiquement,
cette distance ne sera que de quelques pieds (environ 1 m), mais cette distance peut
augmenter dramatiquement si l’objectif est en zoom avant, ou dans des conditions
d’éclairage bas.
Page 19

19
FRANÇAIS
Information sur la Garantie
Soutien Technique Détails
Félicitation pour votre achat. Si à n’importe quel moment ce produit ne fonctionne pas
quand vous le branchez pour la première fois ou si vous vous rencontrez un problème, ne
le rapportez pas au magasin !
Utilisez le guide d’installation /
Manuel de la boite, ou
Visitez le site www.swannsecurity.com
Pour les FAQ, les astuces de
dépannage
et plus encore, ou
Contactez notre équipe d’experts du
support technique…
Europe eusupport@swannsecurity.
com
Etats-Unis tech@swannsecurity.com
Europe (Royaume-Uni)
0203 027 0979
Sans frais États-Unis:
1-800-627-2799
Échange et Réparations États-Unis:
1-800-627-2799 (Option 1)
(L-V, 09h00-17h00 É.U. HNP)
Swann Communications garantit ce produit contre tout défaut de fabrication et contre tout défaut
matériel pour une période de un (1) an à compter de la date d’achat. Vous devez présenter votre
reçu comme preuve de la date d’achat pour valider votre garantie. Toute unité défectueuse sera
réparée gratuitement (pièces et main d’œuvre) ou remplacée, à la discrétion de Swann. L’utilisateur
final est responsable de tous les frais de port qu’implique l’envoi du produit au centre de réparation
de Swann. L’utilisateur est responsable de tous les frais de port si l’envoi doit être effectué en
provenance ou à destination de tout pays hors du pays d’origine.
La présente garantie ne couvre pas tous les dégâts consécutifs à un mauvais usage du produit.
Tous les coûts associés à la prise en charge ce produit ou à son usage sont dans ce cas de la
responsabilité de l’utilisateur. Cette garantie s’applique à l’acheteur original du produit et ne peut
être transférée à une tierce partie. Toute modification non autorisée de tout élément, u toute preuve
de mauvaise utilisation de cet appareil annulera l’ensemble des garanties.
Certains pays n’autorisent pas les limitations de certaines exclusions de la présente garantie. Les
réglementations et lois locales priment.
Vérification FCC
Note : Cet équipement a été testé et est en conformité avec les limites édictées dans le paragraphe
15 des Règlementations FCC, relatif aux équipements numériques de classe B. Ces limites ont
été définies dans le but de fournir une protection raisonnable contre les interférences néfastes
dans les installations résidentielles. Cet équipement génère, utilise et peut irradier des énergies de
fréquences radio et, s’il n’est pas installé dans le respect des instructions fournies, peut provoquer
des interférences auprès des appareils de réception radiotélévisée. Ces dernières peuvent être
déterminées en allumant et éteignant l’équipement installe. L’utilisateur est incité à essayer, si
besoin est, de corriger les interférences à l’aides des mesures suivantes :
- Réorienter ou déplacer l’antenne réceptrice.
- Augmenter l’espace entre l’équipement et le récepteur.
- Brancher l’équipement sur une prise ou un circuit différents de celui auquel le récepteur est
connecté.
- Consulter le revendeur ou un technicien radio/télévision expérimenté.
Ces appareils sont conformes au paragraphe 15 des normes FCC. Leur opération est sujette aux
deux conditions suivantes :
(1) ces appareils ne doivent pas provoquer d’interférence dangereuse, et
(2) ces appareils doivent accepter toute interférence reçue, y compris les interférences pouvant
entraîner un fonctionnement non désiré.
Page 20

© Swann Communications 2014
Page 21

On-Screen Display (OSD)
Instruction Manual
Welcome!
Lets get started.
EN
Page 22

1
1
Introduction
So - you have bought one (or more!) of Swann’s range of Pro Series cameras, browsed
through the On-Screen Display (OSD), noticed lots of confusing settings, and don’t quite
understand what they all do. This manual will help you navigate through the OSD and
explain the OSD settings in detail.
The OSD enables you to control the appearance and characteristics of the image shown on
your camera. It features a myriad of settings that can be adjusted to obtain the best possible
image quality in any surveillance environment, providing you the flexibility to install the
camera in the most challenging of lighting situations. If you are experienced in photography
or video-making, then many of the camera’s functions are things you’ll be familiar with.
Just to be clear - there’s nothing you can do in the OSD which can actually damage the
camera. If it does all go wrong, you can use the Load Default option to set everything back to
the default/automatic settings.
Page 23

2
2
Getting to know the OSD Controller
Arrow Buttons
Use to navigate through
the OSD and adjust
settings.
Display the OSD Main Menu/
Enter function
Quick save
Page 24

3
3
Connecting the OSD Controller
If this is your first time connecting the OSD
Controller, follow the instructions below to
connect it to your camera.
1. Insert the RS485 plug coming from the
camera into the RS485 Port (1).
2. Connect a free end of the supplied power
splitter to the DC IN 12V Port (2).
You can find a detailed camera connection
guide in your camera’s instruction manual.
Page 25

4
4
Navigating the OSD
IMAGE
MAIN MENU
DAY&NIGHT
ZONE MASKING
MOTION DET
VIDEO STD
LANGUAGE
LOAD DEFAULT
SOFT VERSION
RS485
SAVE&EXIT
AUTO
PAL
ENGLISH
20140101
• Press to display the Main Menu of the
OSD on your screen.
• Press or to choose a selection in
the menu list.
• Press or to toggle between options
for a particular setting.
• The symbol indicates that there is
a submenu for the setting. Select the
setting then press to enter the
submenu.
• Press to instantly save any change
made to a particular setting.
• To go back to the previous menu, select
RETURN then press .
Page 26

5
5
The OSD Settings
3D-NR
IMAGE
IRIS
AE MODE
WB AWB - PRO
IMAGE ENHANCE
MIRROR
FLIP OFF
BRIGHTNESS
ZOOM IN 0
RETURN
BACK LIGHT
OFF
60
• 3D-NR (3D Noise Reduction): Lets you
turn the camera’s 3D filtering system on
to assist in obtaining low-noise images
for recordings done at night or in dim
conditions. Setting the 3D-NR value too
high (>9) can result in a “trailing” effect
(also known as motion blur) on moving
objects appearing on screen.
• Iris: Lets you control the default behavior
of your lens and iris. Many of the PRO
series cameras feature a prime lens with
a static iris, so the lens and iris settings
will have no effect. Even cameras that
have a vari-focal lens which is controlled
physically by using the lens control rods will not be affected by these settings.
• IMAGE
3D-NR OFF
3D-NR ON
Page 27

6
3D-NR
IMAGE
IRIS
AE MODE
WB AWB - PRO
IMAGE ENHANCE
MIRROR
FLIP OFF
BRIGHTNESS
ZOOM IN 0
RETURN
BACK LIGHT
OFF
60
• AE (Automatic Exposure) Mode: Lets
you choose from several AE modes
that will allow the camera to evaluate
the amount of light coming through
its image sensor and deliver optimal
exposure to the objects in the scene by
automatically setting the appropriate
shutter speed and/or aperture. This
setting comes in handy for those times
when your camera is in less than
ideal situations and the default AE
mode is not giving you good images
(e.g., camera installed in an area with
unusual lighting conditions, camera
facing a window, camera looking into
car headlights).
• WB (White Balance): Lets you choose
from a selection of preset white
balance options to adjust screen color
and help you obtain the most accurate
reproduction of color tone in the scene.
Page 28

7
3D-NR
IMAGE
IRIS
AE MODE
WB AWB - PRO
IMAGE ENHANCE
MIRROR
FLIP OFF
BRIGHTNESS
ZOOM IN 0
RETURN
BACK LIGHT
OFF
60
SHARPNESS
IMAGE ENHANCE
CONTRAST
SATURATION
RETURN
• Image Enhance: Lets you manually adjust the
levels of sharpness, contrast and saturation in
the displayed image.
• Sharpness: The clarity of detail and edges
in the image. Setting the sharpness too high
will make the image look pixelated. On the
other hand, setting the sharpness too low will
make everything look soft and blurry.
• Contrast: The dynamic range of the
camera’s output. The higher the contrast,
the greater the difference between the
blackest black and the whitest white will be.
• Saturation: The amount of grey in a colour.
Increasing saturation will produce more
vivid and intense colours in the image while
decreasing saturation will result in more
subdued colours. Setting saturation to 0 will
create a completely desaturated, black and
white image.
Page 29

8
3D-NR
IMAGE
IRIS
AE MODE
WB AWB - PRO
IMAGE ENHANCE
MIRROR
FLIP OFF
BRIGHTNESS
ZOOM IN 0
RETURN
BACK LIGHT
OFF
60
• Mirror: Lets you horizontally reverse
the orientation of the image.
• Flip: Lets you turn the image upside
down. This is useful if you have your
camera mounted upside down on a
ceiling and do not want to rotate it
physically.
• Brightness: Lets you adjust the level
of brightness in the displayed image.
Increasing the Brightness setting can
be useful if you have an unusually
dark monitor/television, or are
trying to view images in a very bright
environment. Typically, the default
value is fine unless you have specific
problems you’re trying to overcome.
• Zoom In: Lets you see the object of
interest up to five times closer using
the camera’s digital zoom.
Page 30

9
IMAGE
MAIN MENU
DAY&NIGHT
ZONE MASKING
MOTION DET
VIDEO STD
LANGUAGE
LOAD DEFAULT
SOFT VERSION
RS485
SAVE&EXIT
AUTO
PAL
ENGLISH
20140101
• DAY & NIGHT
• Auto: Lets you set the camera to
switch automatically from day to night
mode.
• Color: Lets you set the camera to
operate in color mode only. In low-light
conditions, the color will be faint, but it
will be there (assuming there’s enough
light to see anything). This will reduce
image clarity in low-light conditions.
• Black & White: Lets you set the
camera to operate in black and white
only.
• External: This mode is not supported.
Lets you choose how the camera handles colour and manages the transition from daytime to
nighttime and vice-versa
Page 31

10
• ZONE MASKING
IMAGE
MAIN MENU
DAY&NIGHT
ZONE MASKING
MOTION DET
VIDEO STD
LANGUAGE
LOAD DEFAULT
SOFT VERSION
RS485
SAVE&EXIT
AUTO
PAL
ENGLISH
20140101
COLOR
ZONE MASKING
AREA NO - 1
AREA NO - 2
AREA NO - 3
AREA NO - 4
AREA NO - 5
AREA NO - 6
AREA NO - 7
AREA NO - 8
RETURN
Colored Privacy Mask Mosaic Privacy Mask
Lets you create and place a “privacy mask”
to conceal parts of the image on the screen.
This restricts what can be seen - useful
when you want to protect personal privacy
or sensitve areas.
• Color: Lets you select what color the
privacy masks are. Or apply a Mosaic
pattern to blur the designated areas
- useful when you want to continue
monitoring masked areas for movement.
• Area No 1-8: Lets you create up to
eight separate rectangular privacy masks,
and customize their size and position.
Page 32

11
• MOTION DETECTION
SENSITIVITY
MOTION DET
AREA NO - 1
AREA NO - 2
AREA NO - 3
AREA NO - 4
RETURN
EXTERNAL
• Sensitivity: Lets you set the sensitivity level for
the motion trigger. When Sensitivity level is High,
motion detection can be triggered even by the
slightest of movement. When Sensitivity level is
Low, a lot of movement will be required to trigger
the motion detection.
• Area No 1-4: Lets you define up to four separate motion sensitive areas, and customize
their size, position and color. Whenever the camera detects motion in those areas, it will
flash that block of area with the associated color.
Lets you can enable motion detection
on the camera. Note that, if you’re using
a Swann DVR with motion detection
enabled, then there’s no need to arm it on
the camera as well.
IMAGE
MAIN MENU
DAY&NIGHT
ZONE MASKING
MOTION DET
VIDEO STD
LANGUAGE
LOAD DEFAULT
SOFT VERSION
RS485
SAVE&EXIT
AUTO
PAL
ENGLISH
20140101
Page 33

12
IMAGE
MAIN MENU
DAY&NIGHT
ZONE MASKING
MOTION DET
VIDEO STD
LANGUAGE
LOAD DEFAULT
SOFT VERSION
RS485
SAVE&EXIT
AUTO
PAL
ENGLISH
20140101
• VIDEO STANDARD
Lets you set the appropriate video
standard for your television.
For example, NTSC (used in USA,
Japan, Canada) or PAL (used in UK and
Australia).
IMAGE
MAIN MENU
DAY&NIGHT
ZONE MASKING
MOTION DET
VIDEO STD
LANGUAGE
LOAD DEFAULT
SOFT VERSION
RS485
SAVE&EXIT
AUTO
PAL
ENGLISH
20140101
• LANGUAGE
Lets you choose the language you
would like the OSD to be displayed in.
At this time, the OSD is only available in
English and Chinese.
Page 34

13
IMAGE
MAIN MENU
DAY&NIGHT
ZONE MASKING
MOTION DET
VIDEO STD
LANGUAGE
LOAD DEFAULT
SOFT VERSION
RS485
SAVE&EXIT
AUTO
PAL
ENGLISH
20140101
• LOAD DEFAULT
If the changes made to the OSD settings
have made the image look worse that
it originally was or you have moved the
camera somewhere else and want to retune the camera, simply reset all OSD
settings back to their factory default.
Page 35

14
• RS485
IMAGE
MAIN MENU
DAY&NIGHT
ZONE MASKING
MOTION DET
VIDEO STD
LANGUAGE
LOAD DEFAULT
SOFT VERSION
RS485
SAVE&EXIT
AUTO
PAL
ENGLISH
20140101
CAM ID 1
RS485
PROTOCOL
BAUDRATE 9600
RETURN
PELCO - D
Lets you configure the camera’s RS485
communication settings - camera ID,
protocol and baud rate
If you change these settings, make sure
you take note of the new values as the
information in these settings are required
to control certain camera features such
as the OSD and PTZ when the camera’s
RS485 plug is connected to a Swann DVR.
Page 36

15
6
Troubleshooting
Problem: I can’t get the OSD to display on my monitor.
Solution:
• Check the power supply to the OSD Controller.
• Check if the Red and Black connectors are correctly inserted into the RS485 green
plug. Look for the A+ and B- labels below the RS485 port on the bottomside of the OSD
Controller. The Red connector should go into the A/+ input and Black connector should go
into the B/- input.
Problem: Why are my video recordings displaying boxes when something is moving?
Solution: This is normal when the camera’s Motion Detection setting is enabled on the OSD.
These boxes appear whenever the camera sees moving objects in the motion-sensitive areas
and are embedded inside the feed your DVR is recording.
Problem: I misplaced the OSD Controller. Is there any other way to operate the OSD?
Solution: Your Swann DVR has a PTZ port with a green plug attached which can be connected
with the Red and Black connectors. For information on how to control the OSD on the DVR,
see the DVR’s instruction manual, specifically the PTZ section.
Page 37

16
7
Need Help?
Swann Technical Support
All Countries E-mail: tech@swann.com
Telephone Helpdesk
USA Toll Free 1-800-627-2799
USA Parts & Warranty 1-800-627-2799 (Option 1)
(M-F, 9am-5pm US PT)
AUSTRALIA 1300 138 324
NEW ZEALAND Toll Free 0800 479 266
UK 0203 027 0979
Page 38

M800OSD150514E | © Swann Communications 2014
 Loading...