

Page 1
1
MMISSIL110411T
Operating Instructions
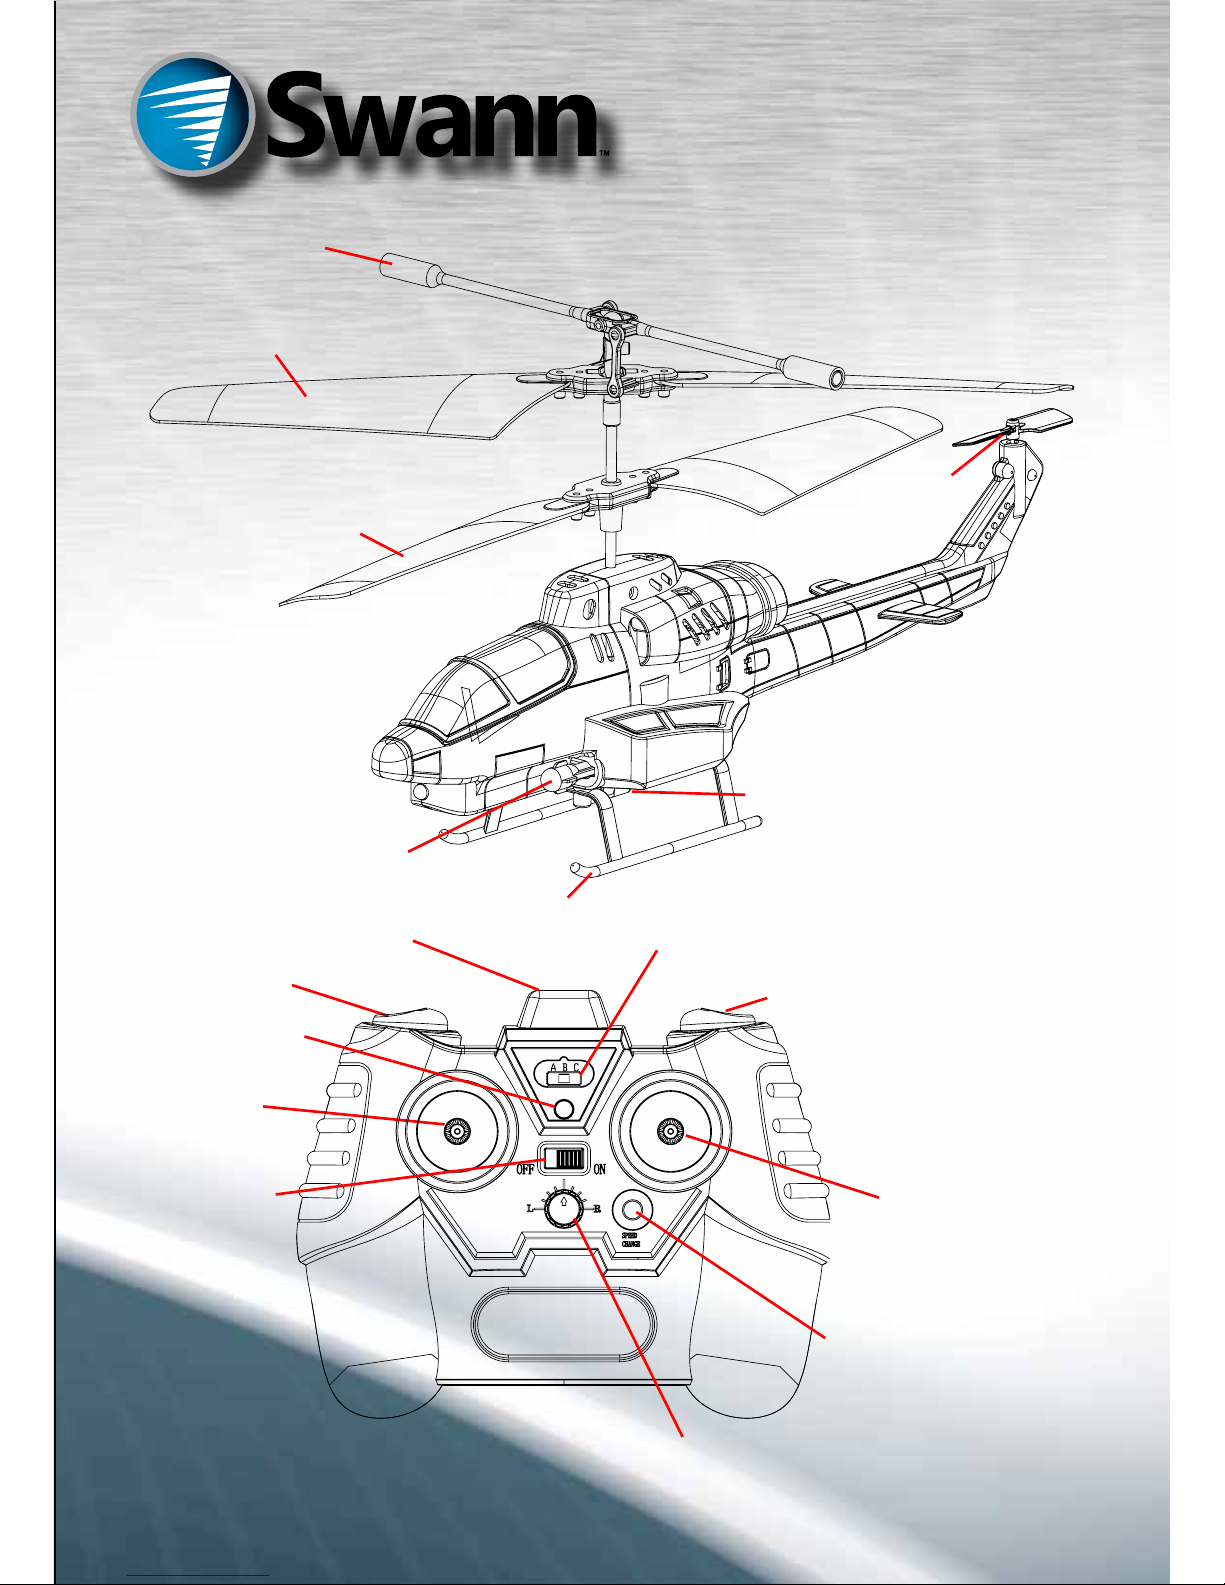
Missile Strike
Band Selector
Charging/Power Light
Rudder Trim Adjustment Dial
Power Switch
Left Trigger
Infrared LEDs
Balance Bar
Upper Rotors
Lower Rotors
Landing Skids
Power Switch & Charging Socket
Missile
Tail Rotor
Left Stick
(Throttle)
Right Stick
(Forward/Back
and Rotation)
Tail Rotor
Speed Select
Button
Right Trigger
Page 2
222
Recharging and Battery Replacement
Ensure the helicopter is turned OFF before attempting to charge it.
If left on, it won’t charge.
Check the orientation of the power cable carefully when connecting it
to the helicopter. If it feels tough to insert or you need to use force, it’s
probably upside down!
It’ll take 45 – 60 minutes to charge. Don’t over-charge the helicopter, and don’t leave it connected to
a charger for more than an hour.
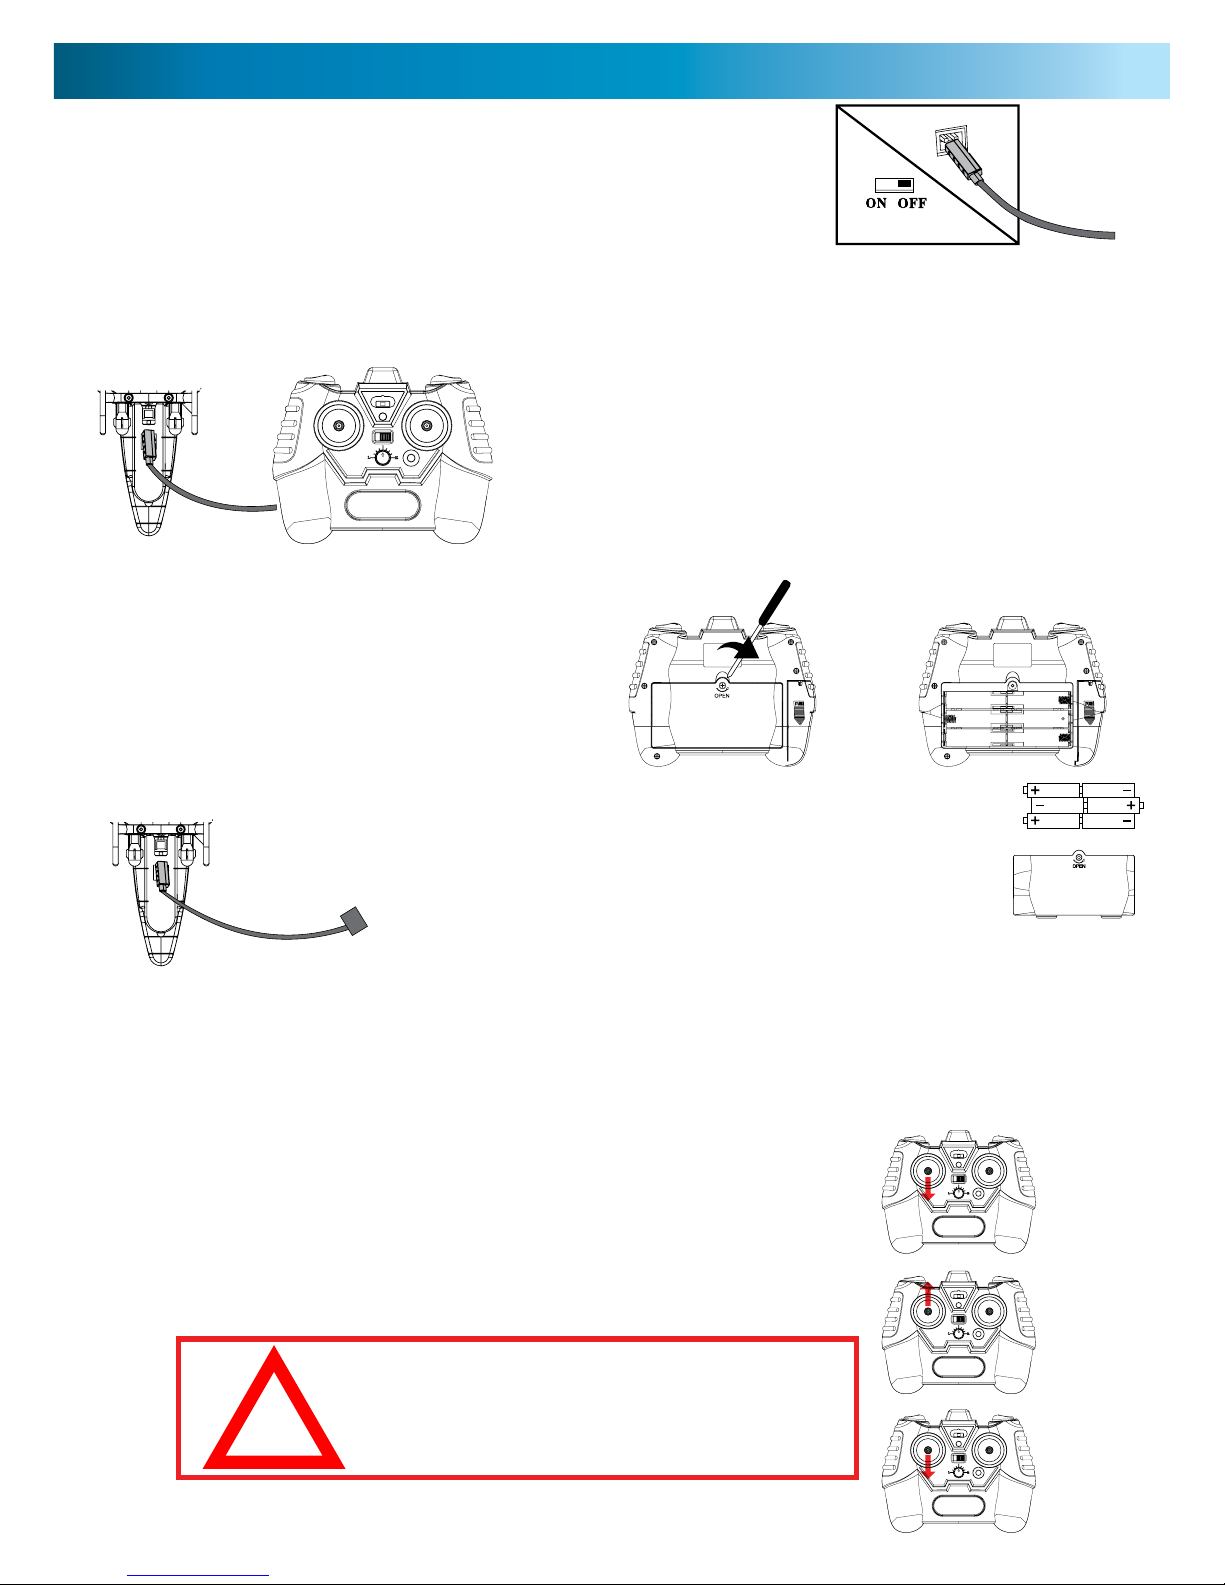
Charge via Remote Control: Open the charging lead
compartment located on the underside of the remote control,
and extend the charging lead. Turn the remote control ON. Plug
the other end into the charging socket on the bottom of the
helicopter. The orange charging LED on the remote control will
be on whilst the helicopter is charging. The red LED will light up
when charging is complete. [If the LED is flashing, then pair the
remote, as described below, and it will then read accurately.]
Replacing Batteries in the Controller:
The battery compartment is located on the
rear of the controller. Undo the screw with
a precision screwdriver and open the battery
compartment. Only use alkaline batteries.
Don’t mix old and new batteries. For more
information on battery useage and safety,
consult page 6.
Charge via USB: Plug the USB end of the charging cable into
a USB port on your computer, or to a stand-alone USB charger.
Then, connect the other end to the helicopter. Never connect
the helicopter to a USB port supplying anything other than 5V
@ 500mA. There is an LED in the USB plug, which will go out
when the helicopter is charging. The LED will light up when
charging is complete, or the helicopter isn’t attached to the
cable.
IMPORTANT NOTE: Charging via USB
When charging from a USB port, always connect the USB plug to a USB port without connecting the
helicopter. Ensure the red light in the USB plug lights up. When you connect the helicopter, this light
will turn off. If it does not go out, this indicates that the helicopter is not being charged - check that
the helicopter is turned off, and check the integrity of the connection.
Pairing the Remote
Before you can fly, you need to ‘pair’ the helicopter and remote together. To do
this, turn on both the helicopter and remote. Select a frequency using the band
selector switch. If flying multiple helicopters, ensure each is on a different band.
Then, push the left stick to minimum. Aim the controller’s IR transmitter at the
helicopter. Move the left stick from minimum to maximum (bottom to top)
and back again. The helicopter will now be paired to that controller.
2
Operating Instructions
CAUTION: Do not touch the running
rotors. Do not fly above or near
someone’s head. Adult supervision is
required at all times.
!
Page 3
33
Basic Principles of Flight
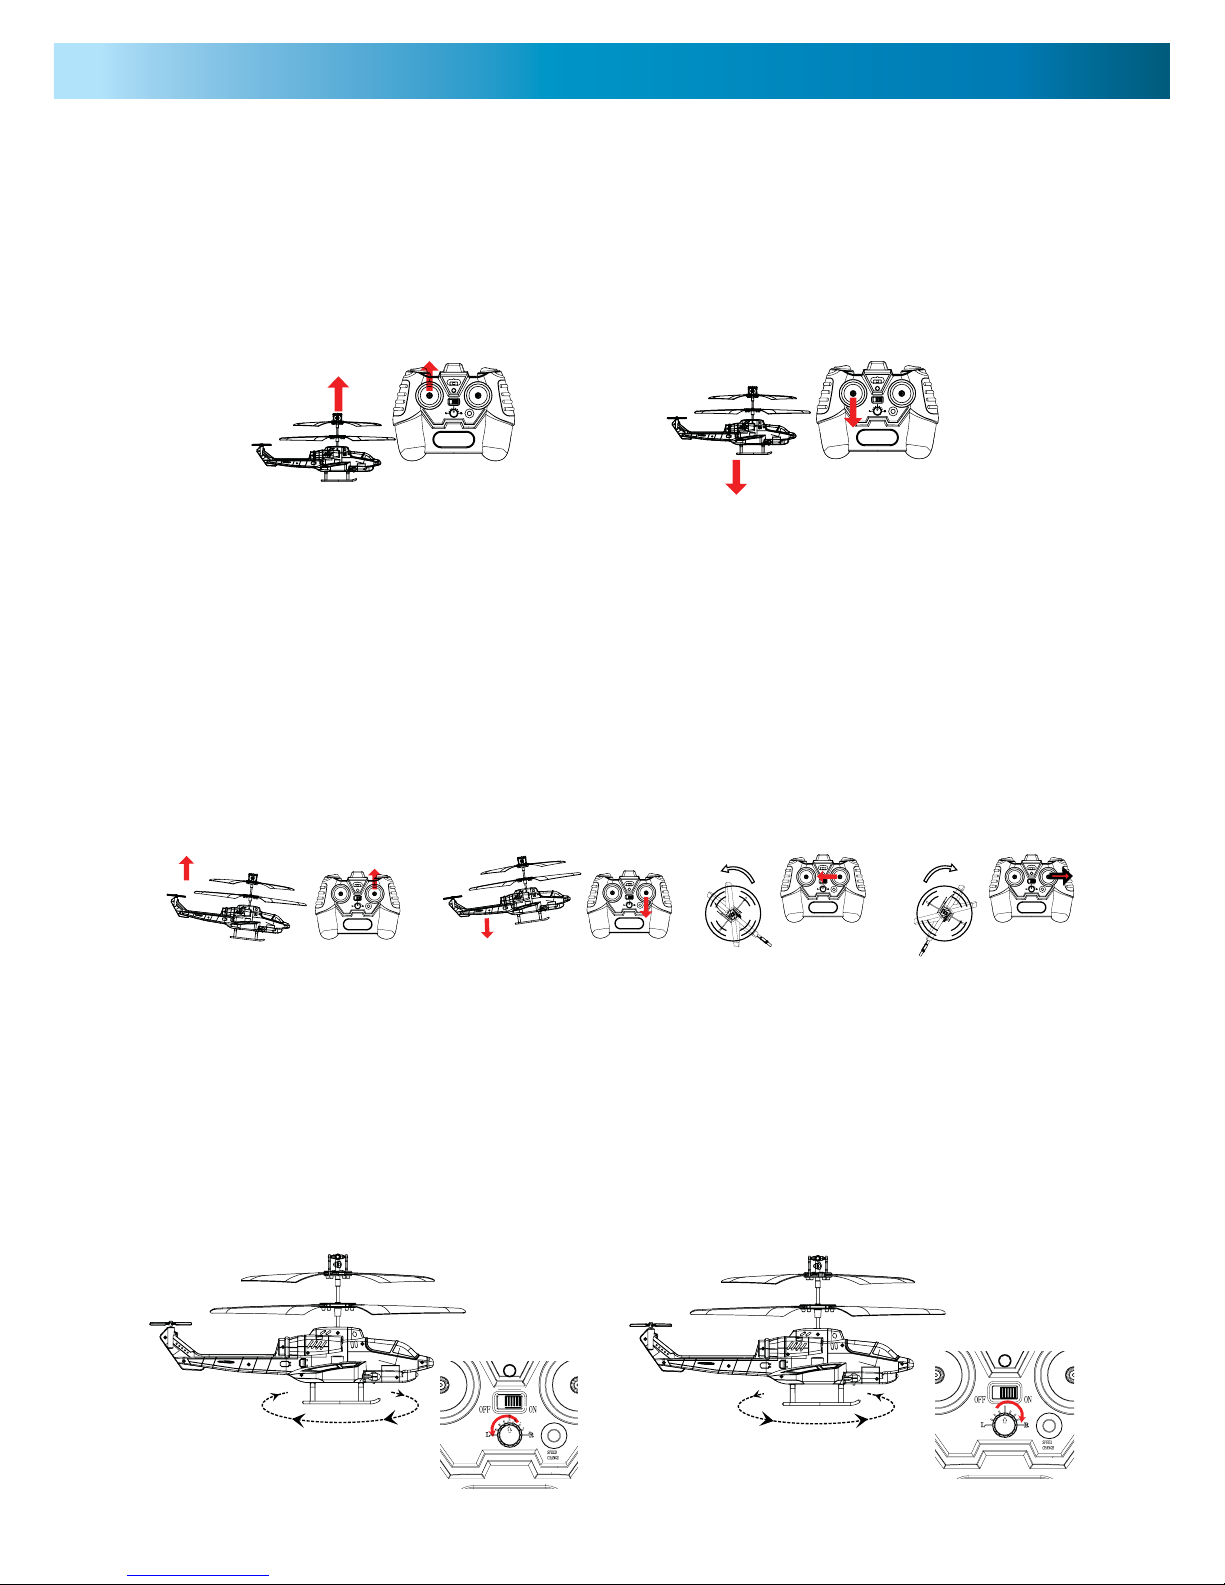
Moving up and down: The helicopter moves up and down by varying the speed of its main rotors
(those two big things that spin). You can control how fast these spin by using the left stick on the
controller. Pushing the stick up will increase the throttle.
To get good results, be gentle and subtle. Small adjustments made slowly and carefully are the best way
to get the helicopter to fly well. Be careful when easing off the throttle – if the helicopter stalls (that
is, doesn’t have enough lift to stay in the air) it’ll fall, and might not be able to recover in time, even if
you jam the throttle back on.
Forward, Backwards and Rotation: The right stick on the controller affects the helicopters direction,
kind of like the right stick on a video game controller.
Pushing the right stick up will pitch the helicopter forwards. Whilst pitched in this way, the main rotors
will push the helicopter along forwards. The opposite is also true – moving the right stick down will
pitch the helicopter backwards and move it in reverse.
You can change the speed of the tail rotor by using the Tail Rotor Speed Select Button.
To rotate the helicopter, move the right stick to either side. This will cause the two main rotors to
change their speeds, causing the body of the helicopter to spin on the spot.
By using the right stick at different angles and positions, you can design and execute some graceful,
arcing turns. On the other hand, quick thrusts of the stick in different directions can create some unique
tricks or stunts. Practice makes perfect!
Trim (Rudder): If you find that the helicopter is turning slowly left or right when you’re not using the
right stick on the controller, then you’ll need to adjust the trim. The trim knob is located on the side of
the controller, on the right side of the right control stick.
You’ll probably have to do this every couple of flights, but it only takes a moment. Basically, the trim ‘finetunes’ the speed of the rotor blades, and will help keep the helicopter flying straight.
If the helicopter is rotating clockwise (it’s turning right from the imaginary miniature pilot’s perspective)
then turn the trim knob counter-clockwise (left). If the helicopter is rotating counter-clockwise (it’s
turning left from the imaginary miniature pilot’s perspective) then turn the trim knob clockwise (right).
Page 4

444
Flying Guide
Wind: Basically, these are (approximately) 1/40th scale helicopters. Full sized helicopters can’t fly in high
winds – and neither can the models. If a full sized helicopter has difficulty overcoming 50mph winds,
then the model will have the same difficulty with 1~2mph winds (i.e. 1/40th as much). There’s nothing
that can be done about this, it’s just physics.
Air conditioning: Hot air rises and cool air falls – this creates movement in the air, leading to an
effect called “wind shear”. Basically, this is when there’s a column of hot air going up next to cold air
going down. Many full-scale aircraft accidents have been caused by wind shear. Air conditioners create
heaps of wind shear. If the helicopter flies through wind shear, it will seem to suddenly fly up or down
(depending on the direction of the wind shear).
The Ground Effect: When the helicopter is near the ground, the air it pushes down with its rotor has
nowhere to go – the ground is in the way. Some of this air bounces back, this pushes the helicopter
up. When the helicopter is near the ground, it will get slightly more lift than it normally would. This is
something to keep in mind when landing.
The Ceiling Effect: Conversely to the ground effect, when you fly too close to a ceiling, a small pocket
of low pressure is created above the helicopter, and it will be sucked upwards. This could be bad – if
you hit the ceiling, the helicopter will stall, fall and possibly be damaged.
Multiple Helicopters: If you’re using more than one helicopter in a space at once, be very careful
when setting the controller band and pairing them to the helicopters. You may find that the more than
one helicopter will be controlled by a single controller, and this can lead to crashes, accidents, injuries
or other very undesirable outcomes.
When using more than one helicopter at a time, ensure that each controller is
set to a different band using the Band Selector switch on the controller.
Places to Fly: Because high winds can be a problem, we recommend flying indoors. However, you
really do need a bit of space to get the most out of the helicopter. Some places which are good for
flight include large garages (whilst the car’s not parked there), indoor sports areas, aircraft hangars,
secret underground submarine pens and so on (though why you’d fly a toy helicopter in your secret
underground submarine pen is beyond us). Or a large lounge room with delicate items stashed
somewhere out of the way - whatever you’ve got.
Operating Instructions
Page 5

5
Back & Forwards, Up & Down: This helicopter features
counter-rotating coaxial rotors (a fancy way of saying two
rotors which spin in opposite directions) and a horizontal
tail rotor. If you’re any kind of expert on helicopters, you’ll
know that this is not the same way that full-scale helicopters
are usually made – they’ve got a single, uni-directional main
rotor with a vertical tail rotor. We think that this coaxial
design works best for these scale models because:
• It’s more stable than a single rotor. Because the rotors move in opposite directions, the helicopter
has less of a tendency to spin the other way.
• It is way easier to set up. There’s only one trim setting to get right, as opposed to the three trim
settings that are required for the more conventional helicopter design.
• More rotors mean more lift, which means an easier to fly and more manoeuvrable helicopter.
However, because the tail rotor is horizontal rather than vertical, the helicopter has a tendency to
ascend whilst moving forwards, and descend whilst reversing. This isn’t really a problem if you ease off
on the throttle whilst moving forward and increase the throttle whilst moving backwards. You’ll get a
feel for it pretty quick.
To alter how fast the helicopter moves backwards and forwards, use the Tail Rotor Speed Select Button
on the controller. When the button is pushed in, the helicopter is in SLOW mode. When the button is
up, it is in FAST mode.
Firing Missiles
To load missiles into the helicopter, align the missile with the firing tube on the side of the helicopter,
and push in gently. Don’t be rough - if it feels like you have to force the missile inside then there’s
something wrong - you’ll probably have to rotate the missile so the grooves line up.
To fire the missiles, use the trigger buttons on the controller. The right trigger will fire the right missile,
and vice-versa.
Be extremely careful where the helicopter is pointed whenever missiles are loaded into the helicopter.
The triggers can easily be bumped inadvertently, and the projectiles have a surprising kick, particularly
at short range.
Don’t use the missile functions around other devices which use infrared controllers (such as a remote
controls or computer devices that use IR communications) as there is a chance that another IR device
might cause a spurious control signal, and cause the helicopter to behave erratically or fire the missiles
without warning.
WARNING: Do NOT
aim at eyes or face.
!
CHOKING HAZARD – Small parts.
Not for Children under 3 years.
!
Page 6

666
Battery Safety Instructions
• Requires 6 x 1.5V AA Alkaline batteries (not included)
• Batteries are small objects.
• Replacing batteries must be undertaken by a competent adult.
• Follow the polarity diagram ( + / - ) in the battery compartment.
• Promptly remove dead/exhausted batteries from the controller.
• Dispose of used batteries responsibly.
• Remove batteries for prolonged storage.
• DO NOT incinerate used batteries.
• DO NOT dispose of batteries in fire, as batteries may explode or leak.
• DO NOT mix new and old batteries or types of batteries (i.e. alkaline/standard).
• DO NOT use rechargeable batteries.
• DO NOT recharge non-rechargeable batteries.
• DO NOT short circuit the supply terminals.
LiPO Battery Instructions:
The helicopter has a built in Lithium Polymer battery. These batteries are light and powerful, as their chemistry
is based on lithium, a light and extremely volatile metal.
• Never leave the helicopter unattended while charging.
• Charge battery in an isolated, controlled environment. Keep far away from flammable materials.
• Do not expose to direct sunlight: there is a risk that the battery may overheat, ignite and/or
explode.
• Do not disassemble, modify, heat, or short circuit the battery. Don’t place it in fire or leave in hot
places or near heat sources.
• Do not drop the battery or subject it to strong impacts.
• Do not allow the battery to get wet.
• Only charge the battery from the supplied charging equipment. Using other charging equipment
will void your warranty, may damage the battery and poses a risk of fire or explosion.
• Use the battery only in this helicopter, and use only this battery in the helicopter.
• Read these instructions carefully and thoroughly, and obey all guidelines herein.
• In the unlikely event of leakage or explosion, use sand or a chemical fire extinguisher to extinguish
the battery.
• The battery must be disposed of responsibly.
If your high school chemistry teacher ever demonstrated what happens when sodium is placed in water
(“bam” is the technical description of the outcome) then you’re somewhat familiar with how volatile
lithium is – except that lithium is even more volatile than sodium is! Basically, obey all the guidelines
and respect the power of lithium!
DANGER
Never insert any sharp objects, pins or
screws into the helicopter as this may
puncture the internal battery!
!
Page 7

7
Important Safety Instructions
CAUTION: Never fly near your face. Keep rotor away from your fingers, hair, eyes and other body
parts. Always lift off from a flat surface. Never hold the flying helicopter in your hand when lifting off.
DO NOT launch helicopter near people or animals. Stay away from obstacles and electrical hazards.
Caution: Do NOT use any projectile other than those supplied.
Parental supervision is required whenever this helicopter is in use by younger children.
Care and Maintenance:
• Always remove the batteries from the controller when not being used for extended durations.
• To clean, wipe gently with a damp cloth. Avoid use of solvents, as these can damage the plastic
components.
• Keep the helicopter and remote away from heat sources.
• Do not submerge the helicopter or remote control in water. This will damage the electronic
components, and could pose a severe risk to the built-in battery.
SAFETY PRECAUTIONS
• Keep hands, hair and loose clothing away from the rotors when the power switch is turned on.
• Turn off controller/charger and helicopter while in use.
• Remove batteries from the controller when not in use.
• Parental guidance is required for younger users.
• Keep your helicopter close and within line of sight – if the line-of-sight to the controller is lost, you
will lose control of the helicopter.
• For best performance, use only fresh Alkaline AA batteries in the controller.
• Read and obey all warnings and safety guidelines in this manual.
• The controller and charger are specifically designed to charge this helicopter. Never use any other
charging equipment!
Special Notice to Adults:
• The helicopter is NOT intended for use by children under fourteen (14) years old, unless directly
supervised by a competent adult at all times.
• The helicopter must only be used with the supplied controller/charger.
• Regularly examine the helicopter and controller for any damage to the plugs, enclosure, rotors,
battery covers and other parts. In the event of any damage, neither the helicopter nor controller
should be used until the damage is completely repaired.
Page 8

888
© Swann Communications 2011
Information
Quick Flight Guide
Got questions or comments about this helicopter?
E-mail: tech@swann.com
Or visit our website - www.swann.com
So – you’ve pulled the helicopter out of the box, have flipped through the manual and thought:
“Too many words… lots of buttons... I don’t know where to start”
Fair enough. Helicopters are complex things. So, we’ve prepared this quick guide.
Here’s what you’ve gotta do:
1. Read and obey all warnings and directions in this manual and on the packaging. We wrote
it because we mean it!
2. Insert batteries into the controller. Use 6 high quality alkaline AA’s.
3. Grab the charging lead in the controller and pop it (gently) into the charging socket on the helicopter.
Ensure that the helicopter is turned OFF.
4. Turn the remote control ON. Leave it there for just over half an hour, then pull it out.
5. Turn the helicopter ON. You’ll see some LEDs light up.
6. Move the left control stick from minimum to maximum and back to minimum.
7. Fly!
Controlling the Helicopter
Moving up / down: Use the left stick on the remote control.
Turning Left / Right: Move the right stick left or right.
Moving forward / back: Move the right stick forward or back.
Shoulder Buttons: Fire missiles.
Adjusting Trim:
Rudder: Use the rudder trim adjustment knob, centre of controller.
Adjusts the helicopters turning/spinning.
What is this “trim” thingy?
If the helicopter is turning or moving when you don’t want it to, then you need to adjust the trim.
Basically, it makes fine adjustments to the rotor speeds, and allows you to fine tune the helicopter’s
sense of direction or change which way it tilts.
Do not touch the running propeller! Do not play
above someone’s head! Adult supervision is required!
Never insert any sharp objects, pins or screws into the
helicopter as this may puncture the internal battery!
CHOKING HAZARD – Small parts. Not for Children under 3 years.
Do not aim at eyes or face.
!
 Loading...