

Page 1
English
FCC NOTICE
This device complies with Part 15 of FCC Rules.
Operation is subject to the following conditions:
(1) This device may not cause harmful interference, and
(2) this device must accept any interference received,
including interference that may cause undesired operation
This product supports
Windows2000 and WindowsXP
Helpdesk
Has the answers
Contact the Swann Helpdesk using our fast e-mail service
tech@swann.com.au or call us on one of the Toll-Free
numbers shown on the back cover of this booklet.
Most problems can be quickly and easily fixed with a simple
e-mail or a quick chat with one of our friendly technical staff.
(Toll-Free available in the US and Australia only)
Memory Camera Series
With motion detection
Installation Guide
Page 2
The Swann amera is designed for use as a PC webcam or imitation Passive
Infra ed (PIR) sensor that captures still images into a Secure Digital (SD) memory card.
This camera must be used indoors and ideally situated in a high area of a room. The
can be used for a variety
Memory C
-R
SD
PIR camera of purposes including monitoring your property or
staff, and catching criminals.
Please Note: The mini CD supplied can only work with CD ROMs which have a mini CD
tray.
2
Introduction
Saving Images to your PC (continued)
Step 5: Highlight the images you want to save to your computer. You can select all images
by clicking on the Edit tab and clicking on “Select All Ctrl+A”.
Step 6: Click on the Edit tab and select “Copy Ctrl+C”. See below.
Step 7: Go to the location of where you want to save the file/s to and click on the Edit tab
and then select “Paste Ctrl+V”. See below.
Step 8: When finished, you will see all of your file/s in your target folder. Double click on
the file/s to view the images.
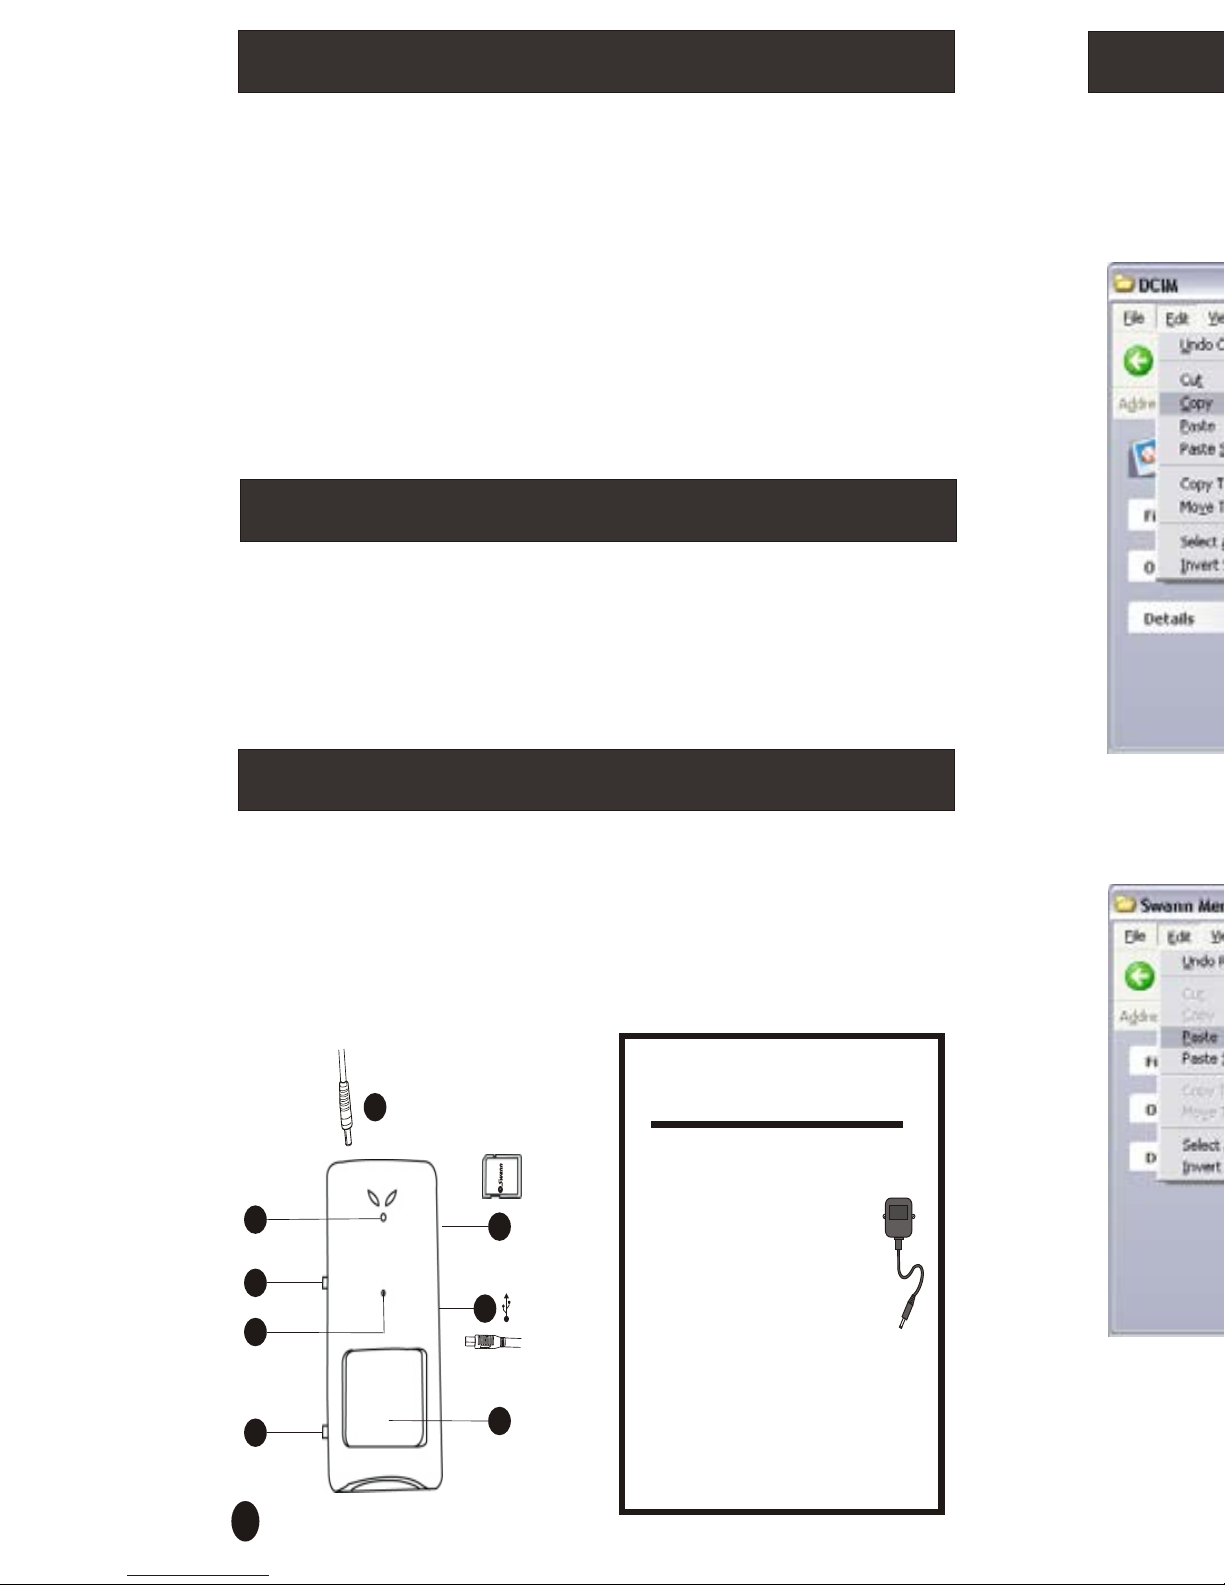
A
B
C
D
E
F
H
G
A. DC power input
B. LED indicator`(lights up when capturing a picture)
C. Shutter button
D. Pinhole Lens
E. PIR ON/OFF switch
F. SD Memory Card slot (SD Card Optional)
G. Mini USB port
H. PIR Sensor and filter
Parts Identification
Introduction
Parts Indentification
Getting Started
PIR Camera
PC Webcam
PC Webcam (continued)
Saving images to your PC
Saving images to your PC (continued)
Help Desk / Support Details
Warranty Information
2
2
3
3
4
5
6
7
Back Cover
Back Cover
2
2
3
3
4
5
6
7
Back Cover
Back Cover
(Optional)
WARNING: IMPORTANT
NOTICE ABOUT CORRECT
USE OF POWER ADAPTER
The correct orientation
for the enclosed power
adapter is in a vertical
or floor mount position.
L’orientation correcte pour
L’adapteur secteur fourni
est dans une position
verticale ou plancher-
monte.
La orientacion correcta para
el adaptador electrico incluido
es en posicion vertical o instalado
en el suelo.
Warranty InformationWarranty Information
Contents
Introduction
Page 3
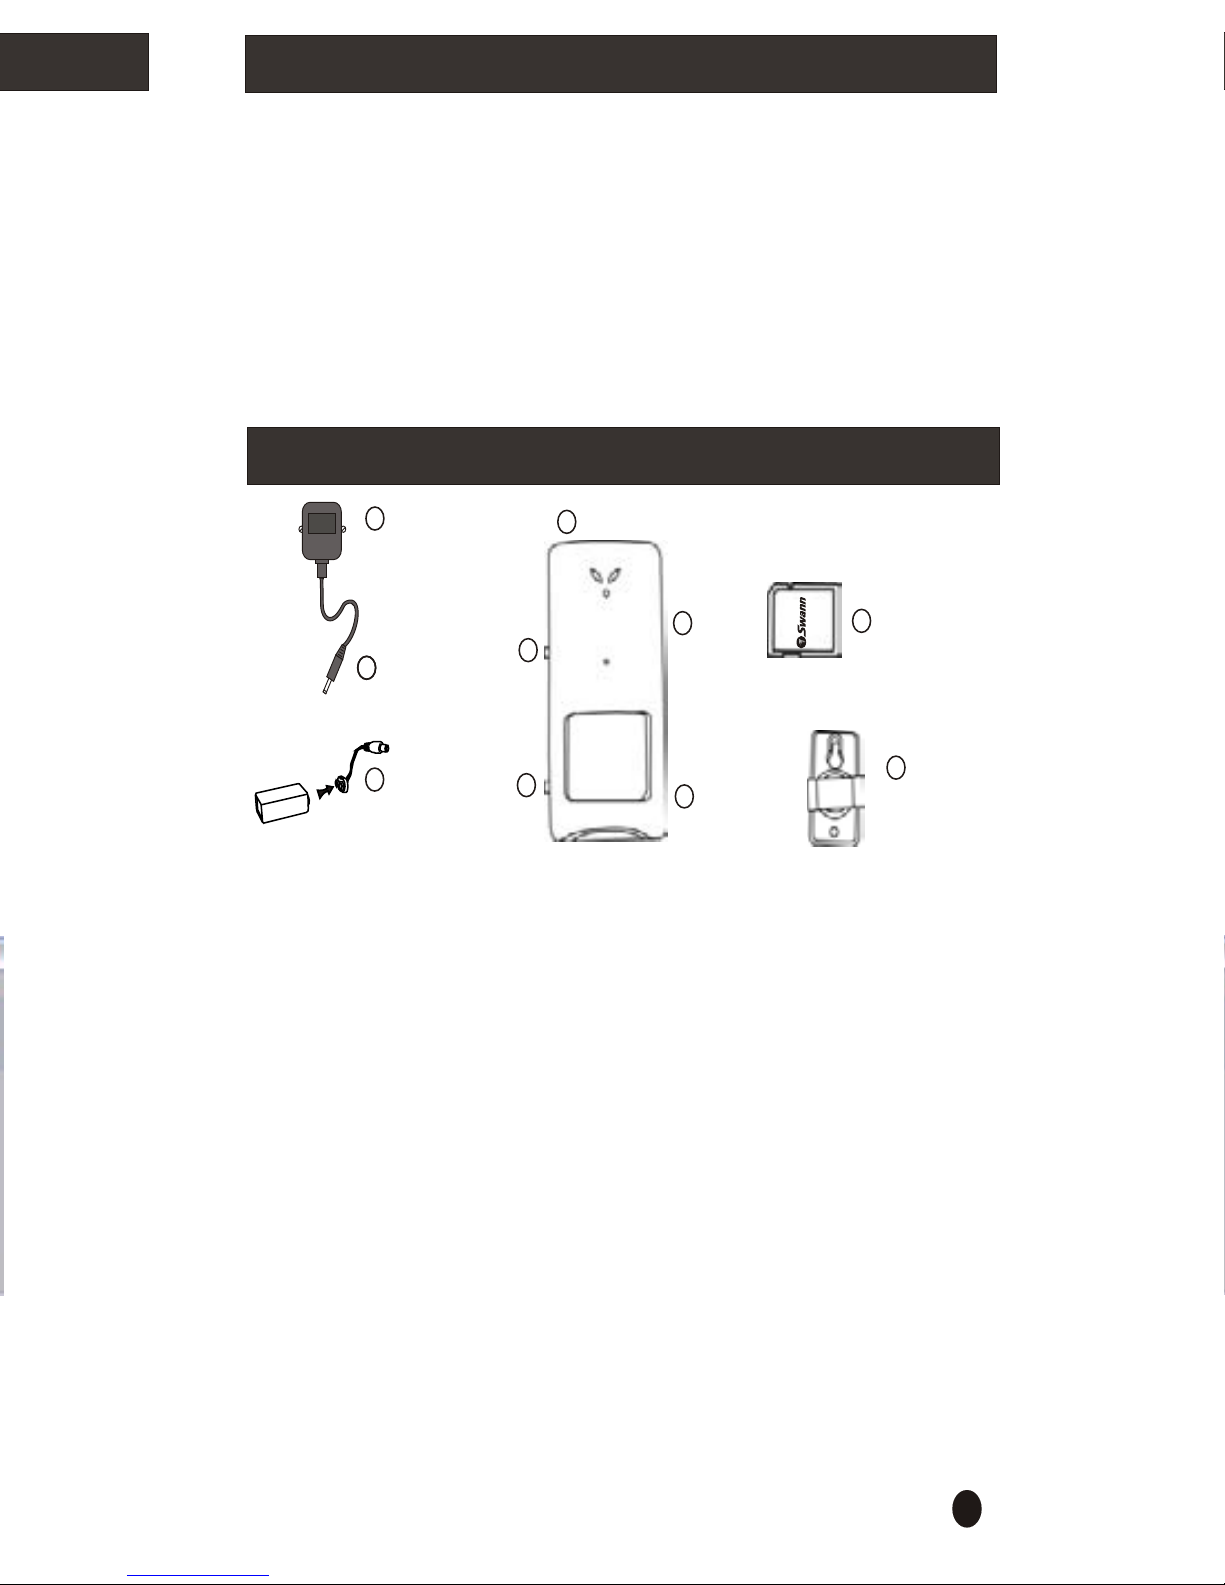
IMPORTANT: Make sure the PIR ON/OFF switch (8) on the left of the camera is in the OFF position.
Step 1: Firstly insert your SD memory card (1) into the SD card slot (2) on the camera.
Step 2: Choose where you want to situate the camera. Keep in mind the camera can only be 3ft / 1m
away from a mains power socket, unless you use extension cables. Then mount the
camera bracket to your wall using the screws provided in the packaging.
Step 3: Connect the camera (3) to the camera bracket (4) mounted on your wall.
Step 4: Connect the DC plug (6) into the DC power socket (5) on the top of the camera.
Step 5: Plug the power adaptor (7) into the mains power on your wall.
For short term usage, connect a 9V battery to the Battery Snap (10) and plug it into the DC power
socket (5).
IMPORTANT: Battery life will last 3 to 8 hours depending on BATTERY quality.
Step 6: Make sure you wait 30 seconds while the camera goes through diagnostics before you push the
PIR ON/OFF switch (8) on the left of the camera into the ON position.
Step 7: The camera will now take images of any motion events within 15 feet (5 metres) of the camera
every 3 seconds. All images will be saved to the default location on the SD memory card.
Step 8: Press the shutter button (9) on the left of the camera to manually save images to your SD
memory card.
IMPORTANT: THIS PRODUCT DOES NOT HAVE TIME AND DATE STAMP FEATURE.
PIR Camera
You can connect your Swann Memory camera to your PC and use the camera as a PC
webcam or extract the images already saved on the SD memory card in the camera. To help
guide you through the process of setting up the camera, we have outlined the steps and
numbered each of the components required in the diagram below each of the configurations.
IMPORTANT!
The SD card can only be inserted one way (gold pins facing towards the back of the camera),
forcing it may damage the camera or SD card.
Make sure you turn OFF the power to the camera before inserting or removing the SD card. Do
not insert or remove the card when the LED is blinking. This can result in damage to the picture
or the SD card.
Getting Started
36
POWER
CONNECTOR
6
CAMERA
POWER
ADAPTOR
7
5
9
1
2
3
8
4
SD MEMORY CARD
CAMERA
BRACKET
6
BATTERY
SNAP
10
BATTERY NOT INCLUDED
(Optional)
Page 4

To connect the camera to your PC and use the camera as a PC webcam or save the
images to your computer, please refer to the image below.
Using the SD PIR cam as a PC camera.
IMPORTANT: Make sure the PIR ON/OFF switch (3) on the left of the camera
is in the OFF position.
Step 1: Firstly install the software on your pc by running the setup.exe file found on the CD.
Step 2: Then connect the USB A plug (1) into a spare USB port (2) on your computer.
Step 3: Make sure the PIR ON/OFF switch (3) on the left of the camera is in the ON position.
Step 4: Hold down on the shutter button (4) before you connect the USB B plug (5) into the
USB port (6) on the right side of the PIR camera.
Step 5: Your system should detect your camera and a “Found new hardware wizard” will start.
Select “Install the software automatically”, and click next. Now you will receive a message that
the software for the device you are installing has not passed “Windows Logo testing to verify
its compatibility with Windows XP”. You must click “Continue Anyway” to complete the
installation. When your system has completed the installation, you will see a message telling
you that the wizard has completed installing the software. Click “finish” to close the wizard.
Note: If you do not get the found new hardware wizard, you should disconnect the USB cable
from the side of the camera and check if the PIR ON/OFF switch is in the ON position. Also
check if the camera is listed as a “MR97316 VGA Dual-Mode Camera” in the Imaging Devices
category of your Device Manager.
Step 6: Run the MR97316 MarsPCam file found on your desktop. The screen below should
appear.
Step 7: Press the button to start previewing from the camera. Otherwise click on “Start
Preview” from the Preview tab menu.
Step 8: Press the button to stop previewing from the camera. Otherwise click on “Stop
Preview” from the Preview tab menu.
Step 9: Press the button to capture the image from the camera. Otherwise click on
“Capture Frame” from the Option tab menu.
Step 10: Press the button to save the last captured image. Otherwise click on “Save Active
Item” from the File tab menu. In the next screen, select the location of where you want to save
the captured “jpeg” image.
Step 11: Press the button to save all captured images. Otherwise click on “Save All Items”
from the File tab menu. In the next screen, select the location of where you want to save the
captured “jpeg” images.
Step 12: Click on the “About MarsPCam” from the Help tab menu to find the version number of
the MarsPCam software.
PC Webcamera
USB CABLE
Plug in to a spare USB
port on your PC.
CAMERA
PC Webcamera continued
4
1
2
5
6
3
4
Page 5

Step 7: Press the button to start previewing from the camera. Otherwise click on “Start
Preview” from the Preview tab menu.
Step 8: Press the button to stop previewing from the camera. Otherwise click on “Stop
Preview” from the Preview tab menu.
Step 9: Press the button to capture the image from the camera. Otherwise click on
“Capture Frame” from the Option tab menu.
Step 10: Press the button to save the last captured image. Otherwise click on “Save Active
Item” from the File tab menu. In the next screen, select the location of where you want to save
the captured “jpeg” image.
Step 11: Press the button to save all captured images. Otherwise click on “Save All Items”
from the File tab menu. In the next screen, select the location of where you want to save the
captured “jpeg” images.
Step 12: Click on the “About MarsPCam” from the Help tab menu to find the version number of
the MarsPCam software.
PC Webcamera continued
5
Page 6

IMPORTANT: Make sure the PIR ON/OFF switch (8) on the left of the camera is in the OFF position.
Step 1: Firstly insert your SD memory card (1) into the SD card slot (2) on the camera.
Step 2: Choose where you want to situate the camera. Keep in mind the camera can only be 3ft / 1m
away from a mains power socket, unless you use extension cables. Then mount the
camera bracket to your wall using the screws provided in the packaging.
Step 3: Connect the camera (3) to the camera bracket (4) mounted on your wall.
Step 4: Connect the DC plug (6) into the DC power socket (5) on the top of the camera.
Step 5: Plug the power adaptor (7) into the mains power on your wall.
For short term usage, connect a 9V battery to the Battery Snap (10) and plug it into the DC power
socket (5).
IMPORTANT: Battery life will last 3 to 8 hours depending on BATTERY quality.
Step 6: Make sure you wait 30 seconds while the camera goes through diagnostics before you push the
PIR ON/OFF switch (8) on the left of the camera into the ON position.
Step 7: The camera will now take images of any motion events within 15 feet (5 metres) of the camera
every 3 seconds. All images will be saved to the default location on the SD memory card.
Step 8: Press the shutter button (9) on the left of the camera to manually save images to your SD
memory card.
IMPORTANT: THIS PRODUCT DOES NOT HAVE TIME AND DATE STAMP FEATURE.
PIR Camera
Saving Images to your PC
Saving images from the SD memory card to your PC. Please refer to illustrations on
page 4.
IMPORTANT: Make sure the PIR ON/OFF switch (3) on the left of the camera is in the OFF
position.
Step 1: Connect the USB A plug (1) into a spare USB port (2) on your computer.
Step 2: Connect the USB B plug (5) into the USB port (6) on the right side of the PIR camera.
Step 3: Windows will prompt you with a “What do you want Windows to do?” Dialog box for
your removable disk. Please select the “Open folder to view files” option.
Step 4: The screen below should appear. Now double click on the “DCIM” folder to view the
images taken by the camera.
You can connect your Swann Memory camera to your PC and use the camera as a PC
webcam or extract the images already saved on the SD memory card in the camera. To help
guide you through the process of setting up the camera, we have outlined the steps and
numbered each of the components required in the diagram below each of the configurations.
IMPORTANT!
The SD card can only be inserted one way (gold pins facing towards the back of the camera),
forcing it may damage the camera or SD card.
Make sure you turn OFF the power to the camera before inserting or removing the SD card. Do
not insert or remove the card when the LED is blinking. This can result in damage to the picture
or the SD card.
Getting Started
POWER
CONNECTOR
6
POWER
ADAPTOR
7
5
9
8
6
BATTERY
SNAP
10
BATTERY NOT INCLUDED
Page 7

SD
7
Saving Images to your PC (continued)
Step 5: Highlight the images you want to save to your computer. You can select all images
by clicking on the Edit tab and clicking on “Select All Ctrl+A”.
Step 6: Click on the Edit tab and select “Copy Ctrl+C”. See below.
Step 7: Go to the location of where you want to save the file/s to and click on the Edit tab
and then select “Paste Ctrl+V”. See below.
Step 8: When finished, you will see all of your file/s in your target folder. Double click on
the file/s to view the images.
Page 8

Swann warrants this product against defects in workmanship and material for a period of one
(1) year from it’s original purchase date. You must present your receipt as proof of date of
purchase for warranty validation. Any unit which proves defective during the stated period will
be repaired without charge for parts or labour or replaced at the sole discretion of Swann. The
repair or replacement will be warranted for either ninety days or the remainder of the original
one year warranty period, whichever is longer. The end user is responsible for all freight
charges incurred to send the to Swann’s repair centres.
shipping from and to any country other than the country
of origin. The warranty does not cover any incidental, accidental or consequential damages
arising from the use of or the inability to use this . Any costs associated with the fitting
or removal of this product by a tradesman or other person or any other costs associated with
its use are the responsibility of the end user. This warranty applies to the original purchaser of
the only and is not transferrable to any third party.
Unauthorised end user or third party modifications to any component or evidence of misuse
or abuse of the device will render all warranties void.
product The end user is responsible
for all shipping costs incurred when
product
product
Help Desk / Support Details
Warranty Information
www.swannsecurity.com
FCC NOTICE
This device complies with Part 15 of FCC Rules.
Operation is subject to the following conditions:
(1) This device may not cause harmful interference, and
(2) this device must accept any interference received,
including interference that may cause undesired operation
This product supports
Windows2000 and WindowsXP
Has the answers
Swann Technical Support
All Countries E-mail: tech@swann.com.au
Telephone Helpdesk
UNITED STATES toll free
1800-627-2799
(Sun-Thurs, 2pm-10pm US PT)
USA Exchange & Repairs
562-777-2551
(Mon-Fri, 9am-5pm US PT)
AUSTRALIA toll free
1300 138 324
(Mon-Fri, 9am-5pm Aus ET)
New Zealand toll free
1300 138 324
(Mon-Fri, 9am-5pm Aus ET)
International
+61 3 8412 4610
(Mon-Fri, 9am-5pm Aus ET)
See http://www.worldtimeserver.com for information on different time zones and
the time in Melbourne Australia compare to your local time.
Contact the Swann Helpdesk using our fast e-mail service
tech@swann.com.au or call us on one of the Toll-Free
numbers shown on the back cover of this booklet.
Most problems can be quickly and easily fixed with a simple
e-mail or a quick chat with one of our friendly technical staff.
(Toll-Free available in the US and Australia only)
Memory Camera Series
With motion detection
Installation Guide
 Loading...