

Page 1
24
Guía de vuelo rápida
Entonces, ya ha quitado el helicóptero de la caja, ha hojeado el manual y ha pensado:
“Demasiadas palabras... Muchos botones… No sé por dónde empezar”
¡Está bien! Los helicópteros son complejos. Por eso hemos preparado esta guía rápida.
Esto es lo que debe hacer:
1. Lea y obedezca todas las advertencias e instrucciones en este manual y en el paquete. ¡Las
escribimos porque son realmente importantes!
2. Inserte las baterías en el controlador. Utilice 6 baterías alcalinas AA de buena calidad.
3. Conecte el helicóptero con el cargador y conecte el cargador a la corriente a través del cargador incluido.
4. Encienda el controlador. Déjelo allí por alrededor de una hora, luego retírelo.
5. Encienda el helicóptero. Verá unas luces LED que se encienden.
6. Mueva el comando de control izquierdo rápidamente hacia el máximo y luego hacia el mínimo.
7. ¡Vuele!
Controlar el helicóptero
Moverse hacia abajo/hacia arriba: Utilice el comando izquierdo del control remoto.
Girar hacia la izquierda/derecha: Mueva el comando derecho hacia la izquierda o derecha.
Moverse hacia adelante/hacia atrás: Mueva el comando derecho hacia adelante o hacia atrás.
Ajustar la dirección:
Rotación (Timón): Utilice los botones de ajuste de dirección de rotación, ubicados debajo del
Utilice los botones de ajuste de dirección hacia adelante y hacia atrás que se encuentran ubicados a
la izquierda del comando derecho. Controla el ángulo y velocidad en la que se mueve el helicóptero
comando derecho. Ajusta el giro del helicóptero.
Hacia adelante/hacia atrás (Paso):
hacia adelante y hacia atrás.
Información
¿Tiene preguntas o comentarios sobre este helicóptero?
Correo electrónico: tech@swann.com
O visite nuestro sitio web: www.swann.com
Este dispositivo cumple con la parte 15 de las reglas FCC. El funcionamiento está sujeto a las siguientes condiciones:
(2) Este dispositivo debe aceptar la transferencia recibida, incluyendo la interferencia que puede causar un
Declaración de conformidad con las FCC (para EE.UU.)
(1) Este dispositivo puede no causar una interferencia nociva, y
funcionamiento no deseado.
¡No toque la hélice cuando esté en funcionamiento! ¡No
juegue sobre la cabeza de alguien!
¡Se requiere la supervisión de un adulto!
!
¡Nunca inserte objetos cortantes, agujas o tornillos en el
helicóptero ya que pueden punzar la batería interna!
RIESGO DE ASFIXIA – Partes pequeñas.
No apto parra niños menores de 3 años.
242424
© Swann Communications 2011
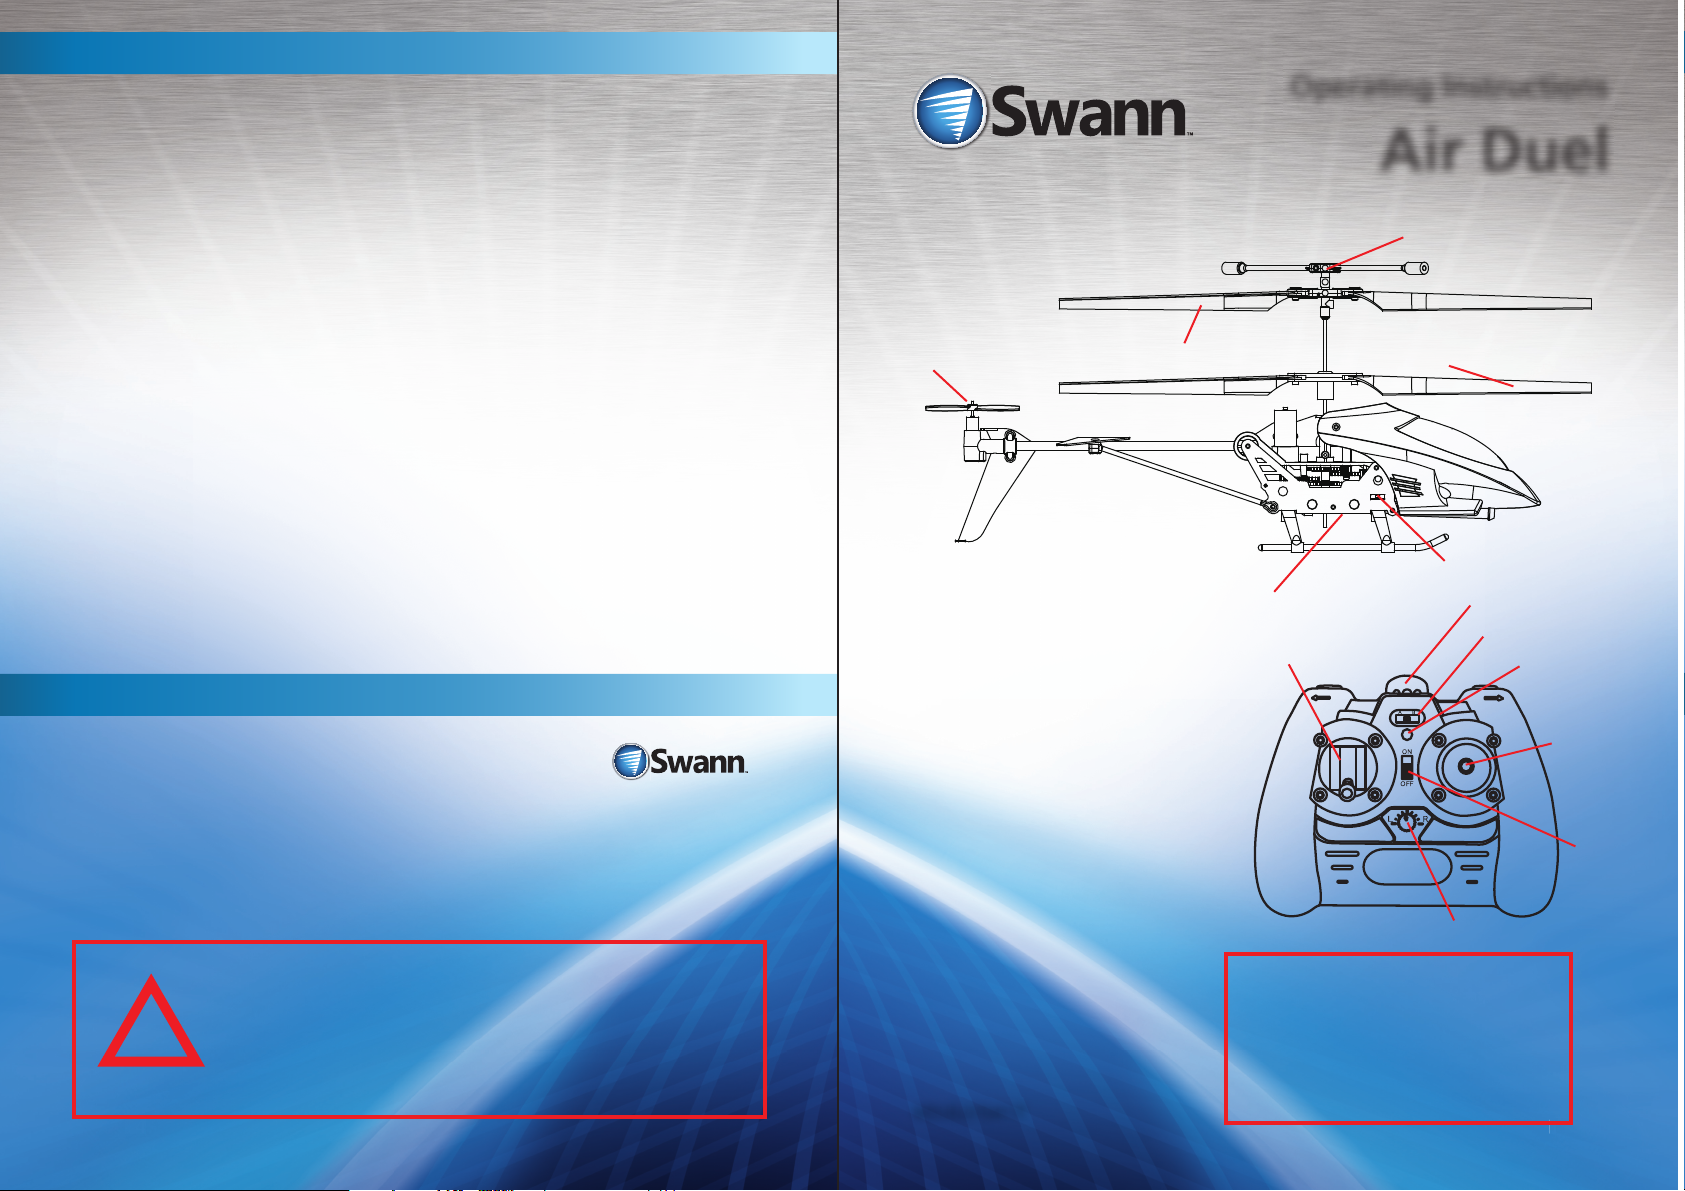
Tail Rotor
Upper Rotors
Congratulations on your purchase of
these remote control model helicopters
from Swann! We were going to tell you
all about how much fun these are, the
tricks you can do and how many hours
of enjoyment you’re going to get out
of ‘em, but we fi gure that if we just talk
about how to fl y them, you’ll discover
the fun for yourselves!
NOTICE: Before using
these helicopters, read this
operating guide carefully,
and obey all warnings
and caution labels.
Seriously, it’s no fun if
someone gets hurt.
MDUEL070411T
Operating Instructions
Air Duel
Balance Bars
Lower Rotors
Charging Socket (far side)
Left Stick
IMPORTANT: Do NOT crash the
helicopters into one another!
This can and will damage
the helicopters, and could
lead to injury.
Oh, and play nice!
Power Switch
IR LEDs
IR Band Selector
Power
Indicator LED
Right Stick
Power Switch
Rotational Trim
1
Page 2
Operating Instructions
Instrucciones de seguridad importantes
IMPORTANT: Do NOT crash the
helicopters into one another!
!
This can and will damage the
helicopters, and could lead to injury.
Recharging and Battery Replacement
Ensure the helicopter is turned OFF before attempting to charge it.
Check the orientation of the power cable carefully when connecting it
to the helicopter. If it feels tough to insert or you need to use force, it’s
It’ll take 45 – 60 minutes to charge. Don’t over-charge the helicopter, and don’t leave it connected to
a charger for more than ninety minutes.
Replacing Batteries in the Controller:
The battery compartment is located on the
rear of the controller. Undo the screw with
a precision screwdriver and open the battery
compartment. Only use alkaline batteries.
Don’t mix old and new batteries. For more
information on battery useage and safety,
consult page 6.
When charging from a USB port, always connect the USB plug to a USB port without connecting the
helicopter. Ensure the red light in the USB plug lights up. When you connect the helicopter, this light
will turn off. If it does not go out, this indicates that the helicopter is not being charged - check that
If left on, it won’t charge.
probably upside down!
Charge via Remote Control: Open the charging lead
compartment located on the underside of the remote control,
and extend the charging lead. Turn the remote control ON.
Plug the other end into the charging socket on the side of
the helicopter. The indicator LED on the remote control will be
orange/red when the helicopter is charging, and will turn green
when the helicopter is charged. [If the LED is fl ashing, then pair
the remote, as described below, and it will then read accurately.]
Charge via USB: Plug the USB end of the charging cable into
a USB port on your computer, or to a stand-alone USB charger.
Then, connect the other end to the helicopter. Never connect
the helicopter to a USB port supplying anything other than 5V
@ 500mA. There is an LED in the USB plug, which will go out
when the helicopter is charging. The LED will light up when
charging is complete, or the helicopter isn’t attached to the
cable.
IMPORTANT NOTE: Charging via USB
the helicopter is turned off, and check the integrity of the connection.
CAUTION: Do not touch the running
rotors. Do not fl y above or near
!
someone’s head. Adult supervision is
required at all times.
PRECAUCIÓN: Nunca vuele cerca de su cara. Mantenga alejado el rotor de sus dedos, cabello, ojos u
otras partes del cuerpo. Siempre despegue de una superfi cie plana. Nunca sostenga el helicóptero en
sus manos cuando esté despegando. NO lance el helicóptero cerca de personas o animales. Manténgalo
alejado de obstáculos y riesgos eléctricos..
Se requiere la supervisión de los padres cuando se use el helicóptero por niños.
• Siempre quite las baterías del controlador cuando no se use por periodos de tiempo extendidos.
• Para limpiarlo, pase un trapo húmedo suavemente. Evite el uso de solventes ya que pueden dañar
los componentes plásticos.
• Mantenga el helicóptero y el control remoto alejados de fuentes de calor.
• No sumerja el helicóptero o el control remoto en agua. Esto dañará los componentes electrónicos
y puede representar un riesgo serio para la batería integrada.
• Mantenga las manos, cabello o ropa suelta fuera del alcance de los rotores cuando el interruptor
de encendido/apagado esté encendido.
• Apague el controlador/cargador cuando el helicóptero esté en uso.
• Quite las baterías del controlador cuando no esté en uso.
• Se requiere la guía de los padres para usuarios menores.
• Mantenga su helicóptero cerca y dentro de la línea de visión, si se pierde la línea de visión del
controlador, perderá el control del helicóptero.
• Para el mejor rendimiento, sólo utilice baterías alcalinas AA nuevas en el controlador.
• Lea y obedezca todas las advertencias e indicaciones de seguridad en este manual.
• El controlador y el cargador están específi camente diseñados para cargar este helicóptero. ¡Nunca
utilice otro equipamiento de carga!
• El helicóptero no está diseñado para el uso de los niños menores de catorce (14) años de edad a
menos que estén supervisados directamente por un adulto competente todo el tiempo.
• El helicóptero sólo debe ser utilizado con el controlador/cargador proporcionados.
• Examine regularmente el helicóptero y el controlador para detector daños en los enchufes,
cerramiento, rotores, tapas de batería y otras partes. En el caso de que se detecte algún daño, no
se deben utilizar ni el helicóptero no el controlador hasta que se reparen por completo.
Cuidado y mantenimiento:
PRECAUCIONES DE SEGURIDAD
Aviso especial para adultos:
PELIGRO
¡Nunca inserte objetos cortantes, agujas o
!
!
tornillos en el helicóptero ya que pueden
punzar las baterías internas!
RIESGO DE ASFIXIA – Partes pequeñas.
No apto parra niños menores de 3 años.
2222
23
Page 3

Instrucciones de seguridad de la batería
• Requiere 6 baterías alcalinas 1,5 V AA (no incluidas)
• Las baterías son objetos pequeños.
• El reemplazo de las baterías debe estar a cargo de un adulto competente.
• Siga el diagrama de polaridad (+ / -) en el compartimento para baterías.
• Quite rápidamente las baterías muertas/agotadas del controlador.
• Deseche las baterías de manera responsable.
• Quite las baterías cuando lo almacene por un tiempo prolongado.
• NO incinere las baterías.
• NO deseche las baterías en el fuego ya que pueden explotar o causar derrames.
• NO mezcle baterías nuevas con baterías viejas o distintos tipos de baterías (es decir, alcalinas con estándares).
• NO recargue baterías no recargables.
• NO ocasione un cortocircuito en las terminales de alimentación.
• NO se recomiendan las baterías recargables.
Instrucciones de batería LiPO:
El helicóptero tiene un par de baterías de polímeros de litio integradas. Estas baterías son livianas y poderosas
debido a que su química está basada en litio, un metal liviano y extremadamente volátil.
• Nunca agote las baterías por completo. Cuando el helicóptero comience a quedarse sin energía,
apáguelo y cárguelo tan pronto como pueda.
• Nunca deje el helicóptero sin atención mientras lo cargue.
• Cargue las baterías en un ambienta aislado y controlado. Mantener lejos de materiales infl amables.
• No exponer a luz solar directa. Hay un riesgo de que la batería se sobrecaliente, se incendie y/o
explote.
• No desarme, modifi que, caliente o cause un cortocircuito en la batería. No la ubique en el fuego
o la deje en lugares cerda de fuentes de calor.
• No tite la batería o la someta a impactos fuertes.
• No permita que la batería se humedezca.
• Sólo cargue la batería desde el equipamiento de carga proporcionado. Utilizar otro equipamiento
de carga anulará su garantía, puede dañar la batería y representa un riesgo de incendio o explosión.
• Utilice la batería sólo en este helicóptero y use sólo esta batería en el helicóptero.
• Lea estas instrucciones cuidadosamente y obedezca todas las indicaciones mencionadas.
• En el caso poco probable de pérdida o explosión, use arena o un extinguidor de fuego químico
para extinguir las baterías.
• Las baterías se deben desechar de manera responsable.
Si su profesora de química del colegio alguna vez demostró lo que sucede cuando el sodio se ubica
en agua (la descripción técnica del resultado es “bum”) está familiarizado de alguna manera con cuán
volátil es el litio, ¡con la diferencia de que el litio es incluso más volátil que el sodio! Básicamente,
¡obedezca todas las indicaciones y respete el poder del litio!
IMPORTADOR:
IMPORTADORA PRIMEX, S.A. DE C.V.
BLVD. MAGNOCENTRO NO. 4
SAN FERNANDO LA HERRADURA
HUIXQUILUCAN, ESTADO DE MEXICO
C.P. 52765
RFC#: IPR-930907-S70
222222
Para cualquier pregunta, comuníquese al (5) 246-5500
Before you can fl y, you need to ‘pair’ the helicopter and remote together. To do
Pairing the Remote
this, turn on both the helicopter and remote. Select a frequency using the band
selector switch. When fl ying multiple helicopters, ensure each is on a different band.
Then, push the left stick to minimum. Aim the controller’s IR transmitter at the
helicopter. Move the left stick from minimum to maximum (bottom to top) and
back again. The helicopter will now be paired to that controller.
Ensure that the helicopters are separated
when pairing the remote controls.
One controller MUST be set to CHANNEL A,
and the other to CHANNEL B.
If the helicopters are within line of sight of one remote control, or the controllers
aren’t set to different bands, then one controller will pair with both helicopters
- a very dangerous outcome. Seriously, just be careful when pairing the remote
controls.
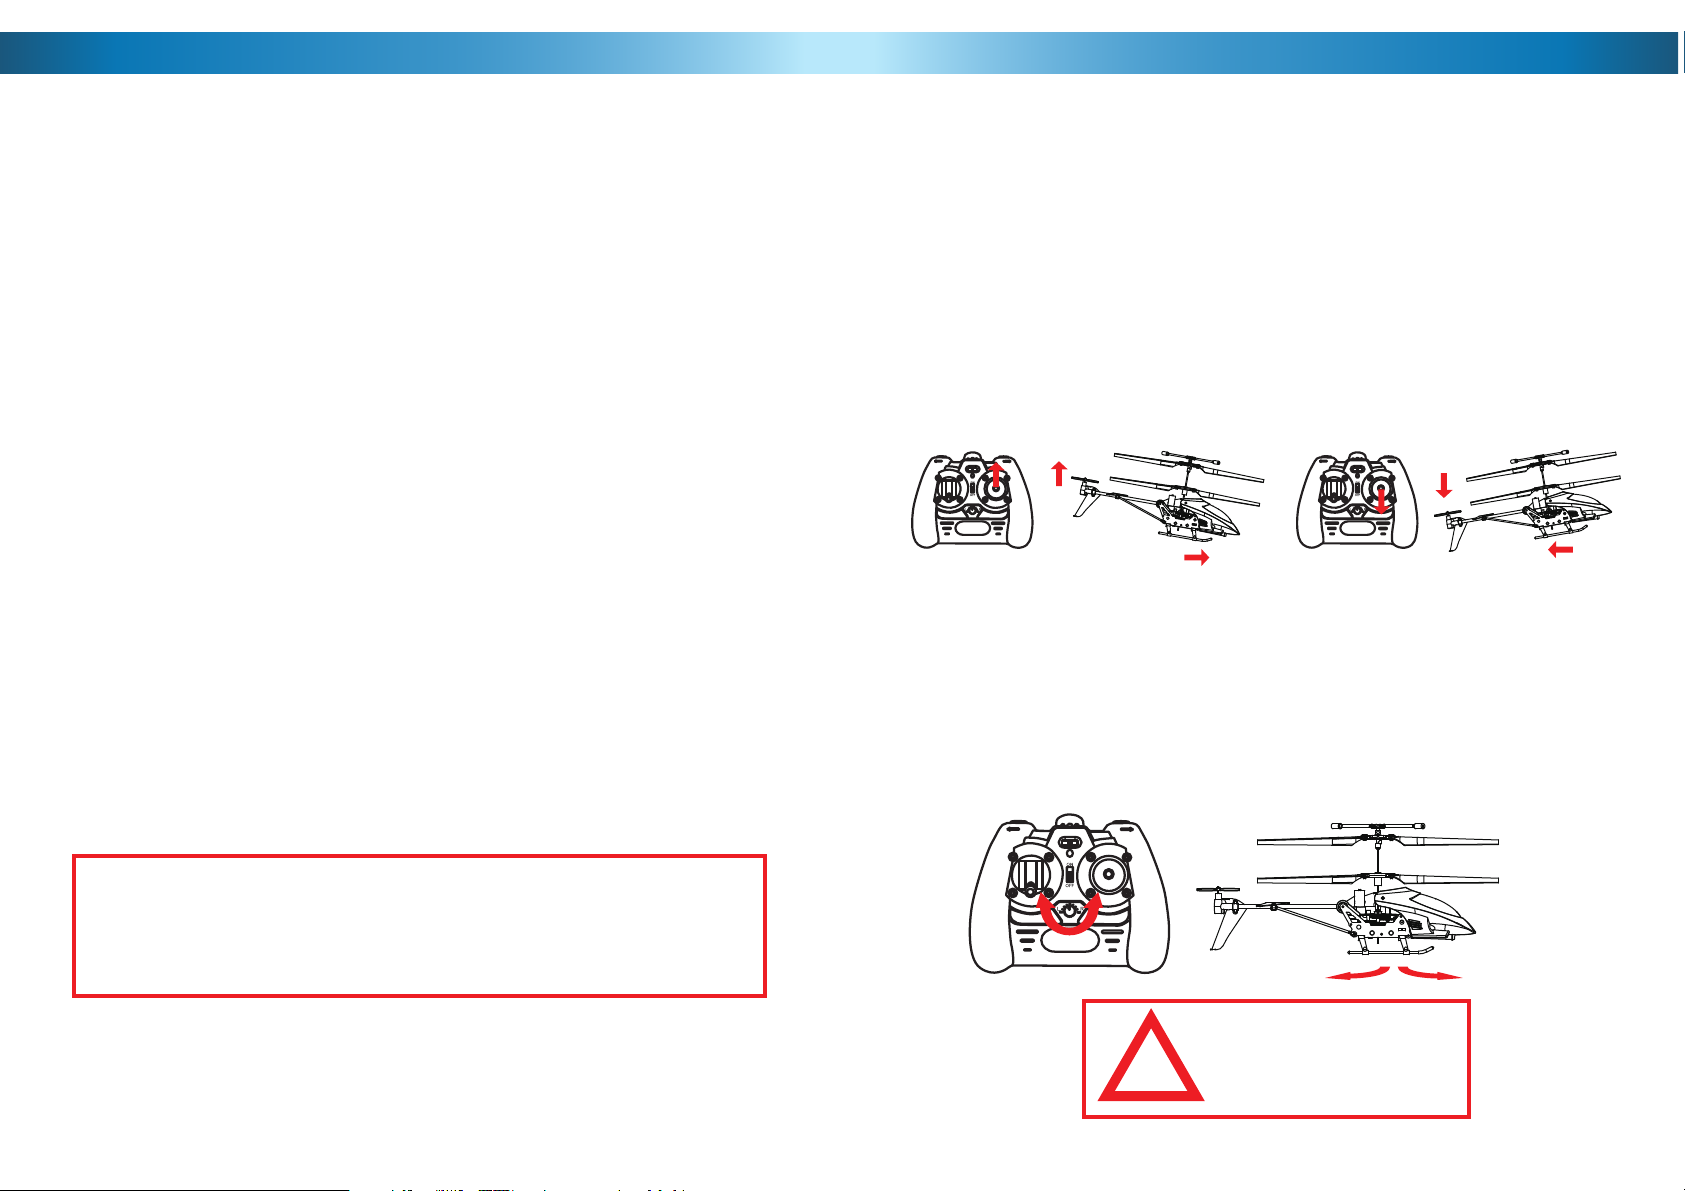
Basic Principles of Flight
Moving up and down: The helicopter moves up and down by varying the speed of its main rotors
(those two big things that spin). You can control how fast these spin by using the left stick on the
controller. Pushing the stick up will increase the throttle.
To get good results, be gentle and subtle. Small adjustments made slowly and carefully are the best way
to get the helicopter to fl y well. Be careful when easing off the throttle – if the helicopter stalls (that
is, doesn’t have enough lift to stay in the air) it’ll fall, and might not be able to recover in time, even if
you jam the throttle back on.
Forward, Backwards and Rotation: The right stick on the controller affects the helicopter’s direction,
kind of like the right stick on a video game controller.
Pushing the right stick up will pitch the helicopter forwards. Whilst pitched in this way, the main rotors
will push the helicopter along forwards. The opposite is also true – moving the right stick down will
pitch the helicopter backwards and move it in reverse.
To rotate the helicopter, move the right stick to either side. This will cause the main rotors to change
their speeds, causing the body of the helicopter to spin on the spot.
By using the right stick at different angles and positions, you can design and execute some graceful,
arcing turns. On the other hand, quick thrusts of the stick in different directions can create some unique
tricks or stunts. Practice makes perfect!
33
Page 4
Operating Instructions
Band Selection
These are two channel IR helicopters. This means that both helicopters can be used at the same time,
provided they are paired to different bands.
The switch in the upper centre of the controller selects bands. You can choose either BAND A or BAND B.
If using two helicopters at once:
• Ensure that one controller is set to BAND A and the other set to BAND B.
• Pair the helicopters very carefully. For best results, pair each helicopter in separate rooms.
• Ensure that they aren’t within line of sight of one another when pairing.
If you’re only using one helicopter, you can use either BAND A or BAND B.
If the controller is interfering with any other devices,or other
devices are interfering with the helicopter, try changing control bands.
Flying Guide
Wind: Basically, these are (approximately) 1/40th scale helicopters. Full sized helicopters can’t fl y in high
winds – and neither can the models. If a full sized helicopter has diffi culty overcoming 50mph winds,
then the model will have the same diffi culty with 1~2 mph winds (i.e. 1/40th as much). There’s nothing
that can be done about this, it’s just physics.
Air conditioning: Hot air rises and cool air falls – this creates movement in the air, leading to an
effect called “wind shear”. Basically, this is when there’s a column of hot air going up next to cold air
going down. Many full-scale aircraft accidents have been caused by wind shear. Air conditioners create
heaps of wind shear. If the helicopter fl ies through wind shear, it will seem to suddenly fl y up or down
(depending on the direction of the wind shear).
The Ground Effect: When the helicopter is near the ground, the air it pushes down with its rotor has
nowhere to go – the ground is in the way. Some of this air bounces back, this pushes the helicopter
up. When the helicopter is near the ground, it will get slightly more lift than it normally would. This is
something to keep in mind when landing.
The Ceiling Effect: Conversely to the ground effect, when you fl y too close to a ceiling, a small pocket
of low pressure is created above the helicopter, and it will be sucked upwards. This could be bad – if
you hit the ceiling, the helicopter will stall, fall and possibly be damaged.
Multiple Helicopters: If you’re using more than one helicopter in a space at once, be very careful
when setting the controller band and pairing them to the helicopters. You may fi nd that the more than
one helicopter will be controlled by a single controller, and this can lead to crashes, accidents, injuries
or other very undesirable outcomes.
When using both helicopters at once, ensure that one controller is set
to CHANNEL A and the other set to CHANNEL B.
Adelantos y retrocesos, hacia arriba y hacia abajo: El helicóptero tiene rotores coaxiales que rotan
de manera contraria (una manera linda de decir dos rotores que giran en direcciones opuestas). Si
es experto en helicópteros, sabrá que no están hechos de la misma manera que los helicópteros de
tamaño real, tienen rotores principales de dirección única con un rotor de cola vertical. Creemos que
este diseño coaxial funciona mejor para estos modelos a escala porque:
• Son más estables que los de rotos único. Debido a que los rotores se mueven en direcciones
opuestas, el helicóptero tiene menos tendencia a girar al otro lado.
• Es mucho más fácil de confi gurar. Sólo hay dos confi guraciones de dirección, contra tres
confi guraciones de dirección que se requieren para el diseño de un helicóptero más convencional.
• Más rotores implican más propulsión, lo que signifi ca una manera más fácil de volar y un
helicóptero más maniobrable.
Sin embargo, debido a que el rotor de cola es horizontal en vez de vertical, el helicóptero tiene una
tendencia a ascender mientras se mueve hacia adelante y a descender cuando de mueve en reversa.
Esto no es un problema si disminuye la velocidad mientras se mueve hacia adelante y aumenta la
velocidad mientras se mueve hacia atrás. Sentirá eso bastante rápido.
Dirección de rotación: Si le parece que el helicóptero gira muy lentamente a la izquierda o derecha
cuando no usa la palanca derecha del controlador, quizás necesite ajustar el timón. La perilla de ajuste
del timón está al costado del controlador, a la derecha de la palanca de control derecha.
Probablemente tenga que hacer esto cada dos o tres vuelos pero sólo le llevará un instante. Básicamente,
este ajuste “afi na” la velocidad de las aspas giratorias, y contribuye a que el helicóptero vuele derecho.
Si el helicóptero rota en el sentido de las agujas del reloj (a la derecha desde la perspectiva del piloto
en miniatura imaginario), gire la perilla de ajuste en el sentido contrario al de las agujas del reloj. Si el
helicóptero rota en el sentido contrario al de las agujas del reloj (a la izquierda desde la perspectiva del
piloto en miniatura imaginario), gire la perilla de ajuste en el sentido de las agujas del reloj.
For best results, pair each helicopter in separate rooms.
Pair the helicopters very carefully.
Ensure that they aren’t within line of sight of one another.
Places to Fly: Because high winds can be a problem, we recommend fl ying indoors.
Low Battery: To get the longest possible life from the built-in battery, never completely discharge it.
As soon as the helicopter shows any sign of running low on power (such as responding slowly or being
unable to maintain altitude easily) turn it off and charge it as soon as practicable. For more information
about battery care, see page 6.
444
!
ADVERTENCIA: NO
vuele cerca de los
ojos o cara.
21
Page 5

Instrucciones de uso
Selección de Canal
Este es un helicóptero de dos canales erease por infrarrojos. Esto se signifi ca que dos helicópteros se
pueden utilizar al mismo tiempo, siempre y cuando estén en canales distintos.
El interruptor en la parte superior central del control selecciona el canal. Usted puede elegir entre
CANAL A o CANAL B.
Si usa dos helicópteros a la vez:
• Asegúrese de que un control este ajustado a CANAL A y el otro a CANAL B.
• Ajuste los helicópteros a su canal con mucho cuidado. Para obtener erase los mejores resultados,
ajuste cada helicópteros a su canal en cuartos separados.
• Asegúrese que los helicópteros no estén dentro de la línea de visión uno del otro cuando haga
el emparejamiento.
Si sólo está utilizando un helicóptero, puede utilizar CANAL A o CANAL B
Si el control está interfi riendo con otros dispositivos, u otros dispositivos están interfi riendo con el
helicóptero, trate de cambiar el canal de el control.
Guía de vuelo
Viento: Básicamente, son helicópteros a escala 1/20 (aproximadamente). Los helicópteros de tamaño
real no pueden volar en vientos altos, tampoco pueden hacerlo los modelos. Si un helicóptero de
tamaño real tiene difi cultades para sobrepasar vientos de 50 mph, el modelo tendrá la misma difi cultad
con vientos de 2 a 3 mph (es decir, en uno a escala 1/20 como mucho) No hay nada que se pueda hacer
con eso, es la física.
Aire acondicionado: El aire caliente sube y el aire frío baja, esto crea movimiento en el aire causando
un efecto llamado “corte del viento”. Básicamente, esto es cuando una columna de aire caliente sube
luego de que el aire frío baja. Muchos accidentes de aeronaves a gran escala han sido causados por
esto. Los aires acondicionados crean desplomes de corte del viento. Si el helicóptero vuela a través de
un corte del viento, parecerá que de repente vuela hacia arriba o hacia abajo (según la dirección del
corte del viento).
El efecto del suelo: Cuando un helicóptero está cerca del suelo, el aire que empuja hacia abajo con
su rotor no tiene dónde ir, el suelo está en medio del camino. Parte de ese aire rebota, esto empuja el
helicóptero hacia arriba. Cuando el helicóptero está cerca del suelo, se elevará un poco más de lo que
se elevaría normalmente. Esto es algo para tener en cuenta al aterrizar.
El efecto del techo: De manera inversa al efecto del suelo, cuando vuela cerca de un techo, se crea
una pequeña bolsa de presión baja debajo del helicóptero, y se succionará hacia arriba. Esto puede ser
malo, si golpea el techo el helicóptero entrará en pérdida, caerá y posiblemente se dañará.
Helicópteros múltiples: Si usa más de un helicóptero a la vez en un mismo espacio, tenga cuidado
al ajustar la banda del controlador y vincular los helicópteros. Usted verá que el mismo controlador
estará a cargo de dos o más helicópteros, lo que puede ocasionar choques, accidentes, heridas u otras
consecuencias no deseadas.
Cuando use más de un helicóptero a la vez, cerciórese de que cada controlador esté
ajustado a una banda distinta con el interruptor selector de banda del controlador.
Lugares donde volar: Debido a que los fuertes vientos pueden ser un problema, se recomienda volar
en interiores.
Batería baja: Para obtener el mayor rendimiento de la batería integrada, nunca la descargue
completamente. Tan pronto como el helicóptero muestre una señal de batería baja (si anda despacio o
no puede mantener altitud fácilmente) apáguelo y cárguelo. Para más información sobre el cuidado de
la batería, consulte la página 22.
202020
Back & Forwards, Up & Down: This helicopter features counter-rotating coaxial rotors (a fancy way
of saying two rotors which spin in opposite directions). If you’re any kind of expert on helicopters,
you’ll know that this is not the same way that full-scale helicopters are usually made – they’ve got a
uni-directional main rotors with a vertical tail rotor. We think that this coaxial design works best for
these scale models because:
• It’s more stable than a single rotor. Because the rotors move in opposite directions, the helicopter
has less of a tendency to spin the other way.
• It is way easier to set up. There are only two trim settings to get right, as opposed to the three trim
settings that are required for the more conventional helicopter design.
• More rotors mean more lift, which means an easier to fl y and more manoeuvrable helicopter.
However, because the tail rotor is horizontal rather than vertical, the helicopter has a tendency to
ascend whilst moving forwards, and descend whilst reversing. This isn’t really a problem if you ease off
on the throttle whilst moving forward and increase the throttle whilst moving backwards. You’ll get a
feel for it pretty quick.
Trim (Rotation): If you fi nd that the helicopter is turning slowly left or right when you’re not using the
right stick on the controller, then you’ll need to adjust the trim. The trim knob is located in the centre
of the controller, between and just below the primary sticks.
You’ll probably have to do this every couple of fl ights, but it only takes a moment. Basically, the trim
‘fi ne-tunes’ the speed of the rotor blades, and will help keep the helicopter fl ying straight.
If the helicopter is rotating clockwise (it’s turning right from the imaginary miniature pilot’s perspective)
then rotate the trim knob counter-clockwise.
If the helicopter is rotating counter-clockwise (it’s turning left from the imaginary miniature pilot’s
perspective) then rotate the trim knob clockwise.
WARNING: Do NOT fl y
!
near eyes or face.
5
Page 6

Battery Safety Instructions
• Requires 6 x 1.5V AA Alkaline batteries (not included)
• Batteries are small objects.
• Replacing batteries must be undertaken by a competent adult.
• Follow the polarity diagram ( + / - ) in the battery compartment.
• Promptly remove dead/exhausted batteries from the controller.
• Dispose of used batteries responsibly.
• Remove batteries for prolonged storage.
• DO NOT incinerate used batteries.
• DO NOT dispose of batteries in fi re, as batteries may explode or leak.
• DO NOT mix new and old batteries or types of batteries (i.e. alkaline/standard).
• DO NOT recharge non-rechargeable batteries.
• DO NOT short circuit the supply terminals.
• Rechargeable batteries are NOT recommended.
LiPO Battery Instructions:
The helicopter has a pair of built in Lithium Polymer batteries. These batteries are light and powerful, as their
chemistry is based on lithium, a light and extremely volatile metal.
• Never completely exhaust the battery. When the helicopter starts to lose power, turn it off and
charge it as soon as practicable.
• Never leave the helicopter unattended while charging.
• Charge battery in an isolated, controlled environment. Keep far away from fl ammable materials.
• Do not expose to direct sunlight: there is a risk that the battery may overheat, ignite and/or
explode.
• Do not disassemble, modify, heat, or short circuit the battery. Don’t place it in fi re or leave in hot
places or near heat sources.
• Do not drop the battery or subject it to strong impacts.
• Do not allow the battery to get wet.
• Only charge the battery from the supplied charging equipment. Using other charging equipment
will void your warranty, may damage the battery and poses a risk of fi re or explosion.
• Use the battery only in this helicopter, and use only this battery in the helicopter.
• Read these instructions carefully and thoroughly, and obey all guidelines herein.
• In the unlikely event of leakage or explosion, use sand or a chemical fi re extinguisher to extinguish
the batteries.
• The battery must be disposed of responsibly.
Principios básicos de vuelo
Moverse hacia abajo y hacia arriba: El helicóptero se mueve hacia abajo variando la velocidad de sus
rotores principales (las cosas grandes que giran). Puede controlar cuán rápido desea que giren usando
el comando izquierdo del controlador. Si empuja el comando hacia arriba aumentará la velocidad.
Para obtener buenos resultados, sea suave y sutil. La mejor manera de hacer que el helicóptero vuele
bien es realizar pequeños ajustes lentamente y con cuidado. Sea cuidadoso cuando descienda la
velocidad, si el helicóptero entra en pérdida (eso es, no tiene la fuerza propulsora sufi ciente para
mantenerse en el aire) se caerá y puede no volver a recuperarse a tiempo, incluso si vuelve a establecer
la velocidad.
Hacia atrás, hacia adelanta, rotación: El comando derecho en el controlador afecta la dirección del
helicóptero, es parecido al comando derecho en el controlador de un video juego.
Empujar el comando derecho hacia arriba dirigirá el helicóptero hacia adelante. Mientras que se dirige
en esa dirección, los rotores principales empujarán el helicóptero hacia adelante. También es posible
lo opuesto, mover el comando derecho hacia abajo dirigirá el helicóptero hacia atrás y lo moverá en
reversa.
Para hacer girar el helicóptero, mueva el comando derecho a uno de los lados. Esto causará que los
rotores principales cambien sus velocidades, causando que el cuerpo del helicóptero gire en el lugar.
Utilizando el comando derecho en ángulos y posiciones diferentes puede diseñar y ejecutar algunos
giros elegantes y arqueados. Por otra parte, empujar rápidamente el comando en diferentes direcciones
puede crear trucos o maniobras únicas. ¡La práctica los hace perfectos!
If your high school chemistry teacher ever demonstrated what happens when sodium is placed in water
(“bam” is the technical description of the outcome) then you’re somewhat familiar with how volatile
lithium is – except that lithium is lighter (and therefore packs a bigger bang per gram) than sodium is!
Basically, obey all the guidelines and respect the power of lithium!
666
PRECAUCIÓN: No toque los
rotores cuando están en
funcionamiento. No vuele sobre
!
o cerca de la cabeza de alguien.
Se requiere la supervisión de un
adulto todo el tiempo.
CARACTERISTICAS ELECTRICAS:
UTILIZA 6 PILAS TIPO “AA” DE 1,5V c/u
PILAS NO INCLUIDAS
19
Page 7

Instrucciones de uso
Important Safety Instructions
Recarga y reemplazo de la batería
Asegúrese de que el helicóptero está apagado antes de intentar
cargarlo. Si está encendido, no se cargará.
Verifi que la orientación del cable de encendido/apagado cuidadosamente
cuando lo conecte al helicóptero. Si se difi culta insertarlo o necesita usar
fuerza, probablemente esté al revés!
Tardará de 45 a 60 minutos en cargarse. No sobrecargue el helicóptero y no lo deje conectado al
cargador durante más de dos horas.
Carga a través del control remoto: Abra el compartimento del
cable de carga ubicado en la parte inferior del control remoto y
extienda el cable de carga. Encienda el control remoto. Conecte el
otro extremo en el conector para carga en el lateral del helicóptero.
El indicador LED del mando a distancia será de color naranja /
rojo cuando el helicóptero de carga, y se pondrá verde cuando el
helicóptero se carga. [Si la luz LED titila, junte el control remoto como
se describe a continuación y lo leerá de manera precisa.]
Reemplazo de baterías en el controlador: El
compartimento para baterías se encuentra en la
parte trasera del controlador. Quite el tornillo
con un destornillador de precisión y abra el
compartimento para baterías. Sólo use baterías
alcalinas. No mezcle baterías viejas con baterías
nuevas. Para más información sobre el uso y la
seguridad de las baterías, consulte la página 22.
Carga mediante USB: Enchufe el extremo USB del cable de
carga en un puerto USB de su computadora o un cargador USB
independiente. Luego, conecte el otro extremo al helicóptero.
Nunca conecte el helicóptero a un puerto USB que proporcione
otra corriente que no sea 5 V @ 500 mA. Hay una luz LED en
el enchufe USB, que se apagará mientras se esté cargando el
helicóptero. La luz LED se encenderá una vez que la carga esté
completa o cuando el helicóptero no esté enchufado al cable.
AVISO IMPORTANTE: Carga a través de USB
Cuando cargue el helicóptero desde un puerto USB, siempre conecte el enchufe
USB a un puerto USB sin conectar el helicóptero. Asegúrese de que la luz roja del
enchufe USB se encienda. Cuando conecte el helicóptero, esta luz se apagará. Si no
se apaga indica que el helicóptero no se está cargando, verifi que que el helicóptero
esté apagado y verifi que la integridad de la conexión.
Sincronización del control remoto
Antes de volar, necesita “sincronizar” el helicóptero con el control remoto. Para hacer
esto, encienda el helicóptero y el control remoto. Seleccione la frecuencia utilizando
el interruptor selector de banda. Si vuela múltiples helicópteros, asegúrese de que
todos se encuentren en una banda distinta. Luego, empuje el comando izquierdo
al mínimo. Apunte al transmisor infrarrojo del controlador al helicóptero. Mueva el
comando izquierdo desde el mínimo hasta el máximo (o desde abajo hacia arriba) y
regréselo nuevamente. Ahora, el helicóptero se sincronizará con el controlador.
CAUTION: Never fl y near your face. Keep rotor away from your fi ngers, hair, eyes and other body
parts. Always lift off from a fl at surface. Never hold the fl ying helicopter in your hand when lifting off.
DO NOT launch helicopter near people or animals. Stay away from obstacles and electrical hazards.
Parental supervision is required whenever this helicopter is in use by younger children.
• Always remove the batteries from the controller when not being used for extended durations.
• To clean, wipe gently with a damp cloth. Avoid use of solvents, as these can damage the plastic
components.
• Keep the helicopter and remote away from heat sources.
• Do not submerge the helicopter or remote control in water. This will damage the electronic
components, and could pose a severe risk to the built-in battery.
• Keep hands, hair and loose clothing away from the rotors when the power switch is turned on.
• Turn off controller/charger and helicopter while in use.
• Remove batteries from the controller when not in use.
• Parental guidance is required for younger users.
• Keep your helicopter close and within line of sight – if the line-of-sight to the controller is lost, you
will lose control of the helicopter.
• For best performance, use only fresh Alkaline AA batteries in the controller.
• Read and obey all warnings and safety guidelines in this manual.
• The controller and charger are specifi cally designed to charge this helicopter. Never use any other
charging equipment!
• The helicopter is NOT intended for use by children under fourteen (14) years old, unless directly
supervised by a competent adult at all times.
• The helicopter must only be used with the supplied controller/charger.
• Regularly examine the helicopter and controller for any damage to the plugs, enclosure, rotors,
battery covers and other parts. In the event of any damage, neither the helicopter nor controller
should be used until the damage is completely repaired.
Care and Maintenance:
SAFETY PRECAUTIONS
Special Notice to Adults:
DANGER
Never insert any sharp objects, pins or
!
!
screws into the helicopter as this may
puncture the internal battery!
CHOKING HAZARD – Small parts.
Not for Children under 3 years.
181818
7
Page 8

Quick Flight Guide
So – you’ve pulled the helicopter out of the box, have fl ipped through the manual and thought:
“Too many words… lots of buttons... I don’t know where to start”
Fair enough. Helicopters are complex things. So, we’ve prepared this quick guide.
Here’s what you’ve gotta do:
1. Read and obey all warnings and directions in this manual and on the packaging. We wrote
it because we mean it!
2. Insert batteries into the controller. Use 6 high quality alkaline AA’s.
3. Grab the charging lead in the controller and pop it (gently) into the charging socket on the helicopter.
Ensure that the helicopter is turned OFF.
4. Turn the remote control ON. Leave it there for just about an hour, then pull it out.
5. Turn the helicopter ON. You’ll see some LEDs light up.
6. Move the left control stick from minimum to maximum and back to minimum.
7. Fly!
Controlling the Helicopter
Moving up / down: Use the left stick on the remote control.
Turning Left / Right: Move the right stick left or right.
Moving forward / back: Move the right stick forward or back.
Adjusting Trim:
Rudder: Use the rudder trim adjustment knob, centre of controller.
If the helicopter is turning when you don’t want it to, then you need to adjust the trim.
Basically, it makes fi ne adjustments to the rotor speeds, and allows you to fi ne tune the helicopter’s
Adjusts the helicopters turning/spinning.
What is this “trim” thingy?
sense of direction.
Information
Got questions or comments about this helicopter?
E-mail: tech@swann.com
Or visit our website - www.swann.com
Warning : Changes or modifi cations to this unit not expressly approved by the party responsible for compliance could
void the user’s authority to operate the equipment.
NOTE: This equipment has been tested and found to comply with the limits for a Class B digital device, pursuant to
Part 15 of the FCC Rules. These limits are designed to provide reasonable protection against harmful interference in
a residential installation. This equipment generates, uses and can radiate radio frequency energy and, if not installed
and used in accordance with the instructions, may cause harmful interference to radio communications. However,
there is no guarantee that interference will not occur in a particular installation. If this equipment does cause harmful
interference to radio or television reception, which can be determined by turning the equipment off and on, the user
is encouraged to try to correct the interference by one or more of the following measures:
• Reorient or relocate the receiving antenna.
• Increase the separation between the equipment and receiver.
• Connect the equipment into an outlet on a circuit different from that to which the receiver is connected.
• Consult the dealer or an experienced radio/TV technician for help.
Do not touch the running propeller! Do not play above someone’s
Never insert any sharp objects, pins or screws into the helicopter as
!
CHOKING HAZARD – Small parts. Not for Children under 3 years.
FCC Warning
head! Adult supervision is required!
this may puncture the internal battery!
Do not fl y near eyes or face.
888
© Swann Communications 2011
Rotor de cola
¡Felicidades por la compra de este
modelo de helicóptero a control
remoto de Swann! Le contaremos todo
sobre cuán divertido es, los trucos
que puede hacer y cuántas horas de
diversión podrá disfrutar, pero intuimos
que si sólo hablamos de cómo hacerlo
volar, ¡usted sólo descubrirá la
diversión!
Rotores superiores
AVISO: Antes de usar
este helicóptero, lea esta
guía de funcionamiento
cuidadosamente y obedezca
todas las etiquetas de
advertencia y precaución.
Seriamente, no es divertido si
alguien se lastima.
Instrucciones de uso
Air Duel
Barras de balance
Rotores inferiores
encendido/apagado
Entrada para carga
Comando
izquierdo
LEASE EL INSTRUCTIVO ANTES DE USAR
MODELO: SWTOY-ARDUEL-CO
Interruptor de
LED infrarrojos
Selector de banda
Luz de energía
Comando derecho
Interruptor de
encendido/
apagado
Dirección de rotación
17
Page 9

Guide de pilotage rapide
Alors – vous avez sorti l’hélicoptère de sa boîte, avez feuilleté le manuel et vous êtes dit :
« Trop de mots…beaucoup de boutons… Je ne sais pas par où commencer »
D’accord. Les hélicoptères sont des choses complexes. Donc, nous avons préparé ce guide rapide.
Voici ce que vous devez faire :
1. Lire et observer tous les avertissements et toutes les directives dans ce manuel et sur
l’emballage. Nous les avons écrits parce que c’est important!
2. Insérez les piles dans le contrôleur. Utilisez 6 piles de haute qualité AA alcaline.
3. Connectez l’hélicoptère au chargeur et connectez le chargeur à l’alimentation via l’adaptateur inclus.
4. Allumez la télécommande. Laissez connecté pendant une heure et demi puis déconnectez.
5. Mettez l’hélicoptère en MARCHE (ON). Vous verrez certains DEL s’allumer.
6. Déplacez rapidement la manette de gauche à maximum puis à minimum.
7. Volez!
Contrôler l’hélicoptère
Monter et descendre : UUtilisez la manette de gauche sur la commande à distance.
Tourner à Gauche/Droite : Déplacez la manette de droite à gauche ou à droite.
Se déplacer en Avant/Arrière : Déplacez la manette de droite en avant ou en arrière.
Ajuster la compensation :
Rotation (Gouverne de direction) : Utilisez les boutons d’ajustement de compensation
Si l’hélicoptère tourne ou se déplace lorsque vous ne le voulez pas, alors vous devez ajuster la
compensation. Fondamentalement, il affi ne la vitesse des rotors et vous permet d’affi ner le sens de
direction de l’hélicoptère ou de changer de quel côté il penche.
rotationnelle situés sous la manette de droite.
Ajuste les virages/vrilles de l’hélicoptère.
Qu’est-ce que cette « compensation »?
Information
Vous avez des questions ou des commentaires
au sujet de cet hélicoptère?
Courriel: tech@swann.com
Ou visitez notre site web - www.swann.com
MISE EN GARDE FCC :
Cet appareil est conforme aux exigences édictées dans le paragraphe 15 des règlementations FCC.
Son opération est sujette aux deux conditions suivantes :
(1) Cet appareil ne doit pas provoquer d’interférence dangereuse, et
(2) Cet appareil doit accepter toute interférence reçue, y compris les interférences pouvant entraîner un
fonctionnement non désiré.
© Swann Communications 2011
Consignes d’utilisation
Rotor de queue
Félicitations pour votre achat de cet
hélicoptère avec commande à
distance de Swann! Nous étions pour
vous raconter comment agréable il est,
les manoeuvres que vous pouvez faire
et combien d’heures de plaisir vous
aurez avec celui-ci, mais nous fi gurons
que si nous vous expliquons son
fonctionnement, vous découvrirez le
plaisir par vous-même!
AVIS : Avant d’utiliser
cet hélicoptère, lisez
attentivement le guide
d’utilisation et observez tous
les avertissements et toutes
les étiquettes de mise en
garde.
Rotors supérieurs
Air Duel
Rotors inférieurs
Prise de charge
Manette de
gauche
Barres d’équilibre
Interrupteur d’alimentation
LED infrarouge
Sélecteur de bandes
LED Indicateur
Manette de droite
Interrupteur
d’alimentation
Compensation rotationnelle
161616
!
Ne touchez pas aux rotors en mouvement! Ne volez pas
au dessus de la tête de quelqu’un!
La supervision d’un adulte est requise!
Ne jamais insérer d’objets pointus, broches ou vis dans
l’hélicoptère puisque ceci peut crever les piles internes!
Sérieusement, ce n’est pas
plaisant si quelqu’un est
blessé.
9
Page 10

Consignes d’utilisation
Consignes de sécurité importantes
Recharge et remplacement de la pile
Assurez-vous que l’hélicoptère est en mode ARRÊT (OFF) avant de
tenter de le charger. Si laissé allumé, il ne se chargera pas.
Vérifi ez l’orientation du câble d’alimentation soigneusement lorsque
vous le branchez à l’hélicoptère. S’il semble diffi cile à insérer ou si vous
avez besoin d’utiliser une certaine force, c’est probablement qu’il est à
Il faudra environ 45 à 60 minutes pour le charger. Ne surchargez pas l’hélicoptère, et ne le laissez pas
branché à un chargeur pendant plus de deux heures.
Remplacer les piles dans le contrôleur : Le
compartiment à piles est situé à l’arrière du
contrôleur. Dévissez la vis avec un petit tournevis et
ouvrez le compartiment à piles. N’utilisez que des
piles alcalines. Ne mélangez pas des anciennes et
des nouvelles piles. Pour plus d’information au sujet
de l’utilisation et de la sécurité en ce qui concerne
les piles, consultez la page 14.
Lorsque vous chargez à partir d’un port USB, connectez toujours la fi che USB à un port USB sans
connecter l’hélicoptère. Assurez-vous que le voyant rouge de la fi che USB s’allume. Lorsque vous
connectez l’hélicoptère, ce voyant s’éteindra. S’il ne s’éteint pas, ceci indique que l’hélicoptère ne se
charge pas – vérifi ez alors que l’hélicoptère est bien fermé (off), et vérifi ez l’intégrité de la connexion.
Avant de pouvoir voler, vous devez « jumeler » l’hélicoptère et la commande à distance
ensemble. Pour ce faire, mettez en marche l’hélicoptère et la commande à distance.
Sélectionnez une fréquence en utilisant le commutateur de bandes de fréquences. Si vous
volez plusieurs hélicoptères, assurez-vous que chacun est sur une bande différente. Puis,
poussez la manette de gauche à minimum. Pointez le transmetteur IR du contrôleur sur
l’hélicoptère. Déplacez la manette de gauche de minimum à maximum (de bas en haut) et
revenez. L’hélicoptère sera alors jumelé à ce contrôleur.
!
l’envers!
Rechargez par l’intermédiaire de la télécommande: Ouvrez
le compartiment du cable de chargement situé en dessous de la
télécommande et etendez le fi l. Mettez la télécommande en marche
( ON ). Branchez l’autre bout dans la prise de charge sur le côté
de l’hélicoptère. L’indicateur LED sur la télécommande sera rouge/
orange lorsque l’hélicoptère est entrain de recharger et deviendra vert
lorsque complètement rechargé. [Si l’indicateur LED clignote, appairez
la télécommande tel que décrit ci-bas vous pourrez alors voir l’état de
chargement actuel.].
Chargement via USB : Branchez l’extrémité USB du câble de
chargement dans un port USB sur votre ordinateur, ou à un
chargeur USD autonome. Puis, connectez l’autre extrémité à
l’hélicoptère. Ne connectez jamais l’hélicoptère à un port USB
qui fournit quoi que ce soit autre que 5V @ 500 mA. Il y a un
DEL dans la prise USB qui s’éteindra lorsque l’hélicoptère se
charge. Le DEL s’allumera lorsque le chargement est complété,
ou si l’hélicoptère n’est pas raccordé au câble.
REMARQUE IMPORTANTE : Charger via USB
Jumeler la commande à distance
MISE EN GARDE : Ne touchez pas aux
rotors en mouvement. Ne volez pas au
dessus ou près de la tête de quelqu’un.
La supervision d’un adulte est requise
en tout temps.
MISE EN GARDE : Ne jamais voler près de votre visage. Garder les rotors loin de vos doigts, cheveux,
yeux et autres parties du corps. Toujours décoller à partir d’une surface plate. Ne jamais tenir l’hélicoptère
dans votre main au moment du décollage. NE PAS lancer l’hélicoptère près des gens ou des animaux.
Rester éloigné des obstacles et des risques électriques.
Une supervision parentale est requise lorsque l’hélicoptère est utilisé par de jeunes enfants.
• Toujours enlever les piles du contrôleur lorsque non utilisé pour des périodes prolongées.
• Pour nettoyer, essuyer doucement avec un linge humide. Éviter d’utiliser des solvants puisque
ceux-ci peuvent endommager les composants en plastique.
• Garder l’hélicoptère et la commande à distance loin des sources de chaleur.
• Ne pas submerger l’hélicoptère ou la commande à distance dans l’eau. Ceci endommagerait les
composants électriques, et pourrait poser un risque sévère pour la pile intégrée.
• Garder les mains, cheveux et vêtements amples loin des rotors lorsque l’interrupteur d’alimentation est à « On ».
• Fermer le contrôleur/chargeur et l’hélicoptère lorsqu’en utilisation
• Enlever les piles du contrôleur lorsque non utilisé.
• Une surveillance parentale est requise avec de jeunes utilisateurs.
• Garder votre hélicoptère près et dans votre champ de vision – si le champ de vision du contrôleur
est perdu, vous perdrez contrôle de l’hélicoptère.
• Pour une meilleure performance, utiliser uniquement des piles AA Alcaline dans le contrôleur.
• Lire et observer tous les avertissements et toutes les directives de sécurité dans ce manuel.
• Le contrôleur et le chargeur sont conçus spécifi quement pour charger cet hélicoptère. Ne jamais
utiliser un autre équipement de charge!
• Cet hélicoptère n’est PA S prévu pour être utilisé par des enfants de moins de quatorze (14) ans,
à moins qu’ils ne soient supervisés directement par un adulte compétent en tout temps.
• L’hélicoptère doit être utilisé uniquement avec le contrôleur/chargeur fournis.
• Examiner régulièrement l’hélicoptère et le contrôleur pour tout dommage aux fi ches, au boîtier,
rotors, couverts de piles et autres pièces. En cas de dommage, ni l’hélicoptère ni le contrôleur ne
doivent être utilisés jusqu’à ce que le dommage ait été réparé.
Soin et Entretien :
MESURES DE SÉCURITÉ
Avis spécial pour les adultes :
DANGER
Ne jamais insérer d’objets pointus, broches
!
!
ou vis dans l’hélicoptère puisque ceci peut
crever les piles internes!
RISQUE D’ÉTOUFFEMENT – Petites pièces.
Non recommandé pour les enfants en bas de 3 ans.
101010
15
Page 11

Instructions au sujet de la sécurité entourant les piles
• Requiert 6 x piles alcaline 1.5 V AA (non incluses)
• Les piles sont de petits objets.
• Le remplacement des piles doit être fait par un adulte compétent.
• Suivez le diagramme au sujet de la polarité (+ / - ) dans le compartiment à piles.
• Enlever immédiatement les piles mortes/affaiblies du contrôleur.
• Disposez des piles usagées de façon responsable.
• Enlevez les piles lors d’un entreposage prolongé.
• NE PAS incinérer les piles usagées.
• NE PAS jeter les piles dans le feu puisque les piles peuvent exploser ou fuir.
• NE PAS mélanger des piles neuves avec des anciennes piles ou des types de piles (par ex. alcaline/standard).
• NE PAS recharger des piles non rechargeables.
• NE PAS court-circuiter les points d’échange.
• Les piles rechargeables ne sont PAS recommandées.
Instructions Piles Li-Po :
L’hélicoptère a une piles Lithium Polymer intégrées. Ces piles sont légères et puissantes, puisque leur
composition chimique est basée sur le lithium, un métal léger et extrêmement volatil.
• Ne jamais affaiblir complètement la pile. Lorsque l’hélicoptère commence à perdre de la puissance,
fermez le et chargez le aussitôt que possible.
• Ne jamais laisser l’hélicoptère sans surveillance lorsque qu’il se recharge.
• Charger les piles dans un environnement isolé et contrôlé. Garder éloigné des matériaux
infl ammables.
• Ne pas exposer à la lumière directe du soleil : il y a un risque que la pile surchauffe, s’enfl amme
et/ou explose.
• Ne pas démonter, modifi er ou court-circuiter la pile. Ne pas la placer dans du feu ou la laisser dans
des endroits chauds ou près des sources de chaleur.
• Ne pas laisser tomber la pile ou l’exposer à des gros impacts.
• Ne pas laisser la pile se mouiller.
• Charger la pile uniquement avec l’équipement de charge fourni. Utiliser tout autre équipement
de charge annulera la garantie, peut endommager la pile et pose un risque de feu ou d’explosion.
• Utiliser la pile uniquement dans cet hélicoptère et utiliser uniquement cette pile dans l’hélicoptère.
• Lire ces instructions attentivement et en entier, et respecter toutes les directives dans la présente.
• Dans l’éventualité peu probable d’une fuite ou d’une explosion, utiliser du sable ou un extincteur
chimique pour éteindre les piles.
• Les piles doivent être disposées de façon responsable.
Les principes de base du vol
Monter et descendre : L’hélicoptère monte et descend en variant la vitesse de ses rotors principaux
(ces grandes choses qui tournent). Vous pouvez contrôler leur vitesse en utilisant la manette de gauche
sur le contrôleur. Pousser la manette vers le haut augmente les gaz.
Pour de bons résultats, soyez délicat et subtil. De petits ajustements faits lentement et soigneusement
sont la meilleure façon de bien faire voler l’hélicoptère. Faites attention lorsque vous relâchez les gaz – si
l’hélicoptère cale (ce qui signifi e n’a pas assez de poussée pour rester dans les airs) il chutera et pourrait
ne pas avoir assez de temps pour se reprendre, même si vous poussez les gaz à fond.
Avant, Arrière et Rotation : La manette de droite sur le contrôleur affecte la direction de l’hélicoptère,
à peu près de la même façon que la manette de droite sur un contrôleur de jeu vidéo.
Pousser la manette vers le haut poussera l’hélicoptère en avant. Tandis qu’il est poussé de cette façon,
les rotors principaux pousseront l’hélicoptère en avant. L’opposé est également vrai – déplacer la manette de droite vers le bas poussera l’hélicoptère vers l’arrière et le déplacera en renverse.
Pour tourner l’hélicoptère, bougez la manette de droite d’un côté ou de l’autre. De cette façon, les
rotors principaux changeront leurs vitesses, ce qui fera tourner l’hélicoptère sur place.
En utilisant la manette de droite dans différents angles et positions, vous pouvez créer et exécuter
des arcs et des rotations gracieuses. Par contre, des poussées rapides sur la manette dans différentes
directions peuvent créer des acrobaties uniques. La pratique rend parfait!
Si votre professeur de chimie a déjà démontré ce qui se produit lorsque le sodium est placé dans l’eau
(« boum » est la description technique du résultat) alors vous êtes quelque peu familier avec le degré de
volatilité du lithium – sauf que le lithium est encore plus volatile que le sodium! En résumé, respectez
toutes les directives et respectez la puissance du lithium!
141414
11
Page 12

Consignes d’utilisation
Selection de la Bande
Cet hélicoptère a deux canaux IR. Cela signifi e que 2 hélicoptères peuvent être utilisés simultanément,
à condition qu’on leur assigne un bande fréquence différente.
L’interrupteur situé au centre dans la partie supérieure de la télécommande vous permet de choisir
entre la bande A et la bande B.
Si vous utilisez deux hélicoptère en même temps :
• Assurez vous qu’une des télécommandes est réglée sur la bande A et que l’autre est réglée sur la
bande B.
• Appariez les helicopters avec soin. Pour un meilleur résultat, appariez-les dans une pièce séparée.
• Assurez vous que les helicoptères ne soient pas dans le champ de l’un et l’autre lors de l’appariement.
If vous n’utilisez qu’un seul hélicoptère, vous pouvez choisir ou bien la bande A ou la bande B.
Si la télécommande interfere avec d’autres dispositifs ou si d’autres appareils interfèrent avec
l’hélicoptère, essayez d’utiliser l’autre bande.
Guide de vol
Vent : Fondamentalement, ces hélicoptères sont des modèles réduits à l’échelle 1/20e
(approximativement). Les hélicoptères pleine grandeur ne peuvent pas voler dans des grands vents – les
modèles non plus. Si un hélicoptère pleine grandeur a de la diffi culté à voler dans des vents de 50 mi/h,
alors le modèle aura la même diffi culté avec des vents de 2~3 mi/h (rapport 1/20). On ne peut rien y
faire, c’est seulement de la physique.
Climatisation : L’air chaud monte et l’air froid descend – ceci cause du mouvement dans l’air, causant
un effet de « cisaillement du vent ». Fondamentalement, c’est lorsqu’une colonne d’air chaud qui
monte à côté de l’air froid qui descend. Plusieurs accidents d’avions pleine grandeur ont été causés par
le cisaillement du vent. Les climatiseurs créent beaucoup de cisaillements de vents. Si l’hélicoptère vole
à travers un cisaillement de vent, il semblera voler soudainement vers le haut ou vers le bas (selon la
direction du cisaillement du vent).
L’effet du sol : Lorsque l’hélicoptère est près du sol, l’air qu’il pousse vers le bas avec son rotor n’a
nulle part où aller – le sol l’en empêche. Une partie de cet air rebondit, ce qui pousse l’hélicoptère vers
le haut. Lorsque l’hélicoptère est près du sol, il aura un peu plus de poussée qu’il en a normalement.
C’est quelque chose à retenir lors d’un atterrissage.
L’effet du plafond : Contrairement à l’effet du sol, lorsque vous volez trop près du plafond, une petite
poche de basse pression se crée au dessus de l’hélicoptère, et il sera attiré vers le haut. Ceci pourrait
être mauvais – si vous frappez le plafond, l’hélicoptère calera, chutera et possiblement s’endommagera.
Hélicoptères multiples : Si vous utilisez plus d’un hélicptère dans un espace en même temps, soyez très
prudent lorsque vous réglez la bande du contrôleur et les jumelez aux hélicoptères. Vous remarquerez
que plus qu’un hélicoptère est contrôlé par un seul contrôleur, et ceci peut causer des collisions, des
accidents, des blessures ou autres résultats très indésirables.
Lorsque vous utilisez plus d’un hélicoptère à la fois, assurez-vous que chaque contrôleur
est réglé sur une bande différente en utilisant l’interrupteur de Sélecteur de bandes sur le
contrôleur.
Endroits où voler : Parce que les grands vents peuvent être un problème, nous recommandons de
voler à l’intérieur.
Pile Faible : Pour obtenir une plus longue durée de vie avec la pile intégrée, ne la déchargez jamais
complètement. Aussitôt que l’hélicoptère montre des signes de manque de puissance (tel réagir
lentement ou être incapable de maintenir son altitude facilement) fermez le et chargez le aussitôt que
possible. Pour plus d’information au sujet des soins apportés à la pile, voir la page 14.
121212
Arrière et Avant, Haut et Bas : Cet hélicoptère est équipé de rotors coaxiaux contrarotatifs (une
façon sophistiquée de dire deux rotors qui tournent dans des directions opposées) et un rotor de queue
horizontal. Si vous êtes un expert au sujet des hélicoptères, vous saurez que ce n’est pas de la même
façon que les hélicoptères pleine dimension sont habituellement faits – ils ont un seul rotor principal
uni-directionnel avec un rotor de queue vertical. Nous pensons que ce design coaxial fonctionne à son
meilleur pour ces modèles à échelle parce que :
• C’est plus stable qu’un seul rotor. Parce que les rotors se déplacent dans des directions opposées,
l’hélicoptère a moins tendance à tourner de l’autre côté.
• C’est beaucoup plus facile à confi gurer. Il n’y a qu’un réglage du compensateur à ajuster,
contrairement aux trois réglages du compensateur qui sont requis pour le design plus conventionnel
d’un hélicoptère.
• Plus de rotors signifi e plus de poussée, ce qui signifi e un hélicoptère plus facile à voler et plus maniable.
However, because the tail rotor is horizontal rather than vertical, the helicopter has a tendency to
ascend whilst moving forwards, and descend whilst reversing. This isn’t really a problem if you ease off
on the throttle whilst moving forward and increase the throttle whilst moving backwards. You’ll get a
feel for it pretty quick.
Compensation (Rotation) : Si vous trouvez que l’hélicoptère tourne plus rapidement dans une direction
que dans l’autre, alors vous avez besoin d’ajuster la compensation de rotation. Les boutons de
compensation de rotation sont situés sous la manette de droite.
Vous devrez probablement faire ceci pour chaque vol, mais ça ne prend qu’un moment. En fait, la
compensation affi ne la vitesse des pales des rotors et aidera à garder l’hélicoptère en ligne droite.
Si l’hélicoptère tourne dans le sens horaire (il tourne à droite dans la perspective imaginaire du pilote
miniature) alors ajustez la compensation plus à gauche. Si l’hélicoptère tourne dans le sens antihoraire
(il tourne à gauche dans la perspective imaginaire du pilote miniature) alors ajustez la compensation
plus à droite.
AVERTISSEMENT : Ne PAS voler
!
près des yeux ou du visage.
13
 Loading...