

Page 1

1
The Setup Wizard
• System Language
• Disable or enable the Setup Wizard
• Configure Password
• General Configuration
• Daylight Savings & Internet Time
• Configure your Email
• Live View Mode
• Live View Icons & Controls
EN
QW4_81525030615E | © Swann 2015
Page 2
4
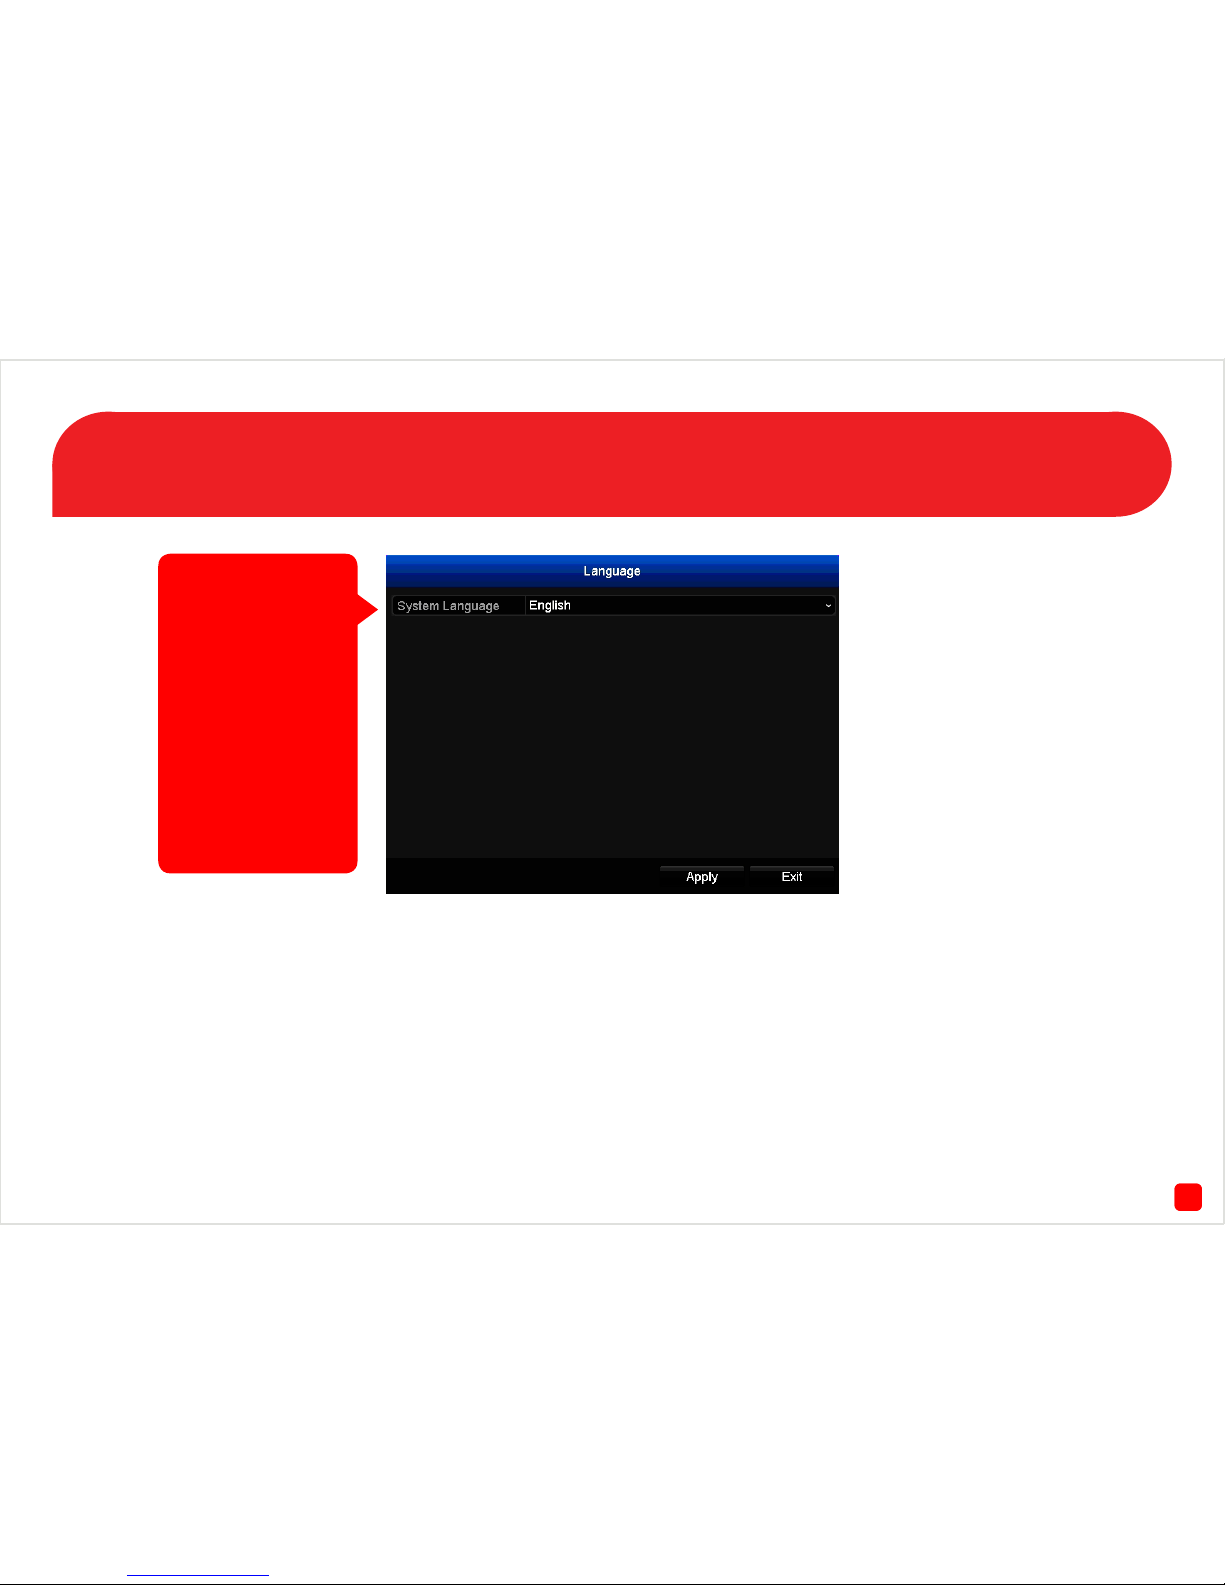
System Language: Choose a language you would like the system menu
to be displayed in. Select from English, Russian, French and Spanish.
• Click “Apply” to continue.
• Click “Exit” to exit the Setup Wizard.
System Language 1
2
Welcome to the Setup Wizard! The Setup
Wizard automatically
runs the first time you
start your DVR and will
guide you through all
the important settings
you need to get up and
working. Please be patient as it can take a
moment for the wizard
to appear after turning
on your DVR.
Page 3
73
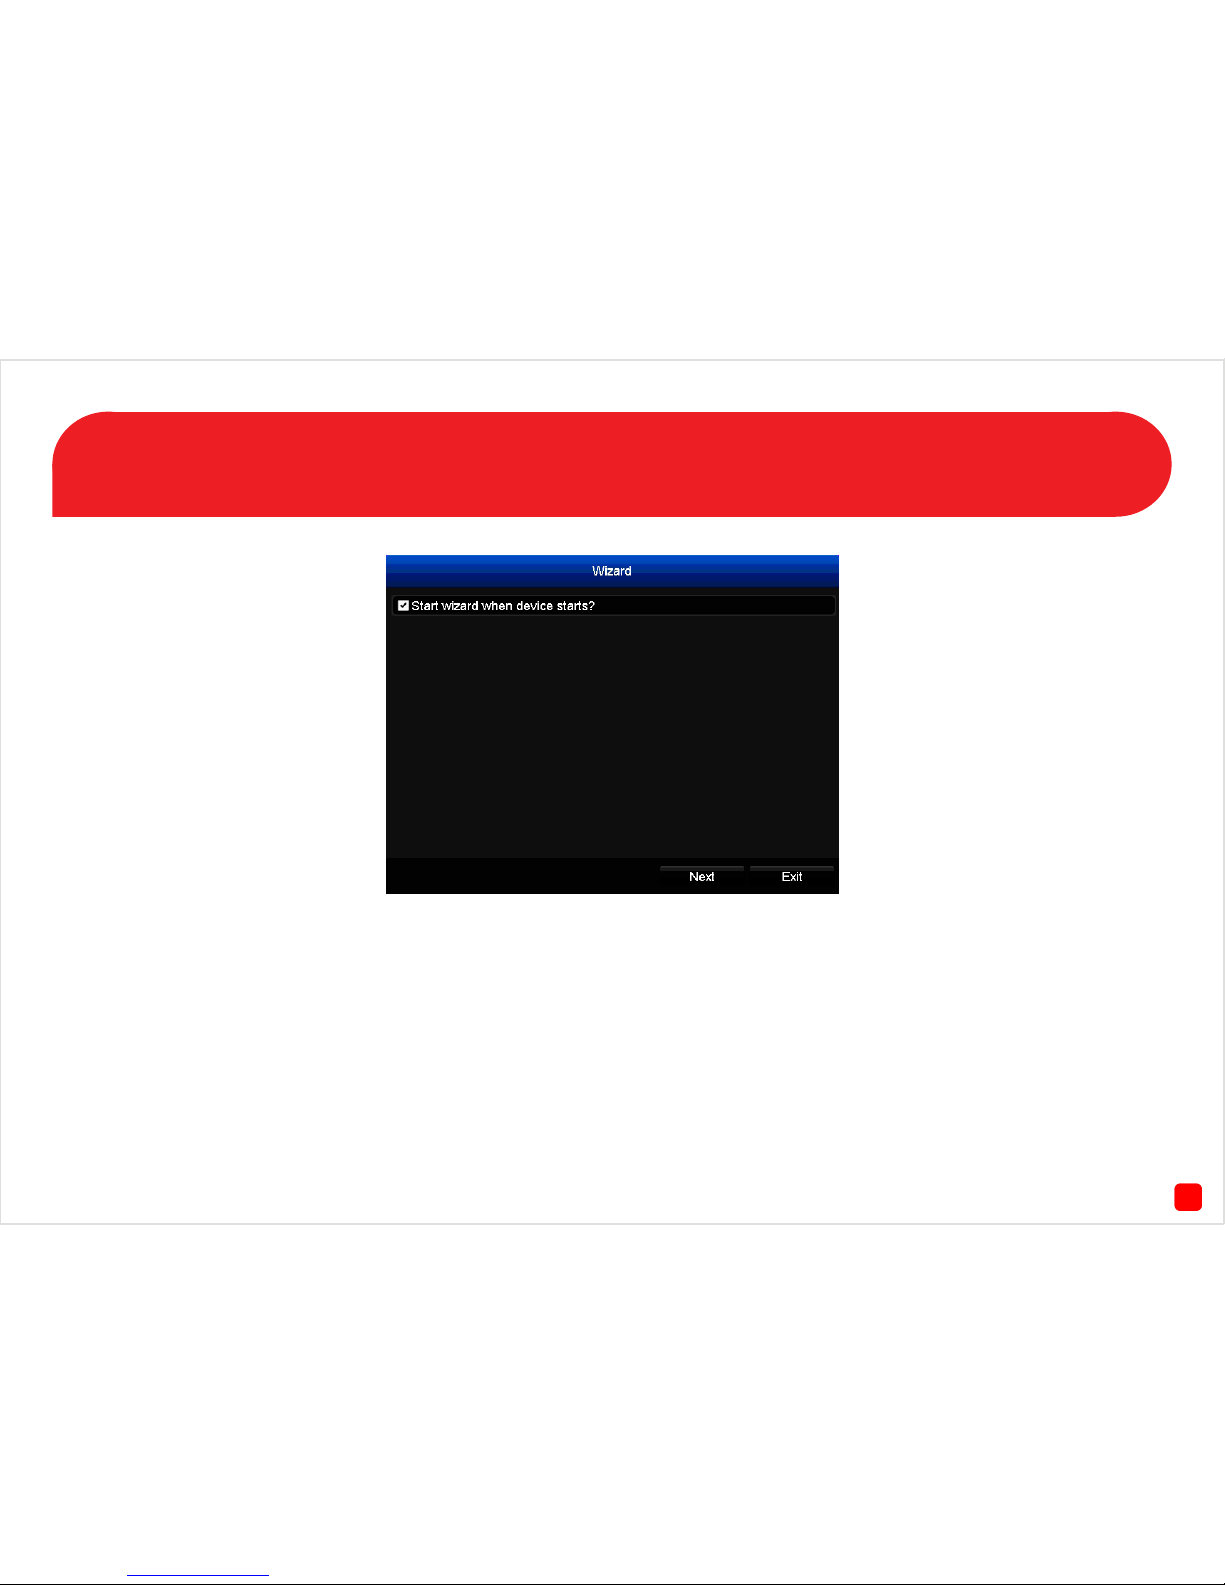
Disable or enable the Setup Wizard 2
By default, the setup wizard will display each time the DVR starts or is
re-booted. As the setup wizard is only required the first time you turn on
the DVR, click the checkbox to disable this.
• Click “Next” to continue.
• Click “Exit” to exit the Setup Wizard.
Page 4
2
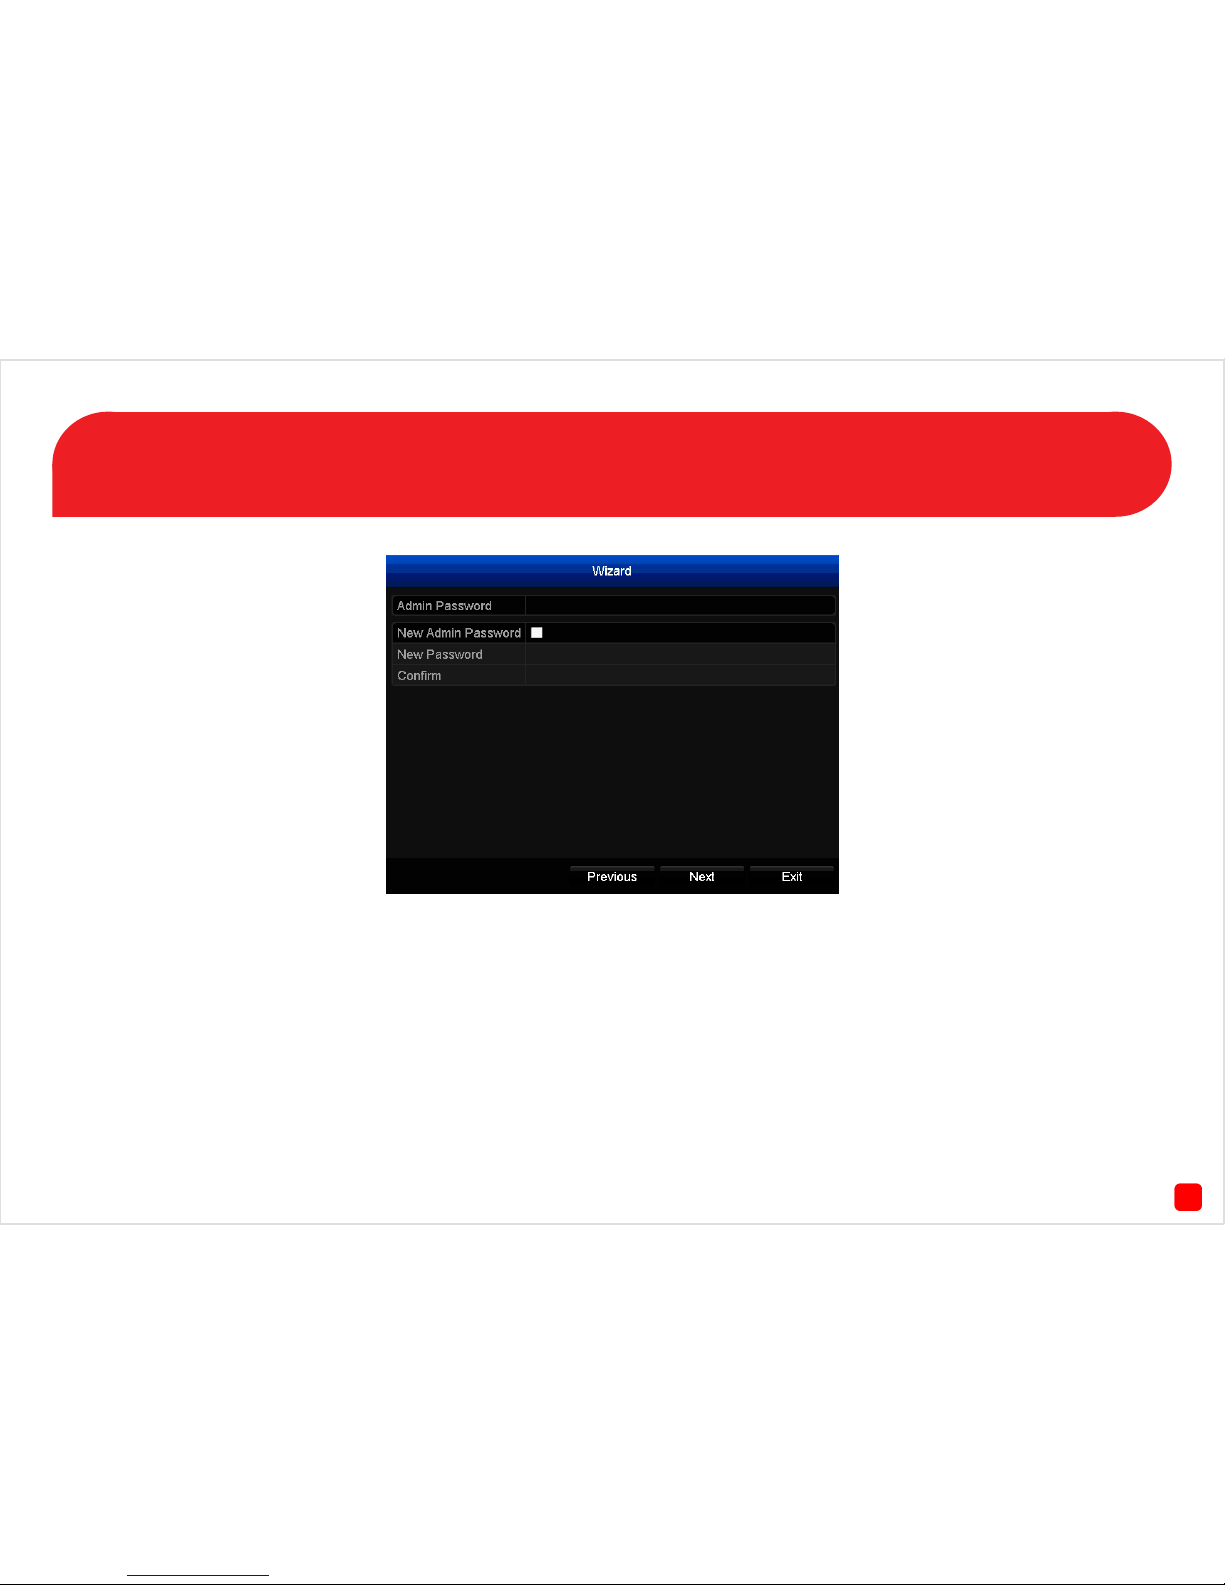
Configure Password 3
This step is really easy. You just have to give your DVR a new password.
Admin Password: The default password is “12345”. Click the dialogue box
and enter this password.
New Admin Password: Click the checkbox to enable a new password.
New Password: Enter a new password. The password can be up to 16 char-
acters in length.
Confirm: Enter your new password again to confirm.
• Click “Previous” to go back to the previous screen.
• Click “Next” to continue.
• Click “Exit” to exit the Setup Wizard.
4
Page 5

55
Time Zone: Select the correct time zone relevant to your region.
Date Format: Select a preferred display format.
System Date: If the date is not correct, click the calendar icon to select
the correct date.
System Time: If the time is not correct, click the clock icon to select the
correct time. The DVR supports a 24-hour clock.
Live View Mode: 3 x 3 is the default mode and will display up to 8 video
channels on-screen. Selecting 1 x 1 will display the first video channel
full-screen. Other views available are 2 x 2, 1 + 5 and 1 + 7.
• Click “Previous” to go back to the previous screen.
• Click “Next” to continue.
• Click “Exit” to exit the Setup Wizard.
General Configuration 4
Page 6

86
The DST function allows you to configure your DVR to automatically adjust its time for Daylight Savings in your time zone. You can set when
daylight saving time starts and ends.
Enable DST: Click the checkbox if you would like the DVR to adjust the
time when Daylight Savings time begins.
From/To: Here you can define when Daylight Savings applies to your
location, so you’ll need to tell the DVR when it applies to you.
DST Bias: This refers to the difference in minutes, between Coordinated
Universal Time (UTC) and the local time. Select the time that DST has
increased by in your time zone.
The NTP (Network Time Protocol) function allows the DVR to automatically sync its clock with an on-line server, which gives it the ability to
constantly have an accurate time setting. Obviously this is very important for a security system and is enabled by default. We don’t recommend changing any of the default settings.
• Click “Previous” to go back to the previous screen.
• Click “Next” to continue.
• Click “Exit” to exit the Setup Wizard.
Daylight Savings & Internet Time 5
Page 7

3
Configure your Email 6
1. Populate each field as shown in the above screenshot (the emails shown
are examples only, don’t use these).
2. Click “Test” to verify that the information you’ve entered is correct. A mes-
sage will appear on-screen indicating a successful email test. Click “OK” to
continue.
3. Click “Send UID” to receive an email containing your DVR’s UID so you can
use it to access from SwannView Plus on your mobile device or computer.
Click “OK” to continue.
4. Click “OK” to complete the setup wizard.
• Click “Previous” to go back to the previous screen.
• Click “Exit” to exit the Setup Wizard.
7
You can configure an
email account so that
your DVR sends you
email alerts when
events occur. We recommend using Gmail.
To create an account
go to (www.gmail.com)
and then input the details here.
If you receive an error during verification, check that you’ve input
your email address and password correctly and check the connection to your network is ok. Also check your Gmail account settings to make sure that “Access for less secure apps” is enabled.
Page 8

68
Live View is the default display mode for the DVR. Each camera connected will be displayed on-screen. You can check the status or operation of
your DVR and cameras by right-clicking the mouse to access the Menu Bar. For smartphone and tablet users, you can use the free SwannView
Plus app to turn your mobile device into a monitoring centre for the DVR. Take a look at the included “The SwannView Plus Mobile App” quick start
guide for further information.
Live View Mode 7
Double-click a live
video channel to
view full screen.
Status Icons
Menu Bar
09/12/2014 10:30:15 Tue
Camera 02
09/12/2014 10:30:15 Tue
09/12/2014 10:30:15 Tue
09/12/2014 10:30:15 Tue
Camera 01
Camera 03 Camera 04
Camera Toolbar
Page 9

99
Live View Icons & Controls 8
Status Icons
Menu Bar
1. Click this to access the Menu.
2. Click this to display a full-screen video channel.
3. Click this to select one of the multi-screen viewing
modes available.
4. Click this to display the previous channel(s).
5. Click this to display the next channel(s).
6. Click this to automatically switch between channels
at specific intervals (known as “Dwell Time”).
7. Click this to select either continuous record mode
or motion detection record mode.
8. Click this to change the display contrast level.
Please note, this doesn’t change the contrast level of
the camera(s).
9. Click this to play back video that has been recorded
on the same day.
10. Click this to disable the internal buzzer when
events or errors occur. Click “Yes” or “No” to confirm.
For more information about the functions available within the Menu, please consult the user
manual available at our website.
The alarm icon indicates
that an event such as motion, video loss or tampering
has occurred.
The recording icon indicates
that the camera is currently
recording (either manually
or via motion detection).
Indicates the channel
has lost video feed
from the camera.
This icon will appear onscreen when there is an error or notification. Click the
icon to view the message.
Camera Toolbar
Clicking a live video channel reveals the Camera
Toolbar which provides quick access to instant
playback, audio monitoring, digital zoom and the
ability to change image settings such as brightness, contrast and saturation.
1
2
3
4
5
6
7
8
9
10
Page 10

10
General Configuration EN
Confused on which location to install your cameras? The cameras included with your security system can be
installed in a number of different locations. Camera location can depend on the following -
1. Distance from the camera to the DVR.
2. Environmental conditions.
3. Lighting conditions.
4. The area that you would like to monitor.
When you position cameras correctly, you can eliminate the need for additional cameras to cover your target
area and maximise the efficiency of your security system. On the flip side, if you position cameras incorrectly,
it can lead to blind spots or to have objects that are not visible or too far for the cameras to view in detail. Keep
these points in mind to get the most out of your security system.
Mount cameras at an elevated position - Mounting your cameras at an elevated position, can keep your cam-
eras out of range of vandals or would be burglars. It also allows your camera to have a high vantage point increasing its viewing area.
Cover your target area - When placing cameras, make sure you provide ample coverage, but not in excess.
For example, if you are trying to cover a backyard gate, don’t zoom in to only have the gate in frame. Position
the camera to cover part of your backyard so you capture as much area as possible without sacrificing video
quality.
Page 11

1311
Front of House and Driveway
To monitor the front of the house, whether it is the front garden, driveway or the entrance to your garage, it is
recommended to install the camera where the roof meets the walls of the house, as illustrated below. This will shelter
the camera from the elements, have a better field of view, and less likely to be vandalized.
You may need to install multiple cameras if you want to focus
on specific areas that you would like to monitor, for example,
one for the driveway, the other on the garage entrance.
Install the camera
where the roof meets
the walls of the house.
Have a look at the image(s) on the DVR
first before installing the cameras
permanently.
Page 12

1612
Front of House and Driveway
This camera will focus
on the garage entrance.
This camera will
focus on the driveway
entrance.
Page 13

1113
Front Door
It has been found that most burglars will enter your home through the front door, so it is very important that you install
a camera here. It is recommended to install the camera either above the door or to the side space permitting. Mount
the camera in an elevated position so it is out of range of vandals or would be burglars. Placing the camera at a slight
angle will allow you to see who is approaching your front door as well as giving you the ability to have facial recognition.
Place the camera at a slight angle.
Most burglars will knock on the front door
first to see if anyone is at home.
Have a look at the image(s) on the DVR
first before installing the cameras
permanently.
Page 14

14
Backyard and Side Entrance
Your backyard is mostly filled with a shed with lawn and garden tools, recreational equipment and children’s toys. It’s
a good idea to install a camera so that you have an entire overview of the backyard. Like the cameras installed at the
front of the house, it is recommended to install the camera where the roof meets the wall of the house. If you have a
side gate or more than one entrance to the backyard, you may want to have an additional camera focused to that area.
This will focus on the side
entrance.
This will focus on the entire
backyard.
Have a look at the image(s) on the DVR
first before installing the cameras
permanently.
Page 15

1715
Indoors
It’s recommended that you place cameras inside the house that have high traffic areas such as entry and exit points
(front door), hallways and staircases (if applicable). Other ideal locations are next to windows and rooms that have high
priced valuables such as electronics, antiques and jewellery.
Have a look at the image(s) on the DVR
first before installing the cameras
permanently.
Page 16

1216
Camera Field of View
The Field of View produced by a camera is the area that the camera can see. It is an important factor to consider as it
determines not just what the camera can see, but also the level of detail that is visible at a given distance. Cameras
with a smaller lens, also known as a wide-angle lens, produce a greater Field of View than cameras with a larger lens.
This means that the camera can see a large area but the objects will appear smaller within the scene area. This is
useful if you want to monitor an entire room or a yard. Cameras with a larger lens also known as narrow-angle have a
smaller Field of View. They can see a limited area, but objects will appear larger within the scene area. This is useful if
you want to monitor a specific target such as a doorway or entrance.
Fixed Lens vs. Varifocal Lens
A Fixed Lens is where the camera’s focal length
(Field of View) is permanently set and cannot be
adjusted by the user.
A Varifocal Lens is where the camera’s lens can
be manually adjusted by the user. This allows for
greater flexibility to optimize the camera picture for
your specific needs.
Wide Angle
Fixed Lens
3.6mm
Narrow Angle
Fixed Lens
6.0mm
Page 17

1517
Lighting and Environment Tips
Lighting
• For best results do not point the camera towards a light source.
• Pointing the camera towards a glass window intending to see outside may result in a poor image because of glare
and lighting conditions inside and outside.
• Don’t place the camera in a shaded area that is looking into a well-lit area as this will result in a poor display. The
light to the sensor located at the front of the camera needs to be the same as the light at the focal target for best
results.
• As the camera uses infrared LEDs to see at night, it’s recommended to clean the lens from time to time if the picture
degrades.
Environment
• Make sure the power connections are not directly exposed to water or moisture and shielded from other outdoor
elements.
• Weatherproof only means that the camera can be exposed to weather such as rain and snow. Weatherproof cameras
cannot be submerged under water.
• Do not expose the camera where rain and snow will hit the lens directly.
• Cameras geared for cold weather may work in extreme conditions as low as -25° as the camera produces heat
when plugged in.
Page 18

18
Camera Cables
When installing cameras outside, it is recommended to install the provided data & power cable away from the elements
so it prevents them from deteriorating over time. Whilst cabling, avoid areas that have a high amount of electrical
equipment where electrical interference is expected. This can create all types of interference to the video picture. Also
avoid sharp bends, which can affect cable impedance and cause interference to the video picture. If you’re using cable
ties, do not over tighten them and avoid using a staple gun to secure as this can potentially damage the cable. There
may be circumstances where you have to join multiple cables together. Go to your hardware store, purchase some
electrical tape and use this to seal the connection(s) between each cable. This will prevent moisture and dust forming
on the connection(s).
Summary
1. Protect the cable from the elements to avoid deterioration.
2. Avoid electrical equipment where electrical interference is expected.
3. Avoid sharp bends and do not bend the cable greater than 90 degrees.
4. Do not over tighten when using cable ties.
5. Avoid using a staple gun to secure the cable to a wall.
6. Do not stretch or apply force greater than 25lbs/11kgs.
7. Use electrical tape to seal the connection(s) when joining multiple cables together.
 Loading...