

Suzuki Micro Grand Digital Piano Owner's Manual
Micro Grand Digital Piano
Owner ’s Manual

Suzuki Musical Instrument Corporation
P.O. Box 710459
Santee, California 92072-0459
800-854-1594
www.suzukimusic.com
Copyright Suzuki Musical Instrument Corporation

Table of Contents
General Precautions . . . . . . . . . . . . . . . . . . . . . 4
Taking Care Of Your Digital Piano. . . . . . . . . 6
Panel Controls. . . . . . . . . . . . . . . . . . . . . . . . . . . 7
Connector Panel. . . . . . . . . . . . . . . . . . . . . . . .15
Piano Pedals. . . . . . . . . . . . . . . . . . . . . . . . . . . .16
Demo . . . . . . . . . . . . . . . . . . . . . . . . . . . . . . . . . .17
Keyboard Voices . . . . . . . . . . . . . . . . . . . . . . . .18
Quick Select . . . . . . . . . . . . . . . . . . . . . . . . . . . . . . .18
Selecting One Of The 138 Voices. . . . . . . . . . . . 18
User Dened Quick Selection Button . . . . . . .19
Layer (Dual) Voice . . . . . . . . . . . . . . . . . . . . . . . . . 19
Lower Voice. . . . . . . . . . . . . . . . . . . . . . . . . . . . . . . .19
Assigning The Split Point For Voice . . . . . . . . .19
Rhythm Section . . . . . . . . . . . . . . . . . . . . . . . .20
Quick Select . . . . . . . . . . . . . . . . . . . . . . . . . . . . . . .20
Selecting One Of The 100 Styles . . . . . . . . . . . . 20
User Dened Quick Selection Button . . . . . . . 21
Adjusting The Tempo . . . . . . . . . . . . . . . . . . . . . .21
Starting And Stopping
The Rhythm Style . . . . . . . . . . . . . . . . . . . . . . . . . 21
Variation . . . . . . . . . . . . . . . . . . . . . . . . . . . . . . . . . .22
Fill - In . . . . . . . . . . . . . . . . . . . . . . . . . . . . . . . . . . . .22
Assigning The Split Point For
The Auto Accompaniment . . . . . . . . . . . . . . . . . 22
Auto Accompaniment . . . . . . . . . . . . . . . . . .23
Auto Bass Chord Fingering . . . . . . . . . . . . . . . . .23
Single (Intelligent) Mode . . . . . . . . . . . . . . . . . .23
Fingered Mode . . . . . . . . . . . . . . . . . . . . . . . . . . . .24
Fingering Guide . . . . . . . . . . . . . . . . . . . . . . . . . . .25
Piano Chord Mode . . . . . . . . . . . . . . . . . . . . . . . . .26
Manual Bass Chord . . . . . . . . . . . . . . . . . . . . . . . . 26
Auto Harmony . . . . . . . . . . . . . . . . . . . . . . . . . . . . . 26
Starting And Stopping
The Auto Accompaniment . . . . . . . . . . . . . . . . . 26
Variation . . . . . . . . . . . . . . . . . . . . . . . . . . . . . . . . . .27
Fill-In . . . . . . . . . . . . . . . . . . . . . . . . . . . . . . . . . . . . . .27
Assigning The Split Point For
The Auto Accompaniment . . . . . . . . . . . . . . . . .27
Metronome . . . . . . . . . . . . . . . . . . . . . . . . . . . .28
Function . . . . . . . . . . . . . . . . . . . . . . . . . . . . . . .29
Reverb Level Setting . . . . . . . . . . . . . . . . . . . . . . . 29
Chorus Level Setting . . . . . . . . . . . . . . . . . . . . . . .30
Touch . . . . . . . . . . . . . . . . . . . . . . . . . . . . . . . . . . . . .30
Changing The Split Point For Lower Voice . . .31
Changing The Split Point For Auto Accompani-
ment . . . . . . . . . . . . . . . . . . . . . . . . . . . . . . . . . . . . . .32
Master Tune . . . . . . . . . . . . . . . . . . . . . . . . . . . . . . .32
Auto Harmony Type Selecting . . . . . . . . . . . . . .33
Record . . . . . . . . . . . . . . . . . . . . . . . . . . . . . . . . .34
Recording . . . . . . . . . . . . . . . . . . . . . . . . . . . . . . . . .34
Playback. . . . . . . . . . . . . . . . . . . . . . . . . . . . . . . . . . . 36
Registration Memory . . . . . . . . . . . . . . . . . . .37
Play Along Songs . . . . . . . . . . . . . . . . . . . . . . .38
iPod Dock Instruction. . . . . . . . . . . . . . . . . . .39
SD Card . . . . . . . . . . . . . . . . . . . . . . . . . . . . . . . .40
MIDI . . . . . . . . . . . . . . . . . . . . . . . . . . . . . . . . . . .44
MIDI Implementation Chart . . . . . . . . . . . . . . . .45
Voice List. . . . . . . . . . . . . . . . . . . . . . . . . . . . . . .46
Style List . . . . . . . . . . . . . . . . . . . . . . . . . . . . . . .49
Specications . . . . . . . . . . . . . . . . . . . . . . . . . .50
Warranty . . . . . . . . . . . . . . . . . . . . . . . . . . . . . . .51
General Precautions
CAUTION
RISK OF ELECTRIC SHOCK
DO NOT OPEN
CAUTION: TO REDUCE THE RISK OF ELECTRIC SHOCK,
DO NOT REMOVE COVER OR BACK
NO USER-SERVICEABLE PARTS INSIDE
REFER SERVICING TO QUALIFIED SERVICE PERSONNEL
INSTRUCTIONS PERTAINING TO A RISK OF FIRE, ELECTRIC SHOCK OR INJURY:
!
The lightning ash with arrowhead symbol, within an equilateral triangle, is intended to alert the user to the presence of
uninsulated or “dangerous voltage” within the product’s enclosure that may be of sucient magnitude to constitute a risk of
electric shock to persons.
The exclamation point within an equilateral triangle is intended to alert the user to the presence of important operation and
maintenance or servicing instructions.
1. CAUTION: Any changes or modications in construction of this device which are not expressly approved by the party
responsible for compliance could void the user’s authority to operate the equipment.
2. Note: This equipment has been tested and found to comply with the limit for a Class A digital device, pursuant to part 15 of
the FCC rules. These limits are designed to provide reasonable protection against harmful interference when the equipment
is operated in a noncommercial environment. This equipment generates, uses, and can radiate radio frequency energy and if
not installed and used in accordance with the instruction manual, may cause harmful interference to radio communications.
Operation of this equipment in a residential area is likely to cause harmful interference in which case the user will be required
to correct the interference at his own expense.
!
4
OWNER’S MANUAL

Welcome
We would like to express our appreciation and
congratulate you for purchasing this mini grand
digital piano. This piano has been designed to
provide you with years of musical enjoyment.
State of the art electronics are combined with
an elegant cabinet that will add beauty and
sophistication to any home environment. Listed
Below are just a few of the features that your
new piano is equipped with:
Elegant Hand Rubbed Lacquer Grand Piano •
Fits Any Sized Room – It’s Less Than 3’ Deep!
Feature Packed Entertainment Center is Fun •
For the Whole Family – It’s More Than Just a
Piano!
Play Hundreds of Optional Music Files. Jazz, •
Pop, Classical, Rock, Country & More!
Compose and Store Your Own Songs with •
Built-in 3 Track Recorder
Interface Your Computer with On-Board MIDI •
and USB ports
Never Needs Tuning•
Practice in Private with Headphones •
(optional)
You will nd many more features and functions
listed within this owners manual. In order to
fully appreciate all the impressive features of this
digital piano, please take a few minutes to read
the following pages of instruction. We will cover
general precautions, assembly, the function of
each control button, and warranty information.
Choose From 128 Instrument Voices •
Including Stereo Grand Piano and 100
Accompaniment Styles
Advanced Graded Hammer Action Keyboard •
Has Authentic Acoustic Piano Touch and Feel
– Teacher Recommended!
Built-In Music Teacher with Verbal and •
Screen Grading
Concert Hall Sound System Has 120 Watts of •
Power and 4 High Performance Speakers
SD Memory Card Plays Pre-recorded Music – •
You Can Even Record Practice Sessions
MINI–GRANDE DIGITAL PIANO
5

Taking Care Of Your Digital Piano
This digital piano will supply you with years of musical enjoyment if you follow the simple rules listed
below.
Important Safety Instructions
Warning
When using electrical products, basic safety precautions
should always be followed, including the following:
Safety
Power Source – The product should always be
connected to a power supply only of the type described
in the operating instructions or as marked on the
product.
Periods of Non-use – The power–supply cord of the
product should be unplugged from the outlet when left
unused for a long period of time.
Service And Modication
This product should be serviced by qualied service
personnel when,
The power supply cord or the plug has been damaged,•
Liquid has been spattered into the unit or it has been •
exposed to rain,
The instrument does not appear to operate normally or •
exhibits a marked change in performance.
The instrument has been dropped or the cabinet has •
been damaged.
Do not attempt to open the piano or make any change •
in the circuits or parts of the unit.
Handling And Transport
Never apply excessive force to the controls, connectors •
or other parts of the instrument.
Always unplug cables by gripping the plug rmly, not •
by pulling on the cable.
Disconnect all cables before moving the instrument.•
Physical shocks caused by dropping, bumping, or •
placing heavy objects on the instrument can result in
scratches and/or more serious damage.
Carefully check the amplier volume control before •
starting to play. Excessive volume can cause permanent
hearing loss.
Cleaning
Clean the cabinet and panel with a soft nonabrasive •
dry cloth. This cloth should be for High Gloss Lacquer
Finish Furniture. A wax based polish specically for
High Gloss Lacquer Finish Furniture may be used on
the cabinet. Do not use paint thinner or petrochemical
based polishes.
To maintain the luster of the keys and buttons wipe •
with a clean, slightly damp cloth, and then polish with a
soft dry cloth.
Location
Do not expose the instrument to the following •
conditions to avoid deformation, discoloration, or more
serious damage:
Direct sunlight (near a window)•
High temperatures (near a heat source, outside, or near •
a window)
Excessive humidity•
Excessive dust•
Strong vibration•
Leave enough space around the piano for it to be •
properly ventilated.
This instrument contains digital circuitry and may cause •
interference if placed too close to radio or television
receivers. If interference occurs, move the instrument
further away from the aected equipment.
Avoid placing vinyl objects on top of the instrument, •
vinyl can stick to and discolor the surface.
Power
Turn the power switch o when the instrument is not •
in use.
To avoid damage to the instrument and other devices •
to which it is connected, turn the power switches of all
related devices o prior to connection or disconnection
of MIDI cables.
Turn the power o if the main cable is damaged or the •
instrument is spattered with liquid.
Do not switch the unit on and o in quick succession, •
this places an undue load on the electronic
components.
Unplug the AC power cord during an electrical storm.•
Avoid plugging the AC power cord into the same AC •
outlet as appliances with high power consumption,
such as electric heaters or refrigerators.
6
OWNER’S MANUAL
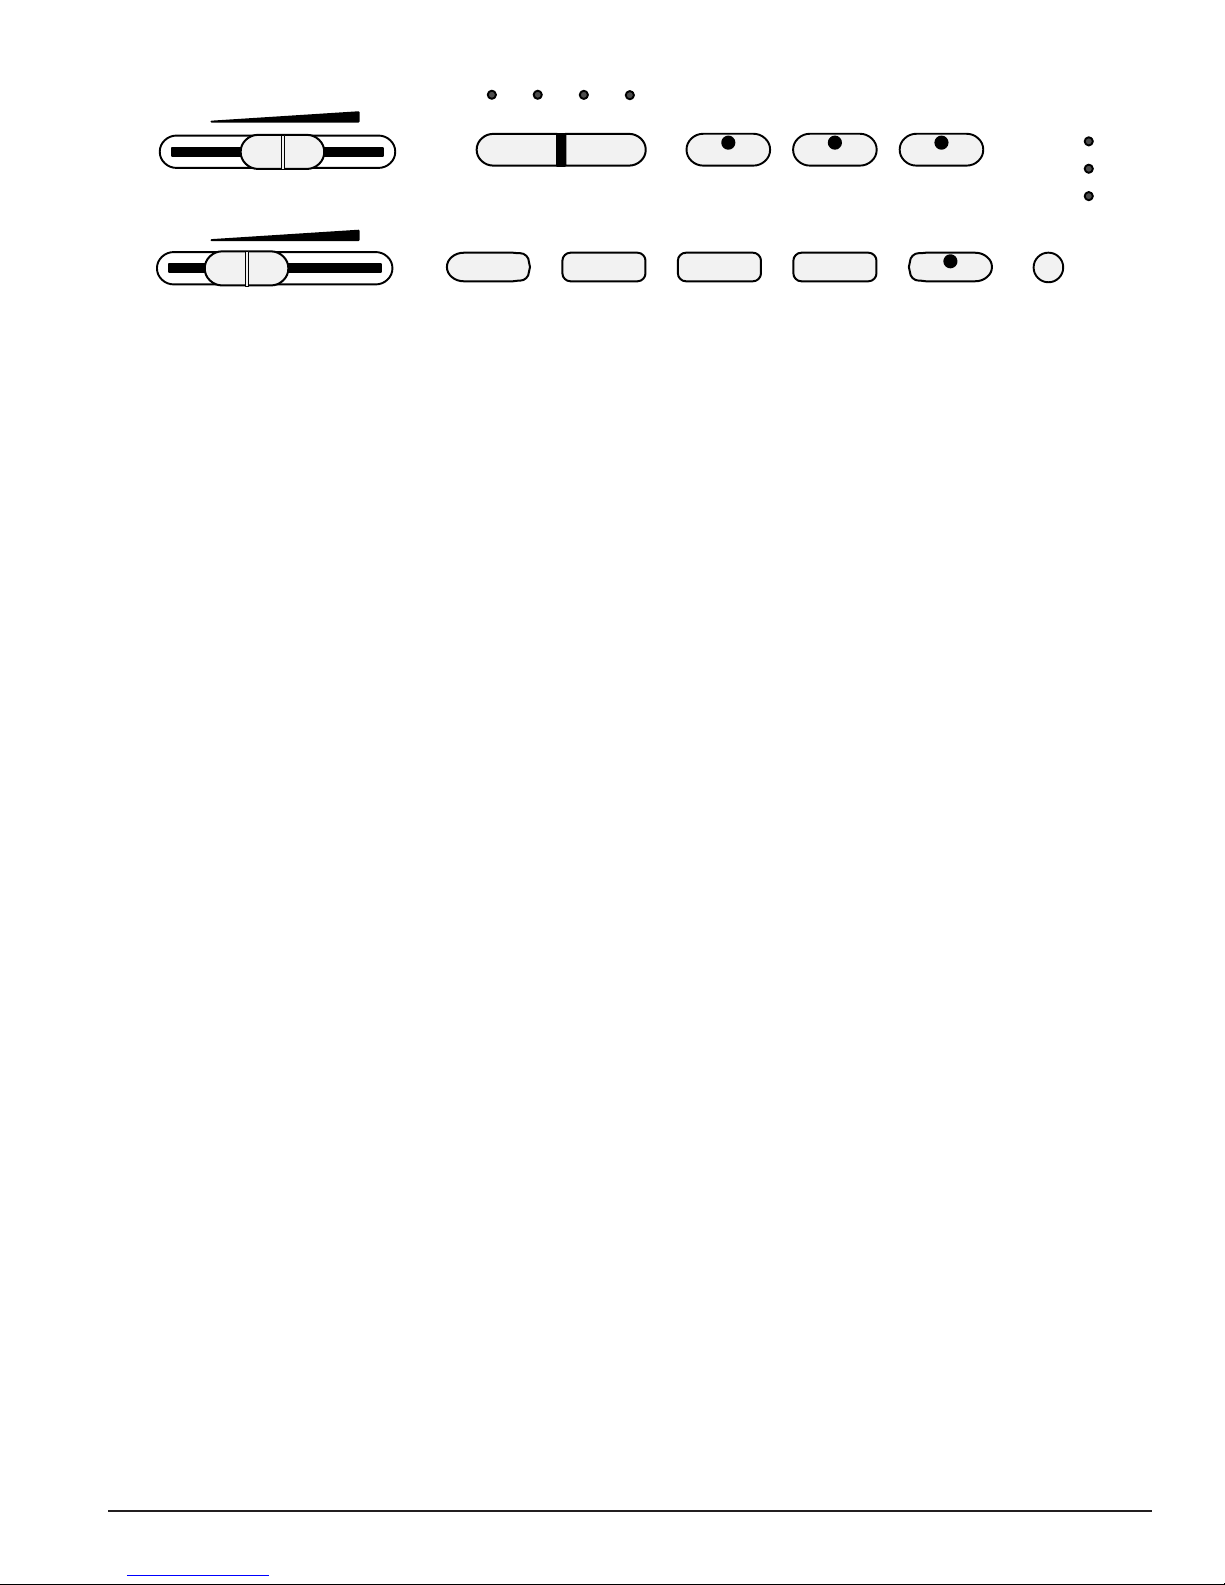
Panel Controls
MIN MAX
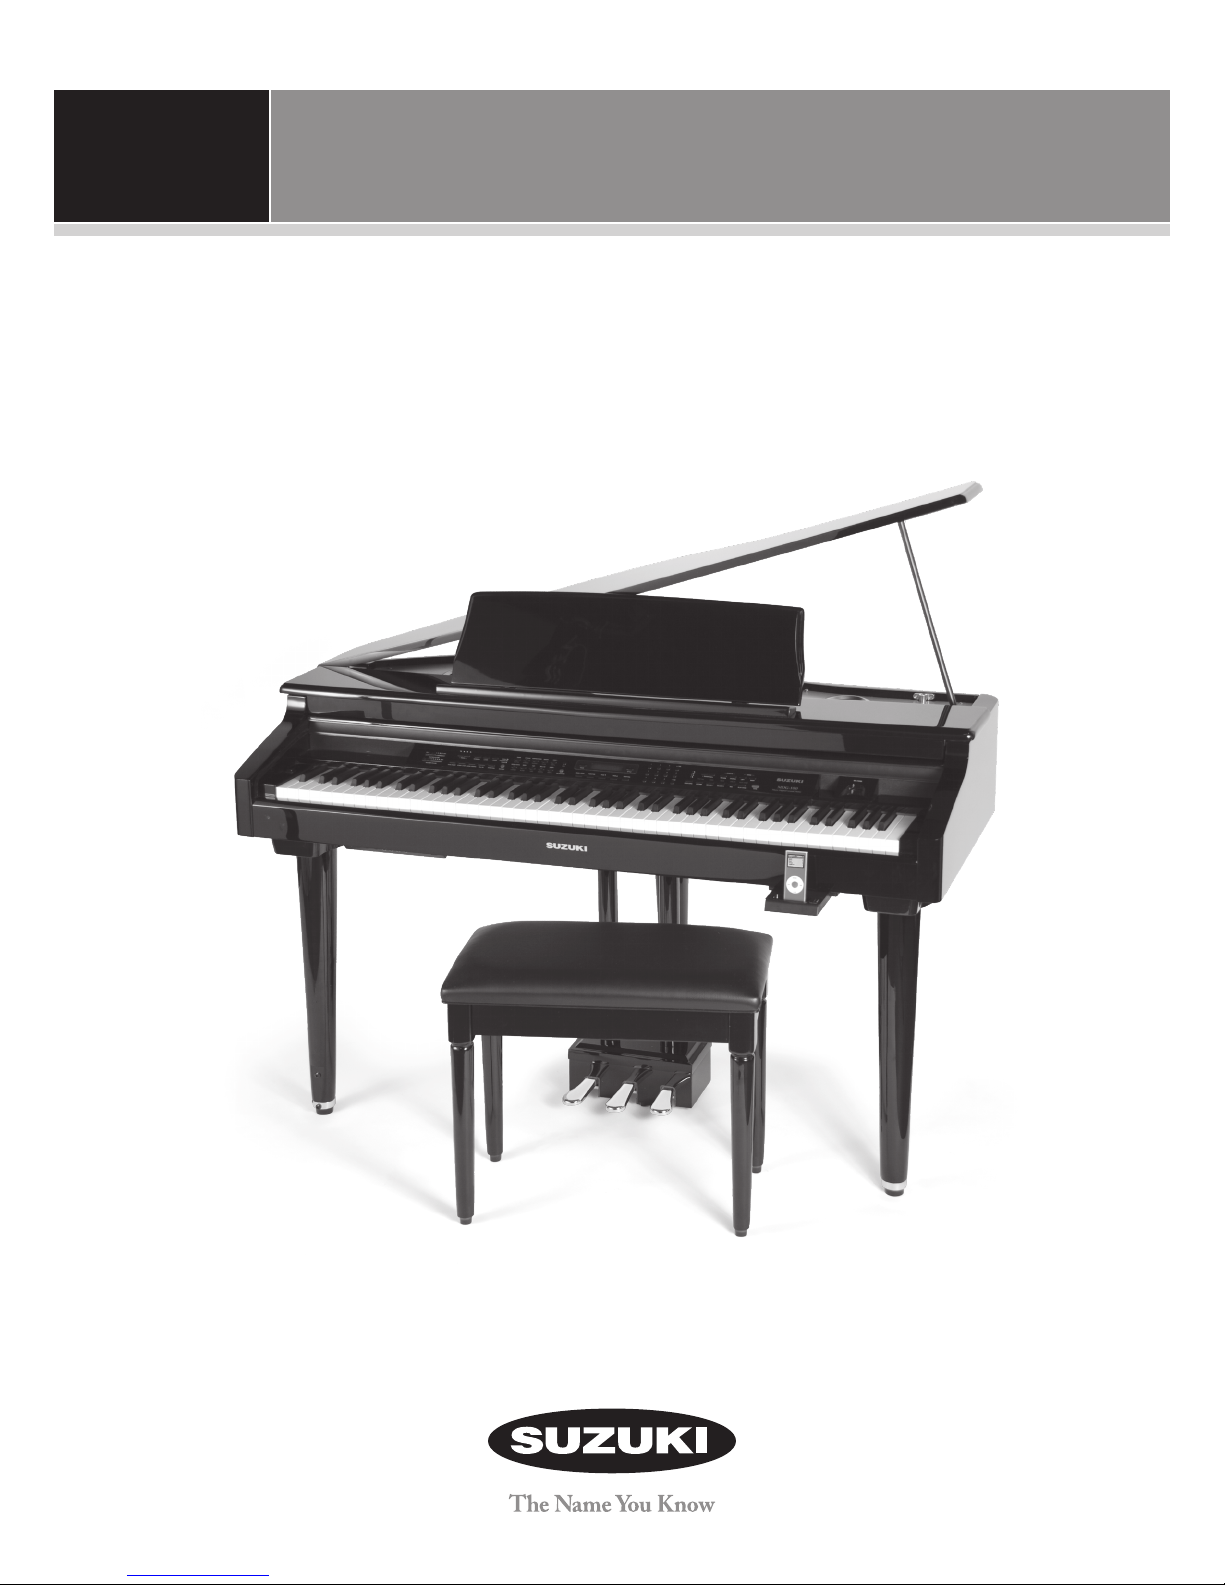
q
MASTER VOLUME
MIN MAX
w
r
LOWERLAYERHARMONY– TEMPO +
ACCOMP VOLUME
The elegant control panel is divided into several distinct sections. The following is a brief description of
all the features located on the control panel.
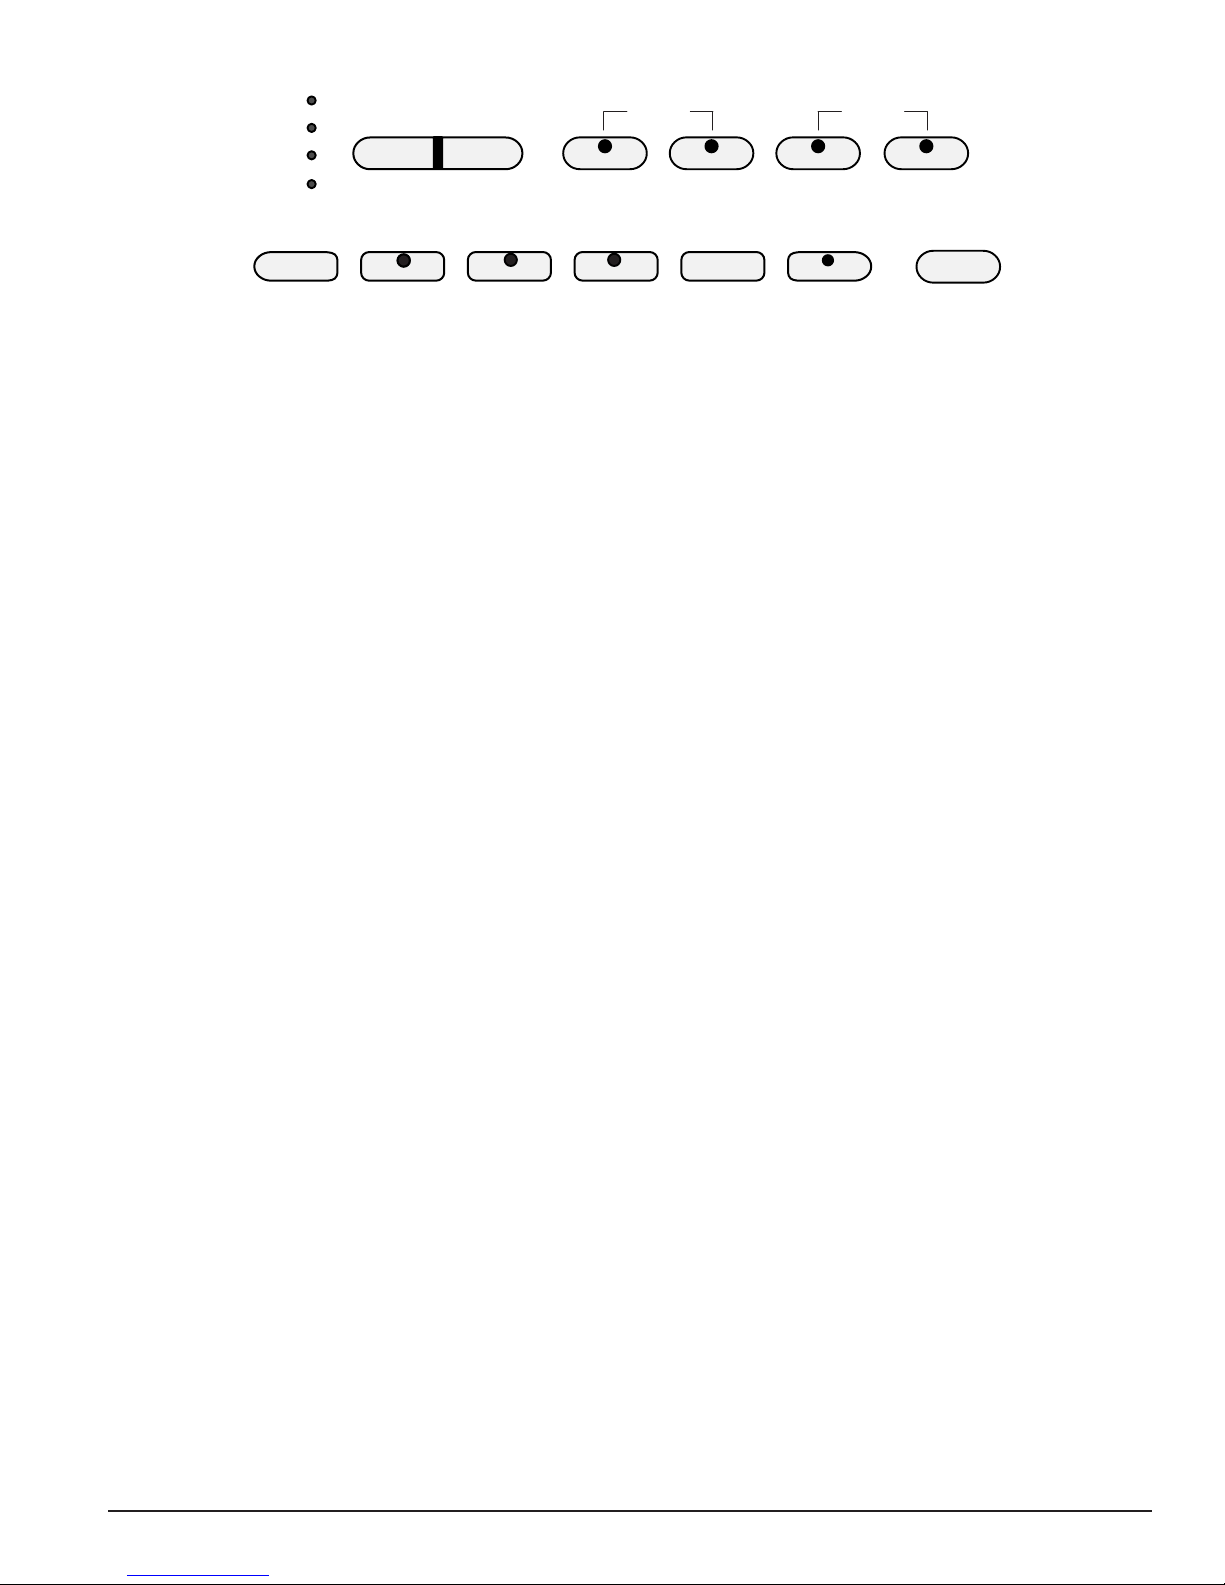
POWER SWITCH The power switch is located to the left of the keyboard.
q
Press the button to turn the power on and o. There is an indicator light on the
Floppy Disk Drive located on right front portion of the piano. This light will be lit
when power is on.
Note: When you turn the power o, do not turn it back on immediately. Wait at least
ve seconds to turn the power back on so that the electronic circuits can properly reset.
MASTER VOLUME Use this sliding control button to adjust the overall volume
w
of the keyboard.
ACCOMP VOLUME Slide this controller to adjust the volume of the auto
e
accompaniment only, the keyboard instrument voice will not be aected.
e
SYNCH
START
START/
STOP
INTRO/
ENDING
FILL IN
VARIATION
TEMPO Press one of the TEMPO buttons, the current tempo value will appear
r
on the display. You can use the TEMPO +, TEMPO – buttons, or the +/YES and –/NO
buttons to change the tempo value range from 40 to 240 bpm (beats per minute).
Press the TEMPO + or TEMPO – buttons or the +/YES and –/NO buttons
simultaneously to recall the default tempo setting for the selected rhythm style.
After three seconds the display will revert to the selected voice.
There is a four-dot beat indicator above the tempo buttons. It indicates the tempo
and beat for the accompaniment that is playing.
MINI–GRANDE DIGITAL PIANO
7
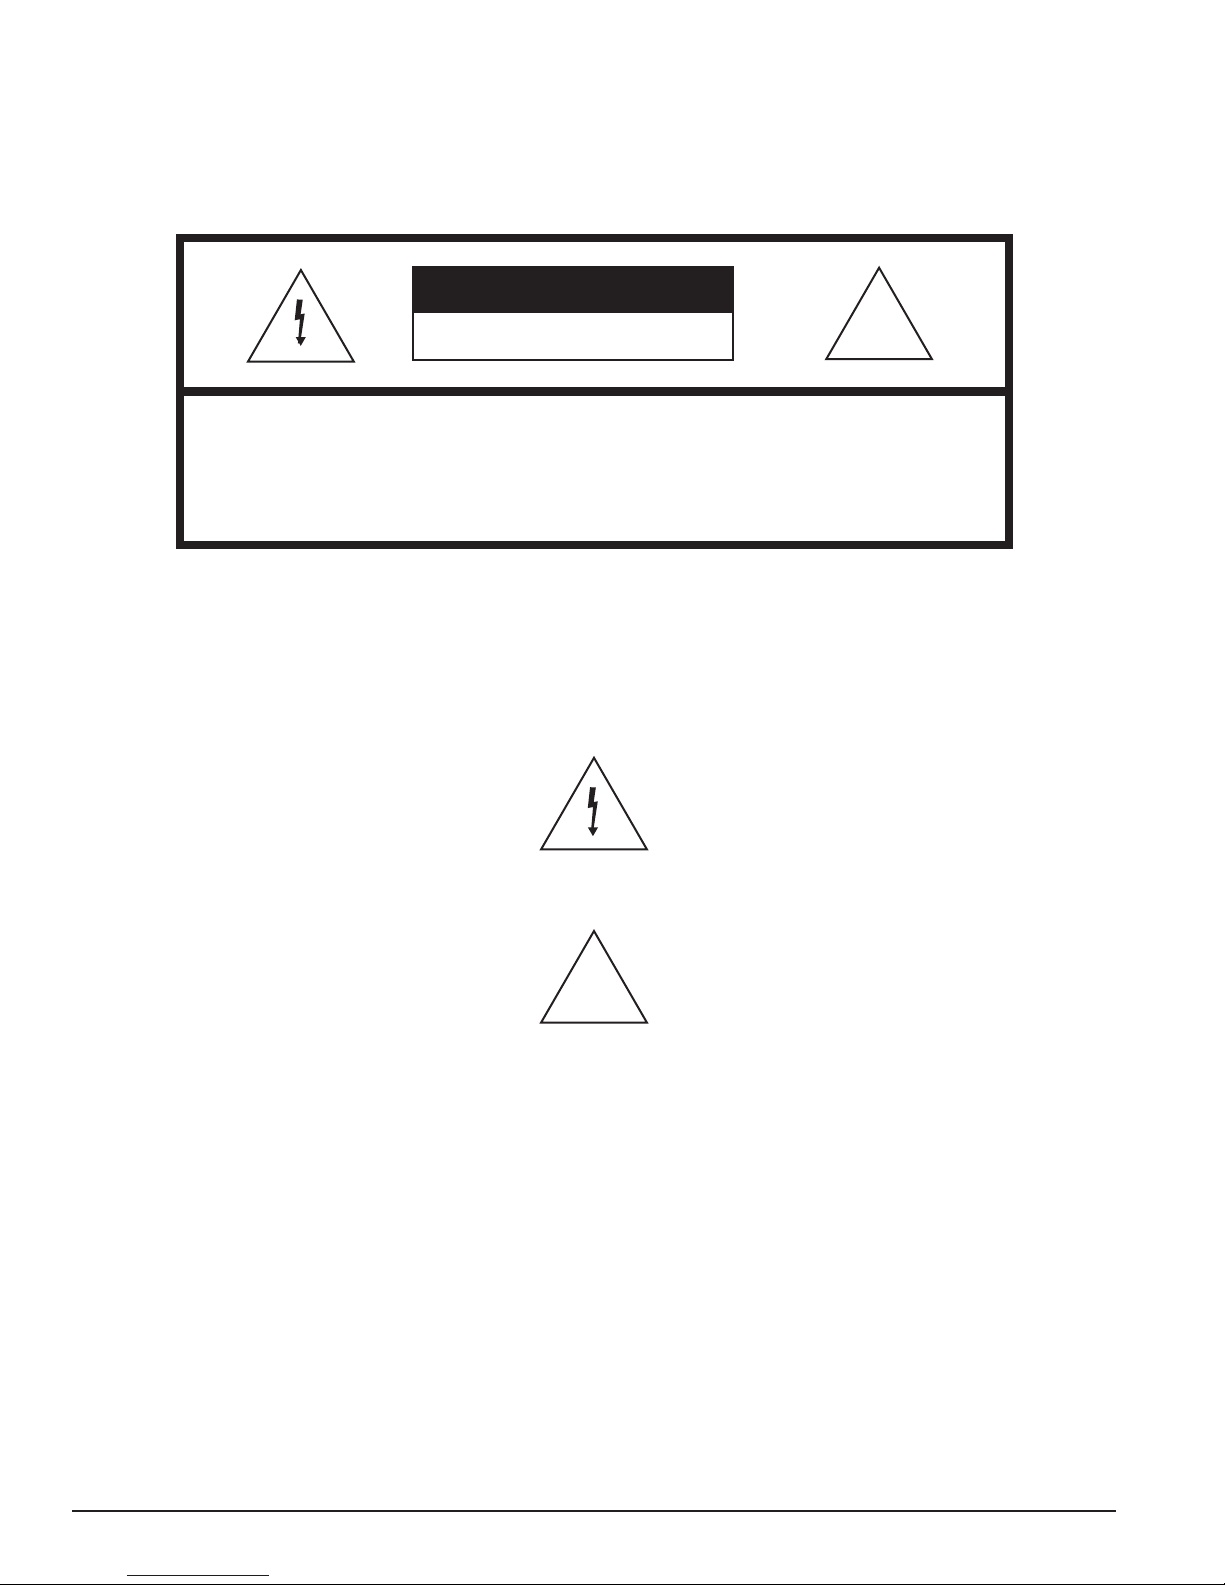
MIN MAX
MASTER VOLUME
yt
u
LOWERLAYERHARMONY– TEMPO +
SINGLE
FINGERED
PIANO
MIN MAX
ACCOMP VOLUME
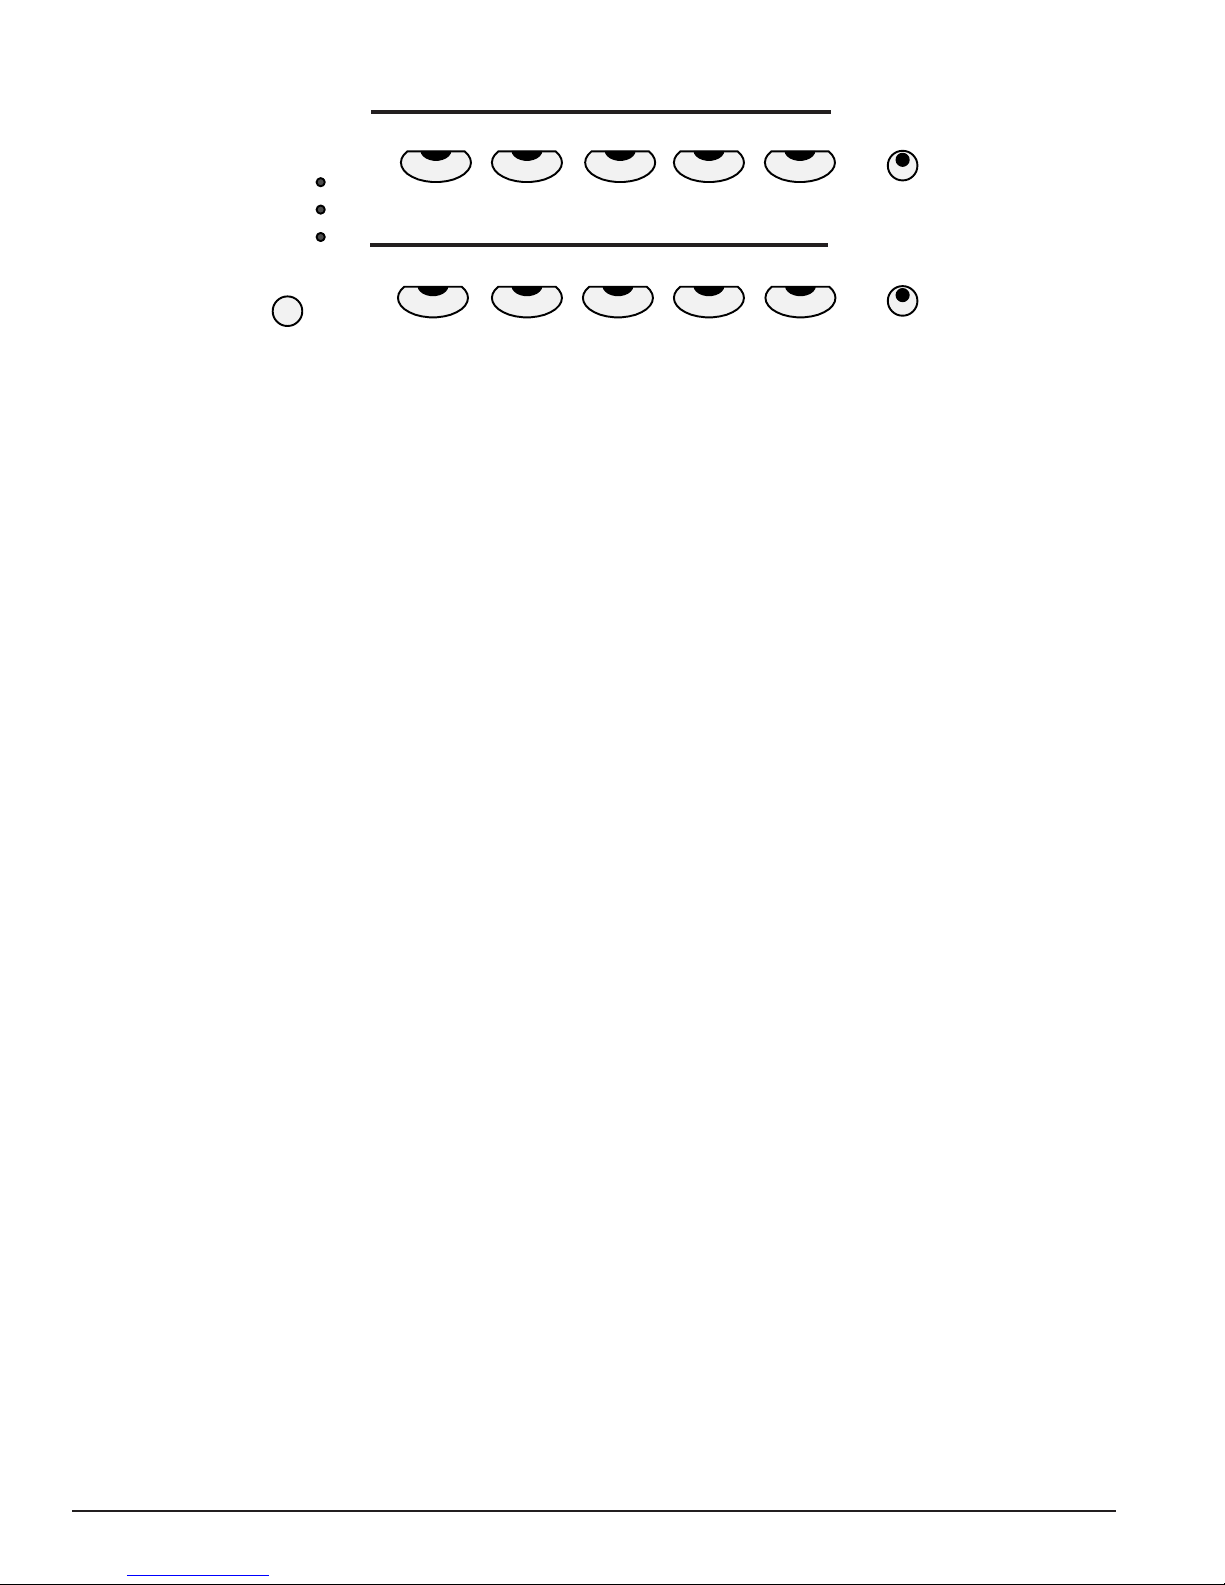
HARMONY When selected, the single note played on the right-hand section
t
of the keyboard will sound with additional auto harmony notes. The note played
in the upper section of the piano determines the root key of the harmony. It is
recommended that one note be played at a time. If more than one note is played
only the highest note will add harmony.
Auto harmony is only available when the auto accompaniment is engaged.
The harmony type selection is assigned in the Function menu. Use it to select the
type of harmony, Duet, Close Harmony, Open Harmony, or Octave.
See the Function section for more information.
LAYER Engaging the LAYER button will put the keyboard in the layer, or dual,
y
mode. Layer, or dual, refers to an additional voice that is tone mixed with the
selected keyboard voice. The assigned layer voice will be heard with the oringinal
voice. To select a new layered instrument voice us the +Yes or -No buttons within 4
seconds after the Layer button has been engaged.
i
SYNCH
START
START/
STOP
INTRO/
ENDING
FILL IN
VARIATION
ACCOMP
LOWER With the LOWER feature engaged the keyboard operates in the split
u
mode. In the split mode the keyboard is divided into two sections. In the right
hand section the oringal or layered voice will sound, and in the left hand section
a dierent voice can be assigned to sound when the keys are played. To select a
new Lower instrument voice us the +Yes or -No buttons within 4 seconds after the
Lower button has been engaged.
SYNC START Synchronized Start mode sets the auto accompaniment into
i
standby mode. When the SYNC START button is pressed the indicator lights above
the tempo will ash to the Tempo of the selected rhythm style. The rhythm style
will start as soon as you play in the auto accompaniment section of the keyboard.
The auto accompaniment will start with the rst recognized chord played in the
auto accompaniment section of the keyboard, depending on which ngering
mode is selected. Pressing the SYNC START button again will stop the auto
accompaniment and put the keyboard back on standby mode.
8
OWNER’S MANUAL
MIN MAX
MASTER VOLUME
SINGLE
LOWERLAYERHARMONY– TEMPO +
FINGERED
PIANO
MIN MAX
ACCOMP VOLUME
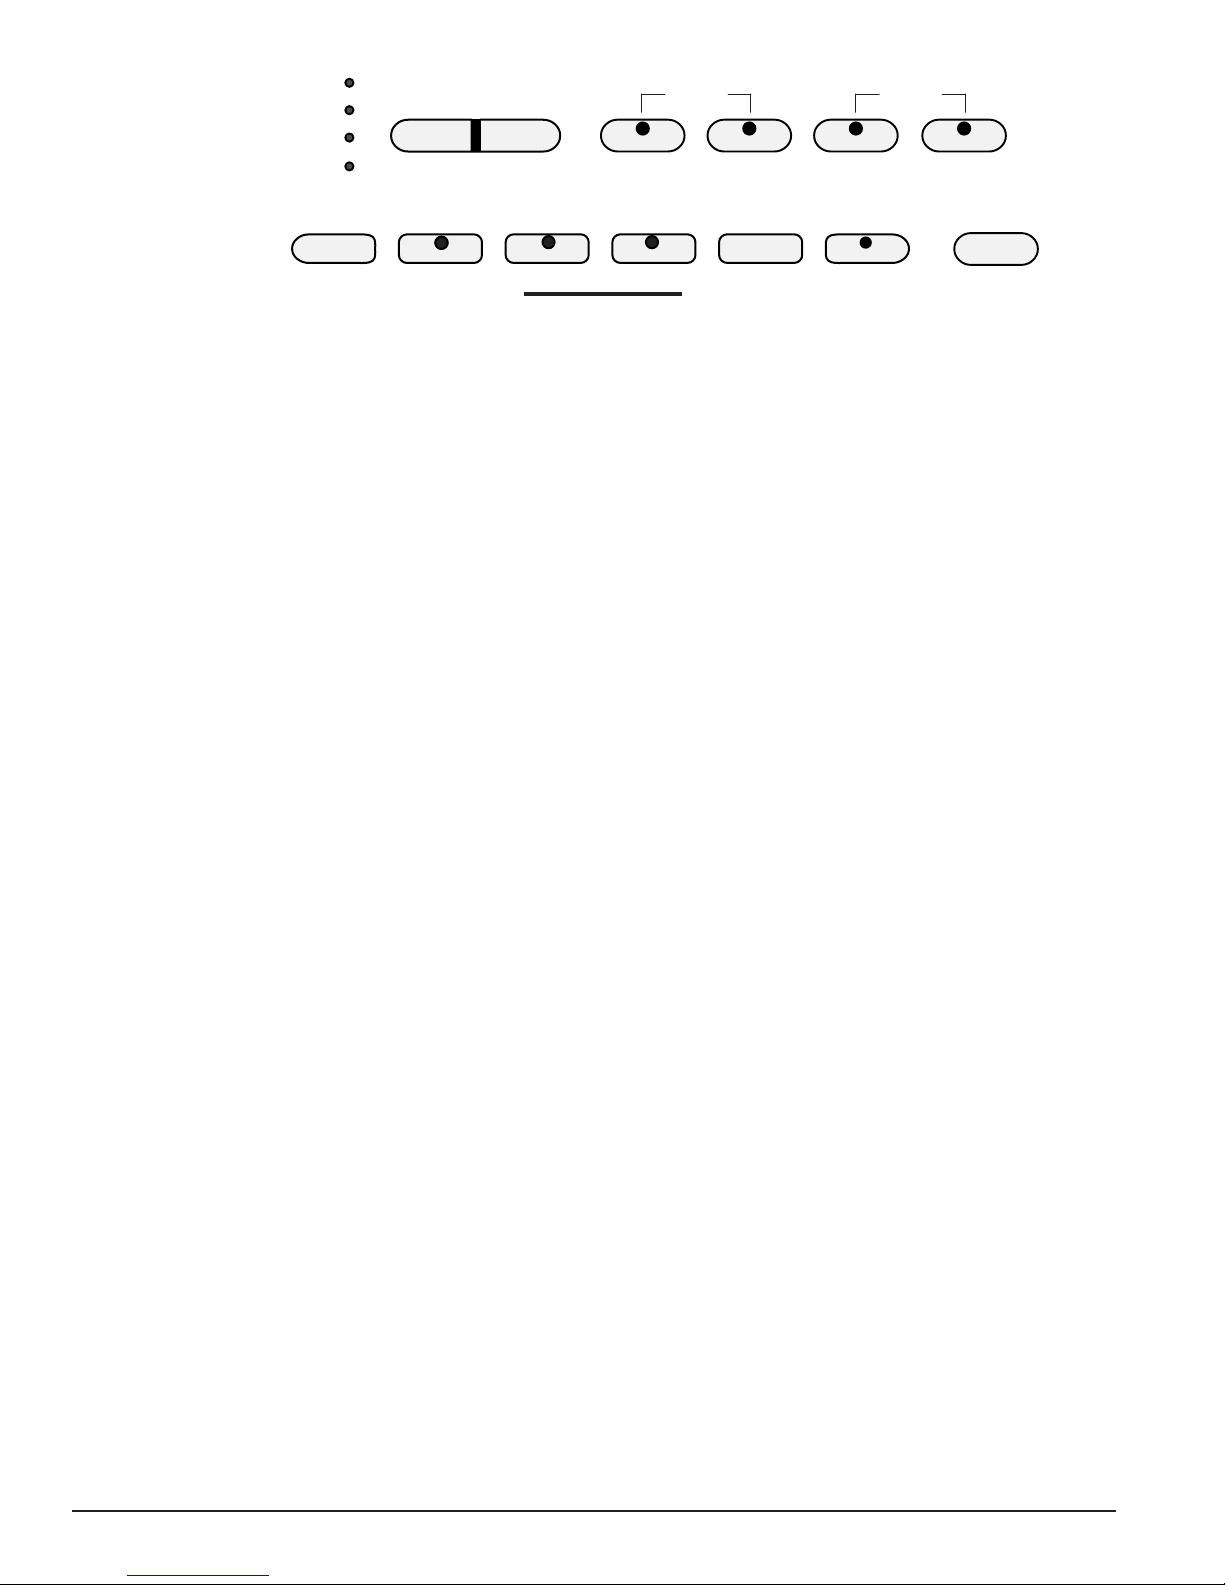
START/STOP This button starts or stops the selected rhythm style. The auto
o
accompaniment will start with the rst recognized chord played in the auto
accompaniment section of the keyboard, depending on the ngering mode
selected.
INTRO/ENDING All of the 100 rhythm styles can be started or nished with an
z
detailed individual introduction or ending pattern.
When engaged, an introduction of rhythm pattern will start followed by the
main pattern. With a rhythm or accompaniment pattern already engaged the
accompaniment can be professionally completed with an ending pattern from the
next measure by pressing the INTRO/ENDING button. If you press the ll-in button
during the ending pattern it will return to the main accompaniment pattern.
FILL IN The ll-in provides the accompaniment with a short rhythm pattern of
x
one or two measures for each style. Press the FILL IN button at any time while the
accompaniment is playing to add a ll-in. If you hold down the FILL IN button, the
ll-in pattern will repeat until the button is released, then the main pattern will play
from the beginning of the next measure.
SYNCH
START
o x
START/
STOP
z c
INTRO/
ENDING
FILL IN
VARIATION
v
ACCOMP
VARIATION All of the 100 rhythm styles include a variation of that style that
c
can be played simply by engaging the VARIATION button. Press the VARIATION
button again to disengage and return to the main pattern.
ACCOMP Each rhythm style has a fully orchestrated auto accompaniment
v
pattern. These accompaniments are dedicated to the selected rhythm style, and
will create rhythm, bass and chord accompaniments. The ACCOMP button selects
the auto accompaniment mode. With this function engaged, the keys to the left
side of the split point are the auto accompaniment section of the keyboard, while
the keys to the right are available for normal playing.
The auto accompaniment ngering modes are single, ngered, piano, and o.
Press the ACCOMP button until the indicator LED that corresponds to the ngering
mode you desire turns on.
MINI–GRANDE DIGITAL PIANO
9
n
PIANO E. PIANO HARPSICHORD ORGAN USER 1
b
SINGLE
FINGERED
PIANO
m
ACCOMP
A/B BUTTON The ve quick select voice and ve quick select style buttons are
b
GUITAR
BOSSA NOVA
LOUNGE
STRINGS
ROCK
BLUES
TRUMPET USER 2
POP
JAZZ
FLUTE
BALLAD
GOSPEL
USER 1
USER 2
A/B
,
METRONOME
each assigned to a line A and line B. Press the A/B button to alternate between the
two selection lines. The indicator light will be lit when selection line B is active.
Please see the quick select buttons below for more information.
QUICK SELECT VOICE There are ten instrument voices that can be selected
n
quickly by pressing one of the ve voice select buttons. These voices are assigned
to line A and line B. Each of these selection lines consists of ve voices. The voice
name in the line A is printed above the voice select button and the voice name on
line B is beneath the button. Press the A/B button to select the voice line of your
choice. When the indicator light is lit the B line or bottom line is active. The selected
voice name and its number will be shown on the display.
Please see the Keyboard Voices section of this manual for more information.
QUICK SELECT STYLE BUTTONS There are ten Rhythm Styles that can be
m
selected quickly by pressing one of the ve Rhythm select buttons. These Rhythm
Styles are assigned to line A and line B. Each of these selection lines consists of ve
rhtyhm styles. The Style name in the line A is printed above the Style select button
and the Rhythm style name on line B is beneath the button. Press the A/B button to
select the Rhythm Style line of your choice. When the indicator light is lit the B line
or bottom line is active. The selected rhythm name and its number will be shown
on the display.
Please see the Rhythm Styles section of this manual for more information.
THE METRONOME BUTTON Toggles the metronome feature on and o and
,
accesses the Metronome menu. The tempo can be increased or decreased using
the TEMPO + and – buttons.
Please see the Setup section of this manual for more information.
10
OWNER’S MANUAL
. .
1
2
3
+/YES
VOICE
SONG/DEMO
FUNCTION
2) 2! 2@
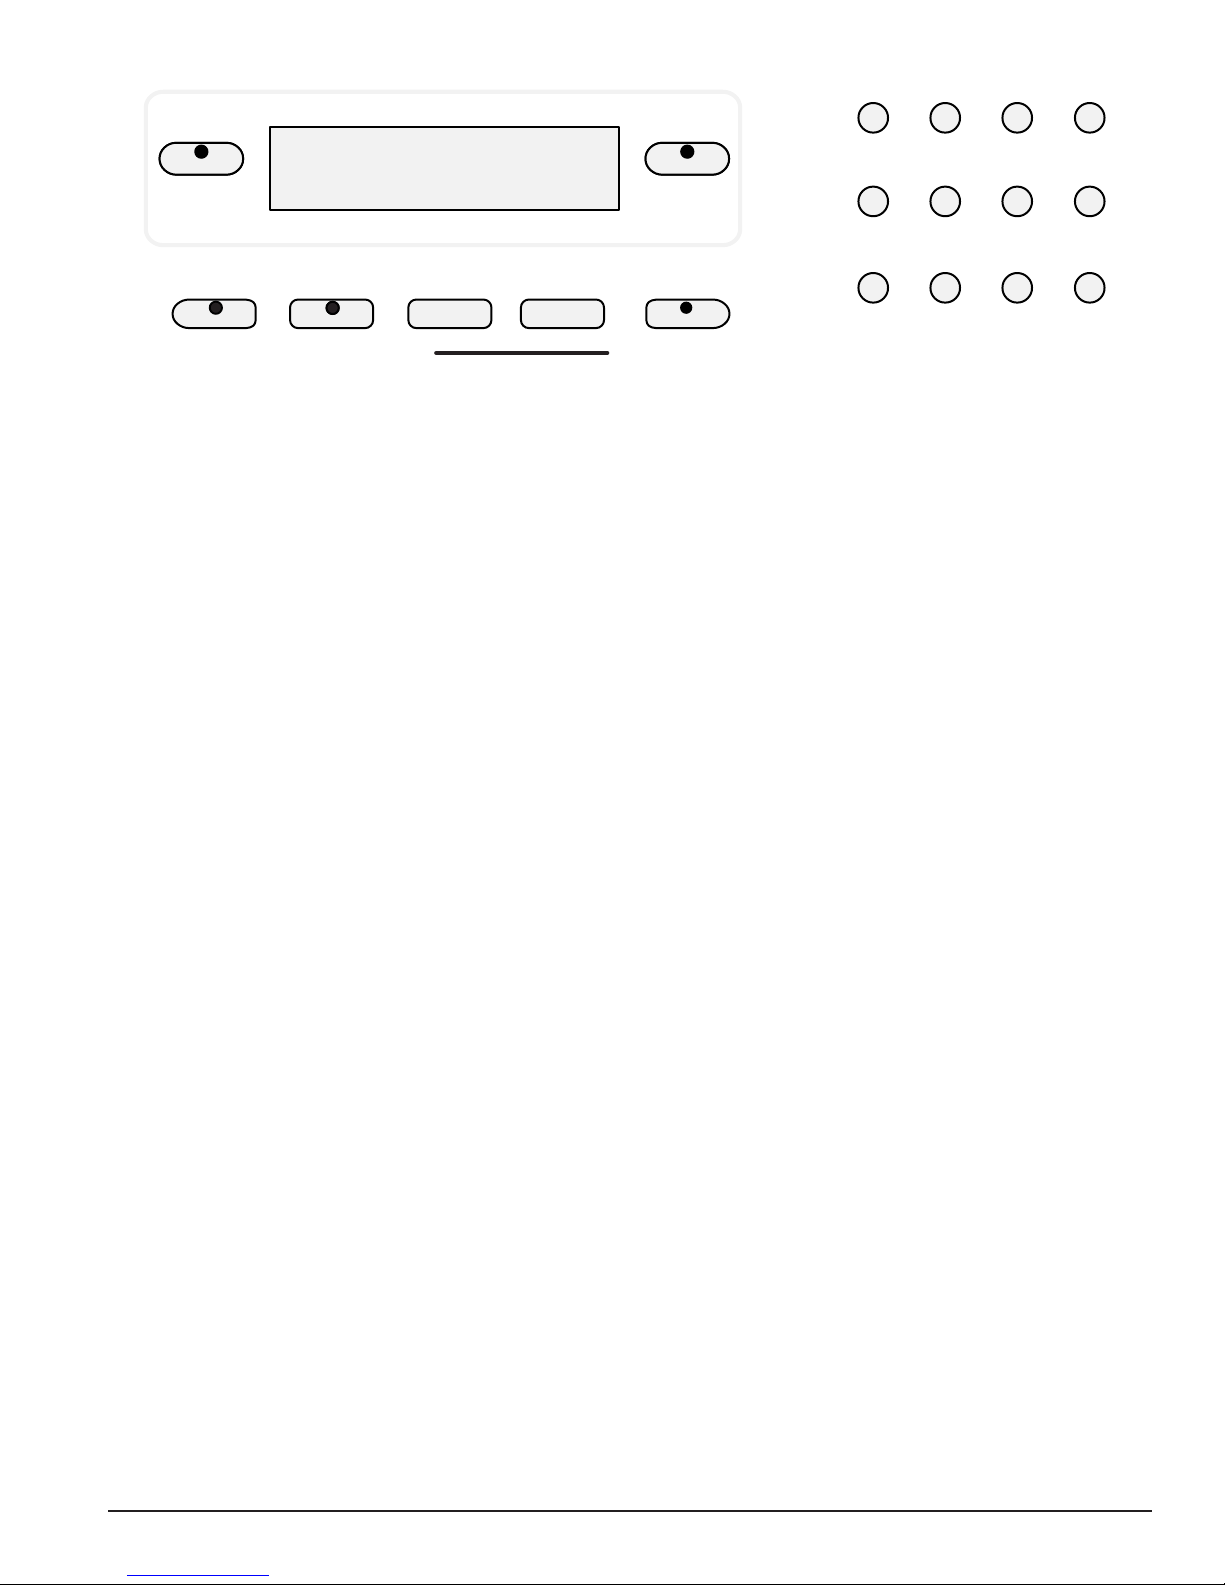
INSTRUMENT VOICE There are 128 GM (General MIDI) instrument voices, plus
.
ten Asian folk instrument voices available on this piano. You can instantly select an
instrument voice by pressing one of the voice select buttons. Or you can use the
number pads to select a voice, the voice name and its number will be shown on the
display. There is a complete list of all 138 voices listed in the back of the manual.
Please see the Voice section of this manual for more information.
STYLE To engage one of the 100 rhythm styles, and the corresponding auto
/
accompaniment, press one of the rhythm style buttons or press the STYLE button
to engage the style selection mode. While its indicator light is lit, use the number
pads to select a style, the style name and its number will be shown on the display.
There is a complete list of all 100 rhythm accompaniment styles listed in the back
of the manual.
STYLE
4
PAGE PAGE
USER REG
7
5
8 –/NO
6 0
9
Please see the Rhythm section of this manual for more information.
SONG This “music teacher” feature can be used as an aid to learn the 50 songs
2)
built into this piano. The SONG button turns the music teacher function on and o.
Please see the Training section of this manual for more information.
FUNCTION The FUNCTION button is used to access the function menu. The
2!
function menu can be used to adjust or change the parameters of a number of
settings. Metronome settings, reverb level, chorus level, touch, split point for voice,
auto accompaniment split point, tuning, drum kit selection and the auto harmony
type are all set from the function menu.
Please see the Function section of this manual for more information.
PAGE The PAGE buttons (up and down) are used to access the dierent menus
2@
in the Function feature. When the FUNCTION button has been pressed use the
PAGE and PAGE to access the Function menu selections.
MINI–GRANDE DIGITAL PIANO
11
STYLE
USER REG
2#
2$
1
4
7
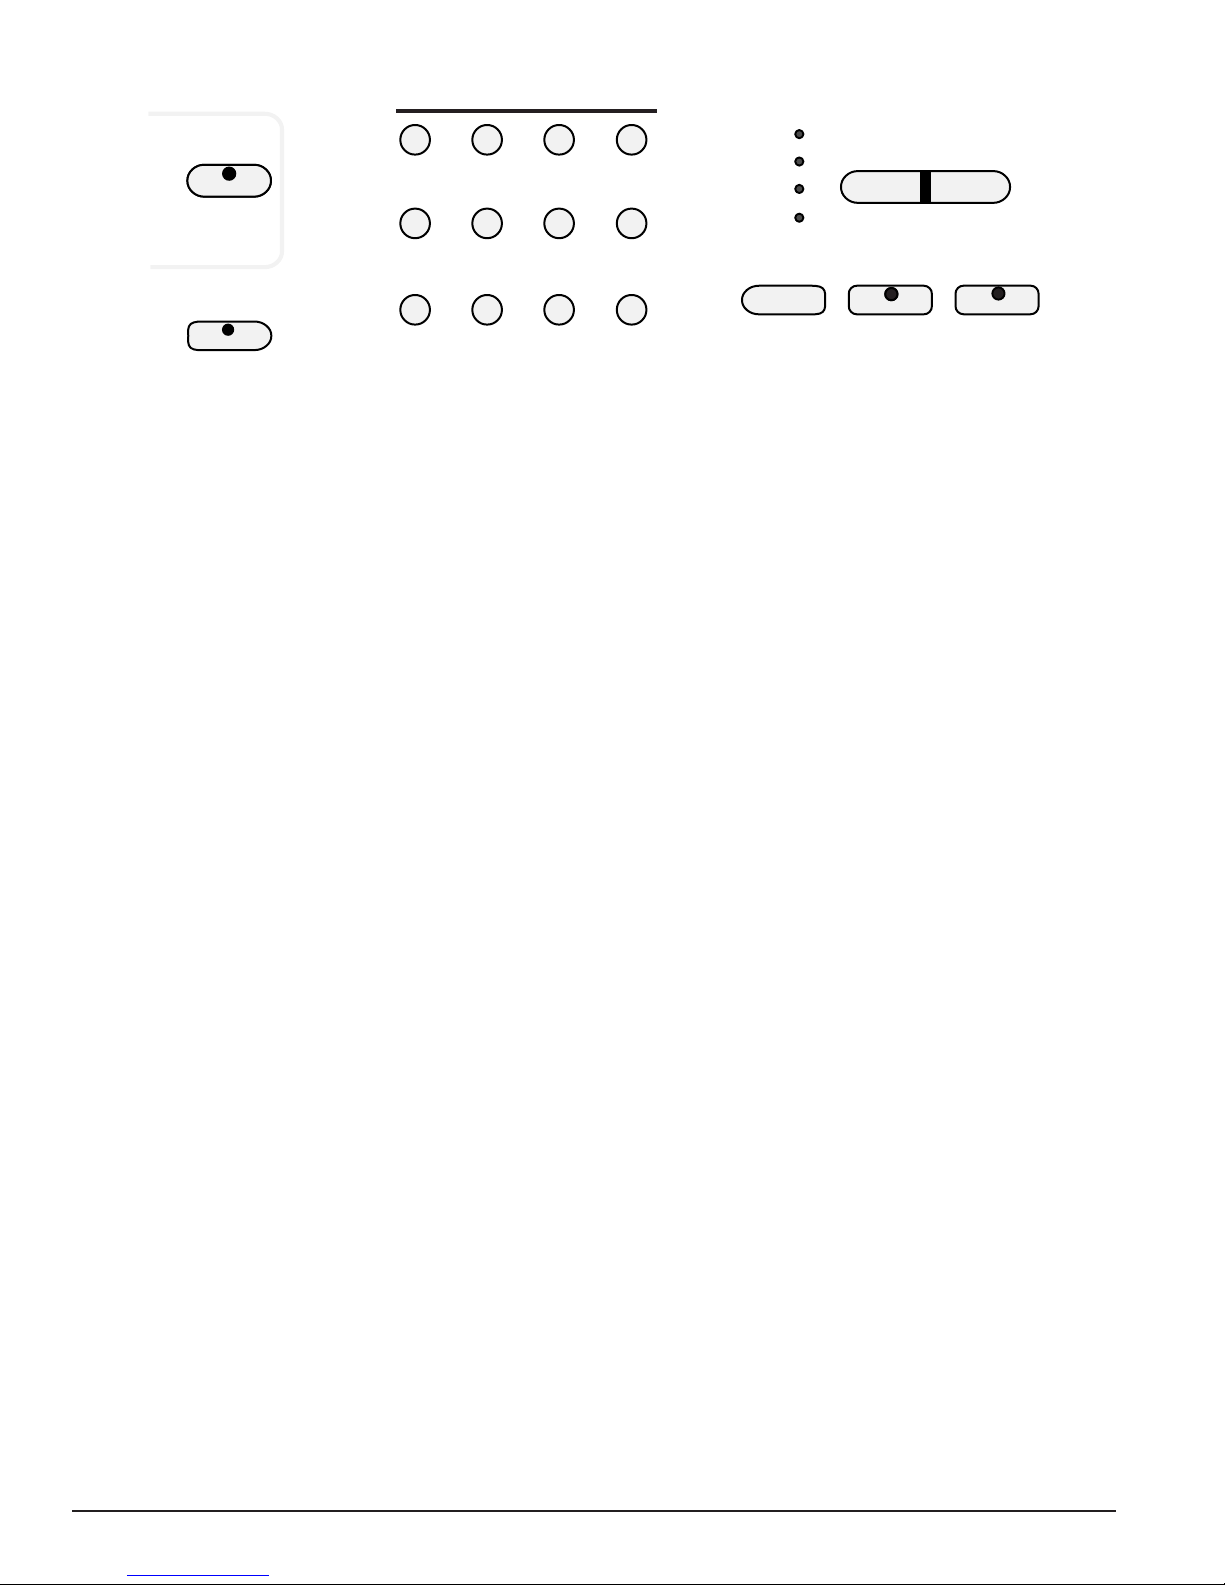
USER REG Registration is used to store keyboard settings. Press the USER REG
2#
2
5
8 –/NO
3
+/YES
6 0
9
1
2
3
4
USER SONG
2%
– TRANSPOSE +
PLAY ALL
ACCOMP
LOAD
MELODY 1
button to engage the registration memory mode, the indicator will light up. Press
one of the numeric buttons 1-9, the stored setting will be recalled instantly. Please
see the Registration Memory section of the manual for more information.
NUMERIC PAD Use the +/YES, –/NO or the numeric pad to input numbers
2$
directly while using the voice, style or function settings. These buttons are also
used to access or alter many of the function features or where ever numerical input
is necessary.
TRANSPOSE The transpose feature can shift the pitch of the keyboard up or
2%
down in semitone intervals up to a maximum of 24 semitones. Press one of the
TRANSPOSE buttons, the current transpose value will appear on the display. Use
the TRANSPOSE + or TRANSPOSE – buttons to set the transpose value range from
–12, one octave lower, to 12, one octave higher. Press the + and – value buttons
simultaneously to recall the default value of 0. After three seconds the display will
return to the currently selected instrument voice. Transpose does not aect notes
that are currently playing. Transpose does not aect the keyboard percussion.
12
OWNER’S MANUAL
1
2
3
4
2^ 2& 2*
EFFECT SONG
CHORUSREVERB– TRANSPOSE +
LEFT RIGHT
USER SONG
2(
REVERB The reverb eect is engaged automatically when the power is turned
2^
CHORUS The Chorus eect adds depth and spaciousness to the selected
2&
PLAY ALL
ACCOMP
LOAD
MELODY 1
SAVE
MELODY 2
UTILITY
REC
PLAY/STOP
PLAY/STOP
CARD
on. Reverb simulates the eect of playing in a big room or hall where the sound
reverberates o the walls and ceiling. Press the REVERB button to turn o the
reverb eect.
You can switch the reverb feature on and o by pressing the REVERB button. The
reverb setting does not aect the auto accompaniment. Reverb depth can be
changed in the function menu “Reverb Level”. Please see the Function Section for
more information.
keyboard voice. Press the CHORUS button to engage the chorus eect and the
indicator will light up. Press the button again to turn o the chorus eect. The
chorus setting does not aect the auto accompaniment. Chorus depth can be
changed in the function menu “Chorus Level”. Please see the Function Section for
more information.
SONG LEFT , SONG RIGHT These buttons are used in conjunction with the
2*
SONG button. It allows the player to play along with the prerecorded traditional
songs contain within this piano. The LEFT button will play the right hand of the
selected song, so tht the user can practice the Left Hand portion of the song. The
RIGHT button will play the Left Hand of the selected song, so that the user can
practice the Right Hand portion of the song. When engaging the LEFT and RIGHT
buttons simultaneously only the accompaniment (if available) will be heard as the
user should play both the Left and Right portions of the selected song. Please see
the Play Along Song section of this manual for more information.
USER SONG The USER SONG button accesses one of the four available song
2(
settings for recording or playback. Use the +/YES, –/NO buttons to select the
song you wish, if there is recorded information on any of the three tracks their
indicator lights will light up. Please see the Record section of this manual for more
information.
MINI–GRANDE DIGITAL PIANO
13
1
2
3
4
2^ 2& 2*
EFFECT SONG
CHORUSREVERB– TRANSPOSE +
LEFT RIGHT
USER SONG
PLAY ALL
ACCOMP
LOAD
MELODY 1
SAVE
MELODY 2
UTILITY
REC
PLAY/STOP
PLAY/STOP
CARD
2( 3) 3! 3@ 3# 3$
ACCOMP The ACCOMP button is used to select the auto accompaniment track
3)
of a song for recording or playback.
Please see the Record section of this manual for more information.
MELODY 1 , MELODY 2 There are two tracks for recording melody, which are
3!
assigned by the MELODY 1 and MELODY 2 buttons.
Please see the Record section of this manual for more information.
REC This unit is able to record four songs, each with a 3-track sequencer. It
3@
will record all note events and the accompaniment patterns exactly as they are
performed. This recorded information is nonvolatile and therefore will not be lost
when the power is turned o.
To Record press and hold down the RECORD button then press the track button(s)
you want to record in. Recording begins as soon as you start to play on any section
of the keyboard.
Press the RECORD button again to stop recording.
Please see the record section of the manual for more information.
PLAY/STOP Press the PLAY/STOP button to hear selected tracks that you have
3#
recorded on. Press the PLAY/STOP button again to stop the playback.
Please see the Record section of this manual for more information.
CARD Press the CARD button to engage the SD memory card function.
3#
Please see the Card section of this manual for more information.
14
OWNER’S MANUAL
Connector Panel
MIDI
IN OUT
USB
MIC
PHONES
AUDIO
IN
L R L R
OUT
q w e r t
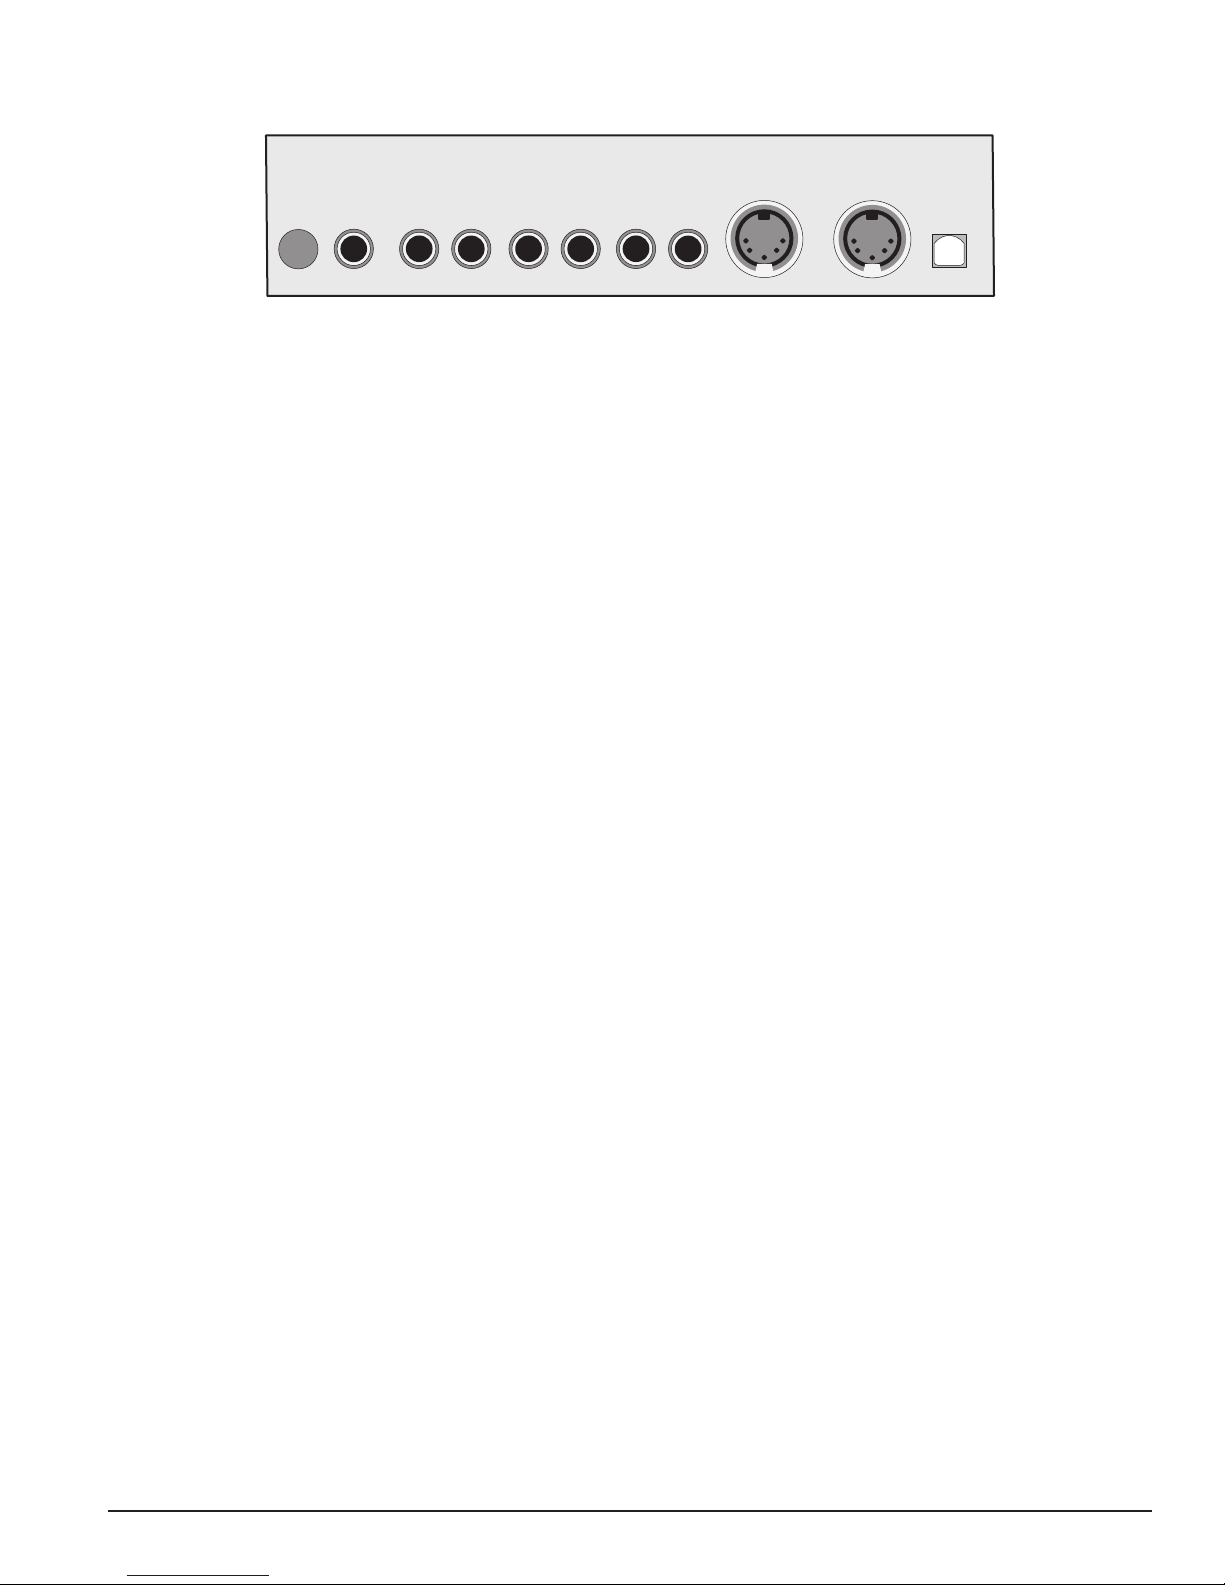
This connector panel, with its various jacks, is located on the bottom left of the piano, under the keybed.
MICROPHONE INPUT The Microphone Input is for use of the microphone.
q
PHONE 1 / PHONE 2 You can play in total silence, without disturbing others in
w
the room, by plugging a set of headphones into one of the appropriate sockets.
When headphones are plugged into either of these jacks the main speaker system
is turned o. Two sets of headphones may be used simultaneously.
AUDIO IN These stereo audio input jacks will amplify the supplied signal
e
through the internal sound delivery system. They can be used to hook up items
such as CD players, MP3 player or Cassette player.
AUDIO OUT — These stereo audio output jacks supplies the piano’s output signal
to external amplication, such as home stereo, PA system or other stand alone
ampliers.
MIDI IN / MIDI OUT This piano contains MIDI in and MIDI output ports. MIDI
r
jacks allow communication with other products equipped with MIDI interfaces.
Please see the MIDI section of this manual for further details.
USB The USB connector allows you to connect the piano directly to your
t
computer’s USB port. This allows you to update your piano’s software if necessary.
Do not turn on the piano with the USB cable connected to the computer to avoid
having to restart your computer. It can connected without driver installation under
the Windows XP, Windows Vista and MAC OSX environment. The piano will be
recognized as USB Audio device to receive and transmit MIDI messages.
MINI–GRANDE DIGITAL PIANO
15
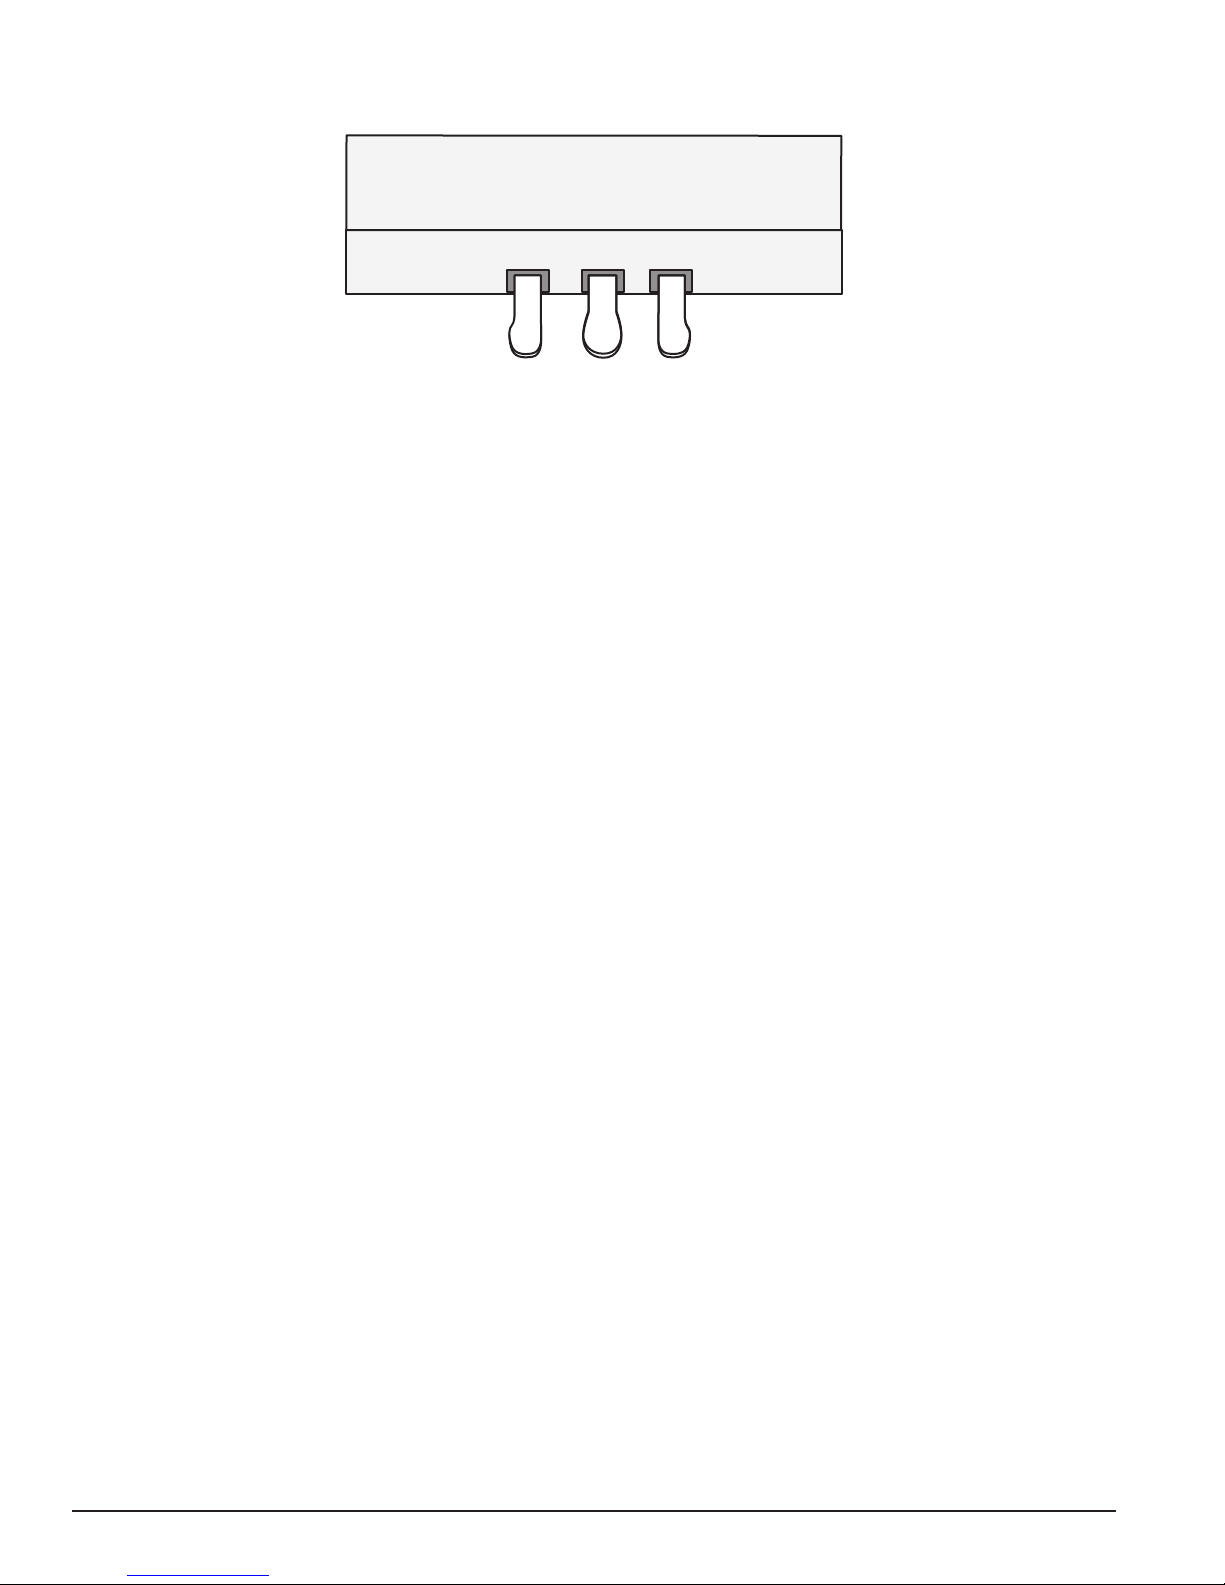
Piano Pedals
SOFT PEDAL When the left pedal is engaged the piano volume is reduced and
q
the timbre slightly altered on the notes that are played.
FUNCTION PEDAL This center pedal can be used to trigger various events,
w
such as START/STOP and Fill In. Pedal function is assigned in the setup menu,
“Pedal Assign”.
q w e
Please see the Setup section of this manual for more information.
SUSTAIN PEDAL When the right pedal is engaged the piano keys will continue
e
to sustain as they are played. Thereby the piano note will decay gradually) as if you
were continuing to hold down the piano keys.
16
OWNER’S MANUAL
 Loading...