

Suzuki Maruti S-Cross User Manual
55KS0-74E
TABLE OF CONTENTS
BEFORE DRIVING 1
STEERING COLUMN CONTROLS 2
INSTRUMENT PANEL 3
OTHER CONTROLS AND EQUIPMENT 4
OPERATING YOUR VEHICLE 5
DRIVING TIPS 6
VEHICLE LOADING AND TOWING 7
INSPECTION AND MAINTENANCE 8
EMERGENCY SERVICE 9
BODY WORK CARE 10
GENERAL INFORMATION 11
SPECIFICATIONS 12


0-1
55KS0-74E
FOREWORD
This manual is an essential part of your
vehicle and should remain with the vehicle
when resold or otherwise transferred to a
new owner or operator. Please read this
manual carefully before operating your
new MARUTI SUZUKI and review the
manual from time to time. It contains
important information on safety, operation
and maintenance.
You are invited to avail the three Free
Inspection Services as described in the
manual. Three free inspection coupons are
attached to this manual. Please show this
manual to your dealer while you take your
MARUTI SUZUKI for any Service.
To prolong the life of your vehicle and
reduce maintenance cost, the periodic
maintenance must be carried out according to “PERIODIC MAINTENANCE
SCHEDULE” described in “INSPECTION
AND MAINTENANCE” section of this manual. It is essential for preventing trouble
and accidents to ensure your satisfaction
and safety.
Daily inspection and care as per “DAILY
INSPECTION CHECKLIST” described in
the “INSPECTION AND MAINTENANCE”
section of this manual is essential for prolonging the life of the vehicle and for safe
driving.
MARUTI SUZUKI INDIA LIMITED believes
in conservation and protection of Earth’s
natural resources.
To that end, we encourage every vehicle
owner to recycle, trade-in or properly dispose of, as appropriate, used Engine Oil,
coolant and other fluids, batteries and
tyres etc.
MARUTI SUZUKI INDIA LIMITED
All information in this manual is based
on the latest product information available at the time of publication. Due to
improvements or other changes, there
may be discrepancies between information in this manual and your vehicle.
MARUTI SUZUKI INDIA LIMITED
reserves the right to make production
changes at any time, without notice and
without incurring any obligation to
make the same or similar changes to
vehicles previously built or sold.
This vehicle may not comply with standards or regulations of other countries.
Before attempting to register this vehicle in any other country, check all applicable regulations and make any
necessary modifications.
3
0-2
55KS0-74E
55KS0-74E
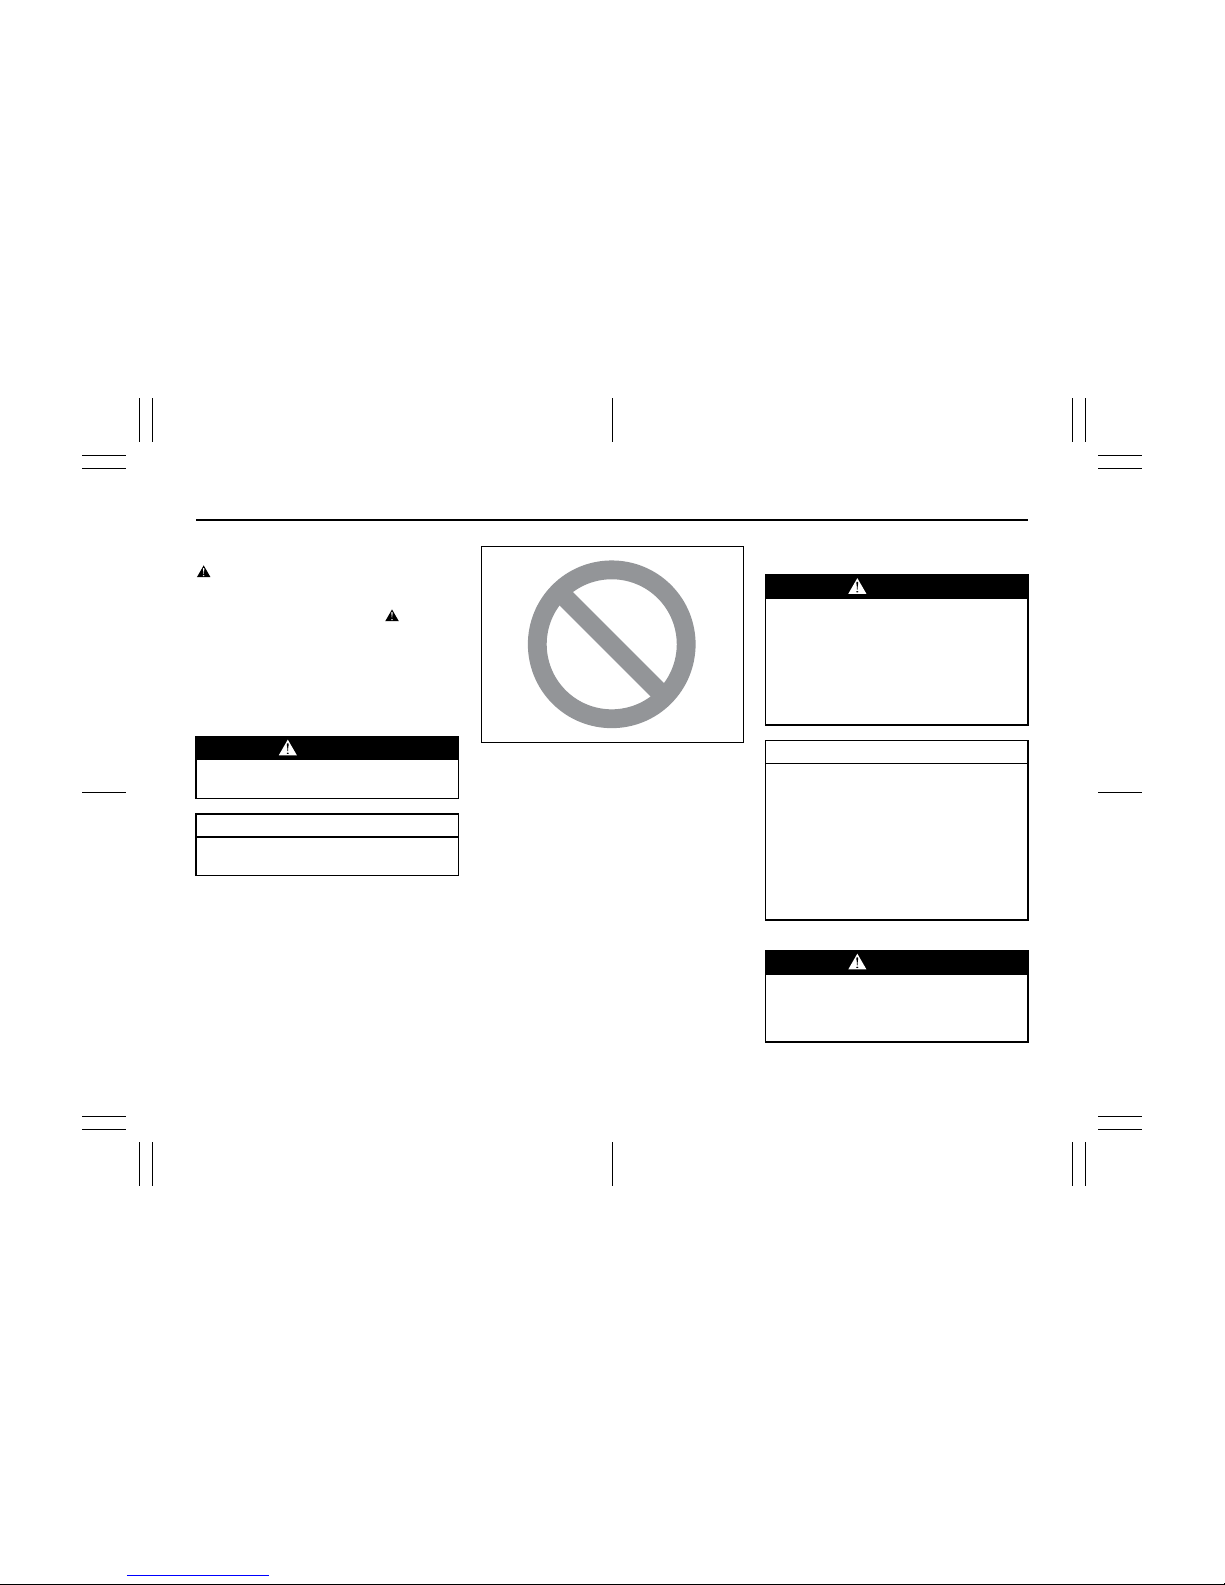
IMPORTANT
WARNING/CAUTION/NOTE
Please read this manual and follow its
instructions carefully. To emphasize special information, the symbol and the
words WARNING, CAUTION and NOTE
have special meanings. These special
meanings apply except when laws or regulations require that the signal words be
used with a different meaning. Pay special
attention to the messages highlighted by
these signal words:
NOTE:
Indicates special information to make
maintenance easier or instructions clearer.
75F135
The circle with a slash in this manual
means “Don’t do this” or “Don’t let this happen”.
MODIFICATION WARNING
WARNING
Indicates a potential hazard that
could result in death or injury.
CAUTION
Indicates a potential hazard that
could result in vehicle damage.
WARNING
Do not modify your vehicle. Modification could adversely affect safety,
handling, performance, or durability
and may violate governmental regulations. In addition, damage or performance problems resulting from
modification may not be covered
under warranty.
CAUTION
Improper installation of mobile communication equipment such as cellular telephones or CB (Citizen’s Band)
radios may cause electronic interference with your vehicle’s ignition system, resulting in vehicle performance
problems. Consult your MARUTI
SUZUKI dealer for advice on installing such mobile communication
equipment.
WARNING
Severe damage may be caused by the
use of either poor quality fuel and/or
lubricants not recommended by
MARUTI SUZUKI.
4
0-3
55KS0-74E
VEHICLE DETAILS
MODEL CHASSIS NO. ENGINE NO. KEY NO.
DATE OF
DELIVERY
ODOMETER
REDAING
(KM)
BATTERY
MAKE
SR.NO.
BATCH CODE
OWNER’S NAME & ADDRESS ________________________________________________________________________________
_________________________________________________________________________________________________________
______________________________________________________________________TEL.NO. ____________________________
ADRESS/STAMP OF SELLING DEALER SELLING DEALER CODE
SHOWROOM
WORKSHOP IMPORTANT INFORMATION TO CUSTOMER
Dear Customer,
For any assistance with regard to our product, please contact General
Manager/Works Manager at any of our Dealer or Authorised Service
Station. For additional enquiry you may contact our Regional Office or
Service Department. The Addresses and Phone nos. are given in
Service Network Booklet provided alongwith vehicle
.
5

0-4
55KS0-74E
55KS0-74E
F: .... FREE SERVICE, P:.... PAID SERVICE, W:.... WARRANTY JOB, A:.... ACCIDENTAL JOB
DATE OF
SERVICE
KIND OF
SERVICE
MILEAGE
(KM)
DESCRIPTION OF JOB NAME OF SERVICING DEALER/
MASS
JOB CARD NO. MECHANICS
SIGNATURE
6
MAINTENANCE SERVICE RECORD

0-5
55KS0-74E
WARRANTY POLICY
Maruti Suzuki India Limited (hereinafter called “Maruti”), warrants
that each new Maruti Suzuki vehicle distributed in India by Maruti
Suzuki and sold by an authorised Maruti Suzuki dealer will be free,
under normal use and service, from any defects in material and
workmanship at the time of manufacture SUBJECT TO THE FOLLOWING TERMS AND CONDITIONS:
(1) Qualification:
To qualify for this warranty:
(a) The Maruti Suzuki vehicle must be delivered by Maruti
Suzuki authorised dealer and set-up, serviced by Maruti
Suzuki authorised dealer service station.
(b) The warranty registration card in respect of each vehicle
must be completed by the dealer at the time of delivery of
the vehicle and dealer should retain the same.
(2) Term:
The term of the warranty shall be twenty-four (24) months or
40,000 kilometers (whichever occurs first) from the date of
delivery to the first owner.
(3) Maruti’s Warranty Obligation:
If any defect(s) should be found in a Maruti Suzuki vehicle within
the term stipulated above, Maruti’s only obligation is to repair or
replace at its sole discretion any part shown to be defective, with a
new part or the equivalent at no cost to the owner for parts or
labour, when Maruti Suzuki acknowledges that such a defect is
attributable to faulty material or workmanship at the time of manufacture. The owner is responsible for any repair or replacements
which are not covered by this warranty.
(4) Limitation:
This warranty shall not apply to:
1) normal maintenance service required other than the three
free services, including without limitation, oil and fluid
changes, headlight aiming, fastener retightening, wheel balancing, wheel alignment and tyre rotation, cleaning of injectors, adjustments of carburettor, ignition timing, clutch and
valve clearance.
2) the replacement of normal wear parts including without limitation, bulbs, tyres and tubes, spark plugs, belts, hoses, filters, wiper blades, brushes, contact points, fuses, clutch disc,
brake shoes, brake pads, cable and all rubber parts (except
oil seal and glass run).
3) any vehicle which has been used for competition or racing.
4) any repairs or replacement required as a result of accidents
or collision.
5) any defects caused by misuse, negligence, abnormal use or
insufficient care.
6) any vehicle which has been modified or altered, including
without limitation, the installation of performance accessories.
7) any vehicle on which parts or accessories not approved by
Maruti Suzuki have been used.
8) any vehicle which has not been operated in accordance with
the operating instructions in the Maruti Suzuki Owner’s Manual.
9) any vehicle which has not received, during the warranty term,
the service inspections prescribed in the Maruti Suzuki
Owner’s Manual.
10) any vehicle which has been assembled, disassembled,
adjusted or repaired by other than an Maruti Suzuki authorised dealer/service station.
11) any vehicle which has been used for purposes other than
what it was designed for.
12) any damage or deterioration caused by industrial pollution
and bird droppings.
7

0-6
55KS0-74E
55KS0-74E
13) insignificant defects which do not affect the function of the
vehicle including without limitation, sound, vibration and fluid
seep.
14) any natural wear and tear including without limitation, aging
etc.
15) Installation and usage of domestic LPG gas/LPG Cylinder.
16) V-belts, hoses and gas leaks (For Maruti Suzuki AC vehicle).
17) Any Vehicle retrofitted with LPG/CNG kits.
(5) Extent of Warranty:
This warranty is the entire written warranty given by Maruti Suzuki
for Maruti Suzuki vehicles and no dealer or its or his agent or
employee is authorised to extend or enlarge this warranty and no
dealer or its or his agent or employee is authorised to make any
oral warranty on Maruti’s behalf.
Maruti Suzuki reserves the right to add any improvements or
change the design of any model at any time with no obligation to
make the same changes on units previously sold.
(6) Warranty Service:
To obtain warranty service, the complete vehicle must be presented at the owner’s expenses to any authorised Maruti Suzuki
dealer.
(7) Owner’s Warranty ResponsibIlities:
It is responsibility of each owner to:
– make certain that the warranty registration/PDl card was
completed at the time of delivery of the vehicle;
– have performed, at his own expenses, by an Maruti Suzuki
authorised dealer/service station all the service inspections
specified in the Maruti Suzuki “Owner’s Manual and Service
Booklet and maintain adequate proof that such service
inspections have been performed.
– make certain that the Maruti Suzuki authorised dealer/ser-
vice station performing the service inspection has certified
the work on the “Maintenance Service Record” page in the
“Owner’s Manual and Service Booklet and
– present the Maruti Suzuki “Owner’s Manual and Service
Booklet to the authorised Maruti Suzuki dealer whenever
requesting service inspections or warranty service.
If the “Owner’s Manual and Service Booklet should be lost or
destroyed the owner should consult the authorised Maruti Suzuki
dealer from whom the vehicle was purchased for instructions concerning replacement of the “Owner’s Manual and Service Booklet.
(8) Disclaimer of Consequential Damage:
Maruti Suzuki assumes no responsibility for loss of vehicle, loss of
time”
inconvenience or any other indirect incidental or consequential
damage resulting from the vehicle not being available to the owner
because of any defect covered by this warranty.
(9) Change of Owner
Even if ownership of the vehicle changes, the remaining warranty
period is effective for the new owner.
8

0-7
55KS0-74E
EMISSION WARRANTY POLICY
Maruti Suzuki offers the Emission Warranty on all Maruti Suzuki
vehicles (apart from the Regular Warranty and will run parallel to
the regular product warranty) only in four metropolitan cities (New
Delhi, Kolkata, Mumbai and Chennai) with effect from July 1st,
2001.
Terms:
The Emission Warranty will be applicable for 80,000 kms or 3
years (Whichever comes earlier) from the date of delivery to the
first owner. The remaining warranty terms will be valid in case of
any change in ownership provided the production of all valid documents.
Conditions:
1. Under Emission Waranty, Warranty claims will be admitted for
a prima facie examination, in case vehicle fails to meet the
Emission Standard as specified in sub rule (2) of rule no. 115
of Central Motor Vehicles Rules (CMVR), 1989.
2. The warranty claims will only be accepted after examination
carried out by Maruti Suzuki or it’s dealer which leads to firm
conclusions that the
a) Original settings have not been tempered in any case.
b) Part (as given in Annexure - A) has a manufacturing defect.
c) Vehicle is unable to meet the Emission Standards (as given
in 1.), inspite of the vehicle having been maintained and
used in accordance with the instructions as specified in
Owner’s Manual and Service Booklet and the used fuel and
different oils (Engine oil, Transmission oil, Brake oil etc.) are
also as per specification.
3. The method of examination for deciding the warranty of the
parts will be at the sole discretion of Maruti Suzuki and it’s
dealer and results of the examination will be final and binding.
If after examination, the warrantable condition is not established, Maruti Suzuki and it’s dealer has the right to charge all,
or part of the cost of such examination.
4. Under Emission Warranty, the parts (as given in Annexure - A)
will be changed free of cost, but the consumables will be
charged as per actual.
5. If the part covered under Emission Warranty or the associated
parts, are not independently replaceable, on account of these
being integral parts of a complete assembly, Maruti Suzuki and
it’s dealer will have the sole discretion to replace either the
entire assembly or by using some of the parts of the system
through suitable repairs or modifications.
6. Any consequential repairs or replacement of parts which may
be found necessary to establish compliance of Emission Warranty, will not be considered under warranty, unless the same is
under product warranty. The consumable will be charged as
per actual under such repair or replacement.
7. Maruti Suzuki will not be responsible for the cost of transportation of the vehicle to the nearest Maruti Suzuki dealer workshop or any loss due to non-availability of the vehicle during
the period of lodging of a warranty claim and examination and/
or repair by Maruti Suzuki dealer.
8. Maruti Suzuki will not be responsible for any penalty that may
be charged by statutory authorities on account of failure to
comply with the EMISSION STANDARDS.
9. Emission Waranty will not be affected on the change of owner,
provided all the documents are available.
9

0-8
55KS0-74E
55KS0-74E
10.All maintenance actions (as specified in the Owner’s Manual
and Service Booklet) need to be followed and recorded in the
manual for emission warranty.
11.The customer needs to produce the PUC (Pollution Under
Control) certificate valid for the period preceeding the test during which the failure is discovered. The receipts (for the maintenance of the vehicle as per specification in Owner’s Manual
and Service Booklet from the date of original purchase of the
vehicle) will also be required.
Conditions under which the Emission Warranty is not
APPLICABLE
1. In the absence of valid PUC certificate.
2. Vehicle not serviced from Maruti Suzuki authorised workshop
as per the schedule specified in the Owner’s Manual.
3. Vehicle subjected to abnormal use (accident, motor race, ral-
lies or for the purpose of establishing the records etc).
4. Use of non MGP (Maruti Geniune Part).
5. Vehicle tempered in an unauthorised manner.
6. Tampering with odometer so that the actual kilometer reading
can not be read.
7. Use of adulterated fuel and/or unspecified oils (Engine oil,
Transmission oil and Brake oil etc).
Annexure - A
List of parts covered under Emission Warranty
1. Fuel Injection Assembly, Pressure Regulator, Throttle Body
Assembly.
2. Electronic Control Module (ECM).
3. Intake Manifold.
4. EGR valve.
5. Distributor and internal parts.
6. Ignition Coil.
7. Canister Assembly.
8. Vapour Liquid Seperator.
9. Fuel Tank and Filler Cap.
10. PCV (Positive Crankcase Ventilation) Valve.
11. Oil Filler Cap.
12. Catalytic Convertor.
13. Exhaust Manifold.
14. All Fuel Injection System related SENSORS.
10

0-9
55KS0-74E
MEMO
11

0-10
55KS0-74E
55KS0-74E
MEMO
12

55KS0-74E
BEFORE DRIVING
1
55KS0-74E
BEFORE DRIVING
Fuel Recommendation ........................................................ 1-1
Keys ...................................................................................... 1-2
Immobilizer System (Petrol Engine)................................... 1-2
Door Locks .......................................................................... 1-4
Keyless Entry Cum Alarm System (if equipped) .............. 1-5
Windows .............................................................................. 1-15
Mirrors .................................................................................. 1-17
Seat Adjustment .................................................................. 1-19
Adjustable Head Restraints (if equipped) ......................... 1-20
Seat Belts and Child Restraint Systems ........................... 1-21
Supplemental Restraint System (air bags)
(if equipped) ......................................................................... 1-32
13
1-1
BEFORE DRIVING 55KS0-74E
55KS0-74E
Fuel Recommendation
Petrol Engine
Yo u must use unleaded petrol with an
octane number (RON) of 91 or higher.
Diesel Engine
The diesel fuel should be with Cetane
Number (CN) higher than 51 and sulphur
content less than 350 ppm (parts per million). Do not use marine diesel fuel, heating oils and so forth.
Petrol/Ethanol Blends
Blends of unleaded petrol and ethanol
(grain alcohol), also known as gasohol, are
commercially available in some areas.
Blends
of this type may be used in your
vehicle if they are no more than 5% ethanol. Make sure this petrol-ethanol blend
has octane ratings no lower than those
recommended for petrol.
Petrol/Methanol Blends
Blends of unleaded petrol and methanol
(wood alcohol) are also commercially available in some areas. DO NOT USE fuels
containing
more than 5% methanol under
any circumstances. Fuel system damage
or vehicle performance problems resulting
from the use of such fuels are not the
responsibility of MARUTI SUZUKI and may
not be covered under Warranty.
Fuels containing 5% or less methanol may
be suitable for use in your vehicle if they
contain cosolvents and corrosion
inhibi-
tors.
NOTE:
If you are not satisfied with the driveability
or fuel economy of your vehicle when you
are using a petrol/alcohol blend, you
should switch back to unleaded petrol containing no alcohol.
CAUTION
Use of leaded fuel in vehicle
equipped with catalytic converter is
prohibited, because lead deactivates
the pollutant reducing components
of catalytic converter and may result
in permanent damage to catalytic
converter.
CAUTION
The fuel tank has an air space to
allow for fuel expansion in hot
weather. If you continue to add fuel
after the filler nozzle has automatically shut off or an initial blowback
occurs, the air chamber will become
full. Exposure to heat when fully
fuelled in this manner will result in
leakage due to fuel expansion. To
prevent such fuel leakage, stop filling
after the filler nozzle has automatically shut off, or when using an alternative non automatic system, initial
vent blowback occurs.
CAUTION
Be careful not to spill fuel containing
alcohol while refueling. Fuels containing alcohol can cause paint damage, which is not covered under the
New Vehicle Limited Warranty.
Fuel Recommendation: 1, 2
14
1-2
55KS0-74E BEFORE DRIVING
55KS0-74E
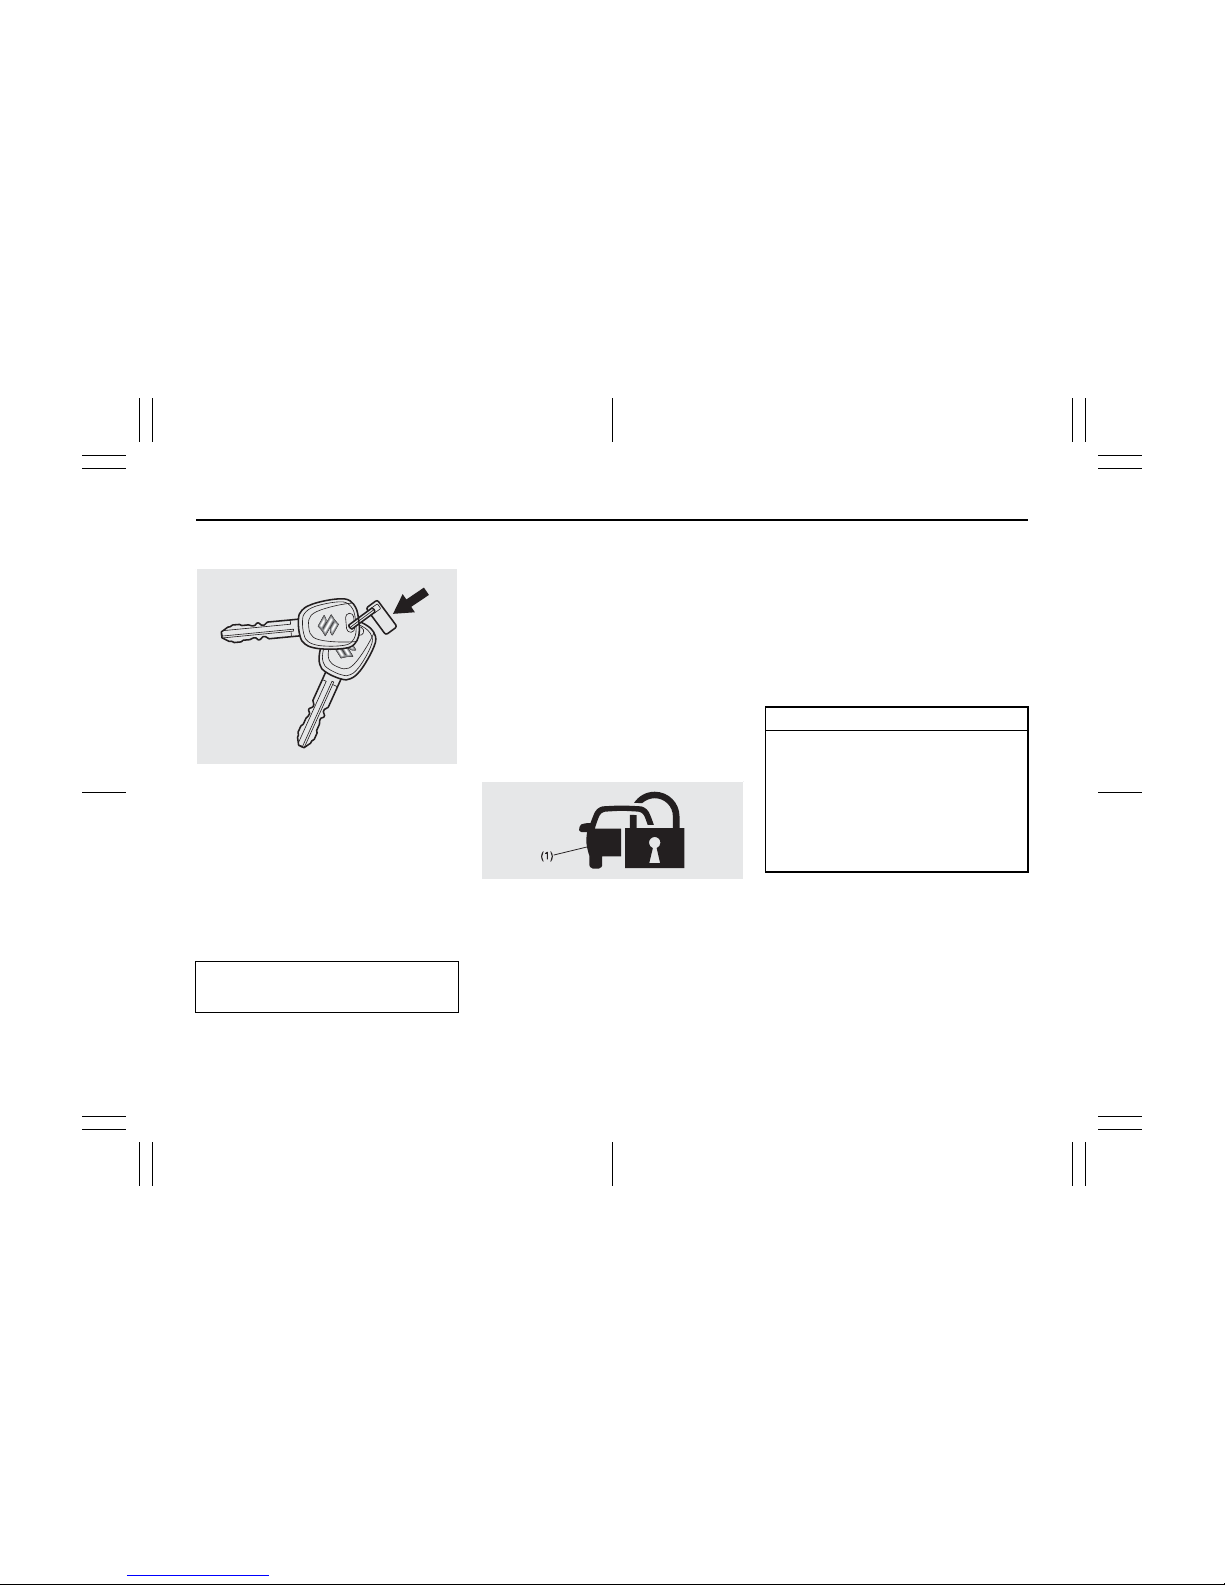
Keys
54G489
Yo u r vehicle comes with a pair of identical
keys. Keep the spare key in a safe place.
One key can open all of the locks on the
vehicle.
The key identification number is stamped
on a metal tag provided with the keys or on
the keys. Keep the tag (if equipped) in a
safe
place. If you lose your keys, you will
need this number to have new keys made.
Write the number below for your future reference.
Immobilizer System (Petrol Engine)
This system is designed to help prevent
vehicle theft by electronically disabling the
engine starting system.
The engine can be started only with your
vehicle’s original immobilizer ignition key
which has an electronic identification code
programmed into it. The key communicates the identification code to the vehicle
when the key is turned to the
“ON” position. If you need to make spare keys, see
your MARUTI SUZUKI dealer. The vehicle
must be programmed with the correct identification code for the spare keys. A key
made by an ordinary locksmith will not
work.
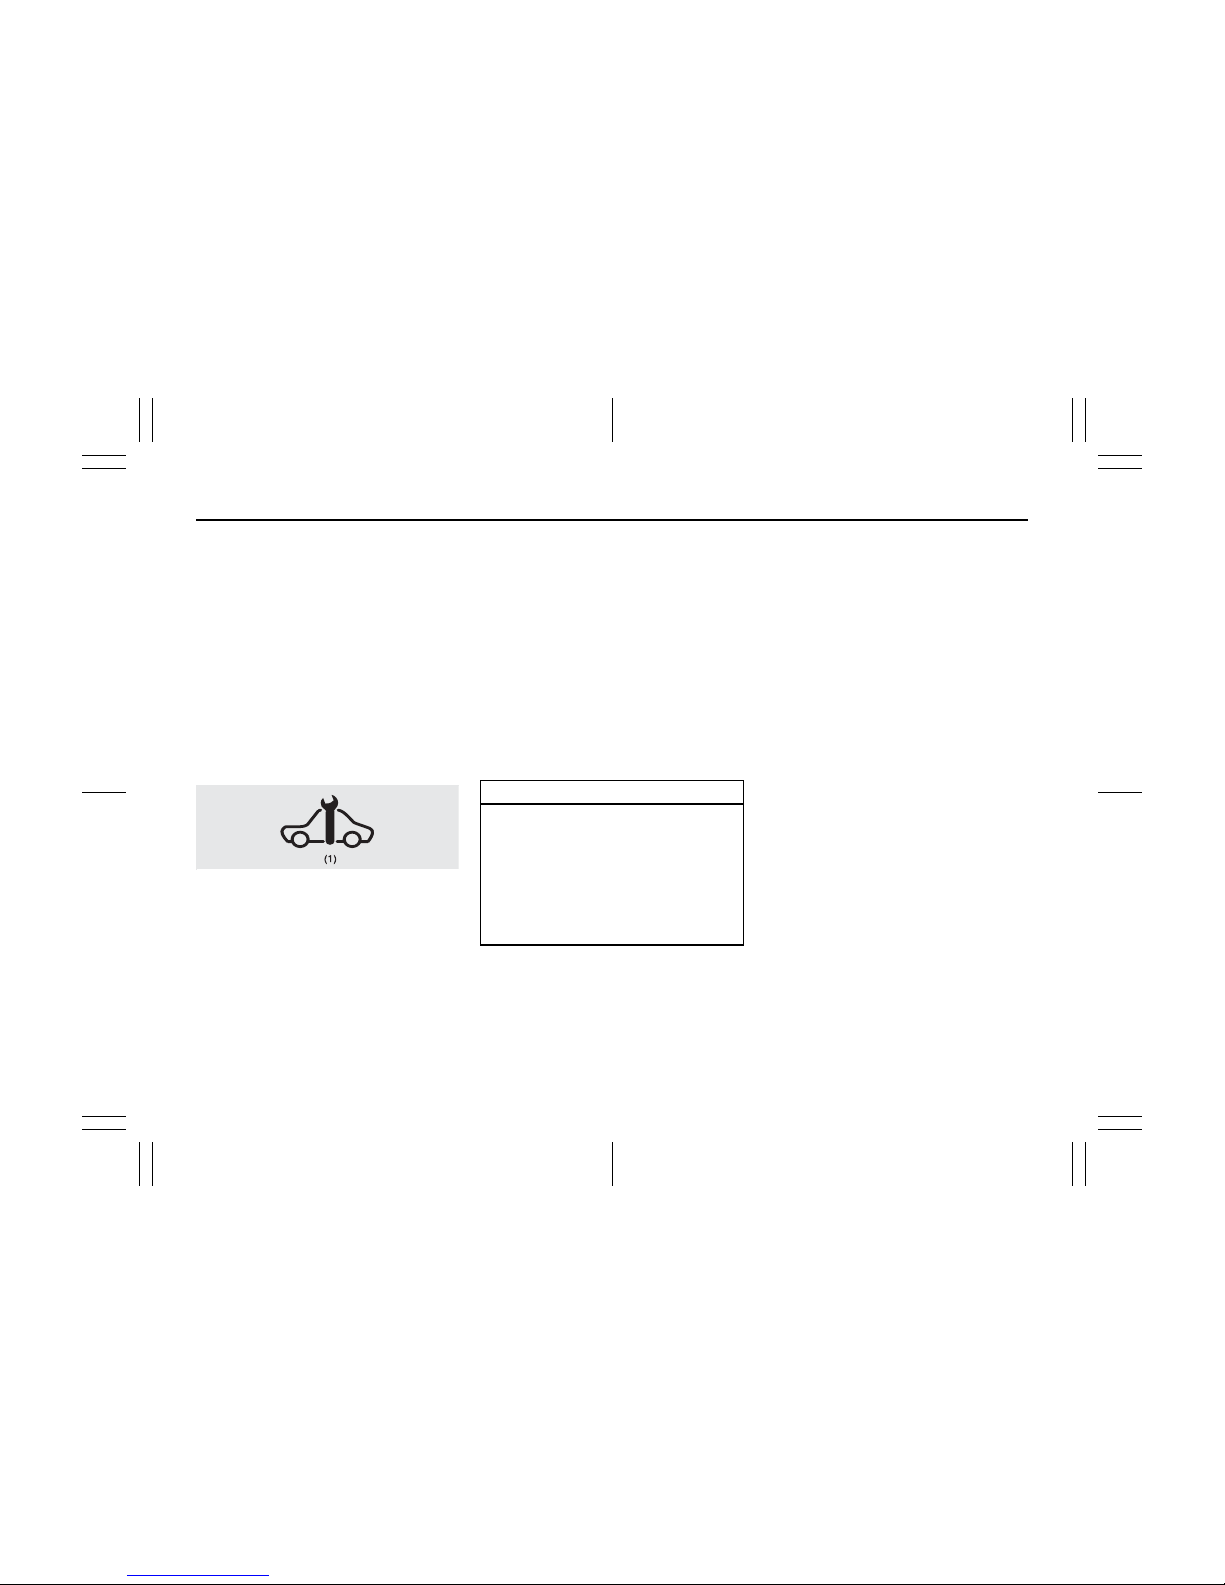
54G003
If the Immobilizer system light (1) blinks
when the ignition switch is in the “ON” position, there may be something wrong with
your key or with the immobilizer system.
Ask your MARUTI SUZUKI dealer to
inspect the system.
NOTE:
• If you lose your Immobilizer ignition key,
see your MARUTI SUZUKI dealer as
soon as possible to have the lost one
deactivated, then have the new key
made by them.
• If you own other vehicles with immobilizer keys, keep those keys away from
the ignition switch when using your vehicle, or the engine may not be started
because they may interfere with your
vehicle’s immobilizer system.
• In case of attaching any metal objects to
the immobilizer key, it may not start the
engine.
KEY NUMBER:
CAUTION
The immobilizer key is a sensitive
electronic instrument. To avoid damaging the immobilizer key:
• Do not expose it to impacts, moisture or high temperature such as by
leaving it on the dashboard under
direct sunlight.
• Keep the immobilizer key away
from magnetic objects.
Keys: 8
15
1-3
BEFORE DRIVING 55KS0-74E
55KS0-74E
Immobilizer System (Diesel Engine)
This system is designed to help prevent
vehicle theft by electronically disabling the
engine starting system.
The engine can be started only with your
vehicle’s original immobilizer ignition key
which has an electronic identification code
programmed into it. The key communicates the identification code to the vehicle
when the key is turned to the
“ON” position. If you need to makespare keys, see
your MARUTI SUZUKI dealer. The vehicle
must be programmed with the correct identification code for the spare keys. A key
made by an ordinary locksmith will not
work.
If the immobilizer system light service vehicle soon (SVS) light (1) for diesel engine
blinks
when the ignition switch is in the
“ON” position, there my be something
wrong with your key or with the immobilizer
system. Ask your MARUTI SUZUKI dealer
to inspect the system.
NOTE:
• If you lose your immobilizer ignition key,
see your MARUTI SUZUKI dealer as
soon as possible to have the lost one
deactivated, then have the new key
made by them.
• If you own other vehicles with immobilizer keys, keep those key away from the
ignition switch when using your
MARUTI SUZUKI, or the engine may not
be started because they may interfere
with you MARUTI SUZUKI immobilizer
system.
• In case of attaching any metal objects to
the immobilizer key, it may not start the
engine.
Ignition Key Reminder (if equipped)
A buzzer sounds intermittently to remind
you to remove the ignition key if it is in the
ignition switch when the driver’s door is
opened.
CAUTION
The immobilizer key is a sensitive
electronic instrument. To avoid damaging the immobilizer key:
• Do not expose it to impacts, moisture or high temperature such as
on the dashboard under direct sunlight.
• Keep the immobilizer key away
from magnetic objects.
Door Locks: 3, 5, 8
16
1-4
55KS0-74E BEFORE DRIVING
55KS0-74E
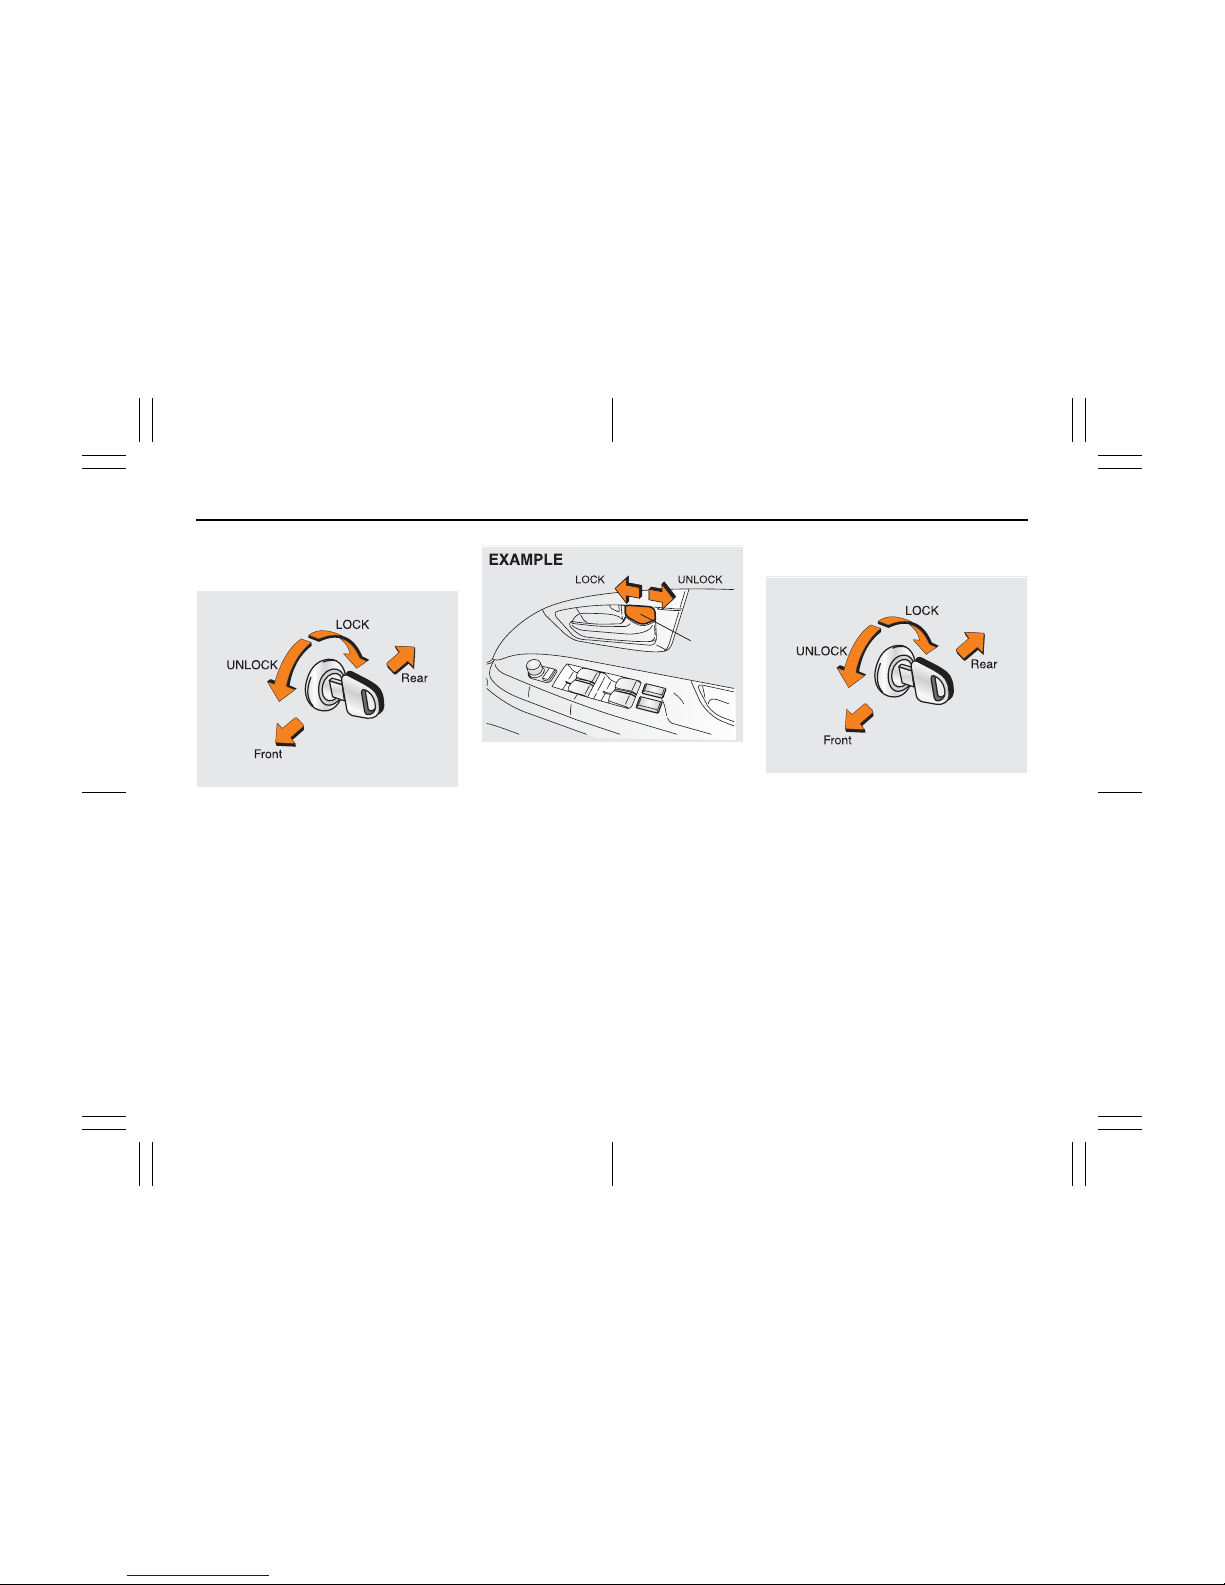
Door Locks
Side Door Locks
60B008
To lock a front door from outside the vehicle:
• Insert the key and turn the top of the key
toward the rear of the vehicle, or
• Tur n the lock knob forward and hold the
door handle up as you close the door.
To unlock a front door from outside the
vehicle, inser t
the key and turn the top of
the key toward the front of the vehicle.
55KS003
To lock a door from inside the vehicle, turn
the lock knob forward. Tu r n the lock knob
rearward to unlock the door.
To lock a rear door from outside the vehicle, turn the lock knob forward and close
the door.
NOTE:
Be sure to hold the door handle up when
you close a locked front door, or the door
will not remain locked.
Central Door Locking System
(if equipped)
60B008
Yo u can lock and unlock all doors (except
trunk lid) simultaneously by using the key
in the front door locks.
To lock all doors simultaneously, insert the
key in the front door lock and turn the top
of the key toward the rear of the vehicle
once.
To unlock all doors simultaneously, insert
the key
in a front door lock and turn the top
of the key toward the front of the vehicle
once.
Door Lock
Knob
Door Locks: 3, 5, 8
17
1-5
BEFORE DRIVING 55KS0-74E
55KS0-74E
55KS004
Yo u can also lock or unlock all doors
(except trunk lid) by depressing the front or
rear of the switc h respectively.
Child-Proof Locks (rear side door)
55KS029
As illustrated, a child-proof lock is provided
for both rear doors. When the lock lever is
in position (1), the child-proof lock is
locked, and when in position (2), the childproof lock is unlocked. When the childproof lock is in the locked position, the rear
door cannot be opened from the inside
even if the inside door lock is unlocked but
can be opened from the outside.
Keyless Entry Cum Alarm
System (if equipped)
81A184
The Keyless Entry cum Alarm System has
two basic functions.
1. Keyless Entry
2. Alarm System
Keyless Entry
Yo u can lock / unlock all doors simultaneously by operating the transmitter near the
vehicle.
• To lock all doors, press “LOCK” button
once. All indicator lights will flash once
when doors are locked.
• To unlock all doors, press the “UNLOCK”
button once. All indicator lights will flash
twice when doors are unlocked.
NOTE:
- Individual doors can also be
UNLOCKED anytime by
using their respective
“Door Lock Knob” inside
the vehicle.
- If child proof locks are in
locked position, rear doors
cannot be opened from
inside.
WARNING
Be sure to place the child-proof lock
in the locked position whenever children are seated in the rear.
Door Locks: 3, 5, 8
18
1-6
55KS0-74E BEFORE DRIVING
55KS0-74E
NOTE:
• The operating distance of the keyless
entry system transmitter is about 20
meters, but this may vary depending on
the condition of transmitter’s battery and
surroundings, especially near other
transmitting devices such as radio towers.
• The door locks cannot be operated with
the transmitter if the ignition key is
inserted in the key cylinder or if any door
is open.
• When any door is open, the vehicle can
not be locked through transmitters. Be
sure to close the doors and windows
before locking.
• If you lose any of the transmitters/keys,
contact your MARUTI SUZUKI
Autho-
rized workshop
as soon as possible for
erasing the transmitter ID from vehicle
controller memory. In case you need a
new transmitter, place an order with your
dealer.
Alarm System
The Alarm System has two basic modes of
operation.
VALET MODE
In Valet mode all the Security Alarm features
of the system like arm/disarm, trigger are
deactivated. In this mode, system will work
as a Keyless Entry only. When the vehicle is
given for servicing or valet parking, turn the
system into Valet mode.
ALARM MODE
The Alarm mode is designed to protect
your vehicle from unauthorised entry. It
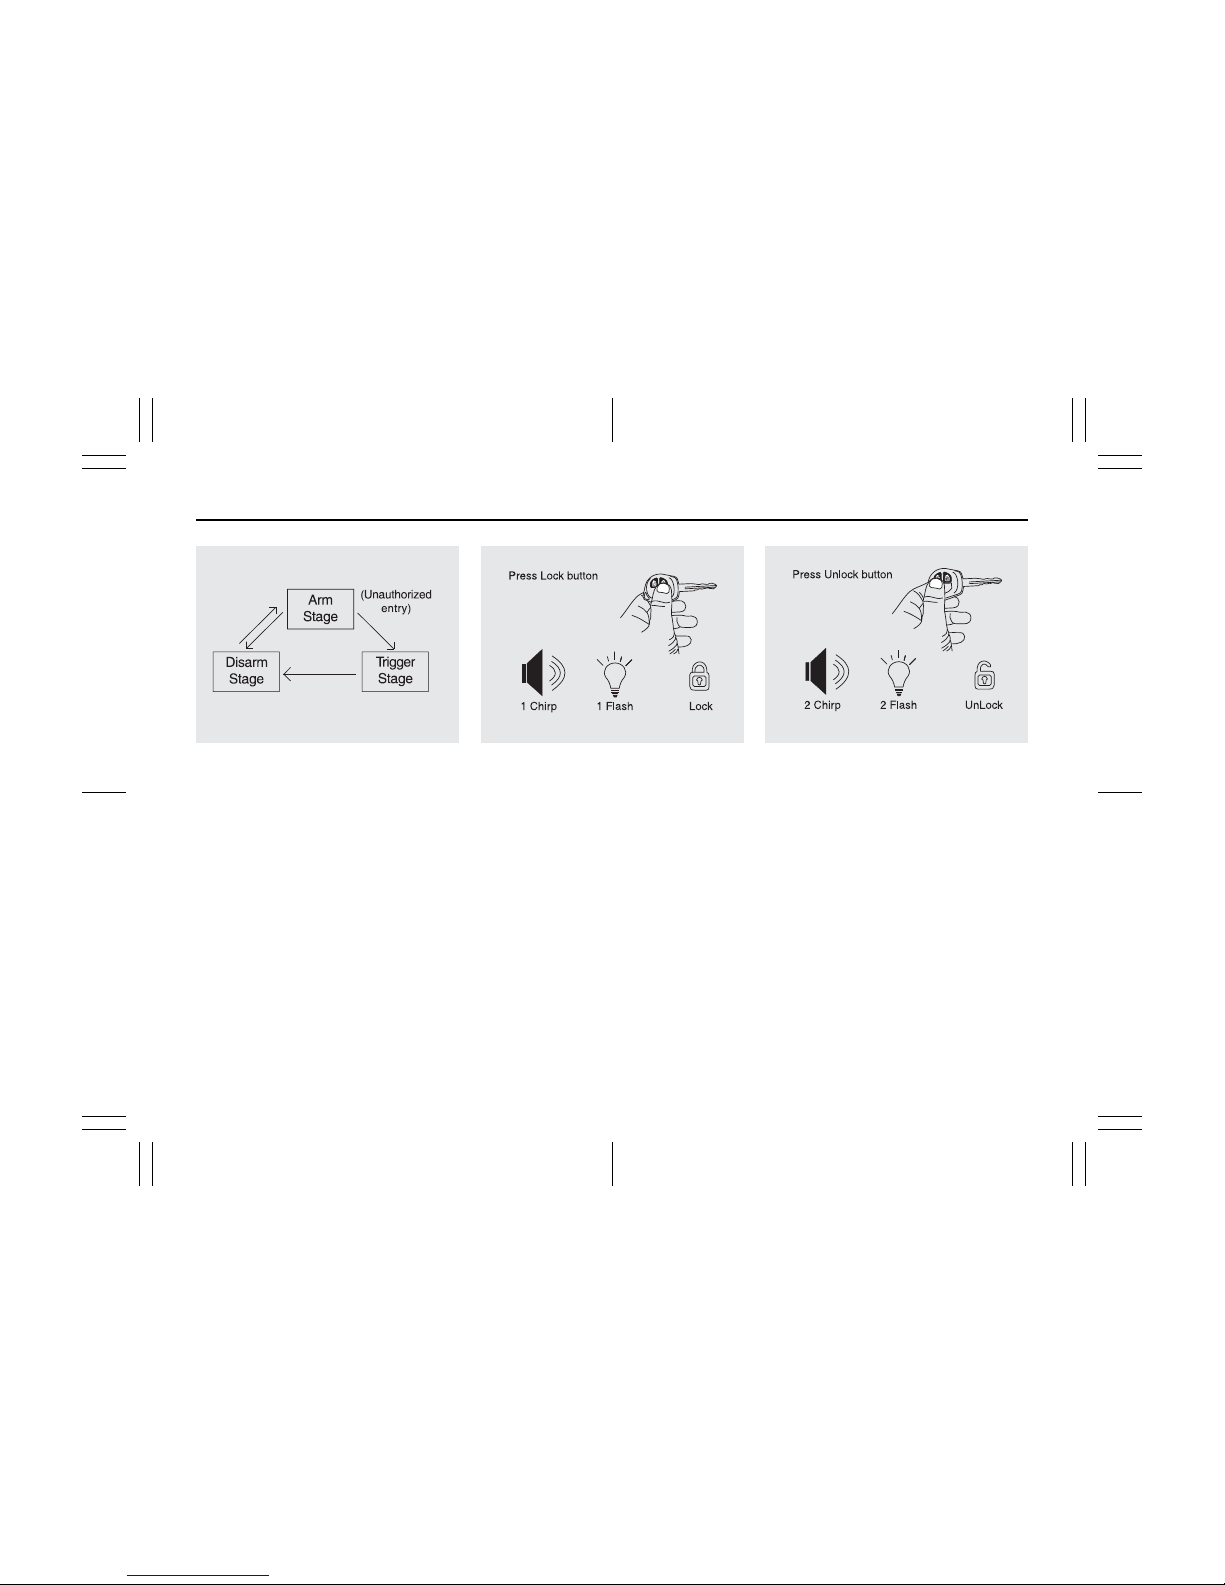
operates in three stages:
First : Arm Stage
Second : Trigger Stage
Third : Disarm Stage.
CAUTION
The transmitter is a sensitive electronic instrument. To avoid damaging
the transmitter:
• Do not expose it to impacts, moisture, dust or high temperature such
as by leaving it on the dashboard
under direct sunlight.
• Do not tamper with internal parts.
• Keep the transmitter away from
magnetic objects such as a television.
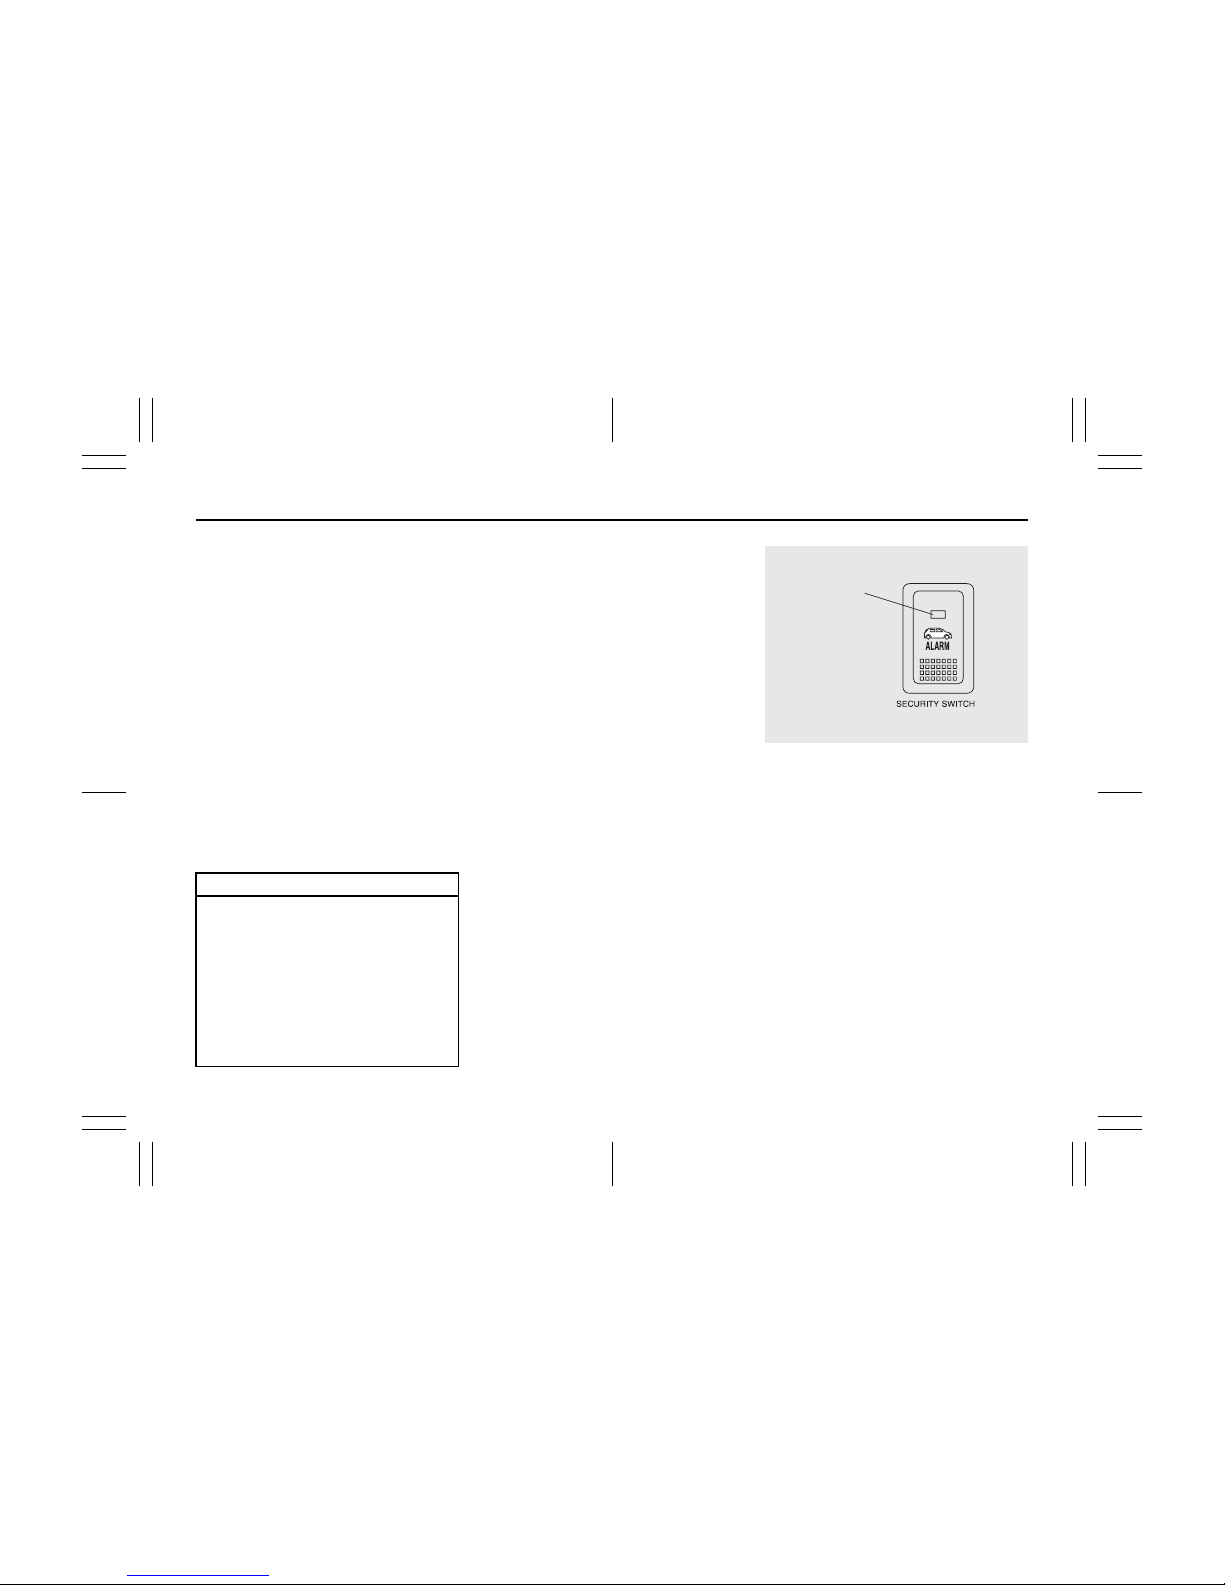
Warning LED
Door Locks: 3, 5, 8
19
1-7
BEFORE DRIVING 55KS0-74E
55KS0-74E
Arm Stage
In Arm Stage, your vehicle is monitored for
any unauthorized entry. In order to arm:
press the key LOCK button once:
As response to locking/arming:
1) Doors will get locked and vehicle will
get armed. This is indicated by one
siren chirp & one light flash of all indicator lights.
2) Visible theft waring LED on security
switch will flash slowly.
NOTE:
1. Three siren chirps and one light flash of
all indicator lights will indiate that hood
is open. However locking and arming of
all doors takes place.
2. Be sure to close the doors and windows
before locking/arming the vehicle.
3. System will not Lock/Arm in following
conditions:
(a) If any of doors is open (expect Hood).
(b) If Key is in key cylinder.
Tri gge r St age
In the event of any unauthorized entry
(without unlocking/disarming) in the vehicle, the alarm
triggers and all indicator
lights flash. The triggering of the alarm is in
two stages. First acting as a warning to the
intruder and then full blast drawing the surrounding attention. In order to bring the
system to disarm stage, press UNLOCK
button on the key or enter the Emergency
Pin. (Described in
Emergency disarm sec-
tion)
Disarm Stage
System should be brought in Disarm Mode
wihile you are entering the vehicle. In order
to disarm: Press the key UNLOCK button
once.
As response to unlocking/disarming:
1) Doors will unlock and vehicle will disarm. This is indicated by two siren
chirps and two light flashes of all indicator lights.
2) Visible theft warning LED on security
switch will flash faster than in arm stage
indicating Aut o rearm (described in
auto rearm section)
Door Locks: 3, 5, 8
20
1-8
55KS0-74E BEFORE DRIVING
55KS0-74E
GENERAL FEATURE
Illuminated Entry
When vehicle is unlocked, the room lamp
will turn ON to facilitate illuminated entry
into the vehicle. If no door is opened in
about 15 seconds of above operation,
room lamp will fade out.
If any door is opened after 15 seconds, the
room lamp turns ON again and after 15
seconds of closing
all doors room lamp will
fade out.
If within 15 seconds after closing all the
doors the driver inserts the key into the key
cylinder, then the room lamp will fade out.
Illuminated Exit
When key is removed from the key cylinder,the room lamp will turn ON to facilitate
illuminated exit. If no door is opened in
about 15 seconds of key removal from key
cylinder, the room lamp will fade out.
When door is opened to ex it the vehicle,
the room lamp will turn ON again
(if it has
turned OFF after 15 seconds of key
removal from key cylinder) and will turn
OFF after 15 seconds of closing all the
doors.
If within 15 seconds of all doors closure,
vehicle is locked by pressing the LOCK
button, the room lamp will fade out.
NOTE: Room lamp will fade out gradually
approximately in 2 seconds.
Mute Lock/Unlock
To Arm/Disarm the vehicle without siren
chirps use this function.
a) Press and release the Key LOCK &
UNLOCK buttons simultaneously.
b) Press and release Key LOCK or
UNLOCK button for desired function.
Example: To Lock / arm the system without
the Siren chirp sound, press and release
the Key LOCK & UNLOCK button simultaneously, then press the Key LOCK button
once.
Auto Rearm
In case of accidental Unlock/Disarm of
vehicle through transmitter, vehicles will
automatically Lock & Arm without any indication, if no door is opened till about 30
seconds.
NOTE : If the vehicle is in Valet Mode, system will only Lock the vehicle.
Radio Frequency Lock Out
Transmitter function Lock/Unlock/Panic will
not work when Key is inside key cylinder.
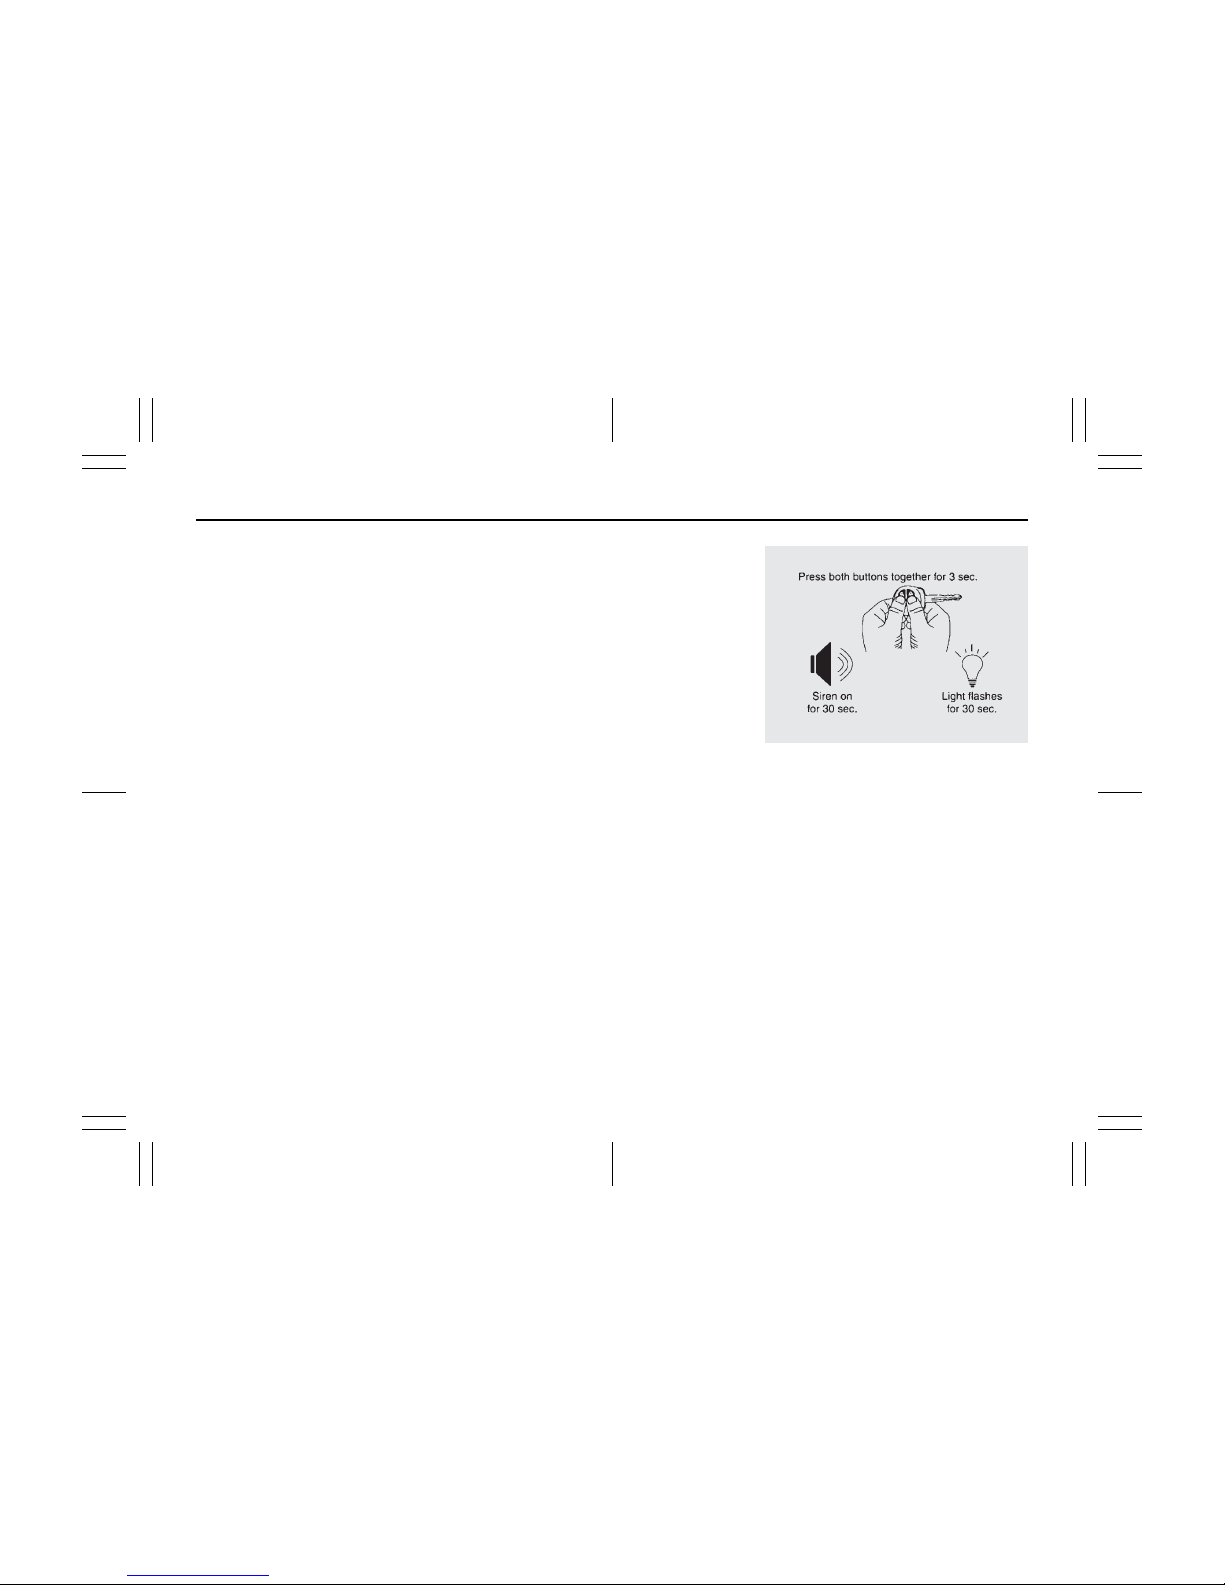
Panic Alarm (Car Locator)
Pani c Alarm feature can be used to bring
the surrounding attention to the vehicle or
to locate the vehicle in congested parking
area.
1) Press and hold the Key LOCK &
UNLOCK button simultaneously for 3
seconds or more.
2) Panic alarm will be activated and siren
will sound and indicator lights will flash
for 30 seconds.
3) Press
and release the Key LOCK &
UNLOCK button simultaneously to cancel the Panic alarm.
Door Locks: 3, 5, 8
Windows: 3, 8
21
1-9
BEFORE DRIVING 55KS0-74E
55KS0-74E
Flashing LED Status
The flashing LED always reflects the status
of the system as following.
Intrusion Alert
The system gives a report if it has been
intruded in your absence. Four chirps are
given when UNLOCK button is pressed
after an intrusion.
PROGRAMMABLE FEATURES
Systems have some features which can be
programmed by user according to their
choice.
Drive Lock Mode
Drive lock mode can be programmed by
SPEED LOCK or can be turned OFF. In
case drive lock mode is programmed to
SPEED LOCK, all the vehicle doors will
lock when vehicle attains the speed of 20
Km/hr.
NOTE:
In case of SPEED LOCK mode, if any door
is opened while driving, it will get cancelled. Once vehicle speed crosses 20
Km/hr, the LED on security switch will blink
for 5 seconds as indication of door open.
Drive Unlock Mode
Drive unlock can be programmed by Key or
can be turned OFF. When
programmed to
Key, turning Ignition ON-OFF, then removing the key from the key cylinder will unlock
all the doors. In case if drive unlock is programmed to OFF then no door will unlock
by removing key from key cylinder.
Siren Chirp ON/OFF feature
Siren Chirps can be programmmed to ON
or OFF. When siren chirp feature is disabled, siren will not chirp after Arm/Disarm
by LOCK/UNLOCK button.
Shock Sensor feature
This is a very important feature of security
system. It enables protection of your vehicle against any major impact. If anybody
tries to intrude into the vehicle, the alarm
triggers. The triggering of the alarm is in
two stages, first acting as a warning to the
intruder and then at full blast. The
sensitivity of shock sensor can be adjusted as
desired by the user.
SYSTEM CONDITION LED STATUS
Disarmed condition LED does not glow
Armed condition Slow Flashes of LED
Auto Arming Condition Fast Flashes
Diagnostic
report
Visual-LED Sound
Built in shock
sensor
Triggered
2 Flashes Four Chirps
Door/Trunk/
Hood Intrusion
3 Flashes Four Chirps
Ignition 5 Flashes Four Chirps
Windows: 3, 8
22
1-10
55KS0-74E BEFORE DRIVING
55KS0-74E
PROCEDURE TO PROGRAM FEATURE
Programming Drive Lock Mode
a) Open the Driver Door of your vehicle.
b) With your vehicle key in the Key
cylinder, turn Ignition ON and then
switch it OFF.
c) Press and release the Security switch
One time.
d) Press and hold the Security switch.
e) One chirp sound confirms entry into
Drive Lock programming mode.
f) Press the Key LOCK button (while
holding the
Security switch), a single
chirp sound confirms mode changed to
speed lock.
g) Two-Siren chirp sound confirms Drive
lock mode OFF.
h) Release the Security switch.
i) Turn the Ignition ON.
Programming Drive Unlock Mode
a) Open the Driver Door of your vehicle.
b) With your vehicle key in the Key
cylinder, turn Ignition ON and then
switch it OFF.
c) Press and release the Security
switch
two times.
d) Press and hold the Security switch.
e) Two-chirp sound confirms entry into
Drive unlock programming mode.
f) Press the Key Lock button (while
holding the Security switch), a single
chirp sound confirms the mode
changed to key Unlock.
g) Two-siren chir p sound confirms the
mode changed to Drive Unlock mode
OFF.
h) Release the Security switch.
i) Turn the
Ignition ON.
Programming Siren Chirp ON/OFF
a) Open the Driver Door of your vehicle.
b) With your vehicle key in the Key
cylinder, turn Ignition ON and then
switch it OFF.
c) Press and release the Security switch
Three times.
d) Press and hold the Security switch.
e) Three-chirp sound confirms entry into
Siren Chirp ON/OFF programming
mode.
f) Press the Key Lock button (while
holding
the Security switch), a single
chirp sound confirms the mode
changed to Siren Chirp ON.
g) Two-Siren chirp sound confirms the
mode changed to Siren Chirp OFF.
h) Release the Security switch.
i) Turn the Ignition ON.
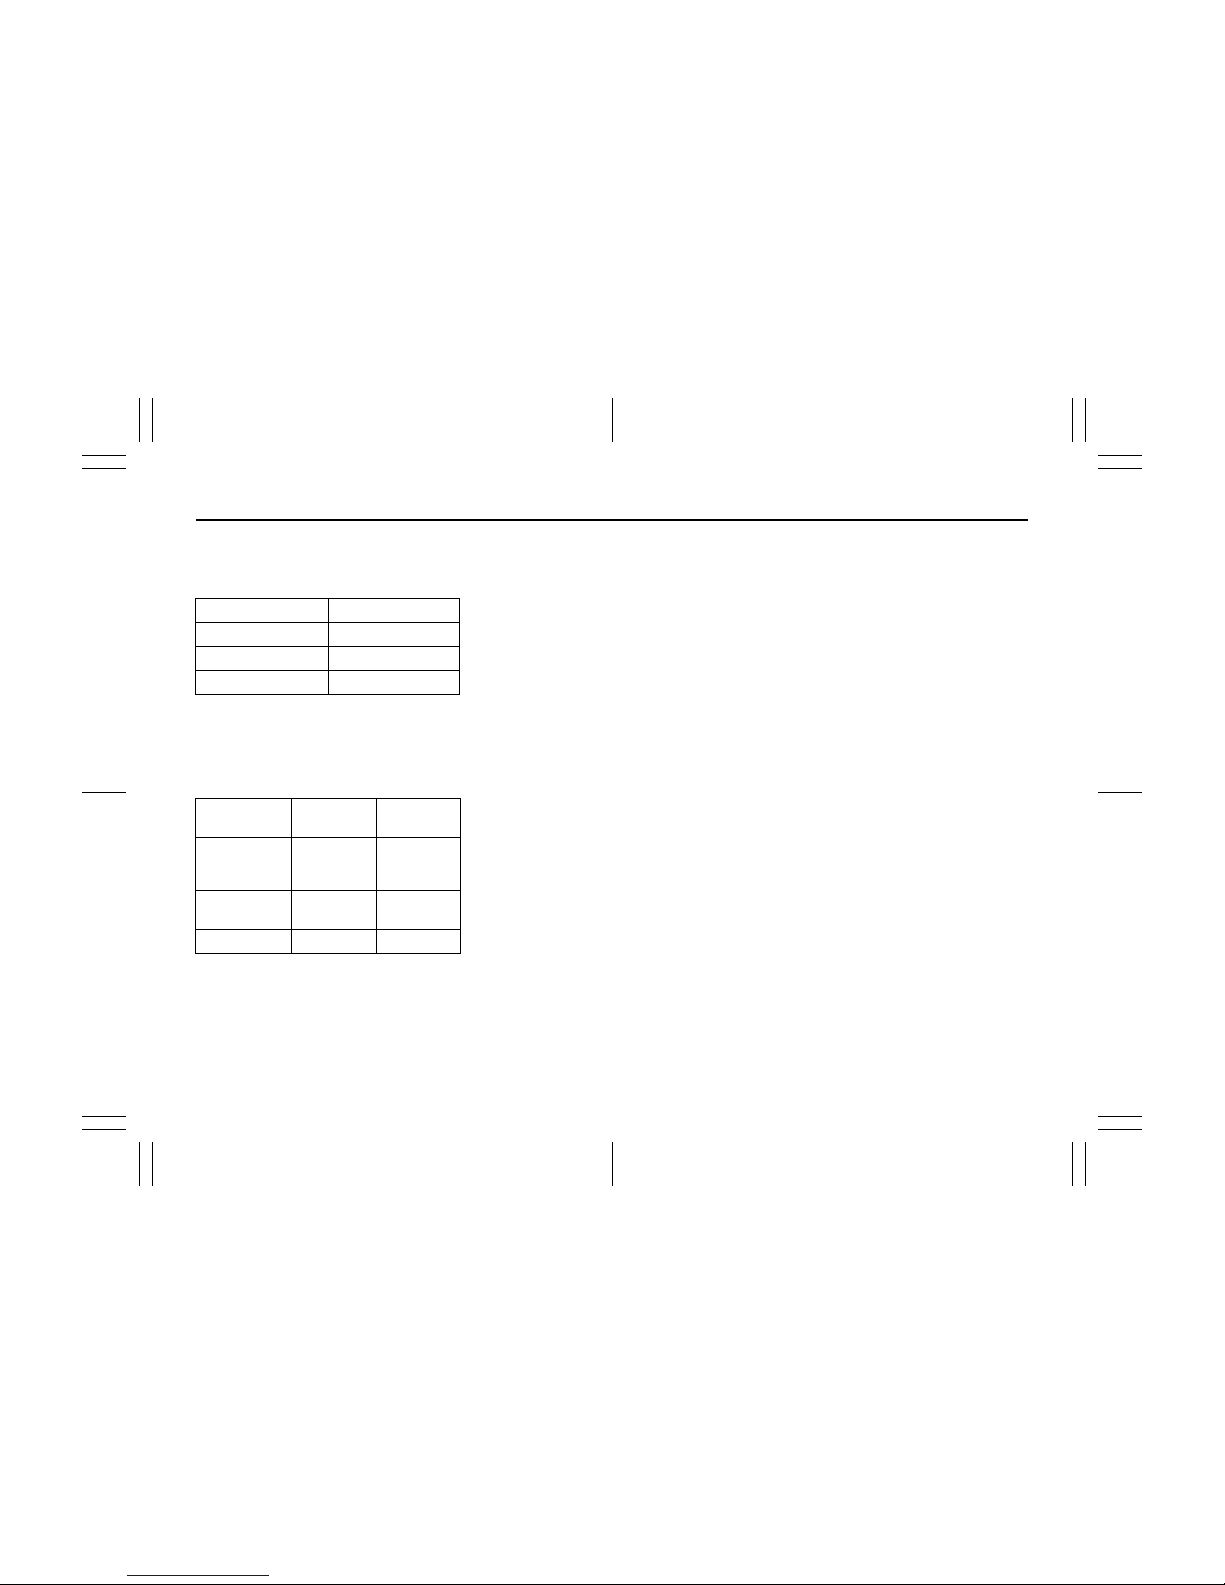
No. Feature 1 Chirp 2 Chirps Default
1. Drive Lock Mode Speed OFF Speed
2. Drive Unlock Mode Key OFF Key
3. Siren chirp ON/OFF ON OFF ON
4. Shock Sensor ON/OFF ON OFF ON
Windows: 3, 8
23

1-11
BEFORE DRIVING 55KS0-74E
55KS0-74E
Programming Shock Sensor ON/OFF
a) Open the Driver Door of your vehicle.
b) With your vehicle key in the Key
cylinder, turn Ignition ON and then
switch it OFF.
c) Press and release the Security switch
Four times.
d) Press and hold the Security switch.
e) Four-chirp sound confirms entry into
Shock Sensor ON/OFF programming
mode.
f) Press the Key Lock button (while
holding the Security
switch), a single
chirp sound confirms the mode
changed to shock sensor ON.
g) Two-Siren chirp sound confirms the
mode changed to shock sensor OFF.
h) Release the Security switch.
i) Turn the Ignition ON.
Shock Sensor Sensitivity
Adjustment via Key
Full Blast Adjustment
Full Blast can be adjusted in 16 levels as
mentioned below.
a) Press UNLOCK button on Key to
Unlock/ Disarm the System.
b) Press
LOCK button on Key to Lock/Arm
the System.
c) Within 5 seconds press LOCK &
UNLOCK button simultaneously for at
least 2 seconds Siren will give long
chirp to confirm entry into sensitivity
Adjustment mode.
i) Press Key LOCK button to adjust the
sensitivity one step lower. Siren will
give one chirp every time LOCK
button is pressed
till at level 1 where
it will give a long chirp. When adjust
to level 1, Full Blast will turn OFF
ii) Press Key UNLOCK button to adjust
the sensitivity one step higher. Siren
will give two chirps every time
UNLOCK button is pressed till at
level 16 where it will give a long
chirp.
Pre-warn Adjustment
Pre-warn
can be adjusted in 16 levels as
mentioned below:
a) Press LOCK button on Key to Lock/Arm
the System
b) Press UNLOCK button on Key to
UNLOCK/ Disarm the System
c) Within 5 seconds press LOCK &
UNLOCK button simultaneously for at
least 2 seconds Siren will give Long
chirp to confirm entry into Sensitivity
Adjustment Mode.
i) Press LOCK
button to adjust the
sensitivity one step lower. Siren will
give one chirp every time LOCK
button is pressed till at level 1 where
it will give a long chirp. When adjusts
to level 1, prewarn will turn OFF.
ii) Press UNLOCK button to adjust the
sensitivity one step higher. Siren will
give two chirps eve ry
time UNLOCK
button is pressed till at level 16
where it will give a long chirp.
Mirrors: 3, 8
Seat Adjustment: 3
24

1-12
55KS0-74E BEFORE DRIVING
55KS0-74E
Mode Programming (Valet/Alarm)
The valet mode can be programmed as
follows:
i) Close the driver door.
ii) Tu r n Ignition ON-OFF quickly.
iii) Press and hold Security switch for 3
seconds minimum.
iv) Change to valet mode is confirmed by
LED ON for 1 minute.
The alarm mode can be programmed as
follows:
Repeat step (i)-(iii) to
program the system
to alarm mode.
Change to Alarm mode will be confirmed
by one long siren chirp and LED OFF.
Program Customer Pincode
(Personalised Pincode)
The Personalised 4-digit number can be
changed from the factory default to ensure
Personalised Security.
Pin code entry
a) Disarm the system.
b) Open the Driver Door.
c) Turn Ignition ON then OFF.
d) Within 5 seconds
press and release
security switch 5 times. A short chirp
followed by long chirps confirms entry
into Pin Code programming mode.
e) Press LOCK button on Key, after a
single chirp enter the First digit (within
1-9) by pressing security switch (for e.g.
to enter 2 press and release security
switch two times).
f) Press
LOCK button on Key , after two
chirps enter the Second digit (within 1-
9) by pressing security switch.
g) Press LOCK button on Key, after 3
chirps enter the Third digit (within 1-9)
by pressing security switch.
h) Press LOCK button on Key, after 4
chirps enter the Fourth digit (within 1-9)
by pressing security
switch.
Emergency Disarm by personalised pin
code
The Personalised 4- Digit Pin Code acts as
a secret Key, to Emergency Disarm the
vehicle.
a) Tu r n the Ignition ON, OFF and then ON.
b) Enter the First digit (for e. g. to enter 2
press and release security switch twice)
c) Tu r n the Ignition OFF then ON.
d) Enter
the Second digit.
e) Tur n the Ignition OFF and then ON.
f) Enter the third Digit.
g) Tur n the Ignition OFF and then ON
h) Enter the Last Digit.
i) Tur n the Ignition OFF and then ON.
The vehicle will get disarmed.
Note: The default pin will be provided by
the dealer at the time of delivery. It is recommended to personalize the pin for
increased security. The pin must be
remembered as it is not possible to retrieve
a lost pin.
Seat Adjustment: 3
25
1-13
BEFORE DRIVING 55KS0-74E
55KS0-74E
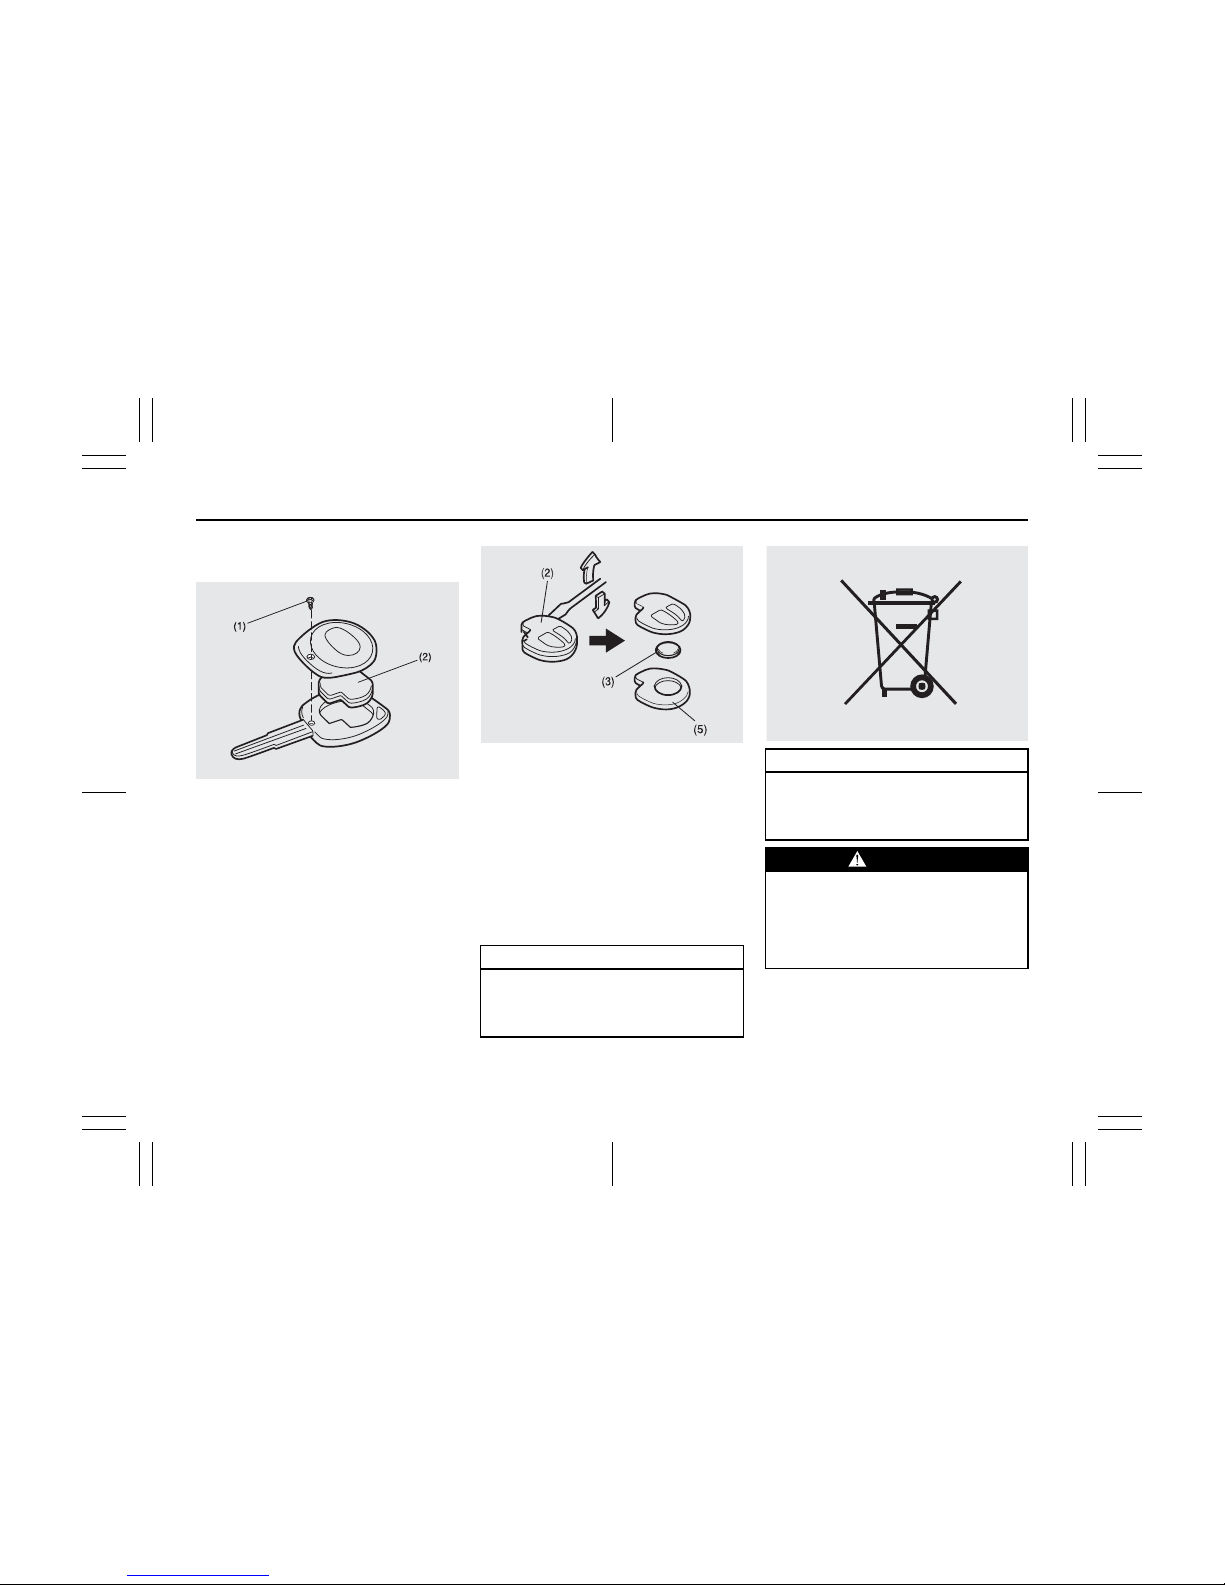
Transmitter battery
Replacement of the Battery
If the transmitter battery gets discharged,
replace the battery with a new one.
To replace the battery of the transmitter:
1) Remove the screw (1), and open the
transmitter cover.
2) Remove the transmitter (2).
3) Put the edge of a flat blade screw driver in
the slot of the transmitter (2)
and pry it
open.
4) Replace the battery (3) (Lithium disc type
CR1620) so that its +ve terminal faces the
bottom cover of the tranmitter (5).
5) Close the transmitter and install it into the
transmitter holder.
6) Close the transmitter cover, install and
tighten the screw (1).
7) Make sure the door locks
can be operated
with the transmitter.
Note: Normal battery life is approximately 2
years, but varies depending on usage. It is
advisable to get battery replaced from
MARUTI SUZUKI Authorized workshop.
CAUTION
Do not remove the screw from the key
Unnecessarily as it damages the screw
head. Kindly replace the screw once
the transmitter battery is changed.
CAUTION
Dispose off the used battery properly
according to applicable rules or regulations. Do not dispose off lithium batteries with ordinary household trash.
WARNING
Swallowing a lithium battery may cause
serious internal injury. Do not allow
anyone to swallow a lithium battery.
Keep lithium batteries away from children and pets. If swallowed, contact a
physician immediately.
Adjustable Head Restraints: 3
Seat Belts and Child Restraint Systems: 3
26
1-14
55KS0-74E BEFORE DRIVING
55KS0-74E
TROUBLESHOOTING
SYMPTOMS PROBABLE CAUSES REMEDIES
Transmitter function (Unlock/Lock/
Panic)not working
1. Battery of the transmitter is weak.
2. Transmitter is exposed to water or it is
wet.
3. D/L or Dome fuse for controller is blown
in the vehicle.
4. In case if any door is open or door
sensor is shorted with the body ground,
remote will not
activate the central
locking/ alarm system.
1. Check the battery.
2. Dry the transmitter and check it.
3. Check and replace the D/L or Dome
fuse.
4. Check if all doors are properly closed
and door switch functioning is O.K.
Operation distance of the transmitter is
less than 20m but still transmitter (Unlock/
Lock/Panic)
is not working
1. Battery of the transmitter is weak.
2. Strong RF interference. (e.g. Radio
Towe r s , High Voltage Transmission line
near by)
1. Check the battery.
2. Drive the vehicle away from the
particular spot and re-test the control
distance.
It is difficult to activate or deactivate the
system in certain area using
the
transmitter.
1. The strong interference caused by
excessive RF activity in a par ticular
area
1. The interference is temporary and only
while the vehicle is in that area.
Alarm is not triggered eve n if any door(s)/
hood/trunk opened in arm stage.
1. The contact point of the hood or door (s)
or trunk
switch is faulty.
2. The connection of the hood or door(s) or
trunk switch is loose.·
1. Replace the defective Switch.
2. Make proper connection.
Siren does not sound when alarm is
triggered.
1. The connection of the siren wire is
loose.
2. Siren is faulty.
1. Make proper connection.
2. Change the siren.
Seat Belts and Child Restraint Systems: 3
27
1-15
BEFORE DRIVING 55KS0-74E
55KS0-74E
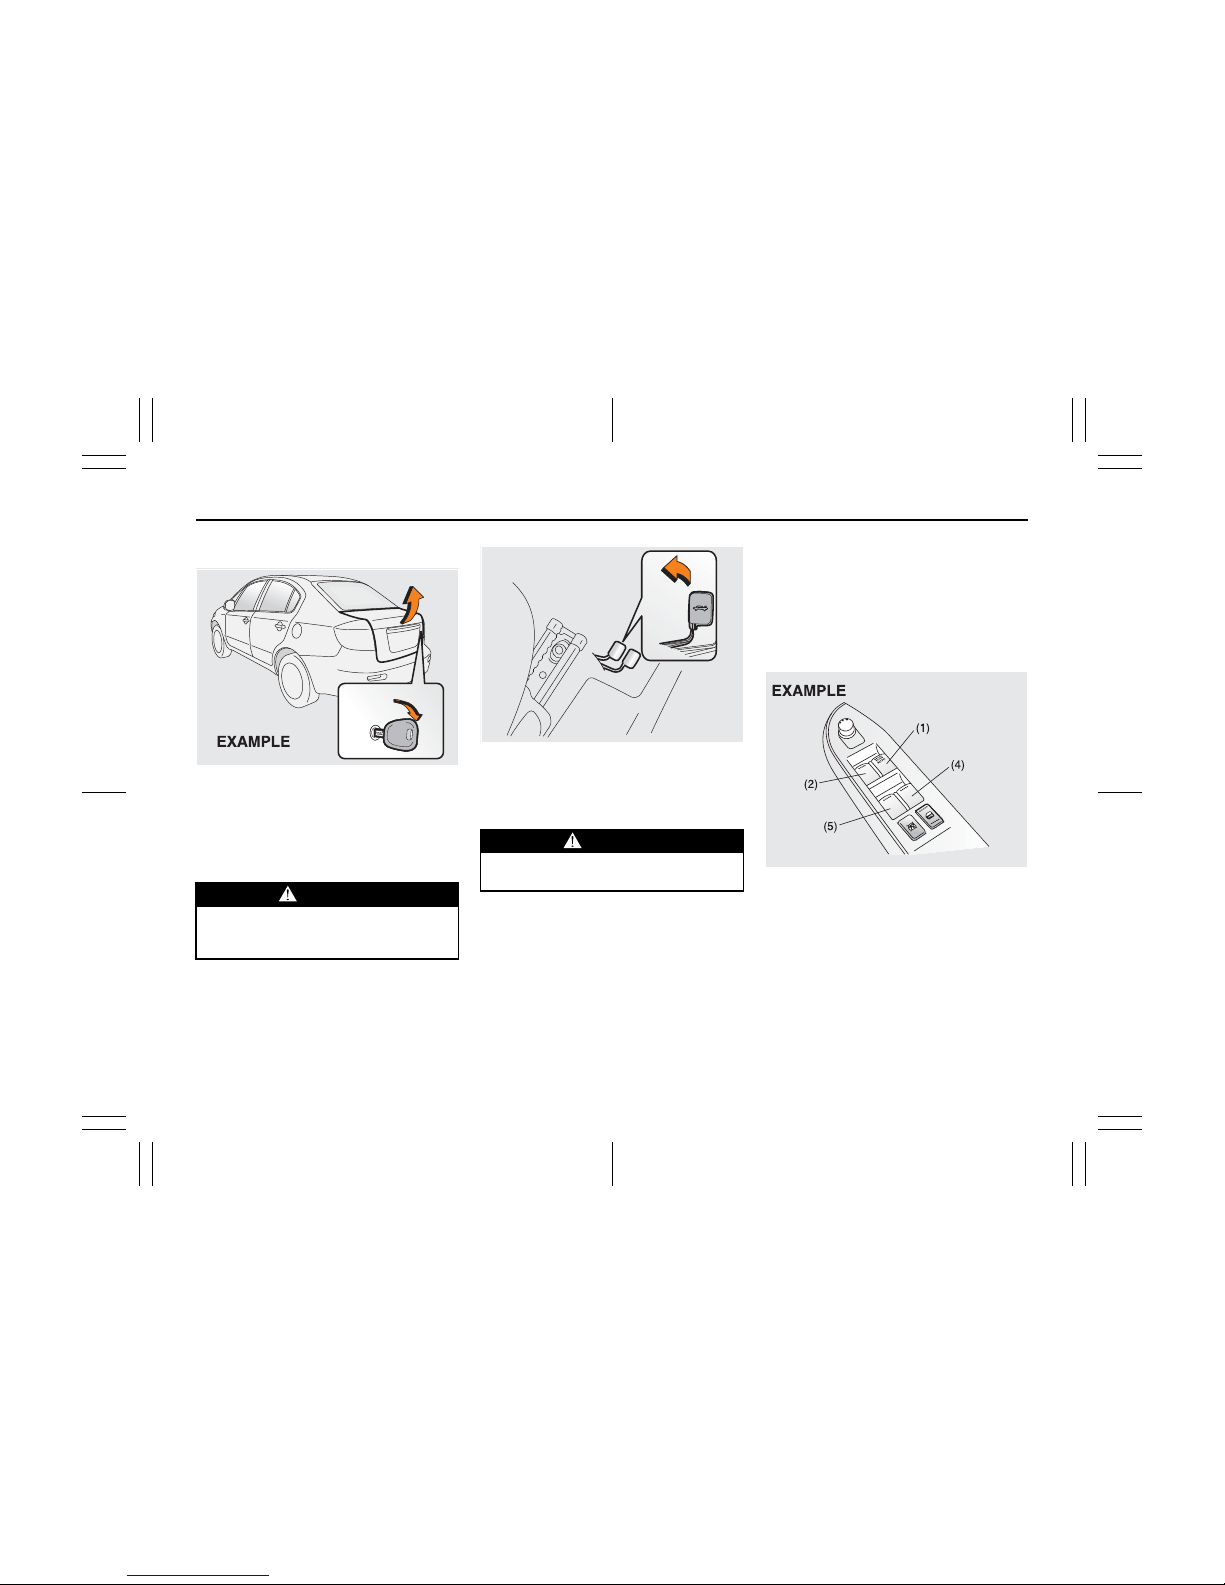
Tru n k Li d
55KS005
The vehicle is equipped with a trunk lid
keylock. Yo u can open the trunk lid by
using the key in the trunk lid lock. To open
the trunk lid, insert the key and turn it
clockwise to unlatch and lift the trunk lid.
55KS006
Yo u can unlock the lid by pulling the
release lever located to the outboard side
of the driver’s seat.
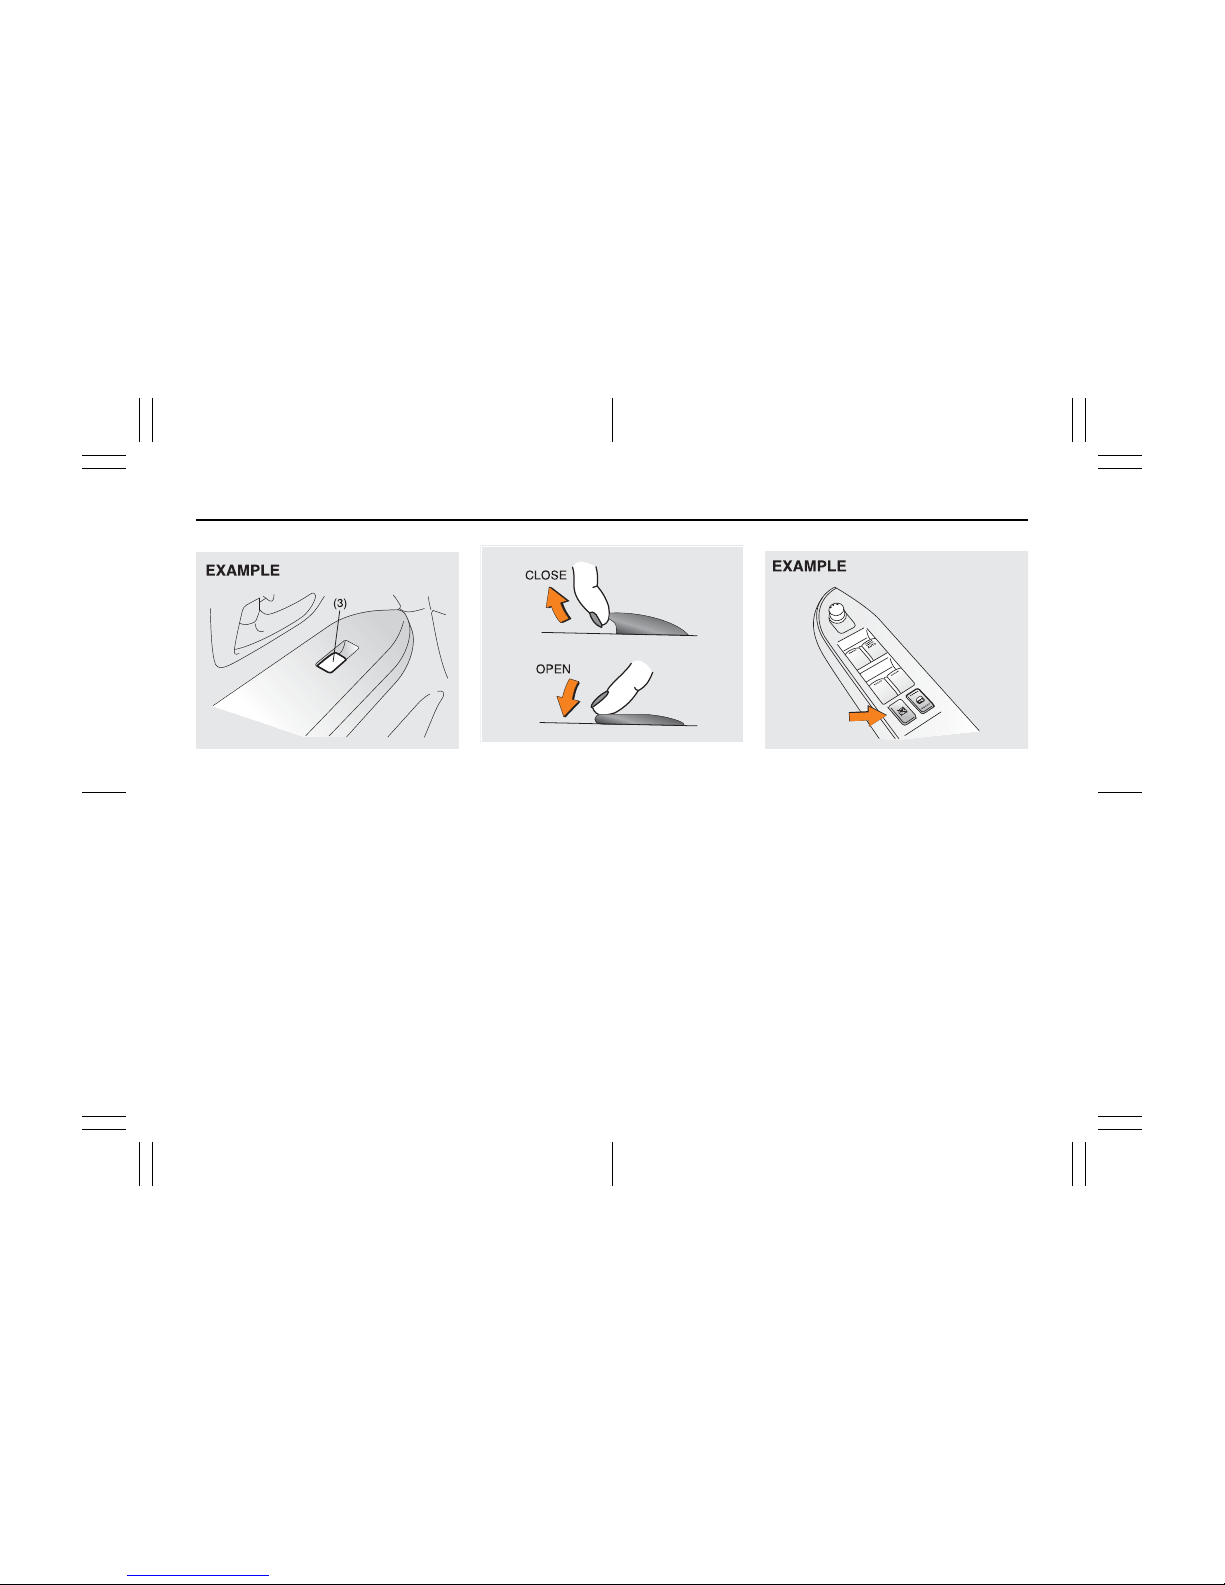
Windows
Electric Window Controls
(if equipped)
The electric windows can only be operated
when the ignition switch is in the “ON” position.
Driver’s side
55KS007
The driver’s door has a switch (1) to operate the driver’s window, and a switch (2) to
operate the front passenger’s window or
there are switches (4), (5), to operate the
rear left and right passenger windows,
respectively.
WARNING
Always make sure that the trunk lid is
fully opened before using the luggage compartment.
WARNING
Always make sure that the trunk lid is
closed and latched securely.
Seat Belts and Child Restraint Systems: 3
28
1-16
55KS0-74E BEFORE DRIVING
55KS0-74E
Passenger’s door
55KS008
The passenger’s door has a switch (3) to
operate the passenger’s window .
81A009
To open a window, push the top part of the
switch and to close the window lift up the
top part of the switch.
The driver’s window has an “auto-down”
feature for added convenience (at toll
booths or drive-through restaurants, for
example). This means you can open the
window without holding the window switch
in
the “Down” position. Press the driver’s
window switch completely down and
release it. To stop the window before it
reaches the bottom, pull the switch up
briefly.
Lock switch
55KS009
The driver’s door also has a lock switch for
the passenger’s window(s). When you
push in the lock switch, the passenger’s
window(s) can not be raised or lowered by
operating any of the switches (2), (3), (4) or
(5). To restore normal operation, release
the lock switch by pushing again.
Seat Belts and Child Restraint Systems: 3
29
1-17
BEFORE DRIVING 55KS0-74E
55KS0-74E
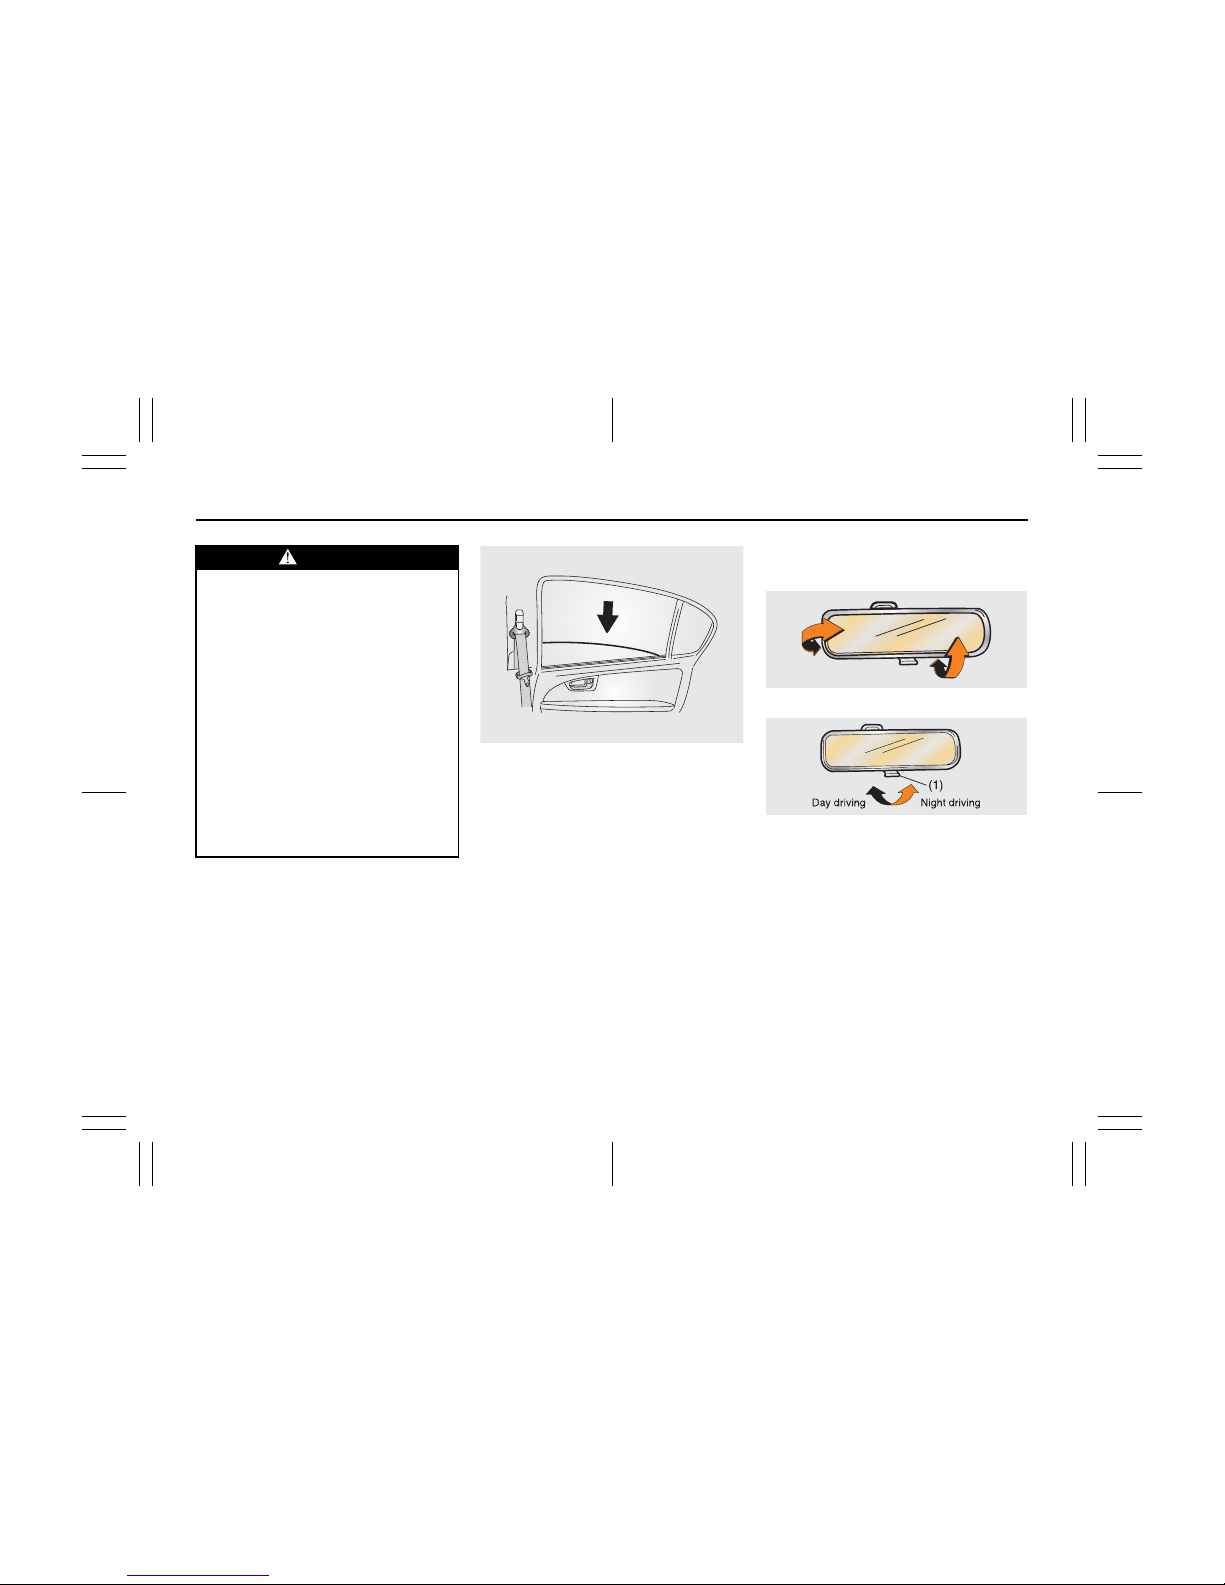
NOTE:
If you drive with one of the rear windows
open, you may hear a loud sound caused
by air vibration. To reduce the sound, open
the driver’s or front passenger’s window, or
narrow the rear window opening.
55KS033
NOTE:
The rear side door windows are not
designed to open fully. They can be
opened about 2/3 of the way down.
Mirrors
Inside Rearview Mirror (if equipped)
65D410
65D409
Yo u can adjust the inside rearview mirror
by hand so as to see the rear of your vehicle in the mirror. To adjust the mirror, set
the selector tab (1) to the day position,
then move the mirror up, down or sideways
by hand to obtain the best view.
When driving at night,
you can move the
selector tab to the night position to reduce
glare from the headlights of vehicles
behind you.
WARNING
• You should always lock the passenger’s window operation when there
are children in the vehicle. Children
can be seriously injured if they get
part of their body caught by the
window during operation.
• To avoid injuring an occupant by
window entrapment, be sure no
part of the occupant’s body such
as hands or head is in the path of
the electric windows when closing
them.
• Always remove the ignition key
when leaving the vehicle even if a
short time. Also do not leave children alone in a parked vehicle.
Unattended children could use the
electric window switches and get
trapped by the window.
Seat Belts and Child Restraint Systems: 3
30
 Loading...