

Page 1
EN | FR | DE | ES | IT | NL | FI | SV
Page 2

Page 3
SUUNTO X9 QUICK GUIDE
EN
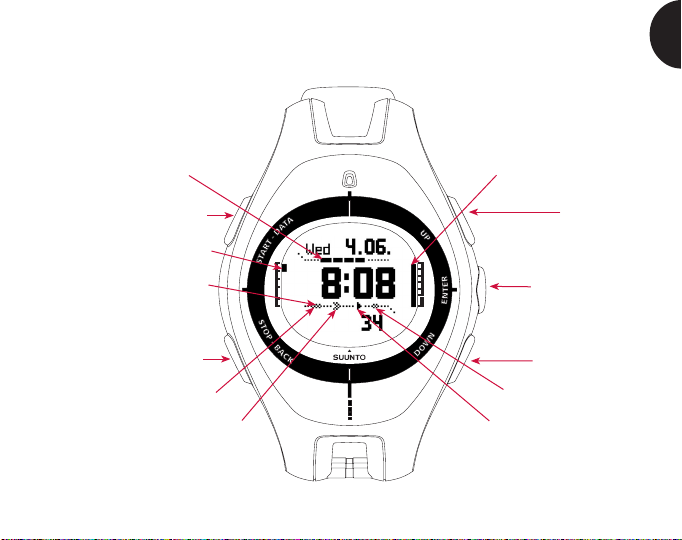
GPS signal
START/DATA
Mode indicator
Altitude alarm
STOP/BACK
Weather alarm
Navigation method
Battery level
UP
ENTER
DOWN
Time alarm
Activity status
Page 4

1. INTRODUCTION
This is the Quick Guide for Suunto X9 wristop computer. It contains brief introductions
to all the modes and guidelines on where and when to use their functions. It also
contains more detailed instructions on how to use the most important functions.
However, it does not include all the information on Suunto X9, and the information
it contains is not always given in full detail. In other words, the Quick Guide should
be used alongside the instruction manual. Therefore you should first read the
instruction manual carefully before using the Quick Guide. You can find the instruction
manual on the CD-ROM supplied with your Suunto X9.
Checklist
Make sure the package contains the following items:
• Suunto X9
• Docking Station
• Charger
• PC-interface cable
• CD containing the Suunto Trek Manager software and the user guide
• Suunto X9 Quick Guide
• Suunto X9 Pocket Guide
• Should any of these be missing from the package, contact the resale agent who
sold you the package.
4
Page 5
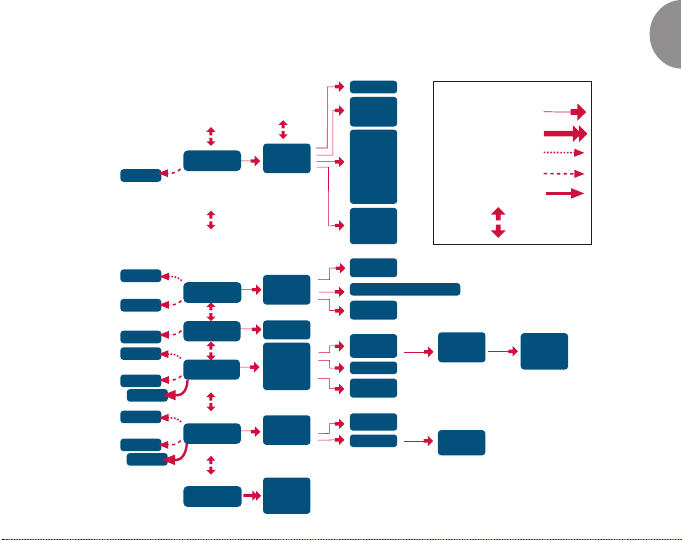
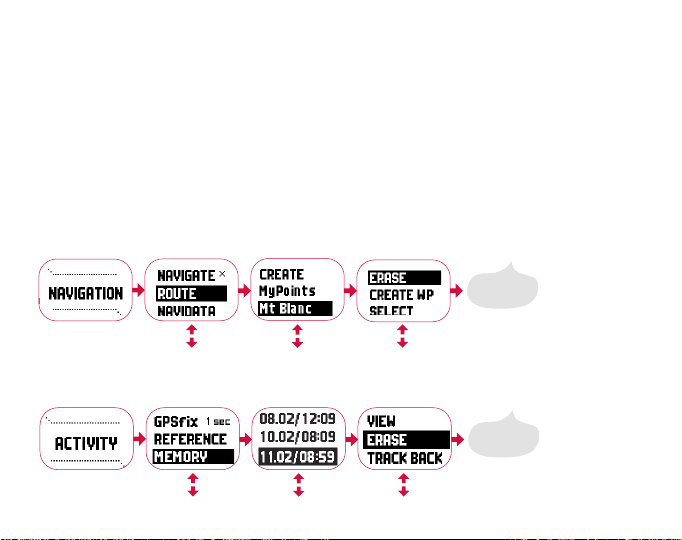
2. BASIC MENU STRUCTURE
ALARM LIST
TIME/DATE
DUAL TIME
SYNC
UTC
TIME
DATE
TEMP
PRESS
ALTITUDE
VERT
DISTANCE
SPEED
POSITION
DATUM
GRID
LIGHT
BRIGHT
CONTRAST
TONES
INFO
ALTITUDE
SEA LEVEL
PRESSURE - TEMPERATURE GRAPH
ALTITUDE
BARO AL
CREATE
My Points
ROUTE LIST
NAVIDATA LIST
ALTITUDE
SEA LEVEL
ALTITUDE
SEA LEVEL
MEMORY LIST
SHORTCUTS
DAY LIGHT
SHORTCUTS
SHORTCUTS
ROUTE INFO
SHORTCUTS
GPS refresh
SUMMARY
SHORTCUTS
GPS refresh
TIME
ALTI/BARO
COMPASS
NAVIGATION
ACTIVITY
ALL MODES
ALARM
TIME/DATE
UNITS
GENERAL
REFERENCE
USE
BARO MEM
ALARM
DECLINATION
CALIBRATE
NAVIGATE
ROUTE
NAVIDATA
TRACK BACK
XTE ALARM
REFERENCE
GPS fix
ACTIVITY
GPS fix
REFERENCE
MEMORY
GPS
MARK Memp
MARK HOME
FIND HOME
POSITION
BUTTONS
ENTER Short press
ENTER Long press
START/DATA Short press
STOP/BACK Short press
STOP/BACK Long press
UP/DOWN
route
CREATE WP
SELECT
WP LIST
ERASE
VIEW
ERASE
TRACK BACK
wp
VIEW
EDIT
LINK WP
UPDATE
ERASE
EN
5
Page 6

3. GENERAL SETTINGS
Before starting to use your Suunto X9, you need to set the correct time and date.
You can also customize all the necessary units and settings.
These instructions show you how to set the time and date. The adjustments of the
other settings is fairly similar. You can find all the settings in the basic menu
structure.
Setting the time and date:
6
Adjust the
settings and accept
with ENTER
Main display
Page 7

4. TIME MODE
The Time mode includes normal watch functions such as time, date, alarm and
stopwatch. In the Time menu you can select the measuring units for the data
displayed in other modes, adjust the general settings such as display contrast and
button tones and define the GPS position format to match the maps you normally
use.
Date
Time
Shortcuts
(Seconds,
Dual time,
Stopwatch)
4.1. Using the Time mode-specific functions
General settings
• Set the time and date (TIME/DATE)
• Customize the desired units and settings, select the coordinate system (
and GENERAL)
UNITS
EN
7
Page 8

Planning your journey
• Set the UTC offset (UNITS)
• Set the Position format (
• If the position format is Grid, set the grid that matches your map (
UNITS)
UNITS)
Before starting the hike
• Adjust the time and dual time if you are in a new time zone (TIME/DATE)
During hiking
• Use the stopwatch to record your runs, hikes etc.
• Adjust the light settings to suit different conditions (
8
LIGHT)
Page 9

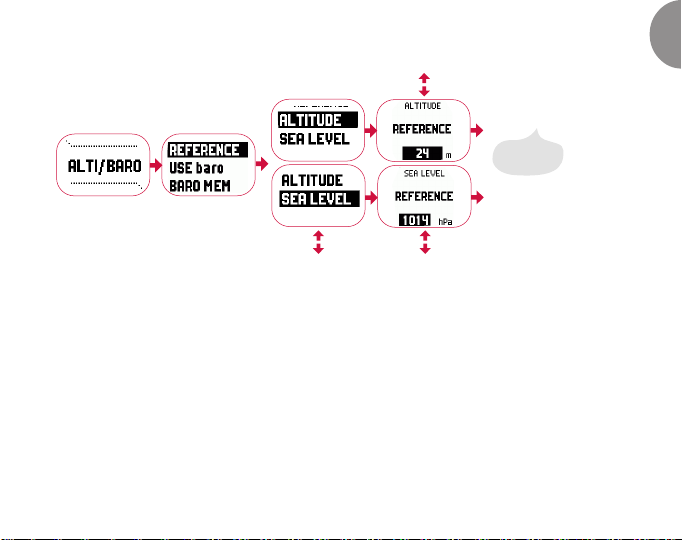
5. ALTI/BARO MODE
The Alti/Baro mode is used for measuring altitude, barometric pressure and
temperature. Suunto X9 calculates the altitude from the current barometric pressure,
which is more sensitive and accurate than the altitude measurement with the GPS,
and is also available when the GPS is off.
Because both altitude and weather data are measured with the same barometric
sensor, you have to select whether you want to use this mode as an altimeter or
as a weather station. The Use selection defines the set of information shown on
the main display. The Alti/Baro menu also contains weather and altitude alarms, the
reference setting needed to relate the current weather state with your current
altitude, and the weather memory.
5.1. Alti use
Vertical speed
Altitude
Shortcuts
(Temperature,
Absolute barometric
pressure (abs), Time)
EN
9
Page 10

5.2. Baro use
Sea level barometric
pressure
6h-barometric
pressure graph
Shortcuts
(Absolute barometric
pressure (abs), Time,
Temperature)
Before starting the hike
• Set the reference altitude and/or sea level pressure (REFERENCE)
• Set the altitude or barometric alarms (
During hiking
• View either altitude or barometric information (USE)
After the journey
• View the 7-day barometric memory (BARO MEM)
10
ALARM)
Page 11
6. COMPASS MODE
The Compass mode aids the GPS functions and offers you navigational support
even when the GPS is off. The 3-axis compass sensor allows tilting up to 30
degrees while still displaying the correct bearing. In the Compass menu you can
set the declination and calibrate the compass to ensure accurate readings in any
location.
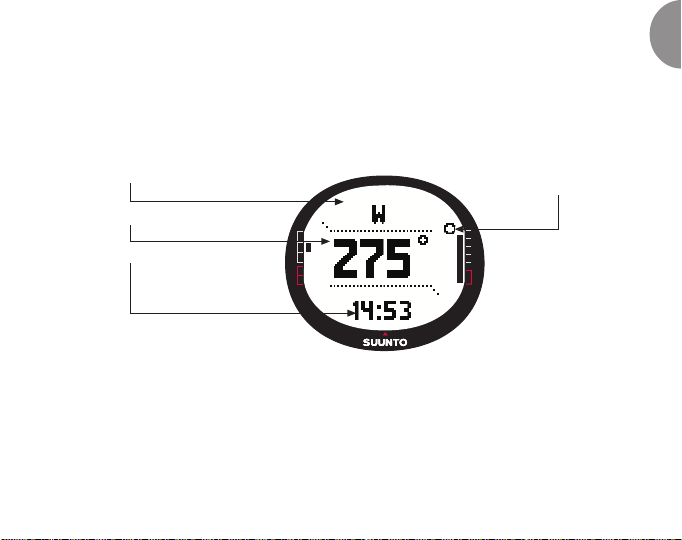
Cardinal points
Heading
Shortcuts
(Time, Bearing (bea),
Bearing lock)
Before starting the hike
• Calibrate the compass (CALIBRATE)
• Set the compass declination (
DECLINATION)
During hiking
• Use the compass to guide you in unfamiliar terrain
• Obtain directions when the GPS is off, or you are moving at such slow speed
that the GPS is not able to measure your direction.
North
indicator
EN
11
Page 12

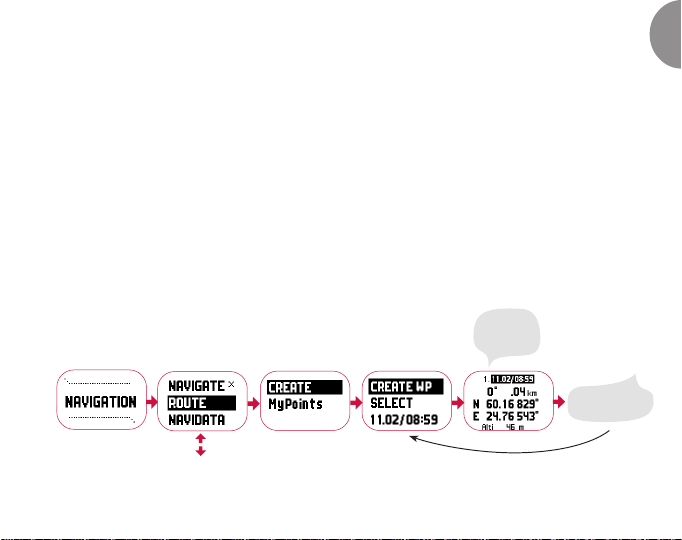
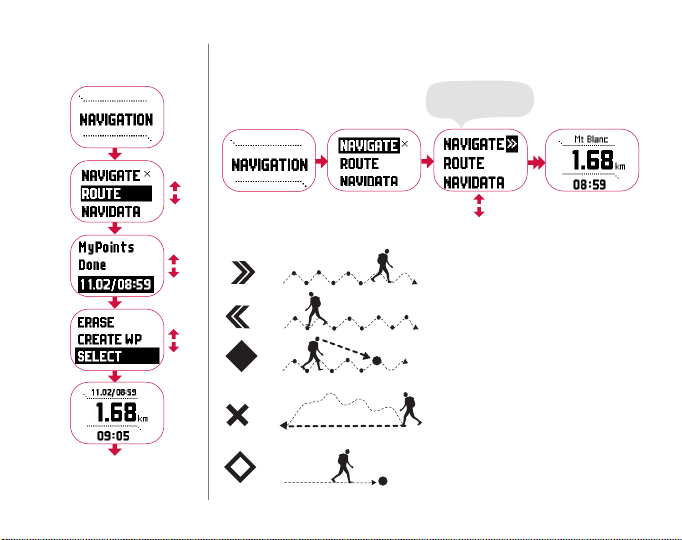
7. NAVIGATION MODE
You should use the Navigation mode when you have a pre-planned destination and
you want to ensure that you will find it. The mode includes all the typical GPS
functions related to routes and waypoints. You can create the routes and waypoints
in this mode or on your PC and use them to guide you to your destination. The
Navigation mode also shows you the distance, direction, estimated time of arrival
and other essential information for all the waypoints of the selected route, and
guides you back to your starting point.
The Navigation mode works together with the Activity mode, so even if you do not
activate a route, for instance when running, the Navigation mode always shows
you the distance and direction to the start.
Waypoint/Route
Distance to
waypoint/Length
of the route
Shortcuts
(Time to waypoint (ttw),
Bearing (bea), Time)
12
Page 13

Planning your journey
• Create a route (ROUTE)
• Create new waypoints by linking (
LINK WP)
Before starting the hike
• Activate a route (ROUTE)
• Choose the navigation method (
• Select the satellite fix rate for the GPS (
NAVIGATE)
GPS FIX)
NOTE: The display is updated according to the selected GPS fix interval.
During hiking
• Navigate on the chosen route
• View navigational data (
NAVIDATA)
Returning home
• Follow the active track log to the beginning of the journey (TRACK BACK)
After the journey
• View, edit and/or erase routes and waypoints (ROUTE)
• Download your data to Suunto Trek Manager for further analysis.
EN
13
Page 14
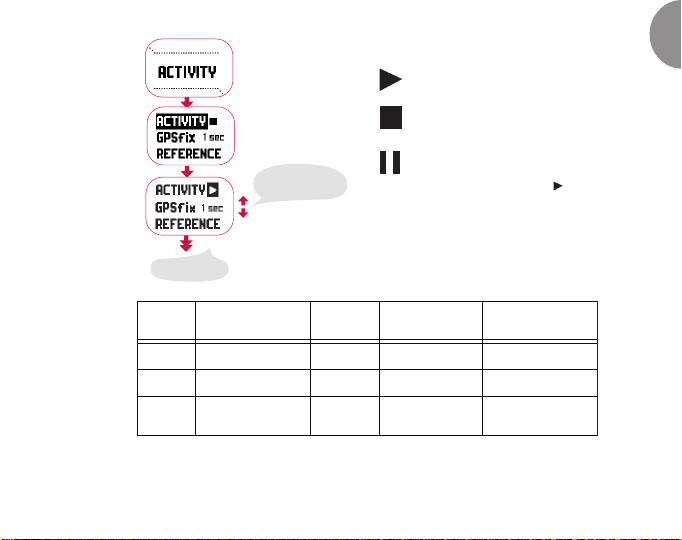
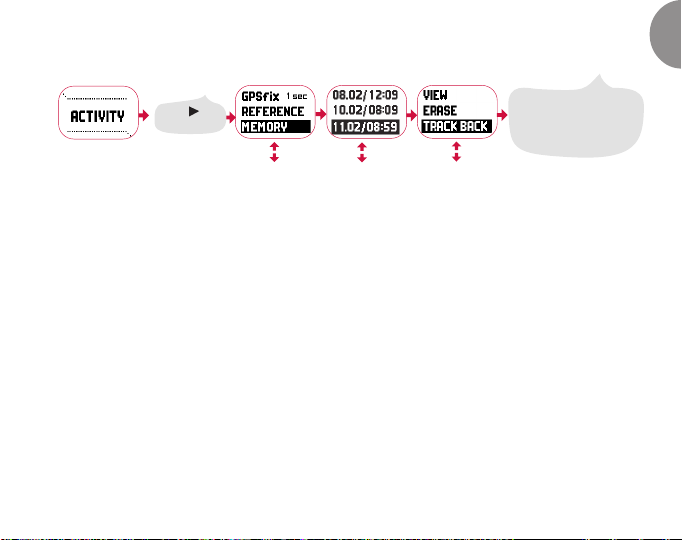
8. ACTIVITY MODE
While the Navigation mode shows you where to go, the Activity mode displays your
current performance. It is the mode you need when you want to measure and record
your activity, be it running in your neighborhood or navigating in the wilderness.
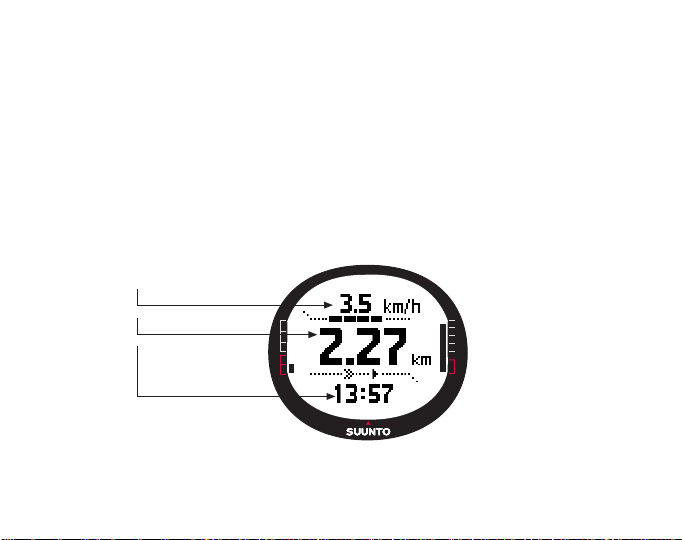
The Activity mode shows you the speed, distance, time from start and other
interesting data regarding your current activity. It records your track with the speed
and altitude profile that you can view on your PC. It also records memory points if
you have marked them. It also gives you a log summary at any time on the road with
just a push of a button.
Speed
Distance traveled
Shortcuts
(Time, Time from
start (tfs), Altitude)
14
Page 15

Before starting the hike
• Choose the activity type (ACTIVITY)
• Select the GPS fix settings for the GPS (
• Set the reference altitude and/or sea level pressure (
GPS FIX)
REFERENCE)
NOTE: The display is updated according to the selected GPS fix interval.
During hiking
• View your speed and distance information
• View the log summary (START/DATA button)
Returning home
• Use the track back (TRACK LOG) function to guide you to the nearest point of a
previously recorded track, and after that to the beginning of this track.
After the journey
• View and/or erase track log files (MEMORY)
• Download your data to Suunto Trek Manager for further analysis
EN
15
Page 16

9. FUNCTION MENU
The Function menu is similar in all the modes. To access the Function menu, press
ENTER in the main display of any mode for more than 2 seconds.
Before starting the hike
• Mark your current position so that you can return there later on (MARK HOME)
During hiking
• View the coordinates of your current position (POSITION)
• Mark specific positions during the activity (
MARK MEMP)
Returning home
• Return to the position that you marked with Mark Home (FIND HOME)
10. SUUNTO TREK MANAGER
In order to enjoy all the benefits of the Suunto X9, you should install Suunto Trek
Manager to your PC.
1. Insert the Suunto Trek Manager CD-ROM into the drive.
2. Wait for the installation to begin and follow the installation instructions.
NOTE: If the installation does not start automatically, click Start --> Run and type
D:\setup.exe.
16
Page 17
Joining the SuuntoSports.com community
1. Connect to the Internet and open your Web browser.
2. Go to www.suuntosports.com.
3. Click Register and register yourself and your Suunto sports instrument. You can
change and update your personal and equipment profiles in the My Suunto section
afterwards. After the registration you will automatically enter the
SuuntoSports.com home page that introduces the site structure and functional
principles.
11. PLANNING YOUR JOURNEY
When you plan your journey, you can create a route using Suunto X9 or Suunto
Trek Manager.
Creating a route with Suunto X9
Set the
waypoint
information
Repeat for other
waypoints
EN
17
Page 18
Mempoint names list
Edit the mempoint names with Suunto Trek Manager.
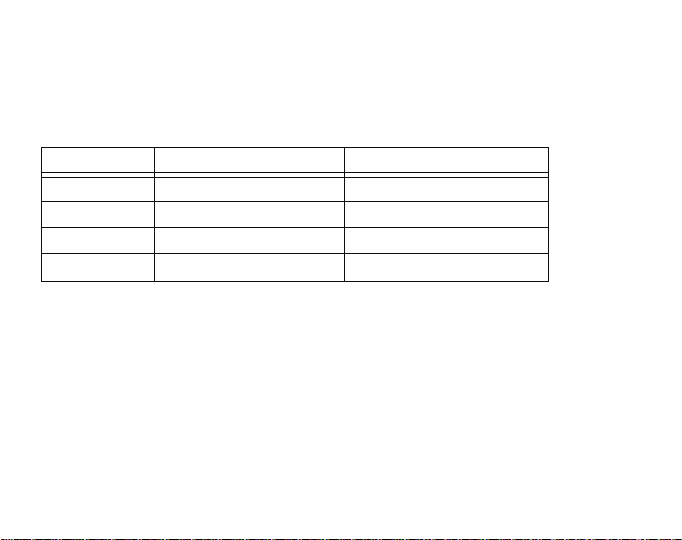
Coordinate formats
Pos. format Datum Grid
Deg Set No adjustment required
Dm Set No adjustment required
Grid No adjustment required Set
UTM No adjustment required No adjustment required
Set: This means that you have to set the correct datum/grid.
No adjustment required: This means that this selection does not have any
effect so you do not have to adjust it.
18
Page 19

12. BEFORE STARTING THE HIKE
Before you start your hike, you should make sure that the compass works properly.
You should also mark the home position so that you can find back if you get lost.
Also make sure that the GPS is on and the route is activated.
Calibrating the compass
Calibration
finished
EN
19
Page 20
Activating a route
Choosing the navigation method
Select a suitable
navigation method
Navigation methods
x
x
x
To a single waypoint of a route
y
y
y
x
To start - no route or WP selected
x
To one point from MyPoints list
20
Page 21
Activity
Main display
Select a suitable
activity status
Activity status
Log recording started, GPS on
Log recording stopped, GPS off
Log recording paused,
GPS in sleep mode.
Same log continues when set to
again
EN
.
GPS fix
GPS Fix
interval
ec
1 s
1 min
Manual
Estimated
duration
4,5 h
12 h
Depends
on usage,
>500 positions
Track log
interval
10 sec
1 min
Manual
Altitude profile
interval
10 sec
ec
20 s
ec
60 s
Memory capacity
(Max. 25 track logs)
24 h
145 h
Up to 400 h
NOTE: The display is updated according to the selected GPS fix interval. In the
Manual GPS fix rate the long press of STOP/BACK updates the display in Activity
and Manual main displays.
21
Page 22
GPS signal quality
22
Mark Home
Or any
other mode
GPS activated
and it marks home
coordinates.
Page 23
Setting the reference altitude/sea level pressure
Reference
value set
NOTE: When the GPS is on, find the altitude reference from the position display
in the Function menu.
NOTE: When the GPS is on, find the sea level reference from Alti/Baro mode by
choosing Baro use.
23
EN
Page 24

Setting the altitude/barometric alarms
Alarm set
Alarm set
NOTE: The baro alarm functions if the barometric pressure changes 4 hPa/0.118
inHg.
24
Page 25

13. DURING HIKING
When on the move you can monitor your progress, navigate using several different
methods and mark the coordinates of specific spots along the route.
Activity and Navigation Data displays
Both the Activity and Navigation mode have separate data displays where you can
view different kinds of navigational and activity-specific information.
To view the displays, press START/DATA in the main display of the Activity or
Navigation mode.
Mark Memp
Position marked
when EPE is
small enough.
Or any
other mode
NOTE: Make sure your activity is before using the Mempoint function. Activating
the Mempoint function does not automatically activate the GPS.
14. RETURNING HOME
Suunto X9 offers you several methods that you can use when you finish your
activity.
25
EN
Page 26

Find Home
x
y
x
y
Suunto X9 guides
you back along
the active track.
Or any
other mode
GPS activated
and guiding
towards home.
Track Back (Active track)
26
Page 27
Track Back (memory)
Use the track back function
Select and
wait for GPS.
to guide you to the nearest
point of a previously recorded
track, and after that to the
beginning of this track
15. AFTER THE JOURNEY
After you have successfully returned from your journey, you can transfer the data
you have gathered with your Suunto X9 to Suunto Trek Manager for further analysis.
You can also upload the route to SuuntoSports.com if you wish.
You can also erase the routes, waypoints, and log files you no longer need.
Transferring Data
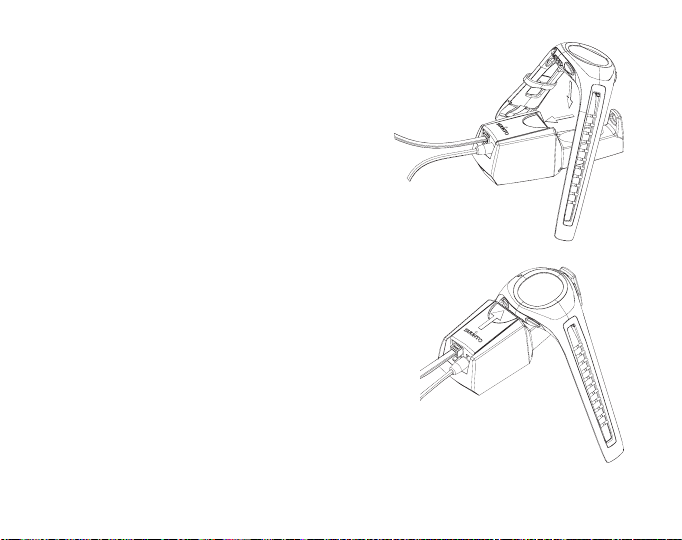
1. Make sure your computer has a free serial port.
2. Attach your Suunto X9 firmly to the docking station with the display facing up.
Plug the adapter in the docking station and the other end in an electric outlet. Plug
the docking station in the serial port of the computer. Suunto X9 enters the PC
Interface mode automatically.
3. Open Suunto Trek Manager.
4. Click
Connect to X9
displays the contents of your Suunto X9 (Tracks, Routes, MyPoints).
icon on the bottom left window and Suunto Trek Manager
EN
27
Page 28
5. To transfer data between your Suunto X9 and Suunto Trek Manager, select an
item and click
Download selected item(s) to folder
icon on the bottom left window.
The selected item is placed in the Downloaded folder in the Local Data window.
You can now view it in the Map window, add waypoints and alarm points.
6. When you have transferred the files to your PC, you can delete them from the
Suunto X9 memory with Suunto Trek Manager and make room for new log files.
For further information on uploading routes, see the Suunto Trek Manager Help in
the Help menu.
Erasing a route
Route
erased
Erasing log files
Log file
erased
28
Page 29

16. CARE AND MAINTENANCE
Only perform the procedures described in this manual. Never disassemble your
Suunto X9. Protect it from shocks, extreme heat and prolonged exposure to direct
sunlight. If not in use, store your Suunto X9 in a clean and dry environment at room
temperature.
Wipe your Suunto X9 clean with a lightly moistened (warm water) cloth. If there are
stubborn stains or marks, you can apply mild soap to the area. Do not expose it to
strong chemicals such as gasoline, cleaning solvents, acetone, alcohol, insect
repellents, adhesives and paint, as they will damage the unit's seals, case and
finish. Keep the area around the sensor free of dirt and sand. Never insert any
objects into the sensor opening.
16.1. Water resistance
Suunto X9 is water resistant. Its water resistance is tested to 100m/330ft according
to ISO 2281 standard (www.iso.ch). This means that you can use the Suunto X9
for swimming or other water sport activities but it should not be used for scuba
diving or freediving.
NOTE: Do not push the buttons under any circumstances while swimming or in
contact with water. Deliberate or unintentional depression of the buttons while the
unit is submerged could cause the unit to malfunction.
NOTE: Large amounts of water and dirt under the cover of Suunto X9 may disturb
the satellite signal reception.
29
EN
Page 30
16.2. Charging the battery
You can charge the battery with either 110V or
220 V mains charger (depending on the area of
purchase), with a car cigarette lighter charger
(optional) or with a 9 V battery.
WARNING! This Suunto product contains a Liion battery. To reduce the risk of fire or burns, do
not disassemble, crush, puncture, short external
contacts or dispose of in fire or water. Only use
manufacturer specified batteries. Recycle or
dispose of used batteries properly.
Charging the battery with a mains
charger
To charge the battery with a mains charger:
1. Place your Suunto X9 on the docking station
with the display facing up.
2. Plug the charger in the docking station. Plug the
charger in an electric outlet.
3. When the battery level indicator is full,
disconnect the charger from the electric outlet.
Your Suunto X9 is now ready for use.
30
Page 31

17. HINTS AND TROUBLESHOOTING
GPS does not take fix
Do you have a clear visibility to the sky? Try holding the unit in an open area with
clear visibility to the sky. Do not hold the unit against your body. Do not hold your
hand or head above the unit. Turn the GPS off and then on again.
NOTE: Before the start, start Activity by choosing in a place with good visibility
to the sky. This helps the GPS to download the satellite data.
Suunto X9 displays the message ‘MEMORY FULL’ more than once
This may occur because of three different reasons:
1. You have 25 tracks recorded in the memory.
You have to erase previous tracks to make room for new ones.
2. There are too many routes or waypoints in the memory.
You have to erase routes/waypoints to make room for new ones.
3. There was a defragmentation in the file system.
Save your data with Suunto Trek Manager and click
the data with Suunto Trek Manager.
How can I make the battery last longer?
The main consumer of battery power is the GPS. Only use the GPS when necessary.
When you are indoors, turn the GPS off, as it will probably not see satellites. The
Clear X9 memory
. Restore
31
EN
Page 32

memory storage functions also consume power and should be avoided when
battery power is low. The GPS fix settings regulate the GPS usage and memory
storage intervals. Set the values to the desired intervals. Heavy use of the backlight
consumes the battery fast.
Suunto Trek Manager cannot establish a connection with Suunto X9
This may occur because of three different reasons:
1. Suunto X9 is docked incorrectly.
Remove and reinstall your Suunto X9 in the docking station and try to connect
again.
2. Connection delay may be too short for your computer.
X9
Go to Suunto Trek Manager and click
long
delay to
in the Information window.
in the X9 window. Change the connection
3. Connection was not acknowledged. Sometimes you have to click more than once,
before the connection is established.
Click
Connect to X9
again.
If Suunto X9 is placed in the docking station and there is no communication between
the unit and the PC within 10 minutes, the unit displays the text '
32
INTERFACE TIMEOUT’.
Page 33

18. DISCLAIMERS
18.1. User’s responsibility
Do not use Suunto X9 as the only navigation aid. Use all available navigation aids
such as charts, compass, visual sightings etc. and compare them with the Suunto
X9 navigation information. Make sure all conflicting information is resolved before
continuing with navigation.
This instrument is intended for recreational use only. Do not use this instrument for
obtaining measurements that require professional or industrial precision.
18.2. Copyright, trademark and patent notice
This publication and its contents are proprietary to Suunto Oy and are intended
solely for the use of its clients to obtain knowledge and key information regarding
the operation of Suunto X9 products. Its contents shall not be used or distributed
for any other purpose and/or otherwise communicated, disclosed or reproduced
without the prior written consent of Suunto Oy. Suunto, Suunto X9s and their logos
are all registered or unregistered trademarks of Suunto Oy. All rights are reserved.
This product is protected by US 6,549,850 patent. US patent application no. 09/
769,851 is pending. Other patents have been applied for. While we have taken
great care to ensure that information contained in this documentation is both
comprehensive and accurate, no warranty of accuracy is expressed or implied. Its
content is subject to change at any time without notice. You can always download
the latest version of this documentation in www.suunto.com.
EN
33
Page 34

18.3. CE
The CE mark is used to mark conformity with the European Union EMC directives 89/
336/EEC and 99/5/EEC.
18.4. Limits of Liability and ISO 9001 Compliance
If this product should fail due to defects in materials or workmanship, Suunto Oy
will, at its sole option, repair or replace it with new or rebuilt parts, free of charge,
for two (2) years from the date of its purchase. This warranty is extended only to
the original purchaser and only covers failures due to defects in materials and
workmanship that occur during normal use while in the period of the warranty. It
does not cover battery, battery replacement, damage or failures resulting in accident,
misuse, neglect, mishandling, alteration or modifications of the product, or any
failure caused by operation of the product outside the scope of its published
specifications, or any causes not covered by this warranty. There are no express
warranties except as listed above. The client can exercise the right to repair under
the warranty by contacting Suunto Oy’s Customer Service department to obtain a
repair authorization. Suunto Oy and its subsidiaries shall in no event be liable for
any incidental or consequential damages arising from the use of or inability to use
the product. Suunto Oy and its subsidiaries do not assume any responsibility for
losses or claims by third parties that may arise through the use of this device.
34
Page 35

Suunto’s Quality Assurance System is certified by Det Norske Veritas to be ISO
9001 compliant in all SUUNTO Oy’s operations (Quality Certificate No. 96-HEL-AQ-
220)
18.5. Disclaimer
Since the GPS satellites and the delivery system are neither owned nor maintained
by Suunto, Suunto takes no responsibility for possible malfunctions, changes in
positioning quality or the discontinuity of the GPS service in the future. Suunto will
not reclaim products because of changes in the GPS service. This device complies
with Part 15 of the FCC limits for class B digital devices. This equipment generates,
uses, and can radiate radio frequency energy and, if not installed or used in
accordance with the instructions may cause harmful interference to radio
communications. There is no guarantee that interference will not occur in a particular
instance. If this equipment does cause harmful interference to other equipment, try
to correct the problem by relocating the equipment. Consult an authorized Suunto
dealer or other qualified service technician if the problem cannot be corrected.
Operation is subject to the following conditions: (1) This device cannot cause
harmful interference, and, (2) this device must accept any interference received,
including interference that may cause undesired operation. Repairs should be
made by authorized Suunto service personnel. Unauthorized repairs will void
warranty.
EN
35
Page 36

19. GPS DATUM LIST
Number Name Description (Datum)
255 WGS84 Global WGS84 coordinate system
This is the default datum and the most widely used degree-based coordinate
system. You can find the complete datum list in the instruction manual.
20. LOCAL GRID LIST
Name Description
Finnish Finnish National grid KKJ 27
Swedish Swedish national map projection RT 90
British British National grid
Swiss Swiss National grid
Irish Irish National grid
NZTM New Zealand Transverse Mercator Projection
Dutch Royal Dutch grid
BNM M28 Austria Area grid M28
BNM M31 Austria Area grid M31
BNM M34 Austria Area grid M34
Page 37

GUIDE RAPIDE D'UTILISATION SUUNTO X9
FR
Signal GPS
START/DATA
Indicateur de mode
Alarme altitude
STOP/BACK
Alarme météo
Méthode de navigation
Niveau de batterie
UP
ENTER
DOWN
Alarme montre
Etat de lactivité
Page 38

1. INTRODUCTION
Vous avez devant vous le Guide rapide d’utilisation des ordinateurs de poignet
Suunto X9. Ce guide présente brièvement tous les modes ainsi que leurs fonctions
respectives. Il contient également des instructions détaillées sur l’utilisation des
fonctions les plus importantes.
Cependant, il ne donne pas toutes les informations relatives à Suunto X9, et les
informations qu’il contient ne sont pas toujours entièrement détaillées. En d’autres
termes, ce Guide rapide d’utilisation doit être utilisé conjointement avec le Manuel
d’utilisation. Nous vous conseillons par conséquent de bien lire le manuel d’utilisation
avant d’utiliser le Guide rapide d’utilisation. Ce Manuel d’utilisation se trouve sur le
CD-ROM livré avec votre Suunto X9.
Liste de contrôle
Assurez-vous que l’emballage contient les articles suivants :
• Ordinateur de poignet Suunto X9
• Socle de synchronisation
• Chargeur
• Câble d’interface PC
• CD contenant le logiciel Suunto Trek Manager et le Manuel d’utilisation
• Guide rapide d’utilisation Suunto X9
• Guide de poche Suunto X9
• Si l’un de ces articles n’est pas contenu dans l’emballage, contactez le revendeur
qui vous a fourni ce produit.
4
Page 39

2. STRUCTURE DE BASE DES MENUS
SHORTCUTS
DAY LIGHT
SHORTCUTS
SHORTCUTS
ROUTE INFO
SHORTCUTS
GPS refresh
SUMMARY
SHORTCUTS
GPS refresh
TIME
ALTI/BARO
COMPASS
NAVIGATION
ACTIVITY
ALL MODES
ALARM
TIME/DATE
UNITS
GENERAL
REFERENCE
USE
BARO MEM
ALARM
DECLINATION
CALIBRATE
NAVIGATE
ROUTE
NAVIDATA
TRACK BACK
XTE ALARM
REFERENCE
GPS fix
ACTIVITY
GPS fix
REFERENCE
MEMORY
GPS
MARK Memp
MARK HOME
FIND HOME
POSITION
ALARM LIST
TIME/DATE
DUAL TIME
SYNC
UTC
TIME
DATE
TEMP
PRESS
ALTITUDE
VERT
DISTANCE
SPEED
POSITION
DATUM
GRID
LIGHT
BRIGHT
CONTRAST
TONES
INFO
ALTITUDE
SEA LEVEL
PRESSURE - TEMPERATURE GRAPH
ALTITUDE
BARO AL
CREATE
My Points
ROUTE LIST
NAVIDATA LIST
ALTITUDE
SEA LEVEL
ALTITUDE
SEA LEVEL
MEMORY LIST
Boutons
ENTER Pression brève
ENTER Pression longue
START/DATA Pression brève
STOP/BACK Pression brève
STOP/BACK Pression longue
UP/DOWN
route
CREATE WP
SELECT
WP LIST
ERASE
VIEW
ERASE
TRACK BACK
wp
VIEW
EDIT
LINK WP
UPDATE
ERASE
FR
5
Page 40

3. PARAMÈTRES GÉNÉRAUX
Avant d’utiliser votre Suunto X9, vous devez régler la date et l’heure. Si nécessaire,
vous pouvez également personnaliser les paramètres d’unité et autres paramètres.
Les instructions données ci-dessous expliquent comment régler la date et l’heure.
Le réglage des autres paramètres est plus ou moins similaire. Vous trouverez la
liste des paramètres dans la structure de base des menus.
Réglage de la date et de l’heure :
6
Choisissez une
valeur et validez
avec ENTER
Affichage
principal
Page 41

4. MODE TIME
Le mode Time comporte les fonctions normales d’une montre, telles que l’heure, la
date, les alarmes et le chronomètre. Dans le menu Time, vous pouvez choisir les
unités de mesure des données affichées dans les autres modes, changer les
paramètres généraux tels que le contraste de l’affichage ou les bips des boutons
et définir le format de position GPS en fonction des cartes que vous utilisez.
Date
Heure
Raccourcis
(secondes, double
fuseau horaire,
chronomètre)
4.1. Utilisation des fonctions propres au mode Time
Paramètres généraux
• Réglez la date et l’heure (TIME/DATE)
• Définissez les unités et autres (
UNITS et GENERAL)
FR
7
Page 42

Préparation de votre parcours
• Définissez le décalage UTC (UNITS)
• Choisissez le format de position (
UNITS)
• Si le format de position est Grid, choisissez le quadrillage correspondant à votre
UNITS)
carte (
Avant la randonnée
• Réglez l’heure du deuxième fuseau horaire si vous êtes dans une zone horaire
différente (
TIME/DATE)
Pendant la randonnée
• Utilisez le chronomètre pour enregistrer vos courses, ascensions, etc.
• Réglez les paramètres d’éclairage en fonction des conditions lumineuses (
8
LIGHT)
Page 43

5. MODE ALTI/BARO
Le mode Alti/Baro permet de mesurer l’altitude, la pression barométrique et la
température. Suunto X9 calcule l’altitude en fonction de la pression barométrique
actuelle. Ce calcul est plus sensible et plus exact que celui du GPS et peut également
être effectué si le GPS est éteint.
Etant donné que les données d’altitude et les données météo sont obtenues avec
le même capteur barométrique, vous devez choisir si ce mode est utilisé comme
altimètre ou comme station météo. Le paramètre Use définit les informations qui
apparaissent sur l’affichage principal. Le menu Alti/Baro permet également d’accéder
aux alarmes météo et d’altitude, à la valeur de référence requise pour établir un
rapport entre les conditions météo actuelles et l’altitude actuelle, et à la mémoire
météo.
FR
5.1. Utilisation du
mode Alti
Vitesse verticale
Altitude
Raccourcis
(température, pression
barométrique absolue
(abs), heure)
9
Page 44

5.2. Utilisation du mode Baro
Pression barométrique
réduite au niveau de la mer
Graphique de pression
barométrique sur 6 heures
Raccourcis
(température, pression
barométrique absolue (abs),
heure)
Avant la randonnée
• Définissez la valeur de référence : altitude et/ou pression réduite au niveau de
REFERENCE)
la mer (
• Réglez les alarmes d’altitude ou barométriques (
Pendant la randonnée
• Affichez les informations d’altitude ou barométriques (USE)
Après la randonnée
• Consultez la mémoire barométrique sur 7 jours (BARO MEM)
10
ALARM)
Page 45

6. MODE COMPASS
Le mode Compass est utile aux fonctions GPS et offre également une aide de
navigation lorsque le GPS est éteint. Le capteur à 3 axes de la boussole permet à
celle-ci d’afficher le bon azimut tout en étant inclinée jusqu’à 30 degrés. Dans le
menu Compass, vous pouvez régler la déclinaison et étalonner la boussole pour
obtenir des mesures précises en n’importe quel endroit.
FR
Points cardinaux
Cap
Raccourcis
(heure, azimut (bea),
verrouillage de
lazimut)
Indicateur
du Nord
Avant la randonnée
• Etalonnez la boussole (CALIBRATE)
• Réglez la déclinaison de la boussole (
DECLINATION)
Pendant la randonnée
• Servez-vous de la boussole pour vous guider en terrain inconnu
• Obtenez les directions lorsque le GPS est éteint ou lorsque vous vous déplacez
à une vitesse si lente que le GPS est incapable de mesurer votre direction.
11
Page 46

7. MODE NAVIGATION
Le mode Navigation est utile si vous avez une destination pré-programmée et que
vous voulez être sûr d’y parvenir. Ce mode comporte toutes les fonctions GPS
traditionnelles utilisant des itinéraires et des points de route. Vous pouvez créer
des itinéraires et des points de route dans ce mode ou sur votre ordinateur, et les
utiliser ensuite pour vous guider vers votre destination. Le mode Navigation affiche
également la distance parcourue, la direction suivie, l’heure d’arrivée estimée et
d’autres informations essentielles pour tous les points de route de l’itinéraire
sélectionné, et vous guide pour revenir à votre point de départ.
Le mode Navigation fonctionne conjointement avec le mode Activity ; c’est à dire
que même sans activer d’itinéraire (lorsque vous courez par exemple), le mode
Navigation indiquera toujours la distance et la direction vers votre point de départ.
Point de route/Itinéraire
Distance avant point de
route/Longueur
itinéraire
Raccourcis
(temps avant point de
route (ttw), azimut (bea),
heure)
12
Page 47

Préparation de votre parcours
• Créez un itinéraire (ROUTE)
• Créez des nouveaux points de route à partir de points existants (
LINK WP)
Avant la randonnée
• Activez un itinéraire (ROUTE)
• Choisissez la méthode de navigation (
• Sélectionnez l’intervalle de repère satellite pour le GPS (
NAVIGATE)
GPS FIX)
REMARQUE : L’affichage est mis à jour en fonction de l’intervalle de repère GPS
sélectionné.
Pendant la randonnée
• Empruntez l’itinéraire sélectionné
• Affichez les données de navigation (
NAVIDATA)
Retour au point de départ
• Suivez le journal de la route active pour revenir à votre point de départ (TRACK
BACK
)
Après la randonnée
• Affichez, modifiez et/ou supprimez des itinéraires et des points de route (ROUTE)
• Téléchargez vos données sur Suunto Trek Manager pour les analyser en détail.
13
FR
Page 48

8. MODE ACTIVITY
Alors que le mode Navigation indique où vous allez, le mode Activity affiche vos
performances actuelles. C’est le mode dont vous avez besoin si vous souhaitez
mesurer et enregistrer votre activité, qu’il s’agisse d’un footing autour de chez vous
ou d’une course en terrain inconnu.
Le mode Activity affiche la vitesse, la distance, la durée et d’autres données
intéressantes relatives à l’activité que vous avez choisie. Il enregistre votre route
avec le profil de vitesse et le profil d’altitude que vous pourrez voir sur votre ordinateur.
Il enregistre également des points de mémoire, si ceux-ci ont été repérés. Il permet
également d’accéder à un journal résumé à tout moment en appuyant simplement sur
un bouton.
Vitesse
Distance parcourue
Raccourcis
(heure, durée depuis
le départ (tfs), altitude)
14
Page 49

Avant la randonnée
• Choisissez le type d’activité (ACTIVITY)
• Sélectionnez le repère satellite pour le GPS (
GPS FIX)
• Définissez la valeur de référence : altitude et/ou pression réduite au niveau de la
mer (
REFERENCE)
REMARQUE : L’affichage est mis à jour en fonction de l’intervalle de repère GPS
sélectionné.
Pendant la randonnée
• Affichez vos informations de vitesse et de distance
• Affichez le journal résumé (bouton START/DATA)
Retour au point de départ
• Utilisez la fonction de retour au point de départ (TRACK LOG) pour vous aider à
revenir au point le plus proche d’une route enregistrée précédemment, et après
cela, au début de votre route.
After the journey
• Affichez et/ou supprimez les journaux de route (MEMORY)
• Téléchargez vos données sur Suunto Trek Manager pour les analyser en détail
15
FR
Page 50

9. MENU FUNCTION
Le menu Function est le même pour tous les modes. Pour accéder au menu Function,
appuyez sur ENTER dans l’affichage principal de n’importe quel mode pendant plus
de 2 secondes.
Avant la randonnée
• Repérez votre position actuelle, pour ainsi pouvoir y revenir plus tard (MARK HOME)
Pendant la randonnée
• Affichez les coordonnées de votre position actuelle (POSITION)
• Repérez des positions particulières lors de votre activité (
MARK MEMP)
Retour au point de départ
• Retournez à la position que vous avez repérée avec la fonction Mark Home (FIND HOME)
10. SUUNTO TREK MANAGER
Pour profiter de tous les avantages de Suunto X9, installez le logiciel Suunto Trek
Manager sur votre ordinateur.
1. Insérez le CD-ROM Suunto Trek Manager dans le lecteur.
2. Attendez que le programme d’installation commence et suivez les instructions
d’installation.
REMARQUE : ISi le programme d’installation ne démarre pas automatiquement,
cliquez sur Démarrer --> Exécuter et entrez D:\setup.exe.
16
Page 51

Adhésion à la communauté SuuntoSports.com
1. Connectez-vous à Internet et ouvrez votre navigateur Web.
2. Allez sur www.suuntosports.com.
3. Cliquez sur Register et inscrivez-vous ainsi que votre instrument de sport Suunto.
Vous pouvez revenir plus tard dans la section My Suunto pour changer et mettre
à jour vos profils personnels ou les données de votre instrument. Une fois
l’inscription terminée, vous accédez automatiquement à la page d’accueil
SuuntoSports.com, qui présente la structure du site et ses principes de
fonctionnement.
11. PRÉPARATION DE VOTRE PARCOURS
Lorsque vous préparez votre parcours, vous pouvez créer un itinéraire à l’aide de
Suunto X9 ou de Suunto Trek Manager.
Création d’un itinéraire avec Suunto X9
Définissez les
informations de
point de route
Recommencez
pour chaque
point de route
FR
17
Page 52

Liste des noms de Mempoint
Modifiez les noms de mempoint avec Suunto Trek Manager.
Formats des coordonnées
Format position Datum Quadrillage
Deg Définir Aucun réglage nest requis
Dm Définir Aucun réglage nest requis
Grid Aucun réglage nest requis Définir
UTM Aucun réglage nest requis Aucun réglage nest requis
Définir : Signifie que vous devez choisir le bon datum/quadrillage.
Aucun réglage n’est requis : Signifie que ce paramètre n’a aucun effet et que
vous n’avez pas à le définir.
18
Page 53

12. AVANT LA RANDONNÉE
Avant de partir en randonnée, assurez-vous que la boussole fonctionne
parfaitement. Il est également conseillé de repérer la position de départ afin d’y
revenir facilement si vous vous perdez. Assurez-vous que le GPS est allumé et
que l’itinéraire est activé.
Etalonnage de la boussole
Etalonnage
terminé
FR
19
Page 54

Activation d’un
itinéraire
Sélection de la méthode de navigation
Choisissez une
méthode de navigation
appropriée
Méthodes de navigation
x
x
x
Vers un point de route particulier
y
y
y
x
Vers le point de départ ; aucun itinéraire
ou point de route nest sélectionné
x
Vers un point de la liste MyPoints
20
Page 55

Activity
GPS fix
Affichage
principal
Intervalle de
repère GPS
1 s
1 min
Manuel
Choisissez une
activité
Durée estimée
4,5 h
12 h
Dépend de lutilisation,
> 500 positions
Activity status
Début de lenregistrement du journal,
GPS allumé
Arrêt de lenregistrement du journal,
GPS éteint
Pause de lenregistrement du journal,
GPS en mode veille.
Le même journal est utilisé quand
de nouveau choisi
Intervalle
journal de route
10 s
1 min
Manuel
Intervalle profil
daltitude
10 s
20 s
60 s
est
Capacité mémoire
(25 journaux de route max.)
24 h
145 h
Jusquà 400 h
REMARQUE : L’affichage est mis à jour en fonction de l’intervalle de repère GPS
sélectionné. Avec l'intervalle de repère GPS manuel, une pression longue sur
STOP/BACK met à jour l'affichage dans les affichages principaux Activity et
Manual.
21
FR
Page 56

Qualité du signal GPS
22
Mark Home
Ou nimporte
quel autre mode
Le GPS est activé
et les coordonnées
du point de départ
sont repérées
Page 57

Définition de l’altitude/pression réduite au niveau de la mer de
référence
Valeur de
référence
définie
REMARQUE : Lorsque le GPS est allumé, accédez à l’altitude de référence à
partir de l’affichage de position dans le menu Function.
REMARQUE : Lorsque le GPS est allumé, accédez à la pression réduite au
niveau de la mer de référence à partir du mode Alti/Baro en choisissant l’utilisation
Baro.
23
FR
Page 58

Réglage des alarmes d’altitude/barométriques
Alarme
réglée
Alarme
réglée
REMARQUE : L’alarme barométrique se déclenche si la pression barométrique
change de 4 hPa/0,118 inHg.
24
Page 59

13. PENDANT LA RANDONNÉE
Au cours de vos déplacements, vous pouvez suivre votre progression, changer
de méthode de navigation et repérer les coordonnées d’un point particulier le long
du parcours.
Affichages des données d’activité et de navigation
Les modes Activity et Navigation possèdent des affichages distincts permettant
d’afficher soit les informations propres à la navigation soit les informations propres
à l’activité.
Pour accéder à ces affichages, appuyez sur START/DATA dans l’affichage principal
du mode Activity ou Navigation.
Mark Memp
Position repérée si
lerreur de position
estimée (EPE) est
suffisamment petite
Ou nimporte
quel autre mode
REMARQUE : Assurez-vous bien que votre activité est sur avant d’utiliser la
fonction Mempoint. Le fait d'activer la fonction Mempoint n'allume pas forcément
le GPS.
25
FR
Page 60

14. RETOUR AU POINT DE DÉPART
Suunto X9 propose plusieurs méthodes pour terminer votre activité.
Find Home
Track Back (route active)
x
Ou nimporte
quel autre mode
Le GPS est
activé et vous
guide vers votre
point de départ.
x
26
y
Suunto X9 vous
guide vers votre
point de départ en
utilisant la même
route quà laller.
y
Page 61

Track Back (mémoire)
Utilisez retour point
Sélectionnez
et attendez
le GPS.
de départ pour
revenir au point le
plus proche dune
route enregistrée, et
ensuite au début de
votre route
15. APRÈS LA RANDONNÉE
Une fois votre randonnée terminée, vous pouvez transférer dans Suunto Trek
Manager les données recueillies avec votre Suunto X9 pour les analyser en détail.
Vous pouvez également téléverser votre itinéraire sur SuuntoSports.com si vous le
souhaitez.
Vous pouvez également supprimer les itinéraires, points de route et fichiers journaux
dont vous n’avez plus besoin.
Transfert de données
1. Assurez-vous que votre ordinateur possède un port série libre.
2. Placez correctement votre Suunto X9 sur son socle de synchronisation, cadran
vers le haut. Branchez une extrémité de l’adaptateur au socle de synchronisation
et l’autre extrémité à une prise électrique. Reliez le socle de synchronisation au
port série de l’ordinateur. Suunto X9 passe automatiquement en mode Interface
PC.
FR
27
Page 62

3. Ouvrez Suunto Trek Manager.
4. Cliquez sur l’icone
Connect to X9
dans la fenêtre en bas à gauche et Suunto
Trek Manager affiche le contenu de votre Suunto X9 (Tracks, Routes, MyPoints).
5. Pour transférer ces données entre votre Suunto X9 et le logiciel Suunto Trek
Manager, sélectionnez un élément et cliquez sur l’icone Download
item(s) to folder
dans la fenêtre en bas à gauche. L’élément sélectionné est
selected
placé dans le dossier Downloaded dans la fenêtre Local Data. Vous pouvez à
présent afficher les données dans la fenêtre Map, ajouter des points de route et
des points d’alarme.
6. Une fois les fichiers transférés sur votre ordinateur, vous pouvez les effacer de
la mémoire Suunto X9 à l’aide du logiciel Suunto Trek Manager et ainsi libérer de
l'espace pour les futurs fichiers journaux.
Pour en savoir plus sur le téléversement d’itinéraires, reportez-vous à l’aide de
Suunto Trek Manager dans le menu Help.
Suppression d’un itinéraire
Itinéraire
supprimé
28
Page 63

Suppression des fichiers journaux
Fichier journal
supprimé
16. ENTRETIEN
Ne suivez que les procédures décrites dans ce guide. Ne démontez jamais votre
Suunto X9. Protégez votre Suunto X9 des chocs, des chaleurs extrêmes et des
expositions prolongées aux rayons du soleil. En cas de non-utilisation, conservez
votre Suunto X9 dans un environnement propre et sec à température ambiante.
Pour le nettoyage, essuyez votre Suunto X9 avec un linge légèrement imbibé d’eau
tiède. En cas de marques ou de taches persistantes, appliquez un savon doux sur
la zone en question. Evitez d’exposer votre Suunto X9 à des produits chimiques
forts tels que l’essence, les solvants de nettoyage, l’acétone, l’alcool, les insecticides,
les adhésifs et les peintures, car ceux-ci pourraient détériorer les joints, le corps et
la finition de l’appareil. Eliminez les saletés, poussières et grains de sable autour de
la zone du capteur. N’insérez jamais d’objets dans l’orifice du capteur.
FR
29
Page 64

16.1. Etanchéité
Suunto X9 est étanche. Son étanchéité a été testée jusqu’à 100 m/330 pieds,
conformément à la norme ISO 2281 (www.iso.ch). Vous pouvez donc utiliser votre
Suunto X9 pour nager ou pratiquer d’autres sports aquatiques mais en aucun cas
pour la plongée sous-marine ou l’apnée.
REMARQUE : N'appuyez jamais sur les boutons lorsque vous nagez ou que
vous êtes dans l'eau. Une pression volontaire ou involontaire des boutons lorsque
l’appareil est immergé peut entraîner des dysfonctionnements.
REMARQUE : Une trop grande quantité d’eau ou d'impuretés à l'intérieur de
Suunto X9 risque de gêner la réception du signal satellite.
16.2. Chargement de la batterie
Pour recharger la batterie, vous avez le choix entre un chargeur secteur 110 V ou
220 V (en fonction de la zone d’achat du produit), un chargeur allume-cigares pour
voiture (accessoire en option) ou une pile 9 V.
REMARQUE : Cet instrument Suunto possède une batterie Li-ion. Pour éliminer
tout risque d'incendie ou de brûlure, évitez de démonter, d'écraser, de percer ou
de court-circuiter la batterie, ou de la jeter dans un feu ou de l'eau. N’utilisez que
des batteries indiquées par le fabricant. Recyclez ou éliminez les batteries selon
les réglementations en vigueur.
30
Page 65

Chargement de la batterie avec un
chargeur secteur
Pour charger la batterie avec un chargeur
secteur :
1. Placez votre Suunto X9 sur son socle de
synchronisation, cadran vers le haut.
2. Reliez le chargeur au socle de
synchronisation. Branchez le chargeur
dans une prise électrique.
3. Lorsque l’indicateur du niveau de batterie
est au maximum, débranchez le chargeur
de la prise électrique. Vous pouvez
maintenant utiliser votre Suunto X9.
FR
31
Page 66

17. ASTUCES ET RÉSOLUTION DES PANNES
Le GPS ne repère aucune position
Etes-vous dans une zone dégagée ayant une bonne ouverture vers le ciel ?
Essayez de tenir l’appareil dans une zone dégagée ayant une visibilité suffisante
vers le ciel. Ne tenez pas l’appareil près de votre corps. Ne placez pas votre main
ou votre tête au-dessus de l’appareil. Eteignez et rallumez le GPS.
REMARQUE : Avant de commencer, activez Activity à partir d’un emplacement
ayant une bonne visibilité vers le ciel. Le téléchargement des données satellites
par le GPS sera ainsi plus facile.
Suunto X9 affiche le message ‘MEMORY FULL’ plusieurs fois
Ce message de mémoire pleine apparaît dans trois situations :
1. Vous avez 25 routes enregistrées dans la mémoire. Vous devez supprimer des
routes afin de libérer de l’espace dans la mémoire.
2. La mémoire contient trop d’itinéraires ou de points de route. Vous devez supprimer
des itinéraires/points de route afin de libérer de l’espace dans la mémoire.
3. Une défragmentation du système de fichier s’est produite. Enregistrez vos
données dans le logiciel Suunto Trek Manager et cliquez sur
pour effacer la mémoire X9. Restaurez les données depuis Suunto Trek Manager.
32
Clear X9 memory
Page 67

Comment faire pour augmenter la durée de vie de la batterie ?
Le GPS est la fonction qui consomme le plus de batterie. N’allumez donc le GPS que
lorsque son utilisation s’avère nécessaire. En intérieur, éteignez le GPS, étant
donné qu’il ne peut capter les signaux des satellites.
Les fonctions d'enregistrement dans la mémoire consomment également de l'énergie
et ne doivent pas être utilisées lorsque la batterie est faible. Les paramètres GPS fix
limitent l’utilisation du GPS et les intervalles d’enregistrement dans la mémoire.
Définissez les valeurs des intervalles désirés. Une utilisation intensive du rétroéclairage réduit également considérablement la durée de vie de la batterie.
Suunto Trek Manager ne peut établir aucune connexion avec Suunto X9
Cette situation se produit pour les raisons suivantes :
1. Suunto X9 n’est pas placée correctement sur son socle.
Retirez et remettez votre Suunto X9 sur son socle de synchronisation et
réessayez de vous connecter.
2. Le délai de connexion est peut être trop court pour votre ordinateur.
Allez dans Suunto Trek Manager et cliquez sur X9 dans la fenêtre X9. Augmentez
le délai de connexion dans la fenêtre Information.
3. La connexion n’est pas établie. Vous devez parfois cliquer plusieurs fois pour
que la connexion s’établisse.
Cliquez de nouveau sur
Connect to X9
.
Si Suunto X9 se trouve sur son socle de synchronisation et qu’aucune
communication n’est établie entre l’appareil et l’ordinateur dans un délai de 10
minutes, l’appareil affiche le message '
INTERFACE TIMEOUT’.
FR
33
Page 68

18. AVERTISSEMENTS
18.1. Responsabilité de l’utilisateur
Suunto X9 ne doit pas représenter votre seule aide de navigation. Utilisez toutes
les autres aides de navigation possibles telles que les cartes, boussoles, repères
visuels, etc. et comparez-les avec les informations de navigation de Suunto X9.
Assurez-vous de résoudre tous les conflits d’informations avant de continuer
votre route.
Cet instrument n’est qu’un appareil de loisir. Ne vous en servez pas pour obtenir
des mesures exigeant une précision professionnelle ou industrielle.
18.2. Informations de copyright, marques et brevets
Cette publication et son contenu sont la propriété de Suunto Oy et sont fournis
uniquement pour permettre à ses clients de mieux connaître les caractéristiques et
le fonctionnement des produits Suunto X9. Son contenu ne doit pas être utilisé ni
distribué à d’autres fins et/ou ne doit pas être communiqué, révélé ou reproduit
sans l’accord écrit préalable de Suunto Oy. Suunto, Suunto X9 et leurs logos
respectifs sont des marques déposées ou non de Suunto Oy. Tous droits réservés.
Ce produit est protégé par le brevet US 09/769,851. D’autres demandes de brevet
sont en cours. Bien que nous ayons pris soin d’inclure dans cette documentation
des informations complètes et précises, aucune garantie de précision n’est
34
Page 69

expresse ou implicite. Son contenu peut être modifié à tout moment sans préavis.
La toute dernière version de cette documentation peut être téléchargée à tout
moment sur www.suunto.com.
18.3. Marquage européen CE
Le symbole CE est utilisé pour indiquer la conformité de ce produit avec les directives
MCE 89/336/CEE et 99/5/CEE.
18.4. Limites de responsabilité et conformité ISO 9001
Si ce produit présente des défauts causés par des vices de matériau ou de
fabrication, Suunto Oy, à sa seule discrétion, réparera ou remplacera gratuitement
le produit avec des pièces neuves ou réparées, pendant une période de deux (2)
ans à compter de la date d’achat. Cette garantie ne s’applique qu’au propriétaire
d’origine et ne couvre que les défauts causés par des vices de matériau et de
fabrication survenus suite à une utilisation normale du produit pendant la période
de garantie. Cette garantie ne couvre pas la batterie, le changement de batterie, les
dommages ou pannes consécutifs à un accident, une mauvaise utilisation, une
négligence, une mauvaise manipulation ou une modification du produit, ni les pannes
causées par l’utilisation du produit pour une application non spécifiée dans cette
documentation, ni les causes non couvertes par cette garantie. Il n’existe aucune
autre garantie expresse que celles citées ci-dessus. Le client exerce son droit de
FR
35
Page 70

réparation sous garantie en contactant le Service clientèle de Suunto Oy afin
d’obtenir une autorisation de réparation. Suunto Oy et ses filiales ne doivent en
aucun cas être tenus responsables des dommages accessoires ou indirects
résultant de l’utilisation ou de l’incapacité d’utiliser ce produit. Suunto Oy et ses
filiales déclinent toute responsabilité en cas de pertes ou de recours de tiers
pouvant survenir suite à l’utilisation de cet instrument.
Le Système d’assurance qualité de Suunto est certifié conforme à la norme ISO
9001 pour toutes les opérations de SUUNTO Oy par Det Norske Veritas (certificat
de qualité Nº 96-HEL-AQ-220).
18.5. Avis de non-responsabilité
Etant donné que les satellites GPS et le système de transmission ne sont pas des
propriétés de Suunto, Suunto ne peut être tenu responsable des éventuels
dysfonctionnements, changements de qualité du repérage ou arrêt du service GPS
à l’avenir. Suunto ne remboursera aucun produit suite à des changements apportés
au service GPS. Cet instrument est conforme à la section 15 des règlements FCC
sur les appareils numériques de classe B. Cet appareil génère et utilise un
rayonnement de fréquence radio et peut causer des interférences nuisibles aux
communications radio s'il n'est pas installé ou utilisé conformément aux instructions.
La non occurrence de ces interférences ne peut être garantie. Si cet appareil
cause des interférences gênantes à d’autres instruments, essayez de résoudre le
problème en déplaçant l’appareil. Consultez un représentant Suunto agréé ou tout
36
Page 71

autre technicien d’entretien habilité si vous ne parvenez pas à éliminer ce problème.
Fonctionnement soumis aux conditions suivantes : (1) Cet appareil ne doit pas
causer d'interférences nuisibles et, (2) cet appareil doit accepter toute autre
interférence reçue, y compris les interférences pouvant entraîner un fonctionnement
non désiré. Les réparations doivent être effectuées par un personnel de
maintenance agréé par Suunto. Les réparations non autorisées annulent la garantie.
19. LISTE DES DATUM GPS
Numéro Nom Description (Datum)
255 WGS84 Système de coordonnées global WGS84
Ce système de coordonnées par degrés est le système par défaut et le système le
plus largement utilisé. Vous trouverez la liste complète des datum dans le manuel
d’utilisation.
FR
37
Page 72

20. LISTE DES QUADRILLAGES LOCAUX
Nom Description
Finnish Finnish National grid KKJ 27
Swedish Swedish national map projection RT 90
British British National grid
Swiss Swiss National grid
Irish Irish National grid
NZTM New Zealand Transverse Mercator Projection
Dutch Royal Dutch grid
BNM M28 Austria Area grid M28
BNM M31 Austria Area grid M31
BNM M34 Austria Area grid M34
Page 73

SUUNTO X9 KURZANLEITUNG
GPS-Signal
START/DATA
Modusanzeige
Höhenalarm
STOP/BACK
Wetteralarm
Navigationsmethode
Batteriestandsanzeige
UP
ENTER
DOWN
Wecker
Aktivitätsstatus
DE
Page 74

Liste der Mempoint-Namen
Bearbeiten Sie die Namen der Mempoints im Suunto Trek Manager.
Koordinatenformate
Pos. Format Wert Gitter
Deg Eingeben Keine Einstellung erforderlich
Dm Eingeben Keine Einstellung erforderlich
Gitter Keine Einstellung erforderlich Eingeben
UTM Keine Einstellung erforderlich Keine Einstellung erforderlich
Eingeben: Geben Sie den korrekten Wert bzw. das Gitter an.
Keine Einstellung erforderlich: Hat keine Auswirkungen und braucht daher
nicht definiert zu werden.
18
Page 75

1. EINLEITUNG
Dies ist die Kurzanleitung für Ihren Suunto X9 Armbandcomputer. Sie stellt in Kürze
alle Modi des Geräts vor und gibt an, wann und wo deren Funktionen genutzt
werden sollten. Außerdem enthält sie detailliertere Anleitungen zur Nutzung der
wichtigsten Funktionen.
Sie stellt jedoch keine vollständige Information über den Suunto X9 dar, und nicht
alle Angaben sind umfassend und detailliert. Sie sollten die Kurzanleitung daher
lediglich als Ergänzung zur ausführlichen Bedienungsanleitung verstehen. Lesen
Sie bitte zuerst die Bedienungsanleitung aufmerksam durch, bevor Sie von der
Kurzanleitung Gebrauch machen. Sie finden die Bedienungsanleitung auf der mit
Ihrem Suunto X9 gelieferten CD-ROM.
Checkliste
Vergewissern Sie sich, dass die Verpackung folgende Dinge enthält:
• Suunto X9
• Dockingstation
• Ladegerät
• PC-Schnittstellenkabel
• CD mit der Suunto Trek Manager-Software und der Bedienungsanleitung
• Suunto X9 Kurzanleitung
• Suunto X9 Taschenanleitung
• Sollte eines dieser Teile in Ihrer Verkaufsverpackung fehlen, kontaktieren Sie
bitte den Händler, bei dem Sie das Instrument gekauft haben.
4
Page 76

2. GRUNDSTRUKTUR DER MENÜS
SHORTCUTS
DAY LIGHT
SHORTCUTS
SHORTCUTS
ROUTE INFO
SHORTCUTS
GPS refresh
SUMMARY
SHORTCUTS
GPS refresh
TIME
ALTI/BARO
COMPASS
NAVIGATION
ACTIVITY
ALL MODES
ALARM
TIME/DATE
UNITS
GENERAL
REFERENCE
USE
BARO MEM
ALARM
DECLINATION
CALIBRATE
NAVIGATE
ROUTE
NAVIDATA
TRACK BACK
XTE ALARM
REFERENCE
GPS fix
ACTIVITY
GPS fix
REFERENCE
MEMORY
GPS
MARK Memp
MARK HOME
FIND HOME
POSITION
ALARM LIST
TIME/DATE
DUAL TIME
SYNC
UTC
TIME
DATE
TEMP
PRESS
ALTITUDE
VERT
DISTANCE
SPEED
POSITION
DATUM
GRID
LIGHT
BRIGHT
CONTRAST
TONES
INFO
ALTITUDE
SEA LEVEL
PRESSURE - TEMPERATURE GRAPH
ALTITUDE
BARO AL
CREATE
My Points
ROUTE LIST
NAVIDATA LIST
ALTITUDE
SEA LEVEL
ALTITUDE
SEA LEVEL
MEMORY LIST
Funktionstasten
ENTER Kurzer Druck
ENTER Langer Druck
START/DATA Kurzer Druck
STOP/BACK Kurzer Druck
STOP/BACK Langer Druck
UP/DOWN
route
CREATE WP
SELECT
WP LIST
ERASE
VIEW
ERASE
TRACK BACK
wp
VIEW
EDIT
LINK WP
UPDATE
ERASE
DE
5
Page 77

3. ALLGEMEINE EINSTELLUNGEN
Bevor Sie Ihren Suunto X9 zum ersten Mal benutzen, müssen Sie Uhrzeit und
Datum einstellen. Sie können außerdem Maßeinheiten und Einstellungen an Ihren
Bedarf anpassen.
Nachfolgend finden Sie die Anleitung zum Einstellen von Uhrzeit und Datum. Die
übrigen Einstellungen werden in ähnlicher Weise vorgenommen. Sie finden alle
Einstellungen im Basisschema der Menüstruktur.
Einstellung von Uhrzeit und Datum:
6
Einstellung ändern
und mit ENTER
bestätigen
Hauptansicht
Page 78

4. TIME-MODUS
Der Time-Modus umfasst normale Zeitfunktionen wie Uhrzeit, Datum, Wecker und
Stoppuhr. Im Time-Menü können Sie die Maßeinheiten für die in anderen Modi dargestellten Angaben wählen, allgemeine Einstellungen wie Displaykontrast und Tastentöne anpassen und das Ihren Landkarten entsprechende GPS-Positionsformat
definieren.
Datum
Uhrzeit
Abkürzungen
(Sekunden, Dualzeit,
Stoppuhr)
4.1. Verwendung der Funktionen des Time-Modus
Allgemeine Einstellungen
• Uhrzeit und Datum einstellen (TIME/DATE)
• Maßeinheiten und Einstellungen anpassen, Koordinatensystem auswählen (
und GENERAL).
UNITS
DE
7
Page 79

So planen Sie Ihre Tour
• GMT-Abweichung einstellen (UNITS)
• Positionsformat einstellen (
UNITS)
• Für das Positionsformat Grid: Wählen Sie das Gitter, das Ihrer Landkarte
entspricht (
UNITS)
Vor Beginn der Tour
• Falls Sie sich in einer neuen Zeitzone befinden, stellen Sie Uhrzeit und Datum ein
TIME/DATE)
(
Unterwegs
• Halten Sie mit Hilfe der Stoppuhr die Zeiten fest, die Sie für verschiedene Strecken
benötigen
• Passen Sie die Displaybeleuchtung an die herrschenden Bedingungen an (
8
LIGHT).
Page 80

5. ALTI/BARO-MODUS
Der Alti/Baro-Modus dient zur Messung von Höhe, Luftdruck und Temperatur. Der
Suunto X9 berechnet die Höhe anhand des momentanen Luftdrucks, welcher
genauere Messergebnisse liefert als GPS-Höhenmessung und auch bei abgeschalteter GPS-Funktion verfügbar ist.
Da Höhen- und Wetterdaten über denselben barometrischen Sensor ermittelt
werden, müssen Sie festlegen, ob Sie diesen Modus als Höhenmesser oder als
Wetterstation nutzen möchten. Unter Use bestimmen Sie, welche Informationen in
der Hauptanzeige erscheinen. Das Alti/Baro-Menü enthält auch Wetter- und Höhenalarm, die für die Wetter-Höhe-Korrelation erforderliche Referenzeinstellung sowie
den Wetterdatenspeicher.
5.1. Verwendung der Alti-Funktionen
Vertikale
Höhe
Abkürzungen
(Temperatur,
Absoluter Luftdruck
[abs], Uhrzeit)
DE
9
Page 81

5.2. Verwendung der Baro-Funktionen
Meeresspiegeldruck
6h-Luftdruckdiagramm
Abkürzungen
(Temperatur, Absoluter
Luftdruck [abs], Uhrzeit)
Vor Beginn der Tour
• Stellen Sie die Referenzhöhe und/oder den Meeresspiegeldruck ein (REFERENCE)
• Stellen Sie den Höhen- oder Luftdruckalarm ein (
Unterwegs
• Kontrollieren Sie die Höhen- oder Barometerwerte (USE)
Nach der Tour
• Rufen Sie den 7-Tage-Barometerdatenspeicher ab (BARO MEM).
10
ALARM)
Page 82

6. COMPASS-MODUS
Der Compass-Modus unterstützt die GPS-Funktionen und hilft Ihnen auch dann bei
der Orientierung, wenn GPS ausgeschaltet ist. Dank seines 3-Achsen-Sensors
kann der Kompass um bis zu 30° geneigt werden, ohne dass die Peilung beeinträchtigt wird. Im Compass-Menü können Sie die Deklination (Abweichungskorrektur)
einstellen und den Kompass kalibrieren, so dass er überall korrekte Angaben liefert.
Kardinalpunkte
Kursrichtung
Abkürzungen
(Uhrzeit, Peilung [bea],
Peilungssperre)
Vor Beginn der Tour
• Kalibrieren Sie den Kompass (CALIBRATE)
• Stellen Sie die Kompassdeklination ein (
DECLINATION)
Unterwegs
• Verwenden Sie den Kompass, um sich in unbekanntem Gelände zurechtzufinden
• Ermitteln Sie Richtungen, wenn die GPS-Funktion abgeschaltet ist oder Sie sich
so langsam bewegen, dass die GPS-Richtungsmessung nicht möglich ist.
Nord-
Anzeige
DE
11
Page 83

7. NAVIGATION-MODUS
Verwenden Sie den Navigation-Modus, wenn Sie zu einem bestimmten Ziel
unterwegs sind und sichergehen wollen, dass Sie es nicht verfehlen. Dieser
Modus umfasst alle typischen GPS-Funktionen, die mit Wegpunkten und Routen
arbeiten. Sie können die Routen und Wegpunkte, die Sie zu Ihrem Ziel führen, direkt
in diesem Modus oder auch im PC programmieren. Der Navigation-Modus zeigt
Ihnen auch Entfernung, Richtung, geschätzte Ankunftszeit sowie andere wichtige
Informationen zu den Wegpunkten Ihrer Route, und er kann Sie zurück zu Ihrem
Ausgangspunkt führen.
Dieser Modus ist an den Activity-Modus gekoppelt. Auch wenn Sie keine Route
aktiviert haben (z.B. beim Joggen), zeigt der Navigation-Modus Ihnen daher stets
die Entfernung und Richtung zu Ihrem Ausgangspunkt.
Wegpunkt/Route
Entfernung zum
Wegpunkt/Länge
der Route
Abkürzungen
(Zeit bis Wegpunkt [ttw],
Peilung [bea], Uhrzeit)
12
Page 84

So planen Sie Ihre Tour
• Erstellen Sie eine Route (ROUTE)
• Erstellen Sie neue Wegpunkte durch Verknüpfen (
LINK WP)
Vor Beginn der Tour
• Aktivieren Sie eine Route (ROUTE)
• Wählen Sie die Navigationsmethode (
• Stellen Sie die Satellitenortungsrate für das GPS-System ein (
NAVIGATE)
GPS FIX)
HINWEIS: Die Anzeige wird gemäß dem gewählten GPS-Ortungsintervall
aktualisiert.
Unterwegs
• Folgen Sie der gewählten Route
• Rufen Sie Navigationsdaten ab (
NAVIDATA)
Auf dem Heimweg
• Folgen Sie dem aktiven Kursprotokoll in umgekehrter Richtung, um zurück zu
Ihrem Ausgangspunkt zu gelangen (
TRACK BACK)
Nach der Tour
• Betrachten, bearbeiten und/oder löschen Sie Routen und Wegpunkte (ROUTE)
• Laden Sie Ihre Daten für weitere Analysen in den Suunto Trek Manager.
13
DE
Page 85

8. ACTIVITY-MODUS
Während der Navigation-Modus Ihnen den Weg zeigt, informiert der Activity-Modus
Sie über Ihre Leistung. Diesen Modus benötigen Sie, wenn Sie Ihre Aktivität messen
und aufzeichnen möchten, sei es die Jogging-Runde in der Nachbarschaft oder
eine Tour durch die Wildnis.
Der Activity-Modus zeigt Ihnen Geschwindigkeit, Entfernung, die seit dem Aufbruch
vergangene Zeit und andere interessante Informationen zu Ihrer Tätigkeit. Er zeichnet
Ihren Kurs zusammen mit Geschwindigkeit und Höhenprofil zur späteren Ansicht
im PC auf. Außerdem speichert er eventuelle unterwegs markierte Punkte
(Mempoints) Unterwegs können Sie jederzeit per Knopfdruck eine Protokollzusammenfassung abrufen.
Geschwindigkeit
Zurückgelegte Strecke
Abkürzungen
(Uhrzeit, Zeit seit
Aufbruch [tfs], Höhe)
14
Page 86

Vor Beginn der Tour
• Wählen Sie die Art der Aktivität (ACTIVITY)
• Wählen Sie die Satellitenortungseinstellungen für das GPS-System (
• Stellen Sie die Referenzhöhe und/oder den Meeresspiegeldruck ein (
GPS FIX)
REFERENCE)
HINWEIS: Die Anzeige wird gemäß dem gewählten GPS-Ortungsintervall
aktualisiert.
Unterwegs
• Kontrollieren Sie Geschwindigkeits- und Streckeninformation
• Rufen Sie die Protokollzusammenfassung ab (START/DATA-Taste)
Auf dem Heimweg
• Lassen Sie sich von der Kursrückverfolgefunktion (TRACK LOG) zum
nächstgelegenen Punkt eines bereits aufgezeichneten Kurses und von dort aus
zu dessen Ausgangspunkt führen
Nach der Tour
• Betrachten und/oder löschen Sie Kursprotokolle
• Laden Sie Ihre Daten für weitere Analysen in den Suunto Trek Manager.
15
DE
Page 87

9. FUNKTIONSMENÜ
Das Funktionsmenü ist in allen Modi ähnlich. Das Funktionsmenü wird durch einen
mehr als zwei Sekunden langen Druck auf ENTER in der Hauptanzeige des jeweiligen
Modus aufgerufen.
Vor Beginn der Tour
• Markieren Sie Ihren Standort, so dass Sie später dorthin zurückkehren können.
MARK HOME)
(
Unterwegs
• Kontrollieren Sie die Koordinaten Ihrer aktuellen Position (POSITION)
• Markieren Sie bestimmte Positionen während Ihrer Aktivität (
MARK MEMP)
Auf dem Heimweg
• Kehren Sie zu Ihrem mit Mark Home markierten Ausgangspunkt zurück (FIND HOME).
10. SUUNTO TREK MANAGER
Um alle Vorteile Ihres Suunto X9 nutzen zu können, sollten Sie die im Verkaufspaket
enthaltene Suunto Trek Manager-Software auf Ihrem PC installieren.
1. Legen Sie die Suunto Trek Manager-CD in das CD-ROM-Laufwerk Ihres PCs ein.
2. Warten Sie, bis die automatische Installation beginnt, und folgen Sie den Anweisungen.
16
Page 88

HINWEIS: Falls die Installation nicht automatisch beginnt, klicken Sie auf Start
—> Ausführen und geben Sie den Befehl D:\setup.exe ein.
So werden Sie Mitglied in der SuuntoSports.com Community:
1. Stellen Sie eine Internetverbindung her und öffnen Sie Ihren Web-Browser.
2. Gehen Sie zu der Adresse www.suunto.com
3. Klicken Sie auf “Register”, um sich und Ihr Suunto-Instrument anzumelden. Ihre
persönlichen Angaben und Ausrüstungsprofile können Sie später unter der Rubrik
My Suunto
ergänzen und aktualisieren. Nach der Anmeldung gelangen Sie
automatisch zur SuuntoSports.com-Homepage, wo Sie mehr über Aufbau und
Funktionsprinzipien der Seiten erfahren.
11. PLANUNG DER TOUR
Beim Planen Ihrer Tour können Sie mit dem Suunto X9 oder dem Suunto Trek
Manager eine Route erstellen.
Erstellung einer Route mit dem Suunto X9
Eingabe der
Wegpunktinformationen
Wiederholung
für weitere
Wegpunkte
17
DE
Page 89

12. VOR BEGINN DER TOUR
Bevor Sie zu Ihrer Tour aufbrechen, sollten Sie sich vergewissern, dass der
Kompass einwandfrei funktioniert. Markieren Sie außerdem Ihren Ausgangspunkt,
so dass Sie zurückfinden, falls Sie sich unterwegs verlaufen sollten. Vergewissern
Sie sich auch, dass die GPS-Funktion eingeschaltet und die Route aktiviert ist.
Kompasskalibrierung
Kalibrierung
abgeschlossen
DE
19
Page 90

Eine Route
aktivieren
Navigationsmethode auswählen
Wählen Sie eine geeignete
Navigationsmethode aus
Navigationsmethoden
x
x
x
Zu einem einzelnen Wegpunkt einer Route
y
y
y
x
Zum Ausgangspunkt keine Route oder
WP ausgewählt
x
Zu einem Punkt aus der Liste MyPoints
20
Page 91

Aktivität
Hauptansicht
Wählen Sie
einen geeigneten
Aktivitätsstatus aus
Activity status
Protokollaufzeichnung gestartet,
GPS aktiviert
Protokollaufzeichnung gestoppt,
GPS deaktiviert
Protokollaufzeichnung unterbrochen,
GPS im Standby. Das unterbrochene
Protokoll wird fortgesetzt, wenn Sie
wählen
erneut
DE
GPS fix
GPS-Ortungsintervall
1
s
1 min
Manual
Geschätzte
Dauer
h
4,5
12 h
Nutzungsabhängig,
> 500 Positionen
Protokollinterval
10 s
1 min
Manu
al
Höhenprofilintervall
10 s
20 s
60 s
Speicherkapazität
(max. 25 Kursprotokolle)
24 h
145 h
Bis 400 h
HINWEIS: Die Anzeige wird gemäß dem gewählten GPS-Ortungsintervall
aktualisiert. Beim manuellen Intervall werden die Activity- und die ManualHauptanzeige durch einen langen Druck auf STOP/BACK aktualisiert.
21
Page 92

GPS-Signalstärke
22
Mark Home
Oder beliebiger
anderer Modus
GPS ist aktiviert
und markiert die
Koordinaten des
Ausgangspunktes
Page 93

Referenzhöhe/Meeresspiegeldruck einstellen
Referenzwert
eingestellt
HINWEIS: Wenn das GPS aktiviert ist, finden Sie die Höhenreferenz in der
Positionsanzeige im Funktionsmenü
HINWEIS: Wenn das GPS aktiviert ist, finden Sie den Meeresspiegeldruck,
indem Sie im Alti/Baro-Modus die Baro-Funktion wählen.
23
DE
Page 94

Höhen/Luftdruckalarm einstellen
Alarm
eingestellt
Alarm
eingestellt
HINWEIS: Der Luftdruckalarm wird ausgelöst, falls sich der der barometrische
Druck um 4 hPa/0.118 inHg ändert.
24
Page 95

13. UNTERWEGS
Während Ihrer Tour können Sie ihren Fortschritt überwachen, verschiedene
Navigationsmethoden anwenden und die Koordinaten bestimmter Orte entlang Ihrer
Route markieren.
Aktivitäts- und Navigationsdatenanzeige
Activity- und Navigation-Modus haben separate Datenanzeigen, die unterschiedliche
Arten von navigations- und aktivitätsrelevanten Informationen zeigen.
Um diese Anzeigen aufzurufen, drücken Sie START/DATA in der Hauptanzeige des
Activity- bzw. Navigation-Modus.
Mark Memp
Position markiert,
wenn EPE klein
genug
Oder beliebiger
anderer Modus
HINWEIS: Achten Sie darauf, dass Ihre Aktivität ist, bevor Sie die MempointFunktion verwenden. Die Aktivierung der Mempoint-Funktion schaltet das GPS
nicht automatisch ein.
14. AUF DEM HEIMWEG
Für das Ende Ihrer Tour bietet der Suunto X9 Ihnen die folgenden Alternativen.
25
DE
Page 96

Find Home Track Back (Aktiver Kurs)
x
Oder beliebiger
anderer Modus
GPS ist aktiviert
und führt Sie
zurück zu Ihrem
Ausgangspunkt.
x
26
y
Der Suunto X9
führt Sie entlang
des aktiven
Kurses zurück.
y
Page 97

Track Back (Aus Speicher)
Lassen Sie sich von der
auswählen
und auf GPS
warten
Kursrückverfolgefunktion
zum nächstgelegenen
Punkt eines bereits
aufgezeichneten Kurses
und von dort aus zu dessen
Ausgangspunkt führen
15. NACH DER TOUR
Nach der Rückkehr von Ihrer Tour können Sie die mit dem Suunto X9 aufgezeichneten
Daten zur weiteren Analyse in den Suunto Trek Manager laden. Wenn Sie möchten,
können Sie Ihre Route auch unter SuuntoSports.com ins Netz stellen.
Außerdem können Sie Ihre nicht länger benötigten Routen, Wegpunkte und Protokolldateien löschen.
Datenübertragung
1. Vergewissern Sie sich, dass Ihr Computer über einen freien seriellen Port verfügt.
2. Legen Sie den Suunto X9 mit dem Display nach oben auf die Dockingstation.
Schließen Sie den Adapter an die Dockingstation und an das Stromnetz an.
Schließen Sie die Dockingstation an den seriellen Port des Computers an. Der
Suunto X9 begibt sich automatisch in den PC-Schnittstellenmodus.
3. Öffnen Sie den Suunto Trek Manager.
4. Klicken Sie im linken unteren Fenster auf das
Connect to X9
Trek Manager zeigt nun die Daten Ihres Suunto X9 (Tracks, Routes, MyPoints).
-Symbol. Der Suunto
DE
27
Page 98

5. Um die Daten vom Suunto X9 in den Suunto Trek Manager zu übertragen, wählen
Sie ein Objekt aus und klicken Sie linken unteren Fenster auf das Symbol
selected item(s) to folder
. Das ausgewählte Objekt wird im Ordner Downloaded
Download
des Local Data-Fensters gespeichert. Sie können es nun im Kartenfenster öfnen
und Weg- oder Alarmpunkte hinzufügen.
6. Nach der Übertragung der Dateien auf den PC können Sie diese mit dem Suunto
Trek Manager aus dem Speicher des Suunto X9 löschen und somit Platz für neue
Logbuchdateien schaffen.
Nähere Informationen zum Hochladen von Routen finden Sie in der Hilfe des Suunto
Trek Manager im Hilfemenü.
Eine Route löschen
Route
gelöscht
Protokolldateien löschen
Protokolldatei
gelöscht
28
Page 99

16. PFLEGE UND WARTUNG
Halten Sie sich genau an die in diesem Handbuch beschriebenen Pflegehinweise.
Nehmen Sie den Suunto X9 niemals selbst auseinander. Schützen Sie ihn vor
Stößen, extremer Hitze und längerer direkter Sonneneinstrahlung. Wenn Sie Ihren
Suunto X9 für längere Zeit nicht benutzen, bewahren Sie ihn in sauberer und
trockener Umgebung bei Raumtemperatur auf.
Der Suunto X9 kann mit einem leicht angefeuchteten Tuch (warmes Wasser) abgewischt werden. Verwenden Sie milde Seife, um die Oberfläche von Verschmutzungen oder hartnäckigen Flecken zu reinigen. Setzen Sie das Instrument
keinen starken chemischen Mitteln wie Benzin, Reinigungsmitteln, Aceton, Alkohol,
Insektenvernichtungsmitteln, Klebstoffen oder Farbe aus, da diese das Gehäuse,
die Dichtungen und die Oberfläche angreifen und beschädigen würden. Halten Sie
den Sensorbereich frei von Staub und Sand. Stecken Sie niemals Stifte oder sonstige
spitze Gegenstände in die Sensoröffnung!
16.1. Wasserdichte
Der Suunto X9 ist wasserdicht. Seine Wasserresistenz wurde bis in eine Tiefe von
100m/330ft gemäß dem Standard ISO 2281 getestet (www.iso.ch). Da bedeutet,
dass Sie ihn beim Schwimmen oder anderen Wassersportaktivitäten tragen können.
Verwenden Sie ihn jedoch keinesfalls zum Tauchen.
HINWEIS: Drücken Sie keinesfalls die Tasten, während Sie schwimmen oder mit
Wasser in Kontakt sind. Das absichtliche oder versehentliche Drücken der Knöpfe
29
DE
Page 100

unter Wasser kann zu Funktionsstörungen führen.
HINWEIS: Viel Wasser oder Schmutz unter der Abdeckung des Suunto X9 kann
den Satellitenempfang stören.
16.2. Laden des Akkus
Der Akku kann mit einem 110 V oder 220 V Netzladegerät (je nach dem Ort des
Verkaufs), einem Kfz-Zigarettenanzünder-Ladegerät (optional) oder einer 9 V
Batterie geladen werden.
HINWEIS: Dieses Suunto-Produkt enthält einen Li-Ion-Akku. Um Feuergefahr
und Verbrennungen zu vermeiden, darf der Akku nicht auseinandergenommen,
zerquetscht, anderweitig beschädigt oder kurzgeschlossen werden. Keinesfalls
in Feuer oder Wasser entsorgen. Verwenden Sie nur die vom Hersteller
angegebenen Akkus. Verbrauchte Akkus müssen vorschriftsgemäß dem
Recycling zugeführt bzw. entsorgt werden.
30
 Loading...