

EN

Suunto X6hr
USER’S GUIDE
EN
1

TABLE OF CONTENTS
1. GENERAL INFORMATION ......................................................................................5
1.1. Care and Maintenance ..........................................................................5
1.1.1. Care of the Suunto X6hr ..........................................................5
1.1.2. Care of the Transmitter Belt .....................................................6
1.2. Water Resistance ..................................................................................6
1.3. Adjusting the Bracelet (Suunto X6hrt) ..................................................7
1.4. Battery Replacement of the Suunto X6hr .............................................8
1.5. Battery Replacement of the Transmitter Belt ......................................11
1.6. After sales service ...............................................................................12
2. HOW TO USE YOUR SUUNTO X6hr ...................................................................13
2.1. Display ...............................................................................................13
2.1.1. Mode Symbols ........................................................................13
2.1.2. Function Symbols ...................................................................14
2.2. Buttons ...............................................................................................15
2.2.1. Short and Long Press .............................................................15
2.2.2. Start Button ............................................................................15
2.2.3. Stop/CL Button .......................................................................16
2.2.4. Suunto Button .........................................................................16
2.2.5. Arrow Buttons .........................................................................17
2.2.6. Button Lock ............................................................................17
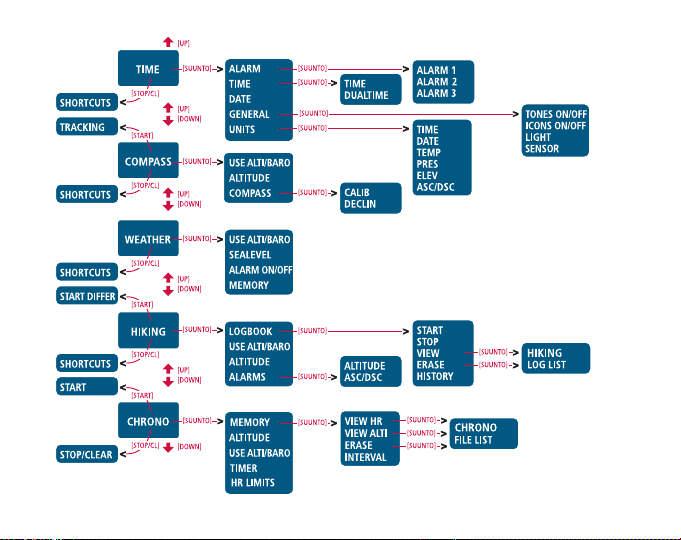
2.3. Menus ...............................................................................................18
2.3.1. Basic Menu Structure .............................................................18
2.3.2. Navigating in Menus ...............................................................18
2.4. Heart Rate monitor and Transmitter Belt .............................................19
2

2.4.1. Electromagnetic Interference .................................................19
2.4.2. Warnings .............................................................................................19
2.4.3. Use of the Suunto X6hr and Transmitter Belt in
a water environment ...............................................................20
2.4.4. Activating the Heart Rate Monitor ..........................................20
3. MODES .................................................................................................................21
3.1. General Information ............................................................................21
3.2. Time Mode ..........................................................................................22
3.2.1. Main Display ...........................................................................22
3.2.2. Alarm ......................................................................................22
3.2.3. Time ........................................................................................24
3.2.4. Date ........................................................................................25
3.2.5. General ...................................................................................26
3.2.6. Units .......................................................................................28
3.3. Compass Mode ...................................................................................31
3.3.1. Main Display ...........................................................................31
3.3.2. Use .........................................................................................33
3.3.3. Altitude/Sealevel .....................................................................34
3.3.4. Compass ................................................................................34
3.4. Weather Mode .....................................................................................37
3.4.1. Main Display ...........................................................................37
3.4.2. Use .........................................................................................38
3.4.3. Sealevel ..................................................................................38
3.4.4. Alarm ......................................................................................38
3.4.5. Memory ..................................................................................39
3.5. Hiking Mode ........................................................................................40
3

3.5.1. Main Display ...........................................................................40
3.5.2. Logbook ..............................................................................................41
3.5.3. Use .........................................................................................45
3.5.4. Altitude ...................................................................................45
3.5.5. Alarms ....................................................................................45
3.6. Chrono ...............................................................................................47
3.6.1. Main Display ...........................................................................47
3.6.2. Memory ..................................................................................48
3.6.3. Altitude ...................................................................................52
3.6.4. Use .........................................................................................52
3.6.5. Timer ......................................................................................53
3.6.6. HR Limits ................................................................................54
4. ADDITIONAL FEATURES .....................................................................................55
4.1. PC Interface ........................................................................................55
4.1.1. Transferring Data ....................................................................55
4.1.2. Suunto Activity Manager Features .........................................57
4.2. SuuntoSports.com ...............................................................................59
4.2.1. System Requirements ............................................................59
4.2.2. SuuntoSports.com Sections ...................................................59
4.2.3. Getting Started .......................................................................61
5. TECHNICAL DATA ................................................................................................62
6. COPYRIGHT AND TRADEMARK NOTICE ...........................................................63
7. CE ............................................................................................................64
8. LIMITS OF LIABILITY AND ISO 9001 COMPLIANCE ..........................................64
9. DISPOSAL OF THE DEVICE ................................................................................65
4

1. GENERAL INFORMATION
This User’s Guide applies to Suunto X6hr and its different design versions.
Suunto X6hr Wristop Computer is a reliable high-precision electronic instrument
intended for recreational use. Outdoor enthusiasts and endurance athletes who enjoy
such sports as mountain climbing, running and biking can rely on Suunto X6hr’s
accuracy.
NOTE: The Suunto X6hr should not be substituted for obtaining measurements that
require professional or industrial precision and should not be used to obtain altitude
or barometric measurements when flying a small aircraft or when practising aviation
sports.
1.1. CARE AND MAINTENANCE
1.1.1. Care of Suunto X6hr
Only perform the procedures described in this manual. Never attempt to disassemble
or service your Suunto X6hr. Protect your Suunto X6hr from shocks, extreme heat and
prolonged exposure to direct sunlight. If not in use, store your Suunto X6hr in a clean,
dry environment at room temperature.
Suunto X6hr can be wiped clean with a lightly moistened (warm water) cloth.
If there are stubborn stains or marks, you can apply mild soap to the area. Do not
expose Suunto X6hr to strong chemicals such as gasoline, cleaning solvents, acetone,
alcohol, insect repellents, adhesives and paint, as they may damage the unit’s seals,
case and finish. Keep the PC interface contacts clean with e.g. a toothbrush. Make
sure the area around the sensor is free of dirt and sand. Never insert any objects into
the sensor openings.
5

1.1.2. Care of Transmitter Belt
Wash the transmitter with mild soap and water after each use. Rinse with pure water;
dry thoroughly and carefully.
Store in a cool dry place. Never store the transmitter wet. Moisture keeps the electrodes
wet and transmitter activated, thereby shortening the life of the battery.
Do not bend or stretch the transmitter as this may damage the electrodes.
1.2. WATER RESISTANCE
Suunto X6hr and the transmitter belt are tested with ISO (International Organization for
standardization) standard 2281 (www.iso.ch). This means that product is water-resistant.
“In addition to the term “water resistant” Suunto X6hr is marked with an indication of a
test overpressure given as a depth in meters (100 m / 330 ft) and transmitter belt (20m
/ 66 ft). This indication however do not correspond to a diving depth but refer to the
pressure at which the water overpressure test was conducted”.
This means that you can not dive to a depth of 100 meter / 330 ft with Suunto X6hr
wristop computer nor 20m / 66 ft with transmitter belt.
Rain, shower, swimming and other normal exposure to water will not effect its operation
but the buttons shall not be pressed if exposed to water in any circumstances.
NOTE! X6hr wristop computers and transmitter belts must not be used for diving.
6
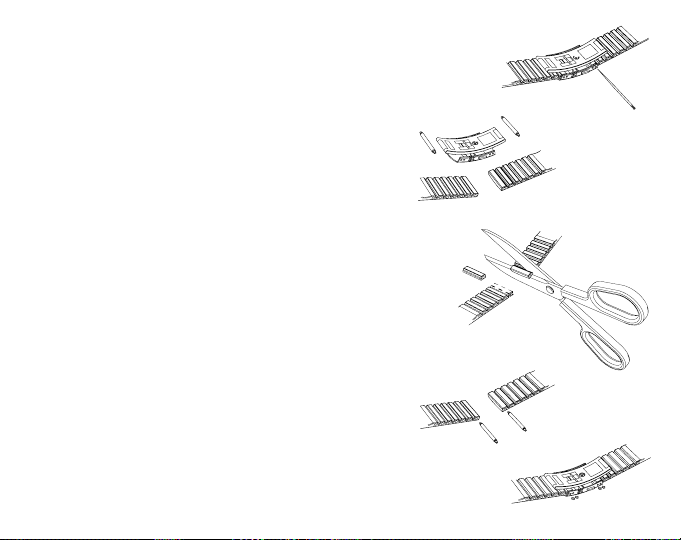
1.3. ADJUSTING THE BRACELET
(SUUNTO X6hrt)
The metal/elastomer bracelets of the Suunto X6hrt
have to be adjusted for the user. The steps are
1. Remove the buckle by releasing the spring bars
with pin, paper clip or other sharp object.
2. Remove both spring bars from the pin holes.
3. Shorten the bracelet by cutting along the grooves
on the inner surface of the bracelet. You can do
this for instance with scissors. If you are unsure
of the correct length, cut the pieces one by one
and test the length after cutting each piece. Cut
in turns from both sides of the bracelet to keep
the sides equally long. Be careful in order not to
shorten the bracelet too much.
4. Replace the spring bars into the last pin holes
of both sides of the bracelet.
5. Attach the buckle to the bracelet by placing the
spring bars into the holes in the buckle. In both
sides of the buckle are holes for two different
positions. This can be used for fine adjusting of
the bracelet length. Make sure that the spring
bars are positioned straight in the buckle.
7

1.4. BATTERY REPLACEMENT
Suunto X6HR operates on a 3-Volt lithium cell, type: CR 2032. The life expectancy is
approximately 12 months in Time/Weather modes.
A low-battery warning indicator is activated on the display when approximately 5–15
percent of the battery capacity is still available. When this occurs, you should replace
the battery. However, extremely cold weather may activate the low battery warning
indicator, even though the battery is still fully operational. If the battery warning indicator
is activated in temperatures above 10°C (50°F), replace the battery.
NOTE: Heavy use of the backlight, altimeter, compass and heart rate monitor will
significantly reduce battery life.
You can replace the batteries yourself as long as you do it properly to avoid any
leakage of water into the battery compartment or computer. Always use original battery
replacement kits. (They include a new battery, battery lid and O-ring.) You can purchase
the battery kits from official Suunto retailers.
NOTE: When replacing the battery, also replace the battery lid and O-ring. Never use
the old ones.
NOTE: Change the battery at your own risk. Suunto recommends you to have the
batteries changed in official Suunto services.
8

REPLACING THE BATTERY
Make sure that you have purchased an original Suunto battery kit (including battery and
battery lid with installed O-ring) before you start replacing the battery.
1. Insert a coin into the slot or a Suunto battery-opening coin into the slot or holes located
in the battery compartment cover on the backside of your device.
2. Turn the coin counterclockwise until it is aligned with the open position marker. Then,
turn and lift the cover with the coin simultaneously, until the cover opens.
9

3. Remove the battery compartment cover and the old battery carefully. Avoid damaging
the contact plate.
4. Carefully clean the inside sealing surface of the battery compartment before placing
your new battery in the compartment.
5. Place the new battery into the battery compartment with the positive side facing up.
Gently slide the battery underneath the contact plate, ensuring that the contact plate
does not break or bend out of place.
6. Place the new battery compartment cover on top of the battery compartment, aligning
the position marker on the cover with the open position marker on the backside of
your device.
7. Using the coin, gently press and turn the cover clockwise, until the position marker
on the cover is aligned with the close position marker on the back.
NOTE: When the battery has been replaced, ensure that the battery compartment is
correctly closed. This helps your Suunto device remain water-resistant. Careless battery
replacement may void the warranty.
NOTE: Heavy use of the backlight, especially in the Night Use setting, will significantly
reduce battery life.
10

1.5. BATTERY REPLACEMENT OF THE TRANSMITTER BELT
The transmitter belt operates on a 3-Volt lithium cell, type: CR 2032.
The transmitter belt’s average expected battery life is 300 hours of use in ideal operating
temperatures.
When Suunto X6hr is not receiving a signal but the transmitter belt is active, a change
of battery might be necessary. Refer to chapter 2.4.1. for other factors that may interfere
with the correct signal.
To change the battery:
1. Insert a coin into the slot located on the battery compartment cover on the backside
of the transmitter belt.
2. Turn the coin
counterclockwise until it is aligned with the open position marker, or
even slightly further for easy opening.
3. Remove the battery compartment cover. Ensure that the
O-ring and all surfaces are
clean and dry. Do not stretch the O-ring.
4. Carefully remove the old battery.
5. Place the new battery into the battery compartment with the positive side facing
up.
11

6. With the O-ring in the correct position, replace the battery compartment cover and
turn it with a coin clockwise until it is aligned with the closed position marker.
NOTE: You should change the battery cover and the O-ring simultaneously with the
battery to ensure that the transmitter remains clean and waterresistant. Replacement
covers are available with replacement batteries.
NOTE: Battery covers of the transmitter belt and the wristop computer are not
interchangeable.
1.6. AFTER SALES SERVICE
If a claim under warranty appears to be necessary, return the product, freight prepaid,
to your Suunto dealer who is responsible for having your product repaired. Include your
name and address, proof of purchase and/or service registration card, as required in
your country. The claim will be honored and the product repaired or replaced at no
charge and returned in what your Suunto dealer determines a reasonable amount of
time, provided all necessary parts are in stock. All repairs made, not covered under
the terms of this warranty, will be made at the owner’s expense. This warranty is nontransferable from the original owner.
If it is not possible to contact your Suunto dealer, contact your local Suunto distributor
for further information. You can locate your local Suunto distributor from www.suunto.
com.
12

2. HOW TO USE YOUR SUUNTO X6hr
2.1. DISPLAY
When your Suunto X6hr leaves the factory, it
is in sleep mode, with the display empty. Long
press (> 2 s) any button to activate the Suunto
X6hr. The text “defrag of memory” is displayed
and after a few seconds the Time mode is
activated. Later on, you can select which mode
is displayed. For information about setting the
correct time, refer to chapter 3.2.3.
In a dd it io n to m od e- sp ec if ic information,
the Suun to X6 hr display includes several
symbols.
2.1.1. Mode Symbols
The mode symbols on the left of the display
indicate the active mode:
Time
Compass
Weather
Hiking
Chrono
13

2.1.2. Function Symbols
Function symbols indicate that either a function (such as Alarm) has been activated or
something needs to be done (battery symbol). The function symbols are:
Alarm
Active, when at least one of the alarms is on.
Weather/Altitude/HR alarm
Active, when weather alarm, altitude alarm, asc/dsc alarm or HR limits alarm is on.
Logbook
Active, when the hiking logbook is recording data.
Chrono
Active, when the chrono is on and recording data to a file.
Use alti/baro
Indicates that the air pressure sensor is used as a barometer and the altitude reading
is fixed.
Active when you select the air pressure to be displayed as weather information. In this
case the altitude reading in Hiking, Chrono and Compass modes is fixed. For more
information refer to chapter 3.3.2.
Battery
Active, when 5–15 percent of the battery capacity is left and the battery should be
replaced.
Button Lock
Active, when the button lock is activated.
14

Heart Rate
Active, when the heart rate monitor is receiving heart rate signal. Flashes in sync with
the heart rate.
2.2. BUTTONS
2.2.1. Short and Long Press
The buttons may have diff erent functi ons
depending on how long you press them.
The ordinary
press or short press means that
the button is pressed quickly.
The
long press means that the button is pressed
for more than 2 seconds.
2.2.2. Start Button
Short press
• In Chrono mode, it starts timing and saves and displays the intermediate times.
• In Hiking mode, it saves the mark points (altitude, heart rate and time).
Long press
• Activates the backlight when the backlight is not set to the off position. For more
information on backlight settings, refer to chapter 3.2.5.
15

2.2.3. Stop/CL Button
Short press
• Returns to the previous menu level or to the previous selection without accepting
the selection.
• In the Chrono mode, it stops timing.
• In the main displays, it acts as a shortcut button that toggles the lowest field of the
main display between three different alternatives. The selection stays active even if
the mode or menu level is changed.
Long press
• Returns to the main display of the current mode without accepting the last
selection.
• In the Chrono mode, it resets the stopwatch.
2.2.4. Suunto Button
Short press
• Scrolls to a lower menu level.
• Accepts the selections made with arrows and moves to the next phase.
• After the last selection, it returns to the Set menu.
• With two possible selections (e.g. light On/Off), it activates the selection and accepts
the selections made with arrows.
Long press
• Returns to the main display of the current mode and accepts the selection.
• With two possible selections (e.g. light On/Off), it accepts the selection and returns
directly to the main display of the current mode.
16

• In the main display of all modes, it activates or deactivates the heart rate limits
alarm.
2.2.5. Arrow Buttons
Short press
• Scrolls from one mode to another.
• Scrolls the menus up and down, and logbook and memory forward and back.
• Changes the values. The
up arrow increases the value and the down arrow decreases
the value.
• With two possible selections (e.g. light On/Off), both arrows change the value.
2.2.6. Button Lock
The button lock prevents you from pushing the buttons. If the button lock is activated
and you try to press a button, the message “unlock press suunto” is displayed.
Activating the button lock
To activate the button lock
1. Press Suunto. Suunto X6hr switches to the Function menu.
2. Press
Start within 2 seconds. The buttons are locked and Suunto X6hr switches to
the main display of the current mode.
Deactivating the button lock
To deactivate the button lock
1. Press Suunto. The following text is displayed: “now press start”.
2. Press
Start within 2 seconds.
17

2.3. MENUS
2.3.1. Basic Menu Structure
The menus are organized hierarchically under the modes. When you select a mode,
its main display appears. When you press Suunto in the mode’s main display, the
mode’s Function menu is displayed. The Function menu includes several functions
and all the functions include sub-functions or settings. This is called the hierarchical
menu structure.
2.3.2. Navigating in Menus
You can scroll the menu items with the up and down arrow buttons on the right side of
Suunto X6hr. Three menu items are displayed at the same time. The menu item that
is currently active and can thus be selected is displayed in reversed color. On the right
side of the display there is an indicator bar showing the total number of menu items.
The number of the active menu item is displayed next to the indicator bar.
To move deeper into the hierarchy, select a menu item and press Suunto. To return
one step up in the hierarchy, press Stop/CL. Remember that if you just press Stop/CL,
changes are not saved. First you have to accept them with the Suunto button.
If you want to return directly to the main display of the active mode, press either Suunto
(saves the changes) or Stop/CL (discards the last change) for more than 2 seconds.
Suunto X6hr has been designed to guide you as much as possible when you navigate in
the menus. When you perform a function, Suunto X6hr often automatically returns to the
menu that you are likely to use next. Also, for example, if you try to do something that is
impossible, Suunto X6hr first displays a message and then automatically recommends
a function in reversed color to help you use the functions.
18

2.4. HEART RATE MONITOR AND TRANSMITTER BELT
The heart rate monitor is the premier feature of Suunto X6hr. It provides you with a
versatile instrument for measuring and analyzing physical performance in different
conditions. When used in conjunction with the altimeter function, the heart rate
monitor allows you to observe changes in heart rate during ascents and descents and
the impact of altitude on heart rate. The heart rates can be recorded in Suunto X6hr
memory and transferred to a PC for analysis. The heart rate data is available in Hiking
and Chrono modes.
2.4.1. Electromagnetic interference
Disturbances may occur near high voltage power lines, traffic lights, overhead lines of
electric railways, electric bus lines or trams, televisions, car motors, bike computers,
some motor driven exercise equipment, cellular phones or when you walk through
electric security gates.
It is best to position the Wristop computer within 3 feet (0,9 meters) of the transmitter.
Ensure that no other transmitters are within that range; signals from other transmitter(s)
can cause an incorrect readout.
Repeated kinetic shock to the Suunto X6hr may cause an incorrect heart rate readout
and should be avoided.
2.4.2. Warnings
Persons who have a pacemaker, defibrillator, or other implanted electronic device
use the heart rate monitor at their own risk. Before starting the initial use of the heart
rate monitor, we recommend an exercise test under a doctor’s supervision. This will
ensure the safety and reliability of the pacemaker and the heart rate monitor when
used simultaneously.
19
 Loading...