

Page 1

SUUNTO TRAVERSE
USER GUIDE
Page 2

Contents
SUUNTO TRAVERSE ................................................................ 1
1 SAFETY ................................................................................... 6
2 GETTING STARTED ............................................................. 10
2.1 Buttons and menus ........................................................ 10
2.2 Set up ............................................................................ 11
2.3 Adjusting settings ........................................................... 13
3 FEATURES ........................................................................... 14
3.1 Activity monitoring .......................................................... 14
3.2 Alti-Baro ......................................................................... 14
3.3 Autopause...................................................................... 24
3.4 Backlight ........................................................................ 24
3.5 Button lock ..................................................................... 25
Page 3

3.6 Compass ....................................................................... 26
3.8 Countdown timer ............................................................ 32
3.9 Displays ......................................................................... 33
3.10 Exercising with sport modes ................................... 34
3.11 Find back ............................................................... 42
3.12 Firmware updates .................................................. 42
3.13 FusedAlti ................................................................ 43
3.14 Icons ...................................................................... 45
POI icons ........................................................................ 47
3.15 Logbook ................................................................. 48
3.16 Memory left indicator .............................................. 51
3.17 Movescount............................................................ 51
3.23 Navigating with GPS AND GLONASS ........................ 55
3.24 Notifications ........................................................... 59
3.25 HR sensors ............................................................ 60
3.27 Routes ....................................................................... 67
3.28 Service menu ......................................................... 73
3.30 Sport modes........................................................... 76
Custom sport modes ....................................................... 76
3.31 Stopwatch .............................................................. 77
3.32 Suunto Apps .......................................................... 79
3.35 Track back ............................................................... 106
Page 4

4.3 Charging the battery..................................................... 111
5 REFERENCE ....................................................................... 114
5.1 Technical specifications ............................................... 114
General ......................................................................... 114
Memory......................................................................... 114
Radio receiver ............................................................... 114
Barometer ..................................................................... 114
Altimeter ....................................................................... 114
Thermometer ................................................................ 115
Chronograph ................................................................. 115
Compass ...................................................................... 115
GPS 115
5.2 Compliance .................................................................. 115
5.3 NOM-121-SCT1-2009 .................................................. 117
5.4 Trademark ................................................................... 117
5.5 Patent notice ................................................................ 117
5.6 Warranty ...................................................................... 118
Warranty Period ............................................................ 118
Exclusions and Limitations ............................................ 118
Access to Suunto warranty service ............................... 119
Limitation of Liabilit y ...................................................... 119
5.7 Copyright ..................................................................... 120
Page 5

Page 6
6
1 SAFETY
Types of safety precautions
WARNING: - is used in connection with a procedure or situation that
may result in serious injury or death.
AVERTISSEMENT: - s'utilise en lien avec une procédure ou
une sit uation pouva nt entraî ner des accidents graves voir e m ortels.
CAUTION: - is used in connection with a procedure or situation
that
will result in damage to the product.
ATTENTION: - s'utilise en lien avec une procédure ou une
situation pouvant entraîner des dégâts sur le produit.
NOTE: - is used to emphasize important information.
REMARQUE: - met l'acc ent sur des informations import antes.
TIP: - is used for extra tips on how to utilize the features and
functions of the device.
CONSEIL: - signale des conseils sup pl
é
mentaires sur l'utilis ation
des fonctionnalit
é
s et caractéristiques de l'appareil.
Page 7

7
Safety precautions
Précautions d'utilis ation
WARNING: ALLERGIC REACTIONS OR SKIN IRRITATIONS MAY
OCCUR WHEN PRODUCT IS IN CONTACT WITH SKIN, EVEN
THOUGH OUR PRODUCTS COMPLY WITH INDUSTRY
STANDARDS. IN SUCH EVENT, STOP USE IMMEDIATELY AND
CONSULT A DOCTOR.
AVERTISSEMENT: DES RÉACTIONS ALLERGIQUES OU
DES IRRITATIONS CUTANÉES PEUVENT SURVEN IR LORSQUE
LE PRODUIT EST EN CONTACT AVEC LA PEAU, MALGRÉ L A
CONFORMITÉ DE NOS PRODUITS AUX NORMES
INDUSTRIELLES. EN CAS D 'ÉVÉNEMENT DE CE TYPE,
CESSEZ IMMÉDIAT EMEN T TOUTE UTILISATION ET
CONSULTEZ UN MÉDECIN.
WARNING: ALWAYS CONSULT YOUR DOCTOR BEFORE
BEGINNING AN EXERCISE PROGRAM. OVEREXERTION MAY
CAUSE SERIOUS INJURY.
AVERTISSEMENT: CONSULTEZ TOUJOURS VOTRE M
É
DECIN
AVANT DE COMME NCER UN PROGRAMME D'ENTRA
Î
NEMENT. LE
SURENTRA
Î
NEMENT PEUT PROVOQUER DES ACCIDENTS
GRAVES.
Page 8
8
WARNING: ONLY FOR RECREATIONAL USE.
AVERTISSEMENT: RÉSERVÉ À UNE UTILI SATION DE LOISI R.
WARNING: DO NOT ENTIRELY RELY ON THE GPS OR
BATTERY
LIFETIME, ALWAYS USE MAPS AND OTHER BACKUP
MATERIAL TO ENSURE YOUR SAFETY.
AVERTISSEMENT: NE VO US FIEZ PAS TOTALEMENT AU
GPS OU À L'AUTONOMIE DE LA BATTERIE. POUR VO TRE
SÉCURITÉ, UTILISEZ TOUJOURS DES CARTES ET AUTRES
MATÉRIELS DE SECOURS.
CAUTION: DO NOT APPLY SOLVENT OF ANY KIND TO THE
PRODUCT, AS IT MAY DAMAGE THE SURFACE.
ATTENTION: N'APPLIQUEZ AUCUN SOLVANT DE
QUELQUE TYPE QUE CE SOIT SUR LE PRODUIT, AU RISQUE
D'EN ENDOMMAGER LA SURFACE.
CAUTION: DO NOT APPLY INSECT REPELLENT ON THE
PRODUCT, AS IT MAY DAMAGE THE SURFACE.
ATTENTION: N'APPLIQUEZ AUCUN PRODUIT INSECTICIDE
QUEL QU'IL SOIT SUR LE PRODUIT, AU RISQ UE D'EN
Page 9
9
ENDOMMAGER LA SURF ACE.
CAUTION: DO NOT THROW THE PRODUCT AWAY, BUT TREAT
IT AS ELECTRONIC WASTE TO PRESERVE THE ENVIRONMENT.
ATTENTION: NE JETEZ PAS LE PRODUIT AUX ORDURES
MÉNAGÈRES. TRAI TEZ-LE COMME UN DÉCHET
ÉLECTRONIQUE AFIN D E PROTÉGER L'ENVIRONNEMENT.
CAUTION: DO NOT KNOCK OR DROP THE DEVICE, AS IT MAY
BE
DAMAGED.
ATTENTION: NE HEUR TEZ PAS OU NE FAITES PAS
TOMBER LE PRODUIT, AU RISQUE DE L'ENDOMMAGER.
Page 10
10
2 GETTING STARTED
2.1 Buttons and menus
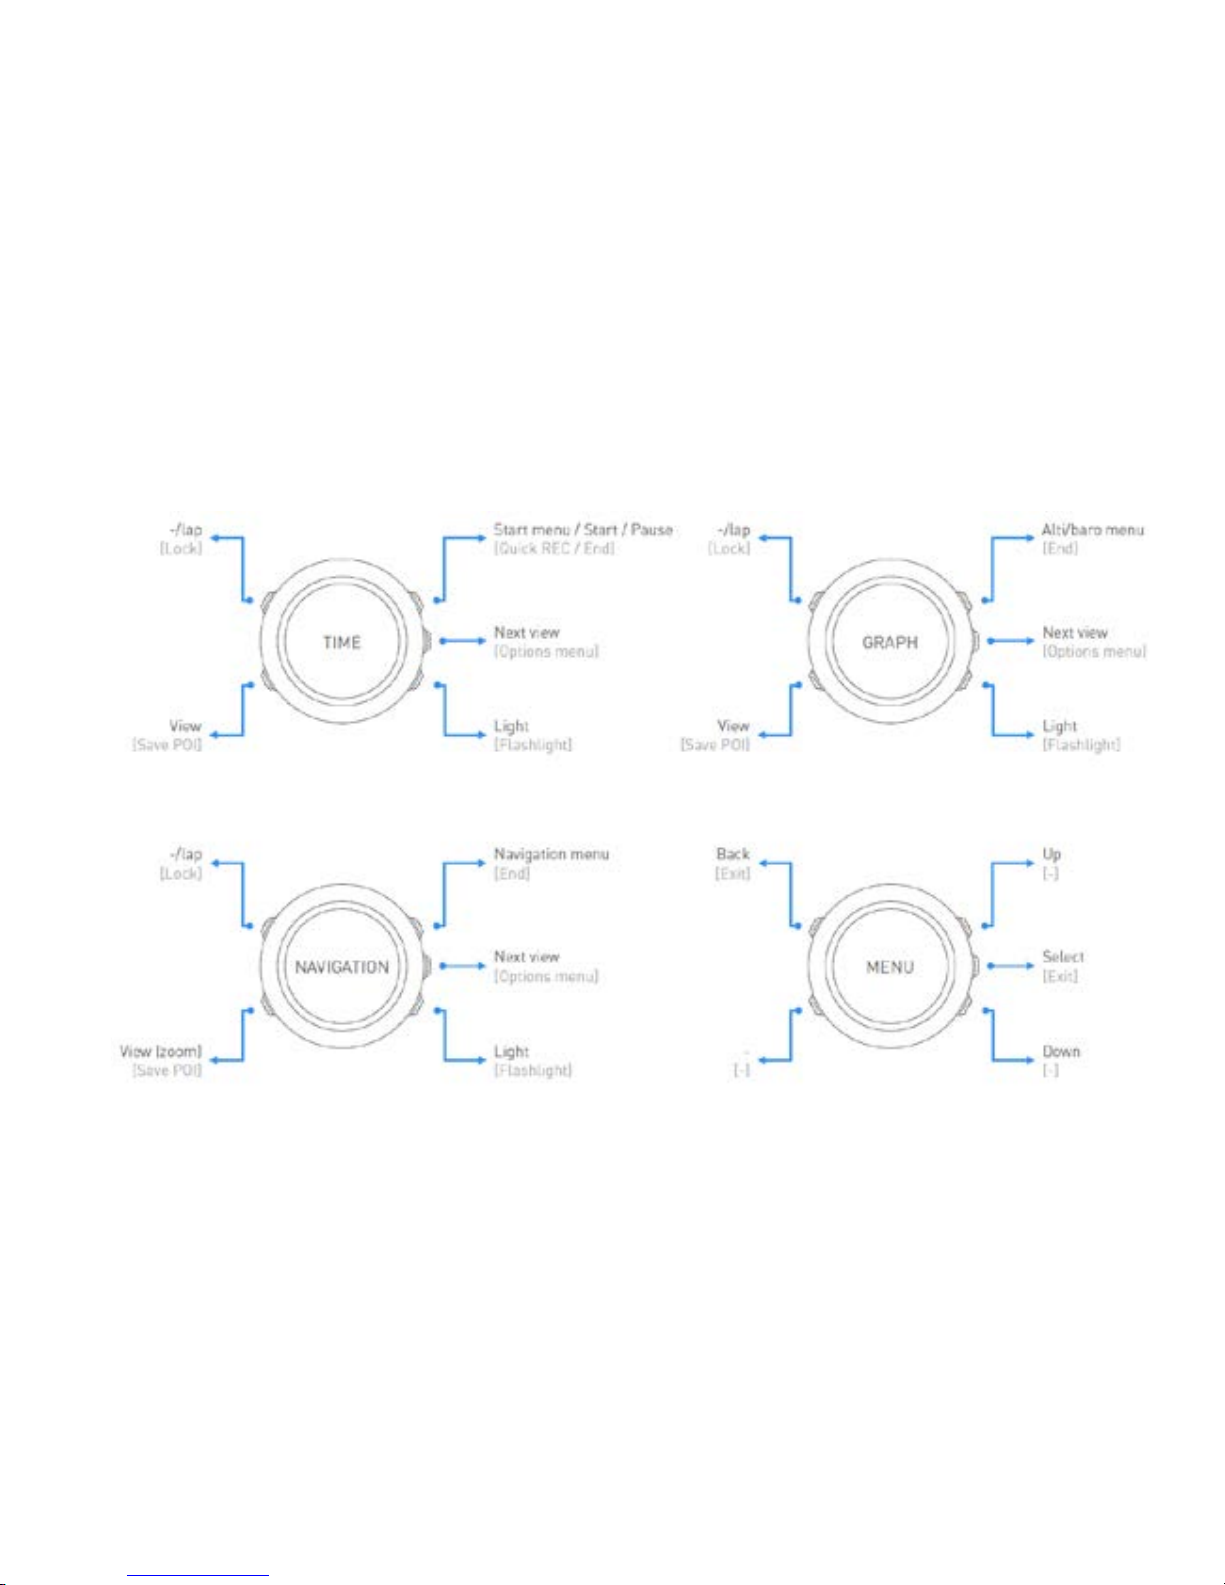
Suunto Traverse has five buttons which allow you to access all the
features.
Upper right [Start]:
•
press to access the start menu
•
press to pause or resume a recording or timer
•
press to increase a value or move up in the menu
•
keep pressed to stop and save a recording
Page 11

11
Center right [Next]:
•
press to change displays
•
press to accept a setting
•
keep pressed to access/exit the options menu
•
keep pressed to access/exit the options menu in sport modes
Bottom right [Light]:
•
press to activate the backlight
•
press to decrease a value or move down in the menu
•
keep pressed to activate flashlight
press to deactivate flashlight
Bottom left [View]:
•
press to change bottom row view
•
keep pressed to save POI
•
keep pressed to access shortcut (see 3.29 Shortcuts)
Upper left [Back Lap]:
•
press return to the previous menu
•
press to add a lap during exercise
•
keep pressed to lock buttons
TIP: When changing values, you can increase the speed by
keeping [Start ] or [Light] pressed until the values start to
scroll faster.
2.2 Set up
Page 12

12
To make the most of your Suunto Traverse you may want to download
Suunto Movescount Mobile App from App store, and create own user
account with Suunto Movescount service before s etti ng up the product.
To start using your sports watch
1. Press any button to start the device
2. Press [Start] or [Light] to scroll to the desired language and press
[Nex t] to se lect.
3. Follow the startup wizard to complete initi al settings. Set val ues with
[Start] or [Light] and press [Next] to accept and go to the next step.
NOTE: you may need to recharge Suunto Traverse before starting the set
up. Watch display will show a battery symbol when it needs to be charged.
To recharge, plug device cable to wall socket or PC .
Fully charging an empty battery takes about 2-3 hours. Buttons are
locked while the USB cable is attached and connected to a computer.
You can exit the startup wizard at any time by keeping [Next] pressed.
The startup wizard takes you through the following settings:
•
Units
•
Time format
•
Personal settings (gender, age, weight)
•
Time update (go outside for GPS signal to automatically update
time)
Page 13
13
•
Pairing with mobile device (this can also be done later if you don’t
have the app installed)
2.3 Ad justing settings
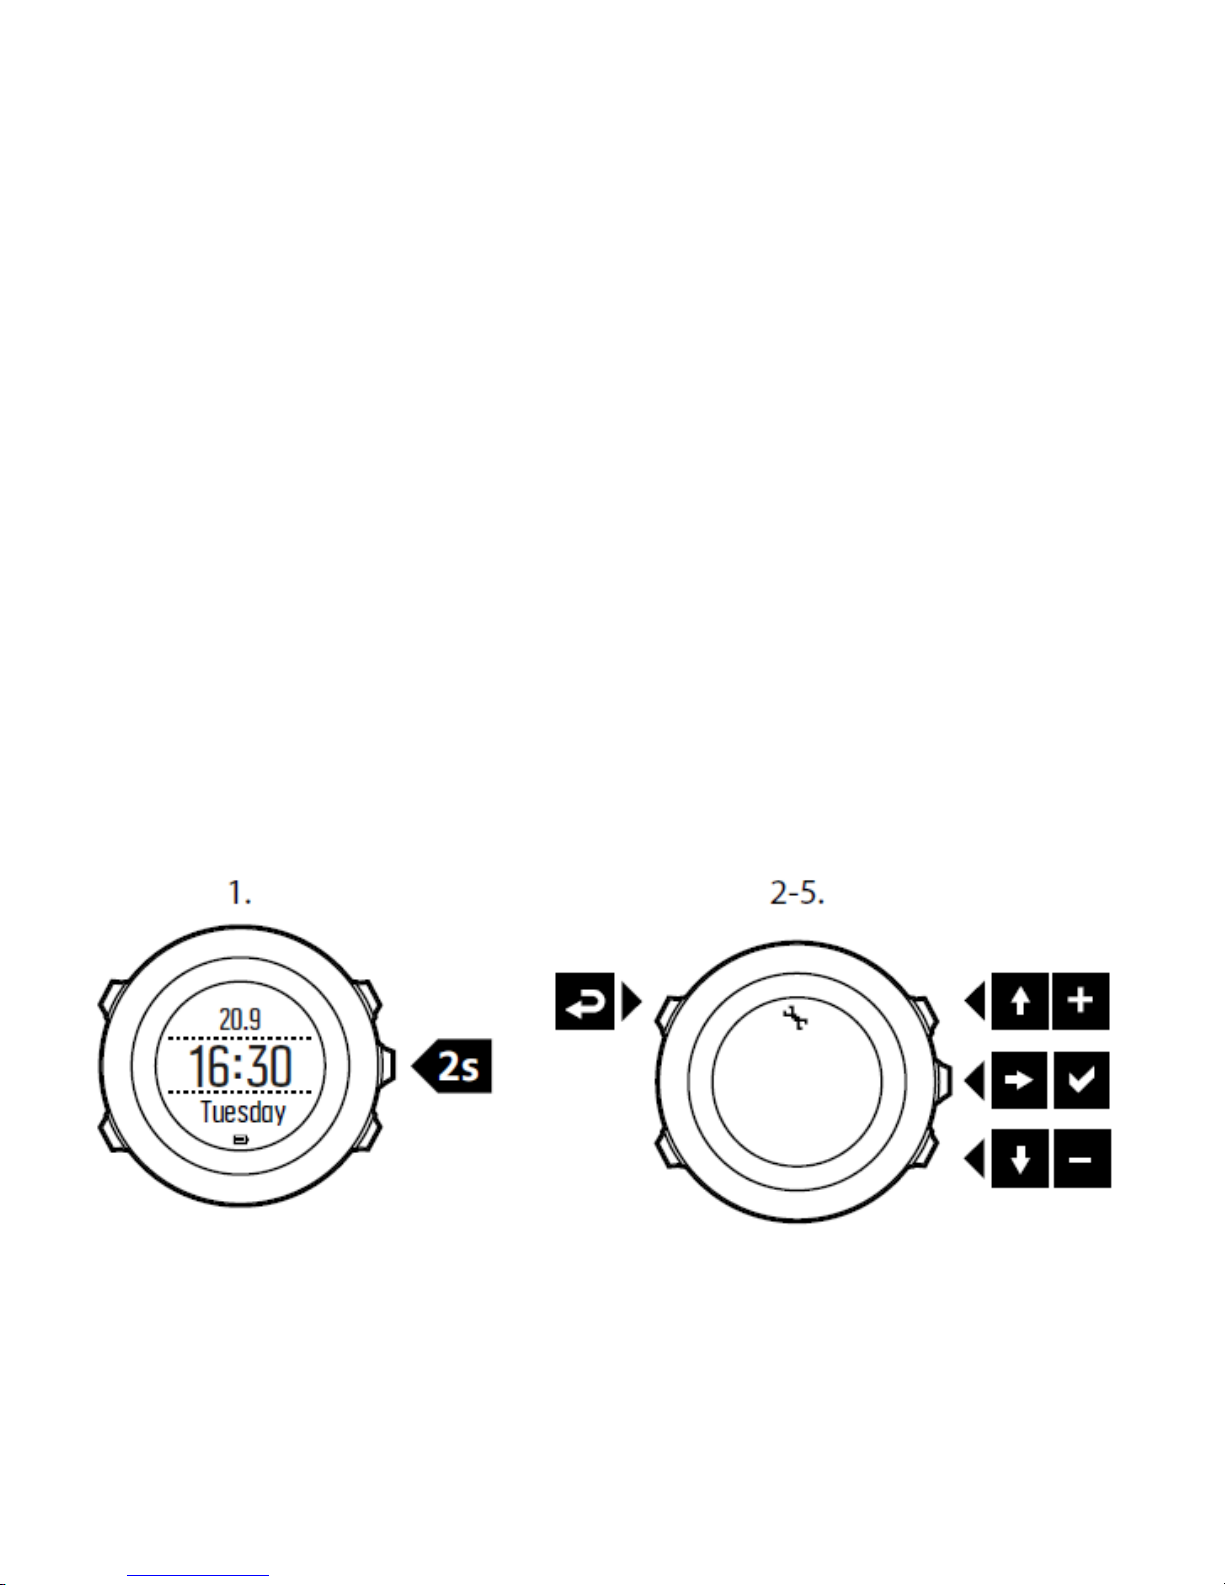
You can change the settings of your Suunto Traverse directly in the
watch, through Movescount, or on the go with Suunto Movescount
App (see
3.21 Movescount mobile app).
To change the settings in the watch:
1. Keep [Next] pressed to enter the options menu.
2. Scroll the menu with [Start] and [Light] .
3. Press [Next] to enter a setting.
4. Press [Start] and [Light] to adjust the setting values.
5. Press [Back Lap] to return to the previous menu or keep [Next]
pressed to exit.
Page 14

14
3 FEATURES
3.1 Activity monitoring
Suunto Traverse measures your daily steps and estimates calories
burned during the day, based on your personal data.
Daily step count is availabl e as a default view in TIME. Yo u can see
the step number by pressing the [VIEW] button.
The step count is measured by the accelerometer sensor, and the
number of steps is updated every 60 seconds.
Daily step count and calories burned are displayed as the first view of
the Logbook. To view your daily step count and an estimation of
calories burned during the day, press [Start] button, and select
Logbook.
The value is reset daily at midnight.
3.2 Alti-Baro
With ALTI-BARO you can view the current altitude or barom etric
pressure. Press [Next] in TIME mode to view the ALTI & BARO
display.
You can show/hide the ALTI-BARO display under the start menu
DISPLAYS » Alti-Baro. Toggle with [Next].
You can access different views by pressing [View].
Three profiles are available: Automatic, Barometer and Altimeter.
Page 15
15
For information on setting profiles, see 3.2.2 Matching profile to
activity.
3.2.1 Getting correct readings
Suunto Traverse constantly measures absolute air pressure using
the built-in pressure sensor. Based on this measurement and
reference values, it calculat es altitude or s ea level air press ure.
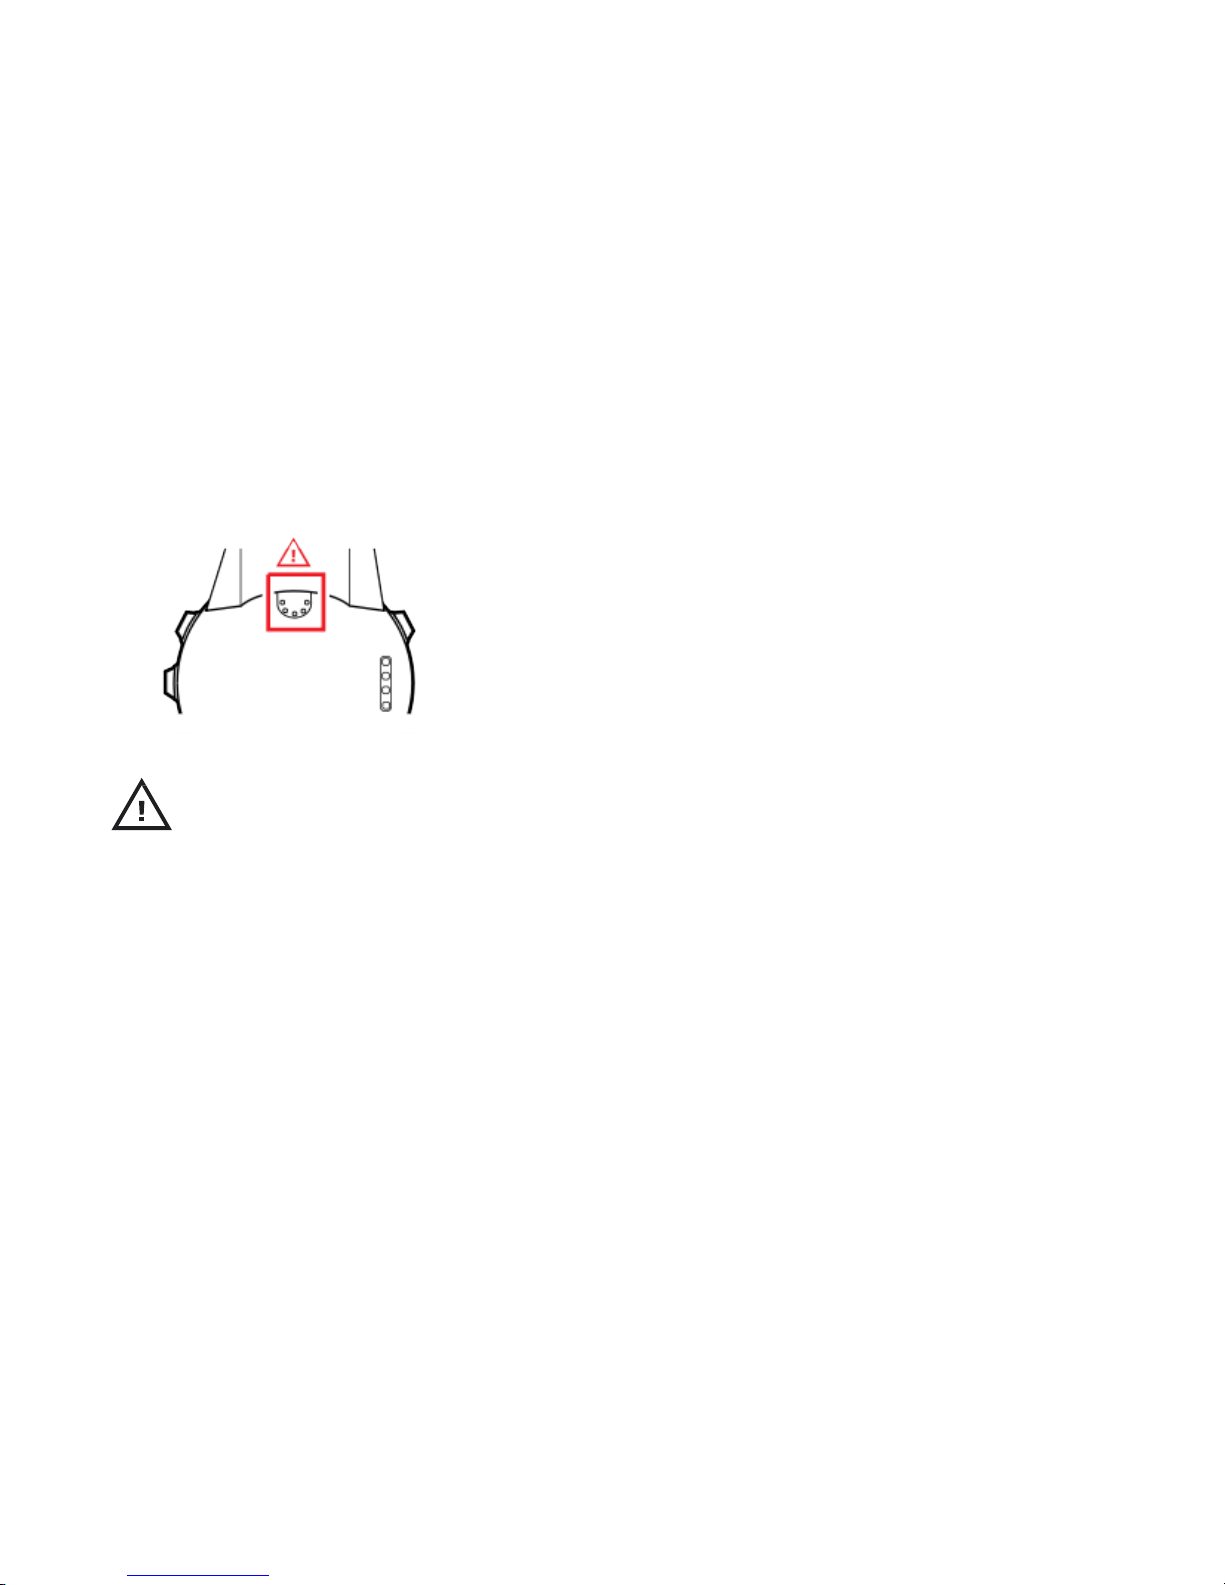
CAUTION: Keep the area around the sensor free of dirt and
sand.
Never insert any objects into the sensor openings.
If you are not recording an outdoor activity, and your activity requires
accurate sea level air pressure or altitude, you need to calibrate your
Suunto Traverse by entering either your current altitude or the current
sea level air pressure.
When recording an activity, Suunto Traverse us es Suunto FusedAlti by
default. This means that altitude readings will be corrected
automatically using FusedAlti together with altitude and seal level
pressure calibrati on. For more information, see
3.13 FusedAlti
.
Page 16

16
The altitude of your location can be found from most topographic maps
or Google Earth. A sea level air pressure reference for your location
can be found using the websites of national weather services.
TIP: Absolute air pressure and known altitude reference = sea
level air pressure. Absolute air pressure and known sea level air
pressure = altitude.
Page 17

17
Changes in local weather conditions will affect altitude readi ngs. If local
weather changes often, it is advisable to reset the current altitude
reference value frequentl y, preferably before st art i ng your journey
when the referenc e val ues are available. As long as the local weather
stays stable, you do not need to set reference values.
To set the sea level pressure and altitude reference values:
1. Keep [Next] pressed to enter the options menu.
2. Scroll to ALTI-BARO with [Light] and enter with [ Next].
3. Scroll to Reference with [Light] and enter with [Next].
4. The following setting options are available:
•
FusedAlti: GPS is switched on and the watch starts calculating
altitude based on FusedAlti.
•
Manual altitude: Set your altit ude manually.
•
Sea level pressure: Set the sea level pressure reference value
manually.
5. Set the reference value using [Start] and [ Light]. Acc ept the
setting with [Next].
Page 18

18
TIP: You can access the Alti/Baro menu by pressing [Start]
when
in ALTI-BARO display.
3.2.2 Matching profile to activity
By default, Suunto Traverse uses Automatic profile that switches
between Alti and Baro automatically, bas ed on movement. In the
Automatic profile, the graph visible in Alt i/BAro displ ay will al ways
represent altitude.
You can either let Suunto Traverse decide a suitable profile for the
activity, or choose yourself a profile that matches your activity.
The Altimeter profile should be selected when your outdoor activity
involves changes in altitude (e.g. hiking in hil l y terrain).
Page 19
19
The Barometer profil e should be selected when your outdoor activity
does not involve changes in altitude (e.g. soccer, sailing, canoeing).
NOTE: You can define the profile as part of the sport mode
settings
in Movescount, or in your Suunto Traverse.
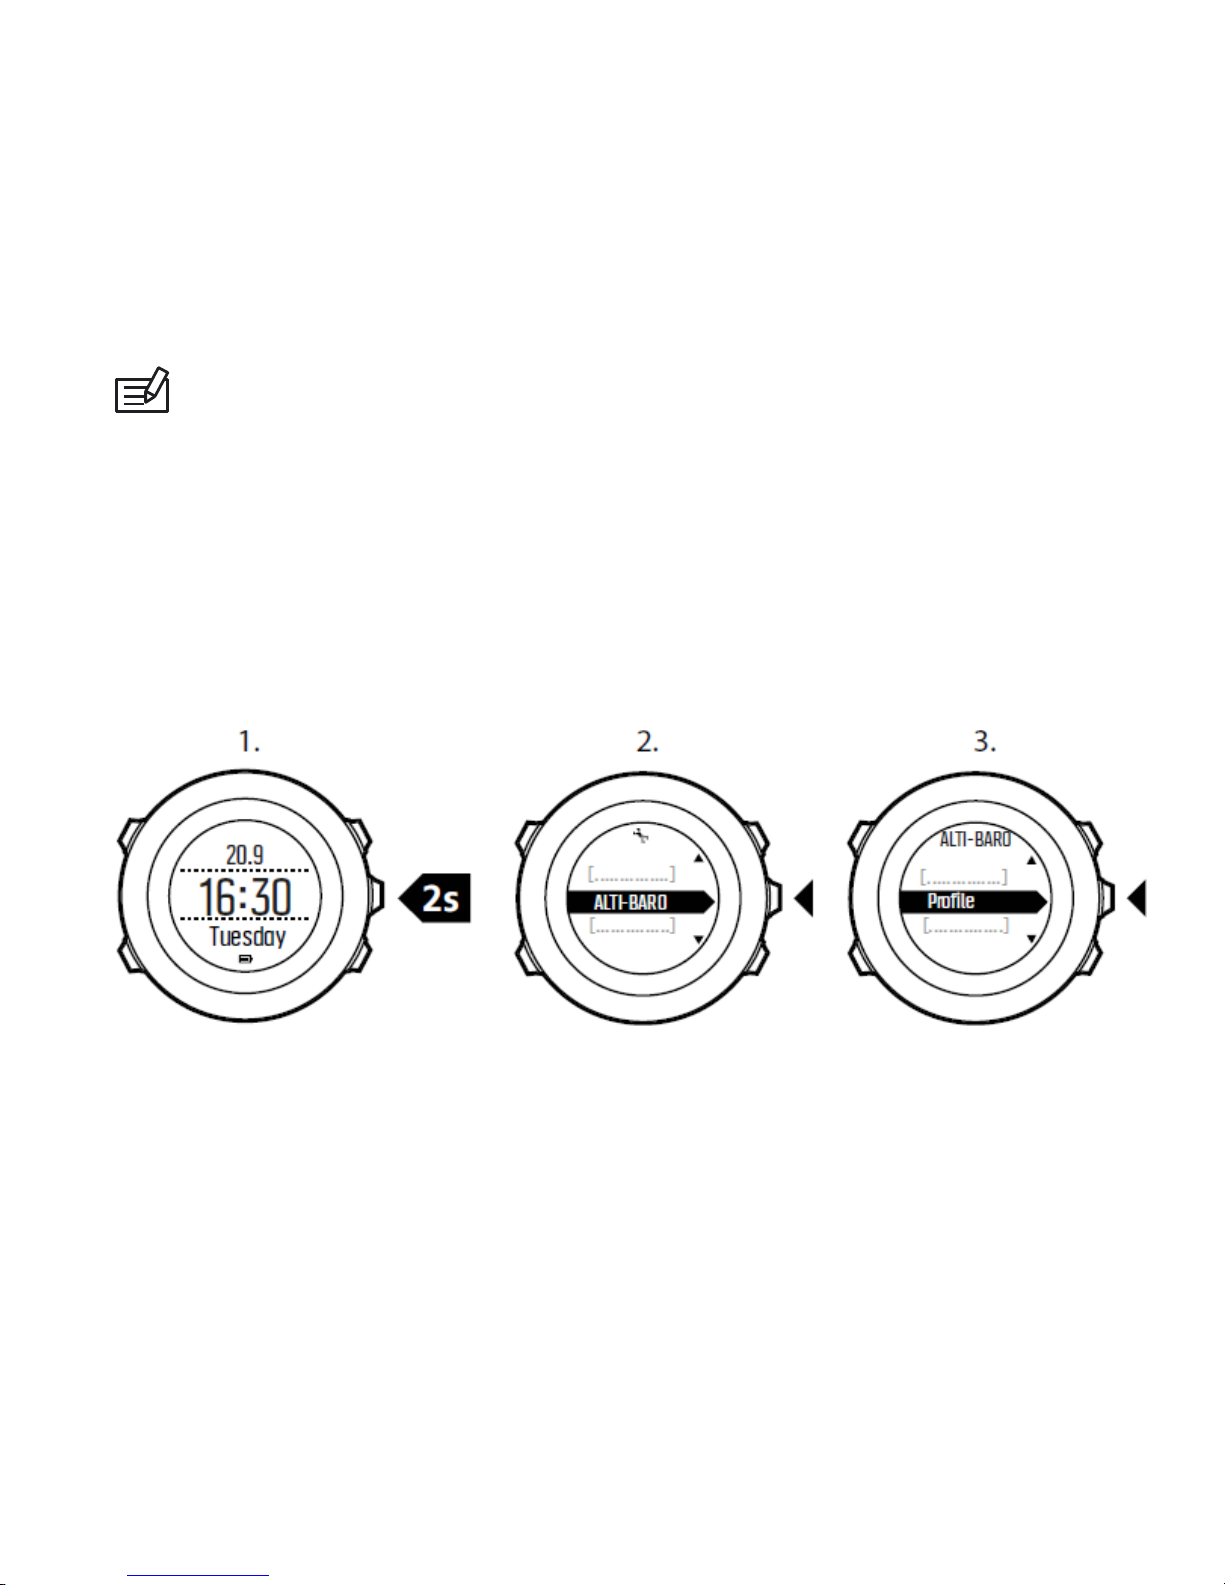
To set the ALTI & BARO profile:
1. Keep [Next] pressed to enter the options menu.
2. Scroll to ALTI-BARO with [ Li ght] and enter with [Next].
3. Press [Next] to select Profile.
4. Scroll the profile options ( Automatic, Altimeter, Barometer) with
[Start] or [Light]. Select a profile with [Next].
Use example: Setting the altitude reference value
You’re on the second day of your two-day hike. You realize that you forgot
Page 20

20
to switch from the Barometer profile to the Altimeter profile when you started
moving in the morning. You know that the current altitude readings given by
your Suunto Traverse are wrong. So, you hike to the nearest location shown
on your topographic map for which an altitude reference value is provided.
You correct your Suunto Traverse alti t ude referenc e value accordingl y and
switch from Barometer to Altimeter profil e. Y our altitude readi ngs are correct
again.
Incorrect read ings
If your Altimeter profile is on for an extended period of time with the
device in a fixed locat i on while the loc al weather changes, the device will
give incorrect altitude readi ngs.
If your Altimeter profile is on and the weather changes frequently while
you climb in altitude or go down in altitude, the device will give you
incorrect readings.
If the Barometer profile is on for an extended period of time as you climb
in altitude or go down in altitude, the device assumes that you are
standing still and interprets your changes in altitude as changes i n sea
level air pressure. It will therefore give you incorrec t sea level ai r press ure
readings.
3.2.3 Using Altime ter profile
The Altimeter profile calculates altitude based on reference val ues.
The reference value can either be sea level air pressure value or
altitude reference value.
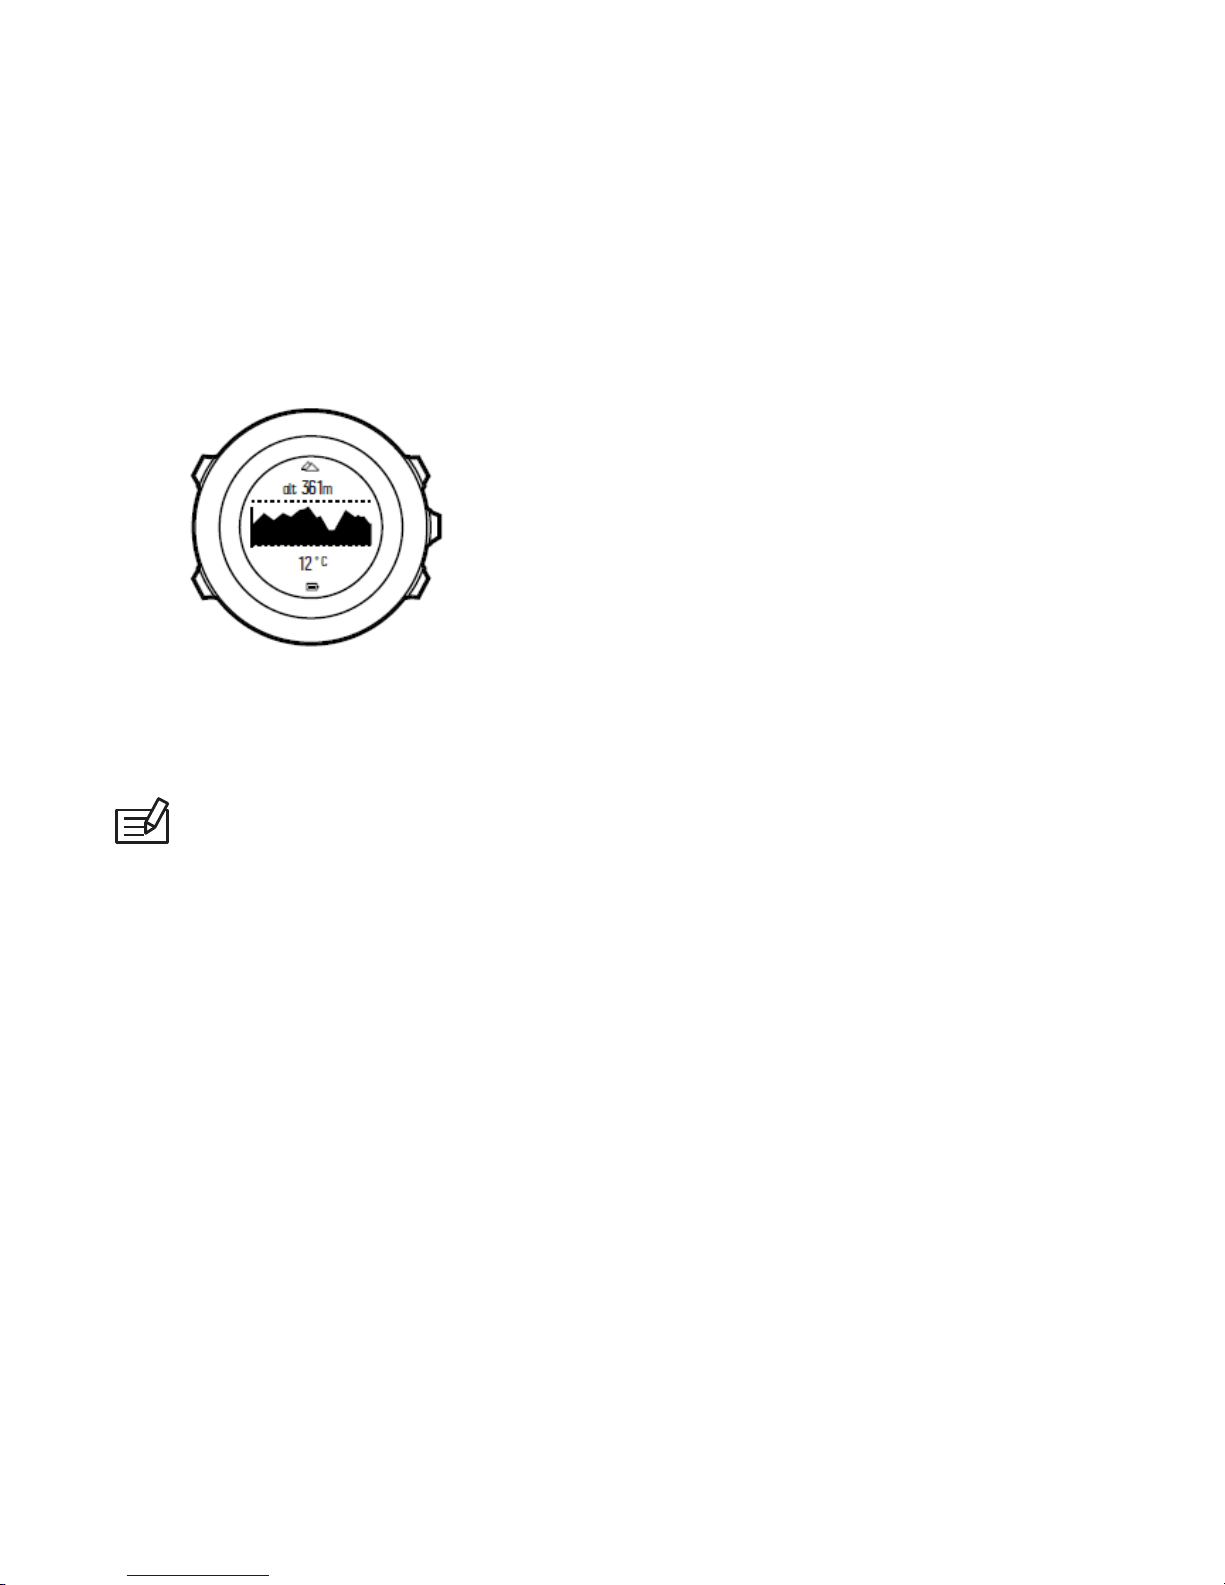
When the Altimeter profile is activated, the altimeter icon is shown on
the display.
When the Altimeter profile is activated, you can access the following
Page 21
21
views:
•
your current altitude, a graph displaying altitude changes over the
past 12 hours (7 min. recording interval)
•
bottom row: change with [View] to show temperature, baro trend
NOTE: If you are wearing your Suunto Traverse on your wrist, you
will need to take it off in order to get an accurate
temperature reading
because your body temperature will affect the initial reading.
3.2.4 Using Barometer profile
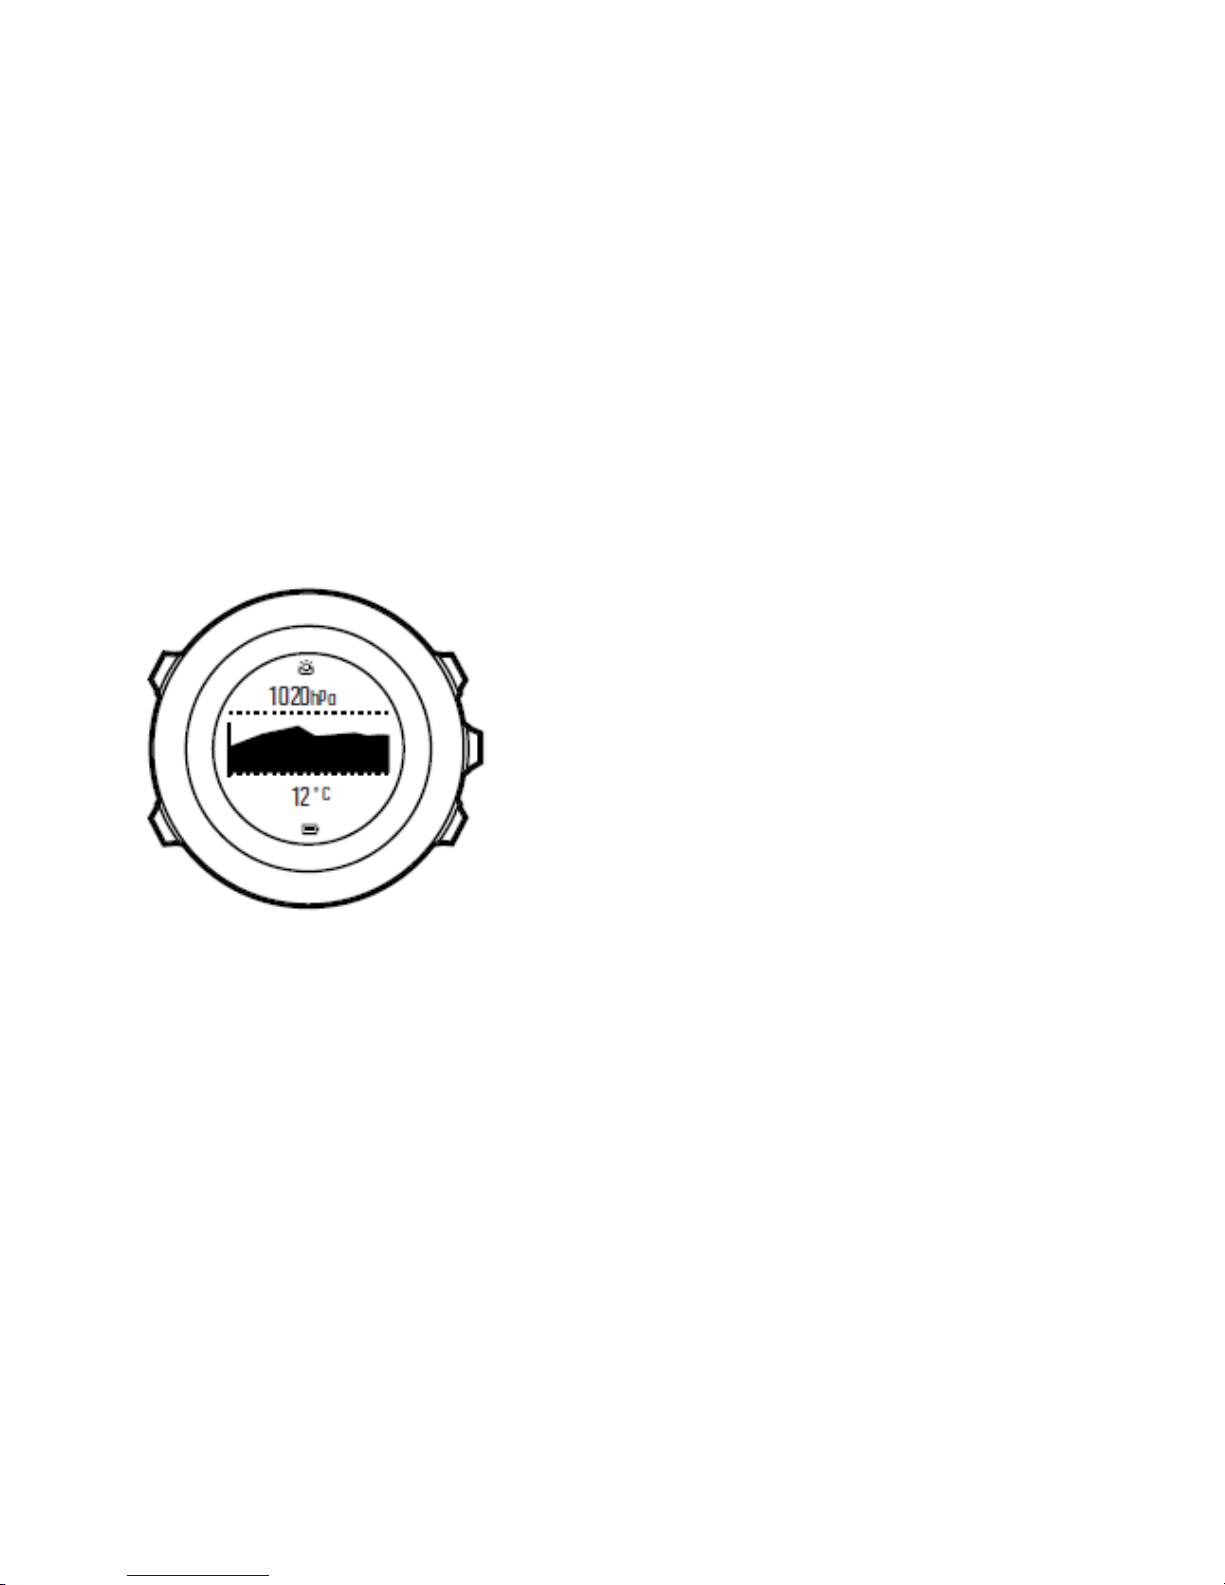
The Barometer profil e shows the current sea level air pressure. This is
based on the reference values added in the settings and the constantly
measured absolute air pressure.
Changes in the sea level air pressure are presented graphically in the
middle row of the display.
Page 22
22
When the Barometer profile is activated, the barometer icon is
shown on the display.
When the Barometer profile is activated, Suunto Traverse shows you
the following barometric inform ation:
•
current pressure or a graph displaying sea level pressure
changes over the past 26 hours (15 min. recording interval)
•
bottom row: change with [View] to show temperature, baro
trend
Page 23

23
NOTE: If you are wearing your Suunto Traverse on your wrist, you
will need to take it off in order to get an accurate
temperature reading
because your body temperature will affect the initial reading.
3.2.5 Using Automatic profile
The Automatic profil e switc hes between the Altimeter and Barometer
profiles according to your movements. When the Automatic profile is
active, the device will automatical ly switc h between interpreti ng
changes in air pressure as changes in altitude or changes in weather.
It is not possible to measure weather and altitude changes at the same
time, as both cause a change in the surrounding air pressure. Suunto
Traverse senses vertical movement and switches to measuring altitude,
when needed. When altitude is shown, it is updated with a maximum
delay of 10 seconds.
If you are at a constant altitude (less than 5 meters of vertical
movement within 12 minutes), Suunto Traverse interprets all pressure
changes as weather changes. The measurement interval is10 seconds.
The altitude reading remains steady and if the weather changes, you
will see changes in the sea level air pressure reading.
Page 24
24
If you are moving in altitude (more than 5 meters of vertical movement
within 3 minutes), Suunto Traverse interprets all pressure changes as
movements in altitude.
In the Automatic Profile, Suunto Traverse will display following information:
top row, name of currently active profile, Altitude, altitude graph. In addition, baro trend and
temperature are accessible with the [View] button.
3.3 Autopause
Autopause pauses the recording of your exercise when your speed is
less than 2 km/h (1.2 mph). When your speed increases to more than 3
km/h (1.9 mph), the recording continues automatical l y.
You can turn Autopause on/off for each sport mode in Movescount
under the advanced settings for the sport mode.
Autopause is set to off by default in Suunto Traverse
3.4 Backlight
Pressing [Light] activates the backlight.
Page 25

25
By default, the backlight turns on for a few seconds and turns off
automatically. This is the Normal mode.
There are three different backlight modes:
Mode:
•
Normal: The backli ght turns on for a few seconds when you
press [Light] and when the alarm clock sounds.
•
Off: The backlight is not switched on by pressing a button or
when the alarm clock sounds.
•
Night: The backlight turns on for a few seconds when you press
any button and when the alarm clock sounds.
•
Toggle: The backlight turns on when you press [Light] and stays on
until you press [Light] again.
3.5 Button lock
Keeping [Back/Lap] pressed locks and unlocks butt ons.
You can change the button lock behavior in the watch settings under
GENERAL » Tones/display » Button lock.
•
Actions only: Start and options menus are locked.
•
All buttons: All butt ons are locked. Backlight can be activated in
Night mode.
Page 26

26
TIP: Select the Actions only button lock setting to avoid
accidentally starting or stopping your log. When the [Back
Lap] and
[Start ] buttons are locked, you can still change
displays by pressing
[Next] and views by pressing [View].
3.6 Compass
Suunto Traverse has a digital compass that allows you to orient
yourself in relation to magnetic north. The tilt -compensated compass
gives you accurate readings even if the compass is not horizontally
level.
You can show/hide the compass display from the start menu under
DISPLAYS » Compass. Toggle with [Next].
The compass display includes the following informat i on:
•
middle row: compass heading in cardinals
•
bottom row: compass heading in degrees
The compass switches to power saving mode after one minute.
Reactivate it with [Start] .
Page 27
27
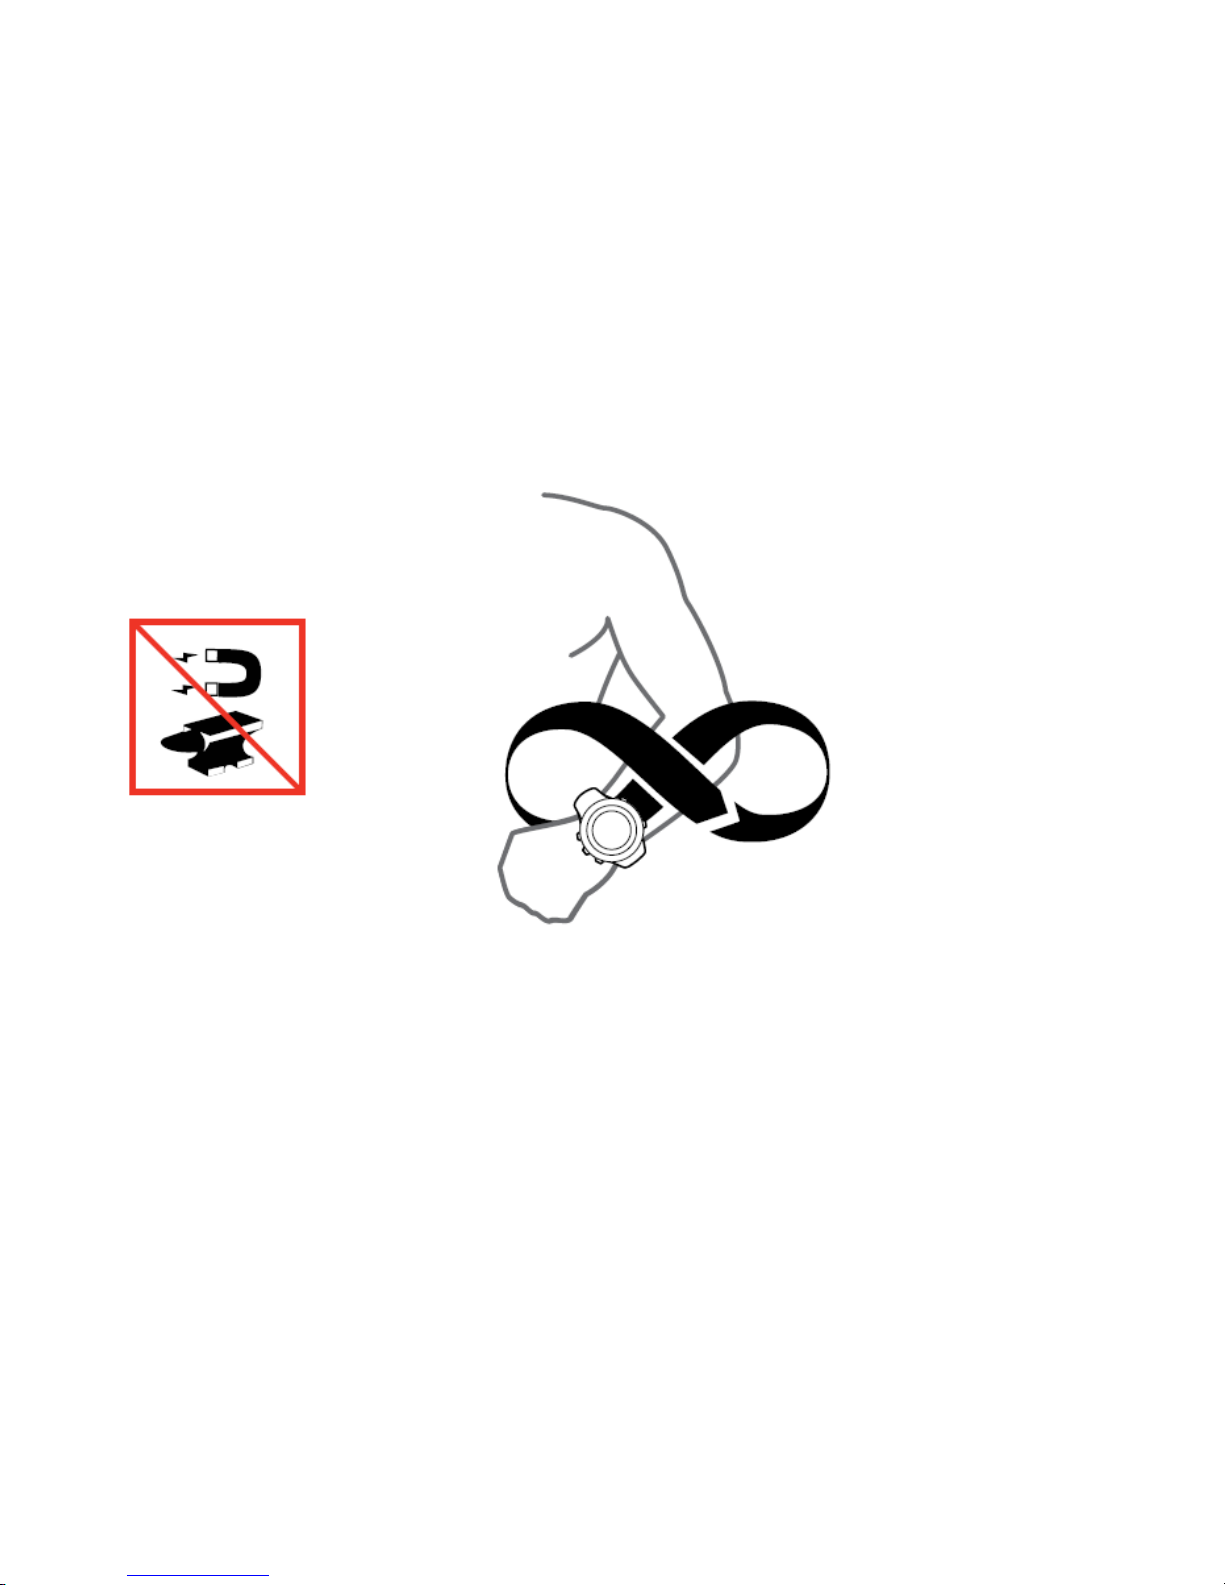
3.7.1 Calibrat ing compass
If you have not used the compass before, you must first calibrate it.
Turn and tilt the watch in multiple directions until the watch beeps,
indicating calibrati on is complet e.
If you have already calibrated the compass and want to re-calibrate it,
you can access the calibration option in the options menu.
If the calibration is successful, the text C ALIBRATION SUCCESSFUL is
displayed. If the calibration does not succeed, the text CALIBRATION
FAILED is displayed. To retry the calibration, press [Start] .
To manually start compass calibration:
1. Keep [Next] pressed to enter the options menu.
2. Scr oll to NAVIGATION with
[Light] and select with [Next].
3. Scroll to Settings with [Light] and select with [Next].
Page 28

28
4. Scroll to Compass with [Light] and select with [Next].
5. Press [Next] to select Calibration.
3.7.2 Setting declination
To ensure correct compass readings, set an accurate declination
value.
Paper maps point to true north. Compasses, however, point to
magnetic north – a region above the Earth where the Earth’s
magnetic fields pull. Because magnetic North and true North are not
at the same location, you must set the declination on your compass.
The angle in between magnetic and true north is your declination.
The declination value appears on most maps. The location of magnetic
north changes yearly, so the most accurate and up-to-date declination
value can be obtained from the internet (for example www.magneticdeclination.com).
Orienteering maps, however, are drawn in relation to magnetic north.
This means that when you are using orienteering maps you need to
turn the declination correction off by setting the decli nat i on value to 0
degrees.
To set the declination value:
1. Keep [Next] pressed to enter the options menu.
2. Scroll to NAVIGATION with
[Light] and select with [Next].
3. Scroll to Settings with [Light] and select with [Next].
4. Scroll to Compass with [Light] and select with [Next].
5. Scroll to Declination with [Light] and select with [Next].
6. Turn the declination off by selecting --, or select W (west) or E
Page 29

29
(east).
7. Set the declination value with [Start] or [Light].
8. Press [Next] to accept the setting.
TIP: You can also access the Navigation men u and Compass
settings by pressing [Start]
in Navigation mode.
3.7.3 Setting bearing lock
You can mark the direction to your target in relation to North with the
bearing lock feature.
To lock a bearing:
1. With the compass active, hold the watch in front of you and turn
yourself towards your target.
Page 30
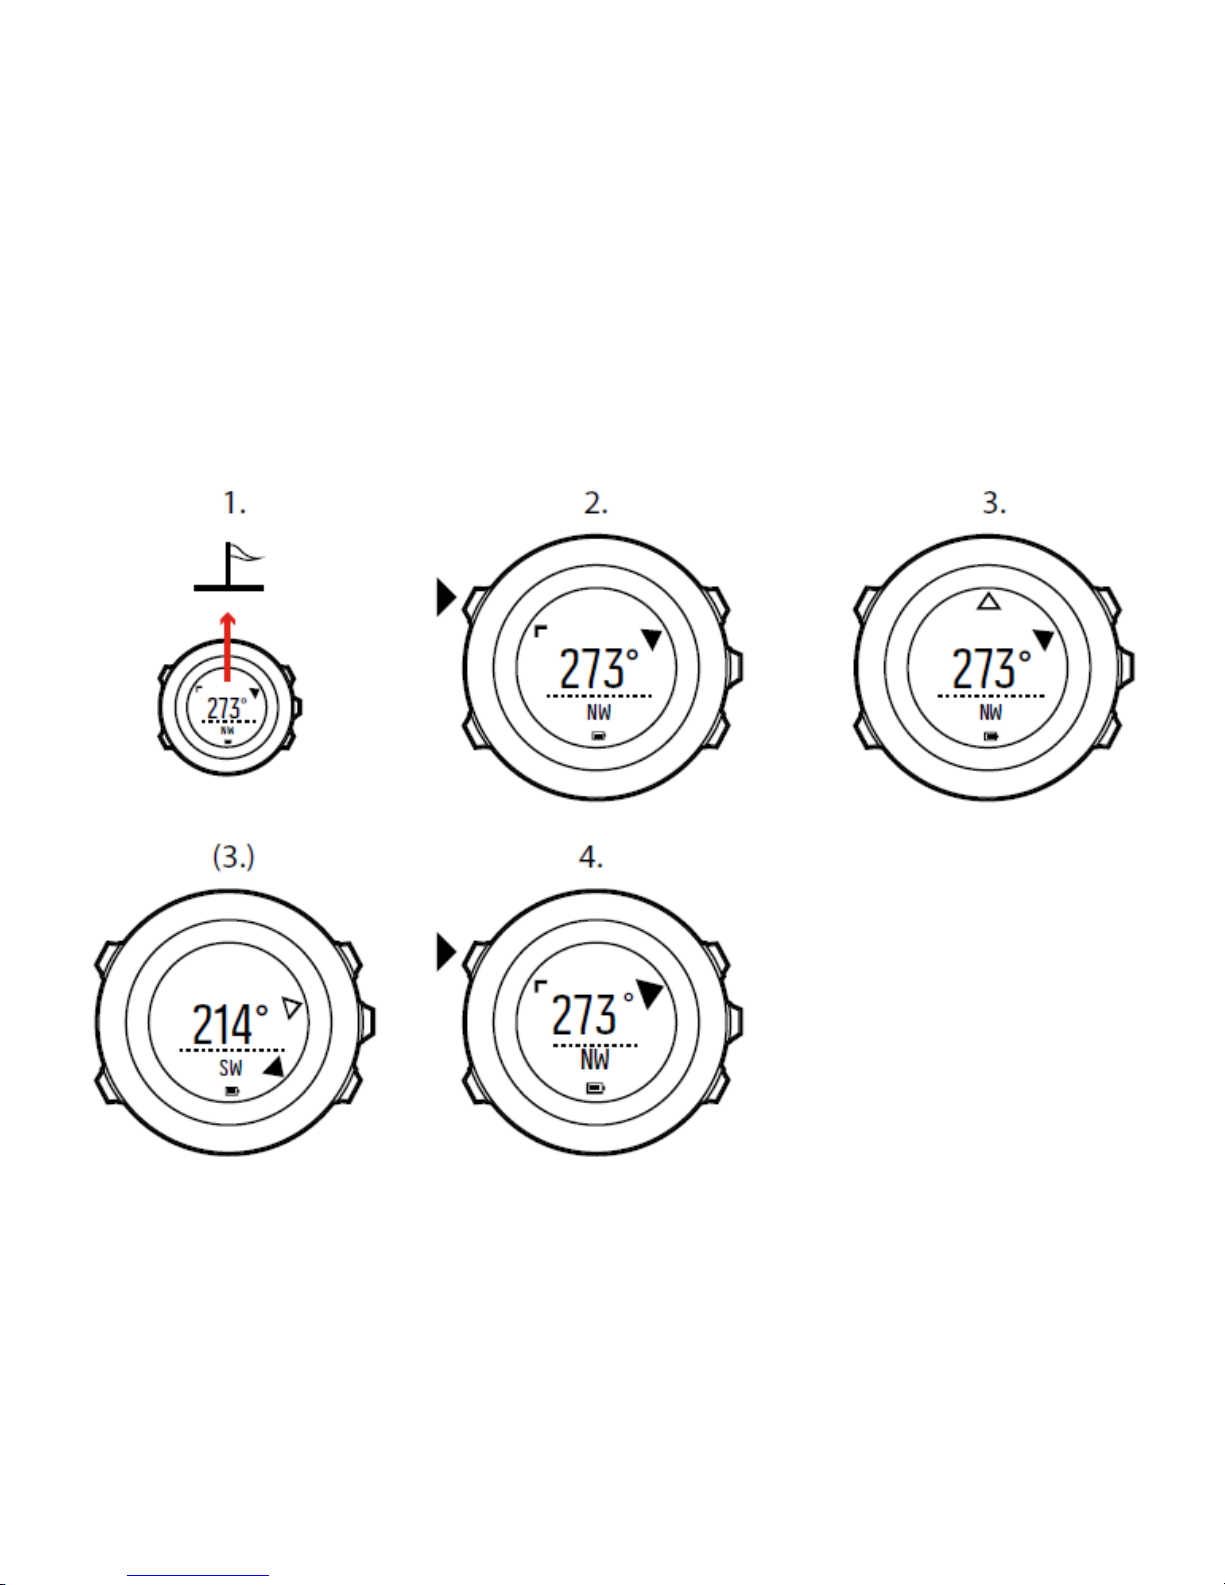
30
2. Press [Back Lap] to lock the current degree displayed on the
watch as your bearing.
3. An empty triangle indicates the locked bearing in relation to the
North indicator (solid triangle).
4. Press [Back Lap] to clear the bearing lock.
Page 31

31
NOTE: While using the compass in an exercise mode, the [Back
Lap] button only locks and clears the bearing. Exit the compass view to
make a lap with [Back Lap].
Page 32

32
3.8 Countdown timer
You can use the countdown timer to count down from a preset time to
zero. The timer makes a short sound every second during the last 10
seconds and sounds an alarm when zero is reached.
You can show/hide the countdown timer from the start menu under
DISPLAYS » Countdown. Toggle with [Next].
To set the countdown time:
1. Press [Next] to until you reach the countdown timer display.
2. Press [View] to adjust the countdown time.
3. Set the hours and minutes with [Start] and [Light]. Accept with
[Next].
4. Press [Start] to start the countdown.
TIP: You can pause/continue the countdown by pressing [Start]
.
Page 33

33
3.9 Displays
Your Suunto Traverse comes with several different features, such as
countdown timer (see Countdown timer) and stopwatch (see
3.31
Stopwatch
), that are handled as displays that can be viewed by
pressing [Next]. Some of them are permanent, and others you can
show or hide as you like.
To show/hide displays:
1. Press [Start] to enter the start menu.
2. Scroll to DISPLAYS by pressing [Light] and press [Next].
3. In the list of display, toggle any feature on/off by scrolling to it with
[Start Stop] or [Light Lock] and pressing [Next].
Keep [Next] pressed to exit the displays menu if needed.
Your sport modes (see
3.30 Sport modes) also have multiple displays
that that you can customize to view different information while you
exercise.
3.9.1 Adjusting display contrast
Increase or decrease the display contrast of your Suunto Traverse in
the watch settings.
To adjust the display contrast:
1. Keep [Next] pressed to enter the options menu.
2. Press [Next] to enter the GENERAL settings.
3. Press [Next] to enter Tones/display.
4. Scroll to Display contrast with [Light] and enter with [Next].
5. Increase the contrast with [Start] , or decrease it with [Light].
Page 34

34
6. Keep [Next] pressed to exit.
3.9.2 Inverting display color
Change the display between dark and light through the settings in the
watch.
To invert the display in the watch settings:
1. Keep [Next] pressed to enter the options menu.
2. Press [Next] to enter the GENERAL settings.
3. Press [Next] to enter Tones/display.
4. Scroll to I nvert display with [Start] and invert with [Next].
3.10 Exercising with sport modes
Use sport modes (see 3.30 Sport modes) to record exercise logs and
view various information during your exercis e.
You can access the sport modes under EXERCISE menu by pressing
[Start Sto p ].
3.10.1 Using Suunto Smart Sensor
A Bluetooth® Smart compatible heart rate sensor, such as the Suunto
Smart Sensor, can be used with your Suunto Traverse to give you
more detailed information about your exercise intensity.
While exercising, the heart rate sensor enables:
•
heart rate in real time
•
average heart rate in real time
Page 35

35
•
calories burned during exercise
And after exercise, the heart rate sensor provides:
•
total calories burned during exercise
•
average heart rate
•
peak heart rate
If you use the Suunto Smart Sensor, you also have the added
advantage of heart rate memory. The Suunto Smart Sensor memory
function buffers data whenever the transmiss i on to your Suunto
Traverse is interrupt ed.
This allows you to get accurate exercise intensity information i n
activities such as swimming where water blocks the transmissi on. It
also means you can even leave your Suunto Traverse behind after
starting a recording. For more information, pleas e refer to the Suunto
Smart Sensor User Guide.
Without a heart rate sensor, your Suunto Traverse provides calorie
consumption estimation i n daily use, and during activiti es where speed
is used to estimate intensity. However, we recommend using a heart
rate sensor to get accurate intensity readings.
Refer to the user guide for S uunto Smart Sensor or other Bluetoot h
Smart compatible heart rate sensor for additional information.
3.10.2 Putting on Suunto Smart Sensor
To start using the Suunto Smart Sensor:
Page 36

36
1. Snap the sensor firmly into the strap connector.
2. Adjust the strap length as needed.
3. Moisten the strap electrode areas with water or electrode gel.
4. Put the strap on so that it fits snugly and the Suunto logo is
facing up.
The Smart Sensor turns on automatically when it detects a heartbeat.
TIP: Wear the strap against your bare skin for best results.
Refer to the Suunto Smart Sensor User Guide for additional information
and troubleshooting.
Page 37

37
NOTE: Dry skin under the belt electrodes, a loose belt, and
synthetic shirt materials can cause abnormally high heart rate
readings.
Moisten the belt electrodes well and tighten the belt to
avoid heart rate
peaks. If you are otherwise concerned about your
heart rate, please
consult a doctor.
3.10.3 Starting recording
To start recording:
1. Press [Start] to enter the start menu.
2. Scroll to Activity, and select [Next]
3. The watch automatically starts searching f or a GPS signal. Wait f o r
the watch to notify that GPS signal has been found, or press [Start]
to select Start and begin recording immediately.
4. Recording your exercise starts automatically when GPS signal
is found, unl ess you press [Start] to begin recording
immediately. To access general menu while exercis i ng, k eep
[Next] pressed.
3.10.4 During recording
As soon as the exercise is recording, you can access additional
displays that show information rel ated to your activit y. B y default, you
will see one additional display showing recording statistic s (durati on,
speed, distance) and one additional displ ay showing your breadcrumb
track.
In Movescount servic e, you can create up to 4 additional displays with
more data fields.
Page 38

38
You can also create up to 5 additional sport modes, if you wish to see
different informati on dependi ng on your activity. If you create additional
modes, you will be asking to select the sports mode before recording
begins.
You can toggle the displays with [Next].
The information varies depending on the sport mode you have selected
(see
3.30 Sport modes). You get even more information, if you use a
heart rate belt and GPS during exercise.
Here are some ideas on how to use the watch during exercise:
•
Press [Next] to scroll through available displays
•
Press [View] to see different information the bottom row of the
display, or to access additional views in the Navigati on display.
•
To avoid accidentally stopping your log recording or making
unwanted laps, lock the buttons by keeping [Back Lap] pressed.
•
Press [Back Lap] to record lap
•
Press [Start] to pause recording. To resume recording, press [Start]
again.
•
Press and hold [Start] t o stop and automatic ally rec ord the acti vity.
3.10.5 Recording tracks
Suunto Traverse allows you to record various information.
If your sport mode has GPS enabled, Suunto Traverse also records
your track during your exercise. You can view the track in Movescount
as part of the recorded Move and export it as a route to use for later
navigation.
Page 39

39
3.10.6 Making laps
During your exercise, you can make laps either manually or
automatically by setting the autolap distance interval i n Movescount.
When you are making laps automatically, Suunto Traverse rec ords the
laps based on the distance you have specified in Movescount.
To make laps manually, press [Back Lap] during the exercise.
Suunto Traverse shows you the following information:
•
top row: split time (duration from the start of the log)
•
middle row: lap number
•
bottom row: lap time
NOTE: The exercise summary always shows at least one lap, your
exercise from start to finish. The laps you have made during the
exercise are shown as additional laps.
3.10.7 Navigation during activity
You can choose to navigate along a route or to a certain POI.
You can also navigate a route or to a POI during your activity.
To navigate during exercise:
1. While you are in a sport mode with GPS activated, from the
navigation view, press Start to access Navigation menu
2. select NAVIGATION.
Page 40
40
3. Scroll to POIs (Points of interest) or Routes with [Light] and select
with [Next].
The navigation view will be updated with navigation guidance
To deactivate navigation, go back to NAVIGATION in the navigation
menu and select End navigati on.
NOTE: If the GPS accuracy setting (see 3.23.3 GPS accuracy and
power saving) of your sport mode is Good or lower, while
navigating
GPS accuracy switches to Best. Battery consumption is therefore
higher.
3.10.8 Using compass during exercise
You can activate the compass and add it to a custom sport mode
during your exercise.
To use the compass during exercise:
1. While you are in a sport mode, keep [Next] pressed to access the
options menu.
Page 41

41
2. Scroll to ACTIVATE with [Light] and s el ect with [Next].
3. Scroll to Compass with [Light] and select with [Next].
4. The compass is shown as the last display on the custom sport
mode.
To deactivate the compass, go back to ACTIVATE in the options menu
and select End compass.
3.10.9 Setting altitude dur ing exerc i se
If you do not want to use FusedAlti (see 3.13 FusedAlti) and you know
exactly what your current elevation is (for instance, from a sign on a
well-traveled mountain trail ), you can manual l y set your altitude while
recording an exercise. Manually setting the altitude turns off FusedAlti if
it was on.
To set your altitude during exercise:
1. Keep [Next] pressed to access the options menu.
2. Scroll to ALTI-BARO with [Start] and select with [Next].
3. Select Altitude with [Next].
4. Set your altitude using [Start] and [Light].
Page 42

42
5. Accept and exit by keeping [Next] pressed.
3.11 Find back
Suunto Traverse automatically saves the starting point of your exercise,
if you are using GPS. With Find back, Suunto Traverse can guide you
directly back to your starting point (or to the location where the GPS fix
was established).
To find back:
1. Keep [Next] pressed to access the options menu.
2. Press [Next] to select NAVIGATION.
3. Scroll to Find back with [Start] and sel ect with [Next].
The navigation guidance is shown as one of the displs.
3.12 Firmware updates
You can update your Suunto Traverse software through Movescount.
When you update the software, all logs are automatically moved to
Movescount and deleted from the watch.
To update your Suunto Traverse software:
1. Install Moveslink if you have not done so already.
2. Connect your Suunto Traverse to your computer with the
supplied USB cable.
3. If an update is available, your watch is updated automatical l y.
Wait for the update to complete before unplugging the USB
cable.
Page 43
43
3.13 FusedAlti
FusedAlti
TM
provides an altitude reading that is a combination of
GPS and barometric altitude. It minimizes the effect of temporary and
offset errors in the final altitude reading.
NOTE: By default, altitude is measured with FusedAlti during
exercises that use GPS and during navigation. When GPS is switched
off, altitude is measured with the barometric sensor.
If you do not want to use FusedAlti in altitude measurement, you can
disable it in the options menu.
To disable FusedAlti:
1. Keep [Next] pressed to access the options menu.
2. Scroll to ALTI-BARO with [Light] and enter with [Next].
3. Scroll to FusedAlti with [Start] and select with [Next].
4. Set FusedAlti Off with [Start] or [Light] and accept with [Next].
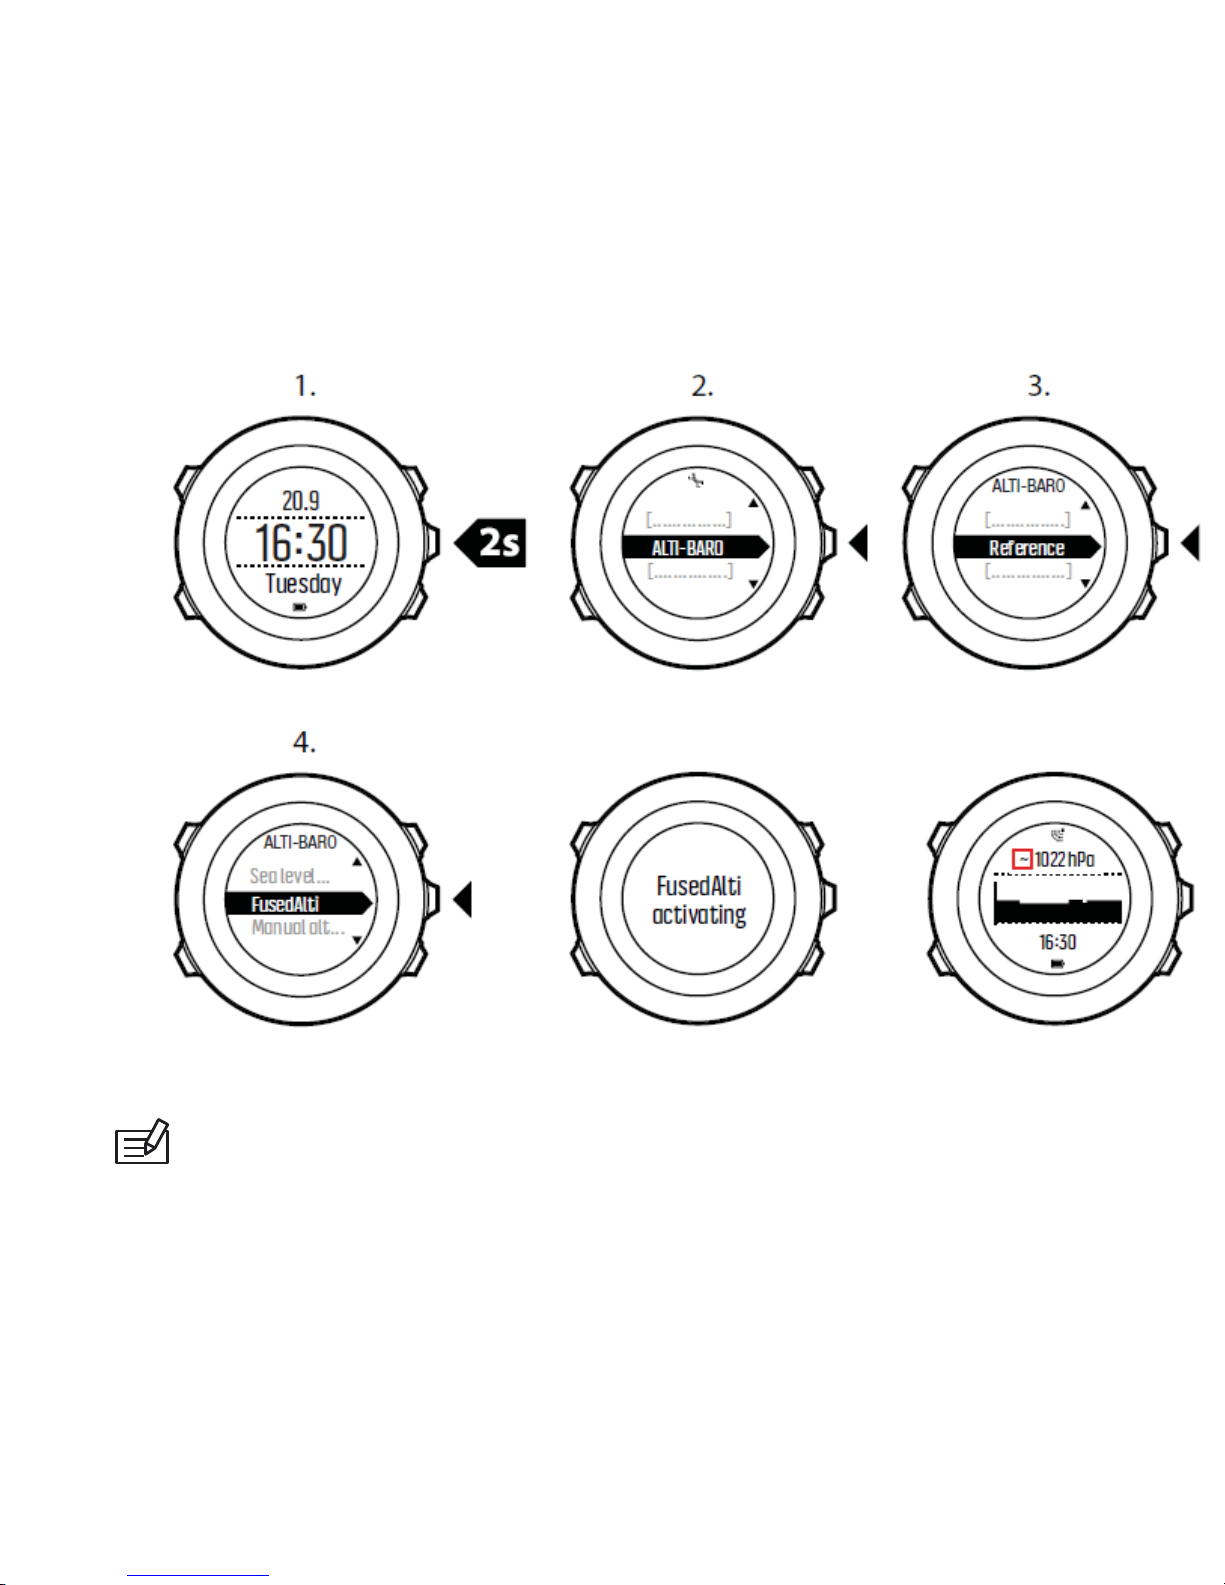
When the device is in TIME mode, you can s earch a new reference
for barometric altitude with FusedAlti. This activates the GPS for a
maximum of 15 minutes.
To search a new reference for barometric altitude with FusedAlti:
1. Keep [Next] pressed to enter the options menu.
2. Scroll to ALTI-BARO with [Light] and enter with [Next].
3. Scroll to Reference with [Light] and enter with [Next].
4. Scroll to FusedAlti with [Start] and select wi t h [Next].
Page 44
44
GPS is switched on and the device starts calculating altitude
based on FusedAlti.
NOTE: In good conditions it takes 4 – 12 minutes for FusedAlti to
activate. During that time, Suunto Traverse shows barometric
altitude
and ~ is shown with the altitude reading to indicate that
the altitude
may not be correct.
Page 45
45
3.14 Icons
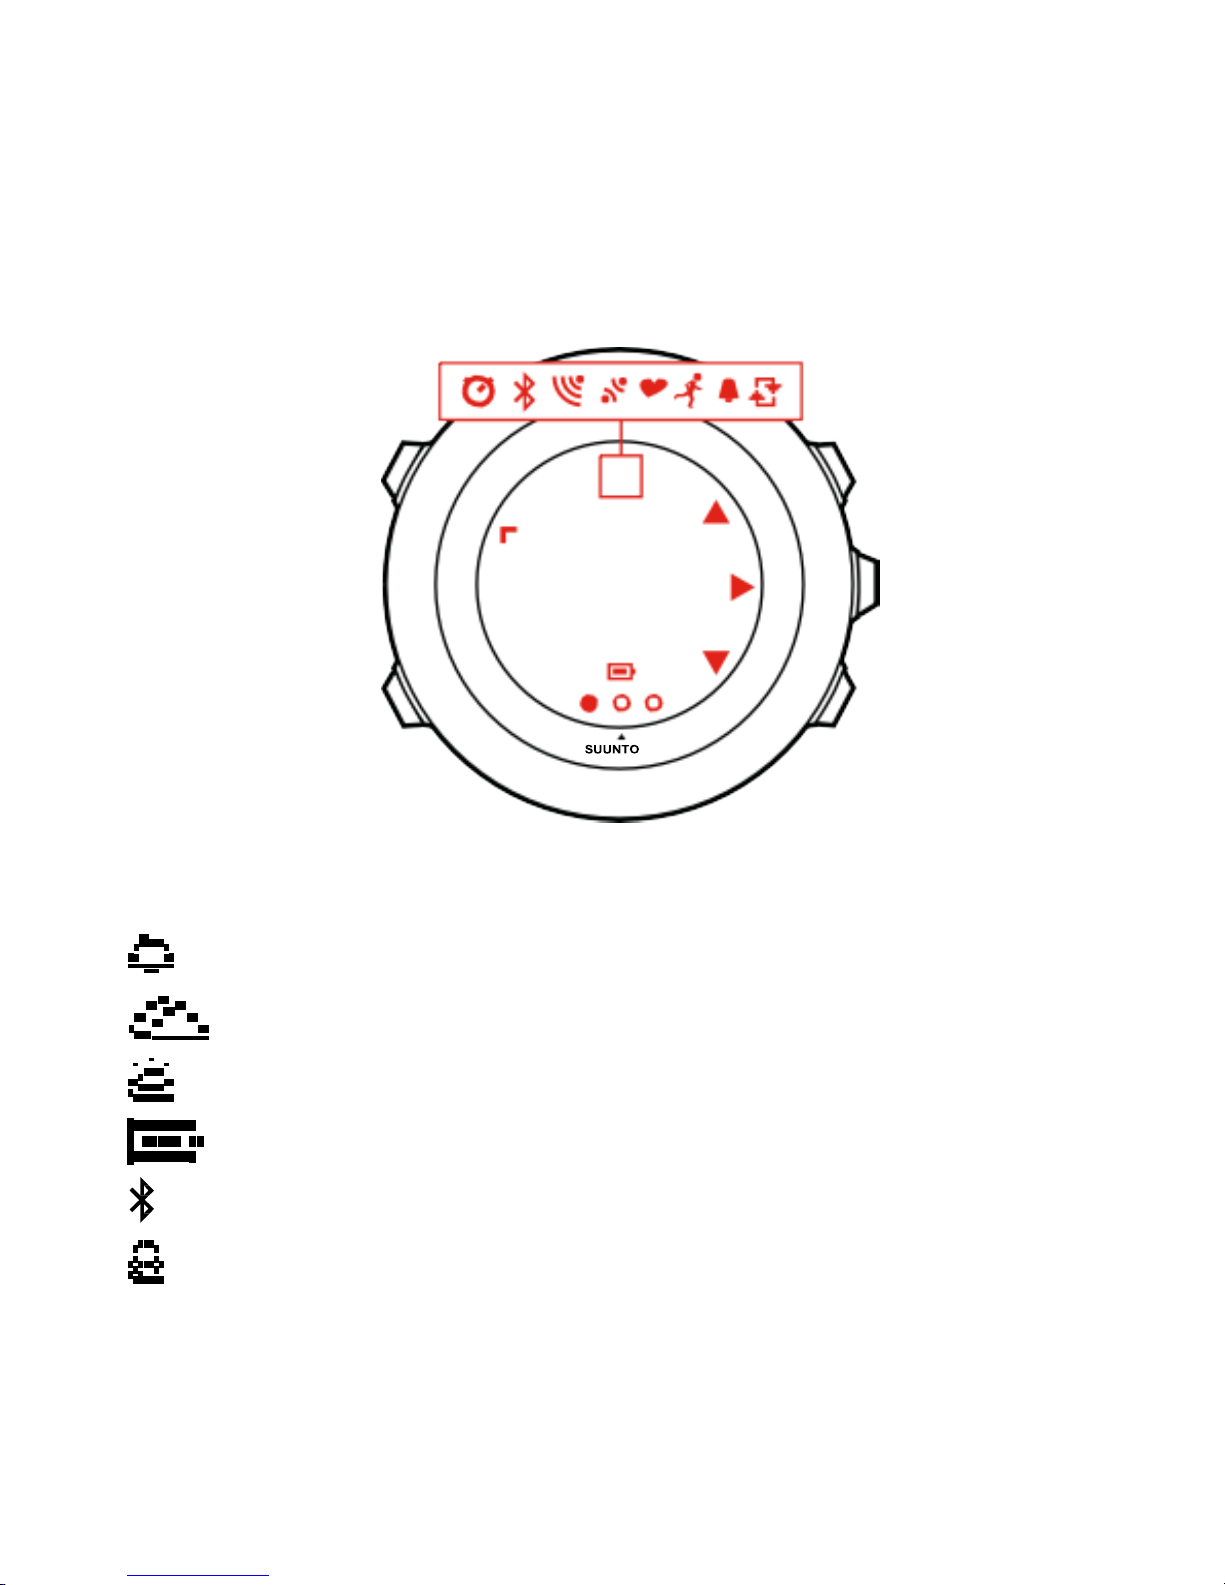
The following icons are displayed in Suunto Traverse3 P eak:
alarm
altimeter
barometer
battery
Bluetooth activit y
button lock
Page 46
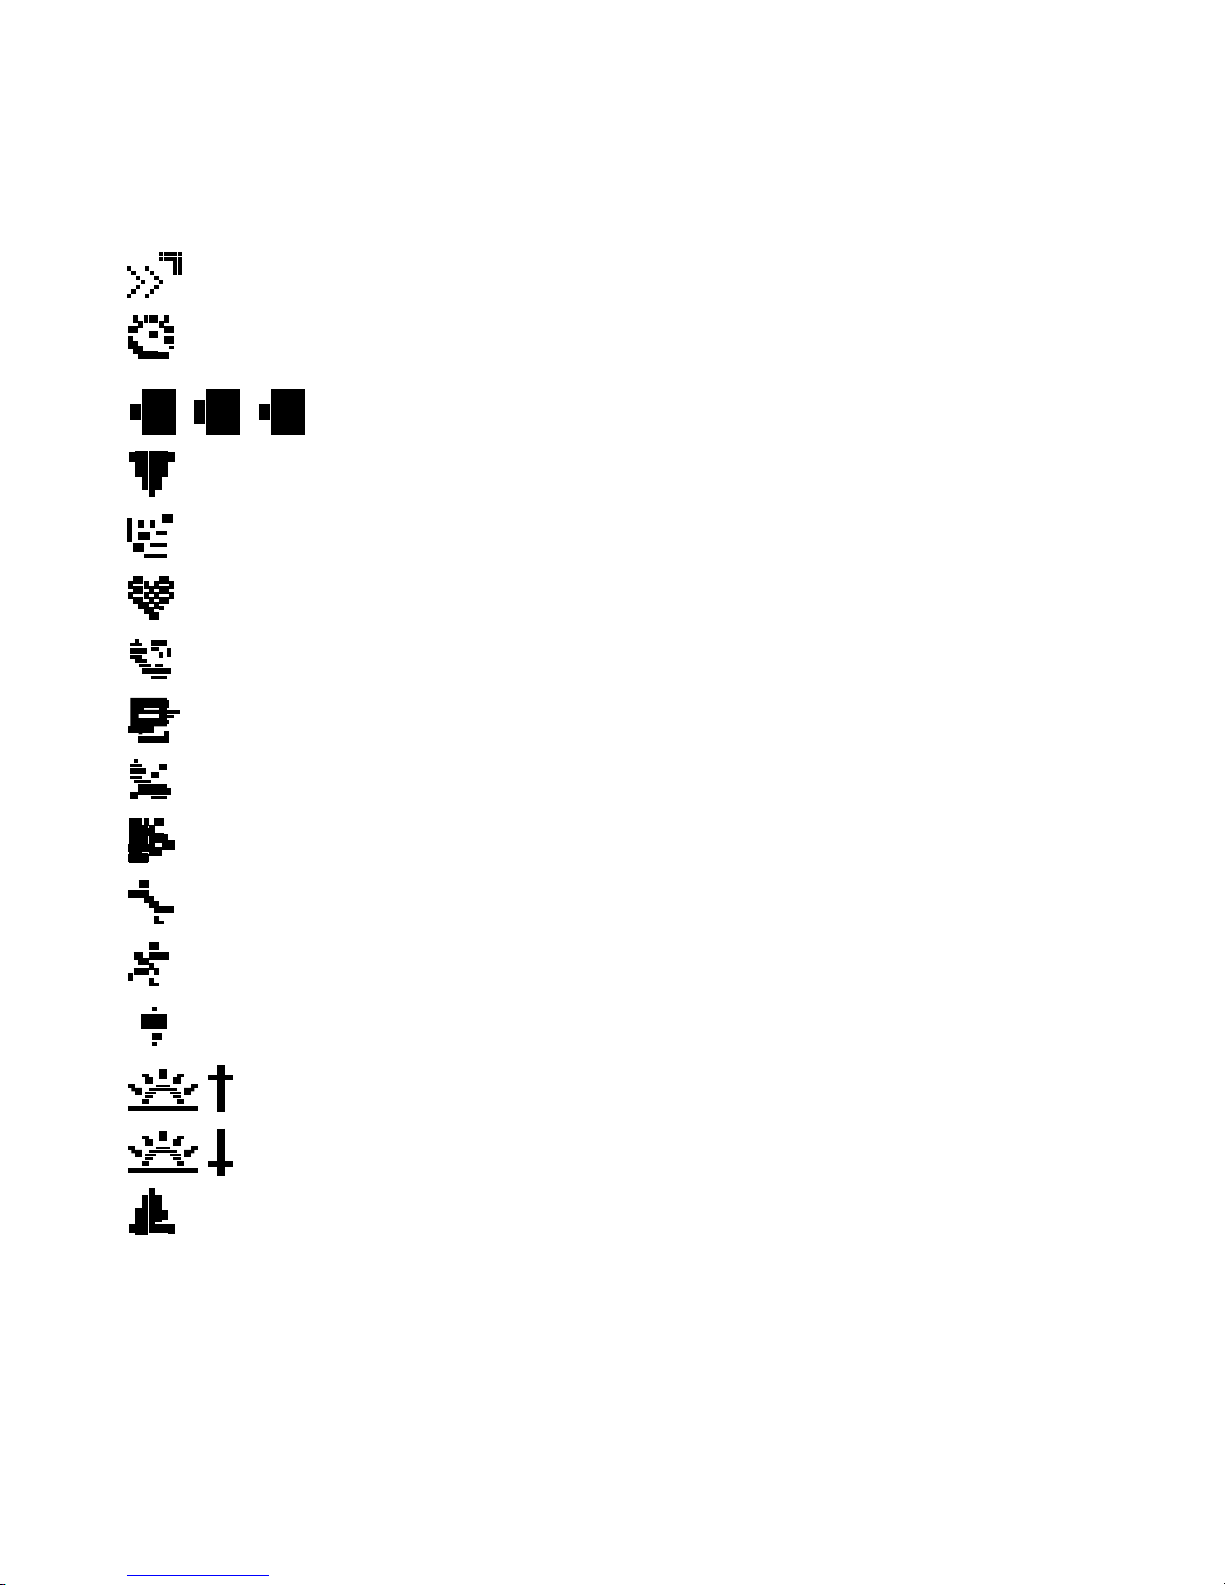
46
button press indicators
chronograph
current display
down/decrease
GPS signal strength
heart rate incoming
call interval timer
message/notification
missed call next/confirm
pairing
settings
sport mode
storm
sunrise
sunset
up/increase
Page 47

47
POI icons
The following POI icons are available in Suunto Traverse
begin
building/home
camp/camping
car/parking
cave
crossroad
end
food/restaurant/cafe
forest
geocache lodging/hostel/hotel
meadow
mountain/hill/valley/cliff
road/trail
rock
Page 48

48
sight water/river/lake/c oast
waypoint
3.15 Logbook
The logbook stores the logs of your recorded activities. The maximum
number of logs and the maximum duration of a single log depend on
how much information is recorded in each activity. GPS accuracy (see
3.23.3 GPS accuracy and power saving) and using the interval timer
(see
3.16 Interval timer), for example, directly impact the number and
duration of logs that can be stored.
You can view the log summary of your activity right after you have
stopped recording or through the LOGBOOK under the start menu.
The information shown in the log summary is dynamic: it changes
depending factors such as sport mode and whether or not you used a
heart rate belt or GPS. By default, all logs include at minimum the
following informati on:
•
sport mode name
•
time
•
date
Page 49

49
•
duration
•
laps
TIP: You can see many more details of your recorded activities in
Movescount.com.
To view log summary after stopping a recording:
1. Keep [Start] pressed to stop and save the exercise.
Alternatively, you press [Start] t o pause t he recording. Aft er pausing,
stop by pressing [Back Lap], or continue recording by pressing [Start] .
After pausing and stopping the exercise, save the log by pressing
[Start] . If you do not want to save the log, press [Light]. If you do
not save the log, you can still view the log summary after pressing
[Light], but the log is not stored in the logbook for later viewing.
2. Press [Next] to view the log summary.
You can also view the s ummaries of all your saved exerci ses in the
logbook. In the logbook the exercises are listed according to date
and time.
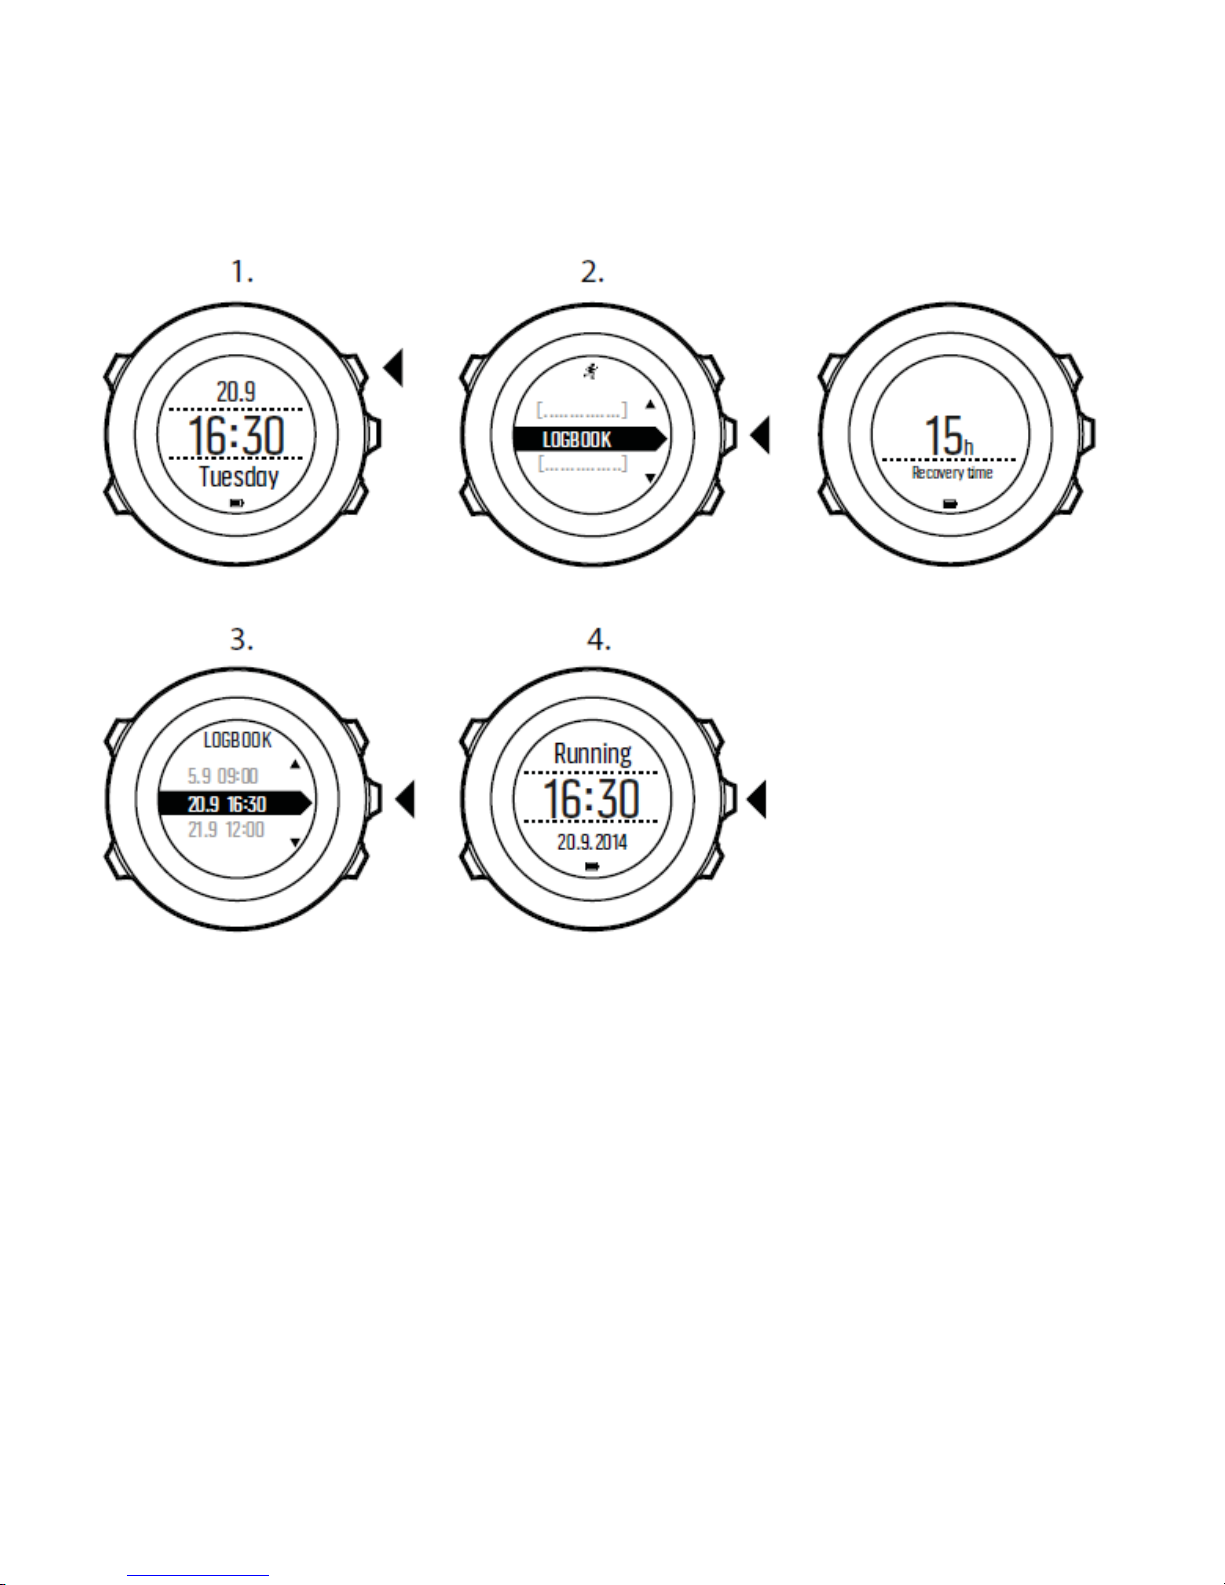
To view summary log in the logbook:
1. Press [Start] to enter the start menu.
2. Scroll to LOGBOOK with [Light] and enter with [Next]. Your current
recovery time is shown.
3. Scroll the logs with [Start] or [Light] and sel ect a log with [Next].
4. Browse the summary views of the log with [Next].
Page 50
50
If the log includes multiple laps, you can view lap-specific information by
pressing [View].
Page 51
51
3.16 Memory left indicator
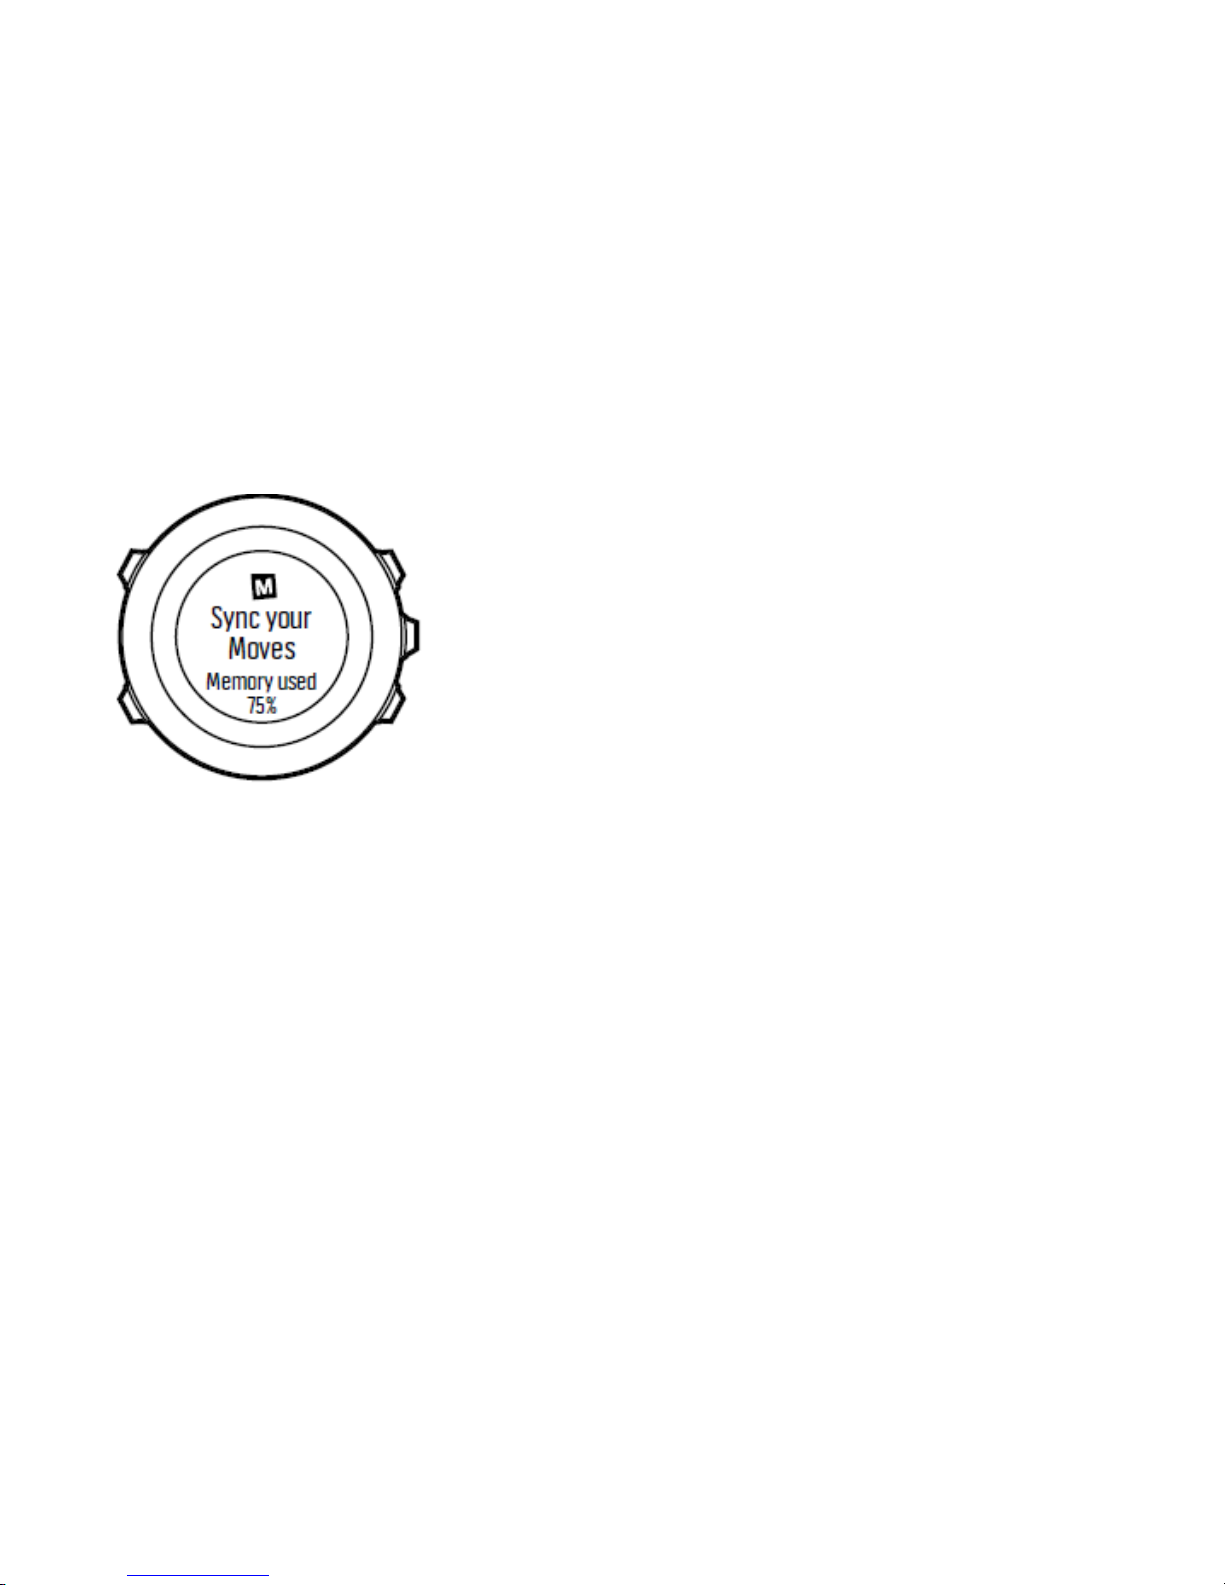
If more than 50 % of the logbook has not been synchronized with
Movescount, Suunto Traversedisplays a reminder when you enter the
logbook.
The reminder is not displayed once the unsynced memory is full and
Suunto Traversebegins overwriting old logs.
3.17 Movescount
Movescount.com is your free personal diary and online sports
community that offers you a rich set of tools to manage your daily
activities and create engaging st ories about your experiences.
Movescount allows you to transfer your recorded exercise l ogs f rom
your Suunto Traverse to Movescount and custom i ze the watch to best
meet your needs.
Page 52
52
TIP: Connect to Movescount to get the latest firmware update for
your Suunto Traverse.
Start by installing Moveslink:
1. Go to www.movescount.com/moveslink.
2. Download, install and open the latest version of Moveslink.
To register to Movescount:
1. Go to www.movescount.com.
2. Create your account.
NOTE: The first time your Suunto Traverse is connected to
Movescount all information (including the watch settings) is transferred
from the watch to your Movescount account. The next time you connect
your Suunto Traverse to your Movescount
account, changes in
settings and sport modes you make in
Movescount and in the watch are
automatically synchronized.
3.18 Movescount mobile app
With the Suunto Movescount App, you can further enrich your Suunto
Traverse experience. Pair with the mobi l e app to get notificati ons on
your Suunto Traverse, change settings and customize s port modes on
the go, use your mobile device as a second display, take pictures with
Page 53

53
data from your move, and create Suunto Movies.
TIP: With any move that is stored in Movescount, you can add
pictures as well as create a Suunto Movie of the move using Suunto
Movescount App.
To pair with Suunto Movescount App:
1. Download and install Suunto Movescount A pp on your
compatible Apple device from the iTunes App Store. The app
description includes the lat est compatibil i t y inform ation.
2. Start Suunto Movescount App and turn on Bluetooth if it is not on
already. Leave the app running in the foreground.
Page 54
54
3. If you have not yet set up your Suunto Traverse, do so now (see 2
Getting started
) and press [Start] when asked to pair MobileApp.
If you are already using your Suunto Traverse, k eep [Next] pressed
to enter the options menu and scroll to PAIR with [Light]. Select
MobileApp with [Next].
4. Enter the passkey shown on your watch display into the paring
request field on your mobile device and tap [Pair].
NOTE: You can change your Suunto Traverse general settings
offline. Customizing sport modes and keeping time, date
and GPS
satellite data up to date require an internet connection
over Wi-Fi or
mobile network. Carrier data connection fees may
apply.
3.21.1 Syncing with mobile app
If you have paired your Suunto Traverse with Suunt o Movescount App,
changes in settings, sport modes, and new moves are automatically
synced default when the Bluetooth connection is active. The Bluetooth
icon on your Suunto Traverse flashes when data is being synced.
This default setting can be changed from the options menu. To
turn off automatic syncing:
1. Keep [Next] pressed to enter the options menu.
2. Scroll to CONNECTIVITY with [Light] and s el ect with [Next].
3. Press Next again to enter the MobileApp sync setting.
4. Toggle off with [Light] and keep [Next] pressed to exit.
W hen automatic s ynci ng is off, you need to manually start syncing to
transfer settings or new moves to the app.
Page 55

55
To manually sync with mobile app:
1. Ensure Suunto Movescount App is running and Bluetooth is on.
2. Press [Start] to enter the start menu.
3. Scroll to MOBILEAPP with [Light] and select with [Next].
4. Press Next to Sync now.
If your mobile device has an active data connection and your app is
connected to your Movescount account, settings and moves are synced
with your account. If there is no data connection, syncing is delayed
until a connection is available.
Unsynced moves recorded with your Suunto Traverse are l isted in the
app, but you cannot view the move details until they are synced with
your Movescount account. Moves that you record with the app are
immediately viewable.
NOTE: Carrier data connection fees may apply when syncing
between Suunto Movescount App and your Movescount account.
3.23 Navigating with GPS AND GLONASS
Suunto Traverse uses the Global Positioning System (GPS) to
determine your current position. GPS incorporat es a set of satellites
that orbit the Earth at an altitude of 20,000 km at the speed of 4 km/s.
The built-in GPS receiver in Suunto Traverse is optim i zed for wrist
use and receives data from a very wide angle.
Page 56
56
3.23.1 Getting GPS signal
Suunto Traverse activates GPS automat ical l y when you sel ect a sport
mode with the GPS functionality, determine your location, or start
navigating.
NOTE: When you activate GPS for the first time, or have not
used it
for a long time, it might take longer than usual to get a GPS
fix.
Subsequent GPS starts will take less time.
TIP: To minimize GPS initiation time, hold the watch steady with
GPS facing up and make sure you are in an open area so that the
watch has a clear view of the sky.
TIP: Regularly synchronize your Suunto Traverse with
Movescount
to get the latest satellite orbit data. This reduces the
time needed to get
the GPS fix and improves track accuracy.
Page 57

57
Troubleshooting: No GPS signal
•
For an optimal signal, point the GPS part of the watch upwards. The
best signal can be received in an open area with a clear view of the
sky.
•
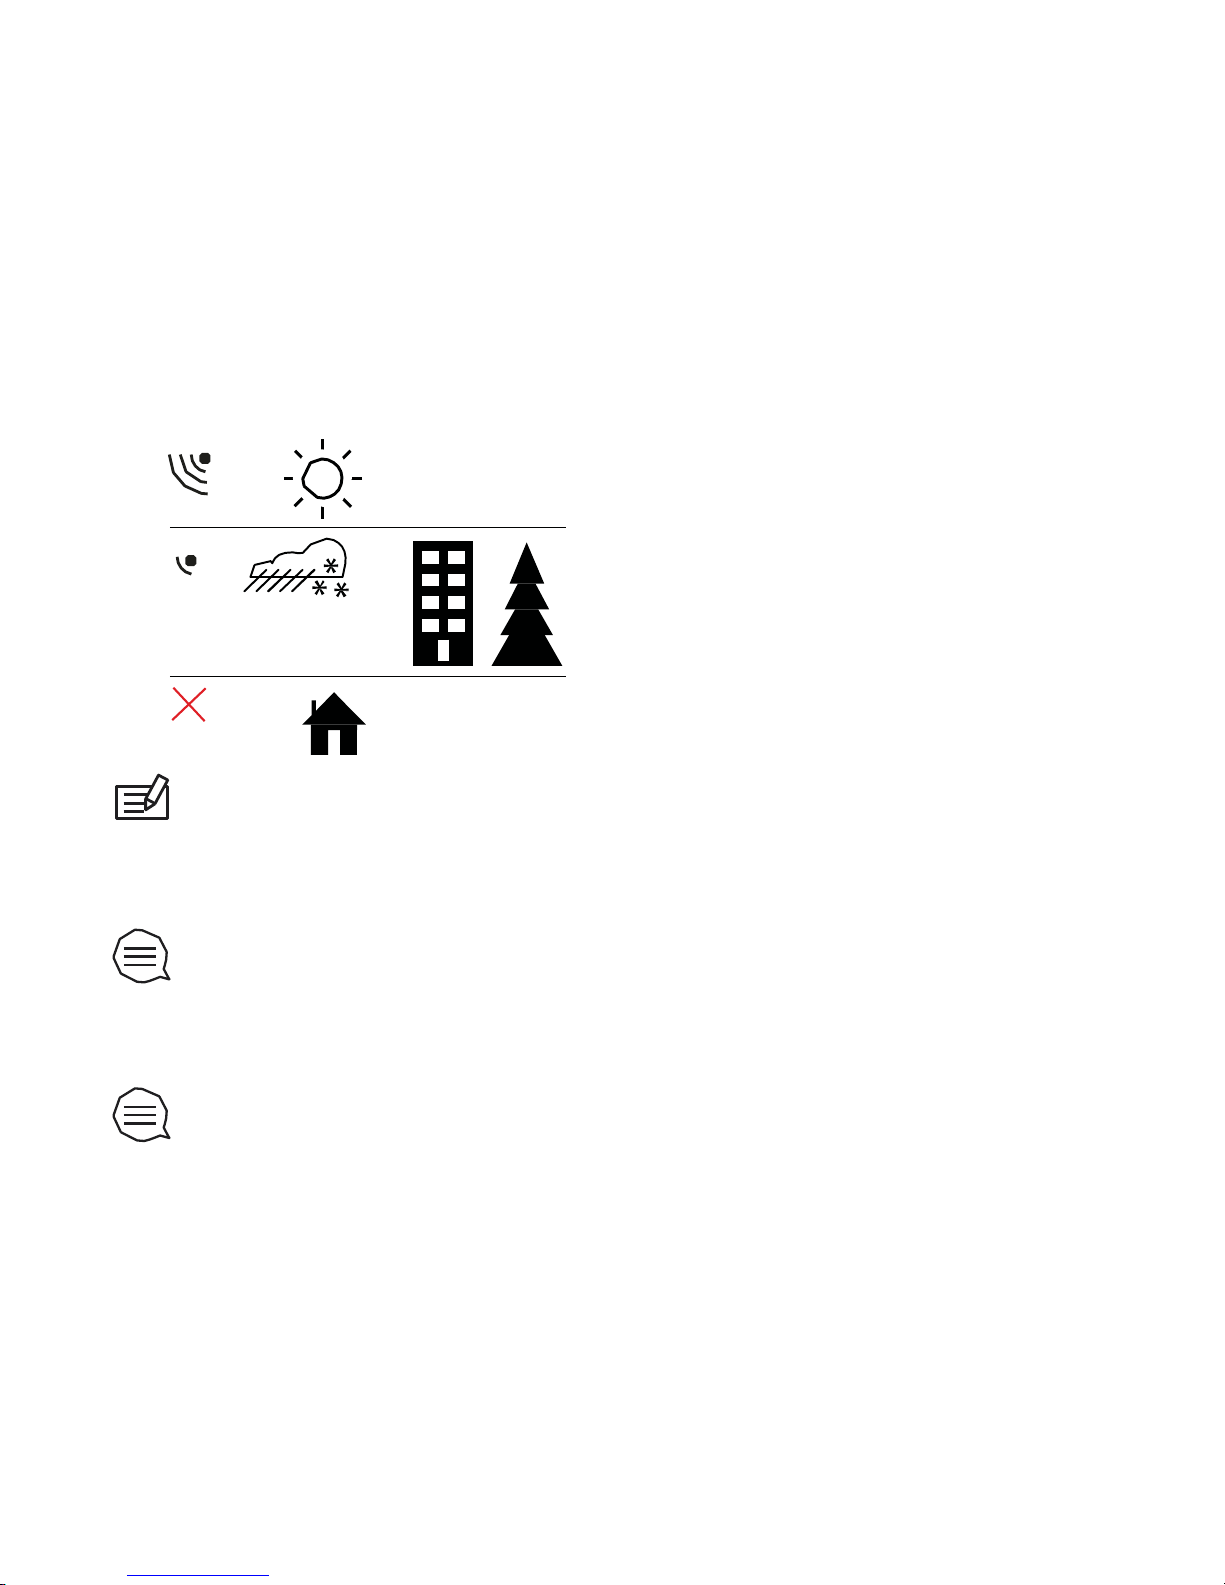
The GPS receiver usually works well inside tents and other thin
covers. However, objects, buil di ngs, dense veget ation or cloudy
weather can reduce the GPS signal reception quality.
•
GPS signal does not penetrate any solid constructions or water.
Therefore do not try to activate GPS for example inside buildings,
caves, or under water.
3.23.2 GPS grids and position formats
Grids are lines on a map that define the coordinate system used on the
map.
Position format is the way the GPS receiver's position is displayed on
the watch. All the formats relate to the same location, they only express
it in a different way. You can change the position format in the watch
settings under GENERAL » Format » Position format.
You can select the format from the following grids:
•
latitude/longitude is the most commonly used grid and has three
different formats:
o
WGS84 Hd.d°
o
WGS84 Hd° m.m'
o
WGS84 Hd°m's.s
•
UTM (Universal Transverse Mercator) gives a two-dimensional
horizontal position pres entat i on.
Page 58
58
•
MGRS (Military Grid Ref erence Syst em ) is an extension of UTM
and consists of a grid zone designator, 100,000-meter square
identifier and a numerical location.
Suunto Traverse also supports the following local grids:
•
British (BNG )
•
Finnish (ETRS-TM35FIN)
•
Finnish (KKJ)
•
Irish (IG)
•
Swedish (RT90)
•
Swiss (CH1903)
•
UTM NAD27 Alaska
•
UTM NAD27 Conus
•
UTM NAD83
•
NZTM2000 (New Zealand)
NOTE: Some grids cannot be used in the areas north of 84°N and
south of 80°S, or outside the countries that they are intended for.
3.23.3 GPS accuracy and power saving
When customizing sport modes, you can define the GPS fix interval
using the GPS accuracy setting in Movescount. The shorter the
interval, the better the accuracy during exercise.
By increasing the interval and lowering the accuracy, you can extend
the battery life.
The GPS accuracy options are:
•
Best: ~ 1 sec fix interval, highest power consumption
•
Good: ~ 5 sec fix interval, moderate power consumption
Page 59
59
•
OK: ~ 60 sec fix interval, lowest power consumption
•
Off: no GPS fix
3.24 Notifications
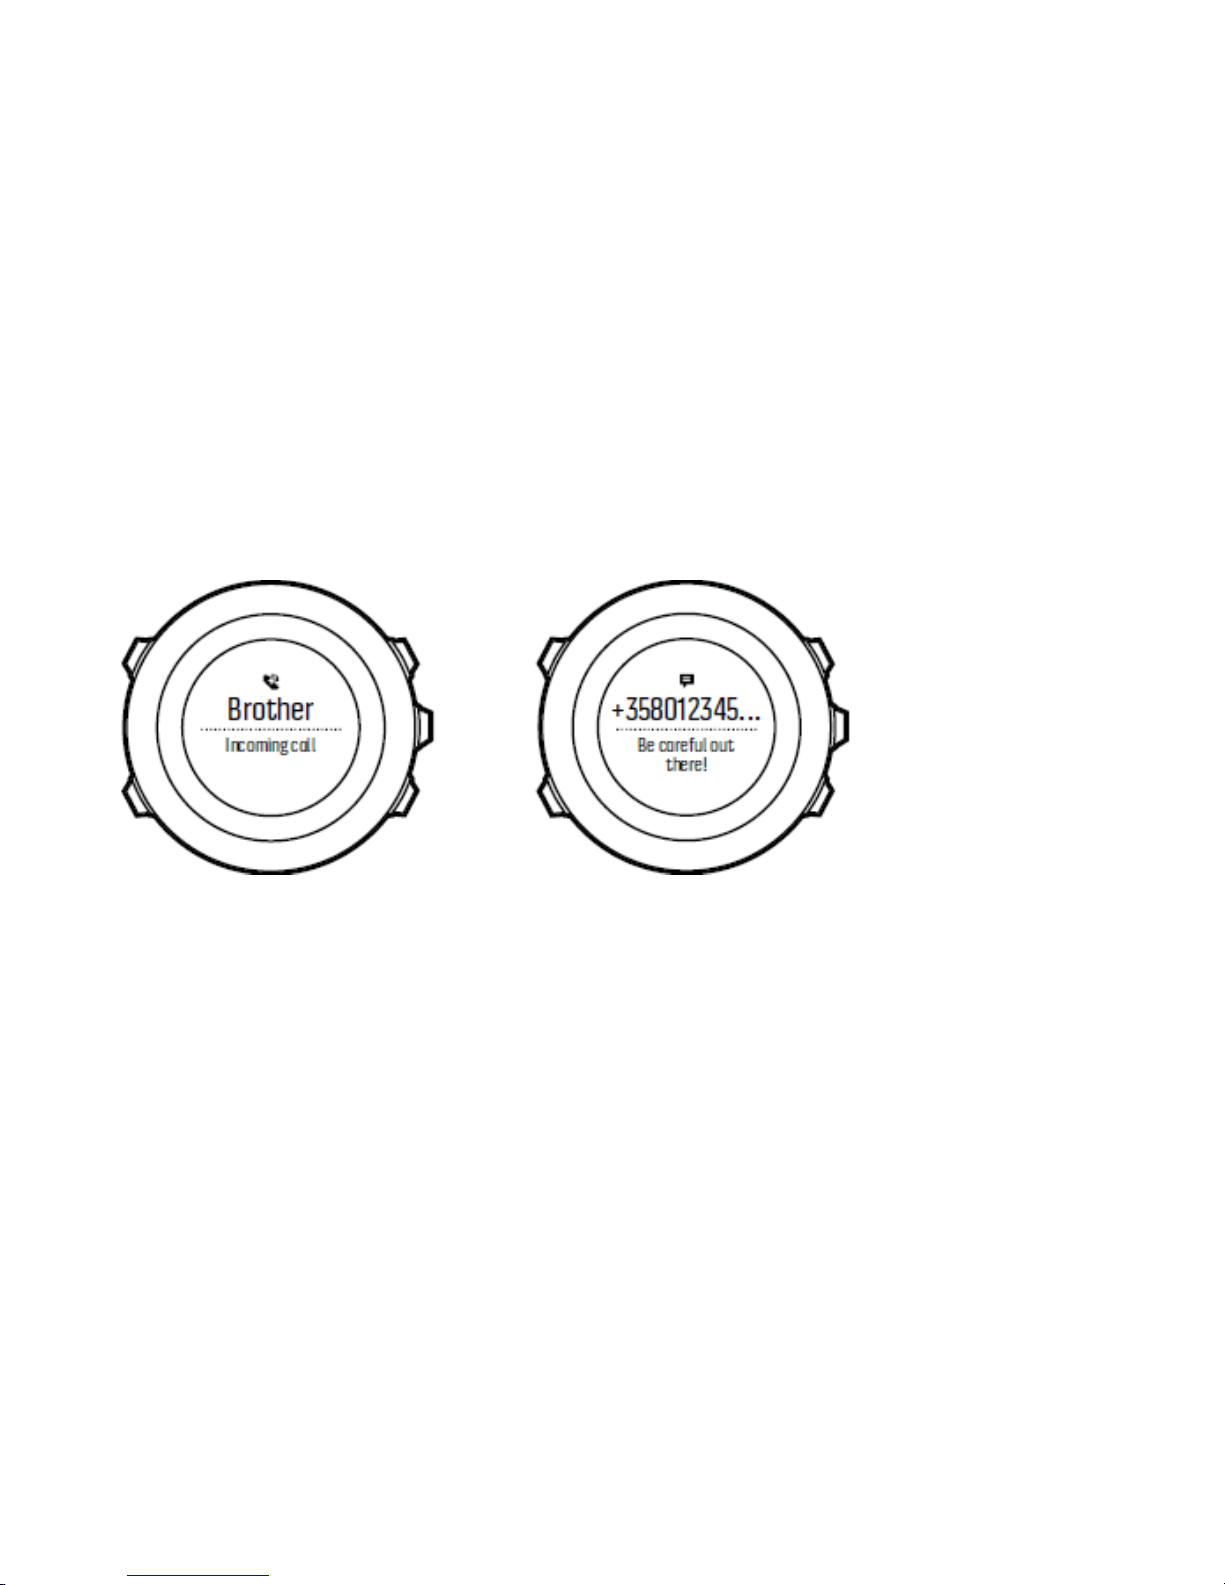
If you have paired your Suunto Traverse with Suunt o Movescount App
(see
3.21 Movescount mobile app), you can get call, message and
push notifications on the watch.
To get notifications on your watch:
1. Keep [Next] pressed to enter the options menu.
2. Press [Light] to scroll to CONNECTIVITY and press [ Next].
3. Press [Light] to scroll to Notifications.
4. Toggle Notifications On/Off with [Light].
5. Exit by keeping [Next] pressed.
With Notifications on, your Suunto Traverse gives an audible alert
and displays a notification icon in the bottom row with each new
event.
Page 60

60
To view notification on your watch:
1. Press [Start] to enter the start menu.
2. Scroll to MOBILEAPP with [Light] and select with [Next].
3. Scroll to NOTIFICATIONS with [Light] and select with [Next].
4.
Scroll through the notifications with [Start] or [Light].
Up to 10 notifications can be listed. Notificat i ons rem ain in your watch
until you clear them from your mobile device. However, notificati ons
older than one day are hidden from view in the watch.
3.25 HR sensors
Pairing procedures may vary depending on the heart rate (HR)
sensor type. Please refer to the user guide for the device you are
pairing with your Suunto Traverse before conti nui ng.
To pair a heart rate sensor:
1. Activate the heart rate sensor.
If you are pairing a Suunto Smart Sensor, see
3.10.2 Putting on
Suunto Smart Sensor
.
Page 61
61
2. Keep [Next] pressed to enter the options menu.
3. Scroll to PAIR with [Light] and select with [Next].
4. Scroll the options with [Start] and [Light] and press [Next] to select
heart rate sensor.
5. Hold your Suunto Traverse clos e to the sensor you are pairing and
wait for Suunto Traverse to notif y that pairing was successful.
If the pairing fails, press [Start] to retry, or [Light] t o return to the
pairing setting.
3.26 Points of interest
Suunto Traverse includes GPS navigation which allows you to
navigate to a pre-defined destination stored as a point of interest
(POI).
NOTE: You can also navigate when you are recording an
exercise
(see 3.10.7 Navigating during exercise).
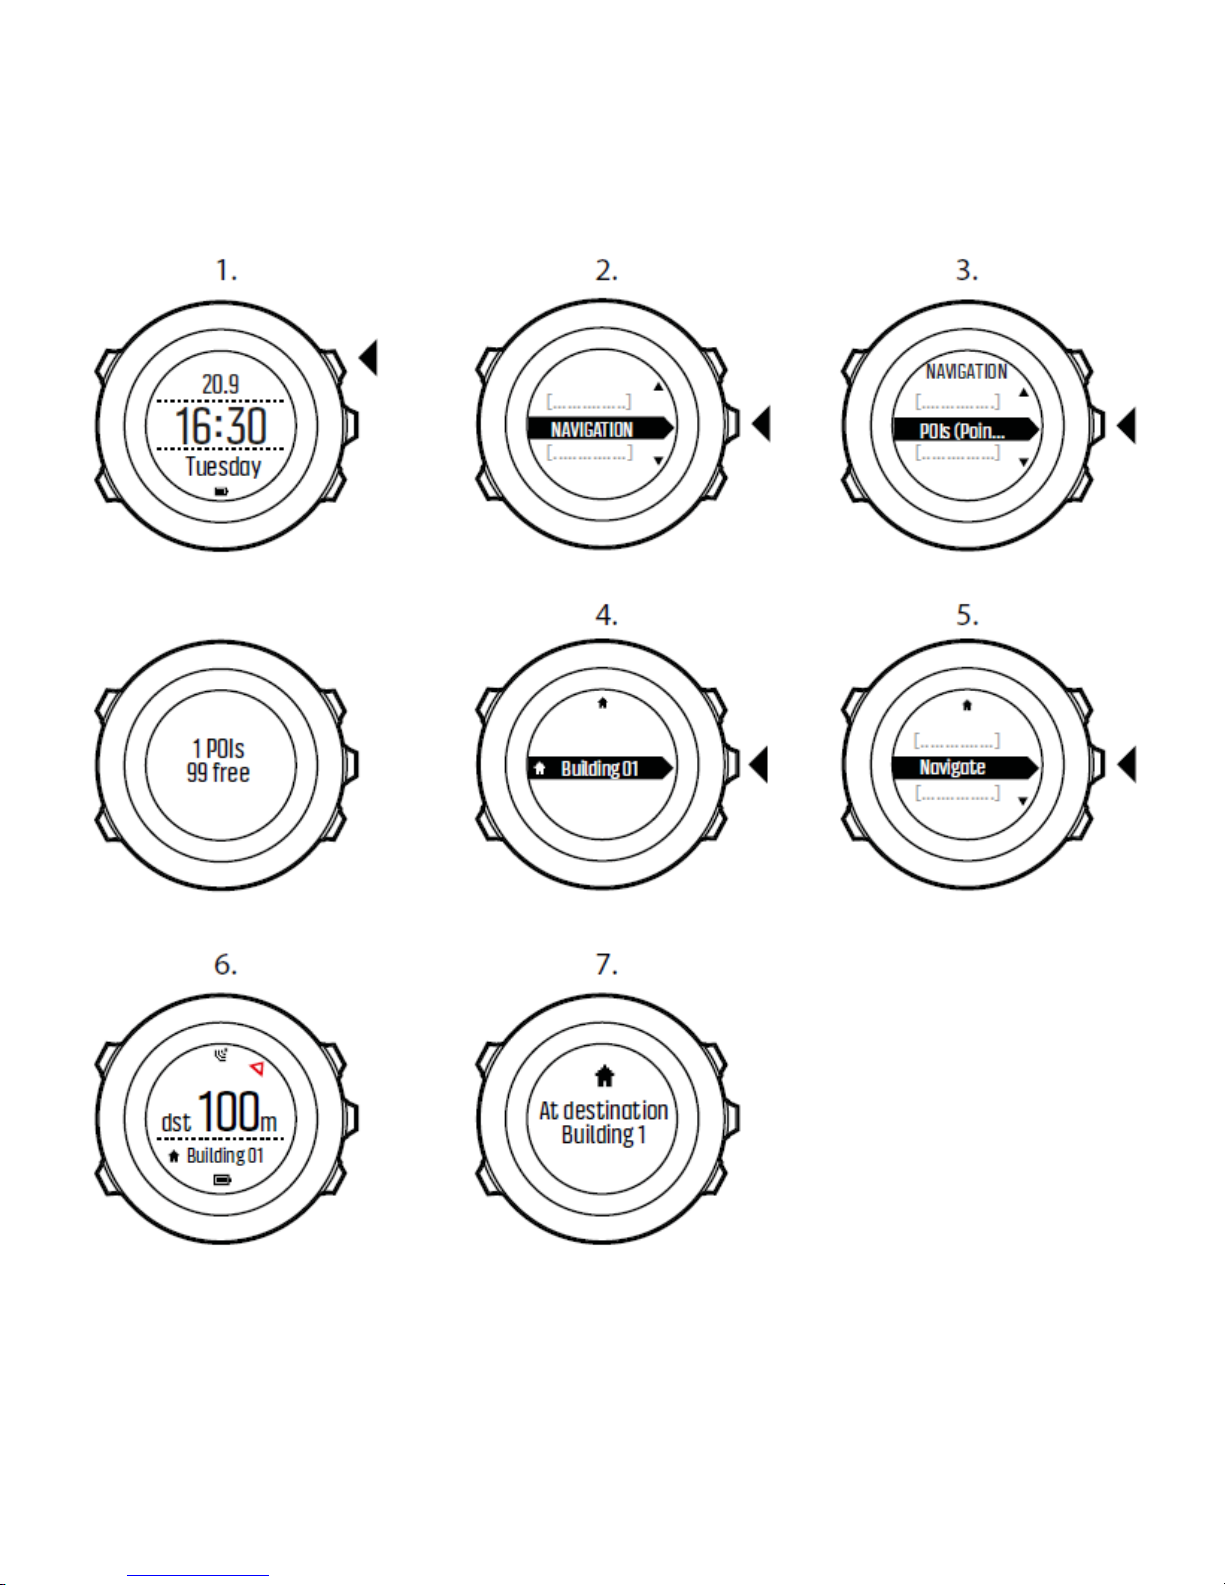
To navigate to a POI:
1. Press [Start] to enter the start menu.
2. Scroll to NAVIGATION using [Start] and enter wi t h [Next].
3. Scroll to POIs (Points of interest) using [Light] and select with
[Next].
The watch displays the number of saved POIs and free space
available for new POIs.
4. Scroll to the POI you wish to navigate to with [Start] or [Light]
and select with [Next].
Page 62

62
5. Press [Next] to select Navigate.
If you are using the compass for the first time, you need to calibrate
it (see
3.7.1 Calibrating compass). After activating the compass, the
watch starts searching for a GPS signal and displays GPS found
after acquiring the signal.
6. Start navigating to the POI. The watch displays the following
information:
•
indicator showing the directi on to your target (see further
explanation below)
•
your distance from the target
7. The watch informs you that you have arrived at your target.
Page 63
63
Page 64
64
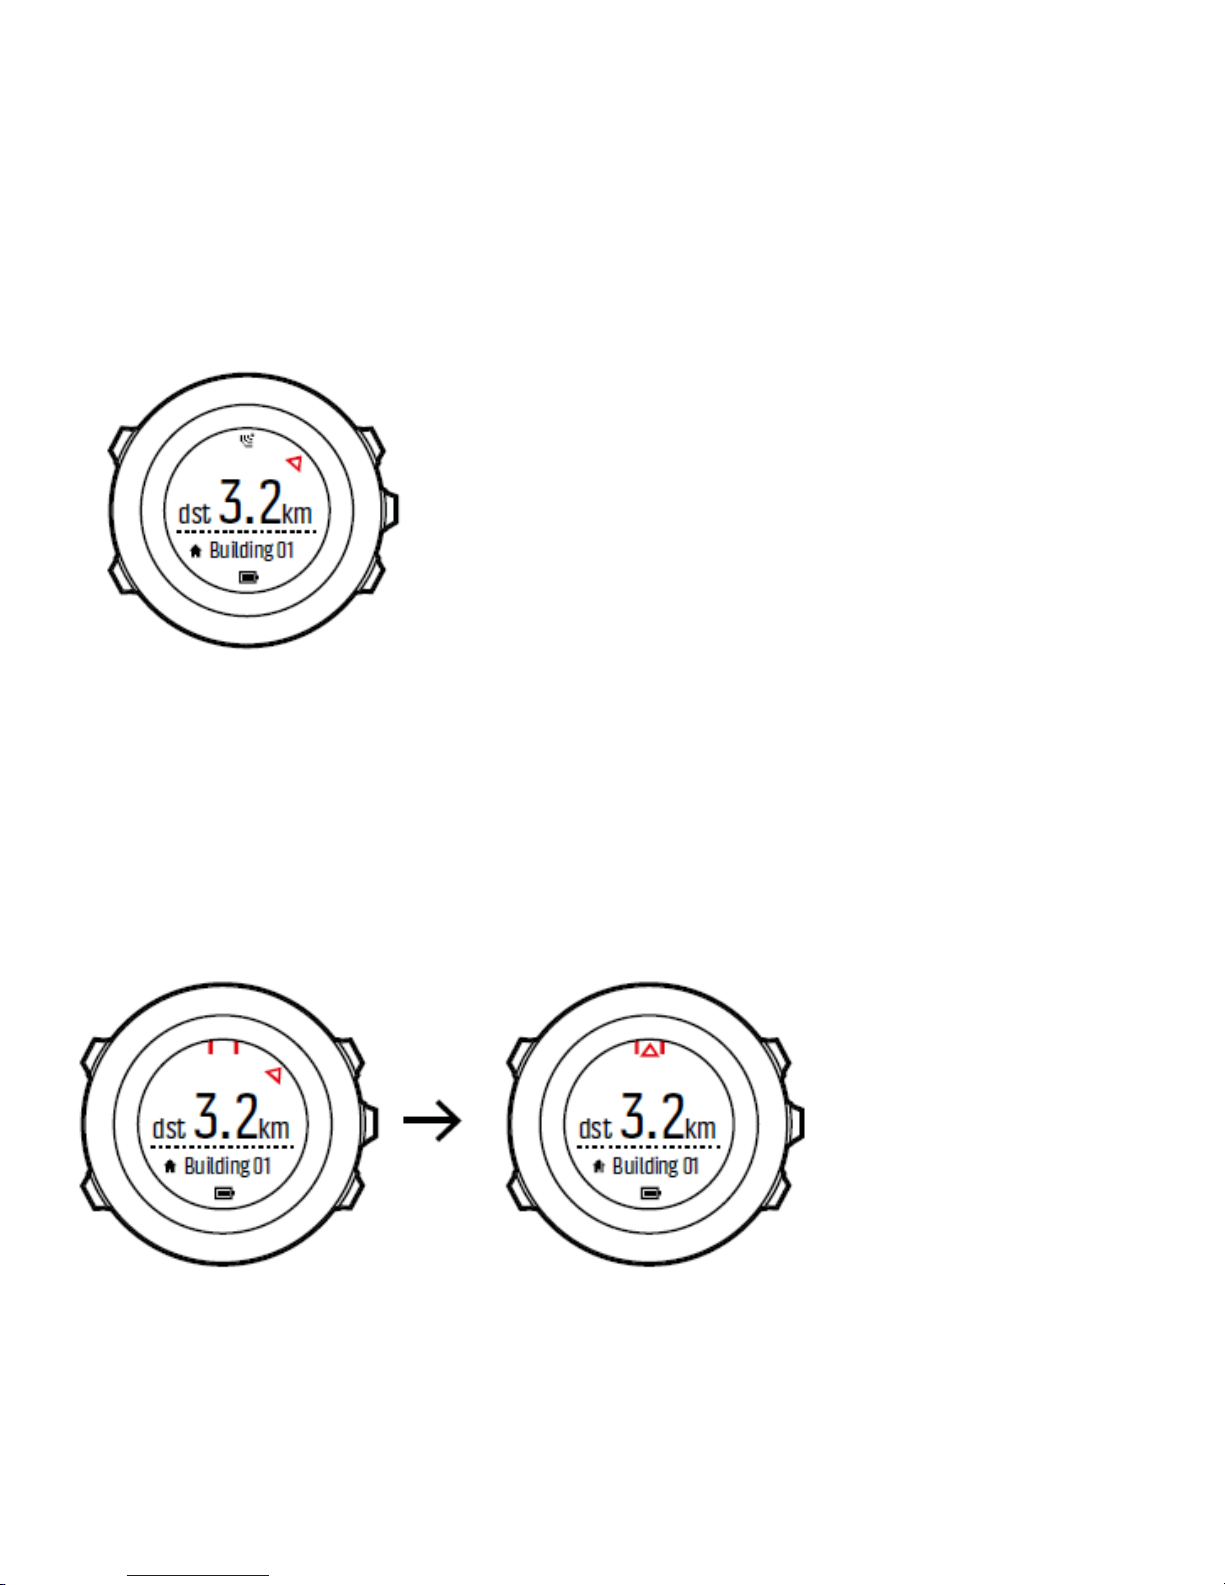
When stationary or moving slowly (<4 km/h), the watch shows you the
direction to t he POI (or waypoint if navigating a route) based on the
compass bearing.
While moving (>4 km/h), the watch shows you the direction to the POI
(or waypoint if navigating a route) based on GPS.
The direction to your target, or bearing, is shown with the empty
triangle. Your direction of travel, or heading, is indic ated by the solid
lines at the top of the display. Aligning these two ensures you are
moving in the correct direction.
Page 65

65
3.26.1 Checking your location
Suunto Traverse allows you to check the coordinates of your current
location using GPS.
To check your location:
1. Press [Start] to enter the start menu.
2. Scroll to NAVIGATION using [Start] and enter wi t h [Next].
3. Press [Next] to select Location.
4. Press [Next] to select Current.
5. The watch starts searching for a GPS signal and displays GPS
found after acquiring the signal. After that your current
coordinates are shown on the display.
TIP: You can also check your location while you are recording an
exercise by keeping [Next] pressed to access the options menu.
3.26.2 Adding your location as a POI
Suunto Traverse allows you to save your current location or define a
location as a POI. You can navigate to a saved POI anytime, for
example, during your exercise.
You can store up to 100 POIs in the watch. Note that also routes take
up this quota. For example, if you have a route with 60 waypoints, you
can additionally store 40 POIs in the watch.
You can select a POI type (icon) and POI name from a pre-defined list,
or freely name the POIs in Movescount.
To save a location as a POI:
Page 66

66
1. Press [Start] to enter the start menu.
2. Scroll to NAVIGATION using [Start] and enter wi t h [Next].
3. Press [Next] to select Location.
4. Select CURRENT or DEFINE to manually change longitude and
latitude values.
5. Press [Start ] t o save the location.
6.
Select a suitable POI type for the location. Scroll through the POI
types with [Start] or [Light]. Select a POI type with [Next].
7. Select a suitable name for the location. Scroll through the name
options with [Start] or [Light]. Select a name with [Next].
8. Press [Start] to save the POI.
TIP: You can create POIs in Movescount by selecting a location on
a map or inserting the coordinates. POIs in your Suunto Traverse
and
in Movescount are always synchronized when you connect the watch
to Movescount.
3.26.3 QUICK SAVE A POI
You can quickly save your current locati on as a POI by long
press ing the View but ton. This can be done from any mode.
3.26.4 Deleting a POI
You can delete a POI directly in the watch or through Movescount.
However, when you delete a POI in Movescount and synchronize your
Suunto Traverse, the POI is deleted from the watch but only disabled
in Movescount.
Page 67

67
To delete a POI:
1. Press [Start] to enter the start menu.
2. Scrol l to NAVIGATION using [Start] and ent er with [Next].
3. Scrol l to POIs (Points of inter est) using [Light] and select
with [Next].
The watch displays the number of saved POIs and free space
available for new POIs.
4. Scroll to the POI you wish to delete with [Start] or [Light] and
select w i th [N e xt].
5. Scroll to Delete with [Start] . Select with [Next].
6. Press [Start] to confirm.
3.27 Routes
You can create a route in Movescount, or import a route created with
another watch from your computer to Movescount. You can also record
a track with your Suunto Traverse, upl oad i t t o Movescount (see
3.10.5
Recording tracks
), and save it as a route.
To add a route:
1. Go to www.movescount.com and log in.
2. Under PLAN & CREATE, browse to ROUTES to searc h and add
existing routes or browse to ROUTE PLANNER to create your
own route. Make sure to tick the use route in my Suunto
Traverse box if you want to use the route in the device.
3. Sync your Suunto Traverse with Movescount using Suunto
Movescount App (manually start sync, see
3.21.2 Syncing with
mobile app) or by using Moveslink and the supplied USB cable.
Page 68

68
Routes are also deleted through Movescount. To
delete a route:
1. Go to www.movescount.com and log in.
2. Under PLAN & CREATE, browse to ROUTE PLANNER.
3. Under MY RO UTES, click on the route you want to delete and
click DELETE.
4. Sync your Suunto Traverse with Movescount using Suunto
Movescount App (manually start sync, see
3.21.2 Syncing with
mobile app) or by using Moveslink and the supplied USB cable.
3.27.1 Navigating a route
You can navigate a route you have downloaded to your Suunto
Traversefrom Movescount (see
3.27 Routes) or recorded from an
exercise (see
3.10.5 Recording tracks).
TIP: You can also navigate as a sport mode (see3.10.7 Navigating
during exercise).
To navigate a route:
1. Press [Start] to enter the start menu.
2. Scroll to NAVIGATION with [Start] and enter with [Next].
3. Scroll to Routes with [Start] and enter wit h [Next].
The watch displays the number of saved routes and after that a list
of all your routes.
4. Scroll to the route you want to navigate with [Start] or [Light].
Select w i th [N e xt].
5. The watch displays al l the waypoints on the s el ect ed rout e. Scroll to
the waypoint you want to use as the starting point with [Start] or
Page 69

69
[Light]. Accept with [Next].
6. Press [Next] to select Navigate.
7. If you selected a waypoint in the middle of the route, Suunto
Traverse prompts you to select the direction of the navigation.
Press [Start] to select Forwards or [Light] to select Backwards.
If you selected the first waypoint as the starting point, Suunto
Traverse navigates t he rout e forward (from the first to the last
waypoint). If you selected the last waypoint as the starting point,
Suunto Traverse navigates the route backwards (from the last
to the first waypoint).
8. If you are using the compass for the first time, you need to
calibrate it (see
3.7.1 Calibrating compass). After activating the
compass, the watch starts searching for a GPS signal and
displays GPS found after acquiring the signal.
9. Start navigating to the first waypoint on the route. The watch
informs you when you are approaching the waypoint and
automatically starts navigat i ng to the next waypoint on the
route.
10. Bef ore the last waypoint on the route the watch informs you that
you have arrived at your destination.
Page 70
70
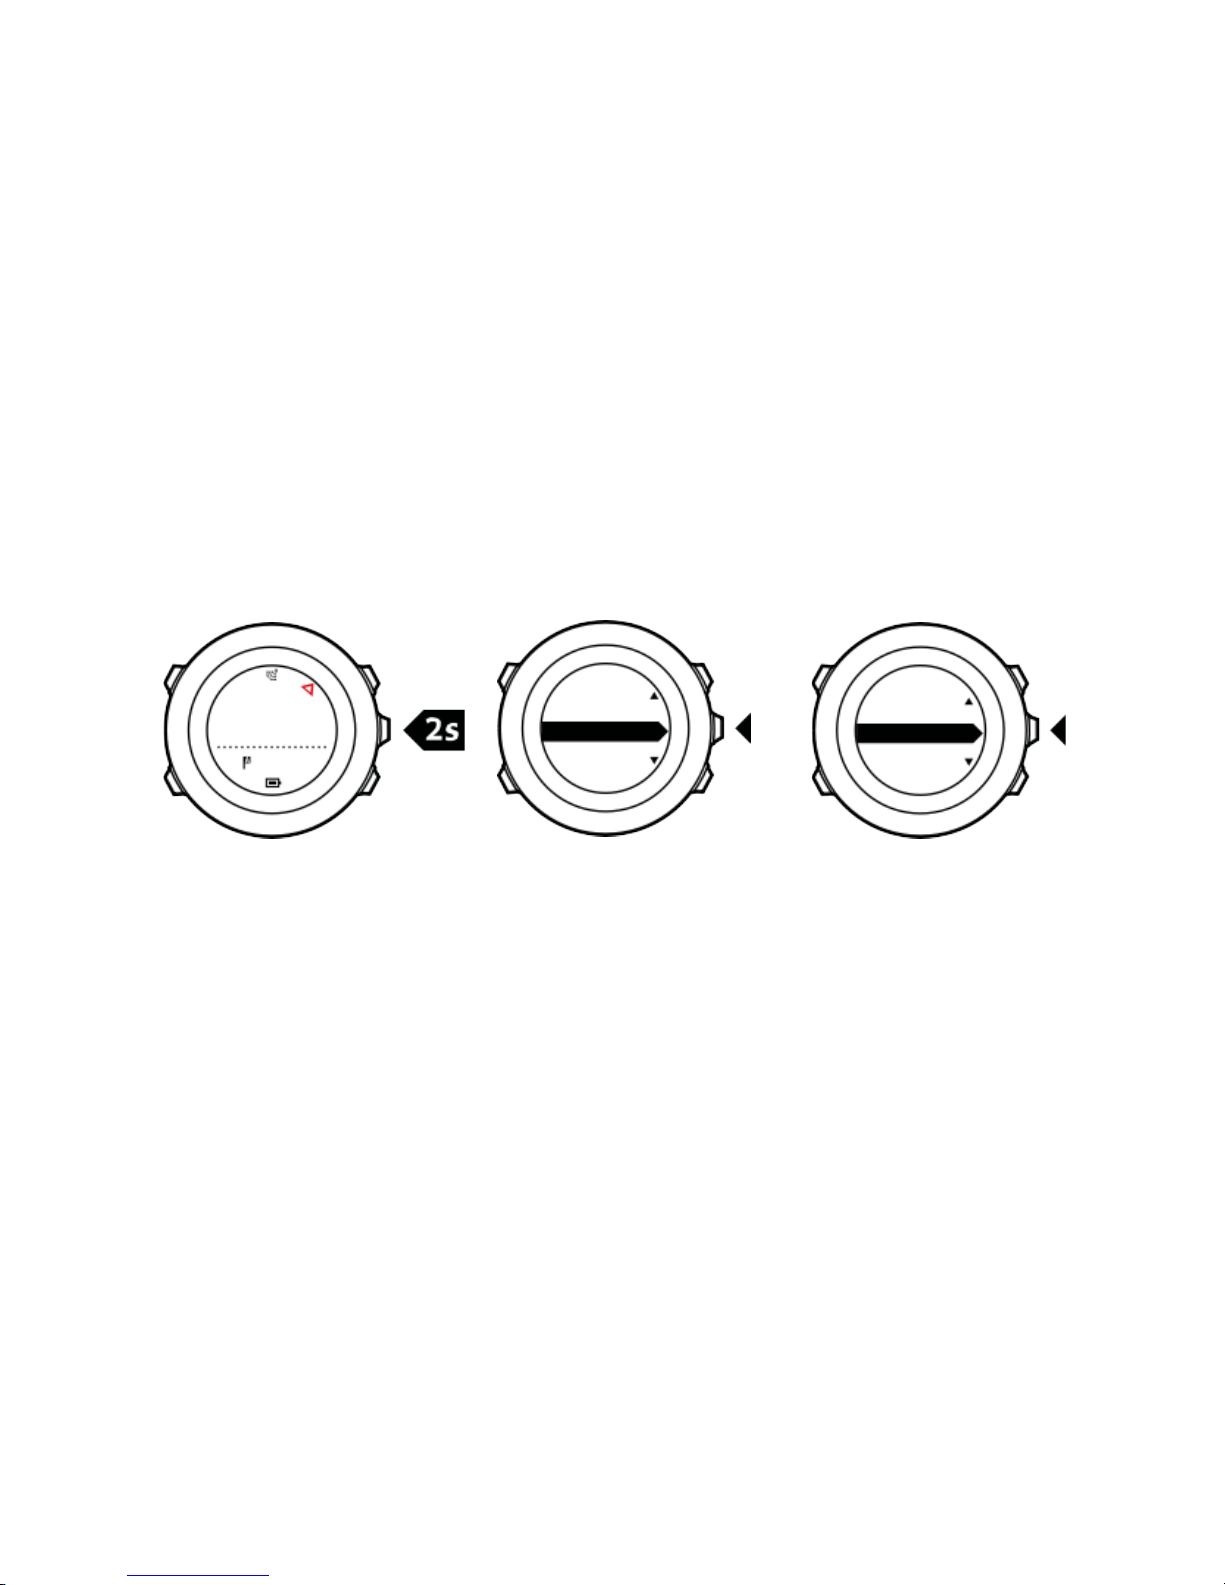
To skip a waypoint on a route:
1. While you are navigating a route, keep [Next] pressed to access the
options menu.
2. Press [Next] to select NAVIGATION.
3. Scroll to Skip way point with [Start] and select with [Next]. The
watch skips the waypoint and starts navigating directly to the next
waypoint on the route.
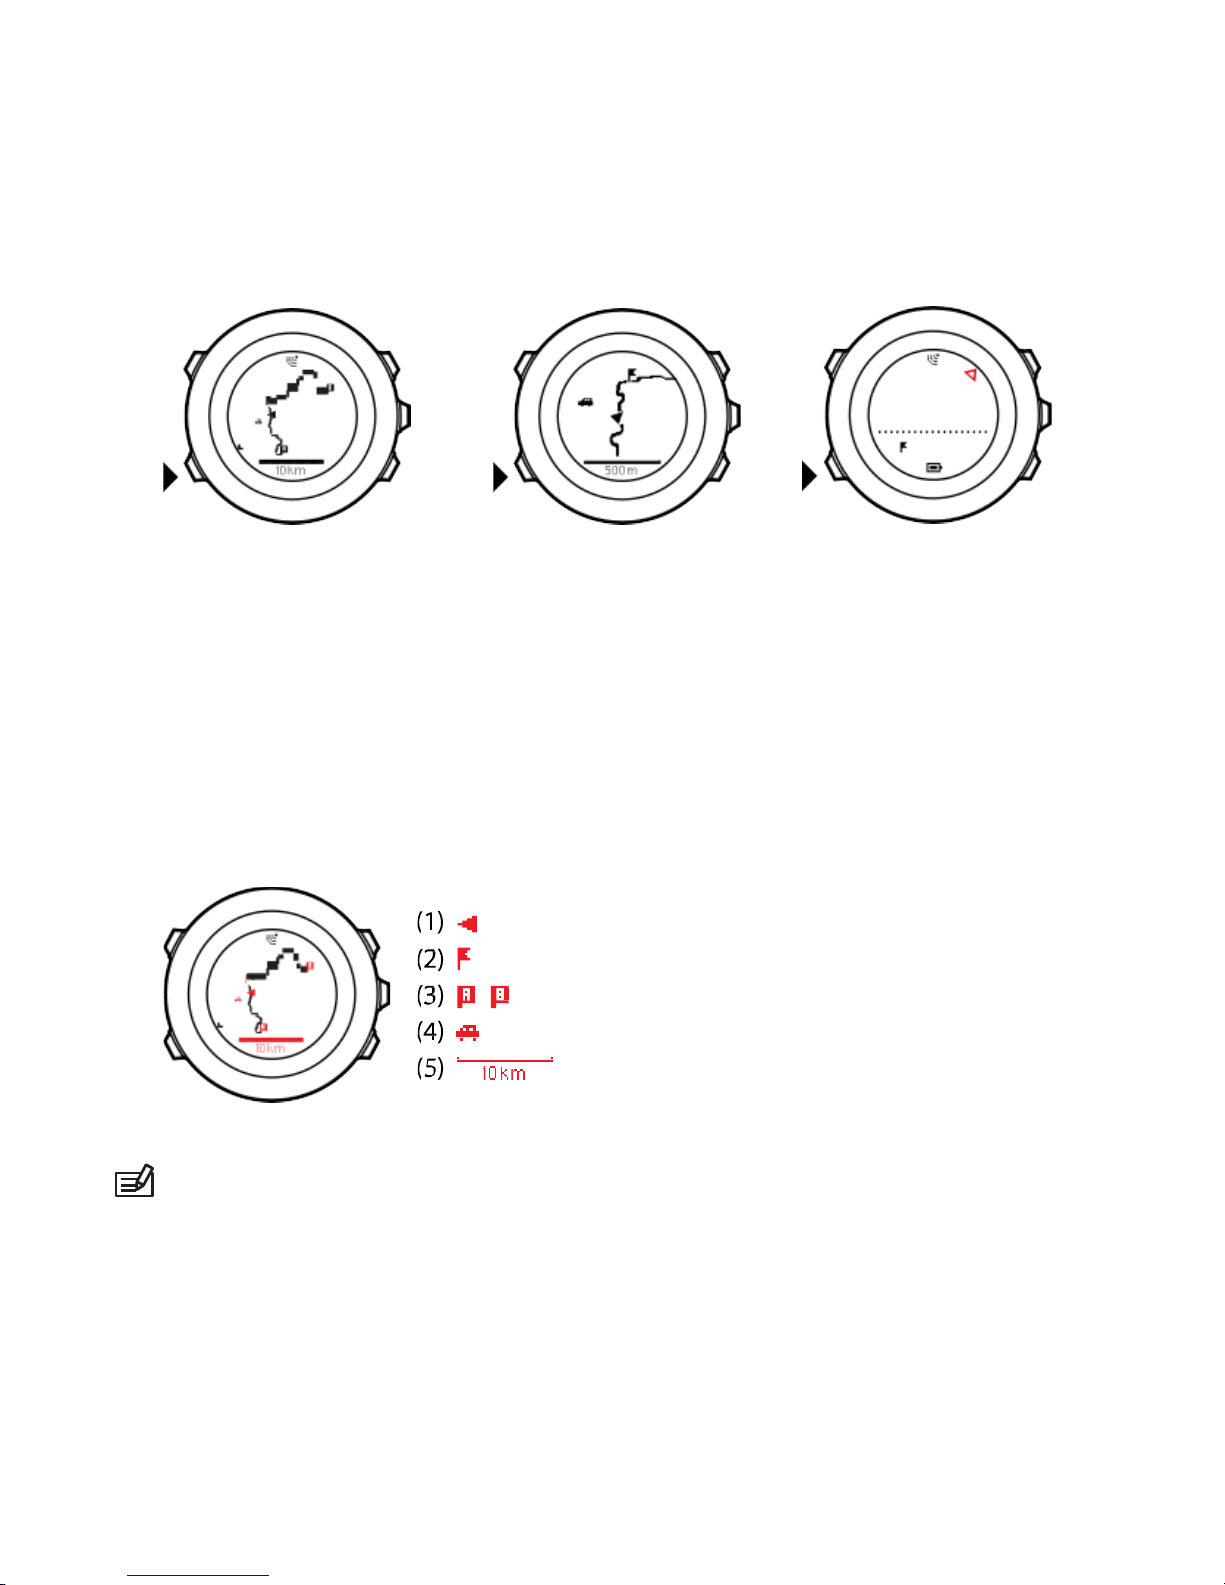
1. 2. 3.
3.27.2 During navigation
During navigation, press [View] to scrol l the foll owing views:
1. the full track view showing the whole route
2. zoomed-in view of the route. By default, the zoomed-in view is
scaled to a 200 m (0.125 mi) scale, or larger if you are far away
from the route. You can change the map orientation in the watch
settings under GENERAL » Map.
3. waypoint navigation view
dst 100m
BEGIN
[...............]
NAVIGAT
ION
[...............]
NAVIGAT
ION
[...............]
Skip wayp...
[...............]
Page 71
71
1. 2. 3.
Full track view
The full track view shows you the following information:
•
(1) arrow indicating your location and pointing to the directi on of
your heading.
•
(2) the next waypoint on the route
•
(3) the first and last waypoint on the route
•
(4) The closest POI is shown as an icon.
•
(5) scale on which the full track view is shown
NOTE: In the full track view the north is always upwards.
dst 200m
WP01
Page 72
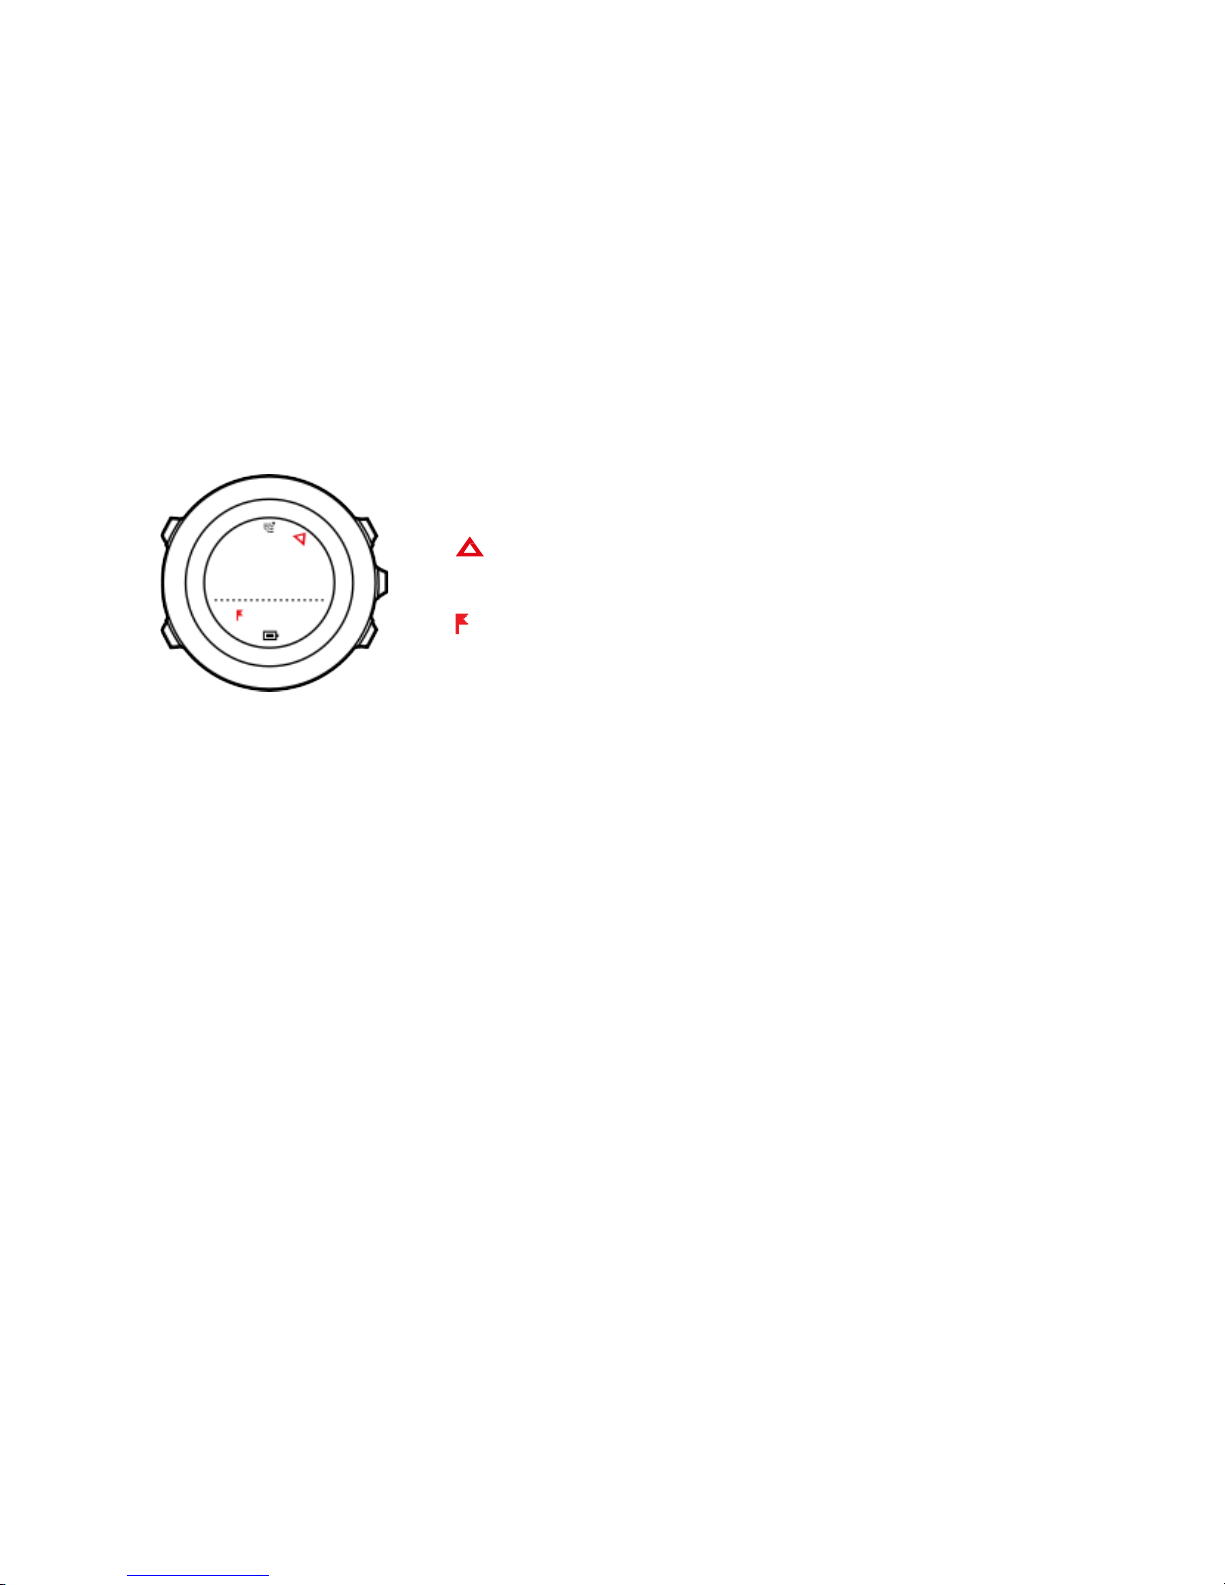
72
Waypoint na vigation view
The waypoint navigation view shows you the following informati on:
•
(1) arrow pointing to the direction of the next waypoint
•
(2) your distance to the next waypoint
•
(3) the next waypoint you are headed towards
(1)
(2)
dst 200m
(3)
WP01
dst 200m
WP01
Page 73

73
3.28 Service menu
To access the service menu, keep [Back Lap] and [Start] pressed
simultaneously until the watc h enters the service menu.
The service menu includes the following items:
•
INFO:
o
Air pressure: shows the current absolute air pressure and
temperature.
o
BLE: shows the current Bluetooth Smart version.
o
Version: shows the current software and hardware version.
•
TEST:
o
LCD test: allows you to test that the LCD works properly.
•
ACTION:
o
Power off: allows you to put the watch into deep sleep.
o
GPS reset: allows you to reset GPS.
NOTE: POWER OFF is a low power state. Connect the USB cable
(with power source) to wake up the watch. The initial setup wizard
starts. All settings except time and date are maintained. Just
confirm
them through the startup wizard.
NOTE: The watch switches to power saving mode when it is
static
for 10 minutes. The watch re-activates when moved.
Page 74

74
NOTE: Service menu content is subject to change without notice
during updates.
Resetting GPS
In case the GPS unit cannot find a signal, you can reset GPS data in
the service menu.
To reset GPS:
Page 75

75
1. In the service menu, scroll to ACTION with [Light] and enter with
[Next].
2. Press [Light] to scroll to GPS reset and enter with [Next].
3. Press [Start] to confirm GPS reset, or press [Light] to cancel.
NOTE: Resetting GPS resets GPS data, compass calibration
values
and recovery time. Saved logs are not removed.
3.29 Shortcuts
By default, when you keep [View] pressed in TIME mode, you toggle
the display between light and dark. This shortcut can be changed to a
different menu item.
To define a shortcut:
1. Keep [Next] pressed to enter the options menu or press [Start] to
enter the start menu.
2. Browse to the menu item to which you want to create a
shortcut.
3. Keep [View] pressed to create the shortcut.
NOTE: Shortcuts cannot be created to all possible menu items,
such as individual logs.
In other modes, keeping [View] pressed accesses predefined shortcuts.
For example, when the compass is active, you can access the
compass settings by keeping [View] pressed.
Page 76

76
3.30 Sport modes
Sport modes are your way to record exercises and other activities with
your Suunto Traverse3 Peak. For any activity, you can select a sport
mode f rom the set of predefined sport modes that came with your
watch. If you cannot find a suitable sport mode, create your own custom
sport modes through Movescount and Suunto Movescount App.
Different information is shown on the displays during exercis e
depending on the sport mode. The selected sport mode also affects
exercise settings, such as heart rate limits and autol ap distanc e.
In Movescount you can create custom sport modes, edit the predefined
sport modes, delete sport modes, or simply hide them so that they are
not shown in your exercise menu (see
3.10.3 Starting
an exercise
).
Custom sport modes
A custom sport mode can contain 1 to 8 different sport mode displays.
You can choose which data appears on each display from a
comprehensive list. You can customize, for exampl e, s ports -specific
heart rate limits, what PODs to search for, or the recording interval to
optimize accuracy and battery duration.
Any sport mode with GPS activated can also use the QUICK
NAVIGATION option. By default, this option is off. When you select POI
or Route, you get a pop-up list of the POIs or routes you have defined in
your watch at the start of your exercise.
Page 77

77
You can transfer up to 10 different sport modes created in Movescount
to your Suunto Traverse3 Peak.
3.31 Stopwatch
The stopwatch is a display that can be turned on or off from the start
menu.
To activate the stopwatch:
1. Press [Start] to enter the start menu.
2. Scroll to DISPLAYS with [Light] and press [Next].
3. Scroll to Stopwatch with [Light] and press [Next].
You can now start to use the stopwatch or press [Next] to go back to
the TIME display. To get back to the stopwatch, press [Next] to scroll
through the displays until you see the stopwatch.
To use the stopwatch:
1. In the activated stopwatch displ ay, press [Start] to start
measuring time.
2. Press [Back Lap] to make a lap, or press [Start] to pause the
stopwatch. To view the lap times, press [Back Lap] when the
stopwatch is paused.
3. Press [Start] to continue.
4. To reset the time, keep [Start] pressed when the stopwatch is
paused.
Page 78
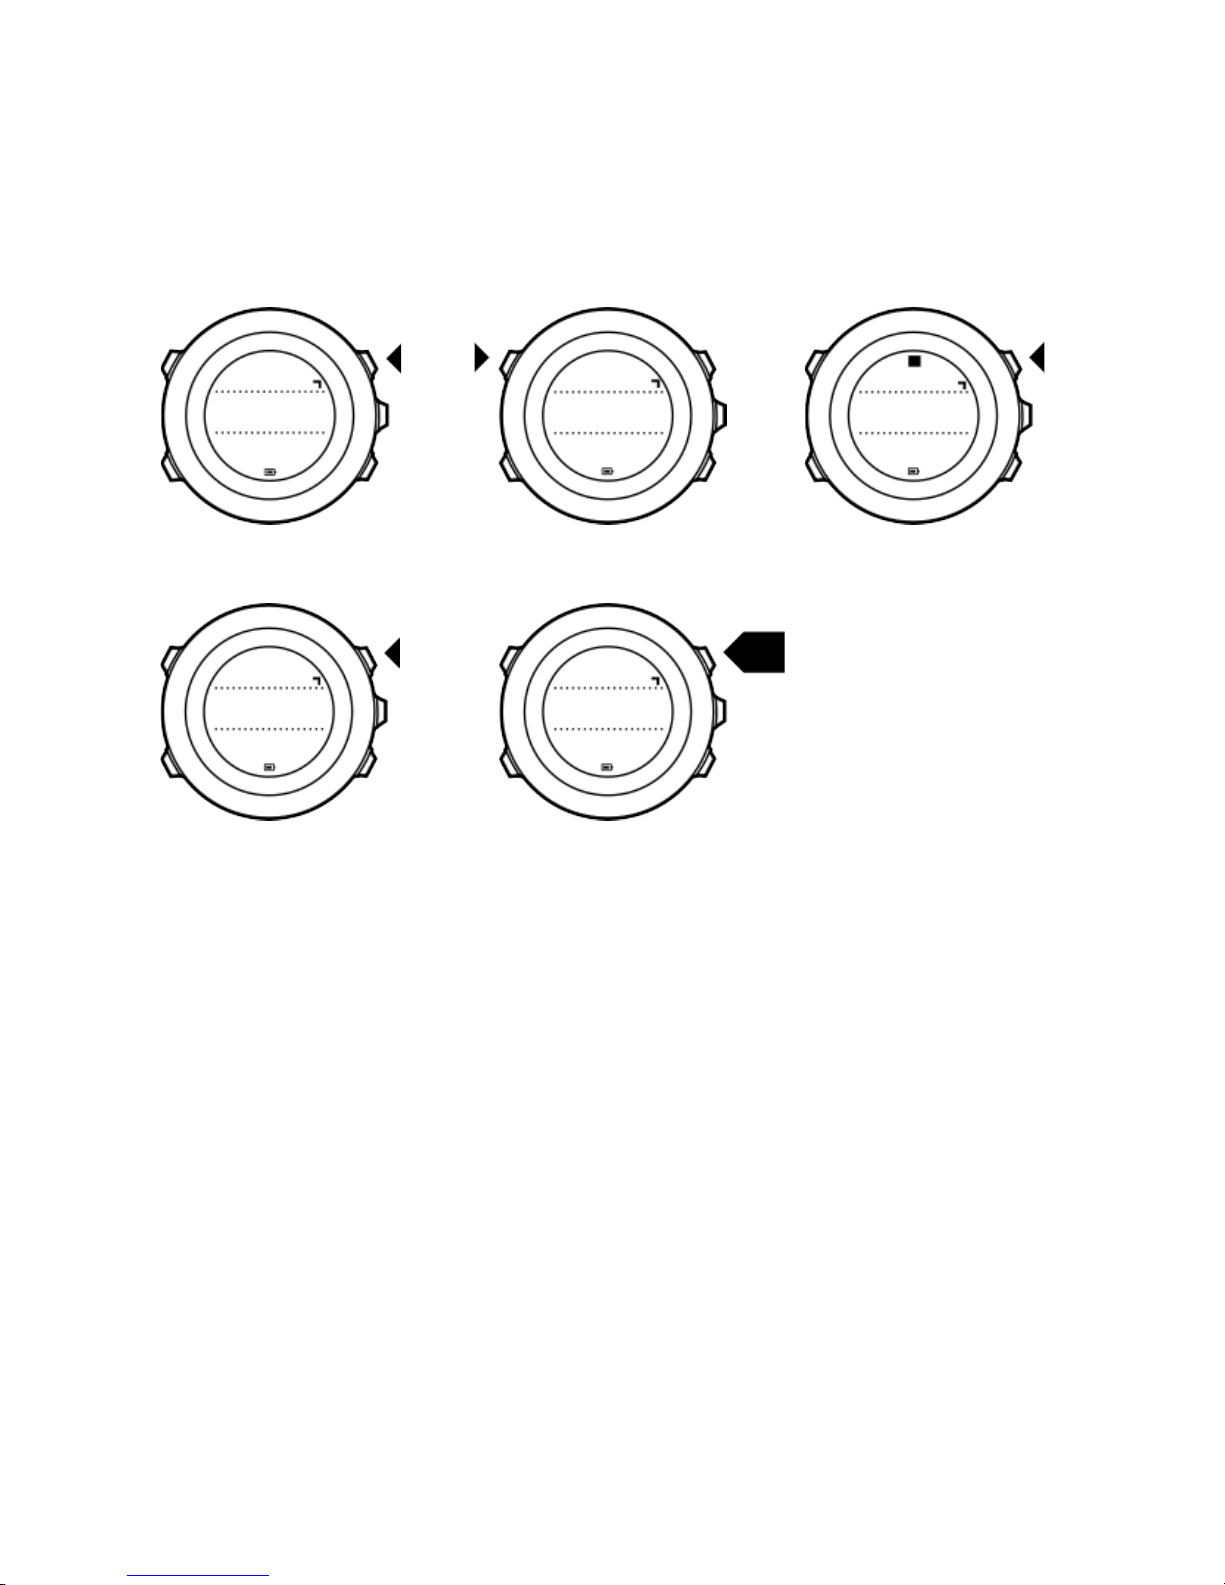
78
1. 2. 2.
3. 4.
W hile the st opwatch is running, you c an:
•
press [View] to switch between the time and lap time shown on the
bottom row of the display.
•
switch to TIME mode with [ Next].
•
enter the options menu by keeping [Next] pressed.
If you no longer want to see the stopwatch display, deactivate the
stopwatch.
To deactivate the stopwatch:
1. Press [Start] to enter the start menu.
2. Scroll to DISPLAYS with [Light] and press [Next].
3. Scroll to End stopwatch with [Light] and press [Next].
Lap 0
00’00.0
00’00.0
Lap 1
00’10.0
00’10.0
Lap 1
00’10.0
00’10.0
Lap 2
00’20.0
00’10.0
Lap 0
00’00.
2
Page 79

79
3.32 Suunto Apps
Suunto Apps allow you to further customize your Suunto Traverse. V isit
Suunto App Zone in Movescount to find Apps, such as various timers
and counters, available for your use. If you cannot find what you need,
create your own App with Suunto App Designer. You can create Apps,
for example, for calculati ng your estimat ed marathon result, or the
slope grade of your skiing route.
To add Suunto Apps to your Suunto Traverse3 Peak:
1. Go to the P LAN & CREATE section in Movescount community and
select App Zone to browse existing Suunto Apps. To create your
own App, go to the PLAN & CREATE section of your profile and
select App Designer.
2. Add Suunto App to a sport mode. Connect your Suunto Traverseto
your Movescount account to synchronize Suunto App to the watch.
The added Suunto App will show the result of its calculation while
you exercise.
NOTE: You can add up to four Suunto Apps to each sport mode.
3.33 Swimming
You can use your Suunto Traverse for rec ordi ng swimmi ng exercises i n a
pool or openwater.
When used together with the Suunto Smart Sensor, you can also record
your heart rate while you are swimming. The heart rate data
Page 80
102
is automatically uploaded to your Suunto Traverse once you get out of
the water.
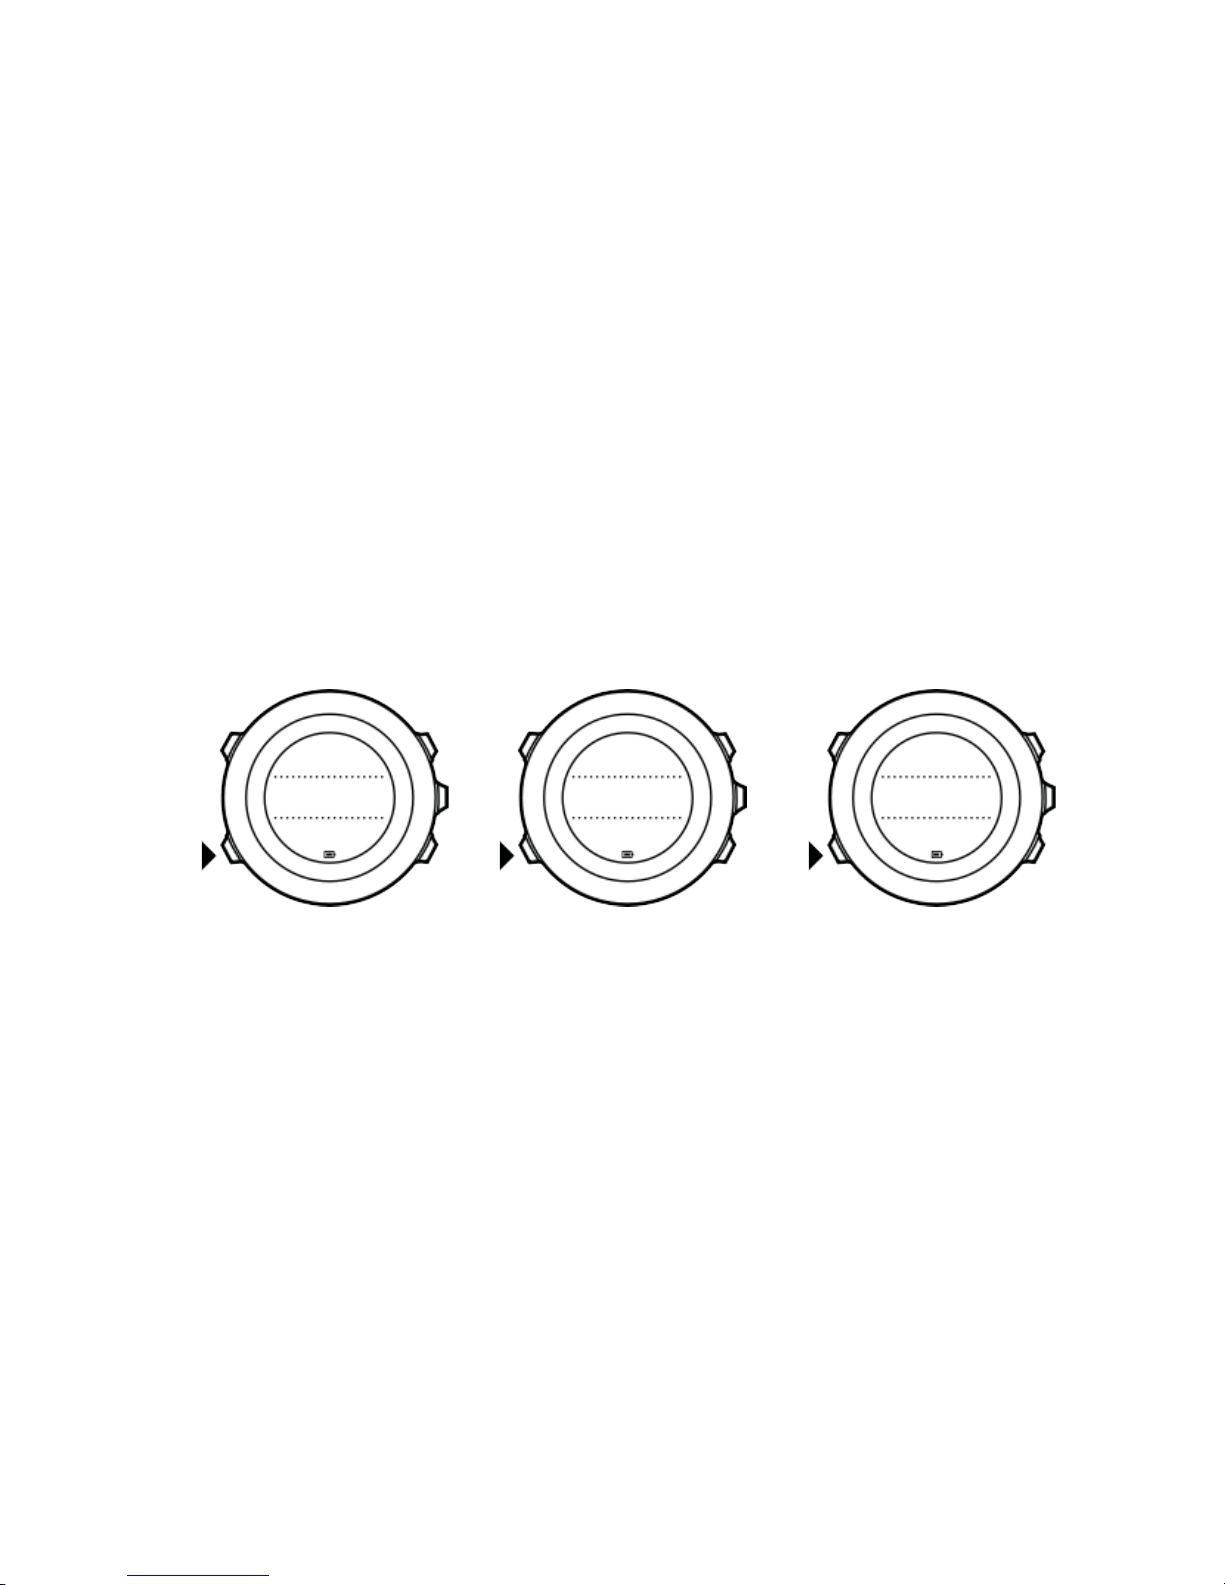
3.34 Time
The time display on your Suunto Traverse shows the following
information:
•
top row: date
•
middle row: time
•
bottom row: change with [View] to show additional information such
as weekday, dual time, and battery level.
To access the time settings:
1. Keep [Next] pressed to enter the options m enu.
2. Press [Next] to enter GENERAL.
3. Scroll to Time/date using [Start] and enter with [Next]. Under
the Time/date menu you can set the following:
•
Time
•
Date
•
GPS timekeeping
•
Dual time
•
Alarm
20.9.
16:30
Tuesday
20.9.
16:30
12
20.9.
16:30
17:30
Page 81

81
To change time settings:
1. In the Time/date menu, scroll to the desired setting with [Start] or
[Light] and select the setting with [Next].
2. Change the values with [Start] and [Light] and save with [Next].
3. Go back to the previous menu with [Back Lap], or keep [Next]
pressed to exit.
Sunrise and sunset time views are available when GPS has been
activated. If GPS is not active, sunrise and sunset times are based on
the last recorded GPS data.
3.34.1 Alarm clock
You can use your Suunto Traverseas an alarm clock. To
access the alarm clock and set the alarm:
1. In the options menu, go to GENERAL, then t o Time/date and
Alarm.
2. Set the alarm on or off with [Start] or [Light]. Accept with [Next].
3. Set the hours and minutes with [Start] and [Light]. Accept with
[Next].
4. Go back to the setti ngs with [Back Lap], or keep [Next] pressed to
exit the options menu.
Page 82
104
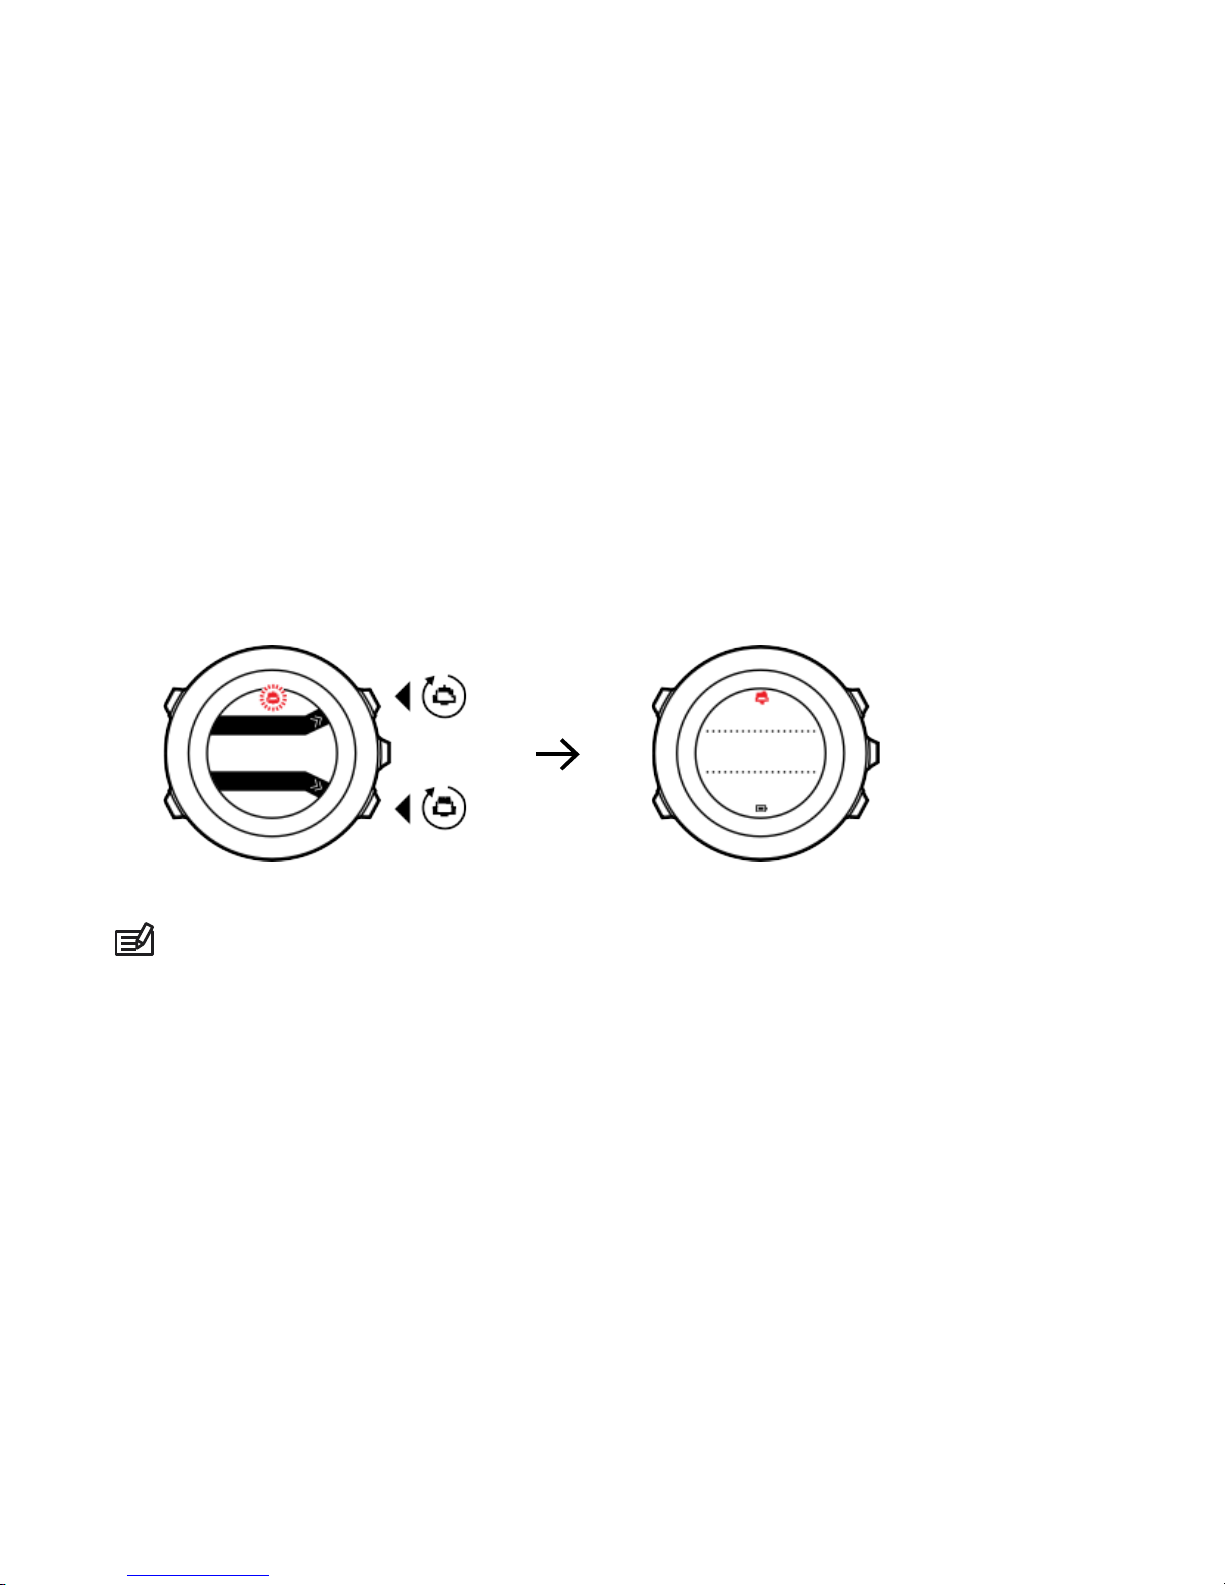
When the alarm is switched on, the alarm symbol is shown on most of
the displays.
When the alarm sounds, you can:
•
Select Snooze by pressing [Light]. The alarm stops and restarts
every five minutes until you stop it. You can snooze up to 12 times
for a total of one hour.
•
Select Stop by pressing [Start Stop]. The alarm stops and restarts
the same time the following day, unless you switch the alarm off in
the settings.
NOTE: When snoozing, the alarm icon blinks in the TIME display.
20.9
16:30
Tuesday
Page 83
105
3.34.2 Time syncing
Your Suunto Traverse tim e can be updated through your mobile phone,
computer (Moveslink) or GPS time. If you have paired your watch with
the Suunto Movescount App, time and time zone are automatically
synced with your mobile phone.
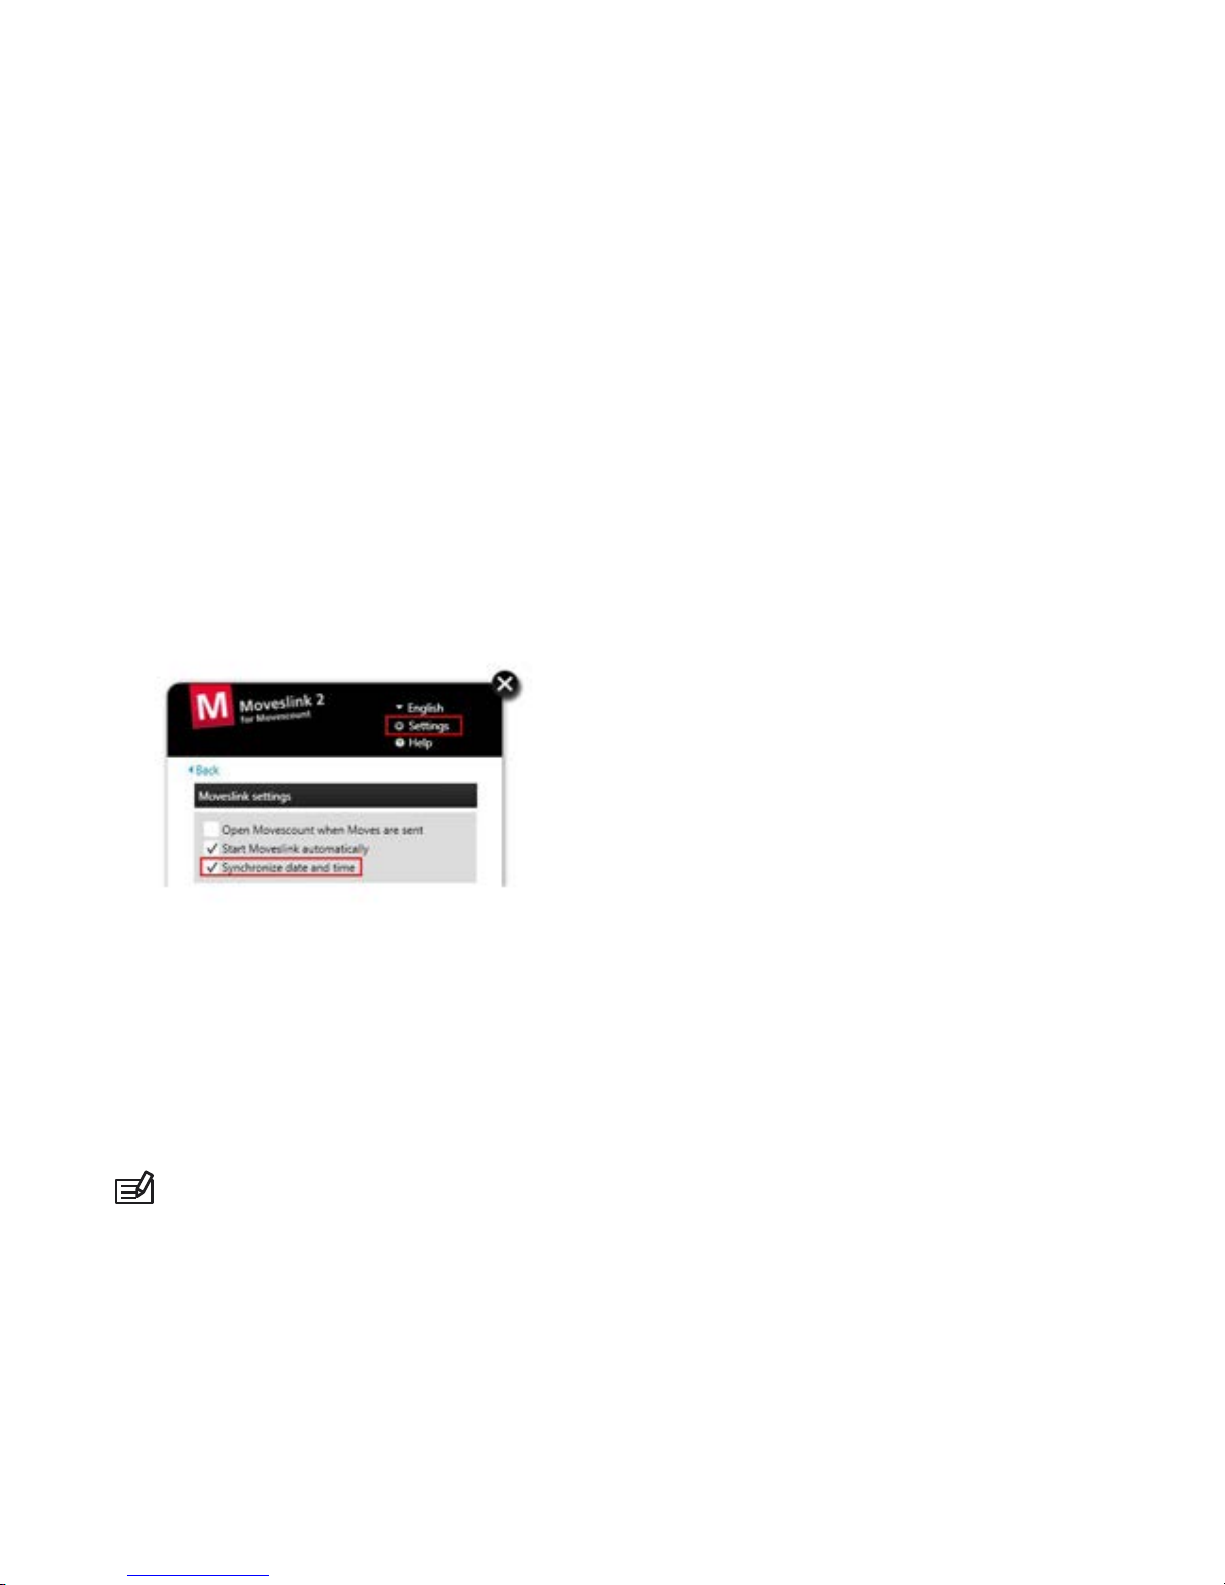
When you connect your watch to the computer with the USB cable,
Moveslink by default updates your watch time and date according to
the computer clock. This feature can be turned off in the Moveslink
settings.
GPS timekeeping
GPS timekeeping corrects the offset between your Suunto Traverse
and the GPS time. GPS timekeeping corrects the time automaticall y
once a day, or after you have adjusted the time manually. Also the dual
time is corrected.
NOTE: GPS timekeeping corrects the minutes and seconds, but not
the hours.
Page 84

106
NOTE: GPS timekeeping corrects the time accurately, if it is less
than 7.5 minutes wrong. If the time is wrong more than that, GPS
timekeeping corrects it to the closest 15 minutes.
GPS timekeeping is activated by default. To deactivate it:
1. In the options menu, go to GENERAL, then t o Time/date and GPS
timekeeping.
2. Set the GPS timekeeping on or off with [Start] and [Light]. Accept
with [Next].
3. Go back to the settings with [Back Lap], or keep [Next] pressed to
exit.
3.35 Track back
With Track back, you can retrace your route at any point during an
exercise. Suunto Traverse creates temporary waypoints to guide you
back to your starting point.
To track back during exercise:
1. While you are in a sport mode that uses GPS, keep [Next] pressed
to access the options menu.
2. Press [Next] to select NAVIGATION.
3. Scroll to Track back with [Start] and select with [Next].
You can now start navigating your way back the same way as during
route navigation. For more information about rout e navigation, see
3.27.1 Navigating a route .
Track back can also be used from the logbook with exercises that
include GPS data. Follow the same procedure as in
Page 85

107
3.27.1 Navigating a route. Scroll to Logbook instead of Routes, and
select a log to start navigating.
3.36 Weat her indicat ors
In addition to the barometer graph (see 3.2.4 Using Barometer
profile),
Suunto Traverse has two weather indicators: weather trend and storm
alarm.
The weather trend indicator is displayed as a view the time display,
providing you a quick way to check weather changes.
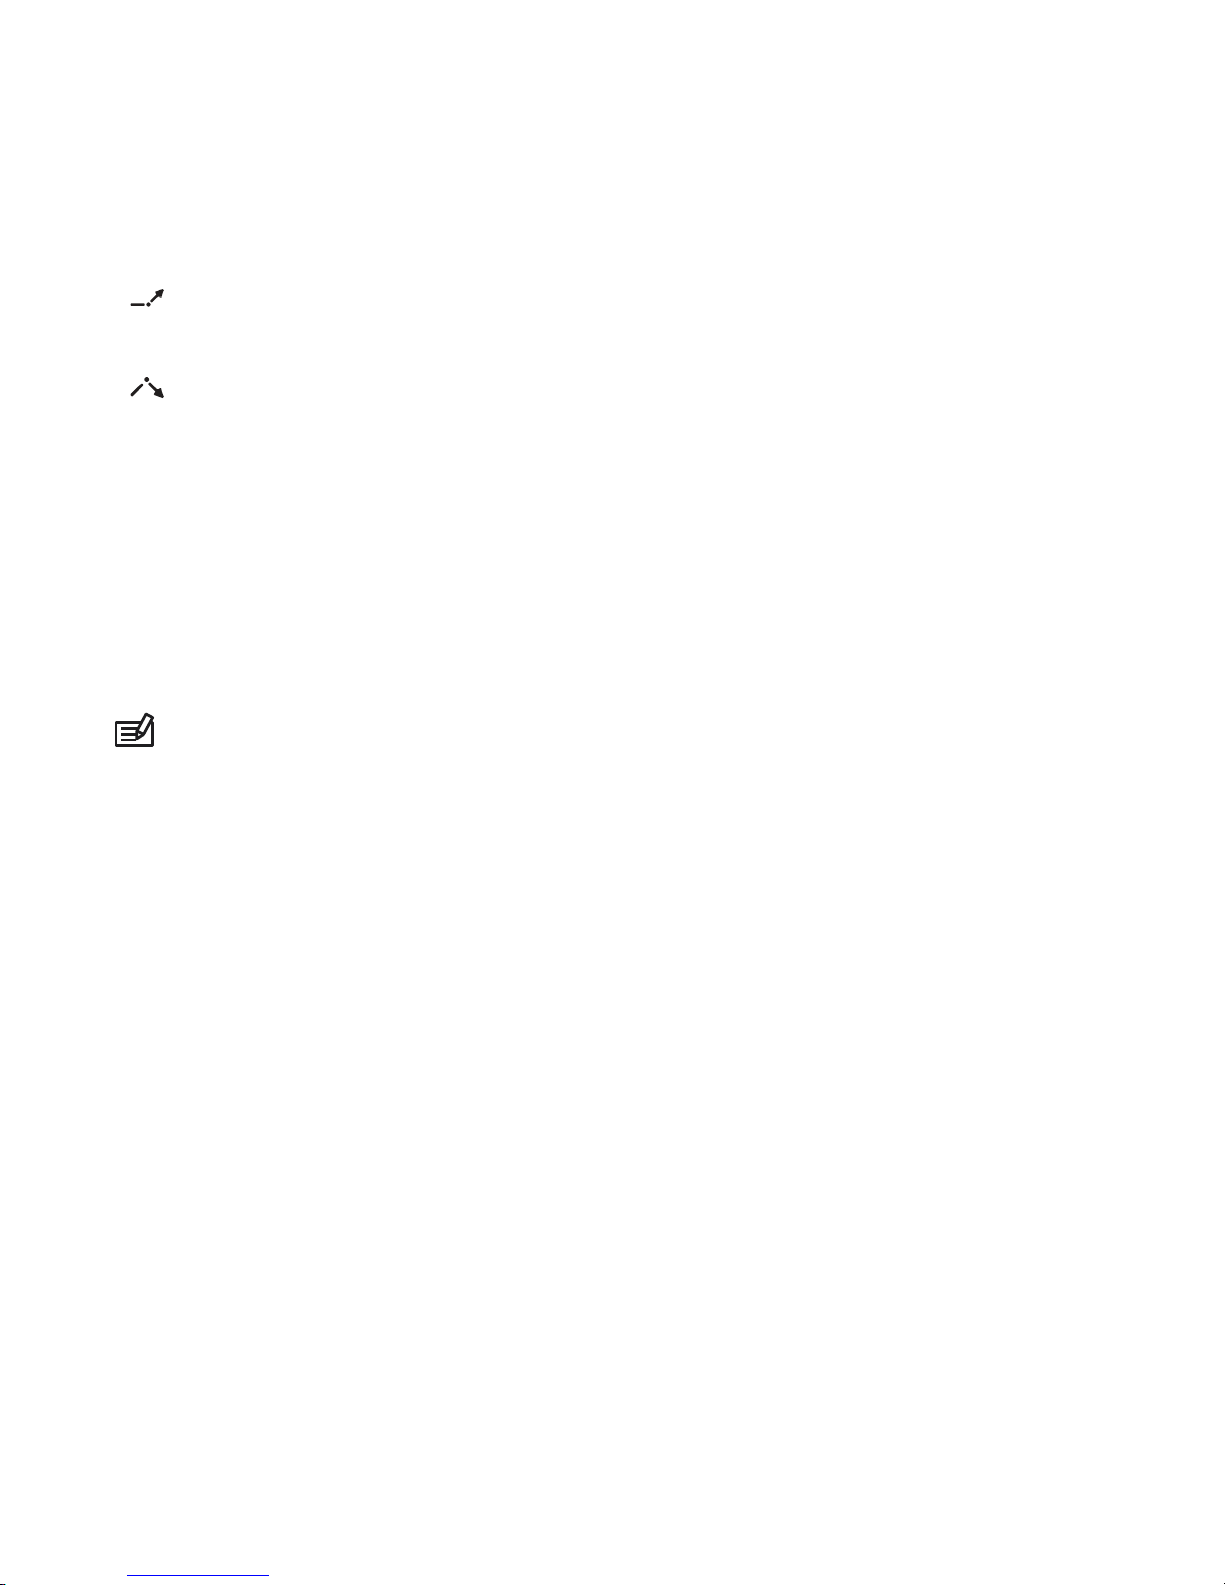
The weather trend indicator is comprised of two lines forming an arrow.
Each line represents a 3-hour period. A change in barometric pressure
greater than 2 hPa (0.59 inHg) over three hours triggers a change the
direction of the arrow. For example:
pressure dropping heavily over the last six hours
Page 86
108
pressure was steady, but rising heavily over the last
three hours
pressure was rising heavily, but dropping heavily
over the last three hours
Storm alarm
A significant drop in barometric pressure typic ally means a storm is
coming and you should take cover. When the storm alarm is active,
Suunto Traversesounds an alarm and flashes a storm symbol when the
pressure drops 4 hPa (0.12 inHg) or more during a 3-hour period.
NOTE: The storm alarm does not work if you have altimeter
profile
activated. See 3.2.2 Matching profile to activity.
To activate Storm alarm:
1. Keep [Next] pressed to enter the options menu.
2. Scroll to ALTI-BARO with [Light] and enter with [Next].
3. Press [Next] to select Storm alarm.
4. Set the storm alarm On or Off with [Start] or [Light] and accept
with [Next].
When a storm alarm sounds, pressing any button ends the alarm. If no
button is pressed, the alarm repeats once after five minutes. The storm
symbol remains on the display until the weather conditions stabi lize
(pressure drop slows down).
Page 87

109
A special lap (called 'storm alarm') is generated when a storm alarm
occurs while recording an exercise.
TIP: You can also activate or deactivate the storm alarm through
the options menu in a sport mode.
Page 88

110
4 CARE AND SUPPORT
4.1 Handli ng guidelines
Handle the unit with care – do not knock or drop it.
Under normal circumstances the watch does not require servicing. After
use, rinse it with fresh water, mild soap, and carefully clean the housing
with a moist soft cloth or chamois.
Use only original Suunto accessories - damage caused by non- original
accessories is not covered by warranty.
TIP: Remember to register your Suunto Traverse at
www.suunto.com/support to get personalized support.
4.2 Water resistance
Suunto Traverseis water resistant to 100 meters/330 feet/10 bars. The
meter value relates to an actual diving depth and is tested in the water
pressure used in the course of the Suunto water resistance test. This
means you can use the watch for swimming and snorkeling, but it
should not be used for any form of diving.
NOTE: Water resistance is not equivalent to functional operating
depth. The water resistance marking refers to static air/ water tightness
withstanding shower, bathing, swimming, poolside diving and
snorkeling.
To maintain water resistance, it is recommended to:
Page 89

111
•
never use the device for other than intended use.
•
contact an authorized Suunto service, distri butor or retailer for any
repairs.
•
keep the device clean from dirt and sand.
•
never attempt to open the case yourself.
•
avoid subjecting the device to rapid air and water temperature
changes.
•
always clean your device with fresh water if subjected to salt
water.
•
never knock or drop the device.
4.3 Charging the battery
The duration on a single charge depends on how Suunto Traverse is
used and in what conditions. Low temperatures, for exampl e, reduce
the duration of a single charge. In general, the capacity of rechargeable
batteries decreases over time.
NOTE: In case of abnormal capacity decrease due to defective
battery, Suunto warranty covers the battery replacement for one
year or
for at maximum 300 charging times, whichever comes first.
The battery icon indicates the charge level of the battery. When the
battery charge level is less than 10 %, the battery icon blinks for 30
seconds. When the battery charge level is less than 2 %, the battery
icon blinks continuously.
Page 90

112
Charge the battery by attaching it to your computer with the supplied
USB cable, or charge with a USB-compatible wall charger. It takes
approximately 2-3 hours to fully charge an empty battery.
TIP: Go to Movescount to change the GPS fix interval of your sport
modes to save battery life. For more information, see
3.23.3 GPS accuracy and power saving.
4.4 Getting support
To get additional support, visit www.suunto. com/support. There you will
find a comprehensive range of support materials, includi ng Questions
and Answers and instruction videos. You can also post questions
directly to Suunto or email/call Suunto support profess i onals .
There are also many how-to videos on the Suunto YouTube channel at
www.youtube.com/user/MovesCountbySuunto.
We recommend registering your product to get the best personalized
support from Suunto.
To get support from Suunto:
1. Register at www.suunto.com/support/MySuunto, or if you have
already, login and add Suunto Traverse to My Products.
2. Visit Suunto.com (www.suunto.c om/support ) to see if you
question has been asked/answered already.
3. Go to CONTACT SUUNTO to submit a question or call us at any
of the listed support numbers.
Page 91

113
Alternatively, s end us an email to [email protected]. Please
include the product name, serial number and a detailed description
of the issue.
Suunto’s qualified custom er support staff will hel p you and, if
needed, troubleshoot your product during t he call.
Page 92

114
5 REFERENCE
5.1 Technical specifications
General
•
operating temperature: -20° C to +60° C/-5° F to +140° F
•
battery charging temperature: 0° C to +35° C/+32° F to +95° F
•
storage temperature: -30° C to +60° C/-22° F to +140° F
•
weight: TBD
•
water resistance (Suunto Traverse): 100 m/328 ft/10 bar
•
water resistance (Suunto Smart Sensor): 20 m/66 ft (ISO 2281)
•
lens: mineral crystal glass (sapphire cryst al i n Sapphire models )
•
power: rechargeable lithium -ion batt ery
•
Battery life: ~ 20 - 100 hours depending on selected GPS accuracy
Memory
•
Points of Interest (POIs): max. 250
Radio receiver
•
Bluetooth® Smart compatible
•
communication frequency: 2.4 GHz
•
range: ~3 m/9.8 ft
Barometer
•
display range: 950 to 1060 hPa/28.05 to 31.30 inHg
•
resolution: 1 hPa/0.03 inHg
Altimeter
•
display range: -500 m to 9999 m/-1640 ft to 32805 ft
Page 93

115
•
resolution: 1 m/3 ft
Thermometer
•
display range: -20° C to +60° C /-4° F to +140° F
•
resolution: 1°
Chronograph
•
resolution: 1 s until 9:59'59, after that 1 min
Compass
•
resolution: 1 degree/18 mils
GPS
•
technology: SiRF star V
•
resolution: 1 m/3 ft
5.2 Compliance
5.2.1 CE
Suunto Oy hereby declares that this product is in compliance with the
essential requirements and other relevant provisions of Directive
1999/5/EC.
Suunto Oy déclare par la présente que ce produit est conforme aux
exigences essentiell es et aux autres disposit i ons pert i nentes de la
directive 1999/5/CE.
5.2.2 FCC compliance
This device complies with Part 15 of the FCC Rules. Operation is subject
to the following two conditions:
(1) this device may not cause harmful interferenc e, and
Page 94

116
(2) this device must accept any interference rec ei ved, includi ng
interference that may cause undesired operation. This product has
been tested to comply with FCC standards and is intended for home or
office use.
Changes or modifications not expressl y approved by Suunto could void
your authority to operate this device under FCC regulations.
Cet appareil est conforme à la Partie 15 des règles de la FCC. Son
utilisation est soumise aux deux conditions sui vant es :
(1) cet appareil ne doit pas causer d'interférences dangereuses,
(2) cet appareil doit accepter toute interf érence reçue, y compris les
interférences pouvant entraîner un foncti onnem ent non désiré. La
conformité de ce produit aux normes de la FCC a été testée et ce
produit est destiné à être utilisé à la maison ou au bureau.
Les changements ou modifications non expressém ent approuvés par
Suunto peuvent annuler votre droit d'uti lis er cet appareil dans l e cadre
de la réglementation de la FCC.
5.2.3 IC
This device complies with Industry Canada lic ence-exempt RS S
standard(s). Operation is subj ect to the following two conditions:
(1) this device may not cause interference, and
(2) this device must accept any interference, including int erf erence
that may cause undesired operation of the device.
Cet appareil est conforme aux normes RSS hors licence d'Industrie
Canada. Son utilisation est soumise aux deux conditions s ui vant es :
(1) cet appareil ne doit pas causer d'interférences,
Page 95

117
(2) cet appareil doit accepter toute interf érence, y compris les
interférences pouvant entraîner un foncti onnem ent non désiré de
l'appareil.
5.3 NOM-121-SCT1-2009
The operation of this equipment is subject to the following tw conditions: (1)
it is possible that this equipment or device may not cause harmful
interference, and (2) this equipment or devic e must accept any interference,
including interferenc e that may cause undesired operation of t he equipment
or device.
5.4 Trademark
Suunto Traverse, its logos, and other Suunto brand trademarks and
made names are registered or unregistered trademarks of Suunto Oy.
All rights are reserved.
Suunto Traverse, ses logos et les autres marques et noms de
commerce de la marque Suunto sont des marques de commerce
déposées ou non déposées de Suunto Oy. Tous droits réservés.
5.5 Patent notice
This product is protected by pending patent applic ations and their
corresponding national rights : LIST TO BE VERIFIED
Additional patent applicat i ons have been filed.
Page 96

118
5.6 Warranty
Suunto warrants that during the Warranty Period Suunt o or a Suunto
Authorized Service Center (hereinafter Servic e Cent er) will, at its sole
discretion, remedy defects i n materials or workmanship free of charge
either by a) repairing, or b) replacing, or c) refunding, subject to the
terms and conditions of this Limited Warranty. This Limited Warrant y is
only valid and enforceable in the country of purchase, unless local law
stipulates otherwise.
Warrant y Pe rio d
The Limited Warranty Period starts at the date of original retail purchase.
The Warranty Period is two (2) years for Products unless otherwise
specified.
The Warranty Period is one (1) year for accessories including but not
limited to wireless sensors and transmitters, chargers, cabl es,
rechargeable batteries, straps , bracelets and hoses.
Exclusions and Li mitations
This Limited Warranty does not cover:
1. a) normal wear and tear such as scratches, abrasions, or alteration
of the color and/or material of non-metallic straps, b) defects
caused by rough handling, or c) defects or damage resulting from
use contrary to intended or recommended use, improper care,
negligence, and accidents such as dropping or crushing;
2. printed materials and packaging;
Page 97

119
3. defects or alleged defects caused by use with any product,
accessory, software and/or service not manufactured or suppli ed by
Suunto;
4. non-rechargeable batteries.
Suunto does not warrant that the operation of the Product or accessory
will be uninterrupted or error free, or that the Product or accessory will
work with any hardware or software provided by a third party.
This Limited Warranty is not enforceable if the Product or accessory:
1. has been opened beyond intended use;
2. has been repaired using unauthorized spare parts; modified or
repaired by unauthorized Service Center;
3. serial number has been removed, altered or made illegible in
any way, as determined at the sole discretion of Suunto; or
4. has been exposed to chemicals including but not limited to
sunscreen and mosquito repellents.
Access to Suunto warranty service
You must provide proof of purchase to access Suunto warranty service.
For instructions how to obtain warranty service, visit
www.suunto.com/warranty, contact your local authorized Suunto
retailer, or call Suunto Contact Center.
Limitation of Liability
To the maximum extent permitted by applicable mandatory laws, this
Limited Warranty is your sole and exclusive remedy and is in lieu of all
other warranties, expressed or implied. Suunto shall not be liabl e for
special, incidental, punit i ve or consequenti al damages,
Page 98

120
including but not limited to loss of antici pated benef its, loss of data,
loss of use, cost of capital, cost of any substitute equipment or
facilities, claims of third part i es, damage to property resulting f rom
the purchase or use of the item or arising from breach of the
warranty, breach of contract, negligence, st rict tort, or any legal or
equitable theory, even if Suunto knew of the likelihood of such
damages. Suunto shall not be liable for delay in rendering
warranty service.
5.7 Copyright
Copyright © Suunto Oy. All rights reserved. Suunto, Suunto
product names, their logos and other Suunto brand trademarks
and names are registered or unregistered trademarks of Suunto
Oy. This document and its contents are proprietary to Suunto Oy
and are intended solely for the use of clients to obtain knowledge
and information regarding the operation of Suunto products. Its
contents shall not be used or distributed for any other purpose
and/or otherwise communicated, disclosed or reproduced without
the prior written consent of Suunto Oy. While we have taken great
care to ensure that information contained in this documentation is
both comprehensive and accurate, no warranty of accurac y is
expressed or implied. This document content is subject to change
at any time without notice. The latest version of this documentati on
can be downloaded at www.suunto.com.
Page 99

SUUNTO CUSTOMER S UPPORT
1. www.suunto.com/support
www.suunto.com/mysuunto
2. AUSTRALIA +61 1800 240 498
AUSTRIA +43 720 883 104
CANADA +1 800 267 7506
CHINA +86 010 84054725
FINLAND
+358 9 4245 0127
FRANCE +33 4 81 68 09 26
GERMANY +49 89 3803 8778
ITALY +39 02 9475 1965
JAPAN +81 3 4520 9417
NETHERLANDS
+31 1 0713 7269
NEW ZEALAND +64 9887 5223
RUSSIA +7 499 918 7148
SPAIN
+34 91 11 43 175
SWEDEN
+46 8 5250 0730
SWITZERLAND
+41 44 580 9988
UK +44 20 3608 0534
USA +1 855 258 0900
© Suunto Oy 9/2014, 3/2015
Suunto is a register ed trademark of Suunto Oy. All Rights reserved.
 Loading...