

Page 1
EN
Page 2
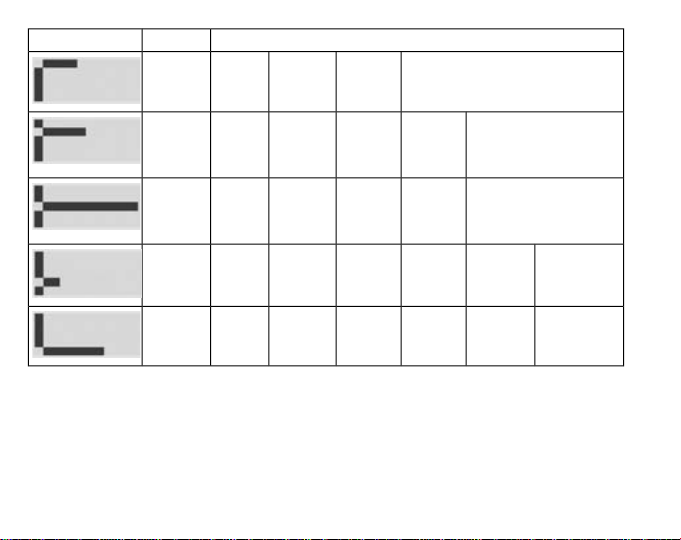
Time mode
Training mode
Total of all training
Shortcuts
Button lock
Backlight
Quick Exit (x) to time
mode (when in Menu,
Totals and Session)
2 sec
Switches between
the modes
Starts and stops
the stopwatch
Shortcuts
Enters and exits the
2 sec
Settings and other
submodes
Summary of last
training session
2 sec
Button lock
Backlight
2 sec
Resets the
stopwatch
Switches
between
the modes
Page 3

WELCOME
Congratulations on choosing Suunto t1 as your training companion. The
Suunto t1 is a high-precision heart rate monitor designed to make your
training as beneficial and enjoyable as possible.
Suunto t1 makes heart rate zone training more illustrative than ever before,
accurately measures the calories you burn during the workout, and keeps
track of your training history. It also includes a number of advanced training
functions that enable the product to grow with your increasing demands.
The Suunto t1 has a coded transmission that prevents wrong readings
caused by other heart rate monitors or sources of interference.
This Users Guide is here to help you get the most out of your training with
Suunto t1. Please read through it to make using your new Suunto t1 even
more fun and interesting.
EN
Page 4

1. Suunto t1 at a glance ... . . . . . . .. .. .. . .. .. .. . .. .. .. .. . .. .. .. . .. .. .. . .. .. .. .. . .. .. .. . .. .. .. 4
1.1. Navigating in the modes and menus . . . . . . .. .. .. . .. .. .. . .. .. .. .. . .. .. .. . .. .. .. . .. 5
1.2. Button symbols and functions ... . . . . . . .. .. .. . .. .. .. . .. .. .. .. . .. .. .. . .. .. .. . .. .. .. 6
1.3. Button lock . . . . .. .. .. . .. .. .. . .. .. .. . .. .. .. .. . .. .. .. . .. .. .. . .. .. .. .. . .. .. .. . .. .. .. . .. . 6
2. Getting started . . . . . .. .. . .. .. .. .. . .. .. .. . .. .. .. . .. .. .. .. . .. .. .. . .. .. .. . .. .. .. .. . .. .. .. . .. . 7
2.1. Setting up Suunto t1 . . .. . .. .. .. .. . .. .. .. . .. .. .. . .. .. .. .. . .. .. .. . .. .. .. . .. .. .. .. . .. . 8
2.2. Activity class (act class) ... . . . . . .. .. . .. .. .. .. . .. .. .. . .. .. .. . .. .. .. .. . .. .. .. . .. .. .. 10
2.3. Time mode . . . . . .. . .. .. .. .. . .. .. .. . .. .. .. . .. .. .. .. . .. .. .. . .. .. .. . .. .. .. .. . .. .. .. . .. . 13
2.3.1. Time/date settings . . . . . .. . .. .. .. . .. .. .. . .. .. .. .. . .. .. .. . .. .. .. . .. .. .. .. . .. .. . 13
2.3.2. Personal settings . . . . .. .. .. . .. .. .. . .. .. .. .. . .. .. .. . .. .. .. . .. .. .. .. . .. .. .. . .. . 14
2.3.3. General settings . . . .. .. .. .. . .. .. .. . .. .. .. . .. .. .. .. . .. .. .. . .. .. .. . .. .. .. .. . .. . 15
2.4. Training mode . . . . . .. . .. .. .. . .. .. .. .. . .. .. .. . .. .. .. . .. .. .. .. . .. .. .. . .. .. .. . .. .. .. .. 15
2.4.1. Training mode settings .. . . . . . .. .. . .. .. .. . .. .. .. .. . .. .. .. . .. .. .. . .. .. .. .. . .. 17
2.4.2. Heart rate zone settings .. . . . . . .. . .. .. .. . .. .. .. . .. .. .. .. . .. .. .. . .. .. .. . .. .. . 17
3. Before training .. . . . . .. .. .. . .. .. .. .. . .. .. .. . .. .. .. . .. .. .. .. . .. .. .. . .. .. .. . .. .. .. .. . .. .. .. 19
3.1. Putting on the heart rate transmitter belt . . . . .. .. .. . .. .. .. .. . .. .. .. . .. .. .. . .. .. . 19
3.2. Heart rate signal troubleshooting .. . . . . .. .. . .. .. .. .. . .. .. .. . .. .. .. . .. .. .. .. . .. .. 20
3.3. Heart rate limit settings . . . .. .. . .. .. .. . .. .. .. .. . .. .. .. . .. .. .. . .. .. .. .. . .. .. .. . .. .. . 21
4. Training . . . . . . . .. .. .. . .. .. .. . .. .. .. .. . .. .. .. . .. .. .. . .. .. .. .. . .. .. .. . .. .. .. . .. .. .. .. . .. .. .. 21
4.1. Connecting your Suunto t1 to the heart rate transmitter belt . . . . . .. . .. .. .. .. 21
4.2. Stopwatch .. . . . . . .. .. . .. .. .. .. . .. .. .. . .. .. .. . .. .. .. .. . .. .. .. . .. .. .. . .. .. .. .. . .. .. .. 22
5. After training ... . . . . . .. .. .. . .. .. .. . .. .. .. . .. .. .. .. . .. .. .. . .. .. .. . .. .. .. .. . .. .. .. . .. .. .. . . 24
5.1. Training Summary . . . . . . . .. .. .. . .. .. .. .. . .. .. .. . .. .. .. . .. .. .. .. . .. .. .. . .. .. .. . .. .. 24
5.2. Training Totals ... . . . . . .. .. . .. .. .. . .. .. .. .. . .. .. .. . .. .. .. . .. .. .. .. . .. .. .. . .. .. .. . .. . 25
2
Page 5

5.3. Suunto Training World .. . . . . . .. .. . .. .. .. .. . .. .. .. . .. .. .. . .. .. .. .. . .. .. .. . .. .. .. . . 26
5.4. Sleep mode . .. . .. .. .. .. . .. .. .. . .. .. .. . .. .. .. .. . .. .. .. . .. .. .. . .. .. .. .. . .. .. .. . .. .. .. 27
6. Warranty . . . .. .. . .. .. .. .. . .. .. .. . .. .. .. . .. .. .. .. . .. .. .. . .. .. .. . .. .. .. .. . .. .. .. . .. .. .. . .. .. 27
7. Care and maintenance . . . .. .. .. . .. .. .. .. . .. .. .. . .. .. .. . .. .. .. .. . .. .. .. . .. .. .. . .. .. .. .. 27
7.1. General instructions . . . . .. .. .. . .. .. .. .. . .. .. .. . .. .. .. . .. .. .. .. . .. .. .. . .. .. .. . .. .. . 27
7.2. Water resistance . . . . .. . .. .. .. . .. .. .. .. . .. .. .. . .. .. .. . .. .. .. .. . .. .. .. . .. .. .. . .. .. .. 28
7.3. Replacing the battery . .. .. .. . .. .. .. . .. .. .. . .. .. .. .. . .. .. .. . .. .. .. . .. .. .. .. . .. .. .. . 29
7.3.1. Replacing the battery of the Suunto t1 .. . . . . . .. .. . .. .. .. . .. .. .. . .. .. .. .. . 29
7.3.2. Replacing the battery of the heart rate belt ... . . . . . .. .. . .. .. .. . .. .. .. . .. . 30
8. Technical specifications . . .. .. .. . .. .. .. .. . .. .. .. . .. .. .. . .. .. .. .. . .. .. .. . .. .. .. . .. .. .. .. 31
9. Intellectual property . . . . .. .. .. . .. .. .. .. . .. .. .. . .. .. .. . .. .. .. .. . .. .. .. . .. .. .. . .. .. .. .. . .. 32
9.1. Trademark . . .. . .. .. .. .. . .. .. .. . .. .. .. . .. .. .. .. . .. .. .. . .. .. .. . .. .. .. .. . .. .. .. . .. .. .. 32
9.2. Patent notice ... . . . . . .. .. . .. .. .. .. . .. .. .. . .. .. .. . .. .. .. .. . .. .. .. . .. .. .. . .. .. .. .. . .. 33
10. Disclaimers . . . . . .. .. .. .. . .. .. .. . .. .. .. . .. .. .. .. . .. .. .. . .. .. .. . .. .. .. .. . .. .. .. . .. .. .. . .. 33
10.1. User's responsibility . . . . . . .. . .. .. .. .. . .. .. .. . .. .. .. . .. .. .. .. . .. .. .. . .. .. .. . .. .. .. 33
10.2. Warnings .. . . . . . .. .. . .. .. .. . .. .. .. .. . .. .. .. . .. .. .. . .. .. .. .. . .. .. .. . .. .. .. . .. .. .. .. 33
11. Disposal of the device . . . . . .. .. . .. .. .. .. . .. .. .. . .. .. .. . .. .. .. .. . .. .. .. . .. .. .. . .. .. .. .. 33
3
Page 6
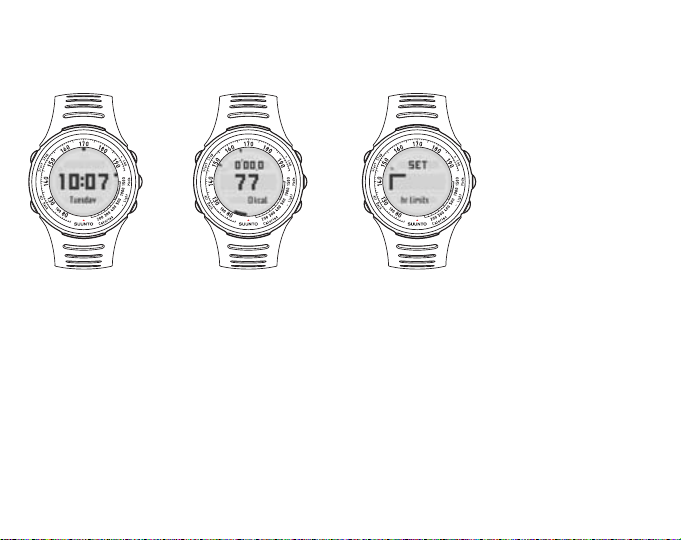
1. SUUNTO T1 AT A GLANCE
In Time mode you can:
- view time
- go to totals
- go to settings
In Training mode you can:
- use the stopwatch
- view your heart rate
- go to summary
- go to settings
In Settings menu you can
change values for:
- heart rate limits
- heart rate zones
- time and date
- general
- personal
Time mode
Training mode
Settings menu
The Suunto wristop computer displays the icon HR for Training mode. In Time mode you will see
the current time.
4
Page 7
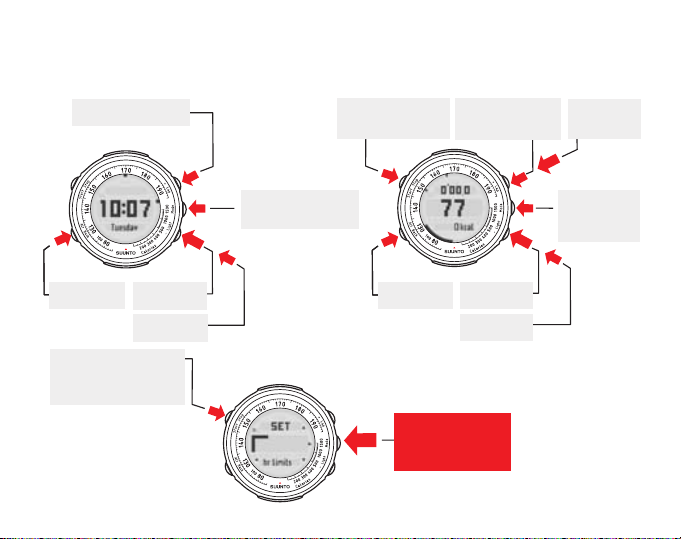
1.1. Navigating in the modes and menus
In Summary you can view
your last session’s:
- duration
- calorie consumption
(energy)
- average heart rate
- peak heart rate
- time spent in and out
of zones and limits
In Totals you can view
the total values of your
sessions for:
- this week
- last week
- this month
- last month
Summary
(from Training mode)
Totals
(from Time mode)
In Time and Training modes, a long press of the MODE button takes you to Settings. In Time
mode, a short press of the + button takes you to Totals, whereas in Training mode, a short press
of the + button accesses Summary. The figure below shows the functionality of both submodes.
You can quick exit Totals, Summary and Settings by pressing the START button.
5
Page 8
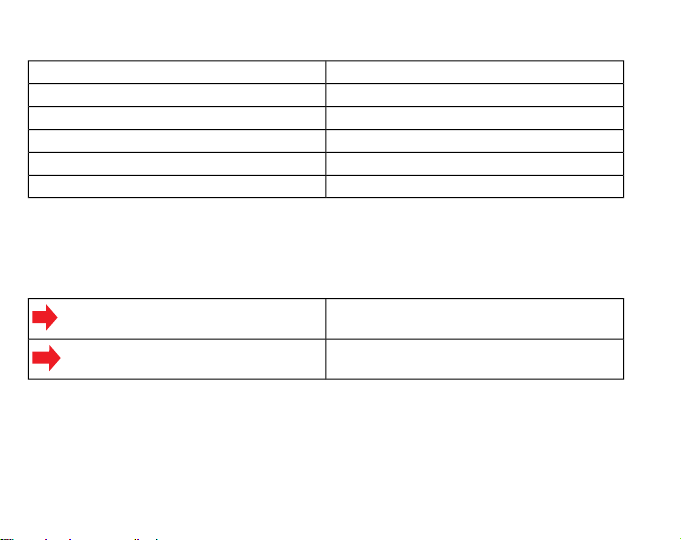
1.2. Button symbols and functions
2 sec
Name in User's GuideButton names on device
++ / Lap
MODEMode
-- / Light
BACKAlt / Back
STARTStart / Stop
In Totals and Summary, small arrows on the screen indicate the buttons that you can navigate
with. The buttons' functions depend on the length of the press. A short press is less than 1 second,
and a long press is more than 2 seconds. Throughout this user's guide, the following symbols are
used to indicate short and long presses.
Short press
Long press
1.3. Button lock
You can lock and unlock the buttons in both Time and Training mode by long pressing the - button.
When the buttons are locked, you still have access to shortcuts and backlight.
6
Page 9
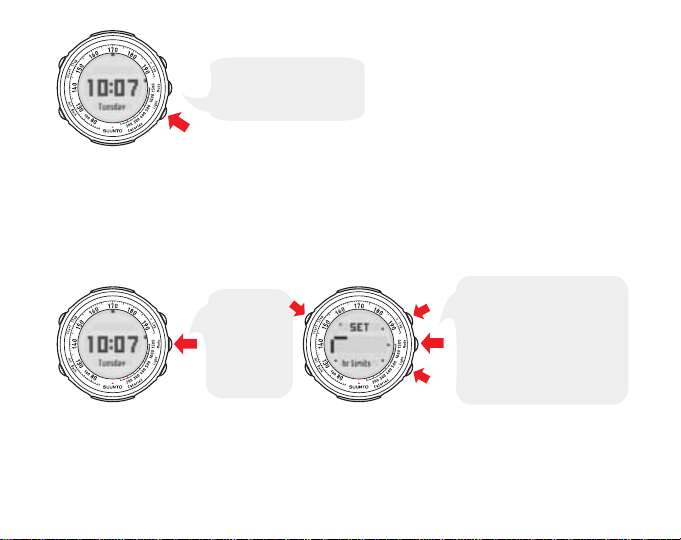
2 sec
When the buttons are
locked, you still have access
to shortcuts and backlight.
2. GETTING STARTED
Long press
the MODE
button in Time
or Training
mode to enter
the Settings
menu.
2 sec
2 sec
Entering Settings
Navigating in Settings
Use + and – buttons to toggle
between the following setting
submenus: heart rate limits,
heart rate zones, time/date,
general and personal. Exit the
Settings menu by long pressing
the MODE button or by
pressing the START button.
Before you are able to make the most of your Suunto t1, it's worth taking some time to personalize
it to suit your individual needs. If you have already defined the settings, you can skip to Section 3.
Before training.
To recap, this figure shows how to enter the Settings menu and its different items.
NOTE
Remember that you can see where you are within the Settings menu by
following the flashing bar in the navigational aid.
7
Page 10
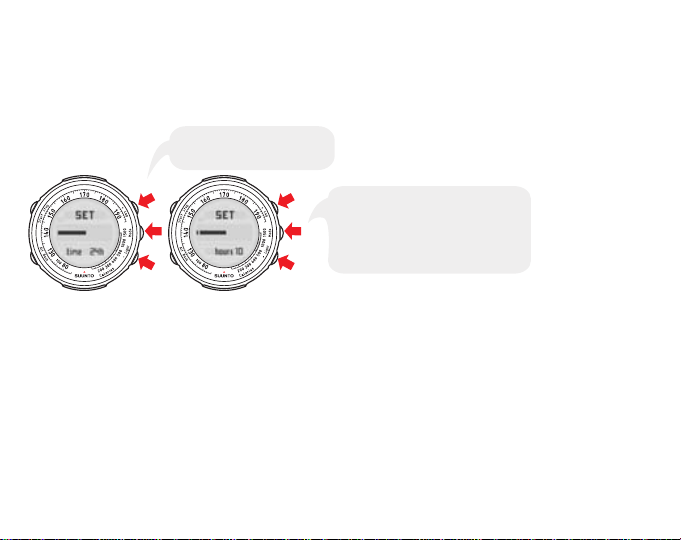
2.1. Setting up Suunto t1
Carry on setting up the time, date,
units and your personal settings.
After this, Suunto t1 will go into
Time mode and will be ready for
operation.
Adjust with + and – buttons.
Accept with MODE button.
When you press a button on your new Suunto t1 for the first time, you will be asked to define some
basic settings. Use the + and - buttons to change the values, accept and move to the next item
by pressing the MODE button.
The following figure shows you how to set up your device for the first time.
NOTE
Your maximum heart rate is determined using the formula 210 minus 0.65
times your age, which is automatically calculated from the date of birth that
you enter. If you know your real maximum heart rate, you should use that
instead of the calculated value.
Navigating in the Settings menus is very easy. Follow the position of the blinking empty box and
you will know exactly where in the Settings menu you are. You can quick exit the Settings menu
and go back to the Time mode by pressing START button.
8
Page 11
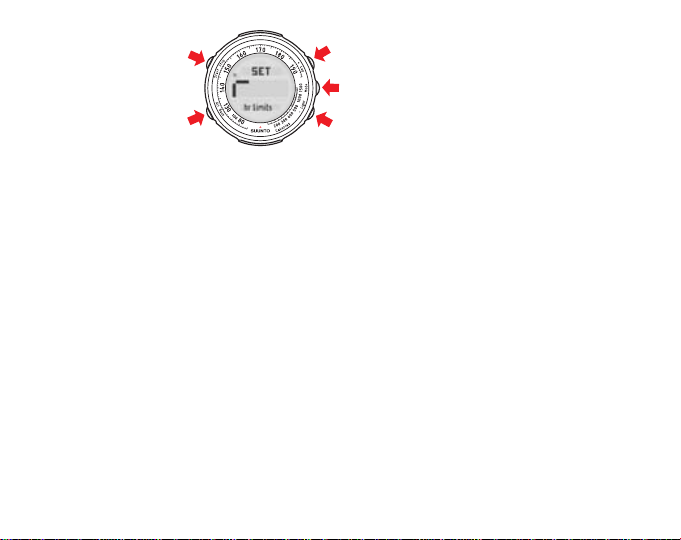
+/ADJUST
RIGHT/EXIT (LONG PRESS)
–/ADJUST
LEFT/EXIT (LONG PRESS)
QUICK EXIT
Take a look at the following table showing the different Settings and the items you can define in
them.
9
Page 12
Heart rate
limits
Heart rate
zones
Time/date
General
OptionsSettingSymbol
rate limits: on/off
Heart
rate
zones:
on/off
Alarm:
on/off
Tones:
on/off
Zone 1:
lower/ upper %
Alarm time:
hour/min
Heart rate:
bpm/%
Zone 2:
upper %
Time:
hours/
minutes/
seconds
Weight:
lb/kg
Alarm: on/offUpper limitLower limitHeart
upper %
hours/
minutes
Height:
ft/cm
Tones: on/offZone 3:
Date: year/ month/ dayDual time:
Time:
12h/24h
Date: mmdd
/ddmm
HeightWeightPersonal
Activity
class
rate
Date of birthSexMax heart
2.2. Activity class (act class)
Important: Your activity class is another one of the settings that you are asked to define when
you set up your device for the first time. Your activity class is a measure of your current activity
level. By entering your current activity class (1 - 10) into your Suunto t1, the device will be able to
give much more accurate calorie consumption information. As the amount and/or intensity of your
physical activity increases, the device will automatically increase your activity class based on your
10
Page 13

recorded heart rate information. Your activity class will also be automatically decreased if, for example, you engage in recreational sports. See the following table for information on determining
your activity class.
11
Page 14

al sports or heavy physical activity.
sports or work requiring modest
physical activity, such as yard work,
nordic walking or moderate-intensity
cycling.
ical exercise, such as running, aerobic classes or high-intensity cycling.
12
exercise sufficiently to cause heavy breathing or
perspiration.
Activity classActivity description
0Always avoid exertion, whenever possible.No regular participation in recreation-
1Walk for pleasure, routinely use stairs, occasionally
210 - 60 minutes per weekRegular participation in recreational
3Over 1 hour per week
4Less than 30 minutes per weekRegular participation in heavy phys-
530 - 60 minutes per week
61 - 3 hours per week
7Over 3 hours per week
7.55 - 7 hours per weekTraining daily
87 - 9 hours per week
8.59 - 11 hours per week
911 - 13 hours per week
9.513 - 15 hours per week
10More than 15 hours per week
Page 15

2.3. Time mode
GO TO TOTALS
BUTTON LOCK
CHANGE SHORTCUT:
- DAY
- DATE
- SECONDS
- DUAL TIME
- EMPTY
GO TO SETTINGS
2 sec
2 sec
LIGHT
Long press
the MODE
button in Time
or Training
mode to enter
the Settings
menu.
2 sec
2 sec
Entering Settings
Navigating in Settings
Use + and – buttons to toggle
between the following setting
submenus: heart rate limits,
heart rate zones, time/date,
general and personal. Exit the
Settings menu by long pressing
the MODE button or by
pressing the START button.
Here you can see the functionality of the buttons used in Time mode. This will help you get started
with using the basic functions of your Suunto t1. Additionally, you will find options for the shortcut,
which is in the bottom line of the display.
The following figure shows how to enter the Time mode Settings menu and its different items. You
can quick exit the Settings menu by pressing the START button.
2.3.1. Time/date settings
In the Time/date menu, you can set the alarm, time, dual time, and date. Accept the settings with
a short press of the MODE button, which also moves you on to the next menu item.
13
Page 16

Continue setting the alarm,
time, dual time and date.
Adjust the alarm on/off setting
with + and – buttons.
Accept with MODE button.
2.3.2. Personal settings
Continue setting your height,
activity class, maximum heart
rate, sex and birth date.
Adjust the weight setting with +
and – buttons. Accept with
MODE button.
Go back to the
previous set value.
In the Personal menu, you can enter personal information such as your weight, height, activity
class, maximum heart rate, gender, and date of birth. Accept the settings with a short press of the
MODE button, which also moves you on to the next menu item.
NOTE
14
See the table in Section 2.2. Activity class (act class) for information on
activity class descriptions.
Page 17

2.3.3. General settings
Pressing the BACK
button switches off
the alarm.
In the General menu, you can set the button tones on or off and choose the units and format the
information is displayed in. Accept the settings with a short press of the MODE button, which also
moves you on to the next menu item.
Light
The light can be activated in both Time and Training mode at any point by short pressing the button. If you want to use the light in Settings, Summary or Totals, the light must be activated before
entering them.
Alarm snooze
Only the BACK button deactivates the alarm; pressing any other button activates the snooze
function, which lasts for 5 minutes. The snooze function can be activated 12 times, after which the
alarm will be deactivated until the set time the following day.
2.4. Training mode
To switch to the Training mode, short press the MODE button.
Here you can see the basic functionality of the buttons used in Training mode as well as options
for the shortcut, which is in the bottom line of the display.
15
Page 18

CHANGE SHORTCUT:
- CALORIE
CONSUMPTION
- AVERAGE HEART
RATE
START/STOP
LAP/RESET (LONG PRESS)
MODE/SCROLL SUMMARY
GO TO SETTINGS
2 sec
- LAP TIME
- TIME
- ZONE (WHEN
SET TO ON)
BUTTON LOCK
2 sec
LIGHT
The stopwatch is accessed by pressing the START button in Training mode and can be seen in
Pressing the START
button starts the
stopwatch and
calculation of amount
of calories consumed.
Pressing the
START button
again stops the
stopwatch.
the top row. The information from the training that you time with the stopwatch, such as heart rate
and calorie consumption, is stored and can later be seen in Totals and Summary. Therefore, you
should activate the stopwatch, and ensure you have a heart rate reading, whenever you
start a training session.
While the stopwatch is running, you can take up to 99 lap times, the first 30 of which are stored
in the memory, by pressing the + button.
NOTE
16
It is not possible to reset the stopwatch while it is running. You must stop
it before resetting it.
Page 19

NOTE
Use + and – buttons to
toggle between the
following Training setting
submenus: heart rate zones,
heart rate limits, time and
date, general and personal.
2 sec
Long press the
MODE button in
Training mode to
enter Training
settings menu.
If the stopwatch is running, and you switch back to the Time mode, the
stopwatch will be displayed on the top of the screen. To stop the stopwatch
go back to the Training mode.
2.4.1. Training mode settings
The following figure shows how to enter the Training mode Settings menu and its different items.
2.4.2. Heart rate zone settings
In the Heart Rate Zone menu, you can define the 3 heart rate zones and set the tones on or off.
The 3 heart rate zones are useful in training as they record how much of your training is spent
within specific heart rate zones, or if you want to give yourself a long enough warm-up, or keep
your heart rate at an optimum level for fat burning.
After training, you can see how much of the session was spent in each zone. Each zone is a range
of heart rates expressed as a percentage of your maximum heart rate (which is calculated based
on the age you enter in the Personal settings menu). Accept the settings with a short press of the
MODE button, which also moves you on to the next menu item.
17
Page 20

The default heart rates for zones 1-3 are 60-70%, 70-80%, and 80-90% of your maximum heart
rate, but if you are following a specially designed training program, enter the zone values that have
been tailored towards your individual goals. The benefits of training in each default zone are shown
in the following table.
zone
Zone 1 (Fitness Zone)
Zone 2 (Aerobic Zone)
Zone 3
(Threshold
Zone)
NOTE
60 - 70% of maximum heart
rate
70 - 80% of maximum heart
rate
80 - 90% of maximum heart
rate
The heart rate zone defaults follow the guidelines of the American College
Main benefitDefault settingHeart rate
Improves your basic endurance, aerobic fitness, and helps you
in weight control (fat burning zone)
Improves your aerobic fitness. This is the preferred zone if you
are training for an endurance event.
Improves your maximum aerobic capacity, and lactate tolerance
ability - meaning your maximum endurance will improve and you'll
be able to fight fatigue better.
of Sports Medicine for exercise prescription.
The device alerts you with a beep when you move from one zone to another so you can modify
your training accordingly.
The average heart rate is also a useful measure during training where the heart rate levels vary
a lot, such as biking in hilly terrain. In these cases, the target zone limits are less practical than
the average heart rate.
18
Page 21

3. BEFORE TRAINING
3.1. Putting on the heart rate transmitter belt
The heart rate transmitter belt is an integral part of Suunto t1's functionality, so it's important that
you know how to wear it correctly.
We recommend that you wear the transmitter against your bare skin to ensure flawless operation.
•
The electrodes must be wet during the exercise. Raise the transmitter a little off your chest
and moisten the electrode area on the side in contact with your skin.
•
Check that the wet electrode areas are firmly against your skin and that the logo is in a central
upright position.
•
Enter Training mode. (Your heart rate will not be visible until you enter Training mode.)
Whenever you enter Training mode or start the stopwatch, your Suunto t1 automatically searches
for signals from a heart rate belt. Once the device has found the signals, your heart rate will be
displayed in the center of the screen.
19
Page 22

3.2. Heart rate signal troubleshooting
Although the heart rate transmitter belt can be used with gym equipment like treadmills and training
bikes, using the belt near overhead power lines or some magnetic or electronic devices may cause
interference with the belt's signal.
Although rare, it is possible that someone with the same heart rate transmitter belt code happens
to be training close to you causing interference with your heart rate readings. In the event of such
interference, check the belt codes by long pressing the BACK button in Training mode. You will
see the belt code in the middle of the display for few seconds. If you have matching codes, move
further off from your training partner. If the interference continues, you should remove the battery
from one of the belts and reinstall it. The belt will then automatically search a new code from 1 to
29.
If you lose the signal, try the following steps to fix the problem.
•
Exit and then re-enter Training mode.
•
Make sure that you are wearing the heart rate transmitter belt correctly. (See Section 3.1.
Putting on the heart rate transmitter belt)
•
Ensure that the electrode area on the back of the belt is slightly wet.
•
Move away from any potential source of interference.
•
If you have been using the belt for some time, the battery may need changing. For instructions
on how to change the transmitter belt's battery, see Section 7.3.2. Replacing the battery of the
heart rate belt.
20
Page 23

3.3. Heart rate limit settings
In the Heart Rate Limit menu, you can set the heart rate limits on or off, define the upper and lower
limits, and set the heart rate alarm on or off. You can set the heart rate limits to help you stay
within a defined heart rate range, which you can set to match the goal of your training.
The heart rate limits are displayed with dots on the left outer rim of the display.
While training, your real-time heart rate is displayed in both the center of the screen and on the
left outer rim. If the average heart rate shortcut is selected, your real-time average heart rate of
the entire log at that point is displayed in the bottom row as either beats per minute or a percentage
of your maximum heart rate. In the Settings menu, you can set alarms to notify you when you go
above your set upper heart rate or below the set lower heart rate.
By checking your average heart rate you can adjust your training intensity to make sure the session
is as effective as possible.
4. TRAINING
Once you have your Suunto t1 set up as you like it, it's time to get out and start training. For detailed
information on training and tips on how to maximize its effectiveness, download Suunto Training
Guidebook from www.suunto.com/training.
4.1. Connecting your Suunto t1 to the heart rate transmitter belt
Whenever you enter Training mode, your Suunto t1 automatically searches for signals from a
heart rate belt. Once Suunto t1 has found the signals from your heart rate transmitter belt, your
heart rate will be displayed in the center of the screen.
21
Page 24

After switching to Training mode,
Suunto t1 displays "HR" while it is
seeking the HR belt signal.
Instead of your heart rate, "HR"
is shown in the center of the display if
no heart rate belt is found.
4.2. Stopwatch
Pressing the START
button starts the
stopwatch and
calculation of amount
of calories consumed.
Pressing the
START button
again stops the
stopwatch.
The stopwatch is activated by short pressing the START button in Training mode. It can be seen
in the top row in Training mode. The information from the training that you time with the stopwatch,
such as heart rate and calorie consumption, is stored and can later be seen in Totals and Summary.
Therefore, you should activate the stopwatch, and ensure you have a heart rate reading,
whenever you start a training session.
22
Page 25

While the stopwatch is running, you can take up to 99 lap times, the first 30 of which are stored
Pressing the + button, when
the stopwatch is running, stores
the split time and displays it in
the top row of the Suunto t1. It
also displays the average heart
rate and shows the lap time.
After 3 seconds the display
jumps back to the stopwatch.
This number
indicates the
ongoing lap.
Pressing the +
button when the
stopwatch is
stopped takes you
to the Summary
display.
Long pressing the +
button when the stopwatch
is stopped resets the
stopwatch. Resetting the
stopwatch doesn't reset the
summary.
2 sec
in the memory, by short pressing the + button.
When the stopwatch has been stopped, you can either view the Summary of the most recent
session or reset the stopwatch, as shown in the figure below. Resetting the stopwatch does not
reset the Summary.
23
Page 26
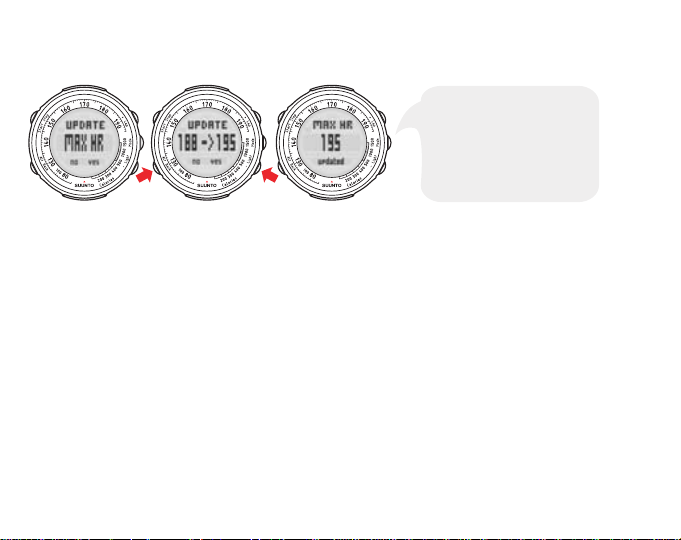
If your heart rate in the most recent session exceeded the maximum heart rate defined in Personal
If you want to update your
maximum heart rate, press
the – button. Pressing
the BACK button takes you
back to the Training mode
without updating your
maximum heart rate.
settings, Suunto t1 will ask if you want to update your maximum heart rate value after resetting
the stopwatch.
5. AFTER TRAINING
Once you have finished your training, your Suunto t1 can provide you with detailed information on
your performance. In this section, we'll look at the Summary and Totals functions, as well as
Suunto's online training community, www.suunto.com/training.
5.1. Training Summary
Immediately after finishing your training, one of the first things you'll want to do is review all the
data recorded during the session. You can see your peak heart rate, your average heart rate, how
many calories you burned, how much time was spent in each zone, and more in the Summary
submode. The training Summary can be accessed by short pressing the + button in Training mode.
You can use the - and + buttons to navigate in the menu.
24
Page 27

Continue pressing the + button to view the summary
of your training: duration, calories, average and peak
heart rate, time spent in and out of limits and zones,
summary of each stored lap.
Press +, when stopwatch is not running, to
view the summary of your training.
Press the BACK button to exit.
Move back in summary using the – button.
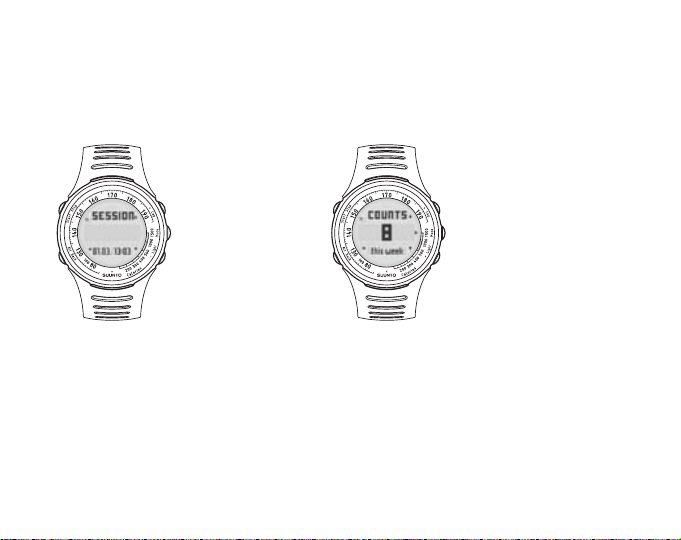
5.2. Training Totals
In addition to the last training session, Suunto t1 stores the data recorded this week (Monday Sunday), last week, this month, and last month. This information can be seen in the Totals submode,
which is accessed by short pressing the + button in Time mode.
When in the Totals submode, the word "Counts" appears at the top of the display. The following
figure shows how to navigate within the Totals menu.
25
Page 28

Pressing the MODE button takes you through your
training totals for this week: calories consumed, training
time and time spent within and outside of each zone.
Press the + button in Time mode to
view the totals of your training.
Press the BACK
button to move back to
the previous display.
In each display, you can use the + and – buttons to
change between the view for this week, last week, this
month and last month.
NOTE
Totals contains information about heart rate zones from sessions where
the zones were set on and a signal from the heart rate belt was received.
Once you have reviewed your data, you can exit Totals by long pressing the MODE or BACK
button. You can also exit Totals at any time by short pressing the START button (quick exit function).
5.3. Suunto Training World
Suunto Training World, Suunto's training-specific Web site, is dedicated to helping athletes and
fitness enthusiasts at all levels achieve their goals. You'll find this site the perfect training partner
for running, cycling, aerobics, spinning, walking and the whole range of endurance and team
sports.
Whether you're working toward a marathon, or aiming for weight loss and a healthy heart, Suunto
Training World is a valuable resource for tips, news and inspiration.
26
Page 29

Take a tour of the site at www.suunto.com/training. Learn about new Suunto training products,
gather training tips, participate in discussions, keep abreast of training news, and motivate yourself
with the stories of Suunto Ambassadors.
5.4. Sleep mode
You can switch your Suunto t1 into sleep mode to save battery and to erase all information in the
Logbook and Totals. Your personal values will be saved.
Switch to sleep mode by long pressing the START, BACK, + and - buttons simultaneously. To
reactivate your Suunto t1, press any button.
6. WARRANTY
For warranty information and additional care and maintenance instructions please refer to the
separate "Warranty, Care and Maintenance - Wristop Computers" leaflet.
7. CARE AND MAINTENANCE
Your Suunto t1 is a precision instrument. By following a few common sense points, you can maximize the life of your device. If your Suunto t1 does require servicing, you should take it to your
nearest Suunto representative. This section also describes the steps to follow when replacing the
battery in both your Suunto t1 and the transmitter belt.
7.1. General instructions
•
Only perform the procedures described in this user's guide.
•
Never attempt to disassemble or service your Suunto t1.
•
Always protect your Suunto t1 from shocks, hard and sharp objects, extreme heat and prolonged
exposure to direct sunlight.
27
Page 30

•
If not in use, store your Suunto t1 in a clean and dry environment at room temperature.
•
In order to prevent the face from becoming scratched, the device should not be stored in the
bottom of a bag or other place where it could come into contact with hard objects.
NOTE
•
You can wipe your Suunto t1 clean with a cloth lightly moistened with warm water. If there are
stubborn stains or marks, you can apply mild soap to the area.
•
Do not expose your Suunto t1 to strong chemicals, such as gasoline, cleaning solvents, acetone,
alcohol, insect repellents, adhesives and paint, as they will damage the unit’s seals, case and
finish.
In case the face becomes scratched, you can use Polywatch cream to
eliminate most of the scratches if not all. The Polywatch cream will be
available at your authorized Suunto dealer, in most of the watches
stores and on Suunto web-shop (www.suunto.com/shop).
7.2. Water resistance
Your Suunto t1 is water resistant up to 30 m/100 ft and the transmitter belt to 20m/66ft according
to ISO 2281 standard (www.iso.ch). This means that you can use your Suunto t1 for swimming
and other water sports activities but you must not use it for scuba diving or freediving.
To maintain water resistance and to ensure that the warranty remains valid, we strongly recommend
that you have all service, except for battery change, performed by authorized Suunto service
personnel.
NOTE
28
Never push the buttons while swimming or in contact with water. Pressing
the buttons while the unit is submerged could cause the unit to malfunction.
Page 31

7.3. Replacing the battery
Your Suunto t1 operates on a 3-Volt lithium cell, type: CR 2032. The life expectancy is approximately
12 months of operation with an average of 4 hours of training a week. The higher your average
amount of training hours a week, the shorter the battery's life expectancy will be. Your Suunto t1
will display the symbol when the battery starts running low.
NOTE
To reduce the risk of fire or burns, do not crush, puncture or dispose of
used batteries in fire or water. Only replace them with manufacturer-specified batteries. Recycle or dispose of used batteries properly.
7.3.1. Replacing the battery of the Suunto t1
To replace the battery:
1. Use a coin to open the battery compartment on the back of your device. Ensure that the O
ring and all surfaces are clean and dry.
2. Remove the old battery.
3. Place the new battery into the battery compartment with the positive side facing up.
4. Slide the battery gently against the contact plate on the side, ensuring that it does not break
or bend out of place.
5. When replacing the cover, rotate it carefully counter-clockwise with your thumb in order to
align the threads. The cover should rotate easily at first without having to use force. If you
have to use force right at the start, the threads are misaligned and may be damaged.
6. Perform the final tightening with a suitably sized coin.
NOTE
The markings on the cover may be left unaligned once the cover has been
tightened. If the old cover is undamaged, it does not need to be replaced.
29
Page 32

NOTE
If the threads of the battery compartment cover are damaged, please send
your device to an authorized Suunto representative for service.
NOTE
NOTE
Replace the battery with extreme care to ensure that your Suunto t1 remains
water resistant. Careless battery replacement may void the warranty.
Heavy use of the backlight will significantly reduce battery life.
7.3.2. Replacing the battery of the heart rate belt
The average expected battery life of the transmitter belt is 300 hours of use in ideal operating
temperatures. If your Suunto t1 does not receive a signal when the transmitter belt is active, you
might need to replace the battery.
To replace the battery:
1.
Use a coin to open the battery compartment cover on the backside of the transmitter belt.
Ensure that the O ring and all surfaces are clean and dry. Do not stretch the O ring.
2.
Remove the old battery.
3.
Place the new battery into the battery compartment with the positive side facing up.
4.
With the O ring in the correct position, replace the battery compartment cover.
30
Page 33

NOTE
We recommend that you replace the battery cover and the O ring simultaneously with the battery to ensure that the transmitter remains clean and
water-resistant. Replacement covers are available with replacement batteries.
NOTE
Battery covers of the transmitter belt and Suunto t1 are not interchangeable.
8. TECHNICAL SPECIFICATIONS
General
• Operating temperature: -20°C to +60°C/-5°F to +140°F
• Storage temperature: -30°C to +60°C/-22°F to +140°F
• Weight: 45 g/50 g/65 g (depending on the strap)
• Water-resistance: 30 m/100 ft (ISO 2281)
• User replaceable battery CR2032
31
Page 34

Calendar clock
• Resolution: 1 s. Programmed until 2050
Stopwatch
• Stopwatch range: 99 hours. Lap time range: 99 hours. Lap/split times: 30/log
• Resolution: 0.1 s
Heart rate data
• Display range: 30 - 240 bpm
• Heart rate limits: 30 - 230 bpm
• Maximum heart rate for percentage display: 240 bpm
Coding
• 29 codes
Transmitter belt
• Water-resistance: 20 m/66 ft (ISO 2281)
• Weight: 61 g
• User-replaceable battery: CR2032
9. INTELLECTUAL PROPERTY
9.1. Trademark
Suunto, Suunto t1, Replacing Luck, their logos, and other Suunto brand trademarks and made
names are registered or unregistered trademarks of Suunto Oy. All rights are reserved. Firstbeat
& Analyzed by Firstbeat are registered or unregistered trademarks of Firstbeat Technologies Ltd.
All rights reserved.
32
Page 35

9.2. Patent notice
This product is protected by the following patents and patent applications and their corresponding
national rights: US 11/432,380, US 11/181,836 and EU Design 000528005-0001/000528005-0010.
10. DISCLAIMERS
10.1. User's responsibility
This instrument is intended for recreational use only. Suunto t1 must not be used as a substitute
for obtaining measurements that require professional or laboratory-quality precision.
10.2. Warnings
If you have a pacemaker, defibrillator, or other implanted electronic device, you use the transmitter
belt at your own risk. Before you start using a transmitter belt, we recommend an exercise test
under a doctor ’s supervision. This will ensure the safety and reliability of the pacemaker and
transmitter belt when used simultaneously.
Exercise may include some risk, especially for those who have been sedentary. We strongly advise
consulting your doctor prior to beginning a regular exercise program.
11. DISPOSAL OF THE DEVICE
Please dispose of the device in an appropriate way, treating it as electronic waste. Do not throw
it in the garbage. If you wish, you may return the device to your nearest Suunto representative.
33
Page 36

34
Page 37

CUSTOMER SERVICE CONTACTS
Global Help Desk +358 2 284 11 60
Suunto USA Phone +1 (800) 543-9124
Canada Phone +1 (800) 776-7770
Suunto website www.suunto.com
COPYRIGHT
This publication and its contents are proprietary to Suunto Oy.
Suunto, Wristop Computer, Suunto t1 and their logos are registered or unregistered
trademarks of Suunto Oy. All rights reserved.
While we have taken great care to ensure that information contained in this
documentation is both comprehensive and accurate, no warranty of accuracy is
expressed or implied. Its content is subject to change at any time without notice.
Page 38

Suunto Oy 6/2006, 6/2007
 Loading...