

Page 1
EN | FR
Page 2
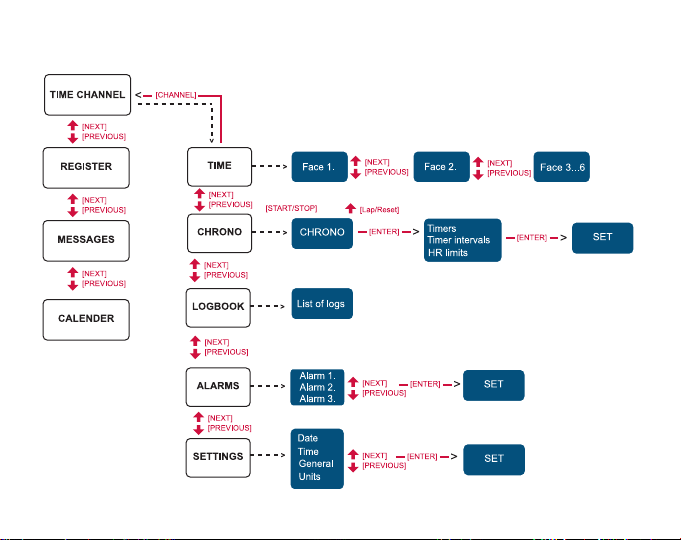
Suunto n6HR Menu Structure
Page 3

CUSTOMER SERVICE CONTACTS
Suunto Oy Phone +358 9 875870
Fax +358 9 87587301
Suunto USA Phone 1 (800) 543-9124
Canada Phone 1 (800) 776-7770
European Call Center Phone +358 2 284 11 60
Suunto Website www.suunto.com
EN
1
Page 4

TABLE OF CONTENTS
1. GENERAL INFORMATION ...................................................................................8
2. HOW TO USE YOUR SUUNTO N6HR .................................................................9
2.1. BUTTONS ..................................................................................................10
2.2. CHANNELS ...............................................................................................13
2.3. MODES ......................................................................................................14
2.4. SIGNAL COVERAGE ................................................................................15
2.5. STATUS ICONS ........................................................................................16
3. TIME CHANNEL ..................................................................................................18
3.1. RECEIVING THE TIME .............................................................................19
3.2. CHOOSING A WATCH FACE ...................................................................20
3.3. WATCH FACE SUB-MODES ....................................................................21
3.3.1. Downloading a watch face ..............................................................21
3.4. CHRONO MODE .......................................................................................22
3.5. CHRONOGRAPH ......................................................................................22
3.6. TIMERS .....................................................................................................23
3.6.1. Timer-Stop ......................................................................................23
3.6.2. Timer-Chrono ..................................................................................24
3.6.3. Timer-Repeat ..................................................................................25
3.7. LOGBOOK .................................................................................................26
3.8. ALARMS ....................................................................................................27
4. HEART RATE TRANSMITTER BELT .................................................................28
4.1. PUTTING ON YOUR TRANSMITTER BELT .............................................28
4.2. MONITORING YOUR HEART RATE ........................................................29
4
Page 5

4.3. SETTING THE HR LIMITS .......................................................................29
4.4. TRANSMITTER BELT USAGE IN WATER ............................................... 30
4.5. CARE OF THE TRANSMITTER BELT ...................................................... 30
4.6. ELECTROMAGNETIC INTERFERENCE ................................................. 30
4.7. WARNINGS ............................................................................................... 31
5. BATTERY ........................................................................................................... 32
5.1. BATTERY LEVEL INDICATOR .................................................................33
5.2. CHARGING THE BATTERY ..................................................................... 34
5.3. REPLACING THE BATTERY OF THE TRANSMITTER BELT .................34
6. SETTINGS ..........................................................................................................36
6.1. DATE .........................................................................................................36
6.2. TIME ..........................................................................................................37
6.2.1. Setting the time ...............................................................................37
6.2.2. Setting the time zone ......................................................................38
6.2.3. Setting the dual zone ......................................................................38
6.3. GENERAL ................................................................................................. 39
6.4. UNITS ........................................................................................................ 41
7. SUUNTO N6HR TRAINING MANAGER ............................................................42
7.1. SUUNTO N6HR TRAINING MANAGER TUTORIAL ................................ 42
7.1.1. Getting started ................................................................................ 42
7.1.2. Planning your training schedule ...................................................... 43
7.1.3. Training and gaining ....................................................................... 43
7.1.4. Reviewing your results .................................................................... 43
7.1.5. Sharing your experiences ...............................................................44
5
Page 6

7.2. SYSTEM REQUIREMENTS ......................................................................44
7.3. PC INTERFACE ........................................................................................45
7.4. INSTALLATION .........................................................................................46
7.4.1. Installing the Suunto n6hr software .................................................46
7.4.2. Calendar synchronization ...............................................................47
7.4.3. Changing the calendar synchronization ..........................................47
7.4.4. Updating the USB drivers ................................................................47
7.5. CONNECTING YOUR SUUNTO N6HR TO A PC .....................................48
7.6. UNINSTALLING SUUNTO N6HR TRAINING MANAGER ........................48
7.7. UNINSTALLING SUUNTO N6HR DRIVERS .............................................48
8. SUUNTOSPORTS.COM .....................................................................................49
8.1. USING SUUNTOSPORTS.COM ...............................................................50
9. FREQUENTLY ASKED QUESTIONS .................................................................51
10. GETTING HELP ...............................................................................................56
11. TECHNICAL SPECIFICATIONS ......................................................................57
12. TERMS AND CONDITIONS .............................................................................59
12.1. COPYRIGHT ............................................................................................59
12.2. TRADEMARKS ........................................................................................59
12.3. PATENTS ................................................................................................59
12.4. ABOUT YOUR SUUNTO N6HR AND SERVICE .....................................60
12.5. FCC COMPLIANCE .................................................................................60
12.6. CE COMPLIANCE ...................................................................................61
12.7. ISO 9001 COMPLIANCE .........................................................................61
6
Page 7

13. WARRANTY ................................................................................................... 62
13.1. LIMITS OF LIABILITY .............................................................................62
13.2. AFTER SALES SERVICE ....................................................................... 63
7
Page 8

1. GENERAL INFORMATION
Wherever life takes you, your new Suunto n6HR keeps you up to date. When you sign
up for the MSN
receive. This dynamic wireless technology discreetly displays the information that
matters most to you. With a quick glance at your wrist, you stay informed about the
news, stocks, weather, sports, and more. The MSN Direct-ready watches are every
bit as fun as they are informative. With different watch faces you can customize the
look of your Suunto n6
The HR transmitter belt allows you to measure your heart rate accurately and check
that it stays within desired limits. Once you've finished your training, you can use the
Suunto n6
You can then save the results in your logbook or share them with your friends at the
SuuntoSports.com web community.
NOTE: This product requires a subscription to the MSN Direct wireless service, which
is available in most major cities in North America.
8
®
Direct service, you can choose exactly what information you want to
HR to fit your personal style.
HR Training Manager PC software to view graphs and stats of your session.
Page 9

2. HOW TO USE YOUR SUUNTO n6HR
To get acquainted with your new Suunto n6
signal coverage, and status icons, keep reading.
There are two ways to receive content on your new Suunto n6
Automatic Service
You will automatically receive the following channels without a subscription:
• Daily high/low temperatures for your city
• National news
• Stock indices
• Monthly calendar
Subscription Plans
To personalize the content you receive, activate the MSN Direct service at
http://direct.msn.com/go. After choosing a subscription plan, you can choose to
receive the local news, weather reports, sports scores and standings, movie times,
stock quotes, and more.
HR and learn about channels, modes,
HR:
9
Page 10
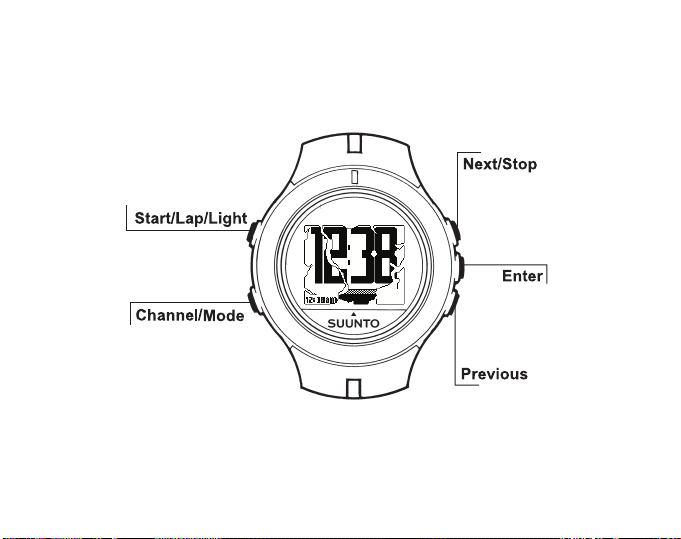
2.1. BUTTONS
Y our Suunto n6
10
HR includes five buttons, each of which has several different functions.
Page 11

START/LAP/LIGHT
Short press
• Starts the chronograph (Chrono mode).
• Stores lap/split times (Chrono mode).
Long press
• Activates the backlight in all the modes. Fo r personalized use of the backlight, see
Chapter 6. Settings.
CHANNEL/MODE
Short press
• Returns to the mode or channel splash screen.
• Scrolls the channel splash screens on the display.
Long press
• Returns to the Time channel splash screen.
NEXT/STOP
Short press
• If a mode/channel splash screen is active, it navigates to the next splash screen.
• Scrolls the menus up.
• When setting/changing a selected item, it scrolls the options on the display.
• When changing values, it increases the value.
• Changes the watch faces (Time mode).
• Stops the chronograph (Chrono mode).
• After you have stopped the chronograph, it scrolls the stored lap/split times on the
display.
Long press
11
Page 12

• When you press and hold the button down for 2 seconds in menus and splash
screens, it starts to scroll through the options until you release it.
• Resets the display after you have stopped the chrono time (Chrono mode).
PREVIOUS
Short press
• If a mode/channel splash screen is active, you can use this button to navigate to
the previous splash screen.
• Scrolls the menus down.
• When setting/changing a selected item, it scrolls the options on the display.
• When changing values, it decreases the value.
• Changes watch faces (Time mode).
• It selects either the lap/split reading, the timer reading or the current time for the
lowest field (Chrono mode).
Long press
• When you press and hold the button for 2 seconds in menus, watch face selections
and splash screens, it starts to scroll through the options until you release it.
ENTER
Short press
• It navigates to the main display. (The main display opens automatically after a few
seconds if you do not push any buttons.)
• Navigates to the submenus in the Chrono, Settings and Alarms modes.
• Accepts the settings.
• Changes the watch face sub-modes (Time mode).
• After the last setting, it takes you back to the Settings menu.
12
Page 13

Long press
• Accepts the settings and returns to the main display.
• Activates/deactivates the HR limits function (Chrono mode)
2.2. CHANNELS
Channels and their modes organize the information on your Suunto n6
HR. Similar to
the channels on your television set, you see different types of content—such as the
news and weather—when you switch channels on your Suunto n6
HR. When you
activate the MSN Direct service, you can select the channels you want to display.
Each channel appears on the Suunto n6
HR display with an icon and the name of the
channel.
• To return to the Time channel, long press CHANNEL/MODE.
• To view the next channel, press CHANNEL/MODE, NEXT/
STOP or PREVIOUS.
• To display the contents of the current channel, release
the button.
13
Page 14
2.3. MODES
Each channel has one or more modes. For example, the Time channel includes the
Time, Chrono, Logbook, Alarms and Settings modes. The name of the current mode
appears on the Suunto n6
HR splash screen.
•To view the current mode, press CHANNEL/MODE once.
•To view the next mode within that channel, press NEXT/STOP
or PREVIOUS.
14
Page 15

2.4. SIGNAL COVERAGE
The MSN Direct service is delivered over a wireless network that is based on FM
radio broadcast signals. Your Suunto n6
HR indicates the strength of the broadcast
signal by displaying a signal strength icon. The icon appears in the upper right corner
of the status bar on most channel screens. The status bar appears on most channel
screens a few seconds after the last button press.
Signal strength can vary based on your location. Sometimes topography (hills,
valleys), building structures, or nearby electronics can interfere with the broadcast
signal that your Suunto n6
HR uses to receive information. Your Suunto n6HR should
receive information even at a low signal strength.
The network sends two types of information to your Suunto n6
HR—broadcast and
personal. Broadcast information—such as news stories and current temperatures—is
sent to every Suunto n6
see is actually captured by your Suunto n6
HR with MSN Direct, but only the information that you want to
HR. Regardless of where you travel in
North America, as long as you are within an MSN Direct coverage area, you shou ld
receive broadcast information.
Your personal information—such as your messages and calendar appointments—is
encrypted with a unique key to help maintain your privacy. You receive personal
information when you are within the range of your home coverage area. Your home
coverage area is the metropolitan area where you live.
For more information about your home coverage area, including what to do when you
travel, go to the MSN Direct Website at www.msndirect.com and click the Help link.
15
Page 16
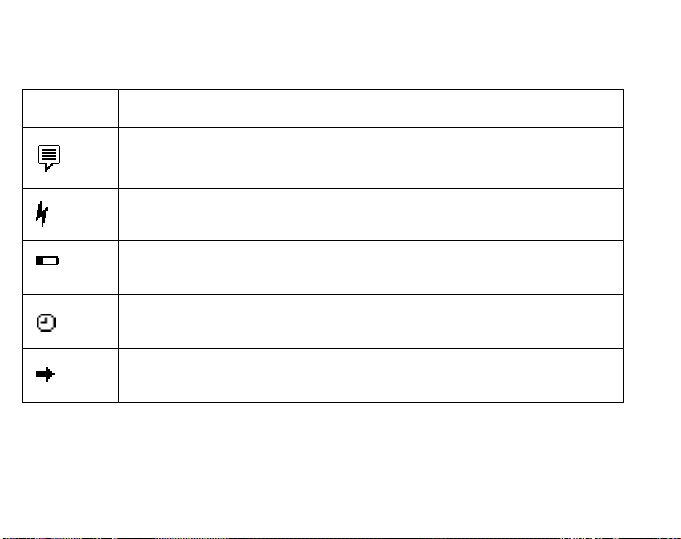
2.5. STATUS ICONS
Your Suunto n6
HR displays various icons. The location of the icons depends on the
watch face used. The following table describes each icon.
Icon Description
New Message indicates that a new message has arrived.
Battery Charging indicates that the battery is currently charging.
Battery Low appears when the battery level is reduced to 30%. You
need to charge your Suunto n6
HR soon.
Alarm On indicates that one of the alarms is set and will sound at
the appropriate time.
Chrono Running: Indicates that the chronograph is currently
running.
16
Page 17
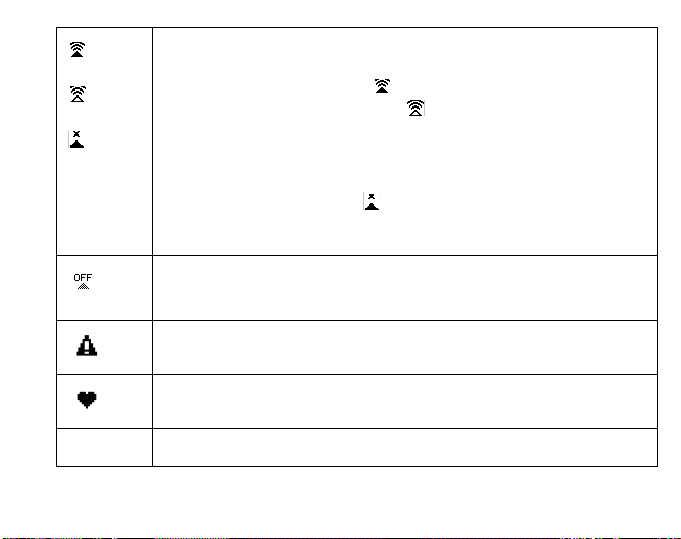
Signal Strength: Shows you the strength of the broadcast signal
that your Suunto n6
HR is receiving.
• A full signal is indicated by .
• A remote signal is indica ted by and it means that your Suunto
HR may not be receiving your personal information. This can
n6
happen before the signal confirms the home coverage area for
your Suunto n6
HR, or if you travel out of your home coverage
area.
• No signal is indicated by and it means that your Suunto n6
HR
has been out of your home coverage area longer than 10 minutes
and cannot find a signal.
tmr
Radio Off: Means that the watch radio is off and your Suunto n6
HR
cannot receive a broadcast signal.
HR limits alarm: Indicates that the measured HR is outside the set
limits.
HR received: Indicates that your Suunto n6
HR receives the heart
rate signal from the HR transmitter belt.
Timer activated: Indicates that one of the timers is active.
17
Page 18

3. TIME CHANNEL
Your Suunto n6HR comes with five channels—Time, Weather, News, Stocks, and
Calendar—that are available for use even before you activate the MSN Direct
service. The Time channel is fully operational and ready to go. The Weather, News,
Stocks, and Calendar channels have limited capabilities until you activate and
personalize MSN Direct. The Weather channel will display daily high and low
temperatures for your local city, the News channel will receive national news stories,
the Stocks channel will display major stock indices information, and the Calendar
channel includes a month-view calendar.
Once you activate MSN Direct, you can receive messages from others, view your
personal appointments, and view an events calendar for the things that interest you,
such as sports schedules, financial events, and local cultural events. You can also
subscribe to and receive personalized information from a number of additional
channels, such as News, Weather, Stocks, and Sports.
This guide provides instructions for using the Time channel. For instructions on using
the other channels—including Messages and Calendar—go to the MSN Direct Web
site at www.msndirect.com and click the Help link.
NOTE: Before you activate MSN Direct, you can also see the Register channel on
your Suunto n6
to activate the service, including the MSN Direct Website address and your Suunto
n6
HR ID. The instrument ID is a number that uniquely identifies your Suunto n6HR so
that you can receive personal messages and information. The Register channel
disappears when you activate MSN Direct.
18
HR. This is a temporary channel that displays the information you need
Page 19

3.1. RECEIVING THE TIME
When your Suunto n6
HR receives a broadcast signal, it should automatically receive
the correct time from an atomic clock. This happens even if you have not yet
activated the MSN Direct service. As long as your Suunto n6
HR keeps on receiving
the signal, you do not need to set the time. The time is accurate to a few thousands of
a second, and it automatically adjusts for daylight saving time and leap years. In
addition, your Suunto n6
HR automatically switches to different time zones as you
travel from place to place.
NOTE: When you turn on your Suunto n6
time from an atomic clock.
If you are in an area where your Suunto n6
HR, it may take a few minutes to receive the
HR cannot receive a signal, you can set the
time manually. You can also change the time display from a 12-hour clock to a 24hour clock, and you can override the automatic time zone setting. For more details,
see Chapter 6. Settings.
19
Page 20
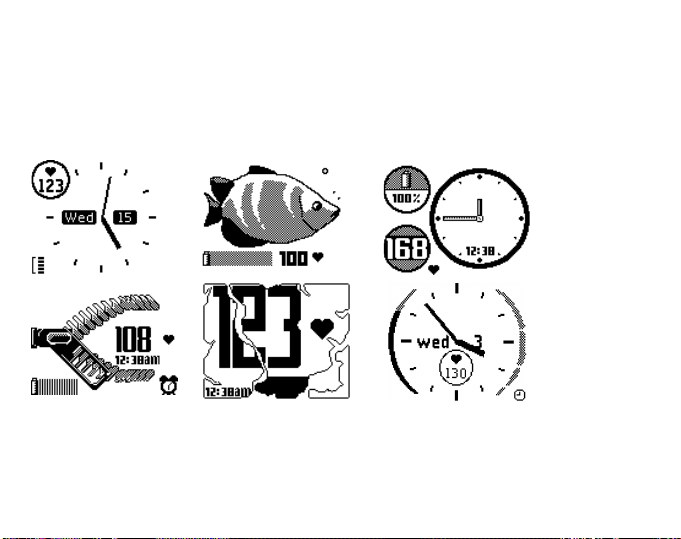
3.2. CHOOSING A WATCH FACE
You can change the face that is displayed on your Suunto n6
HR.
To choose a new watch face:
1. Long press CHANNEL/MODE to go to the Time channel. Wait for the current
watch face to appear.
2. Select the desired watch face with PREVIOUS or NEXT/STOP.
.
20
Page 21

3.3. WATCH FACE SUB-MODES
The watch faces have a few sub-modes that you can adjust with the ENTER button.
With the sub-modes you can customize the watch face to display the date, dual time,
heart rate (and on some watch faces seconds) in addition to the regular time display.
If you change the watch face, the previously selected sub-mode will also be visible
there provided that the watch face supports it. So, for example, if you have selected
to display the date, and you then decide to choose a new watch face, the date will be
visible there, too. However, if your current watch face displays seconds, and you then
select a watch face that does not support such a sub-mode, the seconds will not be
displayed.
3.3.1. Downloading a watch face
Give your Suunto n6
HR a new look to reflect your personal style. You can download
one or two faces, and keep up to two downloaded faces at a time. New watch faces
will be added regularly.
To download a new watch face, register as an MSN direct user and select the desired
watch face.
NOTE: You can only store two downloaded watch faces at a time on your Suunto
n6
HR. If you try to add more, the first watch face that you downloaded is removed.
21
Page 22
3.4. CHRONO MODE
In this mode, you can time your activities and monitor your heart
rate. You can also use various timers to customize your training
sessions and set the heart rate limits. The heart rate is visible on
the top row of the main display when you wear the HR
transmitter belt and your Suunto n6
HR receives the HR signal
from the belt. If there is no signal, the top row displays ---.
3.5. CHRONOGRAPH
With the chronograph you can time events—such as your daily run—and record lap
times. You can record up to 50 laps.
To use the chronograph:
1. Enter the Chrono mode.
2. Press START/LAP/LIGHT to start the chronograph.
3. Press START/LAP/LIGHT while the chronograph is running to store a split time.
NOTE: The chronograph will temporarily freeze, then continue counting. Your split
time and number are displayed in the bottom left corner of the screen.
4. Press NEXT/STOP to stop the chronograph.
5. Press NEXT/STOP to view your individual splits.
6. Press and hold NEXT/STOP for 2 seconds to reset the chronograph.
22
Page 23

3.6. TIMERS
Suunto n6
HR has three different training timers that you can use alongside the
chronograph. For example, you can use these versatile timers for countdown time
measurement before the start of a competition, for work and rest intervals in circuit
training, or to automatically start the chronograph after a warm-up period. Different
timers function differently according to their type and purpose.
3.6.1. Timer-Stop
This is a countdown timer. It starts the set countdown time when
activated and stops it after the time has run out. When the timer
reaches zero, you will hear a beeping sound.
1. Enter the Chrono mode.
2. Press ENTER to access the chronograph sub-menu.
3. Select Timer Intervals.
4. Select Timer-Stop.
5. Set the desired countdown time (seconds and minutes) with PREVIOUS or NEXT/
STOP, and accept the selections with ENTER. The message ‘
INTERVAL
SET’ is displayed, and you return to the chronograph display.
TIMER-STOP
6. Press ENTER to access the chronograph sub-menu.
7. Select Timer.
8. Select Timer-Stop. The message ‘
TIMER-STOP ACTIVATED’ is displayed, and you
return to the chronograph display.
9. Use PREVIOUS to toggle between the chronograph, timer and current time.
10.Press START/LAP/LIGHT to start the countdown. When the countdown reaches
zero, the timer stops automatically. You can also stop the timer manually by
pressing NEXT/STOP.
23
Page 24

11.Press and hold NEXT/STOP for 2 seconds to reset the chronograph.
3.6.2. Timer-Chrono
This is a combined countdown timer and chronograph. Y ou can set a countdown time,
and when it reaches zero, you will hear a beeping sound, and then the chronograph is
activated.
1. Enter the Chrono mode.
2. Press ENTER to access the chronograph sub-menu.
3. Select Timer Intervals.
4. Select Timer-Chrono.
5. Set the desired countdown time (seconds and minutes) with PREVIOUS or NEXT/
STOP, and accept the selections with ENTER. The message ‘
INTERVAL
SET’ is displayed, and you return to the chronograph display.
TIMER-CHRONO
6. Press ENTER to access the chronograph sub-menu.
7. Select Timer.
8. Select Timer-Chrono. The message ‘
TIMER-CHRONO ACTIVATED’ is displayed, and
you return to the chronograph display.
9. Use PREVIOUS to toggle between the chronograph, timer and current time.
10.Press START/LAP/LIGHT to start the countdown. When the countdown reaches
zero, the chronograph starts counting up.
11.Press START/LAP/LIGHT to store splits.
12.Press NEXT/STOP to stop the chronograph.
13.Press NEXT/STOP to view your individual splits.
14.Press and hold NEXT/STOP for 2 seconds to reset the chronograph.
24
Page 25

3.6.3. Timer-Repeat
This feature allows you to set multiple intervals for your chronograph. Suunto n6
HR activates the set interval times one after
another and after they are finished, it stops the chronograph. Y ou
will hear a beeping sound after each interval.
1. Enter the Chrono mode.
2. Press ENTER to access the chronograph sub-menu.
3. Select Timer Intervals.
4. Select Timer-Repeat.
5. Select the number of intervals (1-20) you need with PREVIOUS and NEXT/STOP,
and press ENTER.
6. Set the first interval (seconds and minutes) with PREVIOUS or NEXT/STOP, and
accept the selections with ENTER.
7. Set the next interval(s) in a similar manner. After the last one is set, the message
‘
TIMER-REPEAT INTERVALS SET’ is displayed, and you return to the chronograph
display.
8. Press ENTER to access the chronograph sub-menu.
9. Select Timer.
10.Select Timer-Repeat. The message ‘
TIMER-REPEAT ACTIVATED’ is displayed and
you return to the chronograph display.
11.Use PREVIOUS to toggle between the chronograph, timer and current time.
12.Press START/LAP/LIGHT to start the chronograph. An alarm will sound at each
designated interval. The chronograph stops automatically when all intervals have
been met. If you wish to continue with the chronograph, press START/LAP/LIGHT.
13.Press and hold NEXT/STOP for 2 seconds to reset the chronograph.
25
Page 26

3.7. LOGBOOK
Logbook information is recorded whenever the chrono is activated. The log book can
contain a maximum of 20 logs. When the memory is full and you store new logs, the
oldest are erased automatically. You can clear the logbook memory completely with
your Suunto n6
HR Training Manager.
To view logbook information:
1. Enter the Logbook mode.
2. Select the desired log with PREVIOUS and NEXT/STOP and press ENTER.
3. Scroll the information with PREVIOUS and NEXT/STOP.
The information is displayed in the following order:
• Total time and number of laps
• Average, highest and lowest heart rate values
• Heart rate within the set limits
• Heart rate below the low limit
• Heart rate above the high limit
• Log time graph
NOTE: Time information is always stored but the HR information is only stored if the
HR signal was present when you activated the chronograph.
26
Page 27

3.8. ALARMS
Suunto n6
HR has three separate alarms that you can set to remind you about specific
events or to wake you up in the morning.
To set and activate alarms:
1. Enter the Alarms mode.
2. Select a suitable alarm with PREVIOUS and press ENTER.
3. Set the alarm either On or Off with PREVIOUS and press
ENTER.
4. Set the minutes and hours (and am/pm on the 12h mode)
with PREVIOUS and press ENTER.
Suunto n6
HR sounds the alarm and displays an illuminated
alarm message (see below) for 30 seconds at the set time.
The message automatically disappears after 30 minutes. You
can dismiss the alarm by pressing any of the Suunto n6
HR
buttons.
27
Page 28

4. HEART RATE TRANSMITTER BELT
Here you can learn how to use the heart rate transmitter belt in your training activities.
This chapter also contains important information on HR limits, care of the transmitter
belt, possible disturbances in the signal reception, and warnings. For information on
replacing the battery, see Chapter 5. Battery.
4.1. PUTTING ON YOUR TRANSMITTER BELT
We recommend that you wear the transmitter against your bare skin to ensure
flawless operation.
• The electrodes must be wet during the exercise. Raise the transmitter a little off
your chest and moisten the grooved electrode area on the backside.
• Check that the wet electrode areas are firmly against your skin and the logo is in a
central upright position.
28
Page 29

4.2. MONITORING YOUR HEART RATE
Y ou can monitor your heart rate in the Chrono mode. The heart
rate is visible on the top row of the main display when you wear
the HR transmitter belt and your Suunto n6
signal from the belt. If your Suunto n6
HR receives the HR
HR receives the signal,
the HR text blinks at the same pace as your current heart rate.
If there is no signal, the top row displays ---.
4.3. SETTING THE HR LIMITS
With this function you can set the limits for your target heart rate zone. This is useful
when you, for example, want to keep your HR at an optimum level for fat burning.
When the chronograph is active, your Suunto n6
HR alerts you whenever your heart
rate goes outside the preset zone using alarm signals.
To set the HR limits:
1. Enter the Chrono mode.
2. Press ENTER to access the chronograph sub-menu.
3. Select HR limits.
4. Set the HR limits On with PREVIOUS and NEXT/STOP and press ENTER.
NOTE: When the chronograph is active, you can toggle between HR limits on and off
by long pressing ENTER.
5. Adjust the High and Low limits with PREVIOUS and NEXT/STOP, and press
ENTER.
29
Page 30

4.4. TRANSMITTER BELT USAGE IN WATER
Heart rate measurement in water is technically demanding for the following reasons:
• Pool water with a high chlorine conten t and seawate r may be very conductive, and
the electrodes of the transmitter may get short-circuited.
• The transmitter unit cannot detect the ECG (electrocardiogram) signals.
• Jumping into the water or strenuous muscle movement during swimming may
cause water resistance that shifts the transmitter on the body to a location where it
cannot pick up the ECG signal.
• The ECG signal strength varies depending on the individual’s tissue composition.
People have more problems with heart rate measurement in water than elsewhere.
4.5. CARE OF THE TRANSMITTER BELT
Wash the transmitter belt with mild soap and water after each use. Rinse it with clean
water, and dry thoroughly and carefully.
Store it in a cool and dry place. Never leave it wet because moisture keeps the
electrodes wet and the transmitter activated thereby shortening the battery life. Do
not bend or stretch the transmitter; this may damage the electrodes.
4.6. ELECTROMAGNETIC INTERFERENCE
Disturbances in the HR signal reception may occur near high voltage power lines,
traffic lights, overhead lines of electric railways, electric bus or tram lines, televisions,
car motors, bike computers, some motor driven exercise equipment, cellular phones
or when you walk through electric security gates.
30
Page 31

4.7. WARNINGS
If you have a pacemaker, defibrillator, or other implanted electronic device, you use
the transmitter belt at your own risk. Before you start using a transmitter belt, we
recommend an exercise test under a doctor’s supervision. This will ensure the safety
and reliability of the pacemaker and transmitter belt when used simultaneously.
Exercise may include some risk, especially for those who have been sedentary. We
strongly advise you to consult your doctor prior to beginning a regular exercise
program.
31
Page 32

5. BATTERY
Suunto n6HR is a feature-rich instrument and has numerous functions. Because of
this, it uses a lot of battery power and must be recharged periodically, much like other
devices such as cell phones or walkie-talkies.
Y our Suunto n6
of time the battery lasts between charging sessions varies depending on a number of
factors, including which watch face you are using, which channel Suunto n6
displays most of the time, the strength of the broadcast signal, and the amount of
information that you receive.
To extend the battery life between charging sessions:
• Stay on the Time channel unless you are viewing content on another channel.
Some channels rotate new information through the screen continually, even when
you are not looking, which consumes battery power.
• Turn the button tones off.
• Turn the radio off. If you are outside a reception area or not interested in receiving
information, you can turn the radio off and your Suunto n6
broadcast signal. Remember to turn the radio back on.
• Turn your Suunto n6
off. It maintains your current information for a long time, but the display is blank and
the instrument receives no additional information.
Warning: Your Suunto n6
contains a Lithium cell. To reduce the risk of fire or burns, do not disassemble, crush,
puncture, short external contacts, or dispose of used batteries in fire or water. Only
replace with manufacturer-specified batteries. Recycle or dispose of used batteries
properly.
32
HR should function fully for a few days on a single charge. The amount
HR
HR stops looking for a
HR off. If you are not wearing your Suunto n6HR, you can turn it
HR contains a Li-ion battery and the transmitter belt
Page 33

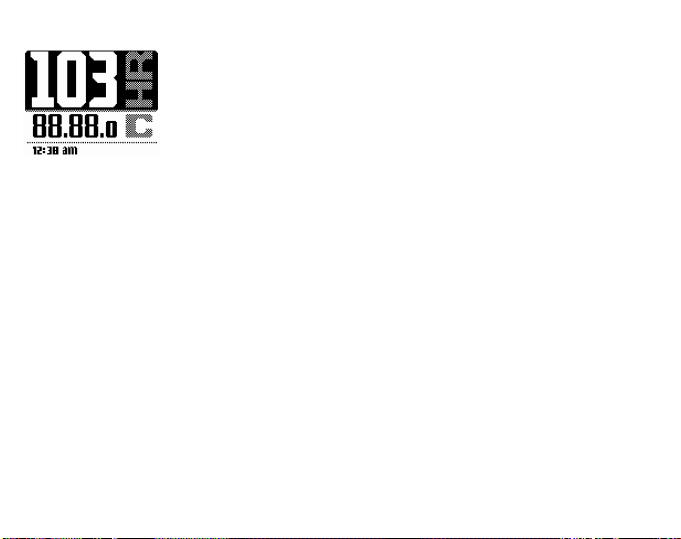
5.1. BATTERY LEVEL INDICATOR
Different watch faces have different ways of displaying the battery level. Here are
some examples of possible battery level indicators:
• Percentage: The battery level percentage is displayed in a circle on the screen.
When the battery is fully charged, it is at 100%. When it is fully discharged, it is at 0%.
• Area: An asymmetric battery level area is displayed on the screen. When the
battery is fully charged, the area is black. When it is fully discharged, the area is
gray.
• Vertical bar: A battery level bar that consists of five blocks is displayed on the
screen. Each block equals 20% of the battery power.
Your Suunto n6
table describes how Suunto n6
HR is fully functional from 100% down to a 20% charge. The following
HR responds at different battery charge levels.
Battery level Suunto n6
30%
20%
The low battery indicator ( ) appears.
A notification message appears. Suunto n6
battery mode. The radio turns off and stops receiving new
information. Suunto n6
5 minutes. The watch face may switch to one that uses less
battery power.
10%
Suunto n6
Suunto n6
HR response
HR goes into the low
HR switches to the Time channel after
HR shuts down and the screen goes blank.
HR conserves the contents of its memory.
33
Page 34

5.2. CHARGING THE BATTERY
If your Suunto n6
charge it as soon as possible. Charging the Suunto n6
To charge your Suunto n6
HR has a remaining battery charge of 30% or less, you should
HR takes up to 5 hours.
HR:
1. Connect the USB cable to the adapter. Plug the adapter into an electrical outlet.
2. Connect the USB cable’s data snake to your Suunto n6
3. Wait for the Suunto n6
HR to fully charge. The message “CHARGED” is displayed
HR.
when the battery is fully charged.
NOTE: You can also charge your Suunto n6
cable but first you need to install the USB software. The USB software installation
package is on the CD delivered with your Suunto n6
HR directly from your PC via the USB
HR. See Chapter 6. for installation
instructions.
5.3. REPLACING THE BATTERY OF THE TRANSMITTER BELT
The transmitter belt operates on a 3-Volt lithium cell, type: CR 2032. The average
expected battery life of the transmitter belt is 300 hours of use in ideal operating
temperatures.
If your Suunto n6
HR does not receive a signal when the transmitter belt is active, you
might need to replace the battery.
34
Page 35

To replace the battery:
1. Insert a coin into the slot located on the battery comp artment cover on the backside
of the transmitter belt.
2. Turn the coin counterclockwise until it is aligned with the open position marker, or
even slightly further for easy opening.
3. Remove the battery compartment cover. Ensure that the O ring and all surfaces are
clean and dry. Do not stretch the O ring.
4. Carefully remove the old battery.
5. Place the new battery into the battery compartment with the positive side facing up.
NOTE: We recommend that you replace the battery cover and the O ring
simultaneously with the battery to ensure that the transmitter remains clean and water
resistant. Replacement covers are available with replacement batteries.
NOTE: Change the battery at your own risk. We recommend that you have the
batteries replaced at authorized Suunto service centers.
35
Page 36

6. SETTINGS
You can adjust all the settings of your Suunto n6HR in the
Settings mode, which is divided into four categories: Date, Time,
General, and Units. If you are receiving a broadcast signal and
the radio is turned on, you cannot set the time and date
manually. Those are set by the network. In this case, your
Suunto n6
atomic clock.
To go to the Settings mode:
1. Long press CHANNEL/MODE to go to the Time channel. Wait for the watch face
to appear.
2. Press CHANNEL/MODE to open the Time splash screen.
3. While the Time splash screen is visible, scroll to Settings with PREVIOUS and
press ENTER. The Settings mode’s main display opens.
6.1. DATE
Suunto n6
The day is automatically updated according to the set date and
year. Also, if network coverage is present and transmission has
been received, the date will be updated automatically. However,
you can also set the date manually.
To set the date:
1. In the Settings mode, select Date.
2. Set the month, day and year with NEXT/STOP or PREVIOUS, and accept the
selections with ENTER. The weekday on the bottom row will be updated
automatically according to your settings.
36
HR automatically receives the correct time from an
HR has a programmed calendar until the year 2049.
Page 37

6.2. TIME
Normally the network provides you with the right time and local time zone. However, if
you have no network coverage, you can also update the time manually.
6.2.1. Setting the time
To set the time:
1. In the Settings mode, select Time.
2. Select Set time.
3. Set seconds, minutes, hours (and am/pm if the 12h unit is in
use) with NEXT/STOP or PREVIOUS, and accept them with
ENTER.
37
Page 38

6.2.2. Setting the time zone
By default, the time zone is set to Set by network and it reflects the time zone that
corresponds to the atomic clock that the Suunto n6
HR is currently set to. This means
that the time zone is updated automatically as you move from place to place. You can
also set the time zone manually.
To set the time zone:
1. In the Time display, select Set time zone.
2. Select your local time zone with NEXT/STOP or PREVIOUS, and press ENTER.
6.2.3. Setting the dual zone
Some of the optional time faces also have a dual time function.
You can use this function to keep track of two different time
zones. For example, if you are traveling and want to keep track
of your home time and local time.
To set the second time zone:
1. In the Time display, select Set dualzone.
2. Select a suitable time zone with NEXT/STOP or PREVIOUS
and press ENTER.
38
Page 39

6.3. GENERAL
To make your Suunto n6
HR better suited to your needs, you can adjust different
settings such as button tones, backlight, radio/watch sleep and splash screen
transition styles. You can also find information for checking the signal strength and
battery status.
To change the general settings:
1. In the Settings mode, select General.
2. Select the setting you want to adjust.
3. Adjust the settings with NEXT/STOP or PREVIOUS, and
accept them with ENTER.
Radio sleep allows you to turn the radio off to save battery
power. This is a good option if you are traveling in an area where there is no signal
coverage. The ‘radio off’ icon ( ) is displayed in the upper right corner of mo st
Suunto n6
HR displays. Normally you should keep your radio on so that you can
receive broadcast information to your channels.
Watch sleep allows you to turn the display of your Suunto n6
power. This is a good option if you know you will not be using your Suunto n6
while, for example, during the night. When you turn off your Suunto n6
HR off to save battery
HR for a
HR, the radio is
also automatically turned off. However, all the other functions work normally even
when the Suunto n6
HR display is turned off. You can turn the display back on with the
press of any button.
Button tones can be set either on or off. When set to off, button presses are not
acknowledged with tones.
39
Page 40

Backlight has three options:
• Normal: Backlight is turned on with the long press of START/LAP/LIGHT. This is
the recommended setting for normal use.
• Off: Backlight cannot be activated with any of the buttons. This is a good setting
for power saving purposes.
• All buttons: Backlight is turned on with the press of any of the buttons. This is a
good setting if you have to use your Suunto n6
HR in a dark environment.
Transitions allows you to customize the channel transitions.
Splash delay allows you to adjust the amount of time the splash screen stays on the
display. While the splash screen is visible, you can switch channels. The longer the
Splash delay is, the more time you have to react.
In Watch info, you can check the general information about your Suunto n6 HR. This
information includes the signal strength and battery life status. For more information
about the items in the Watch info, go to the MSN Direct Website at
www.msndirect.com and click the Help link.
In Software you can view the general information on the software of your Suunto
n6
HR.
40
Page 41

6.4. UNITS
You can also adjust the units that are used for presenting information on your Suunto
n6
HR.
Time format affects the used time style. You can select either 12h with am/pm
symbols or 24h (European style of presenting the time).
Date format affects the order of the day and month in date information. If you select
dd/mm, the day is presented first. If you select mm/dd, the month precedes the day.
In Measurements you can select between imperial and metric measurement
information. The imperial measurements use Fahrenheit and yards, and the metric
measurements use Celsius and meters.
To adjust the units:
1. In the Settings mode, select Units.
2. Select the desired unit.
3. Adjust the unit with NEXT/STOP or PREVIOUS, and press
ENTER. From now on your Suunto n6
HR presents all units in
the chosen format.
41
Page 42

7. SUUNTO n6HR TRAINING MANAGER
Suunto n6HR Training Manager is software designed for people who want to enhance
the functionality of their Suunto n6
information such as training logs from the Suunto n6
transferred the data, you can easily view and organize it, design training programs
and plans, send them to the Web and add them to the calendar.
NOTE: You can always download the latest version of Suunto n6
from www.suunto.com or www.suuntosports.com. Please check for updates regularly
as new features are continuously being developed.
7.1. SUUNTO n6
HR TRAINING MANAGER TUTORIAL
This is a brief tutorial on the use of your Suunto n6
an example on how you can utilize the software before, during and after your training
sessions. For more information on the Suunto n6
parameters, refer to the Suunto n6
7.1.1. Getting started
Before donning on your sneakers or hopping on your bike, you should install the
Suunto n6
HR Training Manager software, create a user profile, and get thoroughly
acquainted with the layout and functions. This way you know how to use the software
to enhance your training activities. You should also make sure that the software uses
the measurement units (imperial or metric) that you are more familiar with.
42
HR. You can use the software to transfer
HR memory. When you have
HR Training Manager
HR Training Manager. It gives you
HR Training Manager features and
HR Training Manager Help.
Page 43

7.1.2. Planning your training schedule
Training programs and plans are the key to effective training. Before you start training
actively, you should create a training program or download a suitable one from
SuuntoSports.com.
When planning your training schedule, the calendar view is an essential tool. After
you have a training program suitable for your specific needs, you can add it to the
calendar so that you are always in sync with your training schedule, and won't miss a
single session. You can also use the calendar view to search for earlier schedules.
7.1.3. Training and gaining
Now you are ready to hit the track. Whenever you set off and start the chronograph,
your Suunto n6
concentrate on training hard, and let your Suunto n6
HR records your training data in specific log files. You can now simply
HR worry about the rest.
7.1.4. Reviewing your results
After returning home from an exhausting but fulfilling training session, you should
take a shower, relax, and then transfer your new logs to the Suunto n6
HR Training
Manager. Before this is done, they are merely digits within the device and you cannot
further utilize them in your training.
First connect your Suunto n6
HR with the software using the USB cable supplied in the
package. The software displays the logs stored in the device. From there you can
drag and drop the logs to appropriate folders in the software. Later on you can
reorganize the logs, for example, according to different sports categories.
Now you can view and edit the logs, and if you select more than one log, you can
compare them. This is very useful when you, for example, run the same distance on
different days and wish to compare the results. You can also analyze the logs
according to different criteria.
43
Page 44

7.1.5. Sharing your experiences
After you have reviewed your results, you can go online and see what
Suuntosports.com has to offer. It is a free Web community where you can, for
example, meet other sports enthusiasts, get advice on how to improve your training
and download new training programs.
You can surf on the SuuntoSports.com site as a guest user but you should register if
you want to fully benefit from the site. If you are pleased with your training results or
feel that others have something to gain from your logs and training programs, you can
upload them to SuuntoSports.com.
You can easily search for new training programs, and download them to your Suu nto
n6
HR Training Manager by dragging and dropping them to any folders in the Logbook
window.
7.2. SYSTEM REQUIREMENTS
• PC with minimum 500 MHz processor clock speed recommended
• Intel Pentium/Celeron family or AMD K6/Athlon/Duron family or compatible
processor
• 128 megabytes (MB) of RAM
• 80 MB of available hard disk space
• USB port
• 1024 x 768 resolution video adapter and monitor or better
• English version of the following operating system:
• Windows XP Pro
• Windows XP Home
• Windows XP Tablet PC Edition
44
Page 45

• Windows 2000 Pro
• Windows 2000 Server
• If you want to synchronize the software with Microsoft Outlook, you need one of the
following versions of the program:
• Microsoft Outlook 2000
• Microsoft Outlook 2002
• Microsoft Outlook XP
7.3. PC INTERFACE
With the PC-interface cable you can transfer information between your Suunto n6
HR
and your computer. The interface cable is delivered in the same package as your
Suunto n6
and the other end of the cable clips on to your Suunto n6
HR. The PC interface cable is plugged to the USB port of your computer,
HR with three docking points.
45
Page 46

7.4. INSTALLATION
To use your Suunto n6
Suunto USB drivers, .Net Framework, and the Suunto n6
software. The Suunto n6
7.4.1. Installing the Suunto n6
1. Make sure your Suunto n6
2. Insert the Suunto n6
HR Training Manager, you need to install the appropriate
HR Training Manager PC
HR installation wizard will do this for you.
HR software
HR is not connected to your computer.
HR CD-ROM into the drive. The installation prompt window
opens automatically.
3. Select Install Suunto n6
HR Training Manager.
4. Wait for the installation to begin and follow the installation instructions.
The software components will be installed in the following order:
• Net Framework v 1.1. This w ill be installed only if it has not been installed in
your system before.
• Suunto n6
HR Training Manager software. During this installation, you need to
select the synchronization method of the training calendar included in the Suunto
n6
HR Training Manager. There are two methods available: Synchronizing with
Microsoft Outlook or with your Suunto n6
HR. For more information on this, see
Section 8.3.2. Calendar synchronization.
• Suunto n6
HR USB drivers. The installation program will install the drivers if
necessary.
5. After the installation wizard has finished the process, attach your Suunto n6
HR to
the USB port. The system should recognize the device automatically.
NOTE: If the installation does not automatically start, click Start --> Run and type
D:\cd_menu.exe. (Substitute D for the CD-ROM drive).
46
Page 47

7.4.2. Calendar synchronization
You can keep a training calendar in your Suunto n6
synchronize this calendar with your Suunto n6
• Sync with Suunto n6
your Suunto n6
using the Suunto n6
HR: Your training plan updates will be automatically sent to
HR via cable every time you establish a connection to your wristop
HR Training Manager.
HR Training Manager. You can
HR via cable or with Microsoft Outlook.
• Sync with Microsoft Outlook: Your training plan updates will be automatically
sent to your Outlook calendar every time you edit them in your Suunto n6
HR
Training Manager. To sync your Outlook calendar with your Suunto n6HR, please
register your Suunto n6
HR and follow the instructions at http://msndirect.com.
7.4.3. Changing the calendar synchronization
If you have chosen a wrong sync mode during the installation, you can still change
the mode later on.
To change the sync mode:
1. Insert the Suunto n6
HR CD-ROM into the drive. The installation prompt window
opens automatically.
2. Select Change calendar sync mode and follow the instructions on the screen.
7.4.4. Updating the USB drivers
The USB driver updates will be delivered through Microsoft Windows Update.
T omanually search for driver updates, click on the ‘Windows Update’ shortcut in the Start
menu (recommended) or go to the following link http://windowsupd ate.microsoft.com.
47
Page 48

7.5. CONNECTING YOUR SUUNTO n6HR TO A PC
The Suunto n6
information between your Suunto n6
HR package contains a PC interface cable with which you can transfer
HR and your computer.
To establish the connection:
1. Attach your Suunto n6
HR to the USB port.
2. Click the clock symbol in the Device window to establish the connection. The
contents of your Suunto n6
HR are displayed in the Device window and the current
settings are displayed in the Properties window.
7.6. UNINSTALLING SUUNTO n6
1. Close the Suunto n6
HR Training Manager.
HR TRAINING MANAGER
2. Select Start - Settings - Control Panel - Add/Remove Programs.
3. Select Suunto n6
NOTE: This will only remove the software and their components but not the Suunto
HR device USB drivers. You have to uninstall them separately.
n6
7.7. UNINSTALLING SUUNTO n6
HR Training Manager 2.0 and click Change/Remove.
HR DRIVERS
1. Select Start - Settings - Control Panel - Add/Remove Programs.
2. Select Suunto n3i/n6
NOTE: If you remove the drivers, your Suunto n6
other desktop applications that send information to your Suunto n6
not work properly.
48
HR USB driver and then click Change/Remove.
HR Training Manager and some
HR via cable will
Page 49

8. SUUNTOSPORTS.COM
Now that you have trained hard and transferred your training data to your Suunto
n6
HR Training Manager, you can share your best experiences with others at
SuuntoSports.com. It is a free and open Internet community where you can compare
your performance with other Suunto users and learn from their experiences.
SuuntoSports.com includes three sections:
• My Suunto contains information about yourself, your sports and your equipment.
•In Communities you can cre ate and manage your own communities, and search
for others. All registered SuuntoSports.com users automatically become members
of the ‘World of SuuntoSports’ community.
• Sport forums include sport-specific news, bulletin boards, event calendars and
discussions. You can also exchange training programs and read travel reports
written by other members.
49
Page 50

8.1. USING SUUNTOSPORTS.COM
This section explains briefly what you can do at SuuntoSports.com. To learn about the
functions and activities in detail, visit the site, try them and, if necessary, use the site
Help. The Help is available on the right side of the bar that divides the screen.
In SuuntoSports.com you can:
1. Register yourself and enter as a registered member. (You can also enter as a
guest user but then your user rights will be somewhat more limited.)
2. Edit your data in the My Suunto section.
3. Search for published logs and training programs, and if you find anything useful,
transfer them to your Suunto n6
HR Training Manager.
4. Transfer your own logs and training programs to SuuntoSports.com.
5. Visit the Communities section where you can search for specific communities,
apply for their membership or create entirely new ones.
6. Visit the Sport forums section where you can search for interesting topics, ask
questions about your favorite sports, and view sport-specific news and calendars.
50
Page 51

9. FREQUENTLY ASKED QUESTIONS
Here are the most commonly asked questions about Suunto n6HR. For additional
questions and answers, go to the Suunto Website at www.suunto.com
about the MSN Direct service, go to the MSN Direct Website at www.msndirect.com
and click Help.
• What do I do in case of a malfunction?
1. Shut down your Suunto n6
HR by simultaneously pressing PREVIOUS,
START/LAP/LIGHT, and CHANNEL/MODE.
2. Wait for a few seconds, and then simultaneously press NEXT/STOP, START/
LAP/LIGHT/ and CHANNEL/MODE. It takes several seconds for the Suunto
n6
· If your Suunto n6
HR to power up.
HR still does not respond to any button presses, call the Suunto
Customer Service (toll free) at 1 (800) 543-9124 for Suunto USA or 1 (800) 7767770 for Suunto Canada.
• How do I replace or recharge the battery?
· No need to replace the battery. Your Suunto n6
HR comes equipped with a
rechargeable battery.
· To recharge the battery, follow the steps in Section 5.2. Charging the battery.
• How can I tell whether my Suunto n6
HR is getting reception?
· Check the signal strength icon that is found in the upper right corner of most
Suunto n6
Suunto n6
HR screens. A good signal is indicated by , which means your
HR is getting reception and is receiving information. No signal is
indicated by , which means you are outside an MSN Direct coverage area or
you are temporarily in an area where reception is poor. means that the
. For questions
51
Page 52

Suunto n6HR may not be receiving your personal information. This can happen
before the signal confirms the home coverage area for your Suunto n6
HR, or if
you travel out of your home coverage area. means that the Suunto n6
radio is off and the Suunto n6HR cannot receive a broadcast signal.
· Check the Signal strength percentage in the Watch Info. For details, see Section
6.3. General.
• How do I determine the remaining battery life?
· Check the Battery life percentage in the Watch Info. For details, see Section 6.3.
General.
• How do I conserve battery life?
· For helpful tips about maximizing the battery life, see Chapter 5. Battery.
• How do I set the time?
· As long as you are in an MSN Direct coverage area, you should not have to set
the time. Your Suunto n6
HR acquires the current local time automatically from an
atomic clock. This may take a few minutes to acquire initially. If the Set Time
setting displays Time Set By Network, then you are in an MSN Direct coverage
area.
· If you are outside an MSN Direct coverage area, you can set the time and date
manually. For details, see Section 6.1. Date and Section 6.2. Time.
• What happens when I activate the MSN Direct service?
· Your Suunto n6
HR receives the personalized information you selected on the
MSN Direct Website. The following actions take place:
1. Your Suunto n6
2. The Register channel disappears from your Suunto n6
3. Your Suunto n6
52
HR receives the confirmation message “WELCOME”.
HR.
HR starts receiving channel content, such as news stories and
HR
Page 53

local weather information.
• How will I know when my Suunto n6
· You will receive a “
WELCOME” confirmation message on your Suunto n6HR. You
HR is activated?
will also receive a confirmation e-mail within 24 hours.
• Can I adjust the volume on my Suunto n6
HR?
·No.
• Can my Suunto n6
HR communicate with other devices enabled with MSN Direct?
·No.
• Can I go swimming with my Suunto n6
HR?
· Yes, you can swim, take a shower and participate in other water sports as long
as you do not dive with your Suunto n6
· The specified water-resistance of Suunto n6
HR.
HR is 330 ft. (100 m) and the
transmitter belt to 66ft. (20 m) according to the ISO 2281 standard (www.iso.ch).
· NOTE: Do not use Suunto n6
HR for diving or to obtain data under water.
· NOTE: Do not push t he buttons while swimming or in contact with water under
any circumstances. Deliberate or unintentional depression of the buttons while
the unit is submerged could cause the unit to malfunction.
• Can I replace the strap with any accessory strap?
• Yes, you can use any 7/8” (22 mm) standard accessory straps as long as they
are compatible with the curved spring bar used in Suunto n6
• Where do I send my Suunto n6
HR for repair service?
· If you experience a problem with your Suunto n6
HR.
HR, please call Suunto
Customer Service (toll free) at 1 (800) 543-9124 for Suunto USA or 1 (800) 7767770 for Suunto Canada. For additional information, go to our Website at
www.suunto.com.
53
Page 54

• My Suunto n6HR does not show the correct time. What should I do?
· When you first turn on your Suunto n6
HR, the time reverts to 12:00 AM. while the
instrument attempts to receive the correct local time from a nearby broadcast
signal. When the Suunto n6
HR receives a signal, the time is automatically
updated to the current local time.
· The MSN Direct coverage area includes most major metropolitan areas
throughout North America. If your Suunto n6
HR is inside any of these coverage
areas, it should automatically receive the correct local time, unless the radio is
turned off. By default, the radio is turned on. If your Suunto n6
HR is outside of a
coverage area, it will not receive the correct time until you return to the coverage
area. For more information about coverage areas, go to the MSN Direct Website
at www.msndirect.com and click the Help link.
· Sometimes the topography (hills, valleys), building structures, or nearby
electronics can interfere with the broadcast signal that your Suunto n6
HR uses to
receive the correct local time. When that happens, your Suunto n6
experiences a delay in receiving the correct time.
· If your Suunto n6
HR is exactly one or more full hours away from the correct time,
it is possible that your time zone settings are set to a specific time zone. Make
sure that the time zone is set to Set by network. For more details, see Section
6.2.2. Setting the time zone.
· If you are outside the MSN Direct coverage area, you can set the time manually.
For more details, see Section 6.2. Time.
• My Suunto n6
· Do not worry! Just place your Suunto n6
HR battery died before I could recharge it. What should I do?
HR on the charger and it will begin to
charge. All your information comes back online as soon as the Suunto n6
enough battery power.
54
HR
HR has
Page 55

• I activated the MSN Direct service, but my Suunto n6HR is not receiving any of the
information I selected. What should I do?
· You may not have received the activation and configuration message that was
sent when you activated the service. This can happen if you were outside an
MSN Direct coverage area, or if you were temporarily in an area where reception
was poor. You can instruct the MSN Direct service to resend the configuration
message. To do so, go to www.msndirect.com and click the link to resend the
configuration message.
• My Suunto n6
HR has not received any new information in a day or more. What
should I do?
· The MSN Direct coverage area includes most major metropolitan areas
throughout North America. If your Suunto n6
HR is inside any of these coverage
areas, it should automatically receive new broadcast information (news stories,
current temperatures). If your Suunto n6
HR is outside a coverage area, it does
not receive any new broadcast information until you return to the coverage area.
For more information about coverage areas, go to the MSN Direct Website at
www.msndirect.com and click Help.
· If you leave your home coverage area and travel to another MSN Direct
coverage area, your Suunto n6
HR will not receive personal information (personal
messages, calendar appointments) unless you go to the MSN Direct Website at
www.msndirect.com and set up a travel schedule.
· Sometimes the topography (hills, valleys), building structures, or nearby
electronics can interfere with the broadcast signal that your Suunto n6
HR uses to
receive information.
55
Page 56

10. GETTING HELP
For additional help with your Suunto n6HR, please call Suunto Customer Service at 1
(800) 543-9124 (Suunto USA) or 1 (800) 776-7770 (Suunto Canada) or go to our
Website at www.suunto.com.
For help with the MSN Direct service, go to the MSN Direct Web site at
www.msndirect.com and click the Help link, or contact MSN Customer Support at 1866-658-7032 (within the United States). For deaf or hard-of-hearing customers, call
1-800-877-9580 (within the United States) for technical support or 1-866-271-7577
(within the United States) for accounts and billing support.
56
Page 57

11. TECHNICAL SPECIFICATIONS
General
• Operating temperature: 30°F to +120°F/0 °C to + 50°C
• Storage temperature: -4°F to +140°F/–20°C to +60°C
• Weight: 56 g
• Water resistance: 330 ft./100 m (according to the ISO 2281 standard)
• Rechargeable Li-ion battery
Calendar Clock
• Resolution: 1 s
• Accuracy: ± 15 s/month
Stopwatch
• Stopwatch range: 0 - 59 h 59 min 59 s
• Split time range: 0 - 59 h 59 min 59 s
• Reminder range: 5 s - 60 min
• Resolution: 0.1 s
Logbook
• Max. number of logs: 20
• Max. 20 hours of HR data
• Max. 50 laps/log
Heart Rate
• Resolution: 1 beat
• Accuracy: ± 1 beat/min.
• Display range: 30 - 230 beats/min
57
Page 58

Transmitter belt
• Weight: 61 g
• User-replaceable battery CR2032
• Water resistance: 66ft./20m (according to the ISO 2281 standard)
• Transmission range: up to 3 ft./1 m
• Modulation frequency: 5,3 kHz
58
Page 59

12. TERMS AND CONDITIONS
12.1. COPYRIGHT
This publication and its contents are proprietary to Suunto Oy and are intended solely
for the use of its clients to obtain knowledge and key information regarding the
operation of Suunto n6
any other purpose and/or otherwise communicated, disclosed or reproduced without
the prior written consent of Suunto Oy.
While we have taken great care to ensure that information contained in this
documentation is both comprehensive and accurate, no warranty of accuracy is
expressed or implied. Its content is subject to change at any time without notice. The
newest version of this documentation can always be downloaded at
www.suunto.com.
© Suunto Oy 11/2004
12.2. TRADEMARKS
Suunto, Suunto n6
trademarks of Suunto Oy. All rights are reserved.
Microsoft, MSN and the MSN Logo are either registered trademarks or trademarks of
Microsoft Corporation in the United States and/or other countries.
12.3. PATENTS
This product is protected by the following patent application:
US pat. appl. no. 09/769,851
HR products. Its contents shall not be used or distributed for
HR, Replacing Luck, and their logos are registered or unregistered
59
Page 60

12.4. ABOUT YOUR SUUNTO n6HR AND SERVICE
You will need a subscription to the MSN Direct service to take full advantage of all
Suunto n6
HR features. MSN Direct is available to residents in the 50 United States,
the District of Columbia, and Canada. To receive MSN Direct on an MSN Direct-ready
device, you must be within an MSN Direct coverage area; check the current coverage
maps available at www.msndirect.com. Internet access is required for the on-line
activation of your MSN Direct account. A major credit or debit card is required.
Activation and service charges will apply. Prices are subject to change. Regular
charging of Suunto n6
HR is required for use. SAFETY FIRST: Watches can be worn
anywhere so use the service sensibly and safely.
12.5. FCC COMPLIANCE
Suunto n6
HR complies with Part 15 of the FCC limits for class B digital devices. This
equipment generates, uses, and can radiate radio frequency energy and, if not
installed or used in accordance with the instructions, may cause harmful interference
to radio communications. There is no guarantee that interference will not occur in a
particular instance. If this equipment does cause harmful interference to other
equipment, try to correct the problem by relocating the equipment.
Consult an authorized Suunto representative or other qualified service technician if
the problem cannot be corrected. Operation is subject to the following conditions: (1)
This instrument cannot cause harmful interference, and, (2) this instrument must
accept any interference received, including interference that may cause undesired
operation.
Repairs should be made at authorized Suunto service centers. Unauthorized repairs
will void warranty.
60
Page 61

12.6. CE COMPLIANCE
The CE mark is used to mark conformity with the European Union EMC directive 89/
336/EEC.
12.7. ISO 9001 COMPLIANCE
Suunto’s Quality Assurance System is certified by Det Norske Veritas to be ISO 9001
compliant in all SUUNTO Oy’s operations (Quality Certificate No. 96-HEL-AQ-220).
61
Page 62

13. WARRANTY
13.1. LIMITS OF LIABILITY
If this product should fail due to defects in materials or workmanship, Suunto Oy will,
at its sole option, repair or replace it with new or rebuilt parts, free of charge, for two
(2) years from the date of its purchase.
This warranty is extended only to the original purchaser and only covers failures due
to defects in materials and workmanship that occur during normal use while in the
period of the warranty.
It does not cover the wristband, the battery, battery replacement, damage or failures
resulting from accident, misuse, neglect, mishandling, alteration or modifications of
the product, or any failure caused by operation of the product outside the scope of its
published specifications, or any causes not covered by this warranty.
There are no express warranties except as listed above.
The client can exercise the right to repair under the warranty by contacting Suunto
Oy’s Customer Service department to obtain a repair authorization. Suunto Oy and its
subsidiaries shall in no event be liable for any incidental or consequential damages
arising from the use of or inability to use the product.
Suunto Oy and its subsidiaries do not assume any responsibility for losses or claims
by third parties that may arise through the use of this instrument.
62
Page 63

13.2. AFTER SALES SERVICE
If a claim under warranty appears to be necessary:
• Return the product, freight prepaid, to your Suunto representative who is
responsible for having your product repaired.
• Include your name and address, proof of purchase and/or service registration card,
as required in your country.
The claim will be honored and the product repaired or replaced at no charge and
returned in what your Suunto representative determines a reasonable amount of
time, provided all necessary parts are in stock.
All repairs made, not covered under the terms of this warranty, will be made at the
owner’s expense. This warranty is non-transferable from the original owner.
If it is not possible to contact your Suunto representative, contact your local Suunto
distributor for further information. You can locate your local Suunto distributor at
www.suunto.com.
63
Page 64

Page 65

COORDONNÉES DU SERVICE CLIENTS
Suunto Oy Tél. +358 9 875870
Fax +358 9 87587301
Suunto USA Tél. 1 (800) 543-9124
Canada Tél. 1 (800) 776-7770
Centres d'appels en Europe Tél. +358 2 284 11 60
Site Web Suunto www.suunto.com
FR
1
Page 66

TABLE DES MATIÈRES
1. INFORMATIONS GÉNÉRALES ............................................................................8
2. UTILISATION DE SUUNTO N6HR .......................................................................9
2.1. BOUTONS .................................................................................................10
2.2. CANAUX ....................................................................................................13
2.3. MODES ......................................................................................................14
2.4. PORTÉE DES SIGNAUX ...........................................................................14
2.5. ICONES D’ÉTAT ........................................................................................16
3. CANAL « TIME » .................................................................................................18
3.1. RÉCEPTION DE L’HEURE ........................................................................19
3.2. CHOIX DU CADRAN DE MONTRE ...........................................................20
3.3. SOUS-MODES DES CADRANS DE MONTRE .........................................21
3.3.1. Téléchargement d’un nouveau cadran de montre ...........................21
3.4. MODE « CHRONO » .................................................................................22
3.5. CHRONOMÈTRE ......................................................................................22
3.6. COMPTES À REBOURS ...........................................................................23
3.6.1. Timer-Stop ......................................................................................23
3.6.2. Timer-Chrono ..................................................................................24
3.6.3. Timer-Repeat ..................................................................................25
3.7. JOURNAL ..................................................................................................27
3.8. ALARMES ..................................................................................................28
4. CEINTURE ÉMETTEUR .....................................................................................29
4.1. MISE EN PLACE DE LA CEINTURE ÉMETTEUR ....................................29
4.2. CONTRÔLE DE LA FRÉQUENCE CARDIAQUE ......................................30
4
Page 67

4.3. RÉGLAGE DES LIMITES DE FRÉQUENCE CARDIAQUE ..................... 30
4.4. UTILISATION DE LA CEINTURE ÉMETTEUR DANS L'EAU ................... 31
4.5. ENTRETIEN DE LA CEINTURE ÉMETTEUR .......................................... 31
4.6. INTERFÉRENCES ÉLECTROMAGNÉTIQUES .......................................31
4.7. ATTENTION ..............................................................................................32
5. BATTERIE .......................................................................................................... 33
5.1. INDICATEUR DE CAPACITÉ DE BATTERIE ...........................................34
5.2. CHARGEMENT DE LA BATTERIE ...........................................................36
5.3. REMPLACEMENT DE LA PILE DE LA CEINTURE ÉMETTEUR ............. 36
6. RÉGLAGES ........................................................................................................38
6.1. SOUS-MODE « DATE » ............................................................................39
6.2. SOUS MODE « TIME » .............................................................................40
6.2.1. Réglage de l’heure .......................................................................... 40
6.2.2. Réglage du fuseau horaire .............................................................41
6.2.3. Réglage du deuxième fuseau horaire .............................................41
6.3. SOUS-MODE « GENERAL » .................................................................... 42
6.4. SOUS-MODE « UNITS » .......................................................................... 44
7. SUUNTO N6HR TRAINING MANAGER ............................................................45
7.1. DIDACTICIEL POUR SUUNTO N6HR TRAINING MANAGER ................45
7.1.1. Introduction .....................................................................................45
7.1.2. Préparation de votre programme d'entraînement ...........................46
7.1.3. Entraînement et résultats ................................................................ 46
7.1.4. Analyse de vos résultats .................................................................46
7.1.5. Partager vos expériences ...............................................................47
5
Page 68

7.2. CONFIGURATION DU SYSTÈME ............................................................48
7.3. INTERFACE PC ........................................................................................49
7.4. INSTALLATION .........................................................................................49
7.4.1. Installation du logiciel Suunto n6hr ..................................................49
7.4.2. Synchronisation du calendrier ........................................................50
7.4.3. Changement de la synchronisation du calendrier ...........................51
7.4.4. Mise à jour des pilotes USB ............................................................51
7.5. CONNEXION DE SUUNTO N6HR À UN ORDINATEUR ..........................51
7.6. DÉSINSTALLATION DE SUUNTO N6HR TRAINING MANAGER ............52
7.7. DÉSINSTALLATION DES PILOTES SUUNTO N6HR ..............................52
8. SUUNTOSPORTS.COM .....................................................................................53
8.1. UTILISATION DE SUUNTOSPORTS.COM ..............................................54
9. FOIRE AUX QUESTIONS ...................................................................................55
10. AIDE ..................................................................................................................61
11. SPÉCIFICATIONS TECHNIQUES ....................................................................62
12. CONDITIONS GÉNÉRALES .............................................................................64
12.1. COPYRIGHT ............................................................................................64
12.2. MARQUES ...............................................................................................64
12.3. BREVETS ................................................................................................64
12.4. À PROPOS DE SUUNTO N6HR ET DU SERVICE MSN DIRECT .........64
12.5. CONFORMITÉ FCC ................................................................................65
12.6. CONFORMITÉ CE ...................................................................................66
12.7. CONFORMITÉ ISO 9001 .........................................................................66
6
Page 69

13. GARANTIE .......................................................................................................67
13.1. LIMITES DE RESPONSABILITÉ ............................................................67
13.2. SERVICE APRÈS-VENTE ...................................................................... 68
7
Page 70

1. INFORMATIONS GÉNÉRALES
Partout où la vie vous emmène, votre montre Suunto n6HR vous tient informé.
Lorsque vous vous inscrivez au service MSN
informations que vous souhaitez recevoir. Cette technologie dynamique sans fil
affiche discrètement les informations qui vous intéressent le plus. D’un simple coup
d’œil à votre montre, vous restez informé de l’actualité, de la bourse, de la météo, du
sport et plus encore. Les montres configurées pour MSN Direct sont aussi
divertissantes qu’informatives. Grâce aux différents cadrans de montre, vous pouvez
personnaliser l'apparence de votre montre Suunto n6
La ceinture émetteur vous permet de mesurer et de surveiller votre fréquence
cardiaque de manière précise. À la fin de votre entraînement, utilisez le logiciel
Suunto n6
HR Training Manager pour consulter les graphiques et les statistiques de
vos séances d'entraînement. Vos résultats peuvent ensuite être enregistrés dans
votre journal ou partagés avec vos amis grâce à la communauté internet
SuuntoSports.com.
REMARQUE : pour profiter pleinement de ce produit, vous devez souscrire au
service MSN Direct. Ce service est accessible dans de nombreuses villes d'Amérique
du nord.
8
®
Direct, vous sélectionnez les
HR à votre convenance.
Page 71

2. UTILISATION DE SUUNTO n6HR
Pour faire connaissance avec votre montre Suunto n6
canaux, les modes, la portée des signaux et les icones d’état, continuez de lire.
Il existe deux façons de recevoir des informations sur votre montre Suunto n6
Service automatique
Vous recevrez automatiquement les canaux suivants sans souscription :
• Températures quotidiennes (min. et max.) de votre ville
• Actualités nationales
• Indices boursiers
• Calendrier mensuel
Plans de souscription
Pour personnaliser le contenu des informations que vous recevez, activez le service
MSN Direct sur http://direct.msn.com/go. Après avoir choisi un plan de souscription,
vous pouvez activer la réception des actualités locales, de la météo, des résultats et
classements sportifs, des infos cinéma, des cotations boursières, et bien plus encore.
HR et découvrir ce que sont les
HR :
9
Page 72

2.1. BOUTONS
Suunto n6
10
HR possède cinq boutons, chacun d’entre eux assurant plusieurs fonctions.
Page 73

Bouton START/LAP/LIGHT
Appui bref
• Démarre le chronomètre (mode « Chrono »).
• Enregistre des temps au tour/temps intermédiaires (mode « Chrono »).
Appui long
• Active le rétro-éclairage dans n’importe quel mode (pour personnaliser l’utilisation
du rétro-éclairage, reportez-vous au chapitre 6 Réglages).
Bouton CHANNEL/MODE
Appui bref
• Ramène à l’écran d’ouverture des modes ou des canaux.
• Fait défiler les écrans d’ouverture des canaux.
Appui long
• Ramène à l’écran d’ouverture « Time ».
Bouton NEXT/STOP
Appui bref
• Si l’écran d’ouverture d’un mode/canal est actif, permet de passer à l’écran
d’ouverture suivant.
• Fait défiler les menus vers le haut.
• Lorsque vous réglez/changez un élément particulier, fait défiler les différentes
options possibles.
• Lorsque vous changez des valeurs, augmente la valeur en question.
• Change le cadran de la montre (mode « Time »).
• Arrête le chronomètre (mode « Chrono »).
• Une fois le chronomètre arrêté, fait défiler les temps au tour/temps intermédiaires
enregistrés.
11
Page 74

Pression longue
• Si vous tenez enfoncé ce bouton pendant deux secondes da ns les menus et les
écrans d'ouverture, fait défiler les options une à une jusqu’à ce que vous relâchiez
le bouton.
• Remet les temps à zéro une fois le chronomètre arrêté (mode « Chrono »).
Bouton PREVIOUS
Appui bref
• Si l’écran d’ouverture d’un mode/canal est actif, ce bouton permet de passer à
l’écran d’ouverture précédent.
• Fait défiler les menus vers le bas.
• Lorsque vous réglez/changez un élément particulier, fait défiler les différentes
options possibles.
• Lorsque vous changez des valeurs, diminue la valeur en question.
• Change le cadran de la montre (mode « Time»).
• Affiche le temps au tour/temps intermédiaire, le compte à rebours ou l'heure
actuelle dans le champ le plus bas (mode « Chrono »).
Appui long
• Si vous tenez enfoncé ce bouton pendant deux secondes dans les menu s, les
sélections de cadrans de montre et les écrans d’ouverture, fait défiler les options
une à une jusqu’à ce que vous relâchiez le bouton.
Bouton ENTER
Appui bref
• Ramène à l’affichage principal (l’affichage principal apparaît automatiquement au
bout de quelques secondes si vous n’appuyez sur aucun bouton).
• Fait apparaître les sous-menus en mode « Chrono », « Settings » et « Alarms ».
12
Page 75

• Valide les réglages.
• Change les sous-modes des cadrans de montre (mode « Time»).
• Une fois le dernier réglage effectué, fait réapparaître le menu « Settings».
Appui long
• Valide les réglages et fait réapparaître l’affichage principal.
• Active/désactive la fonction des limites de fréquence cardiaque (mode
« Chrono »).
2.2. CANAUX
Les canaux et leurs modes respectifs servent à organiser les informations de votre
montre Suunto n6
HR. Les canaux de Suunto n6HR sont similaires à ceux de votre
télévision et permettent d’afficher différents types d’informations (actualités ou météo)
en passant d’un canal à un autre. Lorsque vous activez le service MSN Direct, vous
pouvez sélectionner les canaux que vous souhaitez faire apparaître. Chaque canal
apparaît sur l’affichage de Suunto n6
HR accompagné d’un icone et d’un nom de
canal.
• Pour revenir au canal « Time », appuyez longuement sur le
bouton CHANNEL/MODE.
• Pour afficher le canal suivant, appuyez sur le bouton
CHANNEL/MODE, puis sur NEXT/STOP ou PREVIOUS.
• Pour afficher le contenu d’un canal sélectionné, relâchez le
bouton.
13
Page 76

2.3. MODES
Chaque canal possède un ou plusieurs modes. Par exemple, le canal « Time »
possède les modes « Time », « Chrono », « Logbook », « Alarms » et « Settings ».
Le nom du mode actuel apparaît sur l’écran d’ouverture de Suunto n6
HR.
• Pour afficher le mode actuel, appuyez une fois sur le bouton
CHANNEL/MODE.
• Pour afficher un autre mode de ce canal, appuyez sur le
bouton NEXT/STOP ou PREVIOUS.
2.4. PORTÉE DES SIGNAUX
Le service MSN Direct est transmis par un réseau sans fil utilisant les signaux de
diffusion radio FM. Votre montre Suunto n6
HR indique l’intensité du signal transmis à
l’aide d’un icone représentant l’intensité du signal. Cet icone apparaît dans l’angle
supérieur droit de la barre d’état de la plupart des canaux. Cette barre d’état apparaît
dans la plupart des canaux quelques secondes après la dernière pression d’un
bouton.
L’intensité du signal peut varier en fonction de l’endroit où vous vous trouvez. Les
reliefs, bâtiments ou appareils électroniques alentour peuvent parfois produire des
interférences avec le signal de diffusion utilisé par Suunto n6
informations. Votre montre Suunto n6
HR devrait être en mesure de recevoir des
HR pour recevoir les
informations, même avec un signal faible.
Le réseau envoie deux types d’informations à votre montre Suunto n6
HR : les
informations de diffusion et les informations personnelles. Les informations de
14
Page 77

diffusion, comme les flashs d’infos ou les bulletins météo, sont des informations
générales envoyées à chaque montre Suunto n6
HR configurée pour MSN Direct.
Cependant, seules les informations que vous avez sélectionnées seront capturées
par votre montre Suunto n6
HR. Vous pouvez recevoir ces informations de diffusion
n’importe où en Amérique du nord, à condition de vous trouver dans une zone de
couverture MSN Direct.
Vos informations personnelles, telles que vos messages ou rendez-vous, sont
cryptées à l’aide d’une clé unique assurant la confidentialité de leur contenu. Vous
recevez ces informations personnelles lorsque vous êtes dans votre zone de
couverture locale. Votre zone de couverture locale correspond à la zone
métropolitaine où vous habitez.
Pour en savoir plus sur votre zone de couverture locale, y compris sur les démarches
à suivre lorsque vous voyagez, consultez le site MSN Direct (www.msndirect.com) et
cliquez sur le lien de l’aide.
15
Page 78

2.5. ICONES D’ÉTAT
Votre montre Suunto n6
HR affiche plusieurs icones. L’emplacement de ces icones
dépend du cadran de montre utilisé. Le tableau suivant présente chaque icone :
Icone Description
Nouveau message : signale l’arrivée d’un nouveau message.
Batterie en charge : indique que la batterie est actuellement en
charge.
Batterie faible : apparaît lorsque le niveau de la batterie est descendu
à 30% de sa capacité maximale. Vous devrez bientôt recharger votre
montre Suunto n6
HR.
Alarme activée : indique qu’une des alarmes a été réglée et qu’elle
sonnera à l’heure définie.
Chronomètre actif : indique que le chronomètre est actuellement en
marche.
16
Page 79

Intensité du signal : affiche l’intensité du signal de diffusion reçu par
votre montre Suunto n6
HR.
• Un signal plein est indiqué par .
• Un signal lointain est indiqué par et signifie que Suunto n6
HR
risque de ne pas recevoir vos informations personnelles. Cette
situation peut se produire avant que le signal ne confirme la zone de
couverture locale de votre montre Suunto n6
HR ou si vous sortez de
votre zone de couverture locale.
• L’absence de signal est indiquée par et signifie que votre montre
Suunto n6
HR s’est trouvée en dehors de la zone de couverture locale
pendant plus de 10 minutes et qu’aucun signal ne peut être trouvé.
Radio désactivée : signifie que la réception radio de votre montre est
désactivée et que Suunto n6
HR ne peut capter aucun signal.
Alarme des limites de fréquence cardiaque : indique que la FC
mesurée est en dehors des limites définies.
tmr
Fréquence cardiaque reçue : indique que Suunto n6
HR reçoit le signal
de fréquence cardiaque depuis la ceinture émetteur.
Compte à rebours activé : indique qu'un des comptes à rebours est
actif.
17
Page 80

3. CANAL « TIME »
Suunto n6HR possède cinq canaux (« Time », « Weather », « News », « Stocks » et
« Calendar ») qui peuvent être utilisés sans avoir activé le service MSN Direct. Le
canal « Time » est entièrement opérationnel et immédiatement utilisable. Certaines
fonctions des canaux « Weather », « News », « Stocks » et « Calendar » sont
restreintes, tant que vous n’avez pas activé et personnalisé le service MSN Direct. Le
canal « Weather » indique les températures quotidiennes minimale et maximale de
votre ville, le canal « News » permet de recevoir des bulletins d'information
nationaux, le canal « Stocks » affiche les principales informations d'indices boursiers,
et le canal « Calendar » comporte un calendrier mensuel.
Une fois le service MSN Direct activé, vous pouvez recevoir d’autres types de
messages, voir vos rendez-vous personnels et afficher un calendrier des événements
qui vous intéressent, tels que des compétitions sportives, des forums financiers ou
des rencontres culturelles. Vous pouvez également souscrire à d’autres types de
canaux (et recevoir des infos personnalisées de ces canaux), comme par exemple
l’actualité, la météo, la bourse ou le sport.
Ce guide présente comment utiliser le canal « Time ». Pour obtenir des instructions
sur l’utilisation des autres canaux, y compris des canaux « Messages » et
« Calendar », consultez le site MSN Direct (www.msndirect.com) et cliquez sur le lien
de l’aide.
REMARQUE : tant que MSN Direct n’est pas activé, le canal « Register » apparaît
sur votre montre Suunto n6
informations nécessaires à l’activation du service, l’adresse du site MSN Direct et
l’identifiant de votre montre Suunto n6
permet à votre montre Suunto n6
18
HR. Il s’agit d’un canal temporaire affichant les
HR. Cet identifiant est un numéro unique qui
HR de recevoir des informations et messages
Page 81

personnels. Le canal « Register » disparaît une fois que vous avez activé le service
MSN Direct.
3.1. RÉCEPTION DE L’HEURE
Lorsque votre montre Suunto n6
HR capte un signal de diffusion, elle reçoit
automatiquement l’heure donnée par une horloge atomique. L’heure est reçue même
si vous n’avez pas encore activé le service MSN Direct. Tant que votre montre
Suunto n6
HR capte un signal, vous n'avez pas besoin de régler l'heure. Cette heure
est donnée au millième de seconde près et s’ajuste automatiquement à l’heure d’été
et aux changements d’années. De plus, Suunto n6
HR change automatiquement de
fuseau horaire lorsque vous voyagez.
REMARQUE : lorsque vous allumez votre montre Suunto n6
quelques minutes pour recevoir l’heure d’une horloge atomique.
Si vous êtes dans une zone où votre montre Suunto n6
HR, il faut parfois
HR ne capte aucun signal,
vous pouvez régler l’heure manuellement. Vous avez également le choix entre un
affichage 12 heures ou 24 heures, et vous pouvez désactiver le changement
automatique de fuseau horaire. Pour en savoir plus, reportez-vous au chapitre 6
Réglages.
19
Page 82

3.2. CHOIX DU CADRAN DE MONTRE
Vous pouvez changer le cadran graphique de votre montre Suunto n6
HR.
Pour choisir un nouveau cadran :
1. Appuyez longuement sur le bouton CHANNEL/MODE pour accéder au canal
« Time ». Attendez que le cadran actuel apparaisse.
2. Choisissez le cadran désiré à l’aide des boutons PREVIOUS ou NEXT/STOP.
20
Page 83

3.3. SOUS-MODES DES CADRANS DE MONTRE
Les cadrans de montre possèdent plusieurs sous-modes que vous pouvez définir à
l’aide du bouton ENTER. Ces sous-modes permettent de personnaliser le cadran de
montre de sorte à afficher la date, l’heure d'un deuxième fuseau horaire, la fréquence
cardiaque (ainsi que les secondes sur certains cadrans de montre) en plus de
l’affichage habituel de l’heure. Si vous changez de cadran de montre, le sous-mode
précédemment sélectionné restera visible sur le nouveau cadran, à condition que ce
cadran prenne en charge ce sous-mode. Si par exemple vous avez choisi d’afficher la
date et que vous décidez de changer de cadran de montre, la date sera également
visible sur le nouveau cadran. Par contre, si votre cadran de montre actuel affiche les
secondes et que vous sélectionnez un nouveau cadran ne prenant pas en charge les
secondes, celles-ci ne seront pas affichées sur le nouveau cadran.
3.3.1. Téléchargement d’un nouveau cadran de montre
Donnez un nouveau look à votre montre Suunto n6
HR et affirmez votre style. Vous
pouvez télécharger un ou deux cadrans, et conserver jusqu'à deux cadrans
téléchargés en même temps. De nouveaux cadrans à télécharger apparaissent
régulièrement.
Pour télécharger un nouveau cadran de montre, inscrivez-vous en tant qu'utilisateur
MSN Direct et choisissez le cadran de montre désiré.
Remarque : vous ne pouvez sauvegarder que deux cadrans téléchargés à la fois
dans votre montre Suunto n6
cadran de montre que vous avez téléchargé est remplacé.
HR. Si vous essayez d'en ajouter d'avantage, le premier
21
Page 84

3.4. MODE « CHRONO »
Ce mode permet de mesurer vos activités et de contrôler votre
fréquence cardiaque. De même, vous pouvez personnaliser vos
séances d'entraînement à l'aide de différents comptes à rebours
et définir des limites de fréquence cardiaque. La fréquence
cardiaque apparaît en haut de l'affichage principal lorsque vous
portez la ceinture émetteur et que votre montre Suunto n6
HR
reçoit le signal de fréquence cardiaque. En cas d'absence de
signal, l'affichage indique ---.
3.5. CHRONOMÈTRE
Le chronomètre permet de mesurer des activités (comme votre footing quotidien) et
d’enregistrer des temps au tour. Vous pouvez enregistrer jusqu’à 50 tours.
Pour utiliser le chronomètre :
1. Passez en mode « Chrono ».
2. Appuyez sur le bouton START/LAP/LIGHT pour démarrer le chronomètre.
3. Appuyez sur START/LAP/LIGHT lorsque le chronomètre est en marche pour
enregistrer un temps intermédiaire.
REMARQUE : l’affichage du chronomètre se fige un court instant puis le temps
chronométré réapparaît. Votre temps intermédiaire et son numéro apparaissent dans
l’angle en bas à gauche de l’écran.
4. Appuyez sur le bouton NEXT/STOP pour arrêter le chronomètre.
5. Appuyez sur NEXT/STOP pour voir vos temps intermédiaires.
6. Tenez le bouton NEXT/STOP enfoncé pendant 2 secondes pour remettre le
chronomètre à zéro.
22
Page 85

3.6. COMPTES À REBOURS
Suunto n6
HR possède trois comptes à rebours d’entraînement qui peuvent être
utilisés conjointement avec le chronomètre. Par exemple, ces comptes à rebours
peuvent servir à décompter une période avant le début d’une compétition, à définir
des intervalles de travail/de repos dans un circuit d’entraînement ou à démarrer
automatiquement le chronomètre suite à une période d’échauffement. Chaque
compte à rebours peut être utilisé différemment en fonction de leur type et de votre
objectif.
3.6.1. Timer-Stop
Ce compte à rebours décompte une période définie et s’arrête
une fois que cette période s’est écoulée. Lorsque le compte à
rebours arrive à zéro, un signal sonore retentit.
1. Passez en mode « Chrono ».
2. Appuyez sur ENTER pour accéder au sous-menu du
chronomètre.
3. Sélectionnez Timer Intervals.
4. Sélectionnez Timer-Stop.
5. Définissez le temps à décompter (secondes et minutes) à l’aide des boutons
PREVIOUS ou NEXT/STOP et validez ces réglages avec ENTER. Le message
«
TIMER-STOP INTERVAL SET » (« intervalle défini ») apparaît et l’affichage du
chronomètre réapparaît automatiquement.
6. Appuyez sur ENTER pour accéder au sous-menu du chronomètre.
7. Sélectionnez Timer.
8. Sélectionnez Timer-Stop. Le message «
TIMER-STOP ACTIVATED » apparaît et
l’affichage du chronomètre réapparaît automatiquement.
23
Page 86

9. Utilisez PREVIOUS pour passer du chronomètre au compte à rebours.
10.Appuyez sur le bouton START/LAP/LIGHT pour démarrer le compte à rebours.
Lorsque la période définie s’est écoulée, le compte à rebours s’arrête
automatiquement. Vous pouvez également arrêter le chronomètre manuellement
en appuyant sur NEXT/STOP.
11.Tenez le bouton NEXT/STOP enfoncé pendant 2 secondes pour remettre le
chronomètre à zéro.
3.6.2. Timer-Chrono
Le fonctionnement de ce compte à rebours est lié à celui du chronomètre. Il permet
de définir une période à décompter, et une fois cette période écoulée, un signal
sonore retentit et le chronomètre se met en route.
1. Passez en mode « Chrono ».
2. Appuyez sur ENTER pour accéder au sous-menu du chronomètre.
3. Sélectionnez Timer Intervals.
4. Sélectionnez Timer-Chrono.
5. Définissez le temps à décompter (secondes et minutes) à l’aide des boutons
PREVIOUS ou NEXT/STOP et validez ces réglages avec ENTER. Le message
«
TIMER-CHRONO INTERVAL SET » (« intervalle défini ») apparaît et l’affichage du
chronomètre réapparaît automatiquement.
6. Appuyez sur ENTER pour accéder au sous-menu du chronomètre.
7. Sélectionnez Timer.
8. Sélectionnez Timer-Chrono. Le message «
TIMER-CHRONO ACTIVATED » apparaît et
l’affichage du chronomètre réapparaît automatiquement.
9. Utilisez PREVIOUS pour passer du chronomètre au compte à rebours.
24
Page 87

10.Appuyez sur le bouton START/LAP/LIGHT pour démarrer le compte à rebours.
Lorsque le compte à rebours atteint zéro, le chronomètre démarre.
11.Appuyez sur le bouton START/LAP/LIGHT pour enregistrer des temps
intermédiaires.
12.Appuyez sur le bouton NEXT/STOP pour arrêter le chronomètre.
13.Appuyez sur NEXT/STOP pour voir vos temps intermédiaires.
14.Tenez le bouton NEXT/STOP enfoncé pendant 2 secondes pour remettre le
chronomètre à zéro.
3.6.3. Timer-Repeat
Ce compte à rebours permet de définir plusieurs intervalles pour
votre chronomètre. Suunto n6
HR active les intervalles définis les
uns après les autres et une fois tous les intervalles terminés, le
chronomètre s’arrête. Un signal sonore retentit après chaque
intervalle.
1. Passez en mode « Chrono ».
2. Appuyez sur ENTER pour accéder au sous-menu du
chronomètre.
3. Sélectionnez Timer Intervals.
4. Sélectionnez Timer-Repeat.
5. Choisissez le nombre d’intervalles à définir (1-20) avec les boutons PREVIOUS et
NEXT/STOP et appuyez sur ENTER.
6. Définissez le premier intervalle (secondes et minutes) avec les boutons
PREVIOUS ou NEXT/STOP et validez ces réglages avec ENTER.
7. Définissez le ou les intervalles suivants de la même façon. Une fois le dernier
25
Page 88

intervalle défini, le message « TIMER-REPEAT INTERVALS SET » (« intervalle défini »)
apparaît et l’affichage du chronomètre réapparaît automatiquement.
8. Appuyez sur ENTER pour accéder au sous-menu du chronomètre.
9. Sélectionnez Timer.
10.Sélectionnez Timer-Repeat. Le message «
TIMER-REPEAT ACTIVATED » apparaît et
l’affichage du chronomètre réapparaît automatiquement.
11.Utilisez PREVIOUS pour passer du chronomètre au compte à rebours.
12.Appuyez sur le bouton START/LAP/LIGHT pour démarrer le chronomètre. Une
alarme retentit à chaque nouvel intervalle. Le chronomètre s’arrête
automatiquement lorsque tous les intervalles se sont écoulés. Si vous souhaitez
continuer avec le chronomètre, appuyez sur START/LAP/LIGHT.
13.Tenez le bouton NEXT/STOP enfoncé pendant 2 secondes pour remettre le
chronomètre à zéro.
26
Page 89

3.7. JOURNAL
Des informations sont enregistrées dans le journal chaque fois que le chronomètre
est activé. Le journal peut stocker jusqu'à 20 entrées. Lorsque la mémoire est pleine
et que vous stockez de nouvelles entrées, la plus ancienne est effacée
automatiquement. Vous pouvez effacer complètement la mémoire du journal à l'aide
de Suunto n6
HR Training Manager.
Pour afficher les informations du journal :
1. Passez en mode « Logbook ».
2. Choisissez le journal désiré avec les boutons PREVIOUS et NEXT/STOP, puis
validez avec ENTER.
3. Faites défiler les informations avec les boutons PREVIOUS et NEXT/STOP.
Les informations sont affichées dans l'ordre suivant :
• Durée totale et nombre de tours
• Fréquence cardiaque moyenne, fréquence cardiaque maximale et fréquence
cardiaque minimale
• Fréquence cardiaque comprise dans les limites définies
• Fréquence cardiaque en dessous du seuil minimum
• Fréquence cardiaque au-delà du seuil maximum
• Graphe des heures d'enregistrement
REMARQUE : les informations concernant le temps sont toujours enregistrées. Par
contre, celles concernant la fréquence cardiaque ne sont enregistrées que si la
connexion avec le signal de fréquence cardiaque était établie lorsque vous avez
activé le chronomètre.
27
Page 90

3.8. ALARMES
Suunto n6
HR possède trois alarmes, qui peuvent être réglées pour vous rappeler un
événement particulier ou pour vous réveiller le matin.
Pour régler et activer les alarmes :
1. Passez en mode «Alarms».
2. Choisissez une alarme à l’aide du bouton PREVIOUS, puis
validez avec ENTER.
3. Activez ou désactivez l’alarme en choisissant On ou Off avec
le bouton PREVIOUS, puis validez avec ENTER.
4. Réglez les heures et les minutes (et am/pm en mode
12 heures) à l’aide du bouton PREVIOUS, puis validez avec
ENTER.
À l’heure définie, Suunto n6
HR déclenche l’alarme et affiche un
message lumineux pendant 30 secondes (voir ci-dessous).
Le message disparaît automatiquement après 30 minutes. Pour
arrêter la sonnerie de l’alarme, appuyez sur n’importe quel
bouton de votre montre Suunto n6
28
HR.
Page 91

4. CEINTURE ÉMETTEUR
Ce chapitre présente l'utilisation de la ceinture émetteur lors de vos entraînements. Il
comprend également d'importantes informations sur les limites de fréquence
cardiaque, l'entretien de la ceinture émetteur et les éventuelles perturbations dans la
réception du signal, de même que des avertissements. Pour plus d'informations sur
le remplacement de la pile, reportez-vous au chapitre 5 Batterie.
4.1. MISE EN PLACE DE LA CEINTURE ÉMETTEUR
Pour que votre ceinture émetteur fonctionne parfaitement, nous vous recommandons
de la porter contre votre peau nue.
• Les électrodes doivent être mouillées pendant l’entraînement. Décollez légèrement
l’émetteur de votre poitrine et humidifiez la zone des électrodes (zone rainurée)
située au dos de l’émetteur.
• Vérifiez que la zone des électrodes humidifiée colle bien à votre peau et que le
logo de la ceinture est en position centrale et orienté vers le haut.
29
Page 92

4.2. CONTRÔLE DE LA FRÉQUENCE CARDIAQUE
Vous pouvez contrôler votre fréquence cardiaque en mode
« Chrono ». La fréquence cardiaque apparaît en haut de
l'affichage principal lorsque vous portez la ceinture émetteur et
que votre montre Suunto n6
cardiaque. Si Suunto n6
HR reçoit le signal de fréquence
HR reçoit le signal, le texte HR clignote
à la même vitesse que votre fréquence cardiaque actuelle. En
cas d'absence de signal, l'affichage indique ---.
4.3. RÉGLAGE DES LIMITES DE FRÉQUENCE CARDIAQUE
Cette fonction permet de définir vos limites de fréquence cardiaque minimum et
maximum. Cette fonction est particulièrement utile lorsque, par exemple, vous
souhaitez maintenir votre fréquence cardiaque à un niveau permettant une
combustion maximum des graisses. Lorsque le chrono est actif, Suunto n6
HR vous
avertit à chaque fois que votre fréquence cardiaque sort de la zone prédéfinie, en
faisant retentir des signaux d'alarme.
Pour régler les limites de fréquence cardiaque :
1. Passez en mode « Chrono ».
2. Appuyez sur ENTER pour accéder au sous-menu du chronomètre.
3. Sélectionnez HR limits.
4. Activez les limites de fréquence cardiaque en sélectionnant On avec les boutons
PREVIOUS et NEXT/STOP, puis validez avec ENTER.
REMARQUE : lorsque le chrono est actif, vous pouvez activer ou désactiver les
limites FC en appuyant longuement sur ENTER.
5. Modifiez les limites supérieure et inférieure (High et Low) avec les boutons
PREVIOUS et NEXT/STOP, puis validez avec ENTER.
30
Page 93

4.4. UTILISATION DE LA CEINTURE ÉMETTEUR DANS L'EAU
La mesure de fréquence cardiaque sous l'eau est techniquement difficile pour les
raisons suivantes :
• L'eau des piscines à forte teneur en chlore et l'eau de mer peuvent être très
conductrices, ce qui risque de court-circuiter les électrodes de l'émetteur.
• L'émetteur ne peut pas capter les signaux ECG (électrocardiogramme).
• Lors d'un saut dans l'eau ou de mouvements énergiques pendant la nage,
l'émetteur risque d'être déplacé et de se trouver à un endroit où les signaux ECG
ne pourront plus être perçus.
• L'intensité des signaux ECG varie en fonction de la composition des tissus de
chaque personne. Certaines personnes ont plus de difficulté à mesurer leur
fréquence cardiaque dans l'eau qu'ailleurs.
4.5. ENTRETIEN DE LA CEINTURE ÉMETTEUR
Lavez la ceinture émetteur avec de l'eau et du savon doux après chaque utilisation.
Rincez-la à l'eau claire et essuyez-la bien.
Rangez-la dans un endroit propre et sec. Elle ne doit jamais rester humide car les
électrodes resteraient mouillées, ce qui activerait l'émetteur et réduirait la durée de
vie de la pile. Ne tordez pas la ceinture émetteur et ne l'étirez pas ; vous pourriez
endommager ses électrodes.
4.6. INTERFÉRENCES ÉLECTROMAGNÉTIQUES
La réception du signal de fréquence cardiaque peut être perturbée près des lignes
électriques à haute tension, des feux de circulation, des lignes électriques des voies
ferrées, des bus ou des trams, près des téléviseurs, des moteurs de voiture, des
ordinateurs, de certains appareils d'exercice motorisés, des téléphones cellulaires ou
lorsque vous traversez des portillons électriques de sécurité.
31
Page 94

4.7. ATTENTION
Si vous portez un pacemaker, un défibrillateur ou tout autre appareil électronique
intra-corporel, vous utilisez la ceinture émetteur à vos risques et périls. Avant
d’utiliser la ceinture émetteur pour la première fois, il est conseillé d'effectuer une
épreuve d'effort sous surveillance d'un médecin. Ce test garantira la sécurité et la
fiabilité du pacemaker et de la ceinture émetteur utilisés en même temps.
Les activités sportives peuvent comporter certains risques, surtout pour les
personnes sédentaires. Nous vous recommandons fortement de consulter un
médecin avant de commencer un programme d’entraînement régulier.
32
Page 95

5. BATTERIE
Suunto n6HR est un instrument possédant de nombreuses fonctions. Sa
consommation en énergie étant élevée, sa batterie doit être rechargée régulièrement,
tout comme pour les téléphones portables ou les talkies-walkies.
Avec une batterie pleine, votre montre Suunto n6
pendant plusieurs jours. L’autonomie d’une batterie pleine dépend de nombreux
facteurs : le cadran de montre utilisé, le canal Suunto n6
signal de diffusion et le nombre d’informations reçues.
Pour augmenter l’autonomie d’une batterie pleine :
• Laissez le canal « Time » affiché, sauf si vous souhaitez consulter le contenu d’un
autre canal. Certains canaux mettent à jours des informations en continu, même si
vous n’êtes pas en train de les consulter, ce qui consomme de l’énergie.
• Désactivez les bips des boutons.
• Désactivez la réception radio. Si vous êtes hors d’une zone de réception ou que
vous ne souhaitez pas recevoir des informations, vous pouvez désactiver la
réception radio pour que votre montre Suunto n6
des signaux. N’oubliez pas de réactiver la réception radio.
• Éteignez votre montre Suunto n6
n6
HR, vous pouvez l’éteindre. Votre montre conserve vos informations actuelles
HR. Si vous ne portez pas votre montre Suunto
longtemps, mais l’écran est vide et la montre ne peut recevoir d’informations
supplémentaires.
ATTENTION : votre montre Suunto n6
HR possède une batterie Li-ion et la ceinture
émetteur est alimentée par une pile au lithium. Pour éliminer tout risque d'incendie ou
de brûlure, évitez de démonter, d'écraser, de percer ou de court-circuiter la batterie
ou la pile, ou de les jeter dans un feu ou de l'eau. N'utilisez que des batteries et des
HR peut fonctionner parfaitement
HR affiché, l’intensité du
HR cesse de chercher à capter
33
Page 96

piles neuves recommandées par le fabricant. Recyclez ou éliminez les batteries et
piles usagées selon les réglementations en vigueur.
5.1. INDICATEUR DE CAPACITÉ DE BATTERIE
L’indicateur de capacité de batterie apparaît différemment en fonction du cadran de
montre sélectionné. Voici quelques exemples d’indicateurs de capacité de batterie :
• Pourcentage : le pourcentage de capacité de batterie apparaît dans un cercle sur
l’écran. Lorsque la capacité de la batterie est à 100 %, ce cercle est plein. Lorsque
la batterie est complètement déchargée (0 %), ce cercle est vide.
• Zone : une zone de capacité de batterie asymétrique apparaît sur l’écran. Lorsque
la capacité de la batterie est à 100 %, cette zone est noire. Lorsque la batterie est
complètement déchargée (0 %), cette zone est grise.
• Barre verticale : une b arre de capacité de batterie composée de cinq segments
apparaît sur l’écran. Chaque segment correspond à 20 % de la capacité de la
batterie.
Votre montre Suunto n6
HR ne fonctionne parfaitement qu’avec une batterie chargée
entre 20 et 100 %. Le tableau suivant décrit les comportements de votre montre
Suunto n6
34
HR en fonction des différents niveaux de batterie.
Page 97

Niveau de
batterie
Comportement de Suunto n6
HR
30%
20%
10%
L’indicateur de niveau de batterie faible ( )
apparaît.
Un message d’avertissement apparaît. Suunto
n6
HR passe en mode batterie faible. La réception
radio est désactivée et la montre cesse de
recevoir des informations. Suunto n6
HR fait
apparaître le canal « Time » au bout de 5 minutes.
Le cadran de la montre passe à un cadran
consommant moins d’énergie.
Suunto n6
Suunto n6
HR s’éteint et l’écran est vide.
HR conserve les données dans sa
mémoire.
35
Page 98

5.2. CHARGEMENT DE LA BATTERIE
Si la capacité de batterie de Suunto n6
au plus vite. Il faut environ 5 heures pour recharger votre montre Suunto n6
Pour recharger votre montre Suunto n6
HR est inférieure à 30 %, rechargez la batterie
HR.
HR :
1. Reliez le câble USB à l’adaptateur. Branchez l’adaptateur dans une prise
électrique.
2. Reliez l’extrémité en forme de pince du câble de données USB à Suunto n6
3. Attendez que votre montre Suunto n6
«
CHARGED » apparaît pour indiquer que la batterie est pleine.
HR soit entièrement rechargée. Le message
REMARQUE : vous pouvez également charger votre montre Suunto n6
directement à partir de votre ordinateur grâce au câble USB ; pour cela, vous devez
d’abord installer le logiciel USB. Ce logiciel USB et ses fichiers d’installation se
trouvent sur le CD livré avec la montre Suunto n6
pour connaître les instructions d’installation.
HR. Reportez-vous au chapitre 6
HR.
HR
5.3. REMPLACEMENT DE LA PILE DE LA CEINTURE ÉMETTEUR
La ceinture émetteur est alimentée par une pile au lithium 3 volts de type CR 2032.
Sa durée de vie moyenne est de 300 heures, dans des conditions de température
idéales.
Si votre montre Suunto n6
HR ne reçoit aucun signal lorsque la ceinture émetteur est
active, cela peut indiquer que la pile doit être changée.
36
Page 99

Pour remplacer la pile :
1. Insérez une pièce de monnaie dans l’encoche située sur le couvercle du logement
de pile au dos de la ceinture émetteur.
2. Tournez la pièce dans le sens inverse des aiguilles d'une montre jusqu'à ce qu'elle
soit alignée avec les repères de position ouverte ou tournez-la même davantage
pour faciliter l'ouverture.
3. Retirez le couvercle du compartiment pile. Vérifiez que le joint et les surfaces sont
propres et secs. N'étirez pas le joint.
4. Retirez soigneusement l’ancienne pile.
5. Insérez la nouvelle pile dans le compartiment, le côté positif tourné vers le haut.
REMARQUE : il est recommandé de changer le couvercle du logement de pile et le
joint en même temps que la pile, pour que la ceinture émetteur reste propre et
étanche. Les couvercles de rechange sont vendus avec les piles de rechange.
REMARQUE : si vous changez la pile vous-même, vous en assumez tous les
risques. Il est recommandé de vous adresser aux services agréés Suunto pour faire
changer les piles.
37
Page 100

6. RÉGLAGES
Vous pouvez changer tous les paramètres de votre montre
Suunto n6
menus : « Time », « Date », « General » et « Units ». Si la
réception radio est activée et que vous captez un signal, vous ne
pouvez pas régler l’heure et la date manuellement, ces
paramètres étant définis par le réseau. En effet, votre montre
Suunto n6
par une horloge atomique.
Pour accéder au mode « Settings » :
1. Appuyez longuement sur le bouton CHANNEL/MODE pour accéder au canal
« Time ». Attendez que le cadran apparaisse.
2. Appuyez sur le bouton CHANNEL/MODE pour faire apparaître l’écran d’ouverture
«Time».
3. Lorsque l'écran d'ouverture « Time » est visible, faites défiler jusqu'à Settings à
l’aide du bouton PREVIOUS et appuyez sur le bouton ENTER. L’affichage
principal du mode « Settings » apparaît.
38
HR dans le mode « Settings », qui possède quatre
HR reçoit automatiquement l’heure correcte transmise
 Loading...