

Page 1
EN
Page 2
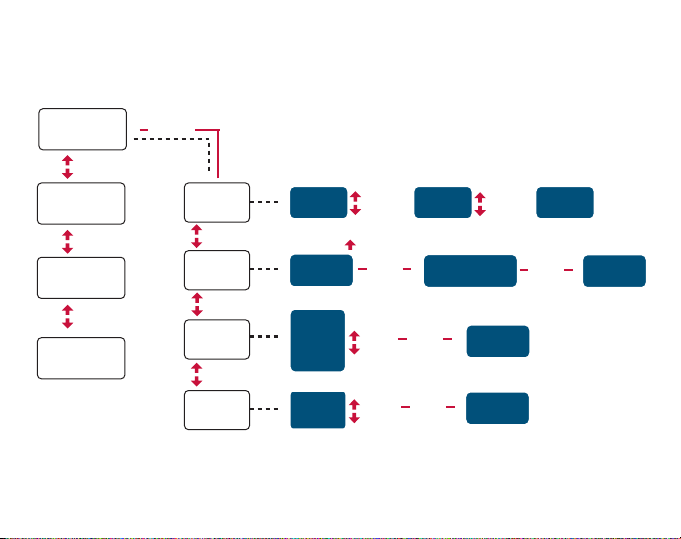
Suunto n3 Menu Structure
TIME CHANNEL
[NEXT]
[PREVIOUS]
REGISTER
[NEXT]
[PREVIOUS]
MESSAGES
[NEXT]
[PREVIOUS]
CALENDER
Hr LIMITS
<
[CHANNEL]
>
TIME
[NEXT]
[PREVIOUS]
CHRONO
[NEXT]
[PREVIOUS]
SETTINGS
[NEXT]
[PREVIOUS]
ALARMS
>
[START/STOP]
>
Time
Date
>
General
Units
Alarm 1.
>
Alarm 2.
Alarm 3.
Face 1.
CHRONO
Time
[NEXT]
[PREVIOUS]
[Lap/Reset]
[ENTER]
[NEXT]
[PREVIOUS]
[NEXT]
[PREVIOUS]
Face 2.
TIMERS
>
TIMER INTERVALS
[ENTER]
[ENTER]
[NEXT]
Face 3.
[PREVIOUS]
Face 3.
[ENTER]
>
SET
SET
>
SET
>
Page 3

CUSTOMER SERVICE CONTACTS
Suunto USA Phone 1 (800) 543-9124
Canada Phone 1 (800) 776-7770
Suunto Website www.suunto.com
EN
1
Page 4

1. GENERAL INFORMATION .................................................................................4
2. HOW TO USE YOUR SUUNTO N3 ....................................................................4
2.1 Buttons ..........................................................................................................5
2.2 Channels .......................................................................................................8
2.3 Modes ...........................................................................................................8
2.4 Signal coverage ............................................................................................9
2.5 Status icons ................................................................................................10
3. TIME CHANNEL ..................................................................................................12
3.1 Receiving the time ......................................................................................12
3.2 Choosing a watch face ............................................. ...................................13
3.3 Downloading a watch face ..........................................................................14
3.4 Chronograph ...............................................................................................14
3.5 Timers .........................................................................................................15
3.6 Alarms .........................................................................................................17
4. BATTERY ............................................................................................................18
4.1 Charging the battery ...................................................................................19
5. SUUNTO SPORTS INSTRUMENT DRIVERS ....................................................21
5.1 Installing Suunto sports instrument drivers (Windows 98) ..........................21
5.2 Installing Suunto sports instrument drivers (Windows 2000) ......................22
5.3 Uninstalling Suunto sports instrument drivers .............................................24
6. SETTINGS ..........................................................................................................25
6.1 Time ............................................................................................................25
2
Page 5

6.2 Date ............................................................................................................ 27
6.3 General ....................................................................................................... 28
6.4 Units ...........................................................................................................30
7. FREQUENTLY ASKED QUESTIONS ................................................................31
8. GETTING HELP ................................................................................................. 36
8. TERMS AND CONDITIONS ............................................................................... 37
8.1 Copyright .................................................................................................... 37
8.2 Trademarks ................................................................................................37
8.3 About your Suunto n3 and service .............................................................37
8.4 FCC COMPLIANCE ................................................................................... 38
8.5 CE compliance ...........................................................................................38
8.6 ISO 9001 compliance .................................................................................38
9. WARRANTY .......................................................................................................39
9.1 Limits of liability ..........................................................................................39
9.2 After sales service ...................................................................................... 40
3
Page 6

1. GENERAL INFORMATION
Ready, Set, Go! Wherever life takes you, your new Suunto n3 keeps you current.
When you sign up for the MSN
information you want to receive. This dynamic wireless technology discreetly displays
the information that matters most to you. With a quick glance at your wrist, you stay
informed about news, stocks, weather, sports and more. MSN Direct-ready watches
are every bit as fun as they are informative. Enjoy making fashion statements with
different watch faces and customizing your Suunto n3 to fit your lifestyle.
To learn more about your new Suunto n3 and how to use it, follow th e instructions in
this guide.
®
Direct service, you can choose exactly what
2. HOW TO USE YOUR SUUNTO N3
To get acquainted with your new Suunto n3 and learn about channels, modes, signal
coverage, and status icons, keep reading. If you have not already done so, follow the
steps in the Quick Start Guide to charge your Suunto n3, activate the MSN Direct
service at www.msndirect.com/go, and personalize the content you want to receive.
4
Page 7
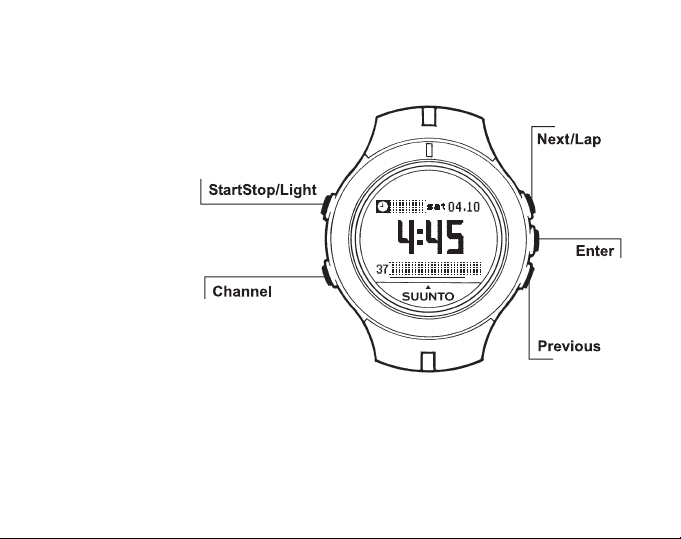
2.1 BUTTONS
Your Suunto n3 includes five buttons each of which has several different functions.
5
Page 8

STARTSTOP/LIGHT
Short press
• Starts and stops the Chronograph in the Chrono mode.
Long press
• Activates the backlight in all the modes. (For personalized use of the backlight, see
chapter 6. Settings.)
CHANNEL
Short press
• Returns to the mode or channel splash screen.
• Scrolls the channel splash screens on the display.
Long press
• Returns to the Time channel splash screen.
NEXT/LAP
Short press
• If a mode/channel splash screen is active, you can use this button to navigate to
the next splash screen.
• Allows you to scroll up the menus.
• When setting/changing a selected item, it scrolls the options on the display.
• When changing values, it increases the value.
• Changes watch faces.
• In the Chrono mode, it stores lap/split times. After you have stopped the
Chronograph, it scrolls the stored lap/split times on the display.
Long press
• When you press and hold the button for two seconds in menus, watch face
6
Page 9

selections and splash screens, it starts to scroll through the options until you
release it.
• In the Chrono mode, it resets the display after you have stopped the chrono time.
PREVIOUS
Short press
• If a mode/channel splash screen is active, you can use this button to navigate to
the previous splash screen.
• Allows you to scroll down the menus.
• When setting/changing a selected item, it scrolls the options on the display.
• When changing values, it decreases the value.
• Changes watch faces.
• It selects either the lap/split reading or the timer reading for the lowest field of the
Chrono mode’s main display.
Long press
• When you press and hold the button for two seconds in menus, watch face
selections and splash screens, it starts to scroll through the options until you
release it.
ENTER
Short press
• In Chrono, Settings and Alarms modes, it navigates to the main display.
• Navigates to submenus.
• Accepts settings.
• After the last setting, it takes you back to the main display.
Long press
• Returns to the main display.
7
Page 10
2.2 CHANNELS
Channels and their modes organize the information on your Suunto n3. Similar to the
channels on your television set, you see different types of content—such as news
and weather—when you switch channels on your Suunto n3. When you activate the
MSN Direct service, you select the channels you want to display on your Suunto n3.
Each channel appears on the Suunto n3 display with an icon and the name of the
channel.
•To return to the Time channel, long press CHANNEL.
•To view the next channel, press CHANNEL, NEXT/LAP or
PREVIOUS.
•To display the contents of the current channel, release the
button pressed.
2.3 MODES
Each channel has one or more modes. For example, the Time channel includes the
Time, Chrono, Alarms and Settings modes. The name of the current mode appears
on the Suunto n3 splash screen.
•To view the current mode, press CHANNEL once.
•To view the next mode within that channel, press NEXT/LAP
or PREVIOUS.
8
Page 11

2.4 SIGNAL COVERAGE
The MSN Direct service is delivered over a wireless network that is based on FM
radio broadcast signals. Your Suunto n3 indicates the strength of the broadcast signal
by displaying a signal strength icon. The icon appears in the upper-right corner of the
status bar on most channel screens. The status bar will appear on most channel
screens a few seconds after the last button press. Even at low signal strength, your
Suunto n3 should receive information. Signal strength can vary based on your
location. Sometimes topography (hills, valleys), building structures, or nearby
electronics can interfere with the broadcast signal that your Suunto n3 uses to receive
information.
The network sends two types of information to your Suunto n3—broadcast and
personal. Broadcast information—such as news stories and current temperatures—is
sent to every Suunto n3 with MSN Direct, but only the information that you want to
see is actually captured by your Suunto n3. Regardless of where you travel in North
America, as long as you are within an MSN Direct coverage area, you should receive
broadcast information.
Your personal information—such as your messages and calendar appointments—is
encrypted with a unique key to help maintain your privacy. You receive personal
information when you are within the range of your home coverage area. Your home
coverage area is the metropolitan area where you live.
For more information about your home coverage area, including what to do when you
travel, go to the MSN Direct Web site at www.msndirect.com and click the Help link.
9
Page 12

2.5 STATUS ICONS
Your Suunto n3 displays various icons. On most watch faces these icons appear in
the lower right corner of the display. The following table describes each icon.
Icon Description
New Message: Indicates that a new message has
arrived.
Battery Charging: Indicates that the battery is
currently charging.
Battery Low: Appears when the battery level is
reduced to 30%. You need to charge your Suunto n3
soon.
Alarm On: Indicates that one of the alarms is set and
will sound at the appropriate time.
Chrono Running: Indicates that the Chronograph is
currently running.
10
Page 13
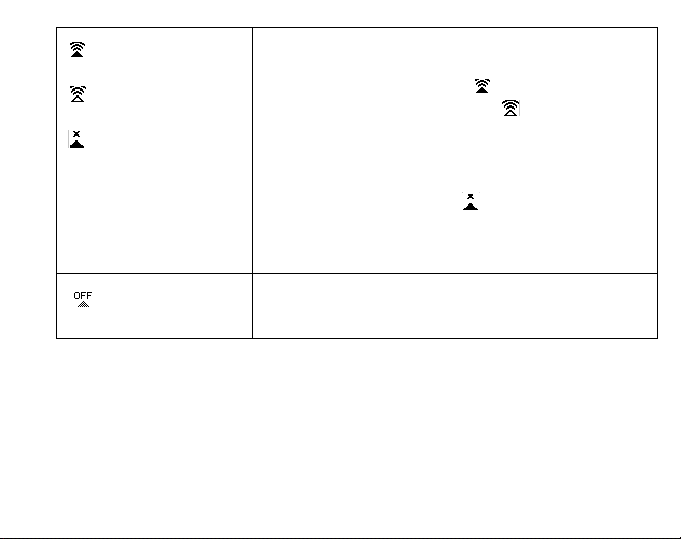
Signal Strength: Shows you the strength of the
broadcast signal that your Suunto n3 is receiving.
• A full signal is indicated by .
• A remote signal is indicated by and it means that
your Suunto n3 may not be receiving your personal
information. This can happen before the signal
confirms the home coverage area for your Suunto
n3, or if you travel out of your home coverage area.
• No signal is indicated by and it means that your
Suunto n3 has been out of your home coverage
area longer than 10 minutes and cannot find a
signal.
Radio Off: Means that the watch radio is off and your
Suunto n3 cannot receive a broadcast signal.
11
Page 14

3. TIME CHANNEL
Your Suunto n3 comes with three channels—Time, Messages, and Calendar—that
are available for use even before you activate the MSN Direct service. The Time
channel is fully operational and ready to go. The Messages and Calendar channels
have limited capabilities until you activate and personalize MSN Direct. The
Messages channel is available for emergency and public service announcements,
and the Calendar channel includes a month view calendar. Once you activate MSN
Direct, you can receive messages from others, view personal appointments, and view
an events calendar for the things that interest you, such as sports schedules, financial
events, and local cultural events. You can also subscribe to a number of a dditional
channels, such as news, weather, stocks, and sports.
This guide provides instructions for using the Time channel. For instructions on using
the other channels—including Messages and Calendar—go to the MSN Direct Web
site at www.msndirect.com and click the Help link.
Note: Before you activate MSN Direct, you also see the Register channel on your
Suunto n3. This is a temporary channel that displays the information you need to
activate the service, including the MSN Direct Web site address and your Suunto n3
ID. The instrument ID is a number that uniquely identifies your Suunto n3 so that you
can receive personal messages and information. The Register channel disappears
when you activate MSN Direct.
3.1 RECEIVING THE TIME
When your Suunto n3 receives a broadcast signal, it should automatically receive the
correct time from an atomic clock. This happens even if you have not yet activated
the MSN Direct service. As long as your Suunto n3 is receiving a signal, you do not
need to set the time. The time is accurate to a few thousands of a second and
12
Page 15

automatically adjusts for daylight savings time and leap years. In addition, your
Suunto n3 automatically changes to different time zones as you travel from place to
place.
Note: When you turn on your Suunto n3, it may take a few minutes to receive the
time from an atomic clock.
If you are in an area where your Suunto n3 cannot receive a signal, you can set the
time manually. You can also change the time display from a 12 hour clock to a 24
hour clock, and you can override the automatic time zone setting. For details, see
chapter 6. Settings.
3.2 CHOOSING A WATCH FACE
You can change the face that is displayed on your Suunto n3.
To choose a new watch face:
1. Long press CHANNEL to go to the Time channel. Wait for the current watch face to
appear.
2. Select a suitable watch face with PREVIOUS or NEXT/LAP.
13
Page 16

3.3 DOWNLOADING A WATCH FACE
When you personalize the MSN Direct service, you can sign up to receive new watch
faces. When you receive a new watch face, a specific message appears on the
display (see the image below):
To view the new watch face and decide whether to keep it:
1.When you receive the message, press ENTER.
The new watch face appears for a few seconds.
2.Do one of the following:
•To keep the watch face, press NEXT/LAP (Yes).
•To discard the watch face, press PREVIOUS (No).
Note: You can only store one downloaded watch face at a time
on your Suunto n3. If you decide to keep a face, the last watch
face that you downloaded is removed.
3.4 CHRONOGRAPH
With the chronograph you can time events—such as your daily
run—and record lap times. You can start the chronograph, stop it,
and then restart it without having to reset it. You can record up to
50 laps.
To use the Chronograph:
1.Long press CHANNEL to go to the Time channel. Wait for the
watch face to appear.
2. Press CHANNEL to open the Time splash screen.
3. While the Time splash screen is visible, press PREVIOUS to select Chrono. The
Chrono mode’s main display opens.
14
Page 17

4. Press STARTSTOP/LIGHT to start the Chronograph.
Minutes, seconds and tenths of the second appear as large numbers. After one
hour, tenths of the second stop appearing on the display (but are still measured as
such).
5. To store lap/split times, press NEXT/LAP.
6. Press STARTSTOP/LIGHT to stop the Chronograph.
7. Scroll the stored lap/split times with NEXT/LAP. You can identify the last lap/split
time by the text “E
ND” on the right upper corner of the display.
8. To reset the Chronograph display, long press NEXT/LAP. Before resetting the
Chronograph, you can restart it by pressing STARTSTOP/LIGHT. It continues
measuring the time from the point when it was previously stopped.
3.5 TIMERS
Suunto n3 has three different training timers that you can use alongside the
Chronograph. For example, you can use these versatile timers for countdown time
measurement before the start of a competition, for work and rest intervals in circuit
training or to automatically start the Chronograph after a warm-up period. Different
timers function differently according to their type and purpose.
• Timer-Stop starts the set countdown time when activated
and stops it after the time has run out.
• Timer-Chrono starts the set countdown time when
activated and automatically starts the Chronograph after
the time has run out.
15
Page 18

•Timer-Repeat activates the set interval times one after
another (maximum of 20 different intervals) and after they
are finished, it returns to the normal Chronograph function.
The Chronograph is activated when the first interval is
started by the press of STARTSTOP/LIGHT and stops only
when stopped by the press of STARTSTOP/LIGHT.
To set and activate Timers:
1.Long press CHANNEL to go to the Time channel. Wait for
the watch face to appear.
2.Press CHANNEL to open the Time splash screen.
3.While the Time splash screen is visible, press PREVIOUS
to select Chrono. The Chrono mode’s main display opens.
4.Press ENTER to navigate to the Timer function display.
5.Use PREVIOUS and NEXT/LAP to select either Timers to
activate any of the three timers or Timer Intervals to set intervals to different timers.
6. On the Activate Timer display, select a suitable timer with PREVIOUS or NEXT/
LAP and press ENTER. Suunto n3 confirms your selection and returns to the
Chrono mode. If you want to deactivate Timers and use the Chronograph without
any countdown alarms, select and accept All Off in the menu.
7. On the Timer Intervals display, use PREVIOUS or NEXT/LAP to select any of the
three timers for setting the Interval time. For Timer-Repeat you can also set the
number of intervals along with their times.
16
Page 19

3.6 ALARMS
Suunto n3 has three separate alarms that you can set to remind you about specific
events or to wake you up in the morning.
To set and activate alarms:
1. Long press CHANNEL to go to the Time channel. Wait for
the current watch face to appear.
2. Press CHANNEL again to open the Time splash screen.
3. While the Time splash screen is visible, scroll to Alarms with
PREVIOUS. After a few seconds, the Time alarms display
opens.
4. Select a suitable alarm with PREVIOUS and press ENTER.
The Set alarm display opens.
5. Set the alarm either On or Off with PREVIOUS and press ENTER.
6. Set the minutes and hours (and am/pm on 12h mode) with PREVIOUS and press
ENTER. Suunto n3 returns to the Time alarms display.
Suunto n3 sounds the alarm and displays an illuminated alarm message (see below)
for 30 seconds at the set time.
The message automatically disappears when the sound
stops. You can dismiss the alarm by pressing any of the
Suunto n3 buttons.
17
Page 20

4. BATTERY
Suunto n3 is a feature-rich instrument and has numerous functions. Because of this,
it uses more battery power and must be recharged periodically, much like other
devices such as cell phones or walkie-talkies.
Y our Suunto n3 should function fully for a few days on a single charge. The amount of
time the battery lasts between charging sessions varies depending on a number of
factors, including which watch face you are using, which channel Suunto n3 displays
most of the time, the strength of the broadcast signal, and the amount of information
that you receive.
To extend the battery life between charging sessions:
• Stay on the Time channel unless you are viewing content on another channel.
Some channels rotate new information through the screen continually, even when
you are not looking at them, which consumes battery power.
• Turn the button tones off.
• Turn the radio off. If you are outside a reception area or not interested in receiving
information, you can turn the radio off and your Suunto n3 stops looking for a
broadcast signal. Remember to turn the radio back on.
• Turn your Suunto n3 off. If you are not wearing your Suunto n3, you can turn it off.
Suunto n3 maintains your current information for a long time, but the Suunto n3
screen is blank and the instrument receives no additional information.
When the Suunto n3 battery is fully charged, it is at 100%. When the Suunto n3
battery is fully discharged, it is at 0%. Your Suunto n3 is fully functional from 100%
down to a 20% charge. The following table describes how Suunto n3 responds at
different battery charge levels.
18
Page 21

Battery charge remaining Suunto n3 response
30%
20%
The low battery indicator ( ) appears.
A notification message appears. Suunto n3 goes
into the low battery mode. The radio turns off and
stops receiving new information. Suunto n3
switches to the Time channel after 5 minutes. The
watch face may switch to one that uses less
battery power.
10%
Suunto n3 shuts down and the screen goes blank.
Suunto n3 conserves the contents of its memory.
4.1 CHARGING THE BATTERY
If your Suunto n3 has a remaining battery charge of 30% or less, you should charge it
as soon as possible. Charging the Suunto n3 takes up to 5 hours.
To charge your Suunto n3:
1. Connect the USB cable to the adapter. Plug the adapter into an electrical outlet.
2. Connect the USB cable’s data snake to your Suunto n3.
3. Wait for the Suunto n3 to fully charge. The message “C
HARGED” is displayed when
the battery is fully charged.
Warning: Your Suunto n3 contains a Li-ion battery. To reduce the risk of fire or burns,
do not disassemble, crush, puncture, short external contacts, or dispose of in fire or
19
Page 22

water. Only replace with manufacturer-specified batteries. Recycle or dispose of used
batteries properly.
Note: You can also charge your Suunto n3 directly from your PC via the USB cable
but first you need to install the USB software. The USB software installation package
is on the CD delivered with your Suunto n3. See chapter 5. for installation
instructions.
20
Page 23

5. SUUNTO SPORTS INSTRUMENT DRIVERS
These instructions assume that you are installing Suunto Sports Instrument drivers on
a clean system, i.e. one that does not contain any Suunto Sports Instrument drivers. If
this is not the case, uninstall the previously installed drivers before proceeding with
the installation. See section 5.3 Uninstalling Suunto sports instrument drivers for
more information.
5.1 INSTALLING SUUNTO SPORTS INSTRUMENT DRIVERS (WINDOWS 98)
The installation is in two parts. First you install the drivers for the Suunto Sports
instrument and then for the virtual USB serial port.
To install the Suunto Sports Instrument:
1. The drivers are located on your PC software installation CD-ROM. Insert the CDROM into your computer.
2. Attach the Suunto Sports Instrument PC interface cable to the computer serial port
and then plug the other end into your Suunto n3. The Add New Hardware Wizard is
activated.
3. Click Next.
4. Choose Search for the best driver for your device. (Recommended) and click Next.
5. Select Specify a location and browse for the driver folder on the installation CDROM. Click Next. The located driver is shown on the screen.
6. Click Next to install the located driver.
7. Click Finish to finish the first part of the installation and proceed to the serial port
installation.
21
Page 24

To install the USB serial port:
This should follow automatically once the Suunto Sports Instrument installation is
complete and take a couple of seconds. Do not interrupt the installation before both
parts of the installation are finished.
Once the installation of the serial port is completed, check that it has been successful.
Select Start - Settings - Control Panel - System - Device Manager. Then select View Devices by connection.
The device should have been installed as Suunto USB Serial Port (COMx), attached
to Suunto Sports Instrument.
5.2 INSTALLING SUUNTO SPORTS INSTRUMENT DRIVERS (WINDOWS 2000)
The installation is in two parts. First you install the drivers for the Suunto Sports
instrument and then for the virtual USB serial port.
To install the Suunto Sports Instrument:
1. The drivers are located on your PC software installation CD-ROM. Insert the CDROM into your computer.
2. Attach the Suunto Sports Instrument PC interface cable to the computer serial port
and then plug the other end into your Suunto n3. The Found New Hardware Wizard
is activated.
3. Click Next. The Install Hardware Device Drivers window opens.
4. Choose Search for a suitable driver for my device (recommended) and click Next.
The Locate Driver Files window opens.
5. Select Specify a location and browse for the driver folder on the installation CDROM. Click Next. The Driver Files Search Results window opens.
6. Click Next to install the located driver.
22
Page 25

7. Click Finish to finish the first part of the installation and proceed to the serial port
installation
To install the USB serial port:
This should follow automatically once the Suunto Sports Instrument installation is
complete. Repeat steps 3-6 to install the USB serial port. Then click Finish to close
the wizard. Do not interrupt the installation before both parts of the installation are
finished.
Once the installation of the serial port is completed, check that it has been successful.
Select Start - Settings - Control Panel - System - Hardware - Device Manager. Then
select View - Devices by connection.
The device should have been installed as Suunto USB Serial Port (COMx), attached
to Suunto Sports Instrument.
23
Page 26

5.3 UNINSTALLING SUUNTO SPORTS INSTRUMENT DRIVERS
5.3.1 Windows 98
To uninstall Suunto Sports Instrument drivers:
1. Select Start - Settings - Control Panel - Add/Remove Software. A window that
shows the currently installed programs opens.
2. Select Suunto USB Drivers and then click Add/Remove. This will bring up the
Suunto Uninstaller screen, which asks if it OK to delete the drivers.
3. Select Continue to finish the uninstallation.
5.3.2 Windows 2000
To uninstall Suunto Sports Instrument drivers:
1. Select Start - Settings - Control Panel - Add/Remove Programs. A window that
shows the currently installed programs opens.
2. Select Suunto USB Drivers and then click Change/Remove. This will bring up the
Suunto Uninstaller screen, which asks if it OK to delete the drivers.
3. Select Continue to finish the uninstallation.
24
Page 27

6. SETTINGS
You can adjust all the settings of your Suunto n3 in the Settings mode, which is
divided into four categories: Time, Date, General and Units. If you are receiving a
broadcast signal and the radio is turned on, you cannot set the time and date
manually, those are set by the network. In this case, your Suunto n3 automatically
receives the correct time from an atomic clock.
To go to the Settings mode:
1. Long press CHANNEL to go to the Time channel. Wait for the watch face to
appear.
2. Press CHANNEL to open the Time splash screen.
3. While the Time splash screen is visible, scroll to Settings with PREVIOUS and
press ENTER. The Settings mode’s main display opens.
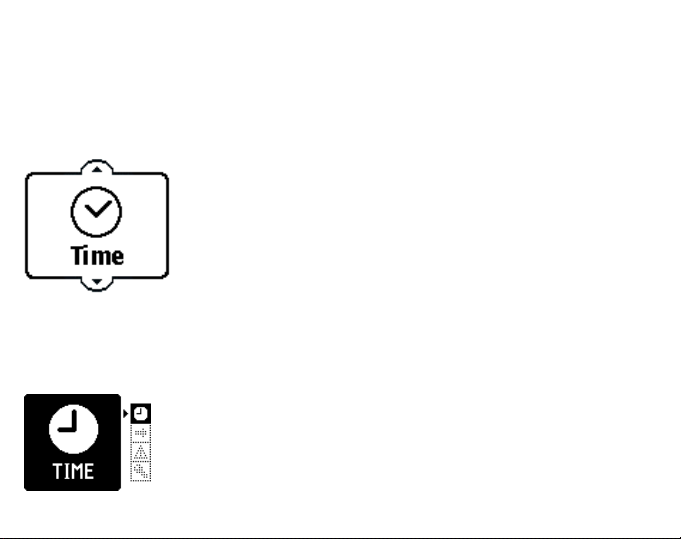
6.1 TIME
Normally the network provides you with the right time and local time zone. However, if
you have no network coverage, you can also update the time manually.
6.1.1 Setting the time
To set the time:
1. In the Settings mode, select Time with ENTER. The Time
display opens.
2. Select Set time with ENTER. The Set time display opens.
25
Page 28

3.Set seconds, minutes, hours (and am/pm if 12h unit is in
use) with NEXT/LAP or PREVIOUS and accept them with
ENTER. Suunto n3 confirms your selections and you return
to the main display.
6.1.2 Setting the time zone
By default, the time zone is set to Set by network and it
reflects the time zone that corresponds to the atomic clock
that the Suunto n3 is currently set to. This means that the
time zone is updated automatically as you move from place
to place. You can also set the time zone manually.
To set the time zone:
1.In the Time display, scroll to Set time zone with PREVIOUS
and press ENTER. The Set time zone display opens.
2.Select your local time zone with NEXT/LAP or PREVIOUS
and press ENTER. Suunto n3 confirms your selection and
you return to the main display.
6.1.3 Setting the dual zone
Some of the optional time faces also have a dual time
function. You can use this function to keep track of two
different time zones. For example, if you are travelling and
want to keep track of your home time and local time.
To set the second time zone:
1.In the Time display, scroll to Set dualzone with PREVIOUS
26
Page 29

and press ENTER. The Set dual zone display opens.
2. Select a suitable time zone with NEXT/LAP or PREVIOUS and press ENTER.
Suunto n3 confirms your selection and you return to the main display.
6.2 DATE
Suunto n3 has a programmed calendar until the year 2049.
The day is automatically updated according to the set date
and year. Also if network coverage is present and
transmission has been received, the date will be updated
automatically. However, you can also set the date manually.
To set the date:
1. In the Settings mode, scroll to Date with PREVIOUS and
press ENTER. The Set date display opens.
2. Set the month, day and year with NEXT/LAP or
PREVIOUS and accept the selections with ENTER. The weekday on the bottom
row will be updated automatically according to your settings. Suunto n3 confirms
your selection on the display and you return to the main display.
27
Page 30

6.3 GENERAL
To make your Suunto n3 better suited to your needs, you can adjust different settings
such as button tones, backlight, radio/watch sleep and splash screen transition
styles. You can also find information for checking the signal strength and battery
status.
To change the general settings:
1.In the Settings mode, scroll to General with PREVIOUS and
press ENTER. The General display opens.
2.Select the desired settings with NEXT/LAP or PREVIOUS
and press ENTER. The display where you can change the
settings opens.
3.Change the settings with NEXT/LAP or PREVIOUS and press
ENTER. You return to the main display.
Radio sleep allows you to turn the radio off to save battery
power. This is a good option if you are traveling in an area
where there is no signal coverage. The “radio off” icon ( ) is
displayed in the upper right corner of most Suunto n3 displays.
Normally you should keep your radio on so that you can receive
broadcasting information to your channels.
Watch sleep allows you to turn the display of your Suunto n3 off to save battery. This
is a good option if you know you will not be using your Suunto n3 for a while, for
example during the night. When you turn off your Suunto n3, the radio is also
automatically turned off. However, all the other functions work normally even when
the Suunto n3 display is turned off. You can turn the display back on with the press of
any button.
28
Page 31

Button tones can be set either on or off. When set off, button presses are not
acknowledged with tones.
Backlight has three options:
• Normal: Backlight is turned on with the long press of STARTSTOP/LIGHT. This
is the recommended setting for normal use.
• Off: Backlight cannot be activated with any of the buttons. This is a goo d setting
for power saving purposes.
• All buttons: Backlight is turned on with the press of any of the buttons. This is a
good setting if you have to use your Suunto n3 in a dark environment.
Transitions allows you to customize the channel transitions.
Splash delay allows you to adjust the amount of time the splash screen stays on the
display. While the splash screen is visible, you can switch channels. The longer the
Splash delay is, the more time you have to react.
In Wat ch in fo, you can check the general information about you r Suunto n3. This
information includes the signal strength and battery life status. For more information
about the items in Watch info, go to the MSN Direct Web site at www.msndirect.com
and click the Help link.
29
Page 32

6.4 UNITS
You can also adjust the units that are used for presenting information on your Suunto
n3.
Time format affects the used time style. You can select either 12h with am/pm
symbols or 24h (European style of presenting the time).
Date format affects the order of the day and month in date information. If you select
dd/mm, the day is presented first. If you select mm/dd, the month precedes the day.
In Measurements you can select between English and metric measurement
information. The English measurements use Fahrenheit and yards, and the metric
measurements use Celsius and meters.
To adjust the units:
1.In the Settings mode, scroll to Units with PREVIOUS and
press ENTER. The Set units display opens.
2.Scroll to the desired unit with PREVIOUS and press ENTER.
3.Adjust the unit with NEXT/LAP or PREVIOUS and press
ENTER. Suunto n3 confirms your selection and returns to the
Settings display.
30
Page 33

7. FREQUENTLY ASKED QUESTIONS
Here are the most commonly asked questions about your Suunto n3. For additional
questions and answers, go to the Suunto Web site at www.suunto.com
about the MSN Direct service, go to the MSN Direct Web site at www.msndirect.com
and click Help.
• How do I replace or recharge the battery?
· No need to replace the battery. Your Suunto n3 comes equipped with a
rechargeable battery.
· To recharge the battery, follow the steps on page 19.
• How can I tell whether my Suunto n3 is getting reception?
· Check the signal strength icon that is found in the upper-right corner of most
Suunto n3 screens. A good signal is indicated by , which means your Suunto
n3 is getting reception and is receiving information. No signal is indicated by ,
which means you are outside an MSN Direct coverage area or you are
temporarily in an area where reception is poor. means that the Suunto n3
may not be receiving your personal information. This can happen before the
signal confirms the home coverage area for your Suunto n3, or if you travel out
of your home coverage area. means that the Suunto n3 radio is off and the
Suunto n3 cannot receive a broadcast signal.
· Check the Signal strength percentage in Watch Info. For details, see page 29.
• How do I determine the remaining battery life?
· Check the Battery life percentage in Watch Info. For details, see page 29.
• How do I conserve battery life?
· For helpful tips about maximizing the battery life, see page 18.
. For questions
31
Page 34

• How do I set the time?
· As long as you are in an MSN Direct coverage area, you should not have to set
the time. Your Suunto n3 acquires the current local time automatically from an
atomic clock. This may take a few minutes to acquire initially. If the Set Time
setting displays Time Set By Network, then you are in an MSN Direct coverage
area.
· If you are outside an MSN Direct coverage area, you can set the time and date
manually. For details, see page 25.
• What happens when I activate the MSN Direct service?
· Your Suunto n3 receives the personalized information you selected on the MSN
Direct Web site. The following actions take place:
1.Your Suunto n3 receives the confirmation message “
WELCOME”.
2.The Register channel disappears from your Suunto n3.
3.Your Suunto n3 starts receiving channel content, such as news sto ries and
local weather information.
• How will I know when my Suunto n3 is activated?
· You will receive a “
WELCOME” confirmation message on your Suunto n3. You will
also receive a confirmation e-mail within 24 hours.
• Can I adjust the volume on my Suunto n3?
·No.
• Can my Suunto n3 communicate with other devices enabled with MSN Direct?
·No.
• Is my Suunto n3 water-resistant?
· Y es. It s water-resist ance is tested to 330ft/100m according to ISO 2281 standard
(www.iso.ch)
32
.
Page 35

· Note: Do not use Suunto n3 for diving or to obtain data under water.
· Note: Do not push the buttons while swimming or in contact with water under
any circumstances. Deliberate or unintentional depression of the buttons while
the unit is submerged could cause the unit to malfunction.
• Can the strap be cut to adjust the length?
·No.
• Where do I send my Suunto n3 for repair service?
· If you experience a problem with your Suunto n3, please call Suunto Customer
Service at (toll free) 1 (800) 543-9124 for Suunto USA or 1 (800) 776-7770 for
Suunto Canada. For additional information, go to our Web site at
www.suunto.com.
• My Suunto n3 does not show the correct time. What should I do?
· When you first turn on your Suunto n3, the time reverts to 12:00 A.M. while the
instrument attempts to receive the correct local time from a nearby broadcast
signal. When the Suunto n3 receives a signal, the time is automatically updated
to the current local time.
· The MSN Direct coverage area includes most major metropolitan areas
throughout North America. If your Suunto n3 is inside any of these coverage
areas, it should automatically receive the correct local time, unless the radio is
turned off. By default, the radio is turned on. If your Suunto n3 is outside of a
coverage area, it will not receive the correct time until you return to the coverage
area. For more information about coverage areas, go to the MSN Direct Web site
at www.msndirect.com and click the Help link.
· Sometimes topography (hills, valleys), building structures, or nearby electronics
can interfere with the broadcast signal that your Suunto n3 uses to receive the
correct local time. When that happens, your Suunto n3 experiences a delay in
33
Page 36

receiving the correct time.
· If your Suunto n3 is exactly one or more full hours away from the correct time, it
is possible that your Time Zone settings are set to a specific time zone. Make
sure that the time zone is set to Set by network. For details, see page 26.
· If you are outside of the MSN Direct coverage area, you can set the time
manually. For details, see page 25.
• My Suunto n3 battery died before I could recharge it. What should I do?
· Do not worry! Just place your Suunto n3 on the charger and it will begin to
charge. All your information comes back online as soon as the Suunto n3 has
enough battery power.
• My Suunto n3 is not responding to any button presses. What should I do?
· Turn your Suunto n3 off and then turn it back on by completing the following
steps:
1.Simultaneously press and release PREVIOUS, STARTSTOP/LIGHT, and
CHANNEL. This turns off the Suunto n3.
2.Wait for a few seconds, and then simultaneously press and release NEXT/LAP,
STARTSTOP/LIGHT, and CHANNEL.
· It takes several seconds for the Suunto n3 to power on, and then a watch face
will appear.
· If your Suunto n3 still does not respond to any button presses, call the Suunto
Customer Service at (toll free) 1 (800) 543-9124 for Suunto USA or 1 (800) 7767770 for Suunto Canada.
• I activated the MSN Direct service, but my Suunto n3 is not receiving any of the
information I selected. What should I do?
· You may not have received the activation and configuration message that was
sent when you activated the service. This can happen if you were outside an
34
Page 37

MSN Direct coverage area, or if you were temporarily in an area where reception
is poor. You can instruct the MSN Direct service to resend the configuration
message. To do so, go to www.msndirect.com and click the link to resend the
configuration message.
• My Suunto n3 has not received any new information in a day or more. What should
I do?
· The MSN Direct coverage area includes most major metropolitan areas
throughout North America. If your Suunto n3 is inside any of these coverage
areas, it should automatically receive new broadcast information (news stories,
current temperatures). If your Suunto n3 is outside a coverage area, it does not
receive any new broadcast information until you return to the coverage area. For
more information about coverage areas, go to the MSN Direct Web site at
www.msndirect.com and click Help.
· If you leave your home coverage area and travel to another MSN Direct
coverage area, your Suunto n3 will not receive personal information (personal
messages, calendar appointments) unless you go to the MSN Direct Web site at
www.msndirect.com and set up a travel schedule.
· Sometimes topography (hills, valleys), building structures, or nearby electronics
can interfere with the broadcast signal that your Suunto n3 uses to receive
information.
35
Page 38

8. GETTING HELP
For additional help with your Suunto n3, please call Suunto Customer Service at 1
(800) 543-9124 (Suunto USA) or 1 (800) 776-7770 (Suunto Canada) or go to our
Web site at www.suunto.com.
For help with the MSN Direct service, go to the MSN Direct Web site at
www.msndirect.com and click the Help link, or contact MSN Customer Support at 1866-658-7032 (within the United States). For deaf or hard-of-hearing customers, call
1-800-877-9580 (within the United States) for technical support or 1-866-271-7577
(within the United States) for accounts and billing support.
36
Page 39

8. TERMS AND CONDITIONS
8.1 COPYRIGHT
This publication and its contents are proprietary to Suunto Oy and are intended solely
for the use of its clients to obtain knowledge and key information regarding the
operation of Suunto n3 products. Its contents shall not be used or distributed for any
other purpose and/or otherwise communicated, disclosed or reproduced without the
prior written consent of Suunto Oy.
While we have taken great care to ensure that information contained in this
documentation is both comprehensive and accurate, no warranty of accuracy is
expressed or implied. Its content is subject to change at any time without notice. The
newest version of this documentation can always be downloaded in
www.suunto.com.
8.2 TRADEMARKS
Suunto, Suunto n3, Replacing Luck, and their logos are registered or unregistered
trademarks of Suunto Oy. All rights are reserved.
Microsoft, MSN and the MSN Logo are either registered trademarks or trademarks of
Microsoft Corporation in the United States and/or other countries.
8.3 ABOUT YOUR SUUNTO N3 AND SERVICE
You will need a subscription to the MSN Direct service to take full advantage of all
Suunto n3 features. MSN Direct is available to residents in the 50 United States, the
District of Columbia, and Canada. To receive MSN Direct on an MSN Direct-ready
device, you must be within an MSN Direct coverage area; check the current coverage
maps available at www.msndirect.com. Internet access is required for the on-line
activation of your MSN Direct account. A major credit or debit card is required.
37
Page 40

Activation and service charges will apply. Prices are subject to change. Regular
charging of Suunto n3 is required for use. SAFETY FIRST: Watches can be worn
anywhere so use the service sensibly and safely.
8.4 FCC COMPLIANCE
Suunto n3 complies with Part 15 of the FCC limits for class B digital devices. This
equipment generates, uses, and can radiate radio frequency energy and, if not
installed or used in accordance with the instructions may cause harmful interference
to radio communications. There is no guarantee that interference will not occur in a
particular instance. If this equipment does cause harmful interference to other
equipment, try to correct the problem by relocating the equipment.
Consult an authorized Suunto dealer or other qualified service technician if the
problem cannot be corrected. Operation is subject to the following conditions: (1) This
instrument cannot cause harmful interference, and, (2) this instrument must accept
any interference received, including interference that may cause undesired operation.
Repairs should be made by authorized Suunto service personnel. Unauthorized
repairs will void warranty.
8.5 CE COMPLIANCE
The CE mark is used to mark conformity with the European Union EMC directives 89/
336/EEC.
8.6 ISO 9001 COMPLIANCE
Suunto’s Quality Assurance System is certified by Det Norske Veritas to be ISO 9001
compliant in all SUUNTO Oy’s operations (Quality Certificate No. 96-HEL-AQ-220)
38
Page 41

9. WARRANTY
9.1 LIMITS OF LIABILITY
If this product should fail due to defects in materials or workmanship, Suunto Oy will,
at its sole option, repair or replace it with new or rebuilt parts, free of charge, for two
(2) years from the date of its purchase.
This warranty is extended only to the original purchaser and only covers failures due
to defects in materials and workmanship that occur during normal use while in the
period of the warranty.
It does not cover battery, battery replacement, damage or failures resulting in
accident, misuse, neglect, mishandling, alteration or modifications of the product, or
any failure caused by operation of the product outside the scope of its published
specifications, or any causes not covered by this warranty.
There are no express warranties except as listed above.
The client can exercise the right to repair under the warranty by contacting Suunto
Oy’s Customer Service department to obtain a repair authorization. Suunto Oy and its
subsidiaries shall in no event be liable for any incidental or consequential damages
arising from the use of or inability to use the product.
Suunto Oy and its subsidiaries do not assume any responsibility for losses or claims
by third parties that may arise through the use of this instrument.
39
Page 42

9.2 AFTER SALES SERVICE
If a claim under warranty appears to be necessary:
• Return the product, freight prepaid, to your Suunto dealer who is responsible for
having your product repaired.
• Include your name and address, proof of purchase and/or service registration card,
as required in your country.
The claim will be honoured and the product repaired or replaced at no charge and
returned in what your Suunto dealer determines a reasonable amount of time,
provided all necessary parts are in stock.
All repairs made, not covered under the terms of this warranty, will be made at the
owner’s expense. This warranty is non-transferable from the original owner.
If it is not possible to contact your Suunto dealer, contact your local Suunto distributor
for further information. You can locate your local Suunto distributor at
www.suunto.com.
40
Page 43

www.msndirect.com
 Loading...