

Page 1
SUUNTO MATCHBOX
COMPASSES
USER GUIDE
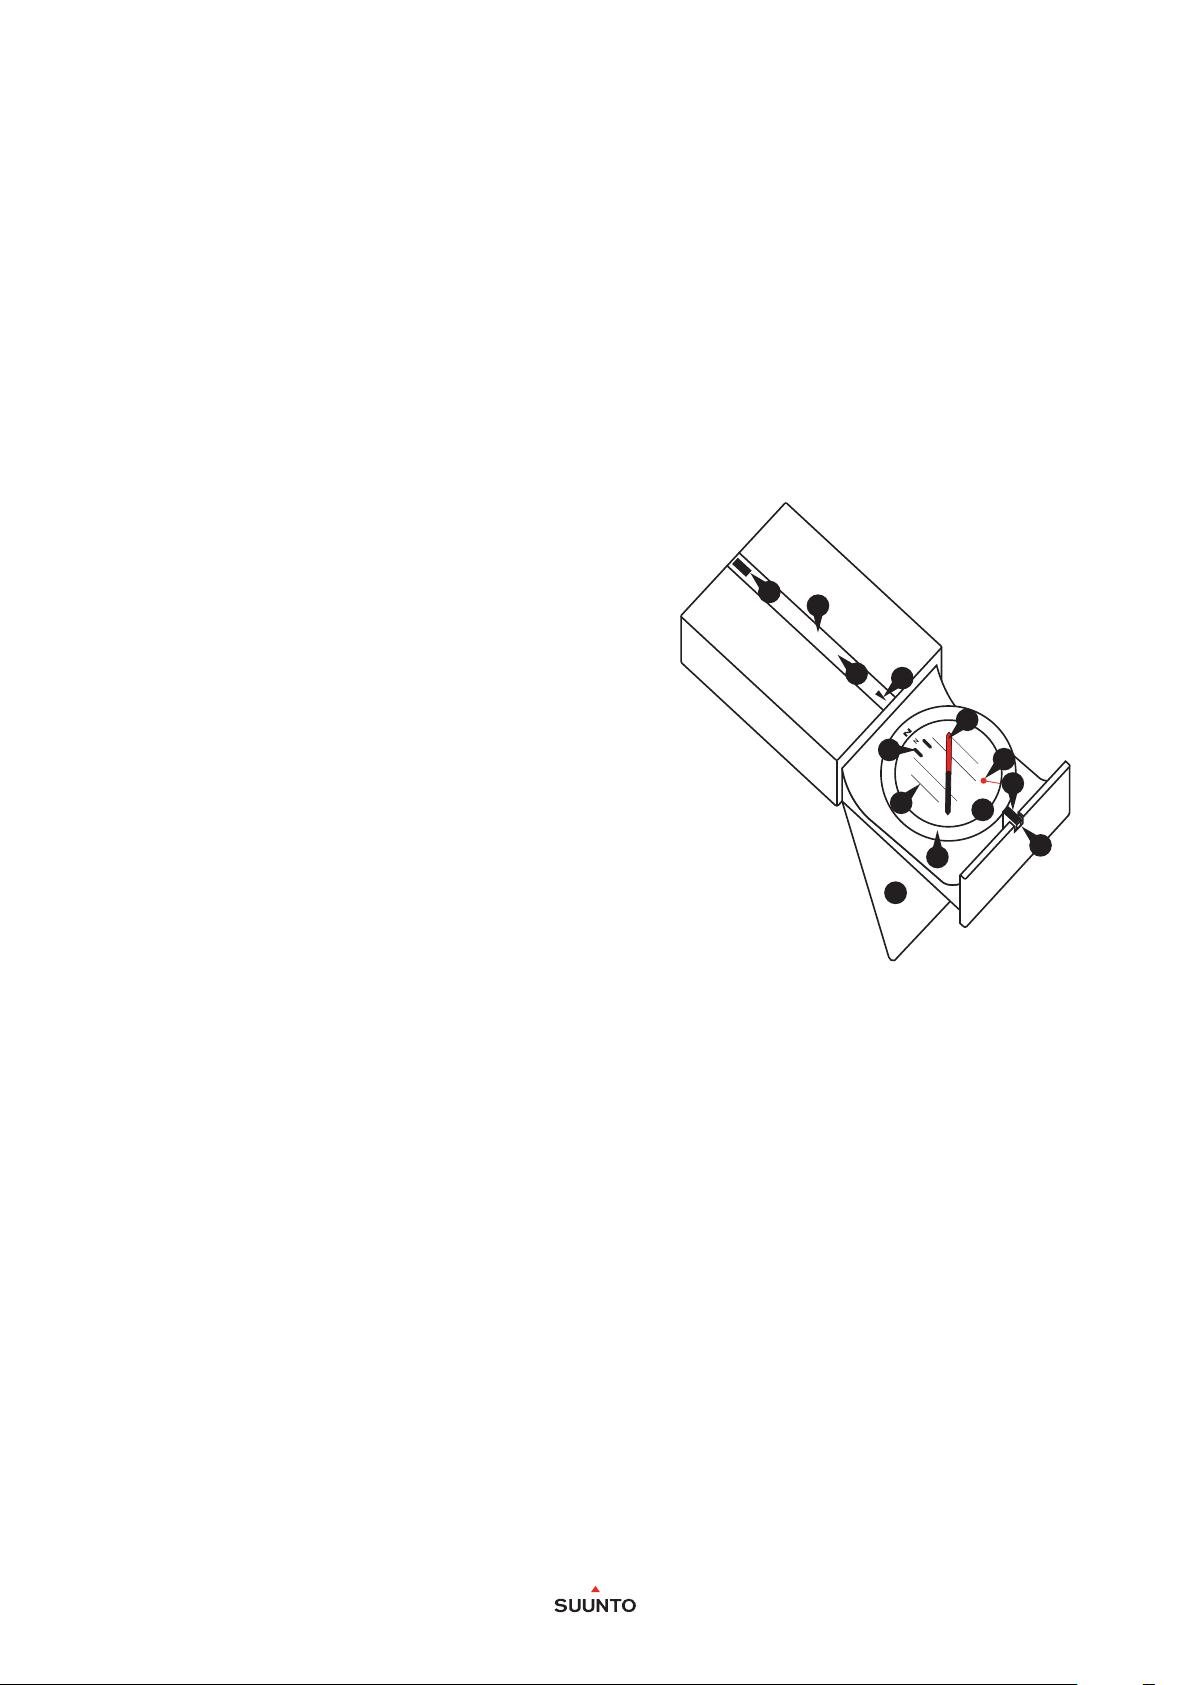
1. Compass anatomy
1. Needle with red end that points to magnetic north
2. Bezel with directional scale for using as a protractor
3. Rotating capsule for setting direction to target
4. Bearing index for reading numerical bearing from bezel
5. Orienting lines used to align capsule with meridian lines on
map
6. Orienting arrow for aligning with needle to nd direction
to target
7. Clinometer (select models only) for measuring vertical
angle
8. Center line for aligning target and compass
9. Notch, mirror and hole (select models only) for precise
sighting of an object
en
8
9
8
4
4
6
2
1
4
3
6
2
3
0
3
8
2
5
6
2
8
1
0
1
2
7
1
4
9
1
6
1
8
3
2
0
4
2
2
2
2
8
2. Orienting the map
To better understand your surroundings, you should use your
compass to rst turn your map in the right direction. This
ensures the geographic features around you are in the same
general direction as you see them on the map.
1. Hold your compass level and look at the red end of the
needle to see where north is.
2. Turn the map so that the northern upper edge is pointing
north.
9
1
Page 2

3. Navigate with map and compass
When navigating with a map and compass, you are rst
determining a direction of travel on the map and then
transferring that direction to the real world.
1. Place the compass on the map between your starting point
(A) and your target (B).
2. Turn the capsule until the orienting lines are parallel to the
meridian lines on the map with N pointing north.
N
EW
S
4
6
2
8
1
0
4
3
B
2
3
0
3
8
2
6
2
1
2
1
4
1
6
1
8
2
0
4
2
2
2
A
N
EW
S
4
3
2
2
3
4
0
3
B
8
2
6
2
4
2
6
8
1
0
1
2
2
1
2
4
0
2
1
6
1
8
A
3. Hold compass level at waist height and turn yourself until
the needle and orienting arrow are aligned.
NOTE: Compensate for declination. See section 4.
3
2
0
3
3
4
8
2
6
2
4
2
2
2
0
2
4
6
2
8
1
0
4
3
2
3
0
3
8
2
1
2
1
4
1
6
1
8
6
2
2
0
4
2
2
2
2
4
6
8
8
1
1
0
6
1
1
2
4
1
2
Page 3

4. Select a visible target in front of you to help you maintain
2
4
6
2
2
2
4
2
6
2
8
3
0
3
2
3
4
your direction while travelling.
5. Follow your progress by comparing landmarks to the map.
4. Declination correction
The meridian lines on a map indicate the direction toward
true north while your compass needle indicates the direction
toward magnetic north. The angle between these two
directions is called magnetic declination.
B
3
2
0
3
3
4
8
2
6
2
4
2
2
2
0
2
2
4
6
8
8
1
1
0
6
1
1
2
4
1
Before navigating you should check your local magnetic
declination from a trusted source, such as a recent map or the
NOAA website. If the magnetic declination is more than a few
degrees, you must compensate for it when navigating.
1. Turn the compass over and extend housing.
2. Turn capsule until screw-head is visible.
3. Insert the metal key into the adjustment screw.
4. Turn the key until the declination indicator is the correct
number of degrees east or west of 0°.
5. Sight a bearing
A bearing is the angle between direction to north and
the direction to a target. This can be used for example in
communicating directions with others or when nding your
location.
1. Open the mirror and hold the compass at eye level so that
you can read the capsule from the reection.
2. Align the target with the sighting notch or hole, keeping
the center line on the mirror in line with the center of the
capsule.
3. Hold the compass steady and turn the capsule until the
orienting arrow and needle are aligned.
NOTE: Compensate for declination. See section 5.
4. If the numerical bearing is needed, read it from the bearing
index.
3
Page 4

6. Finding your location
You can sight two or more objects and use triangulation to
accurately determine where you are.
1. Find a visible object that is identiable on your map and
follow steps 1-3 of the ‘Sight a bearing’ procedure.
2. On the map, place the long edge of the compass on the
object (1).
3. Turn the compass until the orienting lines and meridian
lines are parallel and draw a line from the object.
4. Choose a second object and repeat steps 1-3.
The intersection of the two lines indicates your position, and
the closer the angle between the intersecting lines is to 90°,
the greater the accuracy.
N
EW
S
1
4
2
3
2
4
3
0
6
3
8
8
2
6
2
1
0
4
1
2
2
1
2
2
4
0
1
2
6
1
8
1 2
N
EW
S
1
B
4
2
3
2
4
3
0
6
3
8
2
6
2
8
1
0
4
1
2
2
2
1
2
4
0
1
2
6
1
8
2
2
1 2
4
Page 5

7. Measure slope incline
°
°
0
2
0
4
0
6
0
8
0
8
0
6
0
4
0
2
0
8
0
6
0
4
0
2
0
The scale for declination correction on the back of the capsule
also functions as a scale for the clinometer.
1. Turn the capsule so that the bearing index is at 270° (due
West) and tilt compass on its side with the declination scale
downwards.
2. If you have a clear view across the slope, align the compass
to the slope with the back of the compass is facing you.
3. OR, if you have a clear view up or down the slope, sight the
top or the bottom.
4. Read from the clinometer needle to get approximate
inclination reading.
6
0
0
4
8
0
0
2
8
0
6
0
4
0
2
0
0
2
0
4
0
0
6
X
0
0
2
0
4
0
6
0
8
0
8
X
8
6
1
0
4
1
2
4
3
2
3
2
1
4
1
6
1
8
2
0
0
3
2
2
8
2
2
4
6
2
5
Page 6

8. Care
Use only fresh water and mild soap for cleaning. Clean your
compass regularly.
Operating/storage temperature:
-30° C - +60° C / -22° F - +140° F
© Suunto Oy 2/2014. All Rights reserved. Subject to change
without notice.
Suunto is a registered trademark of Suunto Oy.
SUUNTO CUSTOMER SUPPORT
1. www.suunto.com/support
www.suunto.com/mysuunto
2. support@suunto.com
CAUTION: DO NOT
APPLY SOLVENT OF ANY
KIND.
CAUTION: DO
NOT APPLY INSECT
REPELLENT.
CAUTION: DO NOT
KNOCK OR DROP.
3. AUSTRALIA +61 1800 240 498
AUSTRIA +43 720 883 104
CANADA +1 800 267 7506
FINLAND +358 9 4245 0127
FRANCE +33 4 81 68 09 26
GERMANY +49 89 3803 8778
ITALY +39 02 9475 1965
JAPAN +81 3 4520 9417
NETHERLANDS +31 1 0713 7269
NEW ZEALAND +64 9887 5223
RUSSIA +7 499 918 7148
SPAIN +34 91 11 43 175
SWEDEN +46 8 5250 0730
SWITZERLAND +41 44 580 9988
UK +44 20 3608 0534
USA +1 855 258 0900
6
 Loading...