

Page 1
©
Page 2
Page 3

CUSTOMER SERVICE CONTACTS
Suunto Oy Phone +358 9 875870
Fax +358 9 87587301
Suunto USA Phone 1 (800) 543-9124
Canada Phone 1 (800) 776-7770
European Call Center Phone +358 2 284 11 60
PC-related questions softwarehelpdesk@suunto.com
Suunto Website www.suunto.com
EN
1
Page 4

TABLE OF CONTENTS
1. GETTING STARTED WITH SUUNTO M3 ...........................................................3
1.1.GETTING FAMILIAR WITH SUUNTO M3 .....................................................3
1.2.FIRST STEPS WITH SUUNTO M3 ................................................................4
2. USING RACE TIMER ..........................................................................................5
2.1.SYNCHRONIZING THE COUNTDOWN TIMER ...........................................6
2.2.ADDING A SPLIT TIME MARK DURING THE RACE ...................................6
2.3.USING THE BUTTON LOCK .........................................................................7
3. DETERMINING FAVORED END OF START LINE .............................................8
4. CALCULATING COURSE TO NEXT MARK .....................................................10
5. USING CHRONO AND SETTING ALARMS ......................................................12
5.1.USING CHRONO .........................................................................................12
5.2.SETTING AN ALARM ..................................................................................12
6. CUSTOMIZING SUUNTO M3 ............................................................................14
6.1.CHANGING GENERAL SETTINGS ............................................................14
6.2.CHANGING TIMER SETTINGS ...................................................................14
7. CARE AND MAINTENANCE .............................................................................15
7.1.WATER RESISTANCE ................................................................................15
7.2.REPLACING THE BATTERY ......................................................................16
8. TECHNICAL SPECIFICATIONS ........................................................................19
9. TERMS AND CONDITIONS ...............................................................................20
10. LIMITS OF LIABILITY ........................................................................................21
11. AFTER SALES SERVICE ..................................................................................22
Page 5
1. GETTING STARTED WITH SUUNTO M3
This instruction manual guides you to use all the features of the Suunto M3, a wristop
computer designed for competetive boat racing.
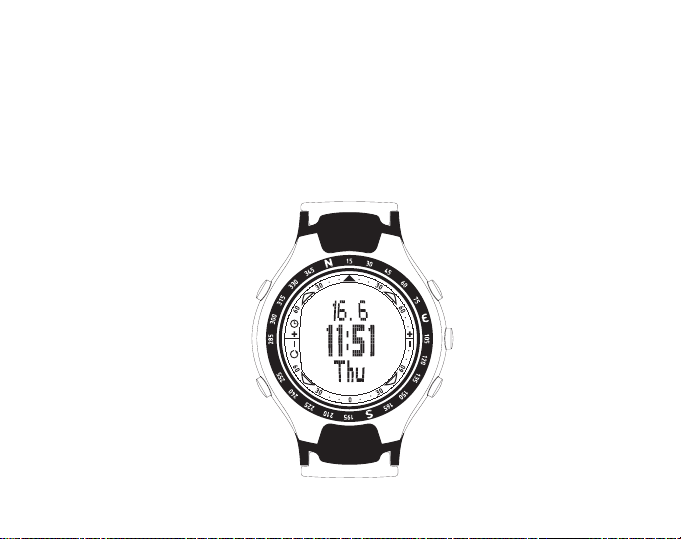
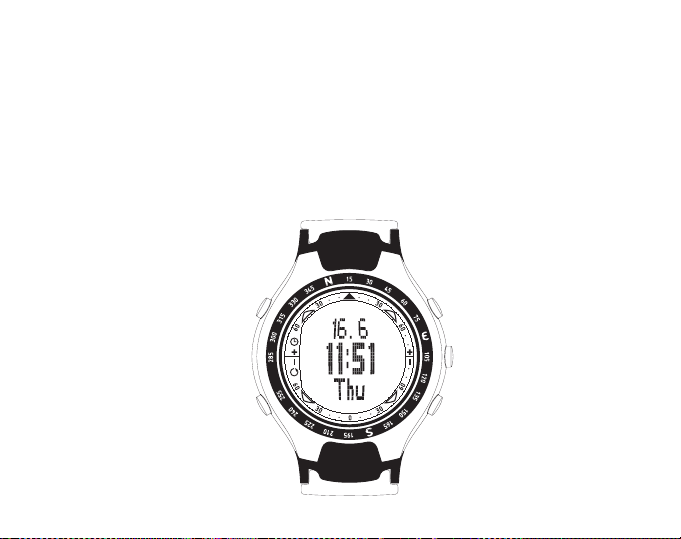
1.1. GETTING FAMILIAR WITH SUUNTO M3
The Suunto M3 has two main displays: the Time and Timer displays. You can switch
between the displays by long pressing (more than 1 seconds) the MODE button. The
picture below shows the Suunto M3 button assignments:
CHRONO
MODE
UP (START/STOP)
ENTER
DOWN (SYNC)
3
Page 6
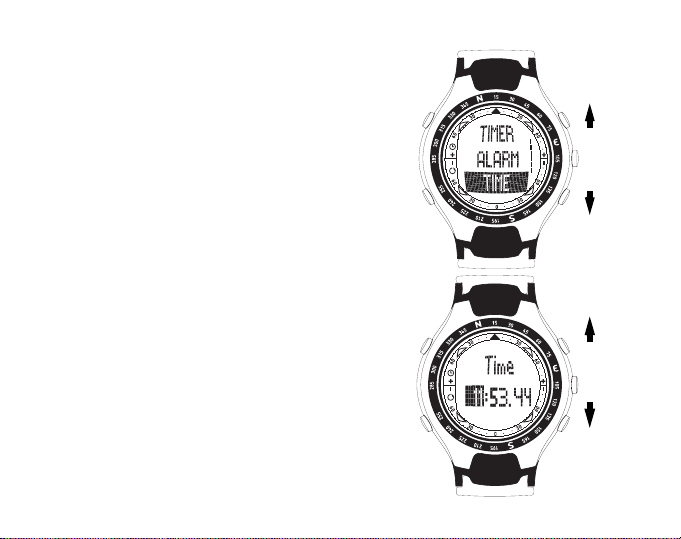
1.2. FIRST STEPS WITH SUUNTO M3
Taking the Suunto M3 into use the first time is
simple: all you need to do is set the current date
and time:
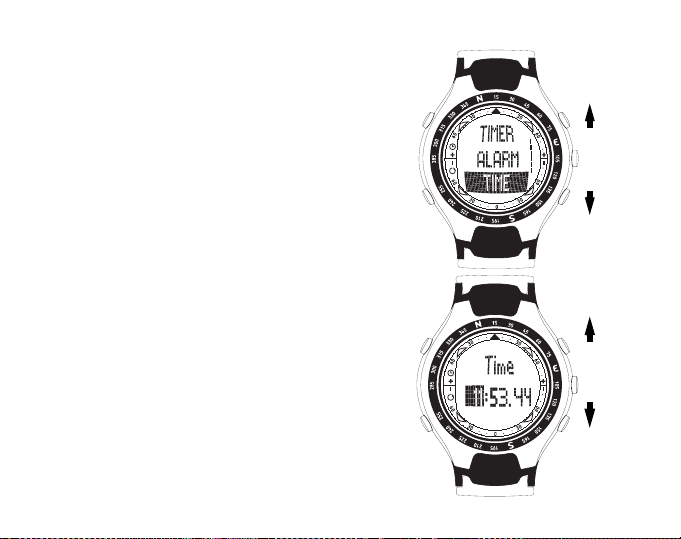
1. While the Suunto M3 is displaying time, press
the ENTER button to open the menu.
2. Use the UP or DOWN button to select the
Time item from the menu.
3. Press ENTER to select the highlighted item.
4. Again, select Time and press ENTER.
5. Adjust the full hours by pressing the UP/
DOWN buttons.
6. Press ENTER to accept and to move forward.
7. Press MODE to return to the time view.
After setting the time, select Date from the menu
and repeat the above.
Your Suunto M3 is now ready for use.
4
3
Page 7

2. USING RACE TIMER
The Suunto M3 helps you to optimize the timing for the race start so that you can
cross the start line at the right time. This helps you get ahead of your opponents and
avoid turbulence from the other boats in front of you.
TIP: While waiting for the race start, you can use the Suunto M3 chronograph
to estimate the time to reach the start line by taking practice starts.
The race timer helps you to follow the official race start countdown.
1. Long press the MODE button to switch to the Timer view.
2. Press ENTER and select Start time.
3. Enter the countdown time with the UP/DOWN buttons. For example, if the official
signal is given 5 minutes before the start, enter 5.
4. At the official signal, press UP to start the countdown on the Suunto M3.
TIP: You can set the timer to repeat the countdown. This is useful if there are
several race starts, for example, for different boat classes. Long press ENTER
to turn the repeat on/off. This can be done both when the timer is running or
when it is stopped. After the start, long pressing DOWN turns the repeat off and
allows you to view the actual race time.
TIP: You can stop the timer with a long press of the UP button. Now press UP
to start the timer again or long press UP to reset the timer if the start is
recalled/rerun for some reason.
5. When the countdown timer reaches 00:00, Suunto M3 starts displaying the elapsed
race time. Long press UP to stop the race time.
TIP: You can also set the countdown timer to start automatically to count to
predefined date and time. To set the timer, press ENTER and select Count to
from the menu.
5
Page 8

2.1. SYNCHRONIZING THE COUNTDOWN TIMER
Suunto M3 allows you to synchronize the timer to the official countdown even after
the countdown has started. This is very useful if you are distracted when the official 5
minute signal is given, causing a delay in starting the timer in Suunto M3. Once the
timer is running, synchronizing is done as follows:
1. Wait and be prepared to the next official signal (such as the 4 or 1 minute signal).
2. At the signal, immediately press the DOWN button.
The timer jumps downward to the full minute and continues the countdown.
TIP: By default, pressing DOWN makes the timer jump downward to the
nextfull minute (for example, from 03.50 to 03.00 and from 03.20 to 03.00).
You can also set Suunto M3 to synchronize to the closest full minute (for
example, from 03:50 to 04:00). See section 6.2 for how to do this setting.
2.2. ADDING A SPLIT TIME MARK DURING THE RACE
You can store split times, for example, when you pass a mark during the race. The
stored times can be viewed after the race with the Logbook.
1. While the race time is running, press ENTER and select Add mark to store a split
time.
2. The new split time and the time elapsed from the previous split time are shown on
the display briefly.
3. After the race, press ENTER and select Logbook to view the stored marks.
NOTE: Up to 10 separate logs can be stored in the Suunto M3 memory. When
the memory is full, a new log automatically replaces the oldest log in the
memory.
6
Page 9

2.3. USING THE BUTTON LOCK
In order to prevent accidental off synchronization of the race timer, you can activate or
switch off the Suunto M3 button lock by pressing first the ENTER and then the
CHRONO button within 3 seconds.
Note that the key lock only disables the following actions: starting the race timer,
stopping the countdown or race time and synchronizing the countdown.
7
Page 10
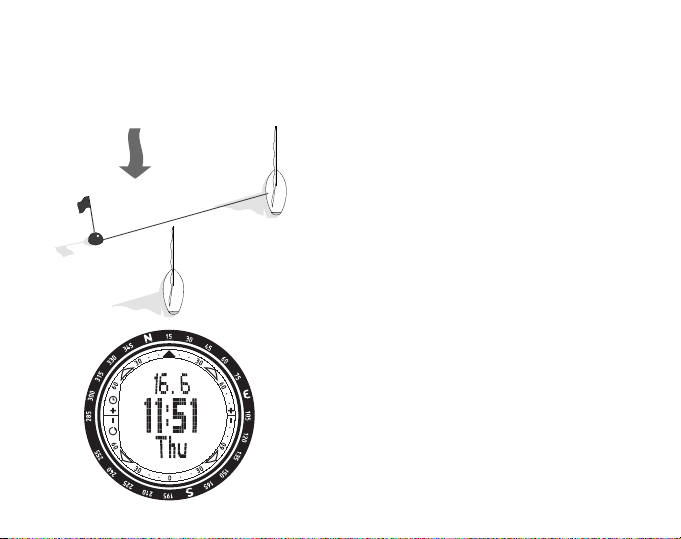
3. DETERMINING FAVORED END OF START LINE
Before a race starts, the wind direction may have shifted and is no longer aligned with
the starting line. The Suunto M3 helps you to determine the favored end of the start
line.
15°
8
1.Head to wind and check your bearing
from the boat compass.
Example: bearing to wind is 15°.
2.Adjust the Suunto M3 rotating bezel so
that the upwind bearing is parallel to the
black triangle on the inner ring.
Page 11
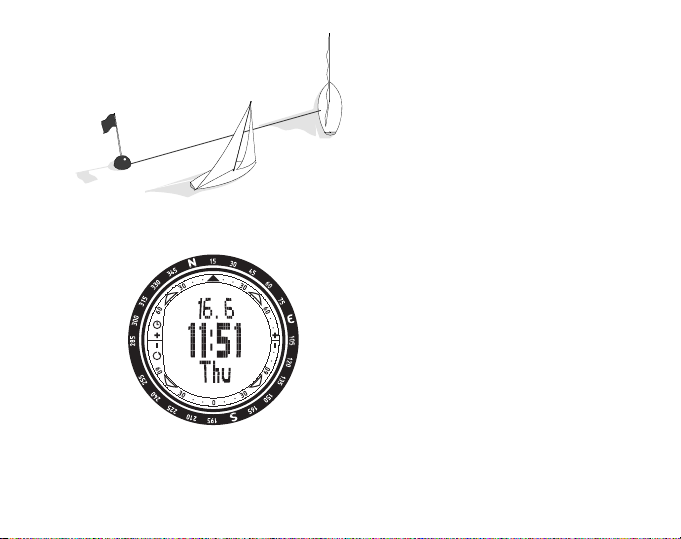
75°
3.Steer the boat along the starting line
and check your bearing from the boat
compass.
Example: the bearing is 75°.
4.Find the bearing on the Suunto M3
rotating bezel and refer to the inner ring:
+
• if the bearing is on the plus (+) sector,
75°
you are steering towards the favored end
of the starting line
• if the bearing is on the minus (-) sector,
you are steering away from the favored
end of the starting line
Example: the 75° bearing is on the plus
(+) sector, meaning that you are heading
towards the favored end.
9
Page 12
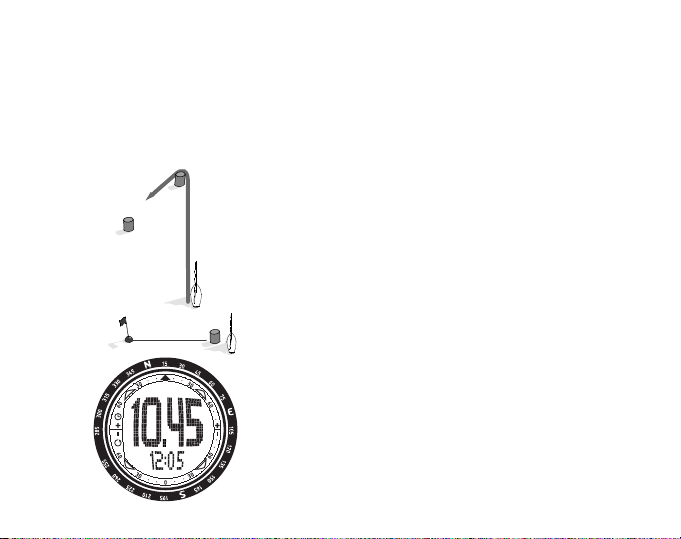
4. CALCULATING COURSE TO NEXT MARK
Setting the bearing to the next mark on the race is sometimes difficult due to poor
visibility. Suunto M3 allows you to calculate the bearing to the next race marker in
advance, before you reach the turning point. This way you can steer to the correct
direction as soon as possible.
The calculation is based on the standard turning angles (30°, 45°, 60°) depending on
the race course.
60
°
1.Steer directly toward the first mark and
check your current bearing from the boat
compass.
°
15
Example: the bearing to the first mark is 15°.
2.Adjust the Suunto M3 rotating bezel so that
your bearing is parallel to the black triangle
on the inner ring.
10
Page 13
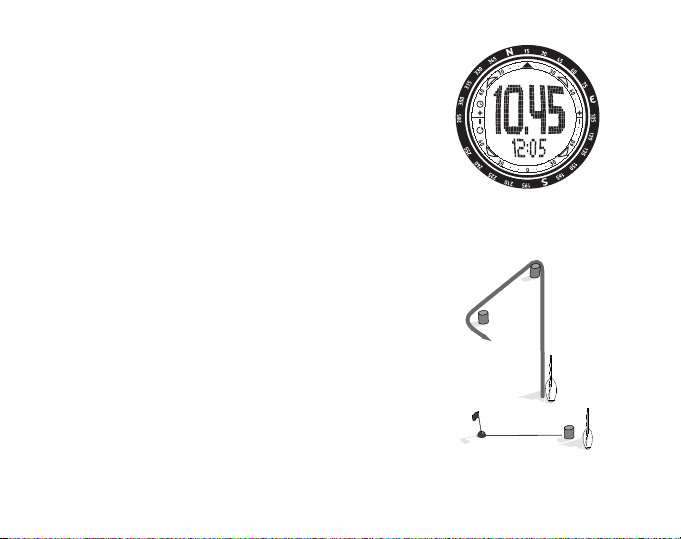
3. Find the appropriate turning angle
degree from the inner ring and read
the bearing to the following mark from
the Suunto M3 rotating bezel.
For example, if your course was 15° and
the turning angle to the next mark is 60°
to the left, the bearing to the next mark is
255°.
4. After passing the first mark, follow the
new bearing and repeat the
calculation to the next mark.
255°
60
°
°
15
11
Page 14

5. USING CHRONO AND SETTING ALARMS
You can use the Suunto M3 as a chronograph or as a too l to remind you of important
events with alarms.
5.1. USING CHRONO
You can use the chronograph in both the Time and the Timer displays.
1. Press the MODE button so that 0:00,0 is displayed on the bottom row.
2. Press CHRONO to start the chrono.
TIP: You can switch between the Time display and the Timer display without
disturbing a running chrono by long pressing the MODE button.
3. Press CHRONO to stop the chrono.
4. Press CHRONO again to reset the chrono.
TIP: While waiting for the race start, you can use the Suunto M3 chronograph
to estimate the time to reach the start line by taking practice starts.
The race timer helps you to follow the official race start countdown.
5.2. SETTING AN ALARM
You can set up to 3 different alarms to remind you of important events. When an
alarm is set, is displayed in the lower right corner of the display.
1. In the Time display, press ENTER and select Alarm from the menu.
2. Select one of the 3 alarms and press ENTER.
3. Set the alarm to On.
4. Set the time and date for the alarm with the UP/DOWN buttons. Press ENTER to
accept the values.
12
Page 15

TIP: If you leave the date empty, the alarm will go off every day at the same
time. If the date is set, the you will get one alarm on the specified date and the
alarm is then set to off.
13
Page 16

6. CUSTOMIZING SUUNTO M3
You can customize the Suunto M3 settings to fit your personal preferences.
6.1. CHANGING GENERAL SETTINGS
1. Press ENTER in the Time display and select General from the menu.
2. Select the setting you want to change:
• Tones: sets the key tones on/off
• Light: adjusts the backlight. There are three different settings:
• Normal: the light switches on for 7 seconds with a long press of the CHRONO
button or when an alarm is activated
• Off: the light does not switch on at all
• Night use: the light switches on for 7 seconds when you press any of the buttons
• Units: changes the way time and date are shown.
• Contrast: adjusts the display contrast.
6.2. CHANGING TIMER SETTINGS
1. Press ENTER in the Timer display and select Settings from the menu.
2. Select the setting you want to change and press ENTER
• Repeat: the timer countdown is restarted if the setting is On.
• Tones: With TONE SEQ you can define when a sound signal is given during countdown, for example, with every full ten minutes or with every 10 seconds. With My
tone you can define a custom time for a signal.
Note that the tone selections are independent from each other.
• Sync: The default setting is Down: when the DOWN button is pressed, the timer is
set downwards to the next full minute. When set to Round, the timer is set to the
closest full minute.
14
Page 17

7. CARE AND MAINTENANCE
Care of the Suunto M3
Only perform the procedures described in this manual. Never attempt to disassemble
or service your Suunto M3. Protect it from shocks, extreme heat and prolonged
exposure to direct sunlight. Avoid rubbing your Suunto M3 against rough surfaces as
this may scratch the face. If not in use, store the Suunto M3 in a clean, dry
environment at room temperature.
After use or exposure to salt water, flush the Suunto M3 with water to remove the salt.
Turn the bezel ring and push the buttons while washing. Finally wipe your Suunto M3
clean and dry with a soft cloth. If there are persistent stains or marks, you can apply
mild soap to the area. Do not expose your Suunto M3 to strong chemicals such as
gasoline, cleaning solvents, acetone, alcohol, insect repellents, adhesives and paint,
as they will damage the unit's seals, case and finish.
7.1. WATER RESISTANCE
Suunto M3 is water-resistant and tested with ISO (International Organization for
Standardization, www.iso.ch) standard 2281. Suunto M3 is also marked with an
indication of a test overpressure given as a depth in meters (30 m/100 feet). This,
however, does not correspond to a diving depth but refers to the pressure at which
the water overpressure test was conducted.
This means that you cannot dive to a depth of 30 m/100 ft. with your Suunto M3.
Rain, showering, swimming and other normal exposure to water will not affect the
operation. However, do not press the buttons under water under any circumstances.
NOTE: The Suunto M3 is not meant for diving.
15
Page 18

7.2. REPLACING THE BATTERY
Your Suunto M3 operates on a 3-Volt lithium cell, type: CR 2032.
A low-battery warning indicator is activated on the display when approximately 5–15
percent of the battery capacity is still available. When this occurs, you should replace
the battery. However, extremely cold weather may activate the low b attery-warning
indicator even when the battery is still fully operational. If the battery-warning indicator
is activated in temperatures above 10°C (50°F), replace the battery.
NOTE: Heavy use of the backlight will significantly reduce battery life.
You can replace the batteries yourself as long as you do it properly to avoid any
leakage of water into the battery compartment or computer. Always use original
battery replacement kits that include a new battery, battery lid, opening tool and Oring. You can purchase the battery kits from official Suunto retailers.
NOTE: Change the battery at your own risk and use the original Suunto
battery replacement kit. Suunto recommends you to have the batteries
changed in official Suunto services.
NOTE: When replacing the battery, also replace the battery lid and O-ring. Never use
the old ones.
16
Page 19

To replace the battery:
1. Insert the opening tool or a coin into the slot located on the battery compartment
cover on the backside of your Suunto M3.
2. Turn the tool/coin counterclockwise until it is aligned with the open position marker.
3. Remove the battery compartment cover and the O-ring, and discard them. Ensure
that all surfaces are clean and dry.
4. Remove the old battery carefully.
5. Place the new battery into the battery compartment under the metal flap, with the
positive side facing up.
6. With the O-ring in the correct position, replace the battery compartment cover and
turn it with the tool/coin clockwise until it is aligned with the closed position marker.
Make sure that the cover stays straight while turning it. Do not use force or press
the cover excessively.
NOTE: Perform battery replacement with extreme care to ensure that your Suunto
M3 remains water resistant. Careless battery replacement may void warranty.
WARNING: This Suunto product contains a Lithium cell. To reduce risk of fire or
burns, do not disassemble, crush, puncture, short external contacts, charge or dispose of in fire or water. Replace only with manufacturer specified batteries. Recycle
or dispose of used batteries properly.
Refer to the pictures on the following page when changing the battery.
17
Page 20

18
Page 21

8. TECHNICAL SPECIFICATIONS
• Operating temperature -20 C to + 50 C / -5 F to 120 F
• Storage temperature -30 C to + 60 C / -22 F to 140 F
• Weight 60 g
• Water-resistant 30 m/100 ft.
• Mineral crystal glass
• Aluminum case
• Replaceable battery CR2032. The battery life expectancy is approximately 12
months.
19
Page 22

9. TERMS AND CONDITIONS
Copyright
This publication and its contents are proprietary to Suunto Oy and are intended solely
for the use of its clients to obtain knowledge and key information regarding the
operation of Suunto M3 products. Its contents shall not be used or distributed for any
other purpose and/or otherwise communicated, disclosed or reproduced without the
prior written consent of Suunto Oy.
While we have taken great care to ensure that information contained in this
documentation is both comprehensive and accurate, no warranty of accuracy is
expressed or implied. Its content is subject to change at any time without notice. The
latest version of this documentation can always be downloaded in www.suunto.com.
Copyright
Trademarks
Suunto, Wristop Computer, Suunto M3, Replacing Luck, and their logos are
registered or unregistered trademarks of Suunto Oy. All rights are reserved.
CE compliance
The CE mark is used to mark conformity with the European Union EMC directive 89/
336/EEC.
ISO 9001 compliance
Suunto's Quality Assurance System is certified by Det Norske Veritas to be ISO 9001
compliant in all SUUNTO Oy's operations (Quality Certificate No. 96-HEL-AQ-220).
20
©
Suunto Oy 4/2005
Page 23

10.LIMITS OF LIABILITY
If this product should fail due to defects in materials or workmanship, Suunto Oy will,
at its sole option, repair or replace it with new or rebuilt parts, free of charge, for two
(2) years from the date of its purchase.
This warranty is only extended to the original purchaser and only covers failures due
to defects in materials and workmanship that occur during normal use while in the
period of the warranty.
It does not cover battery, battery replacement, damage or failures resulting from
accidents, misuse, neglect, mishandling, alteration or modifications of the product, or
any failure caused by operation of the product outside the scope of its published
specifications, or any causes not covered by this warranty.
There are no express warranties except as listed above.
The client can exercise the right to repair under the warranty by contacting Suunto
Oy's Customer Service department to obtain a repair authorization. Suunto Oy and its
subsidiaries shall in no event be liable for any incidental or consequential damages
arising from the use of or inability to use the product.
Suunto Oy and its subsidiaries do not assume any responsibility for losses or claims
by third parties that may arise through the use of this instrument.
Disposal of the device
Please dispose of the device in an appropriate way, treating it as electronic
waste. Do not throw it in the garbage. If you wish, you may return the
device to your nearest Suunto representative.
21
Page 24

11.AFTER SALES SERVICE
If a claim under warranty appears to be necessary, return the product, freight prepaid,
to your Suunto dealer who is responsible for having your product repaired or
replaced. Include your name, address, proof of purchase and/or service registration
card, as required in your country. The claim will be honored and the product repaired
or replaced at no charge and returned in what your Suunto dealer determines a
reasonable amount of time, provided that all necessary parts are in stock. All repairs
that are not covered under the terms of this warranty will be made at the owner's
expense. This warranty is non-transferable from the original owner. If it is not possible
to contact your Suunto dealer, contact your local Suunto distributor for further
information. You can locate your local Suunto distributor in www.suunto.com.
Online warranty registration
Suunto’s dive computers and wristop computers can be registered online at
www.suunto.com. With our new online warranty registration service, we've removed
the need for paperwork and trips to the mailbox by making it possible to register your
Suunto device online, in real time, either in the store when you buy it, or later at
home. Registering your unit makes it quicker and easier for us to help you if you ever
need to send your product for servicing, or if you need information about using your
unit from our Global Help Desk. By typing in your device's serial number, our help
desk and service professionals can find all the information required to give you the
best possible service.Registration will also make it possible for us to contact you in
case we have important safety information concerning your Suunto product.
22
Page 25

COORDONNÉES DU SERVICE CLIENTÈLE
Suunto Oy Tél. +358 9 875870
Fax +358 9 87587301
Suunto USA Tél. 1 (800) 543-9124
Canada Tél. 1 (800) 776-7770
Centre d’appels pour l’Europe
Tél. +358 2 284 11 60
Questions relatives aux PC
softwarehelpdesk@suunto.com
Site Web Suunto www.suunto.com
FR
1
Page 26

TABLE DES MATIÈRES
1. MISE EN ROUTE DU SUUNTO M3 .........................................................................3
1.1.SE FAMILIARISER AVE C LE SUUNTO M3 ......................................................3
1.2.PREMIERS CON TACTS AVEC LE SUUNTO M 3 .............................................4
2. UTILISATION DU CHRONOGRAPHE DE COURSE ...............................................5
2.1.SYNCHRONIZING T HE COUNTDOWN TIMER ............................................... 6
2.2.SYNCHRONISATION DU COMPTE À REBOURS ...........................................7
2.3.UTILISATION DU BOUTON DE V ERROUILLAGE ........................................... 7
3. DÉTERMINER L'EXTRÉMITÉ DE LA LIGNE DE DÉPART LA PLUS FAVORABLE 8
4. CALCUL DE LA ROUTE JUSQU'À LA MARQUE SUIV AN TE ...............................10
5. UTILISATION DU CHRONO ET RÉGLAGE DES ALARMES ................................12
5.1.UTILISATION DU CHRONO ............................................................................ 12
5.2.RÉGLAGE D'UNE ALARME ............................................................................12
6. PERSONNALISATION DES RÉGLAGES DU M3 ..................................................14
6.1.CHANGEMENT D E S PARAMÈTRE S GÉNÉRAUX ........................................14
6.2.MODIFICATION DES RÉGLAGES DU CHRONOGRAPHE ...........................14
7. ENTRETIEN ........................................................................................................... 16
7.1.ÉTANCHÉITÉ .................................................................................................. 16
7.2.REMPLACEMENT DE LA PILE ......................................................................17
8. SPÉCIFICATIONS TECHNIQUES .........................................................................21
9. CONDITIONS GÉNÉRALES ..................................................................................22
10. LIMITES DE RESPONSABILITÉ ................................................... .... ... .... ... ... .... ... .23
11. SERVICE APRÈS-VENTE .....................................................................................24
Page 27
1. MISE EN ROUTE DU SUUNTO M3
Ce mode d'emploi vous guide dans l'utilisation de toutes les fonctions du Suu nto M3,
une montre-ordinateur conçue pour la course nautique.
1.1. SE FAMILIARISER AVEC LE SUUNTO M3
Le Suunto M3 dispose de deux affichages principaux : l'affichage Time (Montre) et
l'affichage Timer (Course). Vous pouvez passer de l'un à l'autre par une pression
longue (plus d'1 seconde) sur le bouton MODE. L'illustration ci-dessous indique les
fonctions affectées aux différents boutons du Suunto M3.
UP (START/STOP)
CHRONO
MODE
(HAUT - MARCHE/
ARRÊT)
ENTER
(VALIDER)
DOWN (SYNC)
(BAS SYNCHRONISATION
3
Page 28
1.2. PREMIERS CONTACTS AVEC LE SUUNTO M3
La première utilisation du Suunto M3 ne
présente aucune difficulté : il vous suffit de
régler la date et l'heure :
1. Pendant que Suunto M3 affiche l'heure,
appuyez sur le bouton ENTER pour ouvrir le
menu.
2. Utilisez le bouton UP (Haut) ou DOWN (Bas)
pour sélectionner l'élément Time dans le
menu.
3. Appuyez sur ENTER lorsque le nom de la
fonction souhaitée apparaît en couleur
inversée.
4. Sélectionnez Time à nouveau et appuyez sur
ENTER.
5. Réglez les heures en appuyant sur les
boutons UP/DOWN (Haut/Bas).
6. Appuyez sur ENTER pour accepter et continuer.
7. Appuyez sur MODE pour revenir à l'affichage
de l'heure.
Après avoir réglé l'heure, sélectionnez Date
dans le menu et répétez l'opération décrite cidessus.
Votre Suunto M3 est maintenant prêt à l'utilisation.
4
3
Page 29
2. UTILISATION DU CHRONOGRAPHE DE COURSE
Le Suunto M3 vous permet d'optimiser le chronométrage pour le départ de la course,
ce qui vous permet de franchir la ligne de départ au bon moment. Ceci vous permet
de prendre de l'avance sur vos concurrents et d'éviter ainsi les turbulences provenant
des autres bateaux devant vous.
CONSEIL : Pendant que vous attendez le départ de la course, vous pouvez
utiliser le chronographe Suunto M3 pour estimer le temps nécessaire pour
atteindre la ligne de départ en faisant des exercices de départ.
Le chronographe de course vous permet de suivre le compte à rebours du départ
officiel de la course.
1. Appuyez longuement sur le bouton MODE pour passer à l'affichage Timer.
2. Appuyez sur ENTER et sélectionnez Start time (Heure de départ)
3. Saisissez le temps du compte à rebours avec les boutons UP/DOWN (Haut/Bas).
Par exemple, si le signal officiel est donné 5 minutes avant le départ, saisissez 5.
4. Au signal officiel, appuyez sur UP (Haut) pour démarrer le compte à rebours sur le
Suunto M3.
CONSEIL : Vous pouvez régler le chronographe de façon à répéter le compte
à rebours. Ceci peut être utile s'il y a plusieurs départs de course, par
exemple, pour différentes catégories de bateaux. Maintenez le bouton
ENTER enfoncé pour activer/désactiver la répétition. L'opération peut être effectuée
aussi bien quand le chronographe est en marche ou quand il est à l'arrêt. Après le
départ, une pression longue sur DOWN désactive la répétition et vous permet de
consulter le temps de course réel.
CONSEIL : Vous pouvez arrêter le chronographe par une pression longue sur
le bouton UP (Haut). Appuyez maintenant sur UP (Haut) pour r edémarrer le
5
Page 30

chronographe ou appuyez longuement sur UP pour réinitialiser le chronographe en
cas de rappel ou annulation du départ pour une raison quelconque.
5. Quand le compte à rebours atteint 00:00, le Suunto M3 commence à afficher le
temps de course écoulé. Appuyer longuement sur UP pour arrêter le temps de
course.
CONSEIL : Vous pouvez aussi régler le compte à rebours pour démarrer
automatiquement le décompte à une date et une heure prédéfinies. Pour
régler le chronographe, appuyez sur ENTER et sélectionnez Count to dans le
menu.
2.1. SYNCHRONIZING THE COUNTDOWN TIMER
Suunto M3 allows you to synchronize the timer to the official countdown even after
the countdown has started. This is very useful if you are distracted when the official 5
minute signal is given, causing a delay in starting the timer in Suunto M3. Once the
timer is running, synchronizing is done as follows:
1. Wait and be prepared to the next official signal (such as the 4 or 1 minute signal).
2. At the signal, immediately press the DOWN button.
The timer jumps downward to the full minute and continues the countdown.
TIP: By default, pressing DOWN makes the timer jump downward to the
nextfull minute (for example, from 03.50 to 03.00 and from 03.20 to 03.00).
You can also set Suunto M3 to synchronize to the closest full minute (for
example, from 03:50 to 04:00). See section 6.2 for how to do this setting.
6
Page 31

2.2. SYNCHRONISATION DU COMPTE À REBOURS
Vous pouvez mettre en mémoire des temps intermédiaires, par exemple quand vous
dépassez une marque au cours de la course. Les temps mémorisés peuvent être
consultés après la course avec le Logbook (Journal).
1. Lorsque que le temps de course est activé, appuyez sur ENTER et sélectionnez
Add mark (Ajouter une marque) pour mémoriser un temps intermédiaire.
2. Le nouveau temps intermédiaire et le temps écoulé depuis le temps intermédiaire
sont affichés pendant un court instant.
3. Après la course, appuyez sur ENTER et sélectionnez Logbook pour consulter les
marques mises en mémoire.
REMARQUE : Jusqu'à 10 enregistrements distincts peuvent être stockés
dans la mémoire du Suunto M3. Quand la mémoire est pleine, un nouvel
enregistrement remplace automatiquement le plus ancien dans la mémoire.
2.3. UTILISATION DU BOUTON DE VERROUILLAGE
Pour éviter une désynchronisation accidentelle du chronographe de course, vous
pouvez activer ou désactiver le bouton de verrouillage du Suunto M3 en appuyant
d'abord sur ENTER et ensuite sur le bouton CHRONO dans les 3 secondes qui suivent.
Il est à remarquer que le verrouillage des boutons ne désactive que les actions suivantes : démarrage du chronographe de course, arrêt du compte à rebours ou du
temps de course et synchronisation du compte à rebours.
7
Page 32

3. DÉTERMINER L'EXTRÉMITÉ DE LA LIGNE DE DÉPART LA
PLUS FAVORABLE
La direction du vent a pu changer avant le départ de la course et ne plus être alignée
avec la ligne de départ. Le Suunto M3 vous aide à déterminer l'extrémité de la ligne
de départ la plus favorable.
15°
8
1. Montez au vent et vérifiez votre azimut
à la boussole de bord.
Exemple : l'angle au vent est de 15°.
2. Réglez la couronne tournante du
Suunto M3 de façon à ce que l'angle au
vent soit parallèle au triangle noir sur la
couronne extérieure.
Page 33

75°
3. Naviguez en longeant la ligne de
départ et relevez votre azimut sur la
boussole de bord.
Exemple : l'azimut est de 75°.
4. Trouver l'azimut sur la couronne
tournante du Suunto M3 et reportez-vous
+
à la couronne intérieure :
75°
• si l'azimut est dans le secteur plus (+),
vous vous dirigez vers l'extrémité de la
ligne de départ la plus favorable.
• si l'azimut est dans le secteur moins (-),
vous vous éloignez de l'extrémité de la
ligne de départ la plus favorable.
Exemple : le 75° est sur le secteur plus
(+), ce qui signifie que vous vous dirigez
vers l'extrémité la plus favorable.
9
Page 34

4. CALCUL DE LA ROUTE JUSQU'À LA MARQUE SUIVANTE
Il est parfois difficile de régler l'azimut sur la marque suivante pendant la course du
fait d'une mauvaise visibilité. Suunto M3 vous permet de calculer à l'avance l'azimut
jusqu'à la marque de parcours suivante, avant d'atteindre le point où vous allez virer.
Vous pouvez ainsi barrer dans la bonne direction le plus tôt possible.
calcul s'appuie sur les angles de changement de cap standard (30°, 45°, 60° ) en
fonction du parcours de la course.
60
°
1. Barrez directement en direction de la
première marque et vérifiez votre azimut
actuel sur la boussole de bord.
°
15
Exemple : l'azimut vers la première marque
est de 15°.
2. Réglez la couronne tournante du Suunto
M3 de façon à ce que votre azimut soit
parallèle au triangle noir sur la couronne
intérieure.
10
Page 35

3. Trouvez la valeur appropriée en
degrés pour l'angle de changement
de cap sur la couronne intérieure et
lisez l'azimut pour la marque suivante
sur la couronne tournante du Suunto
M3.
Par exemple, si votre route était à 15° et
que l'angle de changement de cap vers
la marque suivante est de 60° vers la
gauche, l'azimut vers la prochaine
marque est de 255°.
4. Après avoir passé la première
marque, suivez le nouvel azimut et
renouvelez le calcul pour la marque
suivante.
255°
60
°
°
15
11
Page 36

5. UTILISATION DU CHRONO ET RÉGLAGE DES ALARMES
Vous pouvez utiliser le Suunto M3 comme un chronographe ou un outil pour vous
rappeler des événements importants avec des alarmes.
5.1. UTILISATION DU CHRONO
Vous pouvez utiliser le chronographe à la fois avec l'affichage Time et l'affichage
Timer.
1. Appuyez sur le bouton MODE de façon à ce 0:00,0 soit affiché sur la ligne du bas.
2. Appuyez sur CHRONO pour démarrer le chrono.
CONSEIL : Vous pouvez passer de l'affichage Time à l'affichage Timer sans
perturber le fonctionnement du chrono en effectuant une pression longue sur
le bouton MODE.
3. Appuyez sur CHRONO pour arrêter le chrono
4. Appuyez à nouveau sur CHRONO pour remettre le chrono à zéro.
CONSEIL : Tout en attendant le départ de la course, vous pouvez utiliser le
chronographe Suunto M3 pour évaluer le temps nécessaire pour atteindre la
ligne de départ en procédant à des exercices de départ.
Le chronographe de course vous permet de suivre le compte à rebours du départ
officiel de la course.
5.2. RÉGLAGE D'UNE ALARME
Vous pouvez définir jusqu'à 3 alarmes différentes pour vous souvenir d'événements
importants. Quand une alarme est définie, elle est affichée dans le coin inférieur
droit du cadran.
1. Dans l'affichage Time, appuyez sur ENTER et sélectionnez Alarm dans le menu.
12
Page 37

2. Sélectionnez l'une des 3 alarmes et appuyez sur ENTER.
3. Réglez l'alarme sur On.
4. Réglez l'heure et la date de l'alarme avec les boutons UP/DOWN (Haut/Bas).
Appuyez sur ENTER pour accepter les valeurs.
CONSEIL : Si vous laissez la date vide, l'alarme se déclenchera chaque jour
à la même heure. Si la date est définie, vous aurez alors une alarme à la date
indiquée et l'alarme passe ensuite à off.
13
Page 38

6. PERSONNALISATION DES RÉGLAGES DU M3
Vous pouvez personnaliser les réglages du Suunto M3 pour qu'ils correspondent à
vos préférences personnelles.
6.1. CHANGEMENT DES PARAMÈTRES GÉNÉRAUX
1. Appuyez sur ENTER dans l'affichage Time et sélectionnez General dans le menu.
2. Sélectionnez le paramétrage que vous voulez modifier :
• Tones (Bips) : active/désactive les bips des boutons
• Light (Éclairage) : ajuste le rétro-éclairage. Il existe trois paramétrages différents :
• Normal: l'éclairage s'allume pendant 7 secondes avec une pression longue sur
le bouton CHRONO ou quand une alarme est activée.
• Off (Éteint) : l'éclairage ne s'allume pas du tout
• Night use (Utilisation de nuit) : l'éclairage s'allume pendant 7 secondes si vous
appuyez sur n'importe quel bouton
• Units (Unités) : modifie la présentation de l'heure et de la date.
• Contrast (Contraste) : règle le contraste de l'affichage.
6.2. MODIFICATION DES RÉGLAGES DU CHRONOGRAPHE
1. Appuyez sur ENTER dans l'affichage Timer et sélectionnez Settings (Paramètres)
dans le menu.
2. Sélectionnez le réglage que vous voulez modifier et appuyez sur ENTER
• Repeat ( Répétition) : le compte à rebours est redémarré si le réglage est sur On
(Activé).
• Tones (Bips) : Avec TONE SEQ vous pouvez définir quand un signal sonore retentit pendant un compte à rebours, par exemple, toutes les dix minutes ou toutes les
14
Page 39

dix secondes. Avec My tone vous pouvez définir un délai personnalisé pour un
signal. Il est à remarquer que les sélections des bips sont indépendantes les unes
des autres.
• Sync (Synchronisation) : Le réglage par défaut est Down (Inférieur) : quand on
appuie sur le bouton DOWN (Bas), le chronographe est ramené à la minute entière
qui suit. En cas de réglage sur Round (Arrondi), le le temps restant à décompter
peut être arrondi à la minute entière la plus proche.
15
Page 40

7. ENTRETIEN
ENTRETIEN DE SUUNTO M3
N'effectuez que les opérations décrites dans ce guide. Ne tentez jamais de démonter
ou de réparer vous-même votre Suunto M3. Protégez votre Suunto M3 des chocs,
des chaleurs excessives et des expositions prolongées aux rayons du soleil. Évitez
de frotter votre Suunto M3 contre des surfaces rugueuses pour ne pas régler sa
surface. Lorsque vous ne l'utilisez pas, rangez votre montre-ordinateur dans un
endroit propre et sec, à température ambiante.
Après utilisation ou contact avec de l'eau de mer, rincer le Suunto M3 avec de l'eau
pour enlever le sel. Tournez la couronne et appuyez sur les boutons pendant le
lavage. Finalement, essuyez votre Suunto M3 avec un tissu doux de manière à ce
qu'il soit propre et sec.Pour éliminer les marques et tâches persistantes, appliquez un
savon doux sur la zone concernée. Évitez d'exposer votre Suunto M3 à des produits
chimiques forts tels que l'essence, les solvants de nettoyage, l'acétone, l'alcool, les
insecticides, les adhésifs et les peinturesquirisquent de détériorer les joints, le corps
et le revêtement de l'appareil.
7.1. ÉTANCHÉITÉ
Le Suunto M3est conforme à la norme ISO 2281 (International Organization for
Standardization, www .iso.ch), ce qui signifie que ce produit est étanche. En plus de la
mention étanche, le Suunto M3 indique une profondeur donnée en mètres, qui
correspond à une valeur test de surpression (30 m/100 pieds). Cette indication ne
correspond cependant pas à une profondeur de plongée, mais à la pression à
laquelle le test de surpression a été réalisé.
Autrement dit, vous ne pouvez pas plonger avec votre Suunto M3 à une profondeur
de 30 m (100 pieds). La pluie, la douche, la natation et toute autre exposition normale
16
Page 41

à l'eau ne perturbent pas son fonctionnement. Toutefois, n'appuyez jamais sur les
boutons si l'ordinateur de poignet est immergé.
REMARQUE : Le Suunto M3 ne doit pas être utilisé pour la plongée.
7.2. REMPLACEMENT DE LA PILE
Votre montre-ordinateur Suunto M3 est alimentée par une pile au lithium de 3 volts,
de type CR2032.
Lorsque la capacité de la pile n'est plus qu'à 5 - 15 pourcent de sa capacité initiale, un
indicateur signale que la pile arrive en fin de vie. Nous recommandons le
remplacement de la pile à ce moment-là. Toutefois, l'indication " pile faible " peut être
activée par le frois extrême, même si la pile est encore en bon état de
fonctionnement. Si l'indication " pile faible " s'active par une température de plus de
10 °C (50 °F), il convient de remplacer la pile.
REMARQUE : une utilisation intensive du rétro-éclairage diminue
sensiblement la durée de vie de la pile.
Vous pouvez changer la pile vous-même , tant que vous le faites correctement, de
sorte à éviter toute entrée d'eau dans le logement de la pile ou le corps de l'ordinateur
de poignet. Utilisez toujours des kits de remplacement de pile prévus à cet effet
(ceux-ci comprennent une nouvelle pile, un couvercle de pile, un outil d'ouverture et
un joint torique). Vous pourrez trouver ce matériel chez tous les revendeurs agréés
Suunto.
17
Page 42

REMARQUE : Si vous changez la pile vous-même, vous assumez tous les
risques associés. Utilisez le kit de remplacement de pile original de Suunto.
Suunto vous recommande de vous adresser aux services agréés Suunto pour
faire changer les piles.
REMARQUE : lorsque vous changez la pile, remplacez également le couvercle et le
joint torique. N'utilisez jamais les anciennes pièces.
Pour remplacer la pile :
1. Insérez l'outil fourni ou une pièce dans l'encoche située sur le couvercle du
logement de la pile au dos de votre Suunto M3.
2. Tournez l'outil/la pièce dans le sens inverse des aiguilles d'une montre jusqu'à ce
qu'il/elle soit aligné(e) avec le repère de position ouverte.
3. Retirez le couvercle du logement de la pile ainsi que le joint torique et jetez-les.
Vérifiez que toutes les surfaces sont propres et sèches.
4. Retirez délicatement la pile usagée.
5. Placez la nouvelle pile dans son logement sous le rabat métallique, en orientant
le côté positif vers le haut.
6. Avec le joint torique correctement positionné, replacez le couvercle du logement de
la pile et tournez-le avec l'outil/la pièce dans le sens des aiguilles d'une montre
jusqu'à ce qu'il/elle soit aligné(e) avec le repère de position fermée. Assurez-vous
que le couvercle est posé bien d'aplomb avant de le tourner. Ne forcez pas,
n'appuyez pas sur le couvercle de façon excessive.
REMARQUE : Pour conserver les propriétés d'étanchéité de votre Suunto M3, soyez
extrêmement prudent lors du remplacement de la pile. Un remplacement de pile
négligé annulera la garantie.
18
Page 43

ATTENTION : cette montre-ordinateur Suunto comprend une pile au lithium. Pour éliminer tout risque d'incendie ou de brûlure, évitez de démonter, d'écraser, de percer
ou de court-circuiter la pile, ou de la jeter dans le feu ou dans l'eau. N'utilisez que des
piles neuves recommandées par le fabricant. Recyclez ou jetez les piles usagées
selon les réglementations en vigueur.
Reportez-vous aux illustrations sur la page suivante lorsque vous changez la pile.
19
Page 44

20
Page 45

8. SPÉCIFICATIONS TECHNIQUES
• Température de fonctionnement : -20 °C à +50 °C / -5 °F à +120 °F
• Température de stockage : -30 °C à +60 °C / -22 °F à +140 °F
• Poids : 60 g
• Étanchéité jusqu'à 30 m / 100 pieds
• Verre en cristal minéral
• Corps en aluminium
• Pile remplaçable de type CR2032. Sa durée de vie est d'environ 12 mois.
21
Page 46

9. CONDITIONS GÉNÉRALES
Copyright
Cette publication et son contenu sont la propriété de Suunto Oy et sont fournis
uniquement pour permettre à ses clients de mieux connaître les caractéristiques et le
fonctionnement des produits Suunto M3. Son contenu ne doit pas être utilisé ni
distribué à d'autres fins et/ou ne doit pas être communiqué, révélé ou reproduit sans
l'accord écrit préalable de Suunto Oy.
Bien que nous ayons pris soin d'inclure dans cette documentation des informations
complètes et précises, aucune garantie de précision n'est expresse ou implicite. Son
contenu peut être modifié à tout moment sans préavis. La toute dernière version de
cette documentation peut être téléchargée sur www.suunto.com.
Copyright © Suunto Oy 4/2005
Marques
Suunto, Montre-ordinateur, Suunto M3, Replacing Luck et leurs logos respectifs sont
des marques déposées ou des marques commerciales de Suunto Oy. Tous droits
réservés.
Conformité CE
Le symbole CE est utilisé pour indiquer la conformité de ce produit avec la directive
européenne relative à la CEM 89/ 336/CEE.
Conformité á la norme ISO 9001
Le Système d'assurance qualité de Suunto est certifié conforme à la norme ISO 9001
pour toutes les opérations de SUUNTO Oy par Det Norske Veritas (certificat de qualité Nº 96-HEL-AQ-220).
22
Page 47

10.LIMITES DE RESPONSABILITÉ
Si ce produit présente des défauts causés par des vices de matériau ou de
fabrication, Suunto Oy, à sa seule discrétion, réparera ou remplacera gratuitement le
produit avec des pièces neuves ou réparées, pendant une période de deux (2) ans à
compter de la date d'achat.
Cette garantie ne s'applique qu'au propriétaire d'origine et ne couvre que les défauts
causés par des vices de matériau et de fabrication survenus suite à une utilisation
normale du produit pendant la période de garantie.
Cette garantie ne couvre pas la batterie, le changement de batterie, les dommages
ou pannes consécutifs à un accident, une mauvaise utilisation, une négligence, une
mauvaise manipulation ou une modification du produit, ni les pannes causées par
l'utilisation du produit pour une application non spécifiée dans cette documentation, ni
les causes non couvertes par cette garantie.
Il n'existe aucune autre garantie expresse que celles précitées.
Le client exerce son droit de réparation sous garantie en contactant le Service
clientèle de Suunto Oy afin d'obtenir une autorisation de réparation. Suunto Oy et ses
filiales ne doivent en aucun cas être tenus responsables des dommages accessoires
ou indirects résultant de l'utilisation ou de l'incapacité d'utiliser ce produit.
Suunto Oy et ses filiales déclinent toute responsabilité en cas de pertes ou de
recours de tiers pouvant survenir suite à l'utilisation de cet appareil.
Élimination de l'appareil
Veillez à éliminer cet objet d'une manière appropriée, en le traitant comme
un déchet électronique. Ne le jetez pas à la poubelle. Si vous le souhaitez,
vous pouvez rendre l'appareil à votre représentant Suunto le plus proche.
23
Page 48

11.SERVICE APRÈS-VENTE
Si une réclamation s'avère nécessaire dans le cadre de la garantie, veuillez retourner le
produit, en port payé, à votre distributeur Suunto qui a la responsabilité d'assurer la réparation
ou le remplacement de votre app areil. Joignez vos nom et a dresse, et un e preuve d'achat et/ou
une fiche d'inscription au service, selon ce qui est exigé dans votre pays. La réclamation sera
prise en compte et le produit sera réparé ou remplacé gratuitement, et renvoyé dans un délai
considéré comme raisonnable par votre distributeur Suunto, à condition que toutes les pièces
nécessaires soient en stock. Toutes les réparations qui ne sont pas couvertes par les
conditions de cette garantie seront effectuées aux frais du propriétaire de l'appareil. Le
propriétaire initial de l'appareil ne peut transférer cette garantie à quelqu'un d'autre. S'il n'est
pas possible de contacter votre détaillant Suu nto, contactez votre distributeur local Suunto pour
plus d'informations. Vous p ouve z trouver votre distrib uteur local Suu nto sur w ww.suunto.com.
Enregistrement de la garantie en ligne
Les ordinateurs de plongée Suunto et les montres-ordinateurs peuvent être enregistrés en
ligne sur www.suunto.com. Avec not re nouveau service d'enregis trement de la garantie en
ligne, vous n'aurez plus à remplir des formulaires papier et aller jusqu'à la boîte aux lettres et
vous bénéficiez de la possibilité d'enregistrer votre appareil Suunto en ligne, en temp s rée l, soit
au magasin lorsque vous l'achetez, ou plus tard à votre domicile. L'enregistrement de votre
appareil nous permet de vous aider plus rapidement et plus facilement, si vous avez à nous
envoyer votre produit pour entretien ou si vous avez besoin de demander des informations sur
l'utilisat ion de votre appareil auprès de notre Service d'assistance mon dial. En saisissant le
numéro de série de votre appareil, notre service d'assistance et nos techniciens peuvent
trouver toutes les informations nécessaires pour vous fournir le meilleur service possible.
L'enregistrement nous permettra aussi de vous contacter dans le cas où nous aurions des
informations importantes à vous communiq uer su r la sûreté de votre pro duit Suun to.
24
Page 49

KUNDENDIENST
Suunto Oy Tel. +358 9 875870
Fax +358 9 87587301
Suunto USA Tel. 1 (800) 543-9124
Canada Tel. 1 (800) 776-7770
Europaweites Call Center
Tel. +358 2 284 11 60
Computertechnische Beratung
softwarehelpdesk@suunto.com
Suunto im Internet www.suunto.com
DE
1
Page 50

INHALTSVERZEICHNIS
1. EINSTIEG IN DEN SUUNTO M3 ......................................................................... 3
1.1.DEN SUUNTO M3 KENNEN LERNEN ..........................................................3
1.2.ERSTE EINSTELLUNGEN DES SUUNTO M3 ..............................................4
2. REGATTA-TIMER ................................................................................................ 5
2.1.SYNCHRONISIEREN DES COUNTDOWN-TIMERS ....................................6
2.2.WÄHREND DES RENNENS ZWISCHENZEITEN HINZUFÜGEN ................6
2.3.TASTENSPERRE ..........................................................................................7
3. BESTIMMEN DES BEVORZUGTEN ENDES DER STARTLINIE ........................8
4. KURSBERECHNUNG ZUR NÄCHSTEN MARKIERUNG .................................10
5. CHRONOMETER UND EINSTELLEN VON WECK-/ERINNERUNGSZEITEN .12
5.1.VERWENDEN DES CHRONOMETERS .....................................................12
5.2.WECK-/ERINNERUNGSZEIT EINSTELLEN ...............................................12
6. INDIVIDUELLE EINSTELLUNG DES SUUNTO M3 ..........................................14
6.1.ALLGEMEINE EINSTELLUNGEN ÄNDERN ...............................................14
6.2.TIMER-EINSTELLUNGEN ÄNDERN ..........................................................14
7. PFLEGE UND WARTUNG .................................................................................16
7.1.WASSERDICHTE ........................................................................................16
7.2.BATTERIEWECHSEL ..................................................................................17
8. TECHNISCHE DATEN .......................................................................................21
9. BESTIMMUNGEN UND BEDINGUNGEN .........................................................22
10. HAFTUNGSBESCHRÄNKUNG ........................................................................23
11. KUNDENDIENST ..............................................................................................24
Page 51

1. EINSTIEG IN DEN SUUNTO M3
Diese Bedienungsanleitung führt Sie durch alle Funktionen des Suunto M3, eines
Armbandcomputer für Regattarennen.
1.1. DEN SUUNTO M3 KENNEN LERNEN
Der Suunto M3 hat zwei Hauptanzeigemenüs: Time und Timer. Sie können mit einem
langen Druck (länger als 1 Sekunde) auf die MODE-Taste zwischen den beiden
Anzeigemenüs wechseln. Das nachfolgende Bild zeigt die Tastenbelegung des
Suunto M3:
CHRONO
MODE
UP (START/STOP)
ENTER
DOWN (SYNC)
3
Page 52

1.2. ERSTE EINSTELLUNGEN DES SUUNTO M3
Die erste Ingebrauchnahme des Suunto M3 ist
ganz einfach: Sie müssen lediglich das aktuelle
Datum und die Uhrzeit einstellen.
1. Während der Suunto M3 die Uhrzeit anzeigt,
drücken Sie ENTER und öffnen damit das
Menü.
2. Wählen Sie mit UP oder DOWN Time im
Menü aus.
3. Wählen Sie mit ENTER das markierte Objekt
aus.
4. Wählen Sie dann wieder Time und drücken
Sie ENTER.
5. Stellen Sie die Stunden mit UP/DOWN ein.
6. Bestätigen Sie mit ENTER und gehen Sie zur
nächsten Einstellung über.
7. Drücken Sie MODE, um zur Time-Ansicht
zurückzukehren.
Wählen Sie nun Date im Menü aus und
wiederholen Sie beim Einstellen des Datums
den obigen Vorgang.
Ihr Suunto M3 ist jetzt betriebsbereit.
4
3
Page 53

2. REGATTA-TIMER
Mit dem Suunto M3 können Sie den Rennstart zeitlich optimal koordinieren, sodass
Sie die Startlinie genau zum richtigen Zeitpunkt überqueren. Sie haben so einen
Vorsprung vor Ihren Gegnern und vermeiden Turbulenzen durch andere Boote vor
Ihnen.
TIPP: Während Sie auf den Start des Rennens warten, können Sie den
Chronometer des Suunto M3 verwenden und Übungsstarts durchführen, um
die Zeit zu errechnen, die Sie bis zum Erreichen der Startlinie benötigen.
Mit dem Regatta-Timer können Sie den offiziellen Countdown zum Start verfolgen.
1. Mit einem langen Tastendruck auf MODE wechseln Sie zum Timer-Modus.
2. Drücken Sie ENTER und wählen Sie Start time (Startzeit).
3. Geben Sie die Countdown-Zeit mit UP/DOWN ein. Wird das offizielle Signal
z.B.fünf Minuten vor dem Start gegeben, geben Sie 5 ein.
4. Drücken Sie UP, sobald das offizielle Signal gegeben wird, um den Countdown auf
dem Suunto M3 zu beginnen.
TIPP: Sie können den Timer so einstellen, dass der Countdown wiederholt
wird. Das ist nützlich, wenn es z.B. bei verschiedenen Bootsklassen mehrere
Rennstarts gibt. Mit einem langen Druck auf ENTER schalten Sie die
Wiederholung ein oder aus. Das ist sowohl bei laufendem als auch bei angehaltenem
Timer möglich. Wenn Sie die DOWN-Taste nach dem Start lange drücken, schalten
Sie die Wiederholung aus und sehen die tatsächliche Rennzeit.
TIPP: Langes Drücken von UP hält den Timer an. Drücken Sie UP, um den
Timer wieder zu starten bzw. ihn zurückzusetzen, falls der Start aus
irgendeinem Grund wiederholt oder neu angesetzt wird.
5. Erreicht der Countdown-Timer 00:00, wird auf dem Suunto M3 die Dauer des
5
Page 54

Rennens angezeigt. Ein langer Tastendruck auf UP beendet die Zeitnahme.
TIPP: Sie können den Countdown-Timer auch so einstellen, dass er
automatisch bis zu einer vorgegebenen Zeit läuft. Drücken Sie dazu ENTER
und wählen Sie Count to (Zählen bis) aus dem Menü.
2.1. SYNCHRONISIEREN DES COUNTDOWN-TIMERS
Der Timer des Suunto M3 kann auch noch nach Beginn des offiziellen Countdowns
synchronisiert werden. Das bietet sich an, z.B. wenn Sie das offizielle 5-MinutenSignal verpasst haben und der Timer des Suunto M3 nicht rechtzeitig gestartet
wurde. Bei laufendem Timer gehen Sie dazu wie folgt vor:
1. Warten Sie auf das nächste offizielle Signal (z.B. 4 Minuten oder 1 Minute).
2. Drücken Sie beim Ertönen des Signals sofort die DOWN-Taste.
Der Timer springt nach unten zur nächsten vollen Minute und läuft ab da weiter.
TIPP: Werkseitig ist das Gerät so eingestellt, dass der Timer bei Drücken von
DOWN auf die nächste volle Minute nach unten springt (z.B. von 03:50 auf
03:00 und von 03:20 auf 03:00). Sie können den Suunto M3 aber auch so
programmieren, dass er zur nächsten vollen Minute springt (also z.B. von
03:50 auf 04:00). In Abschnitt 6.2 finden Sie genauere Einzelheiten dazu.
2.2. WÄHREND DES RENNENS ZWISCHENZEITEN HINZUFÜGEN
Sie können auch Zwischenzeiten abspeichern, wenn Sie z.B. während des Rennens
eine Wendeboje passieren. Nach dem Rennen können Sie diese Zeiten mit der
Funktion Logbook (Logbuch) abrufen.
1. Bei laufender Rennzeit drücken Sie auf ENTER und wählen Add mark (Markierung
hinzufügen), um eine Zwischenzeit abzuspeichern.
2. Die neue Zwischenzeit und die seit der vorhergehenden Zwischenzeit vergangene
6
Page 55

Zeit werden kurz angezeigt.
3. Drücken Sie nach dem Rennen auf ENTER und wählen Sie Logbook um Ihre
gespeicherten Zwischenzeiten zu betrachten .
HINWEIS: Sie können bis zu 10 verschiedene Logbücher in Ihrem Suunto M3
abspeichern. Ist der Speicher voll, wird automatisch das älteste Logbuch
durch ein neues ersetzt.
2.3. TASTENSPERRE
Ein versehentliches Abschalten der Synchronisierung des Regatta-Timers lässt sich
verhindern, indem Sie die Tastensperre Ihres Suunto M3 aktivieren bzw. abschalten.
Dazu drücken Sie zuerst ENTER, dann innerhalb von 3 Sekunden CHRONO.
Die Tastensperre gilt nur für folgende Funktionen: Starten des Regatta-Timers,
Anhalten des Countdowns oder der Rennzeit sowie Synchronisieren des
Countdowns.
7
Page 56

3. BESTIMMEN DES BEVORZUGTEN ENDES DER STARTLINIE
Es kann sein, dass der Wind vor Rennstart dreht und nicht mehr mit der Startlinie
ausgerichtet ist. Mit dem Suunto M3 können Sie das bevorzugte Ende der Startlinie
bestimmen.
15°
8
1. Fahren Sie in den Wind und überprüfen
Sie Ihre Peilung mit dem Bootskompass.
Beispiel: Peilung zum Wind ist 15°.
2. Stellen Sie den rotierenden Ring Ihres
Suunto M3 so ein, dass die Peilung in den
Wind parallel zum schwarzen Dreieck des
inneren Rings steht.
Page 57

75°
3. Steuern Sie das Boot an der Startlinie
entlang und überprüfen Sie Ihre Peilung
mit dem Bootskompass.
Beispiel: Peilung ist 75°.
4. Suchen Sie auf dem rotierenden Ring
des Suunto M3 die Peilung und sehen
+
Sie sich den inneren Ring an:
75°
• Liegt die Peilung im Plusbereich (+),
bewegen Sie sich auf das bevorzugte
Ende der Startlinie zu.
• Liegt die Peilung im Negativbereich (-),
bewegen Sie sich vom bevorzugten
Ende der Startlinie weg.
Beispiel: die Peilung 75° befindet sich im
Plusbereich, d.h. Sie bewegen sich auf
das bevorzugte Ende zu.
9
Page 58

4. KURSBERECHNUNG ZUR NÄCHSTEN MARKIERUNG
Bei schlechten Sichtverhältnissen gestaltet sich das Einstellen der Peilung zur
nächsten Wendeboje manchmal recht schwierig. Mit dem Suunto M3 können Sie die
Peilung zur nächsten Wendeboje bereits vor Erreichen der Wendemarke kalkulieren.
Das heißt, Sie können so bald wie möglich in die richtige Richtung steuern.
Die Kalkulation beruht auf den Standard-Wendewinkeln (30°, 45°, 60°), je nach
Rennstrecke.
60
°
1. Steuern Sie direkt auf die erste Boje zu
und überprüfen Sie mit dem Bootskompass
Ihre Peilung.
°
15
Beispiel: Die Peilung zur ersten Boje ist 15°.
2. Stellen Sie den rotierenden Ring Ihres
Suunto M3 so ein, dass Ihre Peilung parallel
zum schwarzen Dreieck auf dem inneren
Ring steht.
10
Page 59

3. Suchen Sie auf dem inneren Ring den
entsprechenden Wendewinkel und
lesen Sie auf dem rotirenden Ring
des Suunto M3 die Peilung zur
nächsten Wendeboje ab.
War Ihr Kurs z.B. 15° und der
Wendewinkel zur nächsten Markierung
beträgt 60° nach links, ist die Peilung zur
nächsten Boje 255°.
4. Haben Sie die erste Wendeboje
passiert, folgen Sie der neuen Peilung
und wiederholen die Berechnung zur
nächsten Wendeboje.
255°
60
°
°
15
11
Page 60

5. CHRONOMETER UND EINSTELLEN VON WECK-/ERINNERUNGSZEITEN
Sie können den Suunto M3 als Chronometer verwenden oder sich durch akustische
Signale an wichtige Termine erinnern lassen.
5.1. VERWENDEN DES CHRONOMETERS
Den Chronometer können Sie sowohl im Time- als auch im Timer-Modus verwenden.
1. Drücken Sie MODE, bis in der unteren Zeile 0:00,0 angezeigt wird.
2. Drücken Sie zum Starten des Chronometers CHRONO.
TIPP: Mit einem langen Tastendruck auf MODE können Sie ohne
Unterbrechung der Zeitmessung zwischen dem Time- und dem Timer-Modus
wechseln.
3. Drücken Sie CHRONO, um die Zeitmessung anzuhalten.
4. Drücken Sie zum Zurücksetzen des Chronometers erneut CHRONO.
TIPP: Während Sie auf den Start des Rennens warten, können Sie den
Chronometer des Suunto M3 verwenden und Übungsstarts durchführen, um
die Zeit zu errechnen, die Sie bis zum Erreichen der Startlinie benötigen.
Mit dem Regatta-Timer können Sie den offiziellen Countdown zum Start verfolgen.
5.2. WECK-/ERINNERUNGSZEIT EINSTELLEN
Sie können bis zu drei Weck- und Erinnerungszeiten für wichtige Termine eingeben.
Wenn der Wecker gestellt ist, erscheint das Symbol rechts unten auf dem
Display.
1. Drücken Sie im Time-Modus auf ENTER und wählen Sie Alarm aus dem Menü.
2. Wählen Sie eine der drei Weck-/Erinnerungszeiten aus und drücken Sie auf
12
Page 61

ENTER.
3. Stellen Sie den Wecker auf On.
4. Datum und Uhrzeit für Weck-/Erinnerungszeiten stellen Sie mit UP/DOWN ein.
Bestätigen Sie die eingegebenen Werte mit ENTER.
TIPP: Wenn Sie kein Datum eingeben, ertönt das akustische Signal jeden
Tag zur selben Zeit. Haben Sie ein Datum eingegeben, ertönt das akustische
Signal an dem Tag; und dann schaltet der Wecker automatisch auf Off.
13
Page 62

6. INDIVIDUELLE EINSTELLUNG DES SUUNTO M3
Sie können Ihren Suunto M3 entsprechend Ihren persönlichen Bedürfnissen
einstellen.
6.1. ALLGEMEINE EINSTELLUNGEN ÄNDERN
1. Drücken Sie im Time-Modus ENTER und wählen Sie General (Allgemein) aus dem
Menü.
2. Wählen Sie die Einstellung, die Sie ändern möchten:
• Tones (Töne): schaltet die Tastentöne ein oder aus.
• Light (Licht): reguliert die Hintergrundbeleuchtung. Es gibt drei verschiedene Einstellungen:
• Normal: Das Licht bleibt bei langem Drücken von CHRONO oder aktiver Weck-/
Erinnerungsfunktion 7 Sekunden eingeschaltet.
• Off (Aus): Die Beleuchtung schaltet sich nie ein.
• Night use (Nacht): Das Licht bleibt nach dem Druck irgendeiner Taste 7 Sekun-
den eingeschaltet.s
• Units (Einheiten): ändert das Format von Uhrzeit und Datum.
• Contrast (Kontrast): reguliert den Kontrast des Display.
6.2. TIMER-EINSTELLUNGEN ÄNDERN
1. Drücken Sie im Timer-Modus ENTER und wählen Sie Settings (Einstellungen) aus
dem Menü.
2. Wählen Sie die Einstellungen, die Sie ändern möchten, und drücken Sie ENTER.
• Repeat (Wiederholung): Lautet die Einstellung On, wird der Countdown des
Timers neu gestartet.
• Tones (Töne): Mit TONE SEQ können Sie definieren, wann während des Count-
14
Page 63

downs ein akustisches Signal ertönen soll, z.B. alle 10 Minuten oder alle 10 Sekunden. Mit My tone (Mein Ton) können Sie eine individuelle Signalzeit definieren.
Bitte beachten Sie, dass diese Toneinstellungen unabhängig voneinander sind.
• Sync: Werkseitig ist Down eingestellt, d.h. beim Drücken von DOWN springt der
Timer automatisch nach unten zur nächsten vollen Minute. Ist Round eingestellt,
springt der Timer auf die nächste volle Minute.
15
Page 64

7. PFLEGE UND WARTUNG
Die Pflege des Suunto M3
Halten Sie sich genau an die in diesem Handbuch beschriebenen Pflegehinweise.
Versuchen Sie niemals, den Suunto M3 auseinander zu nehmen oder selbst zu
reparieren. Schützen Sie ihn vor Stößen, extremer Hitze und längerer direkter
Sonneneinstrahlung. Vermeiden Sie Kontakt mit rauen Oberflächen, da der
Bildschirm dadurch verkratzt werden könnte. Wenn Sie Ihren Suunto M3 für längere
Zeit nicht benutzen, bewahren Sie ihn in sauberer und trockener Umgebung bei
Raumtemperatur auf.
Ist Ihr Suunto M3 mit Salzwasser in Kontakt gekommen, spülen Sie ihn mit
Süsswasser, um das Salz zu entfernen. Drehen Sie dabei den rotierenden Ring und
drücken Sie dieTasten. Wischen Sie den Suunto M3 dann mit einem weichen Tuch
sauber und trocken. Verwenden Sie milde Seife, um die Oberfläche von
Verschmutzungen oder hartnäckigen Flecken zu reinigen. Setzen Sie Ihren Suunto
M3 keinen starken chemischen Mitteln wie Benzin, Reinigungsmittel, Aceton,
Alkohol, Insektenschutzmitteln, Klebstoffen oder Farbe aus, da diese das Gehäuse,
die Dichtungen und die Oberfläche angreifen und beschädigen.
7.1. WASSERDICHTE
Der Suunto M3 ist wasserdicht und wurde gemäß dem Standard ISO 2281 getestet
(www.iso.ch). Der Suunto M3 ist weiterhin mit einem Testüberdruck gekennzeichnet,
der in Tiefenmeter angegeben wird (30 m/100 feet). Beachten Sie, dass dies keine
Tauchtiefe bezeichnet, sondern lediglich den Wasserdruck nennt, unter dem das
Gerät getestet wurde.
16
Page 65

Der Suunto M3 eignet sich keinesfalls zum Tauchen, auch nicht in geringeren Tiefen
als 30 m/100 ft.
Durch normale Wassereinwirkung (Regen, Duschen, Schwimmen) wird seine
Funktion hingegen nicht beeinträchtigt. Drücken Sie jedoch niemals unter Wasser die
Tasten.
HINWEIS: Der Suunto M3 ist nicht zum Tauchen vorgesehen.
7.2. BATTERIEWECHSEL
Der Suunto M3 wird mit einer 3V-Lithiumbatterie des Typs CR 2032 betrieben. Eine
Batterie-Warnanzeige erscheint auf dem Display, wenn noch etwa 5-15 % der
Batteriekapazität verfügbar sind. Wir empfehlen Ihnen, bereits in diesem Stadium die
Batterie auszuwechseln. Beachten Sie, dass extreme Kälte die Warnanzeige
aktivieren kann, selbst wenn die Batterie noch voll funktionsfähig ist. Wenn die
Anzeige in Temperaturen über 10°C (50°F) aktiviert wird, muss die Batterie
ausgewechselt werden.
HINWEIS: Häufiger und lang anhaltender Gebrauch der
Hintergrundbeleuchtung verkürzt die Lebensdauer der Batterie erheblich.
Sie können die Batterie selber auswechseln. Gehen Sie dabei mit großer Sorgfalt vor,
um zu verhindern, dass Wasser in das Batteriefach oder die Computerelektronik
eindringt . Verwenden Sie immer einen Original-Ersatzbatteriesatz bestehend aus
neuer Batterie, Batterieabdeckung, Öffnungswerkzeug und O-Ring.
Ersatzbatteriesätze sind bei Ihrem autorisierten Suunto-Fachhändler erhältlich.
17
Page 66

HINWEIS: Ein Batteriewechsel findet auf eigene Gefahr statt; verwenden Sie
immer einen Original-Ersatzbatteriesatz von Suunto. Wir empfehlen Ihnen, die
Batterie bei Ihrem Suunto-Kundendienst auswechseln zu lassen.
HINWEIS: Wechseln Sie beim Batteriewechsel auch die Batterieabdeckung und den
O-Ring aus. Setzen Sie keinesfalls die alte Abdeckung und Dichtung wieder ein.
So wechseln Sie die Batterie:
1. Stecken Sie das Öffnungswerkzeug oder eine Münze in den Schlitz der Batteriefachabdeckung, die sich auf der Rückseite des Suunto M3 befindet.
2. Drehen Sie das Werkzeug/die Münze gegen den Uhrzeigersinn, bis sich diese auf
einer Linie mit der OPEN-Markierung befindet.
3. Entfernen und entsorgen Sie die alte Batterieabdeckung und den O-Ring.
Vergewissern Sie sich, dass alle Oberflächen sauber und trocken sind.
4. Nehmen Sie die alte Batterie vorsichtig heraus.
5. Legen Sie die neue Batterie mit der positiven Polung (+) nach oben in das
Batteriefach unter die kleine Metallklemme.
6. Schließ en Sie das Batteriefach mit der neuen Abdeckung (auf korrekte Position
des O-Rings achten!) und drehen diese mit dem Werkzeug/der Münze im
Uhrzeigersinn, bis sie sich auf einer Linie mit der CLOSE-Markierung befindet.
Achten Sie darauf, dass die Abdeckung beim Drehen in waagerechter Stellung
bleibt. Abdekkung nicht mit Gewalt oder starkem Druck zudrehen.
HINWEIS: Seien Sie beim Batteriewechsel äußerst vorsichtig, damit die Wasserdichte des Suunto M3 gewährleistet bleibt. Mangelnde Sorgfalt beim Batteriewechsel
kann den Verfall des Garantieanspruchs zur Folge haben.
ACHTUNG: Dieses Suunto-Produkt enthält eine Lithiumbatterie. Um Feuergefahr
und Verbrennungen zu vermeiden, darf die Batterie nicht auseinander genommen,
18
Page 67

zerquetscht, anderweitig beschädigt, kurzgeschlossen oder aufgeladen werden. Keinesfalls in Feuer oder Wasser entsorgen. Verwenden Sie nur vom Hersteller angegebene Batterien. Verbrauchte Batterien müssen vorschriftgemäß dem Recycling
zugeführt bzw. entsorgt werden.
Auf der nächsten Seite ist der Batteriewechsel in Bildern dargestellt.
19
Page 68

20
Page 69

8. TECHNISCHE DATEN
• Betriebstemperatur -20°C bis +50°C / -5°F bis 120°F
• Lagertemperatur -30°C bis +60°C / -22°F bis 140°F
• Gewicht 60 g
• Wasserdicht (30 m/100 ft)
• Mineralkristallglas
• Aluminiumgehäuse
• Auswechselbare Batterie (CR2032). Die Lebensdauer der Batterie beträgt etwa 12
Monate.
21
Page 70

9. BESTIMMUNGEN UND BEDINGUNGEN
Copyright
Diese Publikation und ihr Inhalt sind Eigentum der Firma Suunto Oy. Sie ist ausschließlich für den Gebrauch von Suunto Oy-Kunden bestimmt und dient zur Vermittlung von Kenntnissen und relevanten Informationen bezüglich der Handhabung von
Suunto M3-Produkten. Der Inhalt dieser Publikation darf nicht ohne die schriftliche
Genehmigung der Suunto Oy für einen anderen Zweck verwendet oder weitergegeben oder in anderer Form verbreitet, veröffentlicht oder vervielfältigt werden.
Obwohl wir großen Wert auf die Exaktheit und Ausführlichkeit der Informationen
gelegt haben, können wir keine allumfassende Garantie für ihre Genauigkeit geben.
Hinsichtlich des Inhalts behalten wir uns das Recht auf unangekündigte Änderungen
vor. Die aktuellste Version dieser Dokumentation steht Ihnen jederzeit unter
www.suunto.com zum Download zur Verfügung.
Copyright © Suunto Oy 4/2005
Warenzeichen
Suunto, Wristop Computer, Suunto M3, Replacing Luck sowie alle verwendeten
Logos sind eingetragene oder unregistrierte Warenzeichen der Firma Suunto Oy. Alle
Rechte vorbehalten.
CE-Konformität
Das CE-Symbol bestätigt die Konformität mit der EMC-Direktive 89/336/EEC der
Europäischen Union.
ISO 9001-Konformität
Das Qualitätssicherungssystem der Suunto Oy erhielt durch Det Norske Veritas das
ISO 9001-Zertifikat, welches besagt, dass SUUNTO Oy in allen Operationsbereichen
diese Norm erfüllt (Qualitätszertifikat No. 96-HEL-AQ-220).
22
Page 71

10. HAFTUNGSBESCHRÄNKUNG
Falls dieses Produkt Material- oder Herstellungsfehler aufweist, wird Suunto Oy das
Produkt zwei (2) Jahre lang ab Kaufdatum nach einzig eigenem Ermessen kostenlos
reparieren oder mit neuen oder wiederhergestellten Bauteilen ausstatten.
Diese Garantie besteht ausschließlich gegenüber dem Erstkäufer und deckt nur
Material- oder Herstellungsfehler ab, die während des normalen Gebrauchs innerhalb
der Garantiezeit auftreten.
Die Garantie erstreckt sich nicht auf den Akku bzw. den Batteriewechsel oder auf
Beschädigungen oder Fehler, die auf Grund von Unfällen, Missbrauch, Fahrlässigkeit, Handhabungsfehlern oder eigenhändig am Produkt vorgenommenen Veränderungen auftreten, ebenso wenig auf Funktionsstörungen, die aus dem den Angaben
in der Produktdokumentation zuwiderlaufenden Gebrauch oder anderen nicht unter
die Garantie fallenden Ursachen resultieren.
Es gibt keine weiteren Garantieleistungen als die oben genannten.
Der Kunde kann sich bei Fragen zum Recht auf Reparatur innerhalb der Garantiezeit
mit unserem Kundendienst in Verbindung setzen, der auch die Vollmachten für
externe Reparaturleistungen erteilt. Die Fa. Suunto Oy und ihre Tochterfirmen haften
unter keinen Umständen für direkte oder indirekte Schäden, die aus dem Gebrauch
oder der Unfähigkeit zum Gebrauch des Produkts herrühren.
Die Fa. Suunto Oy und ihre Tochterfirmen übernehmen keinerlei Haftung für Verluste
oder Ansprüche Dritter, die infolge der Benutzung dieses Geräts entstehen können.
Entsorgung
Bitte entsorgen Sie das Gerät vorschriftsmäßig als Elektromüll. Nicht zum
Hausmüll geben. Sie können das Gerät auch zu einem Suunto-Händler in
Ihrer Nähe zurückbringen.
23
Page 72

11. KUNDENDIENST
Ist ein Garantieanspruch gegeben, senden Sie das freigemachte Produkt an den für
die Reparatur oder den Ersatz zuständigen Suunto-Händler. Legen Sie der Sendung
Ihren Namen, Ihre Adresse sowie den in Ihrem Land gültigen Bestimmungen
entsprechend Kaufbeleg und/oder Garantiekarte bei. Ihr Garantieanspruch wird
anerkannt, das Produkt kostenlos repariert bzw. ersetzt und innerhalb eines
angemessenen Zeitraums an Sie zurückgeschickt, sofern alle nötigen Ersatzteile auf
Lager sind. Alle über den Gewährleistungsanspruch hinausgehenden Reparaturen
erfolgen auf Kosten des Eigentümers. Diese Garantie gilt nur gegenüber dem
Erstkäufer des Geräts und ist nicht übertragbar. Können Sie nicht mit einem SuuntoHändler Kontakt aufnehmen, wenden Sie sich für weitere Informationen an Ihre
Suunto-Vertriebsstelle vor Ort. Diese finden Sie unter www.suunto.com.
Garantieregistrierung online
Tauch- und Armbandcomputer von Suunto können online unter www.suunto.com
registriert werden. Unser neuer Service zur Online-Registrierung der Garantie erspart
Ihnen Schreibarbeit und Postversand; Sie können Ihr Suunto Instrument gleich beim
Kauf im Geschäft oder später von zu Hause aus online registrieren. Durch die
Registrierungen können wir Ihnen bei Reparatur- und Wartungsarbeiten schneller
und unkomplizierter helfen, ebenso bei Fragen zu Ihrem Produkt, die von unserem
Global Help Desk beantwortet werden. Die von Ihnen eingegebene Seriennummer
Ihres Produktes ermöglicht es unseren Kundendienstmitarbeitern, die erforderlichen
Informationen schnell zu finden und Ihnen den bestmöglichen Service zu bieten.
Auch können wir im Fall von Sicherheitsinformationen zu Ihrem Suunto-Produkt mit
Ihnen Kontakt aufnehmen.
24
Page 73

DATOS DE CONTACTO DE SERVICIO AL CLIENTE
Suunto Oy Tel. +358 9 875870
Fax +358 9 87587301
Suunto USA Tel. 1 (800) 543-9124
Canadá Tel. 1 (800) 776-7770
Centro de llamadas para Europa
Tel. +358 2 284 11 60
Preguntas relacionadas con PC
softwarehelpdesk@suunto.com
Sitio web de Suunto www.suunto.com
ES
1
Page 74

ÍNDICE
1. PRIMEROS PASOS CON SUUNTO M3 ..............................................................3
1.1.FAMILIARÍCESE CON EL SUUNT O M3 ...........................................................3
1.2.PRIMEROS PASOS CON SUUNTO M3 ........................................................... 4
2. USO DEL TEMPORIZADOR DE REGATA ..........................................................5
2.1.SINCRONIZACIÓN DE LA CUENTA ATRÁS ....................................................6
2.2.PARA AÑADIR UNA MARCA DE TIEMPO PARCIAL DURANTE LA REGATA...7
2.3.UTILIZACIÓN DEL BLOQUEO DE BOTÓN ......................................................7
3. PARA DETERMINAR EL EXTREMO FAVORECIDO DE LA LÍNEA DE SALIDA 8
4. PARA CALCULAR EL RECORRIDO HASTA LA SIGUIENTE MARCA ............10
5. USO DEL CRONÓMETRO Y AJUSTE DE LAS ALARMAS ..............................12
5.1.USO DEL CRONÓ METRO .............................................................................12
5.2.AJUSTE DE UNA A L ARMA ............................................................................12
6. AJUSTES PERSONALES .................................................................................14
6.1.P ARA CAMBIAR LOS AJUSTES GENERALES .............................................14
6.2.PARA CAMBIAR LOS AJUSTES DEL CRONÓMETRO .................................14
7. CUIDADO Y MANTENIMIENTO ........................................................................15
7.1.RESISTENCIA AL AGUA ................................................................................15
7.2.CAMBIO DE LA PILA ......................................................................................16
8. ESPECIFICACIONES TÉCNICAS .....................................................................19
9. TÉRMINOS Y CONDICIONES ..........................................................................20
10. LÍMITACIÓN DE RESPONSABILIDAD ..............................................................21
11. SERVICIO POSVENTA ......................................................................................22
Page 75

1. PRIMEROS PASOS CON SUUNTO M3
Este manual de instrucciones le enseñará a utilizar todas las características del
Suunto M3, un ordenador de muñeca diseñado para regatistas competitivos.
1.1. FAMILIARÍCESE CON EL SUUNTO M3
El Suunto M3 tiene dos pantallas principales: la pantalla de hora Time y la pantalla de
cronómetro Timer. Puede cambiar entre las dos pantallas con una pulsación larga
(más de 1 segundo) del botón MODO. La siguiente ilustración muestra la disposición
de los botones del Suunto M3:
CHRONO
(CRONO)
MODE
(MODO)
UP (START/STOP)
(ARRIBA - ARRANQUE/
PARADA)
ENTER
DOWN (SYNC)
(ABAJO - SINC)
3
Page 76

1.2. PRIMEROS PASOS CON SUUNTO M3
Es muy sencillo comenzar a manejar el Suunto
M3: todo lo que necesita es ajustar la hora y
fecha actuales:
1. Mientras el Suunto M3 muestra la hora, pulse
el botón ENTER para acceder al menú.
2. Utilice los botones ARRIBA o ABAJO para
seleccionar el elemento Time del menú.
3. Pulse ENTER hasta que el nombre del ajuste
aparezca en color inverso.
4. Seleccione de nuevo Time y pulse ENTER.
5. Ajuste la hora pulsando los botones ARRIBA/
ABAJO.
6. Pulse ENTER para aceptar y continuar.
7. Pulse ENTER para regresar a la pantalla de
hora.
Una vez ajustada la hora, seleccione Date en el
menú y repita el procedimiento anterior para
ajustar la fecha.
El Suunto M3 está ya preparado para su uso.
4
3
Page 77

2. USO DEL TEMPORIZADOR DE REGATA
El Suunto M3 le ayuda a optimizar el temporizado para el inicio de regata de manera
que pueda cruzar la línea de salida en el momento preciso. Esto le permitirá sacar
ventaja a sus contrincantes y evitar las turbulencias de otras embarcaciones que
pudieran colocarse delante de la suya.
CONSEJO: Mientras espera para el inicio de la regata, puede utilizar el cronómetro Suunto M3 para hacer una estimación del tiempo que necesita para
alcanzar la línea de salida realizando salidas de prueba
El cronómetro de regata le ayuda a seguir la cuenta atrás oficial para el comienzo de
la regata.
1. Mantenga pulsado unos instantes el botón MODO para cambiar a la pantalla de
Timer (Cronómetro).
2. Presione ENTER y seleccione Start time.
3. Introduzca el tiempo para la cuenta atrás mediante los botones ARRIBA/ABAJO.
Por ejemplo, si la señal oficial se da 5 minutos antes del inicio, ponga el tiempo a
5.
4. En el momento de la señal oficial pulse ARRIBA para comenzar la cuenta atrás en
el Suunto M3.
CONSEJO: Puede ajustar el cronómetro para repetir la cuenta atrás. Esto es
muy útil si se producen varios inicios de regata, por ejemplo para diferentes
clases de embarcación. Pulse durante unos instantes el botón ENTER para
activar o desactivar la función de repetición. Esto puede hacerse tanto con el cronómetro en marcha como cuando esté parado. Después del inicio, una pulsación larga
del botón ABAJO desactiva la función de repetición, lo que le permite ver el tiempo
actual de regata.
5
Page 78

CONSEJO: Puede parar el cronómetro con una pulsación larga sobre el
botón ARRIBA. Presione ahora el botón ARRIBA para arrancar de nuevo el
cronómetro, o haga un pulsación larga sobre el botón ARRIBA para reiniciar
el cronómetro si, por alguna razón, se produce una nueva llamada o reanudación de
la regata.
5. Cuando la cuenta atrás alcanza 00:00, el Suunto M3 comienza a mostrar el tiempo
de regata transcurrido. Haga una pulsación larga sobre el botón ARRIBA para
detener el tiempo de regata.
CONSEJO: Puede también ajustar la cuenta atrás de manera que comience a
contar automáticamente en una hora y fecha preestablecidas. Para ajustar el
cronómetro, pulse ENTER y seleccione Count to en el menú.
2.1. SINCRONIZACIÓN DE LA CUENTA ATRÁS
El Suunto M3 le permite sincronizar el cronómetro con la cuenta atrás oficial, aún
después de que comience la cuenta atrás. Esto es muy útil si está distraído cuando
se da la señal oficial de los 5 minutos y se produce un retraso en el arranque del cronómetro del Suunto M3. Una vez que el cronómetro está en marcha, la sincronización se realiza de la siguiente manera:
1. Espere atento a la siguiente señal oficial (por ejemplo, la señal de 4 ó de 1 minu-
tos).
2. Al darse la señal, presione inmediatamente el botón ABAJO.
El cronómetro saltará hacia abajo hasta el comienzo del siguiente minuto y continuará la cuenta atrás.
CONSEJO: De manera predeterminada, al pulsar el botón ABAJO el cronó-
metro se desplaza hasta el siguiente minuto inferior (por ejemplo, de 03.50 a
03.00 y de 03.20 a 03.00). Puede ajustar el cronómetro del Suunto M3 de
6
Page 79

manera que se desplace hasta el minuto entero más próximo (por ejemplo, de 03.50
a 04.00). En el apartado 6.2 se explica cómo hacer esto.
2.2. PARA AÑADIR UNA MARCA DE TIEMPO PARCIAL DURANTE LA REGATA
Durante la regata, puede almacenar tiempos parciales, por ejemplo cuando pase por
una marca. Los tiempos almacenados pueden verse después de la regata con el
Logbook.
1. Con el cr onómetro en marcha durante la regata, presione ENTER y seleccione
Add mark para almacenar un tiempo parcial.
2. El nuevo tiempo parcial y el tiempo transcurrido desde que se ha tomado el anterior tiempo parcial se mostrarán brevemente en la pantalla.
3. Después de la regata, pulse ENTER y seleccione Logbook para ver los tiempos
parciales almacenados.
NOTA: Puede almacenar en el Suunto M3 hasta 10 regatas o recorridos distintos. Cuando la memoria se llena, un registro nuevo de tiempos parciales
remplazará al registro más antiguo en la memoria.
2.3. UTILIZACIÓN DEL BLOQUEO DE BOTÓN
Para evitar unadesincronización accidental del cronómetro de la regata, puede activar o desactivar el bloqueo de botones en el Sunto M3. Para ello, pulse el botón
ENTER y, antes de que transcurran 3 segundos, el botón CRONO.
Tenga en cuenta que el bloqueo de botón solo impide las siguientes acciones: arranque del cronómetro, parada de la cuenta atrás o del cronómetro y sincronización de
la cuenta atrás.
7
Page 80

3. PARA DETERMINAR EL EXTREMO FA VORECIDO DE LA
LÍNEA DE SALIDA
Antes de que comience una regata, la dirección del viento puede haber cambiado,
dejando de estar alineada con la línea de salida. El Suunto M3 le ayuda a determinar
el extremo favorecido de la línea de salida.
15°
8
1. Ponga proa al viento y anote el rumbo
señalado por la brújula.
Ejemplo: hacia el viento el rumbo es 15º.
2. Ajuste el bisel giratorio del Suunto M3
de manera que el rumbo hacia el viento
sea paralelo al triángulo negro situado en
el anillo interior.
Page 81

75°
3. Ponga la embarcación alineada con la
línea de salida y anote el rumbo de la
brújula.
Ejemplo: el rumbo es 75º
4. Encuentre el rumbo en el bisel giratorio del Suunto M3 y vea la posición
+
respecto al anillo interior:
75°
• Si el rumbo está en el sector +, la
embarcación está dirigida hacia el
extremo favorecido de la línea de salida.
• Si el rumbo está en el sector -, la
embarcación está dirigida hacia el
extremo opuesto de la línea de salida.
Ejemplo: el rumbo es 75º y está en el
sector +, lo que significa que la proa está
dirigida hacia el extremo favorecido.
9
Page 82

4. PARA CALCULAR EL RECORRIDO HASTA LA SIGUIENTE
MARCA
El ajuste del rumbo hacia la siguiente marca es difícil a veces debido a la escasa visibilidad. El Suunto M3 le permite calcular el rumbo a la siguiente marca de regata anticipadamente, antes de alcanzar el punto de virada. De esta manera, puede gobernar
hacia la dirección adecuada lo más pronto posible.
El cálculo se basa en los ángulos estándar de virada (30º, 45º, 60º), dependiendo del
recorrido de la regata.
°
60
°
15
1. Gobierne la embarcación hacia la primera
marca y anote el rumbo de la brújula
Ejemplo: el rumbo hacia la primera marca es
15º.
2. Ajuste el bisel giratorio del Suunto M3 de
manera que su rumbo sea paralelo al triángulo negro situado en el anillo interior.
10
Page 83

3. Encuentre en el anillo interior el
ángulo apropiado de virada y lea el
rumbo hacia la siguiente marca en el
bisel giratorio.
Por ejemplo, si el rumbo hacia la primera marca es de 15º y el ángulo de
virada hacia la siguiente marca es de
60º a babor, el rumbo hacia la segunda
marca será de 255º.
4. Después de pasar la primera marca,
siga el nuevo rumbo y repita el cálculo
para la siguiente marca.
255°
60
°
°
15
11
Page 84

5. USO DEL CRONÓMETRO Y AJUSTE DE LAS ALARMAS
Puede utilizar el Suunto M3 como cronómetro o como una herramienta para recordarle eventos importantes.
5.1. USO DEL CRONÓMETRO
Puede utilizar el cronómetro tanto en la pantalla de Time como en la de Timer.
1. Pulse el botón MODO para que se muestre 00:00,0 en la fila inferior de la pantalla.
2. Pulse CRONO para arrancar el cronómetro.
CONSEJO: Puede cambiar entre pantalla de Time y pantalla de Timer sin
afectar al funcionamiento del cronómetro, haciendo una pulsación larga en el
botón MODO.
3. Pulse CRONO para detener el cronómetro.
4. Pulse CRONO de nuevo para reiniciar el cronómetro.
CONSEJO: Mientras espera para el inicio de la regata, puede utilizar el cronómetro Suunto M3 para hacer una estimación del tiempo que necesita para
alcanzar la línea de salida realizando salidas de prueba.
El temporizador de regata le ayuda a seguir la cuenta atrás oficial para el comienzo
de la regata.
5.2. AJUSTE DE UNA ALARMA
Puede configurar hasta tres alarmas que le recuerden eventos importantes. Cuando
una alarma está activada, el símbolo aparece en la esquina inferior derecha de la
pantalla.
1. En la pantalla de Time, pulse ENTER y seleccione Alarm en el menú.
2. Seleccione una de las 3 alarmas y pulse ENTER.
12
Page 85

3. Ponga la alarma en On.
4. Ajuste la hora y fecha para la alarma mediante los botones ARRIBA/ABAJO. Pulse
ENTER para confirmar los valores.
CONSEJO: Si deja la fecha vacía, la alarma se activará cada día a la misma
hora. Si ajusta la fecha, sonará la alarma a la hora y fecha especificada y
luego se desactivará.
13
Page 86

6. AJUSTES PERSONALES
Puede ajustar algunos aspectos del Suunto M3 de acuerdo con sus preferencias personales.
6.1. PARA CAMBIAR LOS AJUSTES GENERALES
1. En la pantalla de Time, pulse ENTER y seleccione General en el menú.
2. Seleccione el ajuste que quiere cambiar.
• Tones: para activar o desactivar el sonido de los botones
• Light: para la iluminación de la pantalla. Hay tres ajustes distintos:
• Normal: la luz se activa durante 7 segundos al hacer una pulsación larga sobre
el botón CRONO o cuando se activa una alarma.
• Off: la luz no se enciende nunca
• Night use: la luz se enciende durante 7 segundos al pulsar cualquier botón.
• Units: cambia el formato de visualización de hora y fecha
• Contrast: ajusta el contraste de la pantalla
6.2. PARA CAMBIAR LOS AJUSTES DEL CRONÓMETRO
1. En la pantalla de Time, pulse ENTER y seleccione Settings en el menú.
2. Seleccione el ajuste que quiere modificar y pulse ENTER.
• Repeat: si se pone a On la cuenta atrás se reinicia automáticamente.
• Tones: Con Tone SEQ puede establecer en que momento el cronómetro emite un
sonido durante una cuenta atrás, por ejemplo cada 10 minutos o cada 10 segundos. Con My tone puede seleccionar un tono determinado para una señal.
Tenga en cuenta que las selecciones de tono son independientes unas de otras.
• Sync: El ajuste predeterminado es Down: al pulsar el botón ABAJO, el cronómetro
se disminuye hasta el siguiente minuto inferior. cuando se establece en Round, la
lectura del cronómetro se desplaza al minuto entero más próximo.
14
Page 87

7. CUIDADO Y MANTENIMIENTO
Cuidado del Suunto M3
Siga sólo las instrucciones especificadas en este manual. Nunca intente desmontar o
reparar su Suunto M3. Protéjalo de choques, calor extremo y exposición prolongada
a la luz solar directa. Evite frotar el Suunto M3 contra superficies rugosas ya que
éstas podrían arañar la esfera. Si no va a ser utilizado, guárdelo en un lugar seco,
limpio y a temperatura ambiente.
Después de su uso o de la exposición al agua salada, aclare el Suunto M3 con agua
dulce para eliminar la sal. Durante el lavado, gire el bisel y pulse los botones. Por
último, limpie y seque el Suunto M3 con un paño suave. Puede aplicar jabón suave
en las zonas con manchas persistentes. Evite exponer su Suunto M3 a productos
químicos fuertes como gasolina, disolventes, acetona, alcohol, insecticidas, colas y
pintura, pues pueden dañar las juntas, la caja y el acabado.
7.1. RESISTENCIA AL AGUA
Suunto M3 está probado siguiente la norma 2281 de ISO (International Organization
for Standardization, www.iso.ch). Esto significa que es resistente al agua. Además
del término "resistente al agua", el Suunto M3 está marcado con una indicación de
una prueba de sobrepresión dada como una profundidad en metros (30 m/100 p ies).
Esta indicación, sin embargo, no corresponde a una profundidad dada sino que se
refiere a la sobrepresión con la que el agua actúa sobre el reloj.
Esto significa que no puede bucear a una profundidad de 30 m/100 pies con su
Suunto M3. La lluvia, ducha, natación y otras exposiciones normales al agua no afectarán a su funcionamiento. Sin embargo, no pulse nunca los botones bajo el agua.
15
Page 88

NOTA: El Suunto M3 no debe utilizarse para bucear.
7.2. CAMBIO DE LA PILA
El Suunto M3 funciona con una pila de litio de tres voltios del tipo: CR 2032.
Dispone de un indicador de pila que se activa cuando todavía queda entre el 5 y el 15
por ciento de su capacidad. Cuando esto ocurra, recomendamos cambiar la pila. No
obstante, un tiempo extremadamente frío activará el indicador de pila baja, incluso
cuando la capacidad de ésta aún sea elevada. Si el indicador de pila se activa a temperaturas por encima de los 10 °C (50 °F), cambie la pila.
NOTA: El uso continuado de la luz de la pantalla reduce considerablemente
la duración de la pila.
Puede sustituir la pila por sí mismo siempre que lo haga correctamente para evitar
que entre agua en el compartimento de la pila o en el ordenador. Utilice siempre un
kit original de repuesto de la pila, que incluye una pila nueva, tapa de pila, herramienta de apertura y junta tórica. Puede adquirir el kit de repuesto de la pila en un
distribuidor oficial de Suunto.
NOTA: El cambio de pilaes por su cuenta y riesgo. Utilice el kit original de
Suunto de repuesto de la pila. Suunto aconseja que cambie la pila en un ser-
vicio oficial de Suunto.
NOTA: Cuando cambie la pila, sustituya también la tapa de la pila yla junta tórica.
Nunca utilice las antiguas.
Para cambiar la pila:
16
Page 89

1. En la parte posterior del Suunto M3, inserte la herramienta de apertura o una moneda en la ranura situada en la tapa del compartimento de la pila.
2. Gire la moneda/herramienta en el sentido contrario a las agujas del reloj hasta que
se alinee con la marca de posición abierta.
3. Retire la tapa del compartimento de la pila y de la junta tórica y deséchelas. Asegúrese de que todas las superficies están secas y limpias.
4. Retire con cuidado la pila usada.
5. Coloque la nueva pila en el compartimento bajo la tapa metálica con el lado positivo hacia arriba.
6. Con la junta tórica en la posición correcta, vuelva a colocar la tapa del compartimento de la pila y ciérrelo con la moneda/herramienta girando en el sentido de las
agujas del reloj, hasta que quede alineado con la marca de posición cerrada.
Asegúrese de que la tapa permanece alineada mientras la gira. No haga fuerza ni
presione la tapa excesivamente.
NOTA: Realice el cambio de la pila extremando el cuidado, para asegurar que el
Suunto M3 sigue siendo resistente al agua. Si no realiza el recambio de la pila con el
cuidado necesario, la garantía perderá su validez.
ADVERTENCIA: Este producto Suunto contiene una pila de litio. Para reducir el
riesgo de fuego o quemaduras, no desmonte, aplaste, perfore, realice cortocircuitos
externos ni cargue o tire las pilas al fuego o al agua. Sustitúyalas sólo con las pilas
especificadas por el fabricante. Recicle o deseche las pilas usadas de forma apropiada.
Para cambiar la pila consulte las ilustraciones que se muestran en la siguiente
página.
17
Page 90

18
Page 91

8. ESPECIFICACIONES TÉCNICAS
• Temperatura de funcionamiento de -20ºC a + 50ºC / de -5ºF a 120ºF.
• Temperatura de almacenamiento de -30ºC a +60ºC / de -22ºF a 140ºF
• Peso: 60 gr.
• Resistente al agua 30 m/330 pies.
• Pantalla de cristal mineral.
• Carcasa de aluminio.
• Pila reemplazable por el usuario, CR2032. La duración aproximada de la pila es de
12 meses.
19
Page 92

9. TÉRMINOS Y CONDICIONES
Derechos de copia
Esta publicación y su contenido son propiedad de Suunto Oy y están dirigidos exclusivamente al uso de sus clientes para conocer y obtener información clave sobre el
funcionamiento de los productos Suunto M3. Su contenido no debe ser usado o distribuido o comunicado para ningún otro propósito, ni ser desglosado o reproducido
sin el consentimiento previo por escrito de Suunto Oy.
A pesar de que hemos puesto mucho empeño para que la información contenida en
este manual sea a la vez comprensible y precisa, no hay garantía de la precisión
expresada o implícita. Su contenido está sujeto a cambios en cualquier momento sin
previo aviso. La última versión de esta documentación está siempre disponible para
su descarga en www.suunto.com.
Copyright © Suunto Oy 4/2005
Marcas registradas
Suunto, Wristop Computer, Suunto M3, Replacing Luck, y sus correspondientes logotipos son marcas comerciales registradas o no registradas de Suunto Oy. Reservados todos los derechos.
Conformidad CE
El distintivo CE se utiliza para dar fe de la conformidad con la directiva EMC 89/336/
EEC de la Unión Europea.
Conformidad ISO 9001
El Sistema de Garantía de Calidad de Suunto está certificado por Det Norske Veritas
para concordar con la ISO 9001 en todas las operaciones de SUUNTO Oy (Certificado de Calidad Nº 96-HEL-AQ-220).
20
Page 93

10.L ÍMITACIÓN DE RESPONSABILIDAD
Si este producto fallara debido a defectos en el material o en la fabricación, Suunto
Oy, sólo por una vez, lo arreglará o repondrá con partes nuevas o reparadas, sin
cargo alguno, durante dos (2) años a partir de la fecha de compra.
Esta garantía se extiende sólo al comprador original y sólo cubre fallos debidos a
materiales o fabricación defectuosos que han ocurrido durante su uso normal en el
período de garantía.
No cubre los daños o fallos causados por la pila, el recambio de la pila, accidentes,
uso incorrecto, negligencia, utilización incorrecta, alteración o modificación del producto, o cualquier daño causado por el funcionamiento del producto más allá de las
especificaciones publicadas, o por cualquier causa no cubierta en esta garantía.
No existen garantías especificadas excepto las mencionadas anteriormente.
El cliente puede ejercer su derecho a reparación con garantía contactando con el
Departamento de Servicio al Cliente de Suunto OY para obtener una autorización de
reparación. Suunto Oy y sus subsidiarias no asumen responsabilidad alguna por
cualquier daño casual o emergente que resulte del uso o de la incapacidad de uso de
este producto.
Suunto Oy y sus subsidiarias no asumen ninguna responsabilidad por pérdidas o
reclamaciones por terceras personas que puedan proceder del uso de este instrumento.
Eliminación de la unida
Llegado el momento, deseche este producto de la manera apropiada en
conformidad con las disposiciones locales, teniendo en cuenta que se trata
de material de desecho electrónico. No lo arroje junto con la basura. Si lo
desea, puede devolver la unidad al representante de Suunto más cercano.
21
Page 94

11.SERVICIO POSVENTA
Si parece necesario hacer una reclamación durante la garantía, devuelva el producto, con prepago de portes, al vendedor minorista de Suunto, que es el responsable de que la unidad sea reparada o sustituida. Incluya su nombre, dirección y
comprobante de compra o tarjeta de registro, según la normativa de su país. La
reclamación será atendida y el producto reparado o sustituido sin cargo y devuelto en
lo que su distribuidor Suunto determine un plazo razonable de tiempo, siempre y
cuando todas las piezas necesarias estén en stock. Todas las reparaciones no
cubiertas bajo los términos de esta garantía se realizarán a expensas del propietario.
Esta garantía no puede ser transferida por el propietario original. En caso de que no
pueda contactar con su minorista Suunto, contacte con su distribuidor local Suunto
para obtener más información. Puede localizar su distribuidor local Suunto en
www.suunto.com.
Registro de garantía online
Ahora, la garantía de los ordenadores de buceo y de los ordenadores de muñeca
puede ser activada directamente desde el sitio www.suunto.com. Con nuestro nuevo
servicio de registro de garantía, eliminamos la necesidad de papeleo y desplazamientos a la oficina postal, haciendo posible que registre su unidad Suunto online, en
tiempo real, bien en la tienda cuando lo adquiera o, más tarde, desde su casa. El
registro de garantía de su producto nos permitirá ayudarle más fácilmente y con más
rapidez en caso de que necesite enviar su unidad para reparación, o necesite que
nuestro Global Help Desk le facilite información acerca de la utilización del equipo.
Al introducir el número de serie de su producto en el programa, nuestro Servicio de
Atención al Cliente podrá encontrar todos los datos necesarios para proporcionarle el
mejor servicio posible. Registrar su producto permite también que podamos ponernos en contacto con el cliente en caso de que dispongamos de información importante relativa a la seguridad de su producto Suunto.
22
Page 95

NUMERI UTILI PER IL SERVIZIO CLIENTI
Suunto Oy Tel. +358 9 875870
Fax +358 9 87587301
Suunto USA Tel. 1 (800) 543-9124
Canadá Tel. 1 (800) 776-7770
Call Center Europeo
Tel. +358 2 284 11 60
Problemi relativi al PC
softwarehelpdesk@suunto.com
Sitio Internet Suunto www.suunto.com
IT
1
Page 96

INDICE
1. OPERAZIONI PRELIMINARI CON SUUNTO M3 ................................................3
1.1.PER ACQUISIRE DIMESTICHEZZA CON IL SUUNTO M3 ..........................3
1.2.PRIME OPERAZIONI CON IL SUUNTO M3 .................................................4
2. UTILIZZO DEL TIMER .........................................................................................5
2.1.SINCRONIZZAZIONE DEL TIMER DEL CONTO ALLA ROVESCIA ............6
2.2.AGGIUNTA DI UN TEMPO PARZIALE DURANTE LA REGATA ...................6
2.3.UTILIZZO DEL BLOCCO PULSANTI ............................................................7
3. INDIVIDUAZIONE DEL LATO MIGLIORE DELLA LINEA DI PARTENZA ...........8
4. CALCOLO DELLA ROTTA FINO ALLA BOA SUCCESSIVA .............................10
5. UTILIZZO DEL CRONOGRAFO E IMPOSTAZIONE ALLARMI ........................13
5.1.UTILIZZO DEL CRONOGRAFO ..................................................................13
5.2.IMPOSTAZIONE DI UN ALLARME ..............................................................13
6. PERSONALIZZAZIONE DEL SUUNTO M3 .......................................................15
6.1.MODIFICA DELLE IMPOSTAZIONI GENERALI .........................................15
6.2.MODIFICA IMPOSTAZIONI DEL TIMER .....................................................15
7. CURA E MANUTENZIONE ................................................................................17
7.1.IMPERMEABILITÀ ....................................................................................... 17
7.2.SOSTITUZIONE DELLA BATTERIA ............................................................18
8. SPECIFICHE TECNICHE ..................................................................................21
9. CLAUSOLE E CONDIZIONI D'USO ..................................................................22
10. LIMITI DI RESPONSABILITÀ ............................................................................23
11. SERVIZIO POST-VENDITA ...............................................................................24
Page 97

1. OPERAZIONI PRELIMINARI CON SUUNTO M3
Questo manuale di istruzione spiega l'uso di tutte le funzioni del Suunto M3, un
computer da polso progettato per le regate.
1.1. PER ACQUISIRE DIMESTICHEZZA CON IL SUUNTO M3
Il Suunto M3 è dotato di due display principali: il display Time (Tempo) e il display
Timer. Potete passare da un display all'altro premendo a lungo (per più di un
secondo) il pulsante MODE (Modalità). La figura seguente mostra le assegnazioni dei
pulsanti del Suunto M3
CHRONO
MODE
UP (START/STOP)
ENTER
DOWN (SYNC)
3
Page 98

1.2. PRIME OPERAZIONI CON IL SUUNTO M3
Per iniziare a utilizzare il Suunto M3 è sufficiente
impostare la data e l'ora corrente.
1. Mentre viene visualizzata l'ora sul Suunto M3,
premete il pulsante ENTER per accedere al
menu.
2. Utilizzate il pulsante UP o il pulsante DOWN
per selezionare la voce Time dal menu.
3. Premete ENTER per selezionare la voce
evidenziata.
4. Selezionare nuovamente Time e premere
ENTER.
5. Impostate l'ora corretta premendo i pulsanti
UP/DOWN.
6. Premete ENTER per accettare e proseguire.
7. Premete MODE per tornare alla
visualizzazione dell'ora.
Dopo avere impostato l'ora, selezionate Date dal
menu e ripetete l'operazione precedente.
Ora il Suunto M3 è pronto per a essere
utilizzato.
4
3
Page 99

2. UTILIZZO DEL TIMER
Il Suunto M3 vi aiuta a ottimizzare la scelta dei tempi per la partenza della regata,
consentendovi di attraversare la linea di partenza al momento giusto. Ciò vi aiuta a
partire prima degli avversari ed evita di essere disturbati dai "rifiuti" delle barche
davanti.
SUGGERIMENTO: mentre attendete che venga dato il segnale di partenza,
potete utilizzare il cronografo del Suunto M3 per stimare mediante simulazioni
il tempo necessario a raggiungere la linea di partenza.
Il timer aiuta a seguire il conto alla rovescia ufficiale prima dell'inizio della regata.
1. Premete a lungo il pulsante MODE per passare alla visualizzazione Timer.
2. Premete ENTER e selezionate Start Time (Ora di partenza).
3. Immettete il tempo del conto alla rovescia con i pulsanti UP/DOWN. Ad esempio,
se viene dato un segnale 5 minuti prima della partenza, immettete 5.
4. Quando viene dato il segnale dalla barca giuria, premete UP per far partire il conto
alla rovescia sul Suunto M3.
SUGGERIMENTO: potete impostare il timer per programmeare il conto alla
rovescia ripetitivo. Ciò è utile, ad esempio, quando vi sono diverse partenze
scaglionate per barche di classi diverse. Premete a lungo ENTER per attivare
o disattivare tale funzione. Tale operazione può essere effettuata sia quando il timer è
in funzione, sia quando è fermo. Dopo la partenza, premete a lungo DOWN per
disattivare il conto alla rovescia ripetitivo e leggere il tempo effettivo trascorso
dall'inizio della regata.
SUGGERIMENTO: potete fermare il timer premendo a lungo il pulsante Up.
Premete nuovamente UP per far ripartire il timer o premete a lungo UP per
riazzerare il timer se la partenza viene annullata e ripetuta per qualche
5
Page 100

motivo.
5. Quando il timer arriva a 00:00, il Suunto M3 inizia a visualizzare il tempo trascorso
dall'inizio della regata. Premete a lungo UP per fermare il tempo di gara.
SUGGERIMENTO: potete anche impostare il timer del conto alla rovescia in
modo che venga avviato automaticamente a una data e un'ora predefinite.
Per far ciò, premete ENTER e selezionate Count to dal menu.
2.1. SINCRONIZZAZIONE DEL TIMER DEL CONTO ALLA ROVESCIA
Il Suunto M3 consente di sincronizzare il timer con il conto alla rovescia ufficiale
anche dopo che il conto alla rovescia è iniziato. Ciò è molto utile se eravate distratti
quando è stato dato il segnale dei 5 minuti alla partenza, per cui avete fatto partire in
ritardo il timer del Suunto M3. Una volta che il timer è stato avviato, la
sincronizzazione viene effettuata nel seguente modo:
1. Preparatevi al prossimo segnale ufficiale (ad es. quello dei -4 o -1 minuti).
2. Al segnale, premete immediatamente il pulsante DOWN.
Il timer "salta in avanti" al minuto successivo e inizia il nuovo conto alla rovescia.
SUGGERIMENTO: con le impostazioni predefinite, quando premete DOWN,
il timer salta in avanti al minuto successivo (ad esempio, da 03:50 a 03:00, o
da 03:20 a 03:00). Potete anche impostare il Suunto M3 in modo che si porti
sul minuto più vicino precedente (ad esempio, da 03:50 a 4:00). Questa operazione
viene spiegata nella sezione 6.2.
2.2. AGGIUNTA DI UN TEMPO PARZIALE DURANTE LA REGATA
Potete memorizzare i tempi parziali, corrispondenti ad esempio al vostro passaggio a
una boa durante la regata. Tali tempi possono essere visualizzati al termine della
regata con il Logbook (Diario di regata).
6
 Loading...