

Page 1
EN | FR | DE | ES | FI | SV
Increment Borers
Page 2

Page 3

CUSTOMER SERVICE CONTACTS
Suunto Oy Phone +358 9 875870
Fax +358 9 87587301
Suunto USA Phone 1 (800) 543-9124
Canada Phone 1 (800) 776-7770
European Call Center Phone +358 2 284 11 60
Suunto Website www.suunto.com
EN
1
Page 4
SUUNTO INCREMENT BORERS
Congratulations on your purchase of a Suunto increment borer. The borer design is
the result of years of experience and it has been made of the finest steel. If handled
and maintained properly it will remain in good shape for many years.
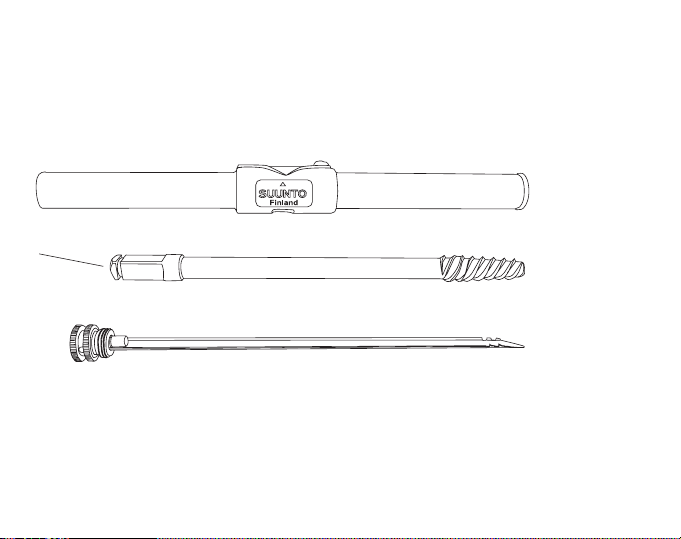
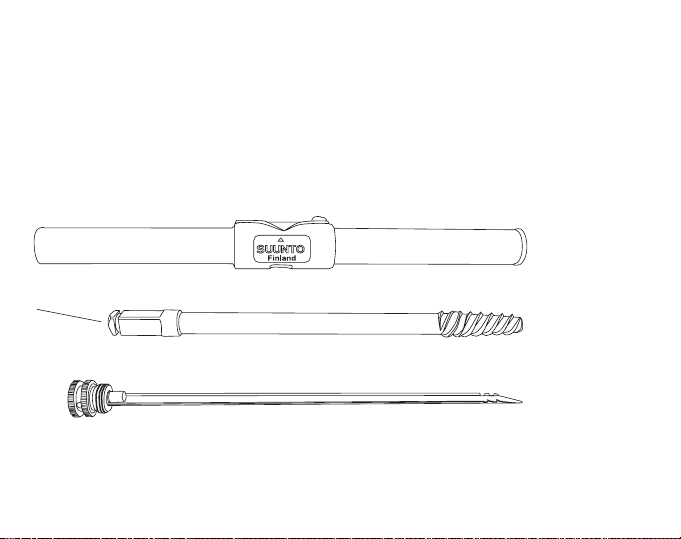
This increment borer consists of three parts:
1.
2.
3.
1. The handle
2. The bit
3. The extractor
2
Page 5
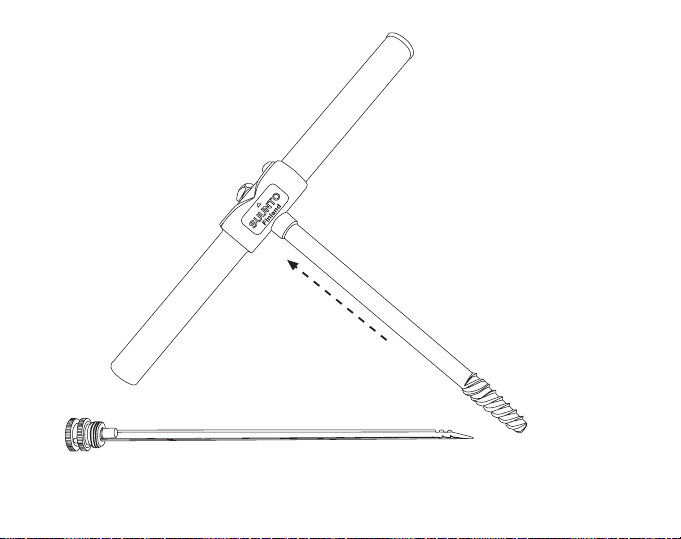
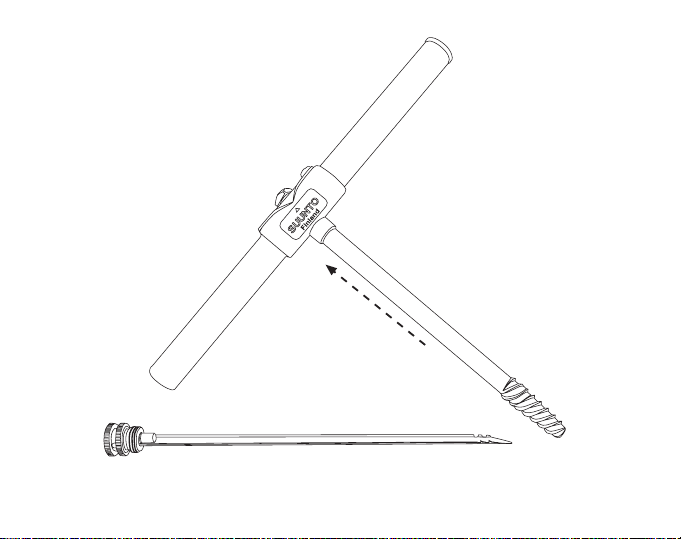
Locking mechanism
3
Page 6
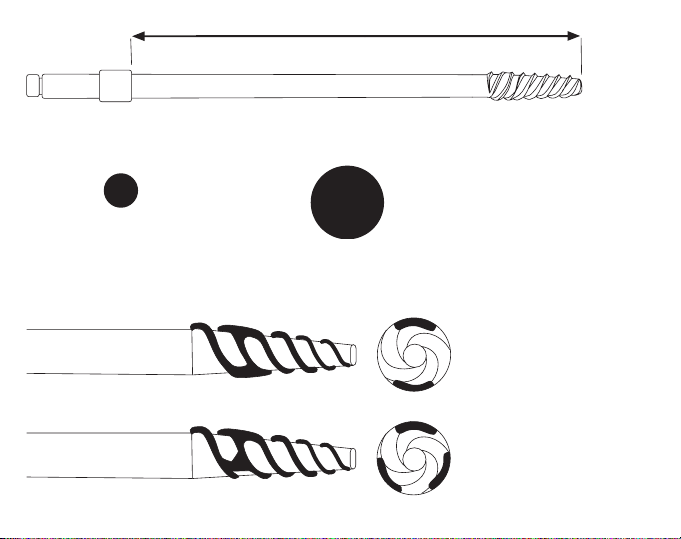
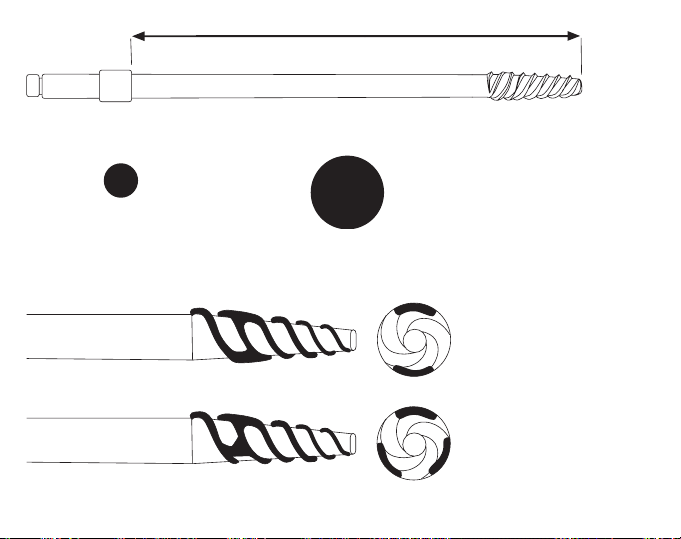
Borer bit length.
5.0 mm
(0.197”)
Core diameter of the wood sample is determined by the inside diameter of the
opening at the threaded end of the bit.
4
12.0 mm
(0.472”)
1.
Thread style:
1.2-thread
2.3-thread
2.
Page 7

Increment borers are used for
• determining the age of standing trees
• measuring the growth rate of a tree
• checking for defects inside a tree
• checking chemical penetration for quality control of treated wood products
• testing the condition of wooden structures in buildings, bridges, etc... (see
Important, number 3)
OPERATING INSTRUCTIONS
1. Open the end cap at the end of the handle. Remove the extractor and the bit from
the handle.
2. Open the locking mechanism. Insert the bit into the handle and close the locking
mechanism.
3. Push the bit threads against the tree at a 90° angle and start turning the handle
while at the same time exerting moderate forward pressure on the handle. This can
best be done by "leaning" against the handle while turning it. The bit threads should
be kept steady to prevent sway. After about a 2-3 cm (1 inch) penetration of the
threads, you can stop the forward "leaning" pressure. Continue turning the handle,
with palms open, until the threads reach the desired depth. Avoid applying
pressure to the handle up, down or laterally as this may result in bit breakage.
4. If the bit does not start to penetrate the wood after a few turns, move the bit to
another spot and try again. Continue to apply "leaning" pressure while turning.
Placing the bit in the deeper bark fissures will aid in starting the bit. (NOTE: The
threads on the bit do not extend to the cutting edge of the bit to allow good
centering and resharpening of the bit.)
5
Page 8

After the desired depth is reached, insert the extractor into the bit "upside down"
i.e., with the edges turned down (∩), at a slight angle, applying upward pressure.
Push the extractor in the full length. Turn the handle a half turn backwards to break
the core loose from inside the tree. The edge of the extractor should now be
pointed upwards (∪). Remove the extractor from the bit by pulling the end cap. The
core sample should be in the extractor, held in place by the serrated tip.
Note! If the wood is very hard, it is possible that the core does not break loose
properly. In this case, move the bit to another spot, start again, and when the
desired depth is reached, turn the handle one and a half turns backwards to make
sure the core breaks loose from inside the tree.
5. Remove the bit immediately from the tree. This should be done before analyzing
the core sample. If left in the tree, even for a short period of time, the bit might
become "locked" in the tree.
6. Clean the bit and extractor at the end of each day with light machine oil. Never
store a dirty or wet borer. It is recommended that beeswax be applied before each
use.
7. Put the plastic cap on the tip of the bit to protect the threads, and store the bit and
extractor inside the handle.
6
Page 9

IMPORTANT
1. Never bore a tree with the extractor inserted in the bit. The extractor should be
inserted only after you have finished the drilling and are ready to extract the core.
The extractor will twist if inside the bit while drilling, resulting in damage.
2. Never extend the handle length by attaching a pipe or similar apparatus to it, nor
use a power drill. The bit has been designed for manual use only. Applying larger
forces may cause failure of the bit or possible injury.
3. Never bore any object which may contain metal objects such as nails of fencing, as
this will cause severe damage to the bit's cutting edge.
4. Always transport and store the bit and extractor inside the handle with the plastic
protection cap in place.
5. Always keep the cutting edges of the bit sharp. Contact your dealer for this service
or to obtain the sharpening stones and accessories.
6. Avoid boring trees which are leaning or suspected to be hollow or decayed.
REMEMBER: The increment borer you purchased is a high quality, precision made
tool. By following these few basic guidelines for its care and use, you should enjoy
many years of quality service from your increment borer.
7
Page 10

Page 11

COORDONNÉES DU SERVICE CLIENTÈLE
Suunto Oy Tél. +358 9 875870
Fax +358 9 87587301
Suunto USA Tél. 1 (800) 543-9124
Canada Tél. 1 (800) 776-7770
Centre d'appels pour l'Europe Tél. +358 2 284 11 60
Site Web Suunto www.suunto.com
FR
1
Page 12
TARIERES D'ACCROISSEMENT SUUNTO
Félicitations! Vous venez d'acquérir une tarière d'accroissement SUUNTO dont le
design est le fruit d'une longue expérience. Elle est fabriquée dans un acier de haute
qualité. Afin d'en tirer le meilleur usage, lisez attentivement ce mode d'emploi et
suivez ses conseils.
Cette tarière d'accroissement se compose de trois parties :
1.
2.
3.
1. Le manche
2. La mèche
3. L'extracteur
2
Page 13
Le système de blocage
3
Page 14
Longueur de perçage de la mèche.
5.0 mm
(0.197”)
Le diamètre du noyau de la carotte est déterminé par le diamètre intérieur de
l'ouverture à l'extrémité filetée de la mèche.
4
12.0 mm
(0.472”)
1.
Filetage :
1.Filetage double
2.Filetage triple
2.
Page 15

Les tarières d'accroissement sont utilisées pour :
• déterminer l'âge des arbres
• mesurer la croissance des arbres
• vérifier les dommages dans les arbres
• contrôler la pénétration des produits chimiques dans le bois traité
• tester l'état des structures en bois (bâtiments, ponts, etc.) (Voir remarque n° 3)
NOTICE D'UTILISATION
1. Enlever l'extracteur et la mèche du manche.
2. Adapter l'embout carré de la mèche dans l'ouverture carrée située au milieu du
manche, et fermer le système de blocage.
3. Placer la mèche perpendiculairement à l'arbre, et commencer à tourner le manche
en exerçant une pression constante ; vous pouvez pour cela vous appuyer sur le
manche. Lorsque la mèche a pénétré de 2 à 3 cm, il n'est plus nécessaire de
s'appuyer. Continuez alors de tourner le manche avec les mains, paumes
ouvertes, pour éviter tout effort latéral qui pourrait briser la mèche. Changer
d'emplacement si la mèche n'arrive pas à pénétrer dans l'arbre. En choisissant une
fissure de l'écorce, on peut faciliter la pénétration.
4. Après avoir atteint la profondeur voulue, insérer l'extracteur dans la totalité de la
mèche de façon à ce que la cuillère regarde vers le bas (∩).
Pour casser la carotte de bois, il faut faire un demi tour de manivelle dans le sens
contraire de la pénétration. L'extracteur regardera donc vers le haut (∪).
Pour sortir la carotte, il suffit de retirer l'extracteur en tirant doucement, de façon à
ne pas briser l'échantillon.
5
Page 16

Remarque: Si le bois est bien dur, il est possible que la carotte de bois ne se
détache pas proprement. Dans ce cas, recommencer à forer à un autre endroit et
lorsque la profondeur désirée est atteinte, tourner le manche d'un tour et demi en
arrière pour être certain que la carotte de bois se détache bien du reste du tronc.
5. Retirer immédiatement la mèche de l'arbre avant de commencer l'analyse de
l'échantillon. En effet, la mèche peut rester bloquée si on la laisse, même que très
peu de temps dans l'arbre.
6. Nettoyer, après chaque jour d'utilisation, la mèche et l'extracteur avec un chiffon
huilé. Ne jamais laisser une tarière sale ou humide sans l'essuyer. Il est
recommandé d'étendre de la cire d'abeille avant chaque usage.
7. Bien remettre le capuchon en plastique pour protéger le filetage, et replacer
toujours la mèche et l'extracteur dans le manche.
REMARQUES IMPORTANTES
1. Ne jamais percer un arbre en laissant l'extracteur à l'intérieur de la mèche, cela
pourrait l'endommager.
2. Ne pas allonger la longueur du manche, en y ajoutant quelques rallonges, ni
adapter une perceuse électrique. La tarière n'est conçue que pour un usage
manuel.
3. Ne pas percer un objet pouvant contenir du métal, par ex. des clous, car cela peut
gravement endommager le filetage.
4. La tarière doit toujours être transportée ou entreposée avec la mèche et
l'extracteur logés dans le manche, avec sa protection plastique.
5. Les lames du filetage de la mèche doivent être régulièrement aiguisées. Adressezvous à votre fournisseur pour cela.
6
Page 17

6. Eviter de percer des arbres qui sont penchés ou que vous supposez être creux ou
pourris.
N'OUBLIEZ PAS : La tarière d'accroissement que vous venez d'acheter est un
instrument de précision de haute qualité. En suivant ces instructions élémentaires
vous assurez un long usage de votre tarière.
7
Page 18

Page 19

KUNDENDIENSTE
Suunto Oy Tel. +358 9 875870
Fax +358 9 87587301
Suunto USA Tel. 1 (800) 543-9124
Canada Tel. 1 (800) 776-7770
Europaweites Call Center Tel. +358 2 284 11 60
Suunto im Internet www.suunto.com
DE
1
Page 20

SUUNTO-ZUWACHSBOHRER
Wir gratulieren Ihnen zur Anschaffung eines Suunto-Zuwachsbohrers! Gestaltung
und Konstruktion des aus erstklassigem Stahl gefertigten Suunto-Zuwachsbohrers
sind das Ergebnis jahrelanger Erfahrung. Richtig eingesetzt und gepflegt, dient er
lhnen viele Jahre als ein zuverlässiges und exaktes Instrument.
Der Zuwachsbohrer besteht aus drei Teilen:
1.
2.
3.
1. Schaft
2. Bohrschneide
3. Auszieher
2
Page 21

Sperre
3
Page 22

Bohrspitzenlänge.
5.0 mm
(0.197”)
Der Durchmesser der Bohrspanprobe wird durch den Innendurchmesser der Öffnung
an dem mit dem Gewinde versehenen Ende bestimmt.
4
12.0 mm
(0.472”)
1.
Ausschläge:
1.zwei Gewinde
2.drei Gewinde
2.
Page 23

Verwendungszwecke des Zuwachsbohrers:
• Altersbestimmung stehender Bäume
• Messung der Zuwachsrate von Bäumen
• Überprüfung innerer Defekte des Baums
• Überprüfung der Chemikaliendurchlässigkeit bei der Qualitätsprüfung behandelten
Holzes
• Überprüfung des Zustands von Holzbauteilen an Gebäuden, Brücken usw. (Siehe
auch 'Wichtig", Punkt 3).
GEBRAUCHSANLEITUNG
1. Bohrschneide und Auszieher aus dem Schaft entnehmen.
2. Die Bohrschneide an den Schaft ansetzen und mit der Sperre verriegeln.
3. Das Gewinde der Bohrschneide unter einem Winkel von 90° an das Holz
andrücken und am Schaft drehen; dabei einen gleichmäßigen Andruck wahren.
Das gelingt am besten, wenn Sie sich gegen den Schaft stemmen. Das Gewinde
der Bohrschneide stabil halten, um Ausschläge zu verhindern. Ist die Klinge 2-3 cm
(1 Zoll) tief in das Holz eingedrungen, brauchen Sie sich nicht mehr gegen den
Schaft zu stemmen. Drehen Sie den Schaft weiterhin mit beiden Händen im
Obergriff, bis die Bohrschneide tief genug eingedrungen ist. Achten Sie darauf,
daß Sie den Schaft nicht seitlich bzw. auf - oder abwärts verkanten, da dies zu
Bohrschneidenbruch führen kann.
Dringt die Bohrschneide nach mehreren Umdrehungen nicht in das Holz ein,
setzen Sie die Bohrschneide an einer anderen Stelle an und versuchen es noch
einmal. Während Sie am Schaft drehen, stemmen Sie sich für den erforderlichen
Andruck wieder an. Wenn Sie die Bohrschneide in einen tiefen Borkenriß
5
Page 24

einsetzen, gelingt es Ihnen leichter, diese in das Holz einzuführen. (Achtung: das
Gewinde der Bohrschneide reicht nicht bis zur Schneideklinge, die ein
Nachschärfen der Bohrschneide gewährleistet).
4. Nachdem die gewünschte Tiefe erreicht ist, wird der Auszieher in dem Bohrer
"Oberseite nach unten gerichtet" eingeführt, d. h. mit den Schnittkanten nach unten
gerichtet, leicht angewinkelt unter Verwendung aufwärtsgerichteten Druckes (∩).
Der Handgriff wird eine halbe Drehung rückwärts gedreht und damit der Bohrspan
vom inneren Holzkörper getrennt, Die Schnittkanten des Ausziehers sollten
nunmehr aufwärts liegen (∪).
Der Auszieher wird vom Bohrer zurück bewegt, indem man an der Endkappe zieht.
Die Bohrspanprobe sollte im Auszieher liegen, festgehalten durch die gezackte
Spitze.
Achtung! Bei Drehungen gegen den Uhrzeigersinn reißt der Span ab. Diese
Drehung darf erst erfolgen, wenn der Bohrvorgang abgeschlossen werden soll!
Man dreht den Bohrer 2-3 mal ruckartig hin und her und danach 2-3 Windungen
zurück. Anschließend wird der Löffel durch die rückwärtige Bohreröffnung
vorsichtig unter den Span geschoben und vorangedrückt, bis er fast an sein
Schraubgewinde anstößt. Die Zacken der Löffelspitze haben in dieser Stellung die
Bohrspanspitze an die konische Innenwand des Bohrers gedrückt und sich im Holz
verkrallt. Der Span kann nun ohne großen Widerstand aus dem Inneren des
Bohrers herausgezogen werden.
5. Die Bohrschneide sofort aus dem Holz herauslösen. Dies sollte noch vor der
Analyse der Borkenprobe getan werden. Wird die Bohrschneide auch nur für kurze
Zeit im Holz gelassen, kann sie sich dort festklemmen.
6
Page 25

6. Am Ende des Arbeitstages die Bohrschneide und den Auszieher mit einem leichten
Maschinenöl reinigen. Lagern Sie den Zuwachsbohrer nie ein, wenn er feucht oder
schmutzig ist. Es empfielt sich, den Zuwachsbohrer vor jeder Verwendung mit
Bienenwachs zu bestreichen.
7. Die Kunststoffkappe zum Schutz des Gewindes auf das obere Ende der
Bohrschneide aufsetzen. Dann Bohrschneide und Auszieher zur Aufbewahrung in
den Schaft stecken.
WICHTIG
1. Nie in Holz bohren, wenn der Auszieher am Schaft angesetzt ist. Der Auszieher
darf nur dann angesetzt sein, wenn Sie das Bohren beendet haben und das
Probestück herausziehen möchten. Andernfalls ist eine Beschädigung des Ausziehers nicht auszuschließen.
2. Nie den Schaft mit irgendwelchen Ansatzstücken verlängern oder etwa einen
Elektrobohrer an den Schaft anschließen. Die Bohrschneide ist ausschließlich für
den Handbetrieb vorgesehen. Eine zu große Drehleistung kann die Bohrschneide
beschädigen.
3. Nie an einem Objekt bohren, das u.U. Metall, etwa Nägel, enthält, da die
Bohrschneide hierdurch ernsthaft beschädigt werden kann.
4. Bohrschneide und Auszieher stets im Schaft mit aufgesetzter KunststoffSchutzkappe aufbewahren und transportieren.
5. Achten Sie darauf, daß die Bohrschneide immer scharf ist. Lassen Sie bei Ihrem
händler nachschleifen. Auch das hierfür erforderliche Zubehör erhalten Sie bei
Ihrem Händler.
7
Page 26

6. Bohren Sie nicht in Bäumen, die schief stehen oder bei denen Verdacht auf
Vermorschung oder innere Aushöhlung besteht.
Denken Sie daran: Ihr Suunto-Zuwachsbohrer ist ein hochwertiges Präzisionsinstrument. Durch Beachtung dieser Gebrauchsanleitung stellen Sie sicher, daß er
Ihnen viele Jahre zuverlässig dienen wird.
8
Page 27

DATOS DE CONTACTO DE SERVICIO AL CLIENTE
Suunto Oy Tel. +358 9 875870
Fax +358 9 87587301
Suunto USA Tel. 1 (800) 543-9124
Canadá Tel. 1 (800) 776-7770
Centro de llamadas para Europa Tel. +358 2 284 11 60
Sitio web de Suunto www.suunto.com
ES
1
Page 28

BARRENAS SUUNTO
Le felicitamos por la compra de una barrena Suunto. Esta barrena se fabrica en
acero de la máxima calidad y su diseño es el resultado de largos años de
experiencia. Si se maneja y mantiene adecuadamente, mantendrá sus condiciones
óptimas durante muchos años.
Esta barrena se compone de tres piezas:
1.
2.
3.
1. Mango
2. Broca
3. Extractor
2
Page 29

Mecanismo de bloqueo
3
Page 30

Longitud de broca.
5.0 mm
(0.197”)
El diámetro de testigo de las muestras de madera depende del diámetro interior del
extremo de la broca que tiene filos de corte.
4
12.0 mm
(0.472”)
1.
Tipo de filos de
corte:
1.2 filos
2.3 filos
2.
Page 31

Las barrenas se utilizan para:
• Determinar la edad de un árbol en pie
• Medir la velocidad de crecimiento de un árbol
• Comprobar la existencia de defectos en el interior de un árbol
• Comprobar la penetración de sustancias químicas para el control de calidad de
productos de madera tratados
• Comprobar el estado de las estructuras de madera de edificios, puentes, etc.
(consulte Importante, número 3)
INSTRUCCIONES DE MANEJO
1. Abra el tapón del extremo del mango. Retire el extractor y la broca del mango.
2. Abra el mecanismo de bloqueo. Inserte la broca en el mango y cierre el
mecanismo de bloqueo.
3. Presione los filos de corte contra el árbol con un ángulo de 90° y empiece a girar el
mango mientras aplica al mango una presión moderada hacia delante. La mejor
forma de hacerlo es apoyarse contra el mango mientras lo gira. Los filos de corte
de la broca deben mantenerse con la misma inclinación para evitar el balanceo.
Una vez que los filos de corte han penetrado aproximadamente 2 ó 3 cm
(1 pulgada), ya no es necesario presionar apoyándose en el mango. Siga girando
el mango, con las palmas abiertas, hasta que los filos de corte alcancen la
profundidad deseada. Evite presionar el mango hacia arriba, hacia abajo o hacia
los lados, dado que podría provocar la rotura de la broca.
4. Si la broca no empieza a penetrar en la madera tras unas pocas vueltas, traslade
la broca a otro punto e inténtelo de nuevo. Siga aplicando presión apoyándose en
el mango mientras lo gira. Para facilitar la penetración inicial de la broca, sitúela
5
Page 32

en una grieta profunda de la corteza. (NOTA: Los filos de corte de la broca no
llegan hasta el borde de corte de ésta, con el fin de permitir un buen centrado y
afilado de la broca.)
Una vez alcanzada la profundidad deseada, inserte el extractor en la broca,
orientado hacia arriba, es decir, con los bordes orientados hacia abajo (∩) y
levemente en ángulo, aplicando una presión ascendente. Presione el extractor
hasta que penetre completamente. Gire el mango media vuelta en sentido inverso,
para que el testigo se desprenda del interior del árbol. Ahora los bordes del
extractor deben estar orientados hacia arriba (∪). Retire el extractor de la broca,
tirando del tapón del extremo. El testigo de muestra debe estar en el extractor,
sujeto por la punta estriada.
¡Atención! Si la madera es muy dura, es posible que el testigo no se desprenda
correctamente. En este caso, traslade la broca a otro punto, empiece de nuevo y,
una vez alcanzada la profundidad deseada, gire el mango una vuelta y media en
sentido inverso para asegurarse de que el testigo se desprenda del árbol.
5. Extraiga inmediatamente la broca del árbol. Debe hacerlo antes de analizar el
testigo de muestra. Si la deja en el árbol, incluso durante un periodo breve, la
broca puede quedar atascada en el árbol.
6. Limpie la broca y el extractor al final de cada jornada con aceite lubricante ligero
para máquinas. No guarde nunca la barrena si presenta suciedad o humedad. Es
recomendable aplicar cera de abeja antes de cada uso.
7. Ponga el tapón de plástico en la punta de la broca para proteger los filos de corte y
guarde la broca y el extractor dentro del mango.
6
Page 33

IMPORTANTE
1. Nunca perfore un árbol con el extractor introducido en la broca. El extractor sólo
debe introducirse tras haber finalizado la perforación y cuando esté listo para
extraer el testigo. Si se deja el extractor dentro de la broca durante la perforación,
se retorcerá y resultará dañado.
2. No alargue nunca el mango fijando un tubo o elementos similares ni utilice una
taladradora con motor. La broca se ha diseñado exclusivamente para un uso
manual. La aplicación de fuerzas mayores puede provocar daños en la broca o
incluso causar lesiones.
3. No perfore nunca ningún objeto que pueda contener objetos metálicos como
clavos o alambres de alambrada, dado que causaría graves daños en el borde de
corte de la broca.
4. Transporte y guarde siempre la broca y el extractor dentro del mango y con el
tapón protector de plástico en su lugar.
5. Mantenga siempre afilados los filos de corte de la broca. Póngase en contacto con
su distribuidor para esta tarea o solicite las piedras de afilar y accesorios
necesarios.
6. Evite perforar árboles inclinados o que sospeche que están huecos o podridos.
RECUERDE: La barrena que ha adquirido es una herramienta de alta calidad y gran
precisión. Siguiendo estas pocas indicaciones básicas para su conservación y
utilización, su barrena le proporcionará un servicio de calidad durante muchos años.
7
Page 34

Page 35

ASIAKASPALVELUN YHTEYSTIEDOT
Suunto Oy Puh. +358 9 875870
Fax +358 9 87587301
Suunto USA Puh. 1 (800) 543-9124
Kanada Puh. 1 (800) 776-7770
Euroopan Call Center Puh. +358 2 284 11 60
Suunnon verkkosivut www.suunto.com
FI
1
Page 36

SUUNTO-KASVUKAIRAT
Suunto-kasvukairat ovat suomalaista laatutyötä. Ne on tehty kestävästä teräksestä ja
oikein käsiteltyinä ja huollettuina ne kestävät useita vuosia.
Suunto kasvukairassa on kolme osaa:
2.
1. Kahva
2. Terä
3. Ulosvetäjä
2
1.
3.
Page 37

Lukitussalpa
3
Page 38

Terän pituus.
5.0 mm
(0.197”)
Terän kierteisen pään aukon sisähalkaisija määrittää puunäytteen ytimen halkaisijan.
4
12.0 mm
(0.472”)
1.
Kierteet:
1.kaksoiskierre
2.kolmoiskierre
2.
Page 39

Kasvukairoja käytetään
• puun iän määrittämiseen
• puunkasvun määrittämiseen
• puun kunnon määrittämiseen
• puuhun imeytyneiden kemiallisten aineiden tarkistamiseen, esimerkiksi puunkäsittelyn laadunvarmistuksessa
• rakennusten, siltojen yms. puurakenteiden kunnon testaamiseen.
KÄYTTÖOHJE
1. Avaa kahvan päässä oleva kierrenuppi ja ota ulosvetäjä ja terä ulos kahvasta.
2. Avaa lukitussalpa. Pujota terä kahvaan ja lukitse se yläpuolelta lukitussalvalla.
3. Paina terää puuta vasten 90 asteen kulmassa ja kierrä kahvaa. Voit esimerkiksi
nojata kahvaan kiertäessäsi sitä. Teräosa tulisi pitää vakaana, ettei terä kääntyisi
vinoon. Lopeta painaminen, kun terä on uponnut puuhun noin 2-3 cm syvyyteen,
mutta jatka kahvan kääntämistä avokädellä kunnes terä on halutussa syvyydessä.
Väitä painamasta kahvaa ylös, alas tai sivusuuntaan, sillä terä voi vioittua. Jos terä
ei uppoa puuhun muutaman kahvankäännön jälkeen, vaihda kairaamiskohtaa.
Kairaaminen kannattaa aloittaa esimerkiksi kaarnan halkeamista.
4. Kun olet kairannut haluttuun syvyyteen, työnnä ulosvetäjä terän sisään kupera
puoli ylöspäin (∩). Työnnä ulosvetäjä aivan pohjaan asti. Käännä kahvaa puoli
kierrosta takaisinpäin. Ulosvetäjä on kääntynyt nyt kovera puoli ylöspäin (∪), jolloin
siihen tarttunut näyte voidaan vetää ulos. Vedä ulosvetäjä varovasti ulos terästä.
Huomaa! Puun ominaisuudet vaikuttavat näytteen irtoamiseen. Jos näyte ei irtoa
puusta, aloita kairaaminen alusta. Toimi muutoin kohdan 3 ja 4 mukaisesti, mutta
käännä kairan kahvaa 1 ½ kierrosta takaisinpäin.
5
Page 40

5. Irrota terä välittömästi puusta ennen näytteen analysoimista. Jos terä jätetään
puun sisään lyhyeksikin aikaa, se saattaa lukkiutua kiinni puuhun.
6. Puhdista terä ja ulosvetäjä käytön jälkeen ohuella öljyllä. Puhdista ja kuivaa pora
aina ennen säilytystä. Kaira kannattaa käsitellä mehiläisvahalla ennen sen
käyttämistä.
7. Säilytä terää ja ulosvetäjää kahvan sisällä. Suojaa terän leikkauspää muovisella
suojalla.
TÄRKEÄÄ
1. Älä koskaan kairatessa pidä ulosvetäjää terän sisällä. Ulosvetäjä työnnetään poran
sisälle vasta kun terä on halutussa syvyydessä.
2. Älä pidennä kahvaa millään apuvälineellä. Älä käytä sähköporaa tai muuta
vastaavaa apuvälinettä. Terä on tarkoitettu vain käsikäyttöön. Voimankäyttö
saattaa vioittaa terää tai aiheuttaa onnettomuuden.
3. Älä poraa kohteita, joissa saattaa olla metalliesineitä, kuten esimerkiksi nauloja,
piikkilankaa yms. Metalliesineet saattavat vioittaa terän leikkausreunaa.
4. Säilytä terää ja ulosvetäjää aina kahvan sisällä kuljetuksen ja varastoinnin aikana.
Suojaa terä aina muovisella suojalla.
5. Pidä terän leikkausreuna aina terävänä. Leikkausreunan teroittamisen helpottamiseksi siinä ei ole kierteitä. Kysy myyjältäsi teroittimia tai teroituspalvelua.
6. Vältä onttojen, mädäntyneiden tai kallellaan olevien puiden kairaamista.
Suunto kasvukairat ovat korkealaatuisia tarkkuusinstrumtentteja. Annettuja käyttöohjeita noudattamalla kasvukaira palvelee sinua useita vuosia.
6
Page 41

KUNDSERVICE, KONTAKTER
Suunto Oy Tel. +358 9 875870
Fax +358 9 87587301
Suunto USA Tel. 1 (800) 543-9124
Canada Tel. 1 (800) 776-7770
Callcenter i Europa Tel. +358 2 284 11 60
Suuntos webbplats www.suunto.com
SV
1
Page 42

SUUNTO TILLVÄXTBORRAR
Vi vill gratulera dig till köpet av en Suunto tillväxtborr. Den är resultatet av många års
erfarenhet och den är tillverkad av det finaste stål. Om den används och sköts enligt
instruktionerna, bibehåller den sin funktion under många år.
Denna tillväxtborr består av tre delar:
1.
2.
3.
1. Handtag
2. Borrpipa med skär
3. Utdragare
2
Page 43

Låsningsmekanism
3
Page 44

Borrpipans längd.
5.0 mm
(0.197”)
Diametern på träprovet avgörs av den inre diametern på öppningen vid skärets
gängade del.
4
12.0 mm
(0.472”)
1.
Gängorna:
1.två gängor
2.tre gängor
2.
Page 45

Tillväxtborrar används för att:
• definiera åldern på det växande trädet
• mäta trädets tillväxtstadium
• kontrollera defekter i veden
• vid kvalitetskontroll kontrollera kemikaliernas genomträngningsdjup hos behandlat
trä
• testa virkets kondition i träkonstruktioner, byggnader, broar etc. Se Viktigt, sidan 8.
BRUKSANVISNING
1. Öppna ändlocket i slutet på handtaget. Ta ut utdragaren och borrpipan ur handtaget
2. Öppna låsningsmekanismen. För in borrpipan i handtaget och stäng
låsningmekanismen.
3. Tryck skäret mot trädet i 90 graders vinkel och vrid om handtaget. Pressa skäret
mot trädet genom att luta kroppen mot handtaget samtidigt som du vrider. Håll
skäret stadigt för att undvika att svaja. När skäret har trängt in i trädet 2-3 cm (1
tum), kan du sluta pressa. Fortsätt att vrida handtaget med öppna handflator ända
tills du har uppnått det önskade djupet. Undvik att få sidokrafter på borren når du
vrider handlaget, då detta kan bryta sönder skäret
4. Om skäret inte tränger in i trädet efter några vridningar, byt ställe och försök på
nytt. Genom att sätta skäret i en djup barkspricka hjälper du skäret in i trädet.
Fortsätt att luta kroppen mot handtaget när du vrider på det. (OBS! Gängorna på
skäret sträcker sig inte ända ned till slutet av skäret för att skäret ska kunna
centreras och slipas.) När det önskade djupet är uppnått, stick då in utdragaren
något vinklad "upp och ned" i borrpipan med kanterna nedåtvända (∩). Tryck in
5
Page 46

utdragaren helt och hållet. Vrid handlaget ett halvt varv tillbaka för att bryta loss
kärnan inuti trädet. Utragarens kant skall nu peka uppåt (∪).
Ta utdragaren ut ur borrpipan genom att dra i den delen som är längst ut.
Borrkärnan följer nu med ut tack vare utdragarens sågtandade spetsar
Obs! Trädets egenskaper påverkar hur lätt man får ut borrkärnan ur trädet. Om den
inte vill lossna, börja om på nytt. Flytta dig till en ny punkt och när önskat djup har
uppnåtts, vrid handtaget ett och ett halvt varv tillbaka för att säkerställa att kärnan
lossnar inuti trädet.
5. Lösgör omedelbart borrpipan från trädet. Detta bör göras innan du analyserar
borrkärnan. Om borrpipan lämnas i trädet även för en kort stund, kan den fastna.
6. Efter varje dag skall du rengöra skäret och utdragaren med tunn maskinolja.
Förvara aldrig en smutsig eller våt tillväxtborr. Det är rekommenderat att smörja in
den med bivax innan du använder den nästa gång.
7. Sätt på plastskyddet på översta delen av skäret för att skydda gängorna, och
förvara skäret och utdragaren i handtaget.
VIKTIGT
1. Borra aldrig något träd med utdragaren instucken i borrpipan. Utdragaren ska
endast föras in då du har slutat borra och är färdig att dra ut borrkärnan. I annat fall
vrider sig utdragaren i borrpipan, vilket kan resultera i skador.
2. Förläng aldrig handtaget med en pipa eller liknande och använd aldrig borrmaskin.
Skäret är konstruerat endast för manuellt bruk. För stort vridmoment kan skada
skäret och orsaka personskador.
3. Borra aldrig i objekt som kan innehålla metall, t.ex. spik, då detta kan skada skäret.
6
Page 47

4. Kom alltid ihåg att transportera och lagra borrpipan och utdragaren i handtaget,
och kom ihåg att alltid använda plastskyddet över gängorna.
5. Se till att alltid hålla skäret välslipat. Ta kontakt med din återförsäljare när du
behöver denna service (eller när du vill skaffa slipstenar eller extra tillbehör).
6. Undvik att borra i träd som lutar eller som du tror är ihåliga eller ruttna.
KOM IHÅG: Tillväxtbrorren som du har köpt är ett precisionsinstrument av högsta
kvalitet. Genom att följa dessa enkla instruktioner försäkrar du dig om att din tillväxtborr skall tjäna dig under många år.
7
Page 48

Page 49

COPYRIGHT
This publication and its contents are proprietary to Suunto Oy.
Suunto, Wristop Computer, Suunto Increment Borers, Replacing Luck and their logos
are registered or unregistered trademarks of Suunto Oy. All rights reserved.
While we have taken great care to ensure that information contained
in this documentation is both comprehensive and accurate,
no warranty of accuracy is expressed or implied.
Its content is subject to change at any time without notice.
Page 50

Suunto Oy 6/1997, 1/2006
 Loading...