

Page 1

SUUNTO GPS TRACK POD
USER GUIDE
en
Page 2

1 SAFETY . . . . . . . .. . .. . .. . .. . .. . .. . .. . .. . . . . . . . . . .. . .. . .. . .. . .. . .. . .. . .. . . . . . . . . . . 4
2 Welcome . . . . . . . .. . .. . .. . .. . .. . .. . .. . .. . . . . . . . . . .. . .. . .. . .. . .. . .. . .. . .. . . . . . . . . 6
3 Light signals . . . . . . . .. . .. . .. . .. . .. . .. . .. . .. . . . . . . . . . .. . .. . .. . .. . .. . .. . .. . .. . . . . 7
4 Using power button . . . . . . . .. . .. . .. . .. . .. . .. . .. . .. . . . . . . . . . .. . .. . .. . .. . .. . .. . . 8
5 Getting started . . . . . . . .. . .. . .. . .. . .. . .. . .. . .. . . . . . . . . . .. . .. . .. . .. . .. . .. . .. . .. . 9
6 Customizing your Suunto GPS Track POD . . . . . . . .. . .. . .. . .. . .. . .. . .. . .. . . . 10
6.1 Connecting to Movescount . . . . . . . .. . .. . .. . .. . .. . .. . .. . .. . . . . . . . 10
6.2 Customizing settings . . . . . . . .. . .. . .. . .. . .. . .. . .. . .. . . . . . . . . . .. . .. 11
7 Using your Suunto GPS Track POD . . . . . . . .. . .. . .. . .. . .. . .. . .. . .. . . . . . . . . . .. 14
7.1 Attaching Suunto GPS Track POD . . . . . . . .. . .. . .. . .. . .. . .. . .. . .. . 14
7.2 Using GPS . . . . . . . .. . .. . .. . .. . .. . .. . .. . .. . . . . . . . . . .. . .. . .. . .. . .. . .. 15
7.3 Recording logs . . . . . . . .. . .. . .. . .. . .. . .. . .. . .. . . . . . . . . . .. . .. . .. . .. . 16
7.4 Making laps . . . . . . . .. . .. . .. . .. . .. . .. . .. . .. . . . . . . . . . .. . .. . .. . .. . .. . 17
7.5 Deactivating Suunto GPS Track POD . . . . . . . .. . .. . .. . .. . .. . .. . .. . 18
7.6 Detaching Suunto GPS Track POD . . . . . . . .. . .. . .. . .. . .. . .. . .. . .. 18
7.7 Uploading data to Movescount . . . . . . . .. . .. . .. . .. . .. . .. . .. . .. . . . 19
8 Pairing Suunto GPS Track POD . . . . . . . .. . .. . .. . .. . .. . .. . .. . .. . . . . . . . . . .. . .. . 20
9 Icons and sounds . . . . . . . .. . .. . .. . .. . .. . .. . .. . .. . . . . . . . . . .. . .. . .. . .. . .. . .. . .. 21
10 Care and maintenance . . . . . . . .. . .. . .. . .. . .. . .. . .. . .. . . . . . . . . . .. . .. . .. . .. . . 23
10.1 Water resistance . . . . . . . .. . .. . .. . .. . .. . .. . .. . .. . . . . . . . . . .. . .. . .. . 23
10.2 Charging the battery . . . . . . . .. . .. . .. . .. . .. . .. . .. . .. . . . . . . . . . .. . . 24
11 Technical specifications . . . . . . . .. . .. . .. . .. . .. . .. . .. . .. . . . . . . . . . .. . .. . .. . .. . 26
11.1 Trademark . . . . . . . .. . .. . .. . .. . .. . .. . .. . .. . . . . . . . . . .. . .. . .. . .. . .. . 26
11.2 FCC compliance . . . . . . . .. . .. . .. . .. . .. . .. . .. . .. . . . . . . . . . .. . .. . .. . 26
11.3 IC . . . . . . . .. . .. . .. . .. . .. . .. . .. . .. . . . . . . . . . .. . .. . .. . .. . .. . .. . .. . .. . . 27
2
Page 3

11.4 CE . . . . . . . .. . .. . .. . .. . .. . .. . .. . .. . . . . . . . . . .. . .. . .. . .. . .. . .. . .. . .. . 27
11.5 Copyright . . . . . . . .. . .. . .. . .. . .. . .. . .. . .. . . . . . . . . . .. . .. . .. . .. . .. . . 27
11.6 Warranty . . . . . . . .. . .. . .. . .. . .. . .. . .. . .. . . . . . . . . . .. . .. . .. . .. . .. . .. 28
Index .. .. .. . .. .. .. .. .. .. .. .. .. .. .. .. .. .. .. .. .. .. .. .. .. .. .. .. .. .. .. .. .. .. .. .. .. . 31
en
3
Page 4
1 SAFETY
Types of safety precautions
WARNING: - is used in connection with a procedure or situation that may result
in serious injury or death.
CAUTION: - is used in connection with a procedure or situation that will result
in damage to the product.
NOTE: - is used to emphasize important information.
TIP: - is used for extra tips on how to utilize the features and functions of the
device.
Safety precautions
WARNING: ALLERGIC REACTIONS OR SKIN IRRITATIONS MAY OCCUR WHEN
PRODUCT IS IN CONTACT WITH SKIN, EVEN THOUGH OUR PRODUCTS COMPLY
WITH INDUSTRY STANDARDS. IN SUCH EVENT, STOP USE IMMEDIATELY AND
CONSULT A DOCTOR.
WARNING: ALWAYS CONSULT YOUR DOCTOR BEFORE BEGINNING AN EXERCISE
PROGRAM. OVEREXERTION MAY CAUSE SERIOUS INJURY.
WARNING: ONLY FOR RECREATIONAL USE.
4
Page 5
WARNING: DO NOT ENTIRELY RELY ON THE GPS OR BATTERY LIFETIME, ALWAYS
USE MAPS AND OTHER BACKUP EQUIPMENT TO ENSURE YOUR SAFETY.
CAUTION: DO NOT APPLY SOLVENT OF ANY KIND TO THE PRODUCT, AS IT
MAY DAMAGE THE SURFACE.
CAUTION: DO NOT APPLY INSECT REPELLENT ON THE PRODUCT, AS IT MAY
DAMAGE THE SURFACE.
CAUTION: DO NOT THROW THE PRODUCT AWAY, BUT TREAT IT AS ELECTRONIC
WASTE TO PRESERVE THE ENVIRONMENT.
CAUTION: DO NOT KNOCK OR DROP THE DEVICE, AS IT MAY BE DAMAGED.
en
5
Page 6

2 WELCOME
Thank you for choosing Suunto GPS Track POD.
Designed for hassle-free outdoor use, Suunto GPS Track POD is a powerful
device that stores tracks, speed, distance and GPS altitude data while you
explore new territories.
Once at home, you can connect Suunto GPS Track POD to Movescount.com
online diary to visualize tracks on a map, or share them with friends. You can
also customize device settings online.
When paired with Suunto Quest, Suunto M5, Suunto t3, Suunto t4 or Suunto
t6, Suunto GPS Track POD provides you real time distance and highly responsive
speed readings for your outdoor activities.
6
Page 7
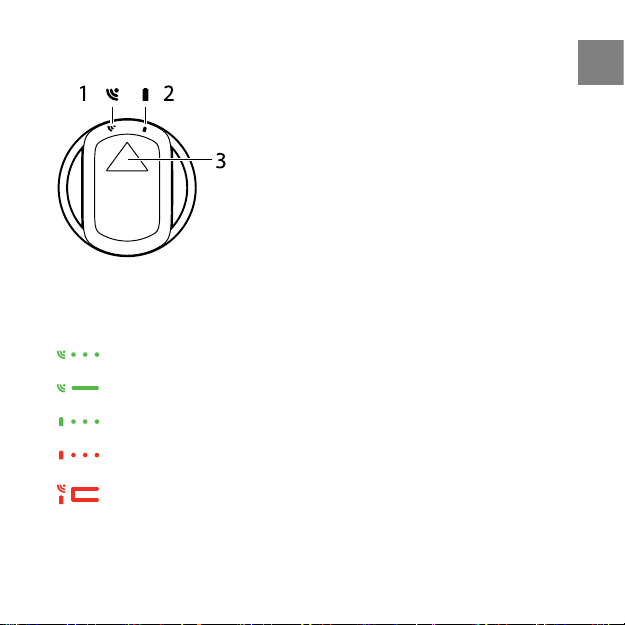
3 LIGHT SIGNALS
1 GPS signal
2 Battery
3 Power button
Searching for GPS signal
GPS signal found
Charging
Low battery (recharge soon)
Error (connect to Moveslink)
For a complete list of signals, see Chapter 9 Icons and sounds on page 21.
en
7
Page 8
4 USING POWER BUTTON
Use the power button for the following functionalities:
Keep the button pressed for 2 seconds to activate/deactivate the device.
●
Press the button to start recording a log and make a lap during recording.
●
8
Page 9
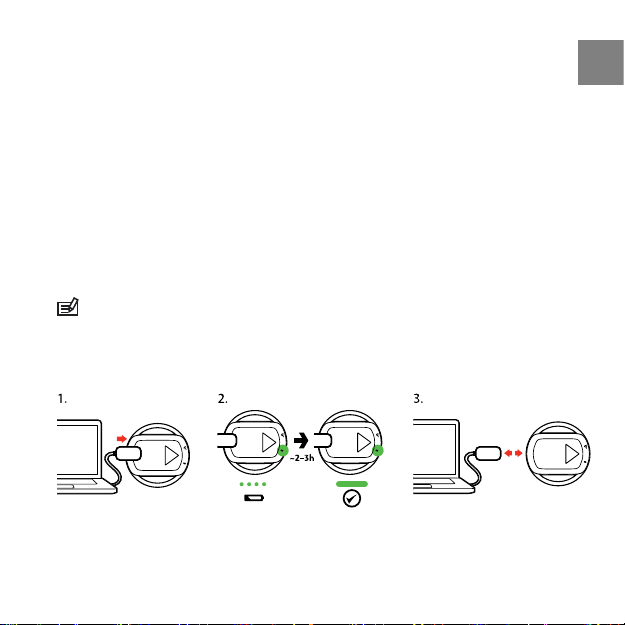
5 GETTING STARTED
To start using your Suunto GPS Track POD:
1. Charge the battery. Your Suunto GPS Track POD wakes up automatically
when you attach it to your computer using the supplied USB cable. You
can also wake up the device by attaching it to a mains socket using the
optional Suunto wall charger.
2. The battery indicator starts blinking green. Fully charging an empty battery
takes 2–3 hours. First time charging may take longer. The power button is
locked during charging with the USB cable.
3. Remove the device when the battery has been fully charged and the battery
indicator is continuously green.
NOTE: Do not remove the USB cable until the battery has been fully charged
to ensure longer battery lifetime. When the charging is complete, Battery full
notification is displayed in the Moveslink window and the battery indicator on
Suunto GPS Track POD is continuously green.
en
9
Page 10
6 CUSTOMIZING YOUR SUUNTO GPS TRACK POD
6.1 Connecting to Movescount
Movescount.com is your free personal diary and online sports community that
offers you a rich set of tools to manage your daily activities and create engaging
stories about your experiences. Movescount allows you to transfer your
recorded exercise logs from your Suunto GPS Track POD to Movescount and
customize the device to best meet your needs.
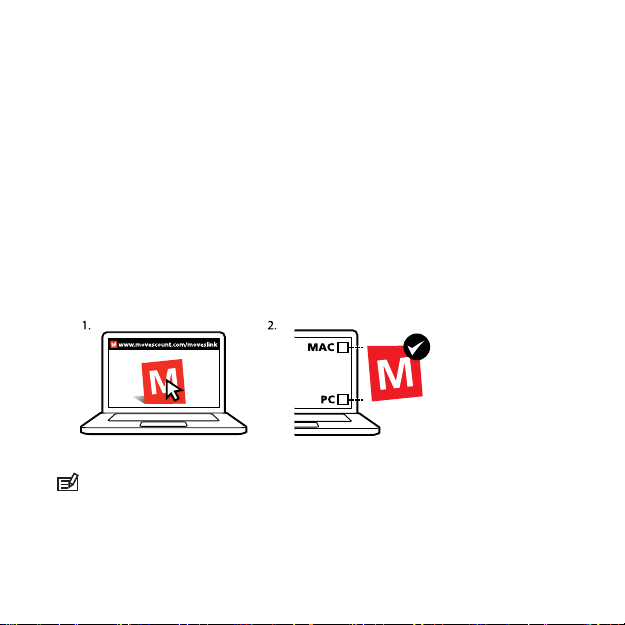
Start by installing the Moveslink version relevant to Suunto GPS Track POD:
1. Go to www.movescount.com/moveslink.
2. Download, install and activate Moveslink.
NOTE: A Moveslink icon is visible on your computer's display when Moveslink
is active.
10
Page 11

To register to Movescount:
1. Go to www.movescount.com.
2. Create your account.
NOTE: The first time your Suunto GPS Track POD is connected to Movescount
all information (including the device settings) is transferred from the device to your
Movescount account. The next time you connect your Suunto GPS Track POD to
your Movescount account, the changes in settings you made in Movescount will
be updated to the device.
NOTE: You can use the Moveslink application without registering to
Movescount. However, Movescount greatly extends the usability, personalization
and settings options of your Suunto GPS Track POD. It also visualizes recorded
tracks and other data from your activities. Therefore, it is recommended to create
a Movescount account in order to utilize the full potential of the device.
6.2 Customizing settings
You can customize your Suunto GPS Track POD settings in Movescount.
11
en
Page 12

To customize your Suunto GPS Track POD:
1. Activate Moveslink and connect Suunto GPS Track POD to your computer
using the supplied USB cable.
2. Log in to Movescount and customize the settings in the GEAR section of
your profile. Remember to save the settings.
3. Reconnect your Suunto GPS Track POD to update the settings in the device.
Your Suunto GPS Track POD includes the following default settings that you
can modify in Movescount:
Automatic log recording: When the automatic log recording is on, Suunto
●
GPS Track POD starts recording your activity log as soon as it gets a GPS fix.
When the automatic log recording is disabled, press the power button to
start recording a log after the GPS fix is found.
GPS fix and recording rate: By default Suunto GPS Track POD is recording
●
data and looking for GPS signal every second.
Sleep mode: By default the sleep mode is off. When the sleep mode is off,
●
Suunto GPS Track POD continuously updates GPS data and records other
data, such as time, speed and distance, at specified intervals.
Sounds: By default the sounds are on. When the sounds are on, you will
●
hear a sound when:
Suunto GPS Track POD receives GPS fix and starts recording a log.
○
12
Page 13

lap is stored.
○
when a log is stopped and Suunto GPS Track POD turns off.
○
For a complete list of sounds, see Chapter 9 Icons and sounds on page 21.
NOTE: Autolap distance is more accurate when you have selected a frequent
GPS fix and recording rate and have a strong GPS signal.
en
13
Page 14

7 USING YOUR SUUNTO GPS TRACK POD
7.1 Attaching Suunto GPS Track POD
NOTE: For best GPS reception, make sure Suunto GPS Track POD faces the sky.
NOTE: Always place the wrist unit and Suunto GPS Track POD on the same
side.
14
Page 15

To attach Suunto GPS Track POD to a strap:
1. Remove the plastic clip from the POD.
2. Place the strap between the clip and the POD and attach the clip back to
the POD.
NOTE: Always attach the strap and the clip from the backside of the POD.
7.2 Using GPS
Suunto GPS Track POD uses Global Positioning System (GPS) in determining
your current position. GPS incorporates a set of satellites that orbit the Earth
at an altitude of 20,000 km at the speed of 4 km/s.
NOTE: When you activate GPS for the first time, or have not used it for a long
time, it might take longer than usual to get a GPS fix. Subsequent GPS starts will
take less time.
en
15
Page 16

TIP: To minimize GPS initiation time, hold the device steady with GPS facing
up and make sure you are in an open area so that the device has a clear view of
the sky.
Troubleshooting: No GPS signal
For an optimal signal, point the GPS part of the device upwards. The best
●
signal can be received in an open area with a clear view of the sky.
The GPS receiver usually works well inside tents and other thin covers.
●
However, objects, buildings, dense vegetation or cloudy weather can reduce
the GPS signal reception quality.
GPS signal does not penetrate any solid constructions or water. Therefore
●
do not try to activate GPS for example inside buildings, caves, or under
water.
7.3 Recording logs
Once Suunto GPS Track POD is charged, you can start recording logs.
To record a log:
1. Go outdoors and make sure you have a clear view of the sky.
16
Page 17

2. To turn on Suunto GPS Track POD, keep the power button pressed until
the GPS signal and battery indicators turn on. The GPS signal indicator starts
blinking while Suunto GPS Track POD searches for GPS signal. Once the
signal is found, the green GPS signal indicator stays on continuously. By
default, Suunto GPS Track POD starts recording a log automatically when
the GPS fix is found.
3. (If you have disabled automatic recording in Movescount, press the power
button to start recording the log.)
NOTE: Connect your Suunto GPS Track POD regularly to Movescount to transfer
your logs and update satellite data to get a shorter GPS fix time.
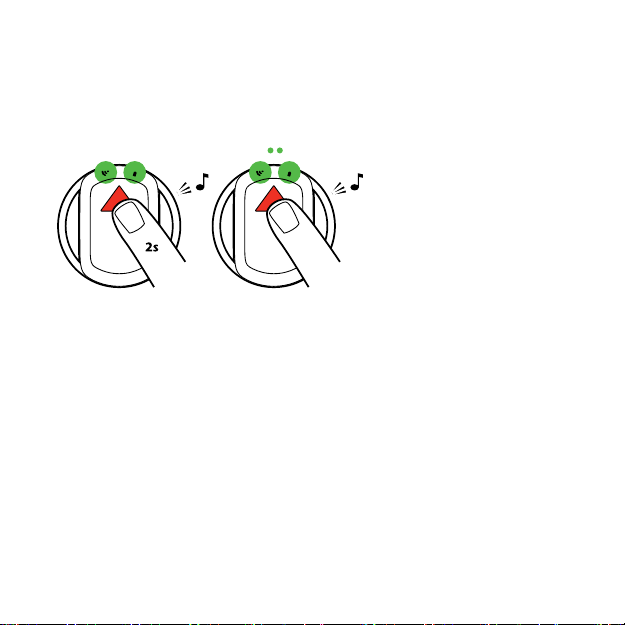
7.4 Making laps
When you are recording a log, you can make laps.
To make a lap:
1. Press the power button on your Suunto GPS Track POD.
2. The indicator lights blink green to confirm that the lap is saved.
17
en
Page 18

TIP: When automatic log recording is on, you can make a lap, for example, to
mark the crossing of the start or finish line in a marathon. This way, you will be
able to see your exact running time, not the time from getting the GPS fix.
7.5 Deactivating Suunto GPS Track POD
To deactivate Suunto GPS Track POD, keep the power button pressed until
both the battery and GPS signal indicators shut down.
7.6 Detaching Suunto GPS Track POD
Pull the strap backward to release the clip from Suunto GPS Track POD.
18
Page 19

7.7 Uploading data to Movescount
To upload your recorded logs from Suunto GPS Track POD to Movescount:
1. Activate Moveslink and connect the device to your computer using the
Suunto USB cable.
2. Your logs are transferred automatically to your Movescount account.
en
19
Page 20

8 PAIRING SUUNTO GPS TRACK POD
Suunto GPS Track POD can be used as a standalone GPS device to save tracks,
speed and distance data as well as GPS altitude during your activities. You can
also pair your Suunto GPS Track POD with compatible Suunto wrist devices to
receive real time speed, distance and cadence information during exercise.
Suunto GPS Track POD is compatible with Suunto Quest, Suunto M5, Suunto
t3, Suunto t4 and Suunto t6.
To pair Suunto GPS Track POD with a compatible Suunto wrist device:
1. Enter the pairing menu on your wrist device (follow the device-specific
instructions) and select the relevant option from the menu (GPS POD or
Speed POD). Wait for the wrist device to prompt you to turn on your POD.
2. Keep the power button pressed to activate Suunto GPS Track POD.
3. Hold Suunto GPS Track POD close to the wrist device and wait for the device
to notify that the POD has been paired.
NOTE: You do not need a GPS fix to pair Suunto GPS Track POD with a Suunto
wrist device.
20
Page 21

9 ICONS AND SOUNDS
No sound
Short sound
Longer sound
en
POD statusSoundsLights
Device off
Power turns on
Battery OK
Battery low (recharge battery)
Battery empty
Looking for GPS signal
GPS signal found
Starts recording a log
New lap
21
Page 22

22
POD statusSoundsLights
POD in sleep mode
Stop exercise/POD deactivated
USB cable connected and
battery charging
Battery fully charged
ERROR: memory full, connect to
Moveslink
ERROR: error when saving log,
memory full
ERROR: connect to Moveslink
Page 23

10 CARE AND MAINTENANCE
Handle the unit with care – do not knock or drop it.
Under normal circumstances the device will not require servicing. After use,
rinse it with fresh water, mild soap, and carefully clean it with a moist soft cloth
or chamois.
For more information on care and maintenance of the unit, refer to the
comprehensive range of support materials, including Questions and Answers
and instruction videos, available at www.suunto.com. There you can also post
questions directly to Suunto Contact Center or get instructions on how to get
your product repaired by an authorized Suunto Service, if needed. Do not
repair the unit yourself.
Alternatively, you may contact Suunto Contact Center at the phone number
listed on the last page of this document. Suunto’s qualified customer support
staff will help you and, if needed, troubleshoot your product during the call.
Use only original Suunto accessories - damage caused by non-original
accessories is not covered by warranty.
TIP: Remember to register your Suunto GPS Track POD in MySuunto at
www.suunto.com/register to get personalized support for your needs.
10.1 Water resistance
Suunto GPS Track POD is water resistant. Its water resistance is tested to 30
m/100 ft according to ISO 22810 standard (www.iso.ch). This means that you
can use Suunto GPS Track POD for swimming, but it should not be used for
any form of diving.
23
en
Page 24

NOTE: Water resistance is not equivalent to functional operating depth. The
water resistance marking refers to static air/water tightness withstanding shower,
bathing, swimming, poolside diving and snorkeling.
To maintain water resistance, it is recommended to:
never push the button while submerged.
●
never use the device for other than intended use.
●
contact an authorized Suunto service, distributor or retailer for any repairs.
●
keep the device clean from dirt and sand.
●
never attempt to open the case yourself.
●
avoid subjecting the device to rapid air and water temperature changes.
●
always clean your device with fresh water if subjected to salt water.
●
never direct water pressure flow towards buttons.
●
never knock or drop the device.
●
10.2 Charging the battery
The battery life on a single charge depends on GPS fix and recording settings.
With 1 second fix and recording interval, the battery will last up to 15 hours.
With 60 second fix and recording interval, the battery will last up to 100 hours
on a single charge.
NOTE: Low temperatures reduce the duration of a single charge.
NOTE: The capacity of rechargeable batteries decreases over time.
When the battery charge level is low (less than 2 hours left), the red battery
indicator starts blinking. You should recharge the battery soon.
24
Page 25

Charge the battery by attaching it to your computer with the Suunto USB cable,
or charge with the USB-compatible Suunto wall charger. It takes approximately
2–3 hours to fully charge an empty battery.
25
en
Page 26

11 TECHNICAL SPECIFICATIONS
Technical specifications
operating temperature: -20° C to +60° C/-5° F to +140° F
●
storage temperature: -30° C to +60° C/-22° F to +140° F
●
battery charging temperature: 0° C to +45° C/+32° F to +113° F
●
water resistance: 30 m/100 ft (ISO 22810)
●
transmission frequency (belt/POD): 2.4 GHz Suunto ANT compatible receiver
●
battery: rechargeable lithium-ion
●
battery duration (single charge):
●
~ 15 hours with 1 sec GPS fix & recording rate*
○
~ 100 hours with 60 sec GPS fix & recording rate*
○
*with a new battery in +20° C
weight: ~ 35 g / ~ 1.2 oz
●
NOTE: Water resistance is not equivalent to functional operating depth.
11.1 Trademark
Suunto GPS Track POD, its logos, and other Suunto brand trademarks and
made names are registered or unregistered trademarks of Suunto Oy. All rights
are reserved.
11.2 FCC compliance
This device complies with Part 15 of the FCC Rules. Operation is subject to the
following two conditions: (1) this device may not cause harmful interference,
26
Page 27

and (2) this device must accept any interference received, including interference
that may cause undesired operation.
11.3 IC
This device complies with Industry Canada licence-exempt RSS standard(s).
Operation is subject to the following two conditions:
(1) this device may not cause interference, and
(2) this device must accept any interference, including interference that may
cause undesired operation of the device.
11.4 CE
Suunto Oy hereby declares that this device is in compliance with the essential
requirements and other relevant provisions of Directive 1999/5/EC.
11.5 Copyright
Copyright © Suunto Oy 2012. All rights reserved. Suunto, Suunto product
names, their logos and other Suunto brand trademarks and names are
registered or unregistered trademarks of Suunto Oy. This document and its
contents are proprietary to Suunto Oy and are intended solely for the use of
clients to obtain knowledge and information regarding the operation of Suunto
products. Its contents shall not be used or distributed for any other purpose
and/or otherwise communicated, disclosed or reproduced without the prior
written consent of Suunto Oy. While we have taken great care to ensure that
information contained in this documentation is both comprehensive and
accurate, no warranty of accuracy is expressed or implied. This document
27
en
Page 28

content is subject to change at any time without notice. The latest version of
this documentation can be downloaded at www.suunto.com.
11.6 Warranty
SUUNTO LIMITED WARRANTY
Suunto warrants that during the Warranty Period Suunto or a Suunto Authorized
Service Center (hereinafter Service Center) will, at its sole discretion, remedy
defects in materials or workmanship free of charge either by a) repairing, or b)
replacing, or c) refunding, subject to the terms and conditions of this Limited
Warranty. This Limited Warranty is only valid and enforceable in the country
of purchase, unless local law stipulates otherwise.
Warranty Period
The Limited Warranty Period starts at the date of original retail purchase. The
Warranty Period is two (2) years for display devices. The Warranty Period is one
(1) year for accessories including but not limited to PODs and heart rate
transmitters, as well as for all consumable parts.
The capacity of rechargeable batteries decreases over time. In case of abnormal
capacity decrease due to defective battery, Suunto warranty covers the battery
replacement for 1 year.
Exclusions and Limitations
This Limited Warranty does not cover:
1. a) normal wear and tear, b) defects caused by rough handling, or c) defects
or damage caused by misuse contrary to intended or recommended use;
28
Page 29

2. user manuals or any third-party items;
3. defects or alleged defects caused by the use with any product, accessory,
software and/or service not manufactured or supplied by Suunto;
This Limited Warranty is not enforceable if item:
1. has been opened beyond intended use;
2. has been repaired using unauthorized spare parts; modified or repaired by
unauthorized Service Center;
3. serial number has been removed, altered or made illegible in any way, as
determined at the sole discretion of Suunto;
4. has been exposed to chemicals including but not limited to mosquito
repellents.
Suunto does not warrant that the operation of the Product will be uninterrupted
or error free, or that the Product will work with any hardware or software
provided by a third party.
Access to Suunto warranty service
You must have proof of purchase to access Suunto warranty service. For
instructions how to obtain warranty service, visit www.suunto.com/warranty,
contact your local authorized Suunto retailer, or call Suunto Contact Center.
Limitation of Liability
To the maximum extent permitted by applicable mandatory laws, this Limited
Warranty is your sole and exclusive remedy and is in lieu of all other warranties,
expressed or implied. Suunto shall not be liable for special, incidental, punitive
or consequential damages, including but not limited to loss of anticipated
benefits, loss of data, loss of use, cost of capital, cost of any substitute
equipment or facilities, claims of third parties, damage to property resulting
29
en
Page 30

from the purchase or use of the item or arising from breach of the warranty,
breach of contract, negligence, strict tort, or any legal or equitable theory, even
if Suunto knew of the likelihood of such damages. Suunto shall not be liable
for delay in rendering warranty service.
30
Page 31

Index
A
attaching, 14
B
battery life, 24
C
charging battery, 9, 24
connecting to Movescount, 10
customizing, 11
D
deactivating, 18
detaching, 18
G
GPS, 15
GPS troubleshooting, 16
I
icons, 21
L
lap, 17
light signals, 7
M
maintenance, 23
making laps, 17
Movescount, 10, 19
Moveslink, 10
P
pairing, 20
power button, 8
R
recording logs, 16
S
settings, 11
sounds, 21
U
uploading to Movescount, 19
W
warranty, 28
water resistance, 23
31
Page 32

SUUNTO CUSTOMER SUPPORT
www.suunto.com/support
www.suunto.com/mysuunto
INTERNATIONAL +358 2 284 1160
AUSTRALIA 1-800-240498 (toll free)
AUSTRIA 0720883104
CANADA 1-800-267-7506 (toll free)
FINLAND 02 284 1160
FRANCE 0481680926
GERMANY 08938038778
ITALY 0294751965
JAPAN 03 6831 2715
NETHERLANDS 0107137269
RUSSIA 4999187148
SPAIN 911143175
SWEDEN 0850685486
SWITZERLAND 0445809988
UNITED KINGDOM 02036080534
USA 1-855-258-0900 (toll free)
www.suunto.com
© Suunto O y 11/2012
Suunto i s a regis tered tradem ark of Suunto Oy.
All Rights reserve d.
 Loading...