

Page 1
Page 2

Page 3

CUSTOMER SERVICE CONTACTS
Suunto USA Phone 1 (800) 543-9124
Canada Phone 1 (800) 776-7770
Suunto Website www.suunto.com
EN
1
Page 4

1. INTRODUCTION .......................................................................................... 6
1.1 SUUNTO G3 FEATURES .............................................................................6
2. GETTING STARTED .................................................................................... 8
2.1 DISPLAY AND BUTTONS ............................................................................8
2.2 USING YOUR SUUNTO G3 .........................................................................9
2.2.1 Modes and menus ..............................................................................9
2.2.2 Press and long press ..........................................................................9
2.2.3 Adjusting the settings .........................................................................9
2.3 KEY LOCK ............................................................... ...................................11
2.4 INITIAL SETTINGS .....................................................................................11
2.4.1 Default features ................................................................................11
3. TIME MODE ............................................................................................... 12
3.1 SHORTCUTS ..............................................................................................12
3.1.1 Stopwatch .........................................................................................12
3.1.2 Dual time ..........................................................................................13
3.2 ALARM ........................................................................................................13
3.3 GENERAL ...................................................................................................14
3.3.1 Tones ...............................................................................................14
3.3.2 Icons .................................................................................................14
3.3.3 Setting the backlight (light) ...............................................................14
3.4 DIST ............................................................................................................15
4. GAME MODE ............................................................................................. 16
4.1 USING YOUR SUUNTO G3 DURING GAME ............................................16
2
Page 5

4.1.1 Selecting the game type and course ...............................................16
4.1.2 Starting the game ............................................................................ 17
4.1.3 During your round ............................................................................ 17
4.1.4 After your round ............................................................................... 17
4.2 STROKEPLAY ........................................................................................... 17
4.3 STABLEFORD ........................................................................................... 19
4.4 MATCH ....................................................................................................... 19
4.5 SCRATCH ........................................................ ..........................................20
4.6 STATISTICS ............................................................................................... 20
4.6.1 Adding penalties (Penalty) ...............................................................21
4.6.2 Quitting the game (Quit game) ........................................................ 21
4.6.3 Erasing additional information (Erase) ............................................. 21
4.6.4 Quitting the hole ............................................................................... 21
4.6.5 Viewing the current result and time .................................................22
4.6.6 Nine-hole game ............................................................................... 22
5. MEMORY MODE ............. ............................... ... .. ... ............................... ... .. 23
5.1 GAME ......................................................................................................... 23
5.2 COURSE .................................................................................................... 23
5.2.1 Creating a course (Create) ..............................................................23
5.2.2 Activating a course (Activate) ..........................................................24
5.2.3 Editing a course (Edit) .....................................................................24
5.2.4 Viewing a course (View) ..................................................................24
5.2.5 Erasing a course (Erase) ................................................................. 25
3
Page 6

5.3 STATS ........................................................................................................25
5.3.1 Viewing game statistics (View) .........................................................25
5.3.2 Erasing games (Erase) .....................................................................25
5.3.3 Erasing all the game statistics (Erase All) ........................................26
5.4 HISTORY ....................................................................................................26
5.4.1 Viewing the history ...........................................................................26
5.4.2 Resetting the history files (Reset) ....................................................27
5.5 HCP INDEX ................................................................................................27
6. SUUNTO GOLF MANAGER .......... ... ... .. ... .................................. ... .. ... ........ 28
6.1 INSTALLATION ..........................................................................................28
6.2 SYSTEM REQUIREMENTS .......................................................................28
6.3 PC INTERFACE ..........................................................................................29
6.4 SUUNTO GOLF MANAGER FEATURES ...................................................29
6.4.1 G-device window (1) .........................................................................31
6.4.2 My Computer window (2) .................................................................31
6.4.3 Main window (3) ...............................................................................31
6.4.4 Properties window (4) .......................................................................31
6.4.5 Suuntosports.com window (5) ..........................................................32
7. SUUNTOSPORTS.COM ............................................................................ 33
7.1 SYSTEM REQUIREMENTS .......................................................................33
7.2 GETTING STARTED ..................................................................................33
7.3 SUUNTOSPORTS.COM CATEGORIES ....................................................34
7.3.1 MySuunto .........................................................................................34
4
Page 7

7.3.2 Communities ....................................................................................34
7.3.3 Sport-specific pages ........................................................................34
8. CARE AND MAINTENANCE ................ .. ... .................................. ............... 35
8.1 CARE OF THE SUUNTO G3 .....................................................................35
8.2 WATER RESISTANCE .............................................................................. 35
8.3 REPLACING THE BATTERY ..................................................................... 36
9. DEFINITIONS AND CALCULATION RULE S ........................................... .. 38
10. TECHNICAL SPECIFICATIONS .............................................................. 42
11. TERMS AND CONDITIONS ..................................................................... 43
11.1 COPYRIGHT ............................................................................................43
11.2 TRADEMARKS ........................................................................................ 43
11.3 CE COMPLIANCE .................................................................................... 43
11.4 ISO 9001 COMPLIANCE ......................................................................... 43
12. LIMITS OF LIABILITY ............................................................................... 44
5
Page 8

1. INTRODUCTION
Congratulations for purchasing Suunto G3, a wristop computer designed for golfers!
Suunto G3 is a sophisticated scorekeeper that allows you to keep track of your score
and your opponent’s results during golf games. Additionally, Suunto G3 memorizes
your and your opponent’s key statistics during the round.
Suunto G3 allows you to choose up to four different game types (Scratch, Stroke, S t ableford and Match Play) and will automatically update the leader during the round.
After which, you can instantly view your and your opponent’s scores and the key statistics of your game. And with the included Golf Manager PC-software, you can analyze your golfing performance over a longer period of time to help you concentrate on
key improvement areas.
1.1. SUUNTO G3 FEATURES Time mode
• Time, calendar, alarm, stopwatch with split times, and unit's setting adjustment
Game mode
• Scorecard for 4 different game types (Strokeplay, Stableford, Match and Scratch)
• Calculates your and your opponent's scores and final results
• Registers statistical data (Fairway hits, GIRs, Up&Downs, Sand saves, Putts and
penalties)
Memory mode
• Stores your 10 favorite courses (selected from PC, stores the course name, score
card)
• Displays the results and the history of played games
• Calculates your handicap for a given course based on your handicap index
6
Page 9

PC-Software
• Scorecard
• Stores played games
• Playing history and trend graphs of the development of key stats (GIR, FIR, putts
etc.)
• Course database (stores the data of all played courses in the memory)
SuuntoSports.com
• Compare your game results with others online
• Download new course data to your personal database on your PC
• Share the best moments of your rounds with your friends on the golf forum
7
Page 10
2. GETTING STARTED
This chapter helps you get started with your Suunto G3. It introduces the buttons and
tells you how to use the functions.
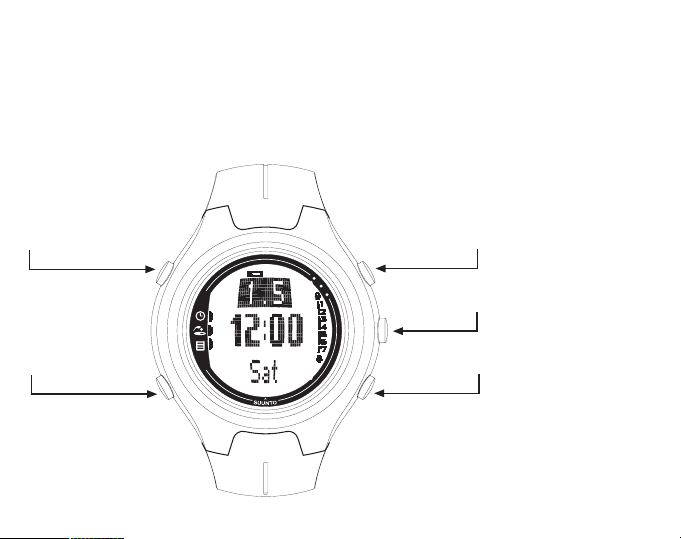
2.1. DISPLAY AND BUTTONS
When your Suunto G3 leaves the factory, the display is blank. The unit is activated,
when you press any of the buttons.
START/DATA
STOP/BACK
8
UP
ENTER
DOWN
Page 11

2.2. USING YOUR SUUNTO G3
This section explains how the menu structure works and how you can adjust different
settings.
2.2.1. Modes and menus
1. Scroll to the desired mode with UP or DOWN. The name of the new mode is
displayed for a short time before the main display opens. The indicator bar on the
left side of the display tells you what the currently active mode is.
2. Press the ENTER button to open the Set menu. Three menu items are displayed
at the same time. The menu item that is currently active and can be selected is
displayed in reversed color. The bar on the right displays the order number of the
menu item and tells you how many items there are. Press STOP/BACK to leave the
menu.
2.2.2. Press and long press
START/DATA, STOP/BACK and ENTER can perform different functions depending
on how long you press them. A long press means that the button is pressed for more
than 2 seconds. This manual will inform you when a long press is required.
2.2.3. Adjusting the settings
The following series of figures show you how you set the date and time.
NOTE: The adjustment of the other settings is done in a similar way.
9
Page 12
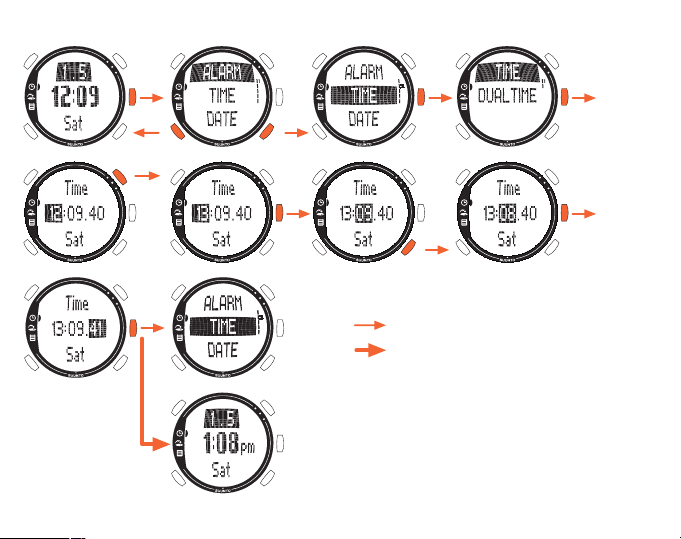
short press
long press
10
Page 13

2.3. KEY LOCK
The key lock prevents you from accidentally pushing the buttons.
To activate the key lock:
1. Press ENTER.
2. Press START/DATA within 2 seconds. The buttons are locked and is displayed
in the upper right corner. If you try to press a button, the message “
” is displayed.
ENTER
UNLOCK PRESS
To deactivate the button lock:
1. Press ENTER. The text “
NOW PRESS START” is displayed.
2. Press START/DATA within 2 seconds.
2.4. INITIAL SETTINGS
By default the unit contains one preset course, 4 opponent names and 1 round. The
statistics history is zeroed.
NOTE: You can remove the preset game and course information from the memory by
accessing the Memory mode (See chapter 5. Memory mode). You can also edit and
change the preset opponents with Suunto Golf Manager software.
2.4.1. Default features
When you first receive the unit it will have:
• Strokeplay as the default game type
• 1 Round played at Amer Sports Country Club (you will see the game stats under
the playing date 12:00/01.05)
• Amer Golf Country Club as the active course
• 4 preset opponents. You may add new opponents later with the PC software. (You
can have up to 5 opponents in the memory at a time.)
11
Page 14

3. TIME MODE
In the Time mode, you can view the current time, dual time, current date and weekday. You can also set alarms, adjust the unit's settings or use it as a stopwatch. Setting the time and date were already covered in section 2.2. Using your Suunto G3.
3.1.SHORTCUTS
You may select 4 different functions for
the bottom row with STOP/BACK.
3.1.1.Stopwatch
To use the stopwatch:
1.Select the stopwatch shortcut with-
2. Press START/DATA to start the stopwatch. If you want to record a split time, press
START/DATA again. The split time stays on the display for a moment, and then
Suunto G3 returns to displaying the running time. Suunto G3 can store up to 30
split times.
3. Press STOP/BACK to stop the stopwatch. If you have recorded any split times, you
can now scroll them with STOP/BACK.
4. To reset the timer, long press STOP/BACK. (If the stopwatch has not been reset,
you can press START/DATA to restart the timing from the end time.)
NOTE: When you have used the stopwatch, you cannot select other shortcuts before
resetting the timer.
12
STOP/BACK.
Page 15

3.1.2. Dual time
The dual time enables you to keep track of another time in another time zone while
traveling.
To set the dual time:
1. Select Time in the Set menu.
1. Select Dual time in the Time menu.
2. Set the hour.
3. Set the minutes. The seconds are synchronized on the basis of the regular time.
3.2. ALARM
You can set up to three independent alarms to remin d you e.g.of important meetings
or wake you up at a specific time. When the alarm is set, is displayed in the lower
right corner of the display.
To set an alarm:
1. Select Alarm in the Set menu.
2. Select one of the three alarms.
3. Change the alarm status to On.
4. Set the hour.
5. Set the minutes.
6. Set the date. (If you do not set the date, the alarm is activated, from that point
onwards, every day at the time the alarm is set.)
13
Page 16

3.3. GENERAL
With this function you can adjust the tones, icons and light.
To adjust general settings:
1. Select General In the Set menu.
2. Select a suitable setting.
3. Adjust the setting.
3.3.1. Tones
Tones are the sounds that indicate that you have successfully pressed the buttons.
You can set the tones to On or Off.
3.3.2. Icons
When the Icons function is on and you scroll to a mode, the mode icon appears on
the display for a short time before the main display opens. When it is off, the main display opens straight away.
3.3.3. Setting the backlight (light)
With the Light function you can adjust the backlight of the Suunto G3 display. It has
three possible settings:
• Normal: The light switches on when you press START/DATA for more than 2
seconds or when an alarm is a ctivated. The light stays on for 7 seconds after the
last press of a button.
• Night Use: The light switches on when you press any of the buttons and stays on
for 5 seconds after the last press of a button. Note: Heavy use of the backlight will
significantly reduce battery life.
• Off: The light does not switch on at all.
14
Page 17

3.4. DIST
With this function you can define the time and date formats and the distance unit you
want your Suunto G3 to use.
• Time: 12h or 24h format
• Date: mm.dd (month before the day), dd.mm (day before the month) or only the
day
• DIST: meters (m) or yards (yd)
15
Page 18

4. GAME MODE
The Game mode allows you to keep score
Active course
Course par
Game type
4.1. USING YOUR SUUNTO G3 DURING GAME
The following sections explain how to use the unit during your round.
4.1.1. Selecting the game type and course
1. Select a game type: Scratch, Strokeplay, Stableford or Match. (The default is
Strokeplay.) You can change the game type in the Memory mode.
2. Select a course if you are playing any other game type than Scratch (see section
5.2.2. Activating the course). If you do not have the course set up, see section
5.2.1. Creating a course.
16
during a round of golf. You can also keep
score of your opponent's game. Your Suunto
G3 displays the leader at all stages of game
and stores up to 5 of your favorite opponents
in its memory.
The Game mode also allows you to register
statistical data like fairway hits and greens in
regulations or penalties of your own game so
that you can later view your playing history.
Page 19

4.1.2. Starting the game
1. In the Game mode, select an opponent from the list. You can edit or change opponents in Suunto Golf Manager.
2. Set your and your opponents handicap. This way the unit can display the leader at
all stages of game.
3. Select the hole where you start from. The default starting hole is 1.
4.1.3. During your round
1. Define total shots and putts for each hole.
2. Define the statistics (Fairway shots, Bunker hits, Up&downs, Sand saves etc.).
3. Define your opponent’s score.
NOTE: You can quit the game any time during the round (see section 4.6.2.).
4.1.4. After your round
After the round, Suunto G3 asks whether you want to see the statistics of the round.
4.2. STROKEPLAY
Strokeplay is a tough and unforgiving format. It is a true test of your skill since every
shot counts, and you cannot pick up the ball and move to the next hole or rely on your
team members to help you out.
The following series of figures shows how to use Suunto G3 during your ro und (section 4.1.3.)
17
Page 20

Scrolls results of
previous holes
Depending on the course, the game ends automatically after 9 or 18 holes (see section 4.6.6).
NOTE: While the game is on, you cannot enter the Time or Memory mode. To view
the time, long press ENTER in the score input screen. (See section 4.6.5. Viewing the
current result and time.)
NOTE: If you need to adjust the scores of previous holes, scroll back with STOP/
BACK and adjust the scores of the desired hole. Return to the current hole screen by
accepting the scores with ENTER.
18
Page 21

4.3. STABLEFORD
Stableford is a popular format as it allows an
individual golfer to play the course on his/her
own merits but, in the event of a bad hole, lets
you pick up the ball and move onto the next
hole. This can help to speed up the round and
reduce frustration if you are not playing very
5 = shots
4= points
well.
After each hole, the unit displays the current
game status (shots / stableford points) for 10
seconds and then continues automatically to
the next hole.
4.4. MATCH
Match is a competition format in which you play
the round with the purpose of winning individual
holes. For example, on hole 1, if you score 4
and your opponent scores 5, you win the hole.
Match is always a two-player game.
Holes won
The unit will ask you to confirm the winner of
the hole because the absolute number of
strokes does not actually matter. However, the
unit allows you to update the shots to maintain
the statistics.
NOTE: After each hole, the unit displays the current score for 10 seconds and then
automatically continues to the next hole.
19
Page 22

4.5. SCRATCH
Scratch is a quick and easy game that allows you to easily calculate your overall
score and putts while playing on the fairway (The putts are updated after finishing the
hole). It does not require any course details and does not adjust scores for different
handicaps.
4.6. STATISTICS
These functions are not game-specific and you can use them in any game type.
1. During the score input press START/DATA.
2. Select the desired option from the list and press ENTER to memorize it.
• Fairway
• Bunker
• Up&down
• Sandsave
NOTE: The unit will display a message ‘
your result is over par and you have memorized an up&down or sand save for that
hole.
20
INVALID SAND SAVE’ or ‘iNVALID UP&DOWN’ if
Page 23

4.6.1. Adding penalties (Penalty)
If you want to memorize a penalty, a separate display opens where you can choose
the following:
• Water
•Out
•Drop
•Rul viol
NOTE: You can only view the penalties with the Suunto Golf Manager software.
NOTE: Suunto G3 does not automatically add penalties in the final score. You have
to add the extra strokes in the total score manually.
4.6.2. Quitting the game (Quit game)
With this function you can quit the game at any time you want. If you quit the game at
the first hole, the game is not saved in the memory.
4.6.3. Erasing additional information (Erase)
If you have entered information for a specific hole that want to erase, you can use the
Erase function. When you select the Erase function, your Suunto G3 displays a list of
the additional information recorded for the hole. You can now erase the unnecessary
information.
4.6.4. Quitting the hole
You can quit a hole in the middle of the game by selecting -- for the putts or the total
score. Your Suunto G3 displays the message “
QUIT HOLE?”. Confirm it with ENTER.
21
Page 24

4.6.5. Viewing the current result and time
short press
long press
4.6.6. Nine-hole game
With Suunto G3 you can play both 9-hole and 18-hole games. With 18-hole games,
you just keep on playing until you reach the end. Suunto G3 will automatically finish
the game after the 18th hole.
You can play 9 holes on an 18-hole course by quitting the game on the 10th hole. If
you start on the back nine, you quit the game on hole 1. If the course has only 9
holes, the game will end automatically after the 9th hole.
22
Page 25

5. MEMORY MODE
The Memory mode gives you access to
the information stored in the unit's memory. It allows you to view statistics and
history of played games, and create and
update course information. It also calculates your course handicap (CHCP) for a
given course
You can also select the game type in the
Memory mode.
5.1. GAME
This function lets you select the game type:
•Stroke
• Stableford
•Match
•Scratch
5.2. COURSE
Here you can create, edit and view courses, and erase them from the unit's memory.
5.2.1. Creating a course (Create)
With this function you can create a new golf course and store it in your Suunto G3.
1. Select Create in the Course menu.
2. Enter the course rating (C.R) and slope rating from the course’s scorecard.
3. Define the PAR, stroke index and distance for each hole.
Active course
Course handicap
Last score on
active course
23
Page 26

4. To create a 9-hole course, long press ENTER during the 9th hole, right after defining the hole distance.
NOTE: If you want to adjust the information regarding previous holes, scroll back with
STOP/BACK.
NOTE: If you want to quit the creation process for some reason, long press STOP/
BACK for more than two seconds.
5.2.2. Activating a course (Activate)
With this function you can activate a course you have created.
1. Select a suitable course in the Course menu.
2. Select Activate.
5.2.3. Editing a course (Edit)
With this function you can edit a course you have created. You can adjust all the values that you entered when you created the course.
If you adjust the stroke index of a certain hole, you must readjust the indexes of all
holes. Otherwise you may save the changes by long pressing ENTER.
5.2.4. Viewing a course (View)
With this function you can view the information concerning a course you have created.
1. Select a suitable course in the Course menu.
2. Select View.
3. Scroll the information pages with UP and DOWN.
4. Press ENTER or STOP/CL to stop viewing a course.
24
Page 27

5.2.5. Erasing a course (Erase)
With this function you can erase a course from the memory.
1. Select a suitable course in the Course menu.
2. Select Erase. Suunto G3 displays the message “
ERASE XXX”.
3. Press ENTER to erase th e course or press STOP/BACK if you do not want to
erase it.
5.3. STATS
With this function you can view and erase game statistics.
5.3.1. Viewing game statistics (View)
With this function you can view the statistics of your previous games.
1. Select View in the Stats menu.
2. Select a game.
3. Scroll the stats pages with UP and DOWN.
4. Press ENTER to return to the selection menu.
5.3.2. Erasing games (Erase)
With this function you can erase individual games stored in the memory.
1. Select Erase in the Stats menu.
2. Select a game. Suunto G3 displays the message “
ERASE HH:MM/DD.MM?”
3. Press ENTER to accept or STOP/BACK to return to the menu.
25
Page 28

5.3.3. Erasing all the game statistics (Erase All)
With this function you can erase all the statistics of all the games stored in the memory.
1. Select Erase all in the Stats menu. Suunto G3 displays the message ‘
?’
GAMES
ERASE ALL
2. Press ENTER to accept or STOP/BACK to return to the menu.
5.4. HISTORY
With this function you can view and reset the history of played rounds.
5.4.1. Viewing the history
The following information is displayed:
• Games: Number of played rounds
• Shots: Total number of shots
• Up and down: Total and percentage
• Sand save: Total and percentage
• GIR: Total and percentage
• FIR: Total and percentage
• Putts: Total and average
Press Enter or STOP/BACK to return to the menu.
See chapter 9. Calculation Rules for more information.
26
Page 29

5.4.2. Resetting the history files (Reset)
1. Select Reset in the History menu. Suunto G3 displays the message ‘
.MM.YY HISTORY?’ where the date refers to the date when the history was previ-
DD
RESET
ously reset.
2. Press ENTER to reset the history or press STOP/BACK if you do not want to reset
it.
5.5. HCP INDEX
Enter your current handicap index to obtain the adjusted course handicap for the
active course.
NOTE: The handicap index is issued by your golf club when you turn in your scorecards and is expressed as a number taken to one decimal place.
The course handicap is calculated from the handicap index and is basically the number of strokes (compensation) you get compared to a scratch golfer (0-handicap) on
the specific course.
Your Suunto G3 calculates the adjusted course handicap, which is your course handicap for the specific tees you are playing from.
27
Page 30

6. SUUNTO GOLF MANAGER
Suunto Golf Manager (SGM) is a software designed to enhance the functionality of
your Suunto G3. You can use it to transfer information such as game scores from the
Suunto G3 memory. When you have transferred the data, you can easily organize,
view and add related information in it.
The Suunto Golf Manager software is included in your Suunto G3 package on a CDROM. You can always download the latest version from www.suunto.com or
www.suuntosports.com. Please check for updates regularly as new features are
developed continuously.
6.1. INSTALLATION
1. Insert the Suunto Golf Manager CD-ROM into the drive.
2. Wait for the installation to begin and follow the installation instructions.
NOTE: If the installation does not start automatically, click Start --> Run and type
D:\setup.exe.
6.2. SYSTEM REQUIREMENTS
• Minimum CPU speed 350 Mhz
• 64 MB of RAM
• 40 MB of available hard-disk space
•Microsoft
• Minimum resolution: 1024 x 768
28
®
Windows 98, Windows NT, Windows 2000, Windows XP
Page 31

6.3. PC INTERFACE
With the PC interface cable you can transfer information between your Suunto G3
and your computer. The interface cable is delivered in the same package as your
Suunto G3.
6.4. SUUNTO GOLF MANAGER FEATURES
The Suunto Golf Manager display is divided into five separate windows. These
windows are shown in the following figure and their functions are briefly introduced in
the following sections. (For more detailed instructions, see Suunto Golf Manager
Help.)
29
Page 32

3
2
1
4
5
30
Page 33

6.4.1. G-device window (1)
In this window you establish the connection between Suunto G3 and Suunto Golf
Manager. After reading the data, Suunto Golf Manager displays the contents
(Courses, Rounds and Players) of your Suunto G3.
You can use the icons to reset the device, save settings and transf er data to Suunto
Golf Manager. The transfer can also be done by dragging the files and dropping them
in the duplicated named folders in the My Computer window.
Connecting your Suunto G3
1. Connect the data cable between your PC and Suunto G3. Suunto G3 displays the
text ‘
SERIAL TRANSFER’.
2. Click Connect/Refresh.
NOTE: Keeping your Suunto G3 connected to the data cable will significantly reduce
battery life.
6.4.2. My Computer window (2)
This window displays the contents of Suunto Golf Manager. When you click on a file,
its information is displayed in the Main and Properties windows. Y ou can transfer dat a
to your Suunto G3 by dragging the files and dropping them in the duplicated named
folders in the G3-device window.
6.4.3. Main window (3)
This window displays the scorecards, history and trend graphs.
6.4.4. Properties window (4)
In this window you can view and edit the information of the item (player, course etc.)
you selected in the My Computer window.
31
Page 34

6.4.5. Suuntosports.com window (5)
This window displays the data you have in SuuntoSports.com. You have to be a registered member before you can add, edit and view data. (For more information on
SuuntoSports.com, see the next chapter.)
32
Page 35

7. SUUNTOSPORTS.COM
SuuntoSports.com is an Internet site for all Suunto wristop computer users. There you
can share experiences and data collected using your Suunto G3.
As a Suunto G3 owner, you can register yourself and have access to all golf-related
services. These services help you to get the most of your golf and your Suunto G3.
7.1. SYSTEM REQUIREMENTS
• Internet connection (min. 56k modem)
• Internet Explorer 4.0 or newer, Netscape 4.7x or newer
• Display resolution: minimum 800x600 (1024x768 recommended)
7.2. GETTING STARTED
To join the SuuntoSports.com:
1. Connect to the Internet and open your Web browser.
2. Go to www.suuntosports.com.
3. Click Register and register yourself and your Suunto G3. You can change and
update your personal and equipment profiles in MySuunto afterwards. After the
registration you will automatically enter the SuuntoSports.com home page that
introduces the site structure and functional principles.
NOTE: Please read the SuuntoSports.com privacy policy before registering.
NOTE: SuuntoSports.com is continuously developed further and its content is subject
to change.
33
Page 36

7.3. SUUNTOSPORTS.COM CATEGORIES
SuuntoSports.com includes three different categories for each sport: MySuunto,
Communities and Sport-specific pages.
7.3.1. MySuunto
MySuunto is intended for your own data. Here you can upload your scores and
courses, and store information about yourself and your unit. When you transfer your
logs (e.g. played rounds) to MySuunto, they are displayed among your data.
You decide who is allowed to view the data, and you ca n publish the scores to compare them with your opponents or other Suunto G3 users.
MySuunto also includes a personal calendar where you can make notes regarding
your training.
7.3.2. Communities
In Communities, Suunto G3 users can form and maintain user groups. For example,
you can form a group with your friends and share your scores and hints, and plan
future rounds. You can also apply for a membership in other groups.
Each group has its own homepage at SuuntoSports.com. This page can be used for
news, group calendars, bulletin boards etc.
7.3.3. Sport-specific pages
Each sport category has its own sport-specific pages at SuuntoSports.com. They
include sport-specific news, bulletin boards and discussion groups. You can propose
good golf-related links to be added and upload information on golf and golfing equipment.
You can also publish your own travel diaries, and describe, recommend or comment
on travel destinations.
34
Page 37

8. CARE AND MAINTENANCE
8.1. CARE OF THE SUUNTO G3
Only perform the procedures described in this manual. Never attempt to disassemble
or service your Suunto G3. Protect it from shocks, extreme heat and prolonged exposure to direct sunlight. If not in use, store it in a clean, dry environment at room temperature.
You can wipe your Suunto G3 clean with a lightly moistened (warm water) cloth. If
there are stubborn stains or marks, you can apply mild soap to the area. Do not
expose your Suunto G3 to strong chemicals such as gasoline, cleaning solvents, acetone, alcohol, insect repellents, adhesives and paint, as they will damage the unit's
seals, case and finish.
8.2. WATER RESISTANCE
Suunto G3 is tested with ISO (International Organization for standardization,
www.iso.ch) standard 2281. This means that it is water-resistant. In addition to the
term ‘water resistant’, Suunto G3 is marked with an indication of a test overpressure
given as a depth in meters (100 m/330 feet). This, however, does not correspond to a
diving depth but refers to the pressure at which the water overpressure test was conducted.
This means that you cannot dive to a depth of 100 m/330 ft. with your Suunto G3.
Rain, showering, swimming and other normal exposure to water will not affect its
operation. However, do not press the buttons under water under any circumstances.
NOTE: Suunto G3 wristop computers are not meant for diving.
35
Page 38

8.3. REPLACING THE BATTERY
Your Suunto G3 operates on a 3-Volt lithium cell, type: CR 2032. The life expectancy
is approximately 12 months.
A low-battery warning indicator is activated on the display when approximately 5–15
percent of the battery capacity is still available. When this occurs, you should replace
the battery. However, extremely cold weather may activate the low battery-warning
indicator even when the battery is still fully operational. If the battery-warning indicator
is activated in temperatures above 10°C (50°F), replace the battery.
NOTE: Heavy use of the backlight will significantly reduce battery life.
You can replace the batteries yourself as long as you do it properly to avoid any leakage of water into the battery compartment or computer. Always use original battery
replacement kits. (They include a new battery, battery lid and O-ring.) You can purchase the battery kits from official Suunto retailers.
NOTE: When replacing the battery, also replace the battery lid and O-ring. Never use
the old ones.
NOTE: Change the battery at your own risk. Suunto recommends you to have the
batteries changed in official Suunto services.
36
Page 39

To replace the battery:
1. Insert a coin into the slot located on the battery compartment cover on the backside
of your Suunto G3.
2. Turn the coin counterclockwise until it is aligned with the open position marker.
3. Remove the battery compartment cover and the O-ring, and discard them. Ensure
that all surfaces are clean and dry.
4. Remove the old battery carefully.
5. Place the new battery into the battery compartment under the metal flap, with the
positive side facing up.
6. With the O-ring in the correct position, replace the battery com-partment cover and
turn it with the coin clockwise until it is aligned with the closed position marker. Do
not press onto the battery compartment cover while turning it with a coin.
NOTE: Perform battery replacement with extreme care to ensure that your Suunto G3
remains water resistant. Careless battery replacement may void warranty.
WARNING: This Suunto product contains a Lithium cell. To reduce risk of fire or
burns, do not disassemble, crush, puncture, short external contacts, charge or dispose of in fire or water. Replace only with manufacturer specified batteries. Recycle
or dispose of used batteries properly.
37
Page 40

9. DEFINITIONS AND CALCULATION RULES
This chapter contains definitions and formulas that your Suunto G3 uses to calculate
the statistics and scores.
Course handicap (CHCP)
This is the adjusted course handicap for the current course and tee you are playing
on.
CHCP is calculated from your Handicap Index.
Formula:
CHCP = (THE PLAYERS HANDICAP INDEX X SLOPE RATING) /113 + (COURSE RATING - PAR)
NOTE: On courses that have 9 holes, the par is multiplied by two.
Course Rating (C.R.)
This represents the playing difficulty of a course for scratch golfers (0-handicap)
under normal course and weather conditions. The course rating is used to adjust your
course handicap for a specific set of tees.
Fairway hit (FIR)
This determines whether your opening shot landed on the fairway. It is registered only
on holes where par is greater than 3. (On par 3's the opening shot should land on
green.)
Formula:
AIRWAY MARKINGS / HOLES WHERE FAIRWAY IS POSSIBLE
F
38
Page 41

Green in regulation (GIR)
This determines your ability to play the fairway in a regulated amount of shots having
2 putts left for playing a par.
GIR is registered automatically on all holes where
Formula:
SHOTS - PUTTS = PAR - 2 OR SMALLER / ALL THE PLAYED HOLES.
Handicap Index
This is the handicap provided by your golf club when you turn in your scorecard. It is
expressed with a number taken to one decimal place and represents your potential
scoring ability.
Match play score
The player with higher handicap receives the difference between the players' course
handicaps as a compensation for the holes he/she is entitled to (determined by
the stroke index).
EXAMPLE: If player A's handicap is 20 and player B's handicap is 15, player A
receives 1 shot compensation for 5 most difficult holes (Stoke Index 1-5).
The winner is the one who has won most holes. The game ends when the player with
lower score cannot win enough holes to tie with the leader.
In this case:
• The winner’s total score is the difference of the number of holes won by both
players
• The loser’s total score is the number of unfinished holes.
EXAMPLE: If player A is in the lead by 3 points after the 15th hole and wins the 16th
hole, the game ends. The score is 4-2 in favor of the player A. The winner ’s score is
always displayed first.
39
Page 42

If the game is interrupted for some reason, the score for each player is the number of
holes they have won.
EXAMPLE: If the player A has won 4 holes and player B 3 holes, player A wins the
game by 4-3.
In case the game ends in a tie after 18 holes, the score is 1-1.
Stableford score
Formula:
STABLEFORD POINTS = 2 + (HOLE PAR + HANDICAP COMPENSATION - STROKES)
Sand save
Sand save determines that the player has succeeded to recover from a bunker and
score a par.
NOTE: The sand save takes into account all holes where you made a bunker marking. To maintain the correct sand save percentage, you need to mark a bunker also
on the holes where you did not score a par. Otherwise the Sand save % will show
100%.
The Sand save does not distinguish the number of putts used and thus it will not
determine if your sand save was accomplished from a green bunker unless you intentionally only mark green bunkers.
Formula:
s
ANDSAVE% = SAND SAVE MARKINGS / (NUMBER OF HOLES WITH SAND SAVE OR BUNKER
MARKINGS
) X 100%
Slope Rating
This represents the relative difficulty of a course for a non-scratch golfer.
40
Page 43

Strokeplay score
Formula:
NET STROKES = HOLE SCORE - HANDICAP COMPENSATION
Up and down
This is possible if you have played the hole within the par, used only 1 putt, and the
last stroke took place close to the green.
Formula:
UP AND DOWN MARKINGS X 100 / NUMBER OF HOLES WHERE UP AND DOWN WAS POSSIBLE
Up and down is possible if:
HOLE SCORE - PUTTS = PAR -1
41
Page 44

10. TECHNICAL SPECIFICATIONS
• Operating temperature -20 C to + 50 C / -5 F to 120 F
• Storage temperature -30 C to + 60 C / -22 F to 140 F
• Weight 60 g
• Water-resistant 100 m/330 ft.
• Mineral crystal glass
• Aluminum case
• User replaceable battery CR2032
• PC-Interface with RS-232 serial connector
42
Page 45

11. TERMS AND CONDITIONS
11.1. COPYRIGHT
This publication and its contents are proprietary to Suunto Oy and are intended solely
for the use of its clients to obtain knowledge and key information regarding the operation of Suunto G3 products. Its contents shall not be used or distributed for any other
purpose and/or otherwise communicated, disclosed or reproduced without the prior
written consent of Suunto Oy.
While we have taken great care to ensure that information contained in this documentation is both comprehensive and accurate, no warranty of accuracy is expressed or
implied. Its content is subject to change at any time without notice. The latest version
of this documentation can always be downloaded in www.suunto.com.
Copyright
11.2. TRADEMARKS
Suunto, Wristop Computer, Suunto G3, Replacing Luck, and their logos are registered or unregistered trademarks of Suunto Oy. All rights are reserved.
11.3. CE COMPLIANCE
The CE mark is used to mark conformity with the European Union EMC directive 89/
336/EEC.
11.4. ISO 9001 COMPLIANCE
Suunto's Quality Assurance System is certified by Det Norske Veritas to be ISO 9001
compliant in all SUUNTO Oy's operations (Quality Certificate No. 96-HEL-AQ-220).
©
Suunto Oy 4/2004
43
Page 46

12. LIMITS OF LIABILITY
If this product should fail due to defects in materials or workmanship, Suunto Oy will,
at its sole option, repair or replace it with new or rebuilt parts, free of charge, for two
(2) years from the date of its purchase.
This warranty is only extended to the original purchaser and only covers failures due
to defects in materials and workmanship that occur during normal use while in the
period of the warranty.
It does not cover battery, battery replacement, damage or failures resulting from accidents, misuse, neglect, mishandling, alteration or modifications of the product, or any
failure caused by operation of the product outside the scope of its published specifications, or any causes not covered by this warranty.
There are no express warranties except as listed above.
The client can exercise the right to repair under the warranty by contacting Suunto
Oy's Customer Service department to obtain a repair authorization. Suunto Oy and its
subsidiaries shall in no event be liable for any incidental or consequential damages
arising from the use of or inability to use the product.
Suunto Oy and its subsidiaries do not assume any responsibility for losses or claims
by third parties that may arise through the use of this instrument.
44
Page 47

Page 48

 Loading...