

Page 1

EN
Page 2

CUSTOMER SERVICE CONTACTS
Global Help Desk +358 2 284 11 60
Suunto USA Phone +1 (800) 543-9124
Canada Phone +1 (800) 776-7770
Suunto website
www.suunto.com
COPYRIGHT
This publication and its contents are proprietary to Suunto Oy.
Suunto, Wristop Computer, Suunto Bike Pod, Replacing Luck and their logos
are registered or unregistered trademarks of Suunto Oy. All rights reserved.
While we have taken great care to ensure that information contained
in this documentation is both comprehensive and accurate,
no warranty of accuracy is expressed or implied.
Its content is subject to change at any time without notice.
Page 3

1. INTRODUCTION
Suunto Bike POD is an accessory for your Suunto t3, Suunto t4 or Suunto
t6 wristop computer. It is a light-weigh t, wire less spee d and di stan ce se nsor
that combines new speed and distance fun ctions with the detailed heart
rate analysis and training benef its of your wristop computer, creating one of
the most advanced cycling-speci fic training tools available.
Suunto Bike POD measures your cycling speed and distance by calculating the
relation between the circumference of your bicycle wheel and the speed at
which it rotates. Measurement is ef fortless and, when proper ly calibrated, also
very accurate.
Suunto Bike POD adds new features to your Suunto t3, t4 or t6 wristop
computer. Once paired with t he Bike POD, the wri stop computer dis plays your
current speed, the distance from start and the lap distance. Furthermore, it
stores lap times automatically accor ding to the distance set by the us er; gives
alarms for too fast or too slow speed, and offers a distance-based interval
training function.
NOTE: The wristop-computer functions related to the use of your Suunto Bike
POD are explained in the indi vidual Suunto t3, t4, and t 6 instruction manuals.
You can download the latest version of the manuals at www.suunto.com/
training.
2. BEFORE USE
2.1. PAIRING YOUR BIKE POD
Before you can use your Suunto Bike POD, you have to pair it with your Suunto
wristop computer. This process can be compared to the tuning of a radio. To be
able to listen to a specific radio station, you have to tune the radio to the correct
frequency. Similarly, to be able to use your Suunto wristop computer with a
specific Bike POD, you must pair t hem with each other. This is only nec essary
when you use your Bike POD for the first time.
To pair your Bike POD with your Suunto wristop computer:
1. Remove the Bike POD battery.
2. Short-circuit the - a nd + metal pla tes in the bat tery compartme nt of the POD
by connecting them with a metal instrument, f or example, by touch ing them
with a screwdriver, knife or a paperclip.
3. In your Suunto t3 or Suunto t4, go to Training mode settings and select
Pair a POD and then Bike.
In your Suunto t6, go to the Training menu an d select Pair and then Bike
POD (if your device has a serial number 50500 000 or higher ) or Spd sens (if
your device has a serial number 5049999 9 or lowe r). The mes sage ‘TURN ON
NEW DEVICE’ is displayed.
4. Insert the battery in the battery compartment and wait for acknowledgement.
5. Your Suunto t3 or t4 will disp lay “Paired” or, if pairing failed, return to the
Pair a POD menu.
Your Suunto t6 will display either ‘”PAIRING COMPLETE” or, if pairing failed,
“NO DEVICES FOUND” within 30 seconds.
6. If pairing is successful, close the battery compartment cover. If pairing fails,
remove the battery and repeat steps 2–5. If pairing still fails, make sure that
there are no active ANT tra nsmitters s uch HR belt s nearby and repeat s teps
2–5.
After successful pairing, you can view speed and distance-related information in
the Speed/Distance mode while on the move.
If you would like to use the Suunto t6 (serial number 50499999 or lower)
simultaneously with both the Bike POD and th e Foot POD, Suunt o offers a fr ee
update to the device at your ne arest Suunto Service Center, upon presenting
the Bike POD proof of purchase and after paying the postal costs for sending it
to the service center.
For information on Suunto Service Center locations visit www.suunto.com.
2.2. INSTALLING AND REPLACING THE BATTERY
1. Open the battery compartment cover with a coin.
2. If replacing the batter y, remove the old battery.
3. Place the new battery into the battery compartment with the positive side
facing up and close the cover.
NOTE: Replace the battery with extreme c are to ensure that your Bike POD
remains water-resistant. Check the condition of the seal on the battery cover
each time you change the batt ery and replace the battery cover if the seal is
damaged. Careless battery replacement may void the warranty.
EN
Page 4
NOTE: To reduce the ris k of fire or burns, do not cr ush, puncture or di spose of
used batteries in fire or water. The POD uses one CR2032 battery. Only use this
kind of battery. Recycle or dispose of used batteries properly.
CR 2032
3. USING YOUR BIKE POD
There are two different Suunto Bike PODs available. The universal Suunto Bike
POD is ideal for all situatio ns, and attaches easily to all kinds of bikes. T he
Suunto Road Bike POD has a quick-release system and also fits on most kinds
of bikes, although it is especially valued as a ro ad -c ycling Bike POD.
3.1. ATTACHING THE UNIVERSAL SUUNTO BIKE POD
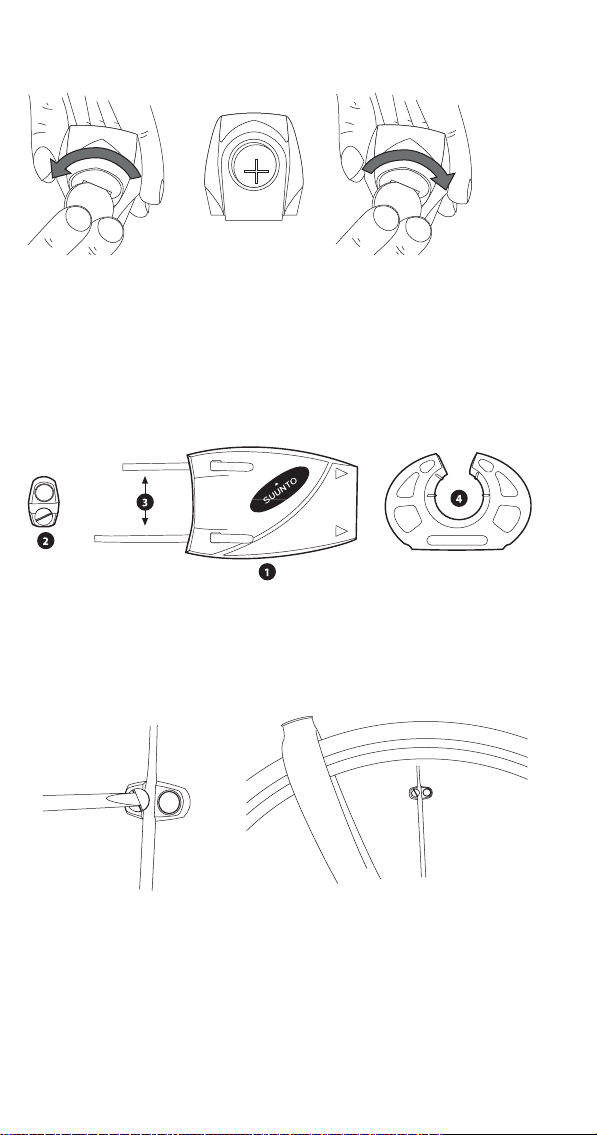
3.1.1. CONTENT OF THE UNIVERSAL SUUNTO BIKE POD PACKAGE
•Bike POD (1)
• Magnet (2)
• 2 wire ties (3)
• Holder for the wristop computer (4)
3.1.2. INSTALLING THE MAGNET BRACKET
Place the magnet bracket on a spoke on the right side of the wheel. The magnet
must be turned towards the Bike POD.
Note: If you are using a wheel with extra flat spokes, you need to cut the tabs on
the magnet bracket beforehand.
3.1.3. INSTALLING THE BIKE POD
1. Insert a wire tie into each slot des igned for this purpose from the Bi ke POD
side. The head of the wire tie must go in its slot as far as possible.
2. Place the Bike POD on th e right blade of the fork (the Bike POD mus t be
pointing forward); close the fixing collars without tightening them.
3. Adjust the position of the Bike POD so the center of the magnet is al igned
with one of the arrows on the Bike POD. Th e distance between the magnet
and the Bike POD must be less than 10 mm.
Page 5

4. Tighten the wire ties and cut them flush.
1
2
3
5. Attach the holder for th e wristop computer t o the ha ndle bar wi th the f lat part
facing up. Place your Suunto wristop computer around it.
3.2. ATTACHING THE SUUNTO ROAD BIKE POD
3.2.1. CONTENT OF THE SUUNTO ROAD BIKE POD PACKAGE
• Road Bike POD consisting of a skewer (1), quick-release lever (2) and nut (3)
• Magnet (4)
• Holder for the wristop computer (5)
3.2.2. INSTALLING THE LOCKING LEVER/BIKE POD
1. Fit the quick-releas e lever to the hub, with the lever to th e left (to the right
when using disc brakes). Close the lever, taking care to position it horizontally
towards the rear (+/– 45°).
2. Adjust the tension on the adjusting nut so that sufficient force is applied when
the locking lever is moved to th e “CLOSE” position (consult your re tailer).
3. When the locking lever can be moved to the “CLOSE” position too easily, the
wheel is not held in place with sufficient force. If this is the case, put the
locking lever in the “OPEN” position and tighten the adjusting nut to increase
the force.
4. Push the locking lever to the “CLOSE” position.
5. In all cases, make sur e th at t he nut is su ff ici en tly sc rewed o n. The en d o f t he
skewer should not be deeper than 2 mm (1/16 inch) inside the nut.
Page 6

+/- 45 o
6. Attach the holder for your Suunto wristop computer to the handle bar with the
flat part facing up. Place the Suunto t-series wristop computer around it. (See
the figure under point 5 in section 3.1.3.)
3.2.3. INSTALLING THE MAGNET MOUNT
Position the magnet mount on a spok e so that it passes in front of one of the
marks on the lever. The magnet must be turned towards the Bike POD.
• Hub (1)
• Magnet (2)
•Bike POD (3)
3.3. ACTIVATION AND DEACTIVATION
Your Bike POD is activated automat ically when the spoke magnet passes the
Bike POD, i.e. when the front whee l s pins . I t st ay s ac tiv e th ro ugho ut th e cycl i ng
trip and for half an hour after the Bike POD has stopped receiving readings from
the magnet.
3.4. CONNECTION
To use your Bike POD, you must establish a con nection between it and your
wristop computer. This can be compared to listening to a radio. To be able to
receive the radio broadcast signal, you need to switch the radio on. Similarly, for
your wristop computer to be able to r eceive t he sign al from y our Bike P OD, the
devices must be connected. You need to es tablish the connection every time
you want to use your wristop computer with your Bike POD.
1. Spin the front wheel so that the spoke magnet passes the Bike POD.
2. In your Suunto t6, select Connect in the Speed/Distance menu.
In your Suunto t3 or Suunto t4, enter Training mode.
3. Your wristop computer informs you when the Bike POD has been found.
Suunto t3 or Suunto t4: If the connection fails, the message “Searching”
disappears from the bottom row of the display and the selected shortcut returns.
In this case, spin the front wheel again to ensure that the Bike POD is active and
try again.
Suunto t6: If the connection fails,”NO DEVICES FOUND” is displayed on the
screen. In this case, spin the front wheel ag ain to ensure th at the Bike POD is
active and try again.
Page 7

3.5. CALIBRATION
Suunto Bike POD measures your bike’s speed and distance from the rotation of
the front wheel. The wristop computer needs a specific calibration fact or that
takes the wheel size into consid eration.
To define the exact calibration factor, measure the tire circumference or
calibrate your Bike POD using a know n distance.
3.5.1. Measuring the circumference manually
1. Set a measuring cord on the floor.
2. Sit on your bike and ride alo ng the cord so that the tires rotate fully at least
once.
3. Measure the covered distance with the accuracy of a millimeter.
4. Divide the circumference by 2050 (for example, 2096 / 2050 = 1.0224 39 =
1.022).
5. Set the calibration fact or i n yo ur Suu nt o t-s er ies wr is top comp uter . S ee s teps
2 to 5 in Section 3.5.3. for setting the calibration factor.
3.5.2. Calibrating the Bike POD using a known distance
1. In your Suunto t3 or Suunto t4, enter Training mode.
In your Suunto t6, select Connect in the Speed/Distance menu.
2. Reset the distance measurement at the start line.
3. In your Suunto t3 or Suunto t4, press START/ STOP in Training mode.
In your Suunto t6, press START/STOP in the Speed/Distance mode.
4. Cover a known distance with your bike.
5. Press START/STOP to stop the measurement.
6. Select Calibrate in the Speed/Distance mode.
7. Select Bike POD and replace the measured distance with the correct
distance.
3.5.3. Calibrating the Bike POD using the calibration factor table
You can also calibrate the Bike POD us in g the cal ibr at ion f ac tor tabl e. The dat a
in the table comes from various ti re manufacturers and th e European Tire and
Rim Technical Organisation. Becaus e of the differences in the tire pressure,
tread pattern, and measurement methods, the table is only indicative.
1. Check your tire size, and find the appropriate calibration factor in the table
(see Appendix).
2. In the Speed/Distance menu, select Calibrate.
3. Select Bike POD.
4. Select Cal. (t6 only)
5. Set the correct calibration factor with UP/DOWN.
Suunto t3
and Suunto t4
Suunto t6
Page 8

4. SUUNTO TRAINING MANAGER SOFTWARE
While using Suunto Bike POD, the speed and distance data is recorded by yo ur
Suunto wristop computer. This data can be displayed in graph form and
analyzed in more detail with Suunto Training Manager software. The software is
included with Suunto t6 and is optional for Suunto t 3 and Suunto t4 devices.
You can always download the la test version of the Suunto Training Manag er
free of charge from www.suunto.com.
5. TECHNICAL SPECIFICATIONS
• Weight:
• Universal Bike POD: 18g / 0.6oz (Including battery and magnet)
• Road Bike POD: 69g / 2.4oz (Including skewer, battery and magnet. Adds
approximately 10g / 0.4oz to your normal quick release.)
• Water-resistance: 10 m / 33 ft.
• Operating temperature: -20°C to +60°C / -5°F to +140°F
• User replaceable battery: 3V CR2032
• Transmission range: up to 10 m / 30 ft.
• Accuracy: When calibrated, typically better than 1%
• Frequency: 2.465 GHz ANT compatible
• Battery life: up to 300 h (at 20°C / 68°F)
6. INTELLECTUAL PROPERTY
6.1. COPYRIGHT
This publication and its contents are proprietary to Suunto Oy and are intended solely
for the use of its clients to obtain knowledge and information regarding the operation
of Suunto products.
Its contents shall not be used or distributed for any other purpose and/or otherwise
communicated, disclosed or reproduced without t he prior wri tten consent of Suunto Oy.
While we have taken great care to ensure that information contained in this
documentation is both comprehensive and accurate, no warranty of accuracy is
expressed or implied. Its content is subject to change at any time without notice. The
latest version of this documentation can always be downloaded in www.suunto.com.
© Suunto Oy 7/2006
6.2. TRADEMARK
Suunto and Replacing Luck are registered trademarks of Suunto Oy. Suunto t3,
Suunto t4, Suunto t6, Suunto Bike POD, Suunto Road Bike POD, and other Suunto
product, feature and content names are registered or unregistered trademarks of
Suunto Oy. Other product and company names are trademarks of their respective
owners.
7. DISCLAIMERS
7.1. USER’S RESPONSIBILITY
This instrument is intended for recreational use only. Suunto Bike POD must not be
substituted for obtaining measurements that require professional or industrial
precision.
7.2. CE
The CE mark is used to mark conformity with the European Union EMC directives 89/
336/EEC and 99/5/EEC.
7.3. ICES
This Class [B] digital apparatus compl ies with Canadian ICES-003.
7.4. FCC COMPLIANCE
This device complies with Part 15 of the FCC limits for class B digital devices. This
equipment generates, uses, and can radiate radio frequency energy and, if not
installed or used in accordance with the instructions, may cause harmful interference
to radio communications. There is no guarantee that interference will not occur in a
particular instance. If this equipment does cause harmful interference to other
equipment, try to correct the problem by relocating the equipment.
Consult an authorized Suunto dealer or other qualified service technician if you
cannot correct the problem. Operation is subject to the following conditio ns:
(1) This device cannot cause harmful interference.
(2) This device must accept any interference received, including interference that may
cause undesired operation.
Repairs should be made by authorized Suunto service personnel. Unauthorized
repairs will void warranty.
Tested to comply with FCC standards. For home or office use.
Page 9

FCC WARNING: Changes or modifications not expressly approved by Suunto Oy
could void your authority to operate this device under FCC regulations.
7.5. LIMITS OF LIABILITY AND ISO 9001 COMPLIANCE
If this product should fail due to defects in materials or workmanship, Suunto Oy will,
at its sole option, repair or replace it with new or rebuilt parts, free of charge, for two
(2) years from the date of its purchase. This warranty is only extended to the original
purchaser and only covers failures due to defects in materials and workmanship that
occur during normal use while in the period of the warranty.
It does not cover battery, battery replacement, damage or failures resulting from
accident, misuse, neglect, mishandling, alteration or modifications of the product, or
any failure caused by operation of the product outside the scope of its published
specifications, or any causes not covered by this warranty.
There are no express warranties except as listed above.
The client can exercise the right to repair under the warranty by contacting Suunto
Oy’s Customer Service department to obtain a repair authorization.
Suunto Oy and its subsidiaries shall in no event be liable for any incidental or
consequential damages arising from the use of or inability to use the product. Suunto
Oy and its subsidiaries do not assume any responsibility for losses or claims by third
parties that may arise through the use of this device.
Suunto's Quality Assurance System is certified by Det Norske Veritas to be ISO 9001
compliant in all Suunto Oy's operations (Quality Certificate No. 96-HEL-AQ-220).
7.6. AFTER SALES SERVICE
If a claim under warranty appears to be necessary, return the product, freig ht pr epai d,
to your Suunto representative who is responsible for having your product repaired or
replaced. Include your name, address, proof of purchase and/or service registration
card, as required in your country. The claim will be honored and the product repaired
or replaced at no charge and returned in what your Suunto representative determines
a reasonable amount of time, provided that all necessary parts are in sto ck. All repair s
that are not covered under the terms of this warranty will be made at the owner's
expense. This warranty is non-transferable from the original owner.
You can locate your local Suunto representative at www.suunto.com.
8. DISPOSAL OF THE DEVICE
Please dispose of the device in an appropriate way, treating it as
electronic waste. Do not throw it in the garbage. If you wish, you may
return the device to your nearest Suunto representative.
Page 10

APPENDIX / ANNEXE / ANHANG / ANEXO
APPENDICE / BIJLAGE / LIITE / BILAGA
Tire size [ETRTO]
Taille de la roue [ETRTO]
Reifengröße [ETRTO]
Tamaño de neumático [ETRTO]
Misura dei copertoni [OTECC]
Bandenmaat [ETRTO]
Pyörän koko [ETRTO]
Hjulstorlek [ETRTO]
44-288 14 x 1.75 1055 0,515
40-330 16 x 1.50 1185 0,578
47-305 16 x 1.75 1195 0,583
40-355 18 x 1.50 1340 0,654
47-355 18 x 1.75 1350 0,659
47-406 20 x 1.75 1515 0,739
37-451 20 x 1-3/8 1615 0,788
37-484 22 x 1-3/8 1770 0,863
40-484 22 x 1-1/2 1785 0,871
25-507 24 x 1 1753 0,855
28-520 24 x 1-1/8 1795 0,876
32-547 24 x 1-1/4 1905 0,929
47-507 24 x 1.75 1890 0,922
54-507 24 x 2.00 1925 0,939
54-507 24 x 2.125 1965 0,959
22-559 26 x 7/8 1920 0,937
30-559 26 x 1.25 1953 0,953
28-584 26 x 1-1/8 1970 0,961
37-590 26 x 1-3/8 2068 1,009
37-584 26 x 1-1/2 2100 1,024
37-559 26 x 1.40 2005 0,978
40-559 26 x 1.50 2010 0,980
44-559 26 x 1.75 2023 0,987
47-559 26 x 1.95 2050 1,000
50-559 26 x 2.00 2055 1,002
54-559 26 x 2.10 2068 1,009
54-559 26 x 2.125 2070 1,010
57-559 26 x 2.35 2083 1,016
75-559 26 x 3.00 2170 1,059
25-630 27 x 1 2145 1,046
25-630 27 x 1-1/8 2155 1,051
32-630 27 x 1-1/4 2161 1,054
37-630 27 x 1-3/8 2169 1,058
35-590 650 x 35A 2090 1,020
38-571 650 x 38A 2125 1,037
38-571 650 x 38B 2105 1,027
18-622 700 x 18C 2070 1,010
19-622 700 x 19C 2080 1,015
20-622 700 x 20C 2086 1,018
23-622 700 x 23C 2096 1,022
25-622 700 x 25C 2105 1,027
28-622 700 x 28C 2136 1,042
30-622 700 x 30C 2170 1,059
32-622 700 x 32C 2155 1,051
19-632 700C Tub 2130 1,039
35-622 700 x 35C 2168 1,058
38-622 700 x 38C 2180 1,063
40-622 700 x 40C 2200 1,073
Tire size [inches]
Taille de la roue [pouces]
Reifengröße [Zoll]
Tamaño de neumático [pulgadas]
Misura dei copertoni [pollici]
Bandenmaat [inch]
Pyörän koko
Hjulstorlek
Circumference [mm]
Circonférence [mm]
Umfang [mm]
Circunferencia [mm]
Circonferenza [mm]
Wielomtre [mm]
Ympärysmitta [mm]
Omkrets [mm]
Calibration factor
Taux d’étalonnage
Kalibrierungsfaktor
Factor de calibración
Fattore di taratura
Kalibratiefactor
Kalibrointikerroin
Kalibreringsfaktor
Page 11

Suunto Oy, 10/2004, 7/2006
 Loading...