

Suunto BIKE POD Instruction Manual

EN | FR | DE | ES | IT | NL | FI | SV

CUSTOMER SERVICE CONTACTS
Suunto Oy Phone +358 9 875870
Suunto USA Phone 1 (800) 543-9124
Canada Phone 1 (800) 776-7770
European Call Center Phone +358 2 284 11 60
Suunto Website www.suunto.com
COORDONNÉES DU SERVICE CLIENTS
Suunto Oy Tél. +358 9 875870
Suunto USA Tél. 1 (800) 543-9124
Canada Tél. 1 (800) 776-7770
Centres d'appels en Europe Tél. +358 2 284 11 60
Site Web Suunto www.suunto.com
KUNDENDIENST
Suunto Oy Tel. +358 9 875870
Suunto USA Tel. 1 (800) 543-9124
Canada Tel. 1 (800) 776-7770
Europaweites Call Center Tel. +358 2 284 11 60
Suunto im Internet www.suunto.com
DATOS DE CONTACTO DE SERVICIO AL CLIENTE
Suunto Oy Tel. +358 9 875870
Suunto USA Tel. 1 (800) 543-9124
Canadá Tel. 1 (800) 776-7770
Centro de llamadas para Europa Tel. +358 2 284 11 60
Sitio web de Suunto www.suunto.com
NUMERI UTILI PER IL SERVIZIO CLIENTI
Suunto Oy Tel. +358 9 875870
Suunto USA Tel. 1 (800) 543-9124
Canada Tel. 1 (800) 776-7770
Call Center Europeo Tel. +358 2 284 11 60
Sito Internet Suunto www.suunto.com
KLANTENSERVICE
Suunto Oy Tel +358 9 875870
Suunto USA Tel 1 (800) 543-9124
Canada Tel 1 (800) 776-7770
European Call Center Tel +358 2 284 11 60
Suunto Website www.suunto.com
ASIAKASPALVELUN YHTEYSTIEDOT
Suunto Oy Puh. +358 9 875870
Suunto USA Puh. 1 (800) 543-9124
Kanada Puh. 1 (800) 776-7770
Euroopan Call Center Puh. +358 2 284 11 60
Suunnon verkkosivut www.suunto.com
KUNDSERVICE, KONTAKTER
Suunto Oy Tel. +358 9 875870
Suunto USA Tel. 1 (800) 543-9124
Kanada Tel. 1 (800) 776-7770
Callcenter i Europa Tel. +358 2 284 11 60
Suuntos webbplats www.suunto.com
Fax +358 9 87587301
Fax +358 9 87587301
Fax +358 9 87587301
Fax +358 9 87587301
Fax +358 9 87587301
Fax +358 9 87587301
Fax +358 9 87587301
Fax +358 9 87587301

English.................. 4
EN
Francaise.............. 8
Deutsch............... 13
Español............... 18
Italiano ................ 23
Nederlands .........28
Suomi.................. 33
Svenska.............. 37
Appendix............. 42
FR
DE
ES
IT
NL
FI
SV
1. INTRODUCTION
Suunto Bike Pod is an accessory for your Suunto t6 wristop computer. It is a
light-weight, wireless speed and distance sensor that combines new speed and
distance functions with the detailed heart rate analysis and training benefits of
your Suunto t6, creating one of the most advanced cycling-specific training tools
available.
Suunto Bike Pod measures your cycling speed and distance via a separate
spoke magnet. Measurement is effortless and when properly calibrated, also
very accurate.
Suunto Bike Pod adds new features to your Suunto t6. When you have paired
the Bike Pod with your Suunto t6, the wristop computer displays your current
speed, the distance from start and the lap distance. Furthermore, it stores lap
times automatically according to the distance set by the user, alarms for too fast
or too slow speed, and offers a distance-based interval training function.
NOTE: The Suunto t6 functions related to the use of your Suunto Bike Pod are
explained in the Suunto t6 instruction manual. You can download the latest version of the manual in www.suunto.com.
2. BEFORE USE
2.1. PAIRING YOUR BIKE POD
Before you can use your Suunto Bike Pod, you have to pair it with your Suunto
t6. This process can be compared to the tuning of a normal radio. To be able to
listen to a specific radio station, you have to tune the radio to the correct frequency. Similarly, to be able to use your Suunto t6 with a specific Bike Pod, you
must pair them with each other. This is only necessary when you use your Bike
Pod for the first time.
To pair your Bike Pod with your Suunto t6:
1. Remove the Bike Pod battery.
2. Short-circuit the - and + metal plates in the battery compartment by connecting them with a metal instrument.
3. Select Pair in the Training menu of your Suunto t6.
4. Select Bike POD. The message ‘TURN ON NEW DEVICE’ is displayed.
5. Insert the battery in the battery compartment and wait for acknowledgement.
Within 30 seconds, either ‘PAIRING COMPLETE’ or, if pairing failed, ‘NO DEVICES
FOUND’ is displayed.
6. If pairing is successful, close the battery compartment cover. If pairing fails,
remove the battery and repeat steps 2-5.
3. USING YOUR BIKE POD
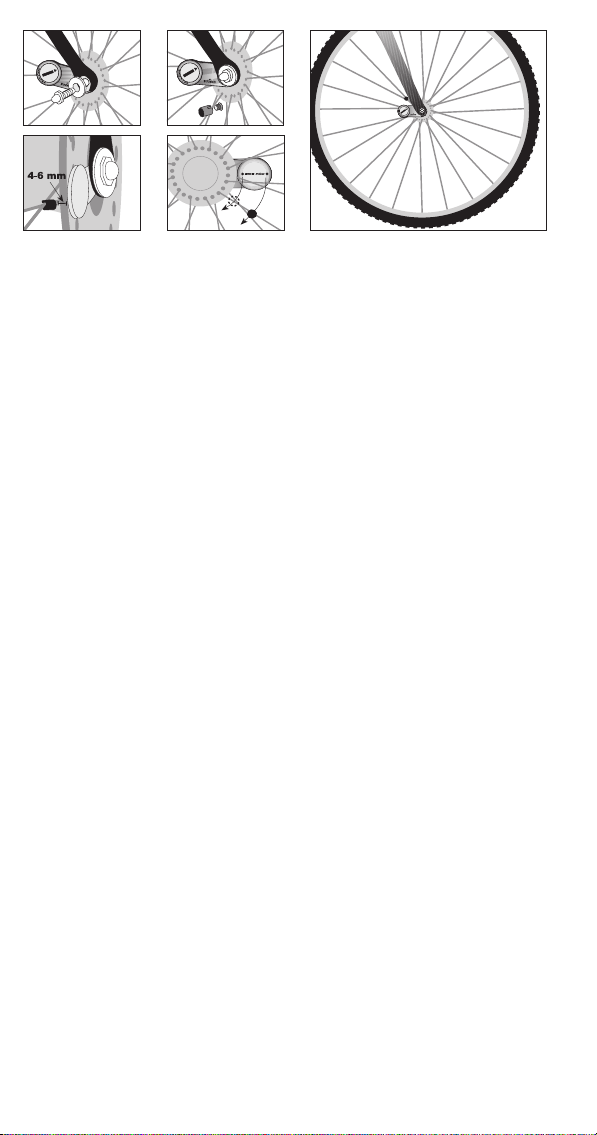
3.1. ATTACHMENT
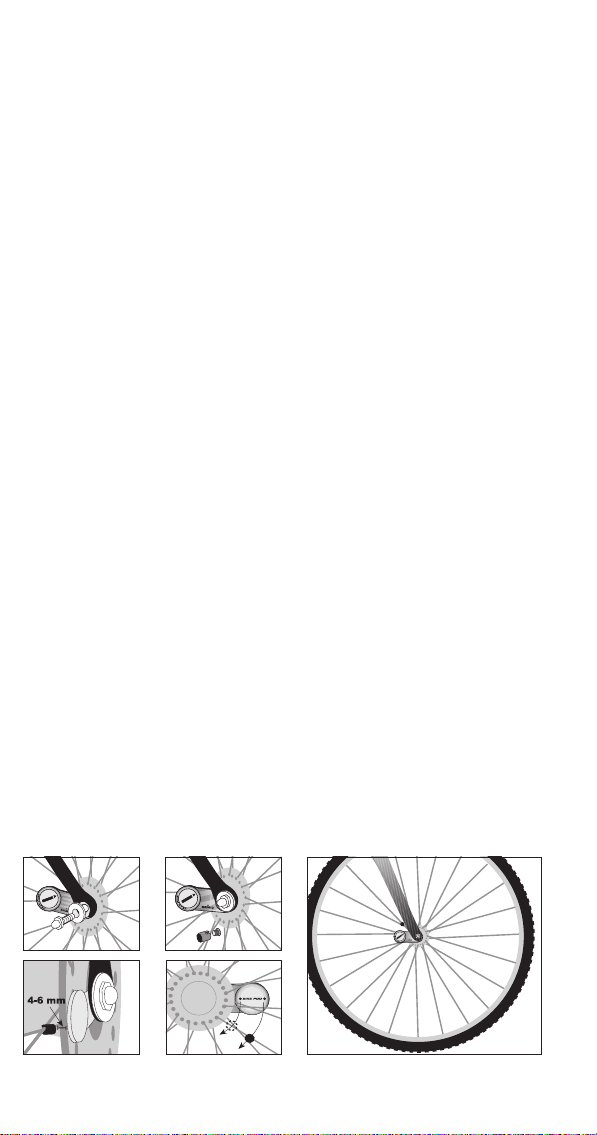
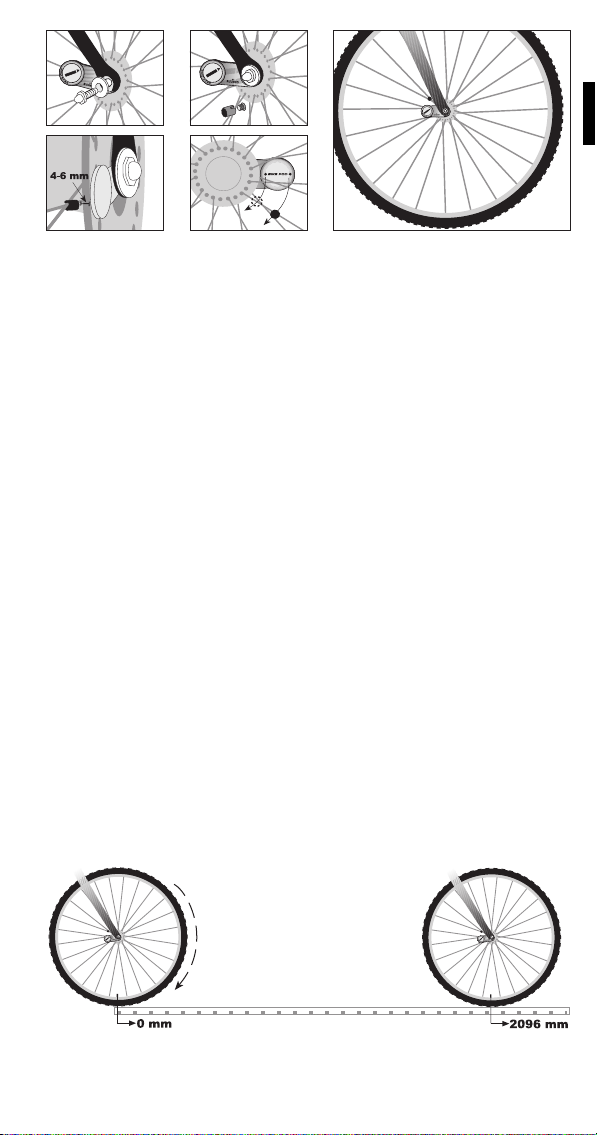
Suunto Bike Pod is attached to the hub of the front wheel, and the spoke magnet is attached to a spoke as close to the Bike Pod as possible.
1. Loosen the front wheel attachment mechanism. (You can attach the Bike Pod
to forks that use both the quick-release mechanism and traditional axle bolts.)
2. Position your Bike Pod horizontally on the front axle between the fork and the
hub in a way that the Bike Pod logo points towards the wheel.
3. Fasten the wheel attachment mechanism.
4. Attach the spoke magnet to a spoke of the front wheel at the same level as
the sensor. The magnet must be facing the speed sensor, and pass it at a
correct distance. A suitable distance is 4-6 mm (0.2").
4
3.2. ACTIVATION AND DEACTIVATION
Your Bike Pod is activated automatically when the spoke magnet passes the
speed sensor i.e. when the front wheel spins. It stays active throughout the
cycling trip and for half an hour after the sensor has stopped getting readings
from the magnet.
3.3. CONNECTION
To use your Bike Pod, you must establish a connection between it and your
Suunto t6. This can be compared to listening to a radio. To be able to receive
the radio broadcast signal, you need to switch the radio on. Similarly, for your
Suunto t6 to be able to receive the signal from your Bike Pod, the devices must
be connected. You need to establish the connection every time you want to use
your Suunto t6 with your Bike Pod.
1. Spin the front wheel so that the spoke magnet passes the sensor.
2. Select Connect in the Speed/Distance menu of your Suunto t6. Suunto t6
informs you when the device has been found.
If the connection fails, Suunto t6 displays the message ‘
this case, spin the front wheel again to ensure that the Bike Pod is active and try
again.
NO DEVICES FOUND’. In
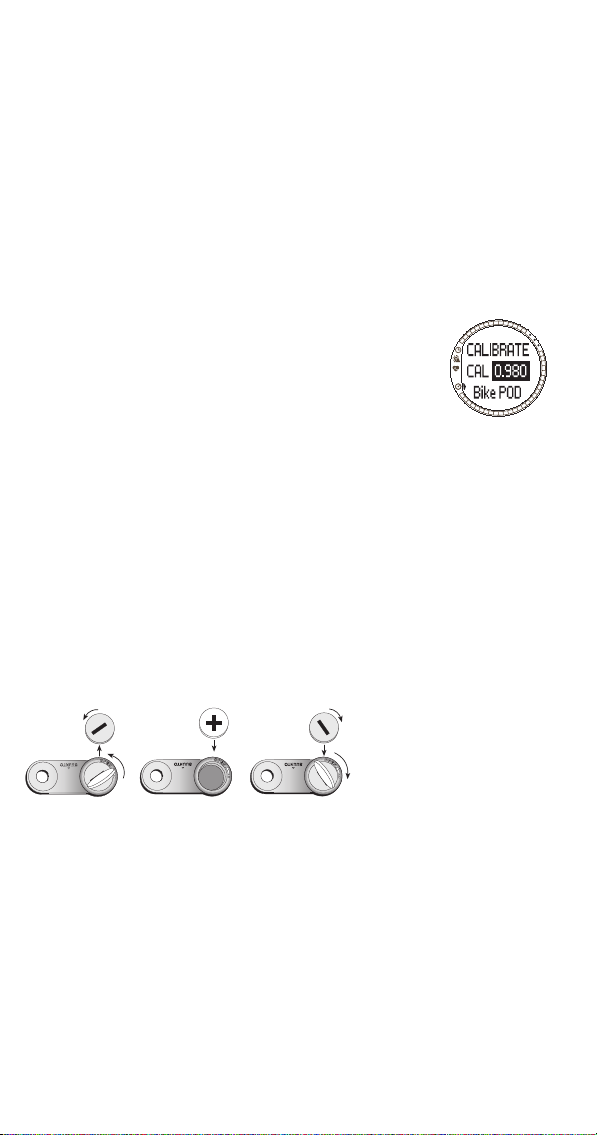
3.4. CALIBRATION
Suunto Bike Pod measures your bike’s speed and distance from the rotation of
the front wheel. Since a single rotation of a smaller wheel does not take you as
far as that of a larger wheel, your Suunto t6 needs a specific calibration factor
that takes the tire size into consideration. For the measurements to be accurate,
you need to adjust the calibration factor of your Suunto t6 to match that of your
wheel size.
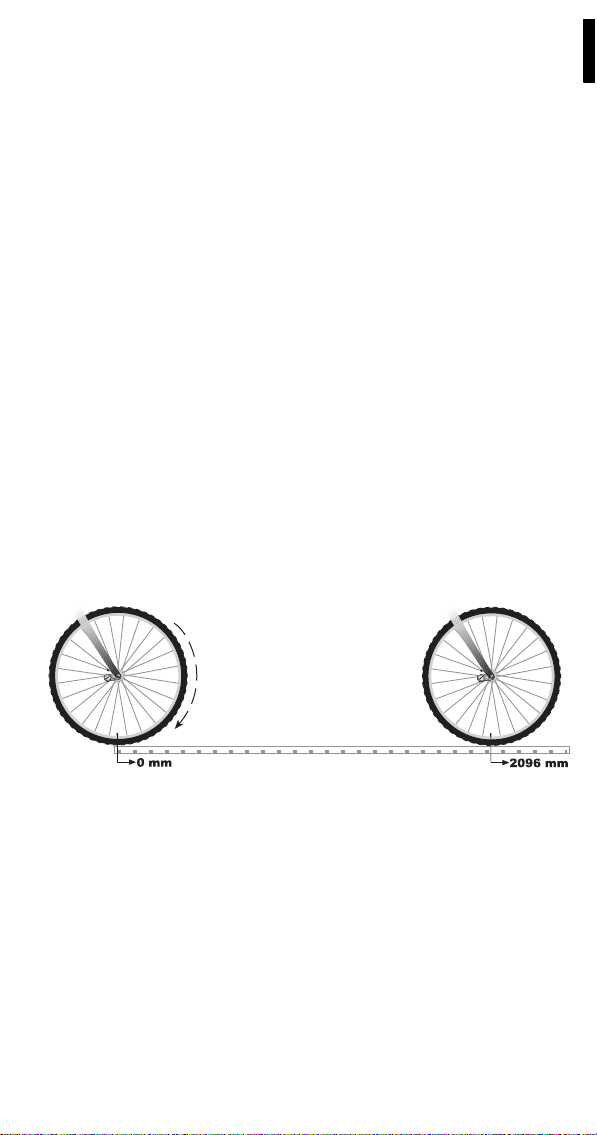
To define the exact calibration factor, measure the tire circumference or calibrate your Bike Pod using a known distance.
3.4.1. Measuring the circumference manually
1. Set a measuring cord on the floor.
2. Ride along the cord so that the tires rotate fully at least once. (The measurement is more accurate if you sit on your bike and do not just push it along the
cord.)
3. Measure the covered distance with the accuracy of a millimeter. (Divide the
distance with the number of rotations if more than one rotation.)
4. Divide the circumference by 2050 (e.g. 2096 / 2050 = 1.022439 = 1.022).
3.4.2. Calibrating the Bike Pod using a known distance
1. Select Connect in the SPD/DST menu of your Suunto t6.
2. Reset the distance measurement at the startline.
3. Press START/STOP in SPD/DST mode and cover a known distance with
your bike.
4. Press START/STOP to stop the measurement.
5. Select Calibrate in the SPD/DST mode.
6. Select Bike POD and replace the measured distance with the correct distance.
3.4.3. Calibrating the Bike Pod using the calibration factor table
You can also calibrate the Bike Pod using the calibration factor table.The data in
the table comes from various tire manufacturers and the European Tire and Rim
Technical Organisation. Because of the differences in the tire pressure, tread
pattern, and measurement methods, the table is only indicative.
1. Check your tire size, and find the appropriate calibration factor in the table
(see Appendix).
5
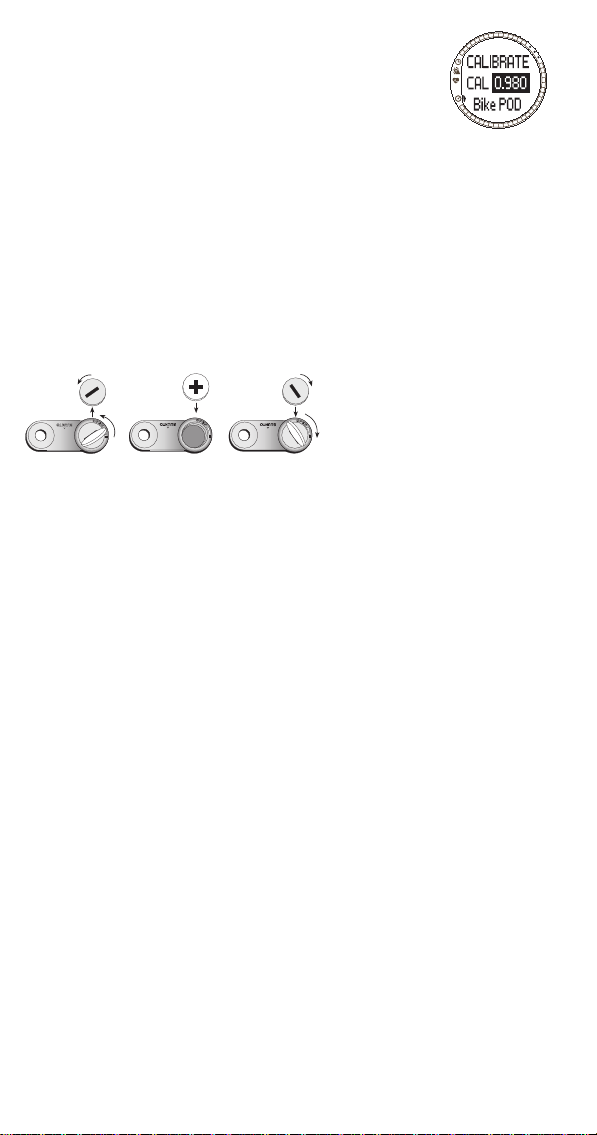
2. In the Speed/Distance menu, select Calibrate.
3. Select Bike POD.
4. Select Cal.
5. Set the correct calibration factor with UP/DOWN.
3.5. REPLACING THE BATTERY
The average battery life is approximately 300 hours. When
your Bike Pod does not work properly any more, you may
need to change the battery.
1. Open the battery compartment cover with a coin.
2. Remove the old battery.
3. Place the new battery into the battery compartment with the positive side
facing up and close the cover.
Replace the battery with extreme care to ensure that your Bike Pod
NOTE:
remains water-resistant. Careless battery replacement may void warranty.
NOTE: To reduce the risk of fire or burns, do not crush, puncture or dispose of
used batteries in fire or water. Only replace them with manufacturer-specified
batteries. Recycle or dispose of used batteries properly.
NOTE: Suunto recommends that the battery cover and the O ring are changed
simultaneously with the battery to ensure that your Bike Pod remains water
resistant. Replacement covers are available with replacement batteries.
O
P
E
N
E
S
O
L
C
4. SUUNTO TRAINING MANAGER (STM)
Your Suunto Bike Pod also adds new features to the Suunto Training Manager.
To be able to use these features, you must update your STM software using the
mini-CD supplied with the Suunto Bike Pod package.
You can also download the latest version of the Suunto Training Manager from
www.suunto.com.
4.1. UPDATING YOUR SUUNTO TRAINING MANAGER
To update Suunto Training Manager:
1. Insert the Suunto Training Manager mini-CD into the drive.
2. Wait for the installation to begin and follow the instructions.
NOTE: If the installation does not automatically start, click Start --> Run and
type D:\setup.exe.
4.2. NEW FEATURES
New features include a speed graph that you can use to view the development
of your cycling speed, and a possibility to view all the graphs in relation to distance instead of time.
NOTE: For more information on the new features, see the Suunto Training
Manager help.
5. TECHNICAL SPECIFICATIONS
• Weight: 19g (including battery and spoke magnet)
• Water-resistance: 30 m / 100 ft. (ISO 2281)
• Operating temperature: -20°C to +60°C / -5°F to +140°F
• User replaceable battery: 3V
• Transmission range: up to 10 m / 30 ft.
• Accuracy: When calibrated, typically better than 1%
• Frequency: 2.465 GHz ANT compatible
• Battery life: 300 h (at 20°C / 68°F)
CR2032
6. INTELLECTUAL PROPERTY
6.1. COPYRIGHT
This publication and its contents are proprietary to Suunto Oy and are intended solely
for the use of its clients to obtain knowledge and information regarding the operation
of Suunto products.
Its contents shall not be used or distributed for any other purpose and/or otherwise communicated, disclosed or reproduced without the prior written consent of Suunto Oy.
6

While we have taken great care to ensure that information contained in this documentation is both comprehensive and accurate, no warranty of accuracy is expressed or
implied. Its content is subject to change at any time without notice. The latest version
of this documentation can always be downloaded in www.suunto.com.
© Suunto Oy 8/2004
6.2. TRADEMARK
Suunto and Replacing Luck are registered trademarks of Suunto Oy. Suunto t6 and
other Suunto product, feature and content names are registered or unregistered
trademarks of Suunto Oy. Other product and company names are trademarks of their
respective owners.
7. DISCLAIMERS
7.1. USER’S RESPONSIBILITY
This instrument is intended for recreational use only. Suunto Bike Pod must not be
substituted for obtaining measurements that require professional or industrial precision.
7.1.1. CE
The CE mark is used to mark conformity with the European Union EMC directives 89/
336/EEC and 99/5/EEC.
7.2. FCC COMPLIANCE
This device complies with Part 15 of the FCC limits for class B digital devices. This
equipment generates, uses, and can radiate radio frequency energy and, if not
installed or used in accordance with the instructions, may cause harmful interference
to radio communications. There is no guarantee that interference will not occur in a
particular instance. If this equipment does cause harmful interference to other equipment, try to correct the problem by relocating the equipment.
Consult an authorized Suunto dealer or other qualified service technician if you cannot correct the problem. Operation is subject to the following conditions:
(1) This device cannot cause harmful interference.
(2) This device must accept any interference received, including interference that may
cause undesired operation.
Repairs should be made by authorized Suunto service personnel. Unauthorized
repairs will void warranty.
Tested to comply with FCC standards. For home or office use.
FCC WARNING: Changes or modifications not expressly approved by Suunto Oy
could void your authority to operate this device under FCC regulations.
7.3. LIMITS OF LIABILITY AND ISO 9001 COMPLIANCE
If this product should fail due to defects in materials or workmanship, Suunto Oy will,
at its sole option, repair or replace it with new or rebuilt parts, free of charge, for two
(2) years from the date of its purchase. This warranty is only extended to the original
purchaser and only covers failures due to defects in materials and workmanship that
occur during normal use while in the period of the warranty.
It does not cover battery, battery replacement, damage or failures resulting from accident, misuse, neglect, mishandling, alteration or modifications of the product, or any
failure caused by operation of the product outside the scope of its published specifications, or any causes not covered by this warranty.
There are no express warranties except as listed above.
The client can exercise the right to repair under the warranty by contacting Suunto
Oy’s Customer Service department to obtain a repair authorization.
Suunto Oy and its subsidiaries shall in no event be liable for any incidental or consequential damages arising from the use of or inability to use the product. Suunto Oy
and its subsidiaries do not assume any responsibility for losses or claims by third parties that may arise through the use of this device.
Suunto's Quality Assurance System is certified by Det Norske Veritas to be ISO 9001
compliant in all Suunto Oy's operations (Quality Certificate No. 96-HEL-AQ-220).
7.4. AFTER SALES SERVICE
If a claim under warranty appears to be necessary, return the product, freight prepaid,
to your Suunto dealer who is responsible for having your product repaired or replaced.
Include your name, address, proof of purchase and/or service registration card, as
required in your country. The claim will be honored and the product repaired or
replaced at no charge and returned in what your Suunto dealer determines a reasonable amount of time, provided that all necessary parts are in stock. All repairs that are
not covered under the terms of this warranty will be made at the owner's expense.
This warranty is non-transferable from the original owner.
If it is not possible to contact your Suunto dealer, contact your local Suunto distributor
for further information. You can locate your local Suunto distributor in
www.suunto.com.
7

1. INTRODUCTION
Suunto Bike Pod est un accessoire de votre ordinateur de poignet Suunto t6.
Il s’agit d’un capteur de vitesse et de distance sans fil léger, qui combine des
fonctions de vitesse et de distance nouvelles aux fonctions d’entraînement de
Suunto t6 (analyse détaillée de la fréquence cardiaque, effets d’entraînement,
etc.), faisant de ce capteur l’un des outils d’entraînement pour cyclistes les plus
perfectionnés du marché.
Suunto Bike Pod mesure la vitesse et la distance que vous parcourez à vélo
grâce à un aimant se fixant sur les rayons de votre roue. Les mesures sont
simples et très précises, à condition que le capteur soit correctement étalonné.
Suunto Bike Pod ajoute de nouvelles fonctions à votre ordinateur de poignet
Suunto t6. Une fois que vous avez établi une liaison entre Bike Pod et
Suunto t6, votre ordinateur de poignet affiche votre vitesse actuelle, la distance
depuis votre point de départ et les distances au tour. De plus, il enregistre
automatiquement des temps au tour en fonction de la distance au tour définie
par l’utilisateur, permet d’utiliser des alarmes pour signaler le dépassement des
vitesses minimale et maximale définies, et possède une fonction d’entraînement
par intervalles reposant sur les informations de distance.
REMARQUE : Les fonctions de Suunto t6 relatives à l’utilisation de Suunto
Bike Pod sont expliquées dans le manuel d’utilisation de Suunto t6. La toute
dernière version de ce manuel peut être téléchargée sur www.suunto.com.
2. AVANT UTILISATION
2.1. LIAISON ENTRE BIKE POD ET SUUNTO T6
Avant d’utiliser Suunto Bike Pod, vous devez établir une liaison entre celui-ci et
Suunto t6. Cette opération peut être comparée au réglage d’une radio
traditionnelle. Pour écouter une station particulière, vous devez réglez la radio
sur la fréquence appropriée. De même, pour utiliser Suunto t6 avec un Bike Pod
particulier, vous devez établir une liaison entre les deux appareils. Cette
opération n’est nécessaire que lorsque vous utilisez Bike Pod pour la première
fois.
Pour établir une liaison entre Bike Pod et Suunto t6 :
1. Retirez la pile de Bike Pod.
2. Court-circuitez les bornes - et + du logement de pile en les reliant avec un
instrument métallique.
3. Sélectionnez Pair dans le menu Training de Suunto t6.
4. Sélectionnez Bike POD. Le message ‘
appareil ») apparaît.
5. Insérez la pile dans le logement de pile et attendez que l’appareil soit repéré.
Dans les 30 secondes, ‘PAIRING COMPLETE’ (« liaison établie ») doit s’afficher ;
si l’établissement de la liaison a échoué, ‘NO DEVICES FOUND’ (« aucun
appareil trouvé ») apparaît.
6. Si la liaison est établie, fermez le couvercle du logement de pile.
Si l’établissement de la liaison a échoué, retirez la pile et répétez les étapes
2à 5.
TURN ON NEW DEVICE’ (« Allumer nouvel
3. UTILISATION DE BIKE POD
3.1. FIXATION
Suunto Bike Pod se fixe sur le moyeu de la roue avant du vélo, et l’aimant se
fixe à un rayon de la roue, le plus près possible de Bike Pod.
1. Desserrez le mécanisme de blocage de la roue avant (Bike Pod peut être fixé
sur des fourches équipées d’un levier de blocage rapide ou munies de
boulons traditionnels).
2. Positionnez Bike Pod horizontalement sur l’axe de la roue avant, entre la
fourche et le moyeu, en orientant le logo Bike Pod vers l’avant.
3. Resserrez le mécanisme de blocage de la roue.
4. Fixez l’aimant à un rayon de la roue avant, au même niveau que le capteur.
L’aimant doit faire face au capteur de vitesse, à une distance suffisante.
Distance adaptée : 4-6 mm (0,2").
8
3.2. ACTIVATION ET DÉSACTIVATION
Bike Pod s’active automatiquement lorsque l’aimant du rayon passe devant le
capteur de vitesse, c’est à dire lorsque la roue avant tourne. Il reste actif tout au
long de la sortie vélo et pendant encore une demi-heure après que le capteur a
cessé de recevoir les signaux de l’aimant.
3.3. CONNEXION
Pour utiliser Bike Pod, vous devez établir une connexion entre le capteur et
Suunto t6. Cette opération peut être comparée à l’écoute d’une radio. Pour
recevoir le signal de diffusion radio, vous devez allumer la radio. De même,
pour que Suunto t6 puisse recevoir le signal envoyé par Bike Pod, les appareils
doivent être connectés. Vous devez les connecter à chaque fois que vous
souhaitez utiliser Suunto t6 avec Bike Pod.
1. Faites tourner la roue avant, pour que l’aimant du rayon passe devant le
capteur.
2. Sélectionnez Connect dans le menu Speed/Distance de Suunto t6. Suunto t6
affiche un message pour indiquer que le capteur a été trouvé.
Si la connexion échoue, Suunto t6 affiche le message ‘
(« aucun appareil trouvé »). Dans ce cas, faites de nouveau tourner la roue
avant pour vérifier que Bike Pod est actif, et réessayez.
NO DEVICES FOUND’
3.4. ÉTALONNAGE
Suunto Bike Pod mesure la vitesse et la distance de votre vélo grâce aux
rotations de la roue avant. Étant donnée qu’une seule rotation d’une petite roue
ne vous emmène pas aussi loin que la rotation d’une roue plus grande, le taux
d’étalonnage défini dans Suunto t6 doit tenir compte de la taille de la roue. Pour
que les mesures soient précises, ce taux d’étalonnage doit correspondre à la
taille de votre roue.
Pour définir le taux d’étalonnage exact, mesurez la circonférence de la roue ou
étalonnez Bike Pod à l’aide d’une distance connue.
3.4.1. Comment mesurer manuellement la circonférence
1. Posez un mètre déroulant sur le sol.
2. Avancez le vélo le long du mètre, de sorte que la roue puisse faire au moins
un tour complet (la mesure est plus précise si vous vous trouvez sur le vélo
au lieu de le pousser simplement le long du mètre).
3. Mesurez la distance parcourue au millimètre près (si vous avez effectué
plusieurs tours de roue, divisez cette distance par le nombre de rotations).
4. Divisez la circonférence par 2050 (par. ex. 2096 / 2050 = 1,022439 = 1,022).
9
3.4.2. Comment étalonner Bike Pod à l’aide d’une distance connue
1. Sélectionnez Connect dans le menu SPD/DST de Suunto t6.
2. Remettez à zéro la mesure de la distance sur la ligne de départ.
3. Appuyez sur START/STOP dans le mode SPD/DST et parcourez à vélo une
distance connue.
4. Appuyez sur START/STOP pour arrêter la mesure.
5. Sélectionnez Calibrate dans le mode SPD/DST.
6. Sélectionnez Bike POD et remplacez la distance mesurée par la distance
correcte.
3.4.3. Étalonnage de Bike Pod à l’aide du tableau de taux
d’étalonnage
Vous pouvez étalonner Bike Pod à l’aide du tableau de taux d’étalonnage. Les
données du tableau proviennent de divers fabricants de pneus et de
l’Organisation technique européenne du pneumatique et de la jante. Du fait des
différences de pression dans les pneus, de leur sculpture et des méthodes de
mesure, ce tableau n’est donné qu’à titre indicatif.
1. Vérifiez la taille de votre roue, et cherchez le taux d’étalonnage
correspondant dans le tableau (voir Annexe).
2. Dans le menu Speed/Distance, sélectionnez Calibrate.
3. Sélectionnez Bike POD.
4. Sélectionnez Cal.
5. Changez la valeur du taux d’étalonnage avec UP/DOWN.
3.5. REMPLACEMENT DE LA PILE
La durée de vie moyenne de la pile est d’environ 300 heures.
Lorsque Bike Pod ne fonctionne plus comme il devrait, c’est
que la pile doit être changée.
1. Ouvrez le logement de la pile à l’aide d’une pièce de monnaie.
2. Retirez l’ancienne pile.
3. Placez la nouvelle pile dans son logement en orientant la borne + vers le
haut et refermez le couvercle.
REMARQUE :
extrêmement prudent lors du remplacement de la pile. Un remplacement de pile
négligé annulera la garantie.
REMARQUE : Pour éliminer tout risque d'incendie ou de brûlure, évitez
d'écraser ou de percer les piles, ou de jeter les piles usagées dans un feu ou de
l'eau. N'utilisez que des piles neuves recommandées par le fabricant. Recyclez
ou éliminez les piles selon les réglementations en vigueur.
REMARQUE : Suunto recommande de changer le couvercle du logement de
pile et le joint en même temps que la pile, pour conserver les propriétés
d’étanchéité de Bike Pod. Les couvercles de rechange sont vendus avec les
piles de rechange.
Pour conserver les propriétés d’étanchéité de Bike Pod, soyez
O
P
E
N
E
S
O
L
C
4. SUUNTO TRAINING MANAGER (STM)
Suunto Bike Pod ajoute également de nouvelles fonctions à Suunto Training
Manager. Pour utiliser ces nouvelles fonctions, vous devez mettre à jour votre
logiciel STM à l’aide du mini-CD livré dans l’emballage de Suunto Bike Pod.
La version la plus récente de Suunto Training Manager peut se télécharger à
partir de www.suunto.com.
4.1. MISE À JOUR DE SUUNTO TRAINING MANAGER
Pour mettre à jour Suunto Training Manager :
1. Insérez le midi-CD de Suunto Training Manager dans le lecteur.
2. Attendez que le programme d’installation commence et suivez les
instructions.
REMARQUE : Si le programme d’installation ne démarre pas
automatiquement, cliquez sur Démarrer --> Exécuter et entrez D:\setup.exe.
10

4.2. NOUVELLES FONCTIONS
Ces nouvelles fonctions comportent un graphe de vitesse, que vous pouvez
utiliser pour suivre l’évolution de votre vitesse à vélo, ainsi qu’une option
permettant d’afficher tous les graphes par rapport à la distance parcourue et
non à la durée de la sortie.
REMARQUE : Pour en savoir plus sur ces nouvelles fonctions, reportez-vous
à l’aide de Suunto Training Manager.
5. SPÉCIFICATIONS TECHNIQUES
• Poids : 19g (pile et aimant compris)
• Étanchéité : 30 m / 100 ft (ISO 2281)
• Température de fonctionnement : de -20°C à +60°C/de -5°F à +140°F
• Pile remplaçable : 3V CR2032
• Rayon de transmission : jusqu’à 10 m / 30 ft
• Précision : Si le capteur est étalonné, marge d’erreur généralement
inférieure à 1%
• Fréquence : 2,465 GHz, compatibilité ANT
• Durée de vie de la pile : 300 h (à 20°C / 68°F)
6. PROPRIÉTÉ INTELLECTUELLE
6.1. COPYRIGHT
Cette publication et son contenu sont la propriété de Suunto Oy et sont fournis
uniquement pour permettre à ses clients de mieux connaître les caractéristiques et le
fonctionnement des produits Suunto.
Son contenu ne doit pas être utilisé ni distribué à d’autres fins et/ou ne doit pas être
communiqué, révélé ou reproduit sans l’accord écrit préalable de Suunto Oy.
Bien que nous ayons pris soin d'inclure dans cette documentation des informations
complètes et précises, aucune garantie de précision n'est expresse ou implicite. Son
contenu peut être modifié à tout moment sans préavis. La version la plus récente de
cette documentation peut être téléchargée à tout moment sur www.suunto.com.
© Suunto Oy 8/2004
6.2. MARQUES
Suunto et Replacing Luck sont des marques déposées de Suunto Oy. Suunto t6 et les
noms des autres produits, fonctions et contenus Suunto sont des marques déposées
ou non de Suunto Oy. Les noms des autres produits et entreprises sont des marques
de leurs propriétaires respectifs.
7. AVERTISSEMENTS
7.1. RESPONSABILITÉ DE L’UTILISATEUR
Cet instrument n’est qu’un appareil de loisir. N'utilisez jamais Suunto Bike Pod pour
obtenir des mesures demandant une précision professionnelle ou industrielle.
7.1.1. Marquage européen CE
Le symbole CE est utilisé pour indiquer la conformité de ce produit avec les directives
MCE 89/336/CEE et 99/5/CEE.
7.2. CONFORMITÉ FCC
Cet appareil est conforme à la section 15 des règlements FCC sur les appareils
numériques de classe B. Cet appareil génère et utilise un rayonnement de fréquence
radio et peut causer des interférences nuisibles aux communications radio s'il n'est
pas installé ou utilisé conformément aux instructions. Rien ne permet de garantir
quand ces interférences peuvent se produire. Si cet appareil cause des interférences
nuisibles à d'autres équipements, essayez de résoudre le problème en changeant
l'équipement de place.
Consultez un représentant Suunto agréé ou tout autre technicien d’entretien habilité
si vous ne parvenez pas à éliminer ce problème. Fonctionnement soumis aux
conditions suivantes :
(1) Cet appareil ne doit pas causer d'interférences nuisibles.
(2) Cet appareil doit accepter toute autre interférence reçue, y compris les
interférences pouvant entraîner un fonctionnement non désiré.
Les réparations doivent être effectuées par un personnel de maintenance agréé par
Suunto. Les réparations non autorisées annulent la garantie.
Testé conforme aux normes FCC. Pour usage domestique ou sur le lieu de travail.
AVERTISSEMENT FCC : Les changements ou modifications non expressément
approuvés par Suunto Oy peuvent annuler votre droit d’utiliser cet appareil aux
termes des réglementations FCC.
11

7.3. LIMITES DE RESPONSABILITÉ ET CONFORMITÉ ISO 9001
Si ce produit présente des défauts causés par des vices de matériau ou de
fabrication, Suunto Oy, à sa seule discrétion, réparera ou remplacera gratuitement le
produit avec des pièces neuves ou réparées, pendant une période de deux (2) ans à
compter de la date d’achat. Cette garantie ne s’applique qu’au propriétaire d’origine et
ne couvre que les défauts causés par des vices de matériau et de fabrication
survenus suite à une utilisation normale du produit pendant la période de garantie.
Cette garantie ne couvre pas la pile, le changement de pile, les dommages ou pannes
consécutifs à un accident, une mauvaise utilisation, une négligence, une mauvaise
manipulation ou une modification du produit, ni les pannes causées par l’utilisation du
produit pour une application non spécifiée dans cette documentation, ni les causes
non couvertes par cette garantie.
Il n'existe aucune autre garantie expresse que celles précitées.
Le client exerce son droit de réparation sous garantie en contactant le Service
clientèle de Suunto Oy afin d’obtenir une autorisation de réparation.
Suunto Oy et ses filiales ne doivent en aucun cas être tenus responsables des
dommages accessoires ou indirects résultant de l’utilisation ou de l’incapacité
d’utiliser ce produit. Suunto Oy et ses filiales déclinent toute responsabilité en cas de
pertes ou de recours de tiers pouvant survenir suite à l’utilisation de cet appareil.
Le Système d’assurance qualité de Suunto est certifié conforme à la norme ISO 9001
pour toutes les opérations de Suunto Oy par Det Norske Veritas (certificat de qualité
Nº 96-HEL-AQ-220).
7.4. SERVICE APRÈS-VENTE
Si vous jugez nécessaire de retourner ce produit sous garantie, renvoyez-le port payé
au revendeur Suunto responsable de la réparation ou du remplacement du produit.
Indiquez votre nom et adresse, et joignez une preuve d'achat et/ou la carte
d'inscription d'entretien, si celle-ci est utilisée dans votre pays. La garantie sera
honorée et le produit remplacé ou réparé gratuitement et renvoyé dans un délai jugé
raisonnable par votre représentant Suunto, à condition que toutes les pièces
nécessaires soient en stock. Toutes les réparations non couvertes par les termes de
cette garantie seront effectuées et facturées au propriétaire. Cette garantie ne peut
pas être cédée par le propriétaire d’origine.
S’il s’avère impossible de contacter votre représentant Suunto, contactez votre
distributeur Suunto local pour obtenir plus d’informations. Pour connaître les
coordonnées de votre distributeur Suunto local, consultez notre site www.suunto.com.
12

1. EINFÜHRUNG
Der Suunto Bike Pod ist ein Zusatzgerät für Ihren Suunto t6 Armbandcomputer.
Der federleichte, drahtlose Geschwindigkeits- und Streckensensor kombiniert
neue Geschwindigkeits- und Streckenfunktionen mit der detaillierten
Herzfrequenzanalyse und den übrigen Trainingsvorteilen Ihres Suunto t6 und ist
eines der fortschrittlichsten fahrradspezifischen Trainingsinstrumente
überhaupt.
Der Bike Pod misst Ihre Fahrtgeschwindigkeit und die zurückgelegte Strecke
mit Hilfe eines separaten Speichenmagneten. Bei ordnungsgemäßer
Kalibrierung ist die Messung kinderleicht und höchst präzise.
Der Bike Pod erweitert die Funktionen Ihres Suunto t6. Nachdem er mit dem
Suunto t6 gekoppelt wurde, zeigt der Armbandcomputer Ihnen Ihre aktuelle
Geschwindigkeit, die Gesamtstrecke ab dem Start sowie die bei
Zwischenzeitnahmen zurückgelegten Strecken. Außerdem speichert er
automatisch Zwischenzeiten nach Zurücklegung der jeweils eingegebenen
Teilstrecken, warnt bei zu hoher oder zu niedriger Geschwindigkeit und enthält
eine streckenbasierte Intervalltrainingsfunktion.
HINWEIS: Die bei Verwendung des Bike Pod nutzbaren Sonderfunktionen
Ihres Suunto t6 sind in dessen Handbuch erläutert. Die aktuellste Version des
Handbuchs steht Ihnen unter www.suunto.com zum Download zur Verfügung.
2. VOR DEM TRAINING
2.1. BIKE POD MIT SUUNTO T6 KOPPELN
Bevor Sie mit Ihrem Bike Pod trainieren können, müssen Sie ihn mit dem
Suunto t6 koppeln. Dieser Prozess ähnelt der Sendersuche bei einem Radio:
Um den gewünschten Sender zu hören, müssen Sie an Ihrem Radiogerät die
korrekte Frequenz einstellen In ähnlicher Weise muss der Bike Pod mit dem
Suunto t6 gekoppelt werden, bevor Sie Ihn nutzen können. Dies ist jedoch nur
nötig, bevor Sie Ihren Bike Pod zum ersten Mal verwenden.
So koppeln Sie Ihren Bike Pod mit Ihrem Suunto t6:
1. Nehmen Sie die Batterie aus dem Bike Pod.
2. Schließen Sie die Metallplättchen – und + des Batteriefachs kurz, indem Sie
sie über einen Metallgegenstand verbinden.
3. Wählen Sie Pair aus dem Training-Menü Ihres Suunto t6.
4. Wählen Sie Bike POD. Die Mitteilung ‘TURN ON NEW DEVICE’ (Neues Gerät
einschalten) erscheint.
5. Legen Sie die Batterie wieder in das Batteriefach ein und warten Sie auf
Bestätigung. Innerhalb von 30 Sekunden erscheint entweder die Meldung
PAIRING COMPLETE’ (Kopplung abgeschlossen) oder bei Fehlschlagen des
‘
Kopplungsversuchs ‘NO DEVICES FOUND’ (Keine Geräte gefunden).
6. Schließen Sie nach erfolgreicher Kopplung das Batteriefach. Falls die
Kopplung fehlschlägt und kein Gerät gefundenwird, nehmen Sie die Batterie
wieder heraus und wiederholen Sie die Schritte 2-5.
3. VERWENDUNG DES BIKE POD
3.1. BEFESTIGUNG
Der Bike Pod wird an der Nabe des Vorderrads befestigt, der Speichenmagnet
an einer Speiche so nahe wie möglich am Bike Pod.
1. Lockern Sie die Vorderradaufhängung. (Der Bike Pod kann sowohl an mit
Schnellspannhebel versehenen Gabeln befestigt werden als auch an solchen
mit herkömmlichen Achsenschrauben.)
2. Setzen Sie den Bike Pod waagerecht auf die Vorderachse zwischen Gabel
und Nabe, so dass das Bike Pod-Logo zum Rad hin zeigt.
3. Befestigen Sie das Vorderrad wieder in der Gabel.
4. Bringen Sie den Speichenmagneten in Höhe des Sensors an einer Speiche
des Vorderrades an. Der Magnet muss auf den Geschwindigkeitssensor
zeigen und nahe an ihm vorbeilaufen. Der empfohlene Abstand zwischen
Magnet und Sensor liegt bei 4-6 mm (0,2").
13
3.2. AKTIVIERUNG UND DEAKTIVIERUNG
Der Bike Pod wird automatisch aktiviert, wenn der Speichenmagnet am
Geschwindigkeitssensor vorbeiläuft, d.h. wenn sich das Vorderrad dreht. Er
bleibt während der gesamten Radtour aktiv und nach dem Empfang des letzten
Magnetimpulses noch für eine weitere halbe Stunde.
3.3. VERBINDUNG
Um den Bike Pod nutzen zu können, müssen Sie eine Verbindung zwischen ihm
und dem Suunto t6 herstellen. Die Funkverbindung wird in ähnlicher Weise
hergestellt wie beim Einschalten eines Radios: so wie das Radiogerät erst nach
dem Einschalten Rundfunksignale empfangen kann, muss auch zwischen dem
Suunto t6 und dem Bike Pod erst eine Funkverbindung existieren, bevor der
Sensor Signale übermitteln kann. Die Verbindung muss jedesmal aufs Neue
hergestellt werden, wenn Sie Suunto t6 und Bike Pod zusammen verwenden.
1. Drehen Sie das Vorderrad, bis der Speichenmagnet am Sensor vorbeikommt.
2. Wählen Sie Connect aus dem Speed/Distance-Menü Ihres Suunto t6. Der
Suunto t6 meldet den erfolgreichen Verbindungsaufbau.
Kann keine Verbindung aufgebaut werden, erscheint stattdessen die Meldung
‘NO DEVICES FOUND’. Drehen Sie in diesem Fall das Vorderrad erneut, um die
Aktivierung des Pike Pod sicherzustellen, und wiederholen Sie den Versuch.
3.4. KALIBRIERUNG
Der Bike Pod ermittelt Geschwindigkeit und zurückgelegte Strecke anhand der
Drehungen des Vorderrades. Da eine Umdrehung eines kleineren Rades Sie
nicht so weit vorwärts bringt wie die eines größeren, benötigt Ihr Suunto t6 den
spezifischen Kalibrierungsfaktor für Ihre Reifengröße. Um den genauen
Kalibrierungsfaktor zu ermitteln, messen Sie den Reifenumfang oder kalibrieren
Sie Ihren Bike Pod anhand einer Ihnen genau bekannten Strecke.
3.4.1. Manuelle Messung des Umfangs
1. Legen Sie ein Maßband auf den Boden.
2. Fahren Sie am Maßband entlang, so dass die Räder mindestens eine volle
Drehung machen (die Messung ist genauer, wenn Sie auf dem Fahrrad
sitzen, anstatt es nur am Maßband entlang zu schieben).
3. Messen Sie die bei der Umdrehung zurückgelegte Strecke auf einen
Millimeter genau (bei mehreren Umdrehungen das Messergebnis durch die
Zahl der Umdrehungen teilen).
4. Teilen Sie den Umfang (mm) durch 2050 und runden Sie auf drei Stellen
hinter dem Komma (z.B. 2096 : 2050 = 1,022439 = 1,022).
3.4.2. Kalibrierung des Bike Pod anhand einer bekannten Strecke
1. Wählen Sie Connect aus dem SPD/DST-Menü Ihres Suunto t6.
2. Setzten Sie an der Startlinie den Kilometerzähler auf Null.
3. Drücken Sie im SPD/DST-Modus auf START/STOP und fahren Sie mit dem
Rad eine genau bekannte Strecke.
4. Drücken Sie danach auf START/STOP, um die Messung zu beenden.
5. Scrollen Sie im SPD/DST-Modus zu Calibrate.
6. Wählen Sie Bike POD und ersetzen Sie die ermittelte Streckenangabe durch
die Ihnen bekannte korrekte Streckenlänge.
3.4.3. Kalibrierung des Bike Pod mit Hilfe der Faktortabelle
Sie können den Bike Pod auch unter Zuhilfenahme der Kalibrierungsfaktortabelle kalibrieren. Die in der Tabelle zusammengetragenen Daten
stammen von diversen Reifenherstellern und von der European Tire and Rim
Technical Organisation. Da individuelle Reifen sich durch Reifendruck, Profil
14
 Loading...