

SureFeed Sealed Pet Bowl User Manual
User Manual
sealed
pet bowl
EN: User Manual 1-14
DE: Bedienungsanleitung 15-28
NL: Handleiding 29-42
ES: Manual del usuario 43-56
DK: Brugervejledning 57-70
FR: Guide d’utilisation 71-84
1
Congratulations on the purchase of your new Sealed Pet Bowl!
The SureFeed Sealed Pet Bowl acts like a lunch box for your pet, keeping food fresh
and tasty until they eat it. By keeping the bowl sealed, wet food will stay fresher for
longer and any unwanted pet food smells lingering around the house will be virtually
eliminated. It will also help keep away flies that can oen collect around pet food in
open bowls.
The Sealed Pet Bowl uses sensors to detect movement nearby, so, when it senses
the presence of a pet (or you) the lid will open. The Sealed Pet Bowl is non-selective,
meaning the sensors will react to any movement within their range, therefore the Pet
Bowl will open for all the pets in your household! However, it is important to note that
the Pet Bowl has no timer function and should be refilled and cleaned on a daily basis.
EN
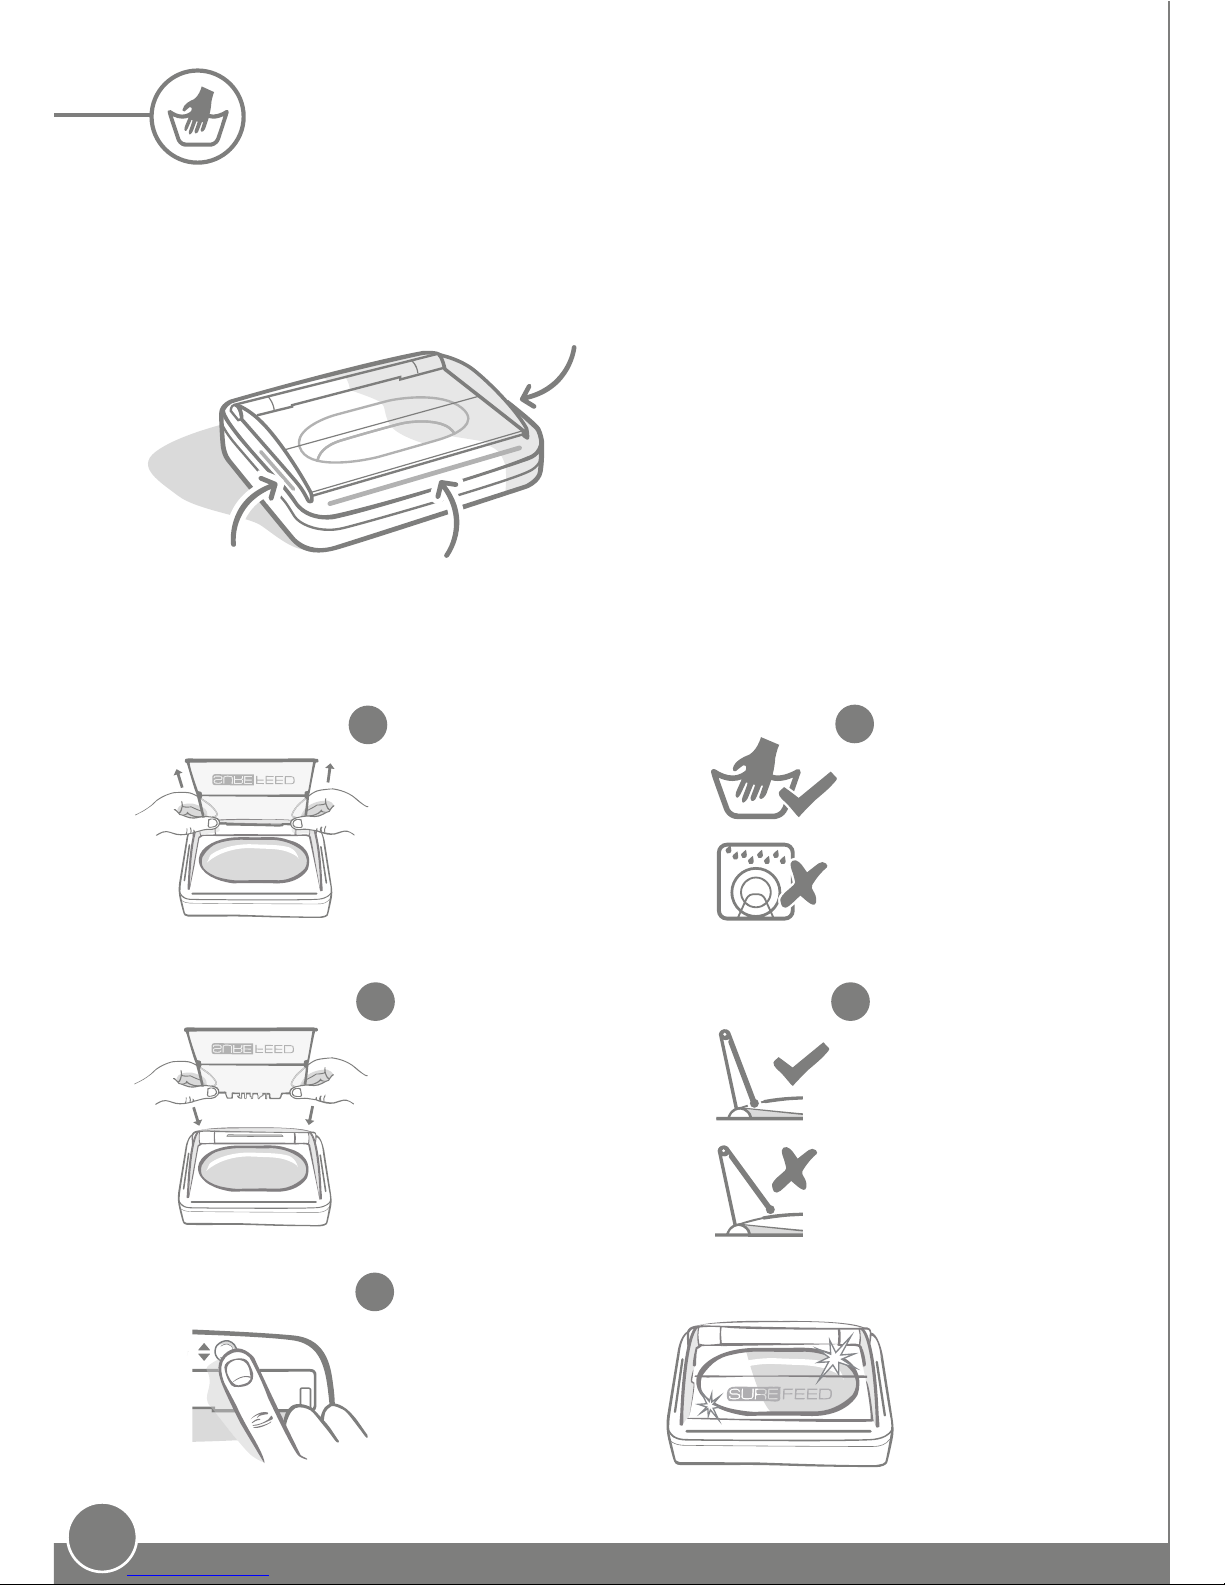
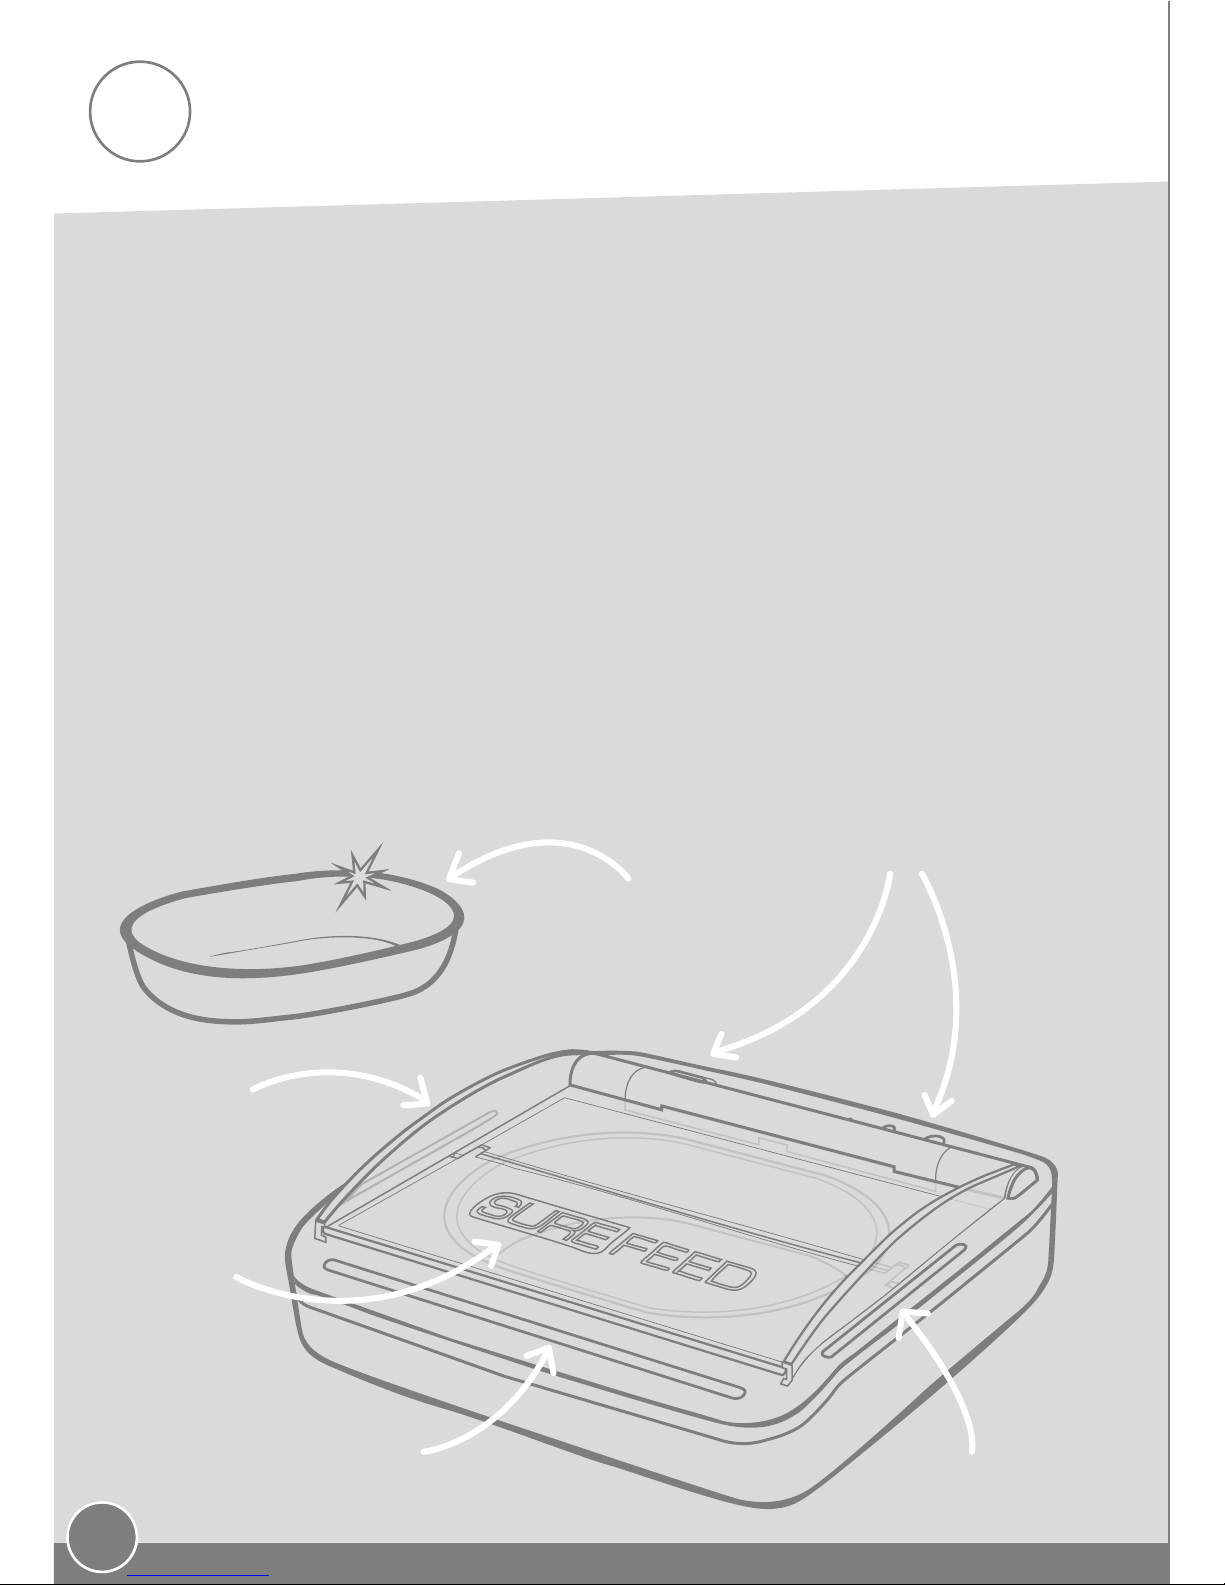
Welcome to your new Sealed Pet Bowl
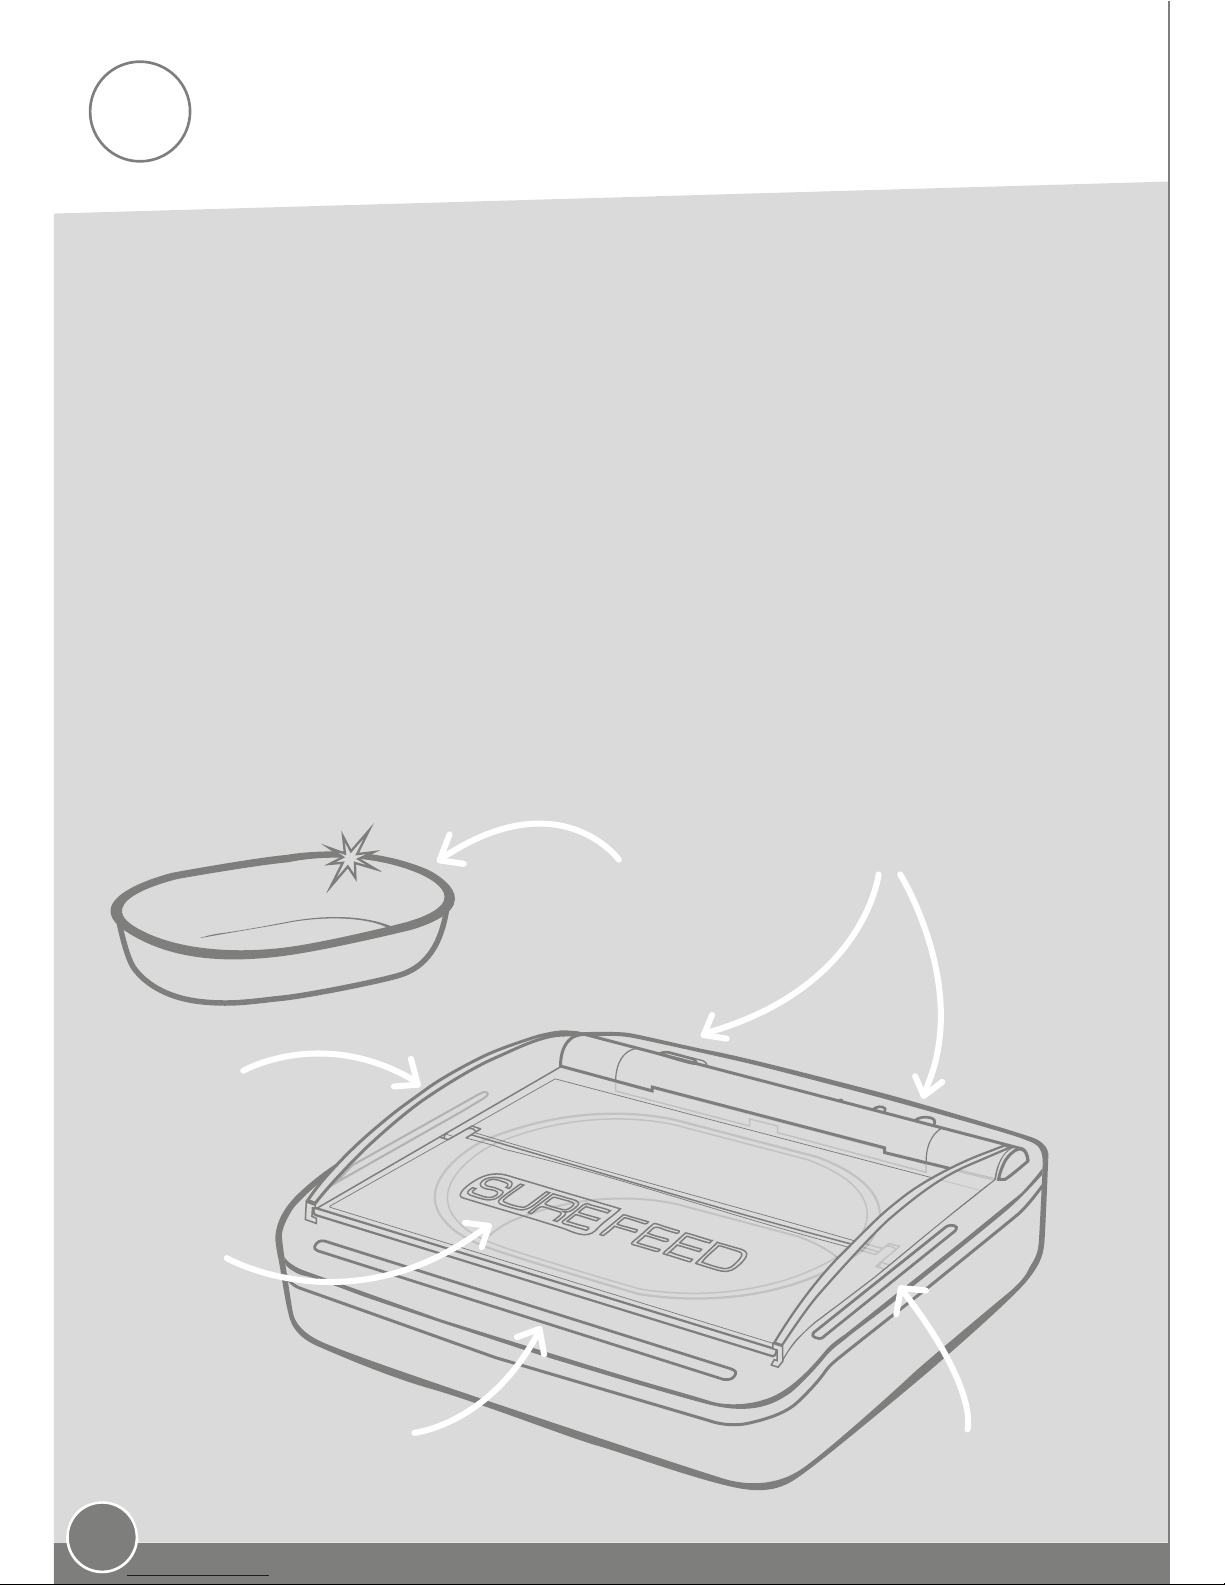
Buttons and lights
Sensors
Lid guides
Lid
SureFeed Bowl
with integrated flexible
seal
Product tour
Sensors
2
Contents
Product overview
Batteries
Buttons & lights
Sensors
Replacing the food
Bowl
Where to place your Sealed Pet Bowl
Training mode (teaching your pet to use the Pet Bowl)
Cleaning
Troubleshooting
Warranty & Disclaimer
3
5
4
5
6
7
8
9
11
13
14

3
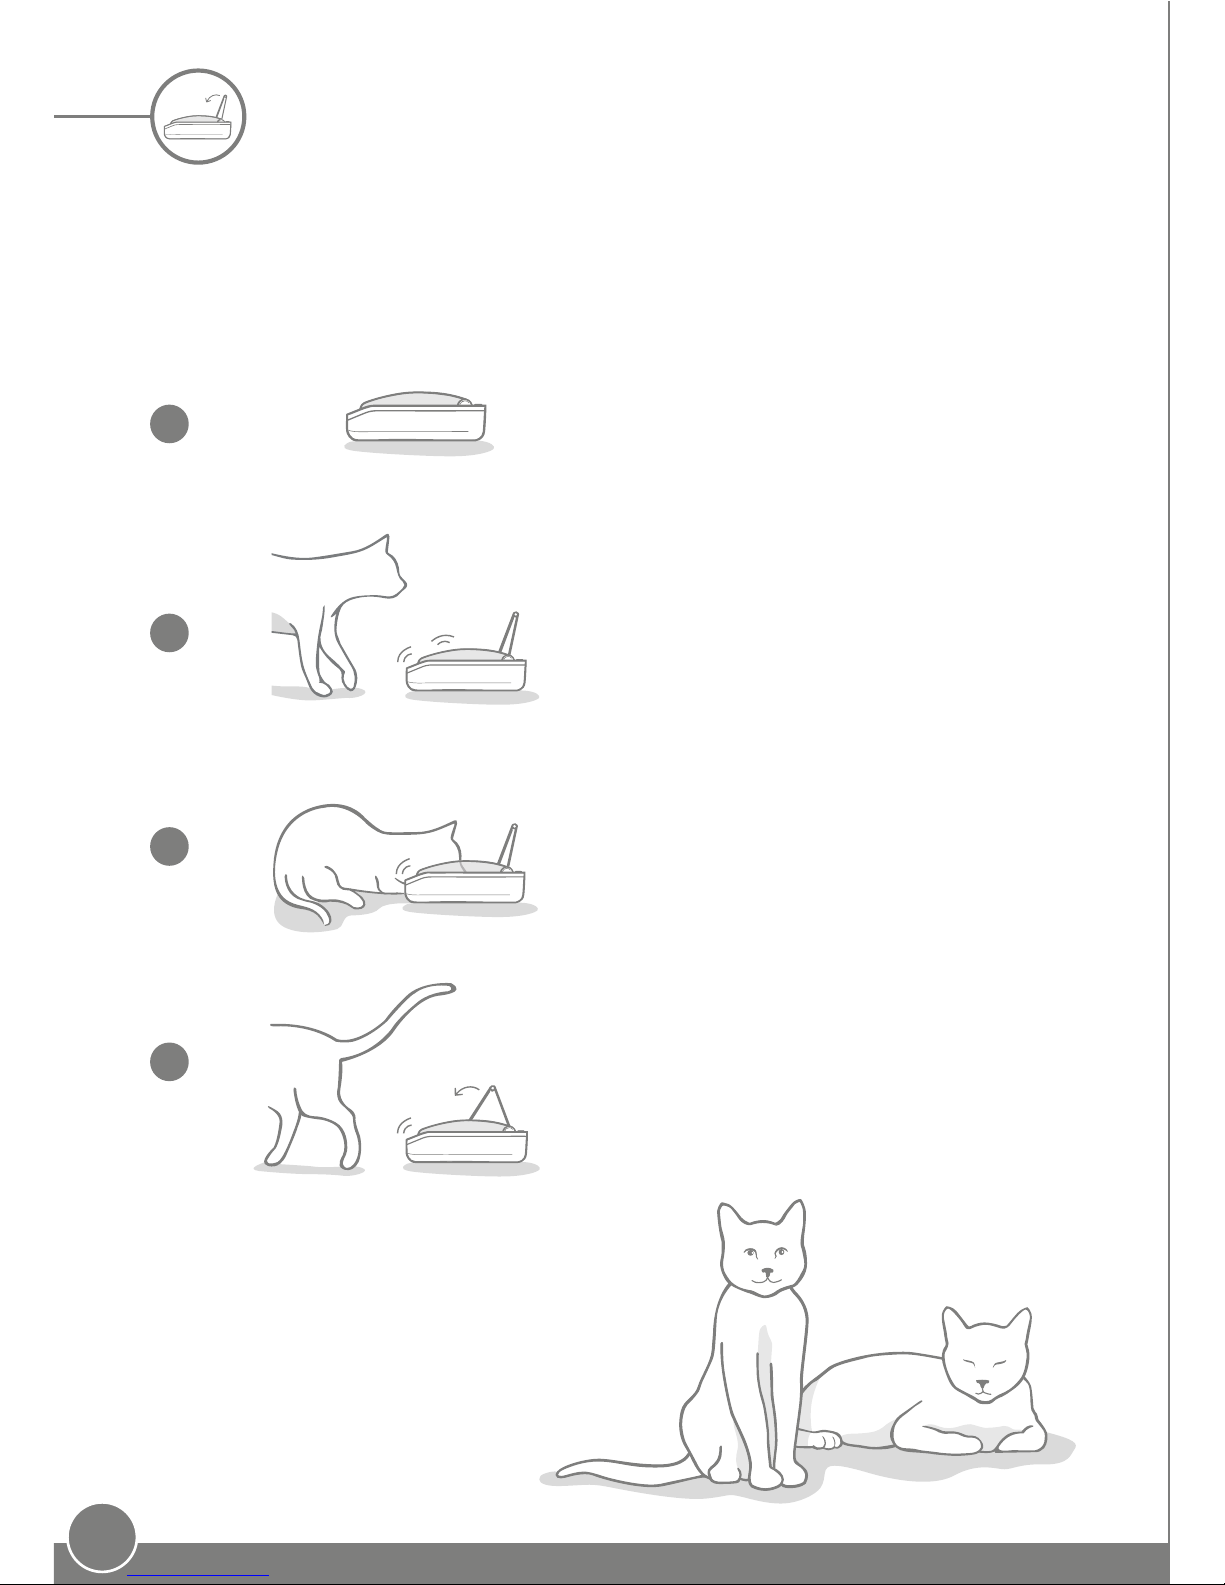
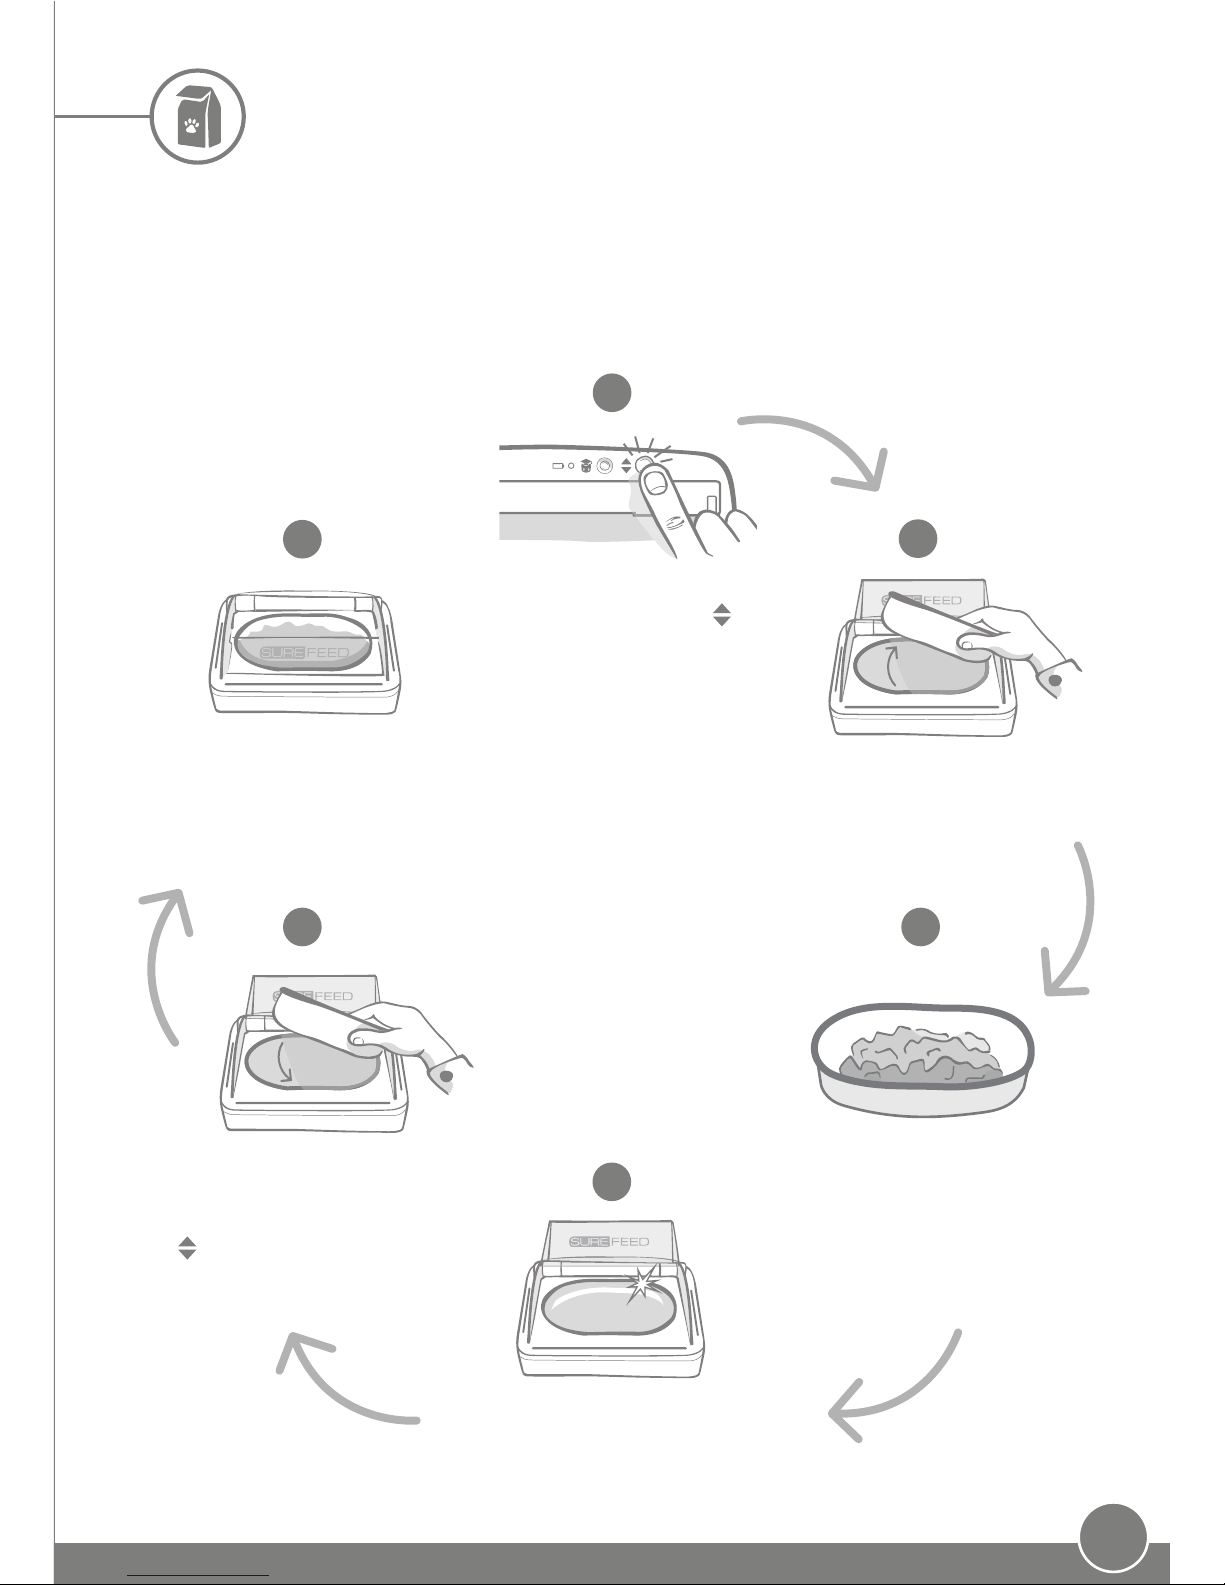
When the Pet Bowl detects a pet nearby,
the lid will open.
Product overview
The Sealed Pet Bowl opens when required (but remains closed at other times) by using
sensors to detect when a pet is approaching its food. This results in their food staying
fresher for longer in the sealed bowl, meaning they can enjoy every bite!
1
2
3
4
Once set up, the lid will remain closed until
a pet approaches to eat, or until you open
it to replenish their food - see page 6.
The lid of the Pet Bowl will remain open
whilst the pet eats.
The SureFeed Sealed Pet Bowl is designed
to be used by cats, but may also be used by
small dogs. It can hold up to 400ml (14fl oz)
of food, which is approximately 2 pouches
of typical wet cat food.
A short time aer the pet has finished
eating and moved away, the lid will close
and the food will be covered again.

4
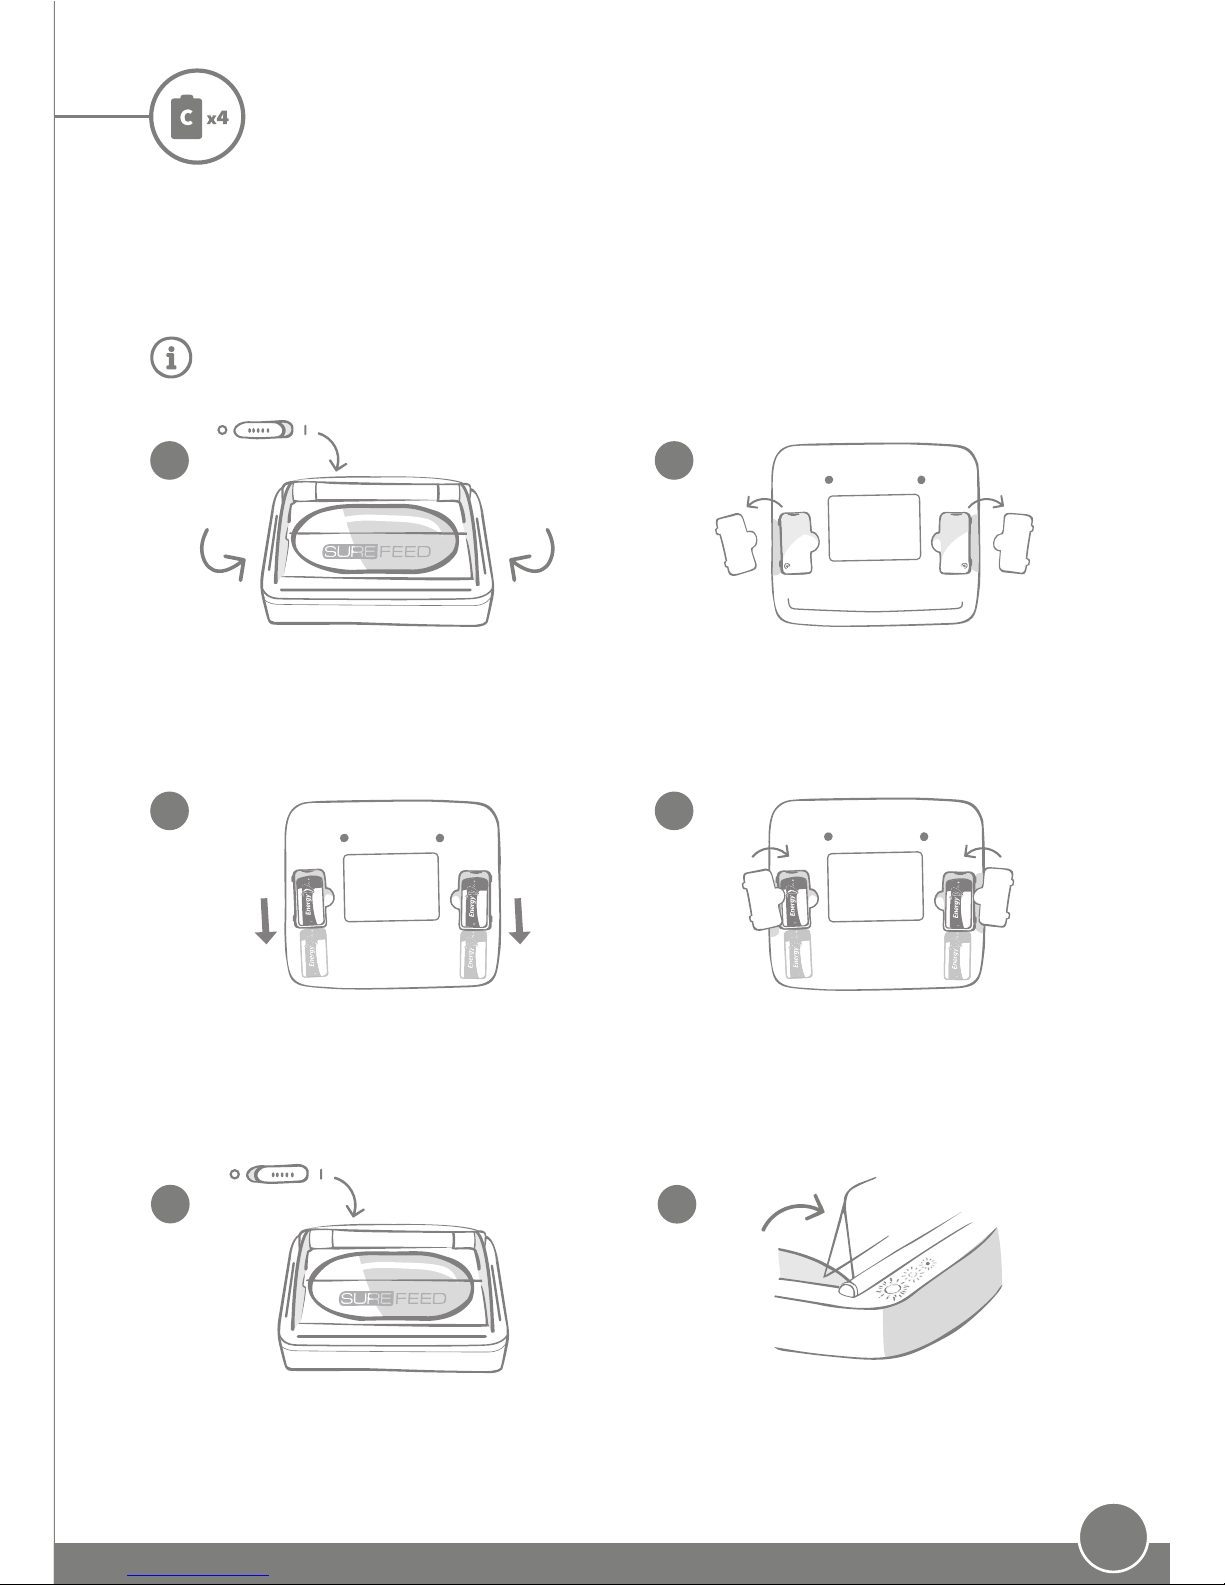
Batteries
Make sure the product is turned o
then turn it upside down to access the
battery compartments.
Insert the batteries. Ensure the +/-
symbols on the batteries match the
symbols on the unit itself.
Place the Pet Bowl in its intended
location and then turn it on. This is so
the sensors can correctly calibrate.
Aer the Pet Bowl is turned on the
sensors need to calibrate. The buttons
will light up and the lid may open.
Remove the battery covers.
Replace the battery covers.
1
3
2
4
5
Always use 4 good quality 1.5V alkaline C cell batteries. This will ensure the best
performance of your Sealed Pet Bowl. This product is not designed for use with
rechargeable batteries. To insert or change the batteries please follow the steps below:
+ +
--
6
The red battery light will flash if the batteries are low, or if there’s a problem with how
they have been inserted.
5
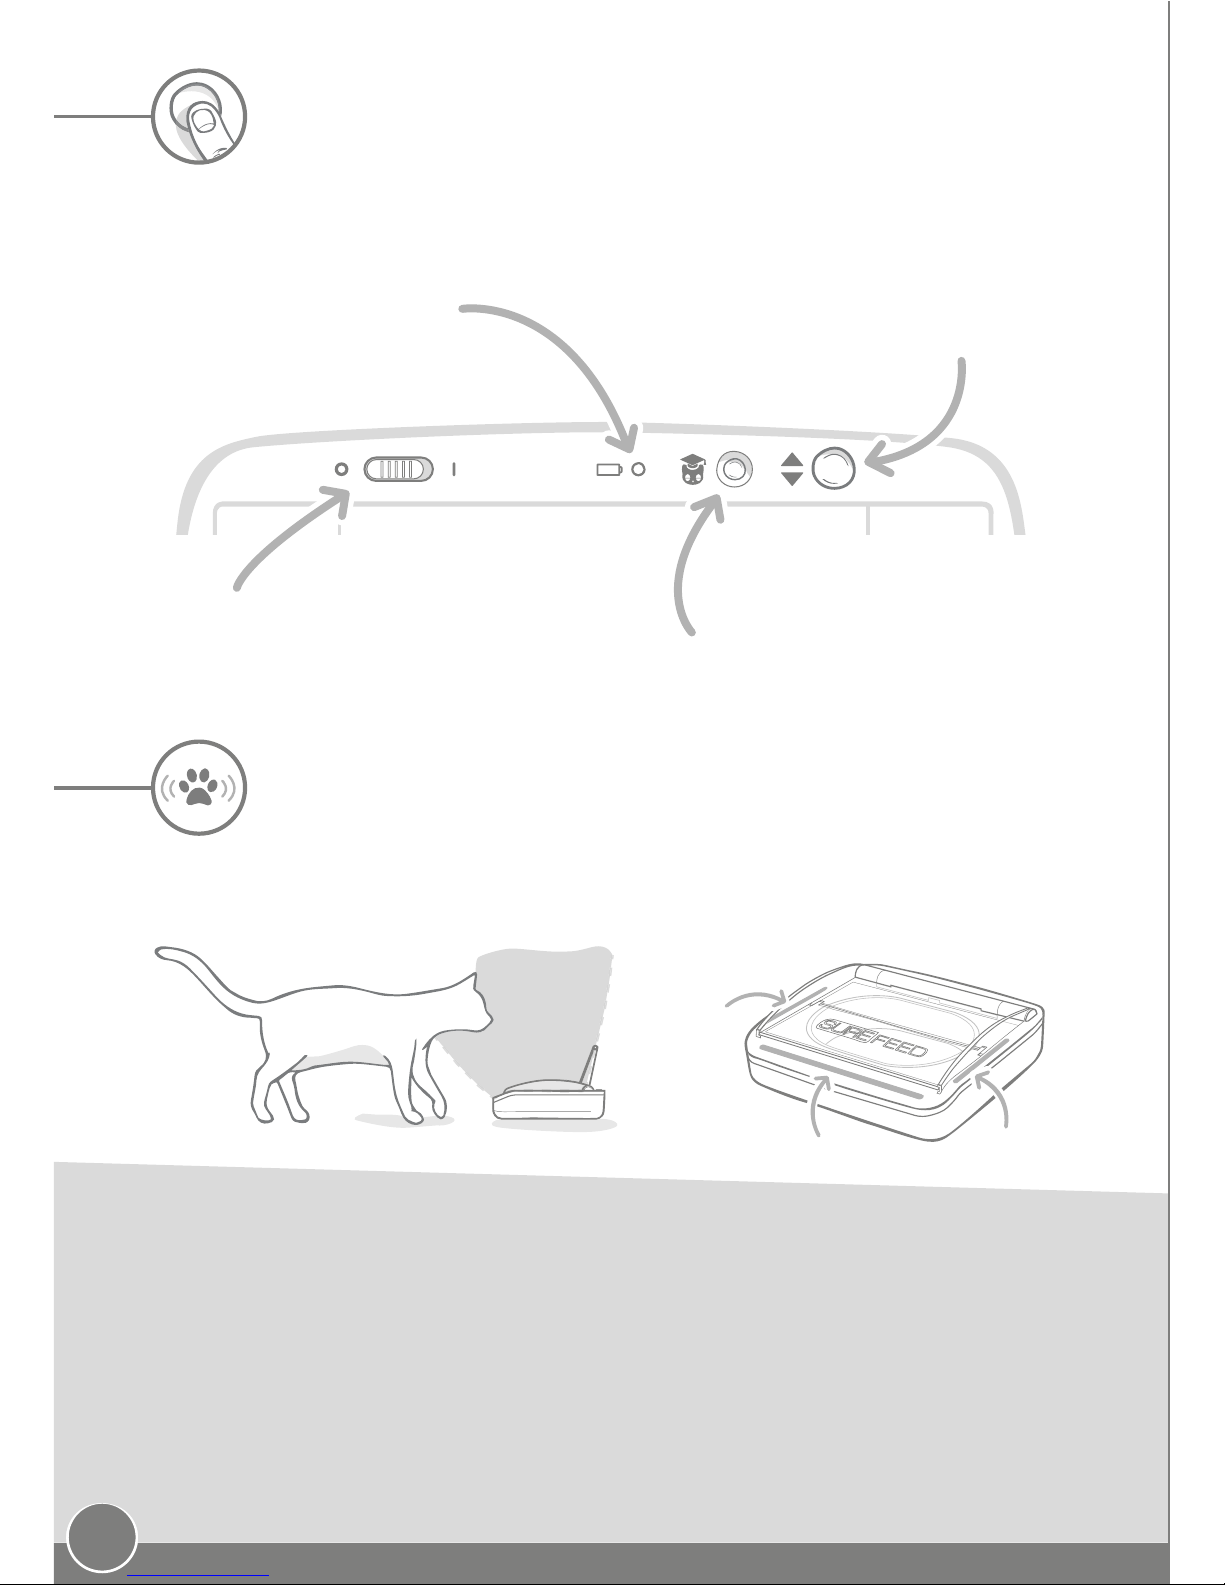
Buttons & lights
The sensors on your Sealed Pet Bowl will react to any physical movement within their range
and are positioned in three separate locations to detect your pet approaching.
To ensure the Pet Bowl functions reliably in your home, the sensors will calibrate to their
new surroundings when the product is turned on - see page 4. The sensors will also need to
recalibrate any time the Pet Bowl is moved. Therefore, aer moving, the lid may stay open for
a bit longer than normal, but it will sort itself out again once the sensors have readjusted to
their surroundings.
We don’t recommend positioning the Pet Bowl in a location where the sensors are constantly
activated, for example under a low surface, or with one side up against a wall, as this could
aect the sensor calibration - see page 8.
All of the Pet Bowl’s buttons and lights can be found towards the rear of the product:
Training button - used to teach
your pet how to use the Pet Bowl.
Illuminates orange. See page 9.
Battery light - this light will
flash red when the batteries
are running low.
Power switch - slide right to turn on
and le to turn o. When you turn the
product o the lid will close.
Manual Open / Close button - allows
you to override the sensors so you can
keep the lid open. It will illuminate
white when activated.
Sensors
Sensor tips & tricks

6
Press the Manual Open/Close
button ( ) to make sure the
Pet Bowl lid opens and stays
open. The white light will
illuminate.
Fill a clean bowl with food.
Ensure that you do not overfill
the bowl as this may prevent the
lid from closing fully and may
cause a mess.
The lid will close fully unless
your Pet Bowl is in training
mode, where it will close to its
current stage - see page 9.
Remove the dirty bowl and
clean it or replace with a
fresh bowl.
Place the filled bowl into the unit
and press the Manual Open/Close
( ) button again. The white light
will turn o.
Before placing the bowl back
into the unit, ensure that all
the surfaces are wiped clean
including the sensors.
Replacing the food
It is important to change your pet’s food on a daily basis, not only to ensure your pet stays
happy and healthy, but also to keep the Pet Bowl clean and in working order. The lid should
open for you when the Pet Bowl detects your presence but, to ensure the lid stays open
whilst you change the food, you can press the Manual Open/Close button
.
1
2
3
4
6
5
7
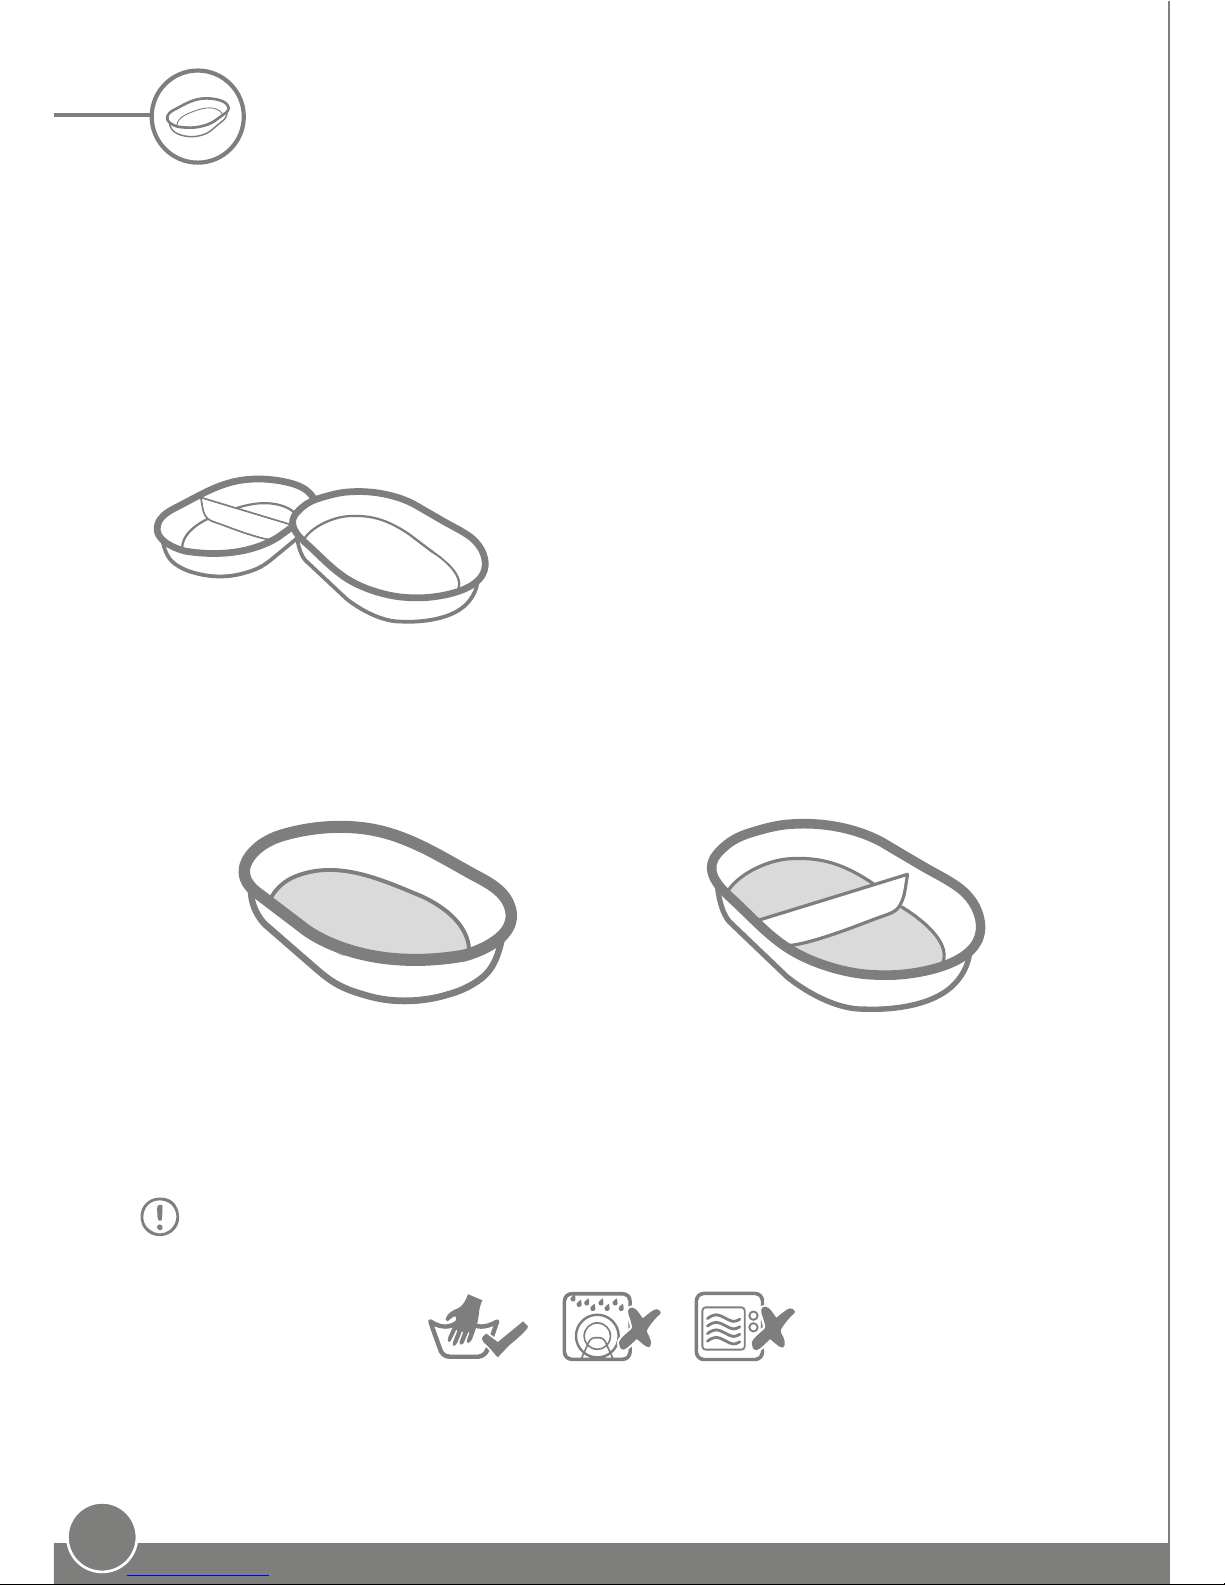
If you want to customise your Pet Bowl, or if you have
multiple units, SureFeed bowls come in four dierent
colours and can be purchased separately.
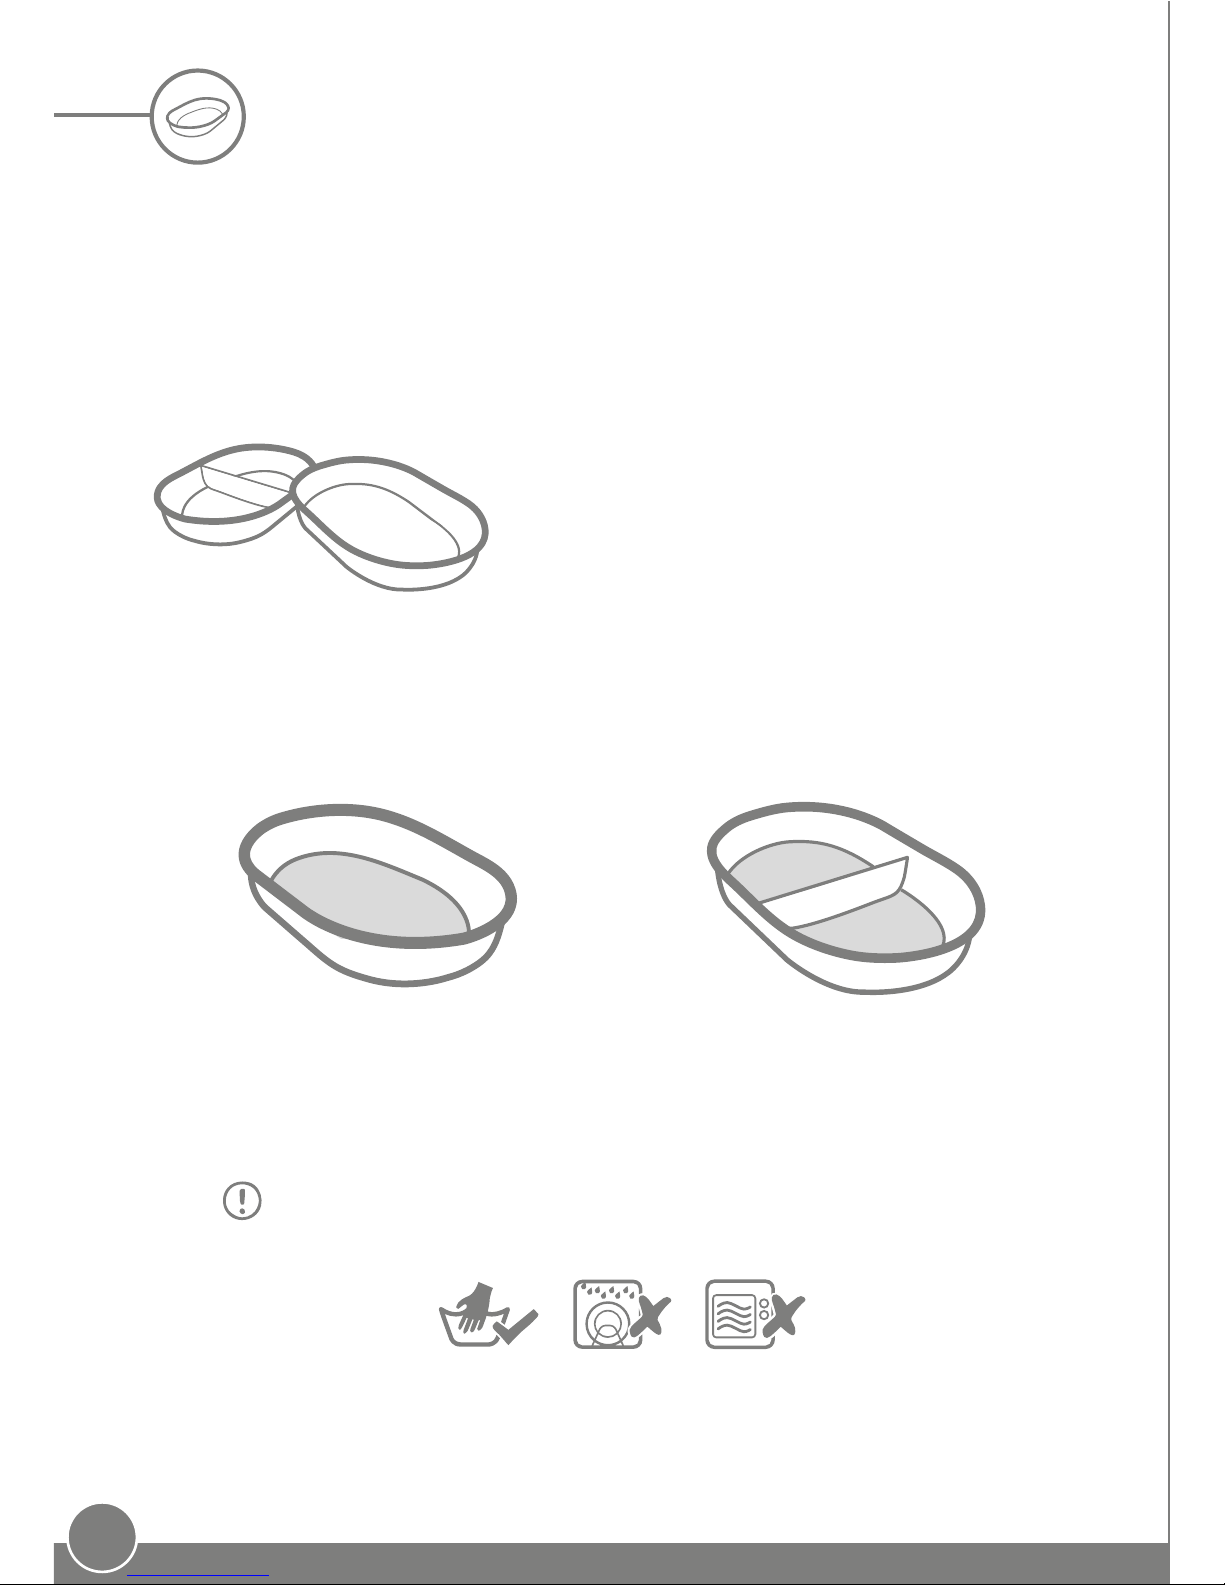
The single bowl is suitable for a
single portion of wet or dry food.
The split bowl is designed for two
dierent foods used at the same time.
Bowl
To purchase additional bowls please ask a SureFlap stockist
or visit: sureflap.com
Available in blue, green, pink and grey.
Add some colour!
The single compartment bowl supplied with your Sealed Pet Bowl has been specifically
designed to work with SureFeed products. SureFeed bowls have an integrated seal on their
top lip. Once the lid of the Pet Bowl is closed, flies can’t get in and food stays fresher.
Please remove the bowl from the unit when cleaning. To keep the integrated seal in
optimal condition we recommend hand washing only.
Please ensure bowls are washed before their first use.
Hand wash only. Do not put it in a dishwasher. Do not microwave
8
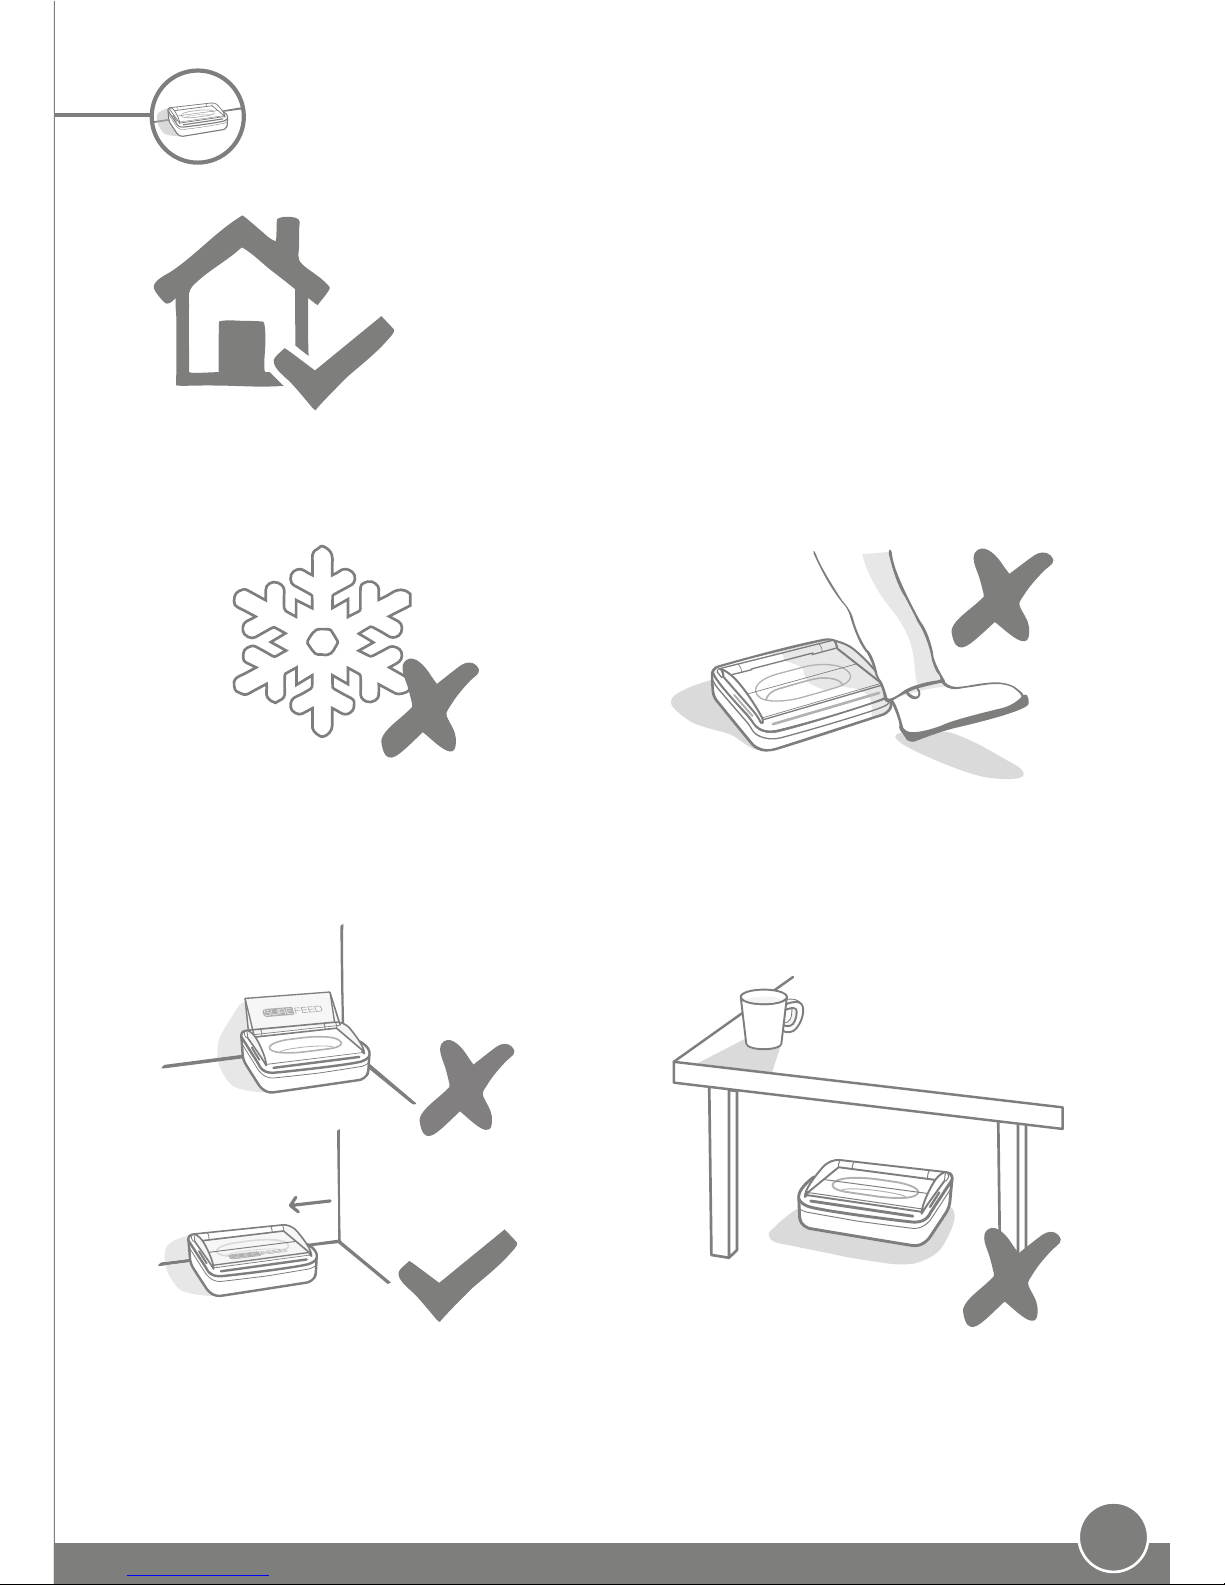
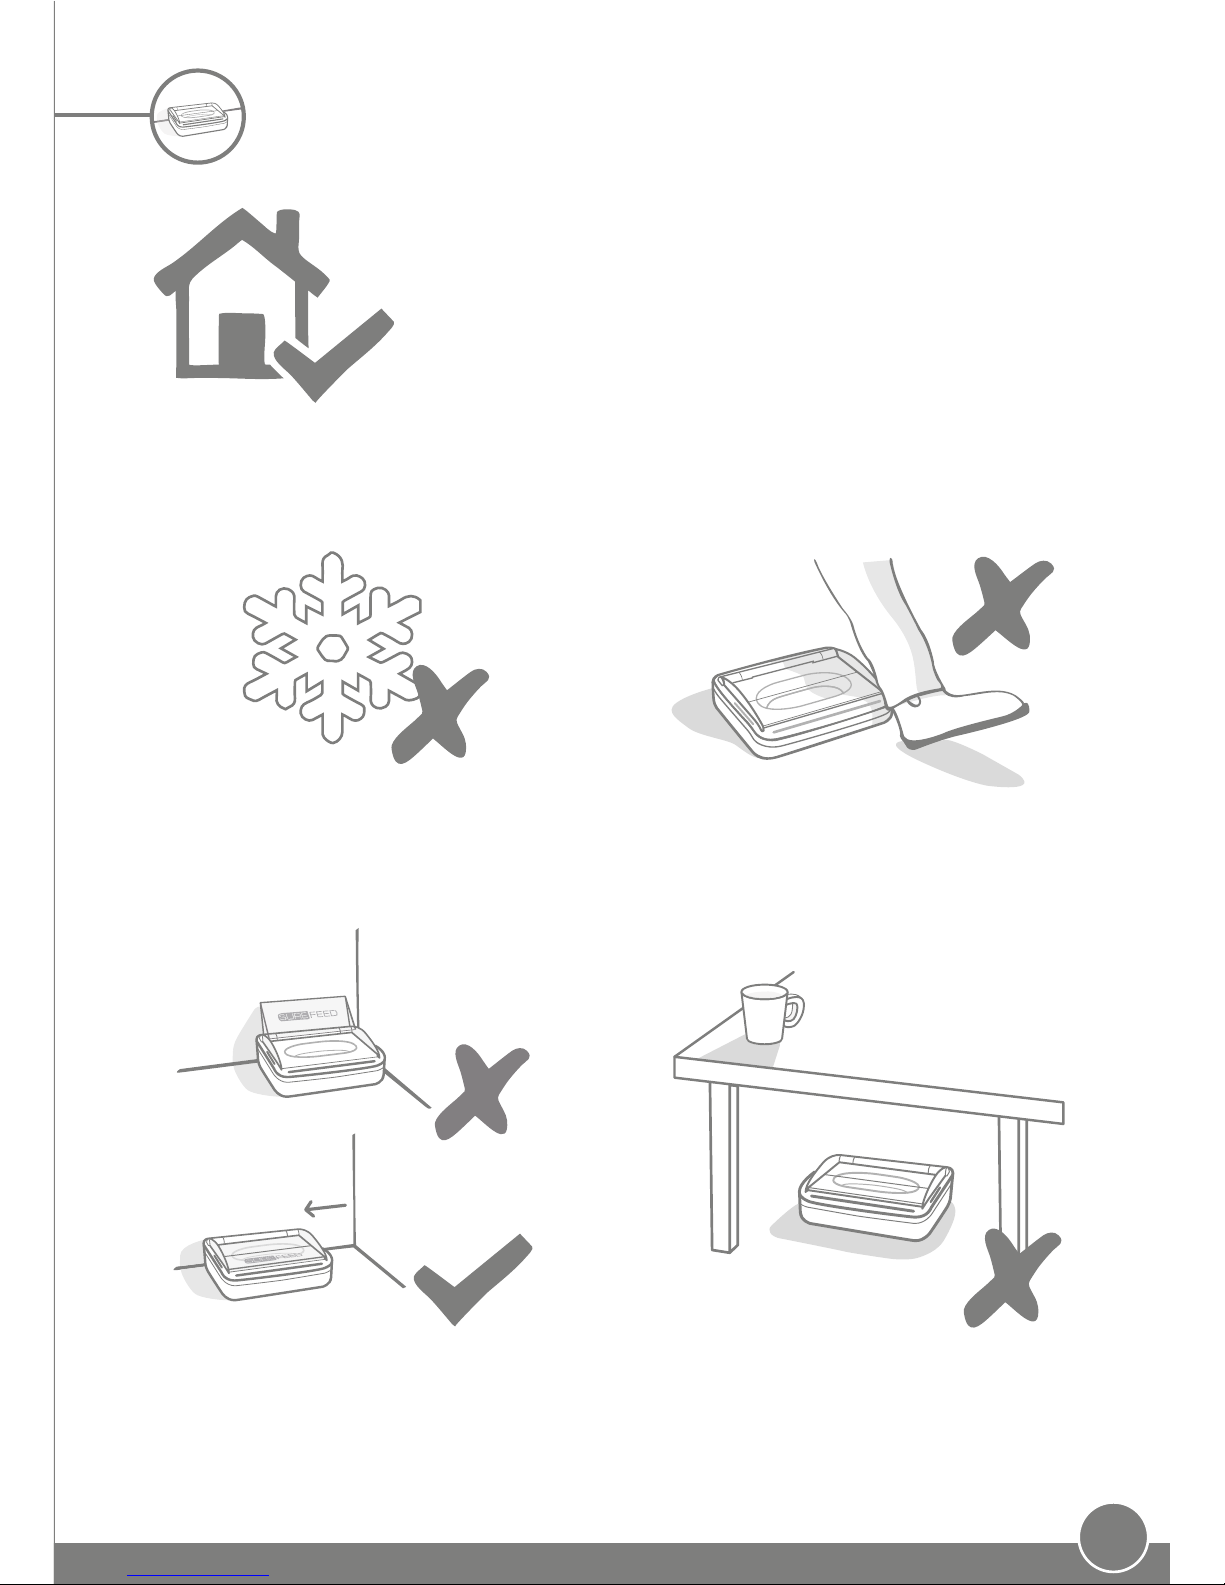
The SureFeed Sealed Pet Bowl is designed for indoor use
only and is therefore ideal for the majority of indoor
feeding locations. We also advise that you try to place
your Pet Bowl somewhere your pet is comfortable eating.
To avoid aecting the sensors’ performance,
do not place the Pet Bowl under low
surfaces. We advise a clearance above the
unit of approximately 1 metre.
Try not to place your Pet Bowl where people
are frequently walking past, as it could
cause a trip hazard.
To avoid aecting the sensors’ performance,
do not place either the le or right sides of
the Pet Bowl up against a wall or surface. We
advise leaving a gap of at least 10cm.
Do not place the unit in the fridge or
place ice packs underneath or inside it.
Where to place your Sealed Pet Bowl
However, there are a few things you must consider when choosing the best location for your
new Sealed Pet Bowl:
10cm
9
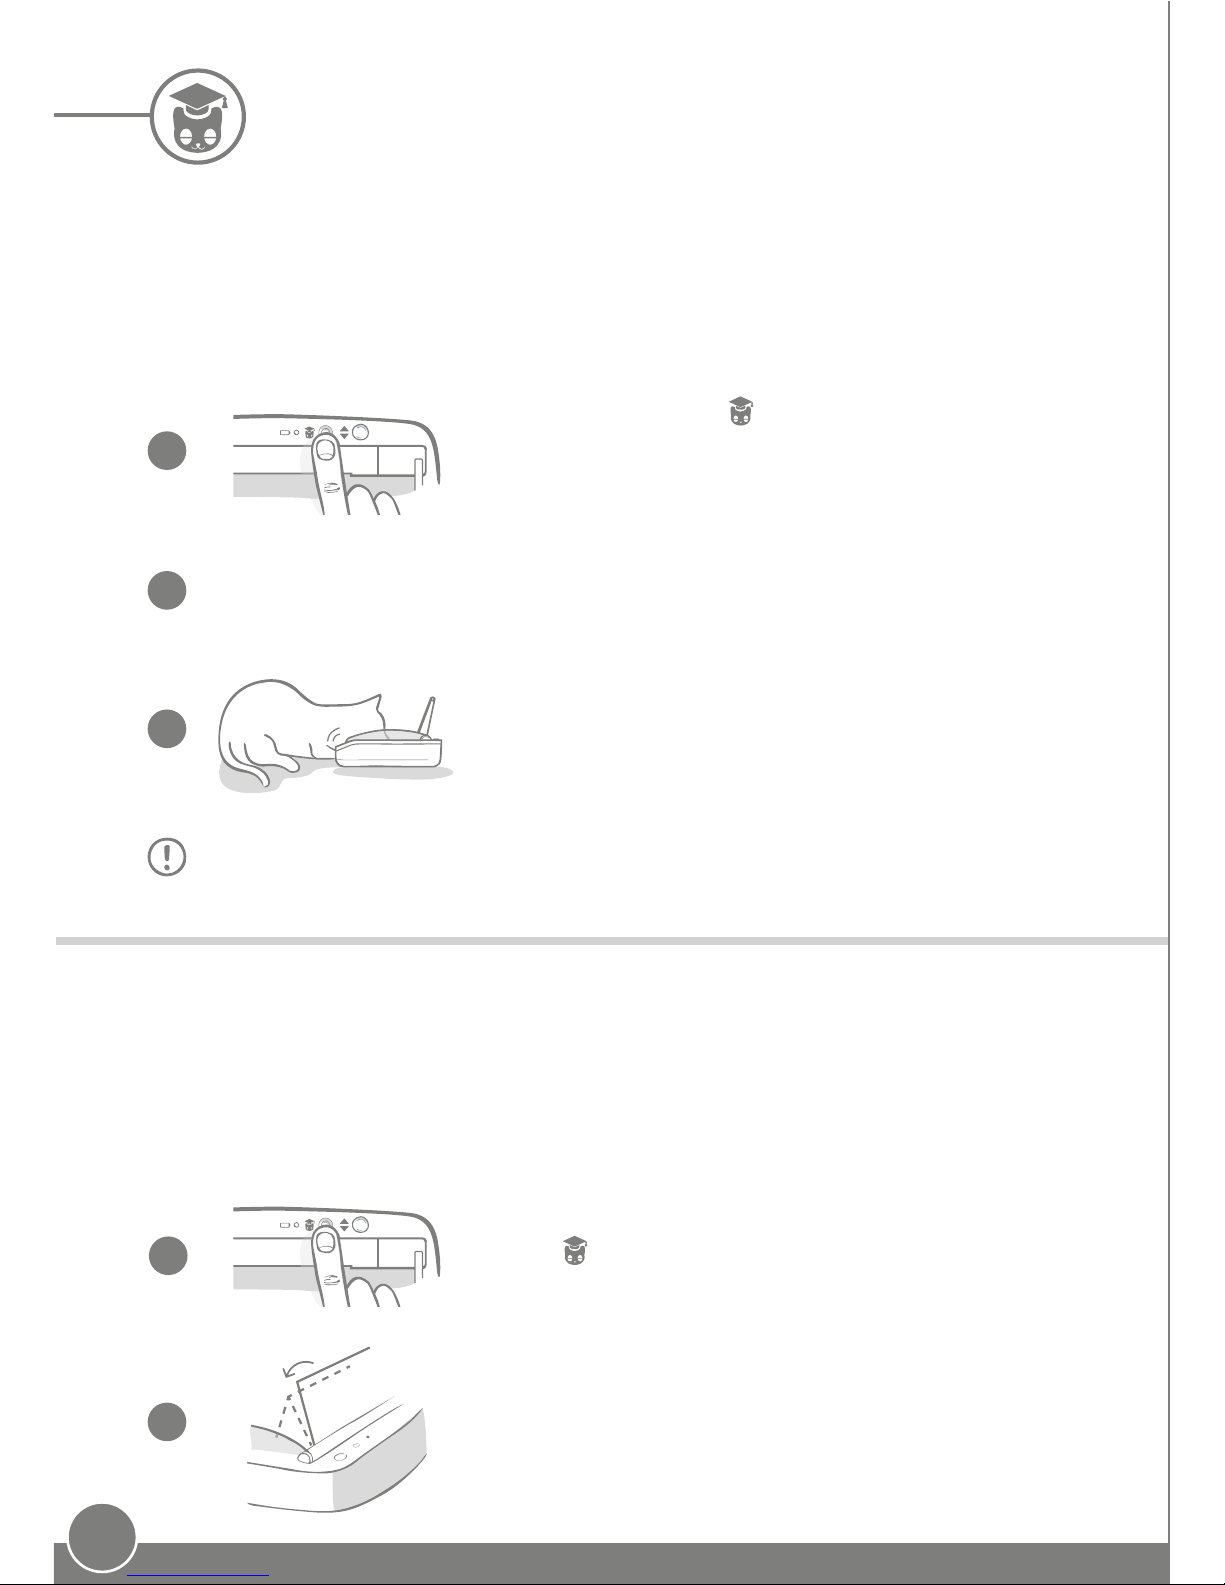
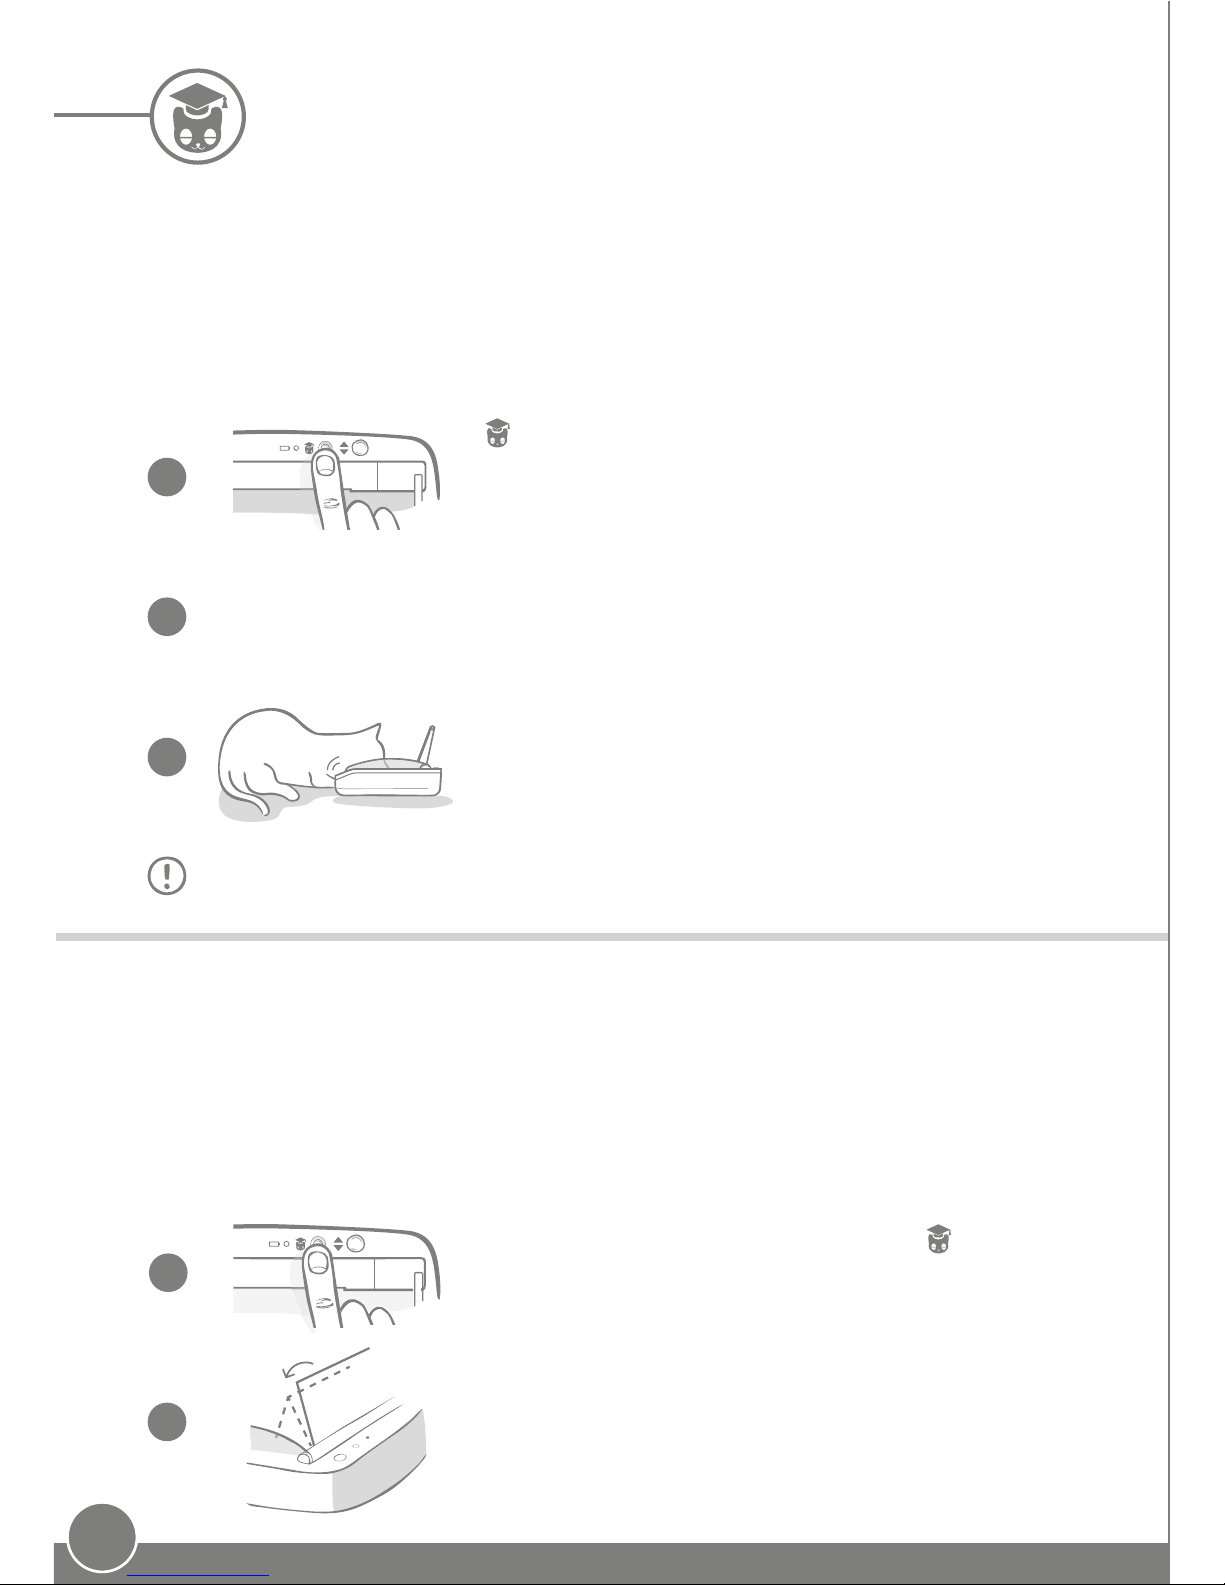
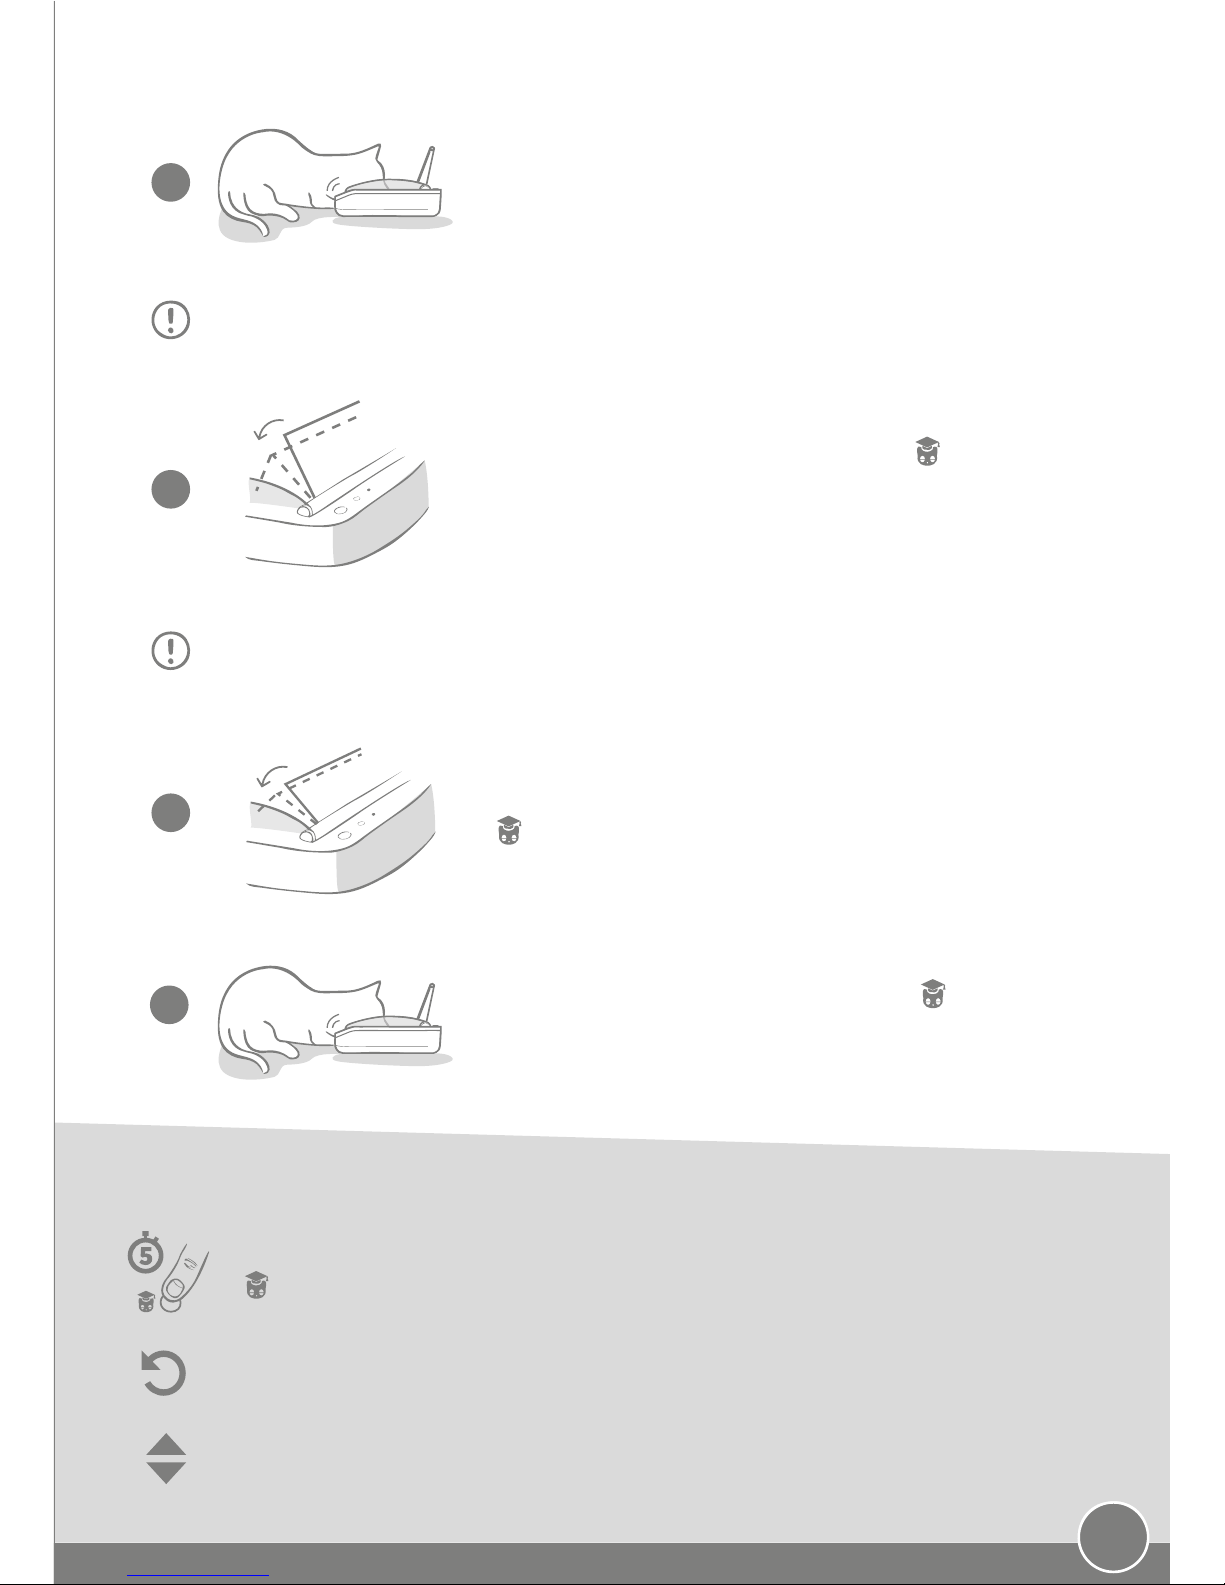
Fill the bowl with your pet’s favourite food and place the unit somewhere they feel
comfortable eating. See page 8 for more details on the best place to put your Pet Bowl.
During this first stage of training your pet to use the Pet Bowl,
the lid will not move, even aer they have moved away.
Remember to take your time and let your pet get used to their new bowl. Once
they are happy, proceed to Part 2.
Some pets may need a couple of days to get used to their new Pet Bowl. The training mode
allows you to slowly introduce more and more movement to the lid meaning your pet can grow in
confidence using their new bowl. This can take a little time but be patient, and do not move on to
Part 2 until your pet seems comfortable.
1
3
2
Press the Training button ( ) once. Don’t worry if the lid opens
due to the Pet Bowl sensing your movement. The orange light
will flash on the training mode button (once every few seconds)
to indicate the mode has been successfully activated.
Now when your pet eats from the bowl there will be some
movement as the lid opens fully. When they finish eating, it
will close slightly.
PART 2 - Increasing the lid movement
4
5
Slowly increasing the lid movement allows your pet to get used to it in three stages. Once again,
for the best results and a happy pet it is important to be patient and not rush this process. The
amount of time required at each stage will vary for each pet (days/weeks) but we recommend
taking a few days for each step.
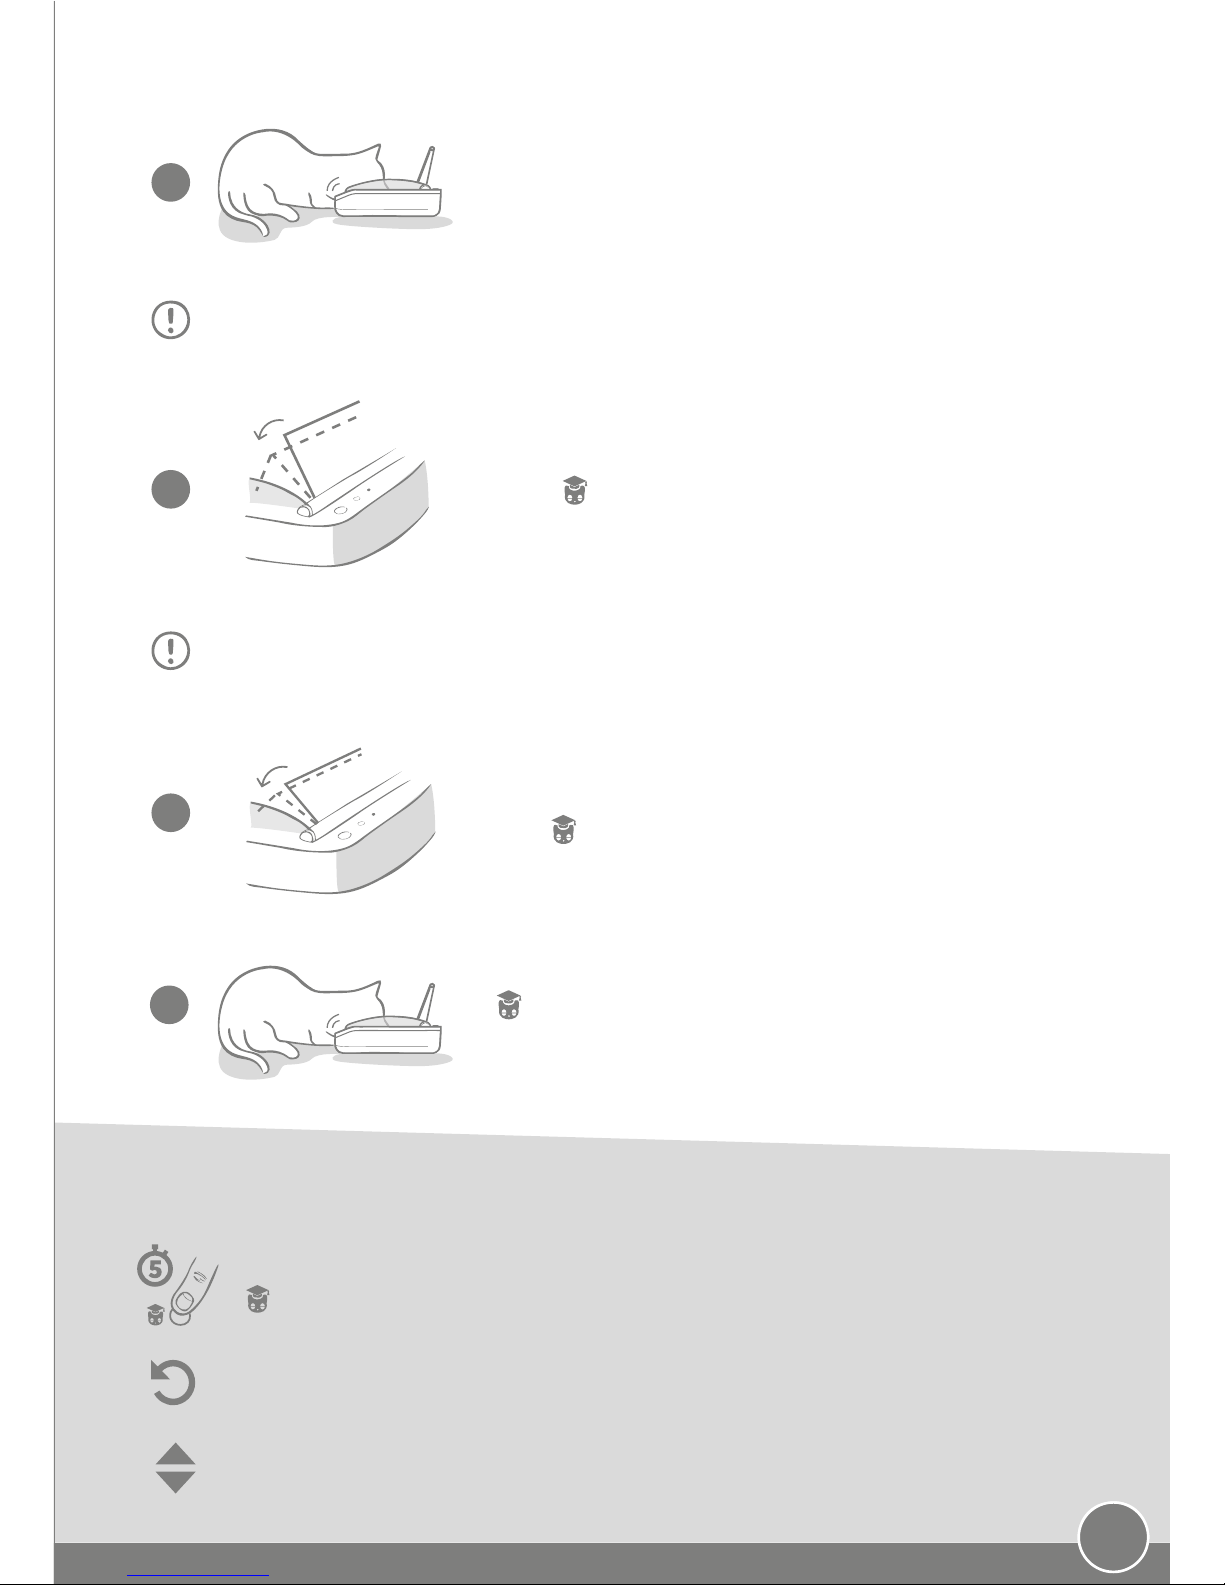
Start to increase the motion of the lid by pressing the Training
button ( ) once again. The lid will close a small amount and
the light will flash orange twice.
Training mode (teaching your pet to use the Pet Bowl)
PART 1 - Introducing your pet to the Pet Bowl
10
Once your pet is happy with the movement, press the Training
button ( ) again. The lid will close to the next position and the
light will now flash orange three times.
Remember to take your time. Do not proceed to the next step until your pet is
confident with this amount of lid movement.
Again, continue to use the Pet Bowl normally and do not proceed to the next step
until your pet is confident with this motion.
You can end the training mode at any time by pressing and holding the Training button
( ) for 5 seconds.
Allow your pet to use the bowl as normal whilst they get used
to the new lid movement. When you need to replace their food
do so as normal - see page 6.
Your pet should be happy with the lid movement now so this
final stage of training has the lid almost fully closed. As before,
press ( ) again. The lid will close to its final position and the
light will now flash orange four times.
7
8
9
6
That’s it! Once your pet is happy with this final position, press
( ) again to exit Training Mode. The lid will close fully and the
orange light will no longer flash.
If you use the Manual Open/Close button whilst your Pet Bowl is in training mode, please be
aware that the lid won’t completely close. It will only close to its current stage setting.
If you need to go back a step, follow the tip above. This takes the Pet Bowl out of training
mode and you can then start the process from the beginning.
Training mode tips & tricks
11
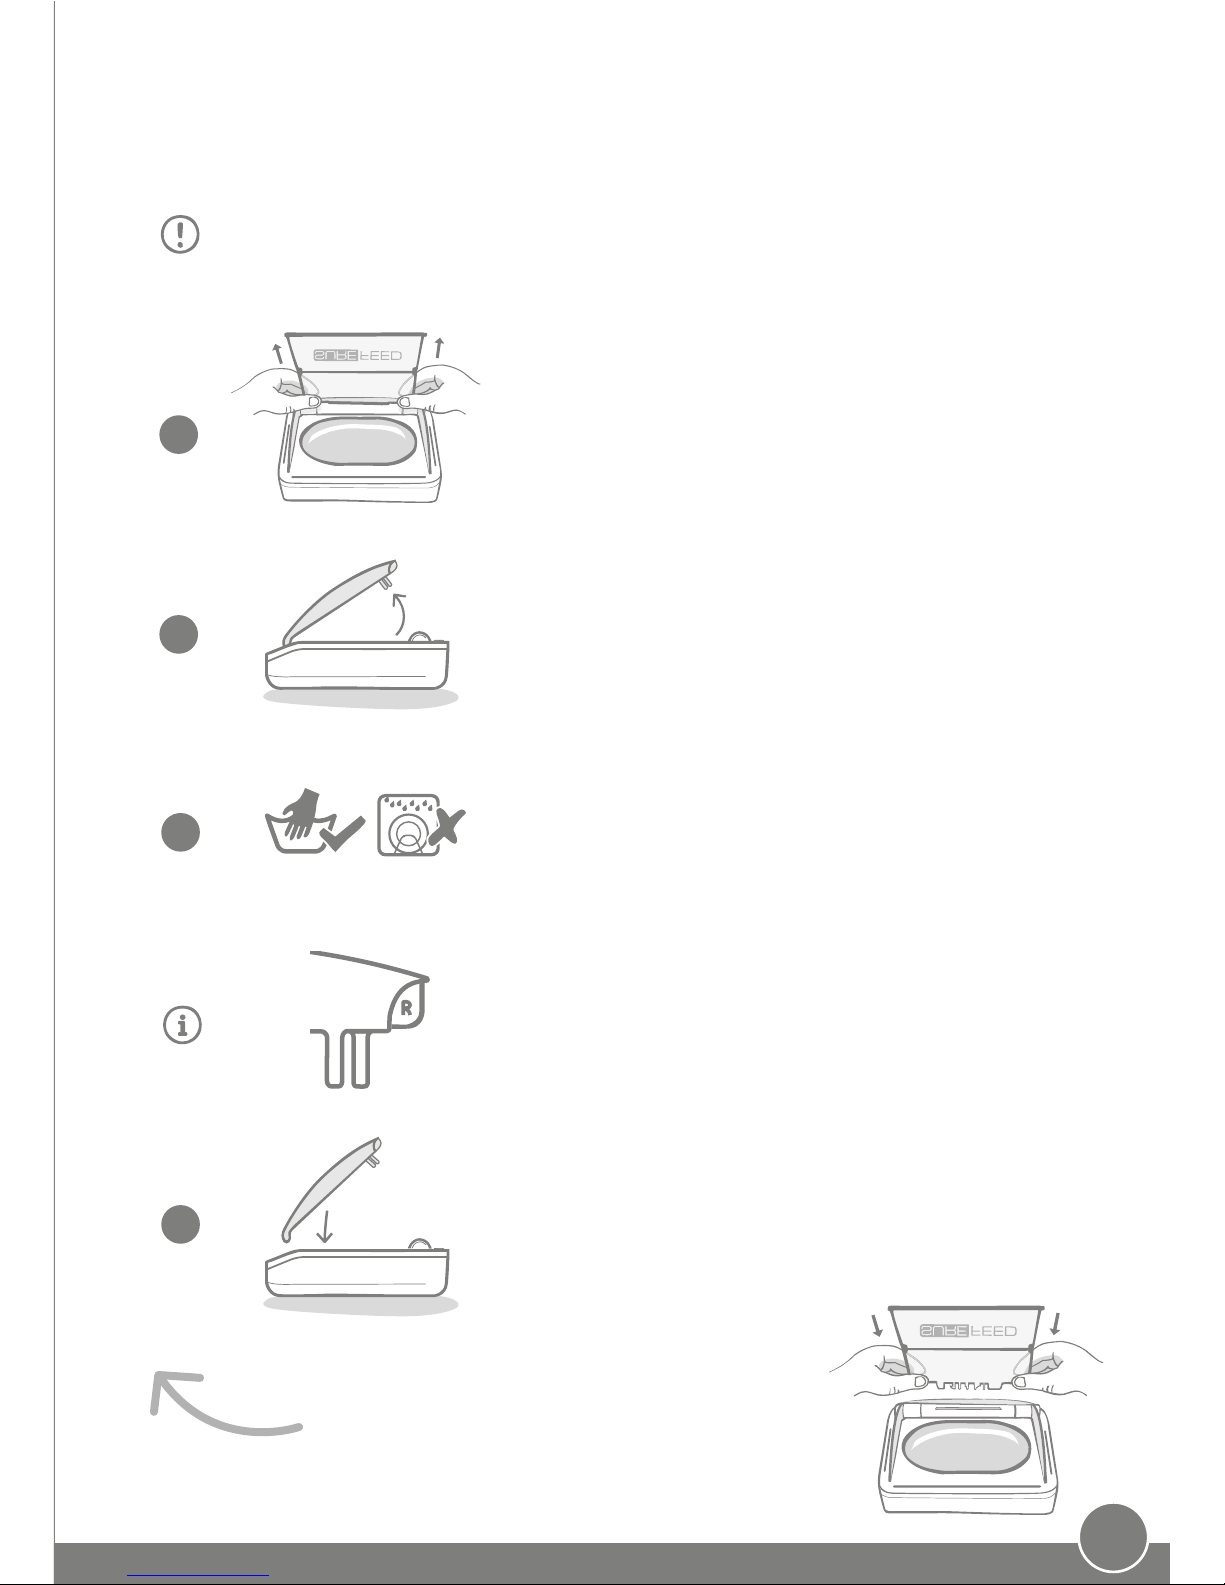
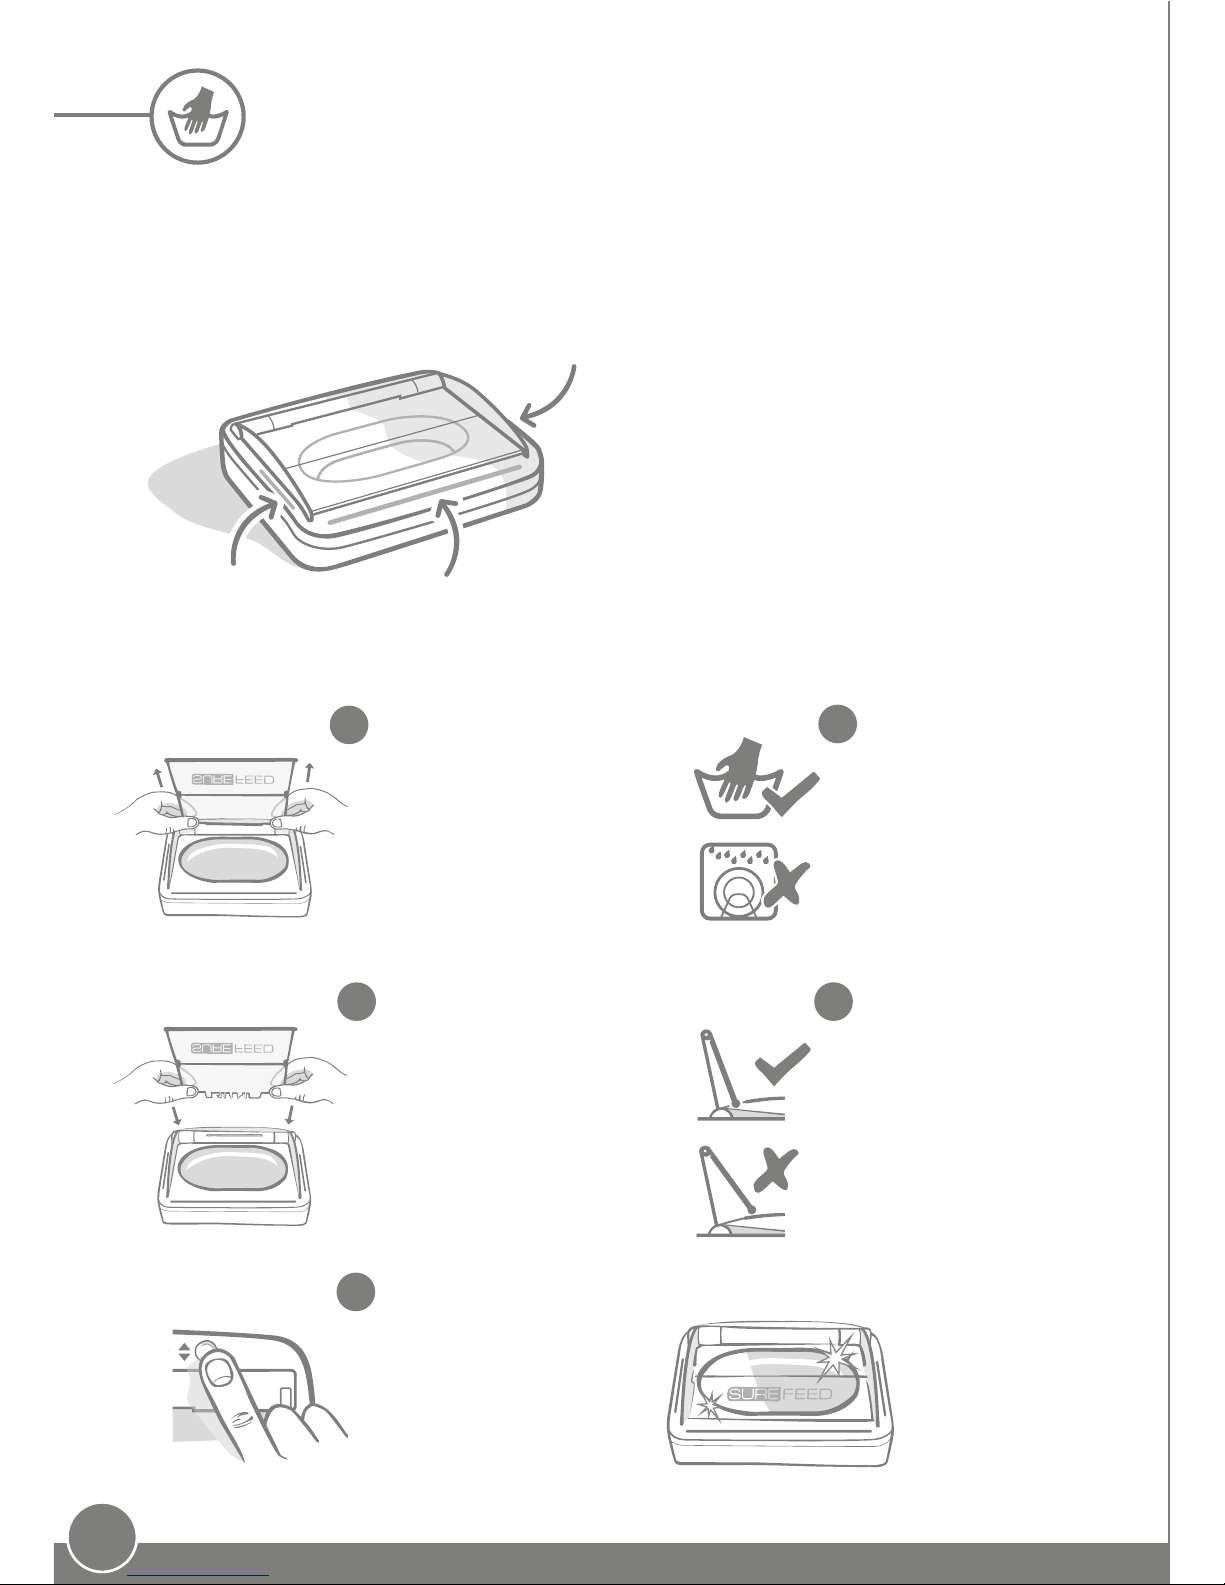
How to remove the lid for cleaning
Press the Manual Open/
Close button, then pull
the lid upwards.
Aer cleaning, replace
the lid keeping both
halves vertical. Make
sure it is correctly
fitted into place.
1
2
3
It is important to keep your SureFeed Sealed Pet Bowl clean to ensure it functions reliably.
Do not submerge the whole unit into water or place it under a running tap! The Pet Bowl
is designed for hand washing with a damp cloth or sponge only.
Hand wash the lid.
Do not put it in a
dishwasher.
The Pet Bowl should be wiped with a damp
cloth on a regular basis. Make sure the three
sensor strips are kept clean at all times to
ensure reliable operation.
See page 7 for more details on how to clean
the SureFeed bowl.
Cleaning
5
The Pet Bowl
is now ready to
use again.
Press the Manual
Open/Close button
again to close the lid.
Once the lid is fitted,
flip the top half back
over so it is resting on
the inside of the lid
guides.
4
12
How to remove the lid guides for cleaning
To replace the lid, follow steps 3 to 5 on page 11.
To replace the lid guides repeat the process but in
reverse. Make sure that you hook them in at the front
first and then attach the back.
Hold one of the lid guides near the rear and pull it
upwards until you are able to unhook the front section.
You will need to pull it hard! Then do the same to
remove the second lid guide.
The lid guides are marked with a small L (le) or R
(right) near the rear to indicate which side each one
fits back into. Make sure to fit them into their correct
sides.
Hand wash the lid guides. Do not put them in the
dishwasher.
1
2
3
4
Firstly, you’ll need to remove the Pet Bowl’s lid. Press
the Manual Open/Close button and then, once the lid is
open, pull it upwards.
The lid guides on the Sealed Pet Bowl are critical parts which allow the lid to open
and close correctly. Both lid guides must be re-attached aer cleaning.
13
• Make sure the Manual Open/Close light isn’t on, as this could be keeping your lid in the open
position. See page 5.
• Ensure there is no food blocking the lid that could be preventing it from closing correctly.
• Make sure that the lid is fitted correctly - it is parallel with the product - and that the lid guides
are attached and on the correct sides. See pages 11 and 12.
• Wipe clean all of the sensors on the product to make sure they are unobstructed.
• Turn the unit o and remove the batteries. Wait for at least 10 seconds before re-inserting the
batteries and turning the product back on
.
Still in need of assistance?
If there is an obvious problem with the batteries the product should sense this and the red battery
light will flash.
• Make sure you are using good quality alkaline C cell batteries.
• Make sure they are inserted correctly with the + and - at the correct orientation - See page 4.
If the orange light is on this means the product is still in training mode. In the last stage of training,
the lid is very nearly closed. This means that from a distance it can look as if the product is in its
normal mode.
If you aren’t expecting your Sealed Pet Bowl to be in training mode, press and hold the training
button ( ) for 5 seconds. The orange light should now turn o.
• Check the product is turned on and that the batteries are fitted correctly - see pages 4 and 5.
• Ensure all of the sensors on the product are clean and unobstructed.
• If the problem persists, please contact the SureFlap Customer Care team.
For more detailed guidance, videos and customer help forums visit:
http://sureflap.com/help
Alternatively contact our friendly Customer Care team: see back cover for details.
Problems with the batteries
The orange light is flashing
The lid won’t open for my pet
Troubleshooting
?
The lid won’t shut
If the Manual Open/Close button is activated but the lid of the Pet Bowl has closed, this is due to the
button’s 15 minute time out. The time out function is to keep the food fresh incase someone fogets
to deactivate the button. If you would like to overide this time out, please contact Customer Care.
The Manual Open/Close button is active but the lid has closed
14
Disclaimer: The SureFlap Sealed Pet Bowl is non-selective and therefore works with any pets, irrespective
of microchip ID. The integrated seal is eective to ensure the food inside stays fresher for longer, however
no seal is 100% eective and the bowl should not be considered to be fully air-tight. This product does not
contain a timer and does not have any time related functionality; it relies on proximity sensors to open the
lid for your pets which can be activated at any time.
In the rare event of any sensor or unit malfunction, the lid operation may be compromised, preventing your
pet from gaining access to its food. Therefore, do not leave your pet unattended, or rely on this product to
sustain them for any prolonged periods of time - no longer than 24 hours for a cat, or the average amount of
time between meals for a small dog. This product is not a substitute for responsible pet ownership.
Warning: This equipment has been tested and found to comply with the limits for a Class B digital device,
pursuant to part 15 of the FCC Rules. These limits are designed to provide reasonable protection against
harmful interference in a residential installation. This equipment generates, uses and can radiate radio
frequency energy and, if not installed and used in accordance with the instructions, may cause harmful
interference to radio communications. However, there is no guarantee that interference will not occur in a
particular installation. If this equipment does cause harmful interference to radio or television reception,
which can be determined by turning the equipment o and on, the user is encouraged to try to correct the
interference by one or more of the following measures:
• Reorient or relocate the receiving antenna
• Increase the separation between the equipment and receiver
• Connect the equipment into an outlet on a circuit dierent from that to which the receiver is
connected
• Consult the Customer Care team or an experienced radio/TV technician for help
CAN ICES - 3 (B)/NMB - 3(B)
Disposal of Products and used Batteries: This icon will indicate products that will be subject to the
following legislation:
The Waste Electrical and Electronic Equipment Directive 2012/19/EU (WEEE Directive) & The Battery
Directive 2006/66/EC and Amendment 2013/56/EU places an obligation on households to dispose of the
waste batteries and products that have reached the end of their life, in an environmentally responsible
manner as this will reduce the impact the waste will have on the environment, therefore these cannot
be placed in household waste bins and should be recycled at an appropriate recycling facility. Further
information on recycling can be found at: www.recycle-more.co.uk
Warranty: The SureFlap Sealed Pet Bowl carries a 1-year warranty from the date of purchase, subject to
proof of purchase date. The warranty is restricted to any fault caused by defective materials, components
or manufacture. This warranty does not apply to products whose defect has been caused by normal wear
and tear, misuse, neglect or intentional damage.
In the event of a part failure due to faulty parts or workmanship, the part will be replaced free of charge
during the warranty period only. At the manufacturer’s discretion a replacement product may be provided
free of charge in the case of a more serious malfunction. Your statutory rights are not aected.
To register your warranty visit: sureflap.com/warranty
Warranty & Disclaimer
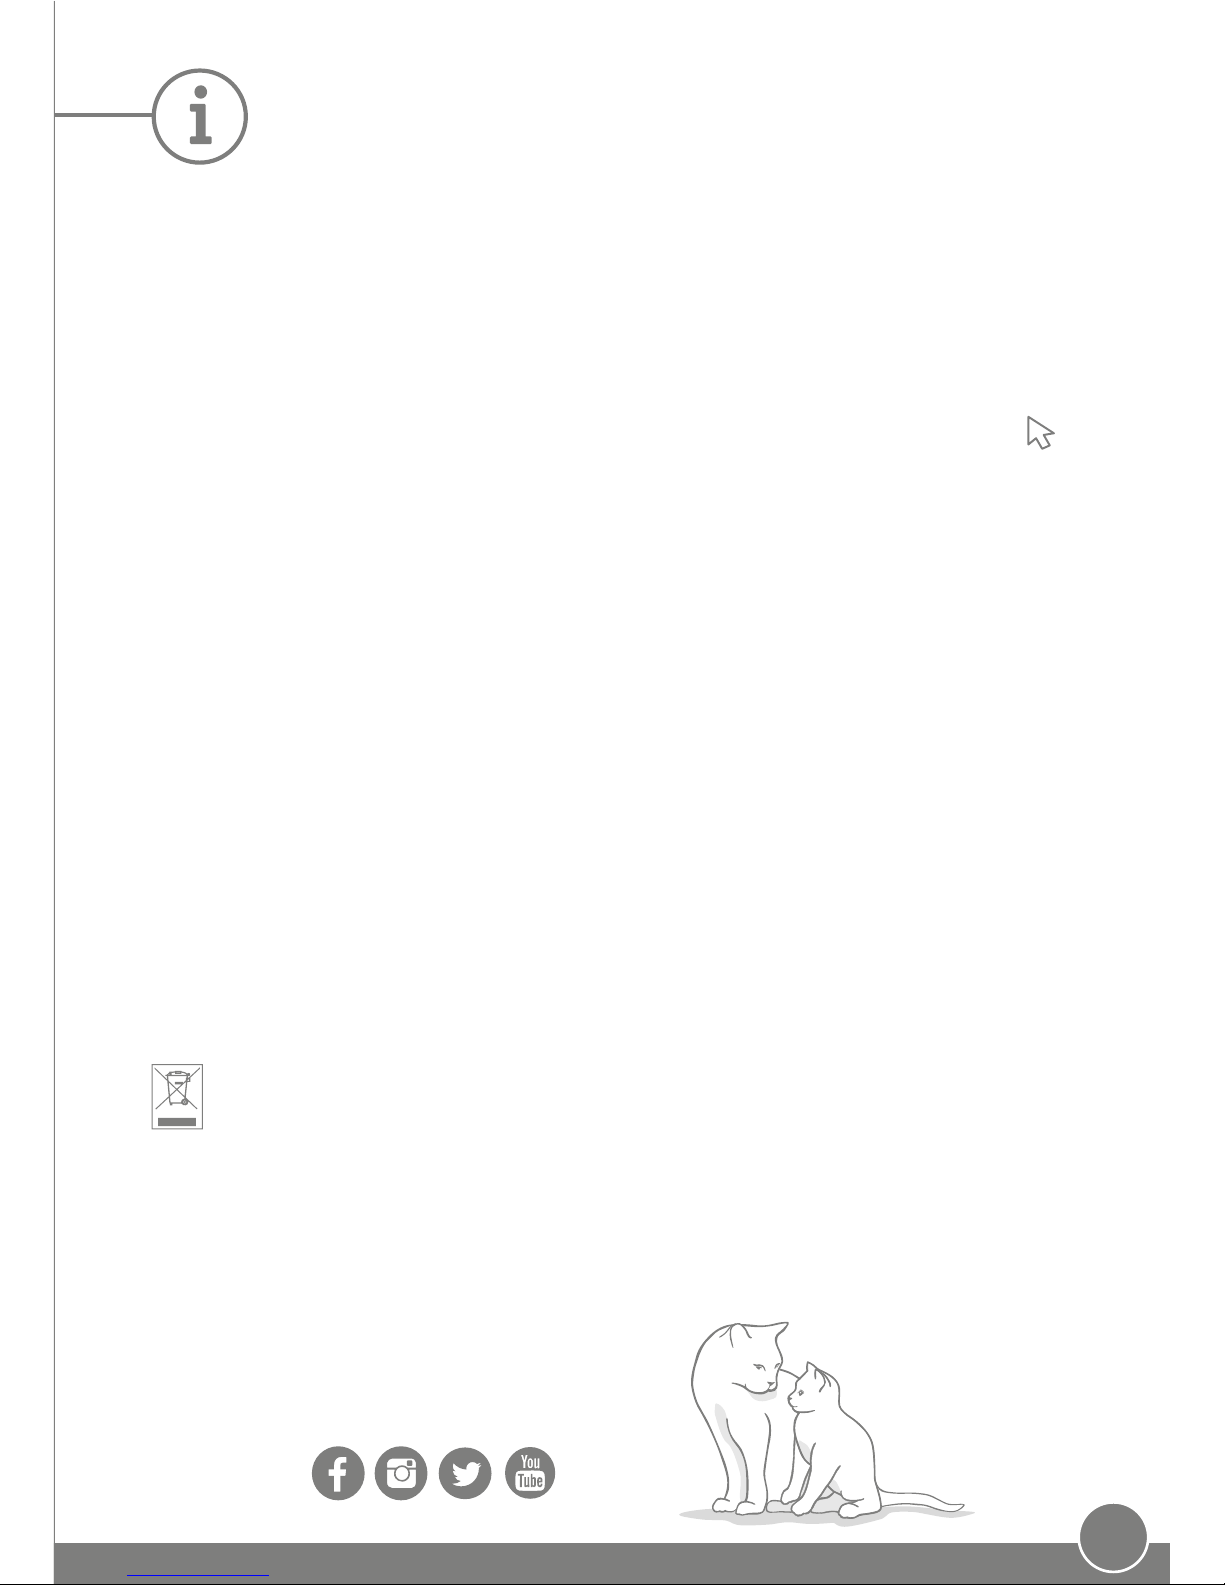
Join the SureFlap community!
Introduce your happy pet and
tell us your story.
#SurePet
15
Herzlichen Glückwunsch zum Kauf Ihrer neuen Ludichten Futterschale!
Die Ludichte SureFeed Futterschale ist wie eine Lunchbox für Ihr Haustier, in der
das Futter so lange frisch und schmackha bleibt, bis Ihr Haustier es frisst. Da die
Futterschale verschlossen ist, bleibt Nassfutter länger frisch und unerwünschte
Futtergerüche im Haus sind praktisch kein Problem mehr. Außerdem hil sie, Fliegen,
die sich gern an oenen Futternäpfen sammeln, fernzuhalten.
Die Ludichte Futterschale verfügt über Sensoren, die Bewegungen in der Nähe
erkennen. Deshalb önet sich die Abdeckung der Futterschale, wenn Ihre Anwesenheit
oder die Ihres Haustieres registriert wird. Die Ludichte Futterschale ist nicht selektiv,
sodass die Sensoren innerhalb ihrer Reichweite auf jede Bewegung reagieren und
sich der Deckel der Futterschale für alle Haustiere in Ihrem Haushalt önet. Hinweis:
Die Futterschale besitzt keine Zeitschaltuhr. Daher sollte sie täglich nachgefüllt und
gereinigt werden.
DE
Ihre Ludichte Futterschale
Tasten und LED-Leuchten
Sensoren
Seitenschienen
Abdeckung
SureFeed Futterschale
mit integrierter flexibler
Abdichtung
Produktteile
Sensoren
16
Inhalt
Produktübersicht
Batterien
Tasten und LED-Leuchten
Sensoren
Austauschen des Futters
Futterschale
Standort der Ludichten Futterschale
Trainingsmodus
– so lernt Ihr Tier den Umgang mit der
Futterschale
Reinigung
Störungen beheben
Garantie und Haungsausschluss
17
19
18
19
20
21
22
23
25
27
28
17
Der Deckel önet sich, sobald ein Haustier in
der Nähe der Futterschale erkannt wird.
Produktübersicht
Dank der Sensoren, die erkennen, wenn sich ein Haustier dem Futter nähert, önet
sich die Ludichte Futterschale (und bleibt aber ansonsten verschlossen). Dadurch
bleibt das Futter Ihrer Haustiere in der Schale länger frisch und sie können jeden Bissen
genießen!
1
2
3
4
Wenn das System erst einmal eingerichtet ist,
bleibt die Abdeckung solange verschlossen,
bis sich ein Haustier dem Gerät nähert
oder Sie den Deckel önen, um Tierfutter
nachzufüllen. Dazu siehe Seite20.
Solange das Haustier aus der Futterschale
frisst, bleibt die Abdeckung geönet.
Die Ludichte SureFeed Futterschale wurde
für Katzen entwickelt, kann aber auch für
kleine Hunde verwendet werden. Es passen
bis zu 400ml Futter in die Futterschale,
was ungefähr zwei Beuteln typischen
Katzennassfutters entspricht.
Kurz nachdem das Haustier gefressen und sich
entfernt hat, schließt der Deckel und das Futter
ist wieder abgedeckt.
18
Batterien
Nachdem Sie sichergestellt haben, dass das
Gerät ausgeschaltet ist, drehen Sie es zum
Önen der Batteriefächer um.
Legen Sie die Batterien ein. Achten Sie darauf,
dass die (+/-)-Symbole auf den Batterien
entsprechend der Symbole auf dem Gerät
eingesetzt werden.
Platzieren Sie die Futterschale an der
gewünschten Stelle und schalten Sie es dann
ein. Dies ist erforderlich, damit die Sensoren
korrekt kalibriert werden können.
Entfernen Sie die
Batteriefachdeckel.
Setzen Sie die
Batteriefachdeckel wieder ein.
3
Verwenden Sie immer 4hochwertige 1,5V-Alkali-Batterien vom Typ C. So bleibt die
Funktionsfähigkeit Ihrer Ludichten Futterschale optimal gewährleistet. Dieses Produkt ist nicht
für die Verwendung mit wiederaufladbaren Akkus bestimmt. Führen Sie bitte die im Folgenden
beschriebenen Schritte durch, um Batterien einzusetzen oder zu wechseln.
Nach dem Einschalten der Futterschale
erfolgt eine Kalibrierung der Sensoren.
Dabei leuchten die Tasten auf und die
Abdeckung kann sich önen.
1
3
2
4
5
+ +
--
6
Die Batteriestandsanzeige leuchtet rot auf, wenn der Batteriestand niedrig ist oder die
Batterien nicht ordnungsgemäß eingesetzt wurden.

19
Tasten und LED-Leuchten
Die Sensoren an Ihrer Ludichten Futterschale reagieren auf jede Bewegung innerhalb ihrer
Reichweite und sind an drei Stellen positioniert, um das Annähern Ihres Haustieres zu erkennen.
Damit die Futterschale bei Ihnen zu Hause ordnungsgemäß funktioniert, passen sich die Sensoren
an die neue Umgebung an, sobald das Produkt eingeschaltet wird (siehe Seite18). Auch bei
einer Verschiebung der Futterschale erfolgt eine Neukalibrierung der Sensoren. Daher kann es
vorkommen, dass die Abdeckung dann etwas länger als gewöhnlich oen bleibt. Dies ist jedoch
schnell behoben, sobald die Anpassung an die Umgebung erfolgt ist.
Wir empfehlen, die Futterschale nicht an einem Ort aufzustellen, an dem die Sensoren ständig
aktiviert werden(z.B. unter einer niedrigen Oberfläche oder direkt an der Wand), da dies
Auswirkungen auf die Kalibrierung der Sensoren haben kann (siehe Seite 22).
Alle Tasten und LED-Leuchten der Futterschale finden Sie auf der Rückseite des Gerätes:
Mit der Taste für den Trainingsmodus
trainieren Sie Ihr Tier für den Umgang mit
der Futterschale. Leuchtet orange. Siehe
Seite23.
Die Batteriestandsanzeige
leuchtet rot auf, wenn der
Batteriestand niedrig ist.
Wenn Sie den Einschaltknopf nach rechts
schieben, ist das Gerät eingeschaltet, wenn Sie
ihn nach links schieben, ist es ausgeschaltet. Die
Abdeckung wird geschlossen, sobald das Produkt
ausgeschaltet wird.
Die manuelle Önen/Schließen ermöglicht es
Ihnen, die Sensoren zu deaktivieren, sodass
die Abdeckung dauerha geönet bleibt. Die
Önen/Schließen-Taste leuchtet weiß, sobald
sie aktiviert ist.
Sensoren
Tipps und Tricks für das Sensoren
20
Drücken Sie die manuelle
Önen/Schließen-Taste ( ),
um sicherzustellen, dass die
Abdeckung sich önet und
geönet bleibt. Die weiße LED
leuchtet auf.
Geben Sie Futter in eine frische
Futterschale. Achten Sie darauf, dass
Sie die Schale nicht überfüllen, da
sonst der Schließmechanismus der
Abdeckung beeinträchtigt wird und
Verunreinigungen entstehen können.
Die Abdeckung schließt sich
vollständig, es sei denn, das Gerät
befindet sich im Trainingsmodus,
wodurch sie sich nur entsprechend der
aktuellen Trainingsphase schließt–
siehe Seite23.
Entfernen und reinigen Sie die
schmutzige Futterschale oder
ersetzen Sie sie durch eine frische
Schale.
Stellen Sie die gefüllte Futterschale
in das Gerät und drücken Sie wieder
die manuelle Önen/Schließen-Taste
( ). Die weiße LED sollte ausgehen.
Vergewissern Sie sich vor dem
Wiedereinsetzen der Futterschale
in das Gerät, dass alle Oberflächen
einschließlich der Sensoren sauber sind.
Austauschen des Futters
Es ist wichtig, dass Sie das Futter Ihres Haustiers täglich austauschen: Nur so können Sie
sichergehen, dass Ihr Liebling gesund und munter bleibt und die Futterschale weiter hygienisch
einwandfrei funktioniert. Die Abdeckung sollte sich önen, sobald die Futterschale Ihre
Anwesenheit registriert. Um sicherzustellen, dass die Abdeckung geönet ist, während Sie das
Futter wechseln, drücken Sie die manuelle Önen/Schließen-Taste.
1
2
3
4
6
5
21
Sollten Sie Ihre Ludichten Futterschalen optisch
leichter unterscheidbar machen wollen oder sich
einfach nur etwas mehr Farbe wünschen, können Sie
unsere farbigen SureFeed Schalen separat erwerben.
Geeignet für eine Einzelportion
Trocken- oder Nassfutter.
Die Split-Schale lässt sich gleichzeitig
mit zwei verschiedenen Futterarten
befüllen.
Futterschale
Zusätzliche Futterschalen erwerben Sie bei Händlern von SureFlap-
Produkten oder auf der Website sureflap.com.
Erhältlich in Blau, Grün, Pink und Grau.
Bringen Sie Farbe in Ihr Zuhause!
Die mit Ihrer Ludichten Futterschale gelieferte Einzelkammerschale wurde speziell für den
Einsatz mit SureFeed-Produkten entwickelt. Die Ränder der SureFeed Futterschalen sind mit
einer integrierten Gummidichtung versehen. Ist die Abdeckung verschlossen, gelangen keine
Fliegen in die Futterschale und das Futter bleibt länger frisch.
Entfernen Sie die Schale aus dem Gerät, um sie zu reinigen. Um die integrierte
Gummidichtung nicht zu beschädigen, empfehlen wir die Reinigung nur von Hand.
Reinigen Sie die Schalen vor der ersten Verwendung. Reinigung nur per Hand. Legen
Sie sie nicht in den Geschirrspüler. Verwenden Sie sie nicht in der Mikrowelle.
22
Die Ludichte SureFeed Futterschale ist nur für den
Einsatz im Innenbereich geeignet und kann deshalb an
vielen Stellen im Innenbereich aufgestellt werden. Wir
empfehlen, die Futterschale an einem Ort aufzustellen, an
dem Ihr Haustier gerne frisst.
Platzieren Sie die Futterschale nicht unter
niedrigen Oberflächen, da das deren
Funktionsfähigkeit beeinträchtigen könnte.
Wir empfehlen über dem Gerät einen Abstand
von ungefähr einem Meter einzuhalten.
Stellen Sie die Futterschale nicht an einem
Ort auf, an dem Menschen o vorbeigehen,
da sie eine Stolpergefahr darstellen könnte.
Stellen Sie die Futterschale nicht mit der
linken oder rechten Seite direkt an der Wand
oder einer sonstigen Fläche auf, da das deren
Funktionsfähigkeit beeinträchtigen könnte. Wir
empfehlen einen Abstand von mindestens 10cm.
Stellen Sie das Gerät nicht in den
Kühlschrank und legen Sie keine
Eisbeutel unter oder in das Gerät.
Standort der Ludichten Futterschale
Jedoch gibt es einige Dinge, die Sie bei der Auswahl des optimalen Standortes für Ihre neue
Ludichte Futterschale beachten müssen:
10cm
23
Füllen Sie die Futterschale mit dem Lieblingsfutter Ihres Haustieres und stellen Sie sie an
einem Ort auf, an dem Ihr Haustier gerne frisst. Weitere Informationen dazu, wo Sie Ihre Futterschale am besten aufstellen, finden Sie auf Seite22
Während dieser ersten Phase, in der Ihr Haustier lernt, wie die
Futterschale genutzt wird, bewegt sich die Abdeckung auch
dann nicht, wenn sich Ihr Haustier sich von der Futterschale
entfernt hat.
Lassen Sie Ihrem Haustier genügend Zeit, sich an die neue Futterschale zu
gewöhnen. Sobald dies geschehen ist, gehen Sie zu Teil2 über.
Einige Haustiere brauchen möglicherweise einige Tage, um sich an ihre neue Futterschale zu
gewöhnen. Mithilfe des Trainingsmodus bewegt sich die Abdeckung nach und nach immer weiter,
damit Ihr Haustier die Scheu vor seiner neuen Futterschale verlieren kann. Das kann ein wenig
dauern, aber haben Sie Geduld, und fahren Sie erst mit Teil2 fort, wenn Ihr Haustier das Gerät
angenommen hat.
1
3
2
Drücken Sie einmal auf die Taste für den Trainingsmodus
( ). Wundern Sie sich nicht, wenn die Futterschale Ihre
Anwesenheit registriert und die Abdeckung geönet wird.
Die orangene LED der Taste für den Trainingsmodus blinkt
(alle paar Sekunden) auf, um anzuzeigen, dass der Modus
erfolgreich aktiviert wurde.
Frisst Ihr Haustier nun aus der Futterschale, bewegt sich die
Abdeckung leicht, um sich ganz zu önen. Wenn es fertig ist,
schließt sie sich etwas.
TEIL 2– Gewöhnung an die Bewegung der Abdeckung
4
5
Durch die langsame Steigerung der Bewegungsintensität der Abdeckung kann sich Ihr Haustier
über drei Phasen hinweg an die Bewegungen der Abdeckung gewöhnen. Noch einmal möchten wir
betonen, dass es, um ein optimales Ergebnis und die Zufriedenheit Ihres Haustiers sicherzustellen,
wichtig ist, es nicht zu drängen und Geduld zu beweisen. Die Dauer der einzelnen Phasen (Tage
oder Wochen) hängt vom jeweiligen Haustier ab, doch empfehlen wir, dass Sie sich für jeden
Schritt einige Tage Zeit lassen.
Drücken Sie die Taste für den Trainingsmodus ( ) erneut,
damit sich die Abdeckung stärker bewegt. Die Abdeckung
schließt sich ein wenig und die LED blinkt zweimal orange.
Trainingsmodus– so lernt Ihr Tier den Umgang mit
der Futterschale
TEIL 1– erstes Kennenlernen der Futterschale
24
Drücken Sie die Taste für den Trainingsmodus ( ) erneut, wenn
sich Ihr Tier an die Bewegung gewöhnt hat. Die Abdeckung schließt
sich weiter und nimmt die nächste Position ein und die LED blinkt
nun drei Mal.
Lassen Sie sich und Ihrem Tier auch hier wieder genügend Zeit. Gehen Sie nicht
zum nächsten Schritt über, ehe Ihr Haustier sich an die zusätzliche Bewegung
gewöhnt hat.
Verwenden Sie die Futterschale weiter wie gewohnt und gehen Sie nicht zum
nächsten Schritt über, ehe Ihr Haustier sich an die Bewegung gewöhnt hat.
Sie können das Training jederzeit beenden, indem Sie die Taste für den Trainingsmodus
( ) 5Sekunden lang gedrückt halten. Die orangene LED sollte nun ausgehen.
Ihr Tier sollte die Futterschale wie gewohnt verwenden dürfen,
während es sich an die neue Bewegung der Abdeckung gewöhnt.
Wenn Sie Futter nachfüllen möchten, tun Sie dies wie auf Seite20
beschrieben.
Ihr Haustier sollte sich nun so weit an die Bewegung der Abdeckung
gewöhnt haben, dass diese in dieser letzten Trainingsphase fast
komplett geschlossen werden kann. Drücken Sie wie zuvor erneut
( ). Die Abdeckung schließt sich nun weiter und nimmt die letzte
Position ein und die LED blinkt vier Mal orange.
7
8
9
6
Geschat! Sobald sich Ihr Haustier an diese letzte Position der
Abdeckung gewöhnt hat, drücken Sie wieder ( ). Die Abdeckung
schließt sich nun vollständig und die orangene LED hört auf zu
blinken. Die Futterschale ist nun bereit für den täglichen Gebrauch.
Wenn Sie die manuelle Önen/Schließen-Taste verwenden, während sich die Futterschale im
Trainingsmodus befindet, sollten Sie beachten, dass die Abdeckung nicht komplett geschlossen
wird. Die Abdeckung wird nur entsprechend der aktuellen Trainingsphase geschlossen.
Sollten Sie einen Schritt zurückgehen müssen, befolgen Sie den Hinweis weiter oben. Dadurch
befindet sich die Futterschale nicht mehr im Trainingsmodus und Sie können den Vorgang von vorn
beginnen.
Tipps und Tricks für das Trainieren
25
So entfernen Sie die Abdeckung vor der Reinigung
Drücken Sie die manuelle
Önen/Schließen-Taste
und ziehen Sie die
Abdeckung nach oben.
Setzen Sie nach dem Reinigen
die Abdeckung wieder ein,
indem Sie beide Hälen
senkrecht halten. Stellen Sie
sicher, dass die Abdeckung
richtig angebracht ist.
1
2
3
Es ist wichtig, dass Sie die Ludichte SureFeed Futterschale regelmäßig reinigen, damit sie
zuverlässig funktioniert. Tauchen Sie das Gerät nicht in Wasser und halten Sie es nicht
direkt unter einen Wasserhahn! Die Futterschale ist allein für die Reinigung von Hand mit
einem feuchten Tuch oder Schwamm gedacht.
Reinigen Sie die
Abdeckung von Hand.
Stellen Sie sie nicht in
den Geschirrspüler.
Die Futterschale sollte regelmäßig mit einem
feuchten Tuch abgewischt werden. Stellen
Sie sicher, dass die drei Sensorleisten immer
sauber sind, um ihren zuverlässigen Betrieb zu
gewährleisten.
Weitere Informationen zur Reinigung der
SureFeed Futterschale finden Sie auf Seite 21.
Reinigung
5
Die Futterschale
ist nun wieder
einsatzbereit.
Drücken Sie die manuelle
Önen/Schließen-Taste
erneut, um die Abdeckung
zu schließen.
Ist die Abdeckung
angebracht, klappen Sie
deren obere Häle so
zurück, dass sie zwischen
den Seitensschienen zum
Liegen kommt.
4
 Loading...