

Supersonic SC-805 Instruction Manual
Fo
E
O
In
Mo
Se
n
n t
f
r C
te
o
d
ri
ustomer Us
w t
elo
r b
to
ot
e b
h
on fo
mati
r
e N
o.
.
o
al N
e
al N
ri
e
he S
m of the ca
re r
u
t
u
r f
e
o
bin
f
. whi
e
eren
. R
t
ch is located
h
in t
eta
.
e
c
s
i
This“bolt Of lighting”
indicates uninsulated
material within your unit
which may cause an electrical shock.
For the safety of everyone in your
household, please do not remove
product covering
FIRE OR SHOCK HAZARD,DO
NOT EXPOSE THIS EQUIPMENTTO
RAIN OR MOISTURE.
TO PREVENT
TO PREVENT
The“exclamation point”
calls attention to features
PR
E-DN
PRE-
UP
REPEAT
/MO/ST
the enclosed literature closely to
prevent operating and maintenance
problems.
for which you should read
ELECTRIC SHOCK, MATCH WIDE
BLADE OF PLUG TO WIDE SLOT,
AND FULLY INSERT.
Ventilation warning:
Dripping warning:
The product shall not be exposed to
dripping or splashing and that no
objects filled with liquids, such as
vases,shall be placed on the product.
The normal ventilation of the
product shall not be impeded for
intended use.
PORTABLE
STEREO RADIO CASSETTE RECORDER
WITH MP3/CD/CD-R/USB/SD/MMC PLAYER
SC-765
SC-805
31
4
6
5
7
1
3
2
9
8
30
10
11
12
13
14
15
16
17
24
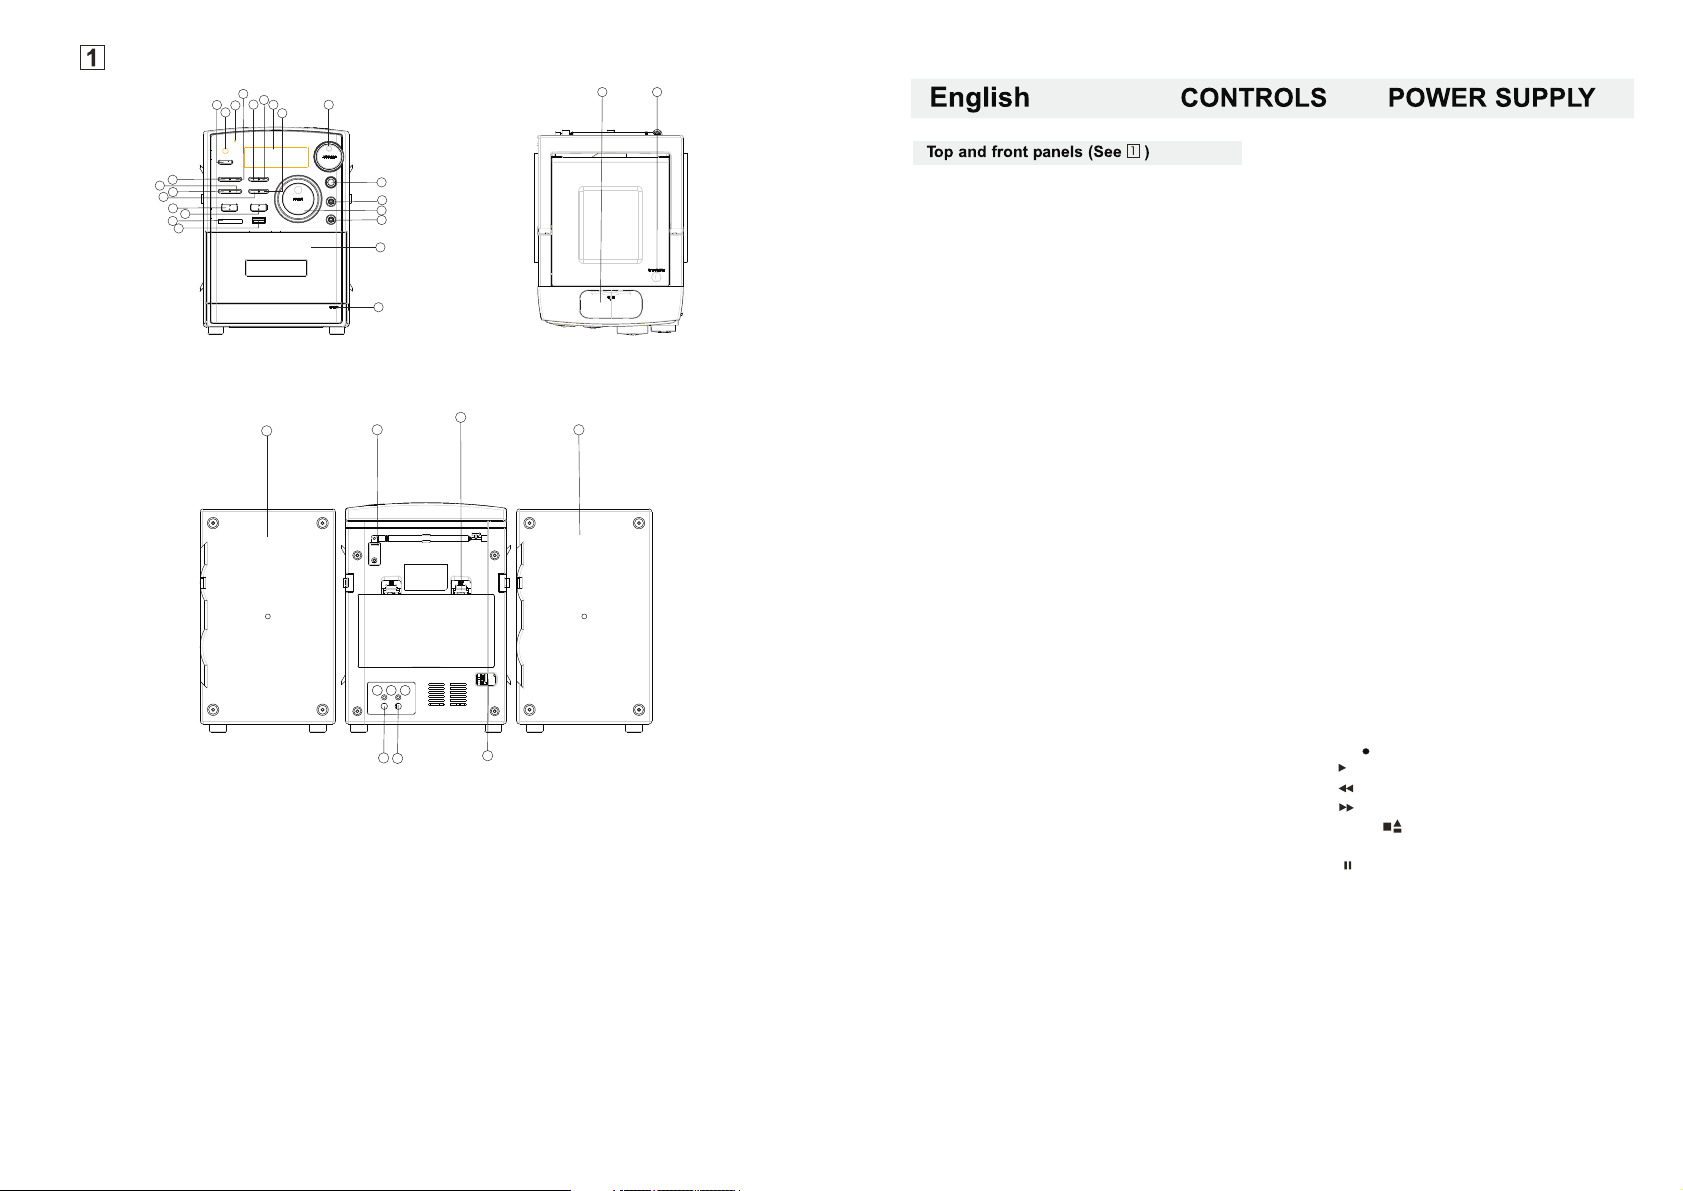
POWER BUTTON
1.
REMOTE SENSOR
2.
STANDBY INDICATOR
3.
4.STOP/USB/SD BUTTON
5.PRE-DN
6. PRE-UP
7.LCD DISPLAY
8.REPEAT /MO/STBUTTON
9.VOLUME
10.PLAY/PAUSE BUTTON
11.MUTE BUTTON
12.EQ BUTTON
13.TIME/PROGRAM BUTTON
14.FUNCTION BUTTON
15.RANDOM/BAND BUTTON
16.SD/MMC CARD JACK
25
23
18
19
20
21
22
27
28
EN-2
AUDIO AUX PLAYER JACK
26
29
17.
18.
24
USB JACK
BASS BUTTON
19.AUX JACK
20.TUNING CONTROL
21. STEREO HEADPHONE JACK
22.CASSETTE COMPARTMENT
23.CASSETTE RECORDERS KEYS
24.LEFT&RIGHT SPEAKER BOXES
25.FM ANTENNA
26.BATTERY DOOR
27.SPEAKER WIRE CONNECTOR(R)
28.SPEAKER WIRE CONNECTOR(L)
29.AC MAINS
30.DOCKING JACK
31.CD DOOR
1.POWER BUTTON
-Press POWER button on
2.REMOTE SENSOR
3.STANDBY INDICATOR
4.STOP/USB/SD BUTTON
- stop CD/MP3/USB/IPOD/SD/MMC playback;
erase a CD program.
Press and hold more than 1.5 sec
change USB1.1/MMC(SD)media(only USB)
PRE- DN BUTTO N
5.
-In the radio mode,
press PRE-DN button to choose the back channel.
-In the mp3 mode,
press PRE-DN button to enter the back folder.
6. PRE-U P BU TT ON
-In the radio mode,
press PRE-UP bu tt on t o ch oo se t he n ex t ch an ne l.
-In the mp3 mode,
7.LCD DISPLAY
- show the AM/FM dial frequency
- show the number of tracks
8.REPEAT/MO/ST BUTTO N
- Repeat a tra ck C D/ MP 3/ US B pr og ra m.
- Repeat mod e : no rm al -> re pe at 1 -> re pe at all->
repeat alb um - >n or ma l.
- Press MO/S T button once , to mon o st at e.
- Press MO/S T button twice , to st er eo s ta te ,
stereo is di sp la ye d( In F M mo de ). .
9.VOLUME
- adjust volume level.
Rotate the volume button to hold the CD/MP3 /
USB/SD/TAPE/IPOD (AUX) / RAID the volume.
10.PLAY/PAUSE BUTTON
- start or pause MP3/CD/USB/IPOD/SD/MMC play
11.MUTE BUTTON
-Press the mute button allows CD / MP3 / USB
/ MMC / SD / TAPE / IPOD (AUX) / the RADIO
to enter the mute state.
12.EQ BUTTON
-Press the button to change EQ CD/MP3 / USB/
SD/MMC/IPOD/RADIO's music style.
-When playing the music, push down this button
is in the popular-jazz-OFF-classica-rock.
13.TIME/PROGRAM BUTTON
-In standby mode, to setup the time of the unit.
-program and review programmed track numbers.
-In the working status, push down this button
can on CD/MP3 / USB/SD/MMC for programming.
14.FUNCTION SELECT
- select source of sound CD/USB/TAPE
IPOD(AUX)/RADIO
15.RANDOM/BAND BUTTON
In a CD/MP3 / USB/MMC/SD mode,
-
press this button can be played at random.
-The radio in the mode, press this button
to select the FM STEREO, FM, AM.
16.SD/MMC CARD JACK
- To listen to your SD/MMC card
with Mp3 music files.
17.USB JACK
-To listen to your USB flash memory
stick with Mp3 music files.
18.BASS BUTTON
Press the BASS button can make the CD/MP3/USB/
-
MMC/SD/TAPE/IPOD (AUX) / RADIO into the BASS state.
19.AUX JACK
-Push FUNC button , select MP3/AUX station.
Play Mp3、DISCMAN、 WALKMAN AUX
insert when no disc.
NOTE:Please take out the CD disc.
20.TUNING CONTROL
-Rotate the TUNING control to find the desired stations.
21.STEREO HEADPHONE JACK
- 3.5 mm stereo headphone jack.
22.CASSETTE COMPARTMENT.
23.CASSETTE RECORDERS KEYS
RECORD ( ) - start recording
PLAY ( ) - start playback
F.REW ( )-rewind the tape toward the beginning.
F.FWD ( )-advance the tape toward the end.
STOP/EJECT ( ) - stop the tape
- open the cassette compartment
PAUSE ( ) - interrupt recording or playback.
24.LEFT&RIGHT SPEAKER BOXES
25.FM ANTENNA
- to improve FM reception
26.BATTERY DOOR
-to open battery compartment
27.SPEAKER WIRE CONNECTOR(R)
28.SPEAKER WIRE CONNECTOR(L)
29.AC MAINS
- inlet for power cord.
30.DOCKING JACK
-To listen to your DOCKING with Mp3 music files.
31.CD DOOR OPEN BUTTON
- press here to open/close the CD door.
EN-3
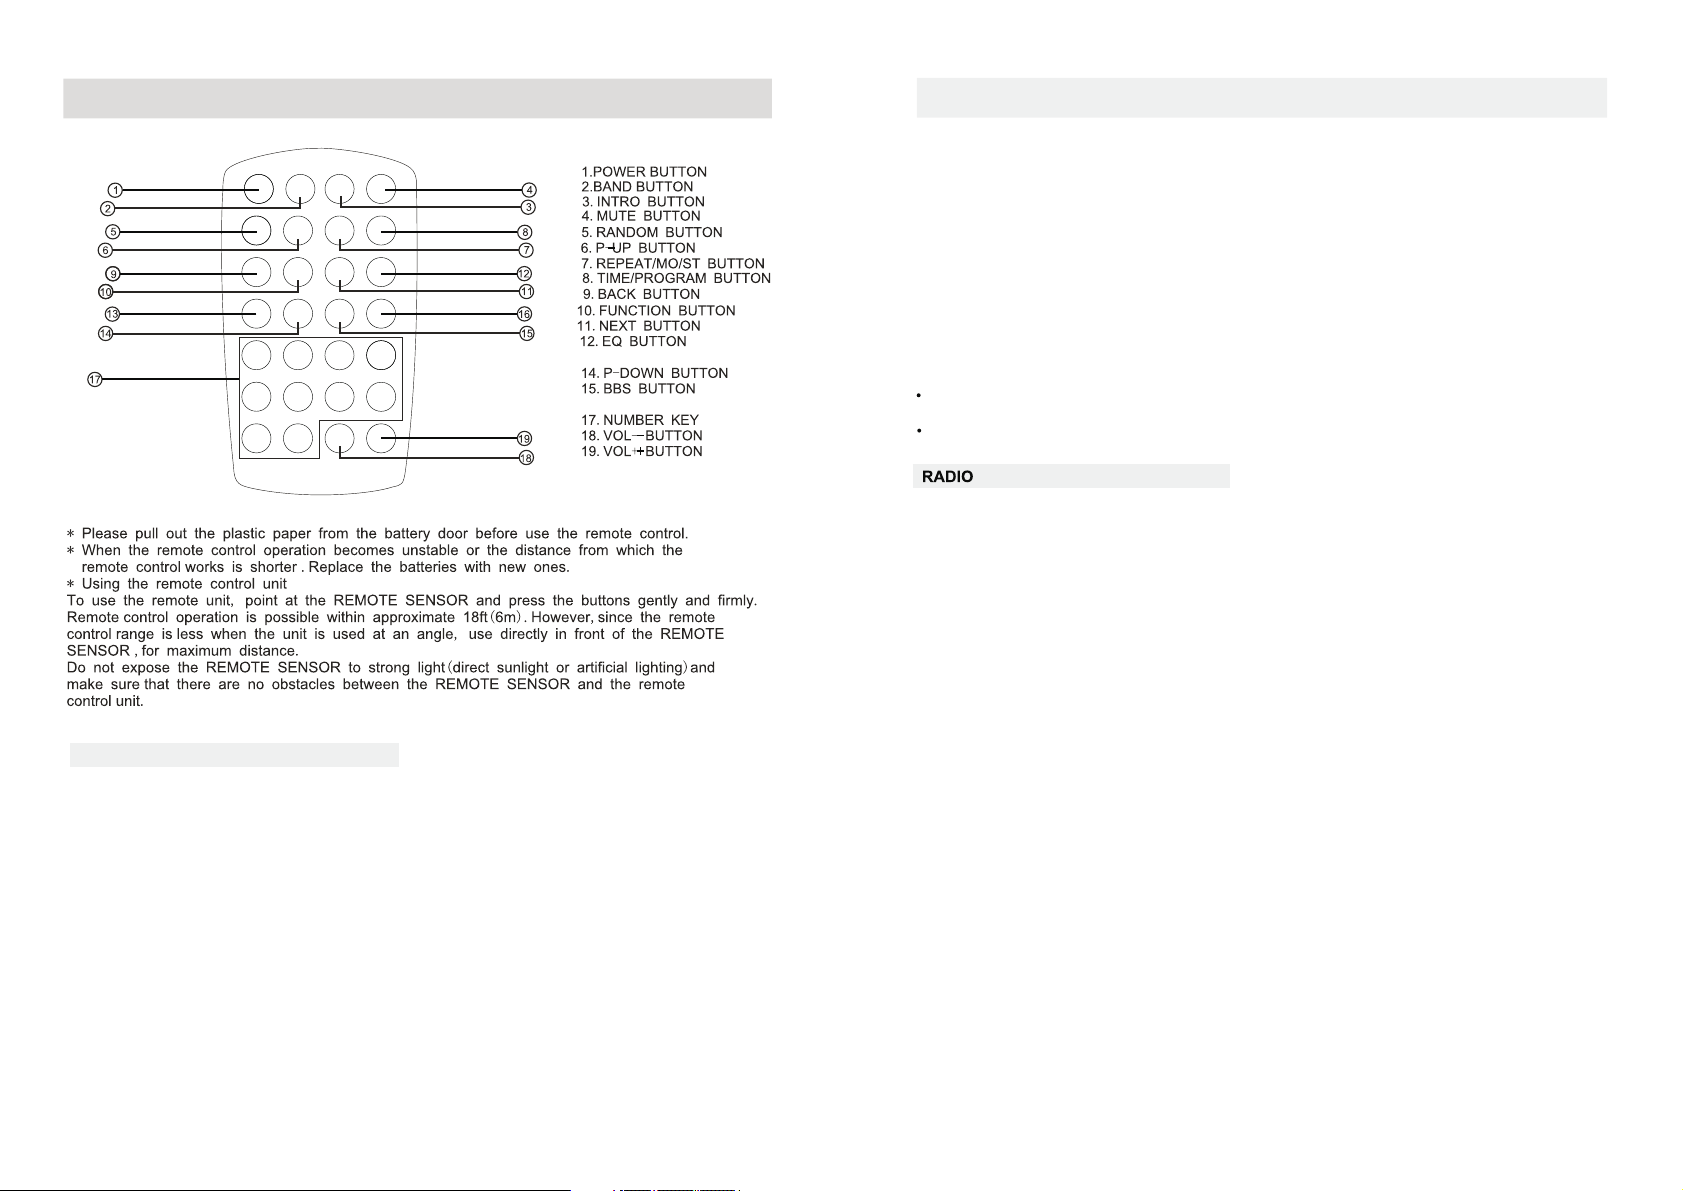
Remote Control
13.PLAY/PAU SE B UT TO N
16.STOP BUT TO N
USE CLOCK
to setup the time of the unit
1.connect the ac on( .
2.short according to the time button, the time will flashing on the lcd display.
3.press BACK、NEXT to select the number of the time. you can setup the time format by
12h or 24h.
4.press time button to confirm.
5.then you can set the hour and the minute with the same method of steps 3-4.
after setup the unit time, long press the time button can setup the unit begin working time ,
6.
with the same method of steps 3-4.
Note: after setup the beginning time, the lcd will display the radio/cd/usb/sd/tape/aux/ipod mode,
Press the BACK or NEXT to choose the mode, then it press time button to affirm, otherwise it play
usb or aux mode first.
The following operation must be in standby mode)
BASIC FUNCTION
Using AC Power
1.check if the power voltage, as shown on the type plate located on the bottom of the set,
corresponds to your local ac power supply. if it does not, consult your dealer or service centre .
2.connect the power cord to the ac mains inlet and the wall outlet. the power supply is
now connected and ready for use.
3.to switch off completely, unplug the power cord from the wall outlet.
unplug the power cord from the wall outlet to protect your set during heavy thunderstorms.
Batteries (not included)
Open the battery compartment and insert eight batteries,
(preferably Alkaline) with the correct polarity as indicated by the + and - symbols
inside the compartment.
Batteries contains chemical substances, so they should be disposed of properly
Incorrect use of batteries can cause electrolyt leakage and will corrode the compartment or
cause the batteries to burst. Therefore:
Do not mix battery types: e.g. alkaline with carbon Zinc. Only use batteries of the same type for the set.
type R-20, UM-1 or D-cells,
POWER SUPPLY
,
,
,
,
,
,
,
,
When inserting new batteries, do not try to mix old batteries with new ones.
Remove the batteries if the set is not be used for a long time.
Radi o re ce ption
1. Pre ss f un ction but to n select RA DI O mode.
2. Pre ss B AN D to select t he d esired wa ve b an d:AM, FM ,F M ST.
3.Tun e to requir ed s tation by R ot at e BACK/ NEX T or p re ss P RE- DN /PRE- U P.
Manu al t un ing: Rota te B ACK or NEXT and the n re lease wit hi n 1 se c.
Auto tu ni ng : Pre ss t he pl ay /pa use but ton ent er th e au tom atic ch ann el
scan m ode, an d to be p ut a uto matic all y sets.
Pres et c ha nnel:(F M 30 Preset m em ories,AM 10 p re set memorie s)
(1)R ot at e BACK/ NEX T Se le ct d esired st at io n.
(2) Pr es s PR OGRAM but to n once , The MEMORY nu mber in di ca tor begin s st ea dy in the
disp la y.
(3) Pr es s PR ESET-UP OR PRE SE T- DN b uttons to s el ec t the des ir ed n umber.
(4) Pr es s PR OGRAM but to n to save tha t st at ion.
(5) Re pe at s teps (1) to ( 4) p rocedur es f or o ther stat io ns.
4.Af te r en d of progra m. p ress PRE- UP or PR E- DN to start p la y th e frequen cy t hat you sel ec te d or
Pres s nu mb er key on the r em ote contr ol .
5.Ro ta te [ VOL-]o r [VO L +] to adj ust the v olume .
6.Ex te nd T EL ES COPIC AN TE NN A to its full le ng th if you are l is te ning to FM br oa dcastin g.
7.Tur n off th e radio by pr es s FUNCTIO N bu tt on sele ct o th er mode or pr es s po wer but to n to
off the unit .
8.Sw it ch o n again a ft er s hut down, t he m em ory fre qu en cy still ex is ts.
MONO /S TE REO
-Pre ss M O/ ST but ton onc e, to m ono state .
-Pre ss M O/ ST but ton twi ce , to s tereo sta te ,s tereo i s di sp layed.
EN-4
EN-5
 Loading...