

Supersonic SC-745 Instruction Manual

INSTRUCTION MANUAL
PORTABLE STEREO CD/MP3/USB PLAYER
WITH STEREO RADIO CASSETTE RECORDER
MANUAL DE INSTRUCCIONES
ESTERÉO CD/MP3/USB PLAYER PORTÁTIL CON
GRABADORA DE CINTA Y RADIO
SC-745
1
ENGLISH
IMPORTANT SAFETY INSTRUCTIONS
WARNING:
TO PREVENT FIRE OR SHOCK HAZARD DO NOT USE THIS PLUG WITH AN EXTENSION
CORD, RECEPTACLE OR OTHER OUTLET UNLESS THE BLADES CAN BE FULLY
INSERTED TO PREVENT BLADE EXPOSURE. TO PREVENT FIRE OR SHOCK HAZARD.
DO NOT EXPOSE THIS APPLIANCE TO RAIN OR MOISTURE.
This lightning flash with
arrowhead symbol, within an
equilateral triangle, is intended
to alert the user to the
presence of insulated
dangerous voltage within the
products enclosure that may
be of sufficient magnitude to
constitute a risk of electric
shock presents.
Warning: to reduce the risk of
electric shock, do not remove
cover (or back ) no user serviceable part inside.
Refer servicing to qualified
service personnel.
The exclamation point
within an equilateral triangle
is intended to alert the user
to the presence of important
operating and maintenance
(servicing) instructions in
the literature accompanying
the appliance.
1. Read these instructions.
2. Keep these instructions.
3. Heed all warnings.
4. Follow all instructions.
5. Do not use this apparatus near water.
6. Clean only with dry cloth.
7. Do not block any ventilation openings.
8. Do not install near any heat sources such as radiators, heat registers, stoves, or other
apparatus (including amplifiers) that produce heat.
9. Protect the power cord from being walked on or pinched particularly at the plugs,
convenience receptacles, and at the point where it exits from the apparatus.
10. Unplug the apparatus during lightening sorts or when unused for long periods of time.
11. Refer all servicing to qualified personnel.
12. This appliance should not be exposed to dripping or splashing water and no objects filled
with liquids such as vases should be placed on apparatus.
13. The AC socket it is used to unplug the unit power cord and it must be easily accessible
every time it is necessary.
14. No flames objects, like candles, must be placed on the unit.
Dripping warning: The products should not be exposed to dripping or splashing and that
no objects filled with liquids, such as vases, shall be placed on the product.
Plug warning: The main plug is used as the disconnect device, the disconnect device
shall remain readily operate.
Ventilation warning: The normal ventilation of the product shall not be impeded for
intended use. Make sure there is enough space above and besides the holes. Install the
unit in a place with suitable ventilation openings (around 7cm).
2
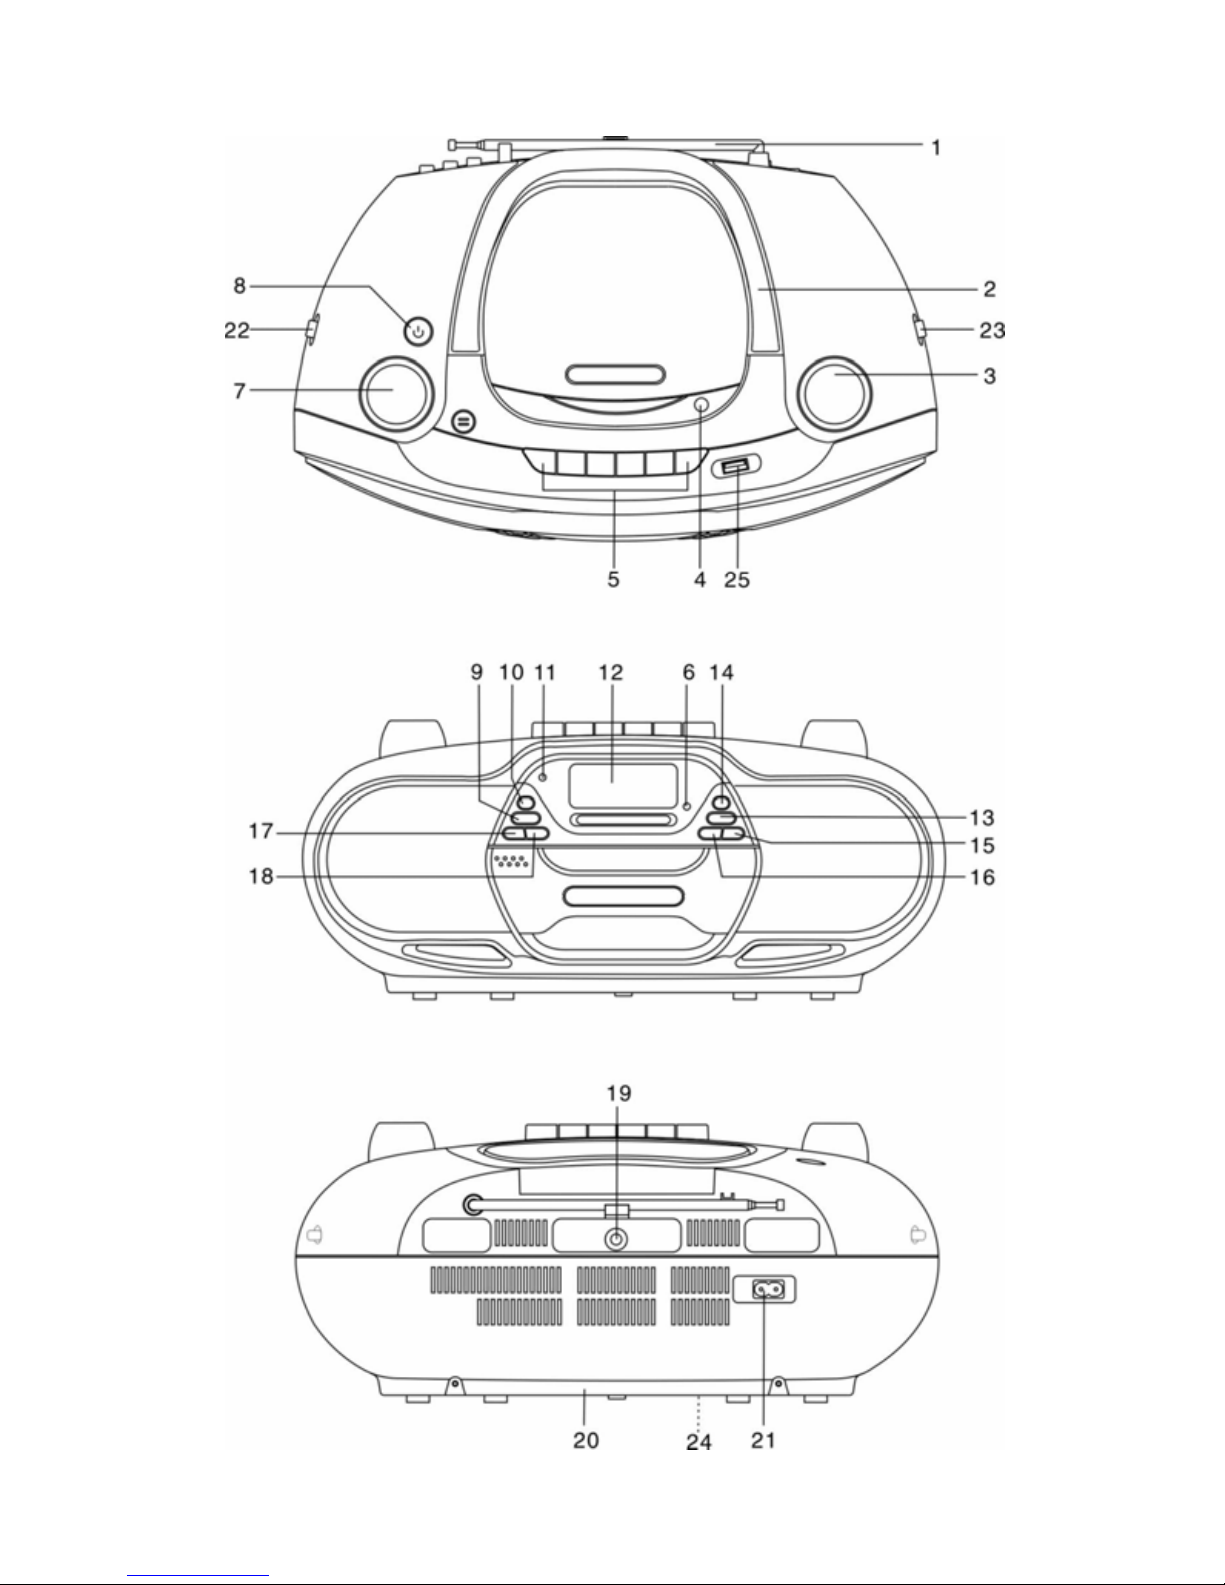
LOCATION OF CONTROLS
3
FEATURES AND CONTROLS
1. FM ANTENNA
2. HANDLE
3. TUNING KNOB
4. CD DOOR OPEN/CLOSE
5. CASSETTE FUNCTION KEYS
6. FM STEREO INDICATOR
7. VOLUME CONTROL
8. POWER BUTTON
9. CD PROG./P-MODE BUTTON
10. BASS BOOST BUTTON
11. POWER INDICATOR
12. LCD DISPLAY
13. FOLD-/ -10 BUTTON
14. FOLD+/+10 BUTTON
15. CD PLAY/PAUSE/USB BUTTON
16. CD STOP BUTTON
17. CD SKIP/SEARCH BACKWARD
BUTTON
18. CD SKIP/SEARCH FORWARD
BUTTON
19. AUX IN JACK
20. BATTERY DOOR
21. AC SOCKET
22. FUNCTION SWITCH
23. BAND SELECTOR
24. AC VOLTAGE SELECTOR
25. USB PORT
IMPORTANT FOR LASER PRODUCTS
REPRODUCTION OF LABELS
1. CLASSIFICATION LABEL, PLACED ON REAR ENCLOSURE.
2. WARNING LABEL, PLACED INSIDE THE UNIT.
CAUTION: Do not open the unit. There are no user serviceable parts inside the unit; consult all
servicing to qualified service personnel.
Discs for Playback
This system can playback all digital audio CD, MP3, finalized digital audio CD-Recordable
(CD-R) discs, finalized digital audio CD-Rewritable (CD-RW) discs and CD-DA format digital
audio CD/CD-R/CD-RW discs.
POWER SOURCE
This unit is designed to be operated on AC/DC.
AC OPERATION
Plug the smaller end of AC power cord into AC jack on unit and the other bigger end into AC
wall outlet. The batteries will be automatically disconnected. For dual voltage version, make
sure that the AC VOLTAGE SELECTOR is switched to your local voltage.
DC OPERATION
Open the BATTERY COMPARTMENT DOOR. Install 8 pcs UM-1/D size batteries (not included)
into compartment. Please follow correct polarities as indicated.
CAUTION
Remove batteries if they are flat or not being used for a long period of time.
Batteries contain chemical substances, so they should be disposed of properly.

4
BASIC FUNCTION
SWITCHING ON THE UNIT
Set the FUNCTION SWITCH to CD/MP3/USB/AUX or RADIO or TAPE position.
TO ADJUST VOLUME
Rotate the VOLUME CONTROL towards right or left to increase and decrease volume.
BASS BOOST SYSTEM
The BASS BUTTON controls the bass of the unit. Bass sound is the lower frequency ranges of
sound. The BUTTON can be press to OFF or ON, When the BASS is on, the unit boosts
(increases) the sound output of the bass frequencies.
AUX-IN OPERATION
This unit has provided special AUX jack, through this jack other audio sources can be
connected to this unit and be amplified.
1. Set the FUNCTION switch to CD/MP3/USB/AUX position.
2. Connect the audio cable into the AUX-IN jack and the other end connect to the AUDIO OUT
jack of the external audio source. The unit will change to AUX mode automatically.
3. Adjust the volume of the main unit to your desired level. Press PLAY of the external audio
source to start playback.
USING THE RADIO
TUNING IN RADIO STATIONS
1. Slide the FUNCTION switch to "RADIO" position.
2. Slide the BAND switch to select the desired wave band: AM/FM/FM ST.
3. Tune to required station by rotating the TUNING KNOB.
4. Rotate the VOLUME CONTROL to comfortable volume level.
5. Extend the TELESCOPIC ANTENNA to its full length if you are listening to FM broadcasting.
Gently rock the unit back and forth to get the best reception when you are listening to AM
program, or place the unit in an open place.
Note: If the broadcasting program is too noisy when you are listening to FM stereo station,
please slide the FUNCTION switch to FM. The FM STEREO indicator will be on if you are
receiving FM stereo program.
6. Turn off the radio by switching the FUNCTION switch to "TAPE" position.
CASSETTE OPERATION
PLAYBACK OF CASSETTE
Be sure to tighten any slack tape in the cassette before use, using either a pencil or a ball-point
pen, simply insert the pen or pencil into the centre of spool and rotate to remove slackness.
Depress the STOP/EJECT button to open the cassette door.
Insert the cassette into the compartment with the open end facing upwards and the full reel on
the left hand side, push the cassette well down and close the door, be sure not to touch the tape
surface, Set the Function switch to “TAPE” position and press the cassette play button. To stop
playback, press the STOP/EJECT button once. To release the cassette, press the
STOP/EJECT button again.

5
AUTO STOP
When the tape reaches the end during playback or recording, the built-in auto stop system will
release the depressed play, record keys. The auto stop system operates while recording from
the built-in radio or CD player, only the cassette function is brought automatically to stop mode
and the radio or CD Player will continue to play.
RADIO RECORDING
1. Install a cassette tape.
2. Set FUNCTION SWITCH to “RADIO” position. After selecting the desired band and tune the
TUNING KNOB to desired broadcast station. Then push down RECORD BUTTON and
PLAY BUTTON simultaneously.
3. After recording the desired broadcast, depress the STOP/EJECT BUTTON lightly, and then
set FUNCTION SWITCH to “TAPE” position in order to listen to the recorded broadcast.
4. If you desire to play recorded broadcast, please follow the instructions explained in playback
section.
ERASURE: When you record over previously recorded tape, the original recording is
automatically erased and replaced by this newly recording materials.
CD/MP3 RECORDING
1. Insert a blank cassette tape into the tape compartment.
2. Slide the FUNCTION switch to CD/MP3/USB/AUX position.
3. Load a CD and select the desired track you want to record.
4. Press CD PLAY/PAUSE button to start playback. Press RECORD key to begin recording.
RECORD key and PLAY key go down simultaneously.
5. Press PAUSE key to interrupt or edit recording. Press it again to resume recording.
6. Press STOP/EJ. Key to end recording. To hear what you recorded, follow instructions in
PLAYING A CASSETTE TAPE.
RECORDING FROM AUX
1. Insert a blank cassette tape into the tape compartment.
2. Slide the FUNCTION switch to CD/MP3/USB/AUX position.
3. Connect the audio cable into the AUX IN jack and select the desired track you want to
record.
4. Press RECORD key to begin recording. RECORD key and PLAY key go down
simultaneously.
5. Press PAUSE key to interrupt or edit recording. Press it again to resume recording.
6. Press STOP/EJ. Key to end recording.
7. To hear what you recorded, follow instructions in PLAYING A CASSETTE TAPE.
TYPES OF CASSETTE
Use only good quality cassettes (IEC TYPE 1) for making recordings. May be used to replay
other types of cassette but is unable to make proper recording on these more specialized tapes.
The use of C120 cassettes is NOT recommended in this machine.
PROTECTING RECORDING
Normally, anything recorded on the tape is automatically erased when new recording is made. It
is possible to protect your recording from accidental erasure by removing the tabs found on the
rear of the cassette.
ERASE TAB
FOR SIDE “A”
 Loading...