

Page 1
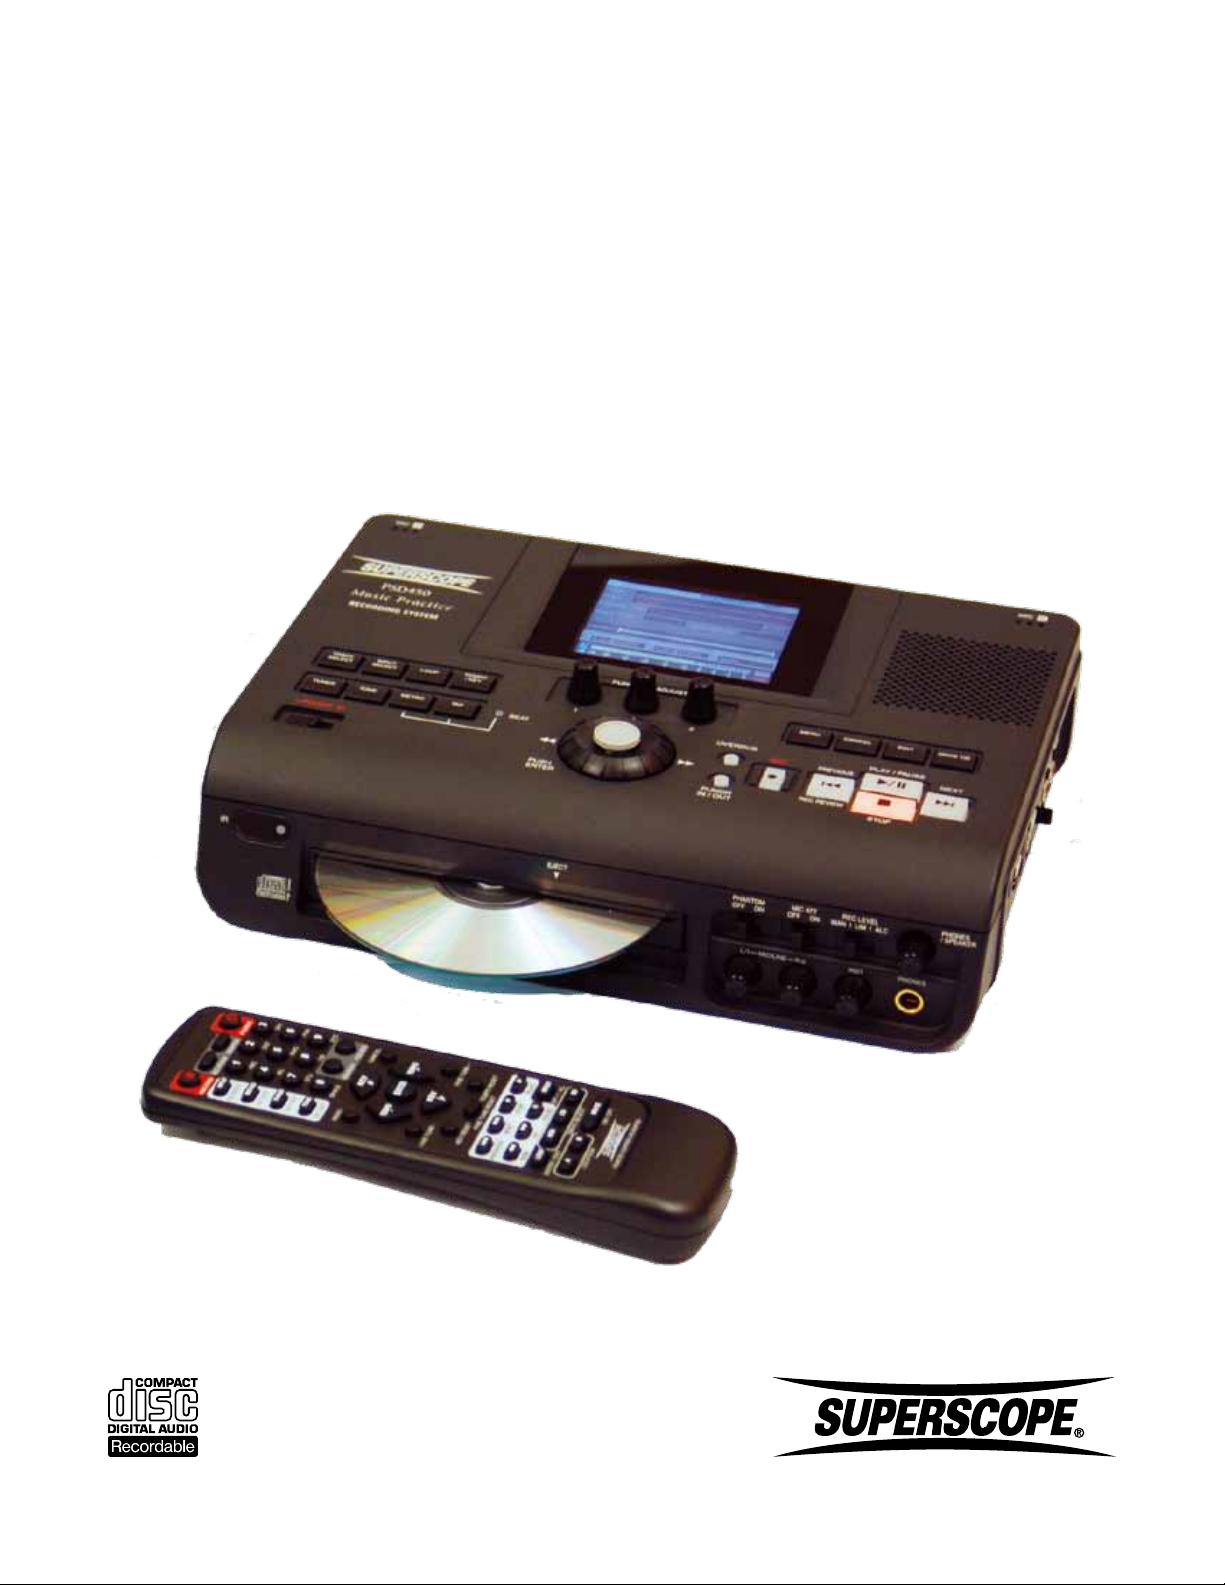
PSD430 / PSD450
Music Practice and Digital Recording System
User Manual
© Copyright 2010, Superscope Technologies, Inc.
Page 2
Contents
CAUTION
RISK OF ELECTRIC SHOCK
DO NOT OPEN
■Important Safety Instructions
READ BEFORE OPERATING EQUIPMENT
CAUTION: TO REDUCE THE RISK OF ELECTRIC SHOCK,
DO NOT REMOVE COVER (OR BACK)
NO USER-SERVICEABLE PARTS INSIDE
REFER SERVICING TO QUALIFIED SERVICE PERSONNEL
The lightning flash with arrowhead symbol
within an equilateral triangle is intended to
alert the user to the presence of uninsulated
"dangerous voltage" within the product's
enclosure that may be of sufficient magnitude to
constitute a risk of electric shock to persons.
The exclamation point within an equilateral
triangle is intended to alert the user to
the presence of important operating and
maintenance (servicing) instructions in the
literature accompanying the appliance.
This product was designed and manufactured to meet strict quality
and safety standards. There are, however, some installation and
operation precautions which you should be particularly aware of.
1. Read instructions.
2. Keep these instructions.
3. Heed all warnings.
4. Follow all instructions.
5. Clean only with dry cloth.
6. Do not use this apparatus near water.
7. To ventilate the unit, do not install it in a rack or bookshelf, and
8. Do not install near nay heat sources such as radiators, heat
9. Do not defeat the safety purpose of the polarized or grounding-
WARNING
TO REDUCE THE RISK OF FIRE OR ELECTRIC SHOCK, DO NOT
EXPOSE THIS PRODUCT TO RAIN OR MOISTURE.
CAUTION : TO PREVENT ELECTRIC SHOCK, MATCH WIDE
BLADE OF PLUG TO WIDE SLOT, FULLY INSERT.
ATTENTION : POUR EVITER LES CHOC ELECTRIQUES, INTRODUIRE LA
LAME LA PLUS LARGE DE LA FICHE DANS LA BORNE CORRESPONDANTE
DE LA PRISE ET POUSSER JUSQUíAU FOND.
NOTE TO CATV SYSTEM INSTALLER:
This reminder is provided to call the CATV (Cable-TV) system installer’s
attention to Section 820-40 of the NEC which provides guidelines for
proper grounding and, in particular, specifies that the cable ground
shall be connected to the grounding system of the building, as close to
the point of cable entry as practical.
NOTE: This equipment has been tested and found to comply with the
limits for a Class B digital device, pursuant to Part 15 of the FCC Rules.
These limits are designed to provide reasonable protection against
harmful interference in a residential installation. This equipment
generates, uses and can radiate radio frequency energy and, if not
installed and used in accordance with the instructions, may cause
harmful interference to radio communications. However, there is no
guarantee that interference will not occur in a particular installation. If
this equipment does cause harmful interference to radio or television
reception, which can be determined by tuning the equipment off and
on, the user is encouraged to try to correct the interference by one or
more of the following measures:
• Reorient or relocate the receiving antenna.
• Increase the separation between the equipment and receiver.
• Connect the equipment into an outlet on a circuit different from
that to which the receiver is connected.
• Consult the dealer or an experienced radio/ TV technician for help.
NOTE: Changes or modifications not expressly approved by the party
responsible for compliance could void the user’s authority to operate
the equipment.
This Class B digital apparatus complies with Canadian ICES-003.
Cet appareil numÈrique de la Classe B conforme à la norme NMB-003
du Canada.
SD Logo is a trademark. microSD Logo is a trademark.
- ii -
10. Protect the power cord from being walked on or pinched
11. Only use attachments/accessories specified by
12. Use only with the cart, stand, tripod, bracket,
13. Unplug this apparatus during lightning storms or when unused for
14. Refer all servicing to qualified service personnel. Servicing is
Additional Safety Information!
• This product should not be placed in a built-in installation such
• Apparatus shall not be exposed to dripping or splashing and that
• When the switch is in the OFF position, the apparatus isn’t
WARNINGS
Do not expose the equipment to rain or moisture.
Do not remove the cover from the equipment.
No naked flame sources, such as lighted candles, should be placed on the
equipment.
Protect the power cord from being walked on or pinched particularly at plugs,
convenience receptacles, and the point where they exit from the apparatus.
Set the unit up on an even surface away from direct sunlight, high
temperatures, high humidity, and excessive vibration.
Do not place heavy items on the unit.
Do not use high voltage power sources. This can overload the unit and cause a
fire.
Do not handle the plug with wet hands. This can cause electric shock.
Do not let metal objects fall inside the unit.
Do not let liquids get into the unit.
Do not spray insecticides onto or into the unit.
Do not attempt to repair this unit by yourself.
note the following: Do not insert objects beneath the unit. Do not
block ventilation slots at the top of the unit. Do not place anything
about 1 meter above the top panel. Make a space of about 8“ (20
cm) around the unit.
registers, stoves, or other apparatus (including amplifiers) that
produce heat.
type plug. A polarized plug has two blades with one wider than
the other. A grounding type plug has two blades and a third
grounding prong. The wide blade or the third prong are provided
for your safety. If the provided plug does not fit into your outlet,
consult an electrician for replacement of the obsolete outlet.
particularly at plugs, convenience receptacles, and the point where
they exit from the apparatus.
the manufacturer.
or table specified by the manufacturer, or
sold with the apparatus. When a cart is used,
use caution when moving the cart/apparatus
combination to avoid injury from tip-over.
long periods of time.
required when the apparatus has been damaged in any way, such
as power-supply cord or plug is damaged, liquid has been spilled
or objects have fallen into the apparatus, the apparatus has been
exposed to rain or moisture, does not operate normally, or has
been dropped.
as a bookcase or rack unless proper ventilation is provided or the
manufacturer’s instructions have been adhered to.
no objects filled with liquids, such as vases, shall be placed on the
apparatus.
completely switched-off from the MAINS.
Superscope PSD430 / PSD450 User Manual
Page 3
Contents
■Table of Contents
■Important Safety Instructions ................... ii
■Table of Contents ....................................... iii
■Supplied Accessories .................................. 6
AAA Allkaline Batteries ..........................................6
Infrared (IR) Remote ............................................... 6
AC Adapter ............................................................6
USB Cable .............................................................. 6
Micro SD Card ........................................................ 6
Mini SD Card Adapter ............................................ 6
SD Card Adapter .................................................... 6
AC Power Cord ...................................................... 6
RCA Patch Cables ................................................... 6
■Introduction ................................................ 7
General Features .................................................... 7
Recording Features ................................................. 7
Music Practice Features .......................................... 7
Package Contents .................................................. 7
■Preparations Before Use ............................ 8
AC Adapter Safety ................................................ 8
Remote Controller Battery Installation .................... 9
■About Discs ................................................. 10
Disc Care ................................................................ 10
■Top Panel ..................................................... 11
POWER ...................................................11
FUNCTION CONTROL Buttons .......................... 11
A. TRACK SELECT ..................................................11
B. INPUT SELECT ....................................................11
C. LOOP ................................................................. 12
D. TEMPO/KEY ....................................................... 12
E. TUNER ................................................................ 12
F. TONE .................................................................. 12
G. METRO .............................................................. 12
H. TAP .................................................................... 12
BEAT Indicator .................................................. 12
FUNCTION ADJUST Knobs ................................ 12
JOG WHEEL / JOYSTICK / ENTER ....................... 12
OVERDUB ......................................................... 13
PUNCH IN / OUT .............................................. 13
CONTROL Buttons (Transport) .......................... 13
A. REC BUTTON ..................................................... 13
B. PREVIOUS & REC REVIEW BUTTON .................... 13
C. PLAY/PAUSE Button ........................................... 13
D. STOP BUTTON ...................................................13
E. NEXT .................................................................. 13
CONTROL Buttons (Top Right) .......................... 13
A. MENU ................................................................ 13
B. CANCEL ............................................................. 13
C. EDIT ................................................................... 13
D. MAKE CD .......................................................... 13
Internal Speaker ...............................................13
- Internal Mic R & Internal Mic L .................. 14
LCD Color Display ............................................. 14
■Front Panel .................................................. 15
Infrared (IR) Receiver ........................................ 15
IR Signal Indicator ............................................. 15
CD-RW Drive .................................................... 15
EJECT Button ................................................... 15
MIC / LINE L & R Level Control .......................... 15
INST (Instrument) Level Control ........................ 15
PHONES Jack .................................................... 15
PHANTOM Power ON/OFF SWITCH .................. 15
MIC ATT ON/OFF .............................................15
RECORD LEVEL MAN / LIM / ALC ...................... 15
MAN (Manual) ....................................................... 15
LIM (Limiter) ........................................................... 15
ALC (Automatic Level Control) ............................... 15
PHONES / SPEAKER LEVEL ................................ 15
■Right Side Panel .......................................... 16
Left / XLR / “1/4” Input Jack ............................. 16
Right / XLR / “1/4” Input Jack ........................... 16
INST IN Jack ..................................................... 16
AUX LEVEL ....................................................... 16
AUX IN Jacks .................................................... 16
LINE OUT Jacks ................................................ 16
■Left Side Panel ............................................ 17
DC Input Jack ................................................... 17
USB Connector ................................................. 17
Mini SD Slot .....................................................17
FOOT PEDAL Jack ............................................. 17
DIGITAL OUT Jack ............................................ 17
DIGITAL IN Jack ................................................ 17
■Back Panel ................................................... 18
Battery Compartment ...................................... 18
■Remote Control .......................................... 19
STANDBY / POWER ...................................... 19
w Alphanumeric Keypad ........................................ 19
e FOLDER .............................................................. 19
r SEARCH .............................................................19
t CANCEL ............................................................. 19
y TEMPO ............................................................... 19
u ENTER ................................................................19
i FINE TUNE .......................................................... 19
o TEMPO RESET ....................................................19
a PLAY
s STOP
.............................................................. 19
.............................................................. 20
Superscope PSD430 / PSD450 User Manual
- iii -
Page 4

Contents
d REPEAT............................................................... 20
f PAUSE
g DRIVE SELECT ....................................................20
h MUTE ................................................................. 20
j LOCATION ......................................................... 20
k LOOP ENTER/EXIT .............................................. 20
FF
REW
NEXT
PREVIOUS
FINE TUNE RESET ............................................... 20
KEY RESET ......................................................... 20
KEY .................................................................... 20
MENU ................................................................20
TONE ON/OFF .................................................... 20
TUNER ON /OFF .................................................. 20
METRO ON/OFF ................................................. 20
INPUT MIC/LINE/AUX ......................................... 20
RECORD ............................................................. 20
RECORD REVIEW ................................................ 20
MONITOR .......................................................... 20
............................................................. 20
(Fast Forward) ........................................... 20
(Rewind) ............................................... 20
............................................................ 20
.................................................... 20
■LCD Display ................................................. 21
PLAY / STOP Mode ................................................. 21
Ⓐ Icons .................................................................. 21
① Status Icons ....................................................... 21
② Loop Icons ........................................................ 21
③ Repeat Icons...................................................... 21
④ Voice Reduction Icons ....................................... 22
⑤ Monitor Icons ...................................................22
⑥ Mute Icons ....................................................... 22
⑦ AC/Battery Icons ............................................... 22
Ⓑ File Information ................................................. 22
Ⓒ Playback Data .................................................... 23
Ⓓ Location ............................................................ 23
Ⓔ Balance & Levels ................................................ 23
Ⓕ VU Meters ......................................................... 23
■Powering On ............................................... 24
Using the AC Adapter ............................................ 24
Using Batteries ....................................................... 24
Battery Life (PSD450) ............................................. 25
AC Power and Battery Tips ..................................... 25
Setting Date and Time ............................................ 26
The Internal Hard Drive (HDD) - PSD450 Only ......... 27
Inserting a Mini SD Card ........................................ 27
Pan Setting – R/2 ................................................... 31
Recording a Solo Performance ................................ 32
Internal Built-in Microphones ................................. 33
Connecting Musical Instruments ............................34
Recording a Microphone and a Musical Instrument at
the Same Time ....................................................... 34
Line Level Sources .................................................. 36
AUX ....................................................................... 37
Digital Connection ................................................. 39
Computer Connection ............................................ 40
■Working with Files and Folders ................. 41
Searching Folders ................................................... 41
Search a USB Device, SD Card or CD ...................... 41
Filtering by Title, Artist, Album, and Genre ............. 42
Using the [Search] Feature ...................................... 42
Text Input Method ................................................. 43
Create a Folder ....................................................... 45
Rename .................................................................. 45
Create a Playlist ...................................................... 46
■CD Ripping .................................................. 48
Ripping an entire Audio CD .................................... 48
Ripping Selected Tracks from an Audio CD ............. 49
■Music Practice ............................................. 51
How to Use the Tuner ............................................ 51
Using the Chromatic Tuner ..................................... 51
Using the Tuning Tone ............................................ 52
Using the Metronome ............................................ 53
Adjusting Accent Beat and Accent Beat Volume ..... 53
Using Tap Tempo .................................................... 54
■Play .............................................................. 54
Playback Operation ................................................ 55
Playback Modes ..................................................... 55
Repeat Modes ........................................................ 56
A-B Loop (Repeat Playback) ................................... 56
Set the A Point ....................................................... 56
Set the B Point ....................................................... 57
Delete a Loop Point ................................................ 58
Adjusting Tempo, Key, and Fine Tune ..................... 58
Tempo .................................................................... 58
Key ........................................................................ 58
Interval Indication ................................................... 59
Fine Tune ............................................................... 59
Voice Reduction ..................................................... 59
■Setting Up Speakers ................................... 28
■Editing ......................................................... 60
■Setting Up Microphones, Instruments and
Other Sound Sources ..................................... 29
Microphones .......................................................... 29
Balanced Connections ............................................ 29
Unbalanced Connections ...................................... 29
External Microphones ............................................ 29
Setting Levels ......................................................... 30
STEREO/PAN Mode ................................................31
Pan Setting – L/1 ................................................... 31
- iv -
Export a File ........................................................... 60
Creating a File with a New Tempo or Key ............... 60
Changing File Format ............................................. 61
Naming the Exported File ....................................... 61
Move a Track .......................................................... 62
Copy a Track .......................................................... 63
Delete a Track ........................................................ 63
Divide a Track ......................................................... 64
Combine a Track .................................................... 65
Trim In / Out ........................................................... 67
Edit Track Information ............................................ 68
Title/Artist/Album ..................................................69
Superscope PSD430 / PSD450 User Manual
Page 5

Contents
Genre ..................................................................... 69
24>16bit Convert ................................................... 69
■Recording .................................................... 70
Recording to the PSD450 Internal Hard Drive ......... 70
Recording to a Mini SD Card .................................. 71
Recording Direct to CD ........................................... 71
Track Increment ...................................................... 72
The Record Settings Menu .....................................72
Pre-Roll Time/ Post-Roll Time .................................. 72
Fade In / Out .......................................................... 72
Recording File Format ............................................. 73
Auto Track Increment ............................................. 73
One Touch Recording ............................................. 73
Count In ................................................................. 74
Auto Convert ......................................................... 74
CD Pre-Gap Setting ............................................... 74
SD + HDD Recording (PSD450 Only) ....................... 74
■Overdub ...................................................... 74
Overdubbing for Composition (Layering sections of a
Track) ..................................................................... 74
Overdubbing for Practice (Recording over a Loop) .. 76
Monitor Source ...................................................... 77
■Punch In/Out ............................................... 78
Allocate Temporary Space (PSD430 Only) ............... 95
■Appendix ..................................................... 96
Main Menu (1 of 2) ................................................ 96
Main Menu (2 of 2) ................................................ 97
Track Select Mode Transition Diagram .................... 98
Input Select Mode Transition Diagram .................... 98
Edit Menu Options ................................................. 99
Key/Tempo Menu................................................... 100
Chromatic Tuner Menu .......................................... 101
Tone Menu............................................................. 101
Metronome Menu .................................................. 101
Continuous Recording Time with Battery Operation
(PSD450) ................................................................ 102
Pop-Up Messages .................................................. 103
Pop-Up Messages (continued) ................................ 104
■Specifications .............................................. 105
General .................................................................. 105
Audio ..................................................................... 105
Input/Outputs ....................................................... 105
■Trademarks, Copyrights and Disclaimers.. 106
MPEG Layer-3 Licensing ......................................... 106
■Recording Effects ....................................... 80
Selecting an Input Signal ........................................ 80
① Delay Time ......................................................... 81
② Decay ................................................................ 81
Playback Balance and Level..................................... 82
Equalizer Settings ................................................... 83
Playback Equalizer .................................................. 83
Frequency .............................................................. 84
Gain ....................................................................... 84
Bandwidth ............................................................. 84
Input Equalizer ....................................................... 84
■CD Burning .................................................. 85
Creating an Audio CD ............................................ 85
Finalizing a CD ....................................................... 86
Creating a Data CD ................................................ 87
CD Duplication ....................................................... 88
Erasing a CD-RW .................................................... 90
Unfinalize ............................................................... 90
Erase Last ............................................................... 91
Finalized CD-RW Menu .......................................... 91
Unfinalized CD-RW Menu ...................................... 91
Erase All ................................................................. 92
Finalized CD-RW Menu .......................................... 92
Unfinalized CD-RW Menu ...................................... 92
■System Settings .......................................... 94
Auto Power Off ...................................................... 94
Backlight Timer ...................................................... 94
Recording Dimmer ................................................. 94
Battery Type ........................................................... 94
Foot Pedal .............................................................. 94
Set Time / Date ....................................................... 95
ATA Device ............................................................. 95
Superscope PSD430 / PSD450 User Manual
- v -
Page 6
Superscope PSD450 User Manual
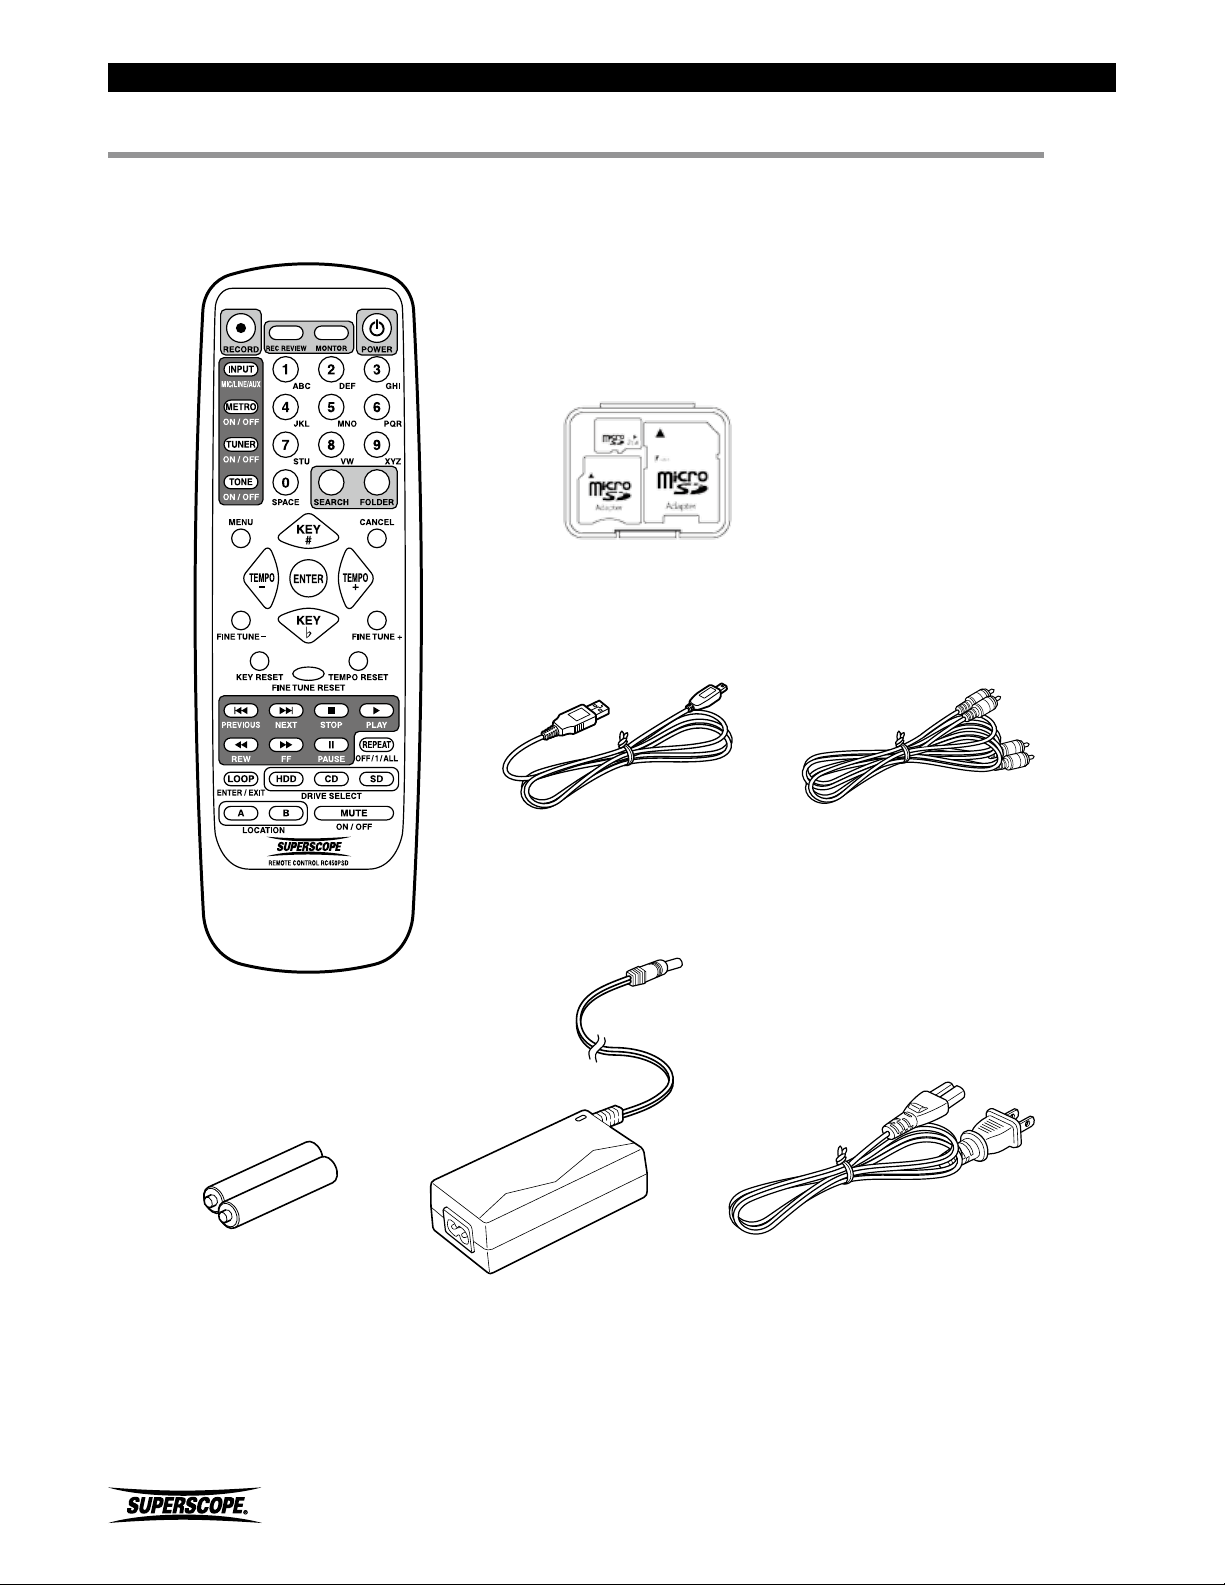
■Supplied Accessories
Infrared (IR) Remote
Micro SD Card
Mini SD Card Adapter
SD Card Adapter
(PSD 430 only)
AAA Allkaline Batteries
USB Cable RCA Patch Cables
AC Adapter
AC Power Cord
The following items (not pictured) are also in the box:
• Instruction Manual on CD-ROM (PDF format)
• Quick Start Guide (printed)
- 6 -
Superscope PSD430 / PSD450 User Manual
Page 7

Superscope PSD450 User Manual
■Introduction
Thank you for purchasing a Superscope PSD400 Series Recording System.
Were you looking for a high-quality, portable recorder? A music practice and transcription tool? If either factor is
important to you, we’re confident you’ll find your recorder to be an immensely powerful and versatile audio system.
Here are just a few features of the PSD400 recorder series:
General Features
• 3.5-inch liquid crystal color display for easy navigation of all features.
• Record up to 6 hours with eight nickel metal hydride AA batteries (or 3.6 hours with alkaline batteries) on a
PSD450.
• USB connection for transferring audio files to and from a computer.
• Stereo internal microphones.
• Stereo XLR combo microphone jacks.
• 48V phantom power.
Recording Features
• Record live performances to the Hard Drive (PSD450 only), SD card, external USB storage, or direct to Compact
Disc.
• Record WAV or MP3 files to the Hard Drive (PSD450 only), SD card, or external USB storage.
• Burn Compact Discs from audio files on your Hard Drive (PSD450 only), SD card, or external USB storage.
• Record to an SD card and the internal Hard Drive at the same time (PSD450 only).
• Layer audio with the Overdub feature.
• Re-record portions of audio with the Punch In/Out feature.
• Edit file information or recorded audio (Trim, Divide, etc.).
Music Practice Features
• Change the key of a song without affecting tempo (+/- one octave in half steps or finer increments).
• Change the tempo of a song without affecting musical pitch (-75% to +50%).
• Create new versions of audio files in different keys and tempos.
• Seamlessly loop different sections of audio material for practice or transcription.
• Reduce lead vocals from stereo recordings.
• Rehearse with the built-in metronome.
• Tune your instrument with the 440Hz tone or chromatic tuner.
Package Contents
• One Superscope PSD430 or PSD450 Recorder.
• One AC adapter (DA450PSD).
• One infrared wireless remote controller (RC450PSD).
• 2-AAA type batteries (for remote control).
• One USB cable.
• One RCA stereo audio system cable.
• One instruction manual on CD-ROM.
• One Quick Start Guide (printed).
Superscope PSD430 / PSD450 User Manual
- 7 -
Page 8
Getting Started
■Preparations
Before Use
AC Adapter Connection
Connect the power output plug of the adapter to the DC
IN jack of the recorder. Connect the AC Power cord to
the household AC power receptacle.
AC Adapter Safety
Only use the AC adapter that is provided with the
recorder. Use of other adapters may result in damage to
the recorder and invalidate the warranty.
Using Batteries
The recorder is designed for use with 8 “AA” size
Alkaline or Nickel-Metal Hydride (Ni-MH) batteries.
The recorder DOES NOT allow for charging of
rechargeable batteries. If you use rechargeable batteries,
you must use an external battery charger (see battery
charger manufacturer instructions for operation and safe
use).
The battery capacity monitoring is different for alkaline
batteries and Ni-MH batteries. Please select the correct
battery type you are using from the System Settings
menu of the recorder.
Safety Cautions When Handling
Batteries
To avoid leakage, overheating, fire and rupturing, always
follow the points below when using batteries with the
recorder.
• Electrolyte leakage or corrosion may occur if
batteries are kept inside the recorder for prolonged
periods of time. Remove batteries prior to prolonged
storage of the recorder.
• When installing batteries into the recorder, make
sure the batteries are installed with the proper
polarity shown inside the battery compartment of
the recorder.
• Do not attempt to recharge non-rechargeable
batteries.
• Do not install old/exhausted batteries into the
recorder. Dispose of old batteries properly.
• Do not mix the types (Alkaline or Ni-MH) or voltages
of batteries.
Remote Controller Notes
The remote controller may not work if the infrared
receiver is exposed to direct sunlight.
The remote controller will not work when there is an
obstacle between the wireless remote controller and the
infrared receiver.
To operate the recorder with battery power, install
batteries into the recorder as follows:
1. Remove the battery cover from the rear side of the
recorder.
2. Insert the batteries into the battery compartment,
making sure to align the positive ( + ) and negative
( - ) end of each battery according to the polarity
diagram shown inside the compartment.
3. Re-attach the battery cover to the rear side of the
recorder.
※ Burning CDs with battery power is not
recommended. Please connect AC power
before burning a CD.
Please be careful when using the remote controller near
other equipment that responds to infrared signals.
Please do not place objects on the remote controller. If
an object resting on the remote continuously depresses a
button, battery power will drain.
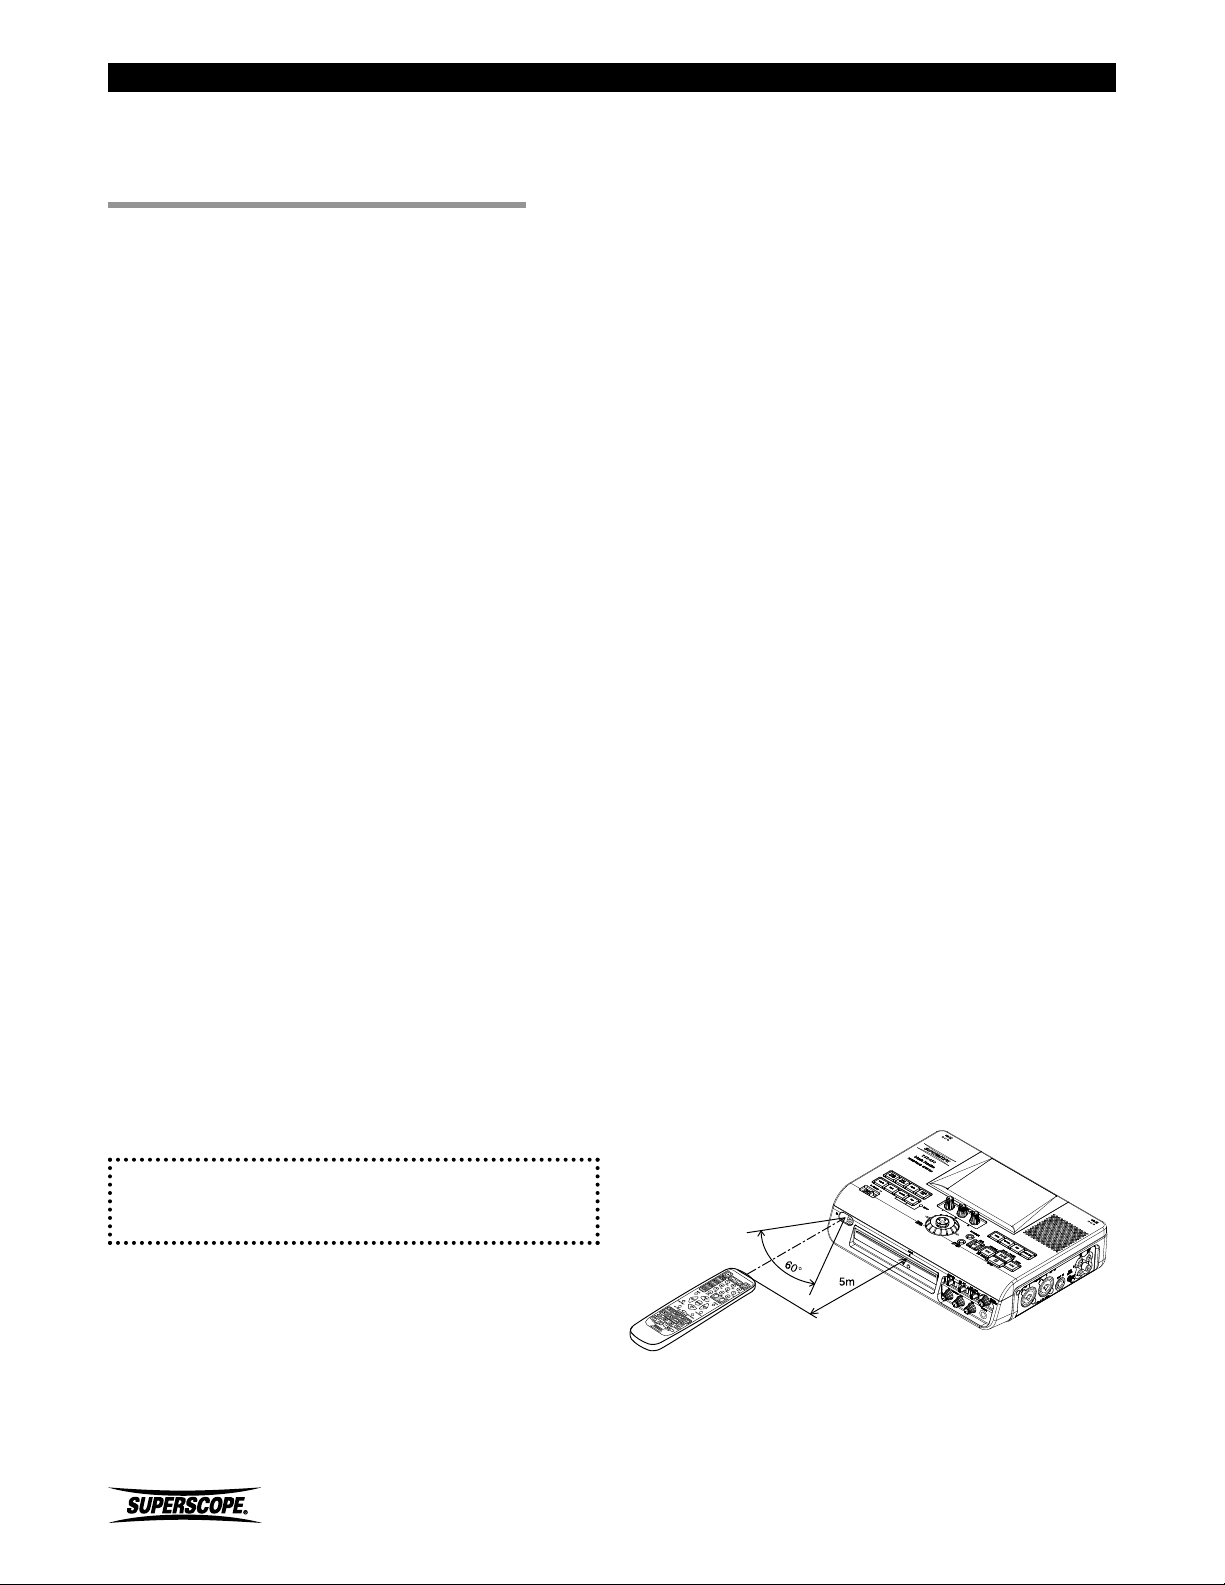
The remote controller will work within a range of 5m and
60 degrees right or left of the IR receiver, as indicated by
the following image:
- 8 -
Superscope PSD430 / PSD450 User Manual
Page 9
Getting Started
Remote Controller Battery Installation
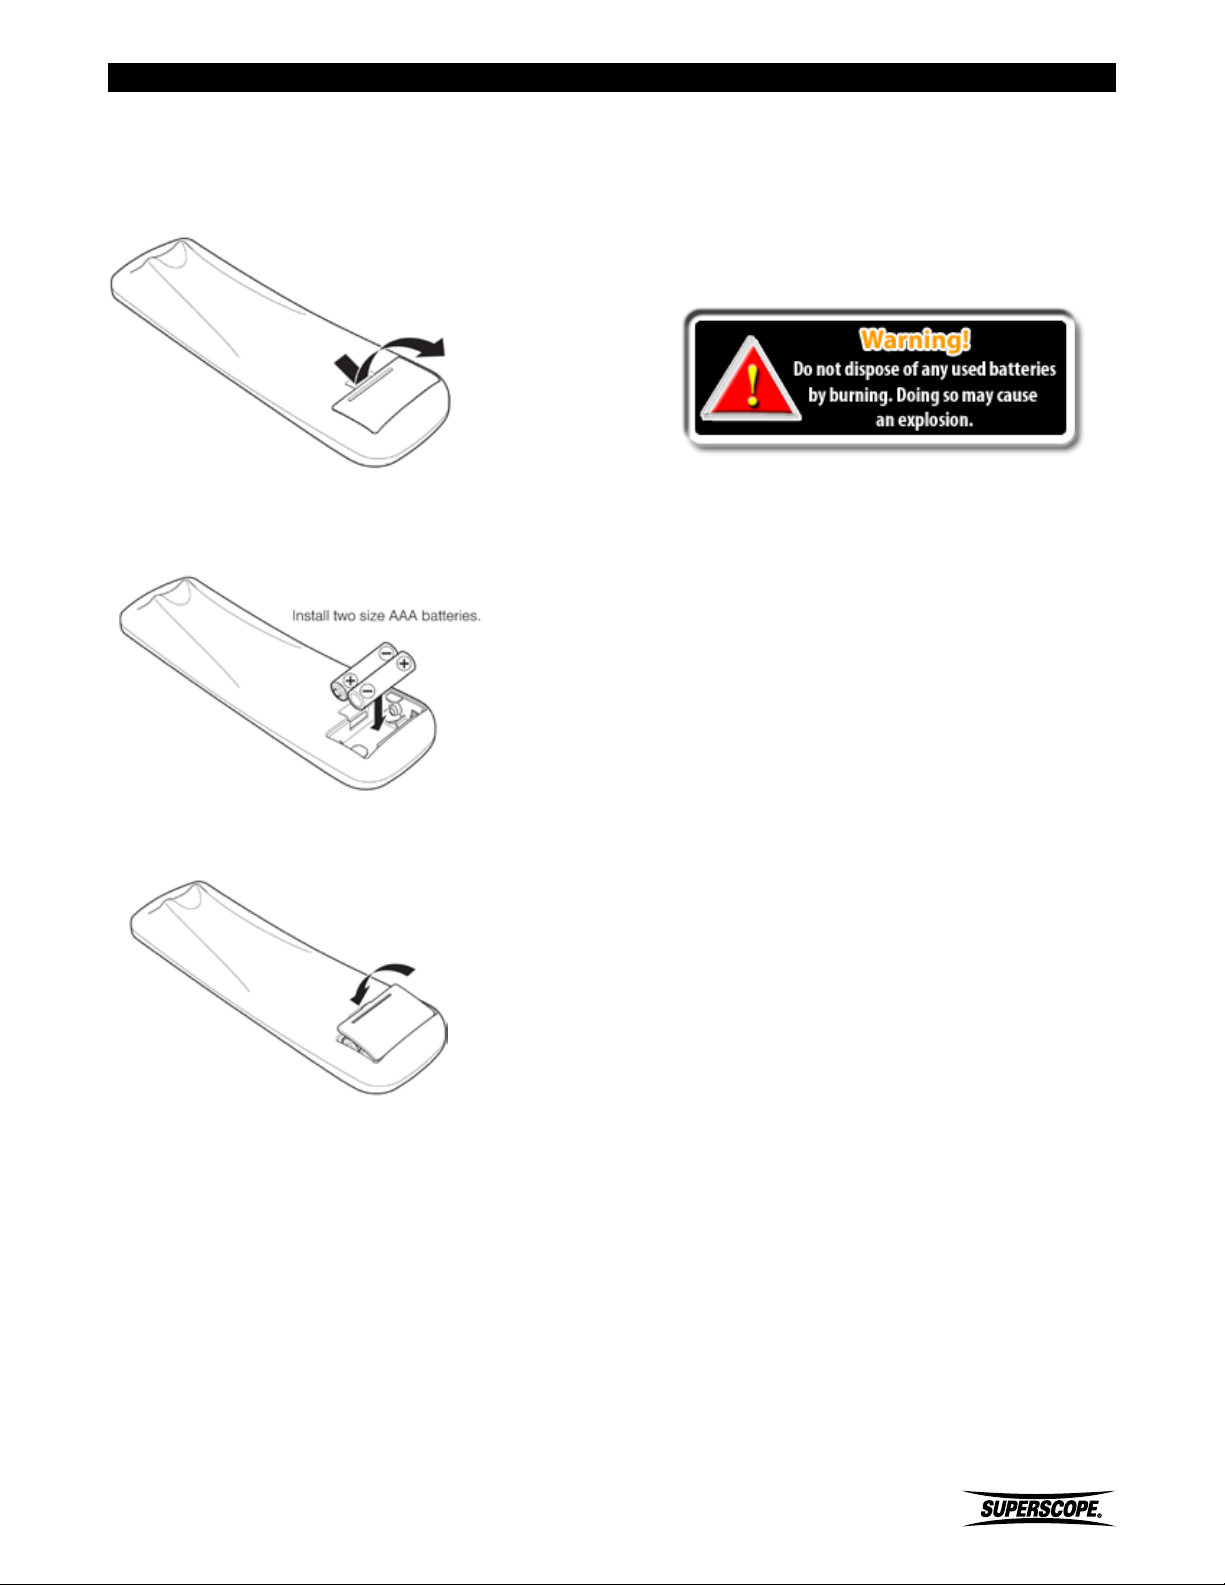
Place 2-AAA batteries (included) inside the wireless
remote controller before it is used. Replace batteries by
removing the battery cover as shown:
Always match the polarity of the 2-AAA batteries with
the polarity indication inside the battery compartment.
If a battery leaks, clean the liquid from the battery
compartment and dispose of the leaking battery
according to the guidelines of your local government.
Please dispose of all used batteries according to the
guidelines of your local government.
Close the battery cover as shown:
With improper battery use, batteries may rupture, leak,
and cause corrosion. Please read the following guidelines
carefully:
If the remote controller is not in use for a long period of
time (more than one month), remove the batteries.
Please do not mix old batteries and new batteries
together.
Please match the polarity of the battery (+/ -) with the
polarity indication on the remote controller.
Batteries may have the same shape, but different
voltages. Do not mix different battery types.
Superscope PSD430 / PSD450 User Manual
- 9 -
Page 10
Getting Started
■About Discs
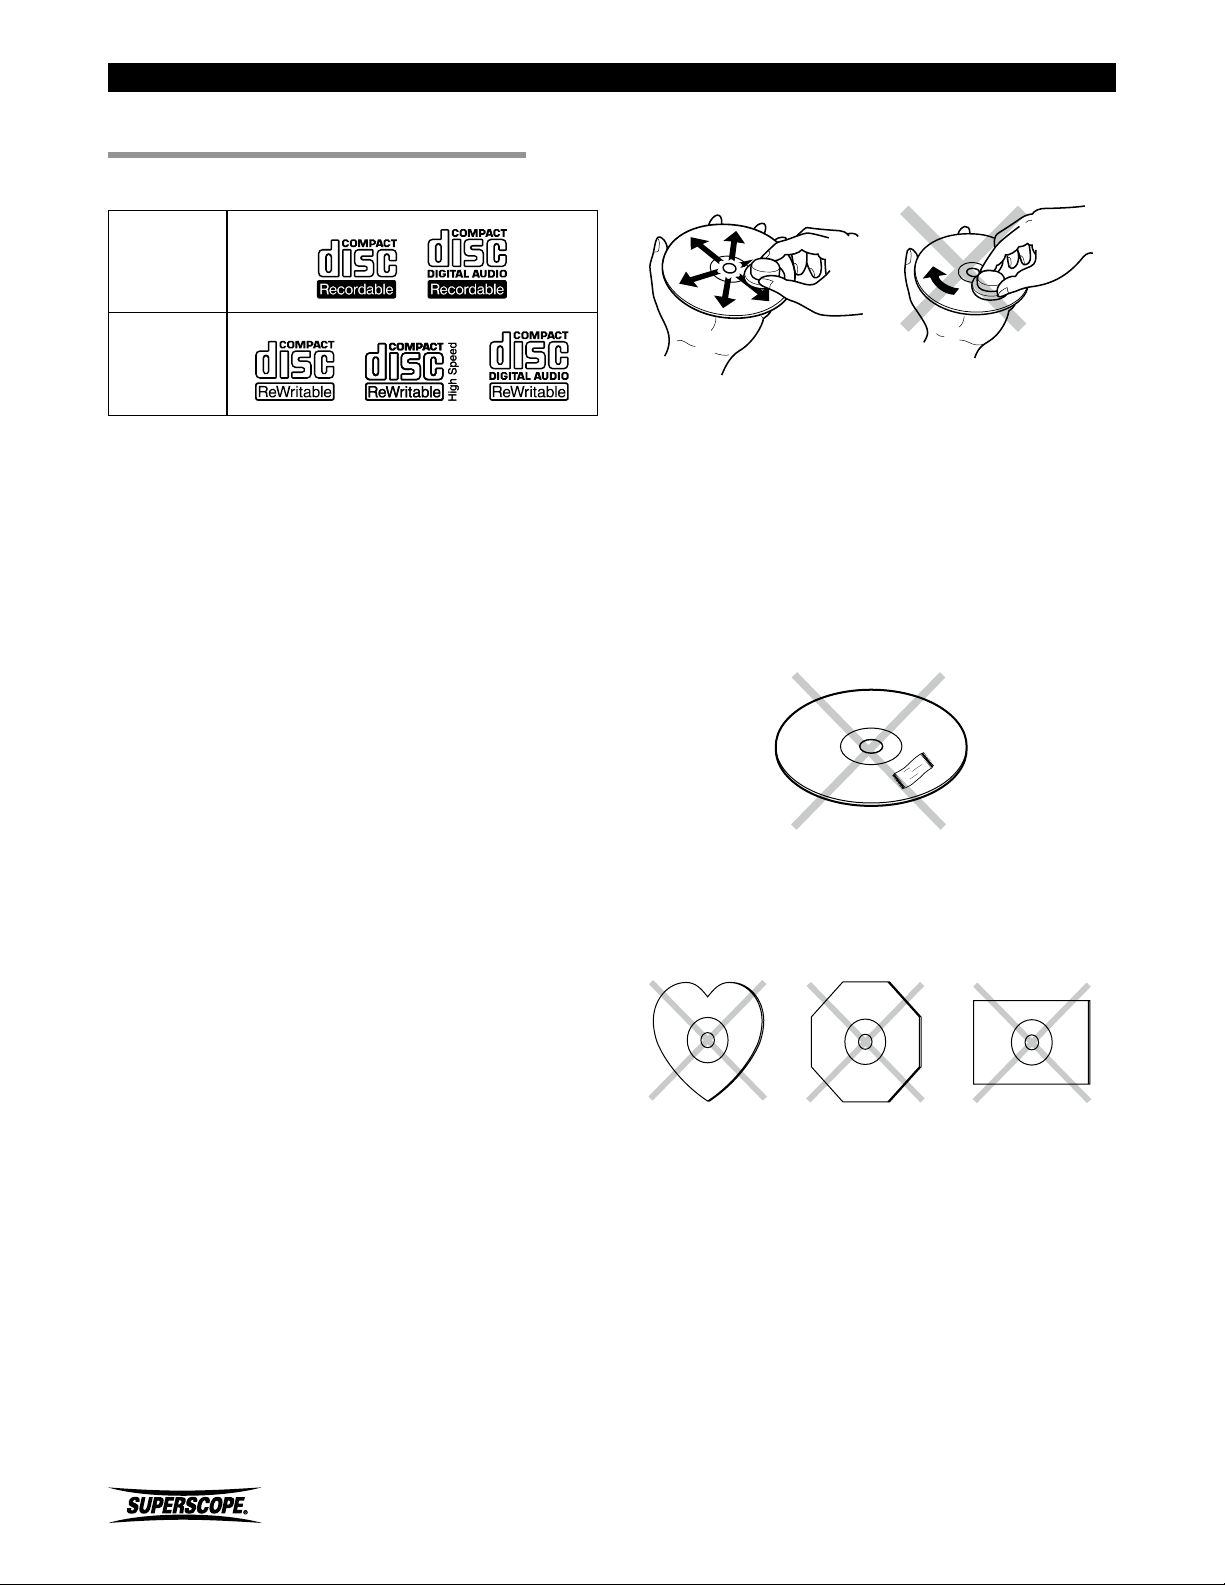
Playable discs
CD-R
CD-RW
Finalized CD-R and CD-RW discs recorded in the CD-DA
format and MP3 format can be played with the unit.
• Finalize is the process to make a CD-R/CD-RW playable
for players (not recorders).
• Some discs may not be able to be played depending
on condition of the discs and recording software.
• Single CDs (8cm) cannot be used.
Always keep the disc surface clean.
When cleaning the disc surface, always be sure to use a
special compact disc cleaner and wipe as shown below.
• Do not use conventional record cleaner for analog
records, as this will adversely affect the disc surface.
Store discs properly by placing them in their disc cases.
• Do not attach a piece of paper or sticker on the label
side of disc. When a disc has a piece of plastic tape or
rental CD label with paste protruded from the edge or
when a disc has a trace of such a sticky object, do not
attempt to play the disc. If such a disc is played on the
CD player, it may cause the disc drive to malfunction
or it may be impossible to remove the disc.
Disc Care
The glossy side shining like a rainbow is the front side of
the disc, and the side on which the label is printed is the
back. Unlike conventional turntables for playing analog
discs, the unit reads the information recorded on the disc
from underneath without contacting it using a beam of
laser light. Therefore, the performance of a compact disc
will not degrade like conventional analog records.
Handle discs carefully so as not to damage or
scratch the front side.
To protect the disc, avoid placing it in the following
locations:
• In direct sunlight or near a source of heat like a heater.
• In a place which is damp or dirty.
• In a place which could be exposed to rain, such as
near a window.
• Do not use a disc with a special shape.
Do not attempt to play a disc with a special shape such
as a heart-shaped disc or octagonal disc. Equipment
malfunction may result.
- 10 -
Superscope PSD430 / PSD450 User Manual
Page 11
■Top Panel
Controls
POWER
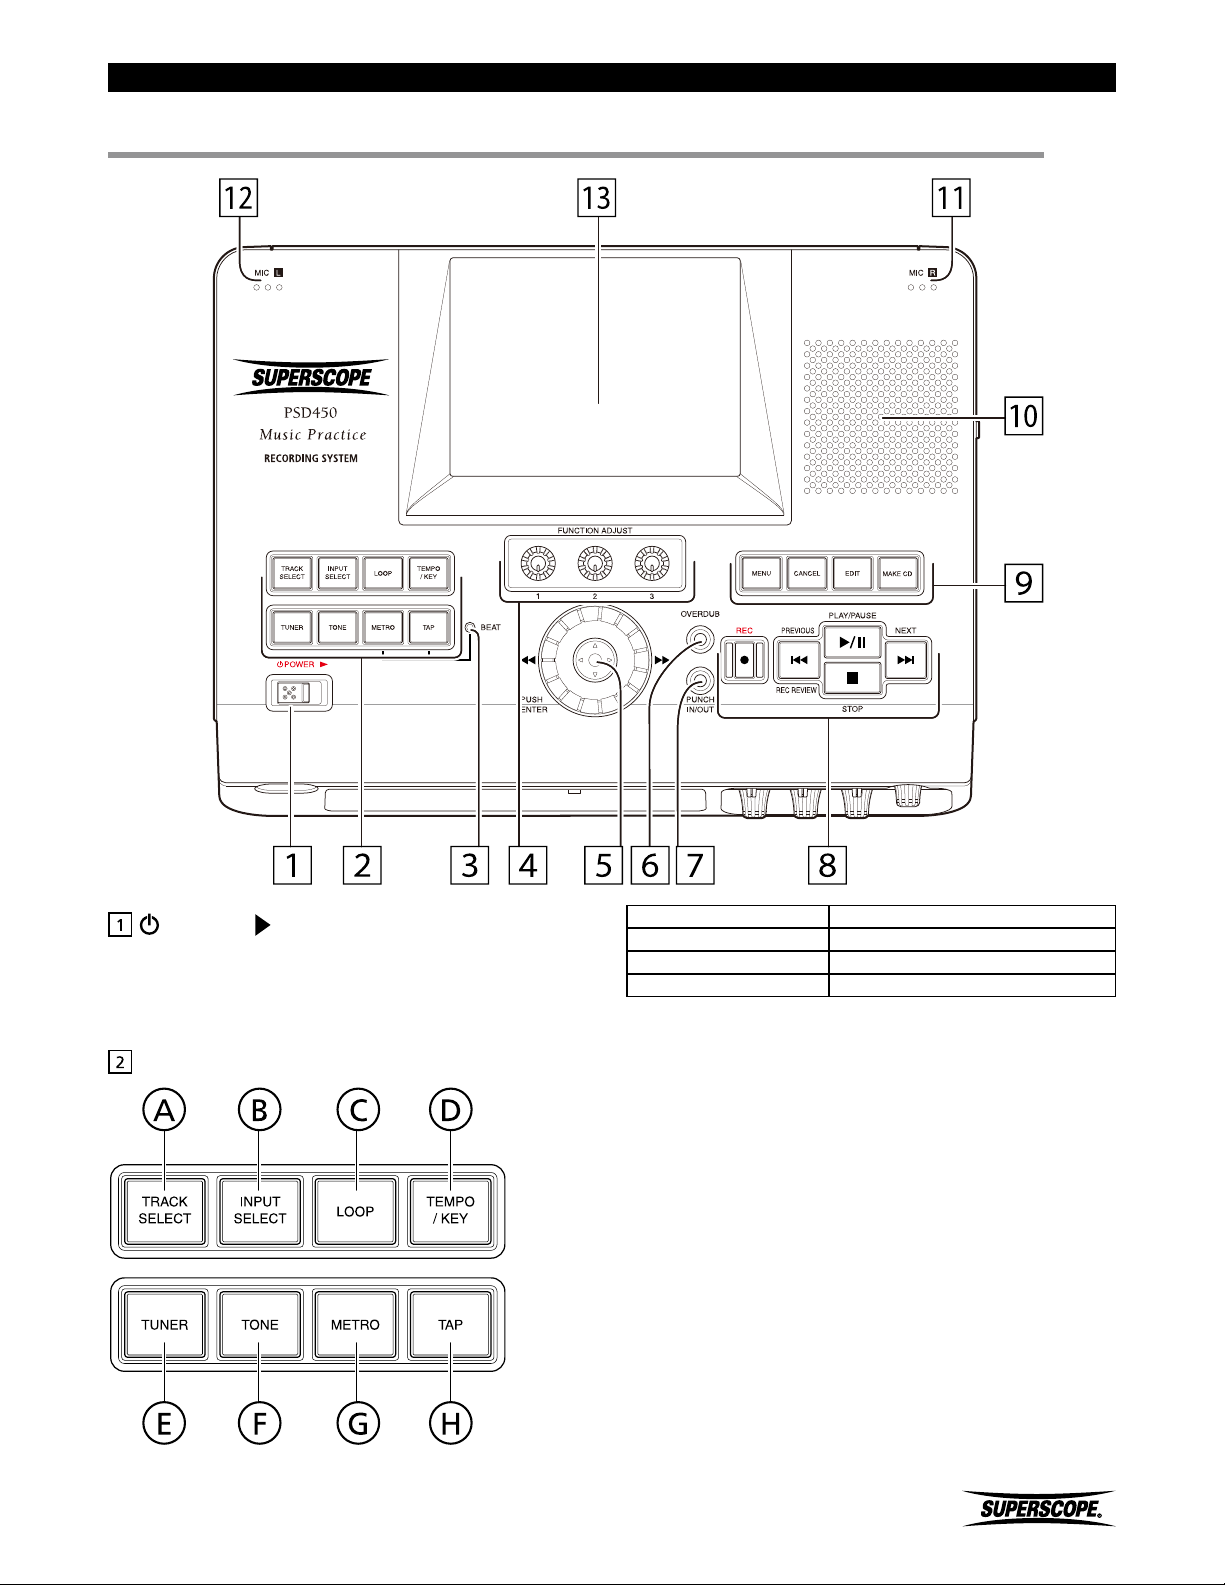
Slide the POWER switch to the right to turn power ON or
OFF.
FUNCTION CONTROL Buttons
Ⓐ TRACK SELECT Ⓔ TUNER (Chromatic tuner)
Ⓑ INPUT SELECT Ⓕ TONE (Tuning tone)
Ⓒ LOOP (A-B) Ⓖ METRO (Metronome)
Ⓓ TEMPO/ KEY Ⓗ TAP
A. TRACK SELECT
Press to select a track for playback, Edit, Overdub, or
Punch In/Out. Also, use to select a record location. Press
this button a second time to return to the main screen.
B. INPUT SELECT
Press to select an input for recording or practice. The
Input Select menu also provides options for Pan, Input
Equalizer, and Effect. Press this button a second time to
return to the main screen.
Superscope PSD430 / PSD450 User Manual
- 11 -
Page 12
Controls
C. LOOP
Press to set loop markers and seamlessly loop a section
of audio. Press this button a second time to return to the
main screen.
D. TEMPO/KEY
Press to adjust the Key, Tempo, and Fine Tuning of any
file during playback. The Tempo/Key menu also provides
options for Voice Reduction, Playback Level, Playback
Balance, and Playback Equalizer. Press this button a
second time to return to the main screen.
E. TUNER
Press to access the chromatic tuner. Press this button a
second time to return to the main screen.
F. TONE
Press to sound the 440Hz tuning tone. The frequency of
this tone is adjustable between 410Hz and 470Hz. Press
this button a second time to return to the main screen.
G. METRO
Press to access the Metronome menu. Press this button a
second time to return to the main screen.
H. TAP
When the metronome menu is selected, press repeatedly
at the desired tempo. Once this button has been pressed
six consecutive times, a new BPM (beats per minute)
setting will be established for the metronome.
BEAT Indicator
LED flashes on and off according to the BPM setting
of the metronome. The LED will flash green for normal
beats and red for accent beats.
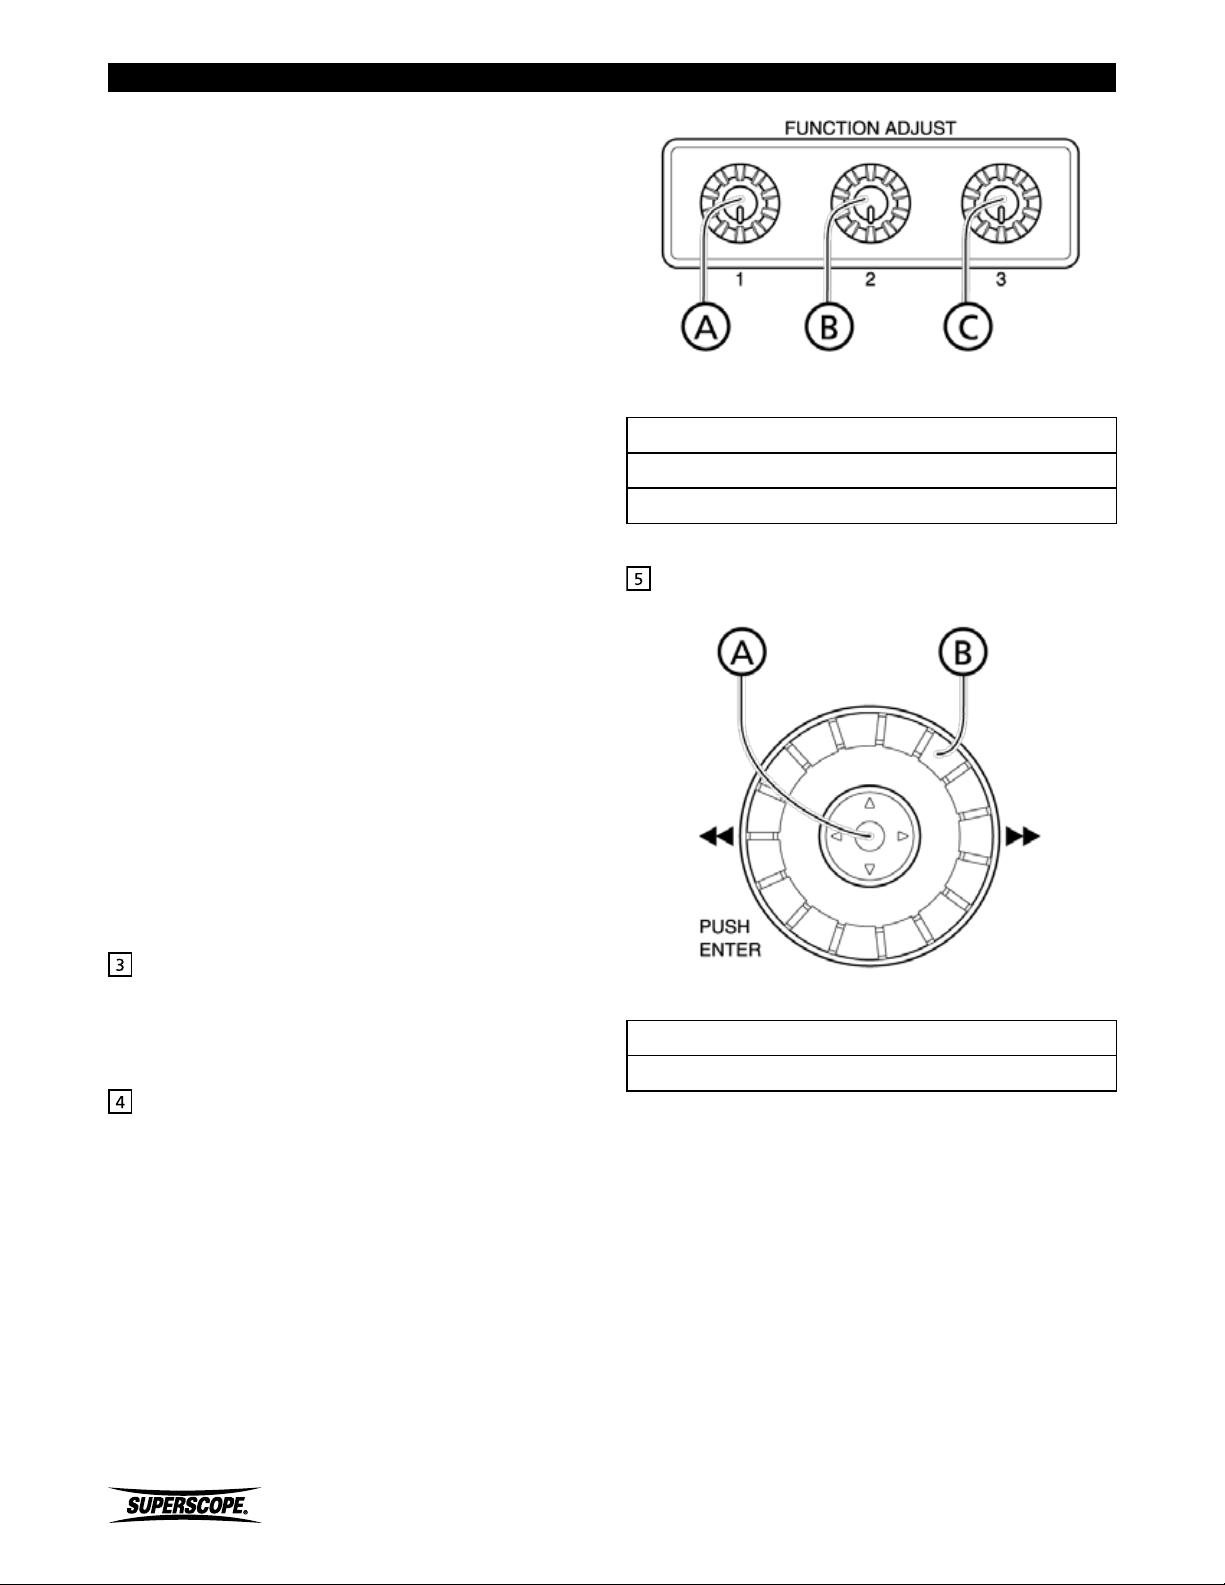
FUNCTION ADJUST Knobs
Turn to adjust various parameters. In addition, pushing
the knobs resets certain settings to their default
values. Refer to indication on display for knob/function
relationship.
Ⓐ FUNCTION ADJUST #1 knob
Ⓑ FUNCTION ADJUST #2 knob
Ⓒ FUNCTION ADJUST #3 knob
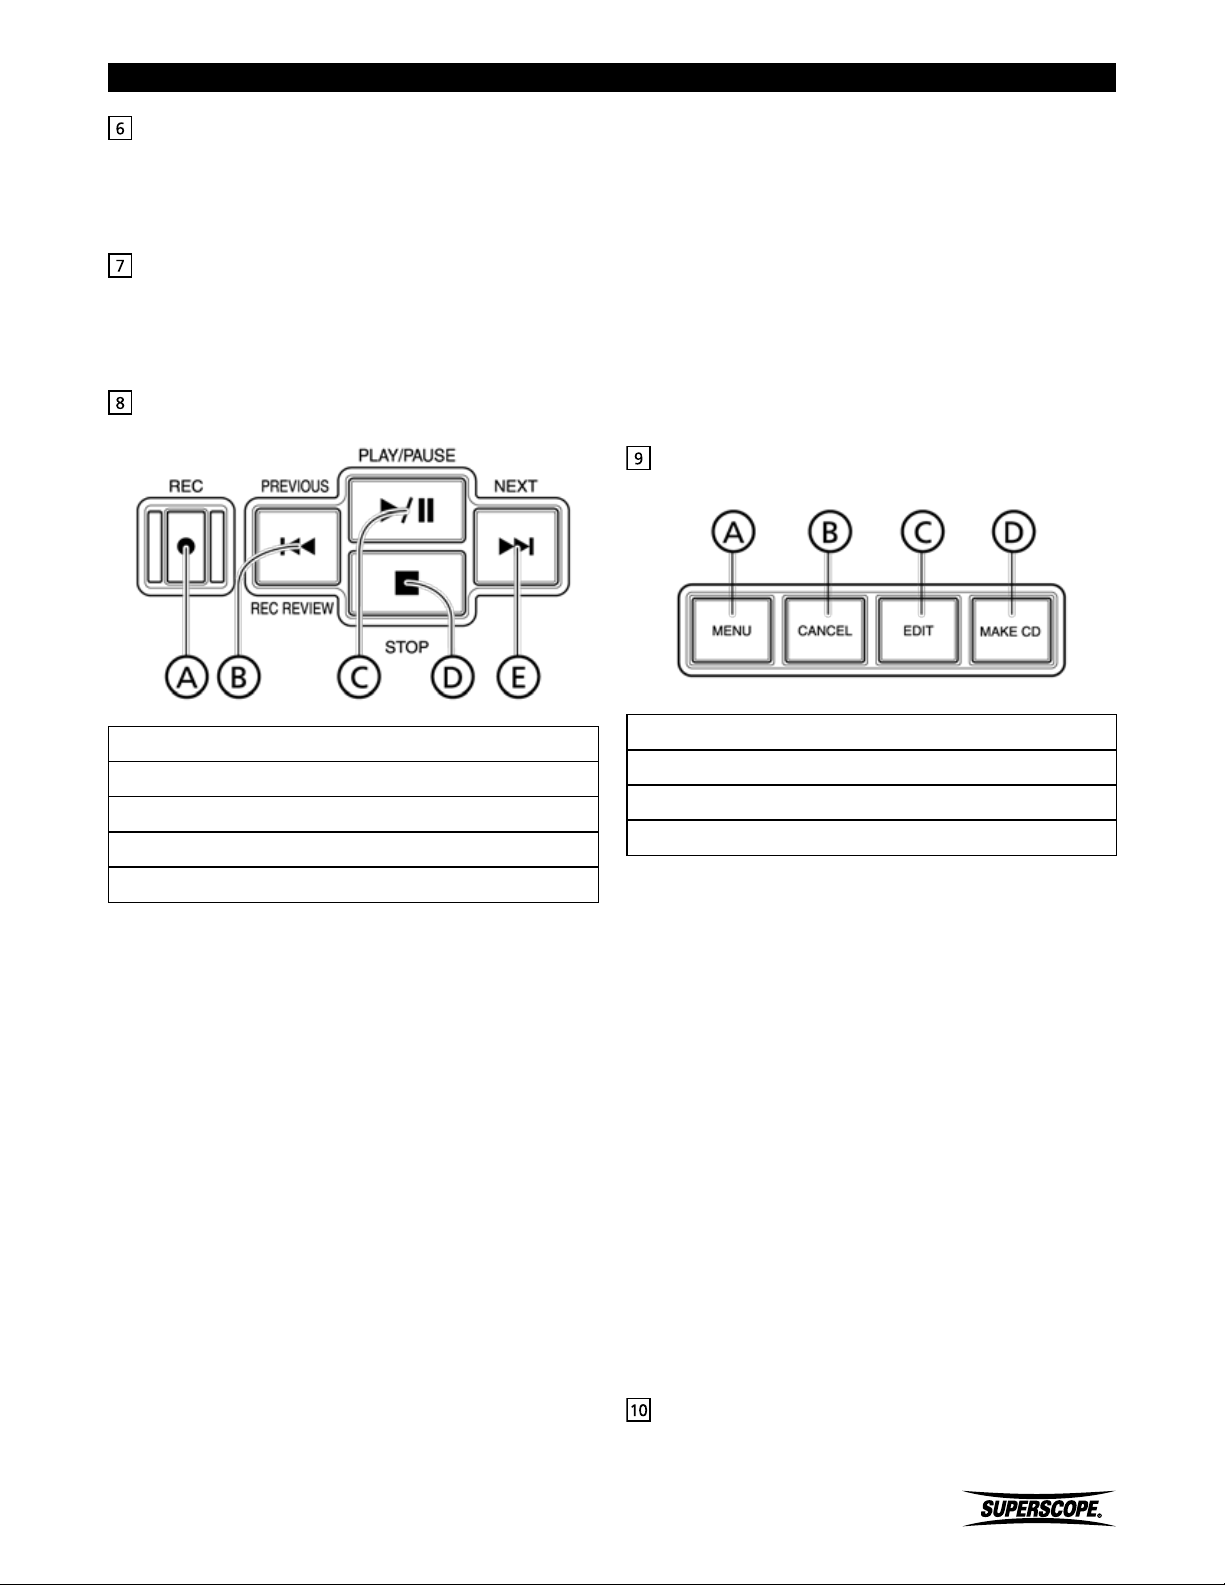
JOG WHEEL / JOYSTICK / ENTER
Ⓐ JOYSTIC / ENTER
Ⓑ JOG WHEEL
A. Move the joystick up and down to select items, or in
certain modes, to change screens. Move the joystick
right and left to changes parameters, or in Play mode
to search through a track. In addition, push the
joystick to "ENTER" (select) items or settings.
B. Turn the jog wheel to select various items or
- 12 -
parameters.
Superscope PSD430 / PSD450 User Manual
Page 13
Controls
OVERDUB
When an accompaniment track is selected, press this
button to enter Overdub mode. When overdubbing is
complete, press this button to return to the main screen.
PUNCH IN / OUT
When a track is selected, press to enter Punch In/Out
mode. When you have finished recording your punch-in,
press this button to return to the main screen.
CONTROL Buttons (Transport)
C. PLAY/PAUSE Button
From Stop mode, press to start or pause playback.
From Record Pause mode, press to begin recording.
From Record mode, press to pause the recording and
increment a track.
D. STOP BUTTON
Press to stop playback or recording.
E. NEXT
Press to advance to the next track.
CONTROL Buttons (Top Right)
Ⓐ REC
Ⓑ PREVIOUS & REC REVIEW
Ⓒ PLAY/PAUSE
Ⓓ STOP
Ⓔ NEXT
A. REC BUTTON
From Stop mode, press to enter Record Pause mode or
Record mode. The Record LED will flash during Record
Pause mode and remain lit during Record mode. From
Stop mode, press to enter Record Pause mode or Record
mode. The Record LED will flash during Record Pause
mode and remain lit during Record mode. From Record
mode, press to increment a track.
Note: The Record button cannot be used to increment
tracks when recording direct to CD.
B. PREVIOUS & REC REVIEW BUTTON
During playback, press to return to the beginning of the
track. If playback is within one second of the start point,
press to return to the beginning of the previous track.
In Stop mode, press to return to the beginning of the
previous track. In Record Mode, press to stop recording
and automatically play back the recently recorded file
(Rec Review function).
Ⓐ MENU
Ⓑ CANCEL
Ⓒ EDIT
Ⓓ MAKE CD
A. MENU
Press to view menu options.
B. CANCEL
Press to cancel settings and delete characters when
editing titles and file information.
C. EDIT
Press to view edit options.
D. MAKE CD
Press to:
• Burn a CD (audio or data)
• Finalize a CD
• Duplicate a CD
• Erase (CD-RW only)
Internal Speaker
All sounds can be heard through the built-in monitor
speaker.
Superscope PSD430 / PSD450 User Manual
- 13 -
Page 14

- Internal Mic R & Internal Mic L
Use the Right and Left internal mics to record without
additional equipment.
LCD Color Display
High-resolution full-color liquid crystal display monitor.
Please refer to LCD Display for an explanation of display
icons.
Controls
- 14 -
Superscope PSD430 / PSD450 User Manual
Page 15
■Front Panel
Controls
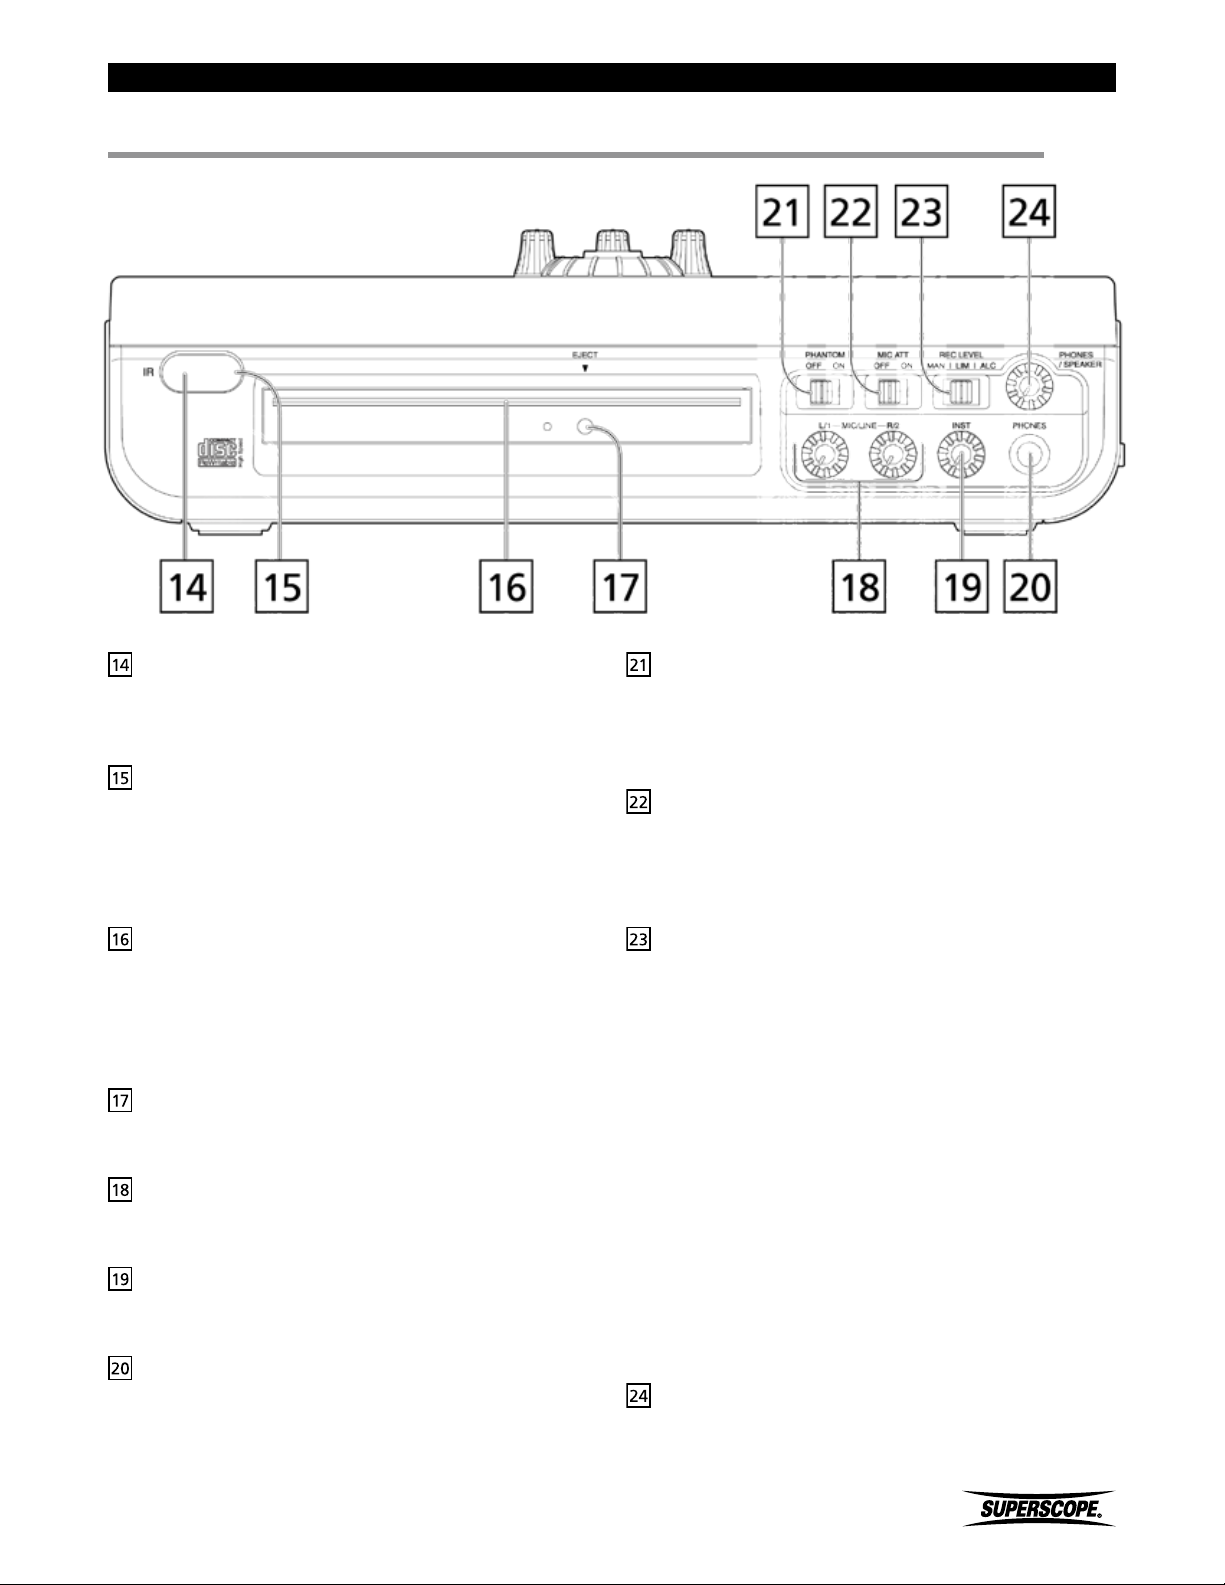
Infrared (IR) Receiver
The infrared receiver detects signals from the wireless
remote controller.
IR Signal Indicator
This LED flashes red when a signal from the wireless
remote controller is received.
When the HDD is active, a green LED will flash (PSD450
only).
CD-RW Drive
Insert an audio CD for playback, accompaniment,
transfer to HDD (PSD450 only), SD card (PSD430 only) or
duplication. Insert a CD-R/RW for burning audio or data
discs.
EJECT Button
Press to eject a compact disc from the CD-RW drive.
MIC / LINE L & R Level Control
Turn these knobs to adjust the level of the MIC/LINE inputs.
PHANTOM Power ON/OFF SWITCH
Switch on to supply 48V phantom power to microphones
connected to the XLR inputs. Switch off when a
microphone does not need phantom power.
MIC ATT ON/OFF
If input level controls are turned low and microphone or
instrument levels are still too strong, switch on to add
15dB of attenuation.
RECORD LEVEL MAN / LIM / ALC
This switch determines the method for setting record
levels.
MAN (Manual)
Input level is controlled by manual adjustment of the
Mic/Line, INST, or AUX level controls.
LIM (Limiter)
Input level is controlled by manual adjustment of the
Mic/Line, INST, or AUX level controls. A limiter circuit
protects against signal overload.
INST (Instrument) Level Control
Turn this knob to adjust the level of the INST input.
PHONES Jack
Connect stereo headphones here. This input accepts ¼”
headphone plugs.
Superscope PSD430 / PSD450 User Manual
ALC (Automatic Level Control)
The Mic/Line, INST, or AUX level controls are bypassed
and input level is controlled automatically. A limiter circuit
protects against signal overload.
PHONES / SPEAKER LEVEL
Turn this knob to adjust the level for the built-in speaker
and headphones.
- 15 -
Page 16
■Right Side Panel
Controls
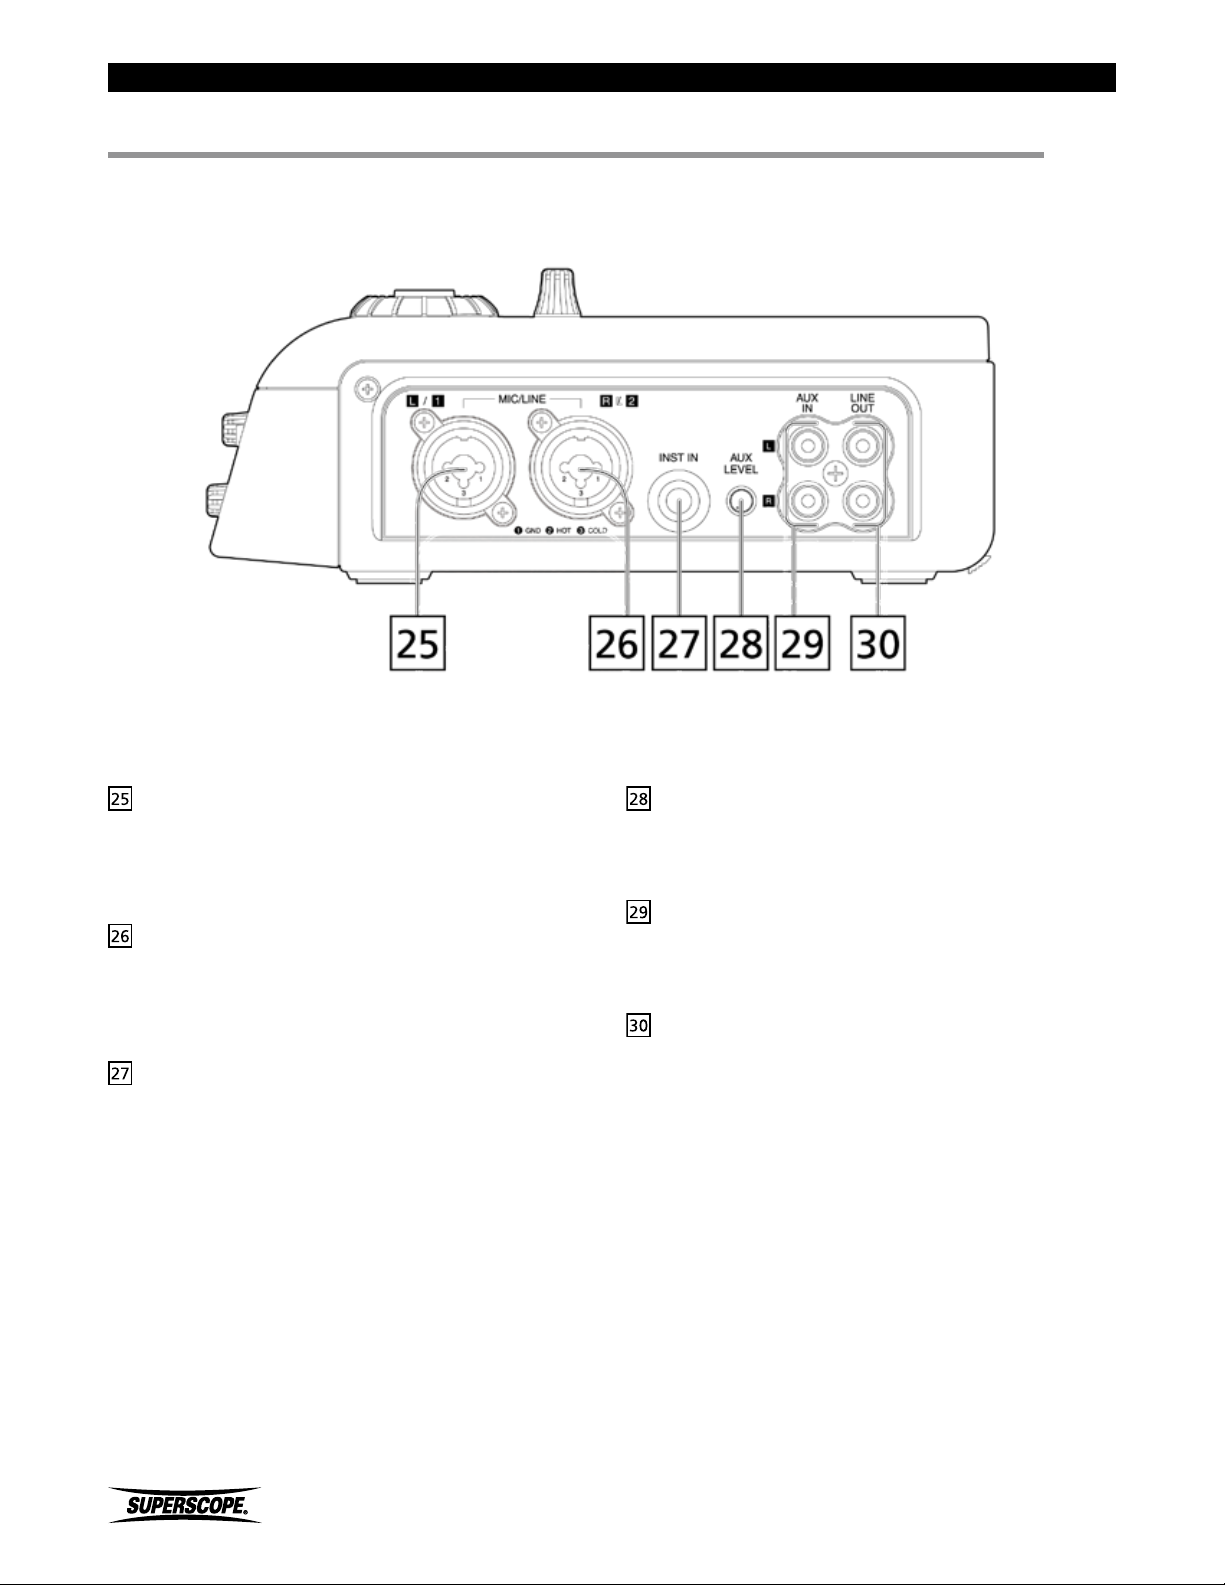
Left / XLR / “1/4” Input Jack
Connect microphones or line level equipment with XLR
or ¼” inch plugs here. Push the Input Select button [2B]
to select the input you wish to use.
Right / XLR / “1/4” Input Jack
Connect microphones or line level equipment with XLR
or ¼” inch plugs here. Push the Input Select button [2B]
to select the input you wish to use.
INST IN Jack
Connect an electric guitar, bass, or keyboard here.
VU Meter Overload If your keyboard or guitar/bass
signals routinely cause the VU meters to display “OVER,”
change INST Input Gain setting to Low.
AUX LEVEL
Turn this knob to adjust the input signal level of the AUX
IN.
AUX IN Jacks
Use these inputs when connecting line level equipment
with RCA outputs, such as CD players or mixing boards.
LINE OUT Jacks
Connect these outputs to the inputs of another audio
device, such as an amplifier, mixing board or alternate
recording device.
- 16 -
Superscope PSD430 / PSD450 User Manual
Page 17
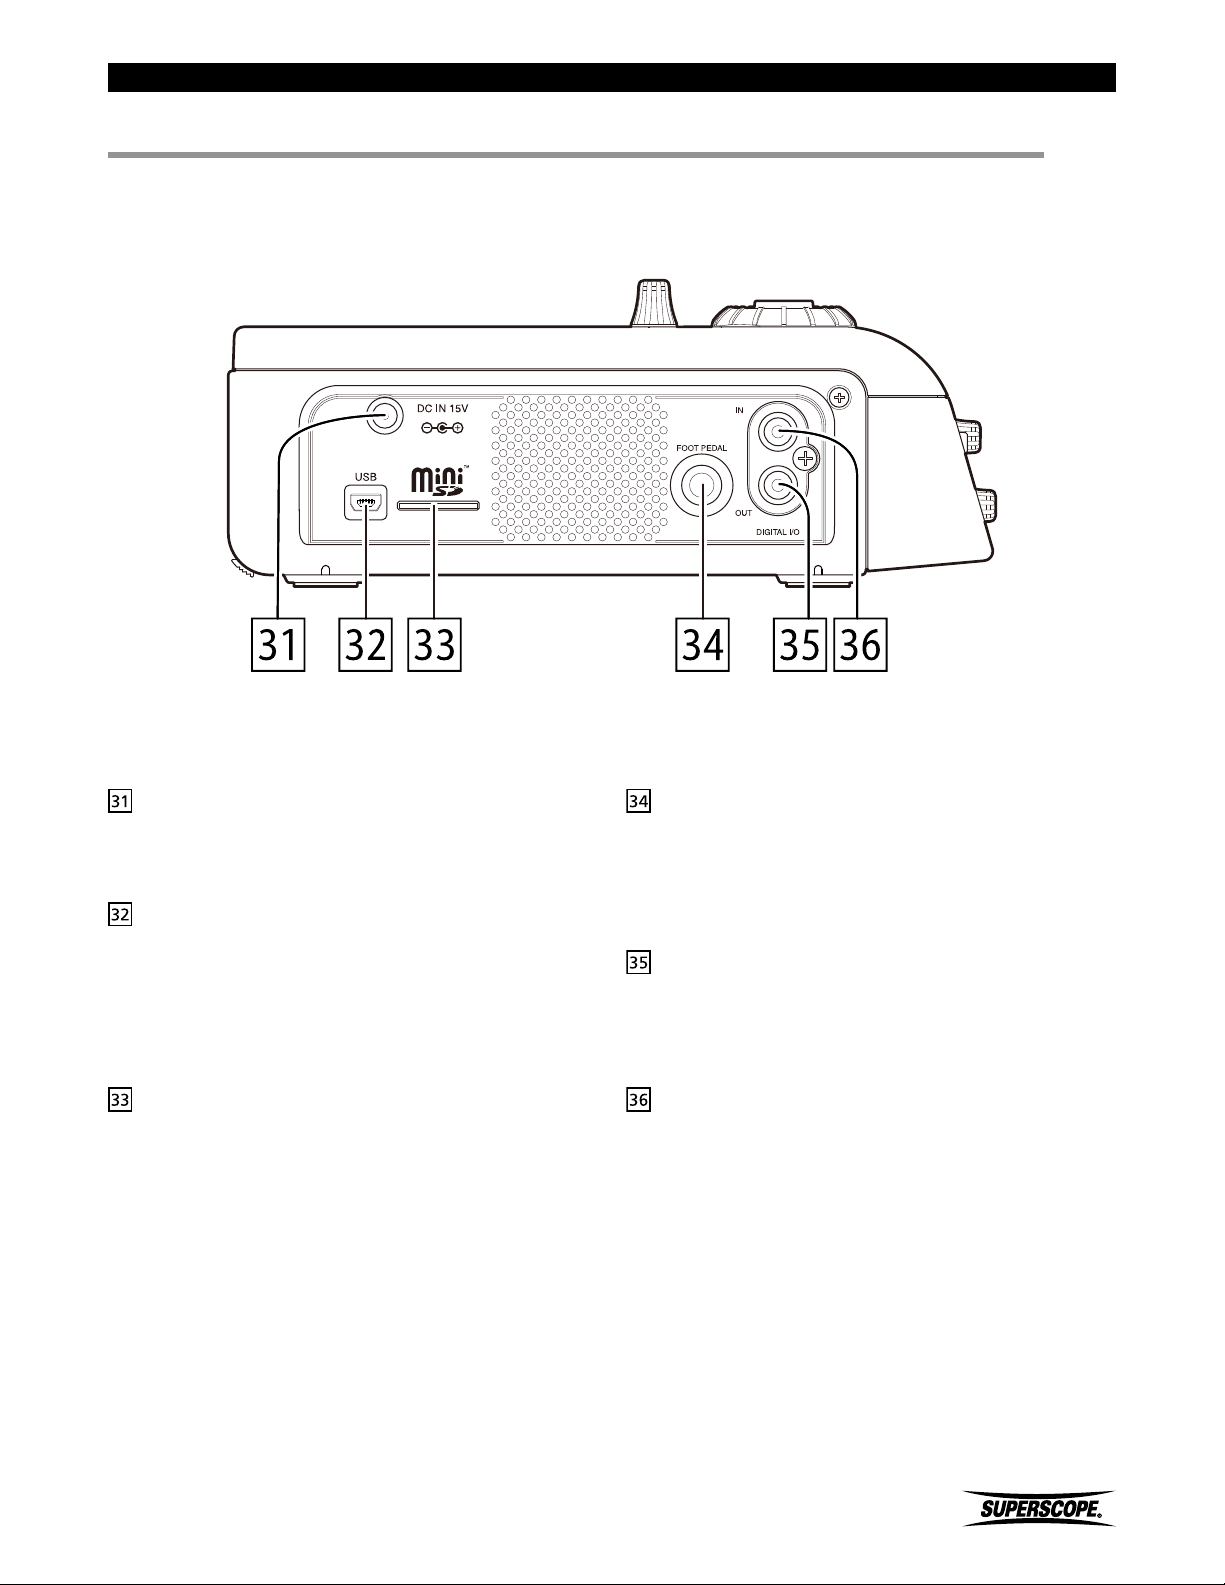
■Left Side Panel
Controls
DC Input Jack
Connect the DA450PSD AC to DC adapter here.
Do not use any adapter other than the DA450PSD.
USB Connector
Connect a USB cable here to transfer data between a
computer and the PSD430’s SD card or the Hard Drive
on a PSD450. In USB mode, all other features will be
inactive. The recorder will not enter USB mode during
recording or when menu screens are active.
Mini SD Slot
Insert a mini SD card in here. A micro SD card with a
micro-to-mini adapter is included with a PSD430. The
PSD450 does not include an SD card. Please purchase
either a mini SD card or a micro SD card with a micro-tomini adapter for use on the PSD450.
FOOT PEDAL Jack
Connect an optional foot pedal here to provide Play/
Pause, Record/Pause, or Punch In/Out control. The
Superscope FT200 foot pedal is available at our online
store.
DIGITAL OUT Jack
Connect to the digital input terminal of another audio
product. The system outputs a signal with a 44.1 kHz
sample rate.
DIGITAL IN Jack
Connect the digital output of another audio product to
this terminal.
Superscope PSD430 / PSD450 User Manual
- 17 -
Page 18
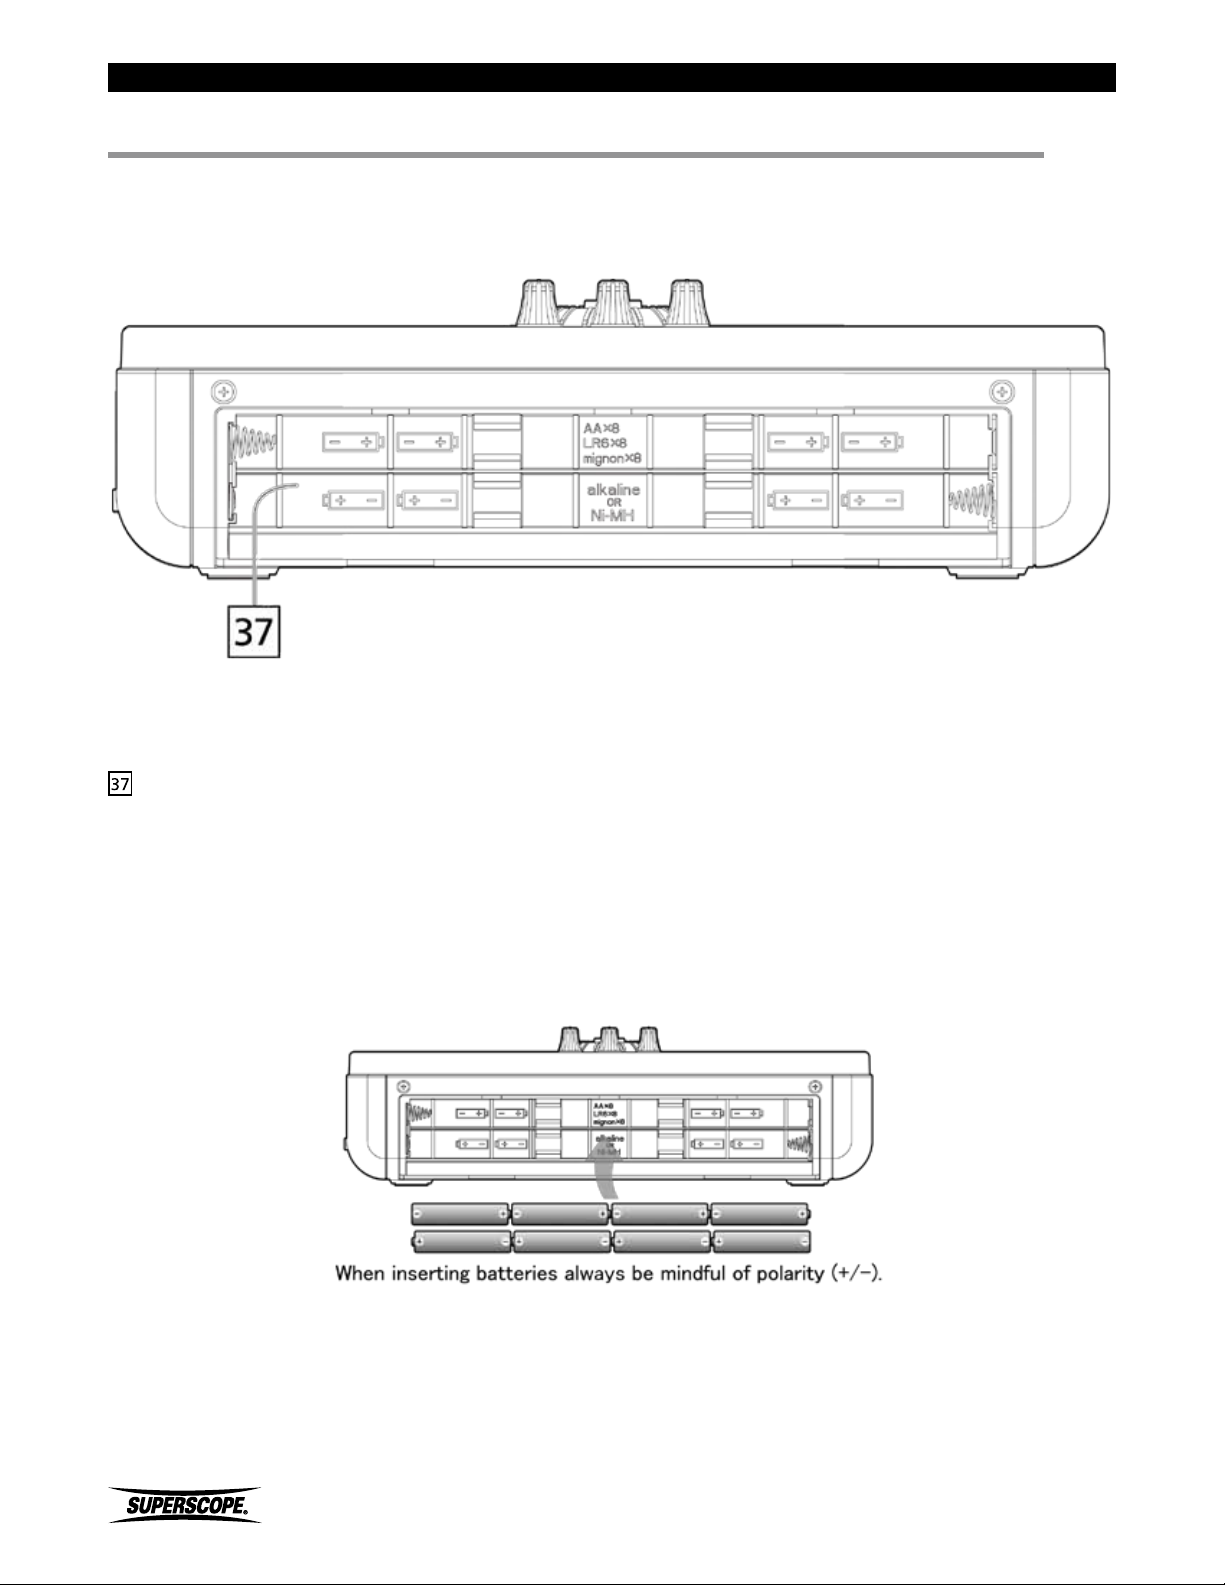
■Back Panel
Controls
Battery Compartment
Insert a Ni-MH rechargeable battery or eight alkaline size
AA batteries here. Please refer to Using Batteries.
- 18 -
Superscope PSD430 / PSD450 User Manual
Page 19
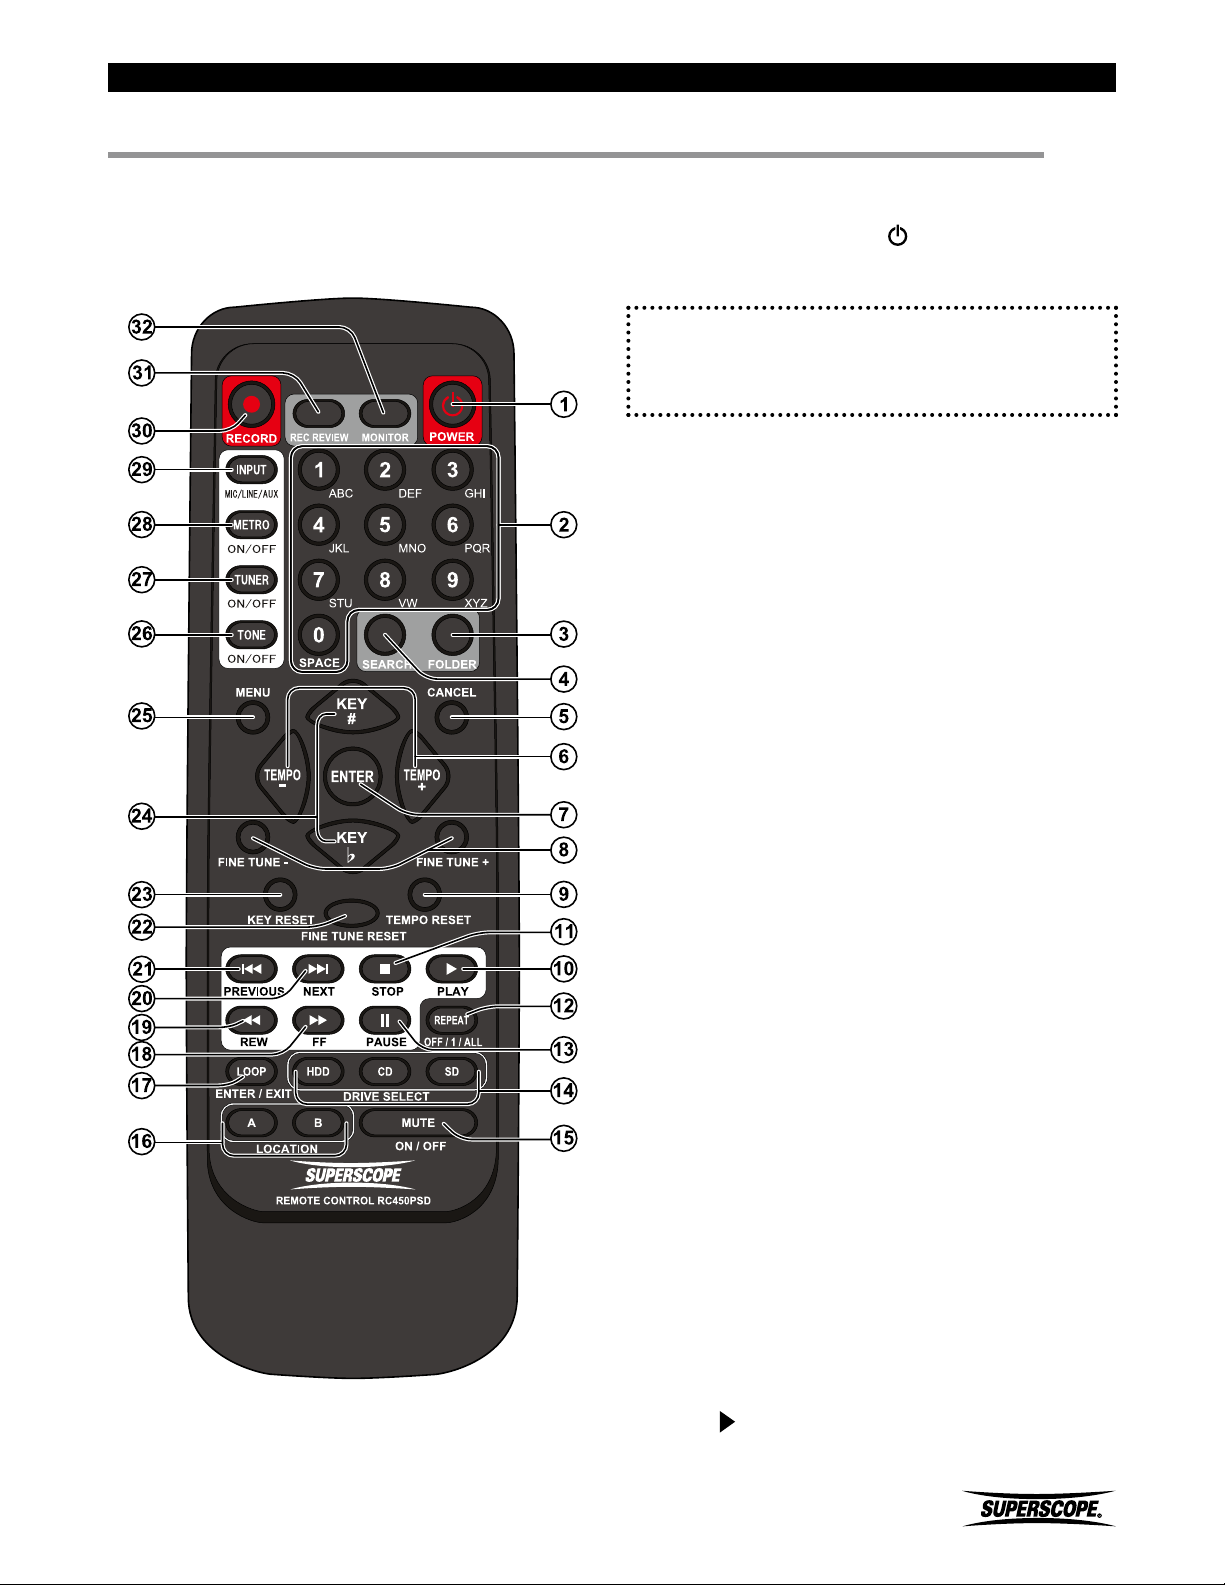
■Remote Control
Controls
STANDBY / POWER
Press to turn power ON or OFF.
※ During battery operation, this button can only
be used to power the unit off. The AC adapter
must be connected to power the unit on with
the remote control.
w Alphanumeric Keypad
When editing folder names, playlist names, or file
information, use the alphanumeric keypad to enter text.
It is possible to select track number dulling CD play.
e FOLDER
Press to select a new folder.
The place that is deeper than the second hierarchy
cannot access it.
r SEARCH
Press to access the Search function.
t CANCEL
When editing folder names, playlist names, or file
information, use this button to delete a character. Also
used to undo changes to Menu settings.
y TEMPO
Press to increase or decrease playback speed without
affecting pitch.
u ENTER
Press to enter selected menus or confirm setting
changes.
i FINE TUNE
Press to increase or decrease playback pitch without
affecting playback speed. Fine Tune control is adjustable
+/-50 cents (100 cents = 1 semitone).
Superscope PSD430 / PSD450 User Manual
o TEMPO RESET
Press to reset Tempo control to normal speed.
a PLAY
Press to play the currently selected track.
- 19 -
Page 20

Controls
s STOP
Press to stop playback.
d REPEAT
Press to change repeat mode. Options include: Off, All,
1, (Single, 1), (Single, All), and Single.
f PAUSE
Press to pause playback.
g DRIVE SELECT
Pressing the HDD (PSD450 only), CD or SD buttons will
display the contents of the selected drive.
h MUTE
Press to mute the internal speaker and Line Out. This will
not affect the headphones or Digital Out.
j LOCATION
A. LOCATION A – In Loop mode, press to set location A.
B. LOCATION B – In Loop mode, press to set location B.
KEY
Press to change the playback key in semitones. Press
‘♭’ to lower the key. Press ‘♯’ to raise the key. Key is
adjustable +/- one octave.
MENU
Press to view Menu options.
TONE ON/OFF
Press to sound the 440Hz tuning tone. The frequency of
this tone is adjustable between 410Hz and 470Hz. Press
this button a second time to return to the main screen.
TUNER ON/OFF
Press to access the chromatic tuner. Press this button a
second time to return to the main screen.
METRO ON/OFF
Press to turn the metronome ON and to enter the
metronome screen. Press this button a second time to
stop the metronome and return to the main screen.
k LOOP ENTER/EXIT
Press to enter and exit Loop mode.
FF (Fast Forward)
Press and hold to initiate an audible forward search of
the playing track.
REW (Rewind)
Press and hold to initiate an audible reverse search of the
playing track.
NEXT
Press to advance to the next available track.
PREVIOUS
Press to return to the beginning of the selected track.
Press within the first second of playback to return to the
previous track.
FINE TUNE RESET
Press to reset Fine Tune control to normal pitch.
INPUT MIC/LINE/AUX
Press to change the Input Source. Options include: Input
MUTE, Internal MIC, External MIC, LINE, INST, Internal
MIC (Lch) + INST, External MIC (Lch) + INST, LINE (Lch) +
INST, AUX, and DIGITAL.
RECORD
Press to enter Record Pause mode. Press this button a
second time to begin recording. During recording, press
this button to increment tracks.
When using One Touch Recording, recording begins after
this button is pressed one time.
RECORD REVIEW
In Record mode, press to stop recording and
automatically play back the recently recorded file.
MONITOR
Press to toggle the monitor source between Playback
Signal and Recording Signal. When Playback Signal is
selected, the input signals, e.g., External MIC, INST, etc.
will not be heard.
KEY RESET
Press to reset Key control to normal pitch.
- 20 -
Superscope PSD430 / PSD450 User Manual
Page 21
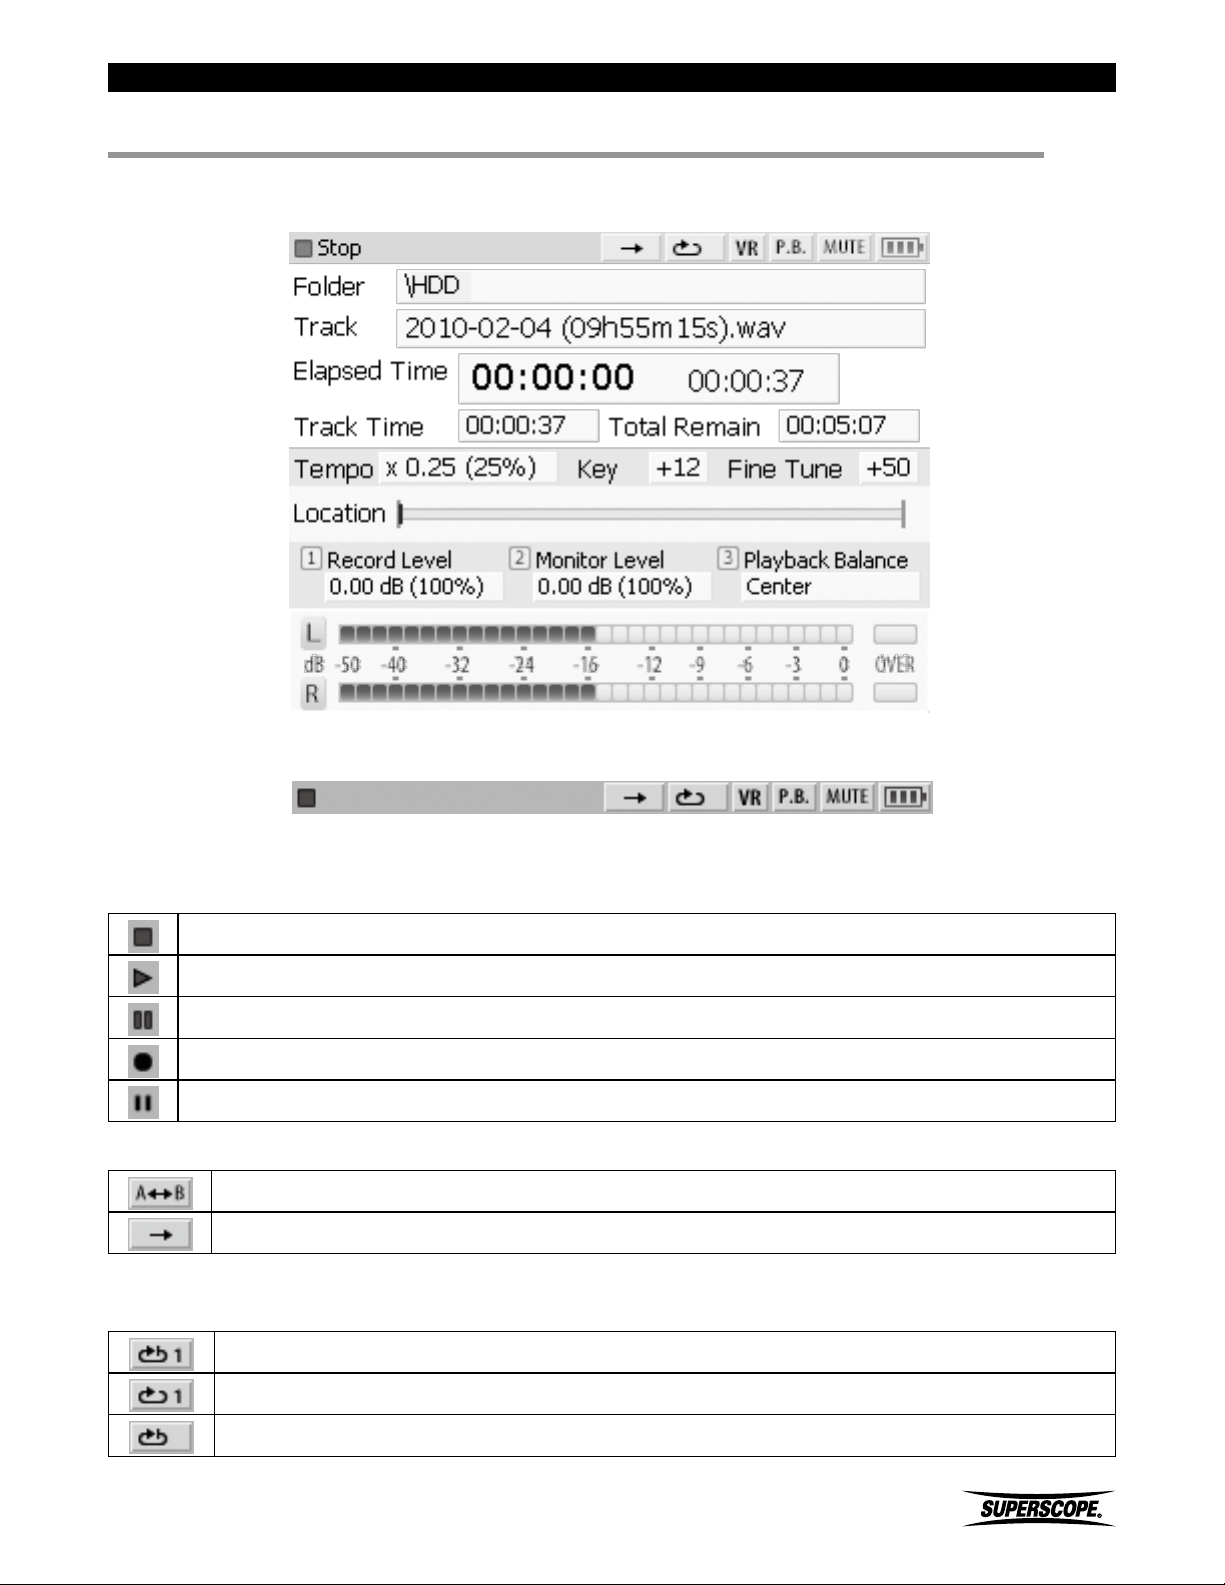
■LCD Display
PLAY / STOP Mode
LCD Display
Ⓐ Icons
① Status Icons
Indicates STOP
Indicates PLAY
Indicates PLAYBACK PAUSE
Indicates RECORD
Indicates RECORD PAUSE
②
Loop Icons
Indicates “A-B” LOOP Playback is ON
Indicates “A-B” LOOP Playback is OFF
Ⓐ
③
Repeat Icons
Play back current track once, then stop at start of current track (Single, 1)
Play back and repeat current track (Repeat 1)
Play back all tracks once, then stop at start of the first track (Single, All)
Superscope PSD430 / PSD450 User Manual
- 21 -
Page 22
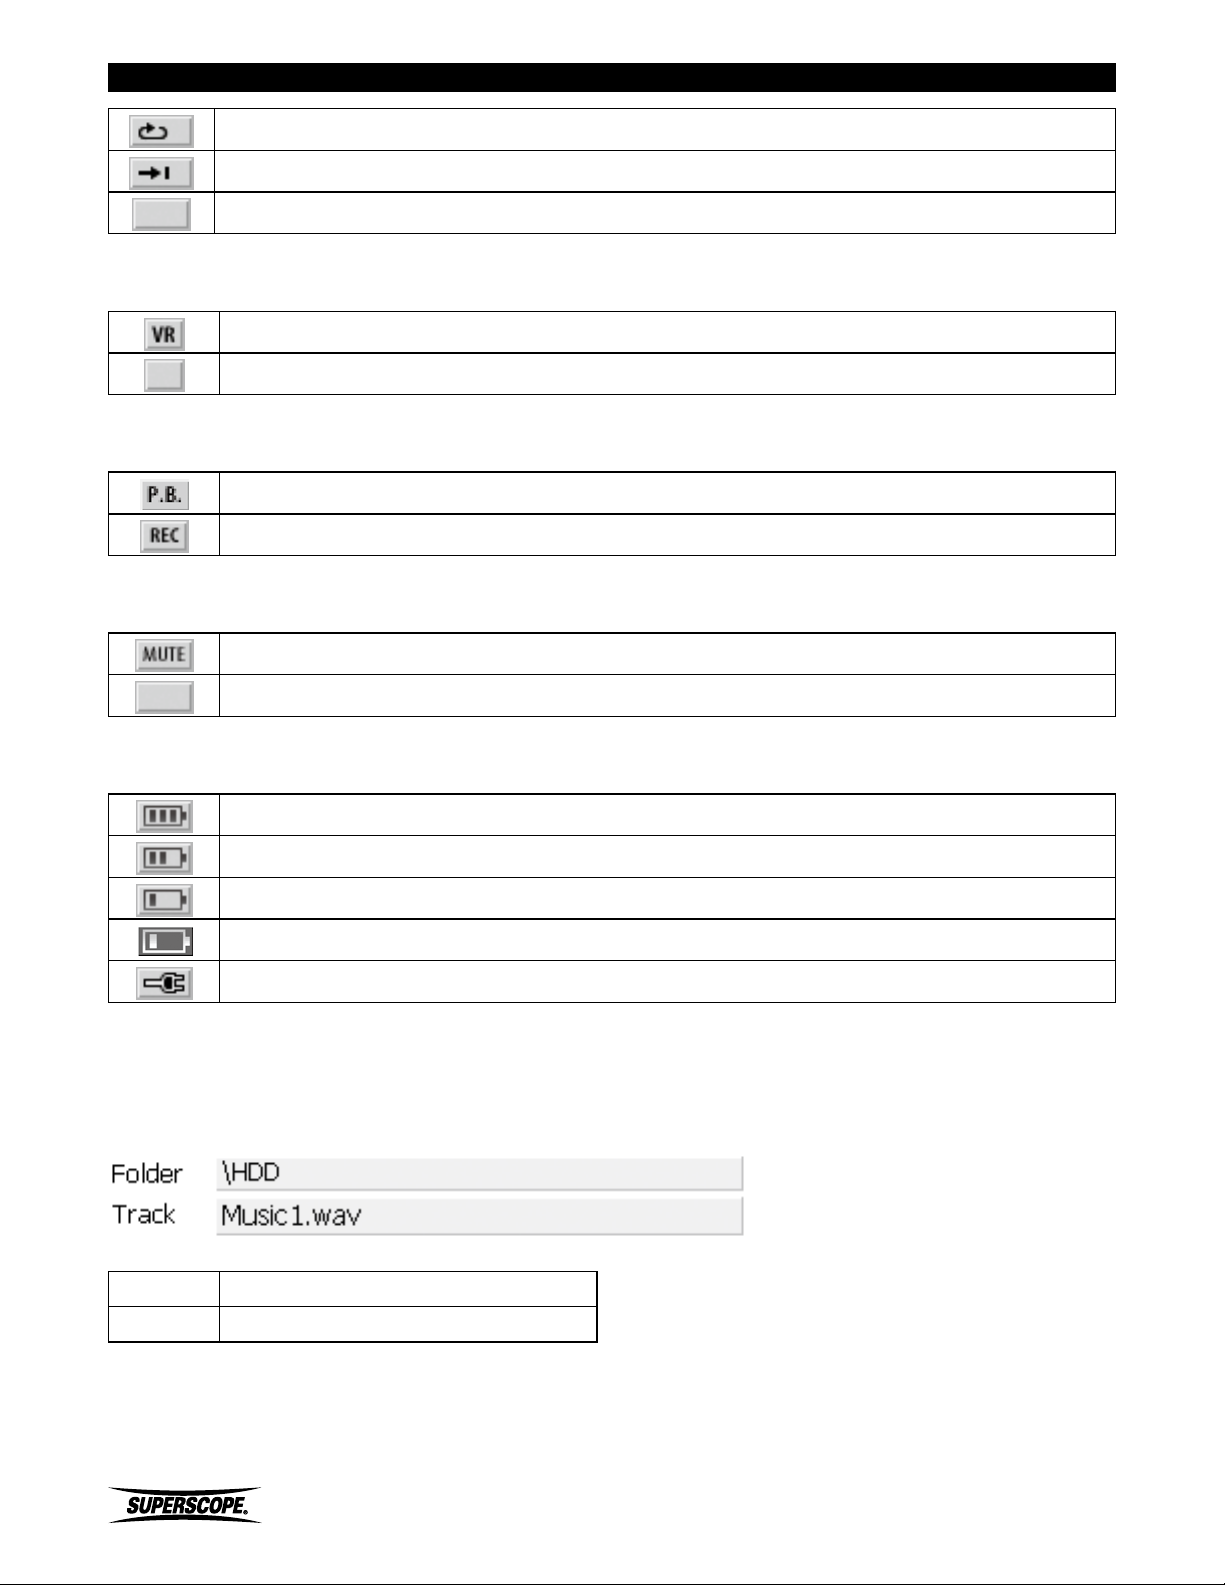
Play back and repeat all tracks (Repeat All)
Play back current track once, then stop at start of the next track (Single)
No indication when Repeat Mode if OFF
④
Voice Reduction Icons
Indicates VR is ON
Indicates VR is OFF
Monitor Icons
⑤
Playback audio is being monitored
Record audio is being monitored
Mute Icons
⑥
Indicates MUTE is ON
LCD Display
No indication when MUTE is OFF
AC/Battery Icons
⑦
Indicates the battery level is full
Indicates the battery level is less than full capacity
Indicates the battery level is low
Indicates the battery level is almost empty (needs to be charged or replaced)
Indicates the AC Adapter is connected
PLAY / STOP Mode
Ⓑ File Information
Folder
Track
Displays the current folder
Displays the active track
- 22 -
Superscope PSD430 / PSD450 User Manual
Page 23
LCD Display
PLAY / STOP Mode
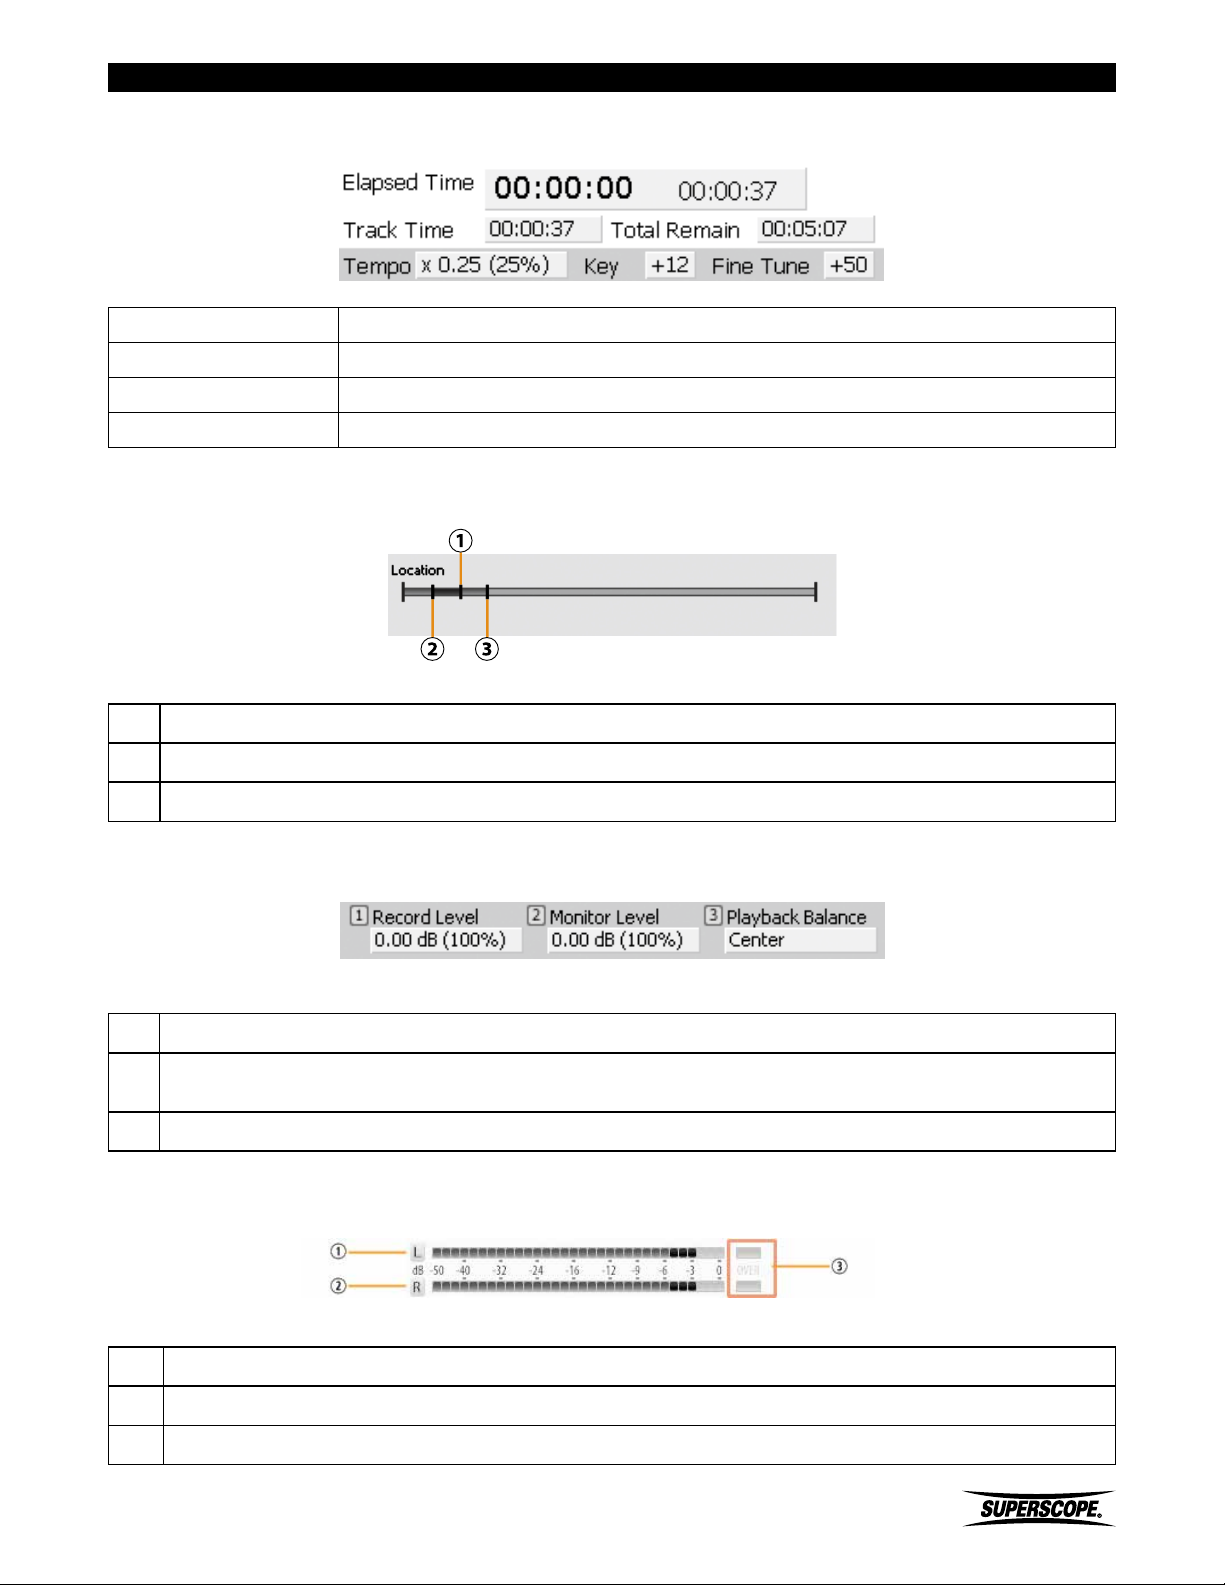
Elapsed Time Displays the elapsed and remaining time for the current track
Track Time Displays the total time for the selected track
Total Remain Displays the total time for all tracks in the currently selected folder
Tempo, Key, Fine Tune Displays the current Tempo, Key, and Fine Tune settings (only when modified)
PLAY / STOP Mode
Indicating Location
Ⓒ Playback Data
Ⓓ Location
Displays the current position on the time line.
Displays the position of location A on the time line.
w
Displays the position of location B on the time line.
e
PLAY / STOP Mode
Assignment of FUNCTION ADJUST knobs
When the Play/Stop mode screen is active, use FUNCTION ADJUST #1 to adjust Record Level.
When the Play/Stop mode screen is active, use FUNCTION ADJUST #2 to adjust Monitor Level.
w
This does not affect the level at which accompaniment files are recorded.
When the Play/Stop mode screen is active, use FUNCTION ADJUST #3 to adjust Playback Balance.
e
PLAY / STOP Mode
Ⓔ Balance & Levels
Ⓕ VU Meters
Level meter indication
Displays the sound level of the left channel in decibels (dB).
Displays the sound level of the right channel in decibels (dB).
w
When sound level is beyond 0dB, “OVER” turns on.
e
Superscope PSD430 / PSD450 User Manual
- 23 -
Page 24
■Powering On
Set Up
Using Batteries
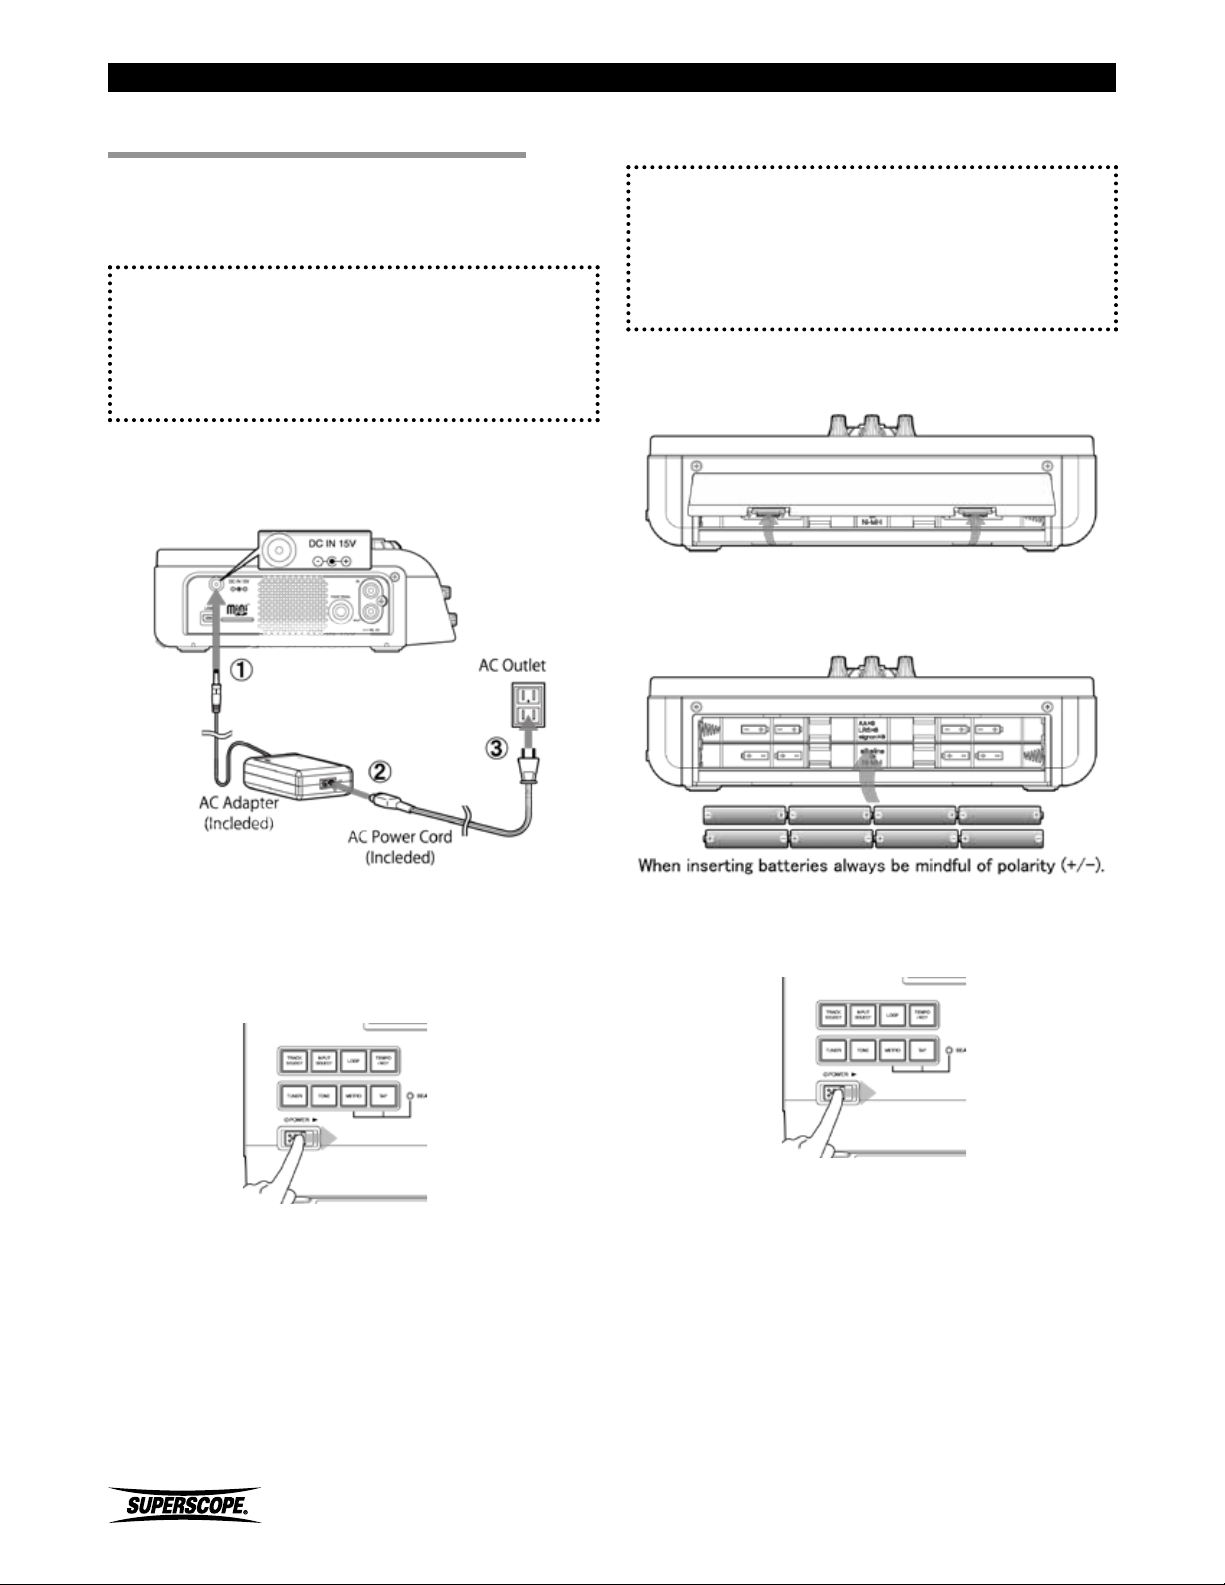
PSD400 series recorders work with AC power or AA size
batteries.
Before using batteries, please refer to Using Batteries.
※ It is not possible to power the unit ON with the
remote controller when using battery power.
※ Burning CDs with battery power is not
recommended. Please connect AC power
before burning a CD.
Using the AC Adapter
Compatible Batteries
PSD400 series recorders work with alkaline batteries
and rechargeable Ni-MH batteries.
※ Manganese batteries are not recommended
due to their low capacity.
1. Remove the battery cover on the back of the
recorder.
2. Insert eight alkaline AA size or Ni-MH batteries (fully
charged).
Connect the AC Adapter to the DC Jack.
w Connect the AC Cord to the Input of the AC Adapter.
e Connect the AC Plug to AC power source.
r Slide the POWER switch to power on.
r
3. Close the battery cover.
4. Slide the POWER switch to power on.
When inserting batteries always be mindful of polarity
(+/-).
※ During battery operation, an icon is displayed
in the top right corner of the display showing
battery power. See AC/Battery Icons.
- 24 -
Superscope PSD430 / PSD450 User Manual
Page 25
Battery Life (PSD450)
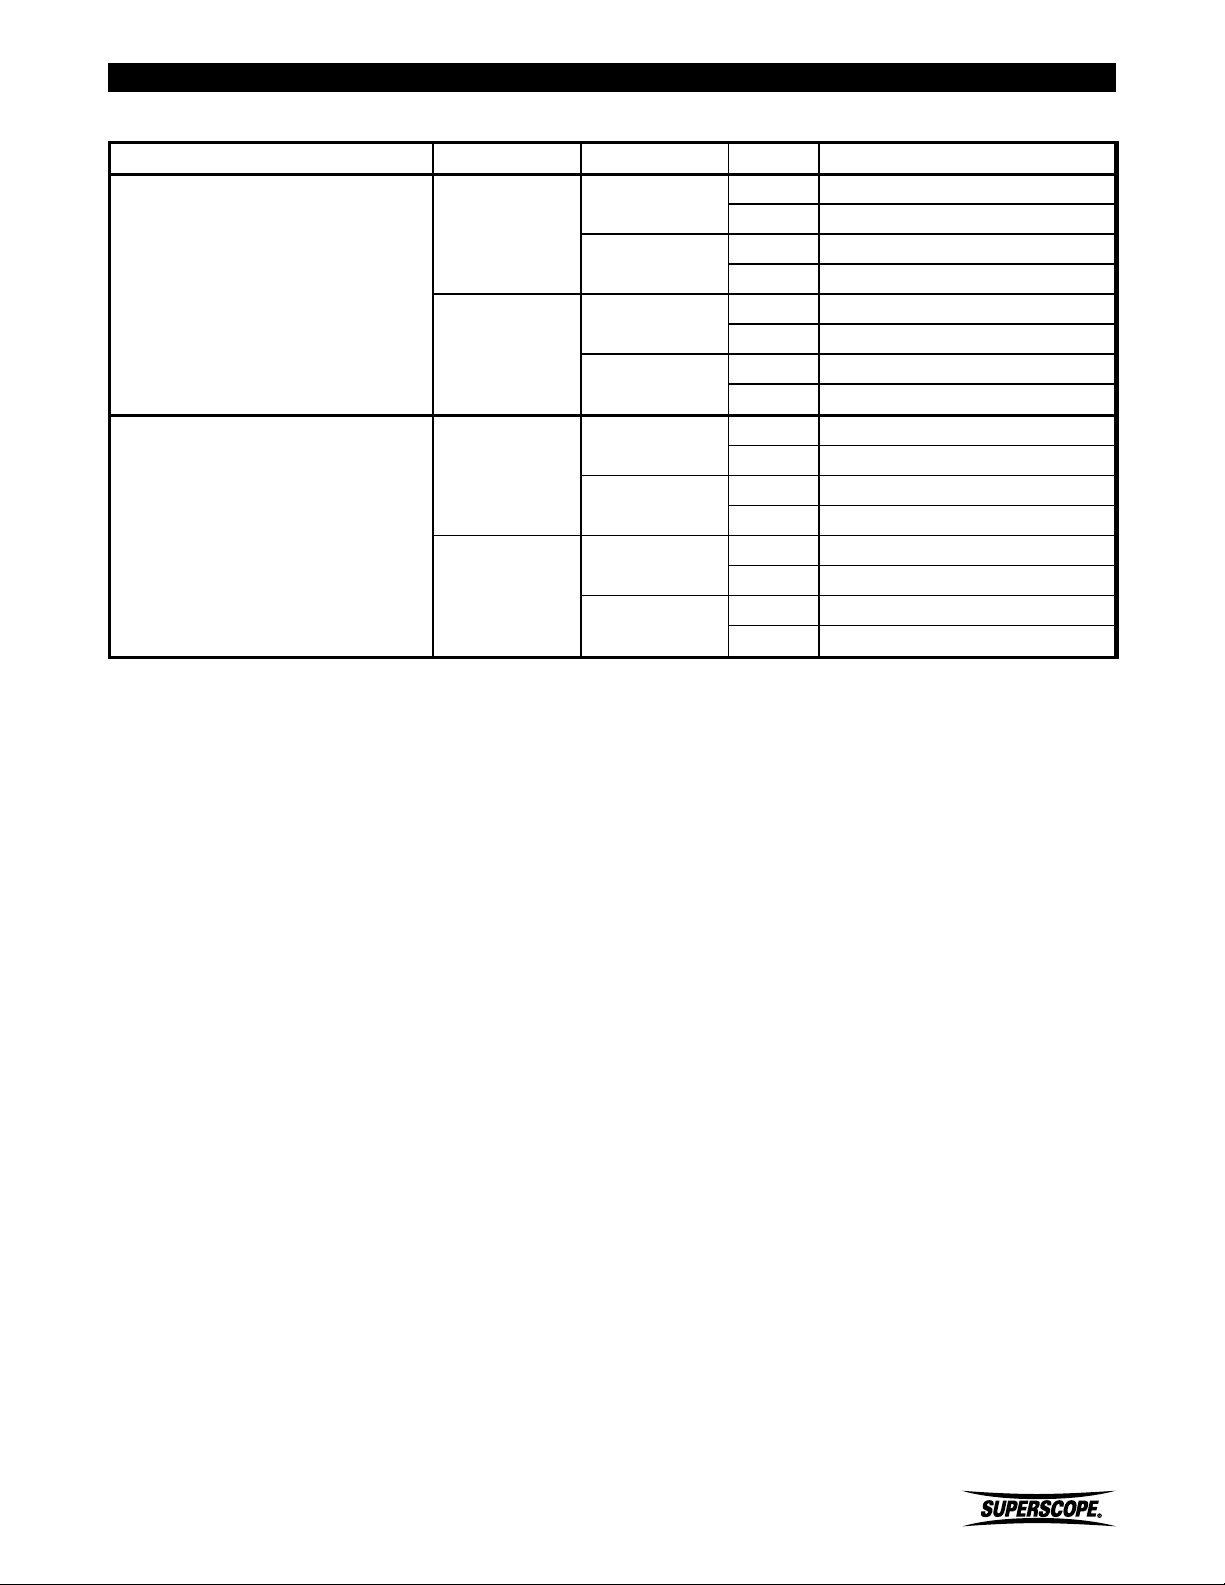
Battery Type ATA LCD Phantom PSD450 Battery Life (hours)
Fully charged 2,700mAh
Ni-MH
AA size
Alkaline
ON
OFF
(PSD430)
ON
OFF
(PSD430)
Set Up
Full bright
Dimmer
Full bright
Dimmer
Full bright
Dimmer
Full bright
Dimmer
OFF 4.8
ON 4.4
OFF 5.9
ON 4.9
OFF 5.2
ON 4.7
OFF 6.2
ON 5.4
OFF 2.5
ON 2.4
OFF 3.2
ON 2.7
OFF 2.6
ON 2.5
OFF 3.6
ON 3.0
Conditions: 77 degrees Fahrenheit.
Volume controller: Minimum position.
Mode: Recording MP3-Stereo-128kbps.
※The estimates above show minimum battery life for
the PSD450. Times for the PSD430 are the same
as those for the PSD450 with ATA (OFF).
AC Power and Battery Tips
• When the AC adapter is connected while batteries
are inserted, AC power will have priority over the
battery power supply.
• It can be helpful to use batteries and the AC power
supply together. If the AC power supply is removed
unexpectedly, recording or playback will continue
without interruption using battery power.
• Do not mix new and old batteries or battery types
(Alkaline or Ni-MH).
• When the unit is not in use for a long period of time,
please remove batteries to prevent battery leakage.
Superscope PSD430 / PSD450 User Manual
- 25 -
Page 26
Set Up
Setting Date and Time
New recordings are given a default track title comprised
of the current date and time, e.g., 2010-01-01
(12h00m00s).wav. Follow these steps to ensure that the
date and time is accurate.
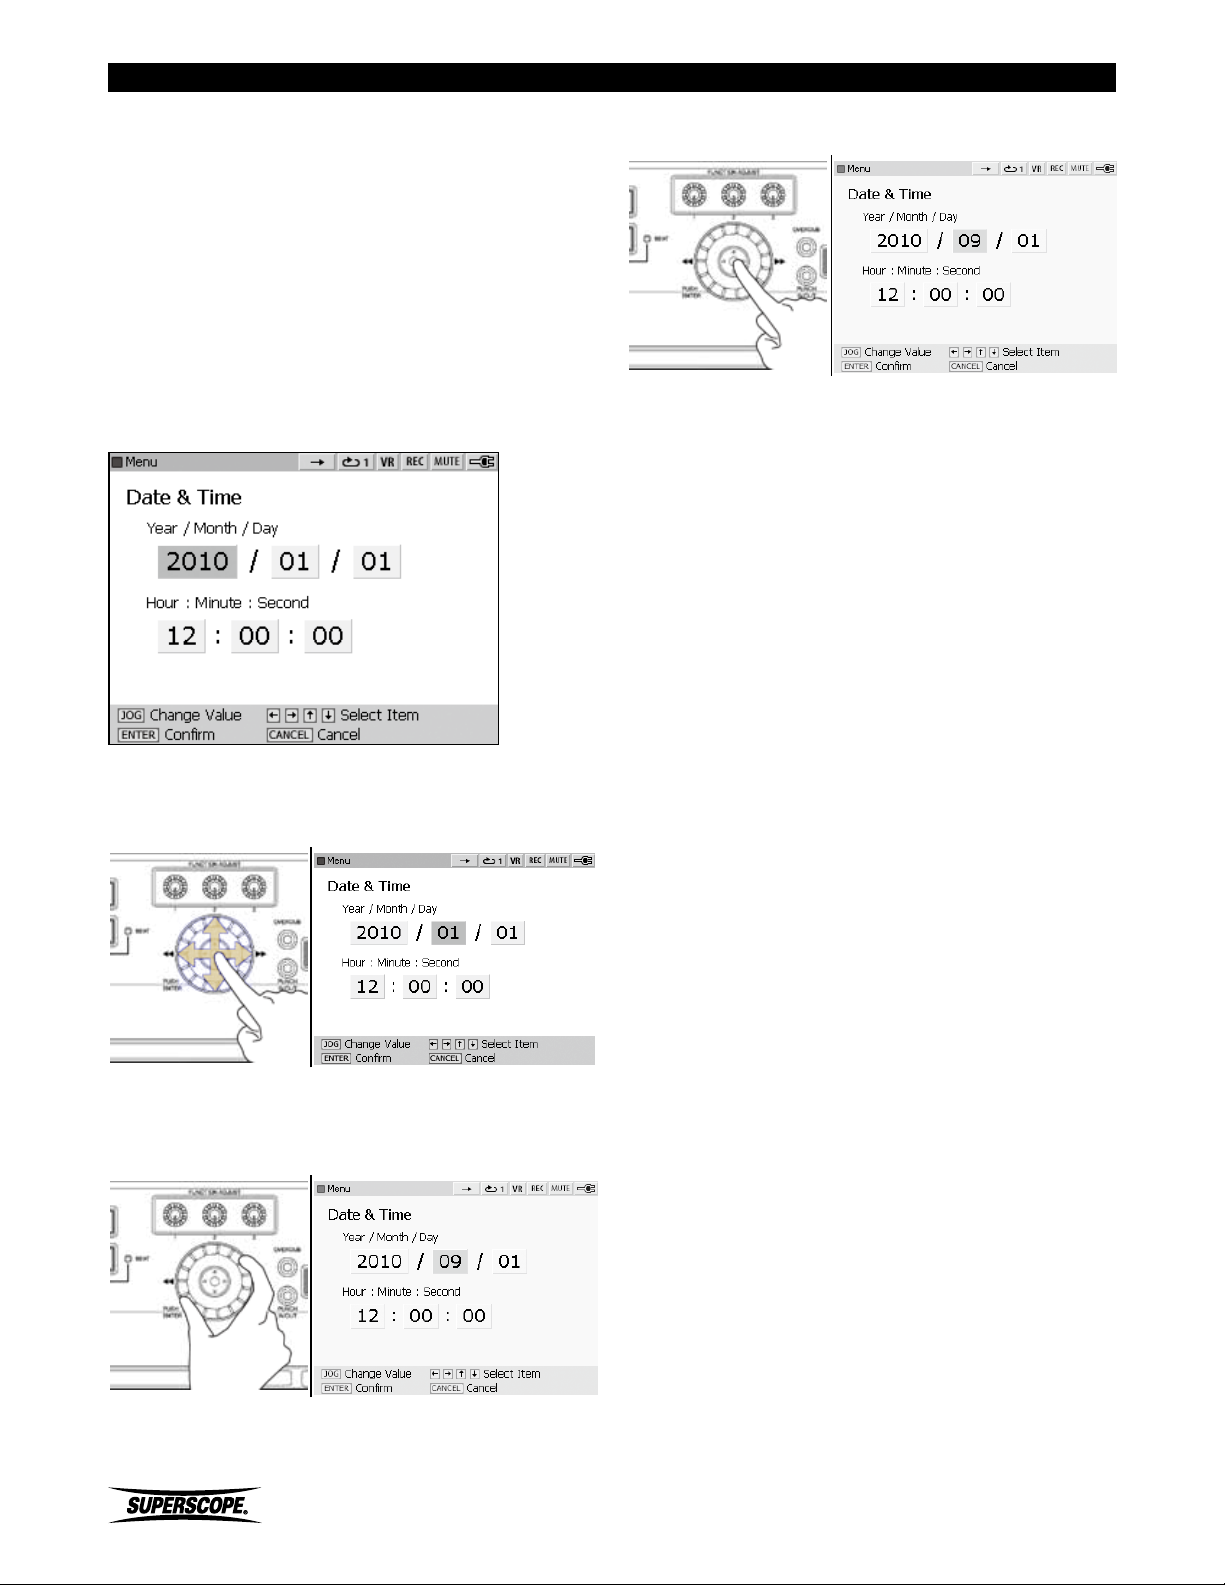
1. Press the Menu button.
2. Use the joystick or jog wheel to highlight System
Settings. Press ENTER.
3. Use the joystick or jog wheel to highlight Set Time/
Date. Press ENTER.
The following screen should appear:
6. Press ENTER to confirm new settings.
4. Move the joystick right, left, up, or down to select
Year, Month, Day, Hour, Minute, or Second.
5. Change Time and Date values by turning the jog
wheel.
- 26 -
Superscope PSD430 / PSD450 User Manual
Page 27
Set Up
The Internal Hard Drive (HDD) - PSD450 Only
Upon Powering Up, the PSD450 will create a file
database on the internal HDD. During this process,
the PSD450 scans the HDD for audio files (WAV,
MP3) and ID3 tag information (Artist, Title, Album,
etc.). The time to create this database will vary based
on the contents of the HDD:
A. Maintaining a Large Number of Audio Files on
the HDD
The amount of audio files and folders you choose to
store on the HDD will directly affect the amount of
time it takes to create a file database. Superscope
recommends that you limit the number of files and
folders on the HDD.
B. Maintaining a Large Number of Non-Audio Files
on the HDD
The PSD450 must scan all files before proceeding,
so storing non-audio files on the HDD is not
recommended. Any number of additional files on
the HDD (e.g., jpg, mov, pdf, etc) will slow down
database creation.
C. Storing Large Audio Files on the HDD
When an audio file is detected on the HDD, the
PSD450 will open the audio file and begin searching
for content information, e.g. Title, Artist, Album,
etc. The PSD450 must search the entire file in case
this information is stored at the end of the file.
Large audio files therefore require more time during
database creation.
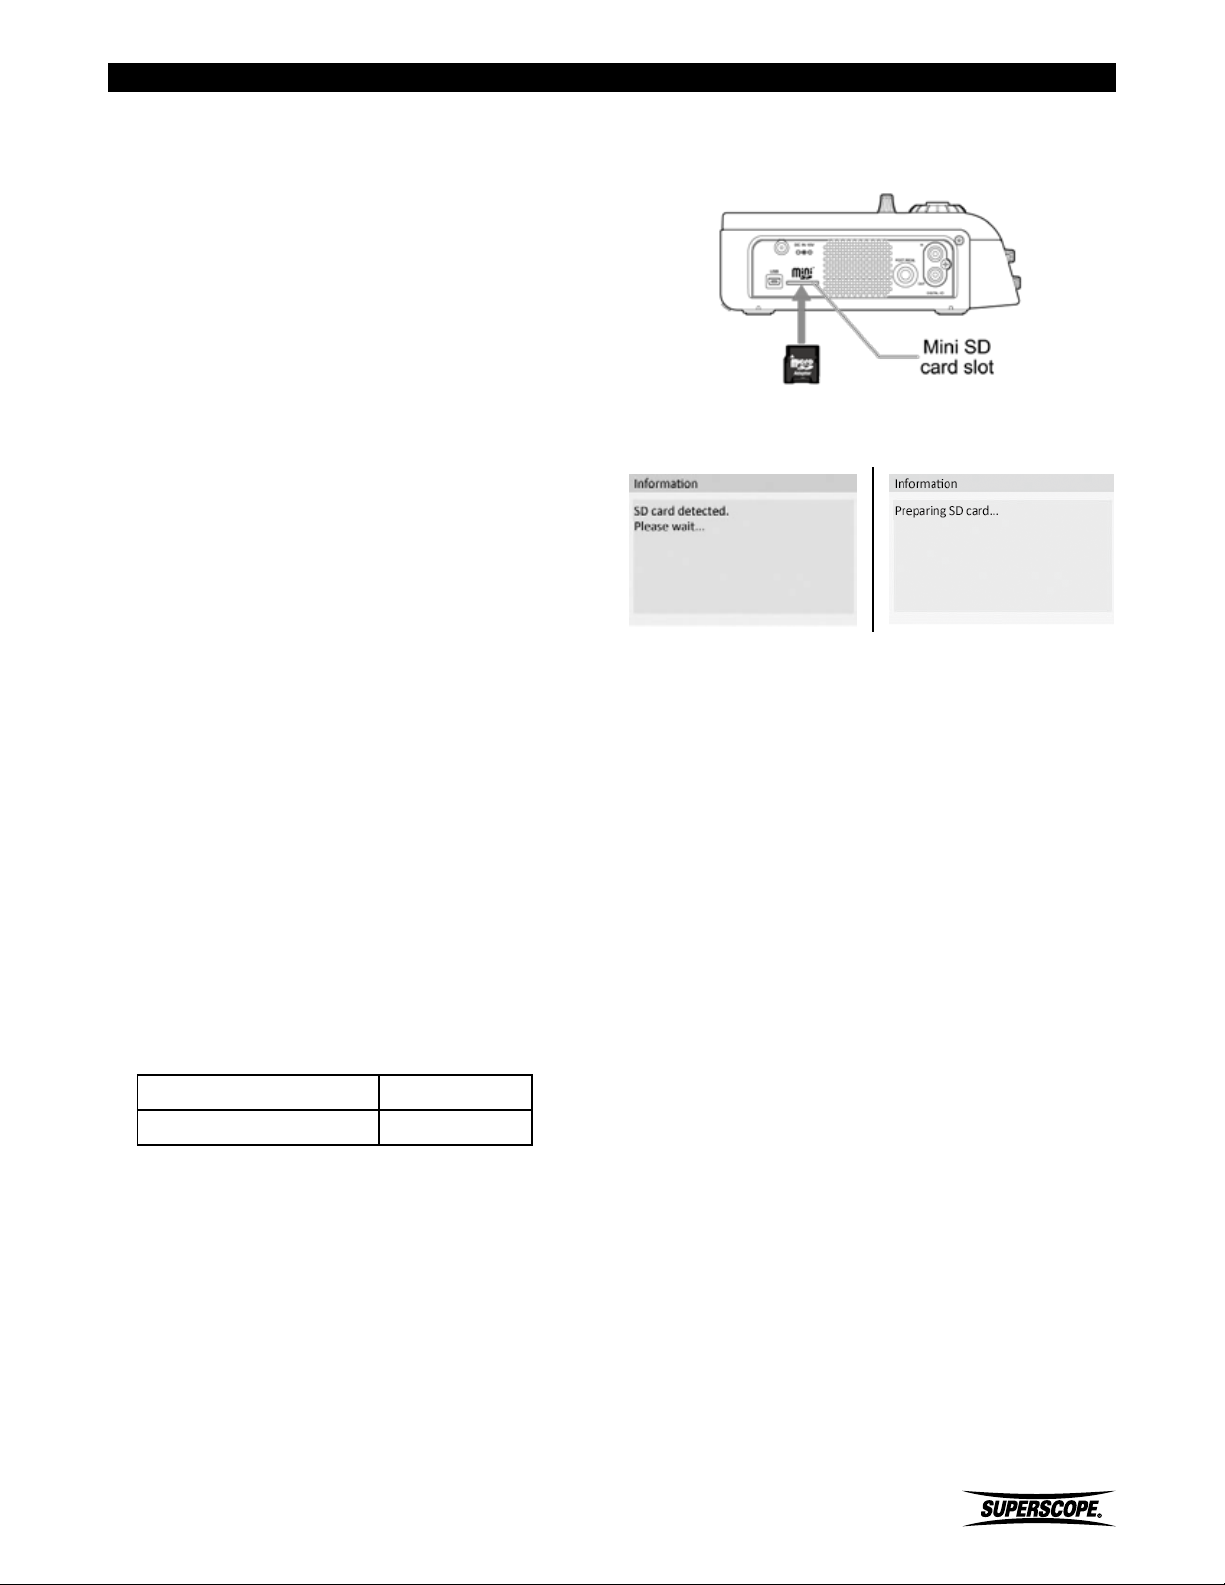
Inserting a Mini SD Card
Insert a mini SD card (or micro SD with mini adapter) into
the mini SD card slot on the left panel of the recorder.
The recorder will begin creating a file database once an
SD card is detected.
※ The same factors that apply to the Internal
Hard Drive of the PSD450 also apply to
database creation when inserting an SD card
on either the PSD430 or PSD450. Do not
remove the mini SD card during recording,
playback, or editing. It is recommended
that you remove the mini SD card only after
switching off power to avoid any risk of lost
or damaged data.
※ The PSD450 will recognize a maximum 99 files
for each folder. If you attempt to record more
than 99 files in a folder, a new folder will be
created automatically.
PSD450 File and Folder Limits
Files Per Folder 99
Single File Size 2GB
※ When the above limits are exceeded
during recording, a new folder is created
automatically and recording continues.
Note: During the transition time, audio may
be lost.
Superscope PSD430 / PSD450 User Manual
Removing a Mini SD Card
Safe SD Card Removal
1. Confirm that the recorder is not writing to the SD
card (recording or editing).
2. Push the mini SD card further into the unit until the
mini SD card springs outward.
3. Remove the mini SD card.
- 27 -
Page 28
Set Up
■Setting Up Speakers
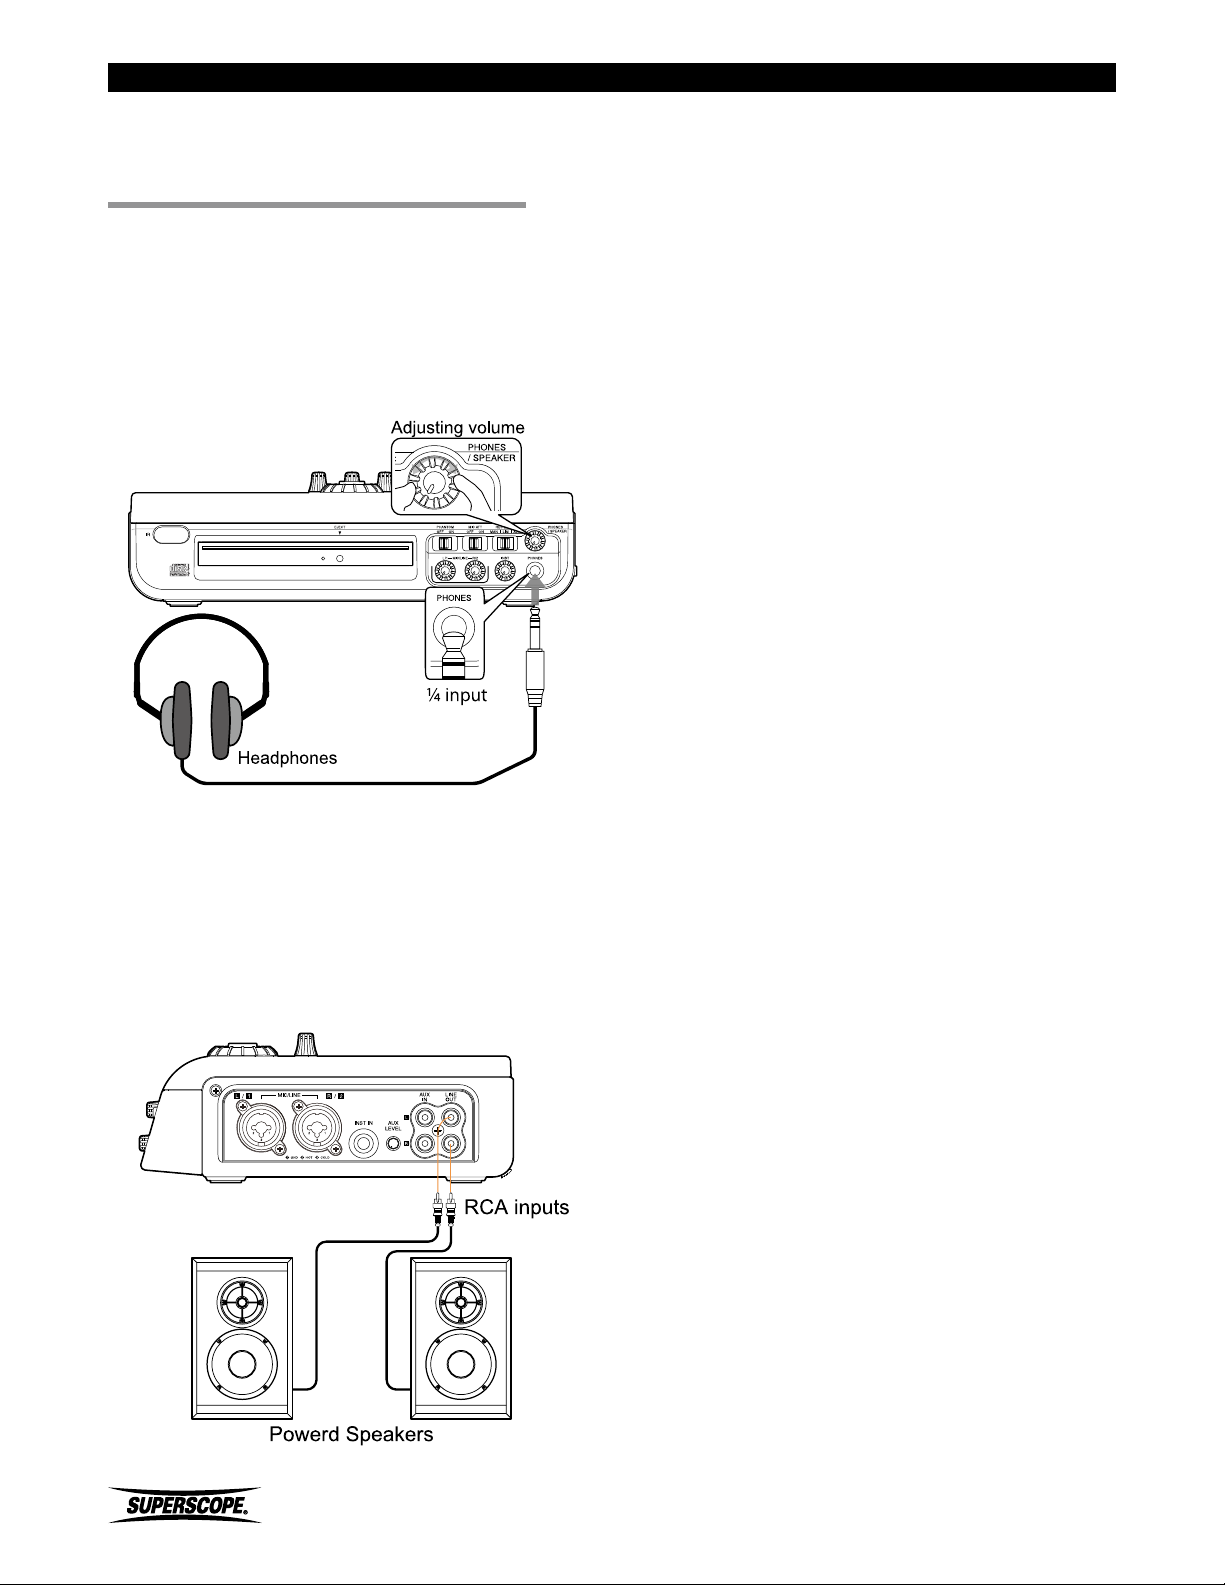
Using Headphones or the Built-In
Speaker
When using headphones or the built-in speaker, regulate
volume by turning the PHONES/SPEAKER level knob on
the front panel. The internal speaker will be muted when
headphones are connected.
External Speakers
When using a powered speaker system, (speakers with
built-in amplifiers), please connect the speaker’s LINE
INPUT to the LINE OUT terminal on the right side panel.
The left channel is the white terminal and the right
channel is the red terminal. Use the volume control on
the powered speakers to adjust level.
.
- 28 -
Superscope PSD430 / PSD450 User Manual
Page 29
■Setting Up Microphones, Instruments and Other Sound Sources
The PSD400 series is designed to record microphones,
musical instruments (guitars and keyboards), line level
equipment and digital equipment (preamps, mixers,
etc.). Please refer to the procedure that describes your
particular recording set-up.
Microphones
Set Up
External Microphones
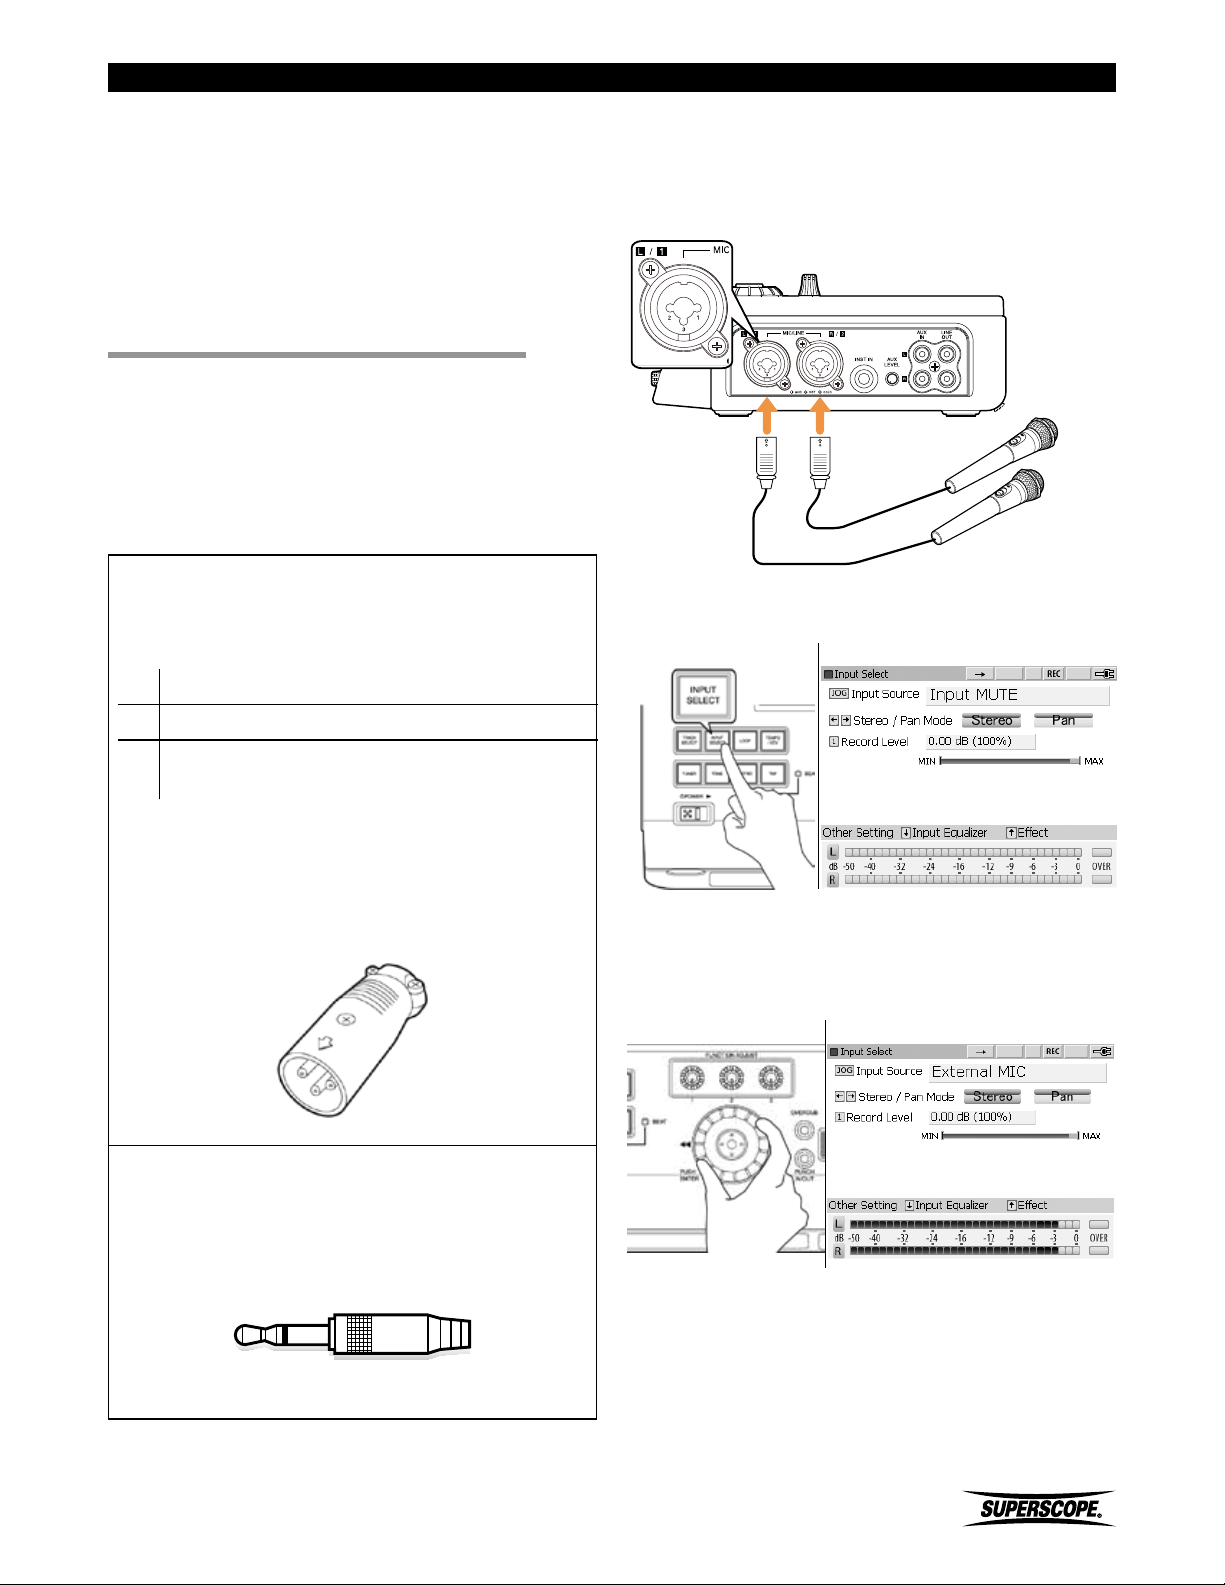
1. Insert microphones into the MIC/LINE input jacks on
the side panel. Both XLR type and ¼”standard plug
types can be used.
XLR plugs
Balanced Connections
Balanced signals require three separate connections
(HOT, COLD, GND):
GND refers to the grounding wire.
HOT refers to the original audio signal.
The COLD signal is the original signal with
opposite phase.
Using balanced connections like the XLR plug (male)
will help to eliminate noise, especially when running
long cable lengths.
XLR Plug
2. Push the INPUT SELECT button to display the Input
Source options.
Input Select Screen
3. Turn the jog wheel to select "External MIC” and
then press the INPUT SELECT button to exit the
screen.
Input Select Screen
Unbalanced Connections
Unbalanced signals only use two connections and are
therefore more susceptible to noise than balanced
connections.
Unbalanced ¼” Plug
Superscope PSD430 / PSD450 User Manual
- 29 -
Page 30
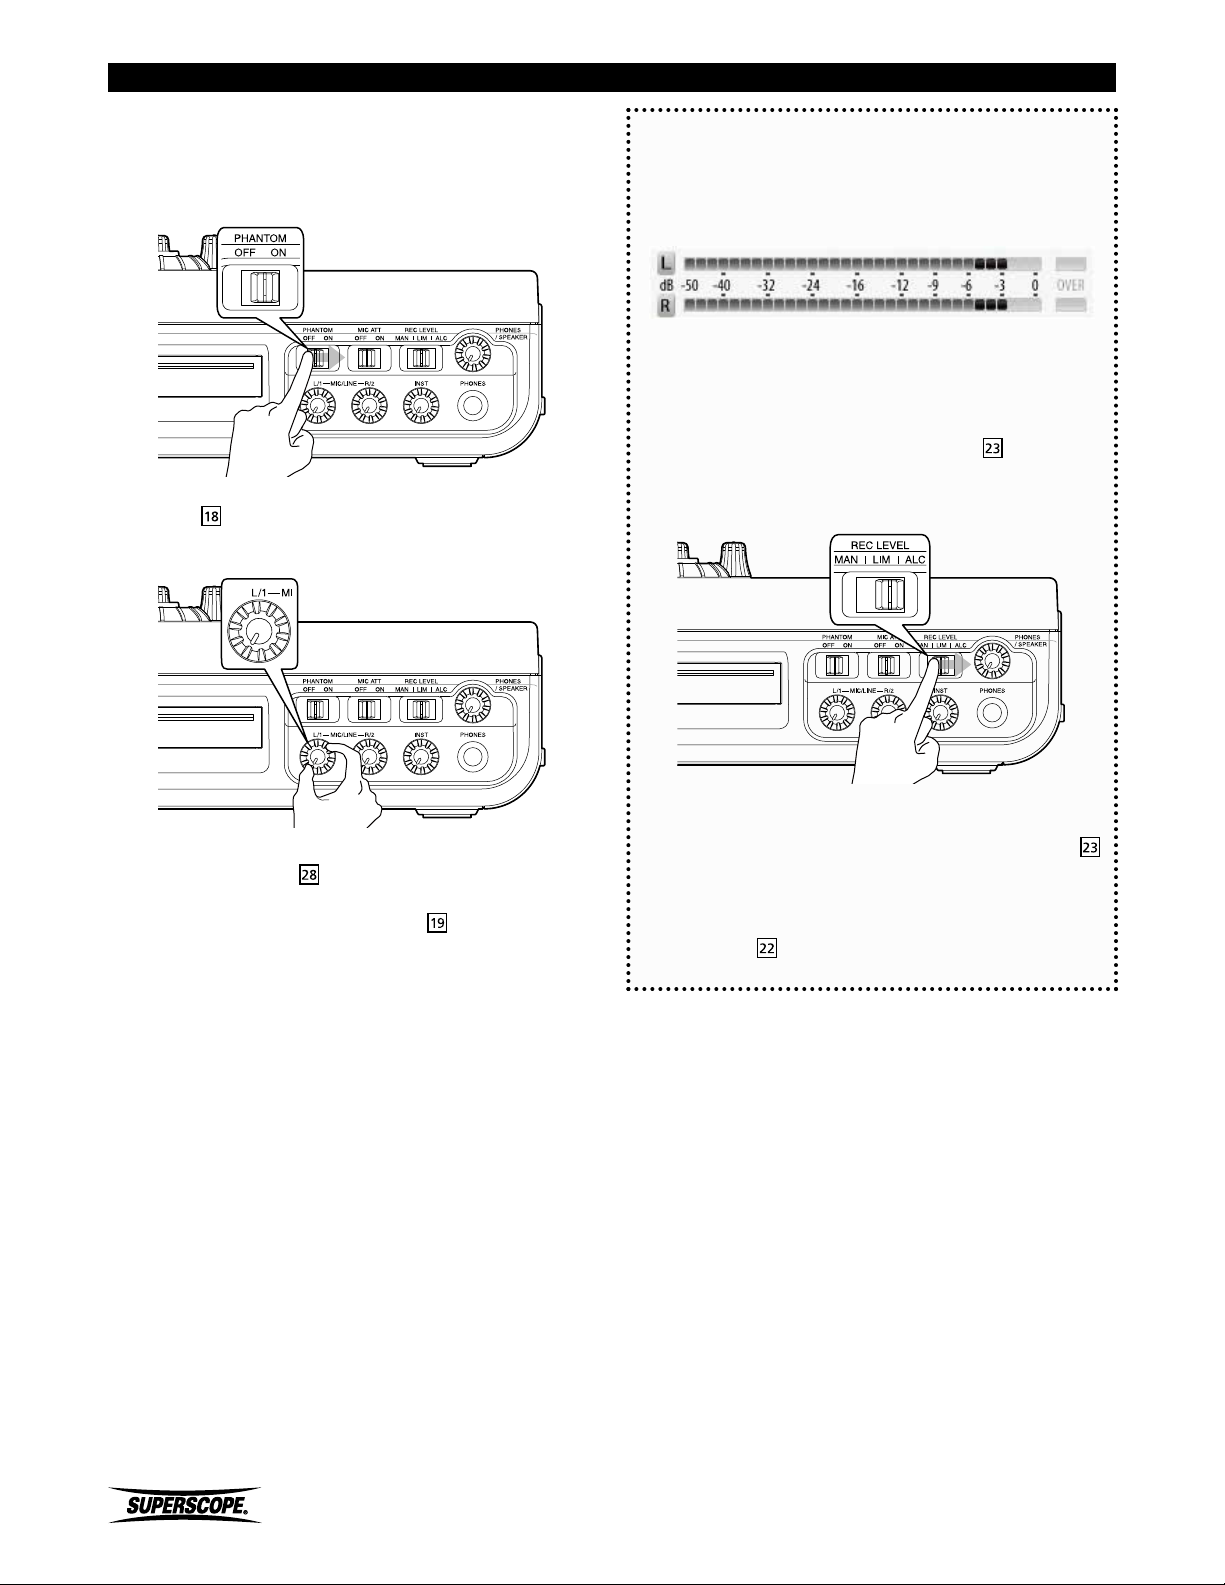
Set Up
When using microphones requiring 48V phantom
power, move the PHANTOM switch to the ON position.
Consult your microphone’s owner’s manual for power
requirement specifications.
Adjust the MIC / LINE L & R Level Controls to obtain a
suitable recording level. See Setting Levels, below.
Setting Levels
As you sing or play your instrument, turn the L/1
and R/2 input-level control knobs clockwise while
observing the display VU meters.
When your performance is at its loudest, the VU meter
should approach 0 dB without lighting OVER.
If the meter consistently lights red, adjust the inputlevel control knobs counter clockwise to reduce the
level and avoid distortion. Switching the
switch to the LIM (Limiter) setting can protect the
recording from distortion caused by transient peaks.
REC LEVEL
※ When using the AUX input, control input
level with the
right side panel. When using the INST input,
control input level with the
level controller.
AUX LEVEL controller on the
Instrument
To disengage the L/1 and R/2 input-level control knobs
and set the recording level automatically, adjust the
REC LEVEL switch to ALC.
If your mics have higher than normal output, try
switching the MIC ATT switch to ON.
- 30 -
Superscope PSD430 / PSD450 User Manual
Page 31
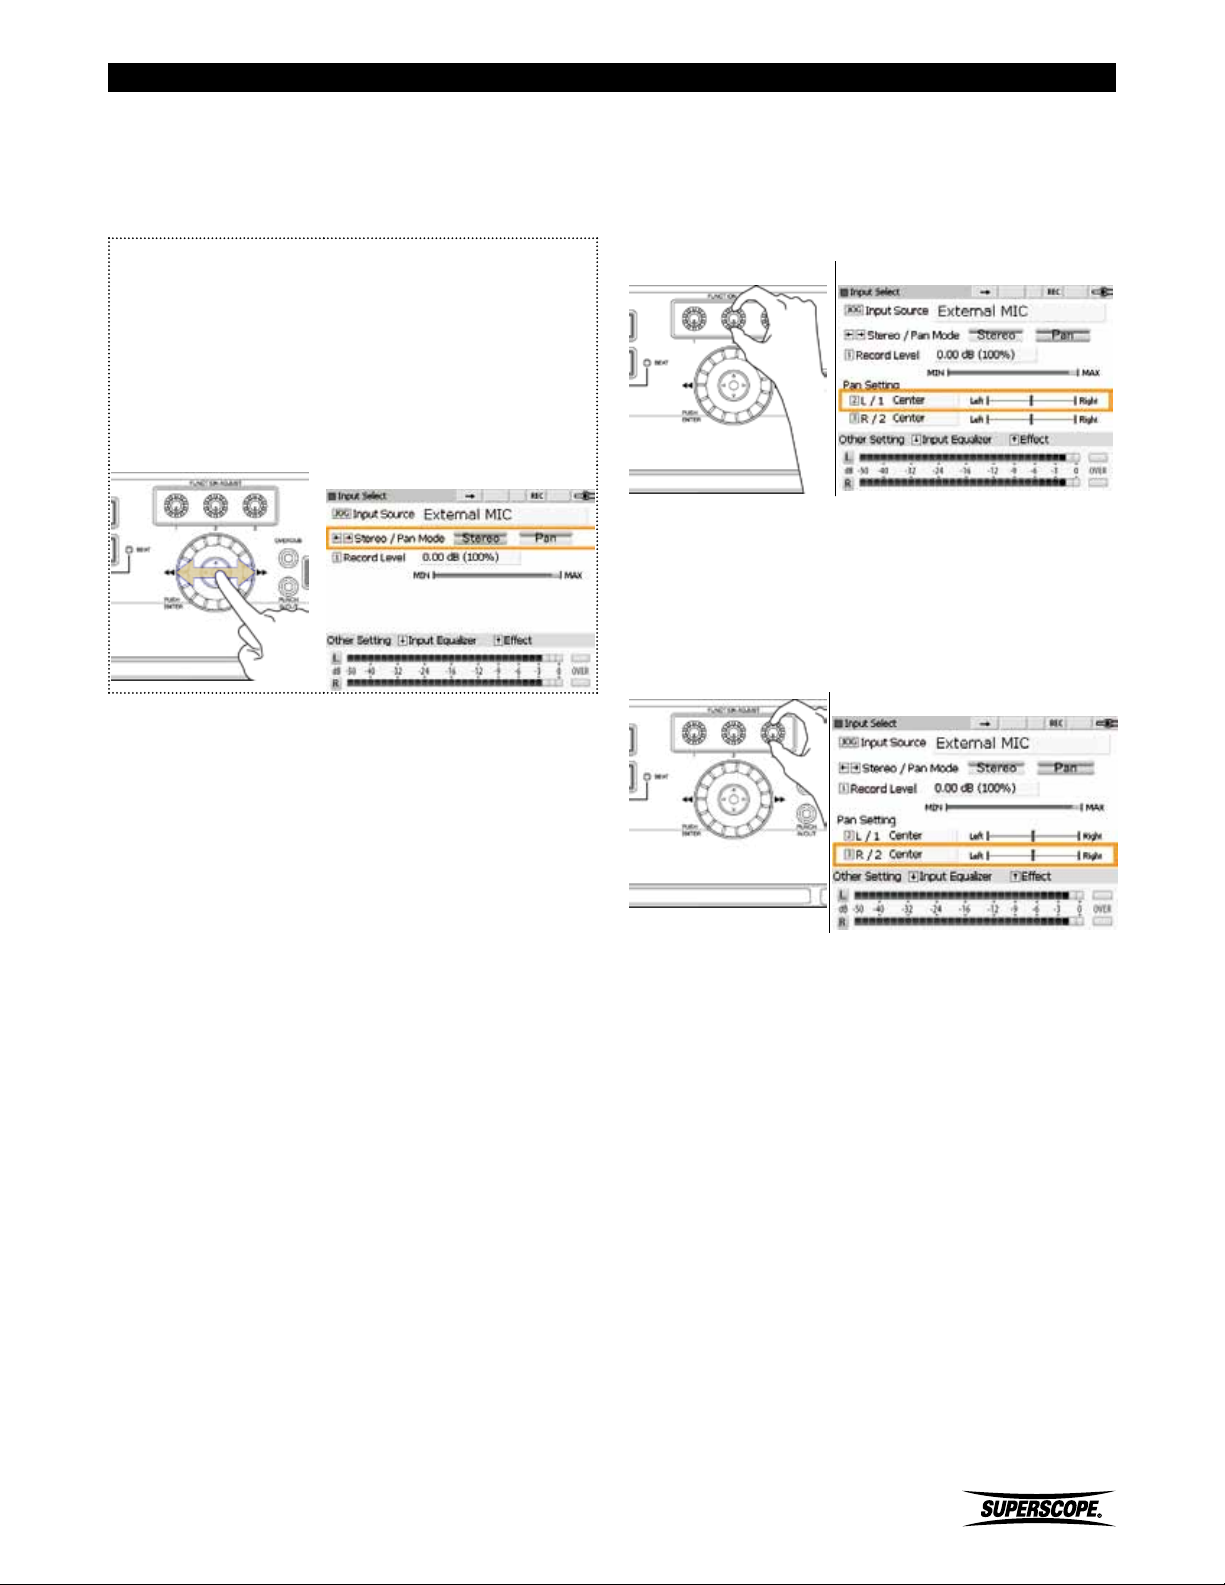
Set Up
STEREO/PAN Mode
From the Input Select screen, move the joystick right or
left to select Stereo Mode or Pan Mode (Stereo mode is
the default setting).
Stereo Mode
Left channel inputs (L) are routed to the left channel
of the recording. Right channel inputs (R) are routed to
the right channel of the recording.
Pan Mode
Input signals can be routed to any position along the
(L/R) stereo spectrum.
Input Select Screen
Pan Setting – L/1
Turn FUNCTION ADJUST #2 (4B) to adjust the Pan
Setting for input L/1 (the left microphone). Adjustments
are made in 1% increments between Left 100% - Center
- Right 100%. The initial setting is Center.
Input Select Screen
Pan Setting – R/2
Turn FUNCTION ADJUST #3 (4C) to adjust the Pan
Setting for input R/2 (the right microphone). Adjustments
are made in 1% increments between Left 100% - Center
- Right 100%. The initial setting is Center.
Input Select Screen
Superscope PSD430 / PSD450 User Manual
- 31 -
Page 32
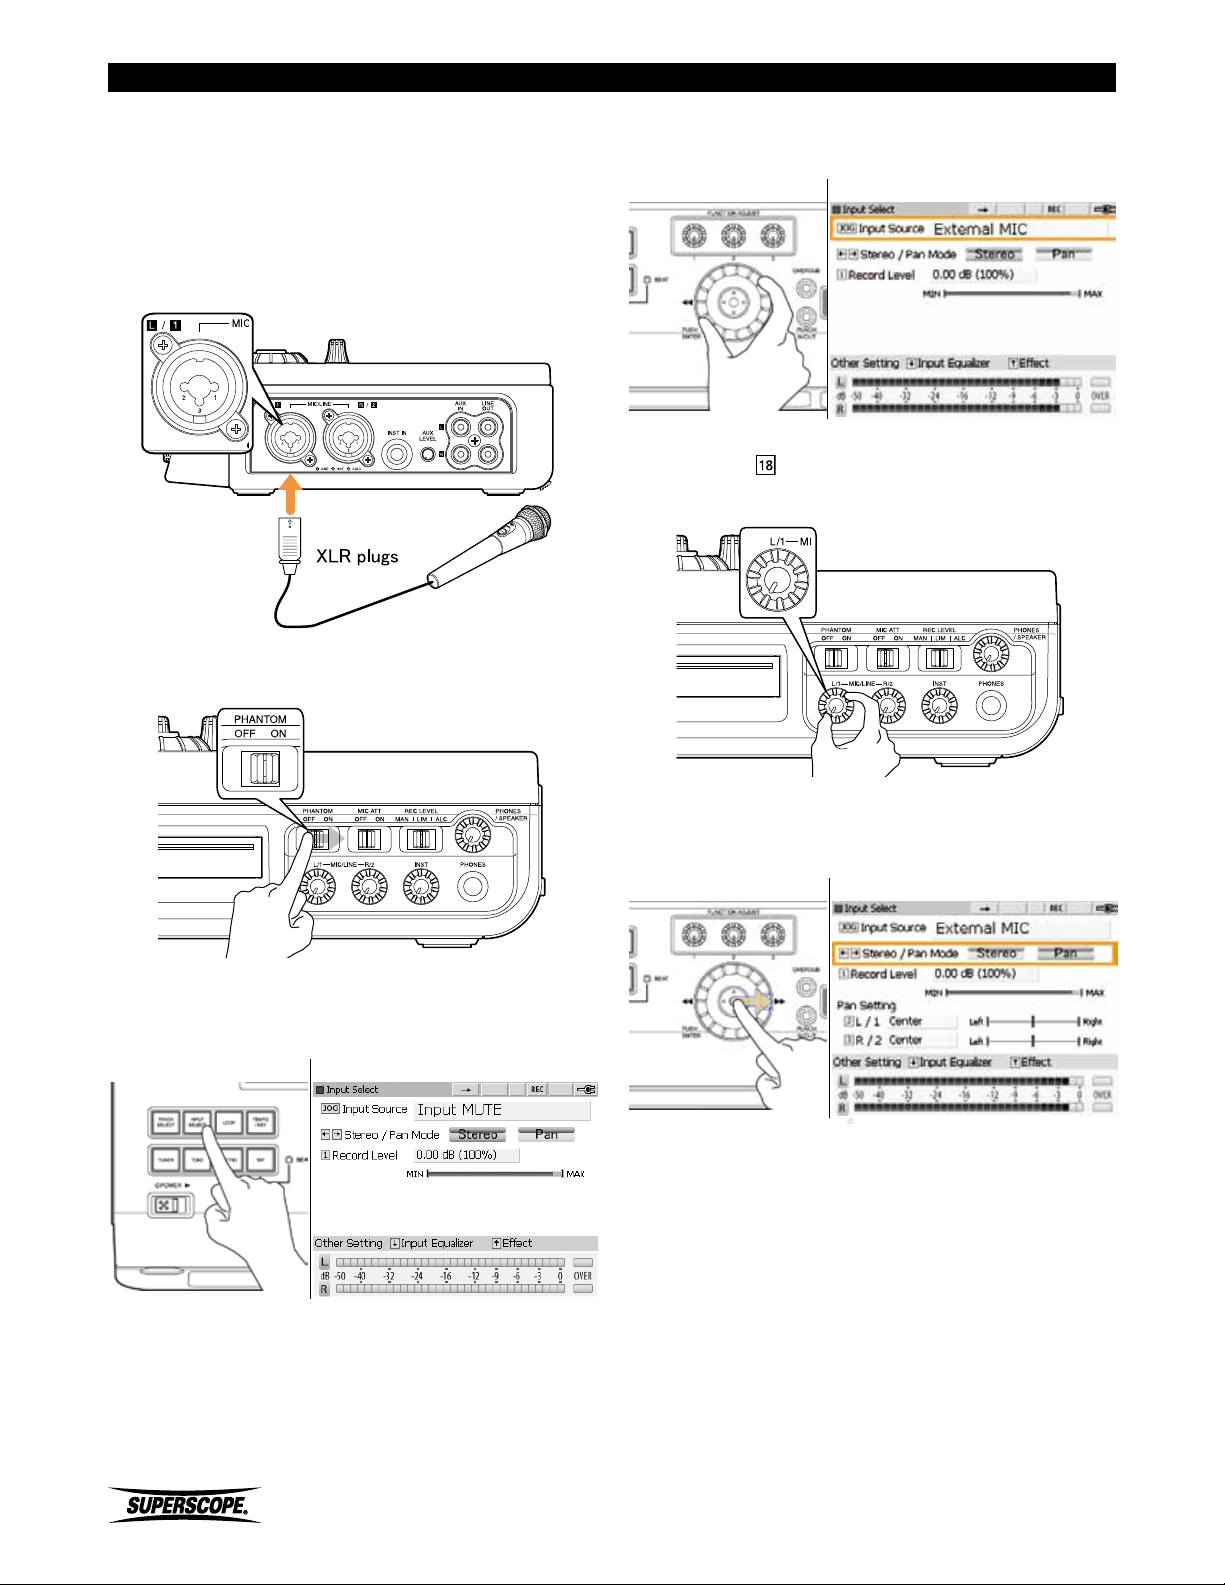
Set Up
Recording a Solo Performance
Follow the instructions below when recording a voice or
instrument with a single microphone:
1. Insert a microphone into the MIC/LINE input (L/1)
on the side panel. Both XLR type and 1/4 “standard
plug types can be used.
When using a microphone that requires 48V phantom
power, move the PHANTOM switch to the ON position.
3. Turn the jog wheel to select External MIC and then
press the INPUT SELECT button to exit the screen.
Input Select Screen
4. Adjust the MIC / LINE level control (L/1) to
obtain a suitable recording level. See Setting Levels.
2. Push the INPUT SELECT button to display the Input
Source options.
Input Select Screen
5. From the Input Select Screen, move the joystick to
the right to select Pan Mode.
Input Select Screen
- 32 -
Superscope PSD430 / PSD450 User Manual
Page 33
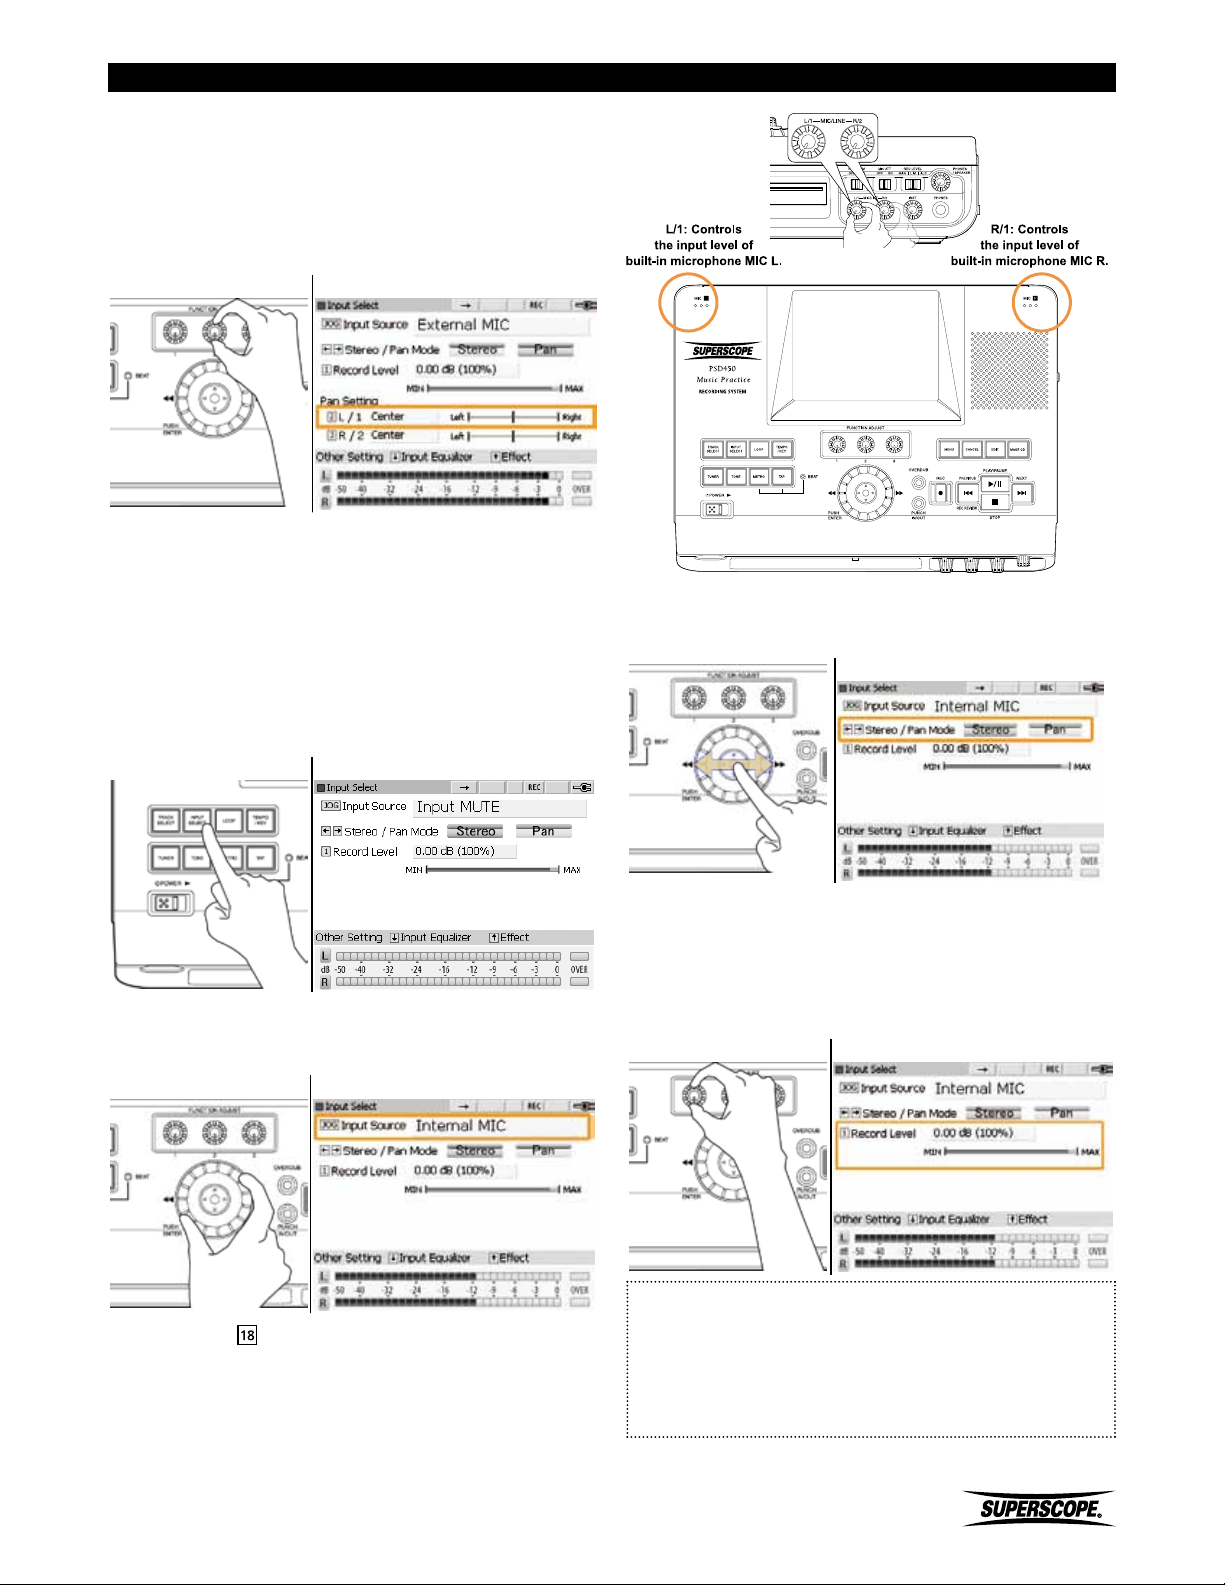
6. Pan Setting – L/1 Selecting Pan Mode will “center”
the stereo position of the microphone connected to
Input (L/1). When recording a solo performance, it is
most common to place the soloist in the “center” of
the stereo spectrum. To alter the stereo positioning
for Input (L/1), turn FUNCTION ADJUST #2 (4B).
Input Select Screen
Internal Built-in Microphones
The recorder has two built-in microphones for stereo
recording. When using the built-in microphones, please
refer to the following procedures.
1. Push the INPUT SELECT button to display the Input
Source options.
Set Up
4. Move the joystick right or left to select Stereo Mode
or Pan Mode (Stereo mode is the default setting).
Input Select Screen
Input Select Screen
2. Turn the jog wheel to select Internal MIC and then
press the INPUT SELECT button to exit the screen.
Input Select Screen
3. Adjust the MIC / LINE L & R Level Controls to
obtain a suitable recording level. See Setting Levels.
5. Set Record Level - For most applications, the Record
Level should be set to the default value of 0dB. Turn
FUNCTION ADJUST #1 (4A) to adjust Record Level.
Press FUNCTION ADJUST #1 (4A) to return Record
Level to 0dB.
Input Select Screen
※ When using the built-in microphones, the
built-in speaker is muted to prevent feedback.
To prevent the built-in microphones from
picking up the sound of buttons on the
top panel, operate the recorder with the
RC450PSD remote control.
Superscope PSD430 / PSD450 User Manual
- 33 -
Page 34
Set Up
Connecting Musical Instruments
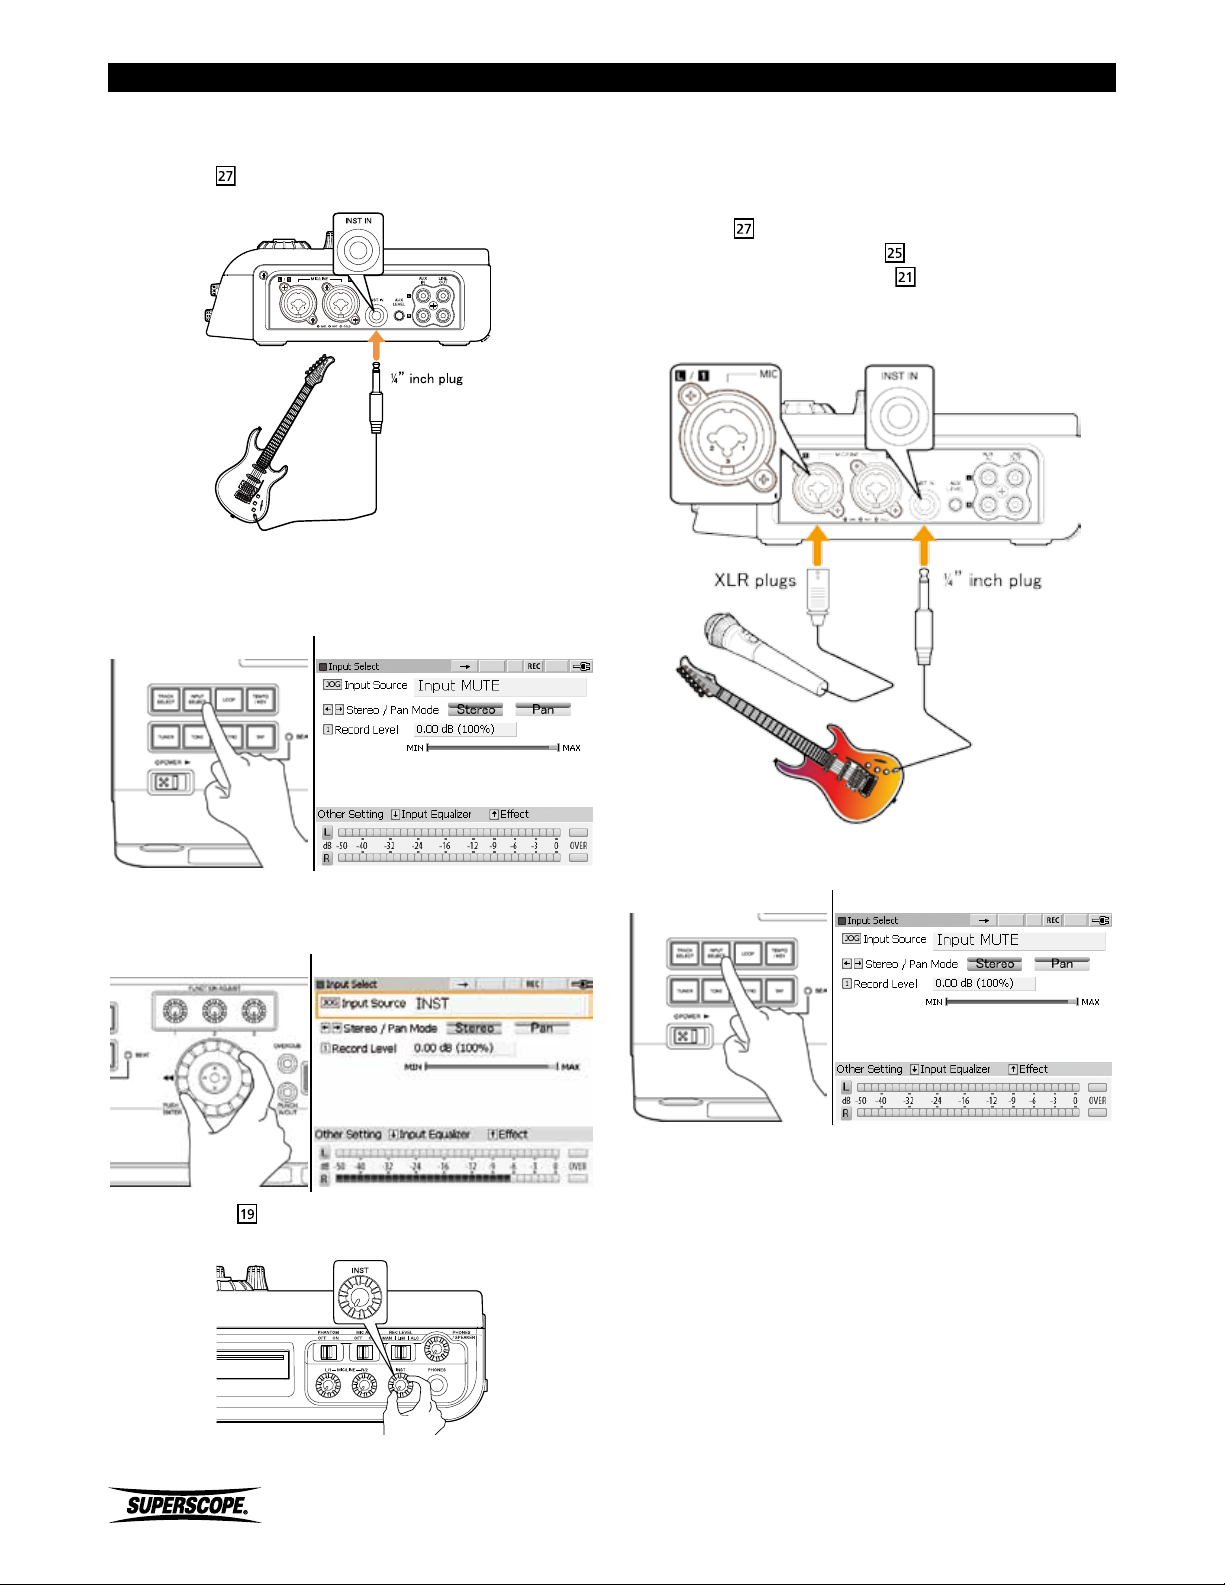
1. Please insert the plug from your instrument cable
into the
2. Push the INPUT SELECT button to display the Input
Source options.
INST IN jack on the right side panel.
Input Select Screen
Recording a Microphone and a Musical Instrument at the Same Time
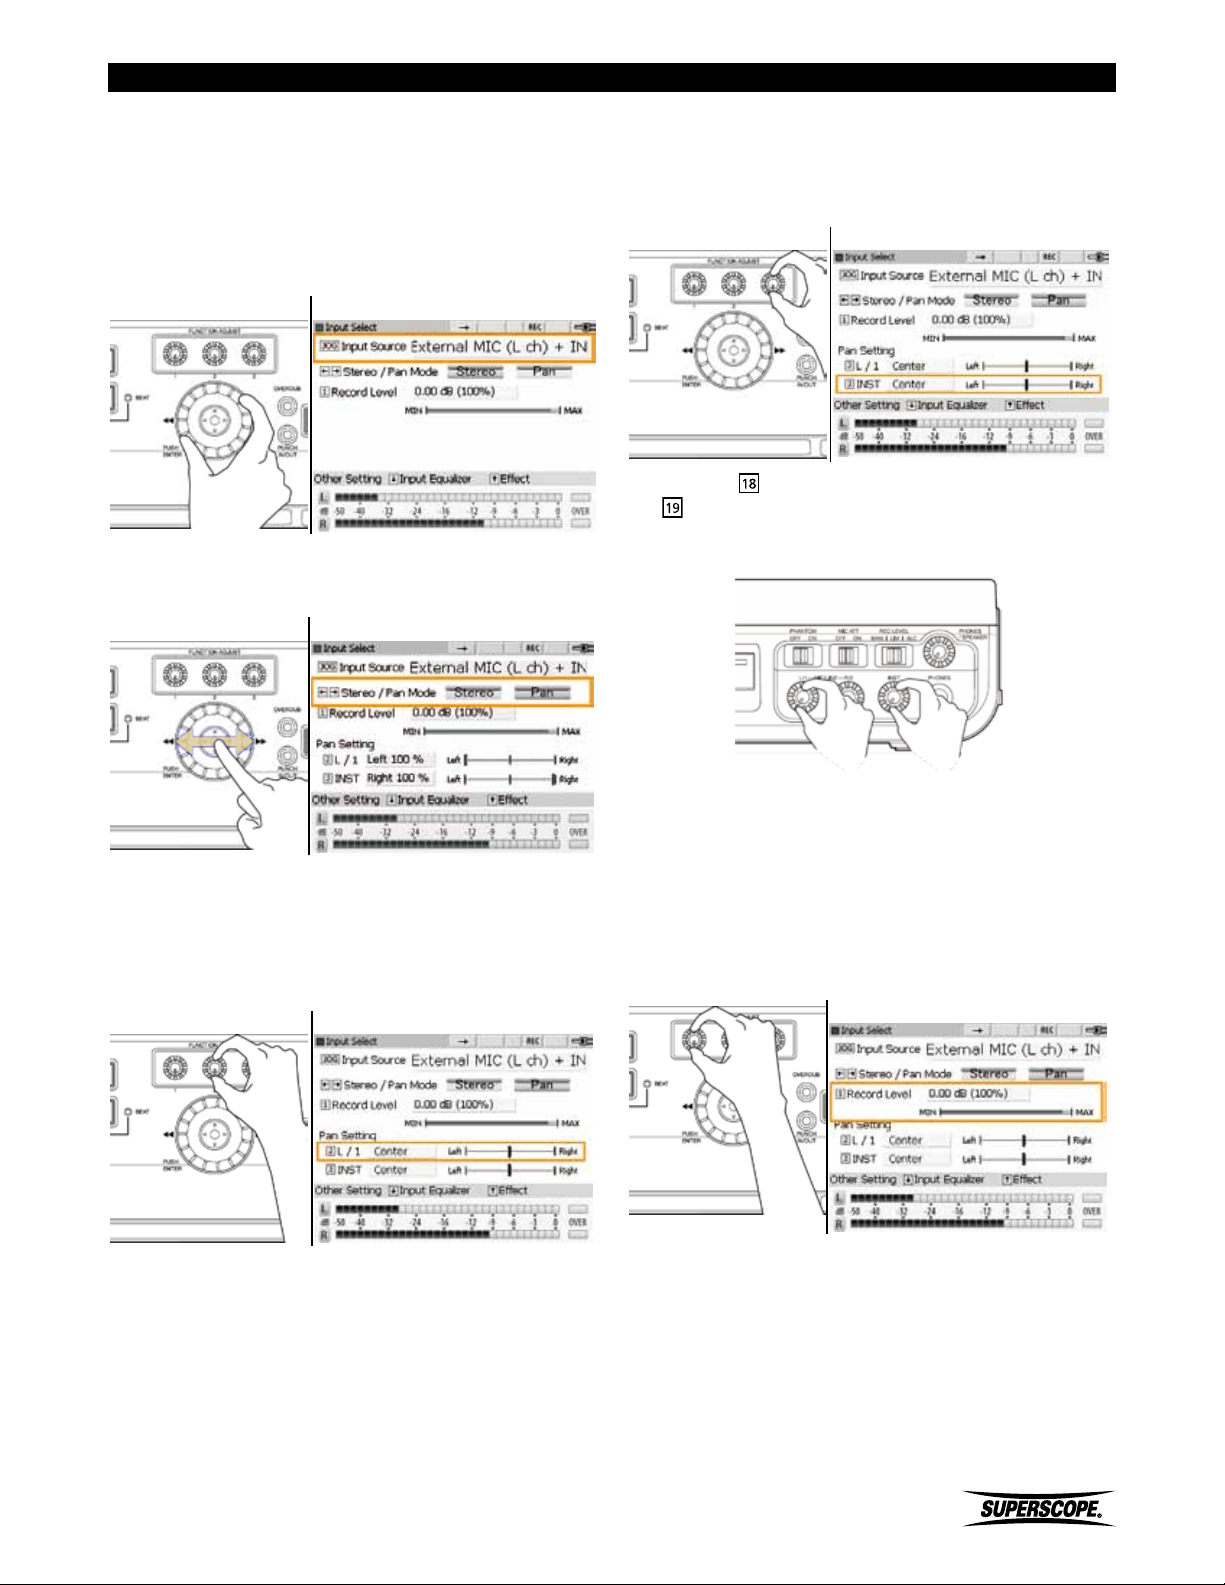
1. Please insert the plug from your instrument cable
into the
the microphone plug into
addition, please switch the
the front panel ON when connecting a condenser
microphone.
INST IN Jack on the side panel. Insert
MIC/LINE jack L1. In
PHANTOM switch on
3. Turn the jog wheel to select INST and then press the
INPUT SELECT button to exit the screen.
Input Select Screen
4. Adjust the INST knob to obtain a suitable
recording level.
2. Push the INPUT SELECT button to display the Input
Source options.
Input Select Screen
See Setting Levels.
- 34 -
Superscope PSD430 / PSD450 User Manual
Page 35
Set Up
3. Turn the jog wheel to select External MIC (L ch) +
INST and then press the INPUT SELECT button to exit
the screen.
※ When connecting an instrument along with a
line level device such as an electronic piano,
please choose LINE (L ch) + INST.
Input Select Screen
4. Move the joystick right or left to select Stereo Mode
or Pan Mode (Stereo mode is the default setting).
Input Select Screen
6. Turn FUNCTION ADJUST #3 (4C) to adjust the Pan
Setting for the INST input. Adjustments are made in
1% increments between Left 100% - Center - Right
100%. The initial setting is Center.
Input Select Screen
7. Turn the MIC/LINE input level knob (L/1) and the
INST knob to obtain a proper level and balance
between the microphone and the instrument. Please
refer to Setting Levels.
5. If Pan Mode is selected, turn FUNCTION ADJUST
#2 (4B) to adjust the Pan Setting for input L/1 (the
left microphone). Adjustments are made in 1%
increments between Left 100% - Center - Right
100%. The initial setting is Center.
Input Select Screen
※ After the recording is completed, the MIC/
INST balance cannot be changed.
8. Set Record Level - For most applications, the Record
Level should be set to the default value of 0.00dB.
Turn FUNCTION ADJUST #1 (4A) to adjust Record
Level. Press FUNCTION ADJUST #1 (4A) to return
Record Level to 0.00dB.
Input Select Screen
Superscope PSD430 / PSD450 User Manual
- 35 -
Page 36
Set Up
Line Level Sources
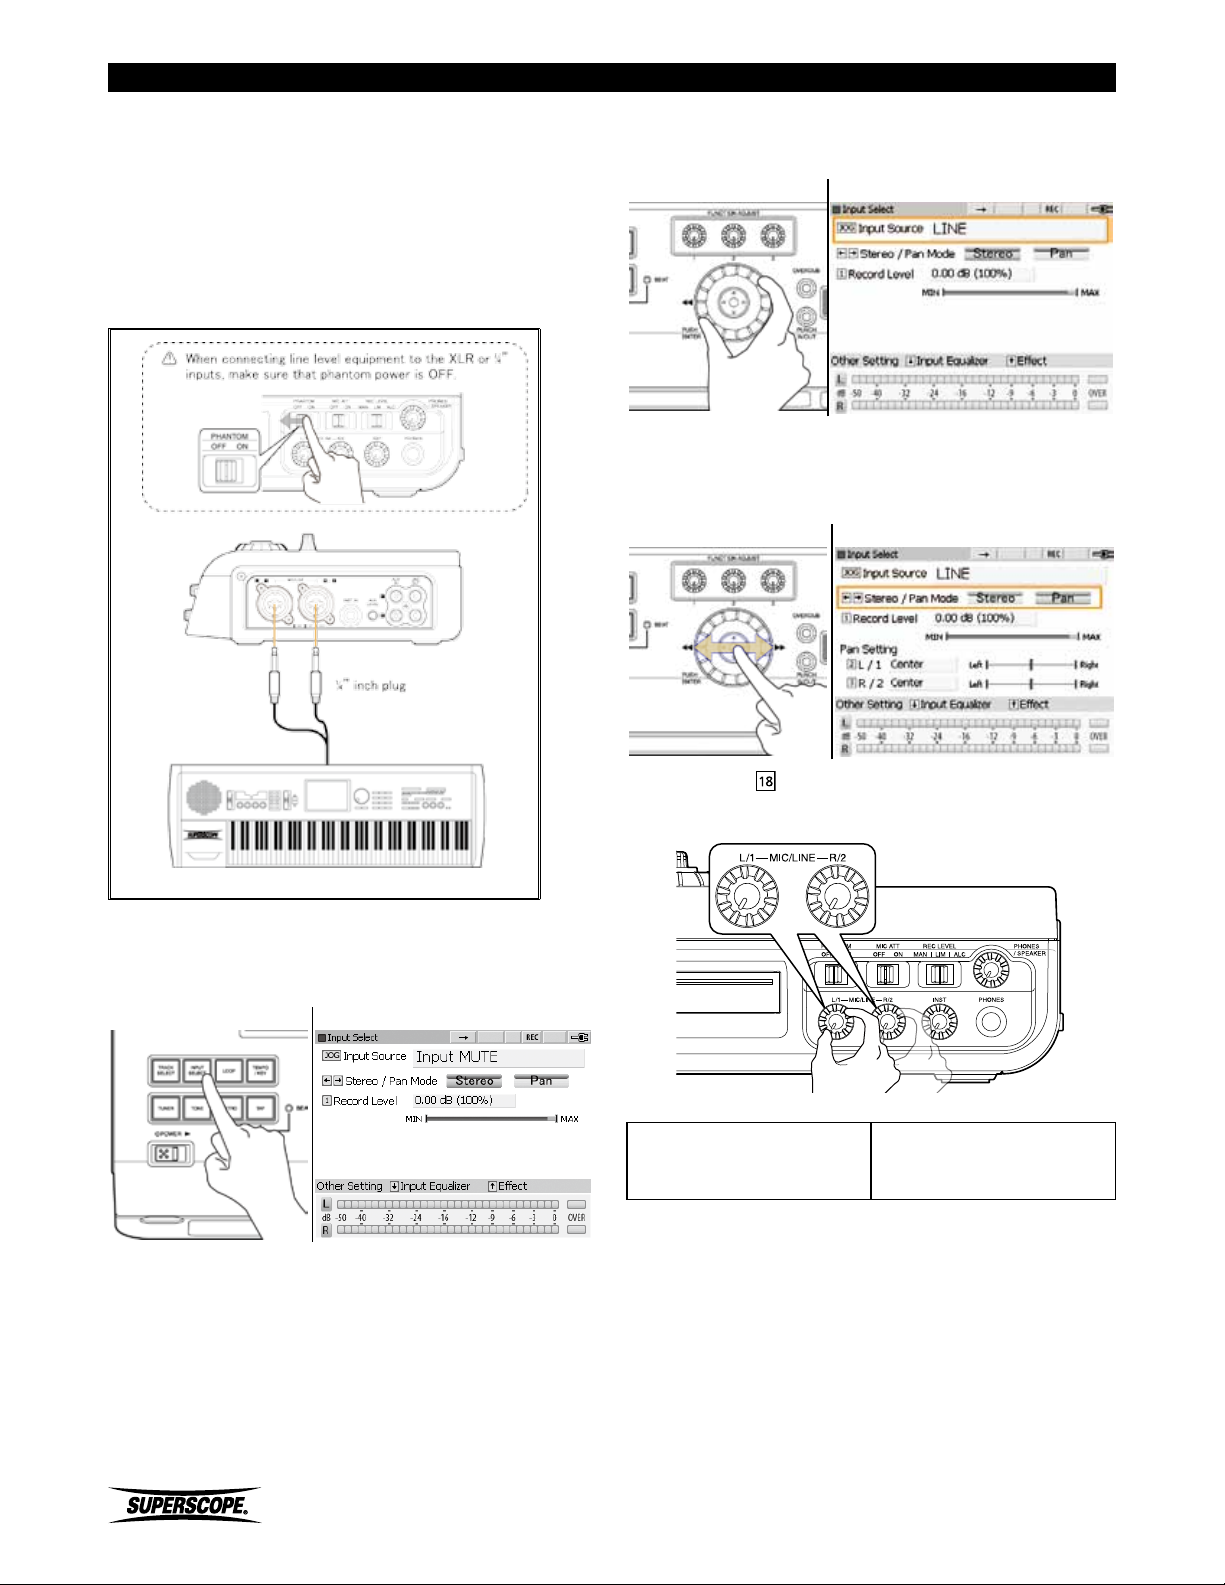
Use the following procedure when connecting line level
equipment (keyboards, mixers, CD players, etc.) to the
XLR or ¼” balanced inputs.
1. Connect line level audio equipment such as mixers
or keyboards to the MIC/LINE Jacks on the right side
panel.
3. Turn the jog wheel to select LINE and then press the
INPUT SELECT button to exit the screen.
Input Select Screen
4. Move the joystick right or left to select Stereo Mode
or Pan Mode (Stereo mode is the default setting). For
adjustment of Pan Setting see STEREO/PAN Mode.
Input Select Screen
2. Push the INPUT SELECT button to display the Input
Source options.
Input Select Screen
5. Adjust the MIC / LINE L & R level controls to
obtain a suitable recording level. See Setting Levels.
L/1: Controls the input
level for LINE L/1.
R/2: Controls the input
level for LINE R/2.
- 36 -
Superscope PSD430 / PSD450 User Manual
Page 37
Set Up
6. Set Record Level - For most applications, the Record
Level should be set to the default value of 0dB. Turn
FUNCTION ADJUST #1 (4A) to adjust Record Level.
Press FUNCTION ADJUST #1 (4A) to return Record
Level to 0dB.
Input Select Screen
AUX
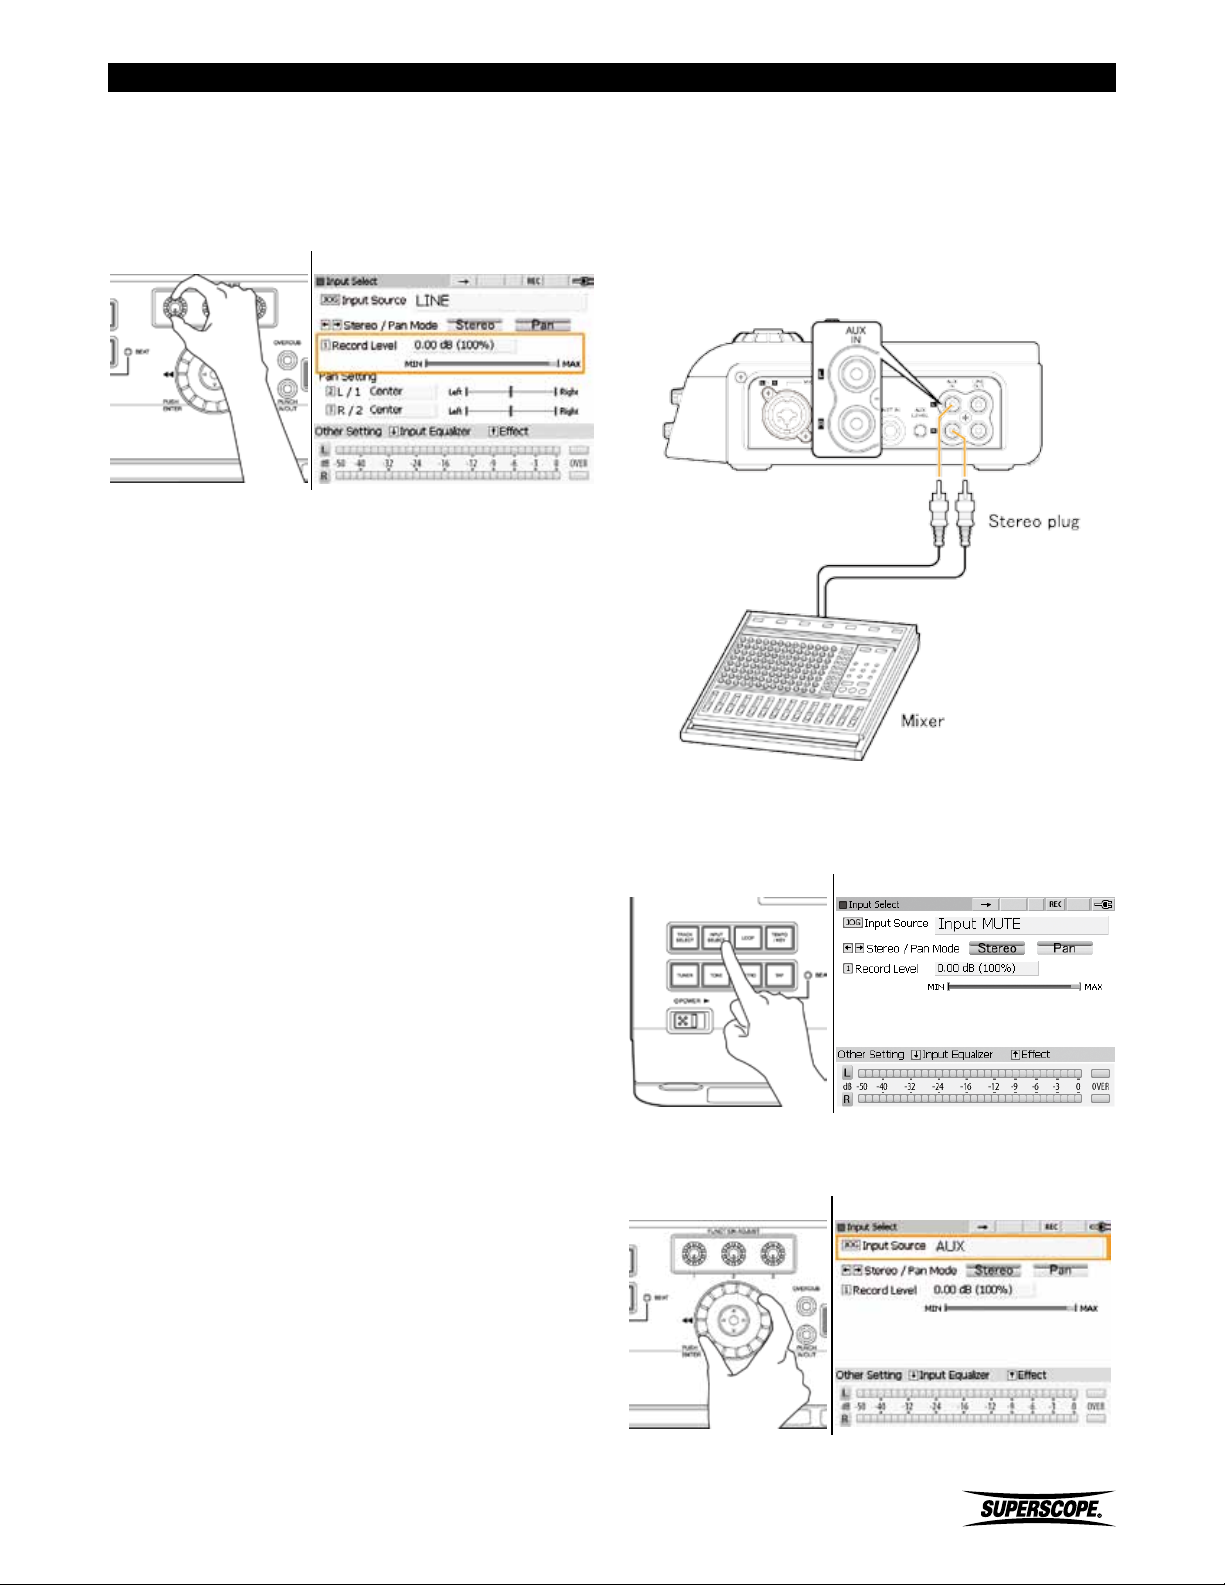
Use the following procedure when connecting line level
equipment (keyboards, mixers, CD players, etc.) to the
RCA unbalanced inputs
1. Connect line level audio equipment such as mixers or
keyboards to the AUX IN Jack on the right side panel.
2. Push the INPUT SELECT button to display the Input
Source options.
Input Select Screen
3. Turn the jog wheel to select AUX and then press the
INPUT SELECT button to exit the screen.
Input Select Screen
Superscope PSD430 / PSD450 User Manual
- 37 -
Page 38
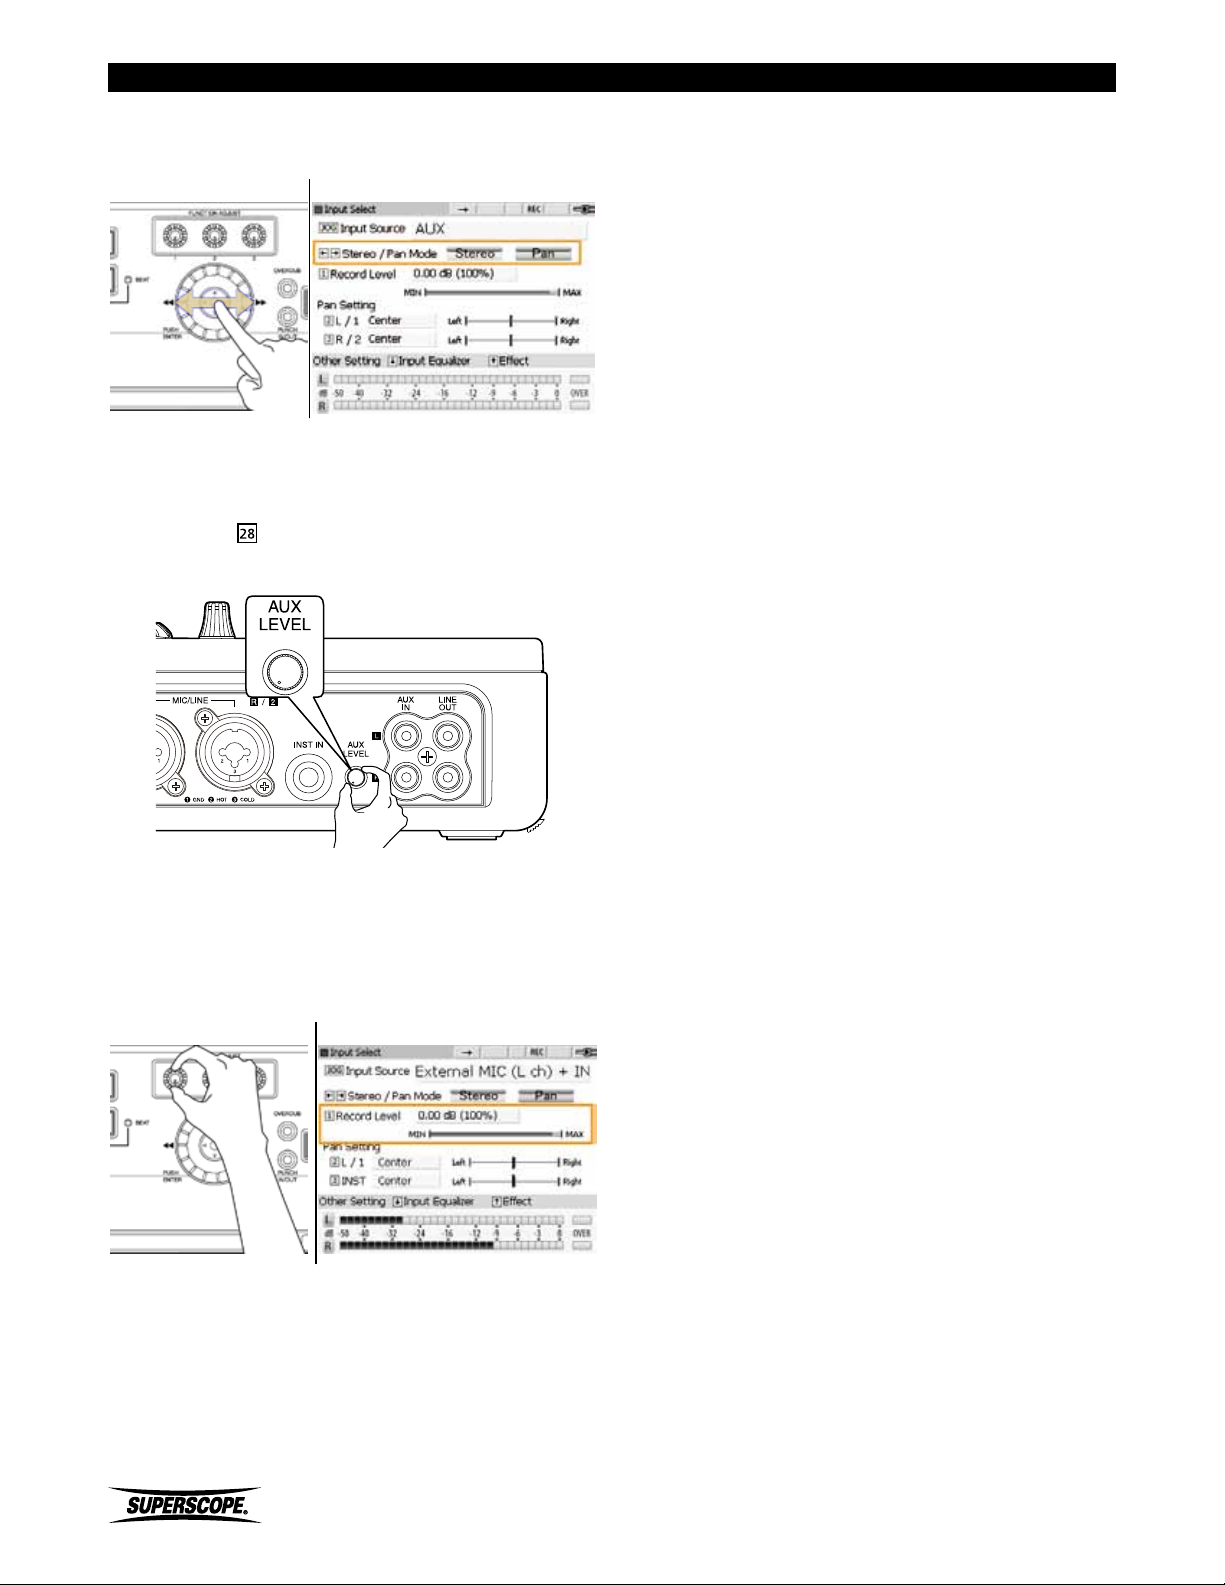
4. Move the joystick right or left to select Stereo Mode
or Pan Mode (Stereo mode is the default setting).
Input Select Screen
※ For adjustment of Pan Setting see STEREO/
PAN Mode.
Set Up
5. Adjust the
suitable recording level. See Setting Levels.
6. Set Record Level - For most applications, the Record
Level should be set to the default value of 0.00dB.
Turn FUNCTION ADJUST #1 (4A) to adjust Record
Level. Press FUNCTION ADJUST #1 (4A) to return
Record Level to 0.00dB.
AUX LEVEL control to obtain a
Input Select Screen
- 38 -
Superscope PSD430 / PSD450 User Manual
Page 39
Set Up
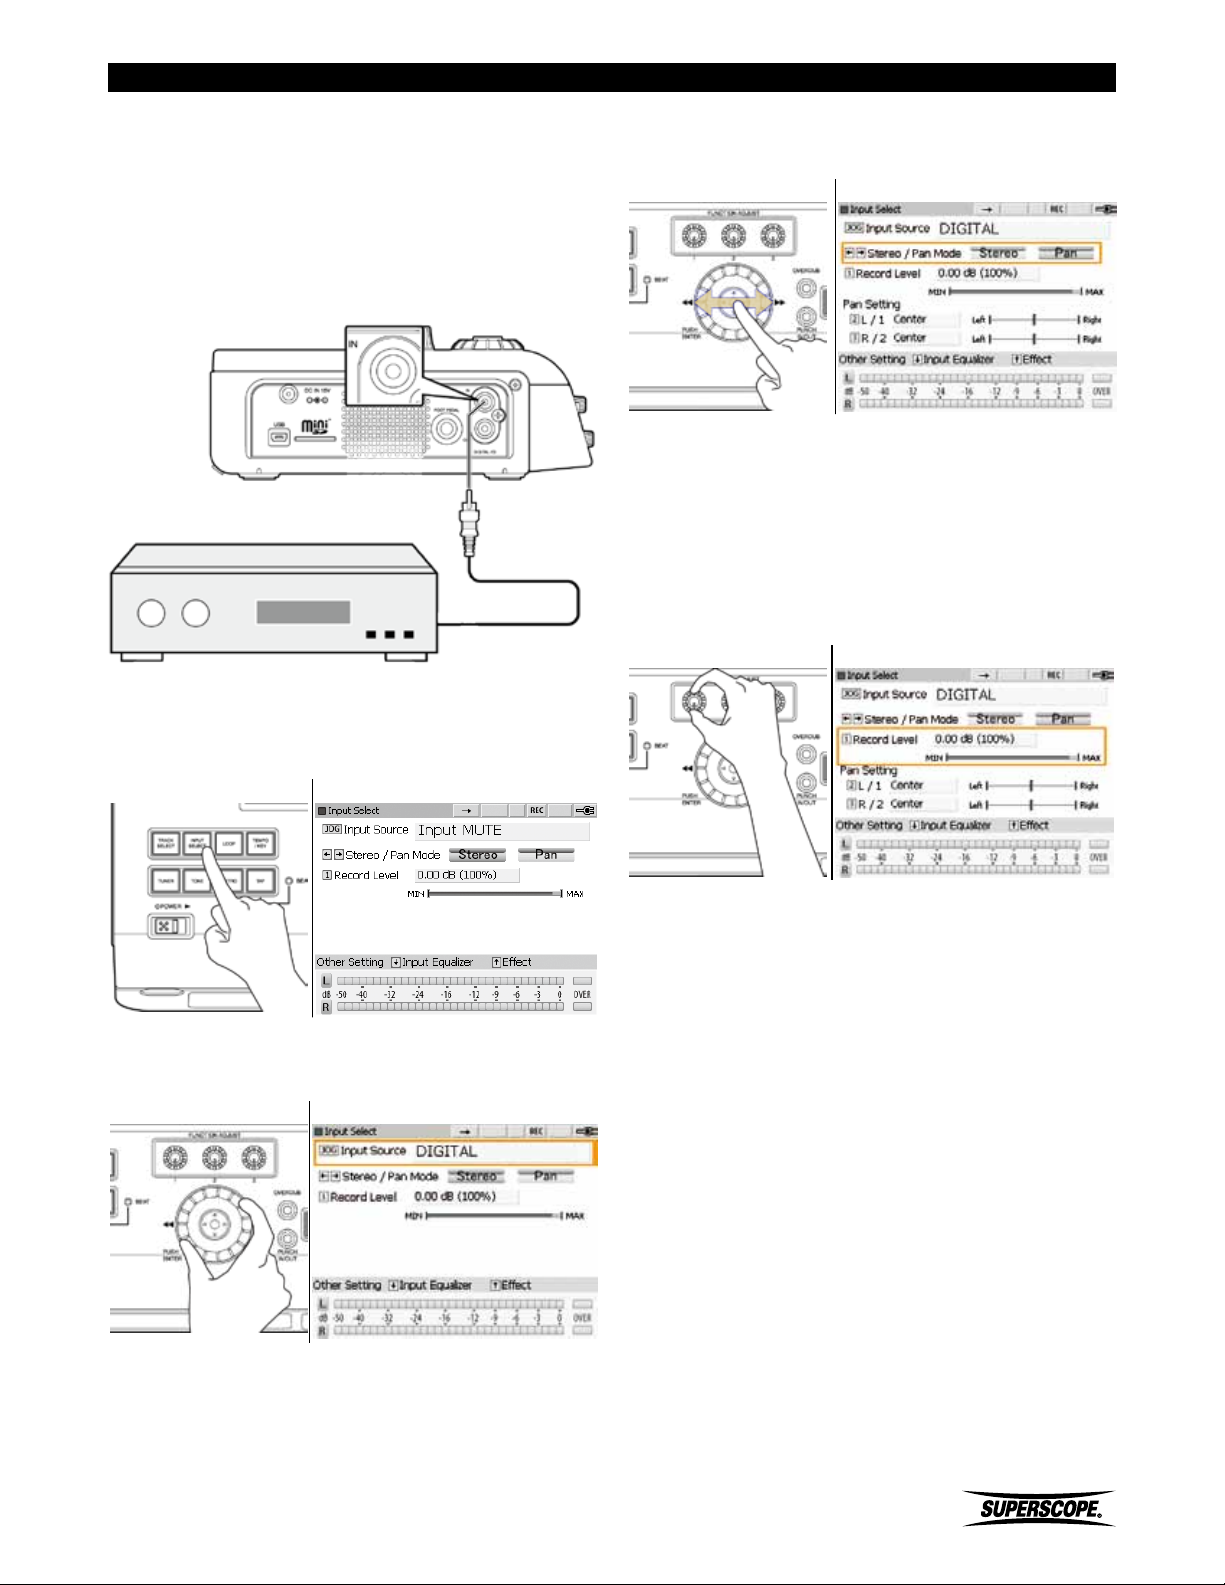
Digital Connection
Use the following procedure when connecting
equipment with digital outputs (keyboards, mixers, CD
players, etc.).
1. Connect digital equipment such as mixers or effects
processors to the DIGITAL IN on the left side panel.
4. Move the joystick right or left to select Stereo Mode
or Pan Mode (Stereo mode is the default setting).
Input Select Screen
※ For adjustment of pan settings, see STEREO/
PAN Mode.
5. Set Record Level - For most applications, the Record
Level should be set to the default value of 0dB. Turn
FUNCTION ADJUST #1 (4A) to adjust Record Level.
Press FUNCTION ADJUST #1 (4A) to return Record
Level to 0dB.
Input Select Screen
2. Push the INPUT SELECT button to display the Input
Source options.
Input Select Screen
3. Turn the jog wheel to select DIGITAL and then press
the INPUT SELECT button to exit the screen.
Input Select Screen
Superscope PSD430 / PSD450 User Manual
- 39 -
Page 40
Set Up
Computer Connection
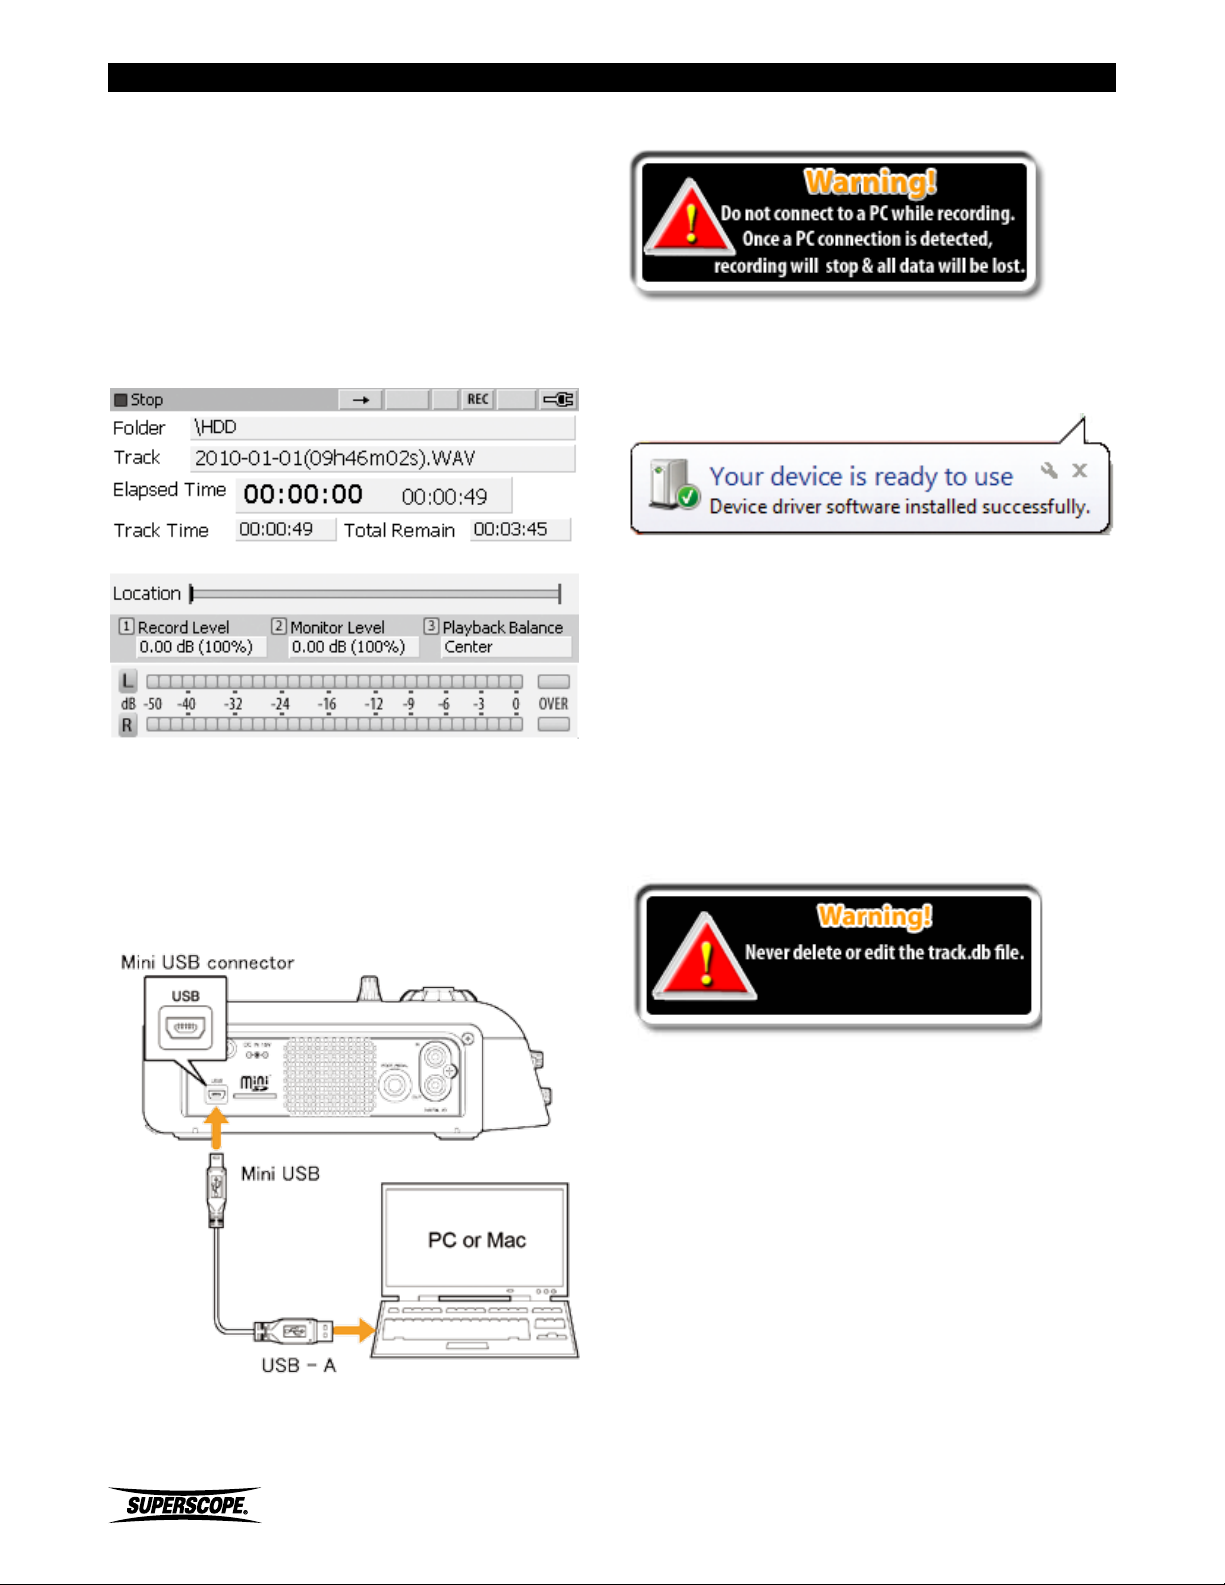
By connecting your recorder to a PC or Mac, you can
transfer music to and from a computer for editing or data
backup. When in USB mode, your computer will be able
to access the files and folders on the PSD450’s internal
hard drive or the PSD430’s SD card.
1. Confirm that the recorder is in Stop Mode and the
Main Screen is active before entering USB mode.
Main [Default] Screen
※ When in USB Mode, all other features will be
inactive.
2. Use the included USB cable to connect the recorder
to your computer.
※ Do not connect to a computer before
powering on the recorder.
3. The recorder should be recognized as an external
drive without having to install a new driver.
4. Locate the PSD430 or PSD450 in your computer’s
directory. Copy, move, and delete files using your
computer’s operating system.
※ When your recorder is connected to a
computer, the file “track.db” and a folder
named “PSD430” or “PSD450” will appear
in your recorder’s file directory. If this file
or folder is edited or deleted, you may lose
access to your audio files and settings.
- 40 -
Superscope PSD430 / PSD450 User Manual
Page 41
Working with Files and Folders
■Working with Files and Folders
The PSD400 series offers several methods for locating a
track for playback, editing, or for use as accompaniment
when overdubbing.
Searching Folders
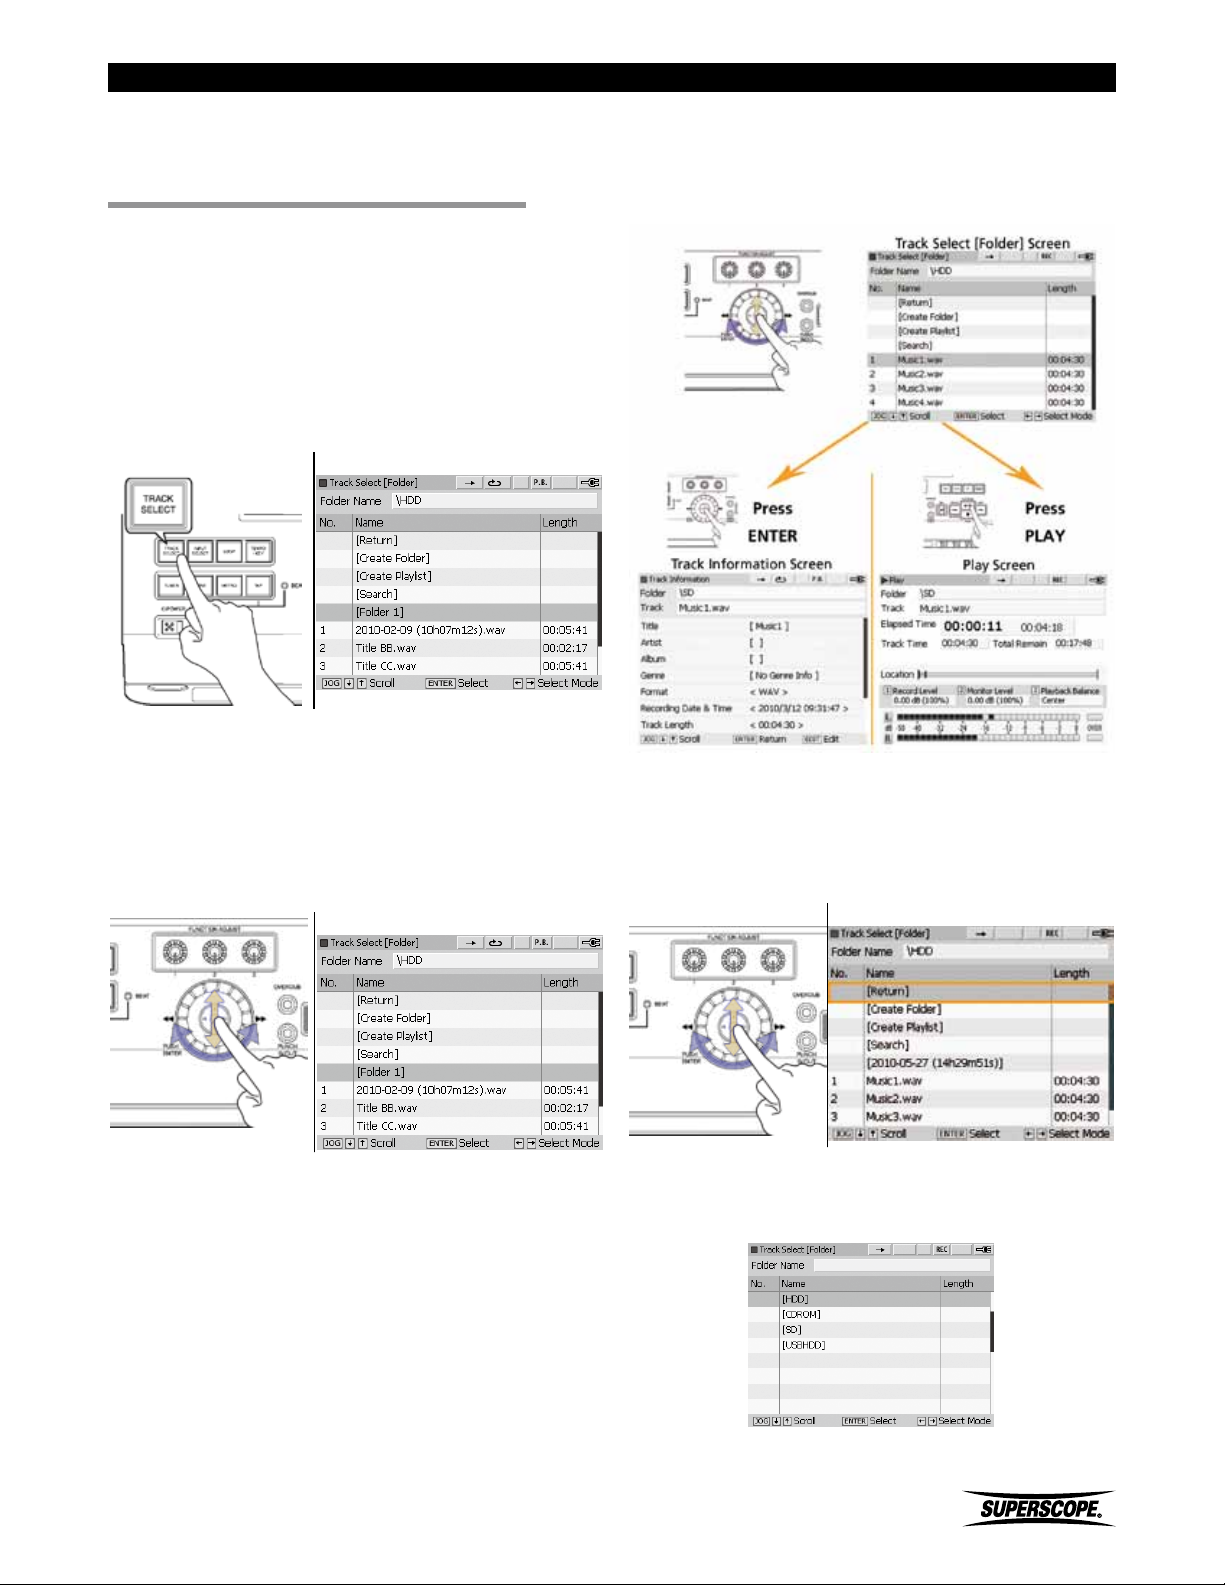
1. Press the TRACK SELECT button to view all files,
folders, and playlists on the PSD450’s Hard Drive
(HDD) or the PSD430’s SD card.
Track Select [Folder] Screen
※ When a track is highlighted in the Track Select
Screen, push ENTER to view or edit track
information. Press the Play/Pause button (8C)
to begin playback.
2. All newly recorded files will appear in the main
folder. Turn the jog wheel or move the joystick up or
down to highlight tracks or subfolders. Sub folders
will appear in brackets, e.g., [sub folder 1]. To search
the contents of a sub folder, either turn the jog
wheel or move the joystick up or down to highlight a
sub folder.
Track Select [Folder] Screen
3. Press ENTER to view the contents of the selected
folder.
Search a USB Device, SD Card or CD
To search the contents of a USB device, SD Card or CD,
select [Return] on the Track Select [Folder] screen and
press ENTER.
Track Select [Folder] Screen
Select a device and press ENTER.
Device Select Screen
Superscope PSD430 / PSD450 User Manual
The contents of the storage device will now be displayed.
- 41 -
Page 42
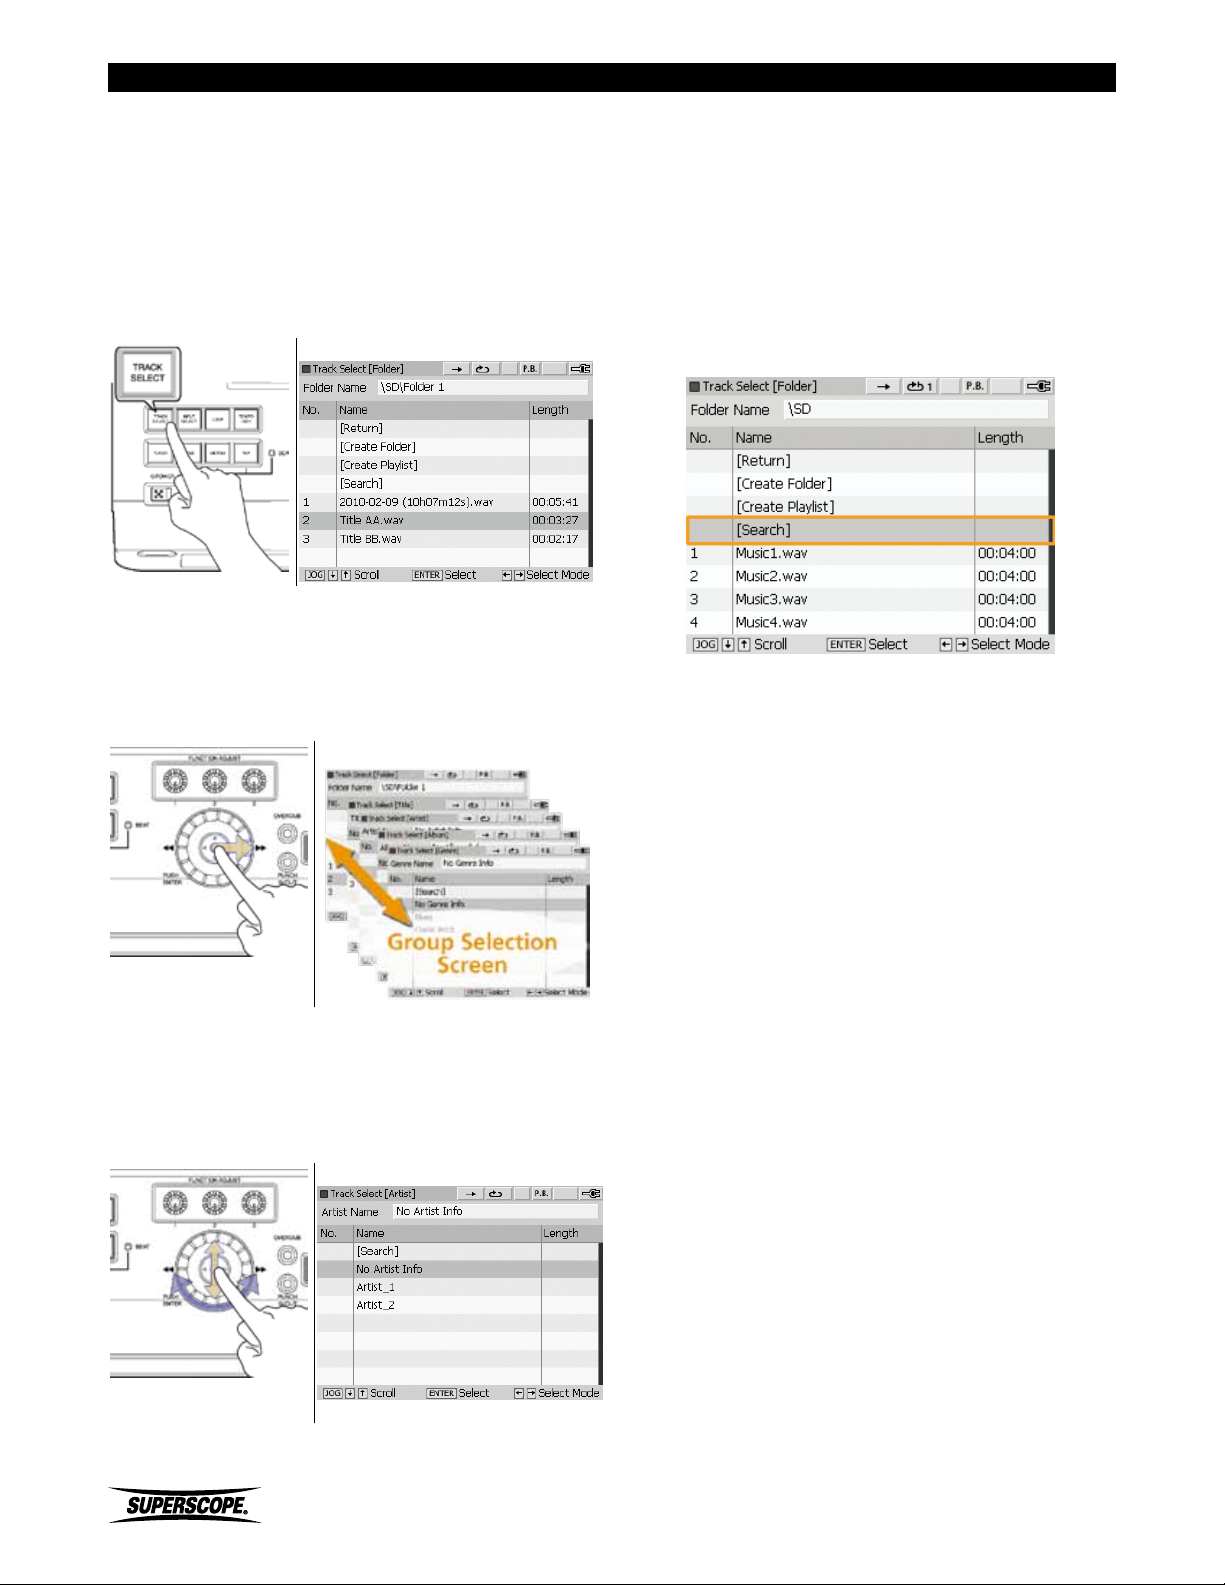
Working with Files and Folders
Filtering by Title, Artist, Album, and Genre
The PSD400 series allows you to create, view, or edit a
file’s tag information (e.g., title, album). You are also able
to search for files by four key tags: Title, Artist, Album, or
Genre.
1. Press the TRACK SELECT Key to launch the Track
Select [Folder] screen.
Track Select [Folder] Screen
2. Push the joystick to the right to view the four Group
Selection Screens. These screens will filter the audio
files on your hard drive (PSD450 only), SD card or
USB storage device by tag information: Title, Artist,
Album, and Genre.
Track Select [Folder] Screen
※ When a track is highlighted in a Group
Selection Screen, push ENTER to view or
edit track information. Press the Play/Pause
button (8C) to begin playback.
Using the [Search] Feature
At the top of the Track Select [Folder] screen and each
Group Selection screen, you will see the [Search] option.
Track Select [Folder] Screen
Use this feature to filter the contents of the current
screen by entering in keywords for the File name, Title,
Artist, Album, or Genre you are searching for.
※ The [Search] feature will only filter the
contents of the currently selected screen. For
example, using [Search] on the Title screen
will only search Title information.
3. Move the joystick up or down or turn the jog wheel
to select a track from any Group Selection Screen.
Move the joystick right or left to switch between the
Group Selection Screens: Title, Artist, Album, and
Genre.
Artist Selection Screen
- 42 -
Superscope PSD430 / PSD450 User Manual
Page 43
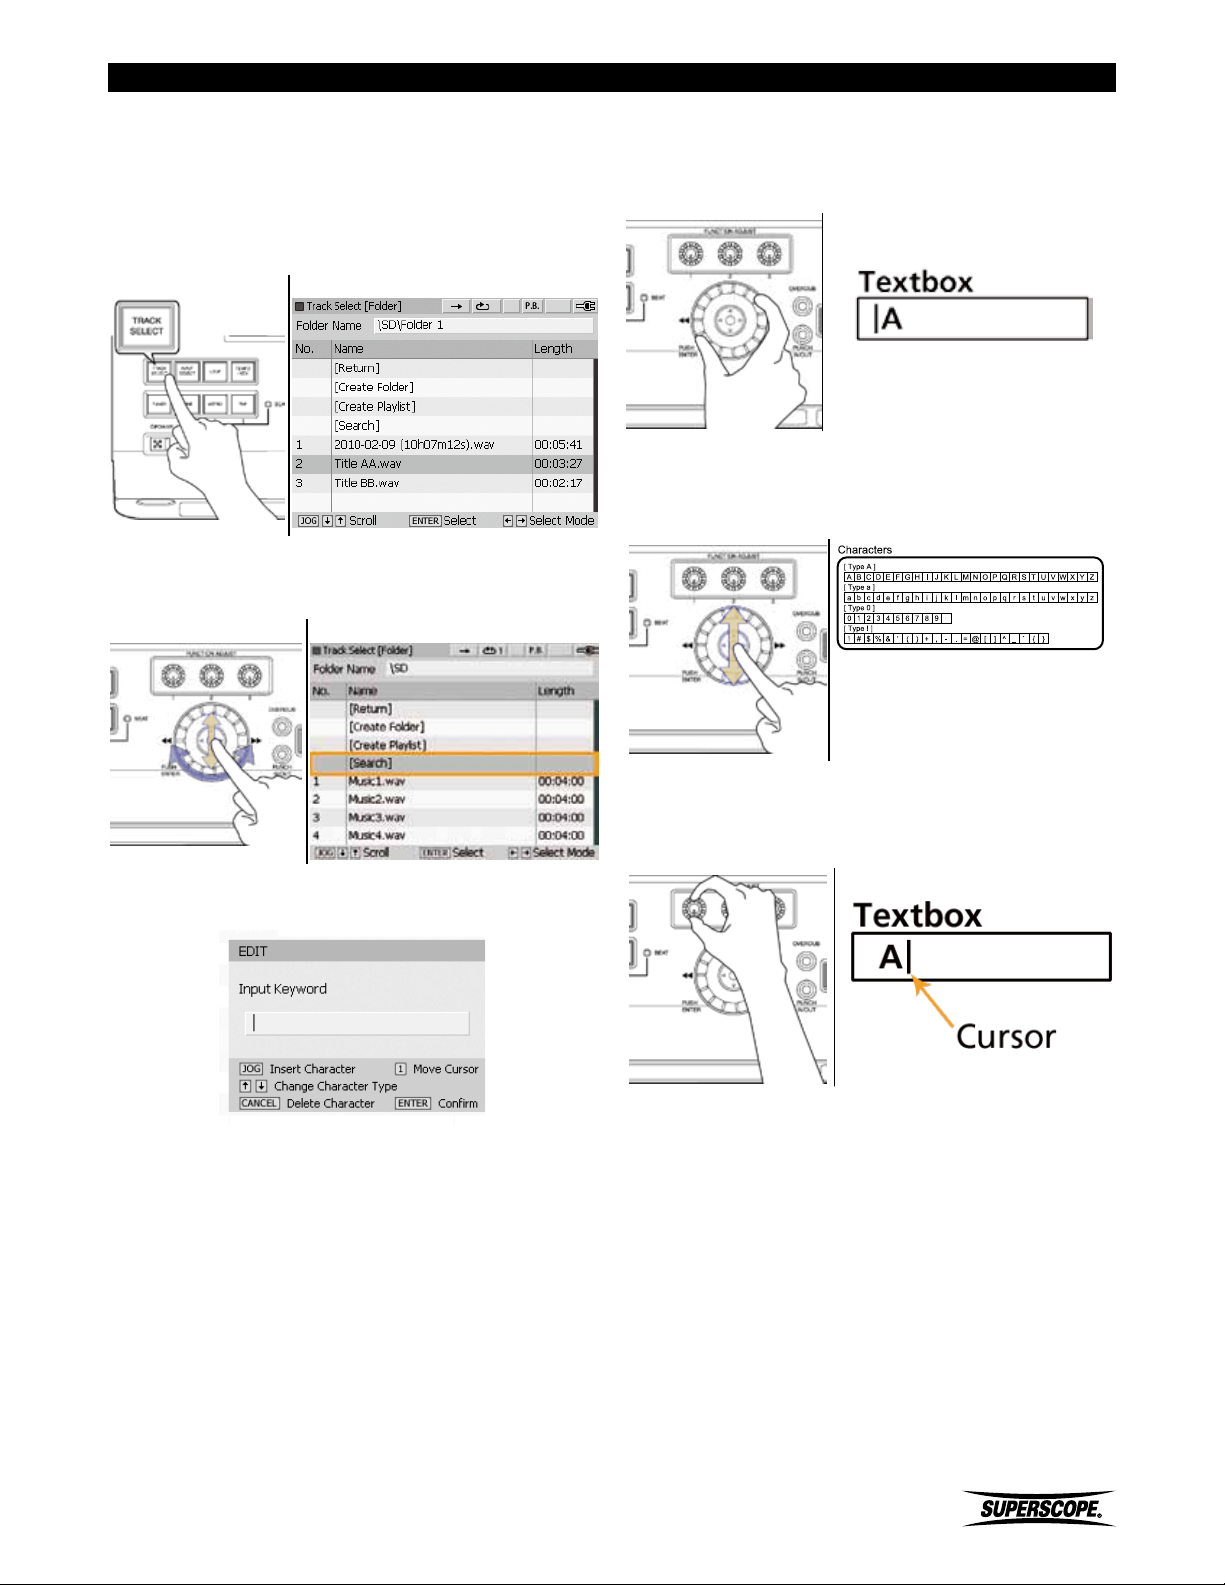
Working with Files and Folders
Use the following procedure when searching for files.
The same procedure is used when searching for titles,
artists, albums, or genres.
1. Press the TRACK SELECT Key to open the Track
Select [Folder] screen.
Track Select [Folder] Screen
2. Turn the jog wheel or move the joystick up or down
to highlight [Search], and then press ENTER.
Track Select [Folder] Screen
Text Input Method
Enter Characters
Turn the jog wheel to enter characters.
Change Character Type
Move the joystick up or down to change character types.
The four different character groups are shown below.
3. Use the Text Input Method below to type the file
name or part of the file name you are searching for.
Move the Cursor
Use FUNCTION ADJUST # 1 (4A) to move the cursor to a
new character.
Superscope PSD430 / PSD450 User Manual
- 43 -
Page 44
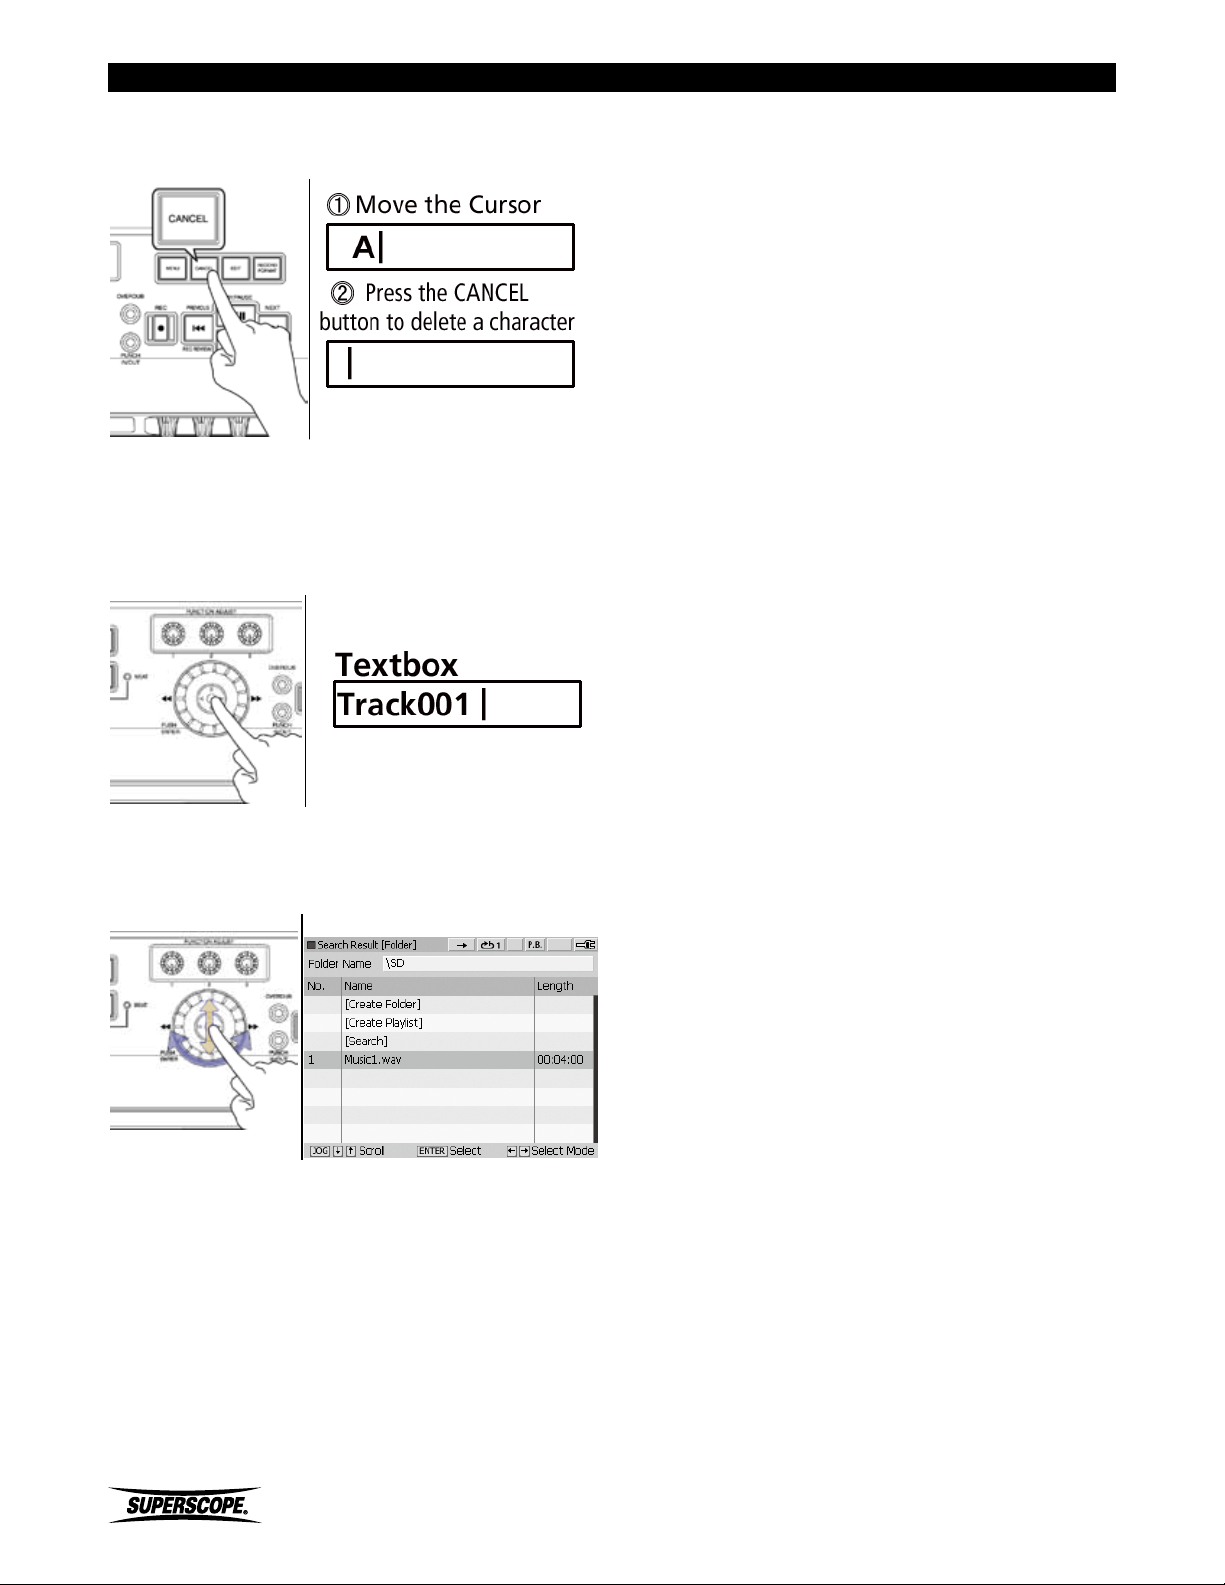
Working with Files and Folders
Delete a Character
Press the CANCEL button to delete a character.
Confirm Entry
When you are finished entering text, press the joystick to
ENTER. When the search is complete, the search results
will be displayed.
Move the joystick up or down or turn the jog wheel to
select a track from the Search Result [Folder] screen.
Search Result [Folder] Screen
- 44 -
Superscope PSD430 / PSD450 User Manual
Page 45
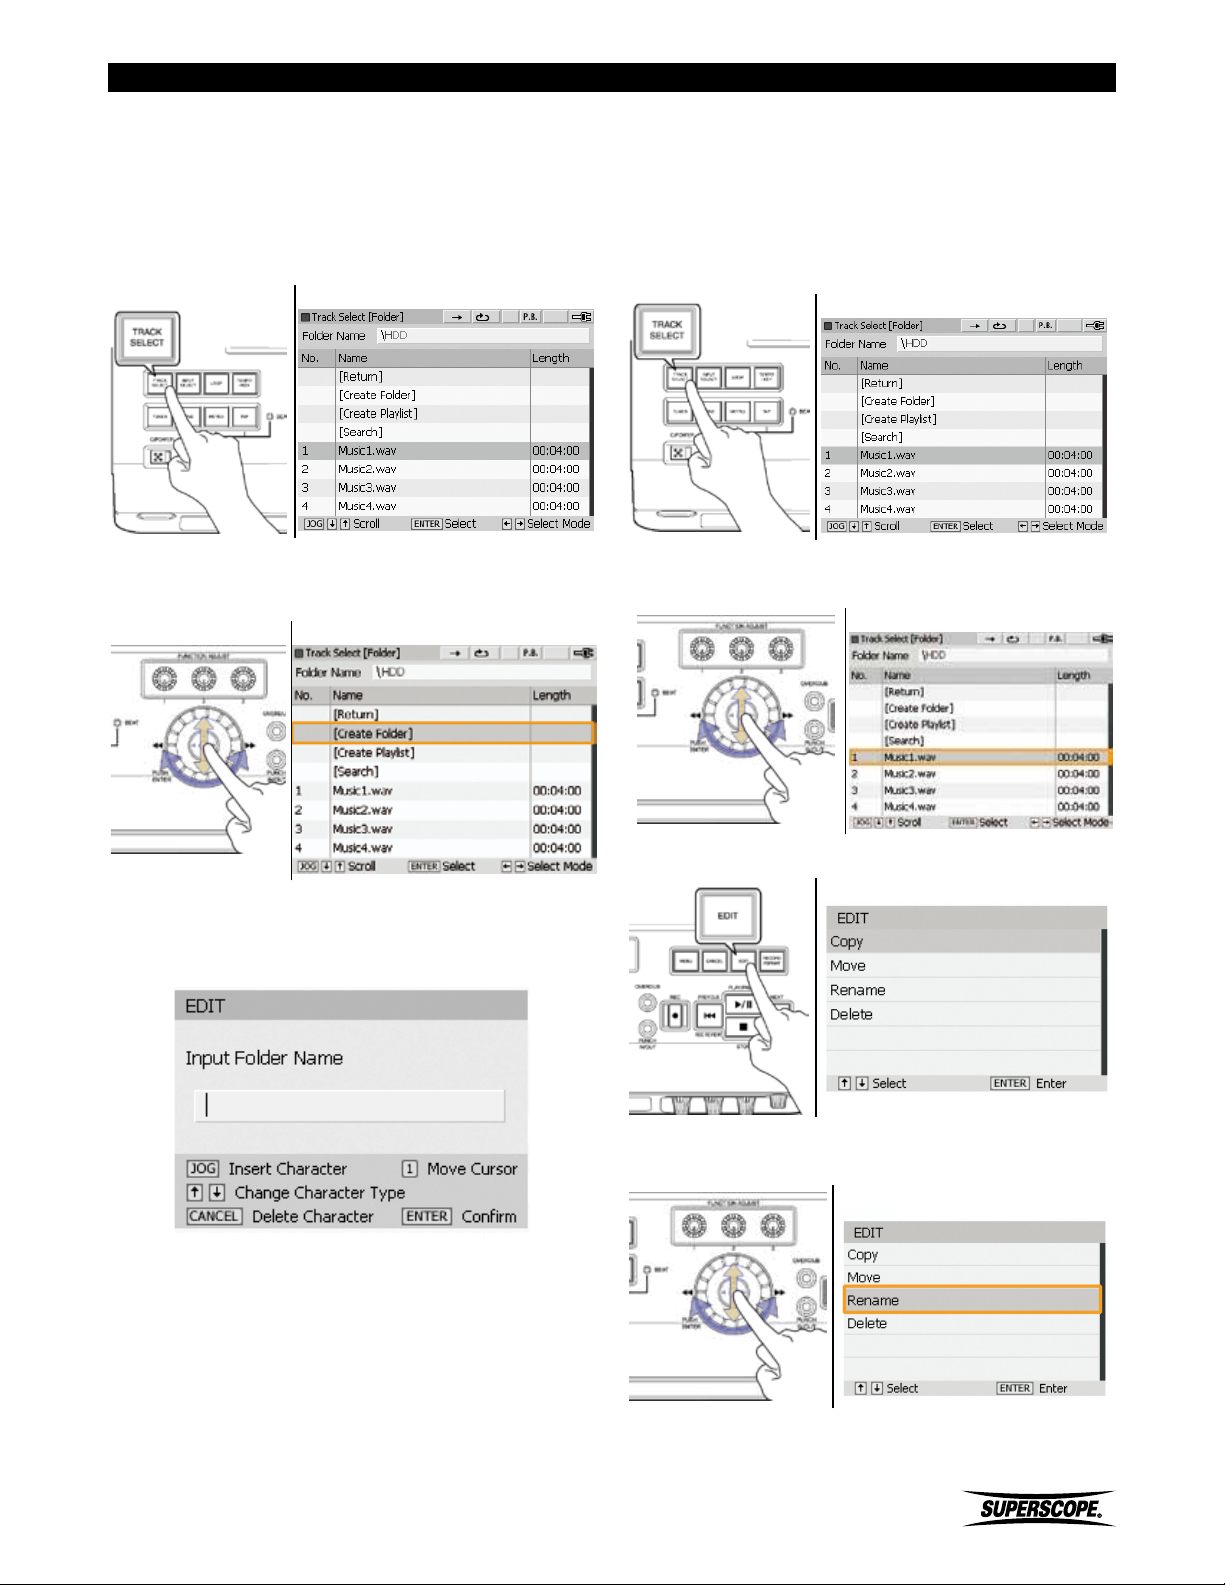
Working with Files and Folders
Create a Folder
Use the following steps to create a new folder for
organizing files.
Press the TRACK SELECT button to open the Track Select
[Folder] screen.
Track Select [Folder] Screen
1. Turn the jog wheel or move the joystick up or down
to highlight [Create Folder]. Press ENTER.
Track Select [Folder] Screen
Rename
Use the following steps to rename folders or tracks. The
recorder will not allow you to use the same name as
another file or folder in the same location.
1. Press the TRACK SELECT button to open the Track
Select [Folder] screen.
Track Select [folder] Screen
2. Turn the jog wheel or move the joystick up or down
to highlight the folder or file you wish to rename.
Track Select [Folder] Screen
2. Enter the name of the new folder by using the Text
Input Method.
Text Input Screen
3. Press the EDIT button.
Edit Screen
4. Turn the jog wheel or move the joystick up or down
to highlight Rename. Press ENTER.
Edit Screen
5. Enter the name of the new folder by using the Text
Input Method.
Superscope PSD430 / PSD450 User Manual
- 45 -
Page 46
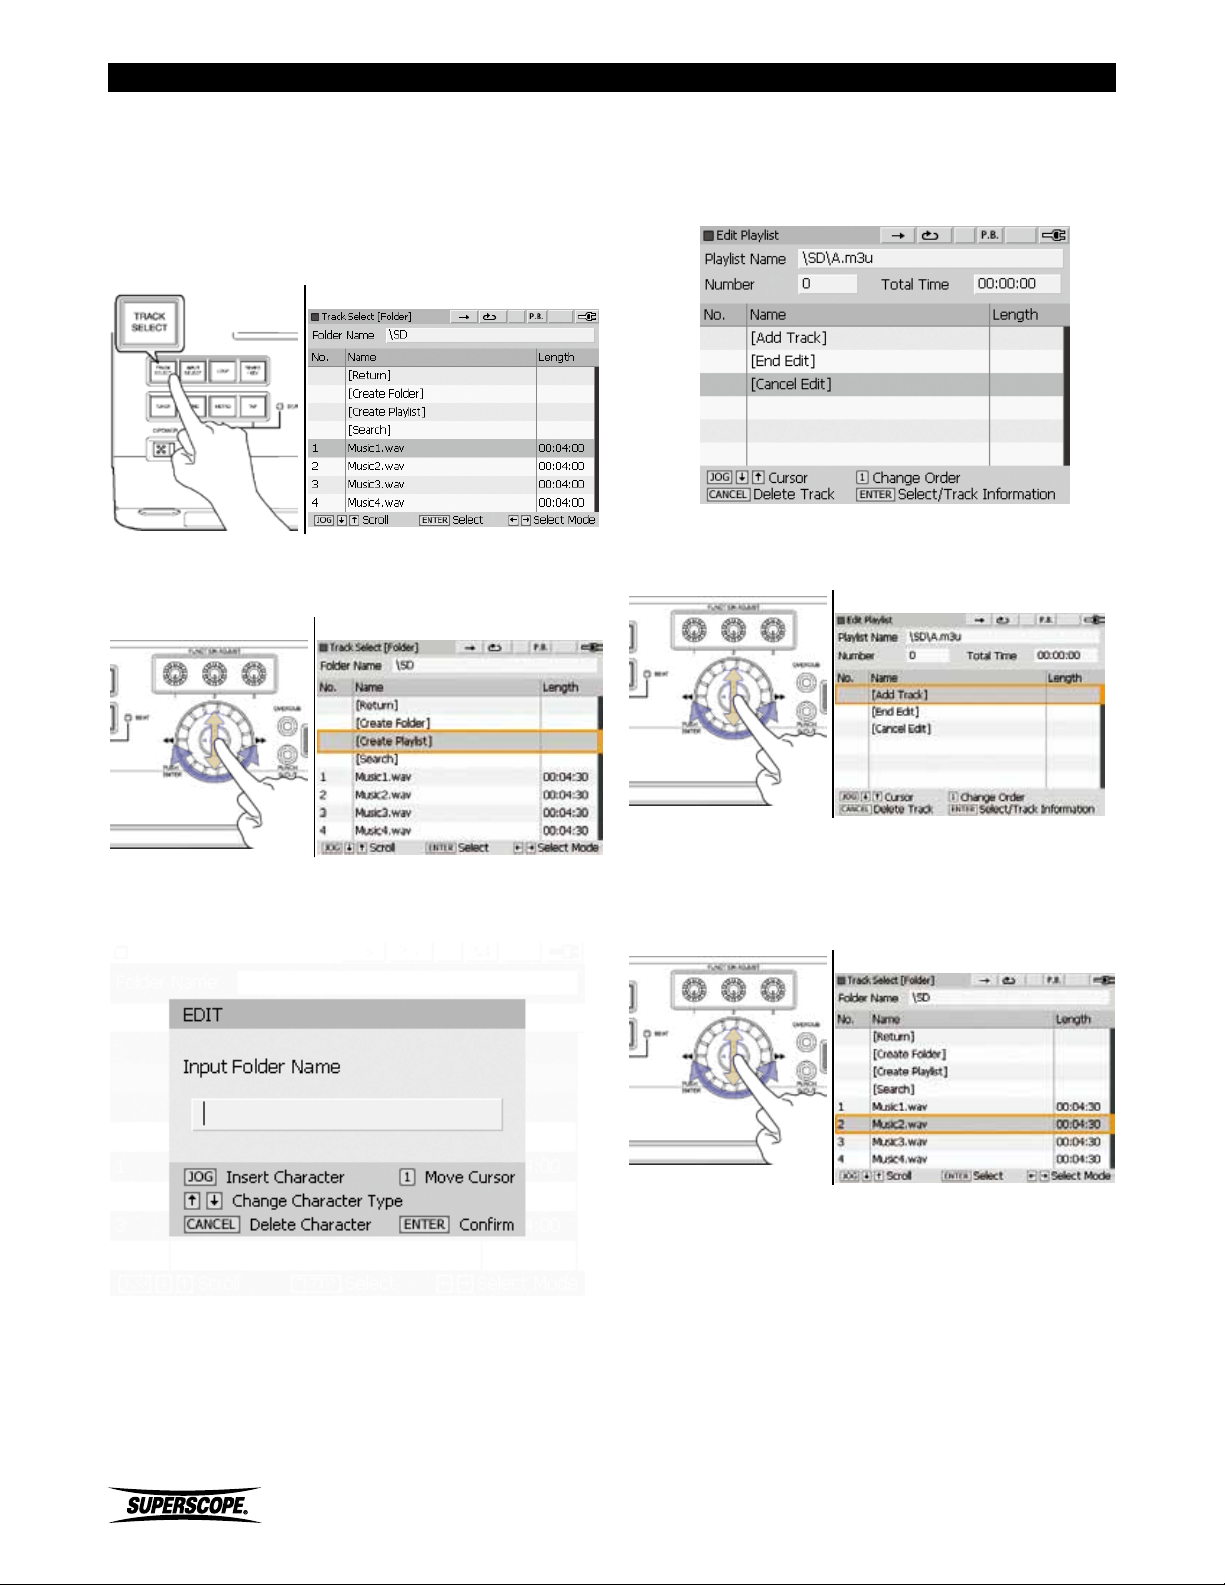
Working with Files and Folders
Create a Playlist
Use the following steps to create a playlist (M3U file
format).
1. Press the TRACK SELECT button to open the Track
Select [Folder] screen.
Track Select [Folder] Screen
2. Turn the jog wheel or move the joystick up or down
to highlight [Create Playlist]. Press ENTER.
Track Select [Folder] Screen
4. When you have finished naming your new playlist
and pressed ENTER to confirm the new title, the Edit
Playlist screen will appear.
Edit Play List Screen
5. Turn the jog wheel or move the joystick up or down
to highlight [Add Track]. Press ENTER.
Edit Play List Screen
3. Enter the name of the new playlist by using the Text
Input Method.
Text Input Screen
6. The Select Track [Folder] screen will appear. Turn
the jog wheel or move the joystick up or down to
highlight a track. Press ENTER to add the selected
track to the playlist.
Select Track [Folder] Screen
- 46 -
Superscope PSD430 / PSD450 User Manual
Page 47
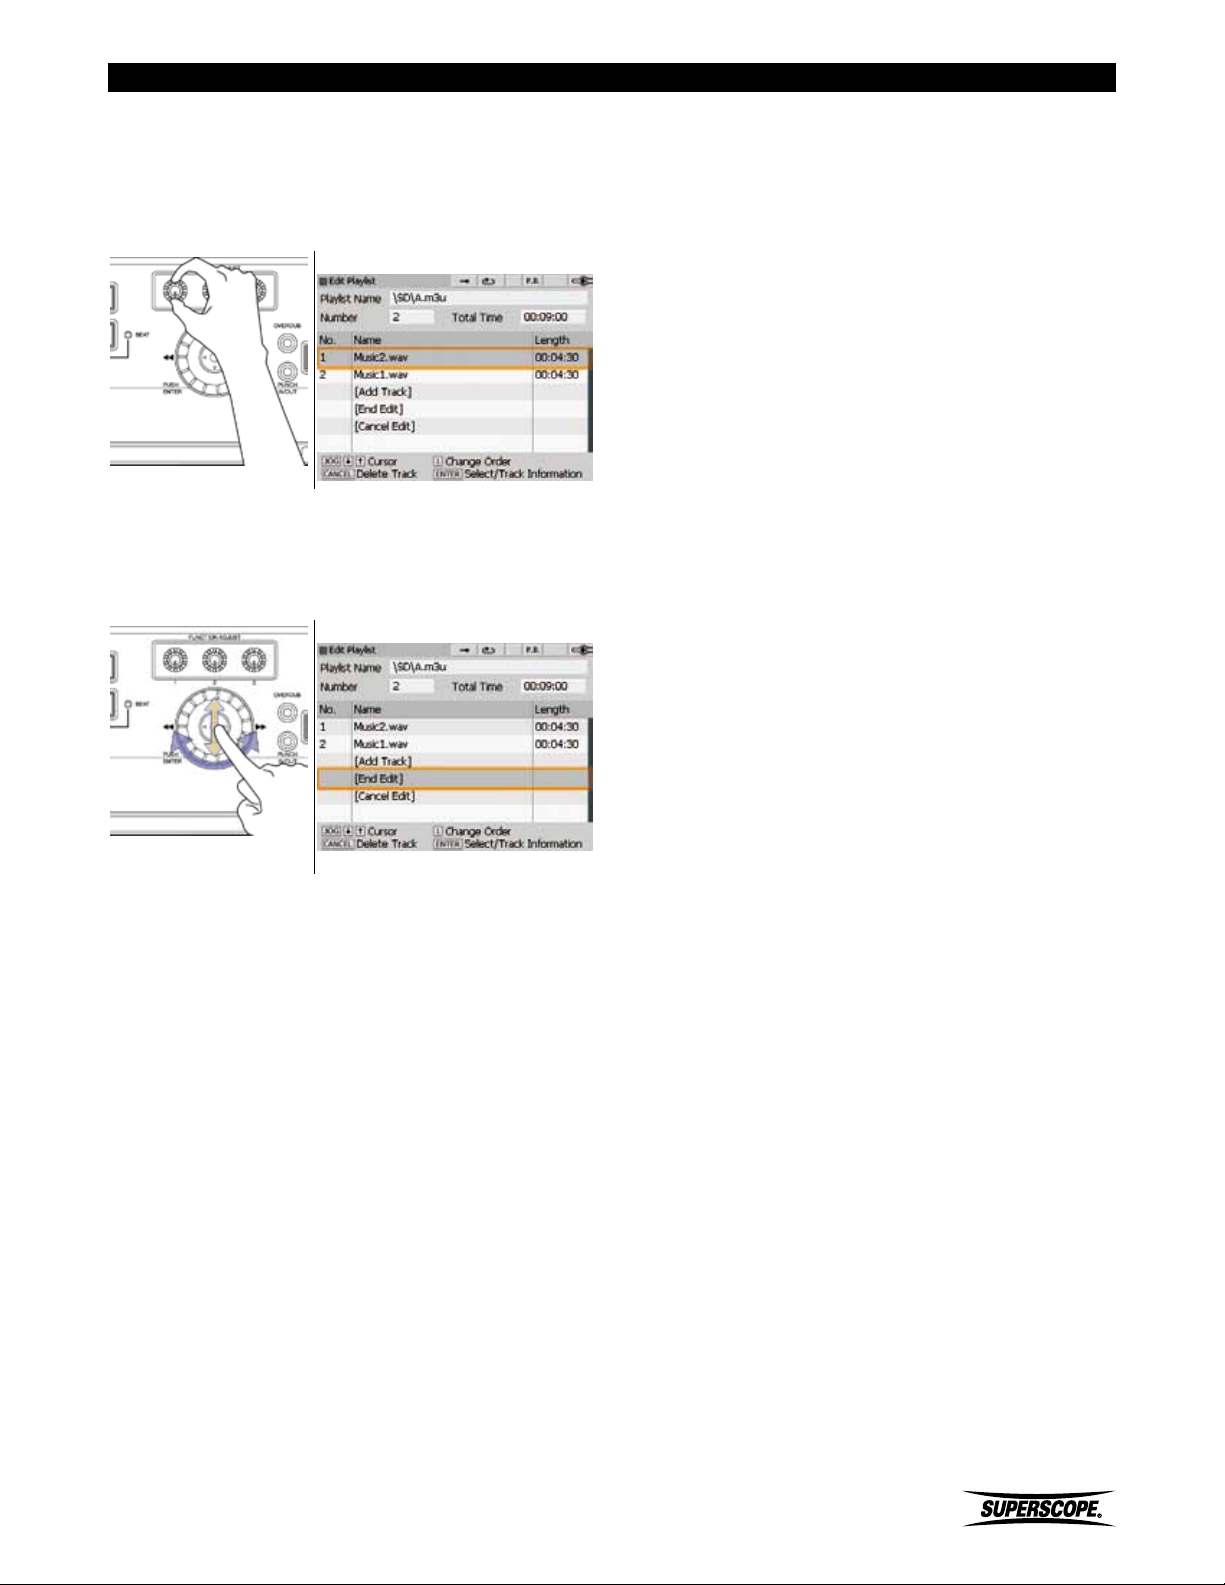
Working with Files and Folders
Change Track Order
7. Highlight a track and turn FUNCTION ADJUST #1
(4A) to change the order of tracks in a playlist.
Highlight a track and press the CANCEL button to
remove the track from the playlist.
Edit Play List Screen
8. When you have finished adding tracks to the playlist,
turn the jog wheel to highlight [End Edit]. Press
ENTER to save the new playlist and exit.
Edit Play List Screen
Superscope PSD430 / PSD450 User Manual
- 47 -
Page 48
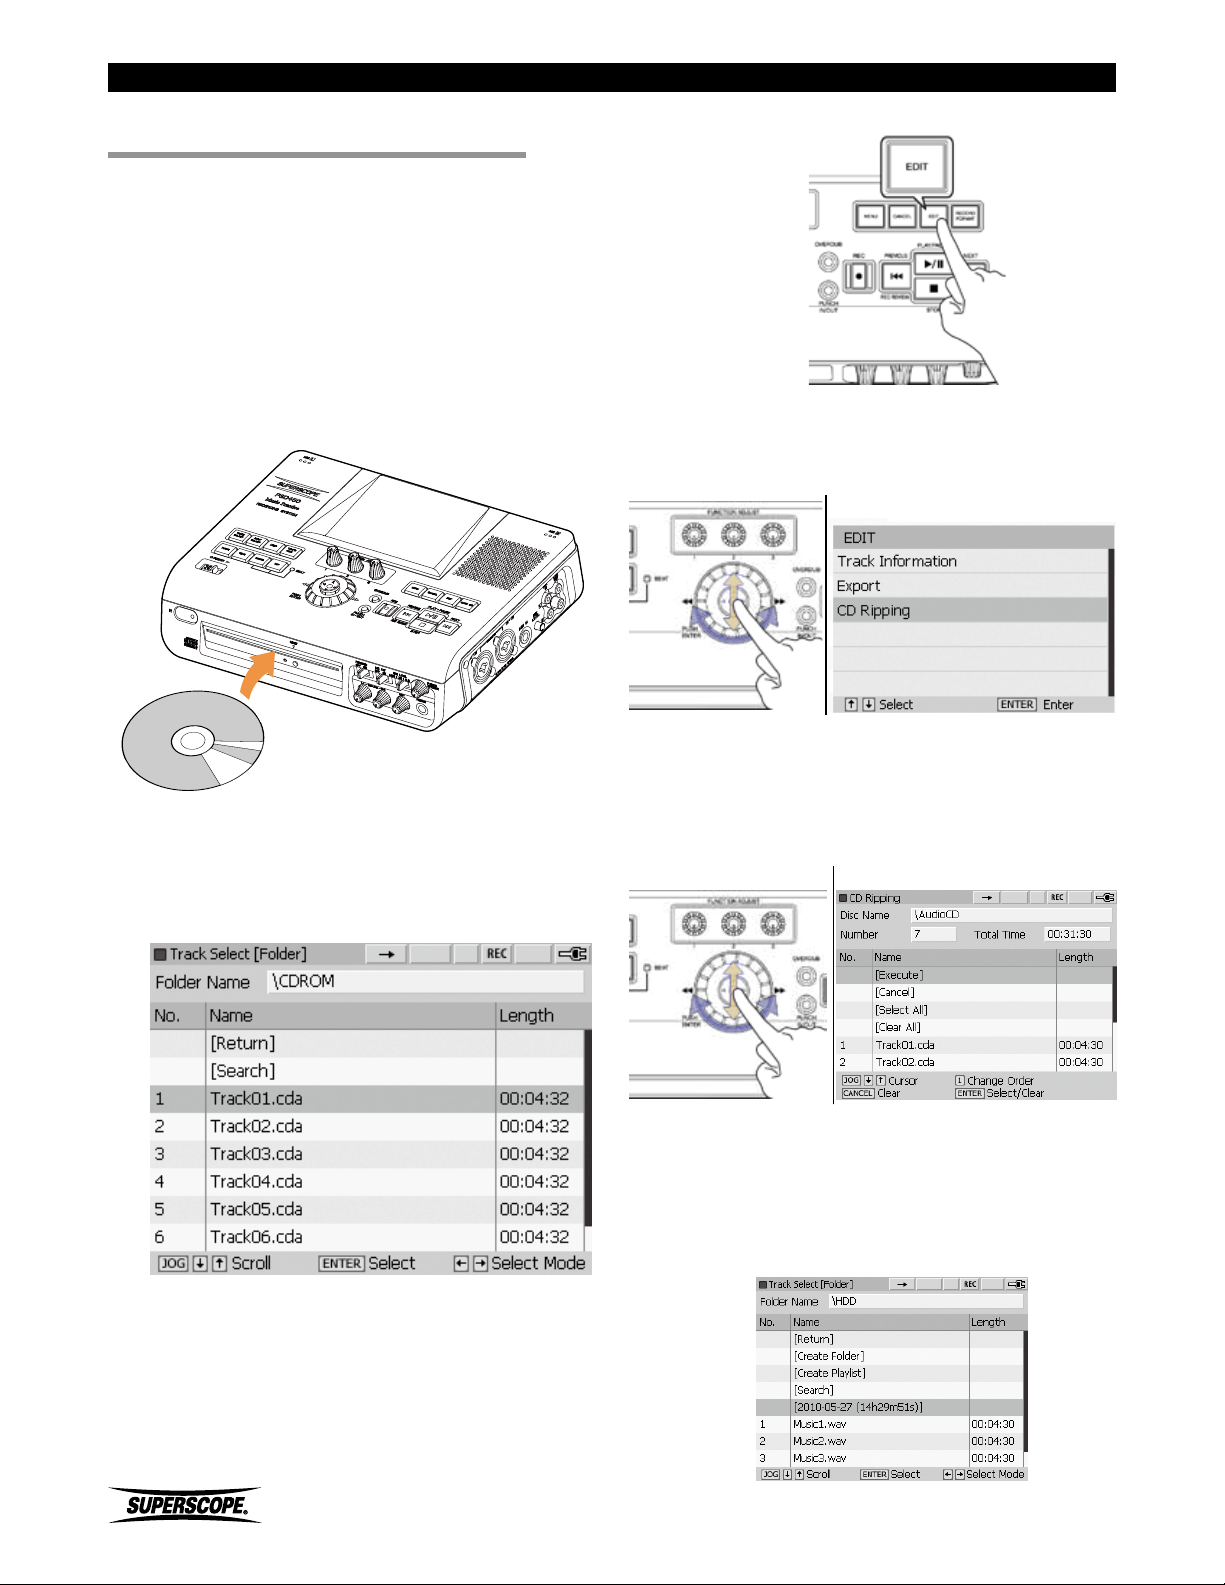
CD Ripping
■CD Ripping
Follow these instruction to “rip” the digital audio from
CD audio tracks to WAV files on the PSD450’s hard drive
or the PSD430’s SD card. Press the Cancel button during
CD ripping to end the procedure.
Ripping an entire Audio CD
1. Insert the CD you wish to rip into the CD-R/RW
drive.
4. Press the EDIT button.
5. Turn the jog wheel or move the joystick up or down
to highlight CD Ripping Press ENTER.
Edit Screen
2. When a CD audio disc is inserted, the contents of
the disc are displayed automatically .
Track Select [Folder] Screen
3. If you have exited the Track Select [Folder]\CDROM
screen, see How to Select [CDROM] to display the
CD contents again. Turn the jog wheel or move the
joystick up or down to highlight a track.
6. When the CD Ripping screen appears, all CD tracks
are selected. To rip the entire CD, simply turn the jog
wheel or move the joystick up or down to highlight
[Execute]. Press ENTER.
CD Ripping Screen
7. The CD tracks will be ripped to a folder in the main
directory of the PSD450 HDD or the PSD430 SD
card. The name of the folder will be the current time
and date, e.g., [2010-05-27 (14h29m51s)].
Track Select [Folder] Screen
- 48 -
Superscope PSD430 / PSD450 User Manual
Page 49
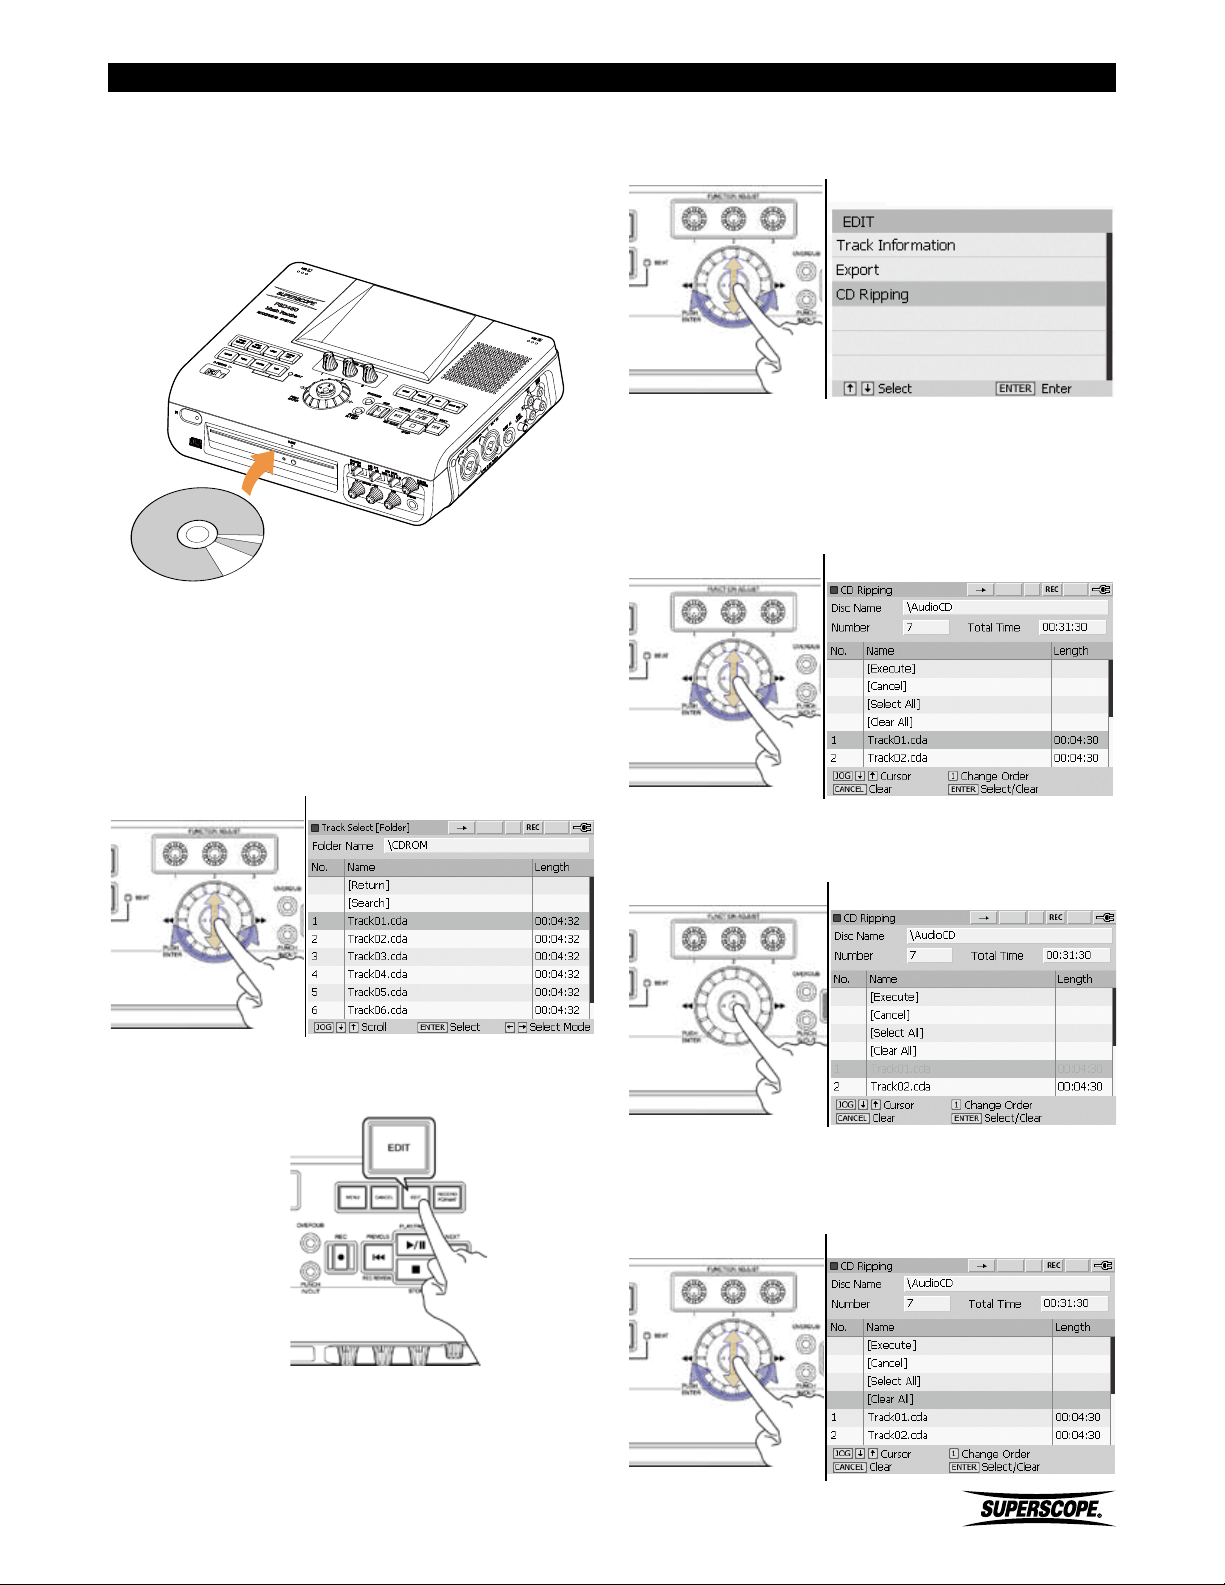
CD Ripping
Ripping Selected Tracks from an Audio CD
1. Insert the CD you wish to rip into the CD-R/RW
drive.
2. When a CD audio disc is inserted, the contents of
the disc are displayed automatically. If you have
exited the Track Select [Folder]\CDROM screen, see
How to Select [CDROM] to display the CD contents
again. Turn the jog wheel or move the joystick up or
down to highlight a track.
4. Turn the jog wheel or move the joystick up or down
to highlight CD Ripping. Press ENTER.
Edit Screen
5. When the CD Ripping screen appears, all CD tracks
are selected. If you intend to rip most of the tracks on
the CD, turn the jog wheel or move the joystick up or
down to select the tracks you do not wish to rip.
CD Ripping Screen
3. Press the EDIT button.
Track Select [Folder] Screen
Press ENTER to remove a track from the list of ripped
tracks.
CD Ripping Screen
If you only intend to rip a small number of tracks from
the CD, turn the jog wheel or move the joystick up or
down to highlight [Clear All].
CD Ripping Screen
Superscope PSD430 / PSD450 User Manual
- 49 -
Page 50
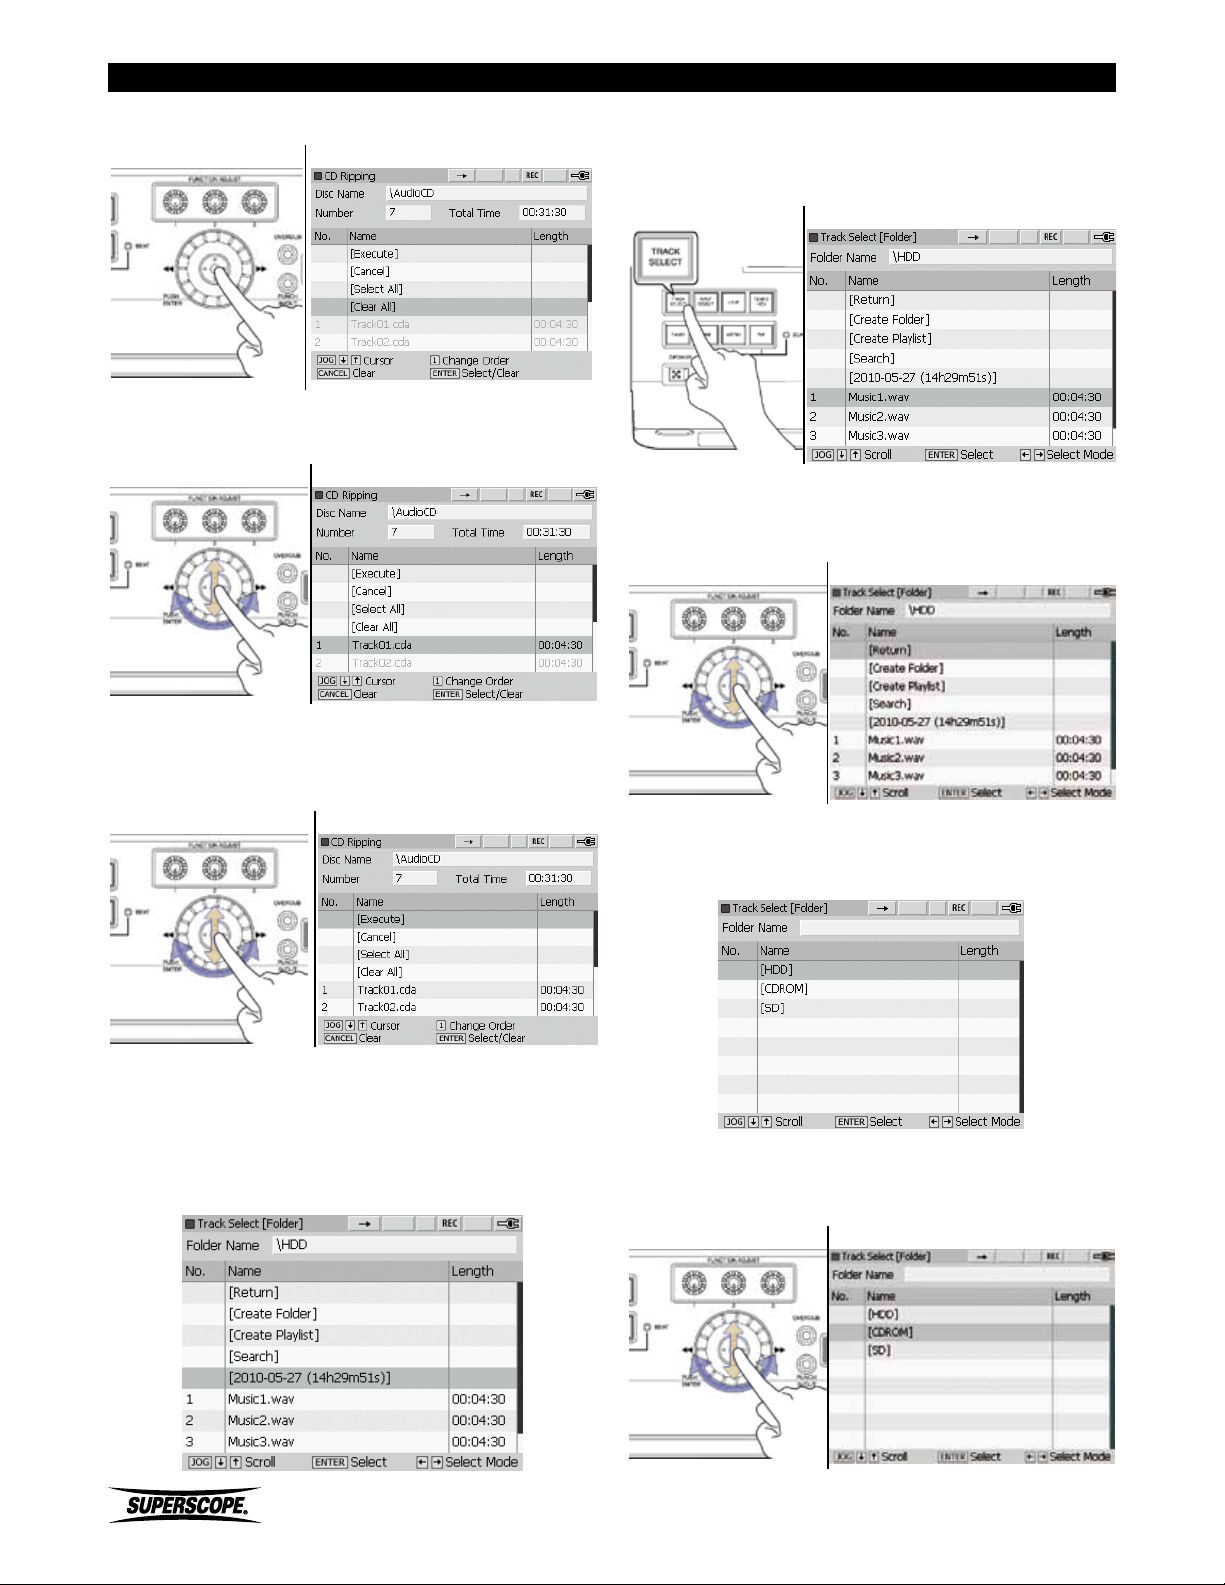
CD Ripping
Press ENTER. All tracks will appear in grey.
CD Ripping Screen
Turn the jog wheel or move the joystick up or down to
highlight the tracks you wish to rip. Press ENTER.
CD Ripping Screen
How to Select [CDROM]
1. Press the Track Select button. The recorder will show
the previously accessed folder.
Track Select [Folder] Screen
2. Turn the jog wheel or move the joystick up or down
to highlight [Return].
Track Select [Folder] Screen
6. When you have selected your tracks for ripping, turn
the jog wheel or move the joystick up or down to
highlight [Execute]. Press ENTER.
CD Ripping Screen
7. The CD tracks will be ripped to a folder in the main
directory of the PSD450 HDD or the PSD430 SD
card. The name of the folder will be the current time
and date, e.g., [2010-05-27 (14h29m51s)].
Track Select [Folder] Screen
3. Repeat this step until the following screen appears:
Device Select Screen
4. Turn the jog wheel or move the joystick up or down
to highlight [CDROM]. Press ENTER.
Device Select Screen
- 50 -
Superscope PSD430 / PSD450 User Manual
Page 51
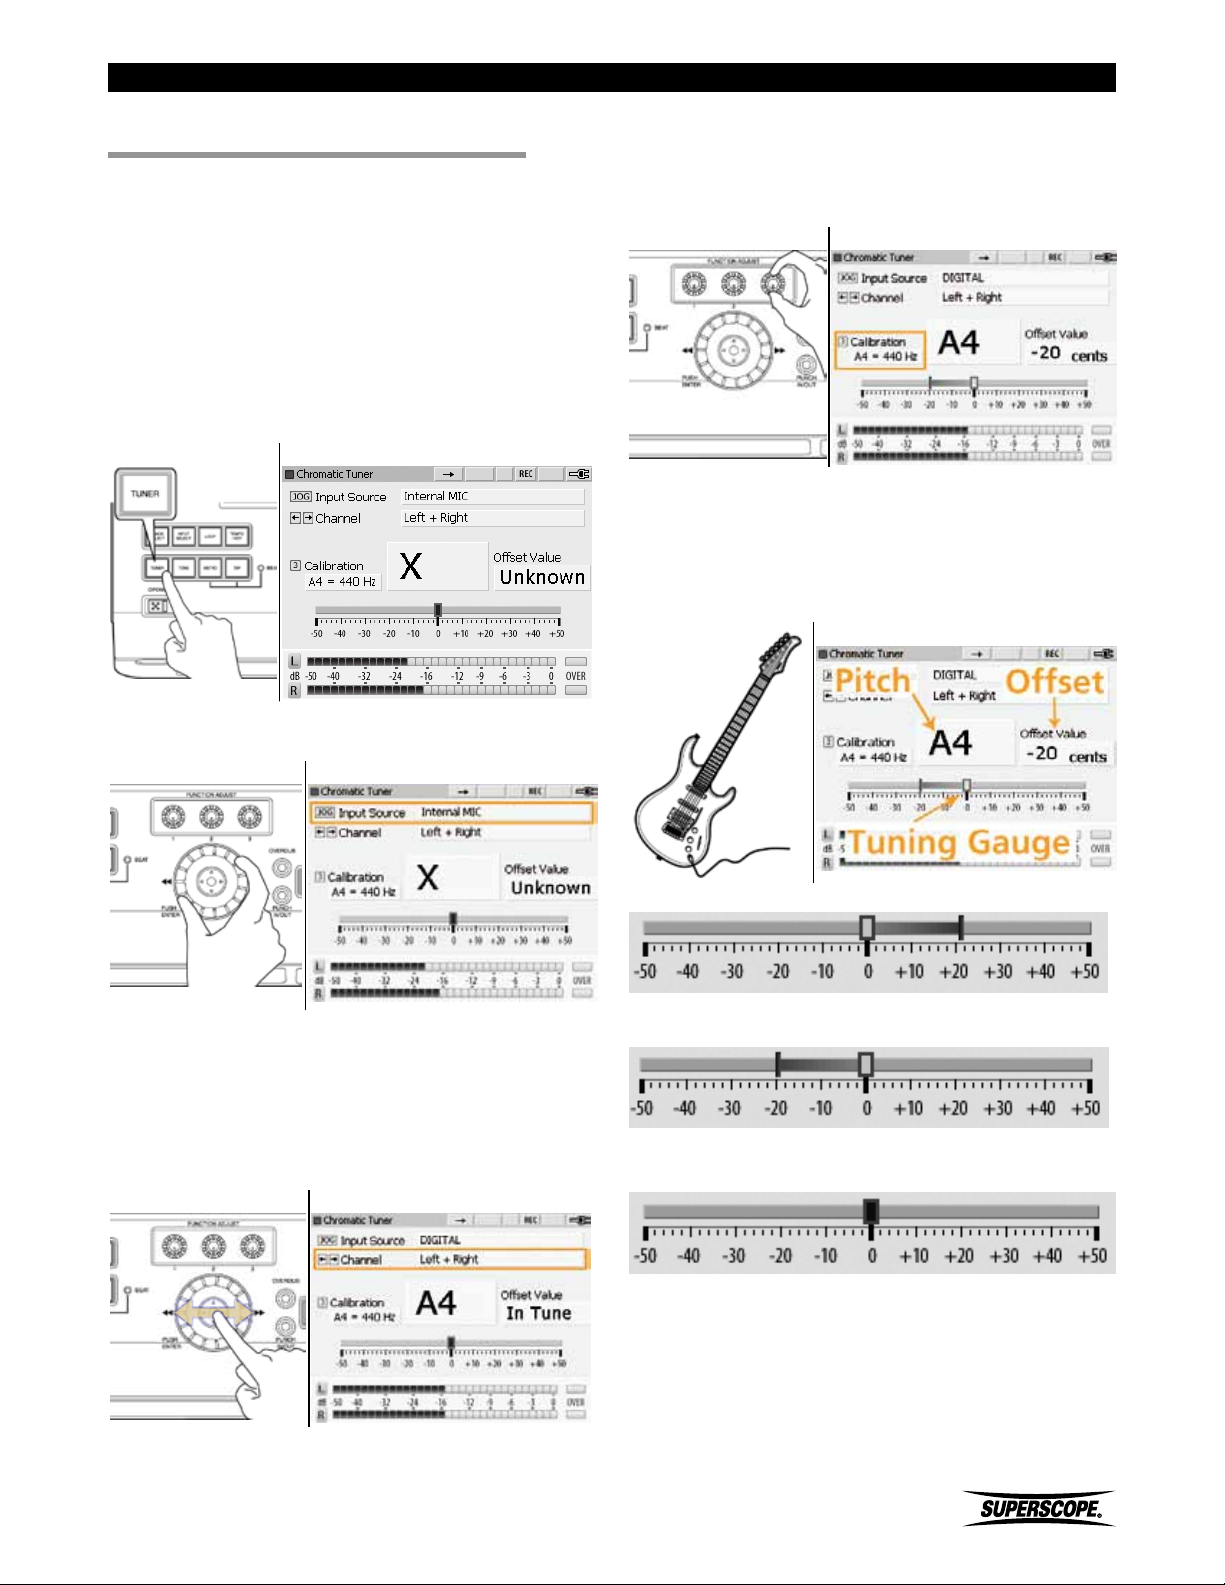
Music Practice
■Music Practice
How to Use the Tuner
The PSD400 series provides two options for tuning
instruments: a chromatic tuner (range=A0 ~ C8) and a
tone generator (default=440Hz).
Using the Chromatic Tuner
1. Push the TUNER button to open the chromatic tuner
screen.
Chromatic Tuner Screen
4. By default, the chromatic tuner is calibrated to
A4=440Hz. The tuner can be calibrated to any
frequency between 410Hz and 470Hz by turning
FUNCTION ADJUST #3 (4C).
Chromatic Tuner Screen
5. As you play a note on your instrument, the closest
musical pitch will be displayed along with an Offset
Value showing how flat or sharp the note is (+/- 50
cents). Tune your instrument until the tuning gauge
is centered and the Offset Value displays “In Tune”.
Chromatic Tuner Screen
2. Turn the jog wheel to select the Input Source.
Chromatic Tuner Screen
3. Move the joystick left or right to select the Input
Channel. Specifying an Input Channel improves
tuning accuracy by preventing interference from
other channels. For example, if you are using one
microphone connected to Input L/1, select Input
Source: External MIC, Channel: Left.
Chromatic Tuner Screen
Tuning gauge indicating “Sharp”
Tuning gauge indicating “Flat”
Tuning gauge indicating “In Tune”
Superscope PSD430 / PSD450 User Manual
- 51 -
Page 52
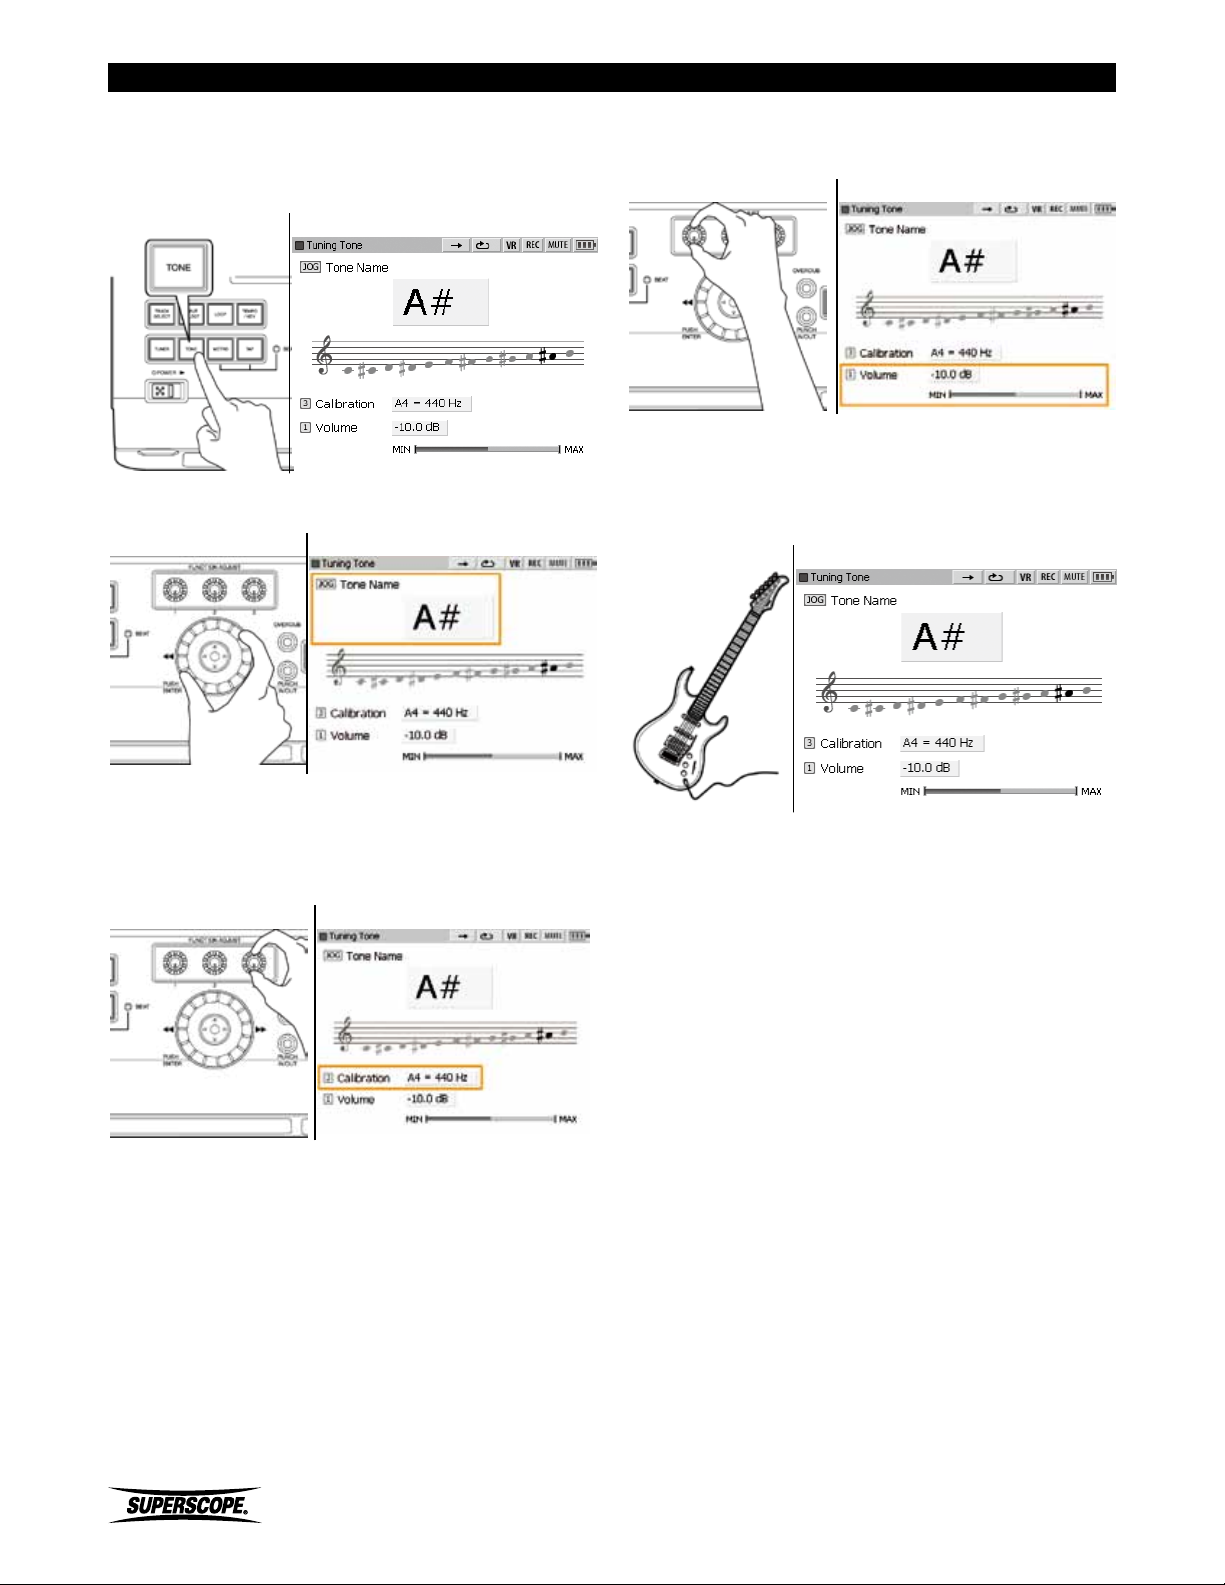
Music Practice
Using the Tuning Tone
1. Push the Tone button to open the Tuning Tone
screen.
Tuning Tone Screen
2. Turn the jog wheel to select the frequency of the
tone generator.
Tuning Tone Screen
4. Turn FUNCTION ADJUST #1 (4A) to adjust the
volume of the tone generator.
Tuning Tone Screen
5. All notes are displayed in concert pitch. Tune your
instrument to match Tone Name displayed on the
Tuning Tone screen.
Tuning Tone Screen
3. By default, the tone generator is calibrated to
A4=440Hz. The tuner can be calibrated to any
frequency between 410Hz and 470Hz by turning
FUNCTION ADJUST #3 (4C).
Tuning Tone Screen
- 52 -
Superscope PSD430 / PSD450 User Manual
Page 53
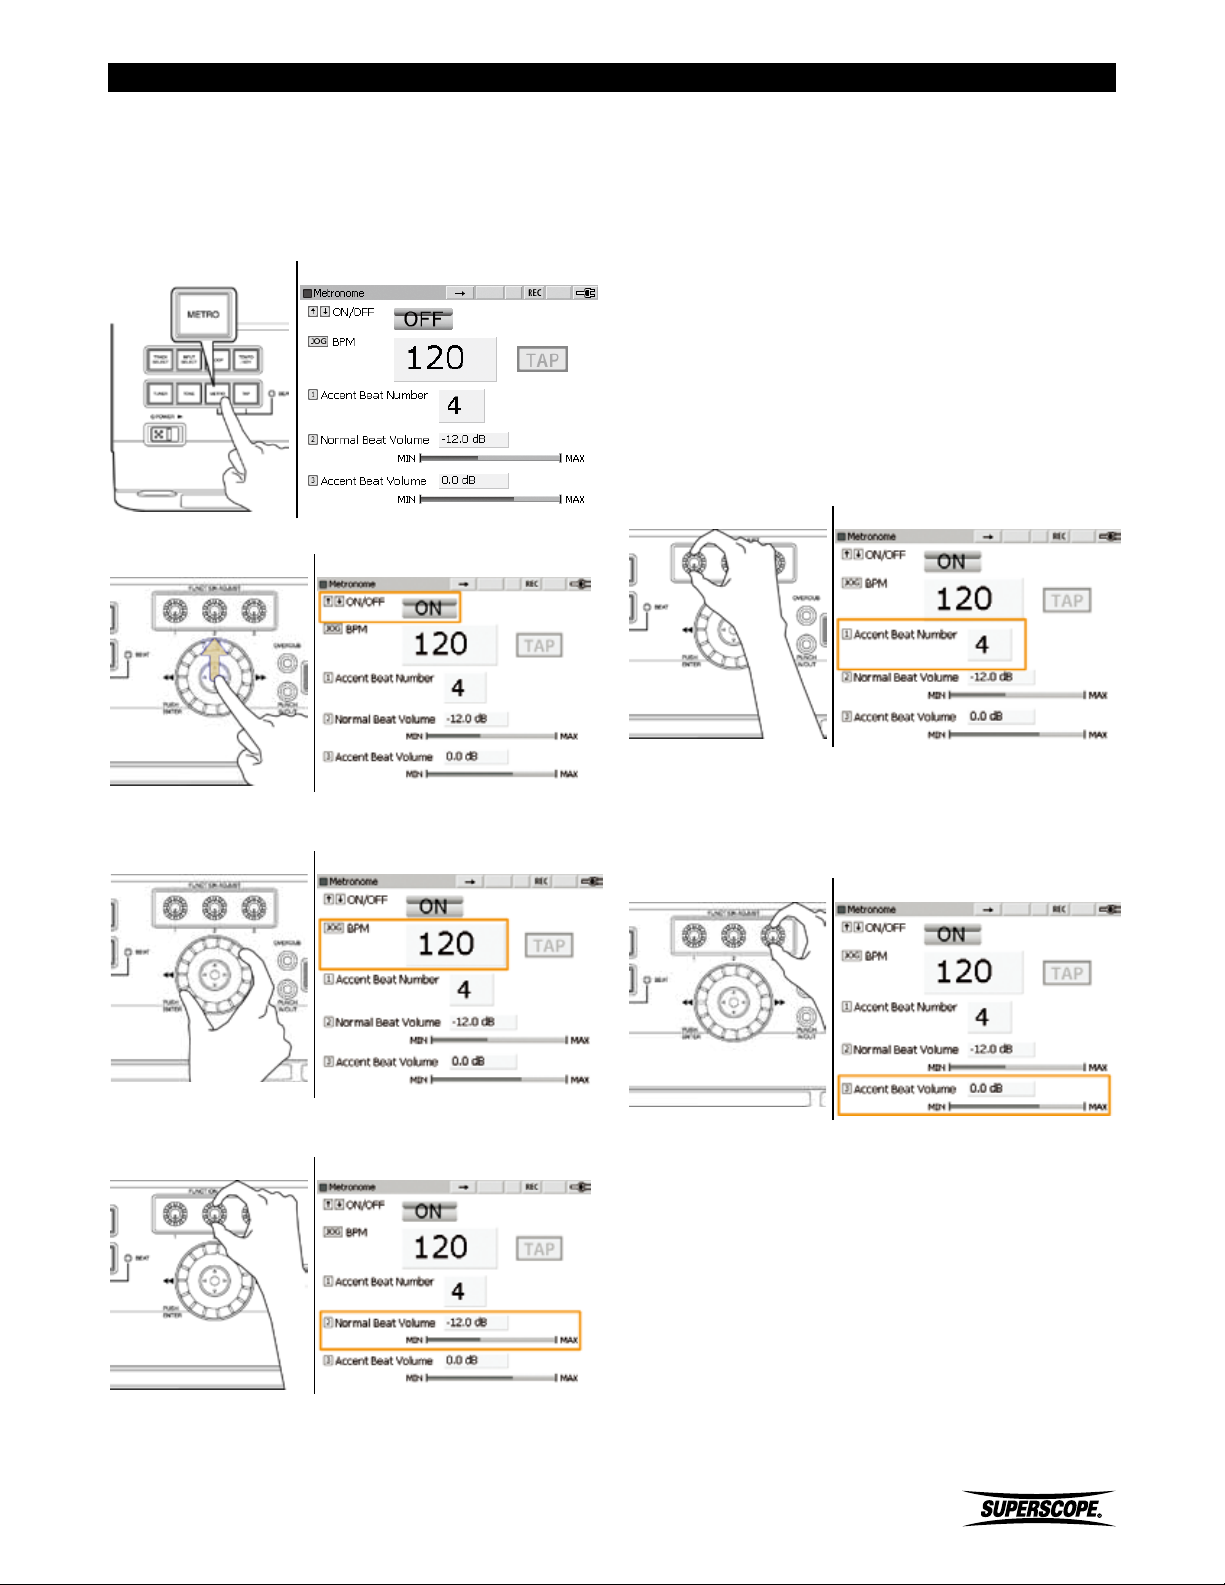
Music Practice
Using the Metronome
The metronome signal can be heard through the line
outputs, headphones or built-in speaker.
1. Press the METRO button or the TAP button to open
the Metronome screen.
Metronome Screen
2. Move the joystick up to turn the metronome ON.
Metronome Screen
Adjusting Accent Beat and Accent Beat Volume
By designating a particular beat to play louder than other
beats, the metronome is able to imply different rhythmic
meters. For instance, setting the Accent Beat Number to
3 will cause every third beat to sound louder than the
other two. At moderate tempos, this will create a waltz
feel. Adjusting the Accent Beat Volume will determine
how much louder the Accent Beat will sound over the
non-accented beats.
1. Turn FUNCTION ADJUST #1 (4A) to set an Accent
Beat Number. Select beat 1-9 or ‘0’ for no accent
beat. Press FUNCTION ADJUST #1 (4A) to return the
Accent Beat Number to the default setting (4).
Metronome Screen
3. Turn the jog wheel to adjust tempo. Tempo can be
set between 35BPM and 250BPM.
Metronome Screen
4. Turn FUNCTION ADJUST #2 (4B) to adjust the
volume of the metronome.
Metronome Screen
2. Turn FUNCTION ADJUST #3 (4C) to set the volume
of the accent beat. Press FUNCTION ADJUST #3 (4C)
to return the Accent Beat Volume to the default
setting (0.0dB).
Metronome Screen
Superscope PSD430 / PSD450 User Manual
- 53 -
Page 54
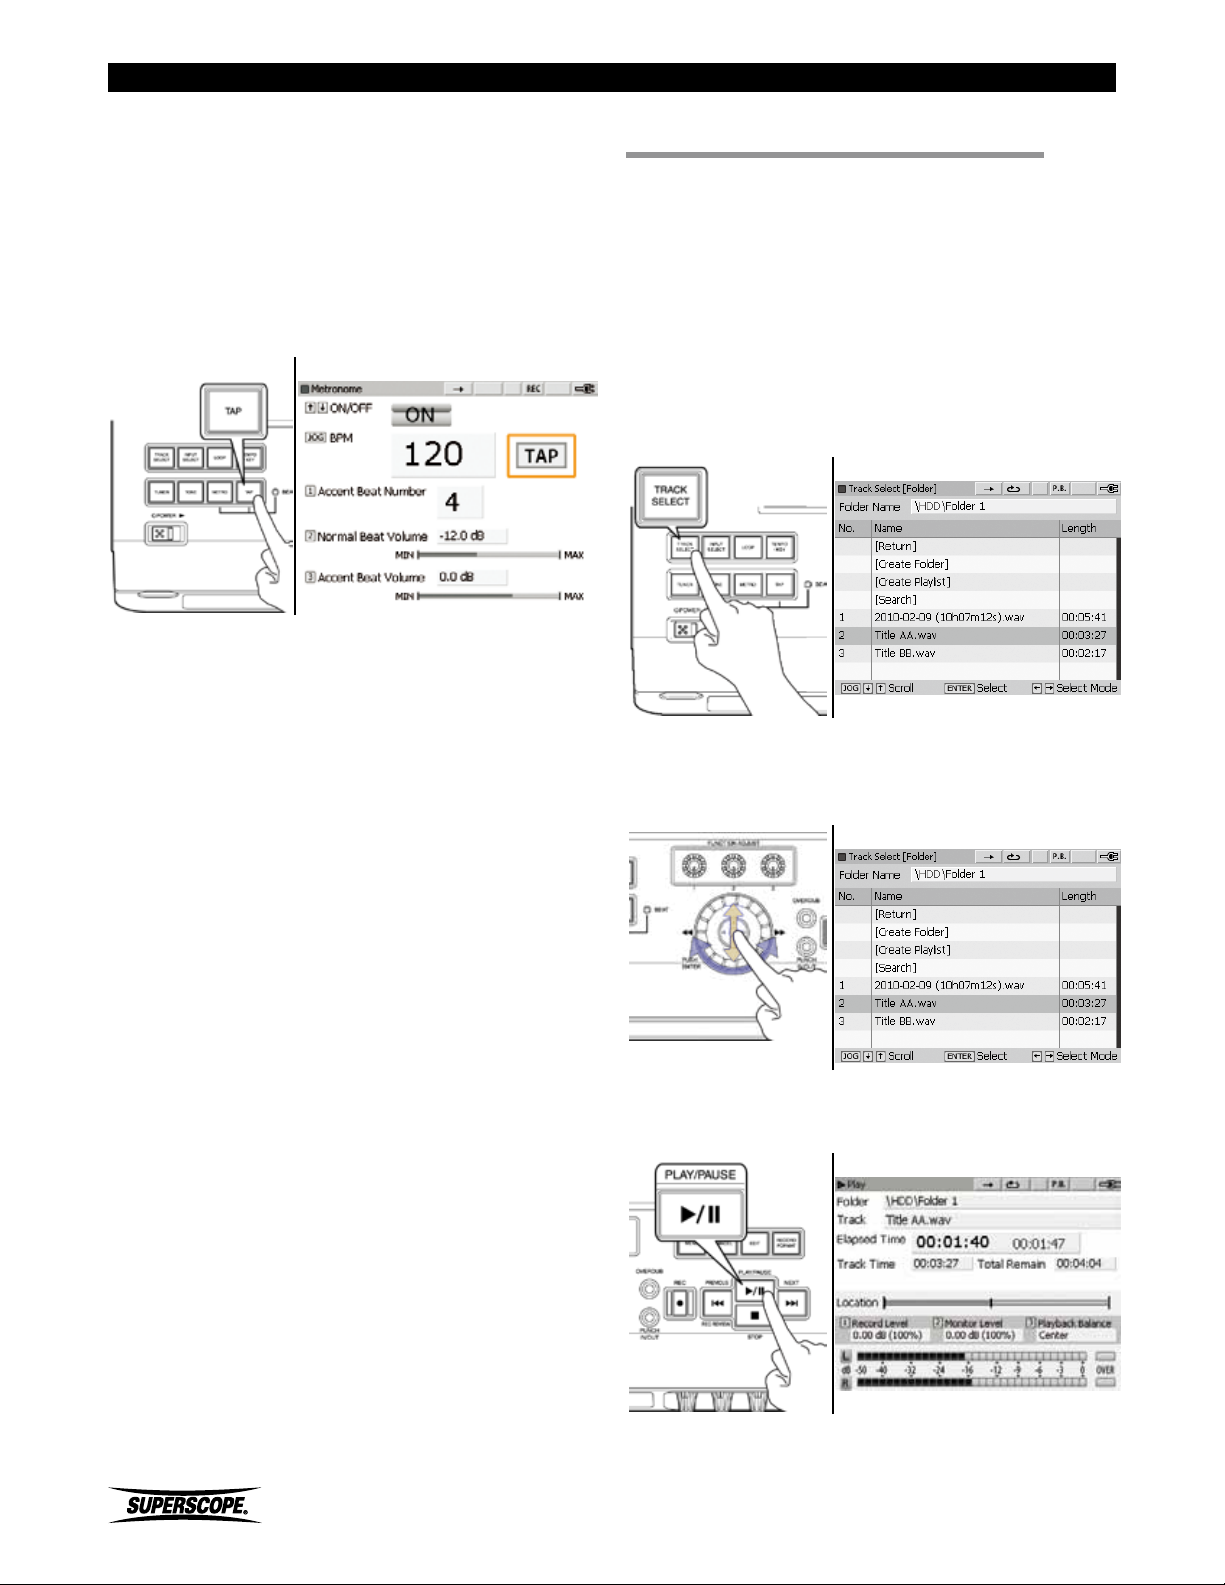
Music Practice
Using Tap Tempo
Metronome Tempo can also be determined by pressing
the TAP button.
Press the TAP button at the desired tempo a minimum of
6 times to adjust the BPM setting of the metronome.
The LED flashes on and off according to the BPM setting
of the metronome. The LED will flash green for normal
beats and red for accent beats.
Metronome Screen
■Play
The PSD400 series can play CD audio or WAV or MP3
files located on the Hard Drive (PSD450 only), SD card,
USB storage device, or CD.
1. Power the unit on (see Set Up).
2. Press the TRACK SELECT button to open the Track
Select [Folder] screen. The contents of the PSD450
internal hard drive (HDD) or the PSD430 SD card will
be displayed. To search the contents of a different
device, see Search a USB Device, SD Card or CD.
Track Select [Folder] Screen
3. Turn the jog wheel or move the joystick up or down
to highlight track for playback.
Track Select [Folder] Screen
4. Press the PLAY/PAUSE button (8C) to play the
selected track.
Play Screen
- 54 -
Superscope PSD430 / PSD450 User Manual
Page 55
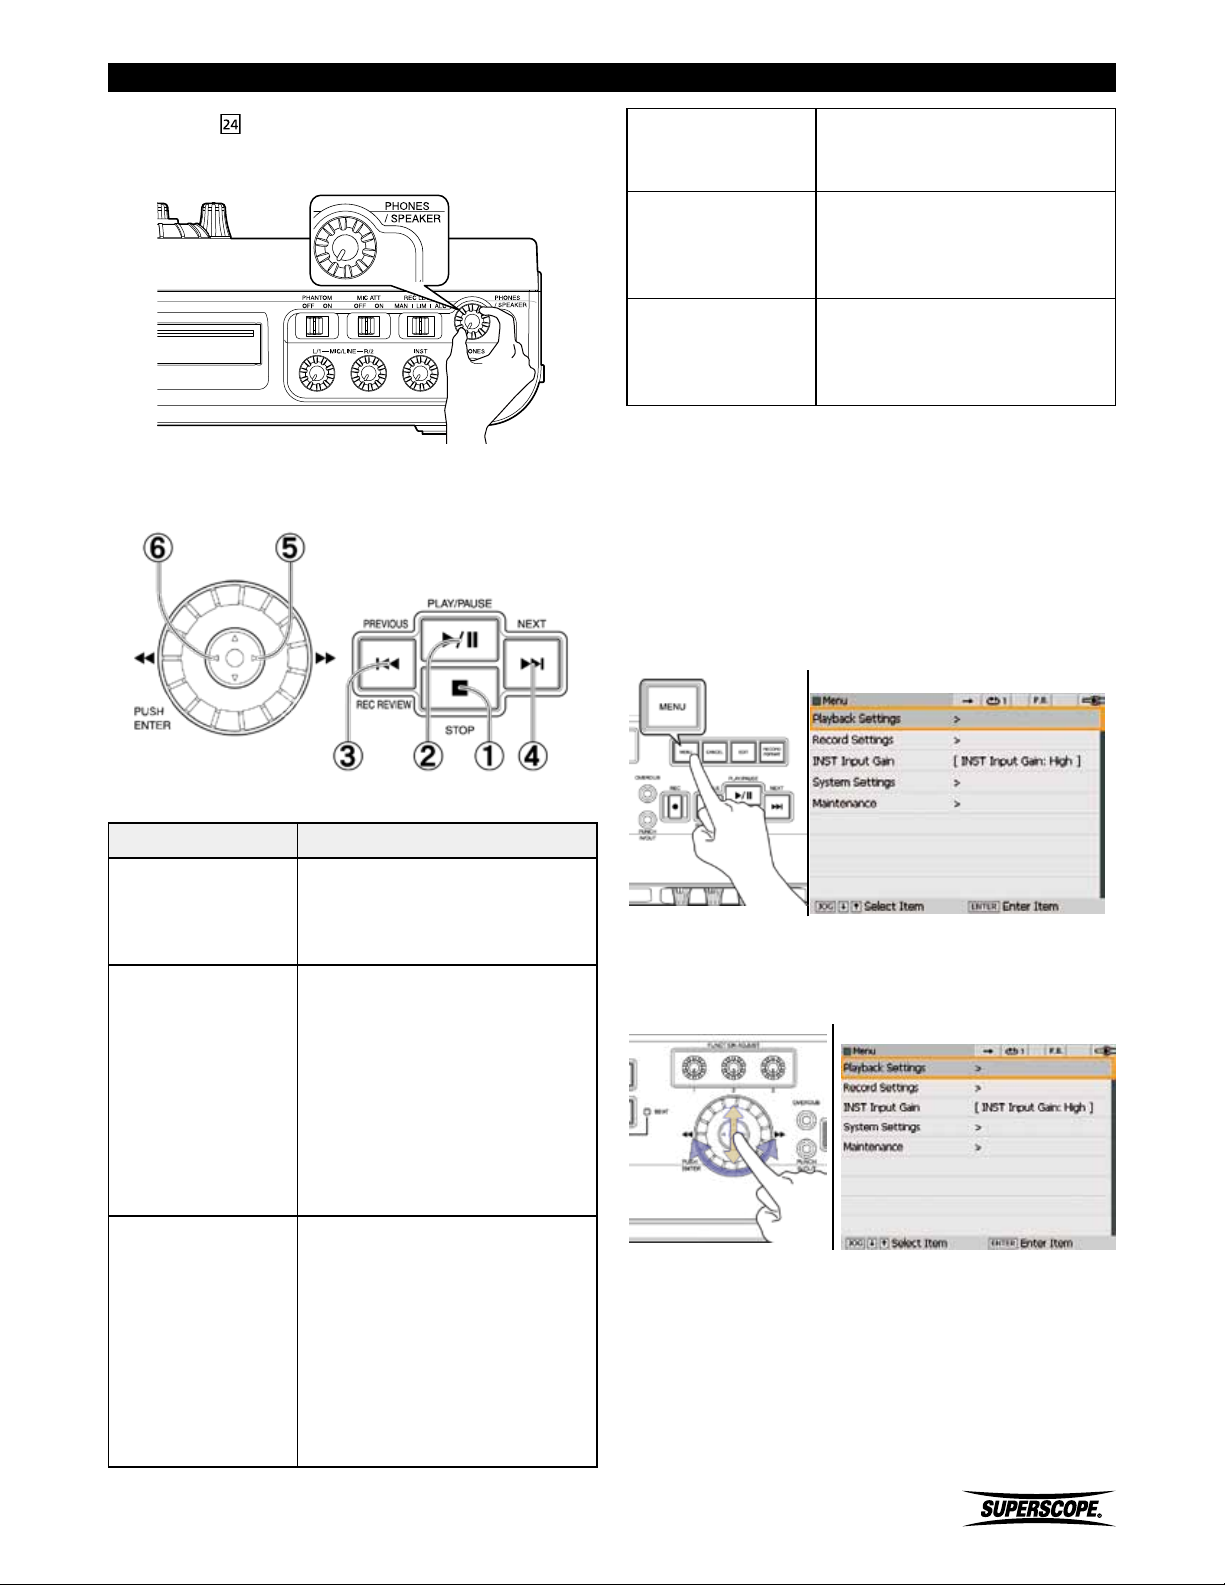
Music Practice
5. Turn the
volume of the speaker or headphones.
PHONES/SPEAKER knob to adjust the
Playback Operation
Press to begin playback at the
④ NEXT
⑤ Fast Forward
⑥ Fast Rewind
beginning of the next track.
Hold the joystick to the right
to begin audible high-speed
searching.
Hold the joystick to the left
to begin audible high-speed
backward searching.
Playback Modes
In Normal operation, playback continues to the next track
as soon as the current track is finished playing.
The PSD400 series contains several alternative playback
modes to accommodate a variety of situations. Follow
these steps to select a new playback (repeat) mode.
1. Press the Menu button to open the Menu screen.
Menu Screen
Button Function
Press to stop playback. Playback
① STOP
② PLAY/PAUSE
③ PREVIOUS
location returns to the beginning
of the track.
• From Stop Mode, press to
begin playback.
• From Pause Mode, press to
resume playback from the
pause location.
• From Play Mode, press to
pause playback.
Press during playback to return
to the start of the track. Press
the Previous button within the
first two seconds of playback
to return to the start of the
previous track.
Press during Stop Mode to
return to the start of the
previous track.
2. Use the jog wheel or joystick to highlight Playback
Settings and then press ENTER.
Menu Screen
Superscope PSD430 / PSD450 User Manual
- 55 -
Page 56
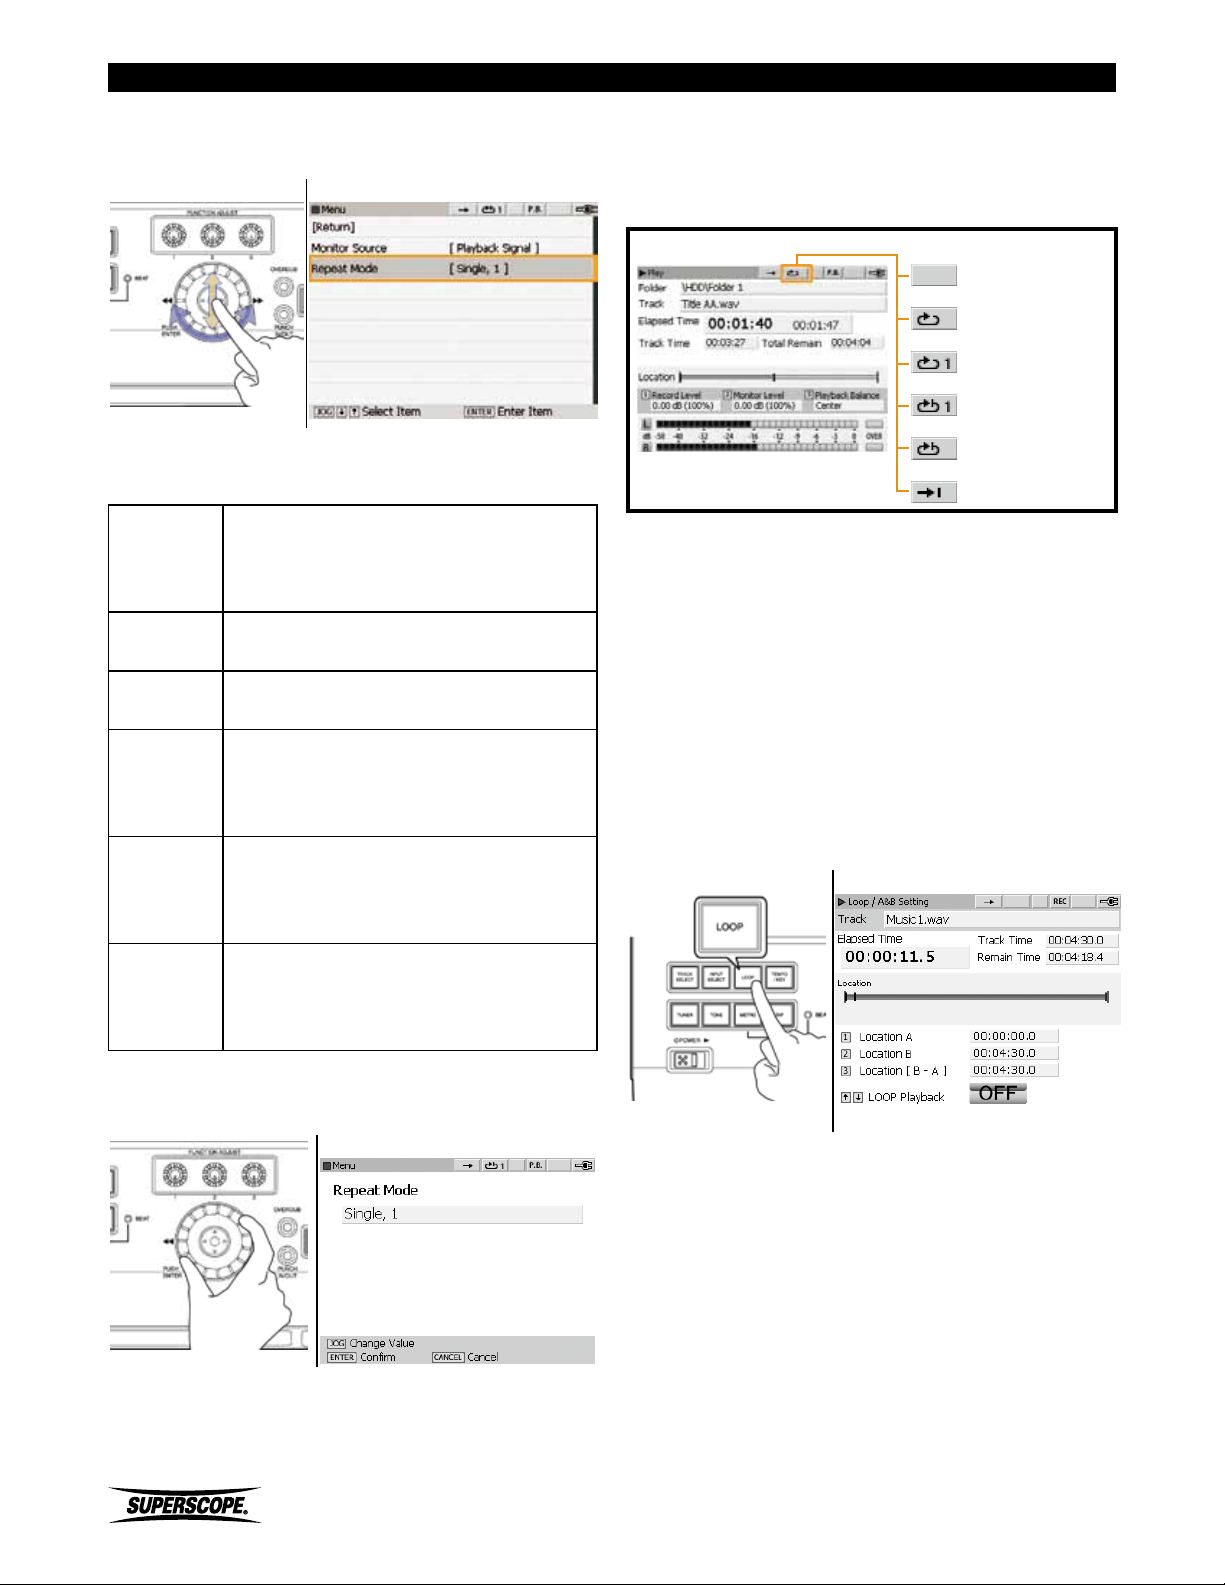
Music Practice
3. Use the jog wheel or joystick to highlight "Repeat
Mode" and then press ENTER.
Menue Screen
Repeat Modes
Normal operation. When a track is
OFF
All
1
Single, 1
Single, All
finished playing, playback continues to
the next track.
All songs in a given folder play repeatedly.
The current track will play repeatedly.
The current track plays once before
playback stops at the beginning of the
current track.
All songs in a given folder play once
before playback stops at the beginning of
the first track.
5. Press the Menu button to exit.
The following Repeat icons will be displayed when the
corresponding Repeat Mode is selected:
OFF
All
1
Single, 1
Single, All
Single
A-B Loop (Repeat Playback)
Use the A-B Loop function to play a section of audio
repeatedly. This function will work when selecting
a file from any location: CD audio, USB, SD, or HDD
(PSD450 only). The procedure below is also used when
determining In/Out points for Overdub and Punch In/
Out.
Set the A Point
1. During playback, press the LOOP button to open the
Loop/ A&B Setting screen.
Loop Setting Screen
The current track plays once before
Single
4. Select a Repeat Mode by turning the jog wheel.
Press ENTER to confirm the selection.
To cancel the setting, press the CANCEL button.
playback stops at the beginning of next
track.
Repeat Mode Screen
2. When you hear the point at which the loop should
- 56 -
begin, press FUNCTION ADJUST #1(4A).
Superscope PSD430 / PSD450 User Manual
Page 57
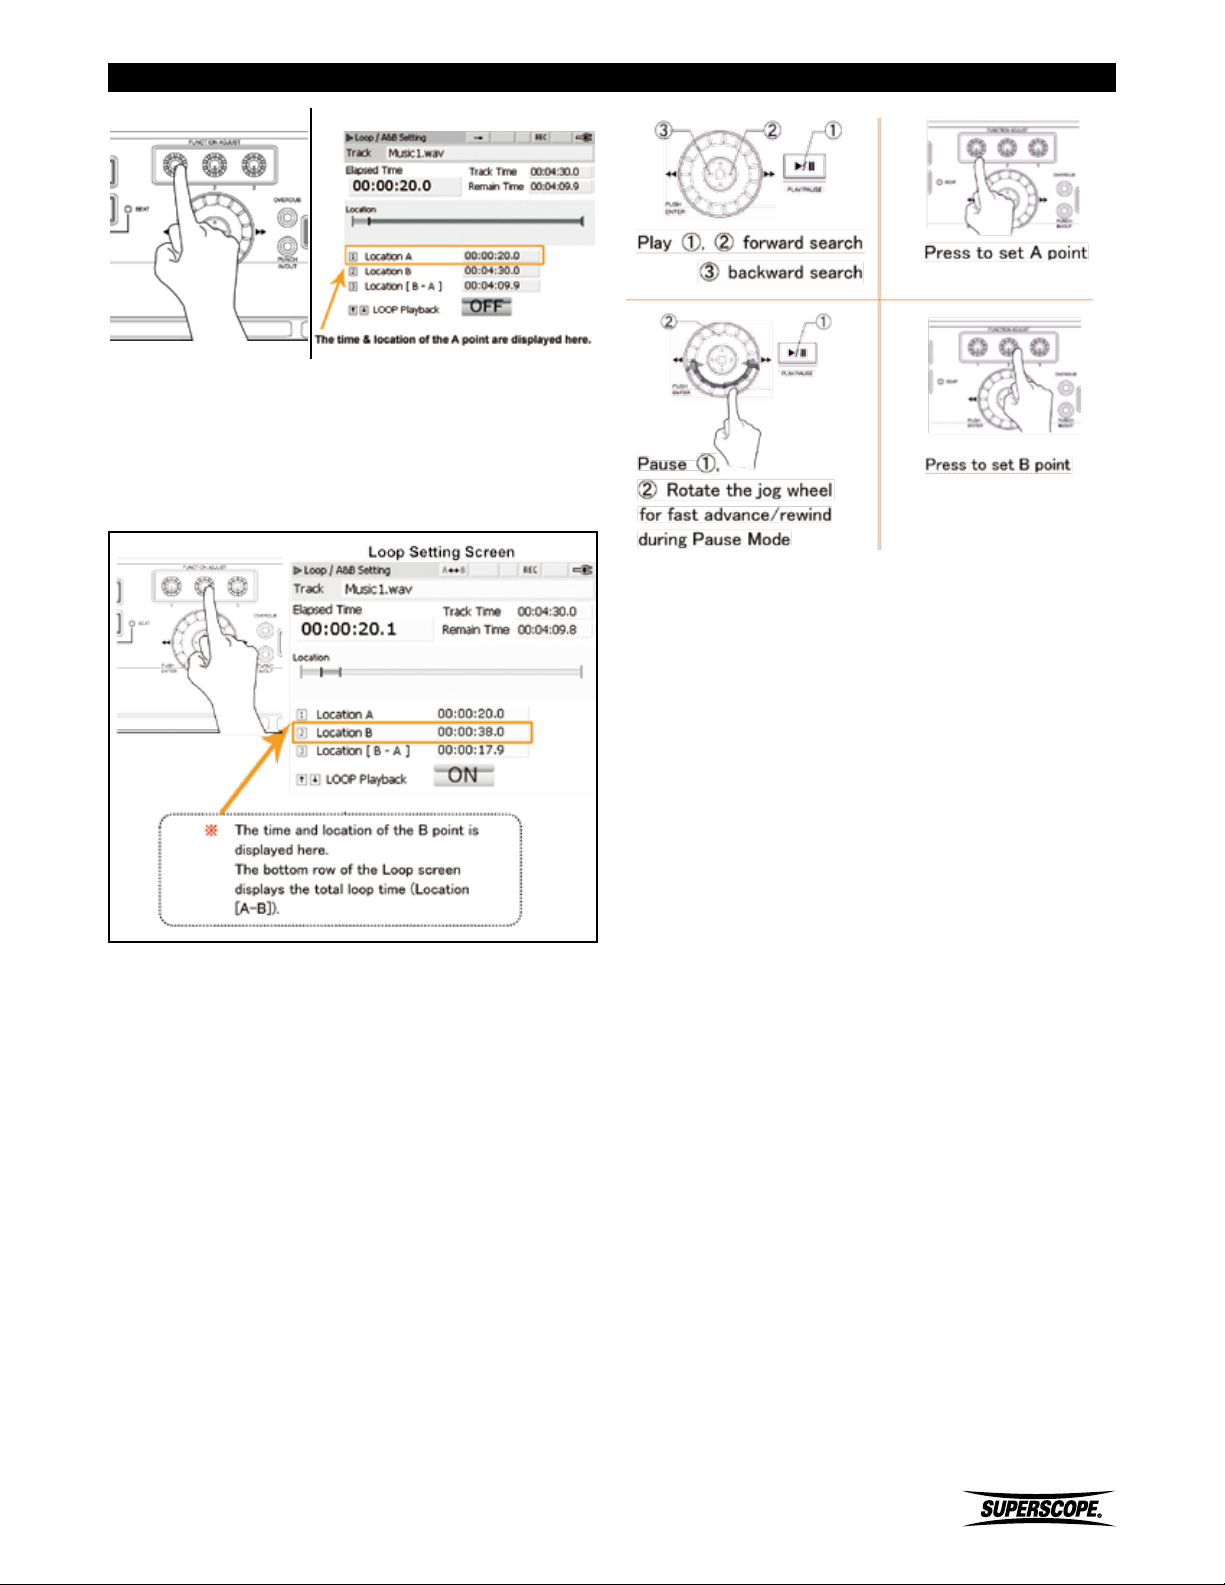
Music Practice
Loop Setting Screen
Set the B Point
1. When you hear the point at which the loop should
end, press FUNCTION ADJUST #2 (4B). When the B
point is set, LOOP Playback begins automatically.
Use the following controls during Loop Mode to locate A
and B points.
Superscope PSD430 / PSD450 User Manual
- 57 -
Page 58
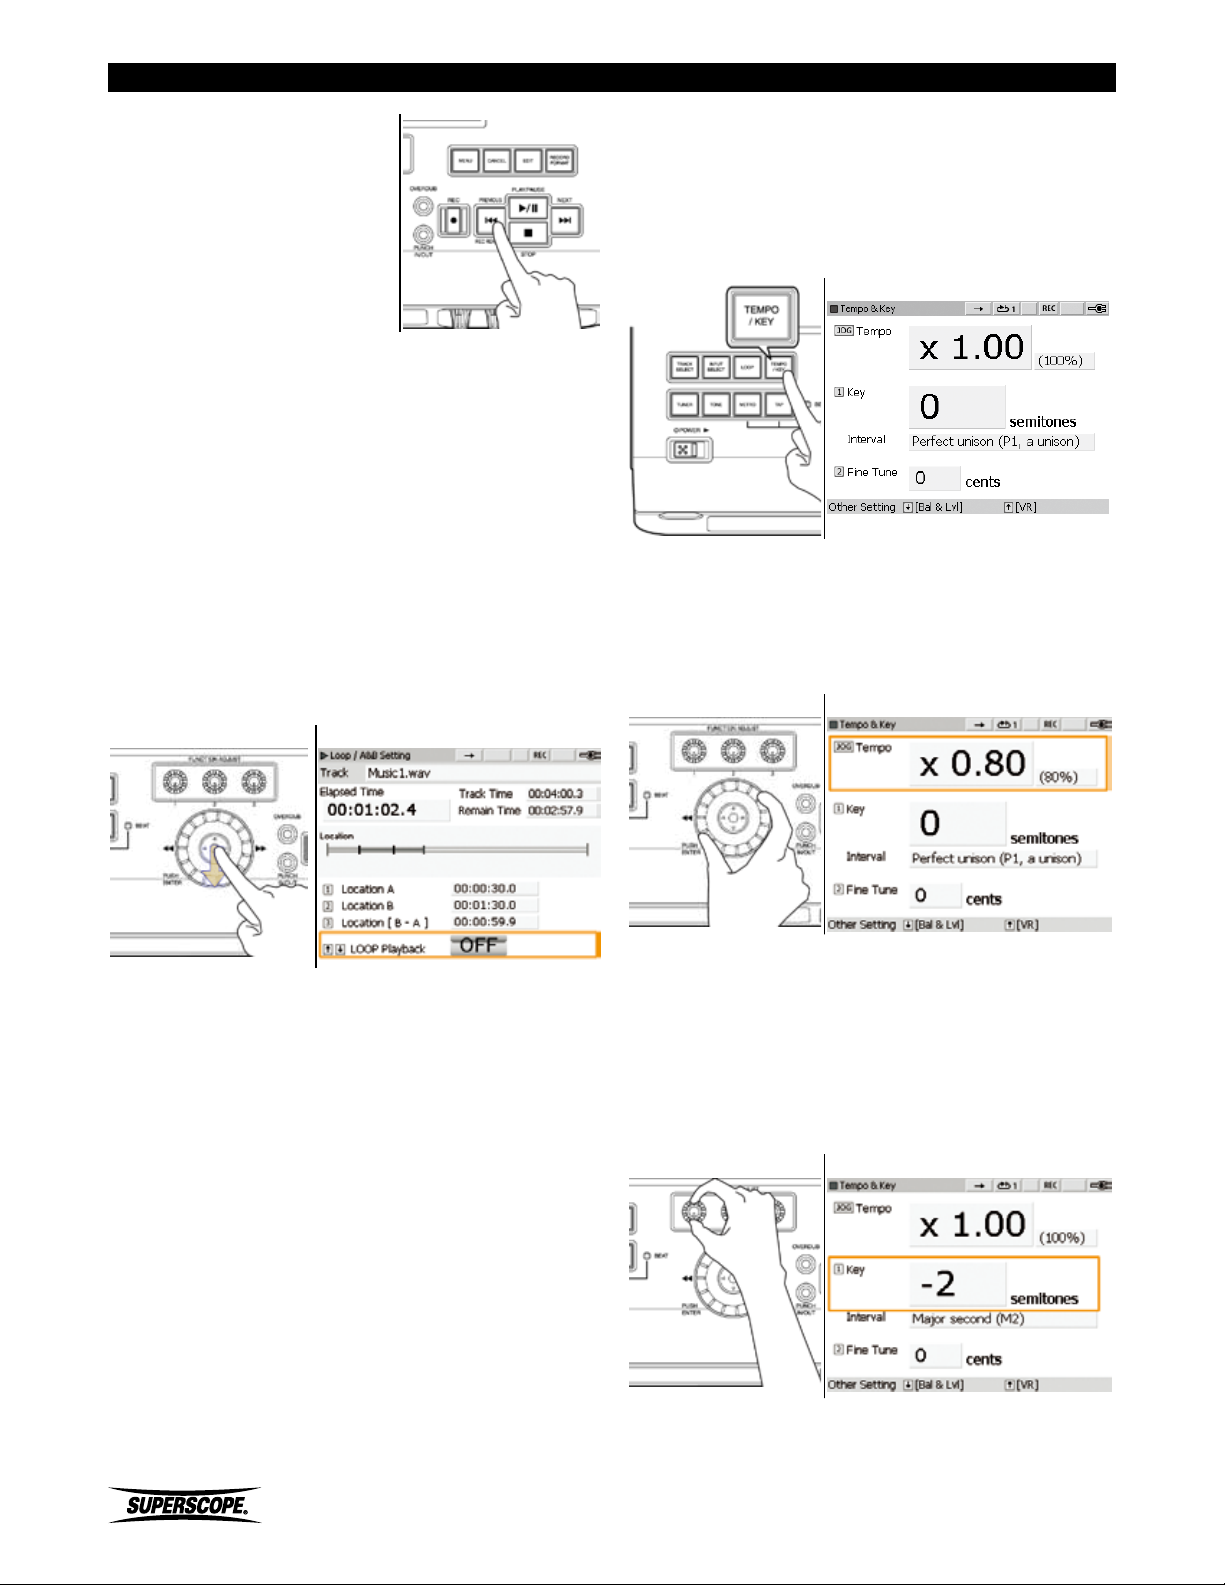
Music Practice
During Loop playback, press the
Previous button to return to the
beginning of the loop.
※ To fine adjust the A point, turn FUNCTION
ADJUST#1 (4A). To fine adjust the B point,
turn FUNCTION ADJUST #2 (4B). Turn
FUNCTION ADJUST #3 (4C) to reposition the
A and B point at the same time.
The A and B points for each track are stored with the file,
so the next time you access the selected track, the same
loop points should appear.
Moving the joystick down will switch to normal playback
(LOOP Playback OFF). Moving the joystick up will resume
A-B Repeat playback (LOOP Playback ON).
Loop Setting Screen
Adjusting Tempo, Key, and Fine Tune
Tempo
1. Press the TEMPO/ KEY button to open the Tempo &
Key screen.
Tempo and Key Screen
2. Turn the jog wheel to adjust Tempo (playback
speed). Press ENTER to reset Tempo to normal speed.
The tempo control function can modify a track’s
tempo (playback speed) between -75% and +50%
(1% intervals) without affecting playback pitch.
Tempo and Key Screen
Key
Delete a Loop Point
1. Push and hold FUNCTION ADJUST #1 (4A) to reset
the A point the beginning of the track (0:00).
2. Push and hold FUNCTION ADJUST #2 (4B) to reset
the B point to the end of the track.
3. Push and hold FUNCTION ADJUST #3 (4C) to reset
both the A and the B point.
1. Turn FUNCTION ADJUST #1 (4A) to modify playback
- 58 -
Key in semitones. Push FUNCTION ADJUST #1 (4A)
to reset Key to normal playback (no Key adjustment).
The Key adjustment range is +/-12 semitones (half
steps).
Tempo and Key Screen
Superscope PSD430 / PSD450 User Manual
Page 59
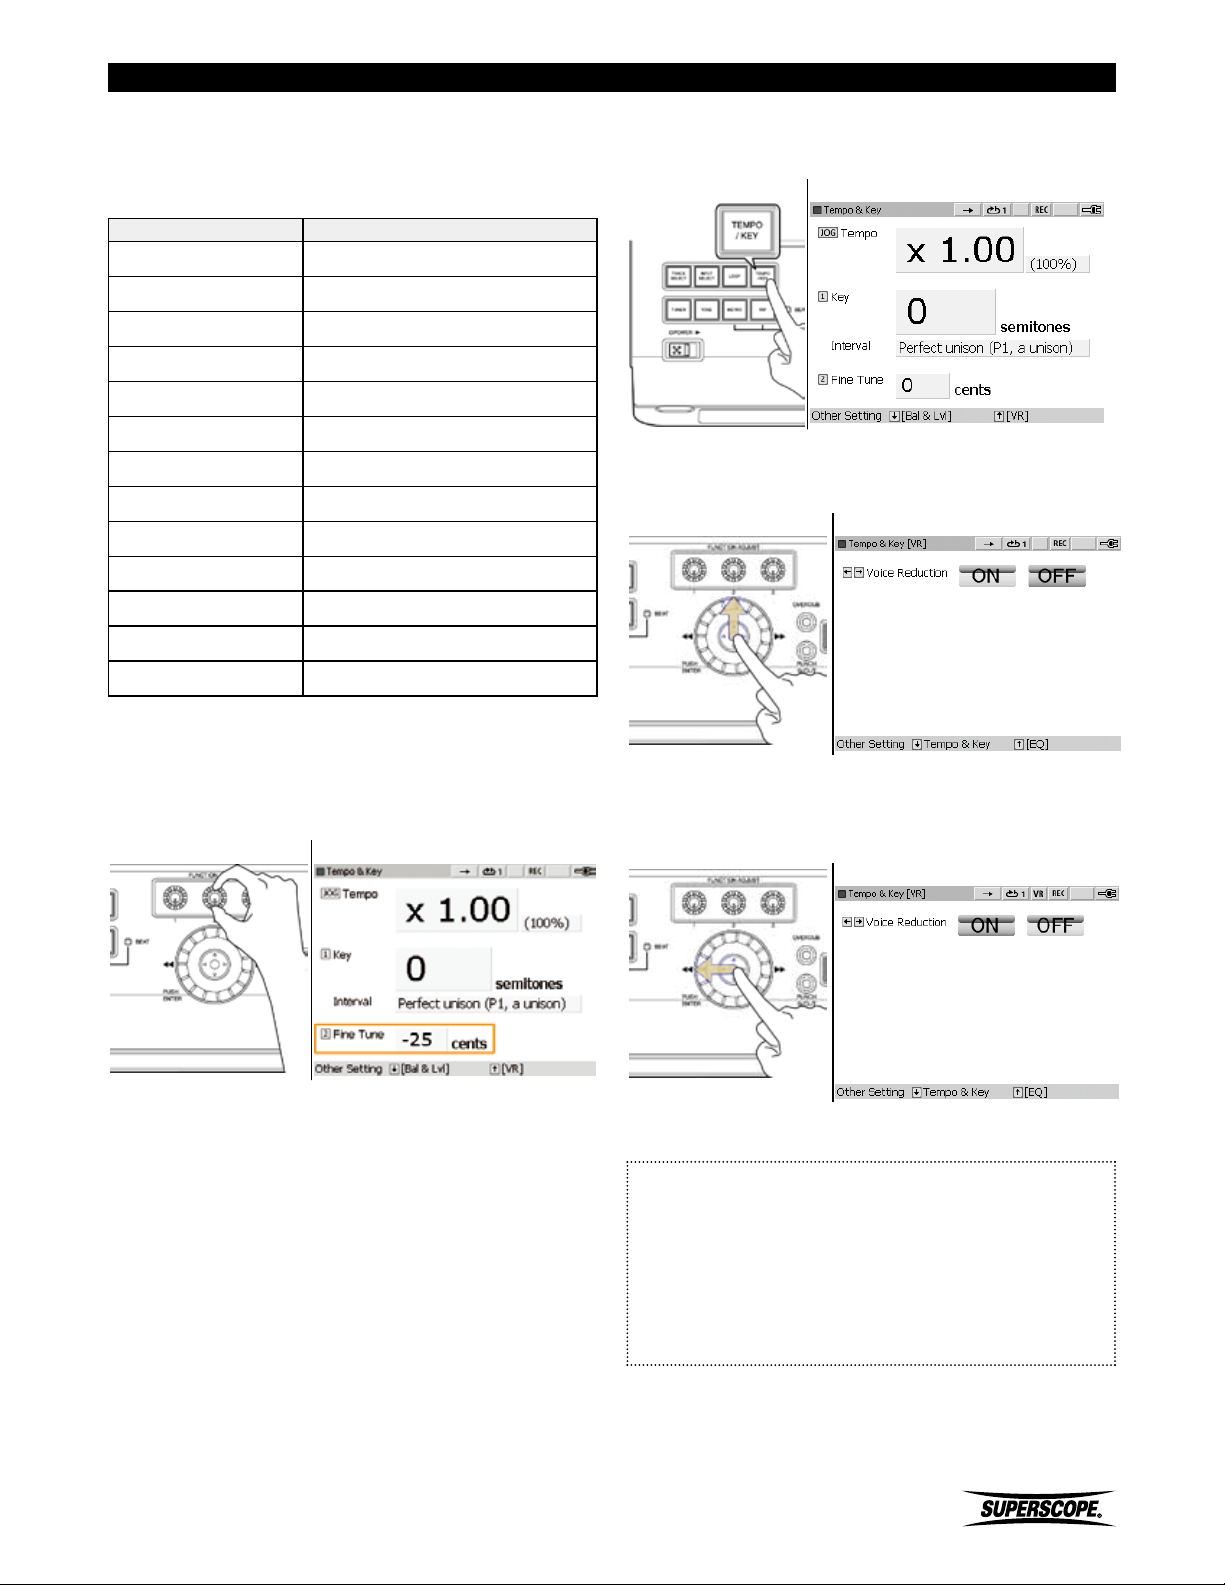
Music Practice
Interval Indication
The Interval indication displays the interval for the
corresponding Key change in semitones.
Semitones Interval
[0] Perfect unison (P1, a unison)
[-1/+1] Minor second (m2)
[-2/+2] Major second (M2)
[-3/+3] Minor third (m3)
[-4/+4] Major third (M3)
[-5/+5] Perfect fourth (P4)
[-6/+6] Tritone (TT)
[-7/+7] Perfect fifth (P5)
[-8/+8] Minor sixth (m6)
[-9/+9] Major sixth (M6)
[-10/+10] Minor seventh (m7)
[-11/+11] Major seventh (M7)
[-12/+12] Perfect octave (P8)
1. Press the TEMPO/KEY button to open the Tempo &
Key screen.
Tempo and Key Screen
2. Move the joystick (5A) up to view the Tempo & Key
[VR] screen.
Tempo and Key [VR] Screen
Fine Tune
Turn FUNCTION ADJUST #2 (4B) to fine tune playback
pitch +/-50 cents. Push FUNCTION ADJUST #2 (4B) to
reset FINE TUNE to normal pitch.
Tempo and Key Screen
※ When you exit the Tempo/Key screen, all
settings are stored along with the selected
file.
Voice Reduction
The voice reduction function is used to reduce the lead
vocal performance in stereo recordings. Use this feature
in conjunction with the Overdub feature to create your
own karaoke-style recordings.
3. Move the joystick to the left to select Voice
Reduction ON. A VR icon will be displayed at the top
of the screen.
Tempo & Key [VR] Screen
4. When a file is played, the level of the main vocal will
be reduced.
※ The Vocal Reduction feature uses a technique
called Center Channel Cancelation to reduce
vocals in stereo recordings. For this feature
to be effective, the main vocal performance
must be positioned in the center of the stereo
field (equal level in the right and left channel).
Vocal Reduction will not work with vocals that
are panned to the right or left channel.
Superscope PSD430 / PSD450 User Manual
- 59 -
Page 60
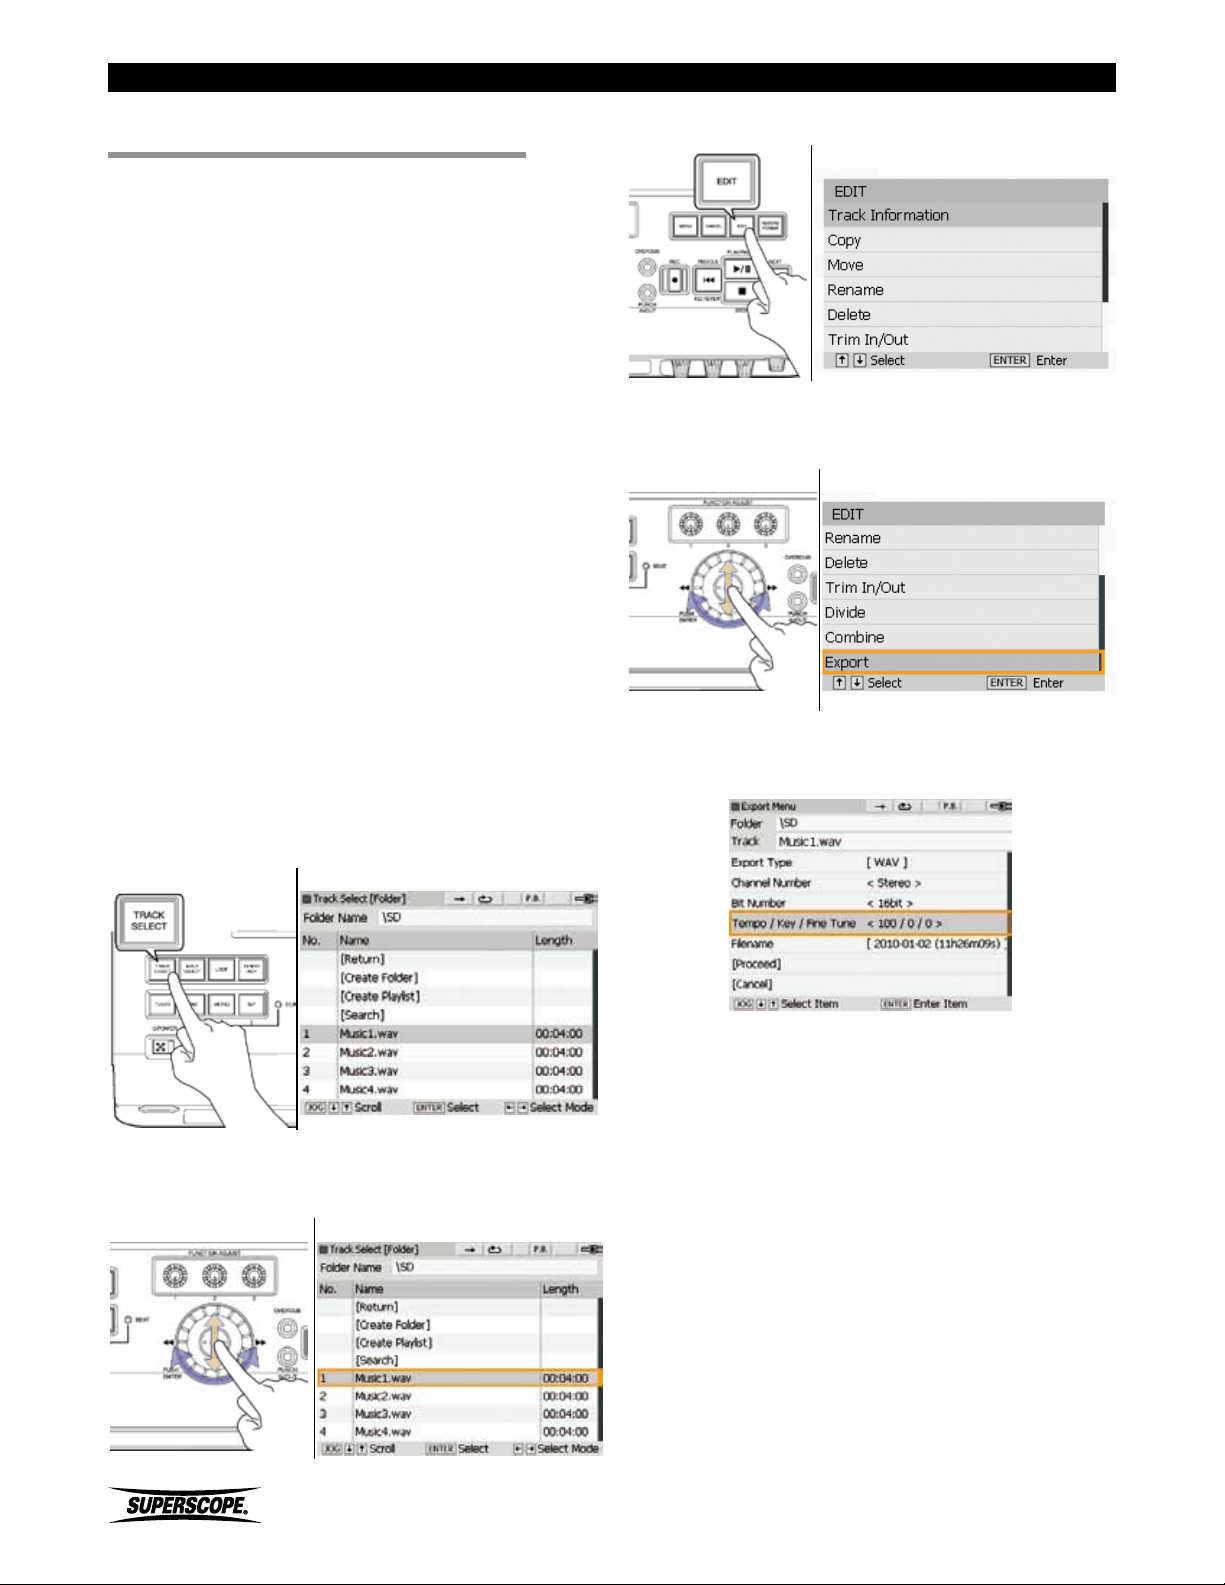
■Editing
※ See the Appendix section for a list of all file,
folder or playlist Edit Menu Options.
Export a File
The Export feature allows you to::
1. Create a new file with different Tempo, Key, or Fine
Tune settings.
2. Create a new file in a different format (i.e., an MP3
version of a WAV file).
The new file will always be exported to the same folder
as the original.
Creating a File with a New Tempo or Key
When Tempo, Key, or Fine Tune settings are altered, the
new values are stored with the file. To change Tempo,
Key and Fine Tune settings, see Adjusting Key, Tempo
and Fine Tune. Once you have altered these settings,
follow these steps to create a new file:
1. Press the TRACK SELECT button to open the Track
Select [Folder] screen.
Editing
3. Press the EDIT button.
Edit Screen
4. Turn the jog wheel or move the joystick up or down
to highlight Export. Press ENTER.
Edit Screen
5. Confirm the Tempo, Key, and Fine Tune settings.
Export Menu Screen
Track Select [Folder] Screen
2. Turn the jog wheel or move the joystick up or down
to highlight the track you wish to export.
Track Select [Folder] Screen
If the displayed values are correct, proceed to Naming
the Exported File. If not, turn the jog wheel or move the
joystick down to select [Cancel]. See Adjusting Tempo,
Key and Fine Tune.
- 60 -
Superscope PSD430 / PSD450 User Manual
Page 61
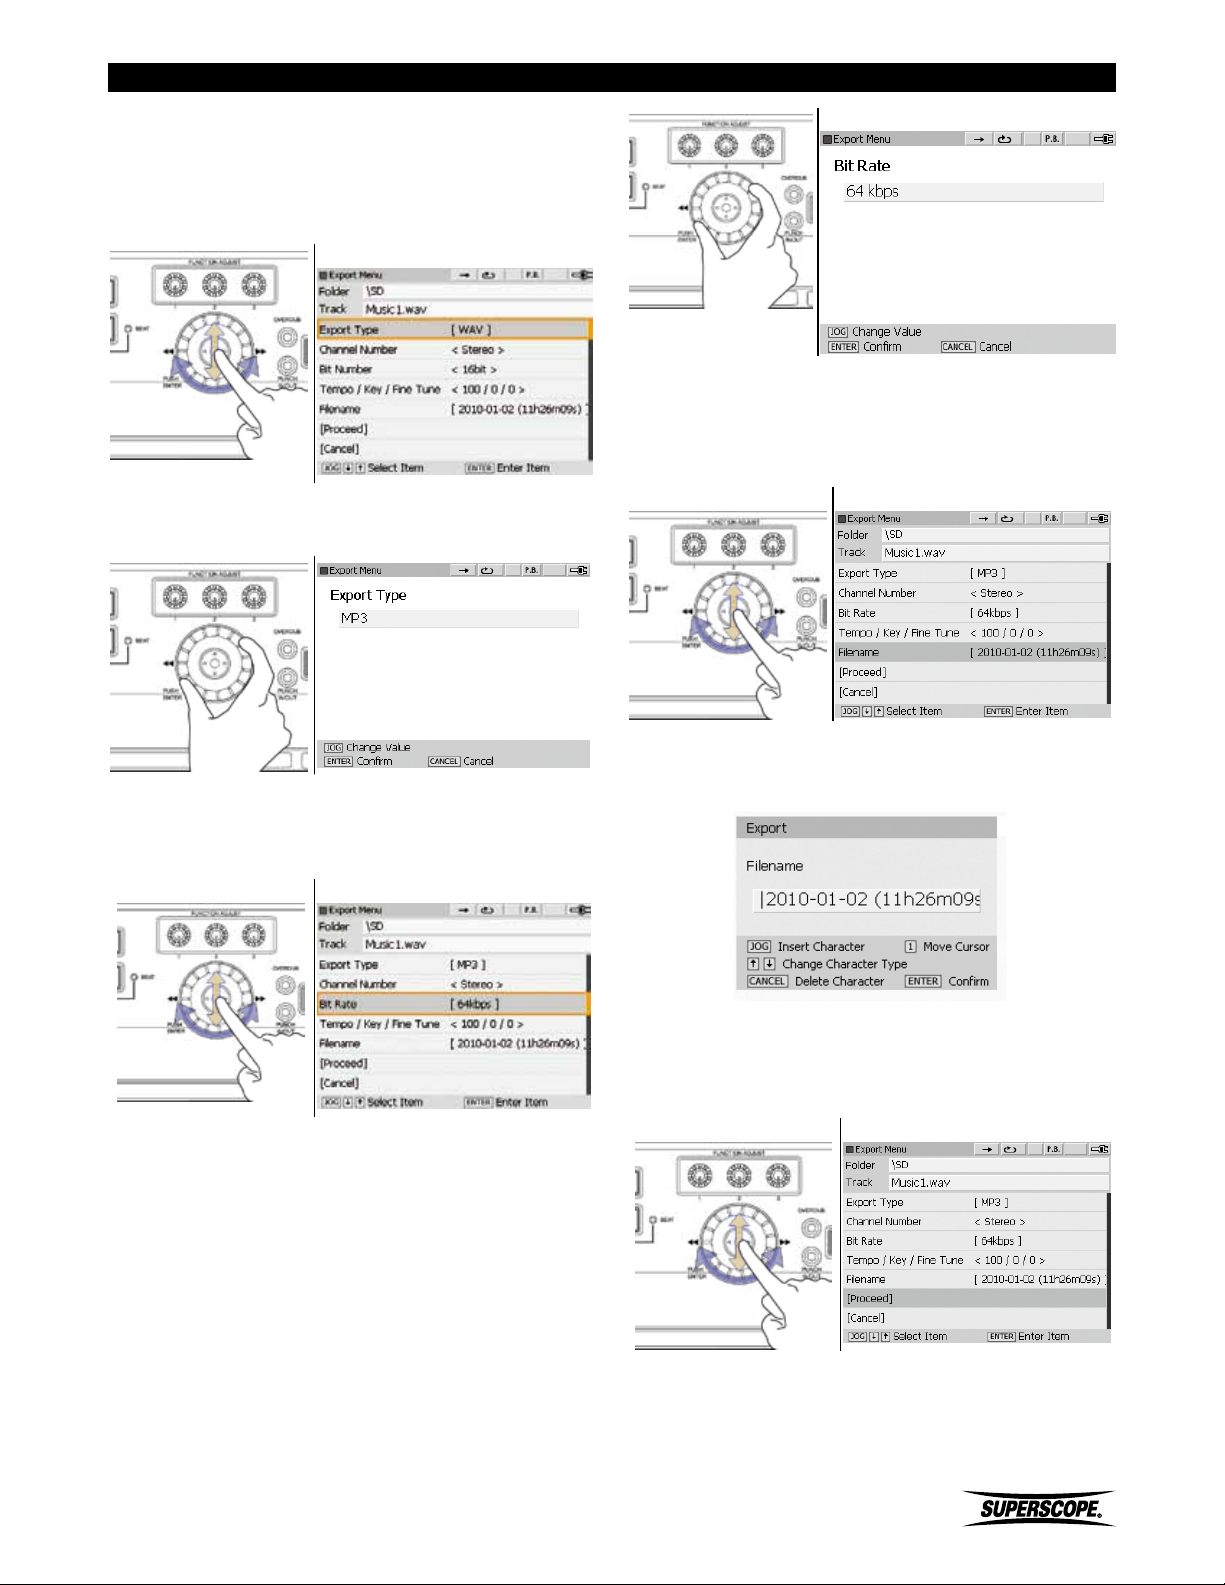
Editing
Changing File Format
1. Turn the jog wheel or move the joystick up or
down to highlight Export Type. The default setting
is [WAV]. To export the selected file as MP3, press
ENTER.
Export Menu Screen
2. Turn the jog wheel to select MP3. Press ENTER to
confirm the change. Export Menu Edit Screen
Export Menu Edit Screen
Naming the Exported File
1. Turn the jog wheel or move the joystick up or down
to select Filename. Press ENTER.
Export Menu Screen
3. The Export Menu will be displayed. Turn the jog
wheel or move the joystick up or down to select Bit
Rate. Press ENTER.
Export Type Setting Screen
4. Turn the jog wheel to select a bit rate. Press ENTER
to confirm the setting. Options include 64, 80, 96,
112, 128, 160, 192, 224, 256 or 320kbps for stereo
files. When exporting mono files, options include 32,
40, 48, 56, 64, 80, 96, 112, 128 or 160kbps.
2. Enter the name of the new file by using the Text Input
Method.
Text Input Screen
3. When you have finished naming the new file and
pressed ENTER to confirm the new title, the Export
Menu screen will appear. Turn the jog wheel to select
[Proceed]. Press ENTER to begin exporting.
Export Menu Screen
Superscope PSD430 / PSD450 User Manual
※ A progress bar is displayed during the Export
procedure. Do not power off until the
procedure is complete. If power is interrupted
during Export, the exported file will be lost.
- 61 -
Page 62
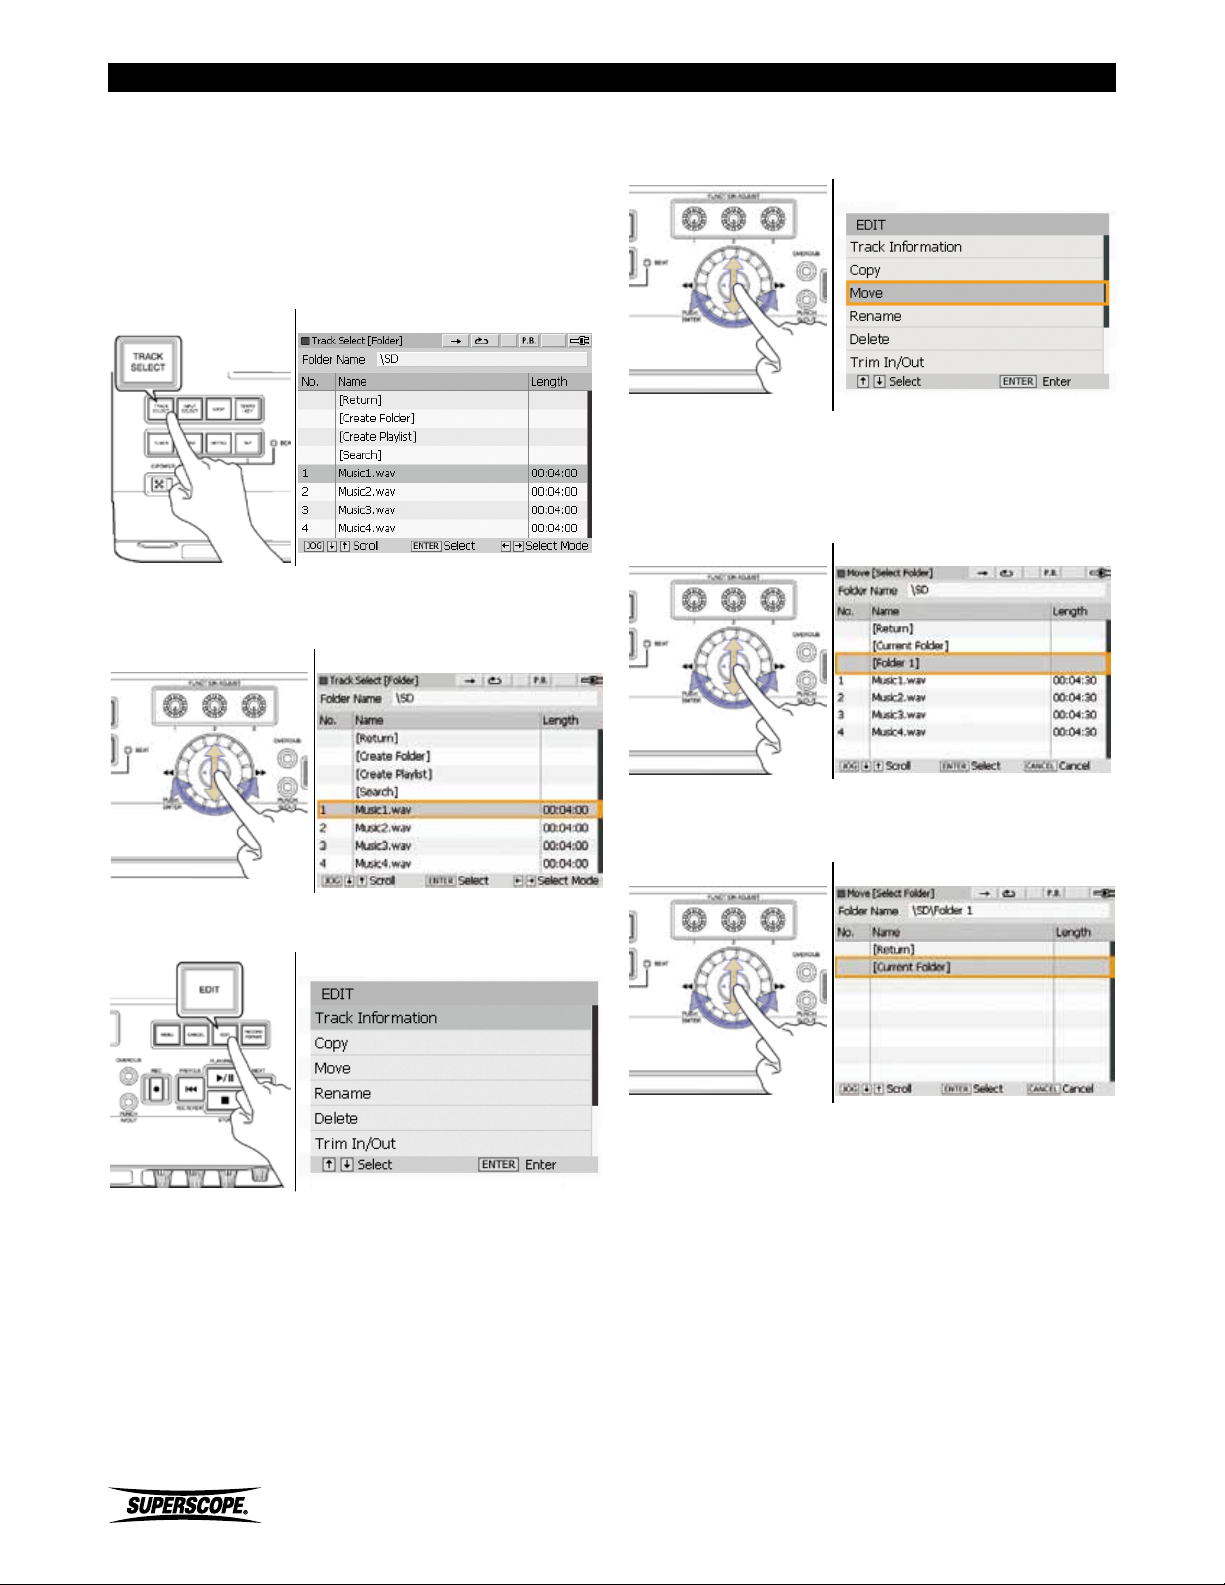
Editing
Move a Track
Use this feature to move a folder or file to another
location, either a new folder or a different drive: SD
USBHDD or internal HDD (PSD450 only).
1. Press the TRACK SELECT button to open the Track
Select [Folder] screen.
Track Select [Folder] Screen
2. Turn the jog wheel or move the joystick up or down
to highlight the folder or file you wish to move.
Track Select [Folder] Screen
4. Turn the jog wheel or move the joystick up or down
to highlight Move. Press ENTER.
Edit Screen
5. Turn the jog wheel or move the joystick up or down
to select the folder you wish to move the selected
item to. Once you have highlighted the new location,
press ENTER.
Move Select [Folder] Screen
3. Push the EDIT button to open the Edit menu screen.
Edit Screen
6. Turn the jog wheel or move the joystick up or down
to highlight [Current Folder]. Press ENTER.
Move Select [Folder] Screen
※ A progress bar is displayed during the Move
procedure. Do not power off until the
procedure is complete. If power is interrupted
during the Move operation, the file you are
moving may be lost.
- 62 -
Superscope PSD430 / PSD450 User Manual
Page 63
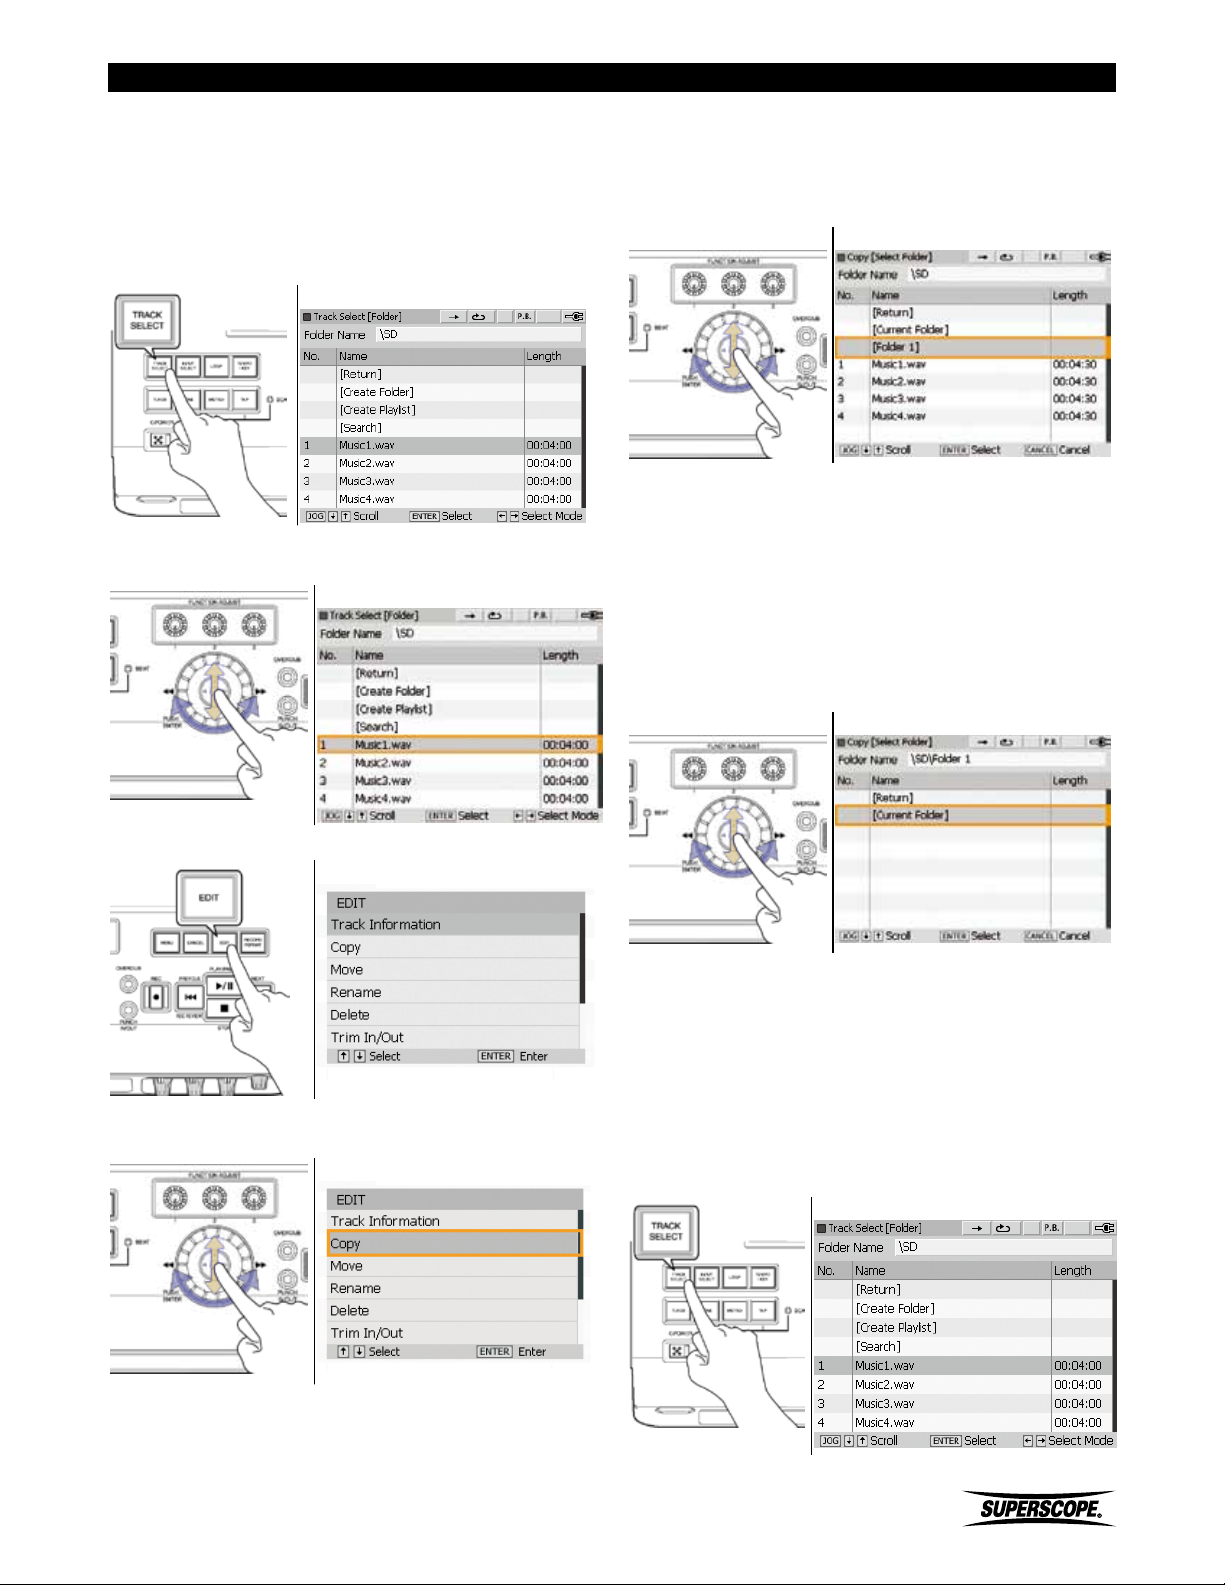
Editing
Copy a Track
Use this feature to copy a folder or file to another
location, either a new folder or a different drive: SD
USBHDD or internal HDD (PSD450 only).
1. Press the TRACK SELECT button to open the Track
Select [Folder] screen.
Track Select [Folder] Screen
2. Turn the jog wheel or move the joystick up or down
to highlight the folder or file you wish to copy.
Track Select [Folder] Screen
5. Turn the jog wheel or move the joystick up or down
to select the folder you wish to copy the selected
item to. Once you have highlighted the new location,
press ENTER.
Copy [Select Folder] Screen
6. Turn the jog wheel or move the joystick up or down
to highlight [Current Folder]. Press ENTER. Track
Select [Folder] Screen Edit Screen.
※ A progress bar is displayed during the Copy
procedure. Do not power off until the
procedure is complete. If power is interrupted
during the Copy operation, data may be lost.
3. Push the EDIT button to open the Edit menu screen.
Edit Screen
4. Turn the jog wheel or move the joystick up or down
to highlight Copy. Press ENTER.
Edit Screen
Copy [Slect Folder] Screen
Delete a Track
Use this feature to remove a folder, playlist or audio
file from the HDD (PSD450 only) or any SD card or USB
storage device recognized by a PSD400 series recorder.
1. Press the TRACK SELECT button to open the Track
Select [Folder] screen.
Track Select [Folder] Screen
Superscope PSD430 / PSD450 User Manual
- 63 -
Page 64
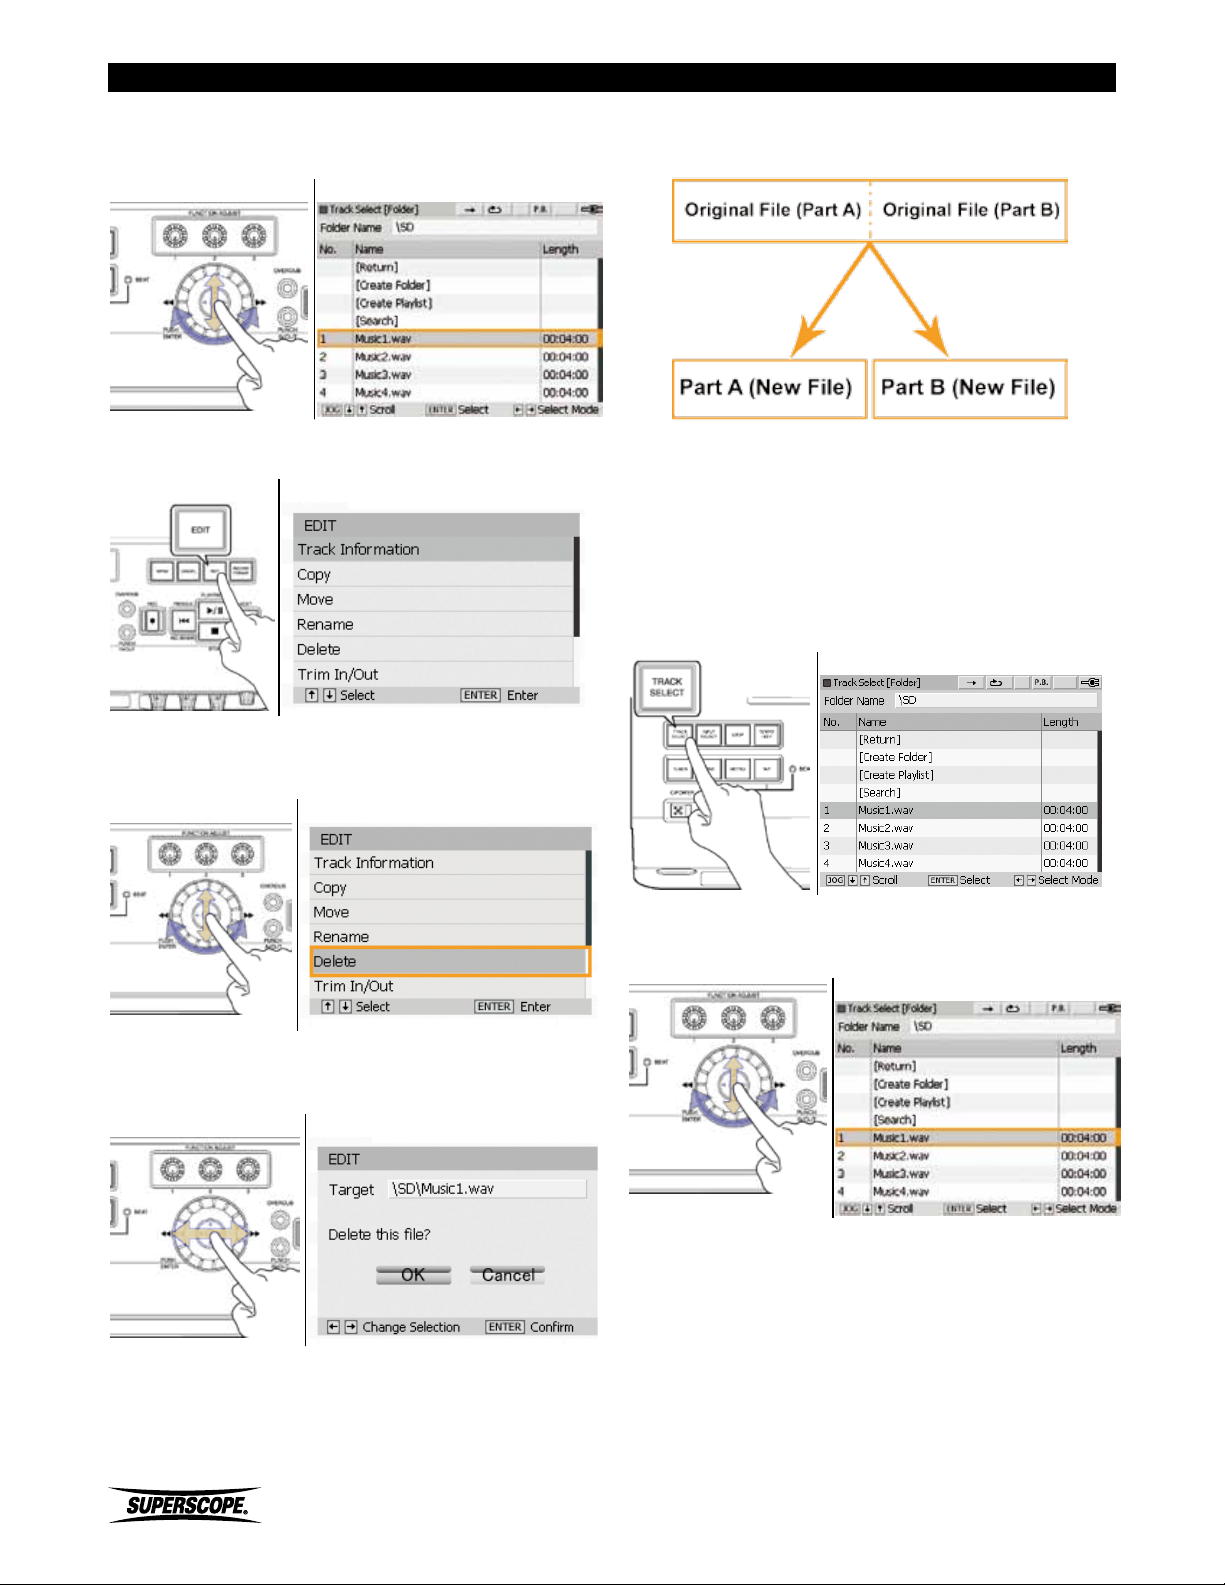
Editing
2. Turn the jog wheel or move the joystick up or down
to highlight the folder or file you wish to delete.
Track Select [Folder] Screen
3. Push the EDIT button to open the Edit menu screen.
Edit Screen
Divide a Track
Use this feature to divide a track into two separate tracks.
※ This feature works with WAV files only. If you
wish to divide an MP3 file, convert the file
to WAV format first before using the Divide
feature (see Export). Each new file must be
more than 4 seconds.
1. Press the TRACK SELECT button to open the Track
Select [Folder] screen.
Track Select [Folder] Screen
4. Turn the jog wheel or move the joystick up or down
to highlight Delete. Press ENTER.
Edit Screen
5. The Delete confirmation screen will appear. Move
the joystick left to select OK and press ENTER.
Edit Screen
2. Turn the jog wheel or move the joystick up or down
to highlight the folder or file you wish to divide.
Track Select [Folder] Screen
※ A progress bar is displayed during the Delete
procedure. Do not power off until the
procedure is complete. If power is interrupted
during the Delete operation, the procedure
may fail.
- 64 -
Superscope PSD430 / PSD450 User Manual
Page 65
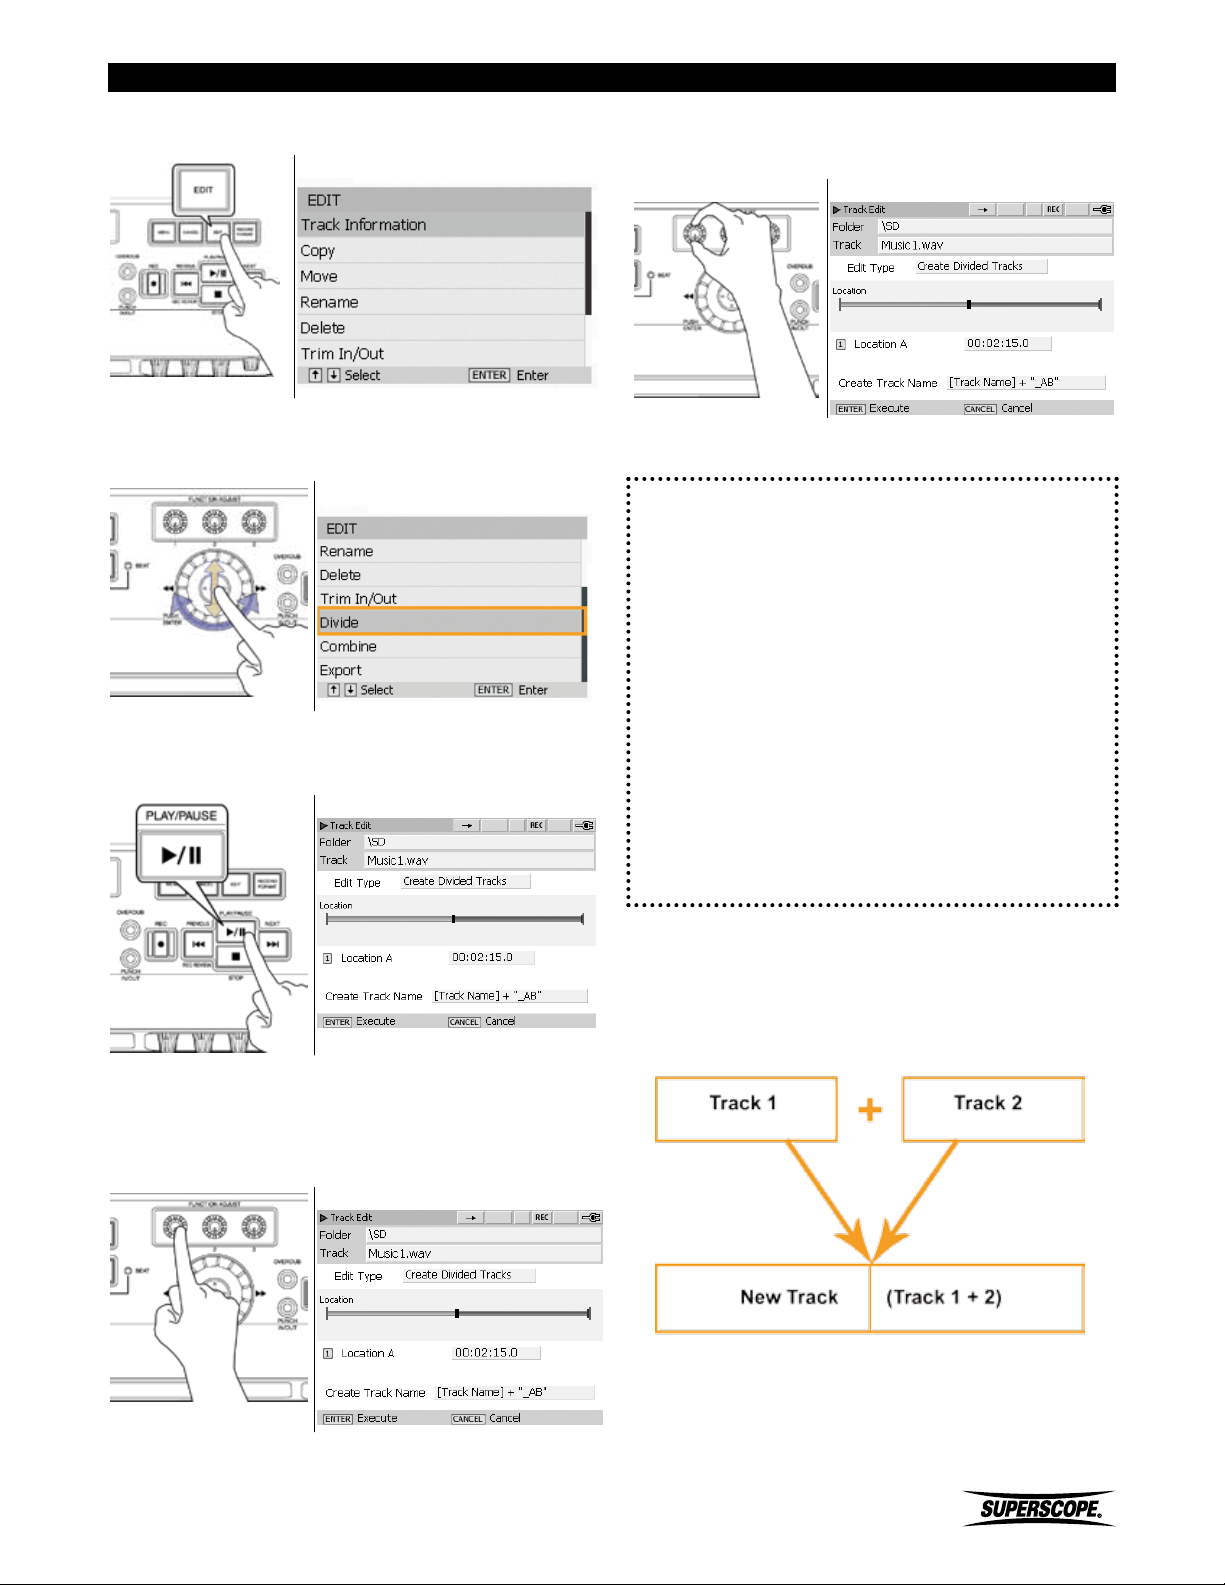
Editing
3. Push the EDIT button to open the Edit menu screen.
Edit Screen
4. Turn the jog wheel or move the joystick up or down
to highlight Divide. Press ENTER.
Edit Screen
5. The Divide screen will be displayed. Press the PLAY/
PAUSE button [8C] to begin playback.
Track Edit Screen
7. You can fine-adjust the divide point by turning
FUNCTION ADJUST #1 (4A).
Track Edit Screen
8. Press the ENTER to divide the track.
The two new files will be placed in the same folder as
the original track.
The new files will be named according to the following
format:
Original file = ‘Track01. wav’
Part A (before Divide point) = ‘Track01_A.wav’
Part B (after Divide point) = ‘Track01_B.wav’
※ A progress bar is displayed during the Divide
procedure. Do not power off until the
procedure is complete. If power is interrupted
during the Divide operation, the new files may
be lost.
6. When you hear the point at which you want to
divide the track, press FUNCTION ADJUST #1 (4A).
Playback will loop the 4 seconds before the Divide
point.
Track Edit Screen
Superscope PSD430 / PSD450 User Manual
Combine a Track
Follow these steps to combine two audio files into one
file.
- 65 -
Page 66
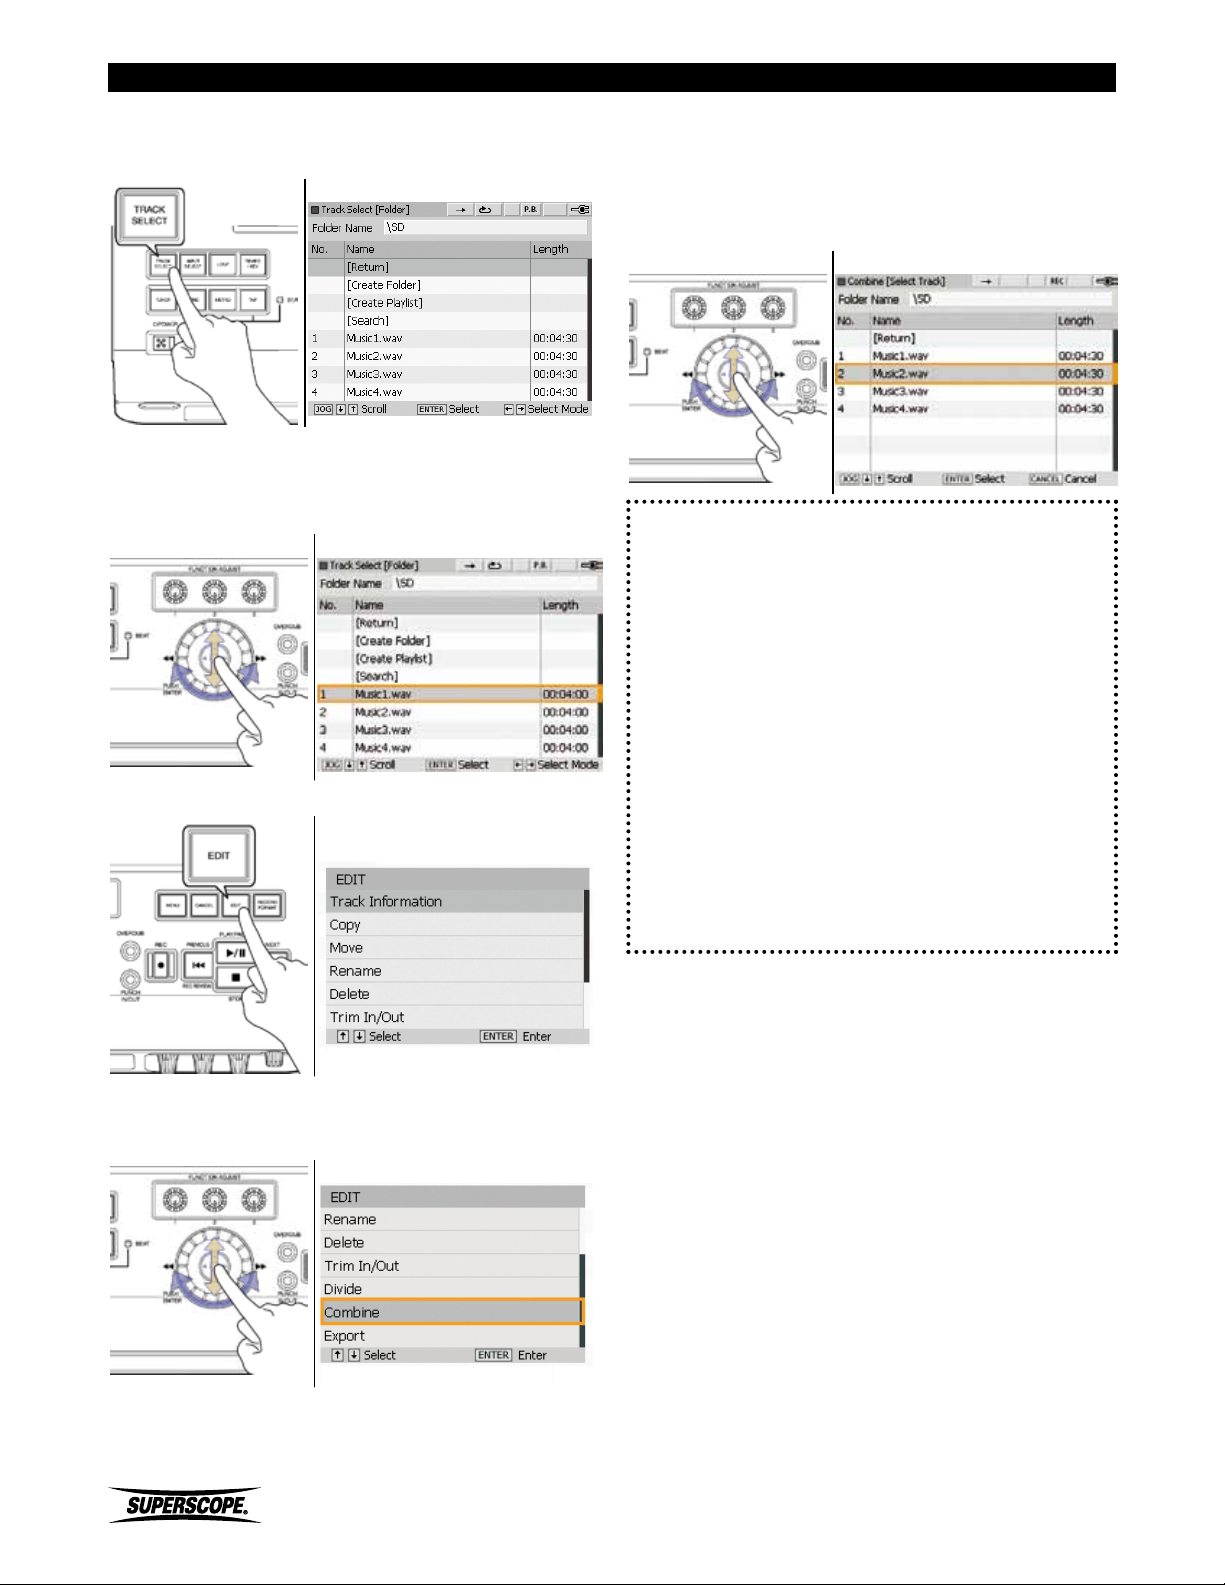
Editing
1. Press the TRACK SELECT button to open the Track
Select [Folder] screen.
Track Select [Folder] Screen
2. Turn the jog wheel or move the joystick up or down
to highlight the file you wish to combine (this track
will become the first part of the combined file).
Track Edit Screen
5. The Combine [Select Track] screen will be displayed.
Turn the jog wheel or move the joystick up or down
to highlight the file you wish to combine (this track
will become the second part of the combined file).
Press ENTER.
Combine [Select Track] Screen
The new file will be placed in the same folder as
track 1 (the first track selected during the Combine
procedure). The new file will be named according to
the following format:
Part A (first file selected) = ‘TrackA.wav’
Part B (second file selected) = ‘TrackB.wav’
3. Push the EDIT button to open the Edit menu screen.
Edit Screen
4. Turn the jog wheel or move the joystick up or down
to highlight Combine. Press ENTER.
Edit Screen
Combined file = ‘TrackA_001.wav
A progress bar is displayed during the Combine
procedure.
※ Do not power off until the procedure is
complete. If power is interrupted during the
Combine operation, the new file may be lost.
- 66 -
Superscope PSD430 / PSD450 User Manual
Page 67
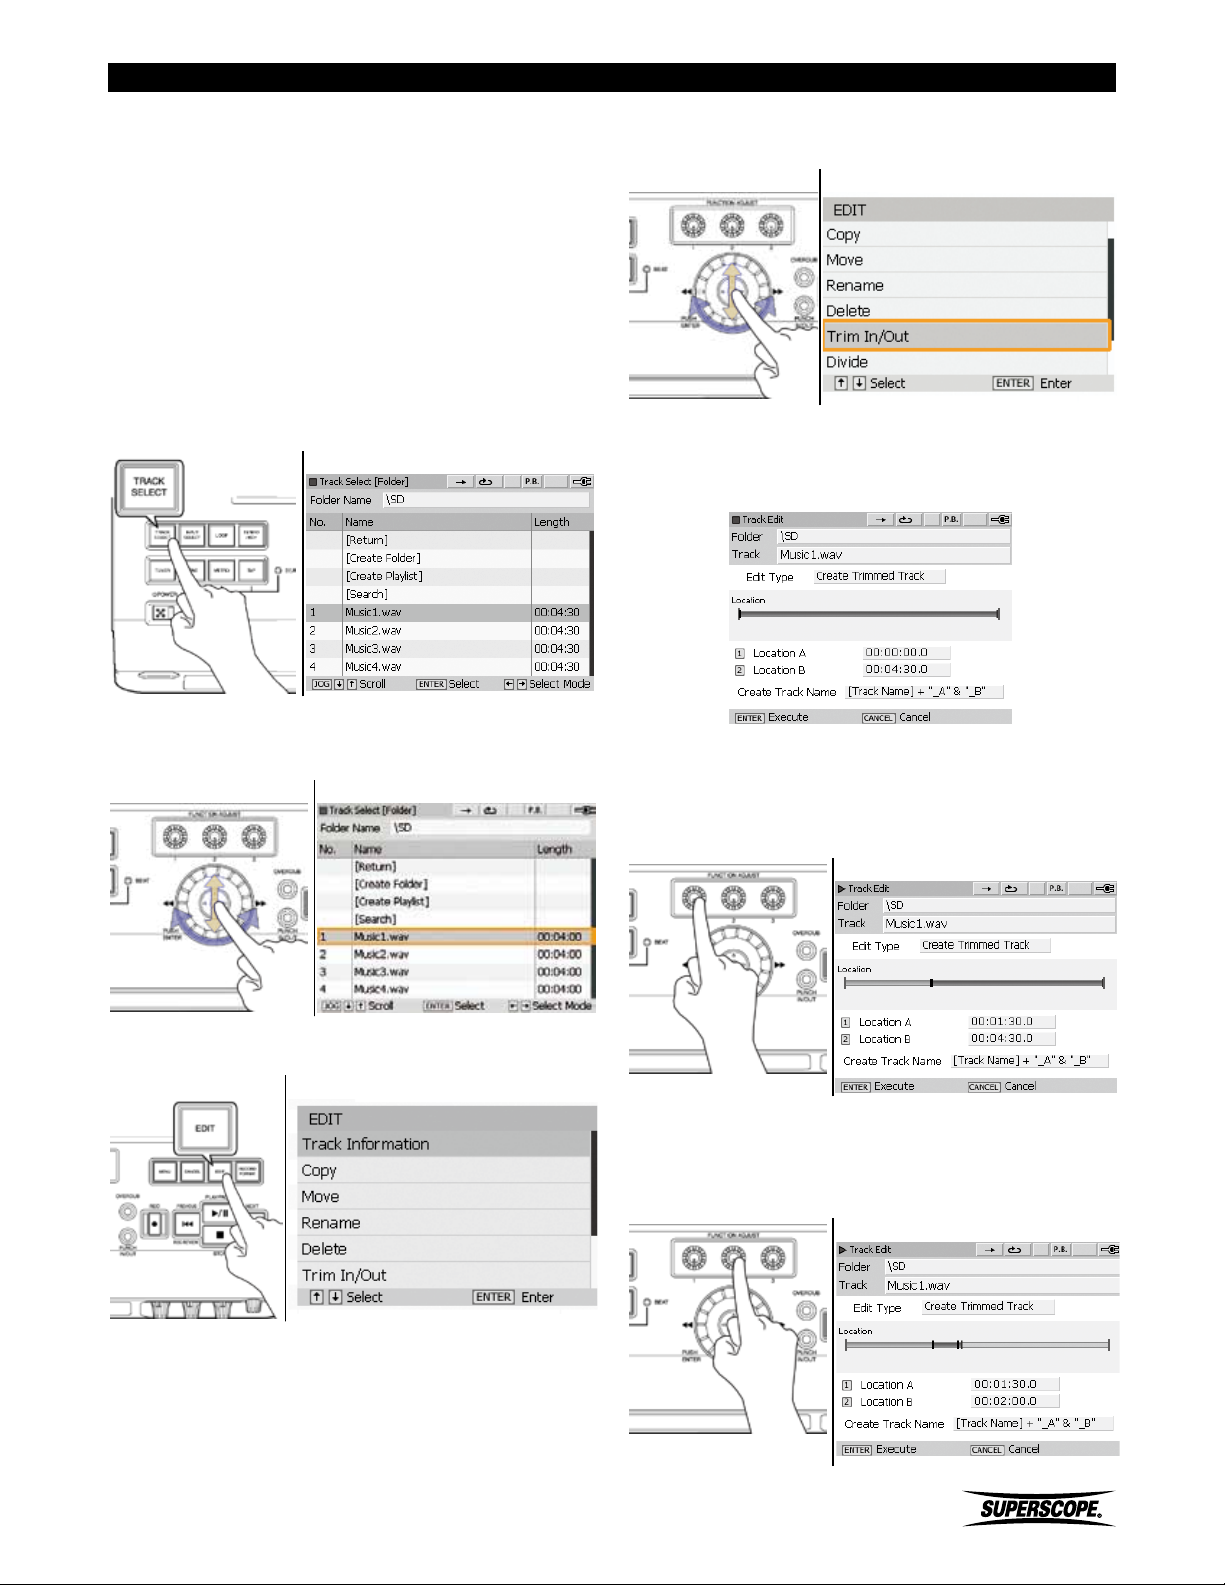
Editing
Trim In / Out
Use this feature to remove unnecessary audio at the
beginning or end of track.
※ This feature works with WAV files only. If
you wish to trim an MP3 file, convert the file
to WAV format first before using the Trim
feature (see Export). Each new file must be
more than 4 seconds.
1. Press the TRACK SELECT button to open the Track
Select [Folder] screen.
Track Select [Folder] Screen
4. Turn the jog wheel or move the joystick up or down
to highlight Trim In/Out. Press ENTER.
Edit Screen
5. The Trim In/Out screen will be displayed. Press the
PLAY/PAUSE button [8C] to begin playback.
Track Edit Screen
2. Turn the jog wheel or move the joystick up or down
to highlight the file you wish to trim.
Track Select [Folder] Screen
3. Push the EDIT button to open the Edit menu screen.
Edit Screen
6. When you hear the point at which you want to trim,
press FUNCTION ADJUST #1 (4A). Playback will loop
the 4 seconds after the Trim point. Audio from the
beginning of the track to this point will be removed.
Track Edit Screen
7. Press FUNCTION ADJUST #2 (4B) to switch playback
to the second trim point. Audio from this point to
the end of the track will be removed. Playback will
loop the 4 seconds before the Trim point.
Track Edit Screen
Superscope PSD430 / PSD450 User Manual
- 67 -
Page 68
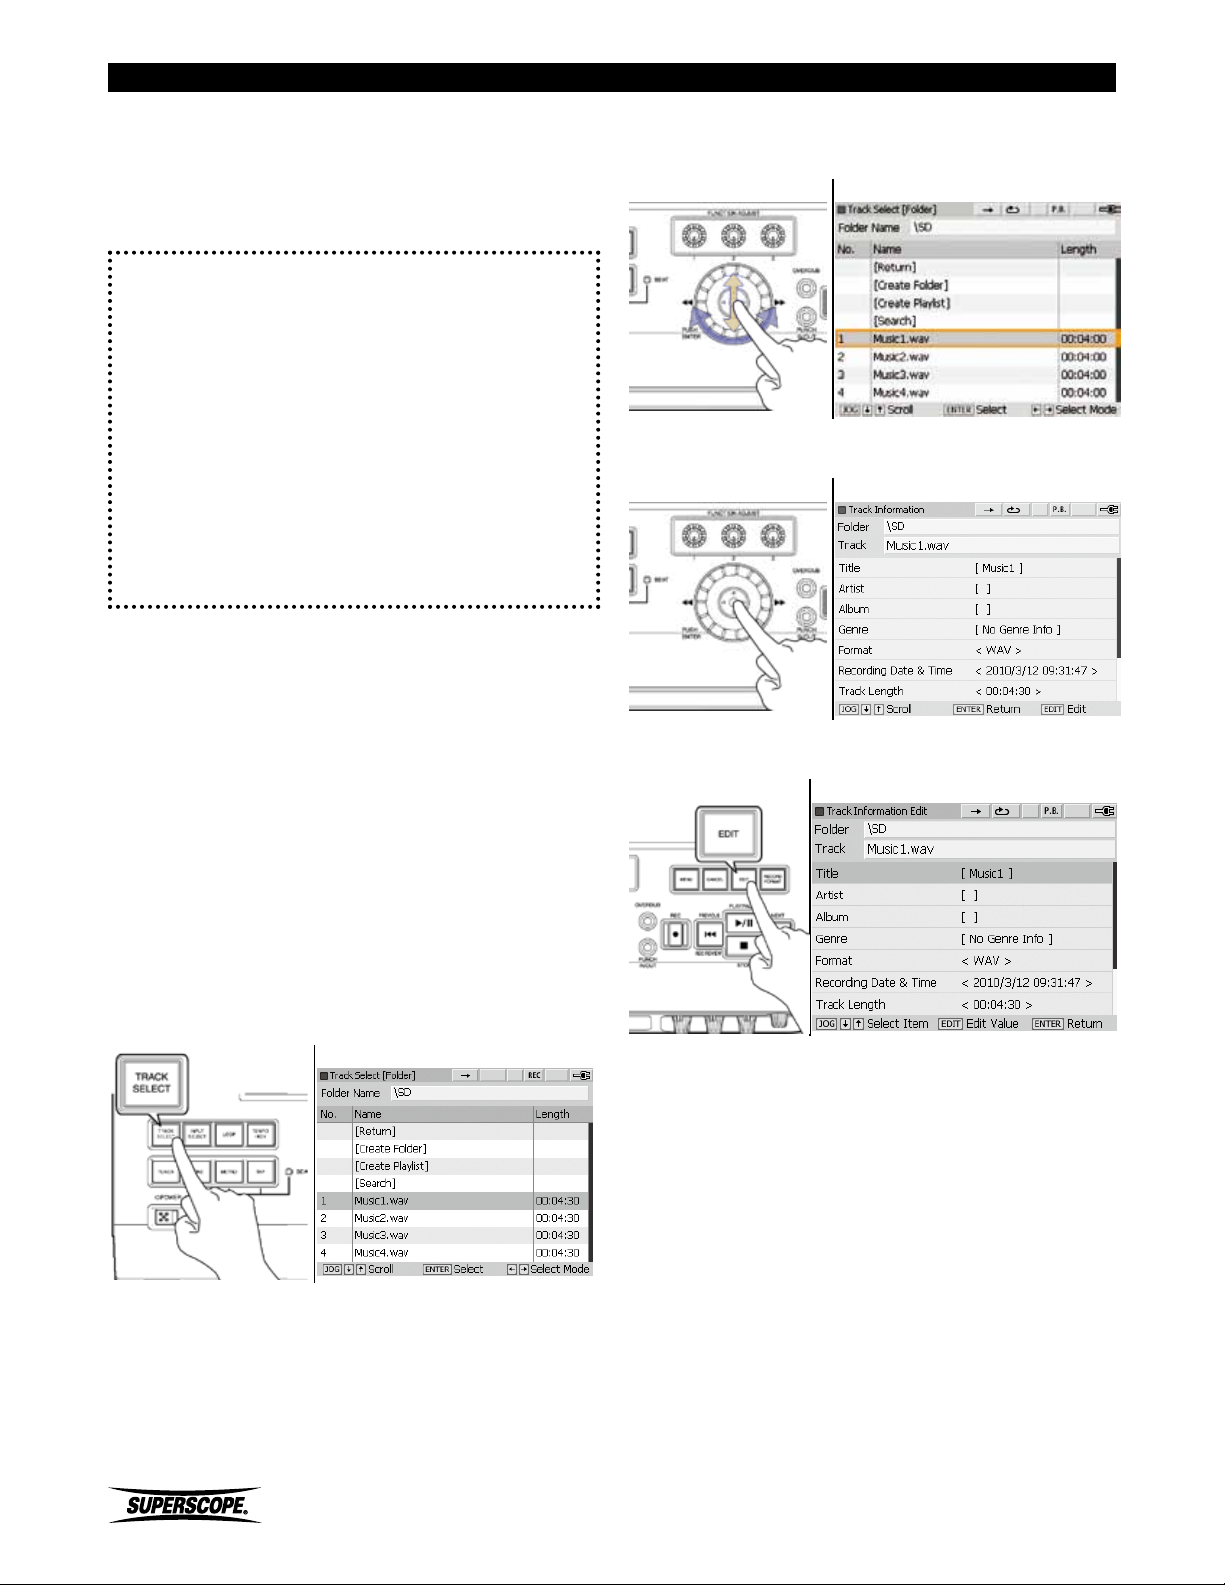
Editing
8. You can fine-adjust the first Trim point by turning
FUNCTION ADJUST #1 (4A). Fine-adjust the second
Trim point by turning FUNCTION ADJUST #2 (4B).
9. Press the ENTER to trim the track.
The new file will be placed in the same folder as the
original track. The new file will be named according to
the following format:
Original file = ‘TrackA.wav’
Trimmed file = ‘TrackA_AB.wav’
A progress bar is displayed during the Trim procedure.
※ Do not power off until the procedure is
complete. If power is interrupted during the
Trim operation, the new file may be lost.
Edit Track Information
Whenever a file is selected in the Track Select screen
or the Normal screen, simply press ENTER to view Track
Information.
The following information is stored with each file: Title,
Artist, Album, Genre, Format, Recording Date & Time,
Track Length, Channel Number, Sampling Rate, and Bit
Number/Bit Rate.
2. Turn the jog wheel or move the joystick up or down
to highlight the file you wish to edit.
Track Select [Folder] Screen
3. Press ENTER to view the file’s track information.
Track Information Screen
4. Press the EDIT button to begin editing track
information.
Track Information[Edit] Screen
Follow these steps to edit a track’s Title, Artist, Album,
and Genre information:
1. Press the TRACK SELECT button to open the Track
Select [Folder] screen.
Track Select [Folder] Screen
- 68 -
Superscope PSD430 / PSD450 User Manual
Page 69
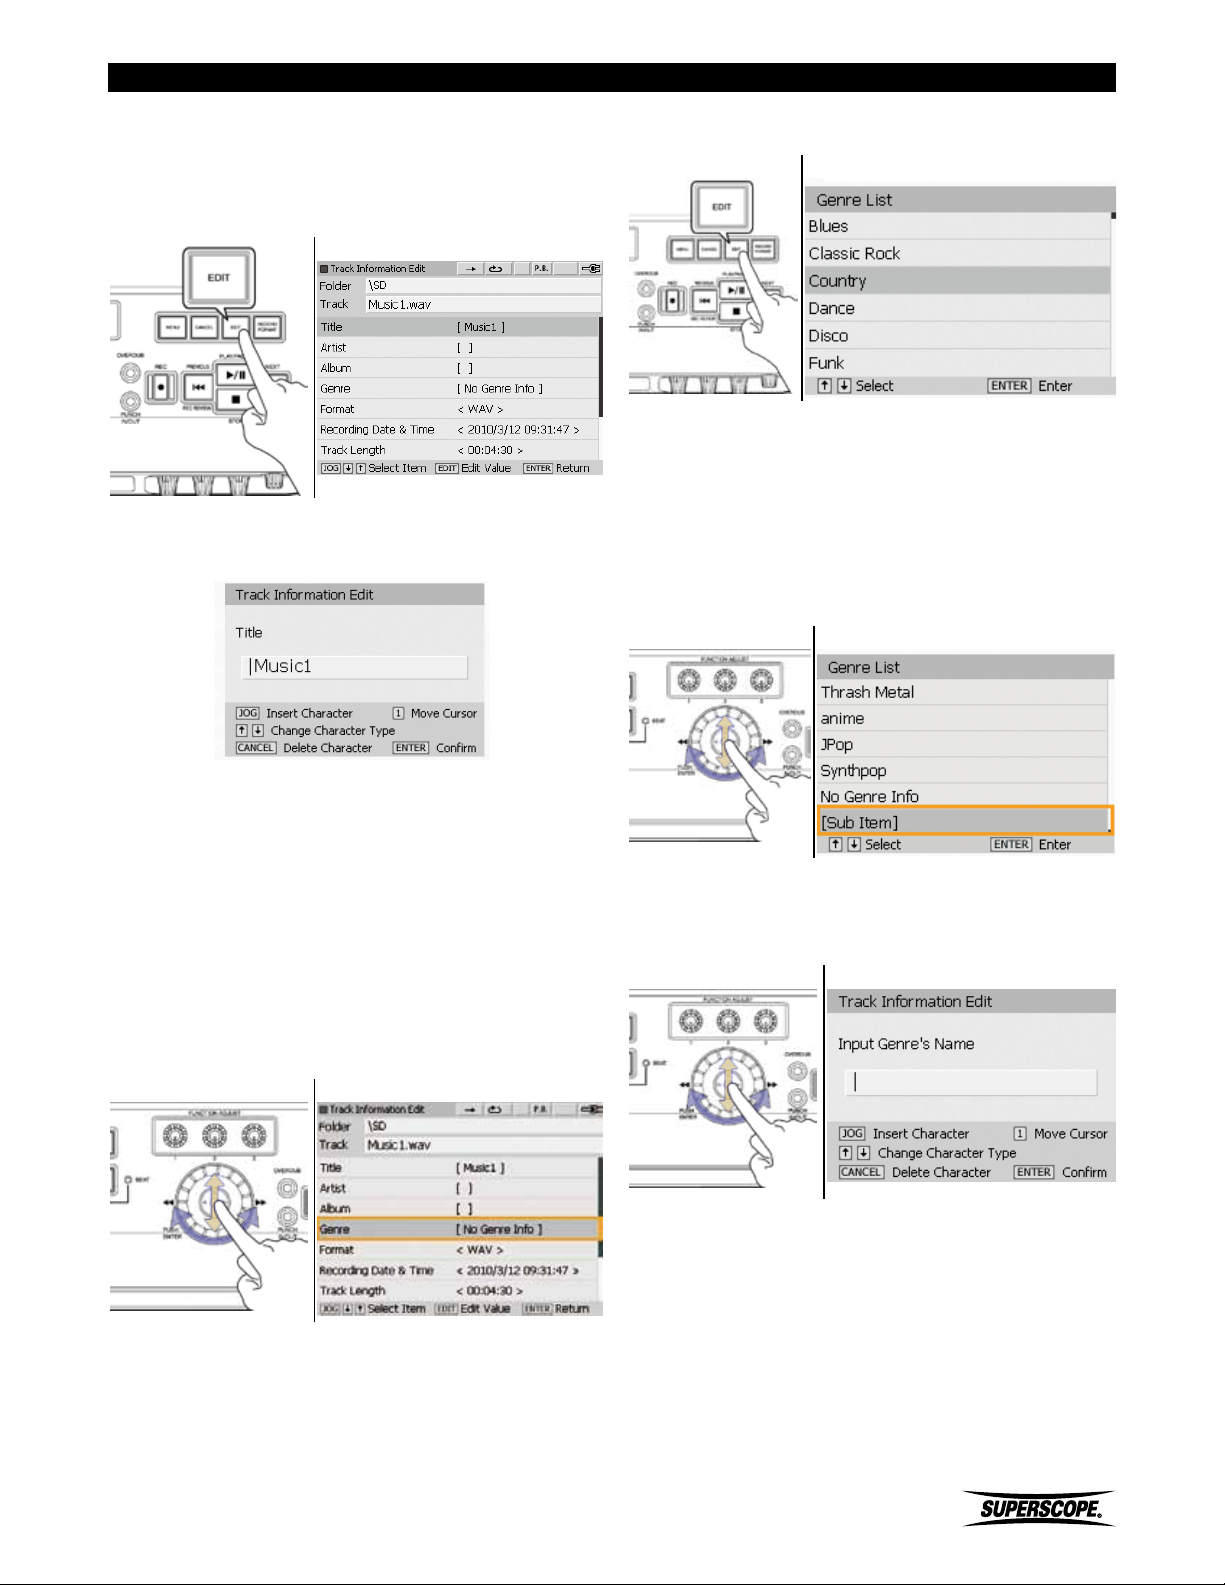
Editing
Title/Artist/Album
1. From the Track Information Edit screen, turn the jog
wheel or move the joystick up or down to highlight
Title. Press the EDIT button to change the title.
Track Information [Edit] Screen
2. Enter the new title by using the Text Input Method.
Text Input Screen
2. Press the EDIT button.
Genre List Screen
Turn the jog wheel or move the joystick up or down to
highlight a genre from the list. Press ENTER to select a
genre.
※ If the genre is not listed, turn the jog wheel
or move the joystick up or down to highlight
[Sub Item].
Genre List Screen
3. When you have finished editing text and pressed
ENTER to confirm the new title, the Track
Information Edit screen will appear. Turn the jog
wheel to highlight Artist or Album.
4. Press the EDIT button. Enter the new Artist or Album
information by using the Text Input Method.
Genre
1. From the Track Information Edit screen, turn the jog
wheel or move the joystick up or down to highlight
Genre.
Track Information Edit Screen
Press ENTER. Enter the new genre by using the Text
Input Method. Repeat steps 1-3. The new genre will now
appear as an option.
Text Input Screen
24>16bit Convert
This option only appears for 24-bit WAV files. Select this
option to make 24-bit files playable on the PSD400 series
recorder. See Auto Convert.
Superscope PSD430 / PSD450 User Manual
- 69 -
Page 70
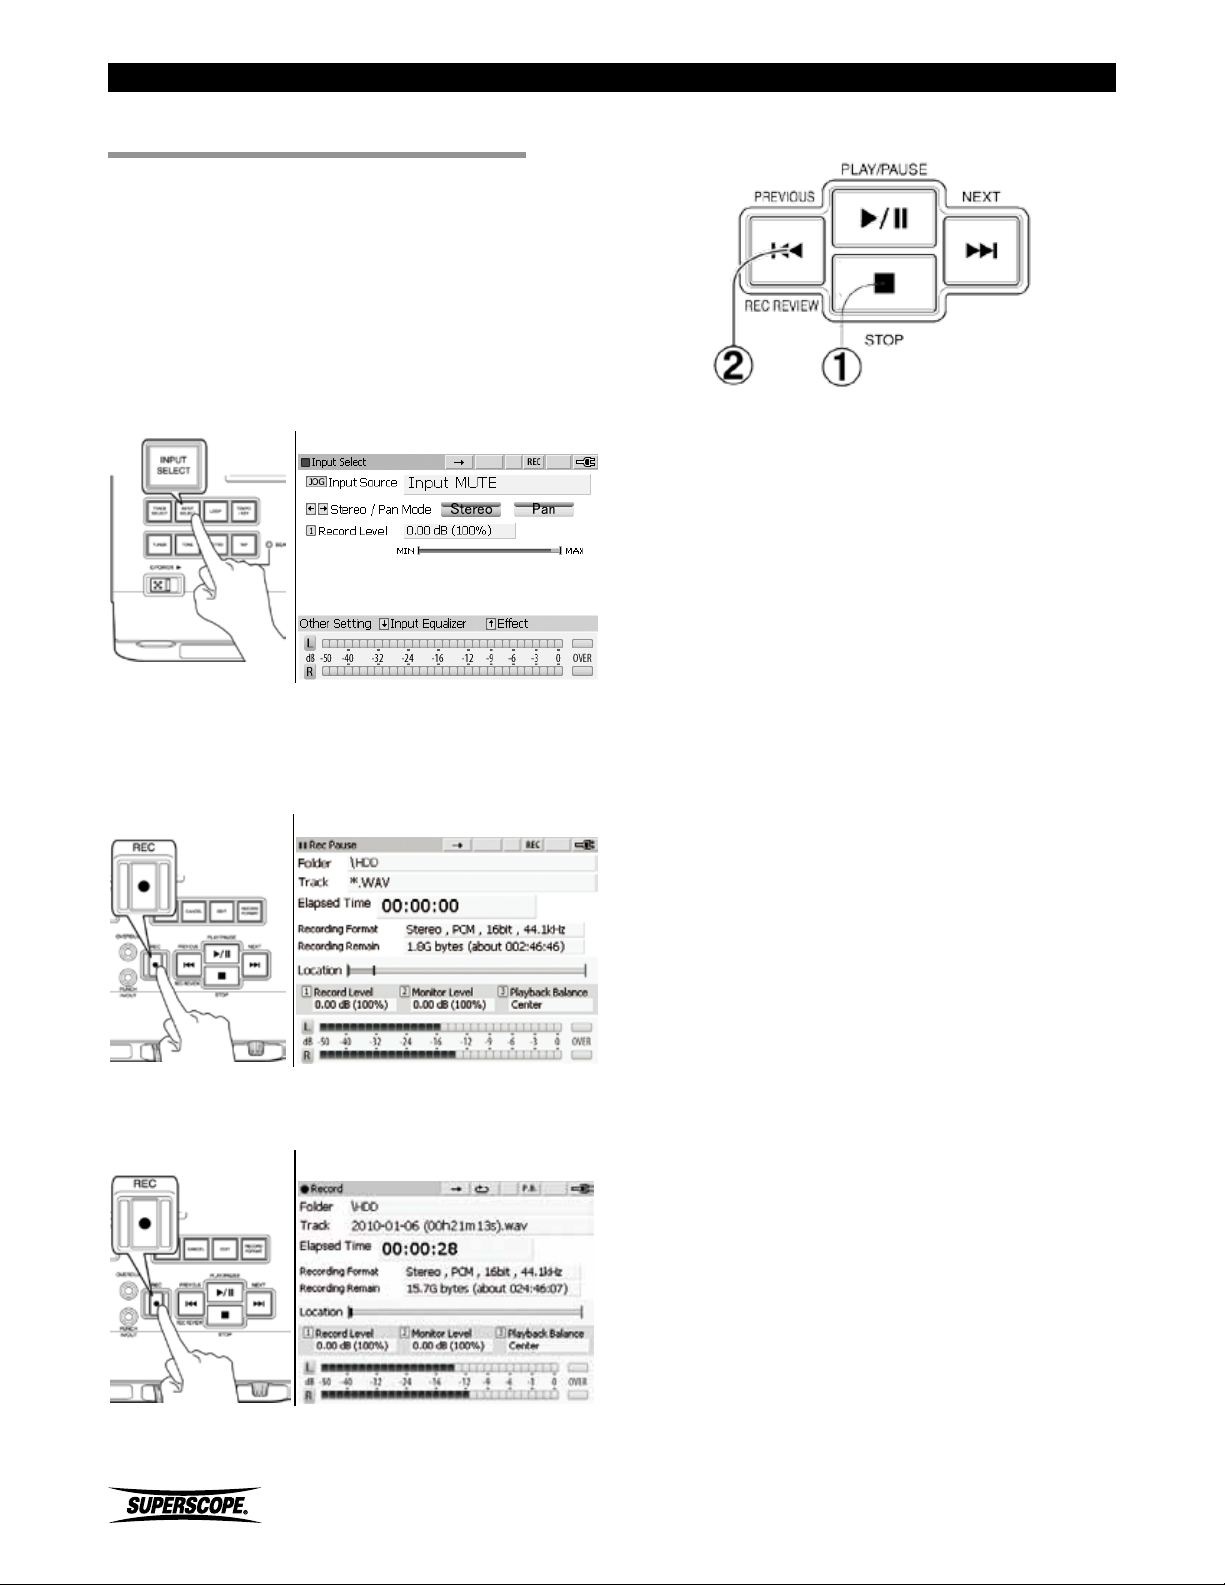
Recording
■Recording
Recording to the PSD450 Internal Hard Drive
1. Select an Input – Press the Input Select button
to view input options. Turn the jog wheel to
change Input Source. For more information on
selecting inputs and setting levels see Setting Up
Microphones, Instruments and Other Sound Sources.
Input Select Screen
4. Finish recording.
① Press the Stop button when you are finished
recording, or
② Press the REC REVIEW button to stop the recording
and playback the recording immediately.
2. Press the Record button once to enter Record Pause
mode. The Record button will flash and the VU
meters at the bottom of the display will respond to
your input signal(s).
Rec. Pause Screen
3. Press the Record Button again to start recording. The
Record button will stay lit during recording.
Record Screen
- 70 -
Superscope PSD430 / PSD450 User Manual
Page 71
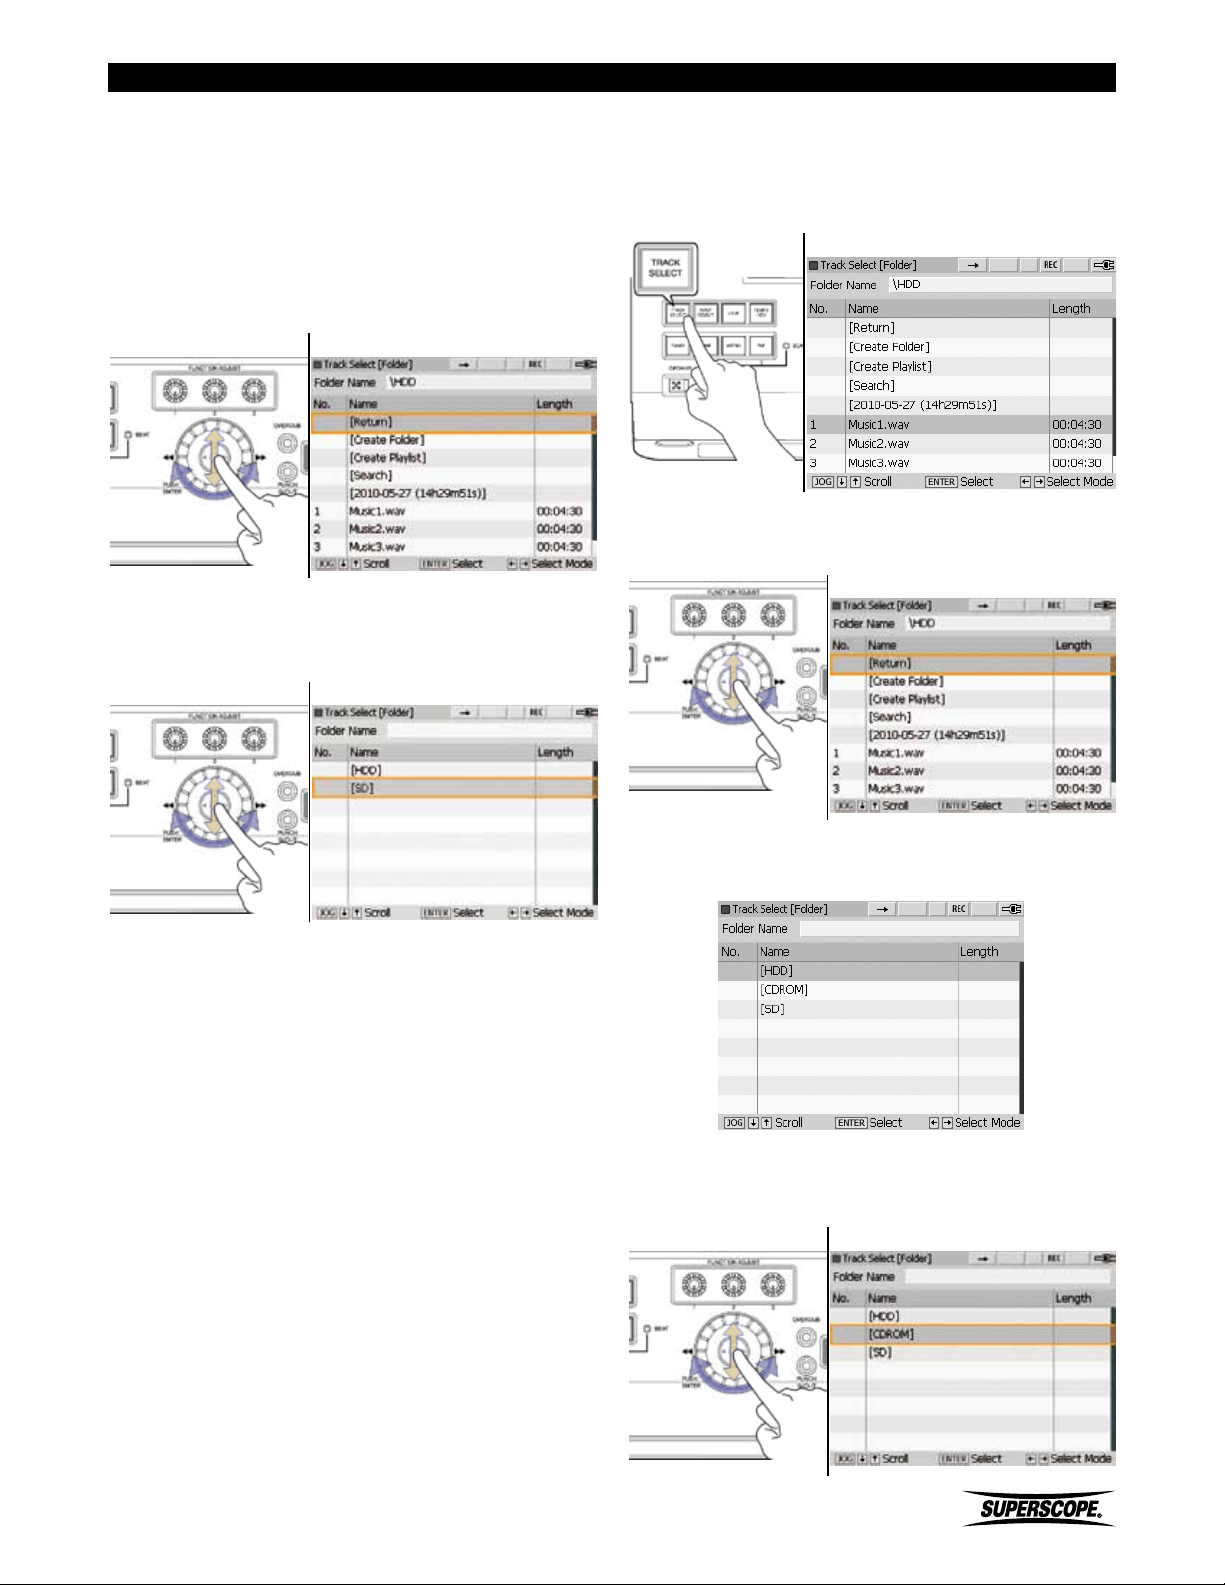
Recording
Recording to a Mini SD Card
SD is the default recording destination on a PSD430.
1. Insert a mini SD Card (see Inserting a Mini SD Card).
2. Select [SD] as your recording destination. Select
[Return] on the Track Select [Folder] screen and press
ENTER.
Track Select [Folder] Screen
3. Turn the jog wheel or move the joystick up or down
to Select [SD] and press ENTER.
Track Select [Folder] Screen
Recording Direct to CD
1. Press the Track Select button. The recorder will show
the previously accessed folder.
Track Select [Folder] Screen
2. Turn the jog wheel or move the joystick up or down
to highlight [Return].
Track Select [Folder] Screen
The remaining steps are identical to Recording to the
Internal Hard Drive (see above).
※ To record to the SD Card and Hard Drive at
the same time (PSD450 only), turn on SD +
HDD Recording in the Record Settings menu.
3. Repeat this step until the following screen appears:
Device Select Screen
4. Turn the jog wheel or move the joystick up or down
to highlight [CDROM]. Press ENTER.
Device Select Screen
Superscope PSD430 / PSD450 User Manual
- 71 -
Page 72
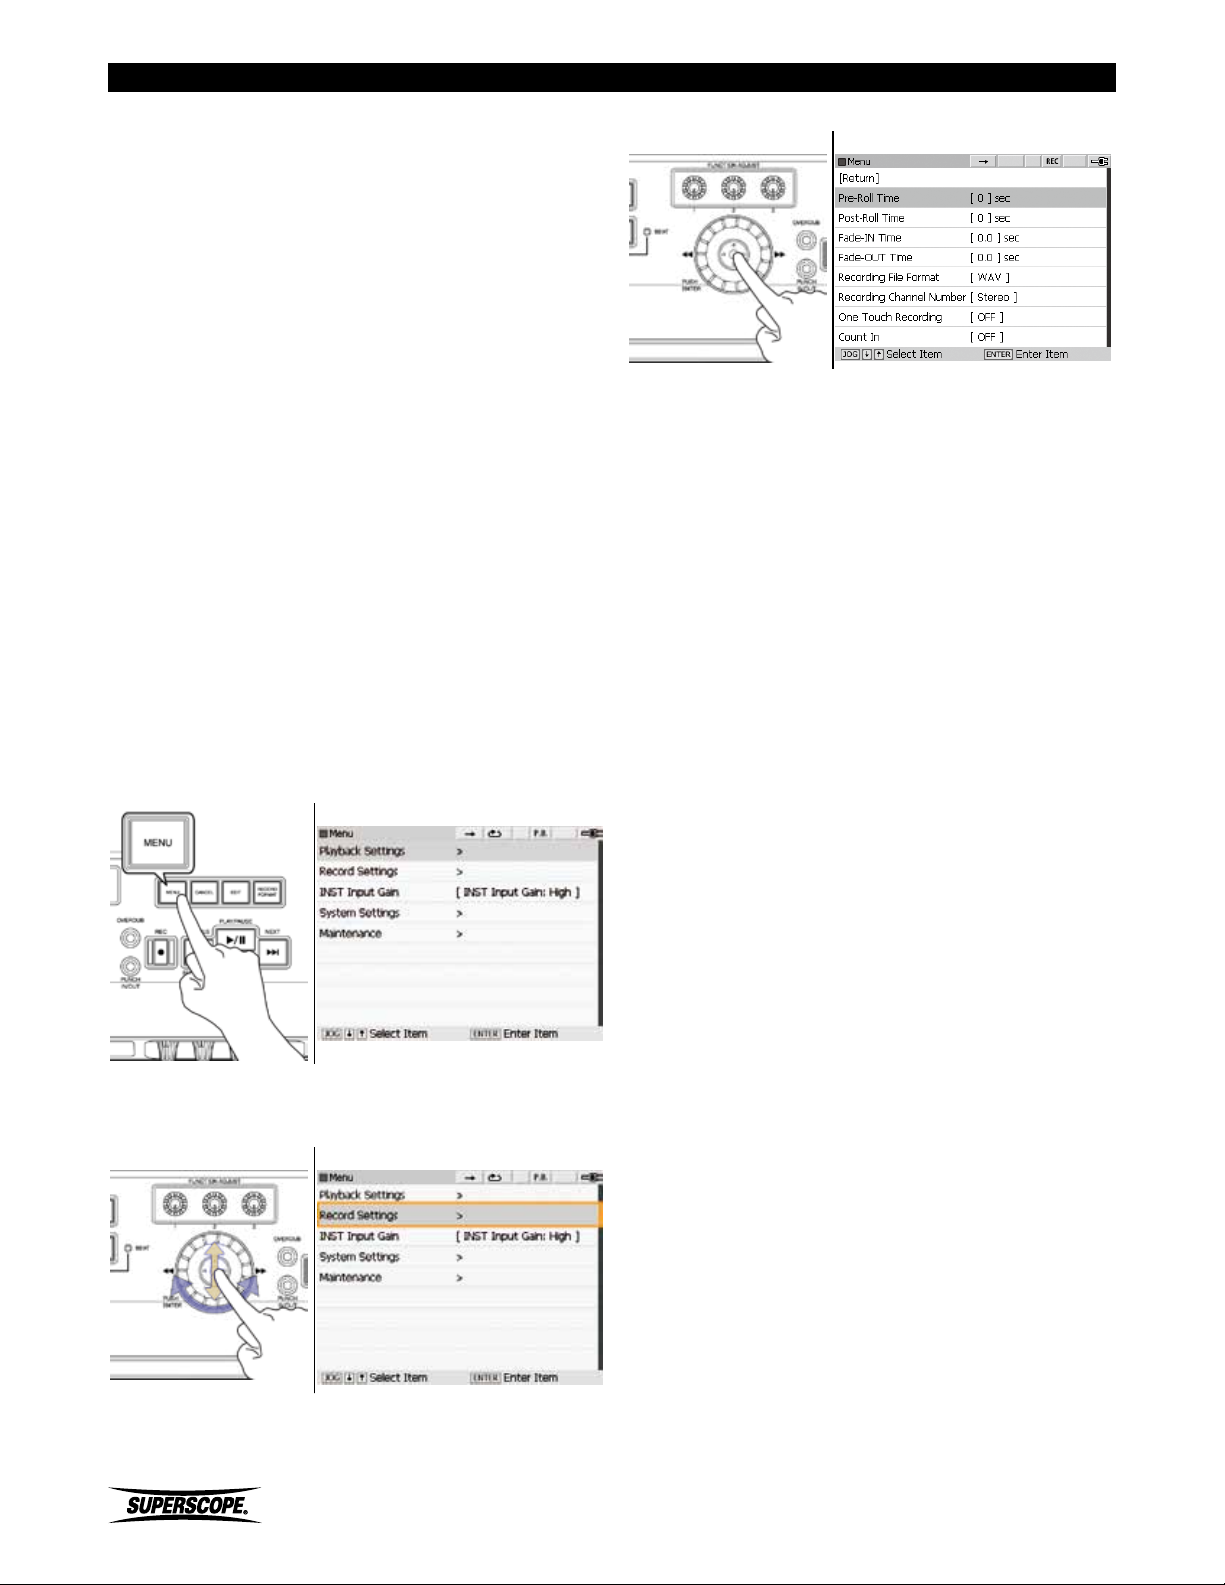
Recording
※ Direct to CD recording is not recommended
when using internal microphones. The
recorder’s built-in mics are sensitive to the
sound of the CD drive.
The remaining steps are identical to Recording to the
Internal Hard Drive (see above).
Track Increment
During recording, you can increment tracks by:
(1) pressing the Record button (seamless track increment)
when recording to SD, HDD (PSD450 only) or USB.*
or
(2) pressing the Play/Pause button (recording is paused).
When a recording is paused, press the Play/Pause button
again to continue recording on a new track.
* There is no seamless track increment when recording
direct to CD. The recorder must enter RECORD/PAUSE
mode.
The Record Settings Menu
To access the Record Settings menu:
1. Press the MENU button.
Menu Screen
3. Press ENTER to view the Record Settings Menu.
Record setting Menu
To change Record Setting:
1. Move the joystick up or down or turn the jog wheel
to highlight options on the Record Settings screen.
2. Press ENTER to select the setting you wish to edit.
3. Turn the jog wheel to change the value.
4. Press ENTER to confirm or CANCEL to cancel the
change.
Pre-Roll Time/ Post-Roll Time
During Overdub and Punch In/Out, it is often helpful
to add a time gap between the moment the Record
button is pressed and the moment that recording begins
(Pre-Roll Time). This added time allows the user to listen
to or play along with the accompaniment track before
recording. This allows for smooth transitions between
original recorded material and new material added
through an overdub or punch-in.
Adding a Post-Roll Time during Overdub or Punch In/
Out will allow the accompaniment track to play for an
additional amount of time after the user is finished
recording new material. Pre-Roll Time and Post-Roll Time
can be adjusted between 0 seconds and 10 seconds in
1 second intervals. The default setting for Pre-Roll Time
and Post-Roll Time is [0] seconds.
Fade In / Out
2. From the menu screen, turn the jog wheel or move
the joystick down to select Record Settings.
Menu Screen
When a Fade-IN Time is selected, the Record Level will
gradually increase from a mute condition to full Record
Level, from the beginning of the recording to the time
specified.
The range for Fade-IN Time is 0.0 (OFF) ~ 10.0 seconds,
adjustable in increments of 0.5 seconds. The default
setting is 0.0 (OFF) seconds.
When a Fade-OUT Time is selected, the Record Level
will gradually decrease from full Record Level to a mute
condition. The fade begins the moment the recording is
stopped.
The range for Fade-OUT Time is 0.0 (OFF) ~ 10.0
seconds, adjustable in increments of 0.5 seconds. The
default setting is 0.0 (OFF) seconds.
- 72 -
Superscope PSD430 / PSD450 User Manual
Page 73
Recording
※ To fade out manually, gradually turn
FUNCTION ADJUST #1 (4A) (Record Level)
counter-clockwise before stopping a
recording.
Recording File Format
The PSD400 series can record either WAV
(uncompressed) or MP3 (compressed) files. Select
Recording File Format to change the type of file the
recorder will create. WAV is the default setting.
Recording Channel Number (mono, stereo setting)
The PSD400 series can record either mono or stereo files.
Select Recording Channel Number to change the number
of channels in recorded files. Stereo is the default setting.
Bit Size (resolution of the recording).
If Recording File Format is set for WAV, this option
will appear as Recording File Bit Number. If Recording
File Format is set for MP3, this option will appear as
Recording File Bit Rate. Increasing this setting increases
the resolution of the recording, but also increases the
size of the recorded file. The settings for bit number/
bit rate will vary depending on the current settings for
Recording File Format and Recording Channel Number.
See the tables below.
Bit Size Table
Recording format WAV.
Settings
24bit* or 16bit
Recording format MP3
Channels Settings
Mono 32 , 40 , 64 , 80 , 128 , 160
Stereo 64 , 80 , 128 , 160 , 256 , 320
Default settings: WAV - Stereo - 16bit.
*Must be converted for playback. See Auto Convert
below.
Auto Track Increment
Increment tracks at pre-set time intervals. Options
include: OFF, 1 minute, 5 minutes, 10 minutes, 15
minutes or 30 minutes. The default setting is OFF. This
feature does not work when recording direct to CD.
One Touch Recording
The PSD400 series has the ability to bypass Record Pause
Mode and simply begin recording after the user presses
the Record button once. The default setting for One
Touch Recording is [OFF].
Superscope PSD430 / PSD450 User Manual
- 73 -
Page 74
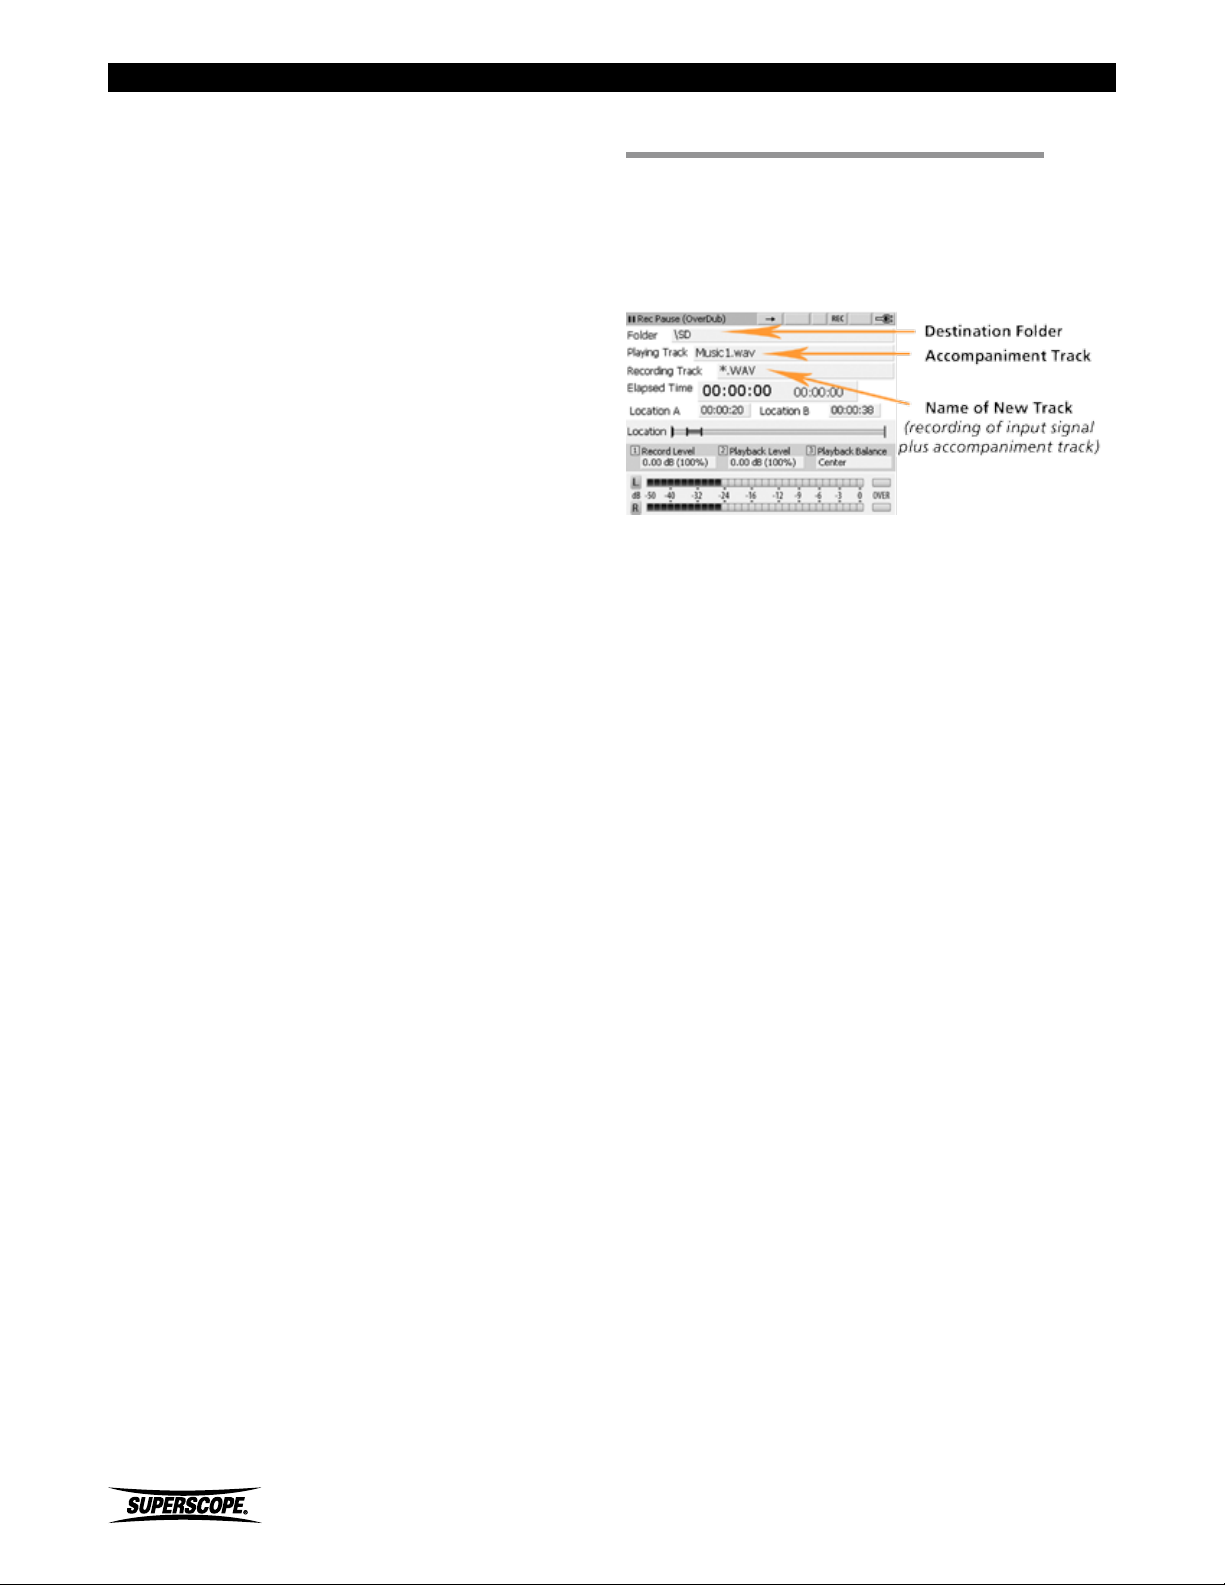
Recording
Count In
When a Count In value is selected, the metronome will
play the specified number of beats before recording
begins. You can select up to 16 beats for a Count In.
To record using Count In, follow the normal steps (see
Recording). When you press the Record button to begin
recording, the metronome will begin automatically
before recording begins. To adjust metronome settings,
see Using the Metronome.
Auto Convert
Your Superscope PSD400 series recorder is designed to
be a “music practice recording system.” Your recorder is
therefore capable of performing a number of different
audio manipulations concurrently, i.e., simultaneous
Tempo, Key, and Fine Tune adjustment; Voice Reduction;
Parametric EQ; etc..
To allow for this level of real time processing, it is
necessary for playback to be CD quality (16bit/44.1kHz).
When higher-than-CD quality (24bit) recordings are
made, a CD quality (16bit) version of the file should be
created for playback on the PSD400 series recorder The
original 24bit recording will be unaffected and available
for transfer to a computer for editing or playback. 24bit
recordings appear in grey type in the Track Select [Folder]
screen.
To create a 16bit playback file automatically, select Auto
Convert [ON]. The default value is Auto Convert [OFF].
CD Pre-Gap Setting
To add a time gap between tracks on an audio CD,
adjust this setting between 0 to 5 seconds. The default
value is 0 seconds.
SD + HDD Recording (PSD450 Only)
Turn on this feature to simultaneously record to an
SD card and the unit’s internal Hard Drive [HDD]. The
primary recording destination must be [SD]. When this
feature is on, the PSD450 will record to the SD Card and
make a duplicate copy of the file in the root directory of
the hard drive [HDD].
■Overdub
The Overdub feature allows the user to layer audio over
a pre-existing recording (sound on sound). When the
Overdub button is pressed, the recorder enters REC
Pause Mode (Overdub).
Loop Setting Screen
In REC Pause Mode (Overdub), pressing the Record
button (blinking red) or the Play/Pause button (blinking
green) will mix the selected input signal (see Set Up) with
the currently selected track.
※ The accompaniment track may be located on
the HDD (PSD450 only), SD, USB or CD. Using
CD accompaniment is not recommended
when using the built-in microphones, because
the sound of the CD drive may be picked up
by the recorder’s internal microphones.
If you have not adjusted the loop points for the selected
accompaniment track, then you may layer audio until
the accompaniment track finishes playing or until you
stop the recording. When the recording is stopped early
(before the accompaniment track finishes playing), the
length of the newly recorded file will equal the elapsed
time at the moment the recording was stopped.
※ To adjust the level of the accompaniment file,
see Playback Balance and Level.
By adjusting loop points before using the Overdub
feature, you are able to utilize the recorder’s additional
Overdub modes:
Overdubbing for Composition (Layering sections of a Track)
In this mode, you will identify a section of audio, then
record additional audio over that section. The end result
is a file identical to the original accompaniment file in
length, but with an added layer of audio within the
section you have outlined.
- 74 -
Superscope PSD430 / PSD450 User Manual
Page 75
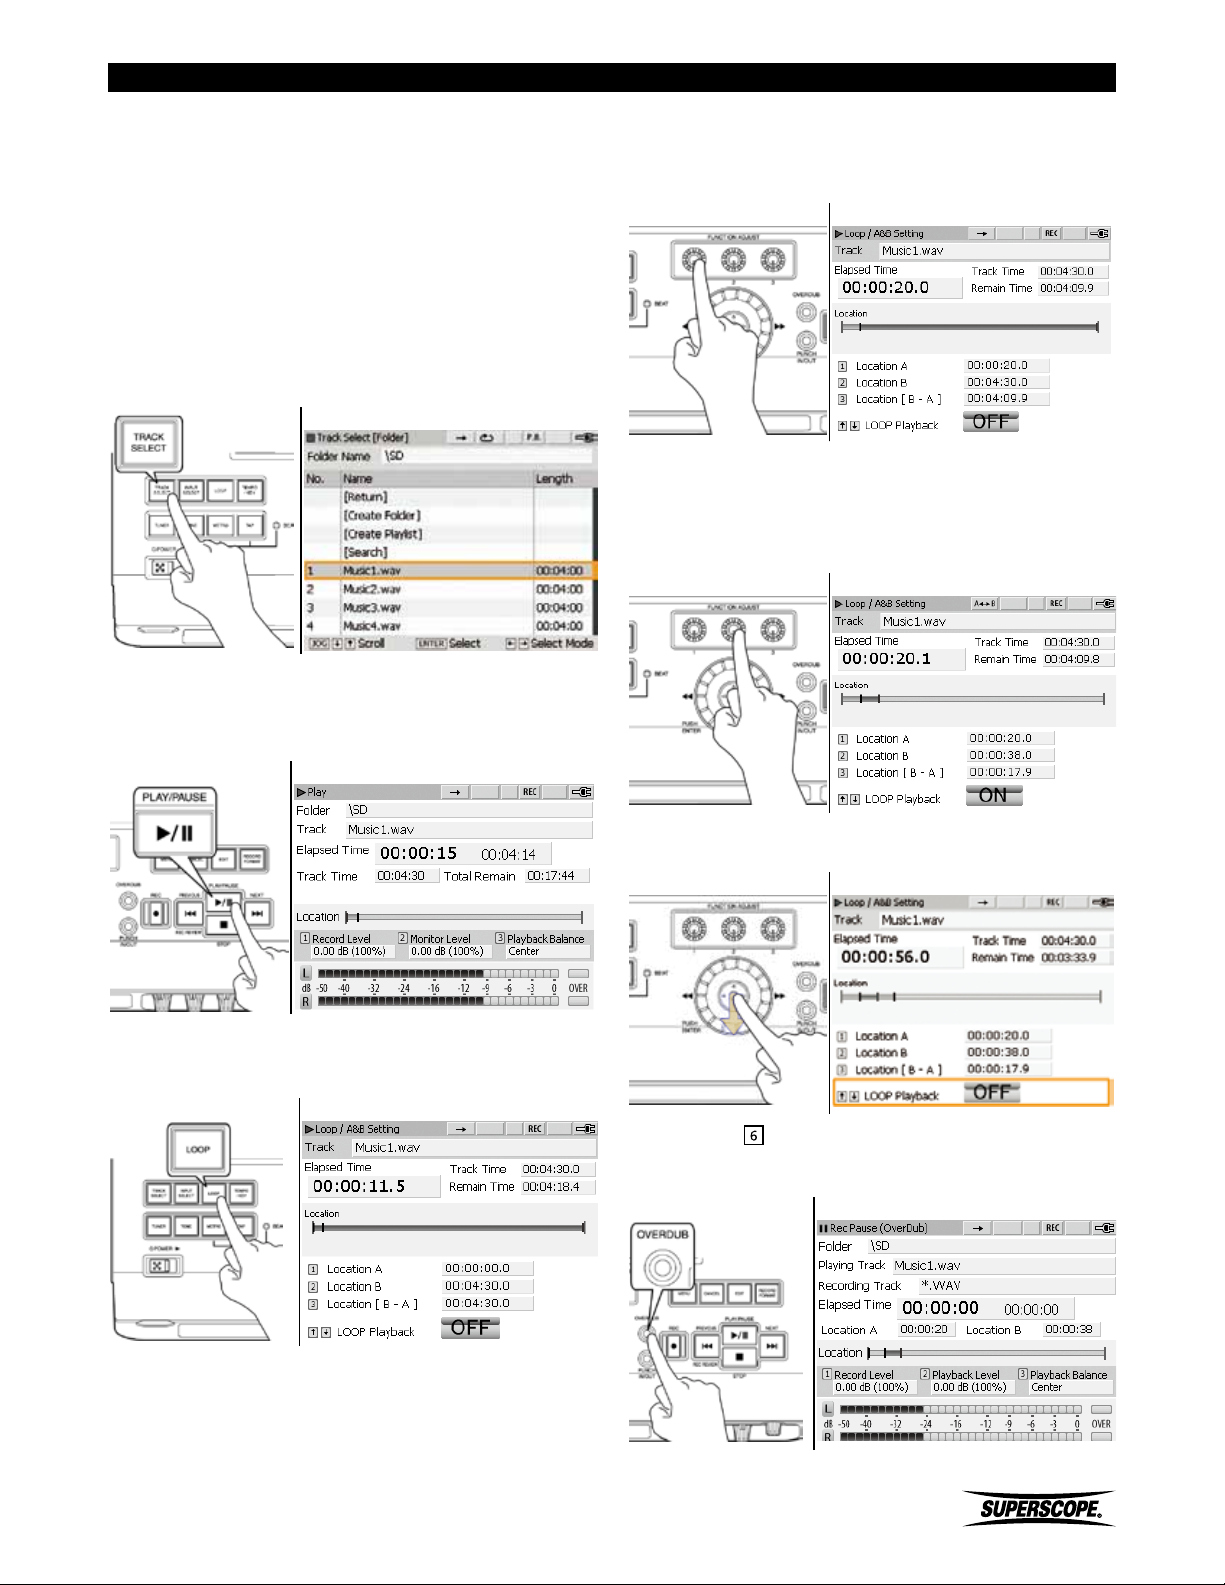
Recording
※ When this mode is selected, playback level
will automatically be reset to maintain
consistent accompaniment level throughout
the recording. See Playback Balance and
Level.
※ This mode is not available when using CD
audio as accompaniment.
1. Press the TRACK SELECT button to select a track to
record over.
Track Select [Folder] Screen
2. If you have already set your Overdub (loop) points,
proceed to step 7. If not, press the PLAY/PAUSE
button to listen to the track.
4. Press FUNCTION ADJUST #1 (4A) during playback
to set Overdub point A. This is the point in the track
you wish to begin layering audio.
Loop Setting Screen
5. Press FUNCTION ADJUST #2 (4B) during playback to
set Overdub point B. This is the point at which you
will finish layering audio. Loop Playback will start at
point A automatically.
Loop Setting Screen
Play Screen
3. Press the LOOP button during playback to view the
LOOP setting menu.
Loop setting Screen
6. Move the joystick down to turn Loop playback OFF.
Loop Setting Screen
7. Press the OVERDUB button to enter REC Pause
Mode (Overdub).
Rec. Pause [OverDub] Screen
Superscope PSD430 / PSD450 User Manual
- 75 -
Page 76
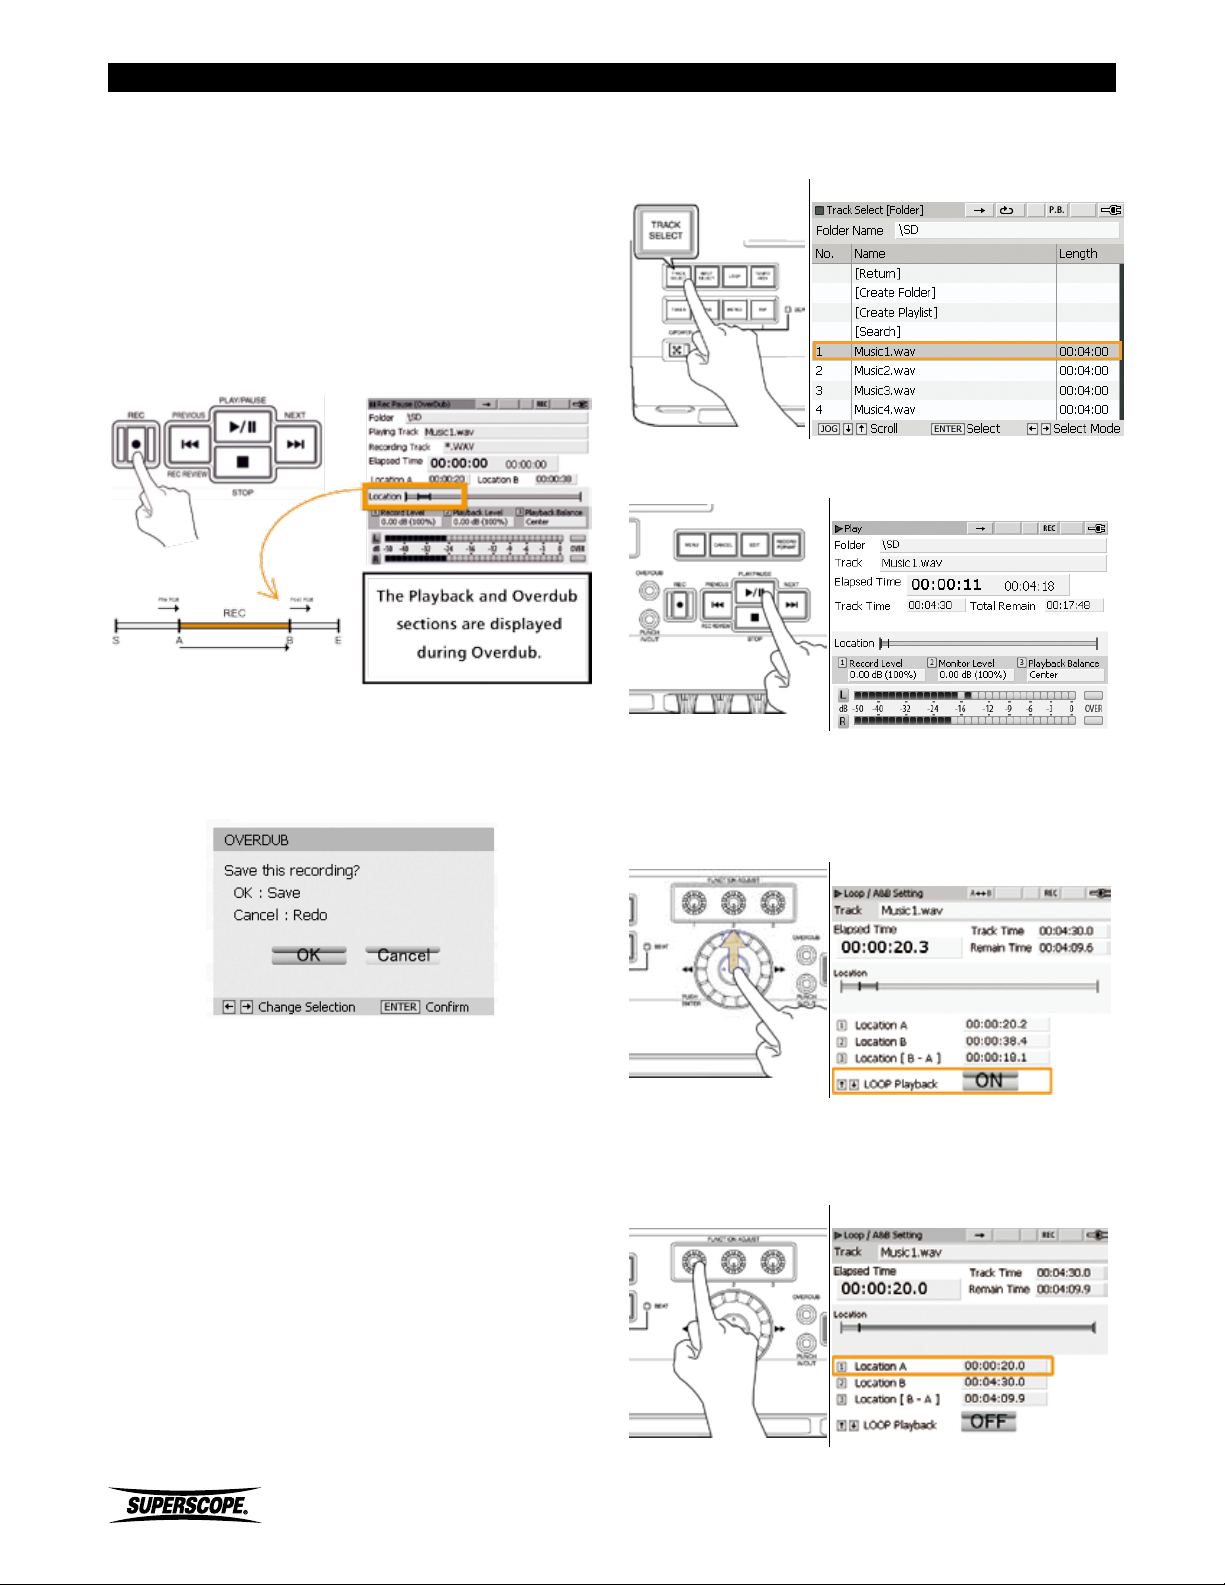
Recording
8. Adjust the REC Level knobs so that the Record Level
(left and right channels) does not exceed 0 dB as
indicated on the Level meters. (see Setting Levels).
9. Press the REC button (8A) or PLAY/PAUSE button
(8C) to start overdubbing. If a Pre-Roll Time is set in
the Record Settings menu (see Pre-Roll Time/ Post
Roll Time), playback will begin a number of seconds
before Overdub point A, as determined by the PreRoll Time.
Rec. Pause [OverDub] Scren
1. Select a track to record over by pressing the TRACK
SELECT button.
Track Select [Folder] Screen
2. Press the PLAY/PAUSE button to listen to the track.
Play Screen
10. The accompaniment track will stop at the end of
point B or the Post-Roll Time (see Pre-Roll Time / Post
Roll Time). The Save menu will appear.
Overdub Save Menu Screen
11. Select OK and the new file (executed overdub) will
be saved. Select Cancel and the file will not be
saved. When Cancel is selected, the recorder will reenter REC Pause Mode (Overdub) (step 7) allowing
the user to redo the Overdub recording.
Overdubbing for Practice (Recording over a Loop)
In this mode, you will identify a section of audio, then
record additional audio over that section until the STOP
button is pressed. Unlike Mode A (Layering Sections of
a Track), the length of the resulting file in this mode is
determined by how long you choose to record over the
repeating loop.
3. Press the LOOP button during playback to view the
LOOP setting menu. If you have already set your
Overdub points, simply move the joystick up to turn
Loop playback ON, and proceed to step 6.
Loop Setting Screen
4. Press FUNCTION ADJUST #1 (4A) during playback
to set the beginning of your accompaniment loop
(point A).
Loop Setting Screen
- 76 -
Superscope PSD430 / PSD450 User Manual
Page 77
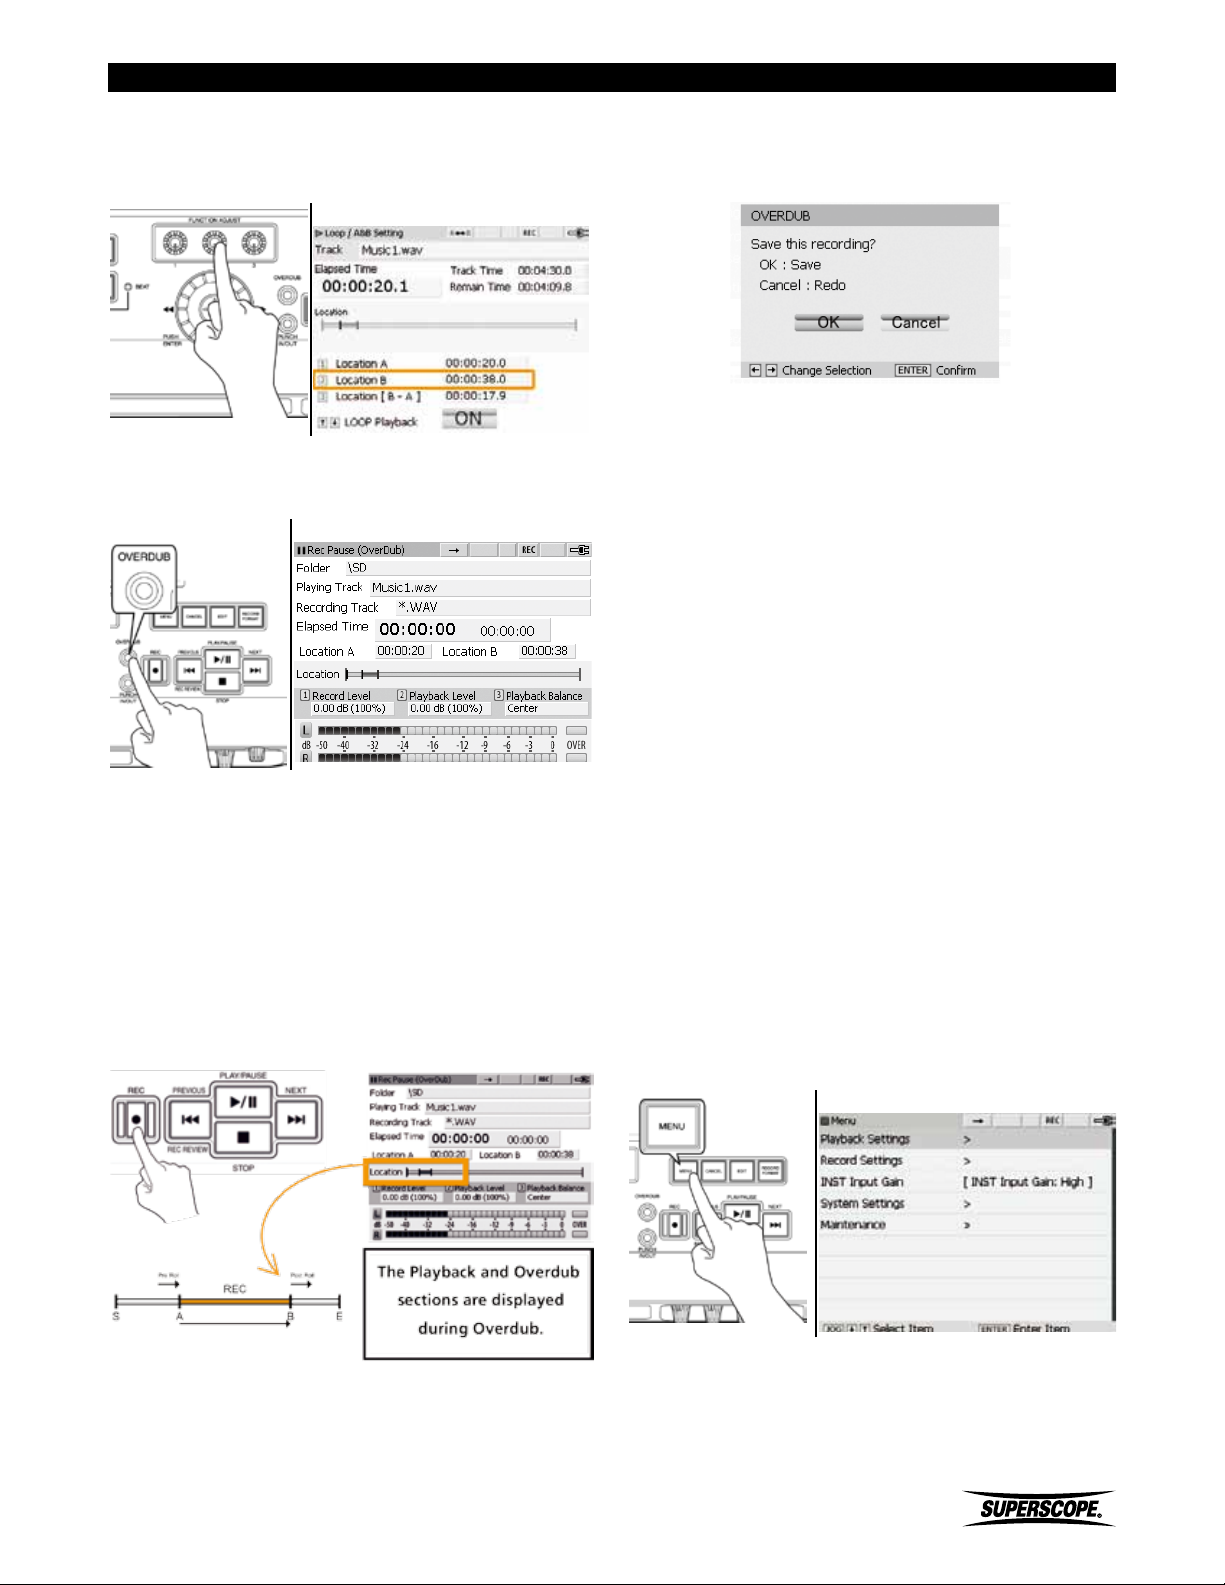
Recording
5. Press FUNCTION ADJUST #2 (4B) during playback to
set the end of your accompaniment loop (point B).
Loop Playback will start at point A automatically.
Loop Setting Screen
6. Press the OVERDUB button [6] to enter REC Pause
Mode (Overdub).
Rec. Pause [OverDub] Screen
9. Press the Stop button when you are finished
recording. The Save menu will appear.
Overdub Save Menu Screen
10. Select OK and the new file (executed overdub) will
be saved. Select Cancel and the file will not be
saved. When Cancel is selected, the recorder will reenter REC Pause Mode (Overdub) (step #6) allowing
the user to redo the Overdub recording.
※ To adjust Playback Level for the
accompaniment file, turn FUNCTION ADJUST
#2 (4B) when the main Overdub screen is
visible.
7. Adjust the REC Level knobs so that the Record Level
(left and right channels) does not exceed 0 dB as
indicated on the Level meters. (see Setting Levels).
8. Press the REC button (8A) or PLAY/PAUSE button
(8C) to start overdubbing. If a Pre-Roll Time is set
in the Record Settings menu (see Pre-Roll Time),
playback will begin a number of seconds before
Overdub point A, as determined by the Pre-Roll
Time.
Rec. Pause [OverDub] Screen
Monitor Source
When Overdubbing, it is helpful to specify a Monitor
Source. Selecting ‘Recording Signal’ as the Monitor
Source will allow you to hear both the accompaniment
file and the input signals (microphones, instruments, etc.)
in the headphones and built-in speaker as you record.
When ‘Playback Signal’ is selected as the Monitor Source,
the input signals will not be heard in the headphones
or built-in speaker. This allows you to hear the
accompaniment track without hearing your own voice or
instrument during recording.
1. Press the MENU button.
Menu Screen
Superscope PSD430 / PSD450 User Manual
- 77 -
Page 78
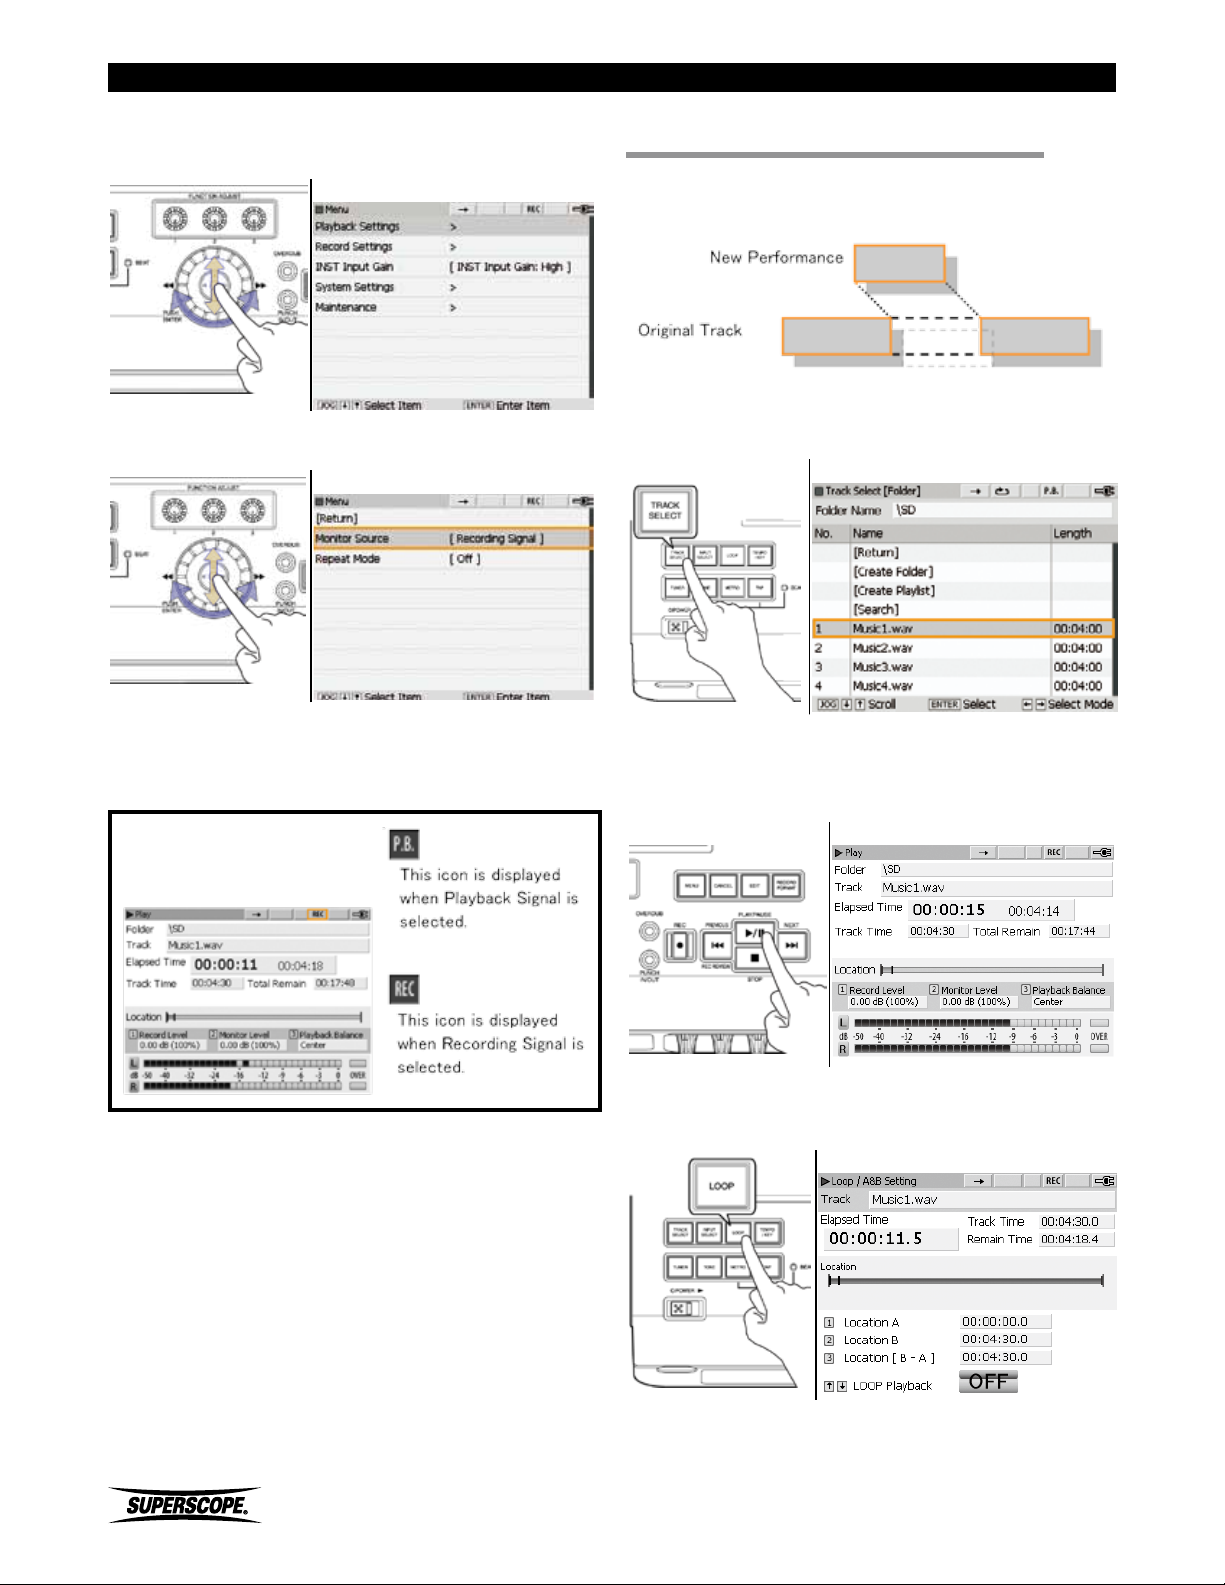
Recording
2. Move the joystick up or down or turn the jog wheel
to select Playback Settings. Press ENTER.
■Punch In/Out
Menu Screen
3. Move the joystick up or down or turn the jog wheel
to select Monitor Source. Press ENTER.
Menu Screen
4. Turn the jog wheel to select Recording Signal or
Playback Signal. Press ENTER. Press the CANCEL
button to cancel changes.
Use the Punch In/Out feature to replace a section of a
performance with a new performance (correct mistakes).
1. Press the TRACK SELECT button to select a track.
Track Select [Folder] Screen
2. If you have already set your Punch In/Out (loop)
points, proceed to step 6. If not, press the PLAY/
PAUSE button to start playback.
Play Screen
3. Press the LOOP button during playback to view the
LOOP setting menu.
Loop Setting Screen
- 78 -
Superscope PSD430 / PSD450 User Manual
Page 79
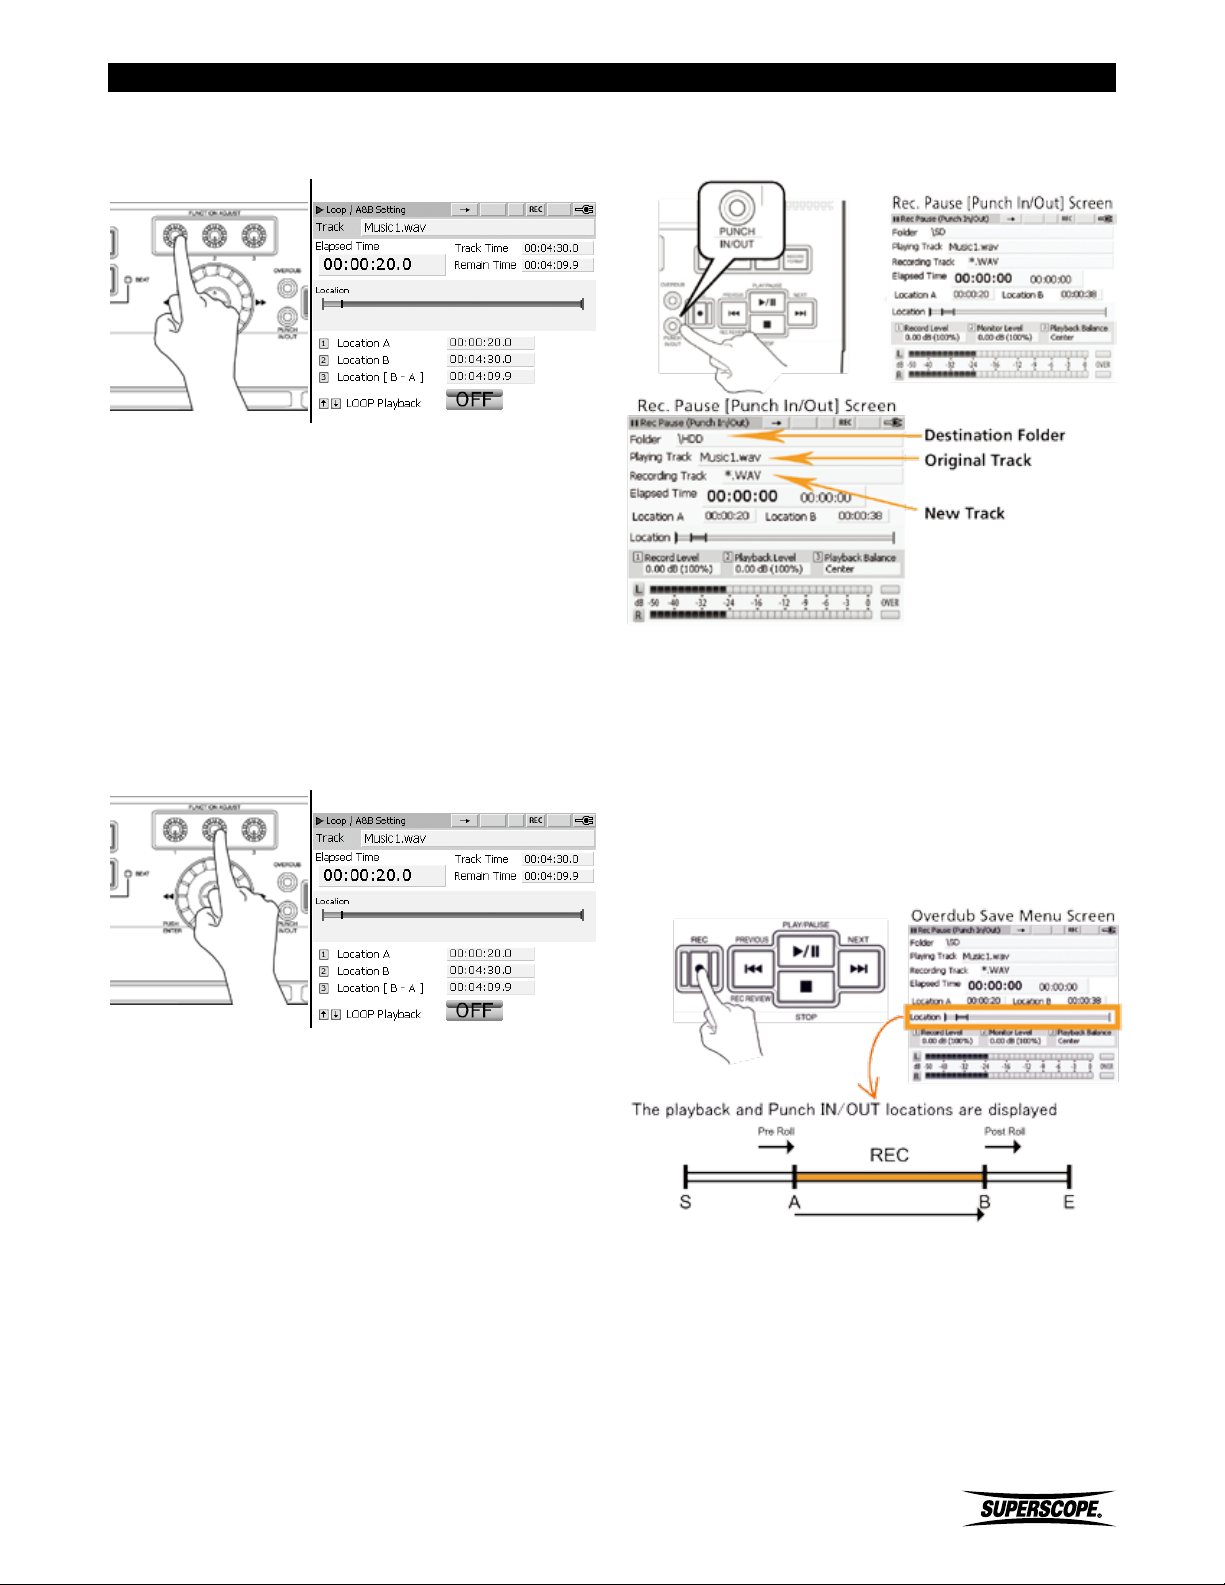
Recording
4. Press FUNCTION ADJUST #1 (4A) during playback to
set the punch-in point.
Loop Setting Screen
5. Press FUNCTION ADJUST #2 (4B) during playback
to set the punch-out point. Loop Playback will be
started at point A automatically.
※ To facilitate smooth transitions between
the original track and your newly recorded
punch-in, it is recommended you set your
punch-in/out points several seconds before
and after the section that needs to be
replaced. Rather than attempting to replace
individual missed notes, try outlining larger
phrases when using Punch In/Out.
Loop Setting Screen
6. Press the PUNCH IN/OUT button to change to REC
Pause Mode (Punch In/Out).
7. Adjust the REC Level knobs so that the Record Level
(left and right channels) does not exceed 0 dB as
indicated on the Level meters. (see Setting Levels).
8. Press the REC button or PLAY/PAUSE button to start
recording. If a Pre-Roll Time is set in the Record
Settings menu (see Pre-Roll Time/Post Roll Time),
playback will begin a number of seconds before
punch-in point A, as determined by the Pre-Roll
Time.
Superscope PSD430 / PSD450 User Manual
- 79 -
Page 80
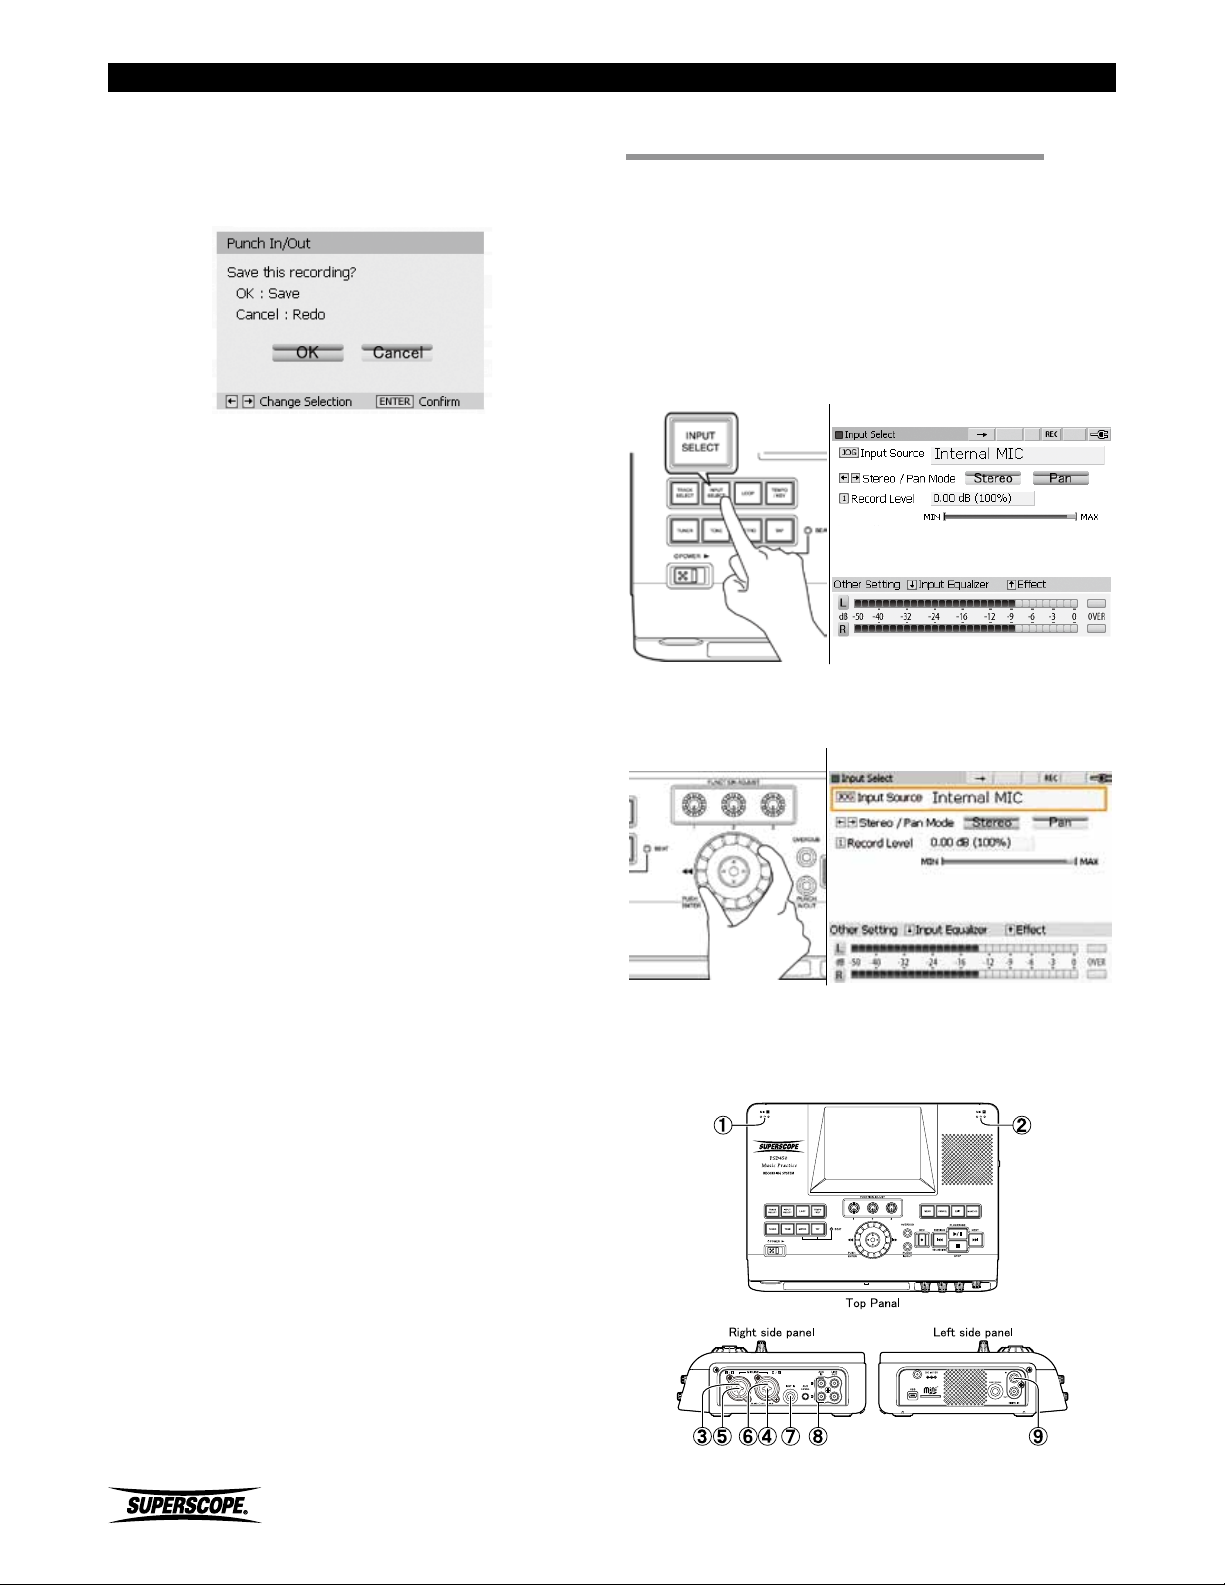
9. When Recording between point A (punch-in) and
point B (punch-out) has finished, the recording will
stop automatically and the Save menu will appear.
Punch In/Out Save Screen
10. Select OK and the new file (executed punch-in)
will be saved. Select Cancel and the file will not be
saved. When Cancel is selected, the recorder will
re-enter REC Pause Mode (Punch In/Out) (step #6)
allowing the user to redo the punch-in recording.
Recording
■Recording Effects
Reverb and Delay effects can be added to input signals
and then recorded. It is not possible to add an effect
to an existing recording. Follow these steps to apply an
effect to your selected input.
Selecting an Input Signal
1. Press the INPUT SELECT button to open the Input
Select screen.
Input Select Screen
2. Turn the jog wheel to select an input configuration
from the options below.
Input select Screen
Available Input Sources
Please refer to the chart on the following page.
- 80 -
Superscope PSD430 / PSD450 User Manual
Page 81
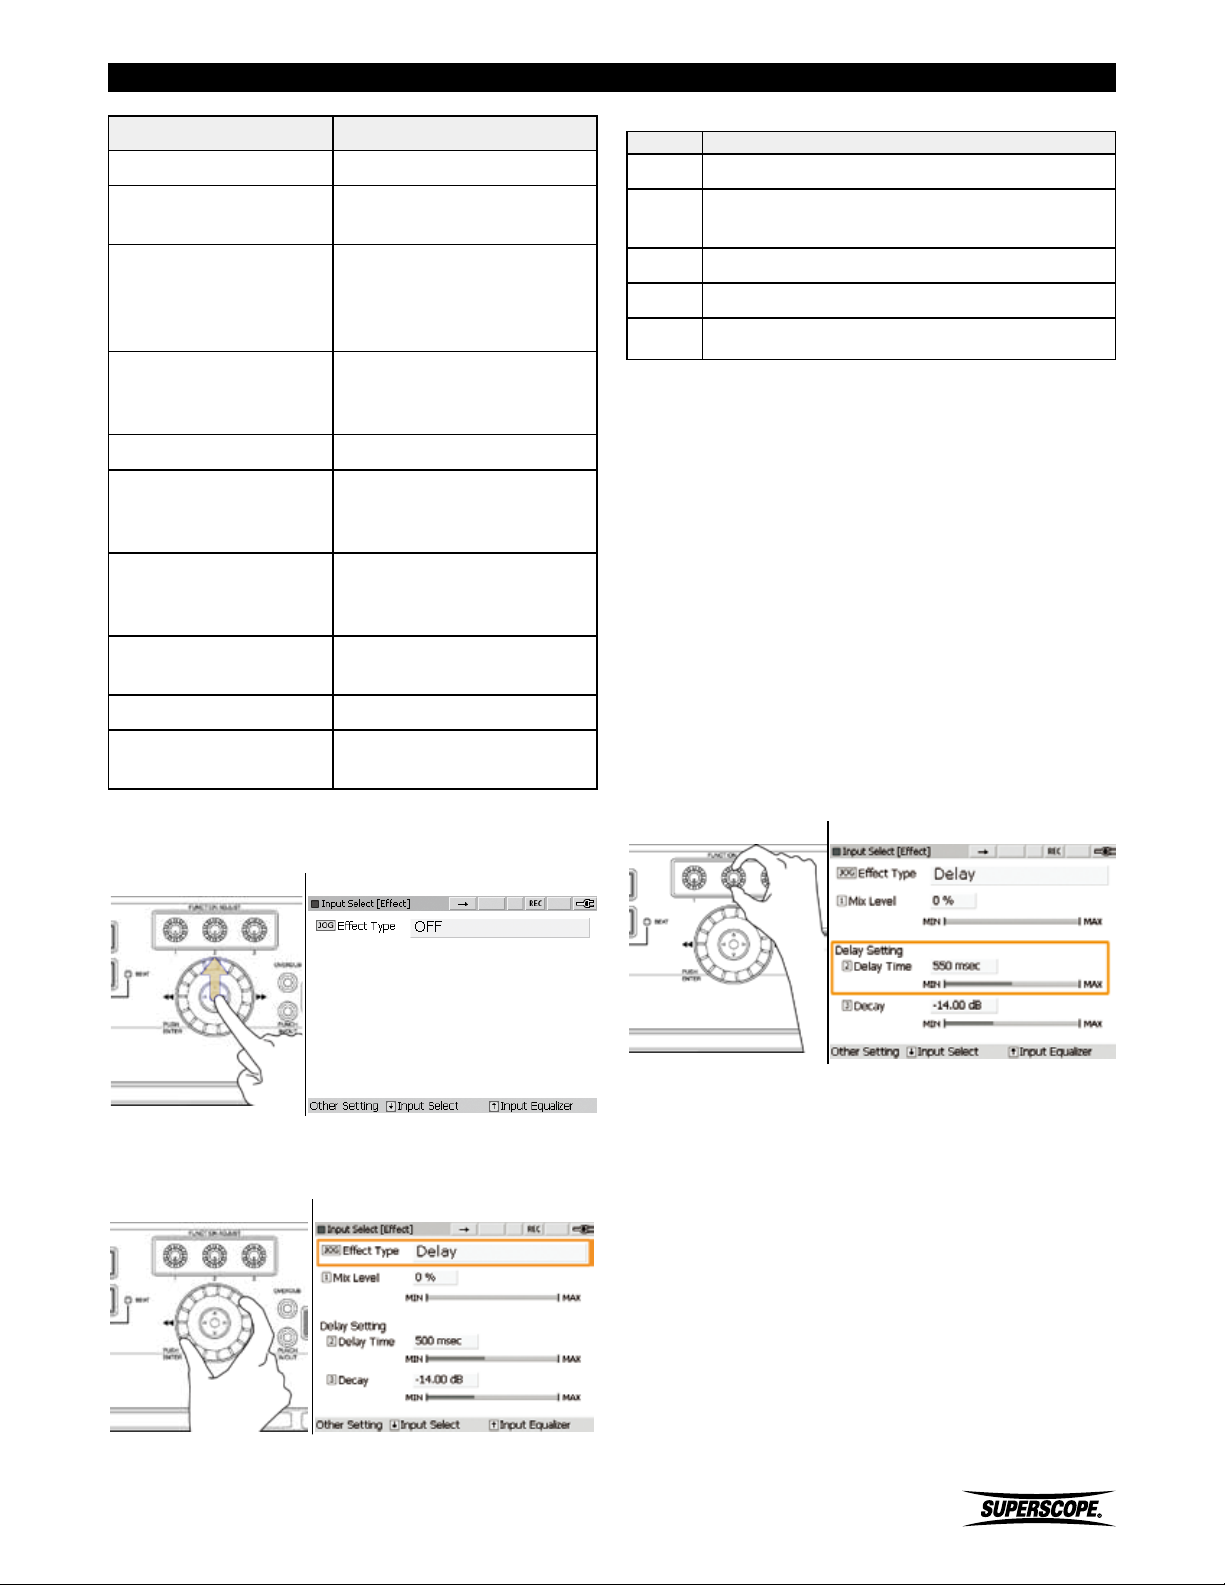
Recording
Input Description
Input Mute Input signal is muted.
Internal MIC
External MIC
LINE
INST
Internal MIC (L ch) +
INST
External MIC (L ch) +
INST
LINE (L ch) + INST
AUX
Selects the built-in
microphones ① ②.
Select this setting when
external microphones are
connected to the XLR/1/4”
inputs③ ④.
Select this setting when LINE
level signals are connected
to the XLR/1/4” inputs ⑤⑥.
Selects the INST input ⑦.
Select the Left internal
microphone ① + the INST
input ⑦.
Selects the Left external
microphone input ③ + the
INST input ⑦.
Selects the Left LINE input
⑤ + the INST input ⑦.
Selects the AUX inputs ⑧.
Effect Type Settings
Effect Description
OFF No effect.
Room
Hall Adds ambience similar to that of a large hall.
Plate Imitates the sound of a plate reverb unit.
Delay Adds discrete echoes to the sound source.
5. If Room, Hall, or Plate is selected as the Effect Type,
6. If Delay is selected as the Effect Type, the following
Adds ambience similar to that of a small to
medium sized room.
the only parameter to adjust is the Mix Level. The
Mix Level setting controls the balance between direct
signal (0%) and processed signal (100%).
additional parameters should be adjusted:
① Delay Time
Delay Time sets the amount of time delay between
repeats.
Delay Time can be adjusted between 0 msec and 1000
msec in 1 msec intervals. The default setting is 500 msec.
DIGITAL
3. Once an input is selected, push the joystick up to
view the Input Select [Effect] screen.
4. Turn the jog wheel to select the effect type from the
table below. The default setting is OFF.
Selects the DIGITAL Inputs
⑨.
Input Select [Effect] Screen
Input Select [Effect] Screen
Turn FUNCTION ADJUST # 2 (4B) to adjust Delay Time.
Press FUNCTION ADJUST # 2 (4B) to return to the default
setting.
Input Select [ Effect] Screen
② Decay
Decay sets the amount of attenuation for each successive
repeat. The greater the attenuation, the quicker the
echoes will fade away. Decay can be adjusted between
-20.00 and -3.00 ㏈ in 0.25 ㏈ steps.
Superscope PSD430 / PSD450 User Manual
- 81 -
Page 82
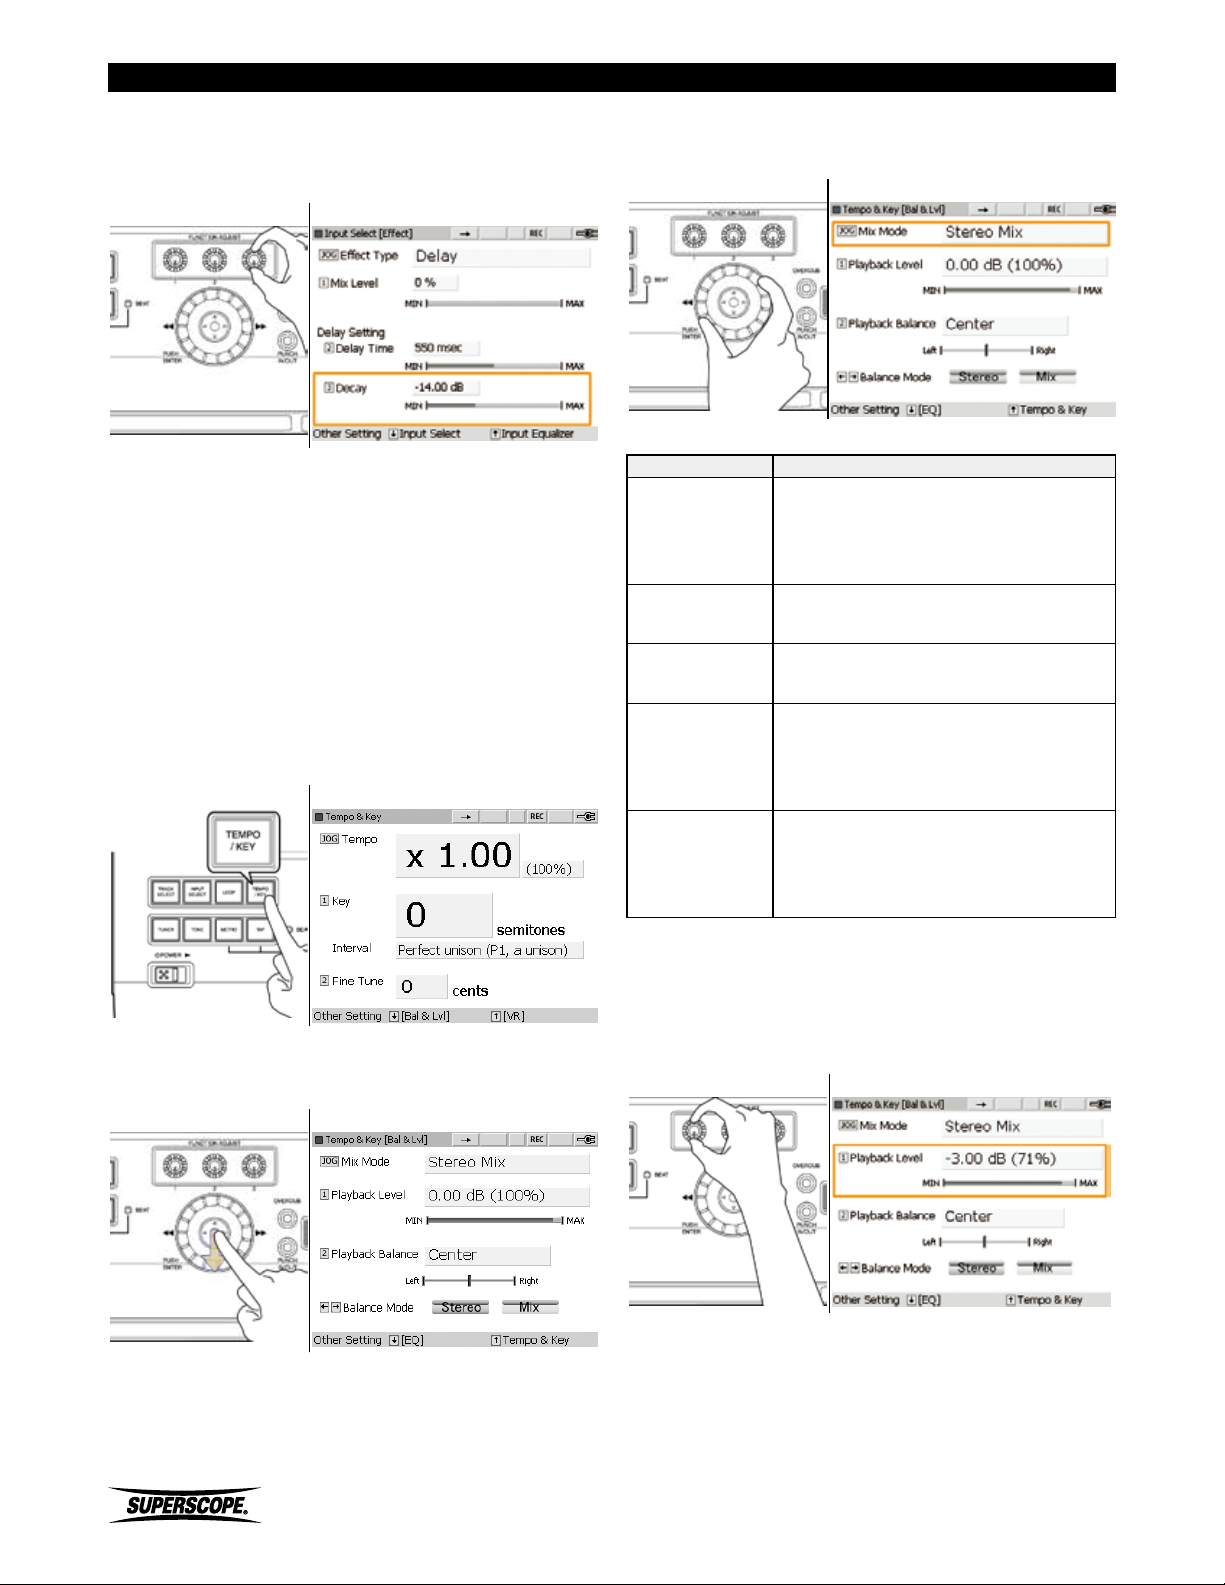
Recording
The default is setting is -14.00dB. Turn FUNCTION
ADJUST # 3 to adjust Decay. Press FUNCTION ADJUST #
3 to return to the default setting.
Input Select [Effect] Screen
Playback Balance and Level
The PSD400 series offers a great deal of flexibility when
determining Playback Balance. Follow these steps to alter
the Balance and Level of any file during playback.
※ When you exit this screen, all settings will be
stored with the selected file.
3. Turn the jog wheel to select Mix Mode. The Mix
Mode settings are explained in the chart below.
Tempo and Key [Balance and Level] Screen
Mix Mode Output Mix
Stereo Mix
(Normal
operation)
L ch – Mix
R ch – Mix
Left channel [input signal (left) +
playback signal (left)]
Right channel [input signal (right) +
playback signal (right)]
Left channel [input signal (left) +
playback signal (left)]
Right channel [input signals (right) +
playback signal (right)]
1. Press the TEMPO/KEY button to open the Tempo/
Key screen.
Tempo and Key Screen
2. Press the joystick down one time to open the Tempo
& Key [Bal & Lvl] screen.
Tempo and Key [Balance and Level] screen
Left channel [input signal (left) +
Mono - Mix
Split
4. Playback Level. Turn FUNCTION ADJUST # 1(4A) to
adjust Playback Level. Playback Level can be adjusted
between MUTE (0%) and -6.0 ㏈ (200%) in 0.25 dB
increments. The default setting is 0.0 ㏈ (100%).
playback signal (left + right)]
Right channel [input signals (right) +
playback signal (left + right
Left channel [playback signal (left +
right)]
Right channel [input signal (left +
right)]
Tempo and key [Balance and Level] Screen
- 82 -
Superscope PSD430 / PSD450 User Manual
Page 83
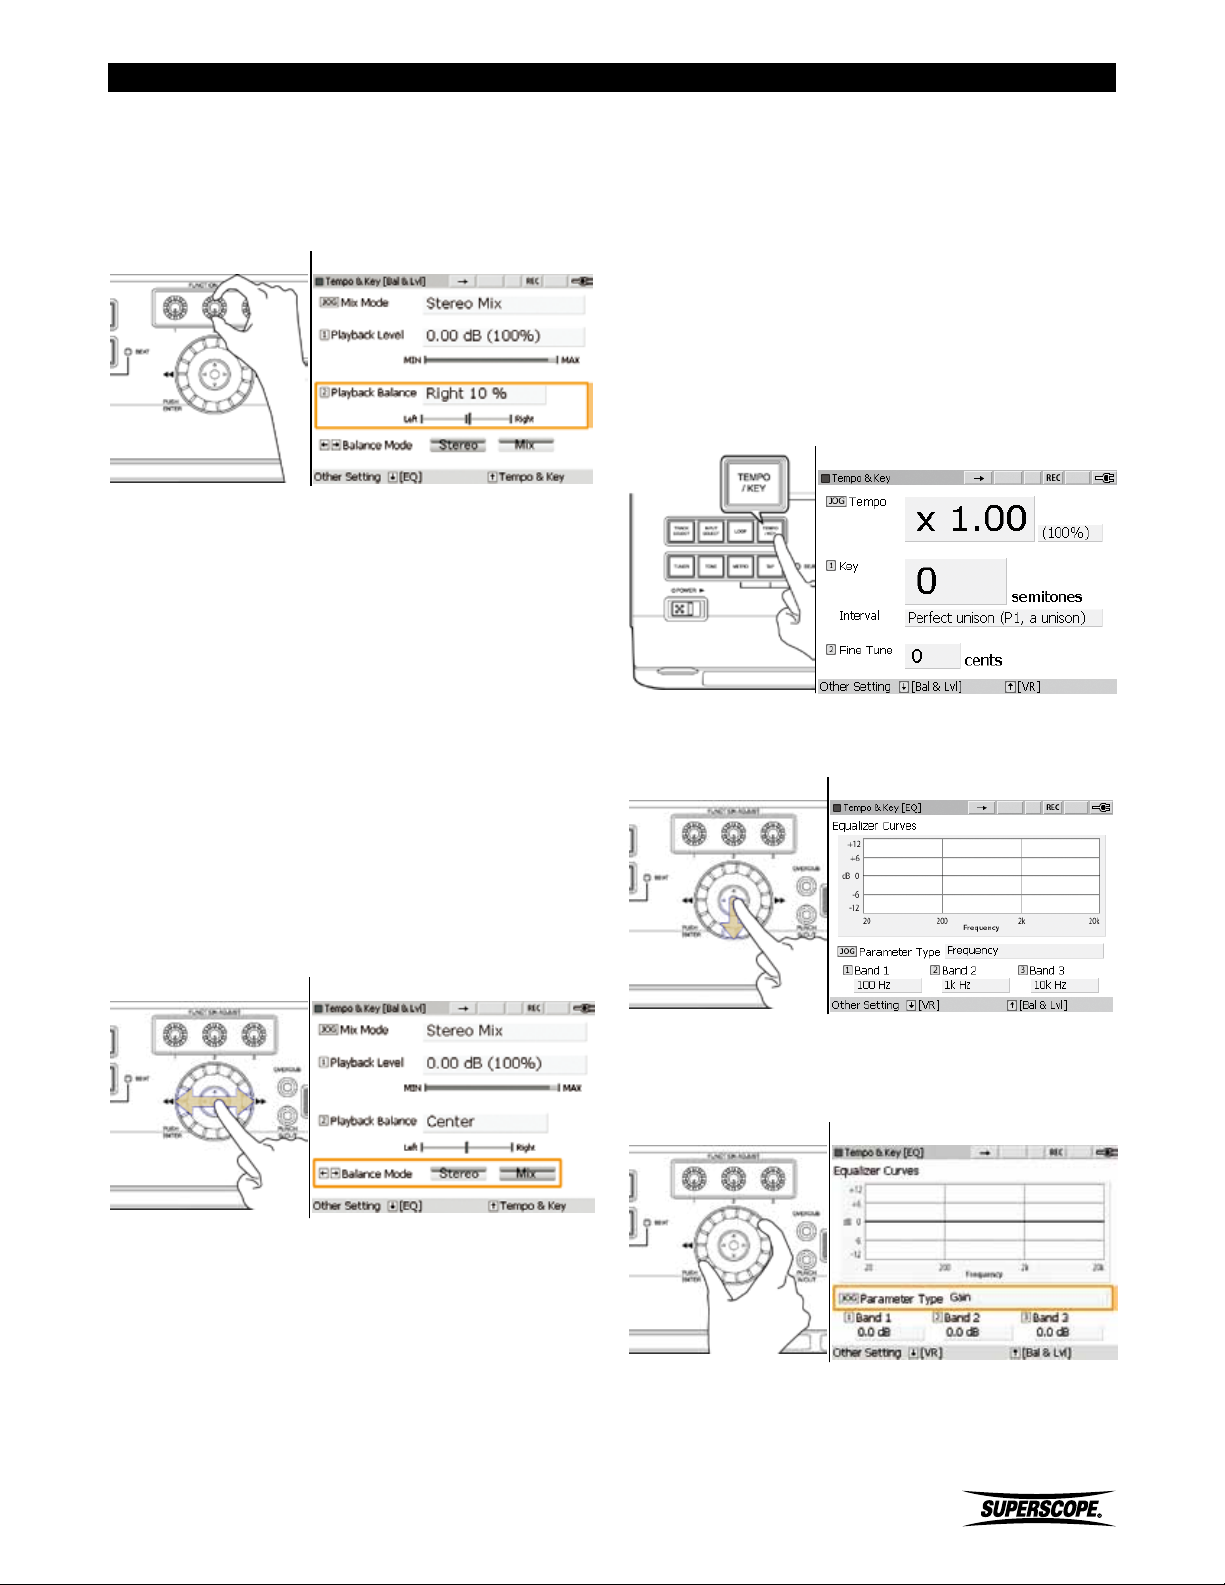
Recording
5. Playback Balance. Playback Balance can be adjusted
in 1% increments between Left 100% ~ Center ~
Right 100% by turning FUNCTION ADJUST #2 (4B).
The default setting is Center. For a description of
Playback Balance behavior, see Balance Mode below.
Tempo and Key [Balance and Level] Screen
6. Balance Mode. In normal operation (Stereo),
a Playback Balance setting of Left 100% will
completely mute the Right channel. Likewise, a
Playback Balance setting of Right 100% will mute
the Left channel.
When transcribing an instrument that is solidly in one
channel (Right or Left), it can be useful to move the
desired audio into both channels, rather than muting
the opposing channel, i.e., silencing one speaker or
one side of a pair of headphones.
Equalizer Settings
The PSD400 series offers two independent 3-band
parametric equalizers (EQ); one equalizer affects input
signals (microphones, instruments, etc.) while the other
equalizer affects file playback. Follow these steps to
adjust the playback equalizer (Note: When you exit this
screen, all settings will be stored with the selected file):
Playback Equalizer
1. Press the TEMPO/KEY button to open the Tempo/
Key screen.
Tempo and Key Screen
2. Press the joystick down two times to open the
Tempo & Key [EQ] screen.
This Balance Mode is referred to as Mix. In Balance
Mode: Mix, a Playback Balance setting of Left 100%
will place the Left channel content in both the
Left and Right output channels (both sides of your
headphones/ L&R speakers) Move the joystick left or
right to select Stereo or Mix. The default setting is
Stereo.
Tempo and Key [Balance and Level] Screen
Tempo and Key [EQ] Screen
3. Parameter Type: Turn the jog wheel to select
the parameter to be adjusted: Frequency, Gain, or
Bandwidth.
Tempo and Key [EQ] Screen
Superscope PSD430 / PSD450 User Manual
- 83 -
Page 84
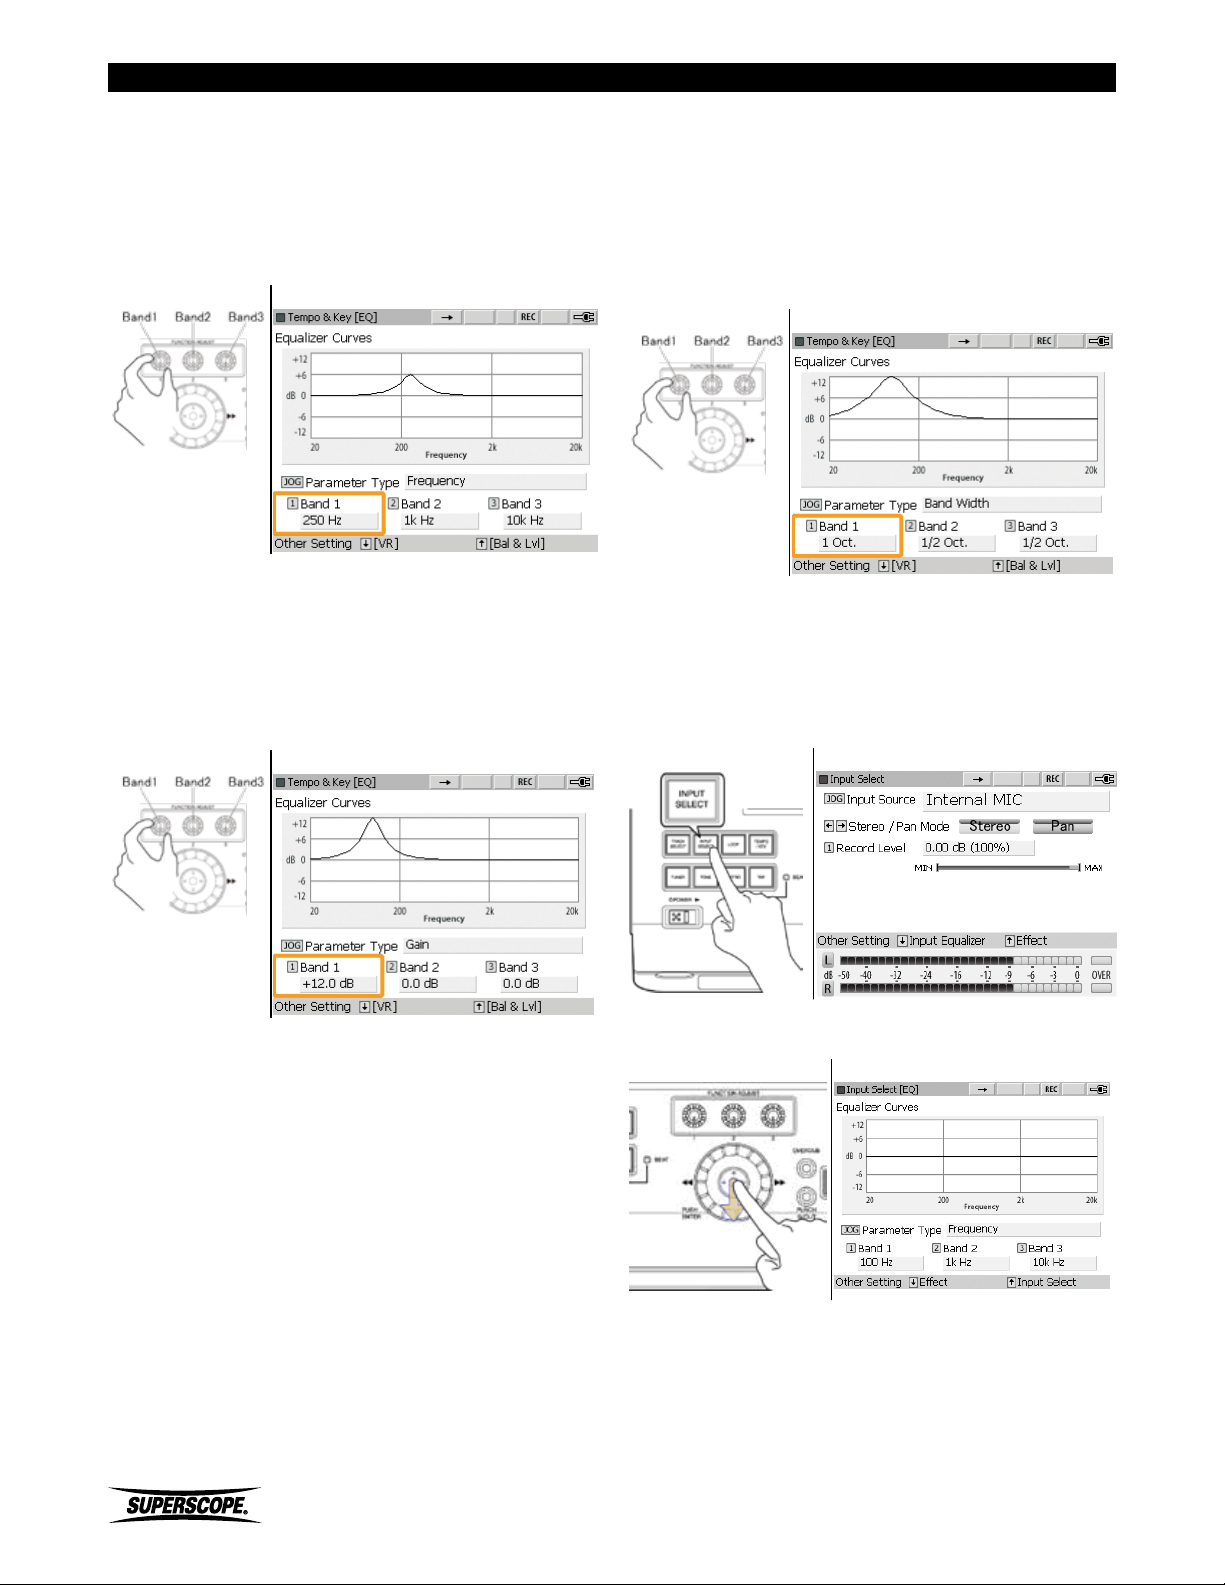
Recording
Frequency
When Parameter Type is set for Frequency, turn the
FUNCTION ADJUST controller to select any frequency
between 20Hz and 20kHz for each band. Pressing the
FUNCTION ADJUST knobs will return all settings to
default values.
Tempo and Key [EQ] Screen
Gain
When Parameter Type is set for Gain, turn the FUNCTION
ADJUST controller to determine the gain for each Band.
Gain can be adjusted +/- 12dB. Pressing the FUNCTION
ADJUST knobs will return all settings to default values.
Tempo and Key [EQ] Screen
Bandwidth
When Parameter Type is set for Bandwidth, turn the
FUNCTION ADJUST controller to set the bandwidth for
each band. Turn right to widen the frequency band.
Turn left to narrow the frequency band. Pressing the
FUNCTION ADJUST knobs will return all settings to
default values.
Tempo and Key [EQ] Screen
Input Equalizer
Follow these steps to adjust the input equalizer:
1. Press the INPUT SELECT button to open the Input
Select screen.
Input Select Screen
2. Press the joystick down one time to open the Input
3. Repeat the remaining steps under Equalizer Settings:
- 84 -
Select [EQ] screen.
Input Select [EQ] Screen
Playback Equalizer.
Superscope PSD430 / PSD450 User Manual
Page 85
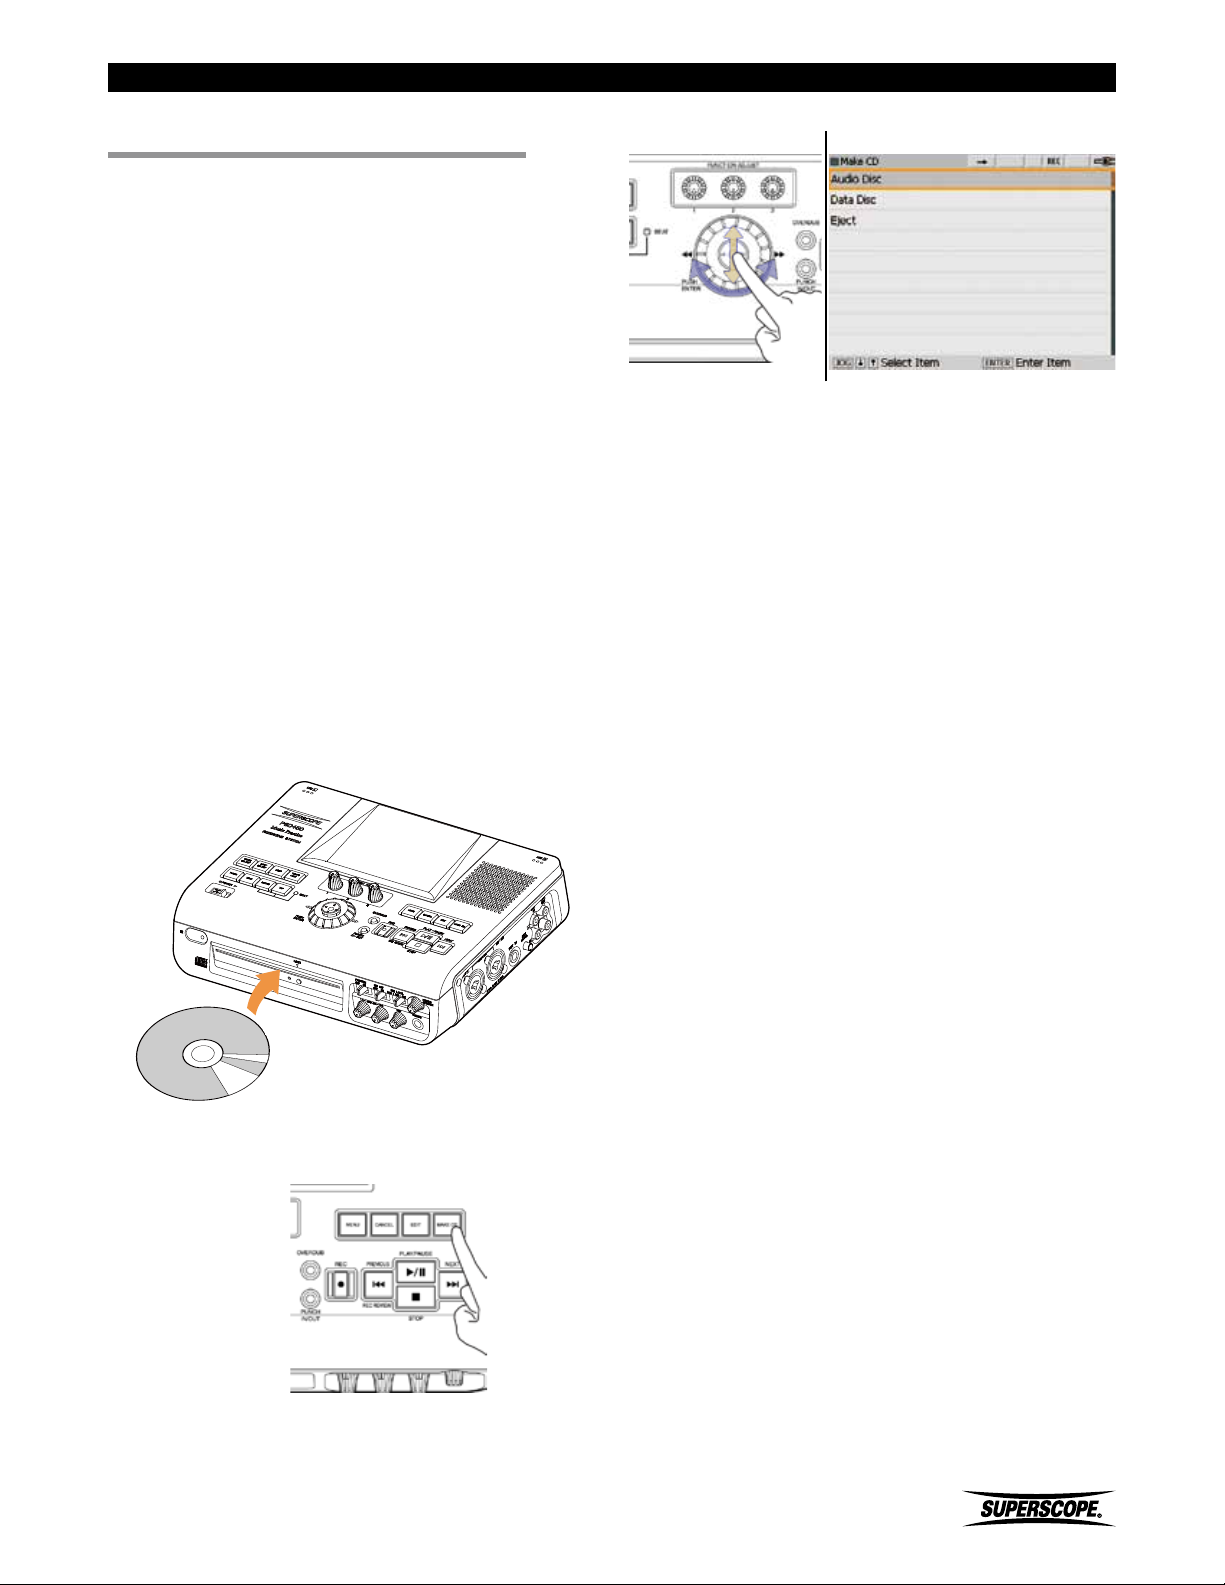
Recording
■CD Burning
Creating an Audio CD
Follow these steps to create an audio CD using WAV
or MP3 files stored on an SD card, USB storage, or the
internal Hard Drive (PSD450 only).
※ The PSD430 will automatically allocate 800
MB of space on the SD card for temporary
CD burning files. If the PSD430 detects less
than 800MB remaining on the SD card, no
space will be allocated. If you prefer to free
this space for additional recordings, change
the ‘Allocate Temporary Space’ setting
to [Disable] (see System Settings). If no
temporary space is allocated it may not be
possible to to burn certain MP3 and 24-bit
WAV files to CD.
※ When creating an audio CD using MP3 or 24-
bit WAV files stored on a USB device, the SD
card must also be inserted in order to store
temporary CD burning files.
Make CD Screen
1. Insert a blank or unfinalized CD-R/RW into the
CD-R/RW drive.
2. Press the MAKE CD button.
3. Turn the jog wheel or move the joystick up or down
to highlight Audio Disc. Press ENTER.
Superscope PSD430 / PSD450 User Manual
- 85 -
Page 86
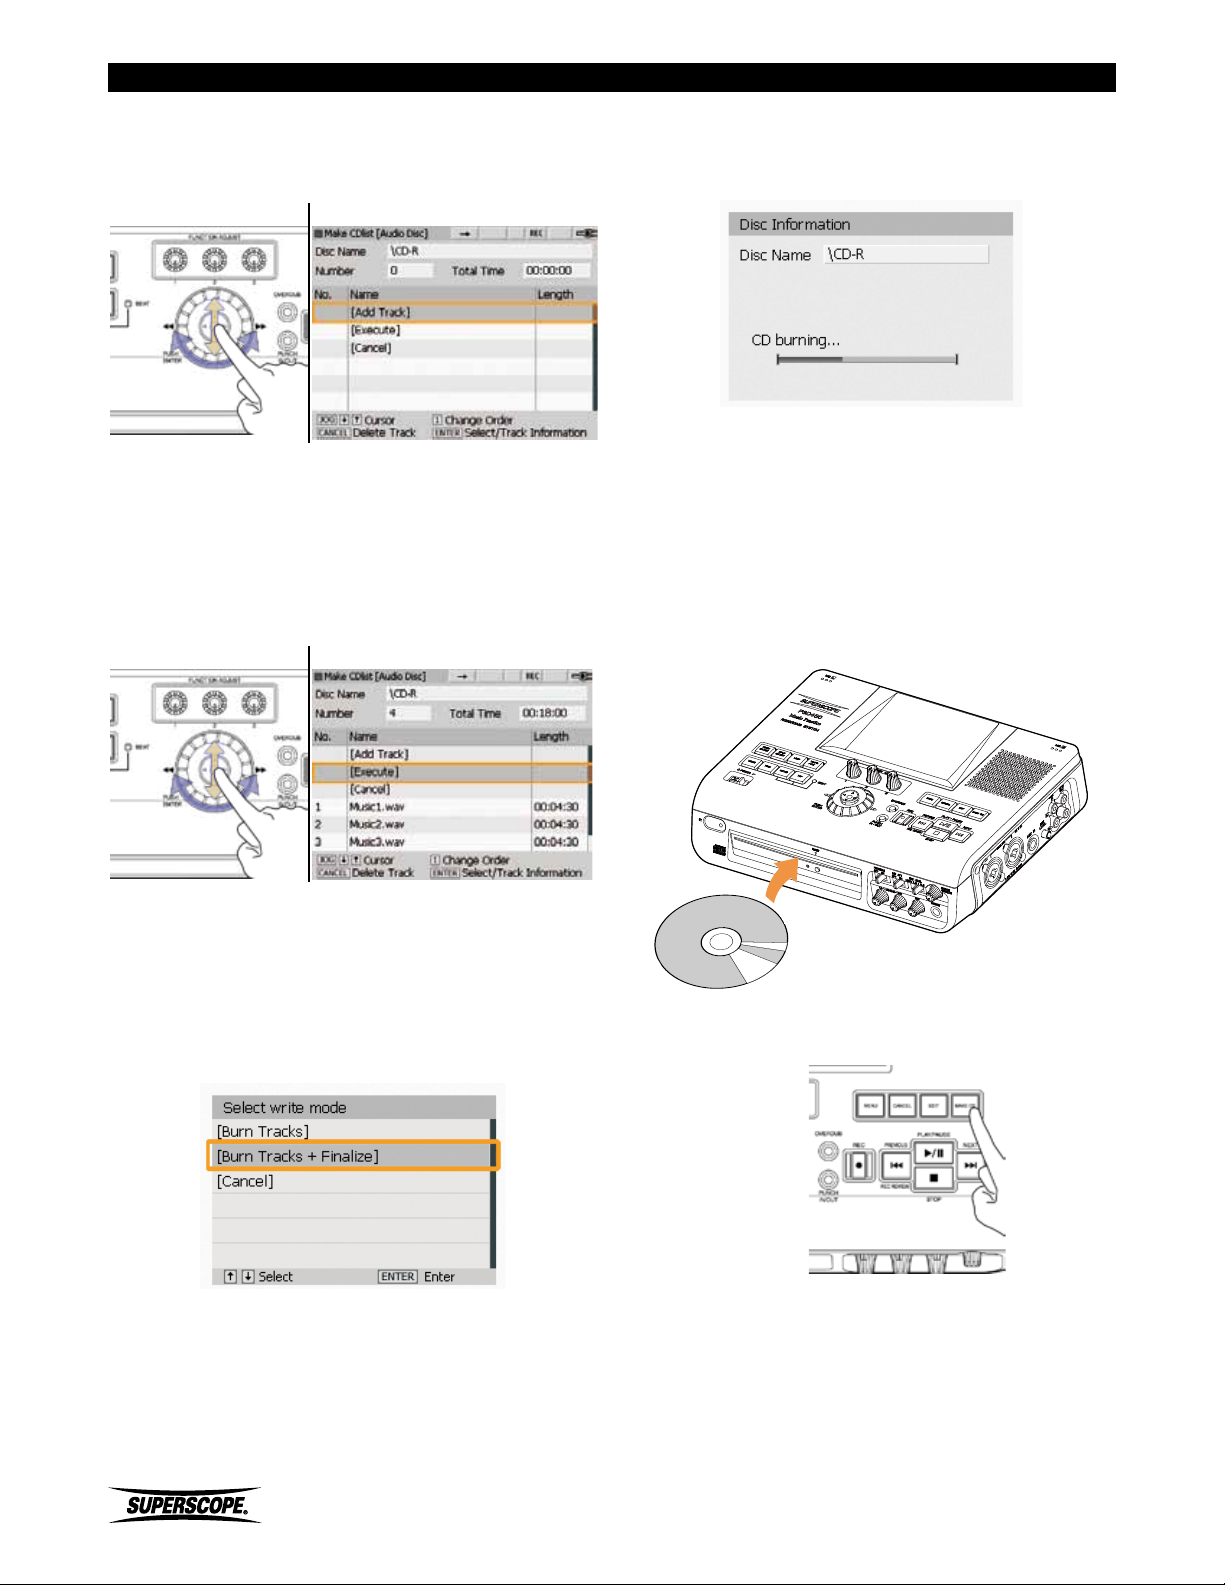
Recording
4. The Make CD List [Audio Disc] screen will appear.
Turn the jog wheel or move the joystick up or down
to highlight [Add Track]. Press ENTER.
Make CD List [Audio Disc] Scrren
5. Use the Track Select method to select a track. Push
ENTER to add the track to the CD list.
6. When you have finished adding tracks, use the jog
wheel or joy stick to select [Execute] on the Make
CD List [Audio Disc] screen. Press ENTER.
Make CD List [Audio Disc] Screen
8. When burning is finished, the CD will be ejected
automatically.
CD Burning Progress Screen
Finalizing a CD
The finalization process writes the table of contents
(TOC) to a compact disc, making the CD readable in
standard CD players. Follow these instructions to finalize
an audio CD:
1. Insert an unfinalized CD-R/RW into the CD-R/RW
drive.
7. Select Write Mode - If you wish to add more
tracks or finalize at a later time, select [Burn Tracks].
If you wish to create a finalized disc that is playable
in other CD players, select [Burn Tracks + Finalize].
Press ENTER.
Select write mode Screen
2. Press the Make CD button.
- 86 -
Superscope PSD430 / PSD450 User Manual
Page 87
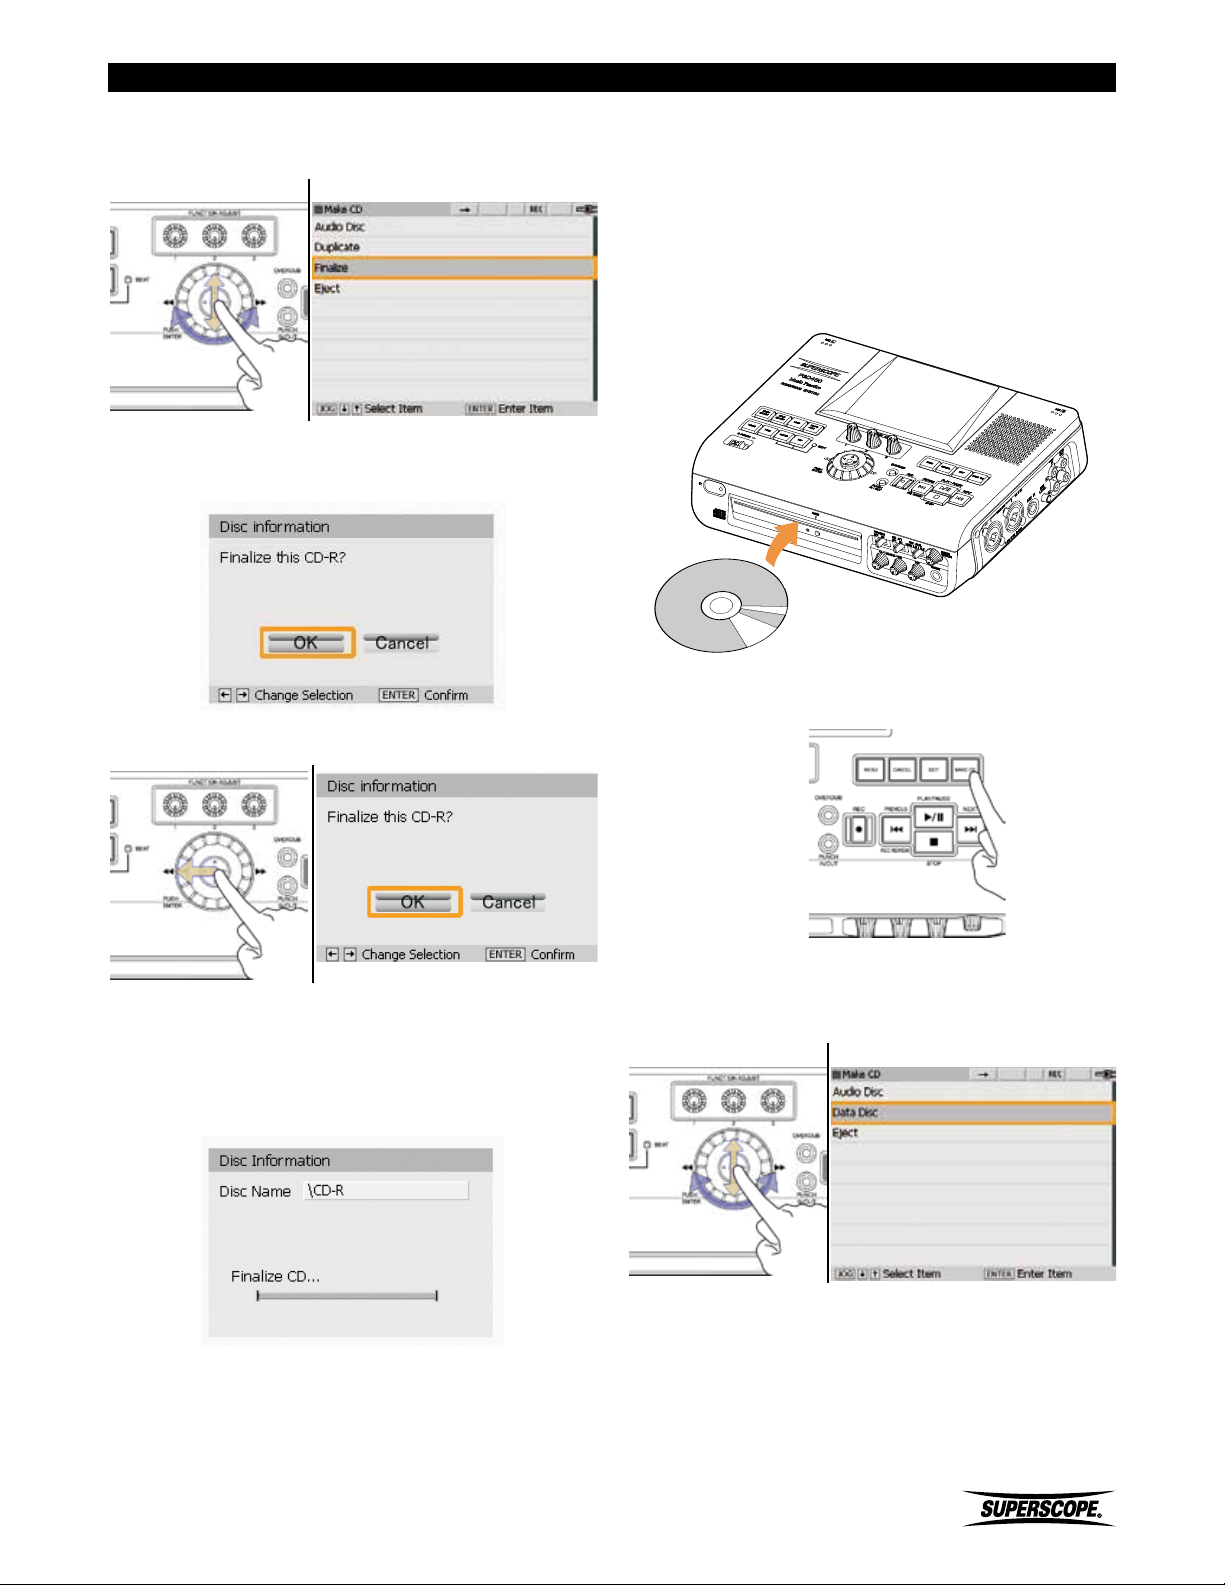
Recording
3. Turn the jog wheel or move the joystick up or down
to highlight Finalize. Press ENTER.
Make CD Screen
4. The following screen will appear:
Creating a Data CD
Follow these instructions to store WAV or MP3 files on
CD media. Data CDs will not play on standard CD audio
players. Use data CDs to transfer WAV or MP3 files
(recorded on the PSD430 or PSD450) to a computer.
1. Insert a blank CD-R/RW into the CD-R/RW drive.
5. Move the joystick left to select OK. Press ENTER.
6. When finalization is complete, status will return to
the Main Screen.
When you select OK, the following screen will
appear:
FINALIZE Progress Screen
2. Press the MAKE CD button.
3. Turn the jog wheel or move the joystick up or down
to highlight Data Disc. Press ENTER.
Make CD Screen
Superscope PSD430 / PSD450 User Manual
- 87 -
Page 88
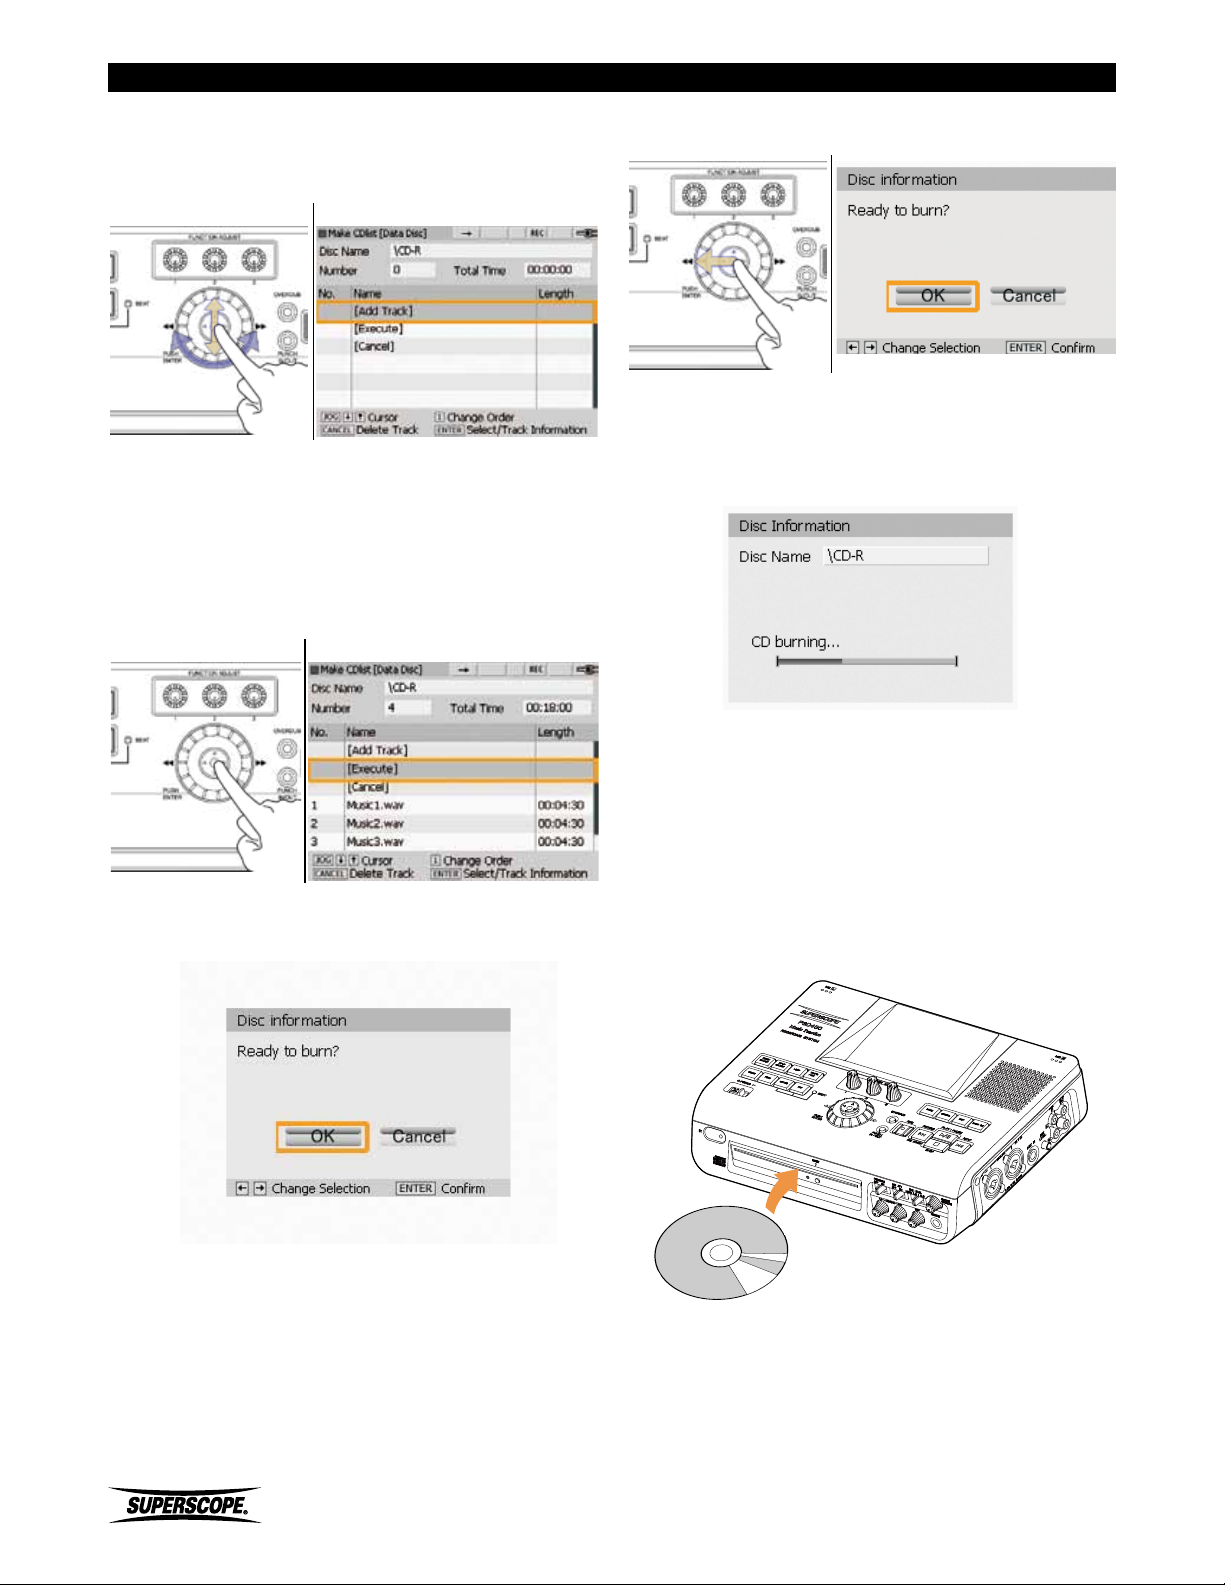
Recording
4. The Make CD List [Data Disc] screen will appear. Turn
the jog wheel or move the joystick up or down to
highlight [Add Track]. Press ENTER.
Make CD List [Data Disc] Screen
5. Use the Track Select Method to select a track. Push
ENTER to add the track to the CD list.
6. When you have finished adding tracks, use the jog
wheel or joystick to select [Execute] on the Make CD
List [Data Disc] screen. Press ENTER.
Make CD List [Data Disc] Screen
8. Move the joystick left to select OK. Press ENTER.
9. When burning is finished, the CD will be ejected
automatically.
CD Burning Progress Screen
7. The following screen will appear:
CD Duplication
Any audio or data CD can be copied by using the
Duplicate feature. Follow these instructions to copy the
contents of a CD to the PSD450’s HDD or the PSD430’s
SD card and then to a blank CD-R/RW:
1. Insert the CD to be duplicated into the CD-R/RW
drive.
- 88 -
Superscope PSD430 / PSD450 User Manual
Page 89
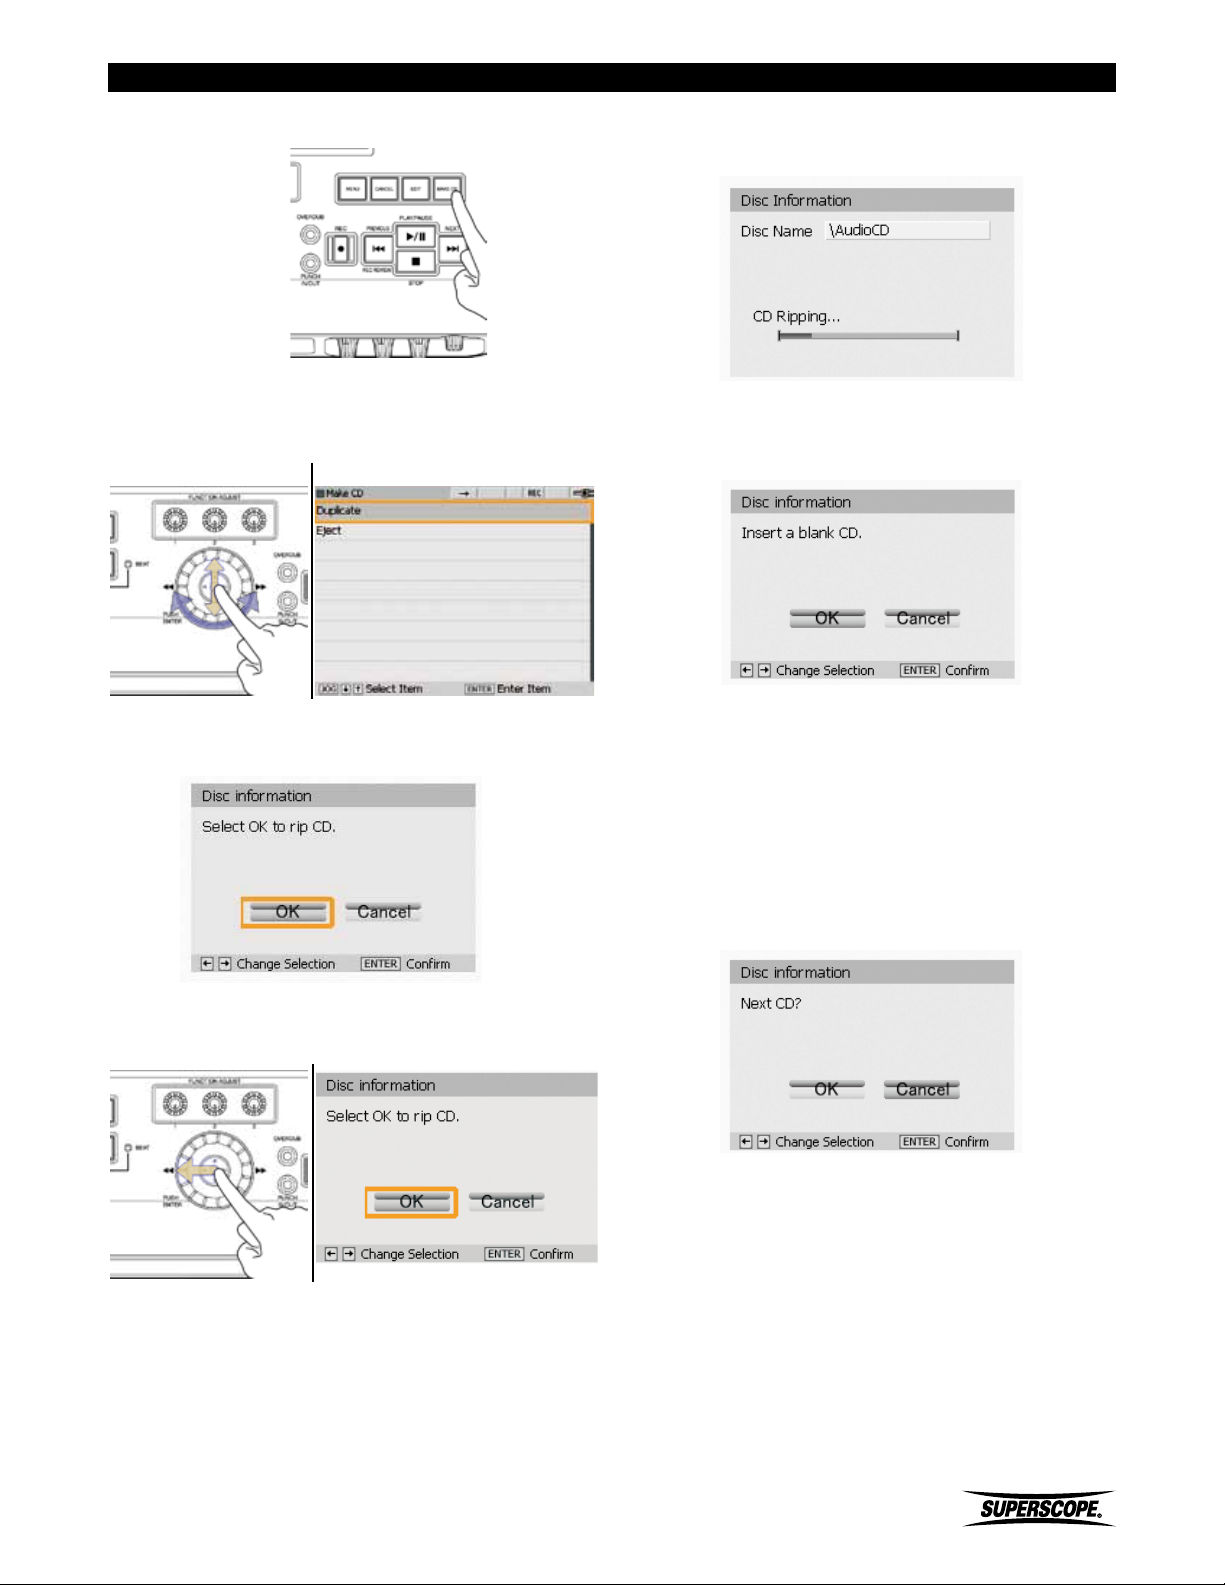
Recording
2. Press the MAKE CD button.
3. Turn the jog wheel or move the joystick up or down
to highlight Duplicate. Press ENTER.
Make CD Screen
6. When ripping is finished, the CD will be ejected
automatically.
7. When CD ripping is complete, the following screen
will appear:
4. The following screen will appear:
5. Move the joystick left to select OK. Press ENTER.
8. Insert a blank CD. When a blank CD is detected, the
recorder will begin burning the ripped WAV files to
CD.
※ If a finalized CD-RW is detected, you will be
prompted to erase the disc before burning.
9. When burning is finished, the CD will be ejected
automatically. The following screen will appear:
10. To make another copy, insert a blank CD and
burning will begin automatically. To end duplication,
select Cancel.
Superscope PSD430 / PSD450 User Manual
- 89 -
Page 90
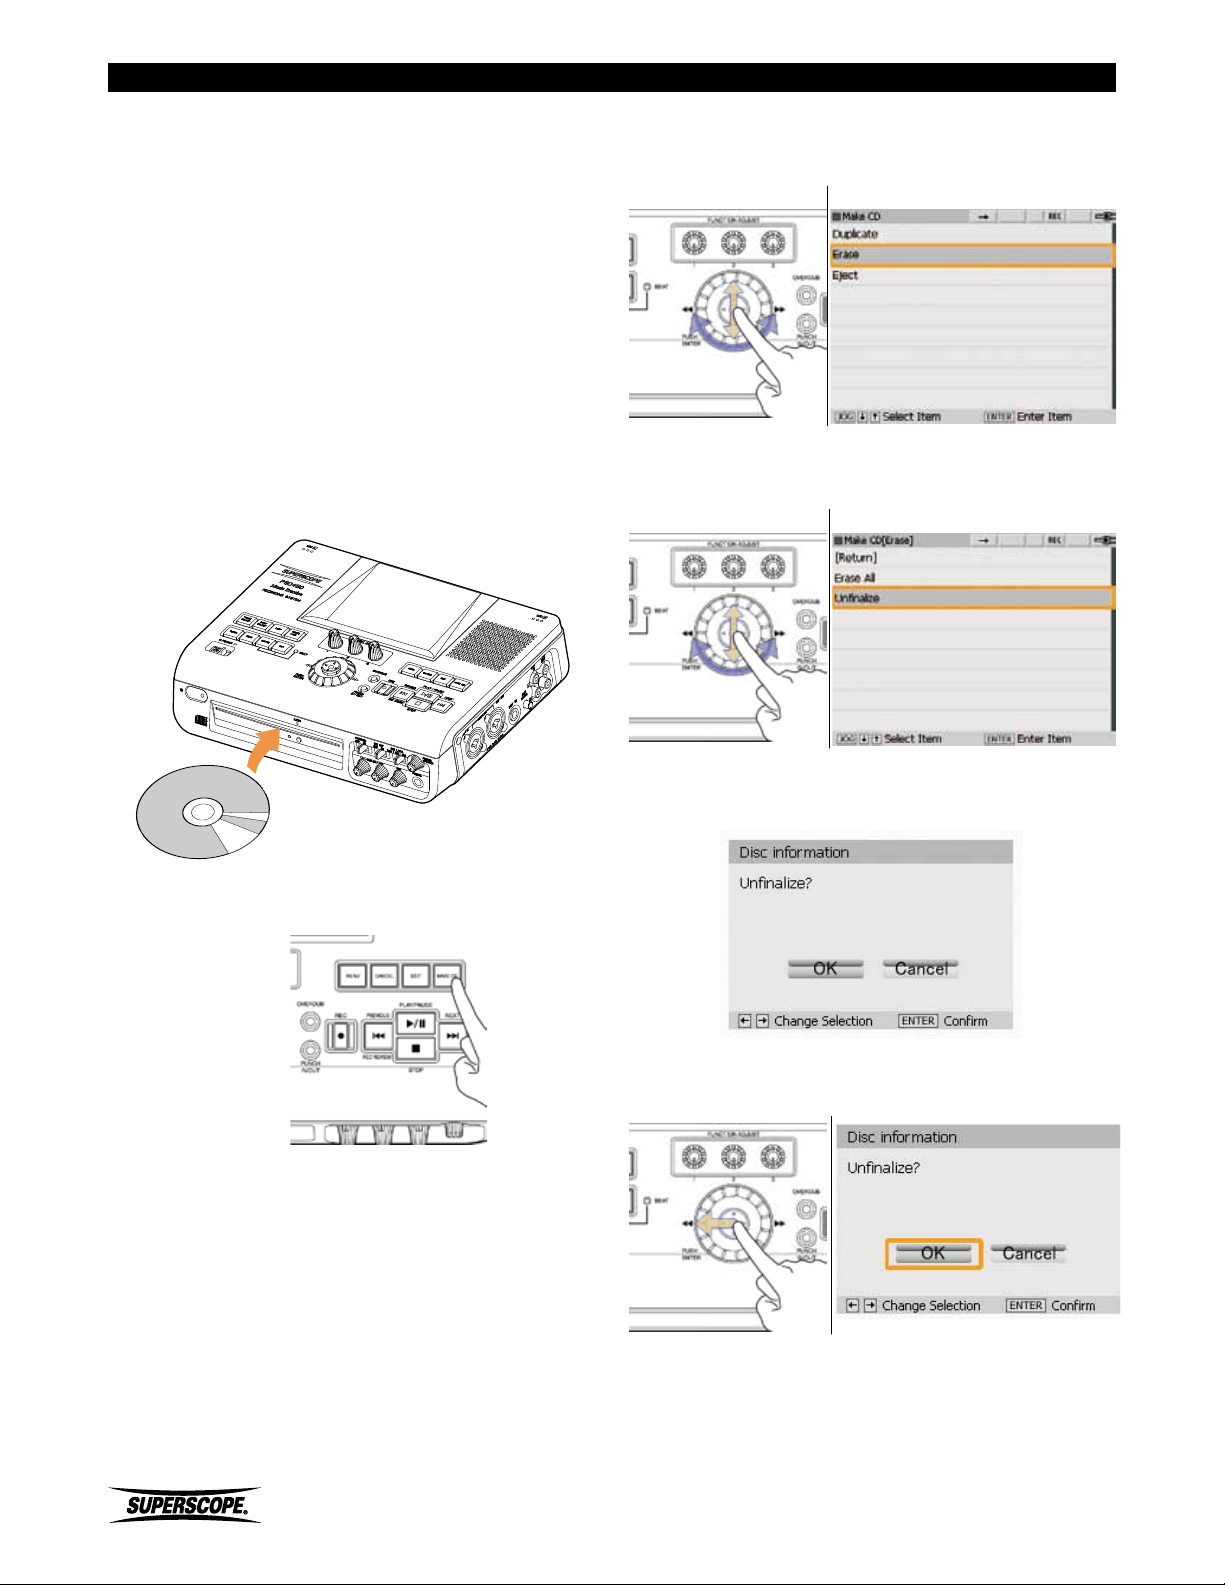
Recording
Erasing a CD-RW
When a CD-RW with audio tracks is detected in the
CD-R/RW drive, three additional options will appear in
the Make CD menu: Unfinalize (finalized CD-RW only),
Erase Last, and Erase All.
※ It is not possible to erase or unfinalize a CD-R
disc.
Unfinalize
To add more tracks to a finalized CD-RW, the disc must
be unfinalized first. Follow these instructions to unfinalize
a CD-RW:
1. Insert a finalized CD-RW into the CD-R/RW drive.
3. Turn the jog wheel or move the joystick up or down
to highlight Erase. Press ENTER.
Make CD Screen
4. Turn the jog wheel or move the joystick up or down
to highlight Unfinalize. Press ENTER.
Make CD [Erase] Screen
2. Press the MAKE CD button.
5. The following screen will appear:
6. Move the joystick left to select OK. Press ENTER.
- 90 -
Superscope PSD430 / PSD450 User Manual
Page 91
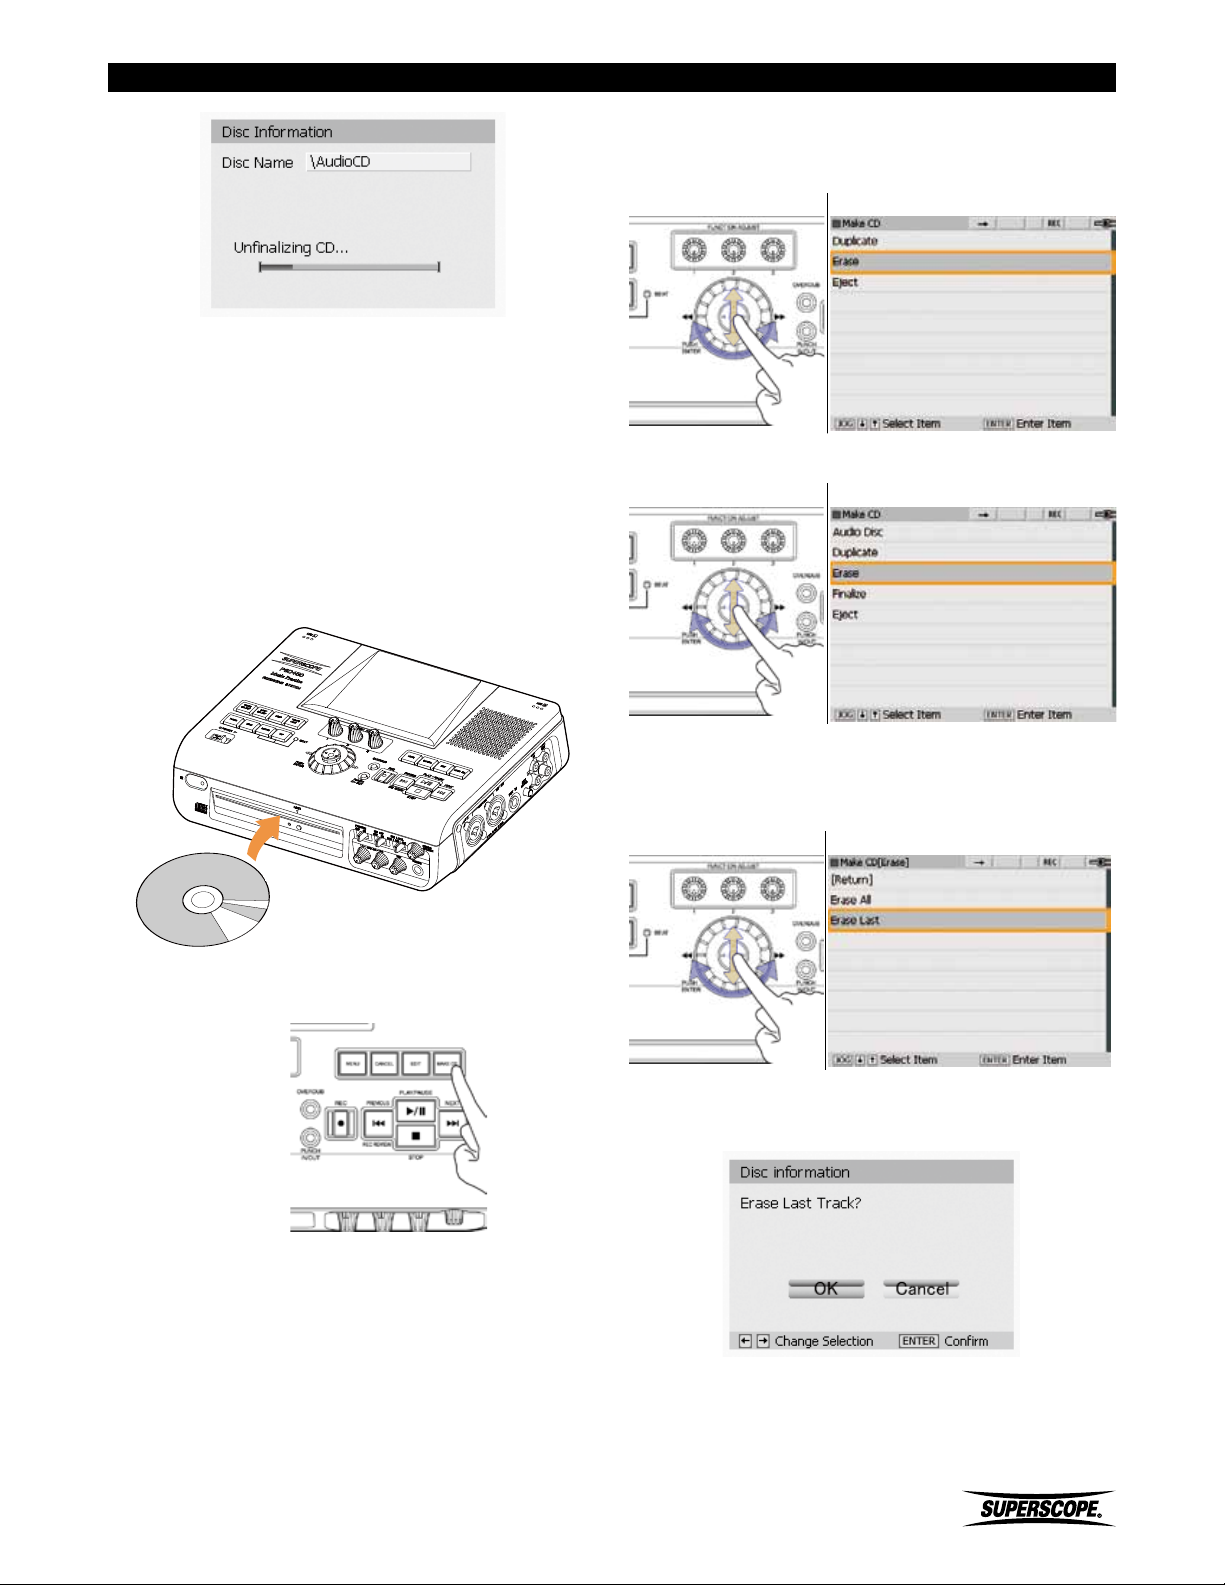
Recording
7. When Unfinalize is complete, status will return to the
Make CD menu.
Erase Last
Follow these instructions to erase the last track on a
CD-RW audio disc. The Erase Last option will not appear
when a data disc is detected.
1. Insert a CD-RW with audio tracks into the CD-R/RW
drive.
3. Turn the jog wheel or move the joystick up or down
to highlight Erase. Press ENTER.
Finalized CD-RW Menu
Make CD Screen
Unfinalized CD-RW Menu
Make CD Screen
2. Press the MAKE CD button.
4. Turn the jog wheel or move the joystick up or down
to highlight Erase Last. Press ENTER.
Make CD [Erase] Screen
5. The following screen will appear:
Superscope PSD430 / PSD450 User Manual
- 91 -
Page 92
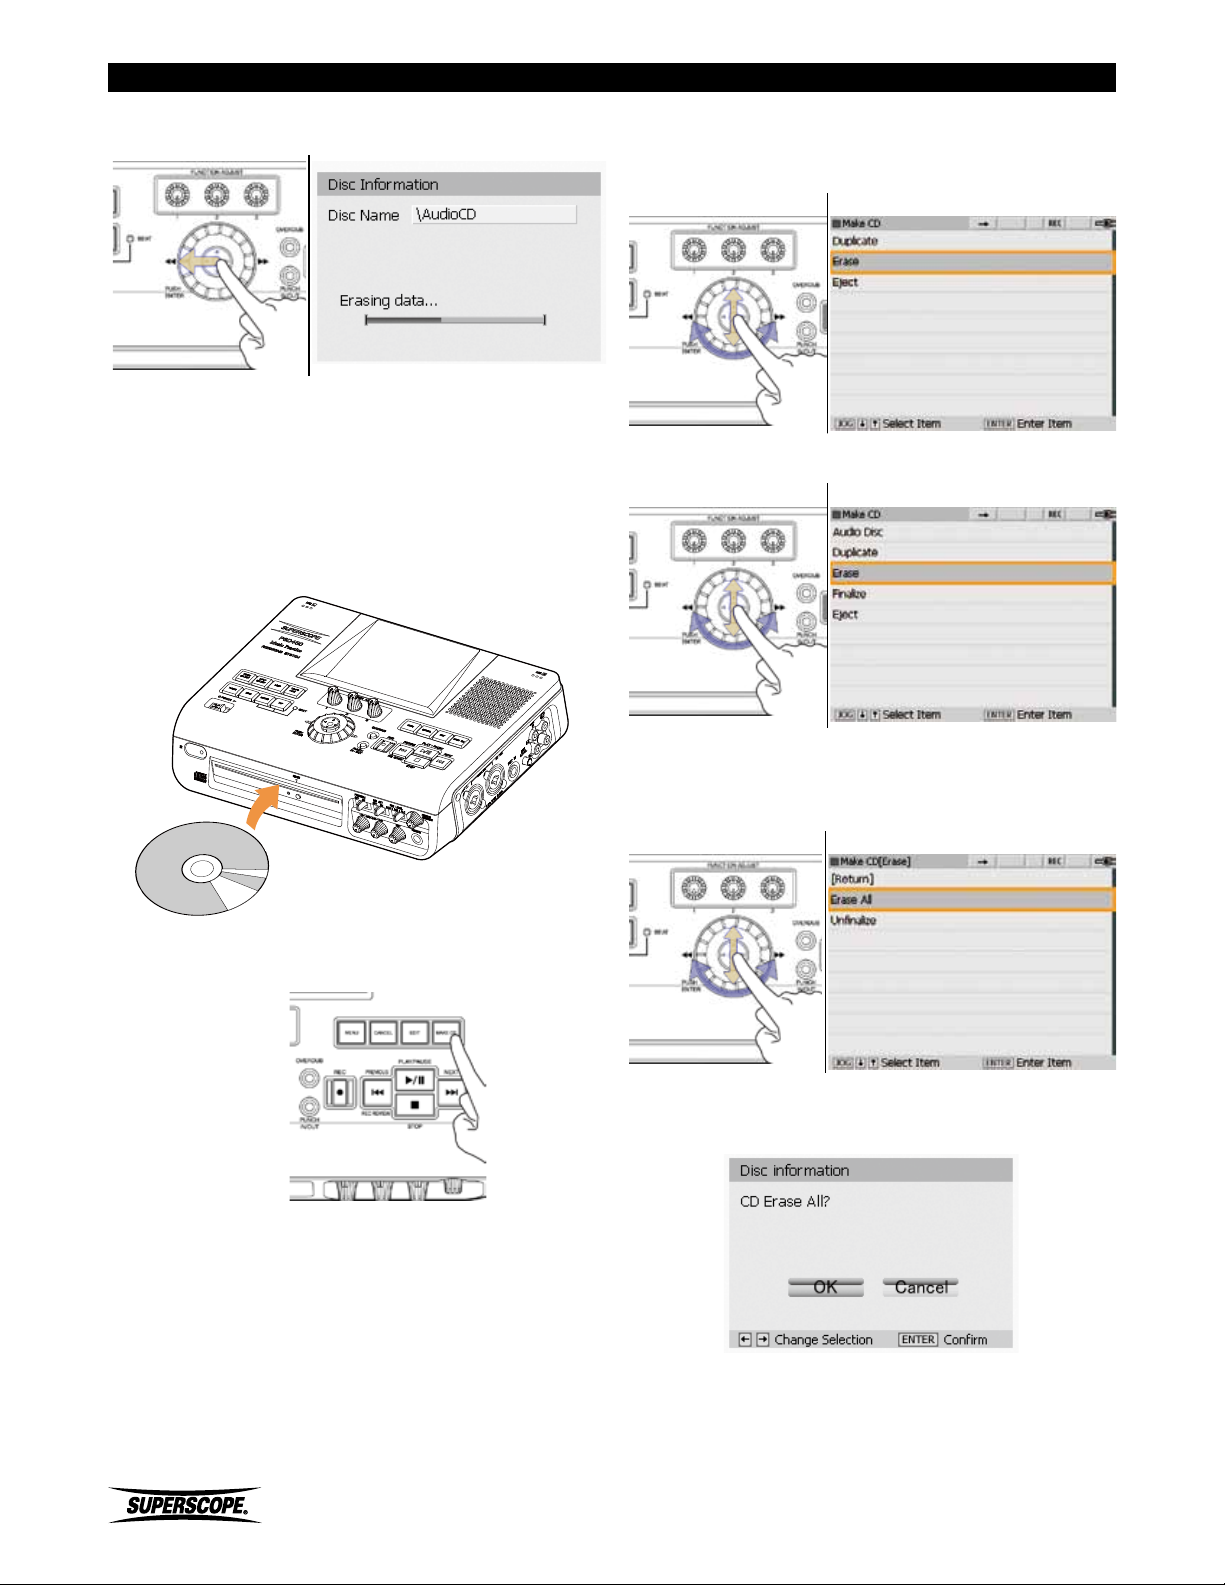
Recording
6. Move the joystick left to select OK. Press ENTER.
Erase All
Follow these instructions to erase the contents of a CDRW audio or data disc:
1. Insert a CD-RW with audio tracks into the CD-R/RW
drive.
3. Turn the jog wheel or move the joystick up or down
to highlight Erase. Press ENTER.
Finalized CD-RW Menu
Make CD Screen
Unfinalized CD-RW Menu
Make CD Screen
2. Press the Make CD button.
4. Turn the jog wheel or move the joystick up or down
to highlight Erase All. Press ENTER.
Make CD [Erase] Screen
5. The following screen will appear:
- 92 -
Superscope PSD430 / PSD450 User Manual
Page 93
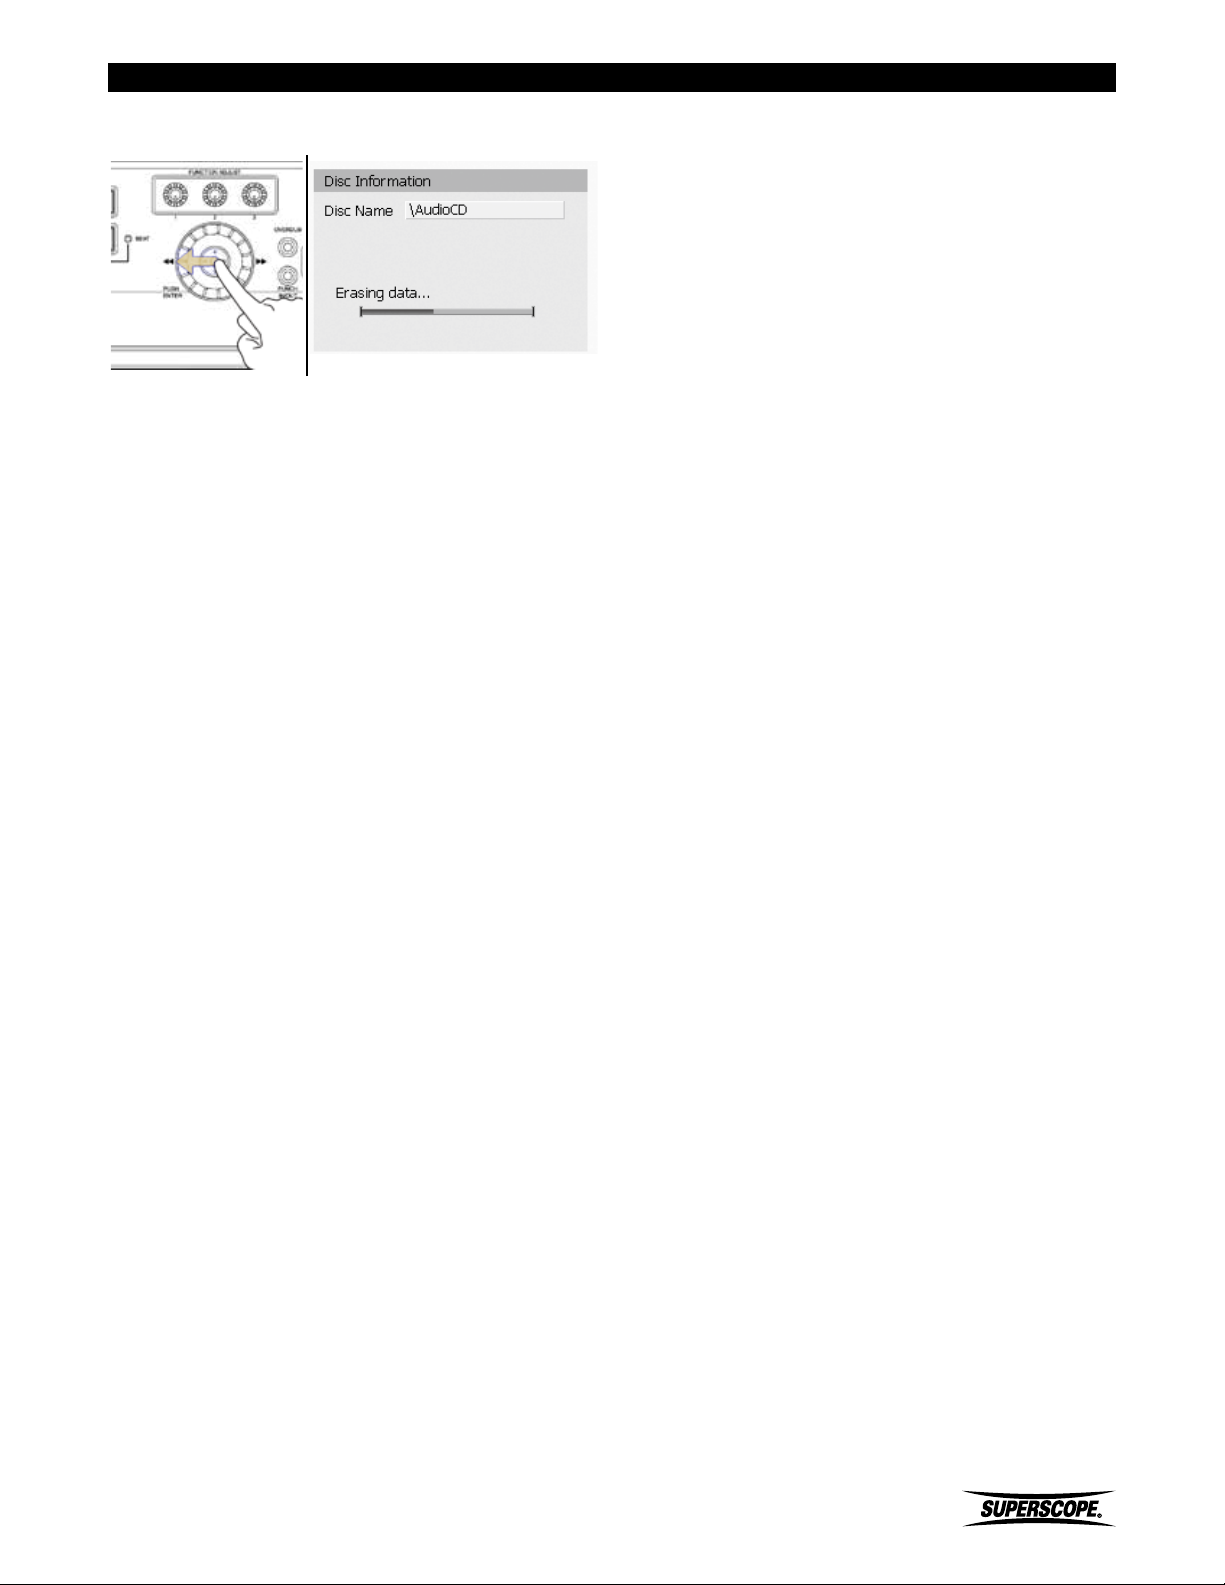
6. Move the joystick left to select OK. Press ENTER.
Recording
Superscope PSD430 / PSD450 User Manual
- 93 -
Page 94
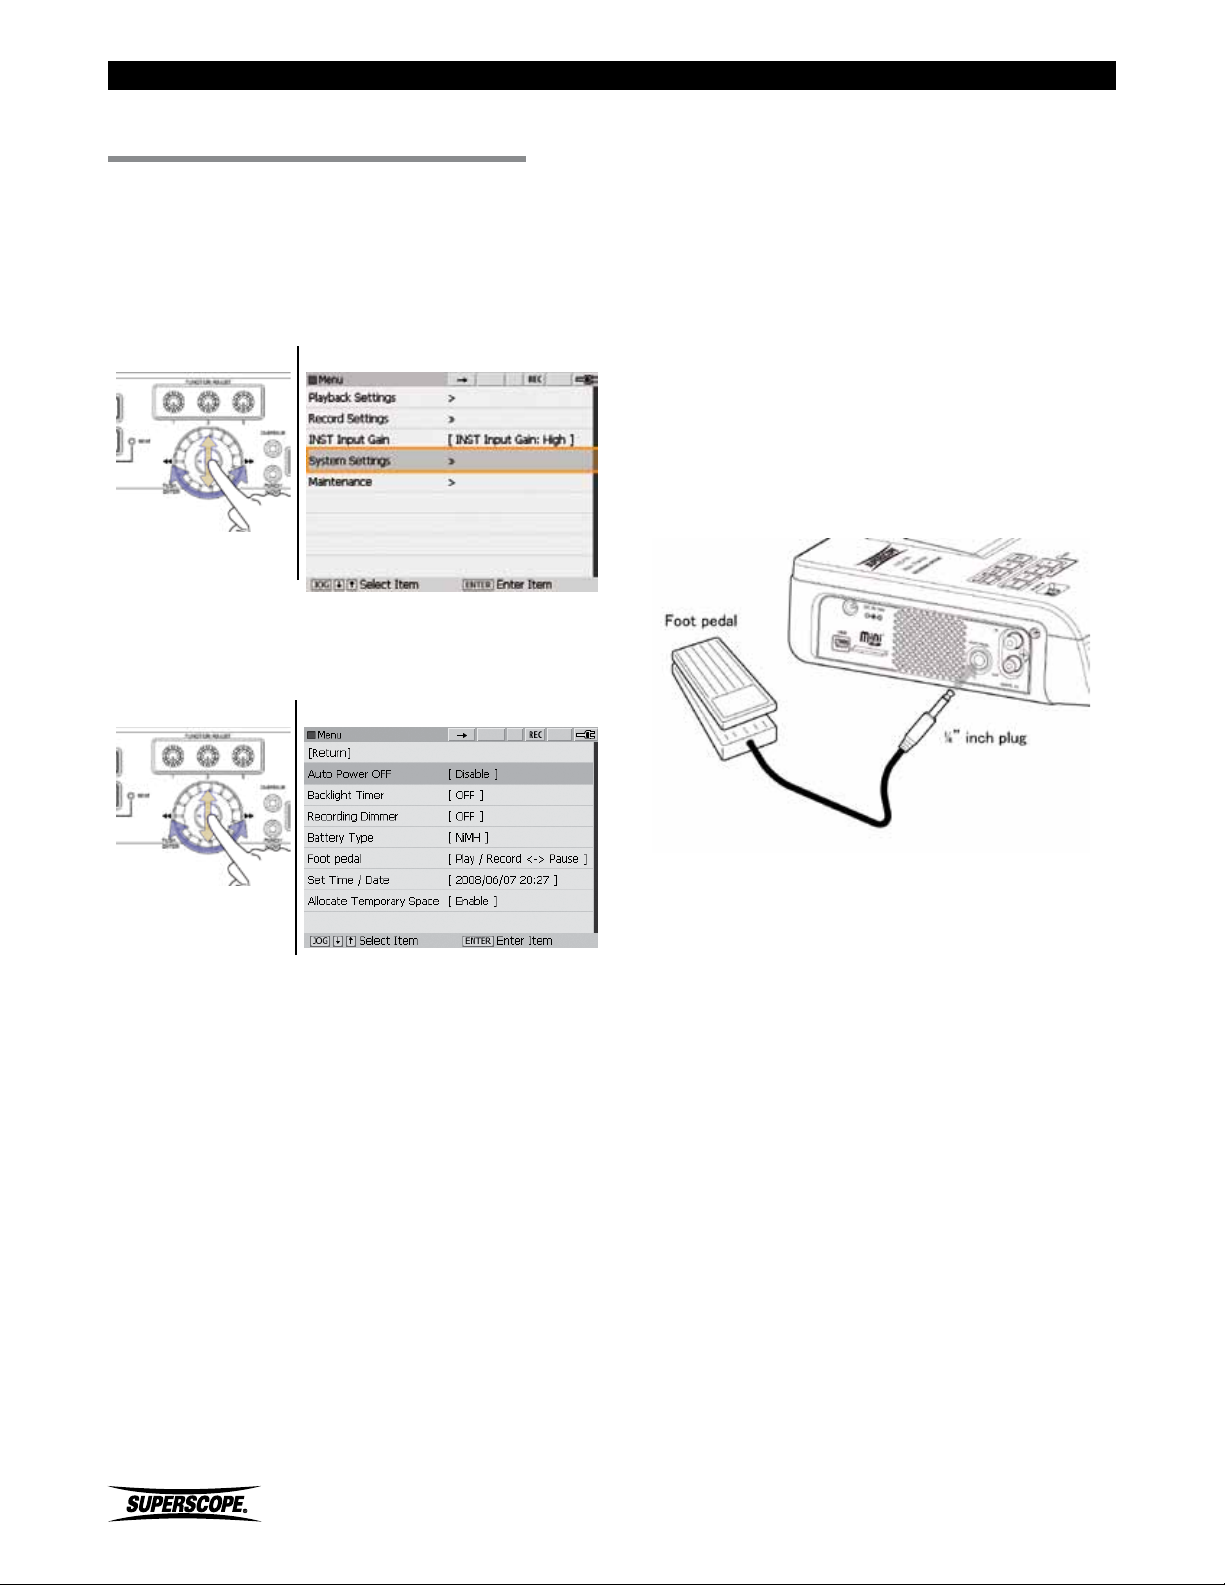
System Settings
System Settings
■
Follow these steps to adjust System Settings:
1. Press the MENU button to display the menu screen.
2. Turn the jog wheel or move the joystick up or down
to highlight System Settings. Press ENTER.
Menu Screen
3. From the System Settings menu, turn the jog wheel
or move the joystick up or down to highlight a menu
setting. Press ENTER.
Recording Dimmer
When this feature is OFF (default setting), the LCD
backlight will not dim during recording regardless of the
Backlight Timer setting. This will save power by allowing
the backlight to dim during recording.
Battery Type
Setting Battery Type allows for greater accuracy with
the battery life gauge. Available options include alkaline
batteries (default setting) and nickel metal hydride
(NiMH).
Foot Pedal
An optional foot pedal can be connected to the Foot
Pedal input on the Left panel.
Menu Screen
4. Turn the jog wheel to change settings. Press ENTER.
Auto Power Off
Turn this feature on to conserve power when the
recorder is not in use. When Auto Power OFF is enabled,
the recorder will power off automatically after 15
minutes of inactivity. This includes the use of all top
panel buttons and knobs, and the remote control. This
feature is disabled during recording and playback. The
default setting is [Disable].
Backlight Timer
This feature saves power by automatically dimming the
LCD backlight after a period of inactivity. This includes
the use of all top panel buttons and knobs, and the
remote control. Settings include OFF, 2 seconds, 5
seconds, 10 seconds, and 20 seconds.
The default setting is OFF.
- 94 -
Superscope PSD430 / PSD450 User Manual
Page 95
System Settings
The following table describes the functions of the foot
pedal:
Foot Pedal Setting Performance
During playback, press the
foot pedal to toggle between
Play and Pause mode.
Play/REC <->Pause
Play<->Recall
The default setting is "Play/REC <->Pause.”
During Recording, press the
foot pedal to toggle between
Record and Record Pause
mode.
During playback, press the
foot pedal once to mark a
recall point.
When the foot pedal is
pressed a second time,
playback will return to the
recall point.
Set Time / Date
See Setting Date and Time.
ATA Device
For maximum battery life and minimal noise during
recording, record to an SD Card and temporarily disable
your hard drive (PSD450 only) and CD drive by selecting
ATA Device [Disable].
When you select ATA Device [Disable], the following
functions will not be available:
1. Direct-to-CD recording.
2. CD playback.
3. Playback / Record to the HDD (PSD450 only).
4. USB communication.
Allocate Temporary Space (PSD430 Only)
Select [Enable] to allocate 800MB of space on the SD
card for temporary CD burning files. If the PSD430
detects less than 800MB remaining on the SD card, no
space will be allocated. If you prefer to free this space for
additional recordings, select [Disable]. If no temporary
space is allocated it may not be possible to to burn
certain MP3 and 24-bit WAV files to CD.
Superscope PSD430 / PSD450 User Manual
- 95 -
Page 96
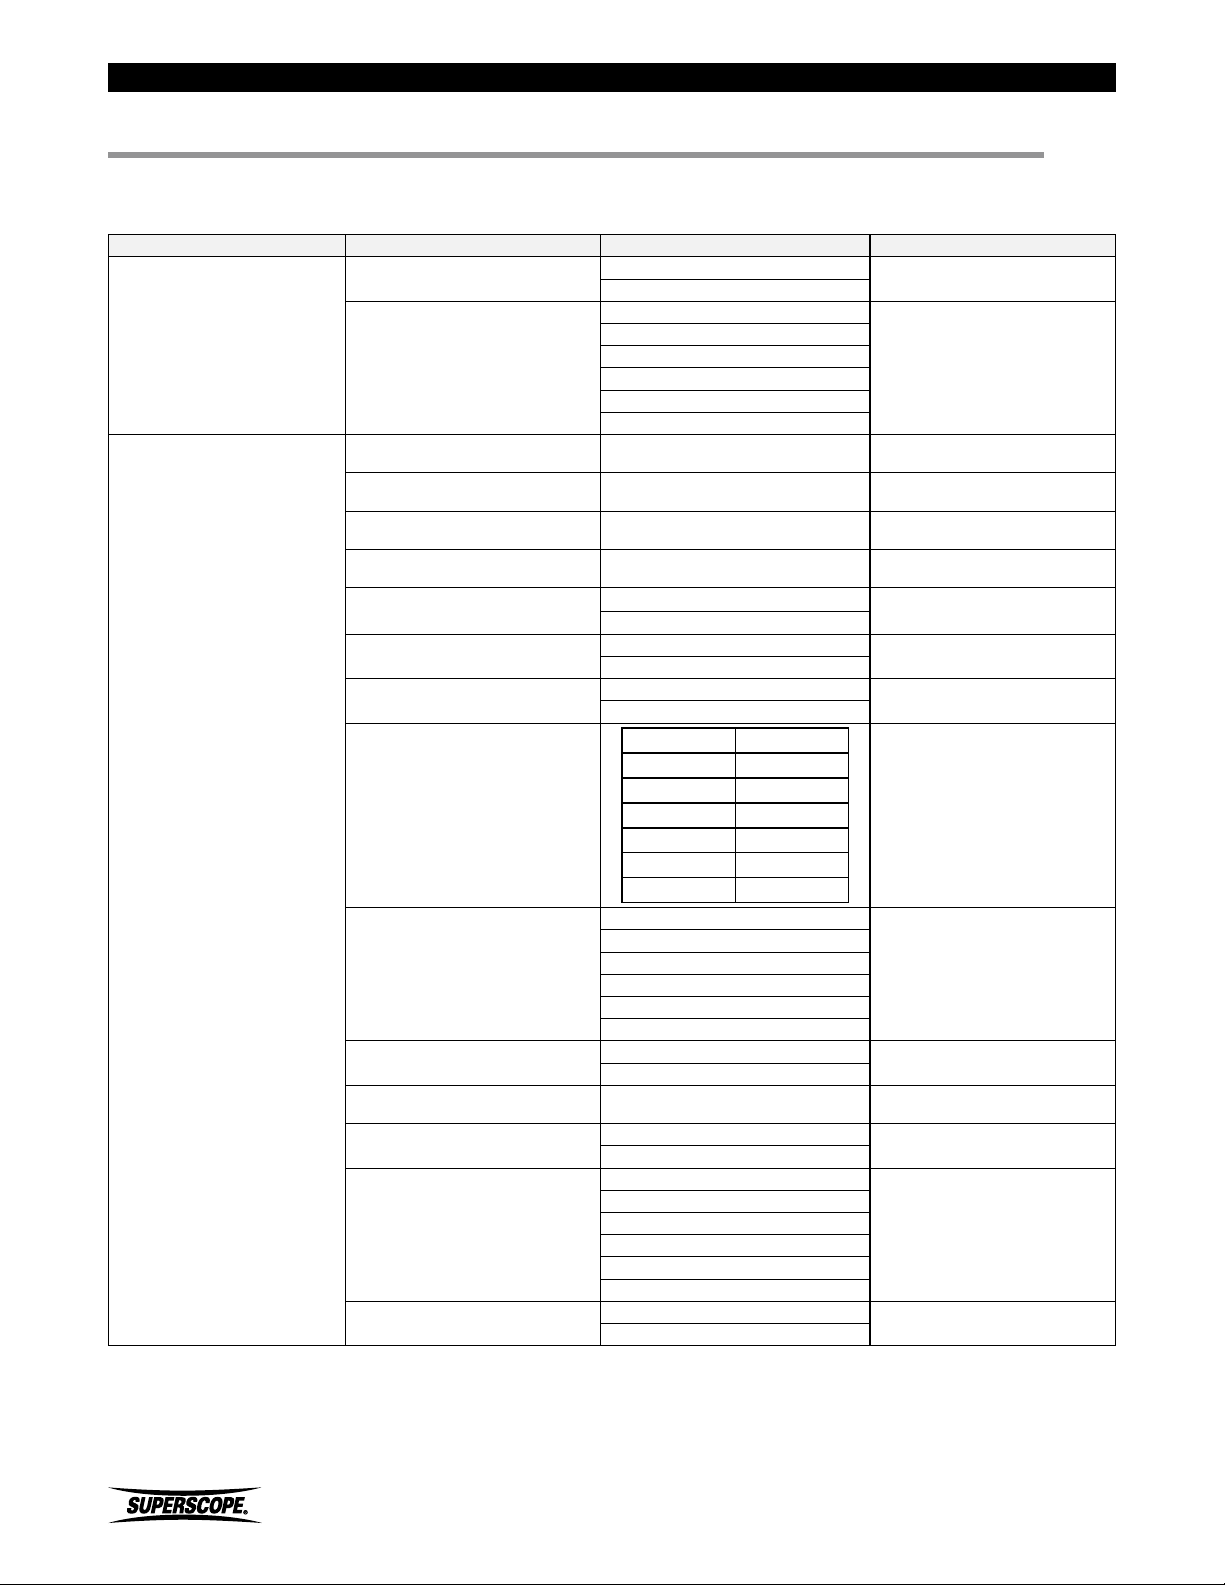
■Appendix
Main Menu (1 of 2)
Sub Menu Menu Item Settings Default Setting
Playback Setting
Record Settings
SD + HDD Recording (PSD450 only)
Monitor Source
Repeat Mode
Pre-Roll Time
Post-Roll Time
Fade-IN Time
Fade-OUT Time
Recording File Format
Recording Channel Number
Recording File Bit Number
Recording File Bit Rate
Auto Track Increment *
One Touch Recording
Count In
Auto Convert
CD Pre-Gap Setting
Appendix
Record Signal
Playback Signal
OFF
All
1
Single, 1
Single, All
Single
OFF, 1 ~ 10sec
(Increment: 1sec)
OFF, 1 ~ 10sec
(Increment: 1sec)
0 ~ 10 sec
(Increment: 1 sec)
0 ~ 10 sec
(Increment: 1 sec)
WAV
MP3
Stereo
Mono
16bit
24bit
32 kbps 112 kbps
40 kbps 128 kbps
48 kbps 160 kbps
56 kbps 192 kbps
64 kbps 224 kbps
80 kbps 256 kbps
96 kbps 320 kbps
OFF
1 min.
5 min.
10 min.
15 min.
30 min.
ON
OFF
OFF, 1 ~ 16beat
Increment: 1beat
ON
OFF
0 Seconds
1 Second
2 Seconds
3 Seconds
4 Seconds
5 Seconds
ON
OFF
Record Signal
OFF
0 sec
0 sec
0 sec
0 sec
WAV
Stereo
16bit
192 kbps
OFF
OFF
OFF
OFF
0 Seconds
OFF
* +/- 2 seconds
- 96 -
Superscope PSD430 / PSD450 User Manual
Page 97
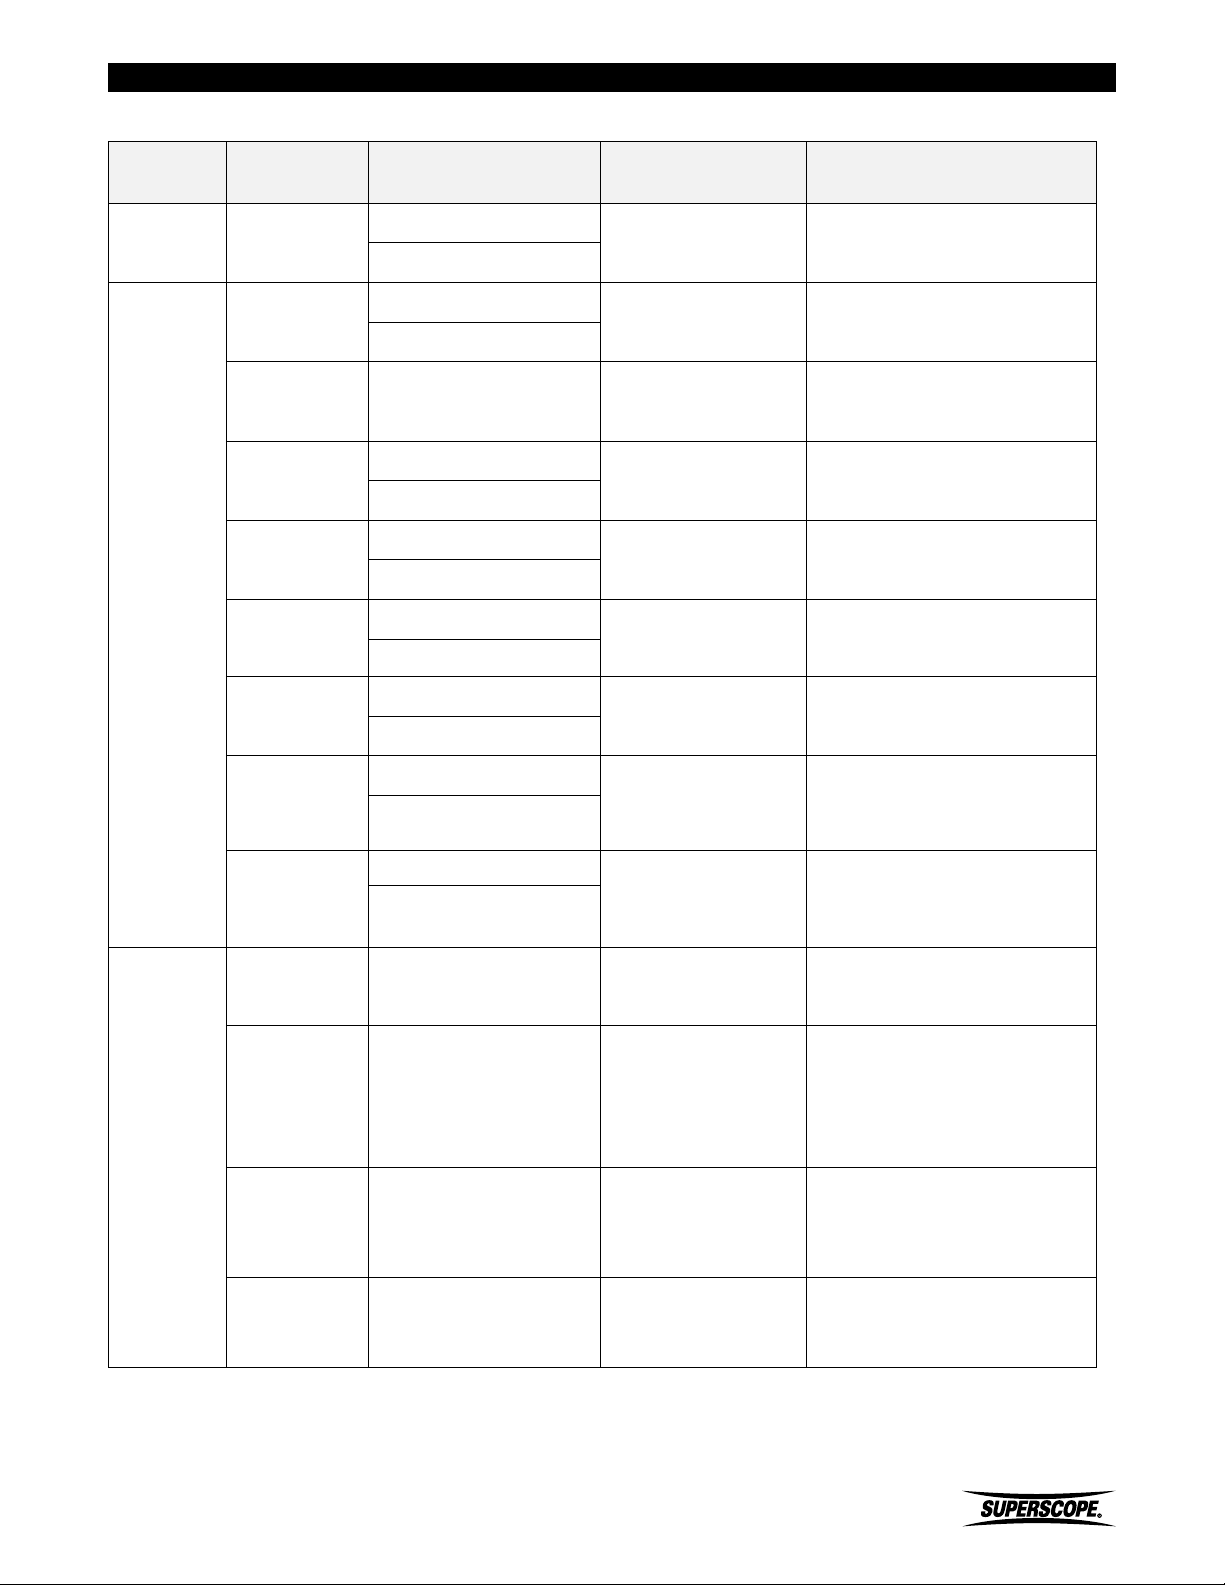
Main Menu (2 of 2)
Appendix
Sub Menu Menu Item Settings
INST Input
Gain Setting
System
Settings
INST Input Gain
Auto Power OFF
Backlight Timer
2sec, 5sec, 10sec, 20sec
Recording Dimmer
Battery Type
Play/Record <-> Pause
Foot Pedal
Set Time/Date
High
Low
Disable
Enable
OFF,
OFF
ON
Alkaline
Ni-MH
Play <-> Recall
Year/Month /Day
Hour:Minute:Second
Default
Setting
High Sets the sensitivity for the INST input.
Disable
OFF
OFF
NI-MH
Play/Record <-> Pause Select Foot Pedal function
-
Powers the unit off after 15 minutes of
no activity.
Dims the LCD backlight after the
selected period of inactivity.
Turn ON to maintain LCD backlight
during recording regardless of
Backlight Timer setting.
For accurate battery gauge read out,
select Battery Type.
Time/Date determines file name for
new recordings. See Setting Date and
Time.
Note
Maintenance
Enable
ATA Device
Allocate Temporary
Space (PSD430
only)
System Information - -
Format SD - -
Format HDD
(PSD450 only)
Restore Defaults - -
Disable
Enable
Disable
- -
Enable
Enable
Temporarily disconnects hard drive
(PSD450 only) and CD-R/CD-RW drive)
to reduce battery consumption..
Allocates 800MB of space on the SD
card for temporary CD burning files.
Displays Model, Software Version,
HDD capacity (PSD450 ony) and SD
capacity.
Select to initialize the SD Card for use
on the PSD430 or PSD450.
※All the data currently on the
SD card will be deleted.
Select to initialize the HDD for use on
the PSD450.
※All the data currently on the
HDD will be deleted.
Returns all menu settings to factory
default values.
Superscope PSD430 / PSD450 User Manual
- 97 -
Page 98
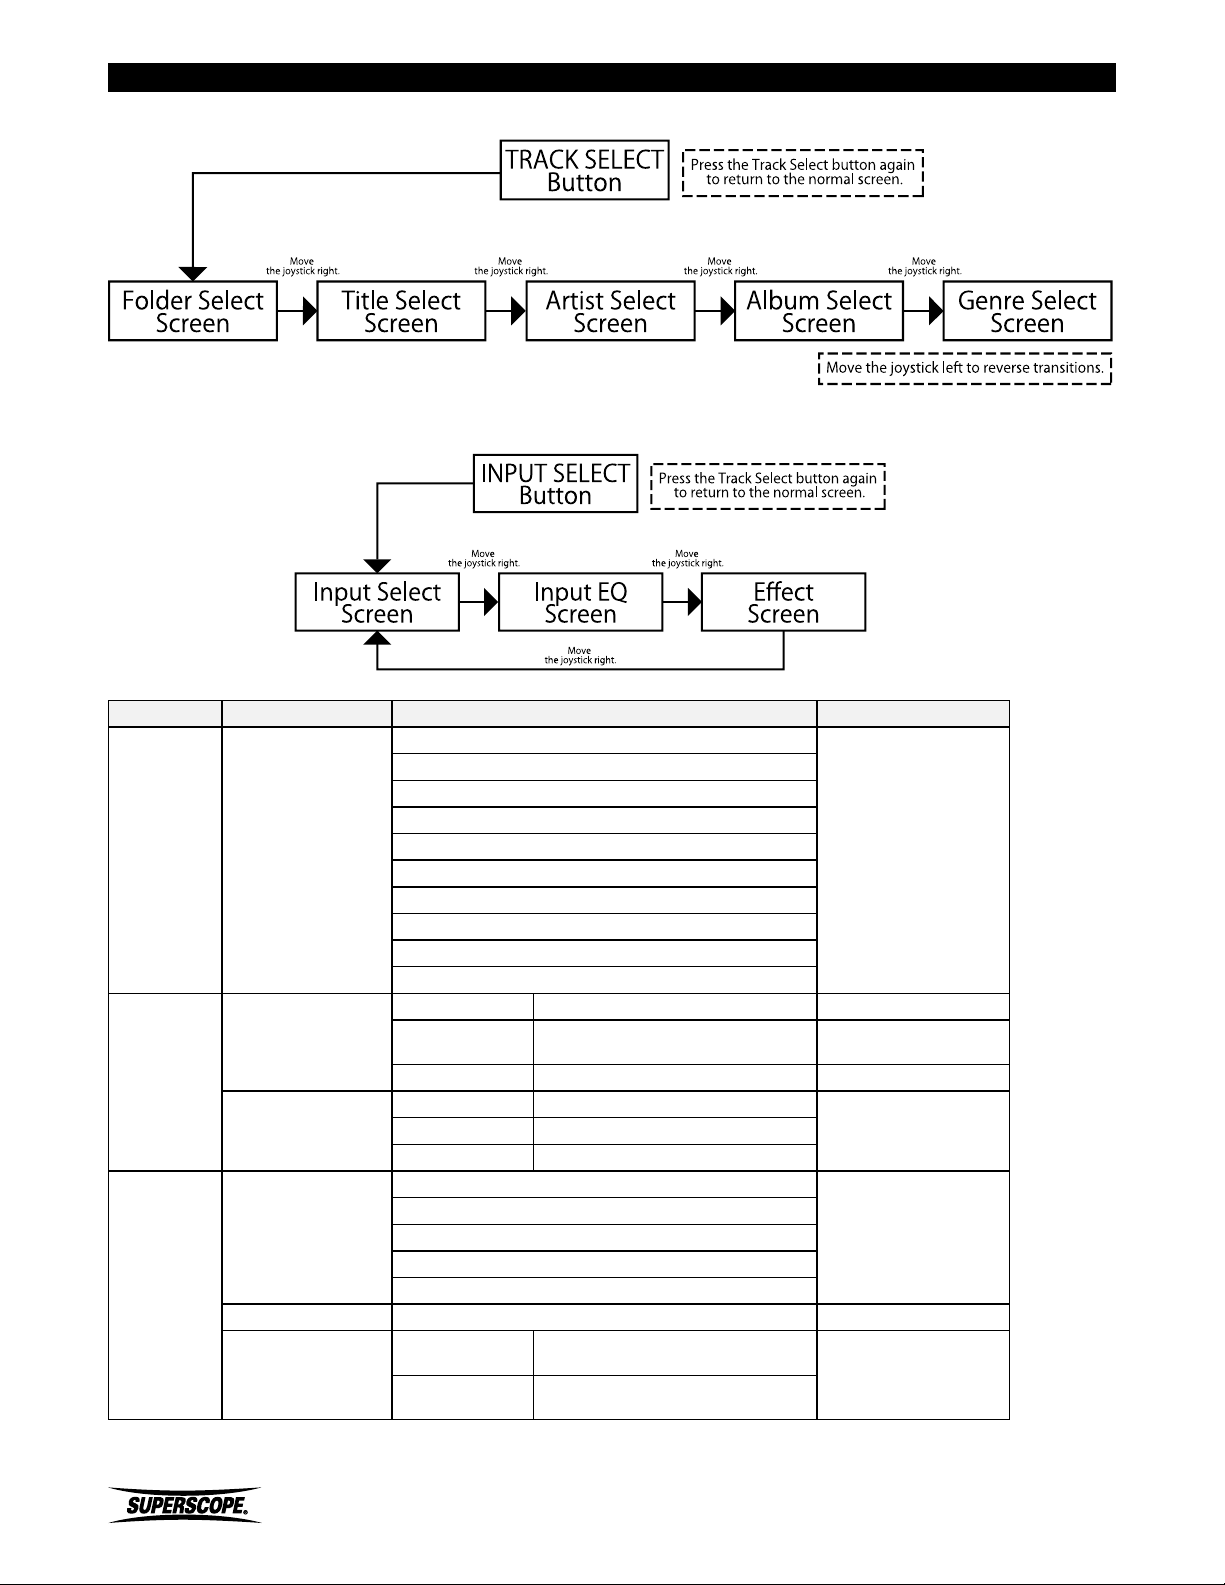
Track Select Mode Transition Diagram
Input Select Mode Transition Diagram
Appendix
Sub Menu Menu Item Settings Default Setting
Input Mute
Internal MIC
External Mic
LINE
Input Select Input Source
Parameter Type
Input EQ
Band
Effect Type
Input Effect
Mix Level [0 ~ 100]% 0%
Delay Setting
INST
Internal Mic (L ch) + INST
External MIC (L ch) + INST
LINE (L ch) + INST
AUX
DIGITAL
Frequency 20Hz ~ 20KHz 100Hz/1KHz/10KHz
Gain
Band Width [1/12,1/6,1/3,192,1,2] Octave 1/2 Octabe
Band 1 Parameter Type
Band 3 Parameter Type
OFF
Room
Hall
Plate
Delay
Delay Time
Decay
[-12.0 ~ +12.0] dB
Increment: 0.5dB
[100 ~ 1000] msec
Increment: 1msec
[Repeat OFF, -20.00 ~ -3.00] dB
Increment: 0.25dB
Input Mute
0.0 dB
-Band 2 Parameter Type
OFF
Repeat OFF
- 98 -
Superscope PSD430 / PSD450 User Manual
Page 99
Appendix
Edit Menu Options
Selected Item
16bit WAV file 24bit WAV file MP3 file Playlist Folder
Track Information Track Information Track Information Copy Copy
Copy Copy Copy Move Move
Move Move Move Rename Rename
Rename Rename Rename Delete Delete
Delete Delete Delete Edit Playlist
Trim In/Out 24 > 16bit Convert Export
Divide
Combine
Export
Superscope PSD430 / PSD450 User Manual
- 99 -
Page 100
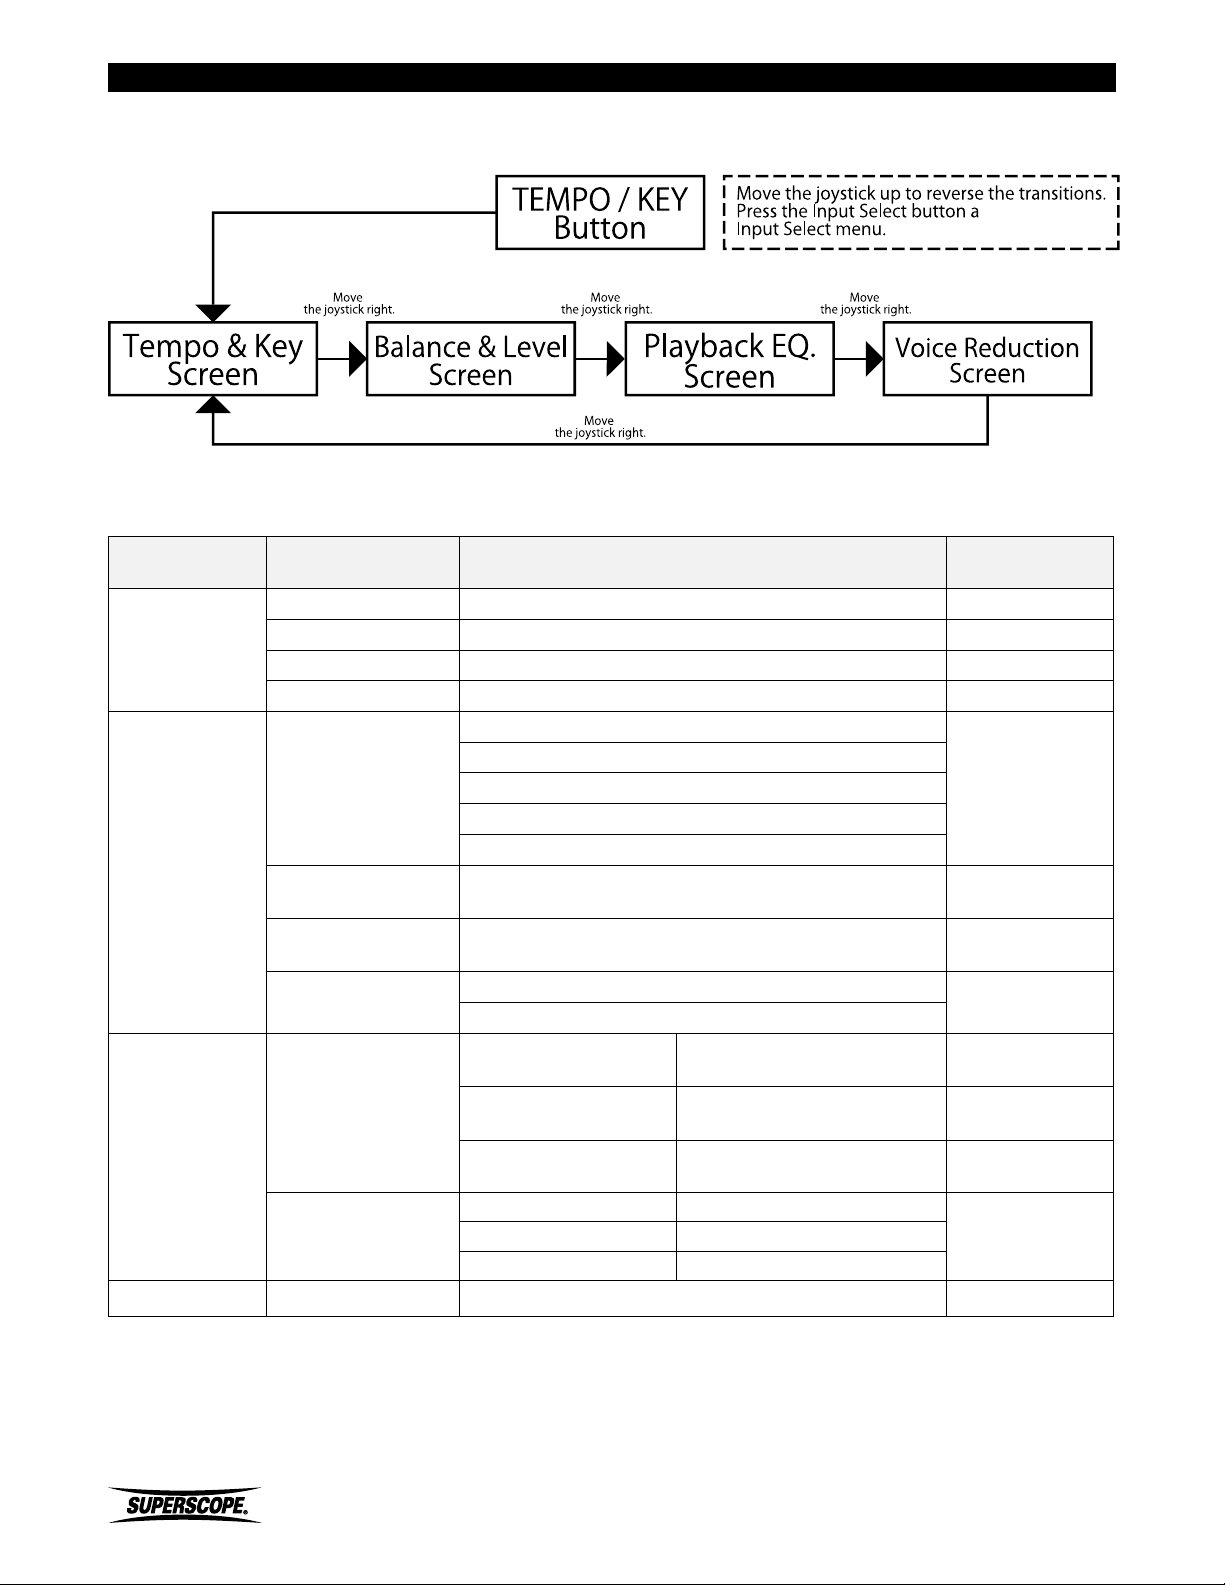
Appendix
Key/Tempo Menu
Sub Menu Menu Item Settings Default Setting
Tempo x[ -0.75 ~ 1.50 ] ( -75 ~ 150% ) Increment : 0.01(1%) X 1.00 (100%)
Tempo & Key
Balance & Level
Playback EQ.
Key [ -12.0 ~ +12.0 ] semitones Increment : 1 semitone 0 semitones
Fine Tune [ -50 ~ +50 ] cent Increment : 1 cent 0 cents
Calibration A4 : [ 430 ~ 460 ] Hz Increment : 1 Hz 440 Hz
Stereo
Split
Mix Mode
Playback Level
Playback Balance
Balance Mode
Parameter Type
[ MUTE, -90.00 ~ +6.00 ]dB (-∞, 1% ~100%)
[ Left 100 ~ Center ~ Right 100 ]%
Frequency 20Hz~20kHz
Gain
Band Width [1/12, 1/6, 1/3, 1/2, 1, 2]Octave 1/2 Octave
L ch Mix
R ch Mix
Monaural Mix
Increment: 0.25 dB
Increment: 1%
Stereo
Mix
[-12.0 ~ +12.0] dB
Increment : 0.5dB
-0.00 dB (100%)
100 Hz / 1 KHz /
Stereo
Center
Stereo
10 KHz
0.0 dB
Band 1 Parameter Type
Band
Band 3 Parameter Type
Voice Reduction Voice Reduction ON / OFF OFF
- 100 -
Superscope PSD430 / PSD450 User Manual
-Band 2 Parameter Type
 Loading...