

Superscope PMR61 User Manual

PMR61
PROFESSIONAL AUDIO RECORDER
User Guide
© Copyright 2016, Superscope LLC.
U.S. Patents Pending
Contents
CAUTION
RISK OF ELECTRIC SHOCK
DO NOT OPEN
CAUTION: TO REDUCE THE RISK OF ELECTRIC SHOCK,
REFER SERVICING TO QUALIFIED SERVICE PERSONNEL
WARNING
TO REDUCE THE RISK OF FIRE OR ELECTRIC SHOCK, DO NOT
EXPOSE THIS PRODUCT TO RAIN OR MOISTURE.
CAUTION: TO PREVENT ELECTRIC SHOCK, MATCH WIDE
BLADE OF PLUG TO WIDE SLOT, FULLY INSERT.
ATTENTION: POUR EVITER LES CHOC ELECTRIQUES, INTRODUIRE LA
LAME LA PLUS LARGE DE LA FICHE DANS LA BORNE CORRESPONDANTE
DE LA PRISE ET POUSSER JUSQUíAU FOND.
CAUTION
USE OF CONTROLS OR ADJUSTMENTS OR PERFORMANCE OF
PROCEDURE OTHER THAN THOSE SPECIFIED HEREIN MAY RESULT
IN HAZARDOUS EXPOSURE.
LASER SAFETY
This unit employs a laser. Only a qualified service person should
remove the cover or attempt to service this device, due to possible
eye injur y.
NOTE TO CATV SYSTEM INSTALLER:
This reminder is provided to call the CATV (Cable-TV) system installer’s
attention to Section 820-40 of the NEC which provides guidelines for
proper grounding and, in particular, specifies that the cable ground
shall be connected to the grounding system of the building, as close to
the point of cable entry as practical.
NOTE: This equipment has been tested and found to comply with the
limits for a Class B digital device, pursuant to Part 15 of the FCC Rules.
These limits are designed to provide reasonable protection against
harmful interference in a residential installation. This equipment
generates, uses and can radiate radio frequency energy and, if not
installed and used in accordance with the instructions, may cause
harmful interference to radio communications. However, there is no
guarantee that interference will not occur in a particular installation. If
this equipment does cause harmful interference to radio or television
reception, which can be determined by tuning the equipment off and
on, the user is encouraged to try to correct the interference by one or
more of the following measures:
• Reorient or relocate the receiving antenna.
• Increase the separation between the equipment and receiver.
• Connect the equipment into an outlet on a circuit different from
that to which the receiver is connected.
• Consult the dealer or an experienced radio/ TV technician for help.
NOTE: Changes or modifications not expressly approved by the party
responsible for compliance could void the user’s authority to operate
the equipment.
This Class B digital apparatus complies with Canadian ICES-003.
Cet appareil numÈrique de la Classe B conforme à la norme NMB-003
du Canada.
- ii -
DO NOT REMOVE COVER (OR BACK)
NO USER-SERVICEABLE PARTS INSIDE
The lightning flash with arrowhead symbol within
an equilateral triangle is intended to alert the
user to the presence of uninsulated "dangerous
voltage" within the product's enclosure that may
be of sufficient magnitude to constitute a risk of
electric shock to persons.
The exclamation point within an equilateral
triangle is intended to alert the user to
the presence of important operating and
maintenance (servicing) instructions in the
literature accompanying the appliance.
■Important Safety
Instructions
READ BEFORE OPERATING EQUIPMENT
This product was designed and manufactured to meet strict quality
and safety standards. There are, however, some installation and
operation precautions which you should be particularly aware of.
1. Read instructions.
2. Keep these instructions.
3. Heed all warnings.
4. Follow all instructions.
5. Clean only with dry cloth.
6. Do not use this apparatus near water.
7. To ventilate the unit, do not install it in a rack or bookshelf, and
note the following: Do not insert objects beneath the unit. Do not
block ventilation slots at the top of the unit. Do not place anything
about 1 meter above the top panel. Make a space of about 8“ (20
cm) around the unit.
8. Do not install near nay heat sources such as radiators, heat
registers, stoves, or other apparatus (including amplifiers) that
produce heat.
9. Do not defeat the safety purpose of the polarized or groundingtype plug. A polarized plug has two blades with one wider than
the other. A grounding type plug has two blades and a third
grounding prong. The wide blade or the third prong are provided
for your safety. If the provided plug does not fit into your outlet,
consult an electrician for replacement of the obsolete outlet.
10. Protect the power cord from being walked on or pinched
particularly at plugs, convenience receptacles, and the point where
they exit from the apparatus.
11. Only use attachments/accessories specified by
the manufacturer.
12. Use only with the cart, stand, tripod, bracket,
or table specified by the manufacturer, or
sold with the apparatus. When a cart is used,
use caution when moving the cart/apparatus
combination to avoid injury from tip-over.
13. Unplug this apparatus during lightning storms or when unused for
long periods of time.
14. Refer all servicing to qualified service personnel. Servicing is
required when the apparatus has been damaged in any way, such
as power-supply cord or plug is damaged, liquid has been spilled
or objects have fallen into the apparatus, the apparatus has been
exposed to rain or moisture, does not operate normally, or has
been dropped.
Additional Safety Information!
• This product should not be placed in a built-in installation such
as a bookcase or rack unless proper ventilation is provided or the
manufacturer’s instructions have been adhered to.
• Apparatus shall not be exposed to dripping or splashing and that
no objects filled with liquids, such as vases, shall be placed on the
apparatus.
• When the switch is in the OFF position, the apparatus isn’t
completely switched-off from the MAINS.
WARNINGS
Do not expose the equipment to rain or moisture.
Do not remove the cover from the equipment.
No naked flame sources, such as lighted candles, should be placed on the
equipment.
Protect the power cord from being walked on or pinched particularly at plugs,
convenience receptacles, and the point where they exit from the apparatus.
Set the unit up on an even surface away from direct sunlight, high
temperatures, high humidity, and excessive vibration.
Do not place heavy items on the unit.
Do not use high voltage power sources. This can overload the unit and cause a
fire.
Do not handle the plug with wet hands. This can cause electric shock.
Do not let metal objects fall inside the unit.
Do not let liquids get into the unit.
Do not spray insecticides onto or into the unit.
Do not attempt to repair this unit by yourself.
Superscope PMR61 User Guide
Contents
English
Declaration of Conformity
We declare that this product, to which this declaration
relates, is in conformity with the following standard:
EN 55032, EN 55024, EN61000-3-2, EN61000-3-3, and
with the requirements of EMC Directive 2004/108/EC.
A NOTE ABOUT RECYCLING
• This product’s packaging materials are
recyclable and can be reused. Please
dispose of any materials in accordance
with the local recycling regulations.
• When discarding the unit, comply with
local rules or regulations.
• Batteries should never be thrown away or incinerated,
and should be disposed of in accordance with the
local regulations concerning chemical waste.
• This product and the accessories packed together
constitute the applicable product according to the
WEEE directive except batteries.
WARNINGS
• Do not handle the AC adaptor with wet hands.
• Do not cover the ventilation with any items such as
tablecloths, newspapers, curtains, etc.
• No unprotected flame sources, such as lit candles,
should be placed on the equipment.
• When disposing of used batteries, please comply with
governmental regulations or environmental rules that
apply in your country or locality.
• Make a space of about 0.1 meter around the unit.
• No objects filled with liquids, such as vases, should be
placed on the apparatus.
• When the switch is in the OFF position, the
equipment is not completely switched off from
MAINS.
• To completely disconnect this product from the mains,
disconnect the plug from the wall socket outlet.
• When setting up this product, make sure that the AC
outlet you are using is easily acceptable.
• Do not expose batteries to excessive heat such as
sunshine, fire or similar.
Français
Déclaration de Conformité
Nous déclarons que le présent produit, auquel se réfère
la présente déclaration, est conforme aux normes
suivantes :
EN 55032, EN55024, EN 61000-3-2, EN 61003-3-3, ainsi
qu’aux exigences de la Directive EMC 2004/108/EC.
UNE REMARQUE CONCERNANT LE RECYCLAGE
• Les matériaux d’emballage de ce produit
sont recyclables et peuvent être réutilisés.
• Veuillez disposer de tout matériau
conformément aux règlements de
recyclage locaux. Lorsque vous mettez
cet appareil au rebut, respectez les lois ou
réglementations locales.
• Les piles ne doivent jamais être jetées ou incinérées,
mais mises au rebut conformément aux règlements
locaux concernant les déchets chimiques.
• Ce produit et les accessoires emballés ensemble sont
des produits conformes à la directive DEEE sauf pour
les piles.
AVERTISSEMENTS
• Ne manipulez pas l’adaptateur AC avec les mains
mouillées.
• Ne pas recouvrir les ouïes de ventilation avec un objet
quelconque comme une nappe, un journal, un rideau,
etc.
• Ne placer aucune source de flamme nue, comme une
bougie allumée, sur l’appareil.
• Pour mettre au rebut les piles usées, respecter les
lois gouvernementales ou les règlements officiels
concernant l’environnement qui s’appliquent à votre
pays ou région.
• Veiller à ce qu’aucun objet ne soit à moins de 0,1
mètre des côtés de l’appareil.
• Aucun objet rempli de liquide, un vase par exemple,
ne doit être placé sur l’appareil.
• Lorsque l’interrupteur est sur la position OFF, l’appareil
n’est pas complètement déconnecté du SECTEUR.
• Pour déconnecter complètement ce produit du
courant secteur, débranchez la fiche de la prise
murale.
• Lors de l’installation de ce produit, assurez-vous que
la prise CA que vous utilisez est compatible.
• N’exposez pas les piles à une source de chaleur
excessive, aux rayons du soleil ou à une flamme par
exemple.
Superscope PMR61 User Guide
- iii -

Contents
Deutsch
Konformitätserklärung
Hiermit erklären wir, dass das Produkt, auf welches
sich diese Erklärung bezieht, den folgenden Normen
entspricht:
EN 55032, EN 55024, EN61000-3-2, EN 61003-3-3 und
der EMV-Richtlinie 2004/108/EG.
HINWEIS ZUM RECYCLING
• Das Verpackungsmaterial dieses
Produktes ist für recycelbar und kann
wiederverwendet werden.
• Bitte entsorgen Sie alle Materialien
entsprechend der örtlichen
Recyclingvorschriften. Beachten Sie bei
der Entsorgung des Gerätes die örtlichen Vorschriften
und Bestimmungen.
• Batterien dürfen nicht in den Hausmüll geworfen
oder verbrannt werden. Bitte geben Sie Batterien
entsprechend der örtlichen Bestimmungen an den
Sammelstellen oder Sondermüllabgabestellen ab.
• Dieses Produkt zusammen mit seinen Zubehörteilen
fällt in den Geltungsbereich der WEEE-Direktive
Ddavon ausgenommen sind die Batterien.
WARNHINWEISE
• Fassen Sie das Netzteil nicht mit nassen Händen an.
• Decken Sie die Lüftungsöffnungen nicht mit einem
Tuch, einer Zeitung, einem Vorhang oder ählichem
ab.
• Es dürfen keine Gegenstände mit offener Flamme
wie zum Beispiel brennende Kerzen auf dem Gerät
abgestellt werden.
• Beachten Sie bei der Entsorgung der verbrauchten
Batterien alle geltenden örtlichen und überregionalen
Regelungen.
• An allen Geräteseiten muß ein Zwischenraum von
ungefähr 0,1 Metern vorhanden sein.
• Auf das Gerät dürfen keine mit Flüssigkeiten gefüllte
Behälter wie zum Beispiel Vasen gestellt werden.
• Wenn der Schalter ausgeschaltet ist (Position OFF),
ist das Gerät nicht vollständig vom Stromnetz
(Spannung) getrennt.
• Um dieses Gerät komplett von der Stromversorgung
abzutrennen, ziehen Sie bitte den Netzstecker von der
Wandsteckdose ab.
• Stellen Sie bei der Aufstellung des Gerätes sicher,
dass die verwendete Wechselstromsteckdose einfach
zugängig ist.
•
Batterien dürfen keiner extremen Hitze wie direkter
Sonneneinstrahlung, Feuer o.ä. ausgesetzt werden.
Español
Declaración de Conformidad
Declaramos que este producto, al cual esta declaración
se refiere, está conforme a los siguientes estándares:
EN 55032, EN 55024,EN 61000-3-2, EN 61003-3-3,y con
los requerimientos de la Norma EMC 2004/108/EC.
ACERCA DEL RECICLAJE
• Los materiales de embalaje de este
producto son reciclables y se pueden
volver a utilizar.
• Disponga de estos materiales siguiendo los
reglamentos de reciclaje de su localidad.
Cuando se deshaga de la unidad, cumpla
con las reglas o reglamentos locales.
• Las baterías nunca deberán tirarse ni incinerarse.
Deberá disponer de ellas siguiendo los reglamentos
de su localidad relacionados con los desperdicios
químicos.
• Este producto juntamente con los accesorios
incluidos con el producto se les aplica la norma RAEE
exceptuando a las baterías.
ADVERTENCIAS
• No manipule el adaptador de CA si tiene las manos
húmedas.
• No cubra la ventilación con objetos como manteles,
periódicos, cortinas, etc.
• No deben colocarse elementos con fuego sobre el
equipo, como por ejemplo velas encendidas.
• Cuando se eliminen baterías usadas, deben cumplirse
los reglamentos oficiales o las normas de protección
del medio ambiente aplicables en su país o en su
zona.
• Deje un espacio de aproximadamente 0,1 metro al
rededor de la unidad.
• No se deben colocar recipientes que contengan
líquidos sobre el aparato, como por ejemplo floreros.
• Cuando el interruptor está en la posición OFF, el
aparato no está completamente apagado de la red
eléctrica.
• Para desconectar completamente este producto de la
red eléctrica, desconecte el enchufe de la toma de la
pared.
• Al conectar este producto, asegúrese de que la toma
de salida de CA que esté utilizando sea fácilmente
accesible.
• No exponga las baterías al calor excesivo, como a la
luz solar directa, al fuego, etc.
- iv -
Superscope PMR61 User Guide

Contents
■Table of Contents
■Important Safety Instructions ................... ii
English ................................................................... iii
A NOTE ABOUT RECYCLING .................................. iii
WARNINGS ............................................................ iii
Français .................................................................. iii
UNE REMARQUE CONCERNANT LE RECYCLAGE.... iii
AVERTISSEMENTS .................................................. iii
Deutsch ................................................................. iv
HINWEIS ZUM RECYCLING ..................................... iv
WARNHINWEISE .................................................... iv
Español .................................................................. iv
ACERCA DEL RECICLAJE ........................................ iv
ADVERTENCIAS ......................................................iv
■Table of Contents ....................................... v
■Package Contents ....................................... 7
PMR61 Recorder .................................................... 7
AC adapter (DA61PMR) .......................................... 7
AC Power Cord ...................................................... 7
USB cable ............................................................... 7
RCA stereo audio cable .......................................... 7
User Guide (PDF Format) on CD-ROM .................... 7
■Preparations Before Use ............................ 8
AC Adapter Connection .....................................8
AC Adapter Safety ............................................. 8
Using Batteries ................................................... 8
Safety Cautions When Handling Batteries ....... 8
■Top Panel ..................................................... 9
POWER Button ............................................. 9
Low BATTERY Indicator .................................... 9
REC Button .................................................. 9
PHONE SPEAKER Level .............................. 9
HEADPHONE Jack .....................................9
PLAY/PAUSE Button ..................................... 9
STOP Button ................................................ 9
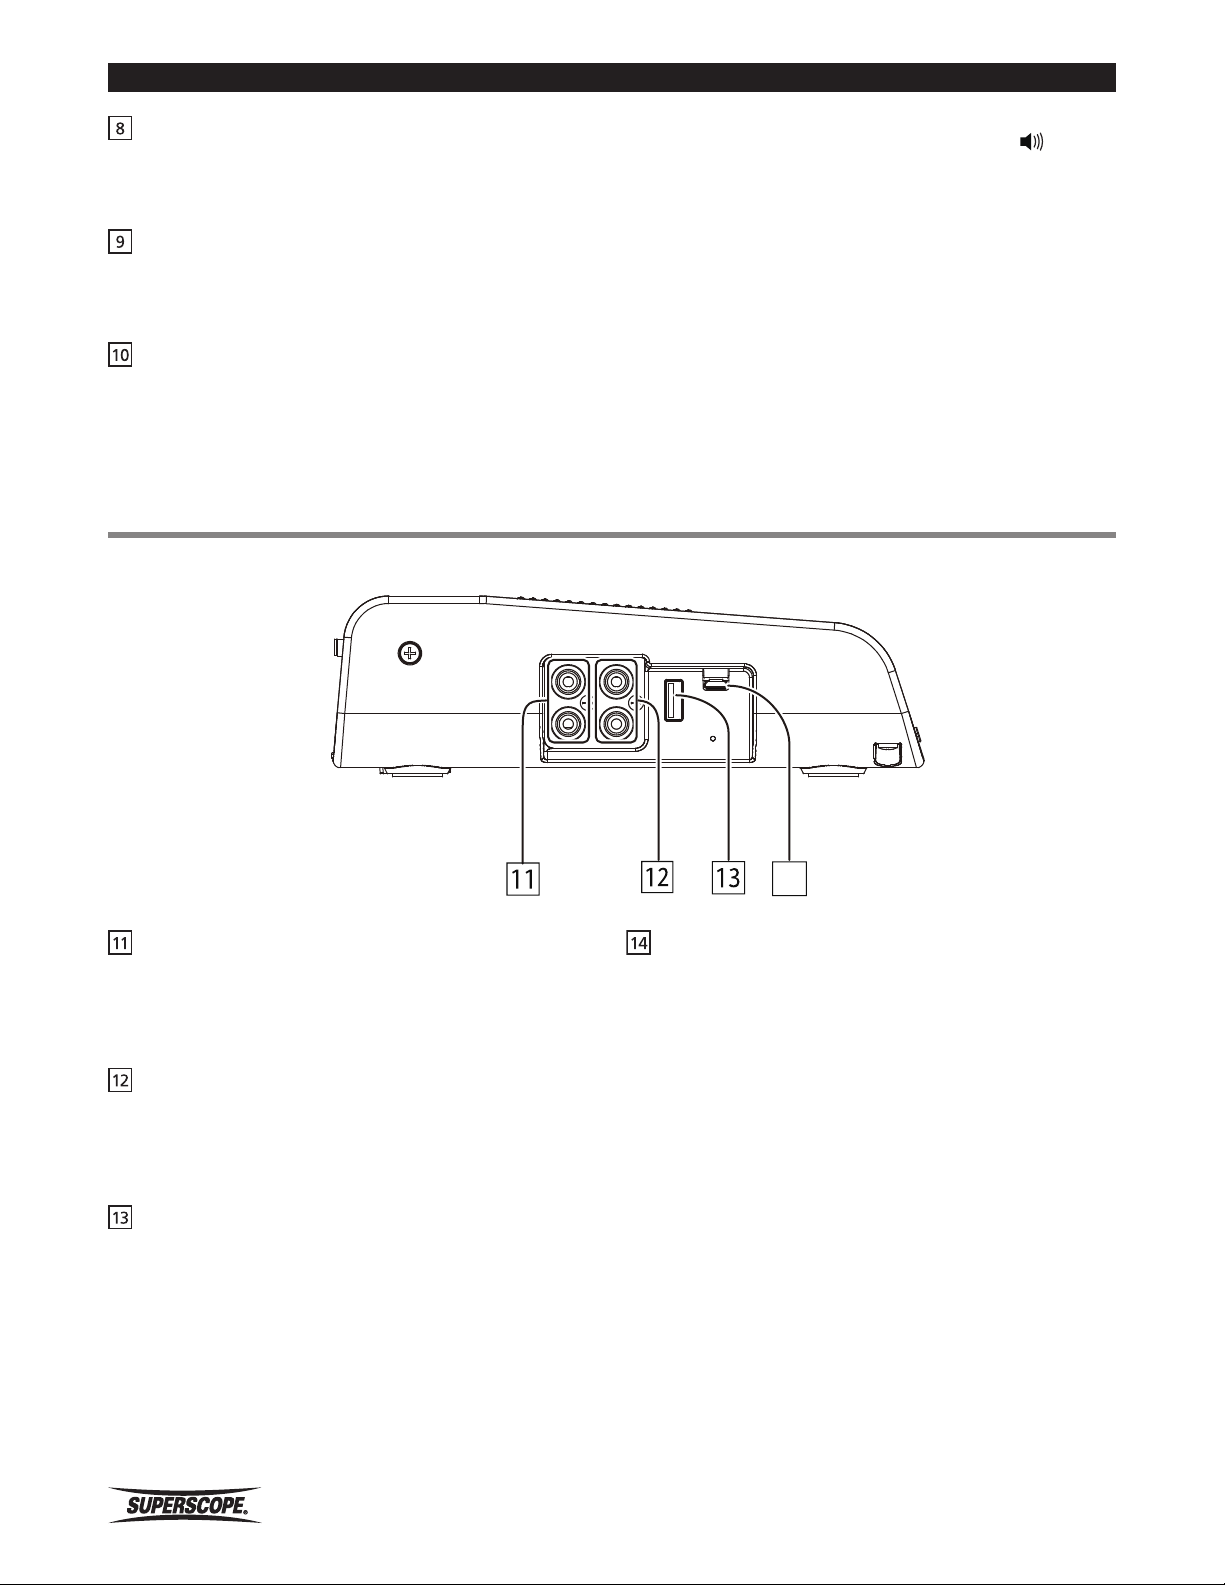
■Side Panel .................................................... 10
Touch Screen ....................................................10
Internal Speaker ............................................... 10
Internal Microphones L & R .............................. 10
LINE OUT Jacks ................................................ 10
AUX IN Jacks .................................................... 10
USB Connector A ............................................. 10
USB Connector B .............................................. 10
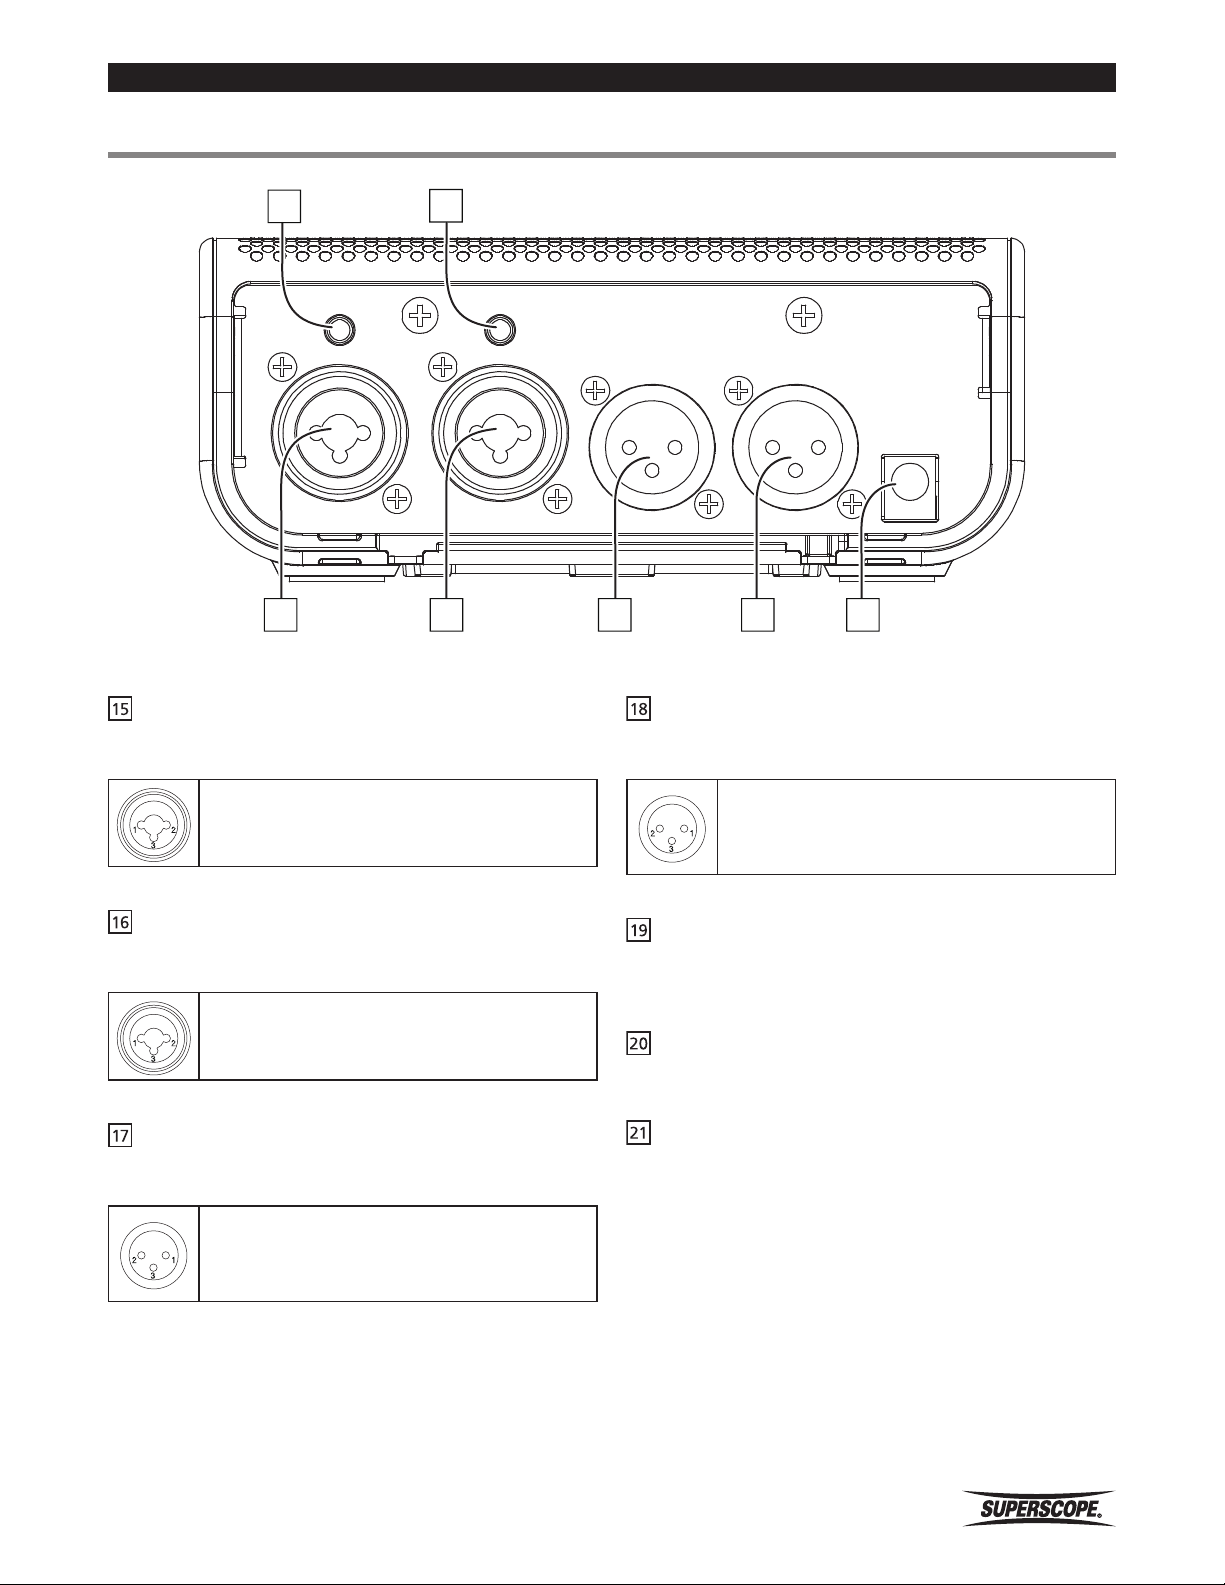
■Rear Panel ................................................... 11
Right MIC/LINE INPUT Jack ............................... 11
Left MIC/LINE INPUT Jack ................................. 11
Right Analog Output (Balanced) Jack ................ 11
Left Analog Output (Balanced) Jack .................. 11
DC Input Jack ................................................... 11
Right Conference Microphone Jack .................. 11
Left Conference Microphone Jack .................... 11
■Powering On ............................................... 12
Using the AC Adapter ............................................ 12
Using Batteries ....................................................... 12
AC Power and Battery Tips ..................................... 13
■Home Screen ............................................... 13
Properties Windows ........................................... 14
■Recording ................................................... 15
Using RECORD CHECK ........................................ 16
Checking USB Media ......................................... 17
■Recording Setup ........................................ 18
Setting Record Settings .................................... 18
Selecting Media .................................................. 19
Setting Record Parameters ............................... 19
Selecting Record Level Control..........................20
Selecting Phantom Power .................................. 20
Setting Microphone Attenuator ....................... 21
Setting Aux Input Attenuator ........................... 21
Setting MIC/LINE Sensitivity ............................. 22
Selecting Noise Reduction ................................ 22
Internal Microphones ......................................... 23
Setting Auto Start Record .................................. 23
Power On Record ................................................... 23
Audio Detect Record .............................................. 24
Setting One Touch Record ................................. 24
■Play ............................................................. 25
Playing ................................................................ 25
Play Mode ...........................................................25
Selecting a Recorded File .................................. 26
Playing a Recorded File ..................................... 26
Renaming a Recorded File ................................ 27
Copy to USB Media ............................................ 27
Move to USB Media ........................................... 28
Delete a Recorded File ....................................... 28
■Settings ...................................................... 29
■Device Settings .......................................... 30
Setting Date and Time ....................................... 30
Setting Time ........................................................... 30
Setting Date ........................................................... 30
Setting Daylight Saving Time .................................. 31
Selecting Time Format ............................................ 32
Setting Display ................................................... 32
Setting Sleep Mode Time ....................................... 33
Setting Home Screen Name
Setting a PIN ....................................................... 34
Setting Battery Type ......................................... 35
Setting User Areas ............................................. 36
................................... 33
Superscope PMR61 User Guide
- v -

Contents
Add Track Number Feature ............................... 37
Setting File Name Format ................................. 38
Setting Audio Output ........................................ 38
Setting Jump Interval Time ............................... 39
■Utility ........................................................... 40
Utility Menu ........................................................ 40
Format Media ...................................................... 40
Backup Media .................................................... 41
Save Settings to USB Media ............................. 41
Load Settings from USB Media ........................ 42
Delete Recorded Files Automatically ............... 43
Restore Factory Settings ................................... 44
Confirm System Version ..................................... 44
■Speaker Setup ............................................ 45
Using Headphones or the Internal Speaker ..... 45
External Speakers ............................................... 45
■Computer Connection ................................ 46
■Using Anti-Glare Stand .............................. 47
■Using Security Lock .................................... 47
■Appendix ..................................................... 48
Main Menu (1 of 2) ................................................ 48
Main Menu (2 of 2) ................................................ 49
Record Settings ...................................................... 50
Internal Media Times .............................................. 51
Continuous Recording Time with Battery Operation
... 52
■Specifications .............................................. 53
General .................................................................. 53
Input ..................................................................... 53
Outputs ................................................................ 53
■Trademarks, Copyrights and Disclaimers .. 54
MPEG Layer-3 Licensing ......................................... 54
- vi -
Superscope PMR61 User Guide
Package Contents
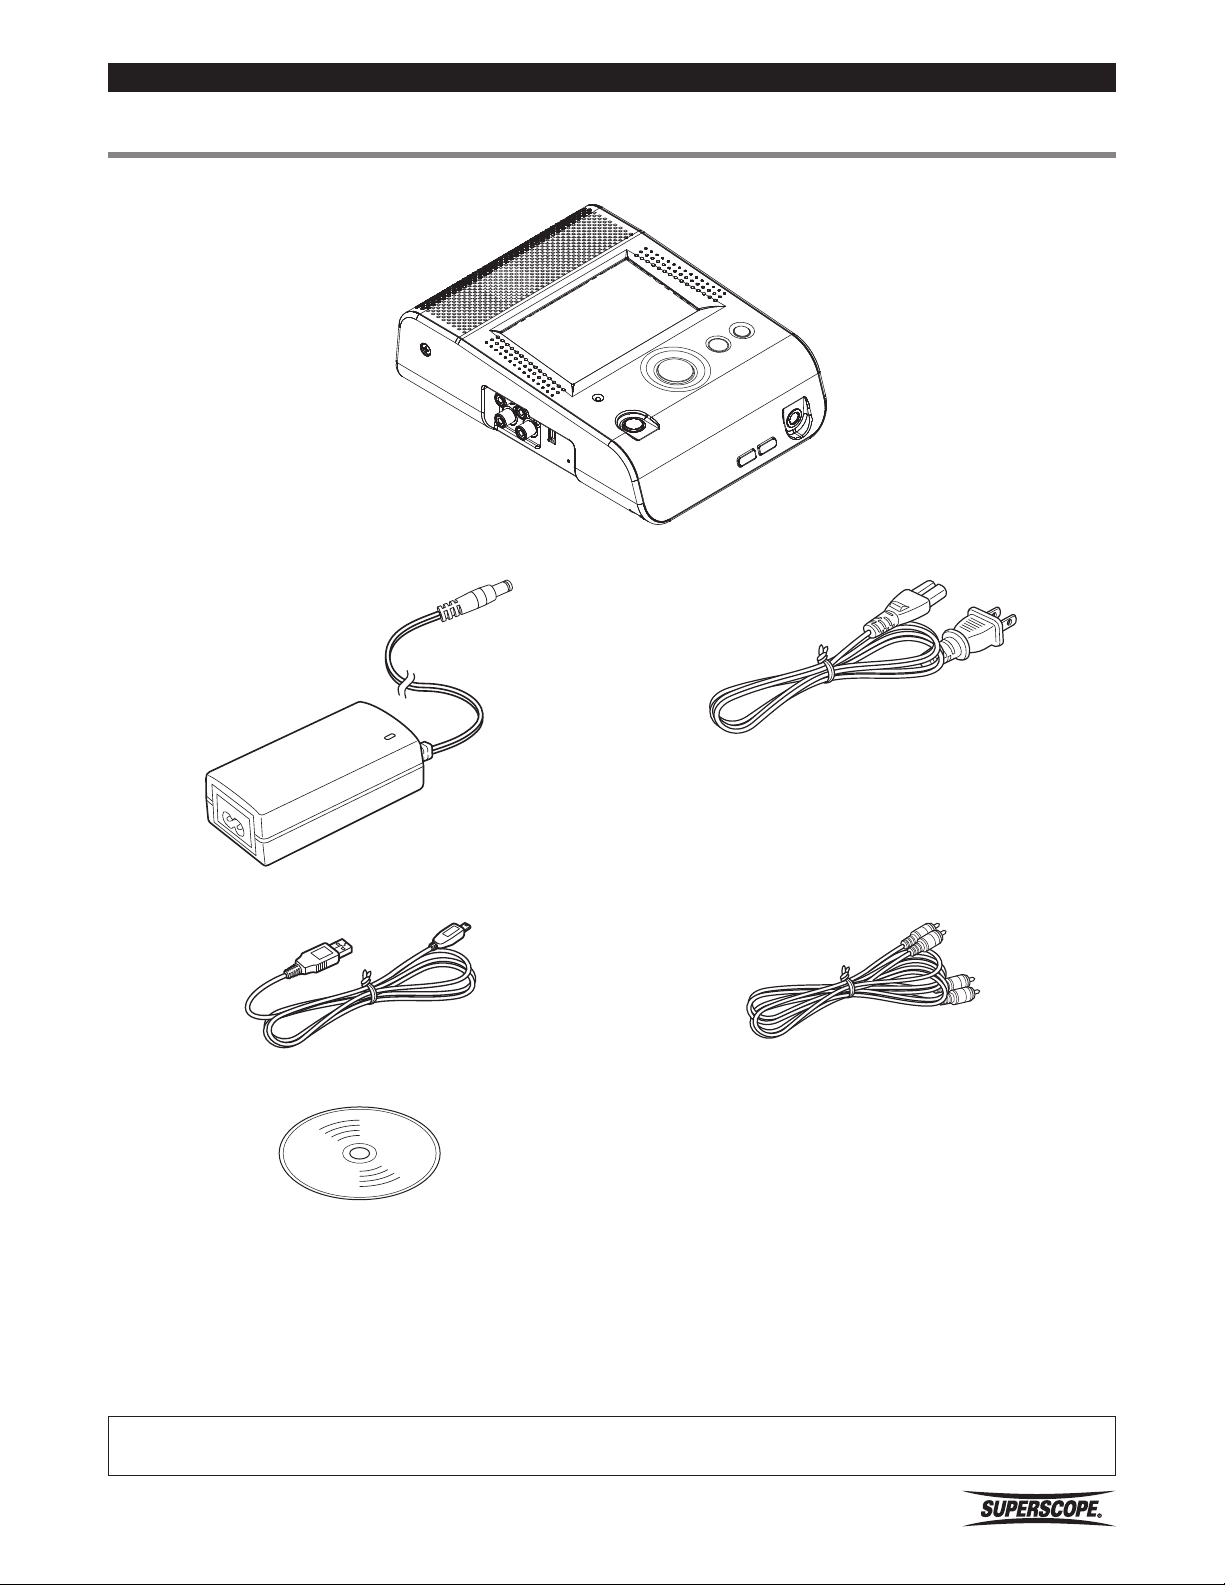
■Package Contents
PMR61 Recorder
AC adapter (DA61PMR) AC Power Cord
USB cable RCA stereo audio cable
User Guide (PDF Format) on CD-ROM
Perchlorate Material - special handling may apply,
See www.dtsc.ca.gov/hazardouswaste/perchlorate.”
Superscope PMR61 User Guide
- 7 -

Getting Started
■Preparations
Before Use
AC Adapter Connection
Connect the power output plug of the adapter to the DC
IN jack of the recorder. Connect the AC Power cord to
the household AC power receptacle.
AC Adapter Safety
Only use the AC adapter that is provided with the
recorder. Use of other adapters may result in damage to
the recorder and void the warranty.
Using Batteries
The recorder is designed for use with 4 “AA” size
Alkaline or Nickel-Metal Hydride (Ni-MH) batteries.
Please select the correct battery type you are using from
the Battery Type option in the Device Settings Menu.
Safety Cautions When Handling
Batteries
To avoid leakage, overheating, fire and rupturing, always
follow the points below when using batteries with the
recorder.
• Electrolyte leakage or corrosion may occur if
batteries are kept inside the recorder for prolonged
periods of time. Remove batteries prior to prolonged
storage of the recorder.
• When installing batteries into the recorder, make
sure the batteries are installed with the proper
polarity shown inside the battery compartment of
the recorder.
• Do not attempt to recharge non-rechargeable
batteries. See Setting Battery Type.
• Do not install old/exhausted batteries into the
recorder. Dispose of old batteries properly.
• Do not mix the types (Alkaline or Ni-MH) or voltages
of batteries.
With improper battery use, batteries may rupture, leak,
and cause corrosion. Please read the following guidelines
carefully:
Batteries may have the same shape, but different
voltages. Do not mix different battery types.
If a battery leaks, clean the liquid from the battery
compartment and dispose of the leaking battery
according to the guidelines of your local government.
Please dispose of all used batteries according to the
guidelines of your local government.
- 8 -
Superscope PMR61 User Guide
■Top Panel
Getting Started
BATTERY
POWER
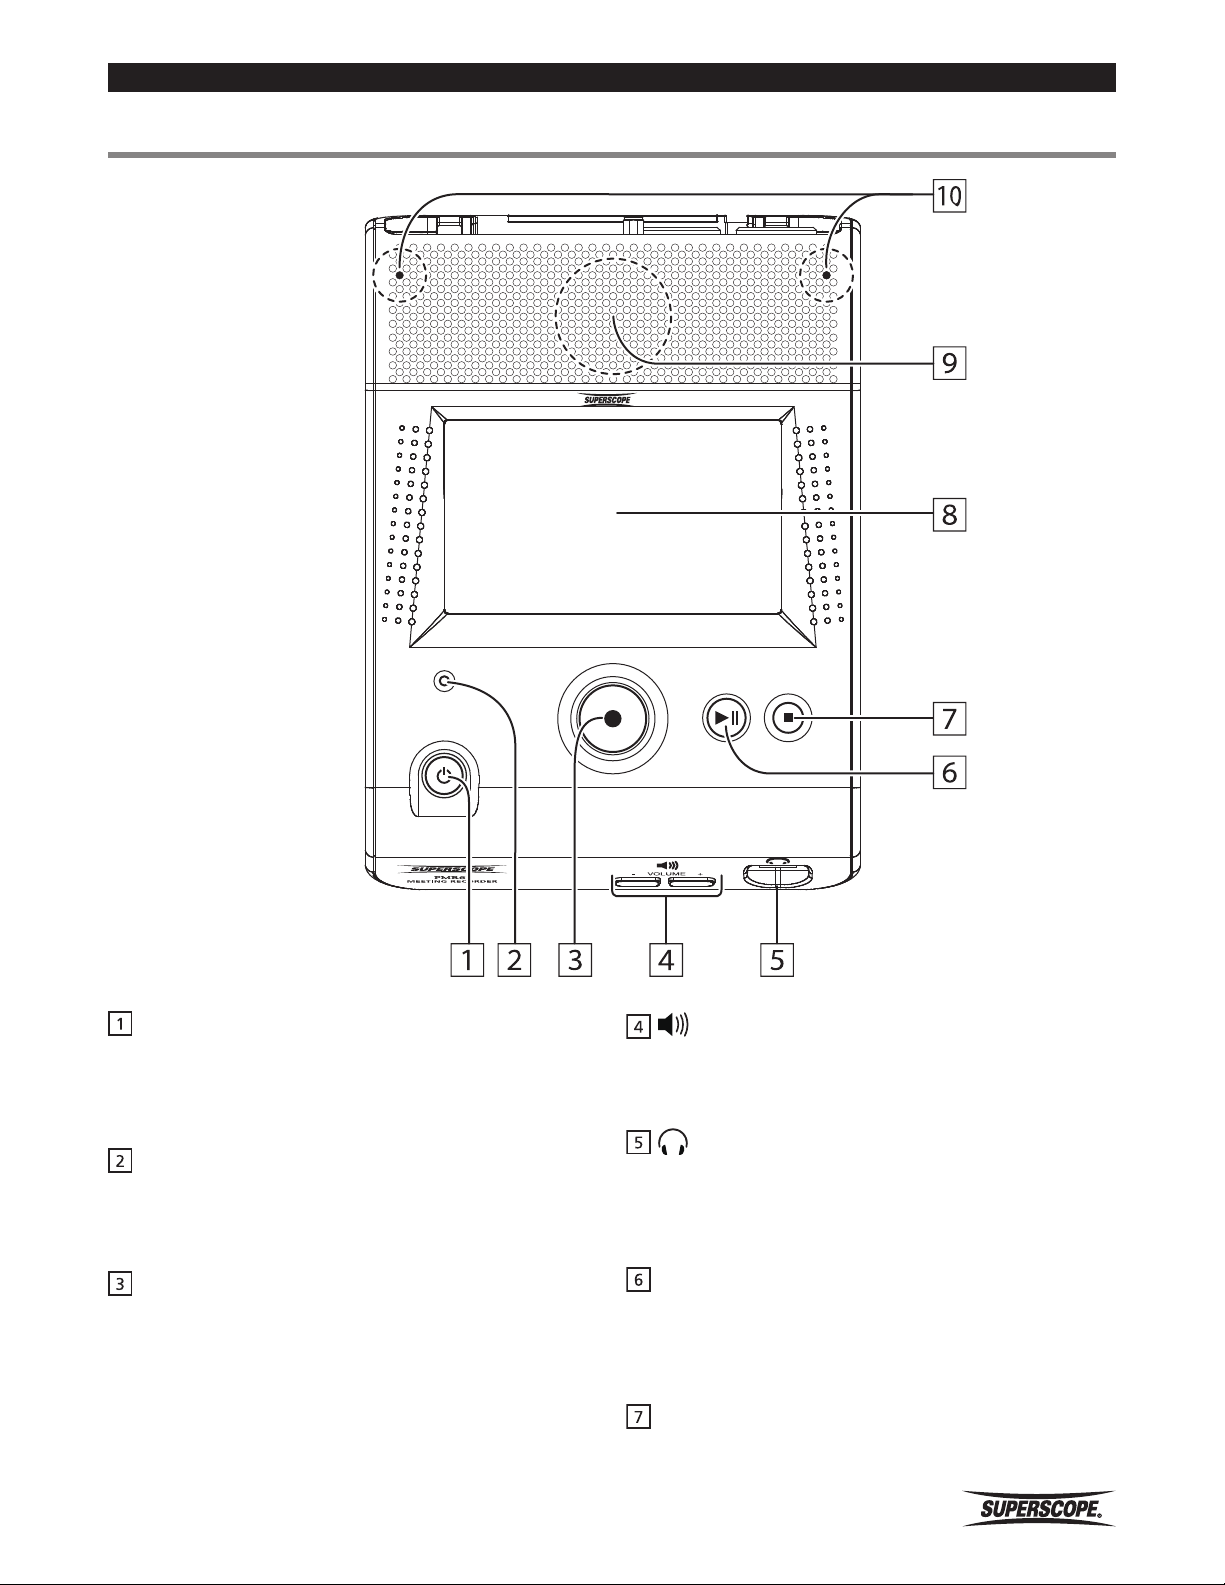
POWER Button
Press the POWER button for 1 second to turn power
ON. Press and hold POWER button for 2 seconds to turn
power OFF.
Low BATTERY Indicator
LED flashes when the battery power is low. LED remains
lit when Ni-MH batteries are charging and the PMR61 is
powered off.
REC
PLAY/PAUSE
STOP
PHONE SPEAKER Level
Press the + and – buttons to adjust the volume of the
built-in speaker or headphones.
HEADPHONE Jack
Connect stereo headphones here. This input accepts
a stereo 1/4” plug and when connected automatically
mutes the internal speaker.
REC Button
From Stop mode, press to enter Record Pause mode or
Record mode. The Record LED will flash during Record
Pause mode and remain lit during Record mode.
During Recording, press REC button to start a new
recording.
Superscope PMR61 User Guide
PLAY/PAUSE Button
From Stop mode, press to start or pause playback.
During recording, press to pause recording. Press again
to resume recording of the same file.
STOP Button
Press to stop playback or recording. Press Stop again to
return to the HOME screen.
- 9 -
Controls
Touch Screen
Touch the touch screen to access recordings, make
changes to settings and to operate the PMR61.
Internal Speaker
During playback, sound can be heard through the
internal speaker unless headphones are connected.
Internal Microphones L & R
Internal microphones are automatically turned on when
no external microphone or line source is connected.
■Side Panel
LINE OUT
L
R
Note
The REC, STOP, PLAY / PAUSE, and PHONE
SPEAKER LEVEL buttons must be pressed and held for
approximately 250 milliseconds to be recognized.
AUX IN
USB-B
USB-A
LINE OUT Jacks
Connect these outputs to the inputs of another audio
device, such as an amplifier, powered speakers, mixing
board or alternate recording device.
AUX IN Jacks
Use these inputs when connecting line level equipment
such as smart phones, tablets, computers, tape and CD
players and mixers.
USB Connector A
Connect a USB flash drive (media) or other USB storage
device. USB media can be connected and removed at
anytime except for the following conditions. Recording,
Playing, and File writing.
14
USB Connector B
Connect a USB cable here to transfer recordings
between the PMR61’s Internal Media and a computer.
MASS STORAGE MODE is initiated when the PMR61
is connected to a computer with a USB cable and is
accessed automatically when in any operating state other
than Record, Play, or during file writing processes.
- 10 -
Superscope PMR61 User Guide
■Rear Panel
Controls
20
CONF MIC-R
INPUT-R
MIC/LINE MIC/LINE
15 17
21
CONF MIC-L
INPUT-L
16 18 19
Right MIC/LINE INPUT Jack
Connect microphones or line level equipment with XLR
or ¼” inch plugs.
➊ GND
➋ HOT (w/ Phantom)
➌ COLD.
OUTPUT-R OUTPUT-L
DC IN
LINE LINE
Left Analog Output (Balanced) Jack
Balanced signals require three separate connections
(HOT, COLD, GND):
➊ GND refers to the grounding wire.
➋ HOT refers to the original audio signal.
➌ The COLD signal is the original signal with
opposite phase.
Left MIC/LINE INPUT Jack
Connect microphones or line level equipment with XLR
or ¼” inch plugs.
➊ GND
➋ HOT (w/ Phantom)
➌ COLD.
Right Analog Output (Balanced) Jack
Balanced signals require three separate connections
(HOT, COLD, GND):
➊ GND refers to the grounding wire.
➋ HOT refers to the original audio signal.
➌ The COLD signal is the original signal with
opposite phase.
DC Input Jack
Connect the DA61PMR AC to DC adapter.
Do not use any adapter other than the DA61PMR.
Right Conference Microphone Jack
Connect microphone with 3.5mm stereo plug.
Left Conference Microphone Jack
Connect microphone with 3.5mm stereo plug.
5V phantom power is supplied at the CONF MIC inputs.
Superscope PMR61 User Guide
- 11 -

■Powering On
Controls
Using Batteries
PMR61 operates with AC power or AA size batteries.
Before using batteries, please refer to “Using Batteries”.
Using the AC Adapter
CONF MIC-R
INPUT-R
MIC/LINE MIC/LINE
AC Outlet
AC Power Cord
(Included)
CONF MIC-L
INPUT-L
OUTPUT-R OUTPUT-L
DC IN
LINE LINE
AC Adapter
(Included)
q Connect the AC Adapter to the DC Jack.
w Connect the AC Cord to the Input of the AC Adapter.
e Connect the AC Plug to AC power source.
r Press the POWER button to power on.
Compatible Batteries
PMR61 works with Alkaline batteries and rechargeable
Ni-MH batteries.
1. Remove the battery cover on the bottom of the
recorder.
2. Insert four AA size Ni-MH batteries or Alkaline
batteries.
3. Close the battery cover.
4. Press the POWER button to power on.
5. Set the correct Battery Type in the Device Settings
When inserting batteries always be mindful of polarity
(+/-).
- 12 -
Menu.
※ During battery operation, an icon is displayed
in the top left corner of the display showing
battery power. See AC ( ) / Battery (
icons.
Superscope PMR61 User Guide
)
Controls
AC Power and Battery Tips
• When the AC adapter is connected while batteries
are inserted, AC power will have priority over the
battery power supply.
• PMR61 will automatically charge Ni-MH batteries
(recommended), whenever AC is connected and
Battery selection in the Setup Menu is Ni-MH. The
upper right hand corner of the display confirms
charging when ( ) is displayed. When using NiMH batteries, use models with charge cycle and mHa
specifications that best fit your application.
• Low BATTERY LED remains lit when Ni-MH batteries
are charging and the PMR61 is powered off.
• It can be helpful to use batteries and the AC power
supply together. If the AC power supply is removed
unexpectedly, recording or playback will continue
without interruption using battery power.
• Do not mix new and old batteries or battery types
(Alkaline or Ni-MH).
• When the unit is not in use for a long period of time,
please remove batteries to prevent battery leakage.
Notes
If you are using Alkaline batteries, please be sure to
select Alkaline (No Charge). PMR61 disables the charging
circuit when Alkaline (No Charge) is selected.
• Battery icon displays as follows;
(Full Charged) (Empty)
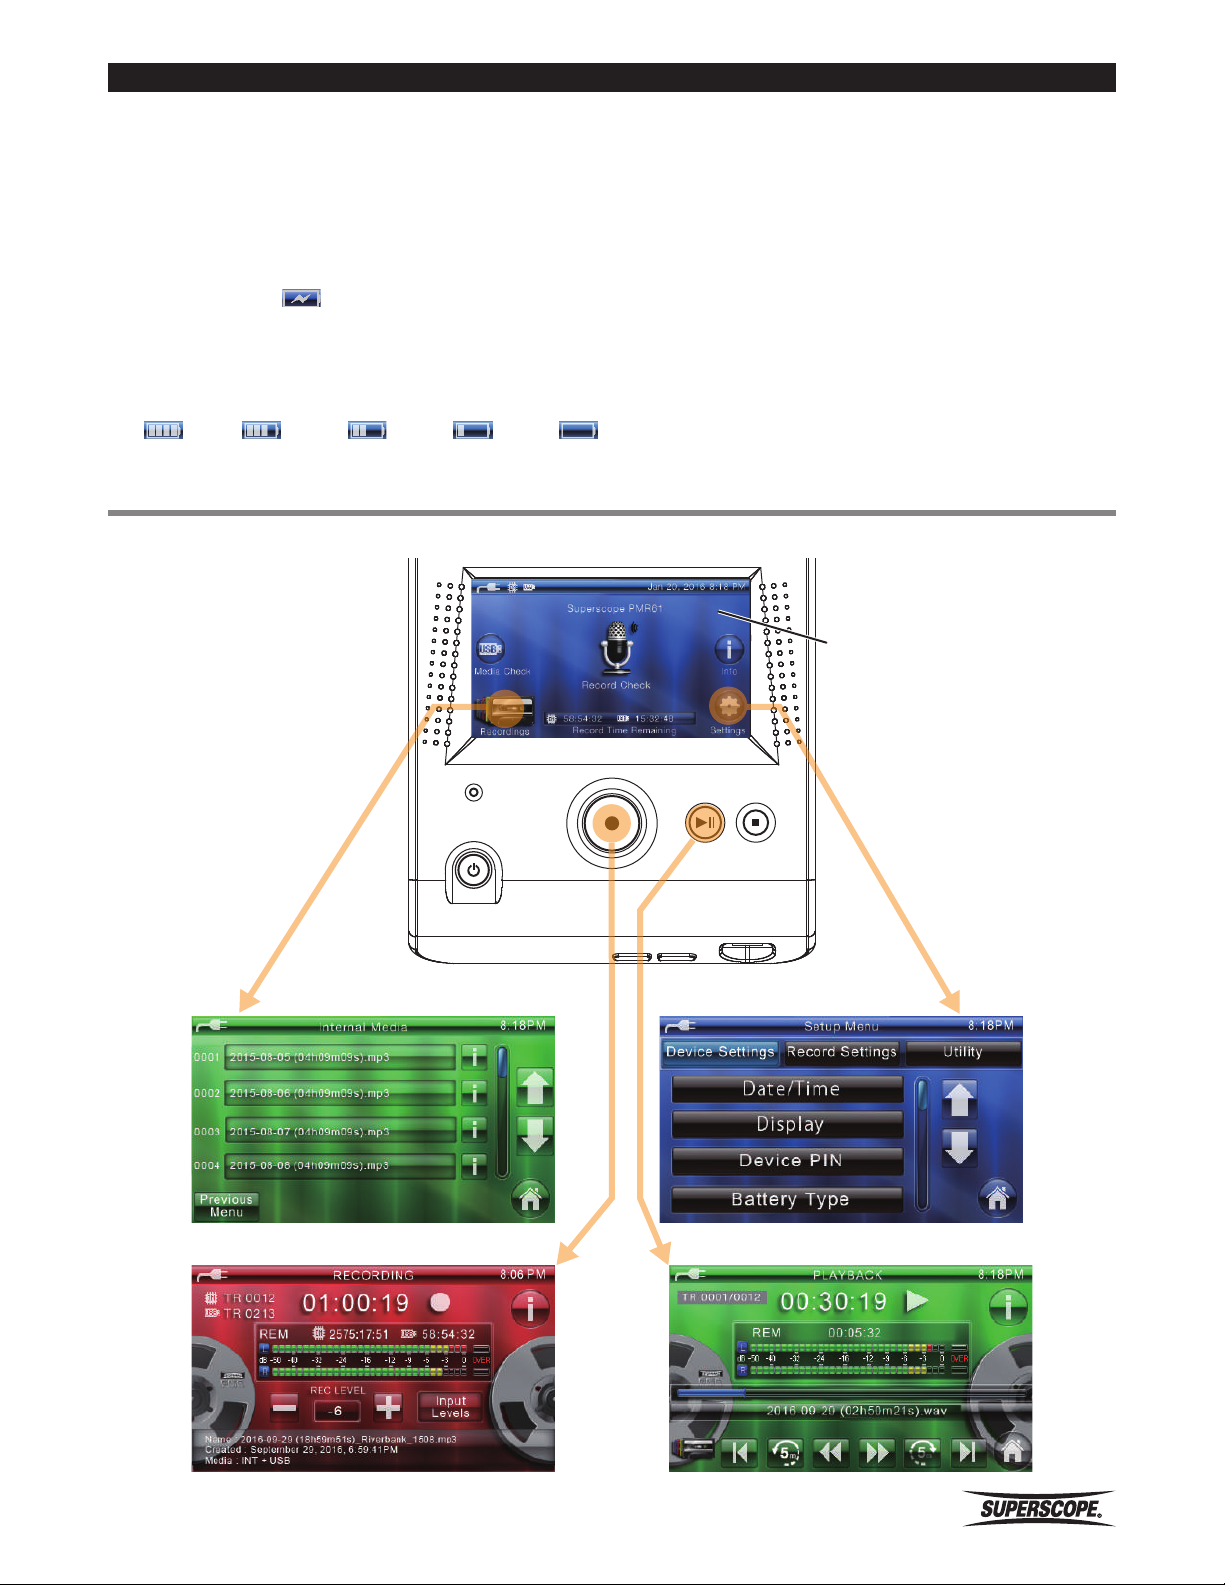
■Home Screen
1. Touch icons on the Home screen to access Recorded Files and Settings.
Home Screen
BATTERY
POWER
REC
PLAY/PAUSE
STOP
Recorded Files list Setup Menu
Recording Playing
Superscope PMR61 User Guide
- 13 -
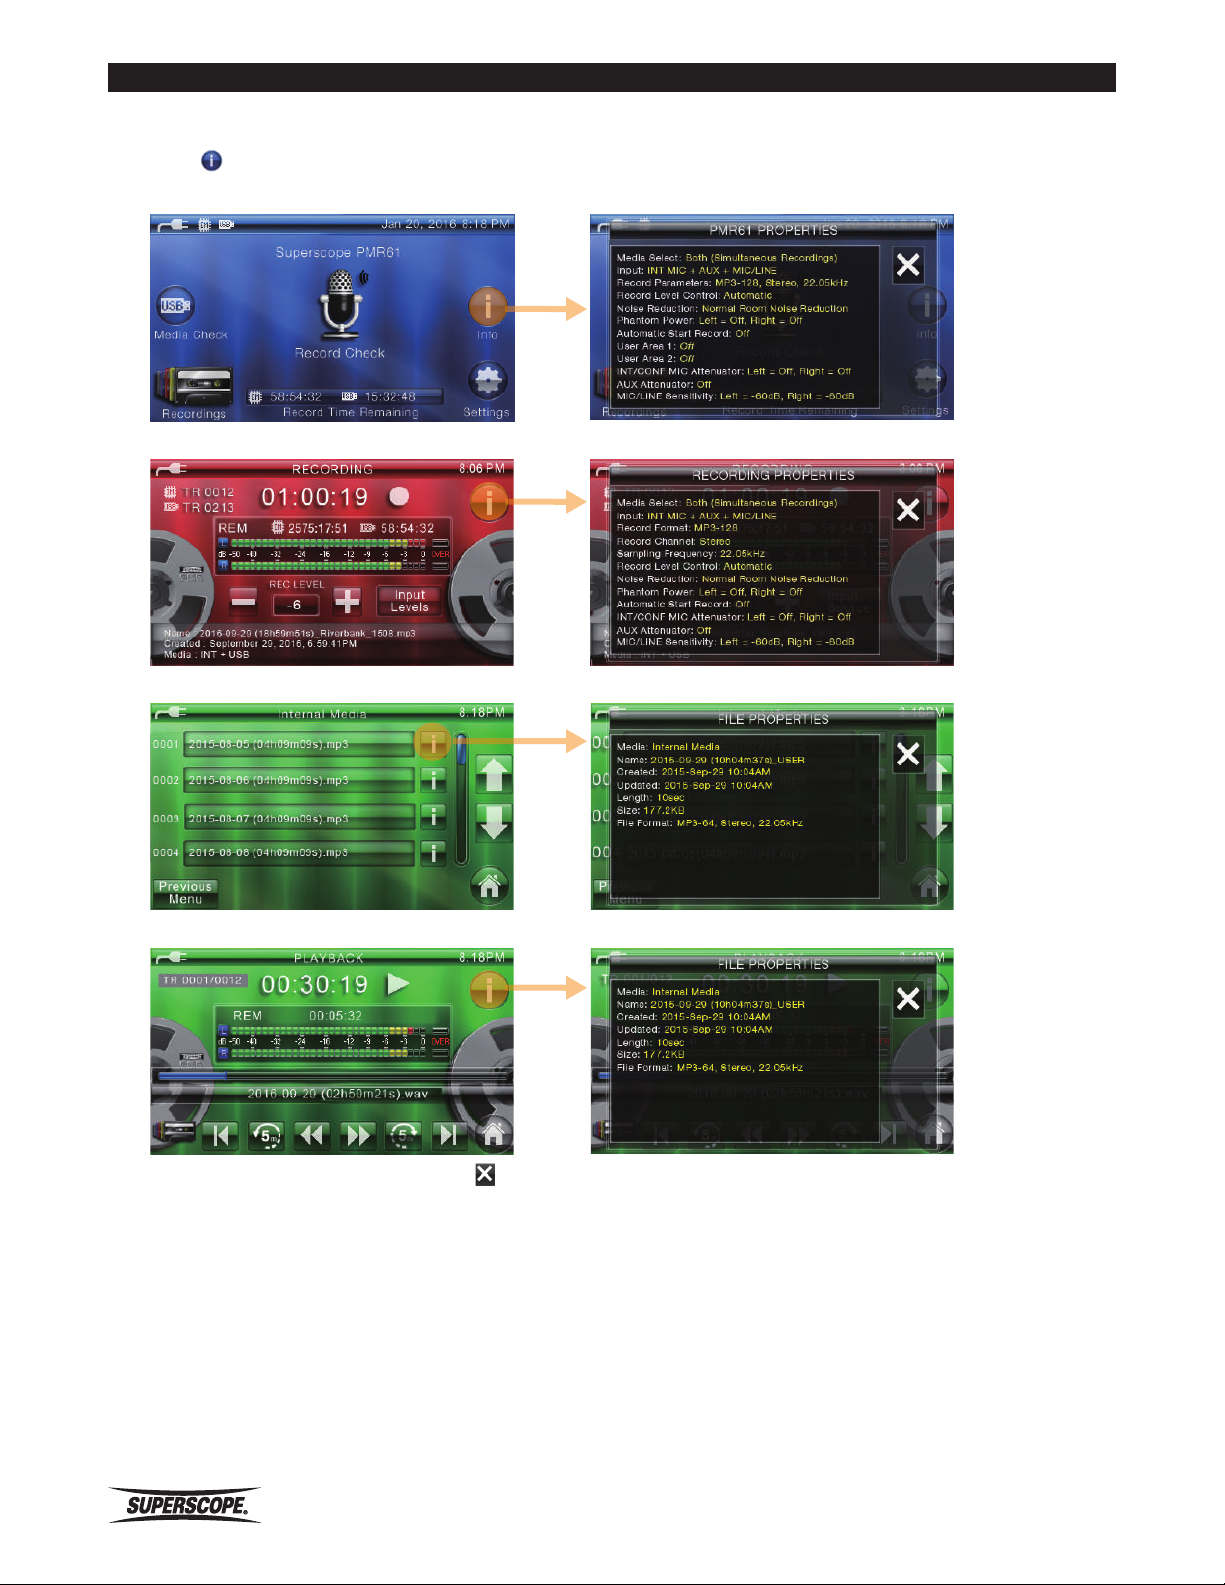
Properties Windows
1. Touch icon to access the properties windows.
Home Screen
Recording
Controls
Recorded Files list
Playing
2. To close the properties window, touch .
Notes
The info fields “Created” and “Updated” Date/Time are displayed in each unique recorded file’s properties by
touching the Info Icon.
Created: Date/Time is the original Date/Time that a recording was started in the PMR61.
Updated: Date/Time is when a PMR recording was stopped or transferred to USB Media or Internal Media using the
Copy, Move and Backup features.
• If a file has no Created: Date/Time when viewed in PMR61 File properties, it was not recorded by a PMR61.
•
Recordings transferred from a computer into the PMR61 via Mass Storage Mode will display an Updated: Date/
Time per the computer’s method.
- 14 -
Superscope PMR61 User Guide

■Recording
1. Press the REC button to begin recording.
The following screen will appear:
2. Touch the − and + level buttons to adjust the REC
LEVEL. When the Record Level Control is set to
Automatic, manual adjustment is not available.
Recording
5. Touch the input source to select it. Then touch + or
– to adjust the levels. Touch the to close the Input
Source Levels Controls screen.
6. To stop recording, press the STOP button.
The recorded file will appear in the File Options screen.
3. To pause the recording, press the PL AY/PAUSE
button. To resume recording press the PL AY/
PAUSE button again or REC button.
4. To select and adjust Input source levels, touch Input
Levels.
Touch the and arrows to scroll through options
associated with the recorded file that is displayed
at the top of the screen. Menu selections Rename,
Copy, Move or Delete require a PIN for operation
if a PIN has been set and turned ON in the Device
Settings.
When the Record Level Control is set to Manual, the
PMR61’s headphone and line output signal includes any
input source after Noise Reduction but before analog
to digital conversion and the codec. When the Record
Level Control is set to Automatic, the headphone and
line output signal includes any input source after Noise
Reduction and analog to digital conversion but before
the codec. To hear what is being recorded, use “Record
Check” to record and playback a test file.
File Limits
Single File Size 2GB
※Note: During the transition time, audio may
be lost. When the above limit is exceeded
during recording, a new file is created
automatically and recording continues.
Superscope PMR61 User Guide
- 15 -
Recording
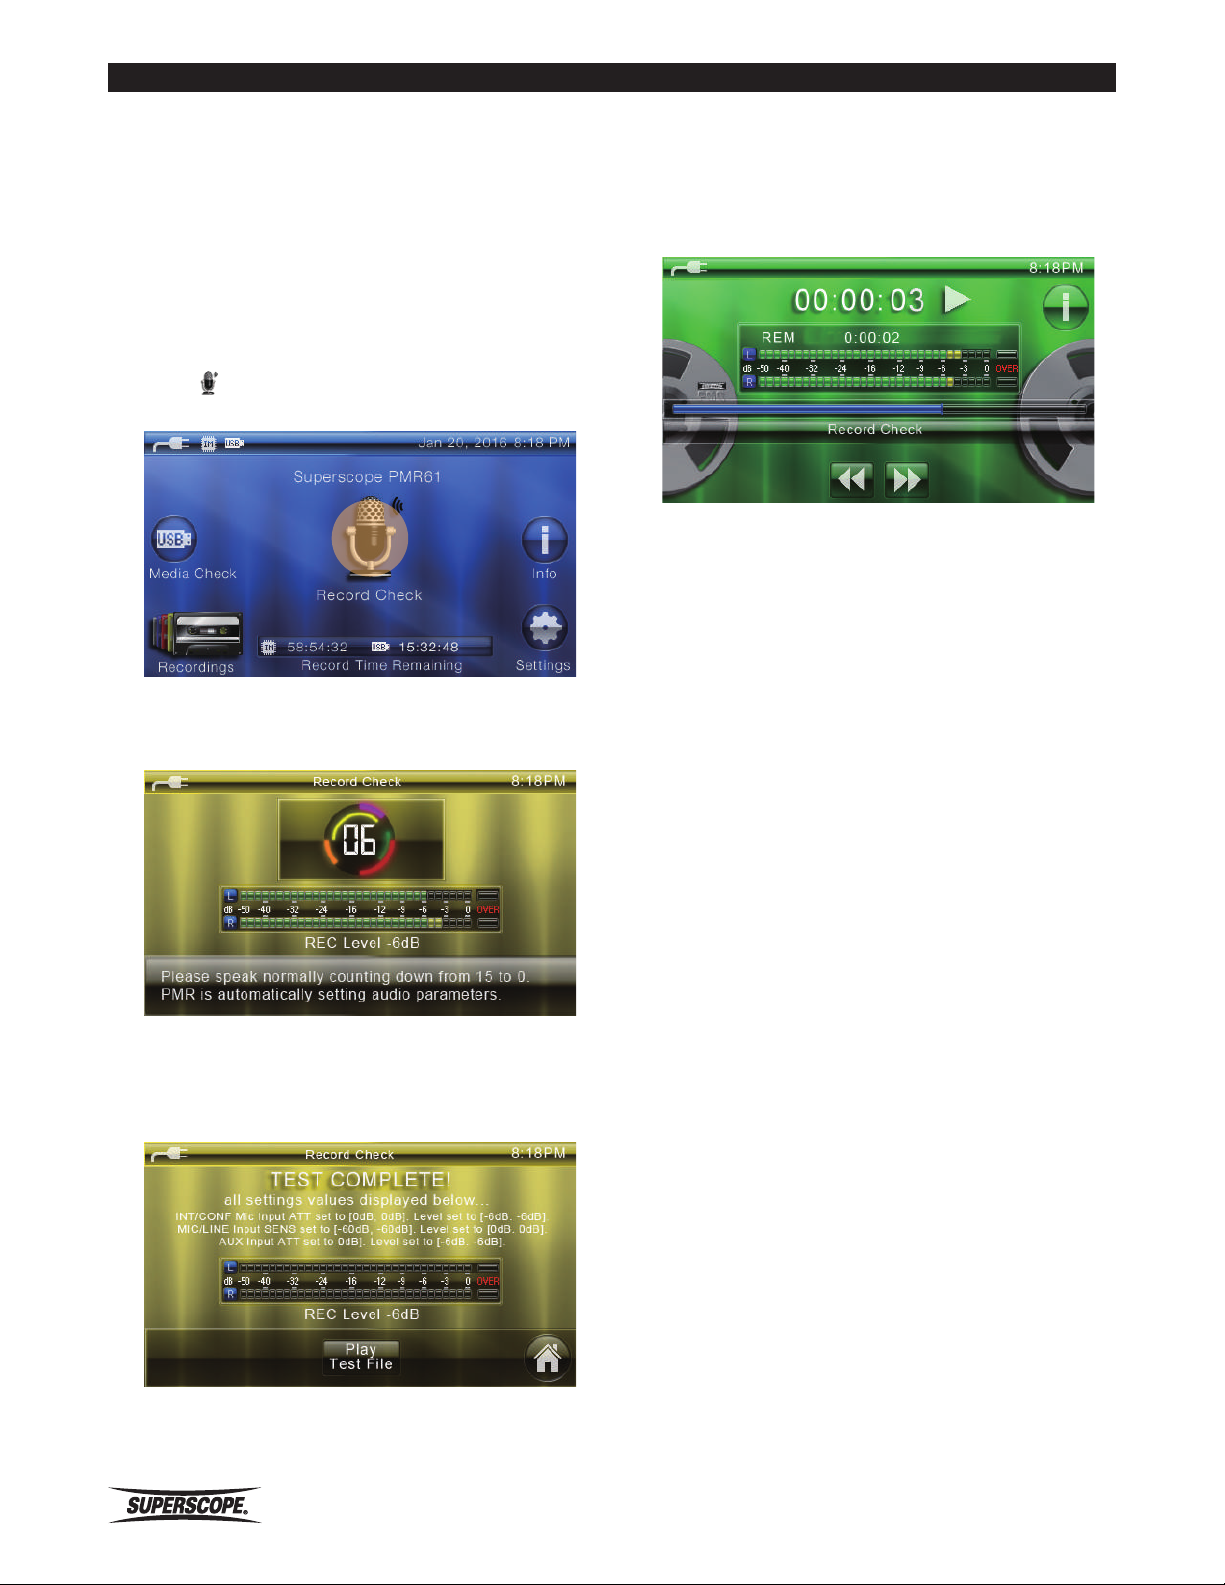
Using RECORD CHECK
Record Check is a 15-second process that automatically
scans multiple input sources and automatically selects
correct sensitivities, attenuation, input levels, and record
level. When the Record Check process is COMPLETED,
you can view the settings and listen to a 5-second test
file to audition the audio performance. The test file will
be automatically discarded. If you are not satisfied with
the recorded performance, you can modify the settings
manually or run the Record Check process again.
1. Touch on the HOME screen to begin Record
Check.
The Record Check screen will appear. Speak into
all microphones that will be used for recording and
count down from 15 to 0.
The PLAYBACK screen will appear and automatically
play the “Record Check” file for you to listen to.
After playback, PMR61 will return to the Record
Check screen. You can listen to the test file again or
return to the Home screen and run Record Check
again.
Note
• During Record Check, be sure to provide a normal
signal throughout the 15 second Record Check
process to any input that you intend to utilize for
recording.
• Pressing the Stop button during the Record Check
process will cancel Record Check.
• Record Check is not available when the Record Level
Control is set to Automatic.
2. Record Check will automatically detect and set input
sensitivities, input source levels, recording levels,
and make a brief test recording. To hear the results,
touch Play Test File.
- 16 -
Superscope PMR61 User Guide

Recording
Checking USB Media
The USB Media Check feature is a speed test designed to
report compatibility of USB media. If using USB media,
always run the USB Media Check prior to use.
1. Insert USB media, wait for media to be recognized,
and then touch USB Media Check.
2. Touch OK.
No Good - USB media is not suitable for use (no USB
icon indication).
3. Touch
Previous Menu to return to the previous Menu.
to return to the HOME screen. Touch
Note
• Detected USB media that has not been checked using
USB Media Check will be indicated by yellow USB
Icon.
• Not all USB media is created equal. PMR61’s USB
Media Check feature is a speed test designed to
report compatibility prior to recording, but this alone
will not guarantee USB media will remain in its tested
condition.
When the USB Media Check process is completed,
one of the three results will be displayed:
Good – USB media is suitable for recording (indicated
by white USB icon).
Poor – USB media is not suitable for recording
(indicated by yellow USB icon).
Superscope PMR61 User Guide
- 17 -
 Loading...