

Page 1
AOC-USAS-L8i Add-on Card
User’s Manual
Revison 1.0c
Page 2
AOC-USAS-L8i Add-on Card User’s Manual
The information in this User’s Manual has been carefully reviewed and is believed to be accurate. The
vendor assumes no responsibility for any inaccuracies that may be contained in this document, makes no
commitment to update or to keep current the information in this manual, or to notify any person or
organization of the updates. P lease Note: For the most up-to-date version of this manual, please see
our web site at www.supermicro.com.
Super Micro Computer, Inc. (“Supermicro”) reserves the right to make changes to the product described
in this manual at any time and without notice. This product, including software, if any, and documentation
may not, in whole or in part, be copied, photocopied, reproduced, translated or reduced to any medium or
machine without prior written consent.
IN NO EVENT WILL SUPERMICRO BE LIABLE FOR DIRECT, INDIRECT, SPECIAL, INCIDENTAL,
SPECULATIVE OR CONSEQUENTIAL DAMAGES ARISING FROM THE USE OR INABILITY TO USE
THIS PRODUCT OR DOCUMENTATION, EVEN IF ADVISED OF THE POSSIBILITY OF SUCH
DAMAGES. IN PARTICULAR, SUPERMICRO SHALL NOT HAVE LIABILITY FOR ANY HARDWARE,
SOFTWARE, OR DATA STORED OR USED WITH THE PRODUCT, INCLUDING THE COSTS OF
REPAIRING, REPLACING, INTEGRATING, INSTALLING OR RECOVERING SUCH HARDWARE,
SOFTWARE, OR DATA.
Any disputes arising between manufacturer and customer shall be governed by the laws of Santa Clara
County in the State of California, USA. The State of California, County of Santa Clara shall be the
exclusive venue for the resolution of any such disputes. Super Micro's total liability for all claims will not
exceed the price paid for the hardware product.
FCC Statement: This equipment has been tested and found to comply with the limits for a Class A digital
device pursuant to Part 15 of the FCC Rules. These limits are designed to provide reasonable protection
against harmful interference when the equipment is operated in a commercial environment. This
equipment generates, uses, and can radiate radio frequency energy and, if not installed and used in
accordance with the manufacturer’s instruction manual, may cause harmful interference with radio
communications. Operation of this equipment in a residential area is likely to cause harmful interference,
in which case you will be required to correct the interference at your own expense.
California Best Management Practices Regulations for Perchlorate Materials: This Perchlorate warning
applies only to products containing CR (Manganese Dioxide) Lithium coin cells. Perchlorate
Material-special handling may apply. See www.dtsc.ca.gov/hazardouswaste/perchlorate for further
details.
WARNING: HANDLING OF LEAD SOLDER MATERIALS USED IN THIS
PRODUCT MAY EXPOSE YOU TO LEAD, A CHEMICAL KNOWN TO THE
STATE OF CALIFORNIA TO CAUSE BIRTH DEFECTS AND OTHER
REPRODUCTIVE HARM.
Manual Revison 1.0c
Release Date: April 2, 2009
Unless you request and receive written permission from Super Micro Computer, Inc., you may not copy
any part of this document. Information in this document is subject to change without notice.
LSI, Integrated Mirroring, Integrated RAID, Integrated Striping, Fusion-MPT, and MegaRAID are
trademarks or registered trademarks of LSI Corporation. Other products and companies referred to herein
are trademarks or registered trademarks of their respective companies or mark holders.
Portions of this document © 2006-2007 LSI Corporation
Copyright © 2008 by Super Micro Computer, Inc.
All rights reserved.
Printed in the United States of America
ii
Page 3

Table of Contents
Table of Contents
Chapter 1 Safety Guidelines..........................................................1-1
1-1 ESD Safety Guidelines.....................................................................1-1
1-2 General Safety Guidelines...............................................................1-1
1-3 An Important Note to Users .............................................................1-1
Chapter 2 Connectors, Jumpers and Indicators............... 2-1
2-1 Front Connectors and Pin Definitions............................................2-1
Internal SAS Connectors ........................................................................2-2
Active LED Connector.............................................................................2-2
2-2 Front Jumper Locations and Pin Definitions................................. 2-3
2-3 LED Indicators ...................................................................................2-4
2-4 RAID Minimum Drive Requirements .............................................. 2-5
Chapter 3 RAID Modes, Firmware and Drivers...................3-1
3-1 RAID Modes.......................................................................................3-1
3-2 Getting Firmware Downloads..........................................................3-2
3-3 Flashing Firmware.............................................................................3-2
3-4 Downloading RAID Mode Drivers...................................................3-2
3-5 Activating RAID Modes in OPROM BIOS .....................................3-3
Chapter 4 MegaRAID BIOS Configuration Utility.............. 4-1
4-1 Performing a Quick Configuration ..................................................4-1
4-2 Configuring Arrays and Logical Drives ..........................................4-1
Starting the MegaRAID BIOS CU ........................................................... 4-2
Using Easy Configuration ....................................................................... 4-2
Using New Configuration and View/Add Configuration........................... 4-4
Creating a Global Hotspare Drive ........................................................... 4-6
Initializing Virtual Drives..........................................................................4-6
First Initialization Method ..................................................................... 4-7
Second Initialization Method ................................................................4-7
4-3 Setting the Hard Disk Write Cache and Read Ahead Policies... 4-8
4-4 Rebuilding a Drive.............................................................................4-9
4-5 Hot Plug Support.............................................................................4-10
4-6 Checking Data Consistency ..........................................................4-11
4-7 Viewing and Changing Device Properties...................................4-12
iii
Page 4

AOC-USAS-L8i Add-on Card User’s Manual
Viewing and Changing Adapter Properties ...........................................4-12
Viewing and Changing Virtual Drive Properties ....................................4-13
Viewing Physical Drive Properties ........................................................4-13
4-8 Forcing Drives Online or Offline.................................................... 4-13
4-9 Configuring a Bootable Virtual Drive............................................4-14
4-10 Deleting a Virtual Drive ................................................................4-14
4-11 Clearing a Storage Configuration ...............................................4-14
Chapter 5 MegaRAID Overview and Installation...............5-1
5-1 Overview.............................................................................................5-1
Creating Storage Configurations............................................................. 5-1
5-2 Hardware and Software Requirements.......................................... 5-2
5-3 Installing for Windows.......................................................................5-2
5-4 Installing for Linux .............................................................................5-5
Linux Error Messages .............................................................................5-5
Chapter 6 MegaRAID Window and Menus ............................6-1
6-1 Starting MegaRAID Storage Manager Software...........................6-1
6-2 MegaRAID Storage Manager Window........................................... 6-4
Physical/Logical View Panel ...................................................................6-4
Properties/Operations/Graphical View Panel.......................................... 6-5
Event Log Panel......................................................................................6-5
Menu Bar ................................................................................................ 6-5
File Menu ............................................................................................. 6-6
Operations Menu.................................................................................. 6-6
Group Operations Menu.......................................................................6-6
Log Menu .............................................................................................6-6
Help Menu............................................................................................6-6
6-3 Creating a New Storage Configuration .......................................... 6-6
Understanding Virtual Disk Parameters ..................................................6-8
Using Auto Configuration ........................................................................6-8
Using Guided Configuration..................................................................6-10
Using Manual Configuration: RAID 0 ....................................................6-13
Using Manual Configuration: RAID 1 ....................................................6-15
Using Manual Configuration: RAID 5 ....................................................6-16
Using Manual Configuration: RAID 10 ..................................................6-17
6-4 Adding or Deleting a Hotspare Disks ...........................................6-18
6-5 Changing Adjustable Task Rates..................................................6-19
6-6 Changing Virtual Disk Properties.................................................. 6-20
iv
Page 5

Table of Contents
6-7 Deleting a Virtual Disk ....................................................................6-20
6-8 Saving a Storage Configuration to Disk.......................................6-21
6-9 Clearing a Storage Configuration from a Controller .................. 6-21
6-10 Adding a Saved Storage Configuration .....................................6-22
Chapter 7 Integrated Mirroring and Integrated Mirroring
Enhanced...................................................................................................7-1
7-1 Introduction.........................................................................................7-1
7-2 IM and IME Features ........................................................................7-2
7-3 IM/IME Description............................................................................ 7-2
7-4 Integrated RAID Firmware ...............................................................7-4
Resynchronization with Concurrent Host I/O Operation .........................7-4
Metadata Support....................................................................................7-4
Hot Swapping.......................................................................................... 7-4
SMART Support......................................................................................7-5
Hot Spare Disk........................................................................................7-5
Media Verification....................................................................................7-5
Disk Write Caching .................................................................................7-5
NVSRAM Usage .....................................................................................7-5
7-5 Fusion-MPT Support.........................................................................7-6
7-6 IM/IME Configuration Overview ......................................................7-6
7-7 Creating IM and IME Volumes ........................................................7-6
Creating an IM Volume ...........................................................................7-7
Creating an IME Volume.......................................................................7-11
Creating a Second IM or IME Volume...................................................7-11
7-8 Managing Hot Spares.....................................................................7-12
7-9 Other Configuration Tasks.............................................................7-13
Viewing Volume Properties ...................................................................7-13
Synchronizing an Array.........................................................................7-13
Activating an Array................................................................................7-14
Deleting an Array ..................................................................................7-14
Locating Drives in a Volume .................................................................7-15
Selecting a Boot Disk............................................................................ 7-15
Chapter 8 Integrated Striping........................................................ 8-1
8-1 Introduction.........................................................................................8-1
8-2 IS Features.........................................................................................8-1
8-3 IS Description.....................................................................................8-2
v
Page 6

AOC-USAS-L8i Add-on Card User’s Manual
8-4 Integrated Striping Firmware ...........................................................8-3
Metadata Support....................................................................................8-3
SMART Support......................................................................................8-3
Disk Write Caching .................................................................................8-3
8-5 Fusion-MPT Support.........................................................................8-3
8-6 IS Configuration Overview...............................................................8-3
8-7 Creating IS Volumes.........................................................................8-4
8-8 Creating a Second IS Volume.........................................................8-7
8-9 Other Configuration Tasks...............................................................8-7
Viewing IS Volume Properties................................................................. 8-7
Activating an Array..................................................................................8-7
Deleting an Array ....................................................................................8-8
Locating a Disk in a Volume.................................................................... 8-8
Selecting a Boot Disk.............................................................................. 8-9
Chapter 9 Using the CFGGEN IR Configuration Utility.9-1
9-1 Hardware and Software Requirements.......................................... 9-1
9-2 CFGGEN Interface Description.......................................................9-2
9-3 CFGGEN Commands.......................................................................9-2
Common Command Line Parameters ....................................................9-3
CREATE Command ................................................................................9-3
DEFAULTS Command............................................................................9-5
DISPLAY Command ...............................................................................9-5
FORMAT Command ............................................................................... 9-8
HOTSPARE Command...........................................................................9-9
STATUS Command.................................................................................9-9
SETOFFLINE Command ......................................................................9-10
SETONLINE Command ........................................................................9-11
AUTO Command (EFI Version Only) ....................................................9-11
DISABLEIR Command (EFI Version Only) ...........................................9-13
ENABLEIR Command (EFI Version Only) ............................................9-13
LIST Command (EFI Version Only) ......................................................9-14
vi
Page 7

Preface
About this Manual
This manual is written for system integrators, PC technicians and knowledgeable PC
users who intend to integrate SuperMicro's AOC-USAS-L8i add-on card to their system.
Product Features
The AOC-USAS-L8i add-on card offers the following features:
• UIO Form Factor
• Dual Internal "ipass" cable ports
• Multiple LED Activity/Failure indicators
Operating Systems Supported
The AOC-USAS-L8i add-on card supports the following Operating Systems (OS):
• Windows 2000/Windows XP/Windows 2003
• Red Hat Enterprise Linux/SUSE Linux
An Important Note to Users
All images and layouts shown in this user's guide are based upon the latest PCB
Revision available at the time of publishing. The card you have received may or may not
look exactly the same as the graphics shown in this manual.
i
Page 8

AOC-USAS-L8i Add-on Card User’s Manual
Contacting SuperMicro
Headquarters
Address: Super Micro Computer, Inc.
980 Rock Ave.
San Jose, CA 95131 U.S.A.
Tel: +1 (408) 503-8000
Fax: +1 (408) 503-8008
Email: marketing@supermicro.com (General Information)
support@supermicro.com (Technical Support)
Web Site: www.supermicro.com
Europe
Address: Super Micro Computer B.V.
Het Sterrenbeeld 28, 5215 ML
‘s-Hertogenbosch, The Netherlands
Tel: +31 (0) 73-6400390
Fax: +31 (0) 73-6416525
Email: sales@supermicro.nl (General Information)
support@supermicro.nl (Technical Support)
rma@supermicro.nl (Customer Support)
9
Asia-Pacific
Address: Super Micro Computer, Inc.
4F, No. 232-1, Liancheng Rd.
Chung-Ho 235, Taipei County
Taiwan, R.O.C.
Tel: +886-(2) 8226-3990
Fax: +886-(2) 8226-3991
Web Site: www.supermicro.com.tw
Technical Support:
Email: support@supermicro.com.tw
Tel: +886-2-8228-1366, ext. 132 or 139
ii
Page 9

Chapter 1
Safety Guidelines
To avoid personal injury and property damage, carefully follow all the safety steps listed
below when accessing your system or handling the components.
1-1 ESD Safety Guidelines
Electric Static Discharge (ESD) can damage electronic components. T o prevent damage
to your system, it is important to handle it very carefully. The following measures are
generally sufficient to protect your equipment from ESD.
• Use a grounded wrist strap designed to prevent static discharge.
• Touch a grounded metal object before removing a component from the antistatic
bag.
• Handle the add-on card by its edges only; do not touch its components, peripheral
chips, memory modules or gold contacts.
• When handling chips or modules, avoid touching their pins.
• Put the card and peripherals back into their antistatic bags when not in use.
1-2 General Safety Guidelines
• Always disconnect power cables before installing or removing any components from
the computer.
• Disconnect the power cable before installing or removing any cables from the
system.
• Make sure that the add-on card is securely and properly installed on the
motherboard to prevent damage to the system due to power shortage.
1-3 An Important Note to Users
All images and layouts shown in this user's guide are based upon the latest PCB
Revision available at the time of publishing. The card you have received may or may not
look exactly the same as the graphics shown in this manual.
1-1
Page 10

AOC-USAS-L8i Add-on Card User’s Manual
Notes
1-2
Page 11
Chapter 2
Connectors, Jumpers and Indicators
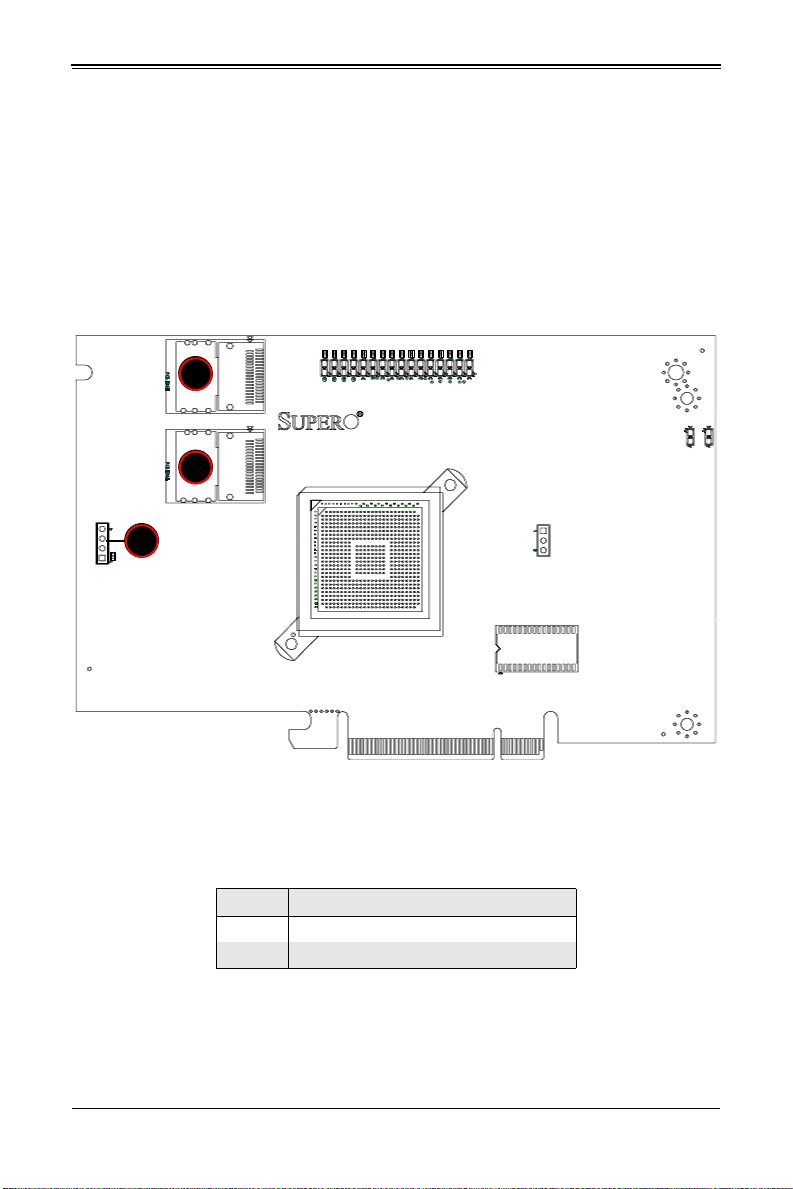
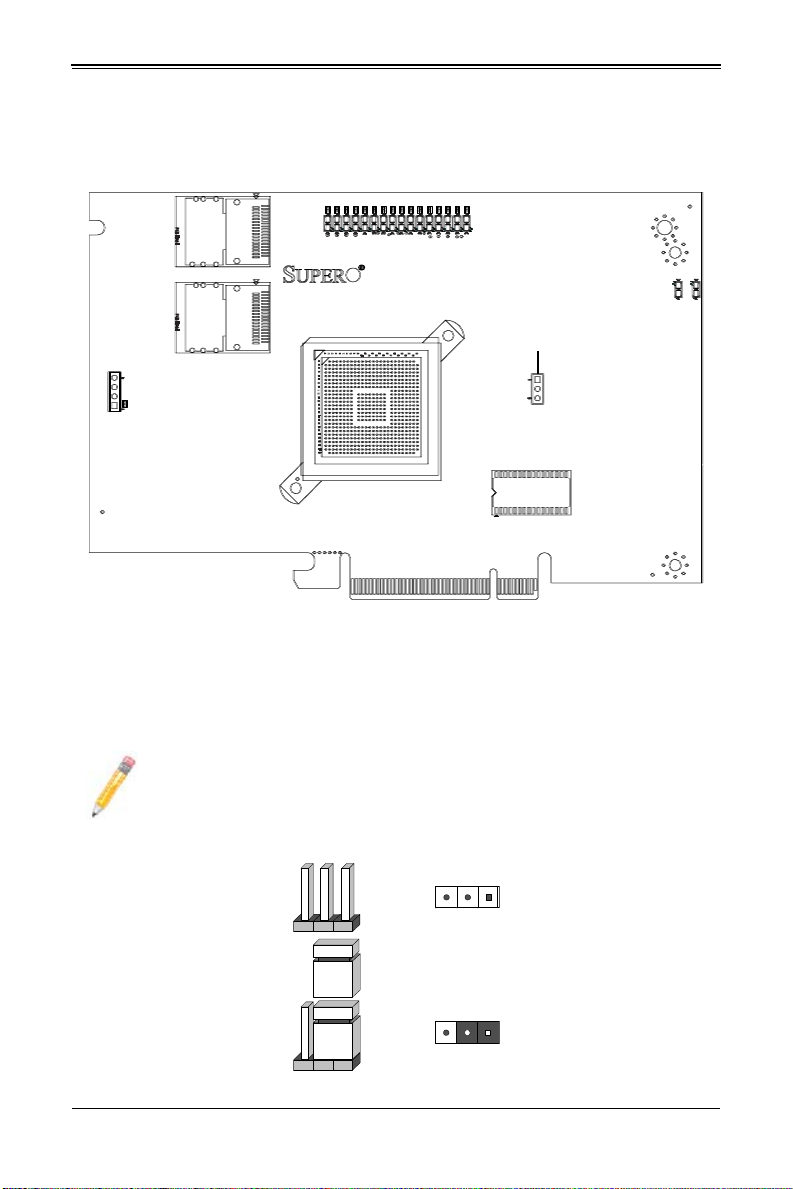
2-1 Front Connectors and Pin Definitions
Connectors are used to attach the add-on card to the system’s mainboard.
Figure 2-1. AOC-USAS-L8i Add On Card Front Connectors and Jumpers
1
1
2
Table 2-1 lists the add-on card’s front connectors.
Table 2-1. Front Connectors and Pin Definitions
Number Description
1 Internal SAS Connectors
2 Front Panel LED Connector
2-1
Page 12
AOC-USAS-L8i Add-on Card User’s Manual
Internal SAS Connectors
The Internal SAS ports (SFF-8087 connector) connect to the backplane allowing the
motherboard to access the hard drives and RAID capabilities. Each connector supports
up to four hard drives allowing the add-on card to support a maximum of eight. (SAS 0-3
and SAS 4-7).
Use a single port SAS "ipass" cable (SuperMicro order number CBL-0108L-02).
Active LED Connector
The LED connector allows the add-on card to display activity and status using a
standard LED panel. Table 2-2 lists the pin definitions for this connector.
Table 2-2. Front Jumpers and Pin Definitions
Number Description
1A - LED+
2 A - LED-
3B - LED+
4 B - LED-
2-2
Page 13
Chapter 2: Connectors, Jumpers and Indicators
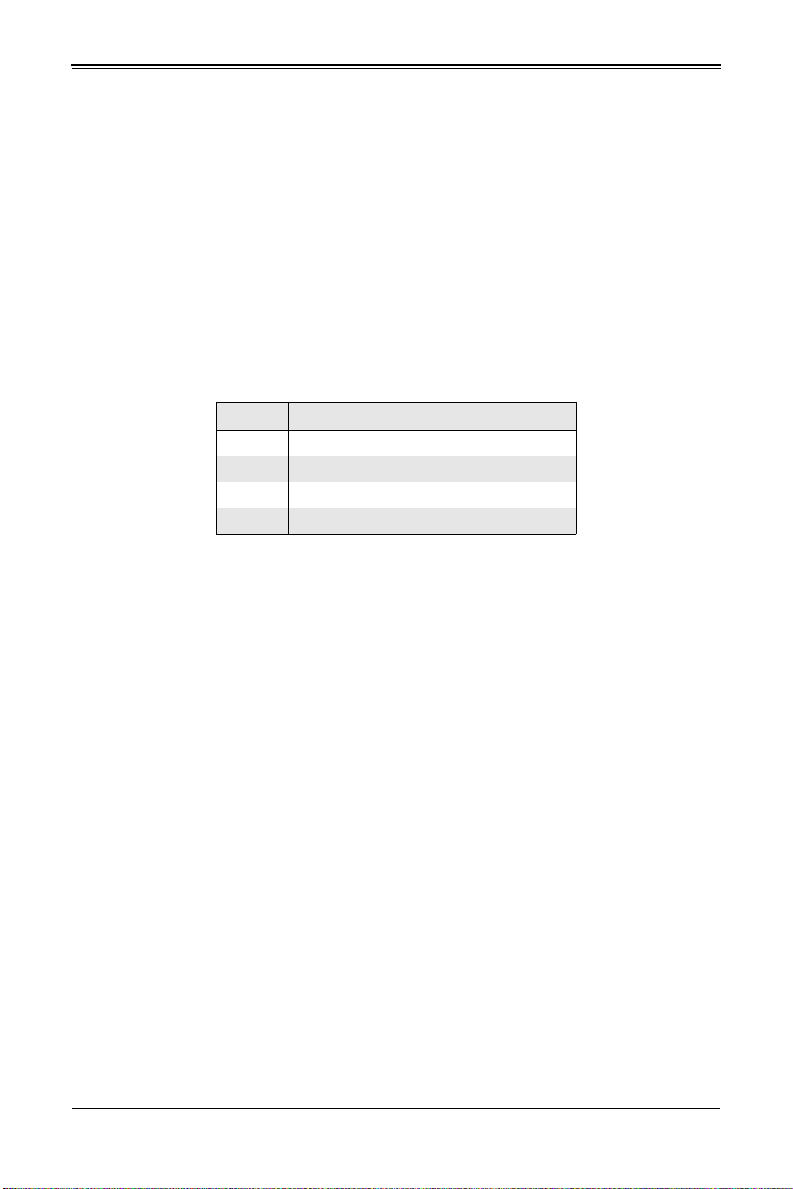
2-2 Front Jumper Locations and Pin Definitions
Figure 2-2. Jumper Locations
SWR5
To modify the operation of the backplane, jumpers can be used to choose between
optional settings. Jumpers create shorts between two pins to change the function of the
connector. Pin 1 is identified with a square solder pad on the printed circuit board.
Figure 2-2 shows jumper locations for the add-on card, while Table 2-3 lists the add-on
card’s pin definitions.
NOTE: On two pin jumpers, "Closed" means the jumper is on and "Open"
means the jumper is off the pins.
Connector
Pins
Jumper
Setting
3 2 1
3 2 1
2-3
Page 14
AOC-USAS-L8i Add-on Card User’s Manual
Table 2-3. SWR5 Jumper Settings
Jumper Jumper Settings Note
SWR5
1-2: Enabled
3: Disabled
Leave disabled when operating in IR or IT mode. Enable for SR
mode operation. Default setting is disabled for IT mode (see
Chapter 3).
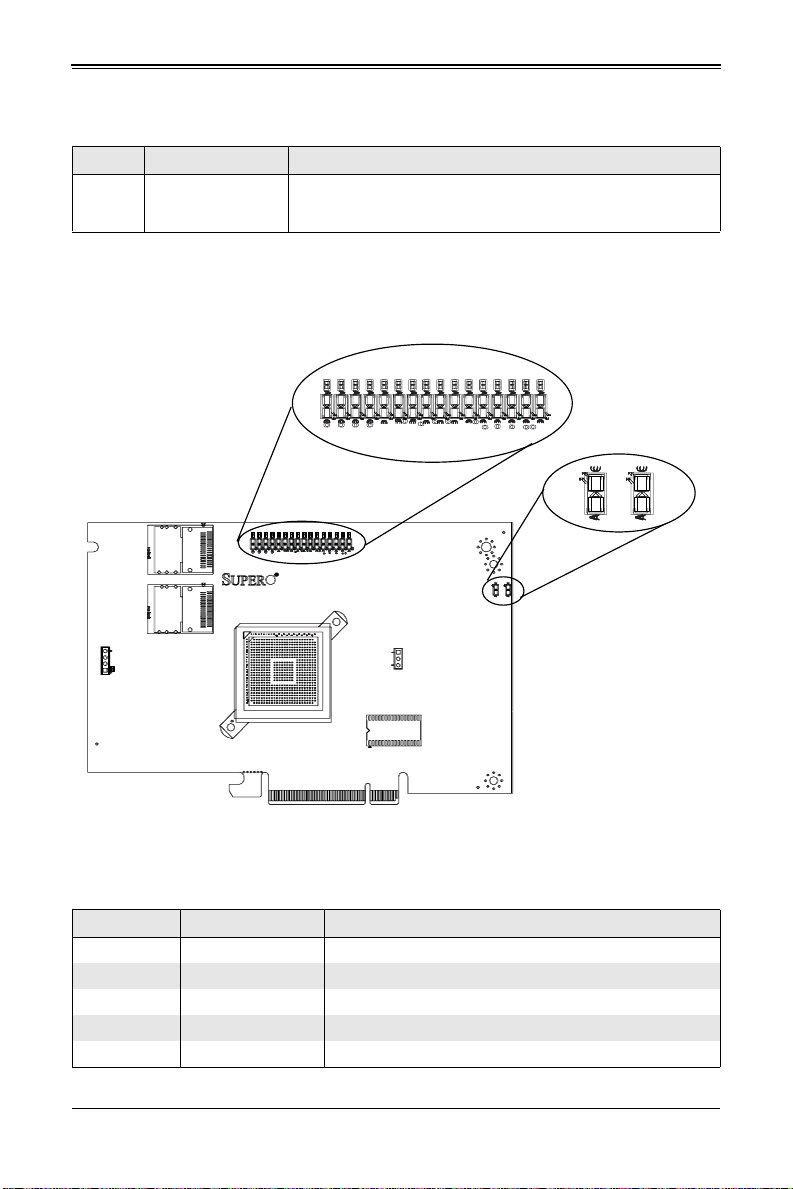
2-3 LED Indicators
Figure 2-3. LED Indicators
Power LEDS
LNP0 - LNP7
A0 - A7
LED2 LED1
Figure displays LED indicators on the add-on card, while table lists the individual LEDs,
their state and their specification.
Table 2-4. Front Pane LEDs
LED State Specification
LED1 Flashing SAS Port Activity
LED2 Flashing Heartbeat and Fault
LNP0 On Fault in HDD #0
LNP1 On Fault in HDD #1
LNP2 On Fault in HDD #2
2-4
Page 15
Chapter 2: Connectors, Jumpers and Indicators
Table 2-4. Front Pane LEDs (Continued)
LED State Specification
LNP3 On Fault in HDD #3
LNP4 On Fault in HDD #4
LNP5 On Fault in HDD #5
LNP6 On Fault in HDD #6
LNP7 On Fault in HDD #7
A0 Flashing Normal Activity in HDD #0
A1 Flashing Normal Activity in HDD #1
A2 Flashing Normal Activity in HDD #2
A3 Flashing Normal Activity in HDD #3
A4 Flashing Normal Activity in HDD #4
A5 Flashing Normal Activity in HDD #5
A6 Flashing Normal Activity in HDD #6
A7 Flashing Normal Activity in HDD #7
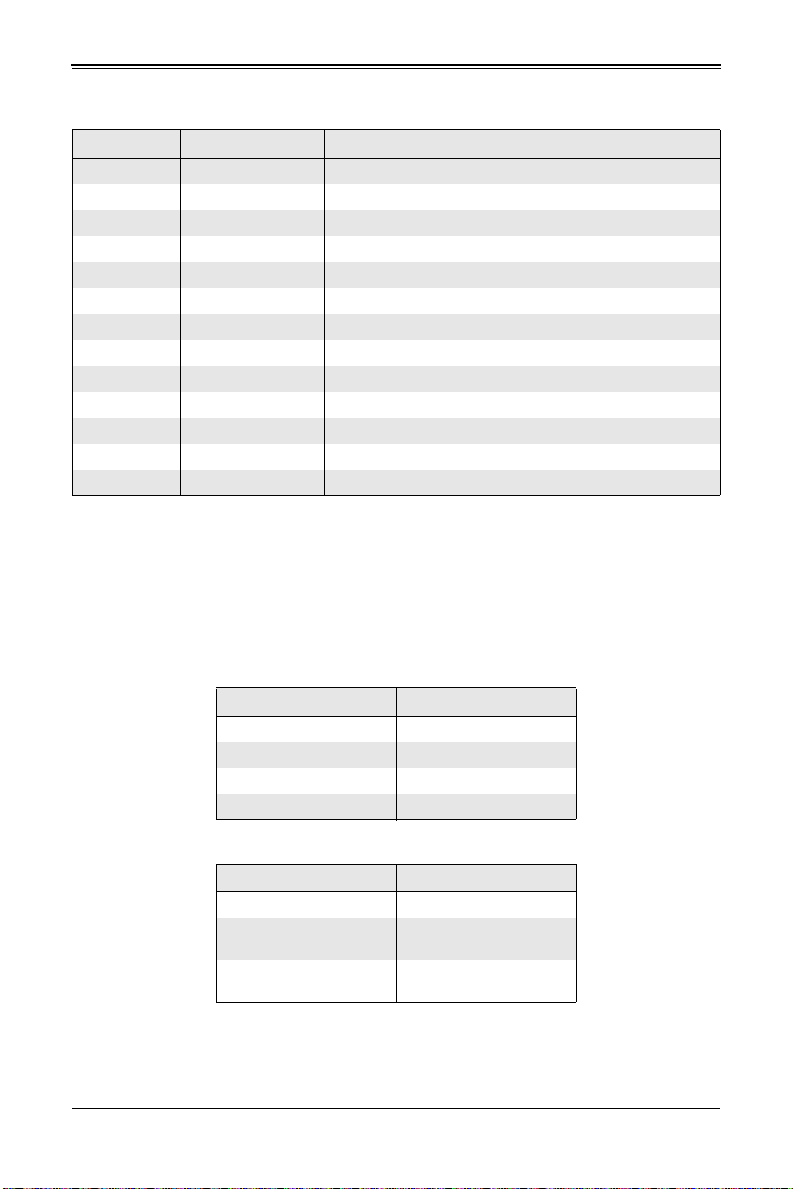
2-4 RAID Minimum Drive Requirements
Use Table 2-5 to determine the minimum number of hard drives needed to set up a
RAID environment in SR mode for the AOC-USAS-L8i Add-on Card. Use Table 2-6 to
determine the minimum number of hard drives needed to set up a RAID environment in
IR mode for the AOC-USAS-L8i Add-on Card.
Table 2-5. RAID Minimum Drive Requirements for SR Mode
RAID Minimum Hard Drives
RAID 0 2
RAID 1 2
RAID 5 3
RAID 10 4 (Two RAID 1 Arrays)
Table 2-6. RAID Minimum Drive Requirements for IR Mode
RAID Minimum Hard Drives
RAID 0 (Integrated Striping) 2
RAID 1 (Integrated
Mirroring)
RAID 1E (Integrated
Mirroring Enhanced)
2
3
2-5
Page 16

AOC-USAS-L8i Add-on Card User’s Manual
Notes
2-6
Page 17

Chapter 3
RAID Modes, Firmware and Drivers
To change RAID modes from the AOC-USAS-L8i Add-on Card’s default IT Mode, you
need to flash your system’s BIOS with a Firmware download and install drivers for the
RAID mode to your operating system.
3-1 RAID Modes
There are three RAID modes that are supported by the AOC-USAS-L8i Add-on Card:
• IT Mode (Initiator and Target Mode): This is the default mode for the
AOC-USAS-L8i Add-on Card. The maximum support for this mode is up to 122 hard
disk drives under expander topology. This mode does not support RAID.
This mode requires an IT mode firmware flash to the BIOS and an IT mode driver
installation to the OS.
• IR Mode (Integrated RAID Mode): In Integrated Raid™ mode the integrated ARM
chip on the AOC-USAS-L8i Add-on Card creates Integrated Mirroring™ (IM, RAID
1), Integrated Mirroring Enhanced (IME, RAID 1E) and Integrated Striping (IS, RAID
0) through the chipset’s BIOS and the system’s OS. The maximum support for this
IR mode is up to 63 hard disk drives under an expander topology.
See Chapter 7: "Integrated Mirroring and Integrated Mirroring Enhanced" on
page 7-1 and Chapter 8: "Integrated Striping" on page 8-1 for details on Integrated
Mirroring Enhanced or Integrated Striping.
This RAID mode requires an IR mode firmware flash to the BIOS and an IT mode
driver installation to the OS.
• SR (Software RAID): In this mode you must buy the I-Button feature from
SuperMicro to enable RAID level 5 use. First you must create RAID level 0, 1, 5 or
10 from the MegaRAID BIOS Configuration Utility in order for the OS to see the hard
disk drives (this can be done via MSM too, so necessary need to be done in
MegaRAID Configuration Utility). The maximum support for this RAID mode is up to
eight (8) hard disk drives under expander topology.
This RAID mode requires an SR mode firmware flash to the BIOS and an SR mode
driver installation to the OS. This mode also requires that the SWR5 jumper on the
AOC-USAS-L8i Add-on Card is enabled (see Section 2-2: "Front Jumper Locations
and Pin Definitions" on page 2-3 for details).
NOTE: MegaRAID Storage Manager (MSM) software version 2.60 or later
supports both SR and IR Mode in both Windows and Linux. MSM does not
support IT Mode since IT is only an initiator and target mode, and therefore it
does not required storage management utility.
3-1
Page 18

AOC-USAS-L8i Add-on Card User’s Manual
3-2 Getting Firmware Downloads
Firmware for RAID modes can only be obtained through contacting SuperMicro
Technical Support for instructions and assistance to obtain firmware downloads.
Each of the RAID modes requires a different firmware download. Make sure the
firmware download corresponds to the RAID mode (IT, IR or SR) that you wish to use
before installing it.
3-3 Flashing Firmware
Follow the procedure below to flash firmware to the BIOS.
Flashing Firmware:
1. Before Flashing the Firmware and BIOS, please erase all the flash part first. Boot to
DOS and run the Clear.BAT file by entering the following command at the DOS
prompt:
a:\>Clear.BAT
This clears all the content from the flash memory.
2. Reboot the system before doing the Firmware and BIOS flash.
3. Flash the BIOS using the ***.BAT file with the following command at the DOS
prompt (where *** represents the name of the BAT file used):
a:\>***.BAT
This automatically flashes the BIOS.
4. The BAT file will flash Firmware and BIOS on the screen. Manually enter the SAS
address when prompted.
5. When the flashing is completed, reboot the system.
The new firmware is now flashed to your system’s BIOS.
3-4 Downloading RAID Mode Drivers
To obtain drivers go to the SuperMicro FTP site and down the appropriate driver for the
operating system you are using.
The drivers can be found at the following FTP site:
ftp://ftp.supermicro.com/driver/SAS/LSI/1064_1068/
See the installation text file within each download for details on the installation of these
drivers.
3-2
Page 19

Chapter 3: RAID Modes, Firmware and Drivers
3-5 Activating RAID Modes in OPROM BIOS
RAID modes can be activated by pressing keyboard keys in the OPROM BIOS setup.
Press CTRL-C for IT or IR mode and CTRL-M for SR mode to activate your system for
one of these modes.
3-3
Page 20

AOC-USAS-L8i Add-on Card User’s Manual
Notes
3-4
Page 21
Chapter 4
MegaRAID BIOS Configuration Utility
The LSI™ MegaRAID® BIOS Configuration Utility (CU) is used to configure disk arrays
and virtual drives and to do other configuration tasks in a pre-boot environment. This
utility is primarily used for SR Mode configurations for the AOC-USAS-L8i Add-on Card.
4-1 Performing a Quick Configuration
The below procedure for quickly configuring arrays and logical drives with the
MegaRAID BIOS CU is intended for users that are already familiar with configuration
utilities and tools. Refer to Section 4-2 for detailed configuration instructions. To ensure
the best performance, select the optimal RAID level for the logical drive you create.
WARNING: It is recommended that you do not use both SAS and SATA drives in
the same array. Using different drive interfaces in this way could cause
unpredictable behavior, decreased performance, an increased error count and
decreased Mean Time Between Failures (MTBF).
Use the following procedure for quickly configuring arrays and logical drives using the
MegaRAID BIOS CU:
1. Boot the system.
2. Start the MegaRAID BIOS CU by pressing C
3. Select CONFIGURE from the MANAGEMENT menu.
4. Select a configuration method from the CONFIGURATION menu. You may choose
from either E
C
ONFIGURATION.
5. Create arrays using the available physical drives.
6. Define the logical drive(s) using the space in the arrays.
7. Initialize the new logical drive(s).
ASY CONFIGURATION, NEW CONFIGURATION or VIEW/ADD
TRL+M.
4-2 Configuring Arrays and Logical Drives
This section provides instructions for configuring arrays and logical drives with the
MegaRAID BIOS CU.
It is recommended that you use drives with the same capacity when you create a
storage configurations. If you use drives with different capacities in one array, the CU
limits each drive to the capacity of the smallest drive.
The number of physical drives in a specific array determines the possible RAID levels
that you can implement with the array. See Section 2-4: "RAID Minimum Drive
Requirements" on page 2-5 for further details.
4-1
Page 22
AOC-USAS-L8i Add-on Card User’s Manual
Starting the MegaRAID BIOS CU
Follow these steps to start the MegaRAID BIOS CU:
1. During boot-up, wait for the following message to appear on the screen:
Press Ctrl-M to run LSI Software RAID Setup Utility
2. When you see this message, hold down the C
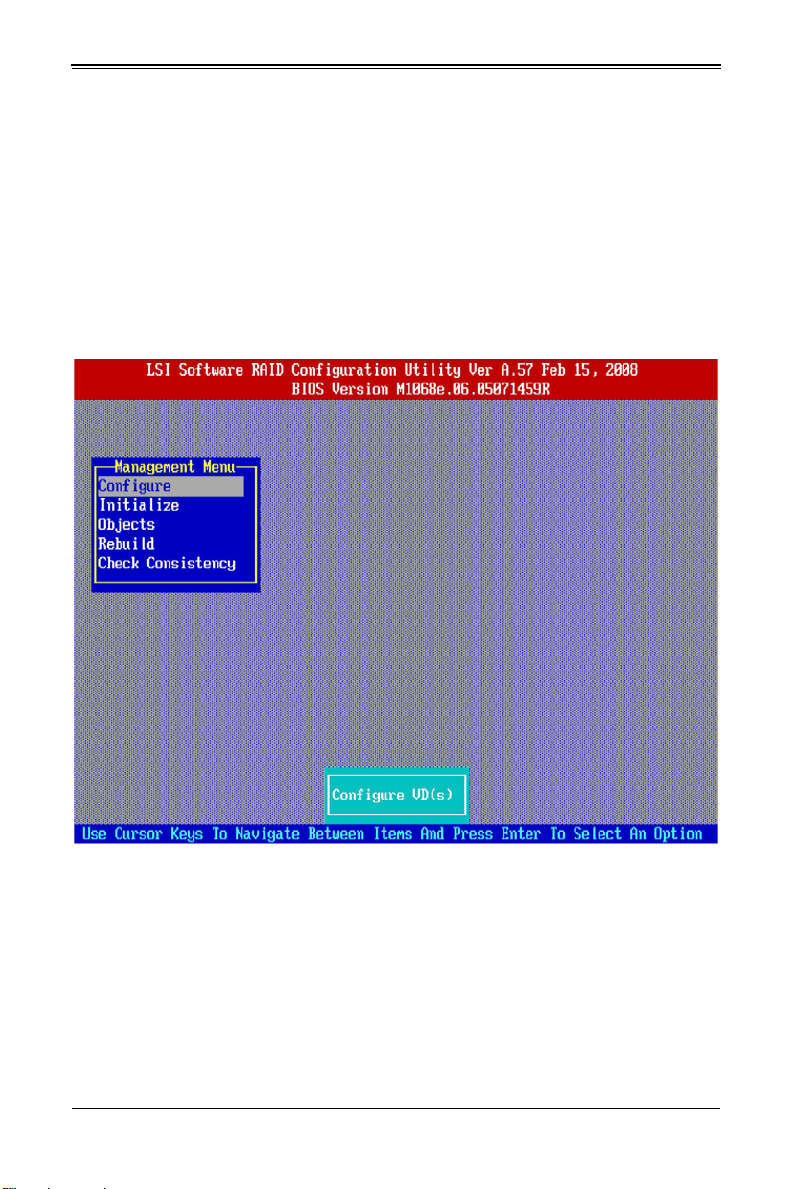
The RAID CONFIGURATION UTILITY MANAGEMENT MENU screen appears, as shown in
Figure 4-1.
Figure 4-1. RAID Configuration Utility Management Menu Screen
TRL key while pressing the M-KEY.
Using Easy Configuration
When you select the Easy Configuration Option, the CU creates one or more arrays
from the available physical drives and configures each array as a single virtual drive. If
virtual drives have already been configured, the CU does not change their configuration.
Follow the steps below to create a virtual drive using E
1. Select CONFIGURATION J EASY CONFIGURATION from the MANAGEMENT menu.
A list of available (READY) physical drives appears.
4-2
ASY CONFIGURATION:
Page 23
Chapter 4: MegaRAID BIOS Configuration Utility
2. Use the arrow keys to select the physical drives you want to include in the array.
a. Press the SPACEBAR to add each selected physical drive to the new array.
When you select a physical drive, its status changes from READY to ONLIN
A[array number]-[drive number]. For example,
ONLIN A00-01 means array 0, disk drive 1.
b. To create a global hotspare drive, highlight a READY disk drive and press F4.
Then select Y
c. To define multiple arrays, select all the drives you want for the first array, then
press E
When you have selected drives for all desired arrays, press F10.
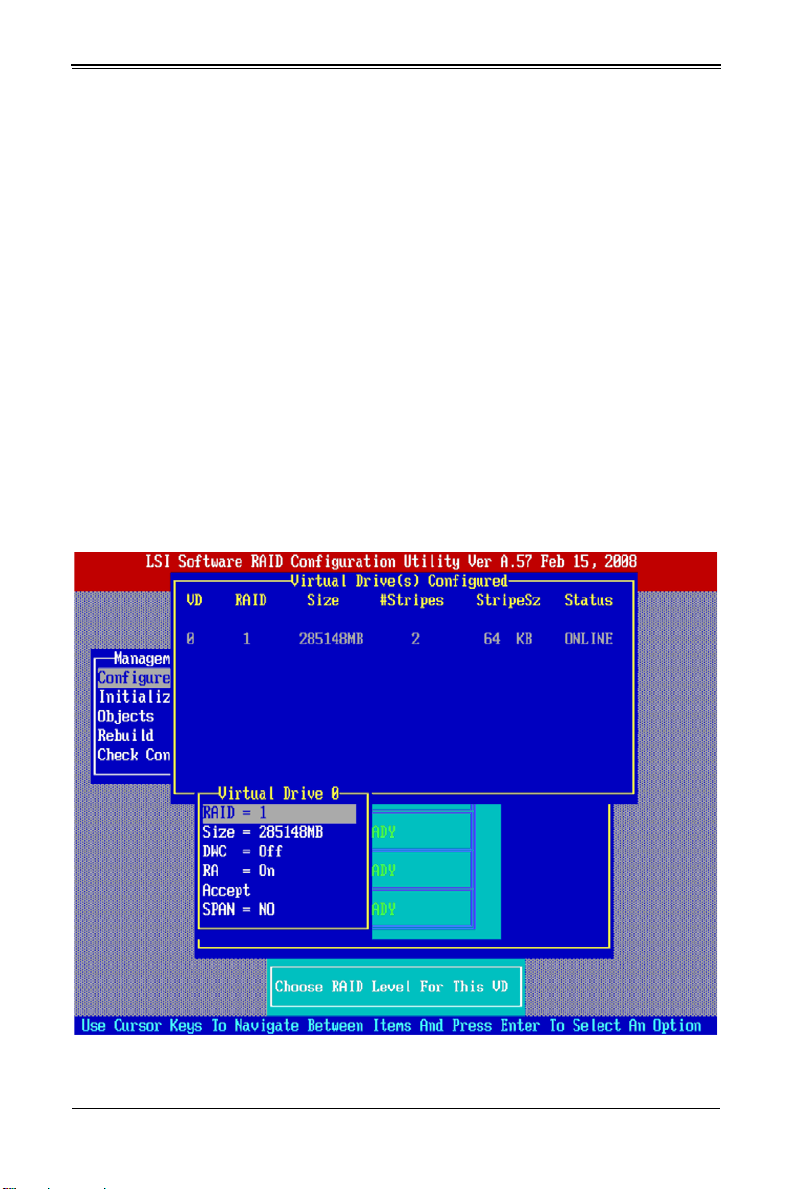
3. Press the
The VIRTUAL DRIVES CONFIGURED screen appears, as shown in Figure 4-2. This
screen shows the virtual drive number, RAID level, virtual drive size, number of
stripes in the physical array, stripe size, and state of the virtual drive.
Press F10 again.
ES from the pop-up menu.
NTER to start selecting drives for the second array, and so on.
SPACEBAR to select an array.
Figure 4-2. Virtual Drives Configured Screen
4-3
Page 24
AOC-USAS-L8i Add-on Card User’s Manual
4. Highlight RAID and press ENTER.
The available RAID levels for the current virtual drive are displayed.
5. Select a RAID level for the virtual drive and press E
NTER.
6. (Optional) Change the drive’s default Write Cache and Read Ahead policies (see
Section 4-3: "Setting the Hard Disk Write Cache and Read Ahead Policies" on
page 4-8).
7. When you have finished defining the current virtual drive, select A
E
NTER.
CCEPT and press
8. Save the configuration when prompted, and press any key to return to the
M
ANAGEMENT menu.
13. Initialize the new virtual drive(s) (see "Initializing Virtual Drives" on page 4-6 for
detailed instructions.)
Using New Configuration and View/Add Configuration
When you select the NEW CONFIGURATION menu option, the CU deletes the existing
arrays and virtual drives and replaces them with the new configuration that you specify.
The V
IEW/ADD CONFIGURATION menu option lets you view the existing configuration or
add to the existing configuration, if possible.
WARNING: If you want to keep the existing data on the storage configuration,
use V
IEW/ADD CONFIGURATION instead of NEW CONFIGURATION.
Follow these steps to configure a disk array using the N
C
ONFIGURATION option:
EW CONFIGURATION or VIEW/ADD
1. SELECT CONFIGURATION J NEW CONFIGURATION or CONFIGURATION→ VIEW/ADD
C
ONFIGURATION from the MANAGEMENT menu.
If you selected NEW CONFIGURATION, select YES to proceed and confirm that you are
erasing the existing storage configuration.
The CU displays an array selection window.
NOTE: The existing storage configuration will be erased only if you save the
newly created configuration at the end of the process. It you do not save the
new configuration, the CU will restore the previously existing configuration.
2. Use the arrow keys to select physical drives for the new array.
3. Press the
SPACEBAR to add each selected physical drive to the new array.
When you select a drive, its status changes from READY to ONLIN A[array number]
- [drive number]. For example, ONLIN A00-01 means array 0, disk drive 1.
4-4
Page 25

Chapter 4: MegaRAID BIOS Configuration Utility
4. To create a global hotspare drive, highlight a READY disk drive and press F4. Then
select Y
ES from the pop-up menu.
Make sure the capacity of the hotspare drive is equal to or larger than the capacity
of the disks in the array and that it is the same type of drive (SAS or SATA).
NOTE: The hotspare drive will rebuild a failed drive even if it is SAS and the
failed drive is SATA, or vice versa. Once the rebuilt is completed, however, it is
recommended that you replace the new array member with a drive of the same
type.
5. To define multiple arrays, select all the drives you want for the first array, then press
E
NTER to start selecting drives for the second array, and so on.
6. When you have selected drives for all desired arrays, press F10.
7. Press the
Press F10 to continue.
8. Highlight RAID and press E
A list of the available RAID levels for the current virtual drive appears.
9. Select a RAID level for the virtual drive and press E
10. (Optional) You may also set the logical drive size by highlighting SIZE and then
pressing E
The minimum valid virtual drive size is 64 Mbytes. An error will appear if you try to
create a virtual drive that is smaller 64 Mbytes.
By default, all the available space in the array is to the current virtual drive. For
RAID 10 arrays, only one virtual can be defined for the entire array.
11. (Optional) You may change the disks’s default Write Cache and Read Ahead
policies (see Section 4-3: "Setting the Hard Disk Write Cache and Read Ahead
Policies" on page 4-8).
12. When you have finished defining the current virtual drive, select A
E
NTER.
13. Configure additional virtual drives on the same array, if desired.
If you have created more than one array, configure a virtual drive on the second
array.
14. Save the configuration when prompted, and press any key to return to the
M
15. Initialize the new virtual drive(s). (See "Initializing Virtual Drives" on page 4-6 for
detailed instructions.)
SPACEBAR to select an array, if needed.
NTER.
NTER.
NTER.
CCEPT and press
ANAGEMENT menu.
4-5
Page 26
AOC-USAS-L8i Add-on Card User’s Manual
Creating a Global Hotspare Drive
The MegaRAID BIOS CU enables you to create global hotspare drives (dedicated
hotspare drives are not supported). A hotspare drive can automatically replace a failed
drive in a redundant RAID 1 or RAID 10 array, to protect against data loss.
WARNING: When you select disk drive for a global hotspare, be sure it is the
same type of drive (either SAS or SATA) as the drives in the arrays that it will
protect. It is recommended that you do not combine SAS and SATA drives in the
same array.
You can create a hotspare when you are configuring a new storage configuration, as
described in the previous sections.
Adding a Hotspare Drive
To add a hotspare drive to an existing redundant storage configuration, use the following
steps:
1. Select O
2. Select PHYSICAL DRIVE.
A list of physical drives appears.
3. Select an un-configured drive or R
4. When the PHYSICAL DRIVE PROPERTY menu appears, select MAKE HOT SPARE and
press E
5. Select YES from the pop-up menu to create the hotspare drive.
Removing a Hotspare Drive
To remove a hotspare drive
1. Select O
2. Select PHYSICAL DRIVE.
A list of physical drives appears.
3. Select the HOTSP disk and press E
4. Select FORCE OFFL INE and press ENTER.
The status of the drive changes to READY, and it can then be used in another new
array.
BJECTS from the MANAGEMENT menu.
EADY drive from the list, and press ENTER.
NTER.
BJECTS from the MANAGEMENT menu.
NTER
Initializing Virtual Drives
WARNING: When you initialize a virtual drive all existing data on the virtual drive
is erased.
4-6
Page 27

Chapter 4: MegaRAID BIOS Configuration Utility
This section explains the two methods of initializing a virtual drive with the MegaRAID
BIOS CU.
If the F
AST INIT property is enabled, fast initialization is used. In fast initialization, the
MegaRAID BIOS CU quickly writes zeroes to the first and last 8 Mbyte regions of the
new virtual drive.
If the F
AST INIT property is not enabled, the MegaRAID BIOS CU performs a complete
initialization on the virtual drive. This may take a long time if the physical disk drives are
large.
First Initialization Method
Follow these steps to initialize a virtual drive using the INITIALIZE menu.
1. On the MANAGEMENT menu, select INITIALIZE.
2. Use the SPACEBAR to highlight the virtual drive to initialize.
The virtual drive name is highlighted in yellow. To deselect it, highlight the virtual
drive and press the
3. Press F10.
4. Select Y
ES at the prompt and press ENTER to begin the initialization.
A graph shows the progress of the initialization until it is complete.
5. After the initialization is complete, press E
If you press ESC while initialization is in progress, the following options appear:
• Stop: (Available only if AutoResume is enabled on the adapter: MANAGEMENT
menu J O
and the CU stores the percentage of the initialization already completed. If
AutoResume is enabled, and if Fast Init is not enabled, the initialization
resumes where it left off when you restart it, instead of starting over from zero
percent.
• Continue: The initialization continues normally.
• Abort: The initialization is completely aborted. If you restart initialization, it
begins at zero percent.
SPACEBAR again.
SC to return to previous menus.
BJECTS J ADAPTER J AUTORESUME.) The initialization is stopped,
Second Initialization Method
Follow these steps to initialize a virtual drive using the OBJECTS menu.
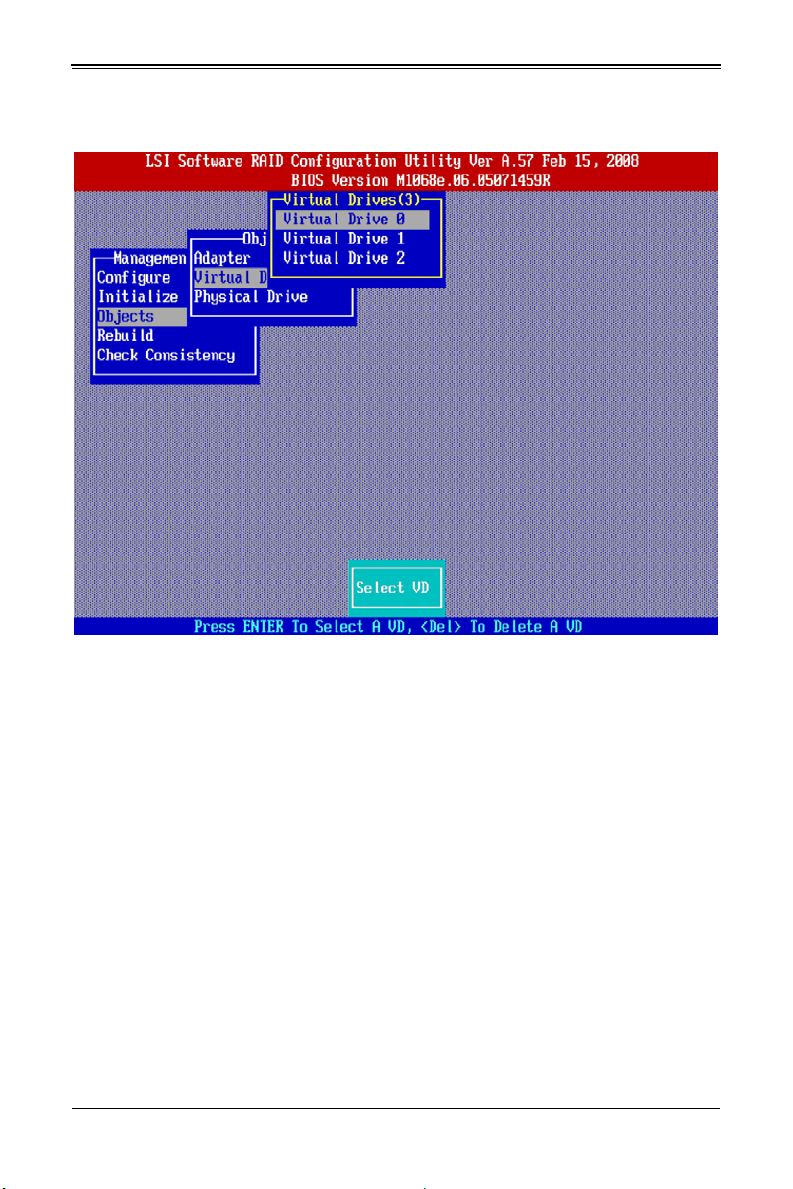
1. From the MANAGEMENT menu, select OBJECTS J VIRTUAL DRIVE, as shown in
Figure 4-3.
The V
IRTUAL DRIVES LIST screen appears (Figure 4-3).
4-7
Page 28
AOC-USAS-L8i Add-on Card User’s Manual
Figure 4-3. Virtual Drives List Screen
2. Select a virtual drive, if there is more than one configured, and press ENTER.
3. Select INITIALIZE from the submenu and press ENTER.
4. Select YES at the prompt and press ENTER.
The CU displays a bar graph showing the initialization progress.
5. When initialization completes, press E
If you press E
options are available, as explained earlier in "First Initialization Method", step 5
above.
SC while initialization is in progress, the STOP, CONTINUE, and ABORT
SC to return to the previous menu.
4-3 Setting the Hard Disk Write Cache and Read Ahead
Policies
You can use the MegaRAID BIOS CU to set the hard disk drive Write Cache and Read
Ahead settings. Any read or write cache policy changes apply to all virtual drives on an
array. In other words, if two virtual drives are defined on a single array and you change
the Read Ahead setting on one virtual drive, the change will also apply to the other
virtual drive on the array.
The Disk Write Cache and Read Ahead policies can be set to O
4-8
N or OFF.
Page 29

Chapter 4: MegaRAID BIOS Configuration Utility
• When the disk Write Cache is ON, a write transaction is considered to be complete
when all the data has been written to the disk cache. When disk Write Cache is O
the write transaction is complete only when the data has been written to the disk.
• When disk Read Ahead is O
N, extra data is read sequentially ahead of the data that
is actually requested and is stored in a cache. If the additional read-ahead data is
then requested, it can be read faster from the cache than from the disk directly.
NOTE: When the disk Write Cache is ON, there is a danger that data could be
lost if the power fails before the cached data is written to disk.
Follow these steps to view or change the virtual drive Write Cache or Read Ahead
settings:
1. From the M
J V
ANAGEMENT menu, select OBJECTS J VIRTUAL DRIVE J VIRTUAL DRIVE N
IEW/UPDATE PARAMETERS.
2. Use the arrow key to move the cursor to DISK WC or READ AHEAD and press ENTER.
3. Use the arrow key to select OFF or ON for DISK WC (DWC) or READ AHEAD.
4. When you see the prompt, CHANGE DWC or CHANGE READ AHEAD, use the arrow
key to select O
FF or ON, then press ENTER to change the cache setting.
The settings are changed for all virtual drives defined on the array.
4-4 Rebuilding a Drive
FF,
The MegaRAID BIOS CU enables you to rebuild a drive of a redundant array if the array
has a failed drive. If the failed drive is still good (that is, if the drive is physically present
and its size is greater than or equal to the defined size of the array) it will be rebuilt. If the
drive is small, an error message will appear and the MegaRAID BIOS CU will not allow
the drive to be rebuilt. A rebuild cannot be started on a failed drive if its size is even 1
byte smaller than the defined size of the array.
Rebuilding a Drive
Follow these steps to rebuild a drive:
1. Select R
EBUILD from the MANAGEMENT menu.
2. When the list of drives appears, highlight the FAIL drive that you want to rebuild and
press the
SPACEBAR to select it.
3. After selecting the physical drive, press F10 and select YES at the confirmation
prompt.
The rebuild process begins, and a graph shows the progress of the rebuild until it is
complete. Although the CU changes the disk drive state to R
EBUILD at this point, the
change does not appear on the screen while the rebuild is in progress.
When rebuild is complete, the CU displays the message:
4-9
Page 30

AOC-USAS-L8i Add-on Card User’s Manual
Rebuilding of Drive X Completed Successfully. Press Esc. (X
= the ID of the rebuilt drive.)
4. Press E
SC to display the MANAGEMENT menu.
The state of the rebuilt disk drive changes from FAIL to ONLIN.
If the CU detects a media error on the source drive during rebuild, it initiates a sector
read for that block.
If the sector read fails, the CU adds entries to the Soft Bad Block Management
(SBBM) table, writes this table to the target drive, and displays an error message.
Additional error messages are displayed if the SBBM table is 80% full or 100% full. If
the SBBM table is completely full, the rebuild operation is aborted, and the drive is
marked as FAIL.
If you press E
SC while the rebuild is running, the following options display:
• Stop: (Available only if AutoResume is enabled on the adapter: MANAGEMENT
M
ENU J OBJECTS J ADAPTER J AUTORESUME) The rebuild is stopped, and the
CU stores the percentage of the rebuild already completed. If A
enabled, and if F
AST INIT is not enabled, the rebuild resumes where it left off
when you restart it instead of starting over from 0 percent.
• Continue: The rebuild continues normally.
• Abort: The rebuild is completely aborted. If you restart the rebuild, it begins at 0
percent.
4-5 Hot Plug Support
UTORESUME is
MegaRAID BIOS CU supports hot plugging of disk drives. When you insert or remove a
disk drive, the following hot plug message appears:
A Drive Has Been Inserted/Removed. Configuration Updated.
Press ESC...
After you press E
SC the inserted or removed drive will be reflected in the list of drives
that appears in the configuration utility.
Obviously, you should not insert or remove a drive while you are defining a new virtual
drive or while an initialization or other process is running. The following information
describes how the CU handles hot plugging when various actions occur:
• If the P
HYSICAL DRIVE window or one of the CONFIGURATION windows is open when
you insert or remove a drive, the window will close when the hot plug message
appears.
• CU menus such as S
ELECT BOOT DRIVE, SELECT ADAPTER and VIRTUAL DRIVE will
completely or partially close when a drive is inserted or removed.
• If a Rebuild is in progress when you insert or remove a drive, the CU first displays
the message:
Rebuilding Of Drive Not Complete! Press Esc..
followed by the hot plug message.
4-10
Page 31

Chapter 4: MegaRAID BIOS Configuration Utility
If the Rebuild was not affected by this hot plug event, it continues to rebuild from
where it left off, provided that A
UTO RESUME is enabled; otherwise, the Rebuild starts
over from the beginning. If the rebuilding array was affected by the hot plug event,
the Rebuild aborts and the array status changes based on the hot plug operation.
• If an Initialization is in progress when you insert or remove a drive, the CU displays
the message:
Initialization of Array Not Complete! Press ESC..
followed by the hot plug message.
• If a consistency check is in progress when you insert or remove a drive, the CU
displays the message
CC Not Completed! Press ESC..
followed by the hot plug message.
4-6 Checking Data Consistency
The Check Consistency feature can be used on RAID 1 or RAID 10 virtual drives to
verify the data consistency between the mirrored physical drives. MegaRAID BIOS CU
automatically corrects any differences found in the data when a consistency check is
run.
Checking Data Consistency
1. On the M
A list of configured virtual drives is displayed.
2. Highlight a virtual drive with the arrow keys.
3. Press the
ANAGEMENT menu select CHECK CONSISTENCY and press ENTER.
SPACEBAR to select the virtual drive to check for consistency.
NOTE: If you select a RAID 0 virtual drive, a message appears stating that a
Check Consistency cannot be performed. To continue, deselect the virtual
drive, highlight a redundant virtual drive, and press the
SPACEBAR again.
4. Press F10.
5. At the prompt, select Y
ES to start the Check Consistency process and press ENTER.
A graph shows the progress of the Check Consistency operation until it is complete.
If the MegaRAID BIOS CU finds any data inconsistencies while comparing the source
and target drives, it fixes the inconsistency by writing the source data to the target drive.
When this happens, the following message appears at the bottom of the screen:
The Data on the Drives is inconsistent. Repair done!
If the MegaRAID BIOS CU finds a media error on the source drive, it pops up a dialog
box with this message:
Error in Reading Sectors! Proceed Anyway (Y/N)?
4-11
Page 32

AOC-USAS-L8i Add-on Card User’s Manual
If you press Y, the program skips the bad block and continues. If you press N, the
program aborts the consistency check. The same message appears if the program finds
a hard media error on the target drive.
If you press E
SC while a Check Consistency is running, the following options are
displayed:
• Stop: (Available only if AutoResume is enabled on the adapter by selecting:
M
ANAGEMENT MENU? J OBJECTS? J ADAPTER? J AUTORESUME.) The Check
Consistency is stopped, and the CU stores the percentage of the task already
completed. If A
UTORESUME is enabled, the Check Consistency resumes where it left
off when you restart it, instead of starting over from zero percent.
• Continue: The Check Consistency continues normally.
• Abort: The Check Consistency is completely aborted. If you restart it, it begins at
zero percent.
4-7 Viewing and Changing Device Properties
The MegaRAID BIOS CU allows you to view properties for adapters, virtual drives, and
physical drives. You can also change some properties for adapters and virtual drives.
Viewing and Changing Adapter Properties
To view or change adapter properties, follow these steps:
1. On the MANAGEMENT menu, select OBJECTS J ADAPTER.
2. Select an adapter from the list. The following list of adapter properties appears:
Table 4-1. List of Adapter Properties
Property Options Default
Rebuild Rate 0 to 100 (% of system resources) 30
Clk Const Rate 0 to 100 (% of system resources) 30
FGI Rate (Foregraound
Initialization rate)
BGI Rate (Background
Initialization rate)
Disk WC (Disk Write Cache) Off, On Off (Write Through enabled)
Read Ahead On, Off On
BIOS State Enable, Disable Enable
Stop on Error No, Yes No
Fast Init Enable, Disable Enable
Auto Rebuild On, Off On
0 to 100 (% of system resources) 30
0 to 100 (% of system resources) 30
4-12
Page 33

Chapter 4: MegaRAID BIOS Configuration Utility
Table 4-1. List of Adapter Properties
Property Options Default
Enable, Disable
When enabled you can stop a
Auto Resume
Disk Coercion
a
consistency check, rebuild, or
initialization and resume it later
where it left off, instead of
aborting it and starting over
None, 128MB, 1GB 1GB
Enable
a. The Disk Coercion property can be accessed only when no configuration is present for
the adapter. Otherwise, an error message appears.
3. If you want to change the value of a property, highlight it and press ENTER.
4. Select or type a different value for the property and press ENTER.
5. When you are finished, press ESC until you return to the MANAGEMENT menu.
Viewing and Changing Virtual Drive Properties
To view or change virtual drive properties, follow these steps:
1. On the MANAGEMENT menu, select OBJECTS J VIRTUAL DRIVE.
2. Select VIEW/UPDATE PARAMETERS.
The only virtual drive properties you can change are Disk WC (Disk Write Cache) and
Read Ahead (see Section 4-3: "Setting the Hard Disk Write Cache and Read Ahead
Policies" on page 4-8). The other properties are view-only.
Viewing Physical Drive Properties
To view physical drive properties, follow these steps:
1. On the MANAGEMENT menu, select OBJECTS J PHYSICAL DRIVE.
2. Highlight a physical drive on the list that appears and press ENTER.
3. Select DRIVE PROPERTIES from the menu.
The drive properties are DEVICE TYPE (DISK), CAPACITY, PRODUCT ID, and REVISION NO.
These properties are view-only.
4-8 Forcing Drives Online or Offline
The MegaRAID BIOS CU enables you to force drives online or offline. You may want to
force a drive of a redundant array offline so that a hotspare drive will automatically
replace it. An auto rebuild will begin immediately if the MegaRAID BIOS CU finds a valid
hotspare drive to replace the offline drive.
You may need to force a drive online if it has gone offline due to a power failure. The
MegaRAID BIOS CU will not allow a drive to be forced online if its size is smaller than
the defined size of the array.
4-13
Page 34

AOC-USAS-L8i Add-on Card User’s Manual
Notes
To force a drive online or offline, follow these steps:
1. On the MANAGEMENT menu, select OBJECTS J PHYSICAL DRIVE.
2. Highlight a physical drive that is a member of an array and press ENTER.
3. Select FORCE OFFL INE or FORCE ONLINE from the menu.
If the drive was online, its status changes to FAIL. If it was offline, its status changes
to ONLIN.
4-9 Configuring a Bootable Virtual Drive
The default boot virtual drive is LD 0. If you change the boot drive to another virtual
drive, the BIOS and the CU will preserve this change. However, if you delete the new
boot virtual drive, you must be sure to configure another virtual drive for booting. The
MegaRAID BIOS CU will not automatically select a different boot virtual drive.
Follow these steps to configure a bootable virtual drive:
1. On the M
2. Select a virtual drive from the list to be the designated boot drive.
ANAGEMENT menu, select CONFIGURE J SELECT BOOT DRIVE.
4-10 Deleting a Virtual Drive
The MegaRAID BIOS CU allows you to delete any single virtual drive defined in the
configuration (sometimes referred to as random deletion).
WARNING: Before you delete a virtual drive, be sure to back up all the data you
want to keep.
To delete a specified virtual drive, follow these steps:
1. Select O
2. Highlight the virtual drive that you want to delete and press DELETE.
3. Select Y
BJECTS J VIRTUAL DRIVE.
ES when the confirmation message appears.
4-11 Clearing a Storage Configuration
WARNING: Before you clear a storage configuration, be sure to back up all the
data you want to keep.
4-14
Page 35

Chapter 4: MegaRAID BIOS Configuration Utility
To clear a storage configuration, follow these steps:
1. On the MANAGEMENT menu, select CONFIGURE J CLEAR CONFIGURATION.
2. When the message appears, select YES to confirm.
All virtual drives are deleted from the configuration.
4-15
Page 36

AOC-USAS-L8i Add-on Card User’s Manual
Notes
4-16
Page 37

Chapter 5
MegaRAID Overview and Installation
This chapter explains provides and overview of MegaRAID Storage Manager software,
and instructions on how to install (or reinstall) the software on your workstation or server
for the supported operating systems, which include: Microsoft Windows, Red Hat Linux,
and SUSE Linux. 5.3.1 Installing MegaRAID Storage Manager Software on Microsoft
Windows.
5-1 Overview
MegaRAID Storage Manager software enables you to configure, monitor, and maintain
storage configurations created under Embedded MegaRAID Software. The MegaRAID
Storage Manager graphical user interface (GUI) makes it easy for you to create and
manage storage configurations.
NOTE: MegaRAID Storage Manager software can be used to manage a wide
range of MegaRAID controllers. Some MegaRAID Storage Manager software
features are not applicable for Embedded MegaRAID Software.
Creating Storage Configurations
MegaRAID Storage Manager software enables you to easily configure the controllers,
disk drives, and virtual disks on your workstation or server. The Configuration Wizard
greatly simplifies the process of creating arrays and virtual disks.
You can use the Configuration Wizard’s Auto Configuration mode to automatically
create the best possible configuration with the available hardware. You can use the
Guided Configuration mode, which asks you a few brief questions about the
configuration, and then creates it for you. Or you can use the Manual Configuration
mode, which gives you complete control over all aspects of the storage configuration.
Monitoring Storage Devices
MegaRAID Storage Manager software displays the status of virtual disks, physical disks,
and other storage devices on the workstation or server that you are monitoring. System
errors and events are recorded in an event log file and are displayed on the screen.
Special device icons appear on the screen to notify you of disk failures and other events
that require immediate attention.
Maintaining Storage Configurations
You can use MegaRAID Storage Manager software to perform system maintenance
tasks such as running consistency checks on arrays that support redundancy.
5-1
Page 38

AOC-USAS-L8i Add-on Card User’s Manual
5-2 Hardware and Software Requirement s
The hardware requirements for MegaRAID Storage Manager software are as follows:
• PC-compatible computer with an IA-32 (32-bit) Intel Architecture processor or an
EM64T (64-bit) processor and at least 128 Mbytes of system memory (256 Mbytes
recommended)
• Hard disk drive with at least 50 Mbytes available free space
The supported operating systems for the MegaRAID Storage Manager software are as
follows:
• Microsoft Windows 2000, Microsoft Windows Server 2003, Microsoft Windows XP,
Microsoft Vista and Microsoft Windows Server 2008.
• Red Hat Linux 3.0 or 4.0
• SUSE SLES 9, with latest updates and service packs
Refer to your server documentation and to the operating system documentation for
more information on hardware and operating system requirements.
5-3 Installing for Windows
Follow these steps if you need to install MegaRAID Storage Manager software on a
system running Microsoft Windows 2000, Microsoft Windows Server 2003, or Microsoft
Windows XP:
1. Insert the MegaRAID Storage Manager software installation CD in the CD-ROM
drive.
If necessary, find and double-click the setup.exe file to start the installation program.
2. When the W
If MegaRAID Storage Manager software is already installed on this system, the
P
ROGRAM MAINTENANCE screen appears. Read the screen text and select MODIFY,
R
EPAIR, or REMOVE.
3. When the next screen appears, read and accept the user license, and click NEXT.
The C
ELCOME screen appears, click NEXT.
USTOMER INFORMATION screen appears, as shown in Figure 5-1.
5-2
Page 39

Chapter 5: MegaRAID Overview and Installation
Figure 5-1. Customer Information Screen
4. Enter your user name and organization name, and in the bottom part of the screen,
select an installation option:
• If you select A
sion of MegaRAID Storage Manager software to view or change storage configurations.
• If you select O
cuts and associates icon availability to only the user with this screen’s user
name.
Click N
EXT to continue.
5. On the next screen, accept the default destination folder, or click CHANGE to select a
different destination folder.
Click N
EXT to continue.
The SETUP TYPE screen appears, as shown in Figure 5-2.
LL USERS, any user with administrative privileges can use this ver-
NLY FOR CURRENT USER, the MegaRAID Storage Manager short-
5-3
Page 40

AOC-USAS-L8i Add-on Card User’s Manual
Figure 5-2. Setup Type Screen
6. Select one of the Setup options. The options are fully explained in the screen text.
• Select COMPLETE if you are installing MegaRAID Storage Manager software on
a server.
• Select C
LIENT if you are installing MegaRAID Storage Manager software on a
PC that is used to view and configure servers over a network.
• Select S
ERVER to install only those components required for remote server man-
agement.
• Select S
TANDALONE if you are using MegaRAID Storage Manager software to
create and manage storage configurations on a standalone workstation.
Click N
EXT to proceed.
7. On the next screen, click INSTALL to install the program.
8. Click FINISH when the final CONFIGURATION WIZARD screen appears.
If you select CLIENT installation for a PC used to monitor servers, and if there are no
available servers with a registered framework on the local subnet (that is, servers with a
complete installation of MegaRAID Storage Manager software), you cannot connect to a
remote server unless you first edit the startupui.bat file. Specifically, you must add the IP
address of the remote server to the end of the startupui.bat file.
5-4
Page 41

Chapter 5: MegaRAID Overview and Installation
For example, to connect to a remote framework on server 192.168.0.10, add the IP
address to the end of startupui.bat as shown in this example:
start JRE\bin\javaw -classpath .;GUI.jar
GUI.VivaldiStartupDialog ajsgyqkj=71244 192.168.0.10
Be sure to include a space in front of the IP address, as shown in the above example.
5-4 Installing for Linux
Follow these steps if you need to install MegaRAID Storage Manager software on a
system running Red Hat Linux or SUSE Linux:
1. Copy the MSM_linux_installer...tar.gz file to a temporary folder.
2. Untar the MSM_linux_installer...tar.gz file using the following command:
tar -zxvf MSM_linux_installer...tar.gz
A new disk directory is created.
3. Go to the new disk directory, and in that directory find and read the readme.txt file.
4. To start the installation, enter the following command:
./install.sh
If you select C
available servers with a registered framework on the local subnet (that is, servers with a
complete installation of MegaRAID Storage Manager software), you cannot connect to a
remote server unless you first edit the startupui.sh file. Specifically, you must add the IP
address of the remote server to the end of the startupui.sh file.
For example, to connect to a remote framework on server 192.168.0.10, add the IP
address to startupui.sh as shown in this example:
start JRE\bin\javaw -classpath .;GUI.jar
GUI.VivaldiStartupDialog ajsgyqkj=71244 192.168.0.10
Be sure to include a space in front of the IP address, as shown in the above example.
LIENT installation for a PC used to monitor servers, and if there are no
Linux Error Messages
One or more of the following messages may appear while you are installing MegaRAID
Storage Manager software on a Linux system:
• More than one copy of MegaRAID Storage Manager software has
been installed.
This message indicates that the user has installed more than one copy of
MegaRAID Storage Manager software. (This can be done by using the rpm-force
command to install the rpm file directly, which is not recommended, instead of using
the install.sh file.) In such cases, the user must uninstall all the rpm files manually
before installing MegaRAID Storage Manager software with the procedure listed
previously.
5-5
Page 42

AOC-USAS-L8i Add-on Card User’s Manual
• The version is already installed.
This message indicates that the version of MegaRAID Storage Manager software
you are trying to install is already installed on the system.
• The installed version is newer.
This message indicates that a version of MegaRAID Storage Manager software is
already installed on the system, and it is a newer version than the version you are
trying to install.
• Exiting installation.
This is the message that appears when the installation is complete.
• RPM installation failed.
This message indicates that the installation failed for some reason. Additional
message text explains the cause of the failure.
5-6
Page 43

Chapter 6
MegaRAID Window and Menus
The MegaRAID Storage Manager software is a configuration and monitoring utility used
with the Embedded MegaRAID Software. This chapter provides instruction on its use
and features.
6-1 Starting MegaRAID Storage Manager Software
Follow these steps to start MegaRAID Storage Manager software and view the main
window:
1. Start the program using the method required for your operating system
environment:
• To start MegaRAID Storage Manager software on a Microsoft Windows system,
select S
TART J PROGRAMS J MEGARAID STORAGE MANAGER J STARTUPUI, or
double-click the M
NOTE: If a warning appears stating that Windows Firewall has blocked some
features of the program, click U
software to start.
This is because Windows Firewall sometimes blocks the operation of programs
that use Java.
• To start MegaRAID Storage Manager software on a Red Hat Linux system,
select A
PPLICATIONS J SYSTEM TOOLS J MEGARAID STORAGE MANAGER J
S
TARTUPUI.
• To start MegaRAID Storage Manager software on a SUSE SLES 9 system,
When the program starts, the SELECT SERVER window appears (Figure 6-1).
TART J SYSTEM J MORE PROGRAMS J MEGARAID STORAGE MANAGER.
select S
EGARAID STORAGE MANAGER shortcut on the desktop.
NBLOCK to allow MegaRAID Storage Manager
6-1
Page 44

AOC-USAS-L8i Add-on Card User’s Manual
Figure 6-1. Select Server Window
If the circle in the server icon is yellow instead of green, it means that the server is
running in a degraded state–for example, because a disk drive used in a virtual disk
has failed. If the circle is red, the storage configuration in the server has failed.
NOTE: To access servers on a different subnet, type in the box at the bottom of
the screen the IP address of a server in the desired subnet where MegaRAID
Storage Manager software is running, and click U
PDATE. If you check the
Connect to remote Framework box, you can also access a standalone
installation of MegaRAID Storage Manager software, if it has a network
connection.
2. Double-click the icon of the server that you want to access.
The S
ERVER LOGIN window appears (Figure 6-2).
6-2
Page 45

Chapter 6: MegaRAID Window and Menus
Figure 6-2. Server Login Window
3. Select an access mode from the drop-down menu.
• Select F
• Select V
4. Enter your user name and password, and click LOGIN.
ULL ACCESS if you need to both view the current configuration and
change the configuration.
IEW ONLY if you need to only view and monitor the configuration.
NOTE: If the computer is net worked, this is the login to the computer itself, not
the network login.
You must enter the root/administrator user name and password to use Full Access
mode. If your user name and password are correct for the Login mode you have
chosen, the main M
EGARAID STORAGE MANAGER window appears.
6-3
Page 46

AOC-USAS-L8i Add-on Card User’s Manual
6-2 MegaRAID Storage Manager Window
This section describes the MEGARAID STORAGE MANAGER window (Figure 6-3).
Figure 6-3. Storage Manager Window
The following sections describe the panels and menu options that appear in this window.
Physical/Logical View Panel
The left panel of the MEGARAID STORAGE MANAGER window displays either the Physical
view or the Logical view of the system and the devices in it, depending on which tab is
selected.
• The Physical view shows the hierarchy of physical devices in the system. At the top
of the hierarchy is the system itself. One or more controllers are installed in the
system. Each controller has one or more ports. Disk drives and other devices are
attached to the ports.
• The Logical view shows the hierarchy of controllers, virtual disks, and disk groups
that are defined on the system. (Physical drives also appear in the Logical view, so
you can see which physical drives are used by each virtual disk.)
6-4
Page 47

Chapter 6: MegaRAID Window and Menus
The following icons in the left panel represent the controllers, disk drives, and other
devices:
•System
• Controller
•Port
• Array
• Virtual disk
• Physical drive
A red circle to the right of an icon indicates that the device has failed.
A yellow circle to the right of an icon indicates that a device is running in a degraded
state.
Properties/Operations/Graphical Vi ew Panel
The right panel of the MEGARAID STORAGE MANAGER window has either two or three
tabs, depending on what kind of device is selected in the left panel.
• The P
• The O
• The G
ROPERTIES tab displays information about the selected device. For example, if
a controller icon is selected in the left panel, the P
ROPERTIES tab lists information
such as the controller name and the device port count.
PERATIONS tab lists the operations that can be performed on the device that is
selected in the left panel. Some types of devices, such as arrays and ports, do not
have operations associated with them.
RAPHICAL VIEW tab can be selected in the right panel if a physical drive or
virtual disk is selected in the left panel. In graphical view, the device’s storage
capacity is color coded according to the legend shown on the screen. For example,
on a physical drive configured space is blue, available space is white, and reserved
space is red.
Event Log Panel
The lower part of the MEGARAID STORAGE MANAGER window displays the system event
log entries. New event log entries appear during the session. Each entry has a
timestamp and date, an error level indicating the severity of the event, and a brief
description of the event.
Menu Bar
This section contains brief descriptions of the main selections from the MEGARAID
S
TORAGE MANAGER menu bar.
6-5
Page 48

AOC-USAS-L8i Add-on Card User’s Manual
File Menu
The FILE menu has an EXIT option for exiting from the MEGARAID STORAGE MANAGER
software. It also has a R
S
TORAGE MANAGER window. (RESCAN is seldom required; the display normally updates
ESCAN option for updating the display in the MEGARAID
automatically.)
Operations Menu
The OPERATIONS menu is available when a controller, physical drive, or logical drive is
selected in the M
vary depending on what type of device is selected in the left panel of the M
S
TORAGE MANAGER window. The options also vary depending on the current state of the
selected device. For example, if you select an offline physical drive, the M
O
NLINE option appears in the OPERATIONS menu.
EGARAID STORAGE MANAGER window. The OPERATIONS menu options
EGARAID
AKE DRIVE
You can also view the OPERATIONS selections on the main window on the OPERATIONS
tab in the right panel. If an operation requires user inputs before it can be executed, it
appears in the O
O
PERATIONS menu pops up if you right-click a device icon in the left panel.
PERATIONS tab but not in the OPERATIONS menu. A device-specific
An ADVANCED OPERATIONS submenu is also available. This is where you access the
C
ONFIGURATION WIZARD and other configuration-related commands. To access this
menu, select O
PERATIONS J ADVANCED OPERATIONS.
Group Operations Menu
The GROUP OPERATIONS menu options include CHECK CONSISTENCY, INITIALIZE, and
S
HOW PROGRESS.
Log Menu
The LOG menu includes options for saving and clearing the message log.
Help Menu
On the HELP menu you can select HELP J HELP to view the MegaRAID Storage
Manager software online help file. You can select H
ELP J ABOUT to view version
information for the MegaRAID Storage Manager software.
NOTE: When you use the MegaRAID Storage Manager software online help,
you may see a warning message that Internet Explorer has restricted the file
from showing active content. If this warning appears, click on the active content
warning bar and enable the active content.
6-3 Creating a New Storage Configuration
You may use MegaRAID Storage Manager software to also create and modify storage
configurations. The RAID 0, RAID 1, RAID 5 and RAID 10 storage configurations are
supported using this software.
6-6
Page 49

Chapter 6: MegaRAID Window and Menus
WARNING: It is recommended that you do not use both SAS and SATA drives in
the same array. Using different drive interfaces in this way could cause
unpredictable behavior, decreased performance, an increased error count, and
decreased MTBF.
NOTE: You cannot create or modify a storage configuration unless you are
logged on with administrator privileges.
To open the MegaRAID Storage Manager Configuration Wizard, select a controller in
the left panel of the M
J A
DVANCED OPERATIONS J CONFIGURATION J CONFIGURATION WIZARD.
This brings up the Configuration Wizard’s MODE SELECTION screen (Figure 6-4).
EGARAID STORAGE MANAGER window and then select OPERATIONS
Figure 6-4. Mode Selection Screen
6-7
Page 50

AOC-USAS-L8i Add-on Card User’s Manual
The menu lists three configuration modes:
• Auto Configuration automatically creates an optimal configuration from the
available disk drives.
• Manual Configuration gives you the greatest level of control in creating a new
virtual disk.
• Guided Configuration asks you a few simple questions about what kind of
configuration you want and then automatically creates it from the available disk
drives.
NOTE: You can use AUTO, GUIDED, or MANUAL CONFIGURATION mode to create
a RAID 0, or RAID 1 configuration. To create a RAID 10 configuration, you must
use the M
ANUAL CONFIGURATION mode.
Understanding Virtual Disk Parameters
This section describes the Virtual Disk Parameters that you can set when you use the
Guided Configuration or Manual Configuration modes of the Configuration Wizard. You
should change these parameters only if you have a specific reason for doing so. It is
usually best to leave them at their default settings.
• Stripe Size: A stripe size of 64 Kbytes is supported.
• Disk Cache Policy: Select a cache setting for this disk: Unchanged, Enabled, or
Disabled.
•Init State
• No Initialization: The new configuration is not initialized and the existing data
on the disks is not overwritten.
• Fast Initialization: MegaRAID Storage Manager software quickly writes zeroes
to the first and last 8 Mbyte regions of the new virtual disk.
• Full Initialization: A complete initialization is done on the new configuration.
This may take a long time if the disks are large.
Using Auto Configuration
Auto Configuration is the quickest and simplest way to create a new storage
configuration. When you select A
W
IZARD screen, the Configuration Wizard creates the best configuration possible using
the available physical disks and displays them in the A
Figure 6-5).
UTO CONFIGURATION mode on the first CONFIGURATION
UTO CONFIGURATION screen (see
6-8
Page 51

Chapter 6: MegaRAID Window and Menus
Figure 6-5. Auto Configuration Screen
Follow these steps to create a new storage configuration in Auto Configuration mode:
1. Select a redundancy option from the drop-down menu at the bottom of the AUTO
C
ONFIGURATION screen:
• No Redundancy: The new configuration will have no data redundancy (RAID
0). If a physical disk in the configuration fails, all data will be lost.
• With Redundancy: The new configuration will have data redundancy via mir-
rored data (RAID 1) or via parity data (RAID 5). If a physical disk fails, data is
still protected.
2. Select an initialization option from the drop-down menu at the bottom of the screen:
• No Initialization: Using this option, new configuration is not initialized and the
existing data on the disks is not overwritten.
• Fast Initialization: Using this option, MegaRAID Storage Manager software
quickly writes zeroes to the first and last 8 Mbyte regions of the new virtual disk.
• Full Initialization: If you select this option, a complete initialization is done on
the new configuration. This may take a long time if the disks are large.
6-9
Page 52

AOC-USAS-L8i Add-on Card User’s Manual
3. (Optional) Click MODIFY if you want to switch to Manual Configuration mode so you
can modify the suggested Auto Configuration.
When you click M
ODIFY, the VIRTUAL DISK CREATION screen appears. In this screen
do the following:
a. Select the new virtual disk, and click R
ECLAIM.
b. Select the new array from the ARRAYS WITH FREE SPACE list, and change the
virtual disk parameters as needed.
4. Click F
INISH.
The new storage configuration will be created and initialized (unless you selected
N
O INITIALIZATION).
Using Guided Configuration
Guided Configuration provides an easy way to create a new storage configuration.
Based on the information that is provided, the Configuration Wizard uses the available
disk drives to create an optimal storage configuration (see Figure 6-6).
Figure 6-6. First Guided Configuration Screen
6-10
Page 53

Chapter 6: MegaRAID Window and Menus
Follow these steps to create a new storage configuration in Guided Configuration mode:
1. Select a redundancy option at the top of the GUIDED CONFIGURATION screen:
• Redundancy Only: This option creates a configuration only if redundancy
(RAID 1 or RAID 5) is possible.
• Redundancy When Possible: This option creates a redundant configuration if
possible. Otherwise, this creates a non-redundant configuration.
• No Redundancy: This option creates a non-redundant configuration.
2. Choose whether you want to use existing arrays in the new virtual disk. The options
are:
• Use Existing Arrays Only
• Don’t Use Existing Arrays
• Use Existing and New Arrays
The first and third options are disabled if there are no available existing arrays.
3. Select a maximum number of virtual disks to be created. The Configuration Wizard
may not be able to create as many virtual disks as you want, depending on the
current configuration and the number of virtual disks that have already been
created.
6-11
Page 54

AOC-USAS-L8i Add-on Card User’s Manual
4. Click NEXT to continue to the next screen (see Figure 6-7).
Figure 6-7. Second Guided Configuration Screen
5. Change the default volume parameters in this screen, if needed. In the top section
of the window you can specify the number of virtual disks to create. You can also
choose to use less than the full capacity of this array for the virtual disk(s).
NOTE: You may choose to do this in order to leave capacity available for other
virtual disks that you create later.
6. Click N
EXT to continue to the next screen.
7. Check the configuration that you have just defined. If it is acceptable, click FINISH. If
you want to change something, click B
ACK to return to the previous screens.
6-12
Page 55

Chapter 6: MegaRAID Window and Menus
Using Manual Configuration: RAID 0
Follow these steps to create a RAID 0 storage configuration using the Manual
Configuration mode of the Configuration Wizard.
Figure 6-8 shows the first screen that appears when you select M
Figure 6-8. Manual Configuration – First Manual Configuration Screen
ANUAL CONFIGURATION.
1. In this first screen, select two or more available drives in the left panel. Click the
right ADD arrow button to move the selected drives to the right panel.
NOTE: MegaRAID Storage Manager software will not allow you to select the
disk drive on which the operating system is installed or any other drives that are
already part of a configuration.
2. Click A
CCEPT to accept these drives for the new RAID 0 array.
NOTE: To remove a single drive from a proposed new array, select the drive
icon in the right panel and click the left R
EMOVE arrow button.
6-13
Page 56

AOC-USAS-L8i Add-on Card User’s Manual
3. Click NEXT.
The DEFINING A VIRTUAL DISK screen of the Configuration Wizard appears, as shown
in Figure 6-9.
Figure 6-9. Defining a Virtual Disk Screen
The A
RRAYS menu lists the new array that you just defined, plus any existing arrays
with holes (free space) that could be used for a new configuration.
4. From the A
RRAYS menu, select the array to use for the new virtual disk.
5. In the right VIRTUAL DISK PROPERTIES panel, select RAID 0 as the RAID level.
6. (Optional) Set Size (in MB) to a lower number if you do not want to use the entire
available capacity for the new virtual disk.
7. (Optional) Change the other properties in the V
IRTUAL DISK PROPERTIES panel, if
necessary.
8. Click A
CCEPT to accept the configuration of the new virtual disk.
6-14
Page 57

Chapter 6: MegaRAID Window and Menus
NOTE: Click the RECLAIM button if you want to undo a virtual disk that you just
defined.
9. Click NEXT to continue with the next configuration step. The VIRTUAL DISK SUMMARY
screen appears.
10. Review the configuration shown in the V
change something, click B
ACK and change the configuration parameters.
IRTUAL DISK SUMMARY screen. If you want to
11. Cl i ck F INISH to accept the configuration and start the initialization process (unless
you selected No Initialization earlier).
Using Manual Configuration: RAID 1
Follow these steps to create a RAID 1 storage configuration using the Manual
Configuration mode of the Configuration Wizard:
1. In the F
IRST MANUAL CONFIGURATION screen, shown in Figure 6-8, select two
available drives in the left panel. Click the right arrow button to move the selected
drives to the right panel.
NOTE: MegaRAID Storage Manager software will not allow you to select the
disk drive on which the operating system is installed or any other drives that are
already part of a configuration.
2. Click A
CCEPT to accept these drives for the new RAID 1 array.
3. Click NEXT.
The next Configuration Wizard screen appears, as shown in Figure 6-9.
RRAYS menu lists the new array(s) that you just defined, plus any existing
The A
arrays with holes (free space) that could be used for a new configuration.
4. Select the array to use for the new virtual disk.
5. In the right panel, select RAID 1 as the RAID level.
6. (Optional) S
ET SIZE (in MB) to a lower number if you do not want to use the entire
available capacity for the new virtual disk.
7. (Optional) Change the other V
IRTUAL DISK PROPERTIES, if necessary.
8. Click ACCEPT to accept the configuration of the new virtual disk.
NOTE: Click the RECLAIM button if you want to undo a virtual disk that you just
defined.
6-15
Page 58

AOC-USAS-L8i Add-on Card User’s Manual
9. Click NEXT to continue with the next configuration step.
The VIRTUAL DISK SUMMARY screen appears.
10. Review the configuration shown in the screen. If you want to change something,
click B
ACK and change the configuration parameters.
11. Cl i ck F INISH to accept the configuration and start the initialization process (unless
you selected N
O INITIALIZATION earlier).
Using Manual Configuration: RAID 5
Follow these steps to create a RAID 5 storage configuration using the Manual
Configuration mode of the Configuration Wizard. You must buy the I-Button feature from
SuperMicro to enable RAID level 5 use.
1. In the first M
in the left panel. Click the right arrow button to move the selected drives to the right
panel.
NOTE: MegaRAID Storage Manager software will not allow you to select the
disk drive on which the operating system is installed or any other drives that are
already part of a configuration.
ANUAL CONFIGURATION screen (Figure 6-8), select three available drives
2. Click A
CCEPT to accept these drives for the new RAID 5 array.
NOTE: To remove a single drive from a proposed new array, select the drive
icon in the right panel and click the left arrow button.
3. Click N
EXT.
The next CONFIGURATION WIZARD screen appears (Figure 6-9). The ARRAYS menu
lists the new array that you just defined, plus any existing arrays with holes (free
space) that could be used for a new configuration.
4. From the A
RRAYS menu, select the array to use for the new virtual disk.
5. In the right panel, select RAID 5 as the RAID level.
6. (Optional) Set S
IZE (in MB) to a lower number if you do not want to use the entire
available capacity for the new virtual disk.
7. (Optional) Change the other V
IRTUAL DISK PROPERTIES, if necessary.
8. Click ACCEPT to accept the configuration of the new virtual disk.
NOTE: Click the RECLAIM button if you want to undo a virtual disk that you just
defined.
6-16
Page 59

Chapter 6: MegaRAID Window and Menus
9. Click NEXT to continue with the next configuration step. The VIRTUAL DISK SUMMARY
screen appears.
10. Review the configuration shown in the V
change something, click B
ACK and change the configuration parameters.
IRTUAL DISK SUMMARY screen. If you want to
11. Cl i ck F INISH to accept the configuration and start the initialization process (unless
you selected N
O INITIALIZATION earlier).
Using Manual Configuration: RAID 10
Follow these steps to create a RAID 10 storage configuration using the Manual
Configuration mode of the Configuration Wizard:
1. In the first M
drives in the left panel. Click the right arrow button to move the selected drives to
the right panel.
2. Click A
3. Select two more drives for a second RAID 1 array, and click A
4. Click NEXT.
The next CONFIGURATION WIZARD screen appears, as shown in Figure 6-9. The
A
RRAYS menu lists the new arrays that you just defined, plus any existing arrays
with holes (free space) that could be used for a new configuration.
5. In the left panel, select the two RAID 1 arrays from the menu.
6. In the right panel, select RAID 10 as the RAID level.
For a RAID 10 array, the entire capacity of the array is automatically used for the
new virtual disk. You cannot define another virtual disk on this array.
7. (Optional) Change the other V
information, see "Understanding Virtual Disk Parameters".
8. Click A
ANUAL CONFIGURATION screen, shown in Figure 6-8, select two available
CCEPT to accept these drives for a new RAID 1 array.
CCEPT.
IRTUAL DISK PROPERTIES, if necessary. For more
CCEPT to accept the configuration of the new virtual disk.
NOTE: Click the RECLAIM button if you want to undo a virtual disk that you just
defined.
9. Click N
EXT to continue with the next configuration step. The VIRTUAL DISK SUMMARY
screen appears.
10. Review the configuration shown in the screen. If you want to change something,
click B
ACK and change the configuration parameters.
11. Cl i ck F INISH to accept the configuration and start the initialization process (unless
you selected N
O INITIALIZATION earlier).
6-17
Page 60

AOC-USAS-L8i Add-on Card User’s Manual
6-4 Adding or Deleting a Hotspare Disks
Hotspares are disk drives that are available to automatically replace failed drives in a
RAID 1, RAID 5 and RAID 10 virtual disk. Each virtual disk can have one dedicated
hotspare.
For more information, see the software Help file for more information.
To add a global hotspare disk, follow these steps:
1. In the left panel of the M
any unused disk drive.
2. Click on the O
PERATIONS tab of the MEGARAID STORAGE MANAGER window to
display the tab (Figure 6-10).
EGARAID STORAGE MANAGER window, right click the icon of
Figure 6-10. Adding a Hotspare Disk
3. In the left pane of the tab, select the M
AKE GLOBAL HOTSPARE option.
4. In the right pane of the tab, select your preferred AFFI NITY option (NO AFFI NITY or
W
ITH AFFINITY).
5. Press the Go button to create your hotspare disk.
6-18
Page 61

Chapter 6: MegaRAID Window and Menus
Make sure the capacity of the hotspare drive is equal to or larger than the capacity of the
disks in the array and that it is the same type of drive (SAS or SATA).
NOTE: The hotspare drive will rebuild a failed drive even if it is SAS and the
array drives are SATA, or vice versa. Once the rebuild is complete, it is
recommended that you replace the new array member with a drive of the same
type.
To remove a global hotspare disk, follow these steps:
1. In the left panel of the M
EGARAID STORAGE MANAGER window, select a hotspare
drive.
2. Click on the O
PERATIONS tab of the MEGARAID STORAGE MANAGER window to
display the tab (Figure 6-10).
3. In the left pane of the tab, select the R
EMOVE GLOBAL HOTSPARE option.
4. Press the Go button.
This brings up a dialog box for you to confirm your deletion.
5. Check C
ONFIRM in the dialog box and then press OK to confirm your deletion.
6-5 Changing Adjustable Task Rates
Follow these steps if you need to change the adjustable rates for rebuilds and other
system tasks that run in the background:
NOTE: It is recommended that you leave the adjustable task rates at their
default settings to achieve the best system performance. If you raise the task
rates above the defaults, foreground tasks will run more slowly and it may seem
that the system is not responding. If you lower the task rates below the defaults,
rebuilds and other background tasks may run very slowly and may not complete
within a reasonable time. If you decide to change the values, record the original
default value here so you can restore them later, if necessary:
Rebuild Rate: ____________
Background Initialization (BGI) Rate: ____________
Check Consistency Rate: ____________
1. Select the P
window, and select a controller icon.
2. In the right panel of the M
O
PERATIONS tab, and select SET ADJUSTABLE TASK RATES.
The task rates appear in the right panel.
3. Enter changes, as needed, to the task rates for R
I
NITIALIZATION (BGI) Rate (for fast initialization), and CHECK CONSISTENCY RATE (for
consistency checks).
HYSICAL VIEW tab in the left panel of the MEGARAID STORAGE MANAGER
EGARAID STORAGE MANAGER window, select the
EBUILD RATE, BACKGROUND
6-19
Page 62

AOC-USAS-L8i Add-on Card User’s Manual
Each task rate can be set from 0 to 100. The higher the number, the faster the
activity will run in the background, possibly impacting other system tasks.
4. Click G
O to accept the new task rates.
5. When the warning message appears, click OK to confirm that you want to change
the task rates.
6-6 Changing Virtual Disk Properties
You can change a virtual disk’s READ POLICY, WRITE POLICY, and other properties at any
time after the virtual disk is created. To do this, follow these steps:
1. Select a virtual disk icon in the left panel of the M
window.
2. In the right panel, select the P
P
ROPERTIES.
ROPERTIES tab, and then select SET VIRTUAL DISK
A list of Virtual Disk Properties appears in the right panel.
3. Change the virtual disk properties as needed in the right panel. For information on
these properties, see "Understanding Virtual Disk Parameters".
NOTE: Only the Disk Write Cache and Read Ahead functions are supported in
Embedded MegaRAID Software.
EGARAID STORAGE MANAGER
4. Click G
O to accept the changes.
6-7 Deleting a Virtual Disk
You can delete virtual disks to rearrange the storage space.
WARNING: Be sure to back up the data on the virtual disk before you delete it.
Be sure that the operating system is not installed on this virtual disk.
To delete a virtual disk, follow these steps:
1. Back up all user data that is on the virtual disk you intend to delete.
2. In the left panel of the M
tab, and click the icon of the virtual disk you want to delete.
3. In the right panel, select the O
4. Click GO.
5. When the warning message appears, click YES to confirm that you want to delete
the virtual disk.
EGARAID STORAGE MANAGER window, select the LOGICAL
PERATIONS tab, and select DELETE VIRTUAL DISK.
6-20
Page 63

Chapter 6: MegaRAID Window and Menus
6-8 Saving a Storage Configuration to Disk
You can save an existing controller configuration to a file so you can apply it to another
controller.
To save a configuration file, follow these steps:
1. Select a controller icon from the left panel of the M
EGARAID STORAGE MANAGER
window.
2. On the menu bar, select O
J S
AVE CONFIGURATION.
PERATIONS J ADVANCED OPERATIONS J CONFIGURATION
The SAVE dialog box appears.
3. In the S
AVE dialog box, type a name for the configuration file or accept the default
name (hostname.cfg).
4. Click S
AVE to save the configuration file.
6-9 Clearing a Storage Configuration from a Controller
You can use the ADD NEW CONFIGURATION option to add a new storage configuration
while keeping the existing configuration. Alternatively, you can clear the existing storage
configuration from a controller and then create a totally new configuration or load a
previously saved configuration file.
WARNING: Before you clear a configuration, be sure to save any data that you
want to keep. Clearing a configuration deletes all data from the disks of the
existing configuration. Be sure that the operating system is not installed on this
configuration.
To clear a configuration from a controller, follow these steps:
1. Select a controller icon in the left panel of the M
window.
2. On the menu bar, select O
J C
LEAR CONFIGURATION.
PERATIONS J ADVANCED OPERATIONS J CONFIGURATION
A WARNING message appears.
3. Click Y
ES to clear the configuration or NO to cancel the operation.
EGARAID STORAGE MANAGER
6-21
Page 64

AOC-USAS-L8i Add-on Card User’s Manual
6-10 Adding a Saved Storage Configuration
When you replace a controller, or when you want to duplicate an existing storage
configuration on a new controller, you can add a saved configuration to the controller.
WARNING: When you add a saved configuration to a replacement controller, be
sure that the number and size of the physical disks connected to the controller
are exactly the same as when the configuration was saved.
To add a saved configuration, follow these steps:
1. Select a controller icon in the left panel of the M
window.
2. On the menu bar, select O
J A
DD SAVED CONFIGURATION.
A WARNING message appears.
3. Click YES.
4. When the OPEN dialog box appears select the configuration file, and click OPEN.
5. View the configuration detail, then select APPLY.
6. Confirm the new configuration when prompted.
PERATIONS J ADVANCED OPERATIONS J CONFIGURATION
EGARAID STORAGE MANAGER
6-22
Page 65

Chapter 7
Integrated Mirroring and Integrated
Mirroring Enhanced
This chapter provides an overview of the Integrated Mirroring (IM) and Integrated
Mirroring Enhanced (IME) features. The chapter also explains how to create Integrated
Mirroring (IM) and Integrated Mirroring Enhanced (IME) volumes using the SAS BIOS
Configuration Utility (SAS BIOS CU), which is used to setup IR Mode.
7-1 Introduction
As a result of the shift towards Network Attached Storage (NAS), ISPs need a cost
effective, fault-tolerant solution to protect the operating systems on small form factor,
high-density, rack-mountable servers. The Integrated Mirroring (IM) and Integrated
Mirroring Enhanced (IME) features provide data protection for the system boot volume
to safeguard critical information such as the operating system on servers and high
performance workstations. The IM and IME features provide a robust,
high-performance, fault-tolerant solution to data storage needs, at a lower cost than a
dedicated RAID controller.
To provide fault-tolerant protection for critical data, the IM and IME features support one
or two mirrored volumes per SAS controller. The two volumes can contain up to twelve
disk drives total, plus one or two hot spare disks.
If a disk in an Integrated Mirroring volume fails, the hot swap capability allows you to
restore the volume by simply swapping disks. The firmware then automatically
re-mirrors the swapped disk. Additionally, each SAS controller can have one or two
global hot spare disks available to automatically replace a failed disk in the IM or IME
storage volumes on the controller. Hot spares make the IM/IME volume even more fault
tolerant.
NOTE: You can also configure one IM or IME volume and one Integrated
Striping (IS) volume on the same SAS controller.
The IM/IME feature uses the same device drivers as the standard based controllers,
providing seamless and transparent fault tolerance. This eliminates the need for
complex backup software or expensive RAID hardware. The IM/IME feature operates
independently from the operating system, in order to conserve system resources. The
BIOS-based configuration utility makes it easy to configure IM and IME volumes.
7-1
Page 66

AOC-USAS-L8i Add-on Card User’s Manual
7-2 IM and IME Features
IM and IME support the following features:
• Configurations of one or two IM or IME volumes on the same SAS controller. IM
volumes have two mirrored disks; IME volumes have three to ten mirrored disks.
Two volumes can have up to 12 disks total. (Requires Integrated RAID firmware
v1.20.00 or above.)
• One or two global hot spare disks per controller, to automatically replace failed disks
in IM/IME volumes. (Support for two hot spares requires Integrated RAID firmware
v1.20.00 or above.) The hot spares are in addition to the 12-disk maximum for two
volumes per SAS controller.
• Mirrored volumes run in optimal mode or in degraded mode (if one mirrored disk
fails).
• Hot swap capability.
• Presents a single virtual drive to the OS for each IM/IME volume.
• Supports both SAS and SATA disks. The two types of disks cannot be combined in
the same volume. However, an SAS controller can support one volume with SATA
disks and a second volume with SAS disks.
• Fusion-MPT architecture.
• Easy-to-use BIOS-based configuration utility.
• Error notification: the drivers update an OS-specific event log.
• SES status LED support.
• Write journaling, which allows automatic synchronization of potentially inconsistent
data after unexpected power-down situations.
• Metadata used to store volume configuration on mirrored disks.
• Automatic background resynchronization while host I/Os continue.
• Background media verification ensures that data on IM/IME volumes is always
accessible.
7-3 IM/IME Description
The Integrated RAID solution supports one or two IM/IME volumes on each SAS
controller (or one IM/IME volume and one Integrated Striping volume). Typically, one of
these volumes is the boot volume, as shown in Figure 7-1. Boot support is available
through the firmware of the SAS controller that supports the standard Fusion-MPT
interface. The runtime mirroring of the boot disk is transparent to the BIOS, drivers, and
operating system. Host-based status software monitors the state of the mirrored disks
and reports any error conditions. Figure 7-1 shows an IM implementation with a second
disk as a mirror of the first (primary) disk.
7-2
Page 67

Chapter 7: Integrated Mirroring and Integrated Mirroring Enhanced
Figure 7-1. Typical Integrated Mirroring Implementation
IM Volume
Primary
SAS
Mirror
NVSRAM
(For Write
Journaling )
LSI Fusion -MPT
Memory Bus
Controller
Flash
(For Co nfiguration )
The advantage of an IM/IME volume is that there is always a second, mirrored copy of
the data. The disadvantage is that writes take longer because data must be written
twice. On the other hand, performance is actually improved during reads.
Figure 7-2 shows the logical view and physical view of an IM volume.
Figure 7-2. Integrated Mirroring Volume
Logical View Physical Vie w
LBA 1
LBA 2
LBA 3
...
LBA N
LBA 1
LBA 2
LBA 3
...
LBA N
LBA 1
+
LBA 2
LBA 3
...
LBA N
An IME volume can be configured with up to ten mirrored disks. (One or two global hot
spares can be added also.) Figure 7-3 shows the logical view and physical view of an
Integrated Mirroring Enhanced (IME) volume with three mirrored disks. Each mirrored
stripe is written to a disk and mirrored to an adjacent disk. This type of configuration is
also called RAID 1E.
7-3
Page 68

AOC-USAS-L8i Add-on Card User’s Manual
Figure 7-3. Integrated Mirroring Enhanced with Three Disks
Logical View Physical View
Mirrored Stripe 1
Mirrored Stripe 2
Mirrored Stripe 3
Mirrored Stripe 4
Mirrored Stripe 5
Mirrored Stripe 6
. . .
Mirrored Stripe N
Mirrored Stripe 1
Mirrored Stripe 3
Mirrored Stripe 4
Mirrored Stripe 6
. . .
Mirrored Stripe n -2
Mirrored Stripe n
Mirrored Stripe 2
Mirrored Stripe 1
Mirrored Stripe 5
+ +
Mirrored Stripe 4
. . .
Mirrored Stripe n-1
Mirrored Stripe (n-2)
Mirrored Stripe 3
Mirrored Stripe 2
Mirrored Stripe 6
Mirrored Stripe 5
. . .
Mirrored Stripe n
Mirrored Stripe (n-1)
The BIOS-based configuration utility enables you to create IM and IME volumes during
initial setup and to reconfigure them in response to hardware failures or changes in the
environment.
7-4 Integrated RAID Firmware
This section describes features of the Integrated RAID firmware.
Resynchronization with Concurrent Host I/O Operation
The Integrated RAID firmware allows host I/Os to continue on an IM or IME volume
while the volume is being re-synchronized in the background. Resynchronization is
attempted after a hot spare is activated due to a physical device failure, or after a hot
swap has occurred to a physical disk in the volume.
Metadata Support
The firmware supports metadata, which describes the IM/IME logical drive configuration
stored on each member disk. When the firmware is initialized, each member disk is
queried to read the stored metadata in order to verify the configuration. The usable disk
space for each member disk is adjusted down when the configuration is created, in
order to leave room for this data.
Hot Swapping
The firmware supports hot swapping. The hot-swapped disk is automatically
resynchronized in the background, without any host or user intervention. The firmware
detects hot swap removal and disk insertion.
7-4
Page 69

Chapter 7: Integrated Mirroring and Integrated Mirroring Enhanced
Following a hot swap event, the firmware readies the new physical disk by spinning it up
and verifying that it has enough capacity for the mirrored volume. The firmware
resynchronizes all hot-swapped disks that have been removed, even if the same disk is
re-inserted. In a two-disk mirrored volume, the firmware marks the hot-swapped disk as
the secondary disk and marks the other mirrored disk as the primary disk. The firmware
resynchronizes all data from the primary disk onto the new secondary disk.
SMART Support
SMART is a technology that monitors hard disk drives for signs of future disk failure and
generates an alert if such signs are detected. The firmware polls each physical disk in
the volume at regular intervals. If the firmware detects a SMART ASC/ASCQ code on a
physical disk in the IM/IME volume, it processes the SMART data and stores it in
nonvolatile memory. The IM/IME volume does not support SMART directly, since it is
just a logical representation of the physical disks in the volume.
Hot Spare Disk
One or two disk drives per controller can be configured as global hot spare disks, to
protect data on the IM/IME volumes configured on the controller. If the firmware fails one
of the mirrored disks, it automatically replaces the failed disk with a hot spare disk and
then resynchronizes the mirrored data. The firmware is automatically notified when the
failed disk has been replaced, and it then designates the failed disk as the new hot
spare.
Media Verification
The firmware supports a background media verification feature that runs at regular
intervals when the IM/IME volume is in optimal state. If the verification command fails for
any reason, the other disk’s data for this segment is read and written to the failing disk in
an attempt to refresh the data. The current Media Verification Logical Block Address is
written to nonvolatile memory occasionally to allow media verification to continue
approximately where it left off prior to a power-cycle.
Disk Write Caching
The firmware disables disk write caching by default for IM/IME volumes. This is done to
increase data integrity, so that the disk write log stored in NVSRAM is always valid. If
disk write caching were enabled (not recommended), the disk write log could be invalid.
NVSRAM Usage
The Integrated RAID firmware requires at least a 32K NVSRAM in order to perform write
journaling. Write journaling is used to verify that the disks in the IM/IME volume are
synchronized with each other.
7-5
Page 70

AOC-USAS-L8i Add-on Card User’s Manual
7-5 Fusion-MPT Support
The BIOS uses the LSI Fusion-MPT® interface to communicate to the SAS controller
and firmware to enable IM and IME volumes. This includes reading the Fusion-MPT
configuration to access the parameters that are used to define behavior between the
SAS controller and the devices connected to it. The Fusion-MPT drivers for all
supported operating systems implement the Fusion-MPT interface to communicate with
the controller and firmware.
7-6 IM/IME Configuration Overview
You can use the SAS BIOS CU to create one or two IM/IME volumes on each SAS
controller, with one or two optional global hot spare disks. All disks in an IM/IME volume
must be connected to the same SAS controller.
Although you can use disks of different size in IM and IME volumes, the smallest disk in
the volume will determine the logical size of all disks in the volume. In other words, the
excess space of the larger member disk(s) will not be used. For example, if you create
an IME volume with two 100-GB disks and two 120-GB disks, only 100-GB of the larger
disks will be used for the volume.
Refer to Section 7-2 below for more information about Integrated Mirroring volumes.
7-7 Creating IM and IME Volumes
The SAS BIOS CU is part of the Fusion-MPT BIOS. When the BIOS loads during boot
and you see the message about the Configuration Utility, press C
After you do this, the message changes to:
Please wait, invoking SAS Configuration Utility...
After a brief pause, the main menu of the SAS BIOS CU appears. On some systems,
however, the following message appears next:
LSI Configuration Utility will load following initialization!
In this case, the SAS BIOS CU will load after the system has completed its power-on
self test.
You can configure one or two IM or IME volumes per Fusion-MPT controller. You can
also configure one IM/IME and one Integrated Striping (IS) volume on the same
controller, up to a maximum of twelve physical disk drives for the two volumes. In
addition, you can create one or two hot spares for the IM/IME array(s).
The following guidelines also apply when creating an IM or IME volume:
• All physical disks in a volume must be either SATA (with extended command set
support) or SAS (with SMART support). SAS and SATA disks cannot be combined
in the same volume. However, you can create one volume with SAS disks and a
second volume with SATA disks on the same controller.
• Disks must have 512-byte blocks and must not have removable media.
TRL-C to start the CU.
7-6
Page 71

Chapter 7: Integrated Mirroring and Integrated Mirroring Enhanced
• An IM volume must have two drives. An IME volume can have three to ten drives. In
addition, one or two hot spares can be created for the IM/IME volume(s).
NOTE: If a disk in an IM/IME volume fails, it is rebuilt on the global hot spare if
one is available. It is recommended that you always use hot spares with IM/IME
volumes.
Creating an IM Volume
Follow these steps to create an IM volume with the SAS BIOS CU:
1. On the ADAPTER LIST screen (Figure 7-4), use the arrow keys to select an SAS
adapter.
Figure 7-4. Adapter List Screen
7-7
Page 72

AOC-USAS-L8i Add-on Card User’s Manual
2. Press ENTER to go to the ADAPTER PROPERTIES screen, as shown in Figure 7-5
below:
Figure 7-5. Adapter Properties Screen
7-8
Page 73

Chapter 7: Integrated Mirroring and Integrated Mirroring Enhanced
3. On the ADAPTER P ROPERTIES screen, use the arrow keys to select RAID PROPERTIES
on the screen and press E
The SELECT NEW ARRAY TYPE screen appears (Figure 7-6).
Figure 7-6. Select New Array Type Screen
NTER.
7-9
Page 74

AOC-USAS-L8i Add-on Card User’s Manual
4. In the SELECT NEW ARRAY TYPE screen (Figure 7-6), select CREATE IM VOLUME.
The CREATE NEW ARRAY screen appears (Figure 7-7). This screen shows a list of
disks available to be added to a volume.
Figure 7-7. Create New Array Screen
5. In the C
REATE NEW ARRAY screen move the cursor to the RAID Disk column and
select a disk. To add the disk to the volume, change the N
key, - key, or
SPACE bar.
O to YES by pressing the +
When the first disk is added, the SAS BIOS CU prompts you to either keep existing
data or overwrite existing data.
6. Press M to keep the existing data on the first disk or press D to overwrite it.
If you keep the existing data, this is called a data migration. The first disk will be
mirrored onto the second disk, so any data you want to keep must be on the first
disk selected for the volume. Data on the second disk is overwritten. The first disk
must have 512KB available for metadata after the last partition.
As disks are added the A
RRAY SIZE field changes to reflect the size of the new
volume.
7. [Optional] Add one or two global hot spares by moving the cursor to the hot spare
column and pressing the + key, - key, or
SPACE bar.
Figure 7-7 shows an IM volume configured with one global hot spare disk.
7-10
Page 75

Chapter 7: Integrated Mirroring and Integrated Mirroring Enhanced
8. When the volume has been fully configured, press C and then SAVE CHANGES. Then
exit this menu to commit the changes.
The SAS BIOS CU pauses while the array is being created.
Creating an IME Volume
Follow these steps to create an IME volume with the SAS BIOS CU:
1. On the ADAPTER LIST screen, use the arrow keys to select an SAS adapter.
2. Press ENTER to go to the ADAPTER PROPERTIES screen (Figure 7-5).
3. On the ADAPTER P ROPERTIES screen, use the arrow keys to select RAID PROPERTIES
on the screen and press E
4. When you are prompted to select a volume type, select CREATE IME VOLUME.
The CREATE NEW ARRAY screen (Figure 7-7) shows a list of disks that can be added
to a volume.
5. Move the cursor to the RAID D
volume, change the N
6. Repeat this step to select a total of three to ten disks for the volume.
All existing data on all the disks you select will be overwritten. As you add disks, the
A
RRAY SIZE field changes to reflect the size of the new volume.
7. [Optional] Add one or two global hot spares to the volume by moving the cursor to
the hot spare column and pressing the + key, - key, or
8. 8. When the volume has been fully configured, press C and then select SAVE
C
HANGES. Then exit this menu to commit the changes.
The SAS BIOS CU pauses while the array is being created.
NTER.
ISK column and select a disk. To add the disk to the
O to YES by pressing the + key, - key, or SPACE bar.
SPACE bar.
Creating a Second IM or IME Volume
The SAS controllers allow you to configure two IM or IME volumes per controller. If
one volume is already configured, and if there are available disk drives, there are
two ways to add a second volume. The first is as follows:
1. In the configuration utility, select an adapter from the A
2. Select the RAID PROPERTIES option to display the current volume.
3. Press C to create a new volume.
4. Continue with either step 4 of "Creating an IM Volume" on page 7-7 or step 4 of
"Creating an IME Volume" on page 7-11 to create a second volume.
The other way to add a second volume is as follows:
1. On the A
DAPTER LIST screen, use the arrow keys to select an SAS adapter.
2. Press ENTER to go to the ADAPTER PROPERTIES screen (Figure 7-5).
7-11
DAPTER LIST.
Page 76

AOC-USAS-L8i Add-on Card User’s Manual
3. On the ADAPTER P ROPERTIES screen, use the arrow keys to select RAID PROPERTIES
and press E
4. Continue with step 4 of "Creating an IM Volume" on page 7-7 or step 4 of "Creating
an IME Volume" on page 7-11 to create a second volume.
NTER.
7-8 Managing Hot Spares
You can create one or two global hot spare disks to protect the IM or IME volumes
on a SAS controller. Usually, you create global hot spares at the same time you
create the IM/IME volume. Follow these steps to add global hot spare disks later:
1. On the V
2. Select MANAGE HOT SPARE on the MANAGE ARRAY screen (Figure 7-8).
IEW ARRAY screen, select MANAGE ARRAY.
Figure 7-8. Manage Array Screen
3. Select a disk from the list by pressing the + key, - key, or
4. After you select the global hot spare disk, press C.
An error message appears if the selected disk is not at least as large as the smallest
disk used in the IM/IME volume(s). The global hot spare disk must have 512-byte
blocks, it cannot have removable media, and the disk type must be either SATA with
extended command set support or SAS with SMART support.
7-12
SPACE bar.
Page 77

Chapter 7: Integrated Mirroring and Integrated Mirroring Enhanced
If SATA disks are used for the IM/IME volume(s), the hot spare disk must also be a
SATA disk. If SAS disks are used, the hot spare disk must also be a SAS disk. An
error message appears if the selected disk is not the same type as the disks used in
the IM/IME volumes.
5. [Optional] Select a second hot spare disk.
6. Select S
The configuration utility pauses while the global hot spares are being added.
Follow these steps to delete a global hot spare:
1. Select M
2. Select DELETE HOT SPARE and then press C.
If there are two hot spares, select which one you want to delete.
3. Select S
The configuration utility pauses while the global hot spare is being removed.
AVE CHANGES then exit this menu to commit the changes.
ANAGE HOT SPARE on the MANAGE ARRAY screen (Figure 7-8).
AVE CHANGES then exit this menu to commit the changes.
7-9 Other Configuration Tasks
This section explains how to perform other configuration and maintenance tasks for
IM and IME volumes.
Viewing Volume Properties
Follow these steps to view the properties of volumes:
1. In the SAS BIOS CU, select an adapter from the ADAPTER LIST. Select the RAID
P
ROPERTIES option.
The properties of the current volume are displayed. If global hot spares are defined,
they are also listed.
NOTE: If you create one volume using SAS disks, another volume using SATA
disks, and global hot spare disks, the hot spare disks will only appear when you
view the volume that has the same type of disks as the hot spare disks.
2. If two volumes are configured, press A
3. To manage the current array, select MANAGE ARRAY and press ENTER.
LT+N to view the other array.
Synchronizing an Array
The Synchronize Array command forces the firmware to resynchronize the mirrored
disks data in the array. It is seldom necessary to use this command, because the
firmware automatically keeps the mirrored data synchronized during normal
operation. When you use this command, one disk of the array is placed in the
Degraded state until the data on the mirrored disks has been resynchronized.
7-13
Page 78

AOC-USAS-L8i Add-on Card User’s Manual
Follow these steps to force the synchronization of a selected array:
1. Select SYNCHRONIZE ARRAY on the MANAGE ARRAY screen (Figure 7-8).
2. Press Y to start the synchronization, or N to cancel it.
Activating an Array
An array can become inactive if, for example, it is removed from one controller or
computer and moved to another one. The Activate Array option allows you to
reactivate an inactive array that has been added to a system. This option is only
available when the selected array is currently inactive.
Follow these steps to activate a selected array
1. Select A
2. Press Y to proceed with the activation, or press N to abandon it.
After a pause, the array will become active.
CTIVATE ARRAY on the MANAGE ARRAY screen (Figure 7-8).
NOTE: If there is a global hot spare disk on the controller to which you have
moved the array, the BIOS checks when you activate the array to determine if
the hot spare is compatible with the new array. An error message appears if the
disks in the activated array are larger than the hot spare disk or if the disks in
the activated array are not the same type as the hot spare disk (SATA versus
SAS).
Deleting an Array
WARNING: Before deleting an array, be sure to back up all data on the array that
you want to keep.
Follow these steps to delete a selected array:
1. Select DELETE ARRAY on the MANAGE ARRAY screen (Figure 7-8).
2. Press Y to delete the array.
After a pause, the array is deleted. If there is another remaining array and one or
two hot spare disks, the BIOS checks the hot spare disks to determine if they are
compatible with the remaining array. If they are not compatible (too small or wrong
disk type) the firmware deletes them also.
NOTE: After a volume has been deleted, it cannot be recovered. When an IM
volume is deleted, the data is preserved on the primary disk. When an IME
volume is deleted, the master boot records of all disks are deleted.
7-14
Page 79

Chapter 7: Integrated Mirroring and Integrated Mirroring Enhanced
Locating Drives in a Volume
You can use the SAS BIOS CU to locate and identify a specific physical disk drive
by flashing the drive’s LED. You can also use the SAS BIOS CU to flash the LEDs of
all the disk drives in a RAID volume. There are several ways to do this:
• When you are creating an IM or IME volume, and a disk drive is set to Yes as part of
the volume, the LED on the disk drive is flashing. The LED is turned off when you
have finished creating the volume.
• You can locate individual disk drives from the SAS Topology screen. To do this,
move the cursor to the name of the disk in the Device Identifier column and press
Enter. The LED on the disk flashes until the next key is pressed.
• You can locate all the disk drives in a volume by selecting the volume on the SAS
Topology screen. The LEDs flash on all disk drives in the volume.
NOTE: The LEDs on the disk drives will flash as described above if the
firmware is correctly configured and the drives or the disk enclosure supports
disk location.
Selecting a Boot Disk
You can select a boot disk in the SAS Topology screen. This disk is then moved to scan
ID 0 on the next boot, and remains at this position. This makes it easier to set BIOS boot
device options and to keep the boot device constant during device additions and
removals. There can be only one boot disk.
Follow these steps to select a boot disk:
1. In the SAS BIOS CU, select an adapter from the A
2. Select the SAS TOPOLOGY option.
The current topology is displayed. If the selection of a boot device is supported, the
bottom of the screen lists the A
LT+B option. This is the key for toggling the boot
device. If a device is currently configured as the boot device, the D
column on the SAS T
OPOLOGY screen will show the word Boot.
3. To select a boot disk, move the cursor to the disk and press ALT+B.
4. To remove the boot designator, move the cursor down to the current boot disk and
press A
LT+B. This controller will no longer have a disk designated as boot.
5. To change the boot disk, move the cursor to the new boot disk and press ALT+B.
The boot designator will move to this disk.
DAPTER LIST.
EVICE INFO
NOTE: The firmware must be configured correctly in order for the ALT+B
feature to work.
7-15
Page 80

AOC-USAS-L8i Add-on Card User’s Manual
Notes
7-16
Page 81

Chapter 8
Integrated Striping
This chapter provides an overview of the LSI Integrated Striping™ (IS) feature and
explains how to create Integrated Striping (IS) volumes using the SAS BIOS
Configuration Utility (SAS BIOS CU), which is used to setup IR Mode.
8-1 Introduction
The Integrated Striping (IS) feature is used for applications that require the faster
performance and increased storage capacity of striping. The low-cost IS feature has
many of the advantages of a more expensive RAID striping solution. A single IS logical
drive may be configured as the boot disk or as a data disk.
The IS feature is implemented with controller firmware that supports the Fusion-MPT
Interface. IS provides better performance and more capacity than individual disks,
without burdening the host CPU. The firmware splits host I/Os over multiple disks and
presents the disks as a single logical drive. In general, striping is transparent to the
BIOS, the drivers, and the operating system.
The SAS BIOS CU is used to configure IS volumes, which can consist of two to ten
disks.
8-2 IS Features
Integrated Striping supports the following features:
• Support for volumes with two to ten disks
• Support for two IS volumes (or one IS volume and one IM/IME volume) on a
controller, with up to 12 disks total. (Requires Integrated RAID firmware v1.20.00 or
above.)
NOTE: All physical disks in a volume must be connected to the same SAS
controller.
• Presents a single virtual drive to the OS for each configured volume
• Support for both SAS and SATA drives, although the two types of drives cannot be
combined in one volume
• Fusion-MPT architecture
• Easy-to-use SAS BIOS configuration utility
• Error notification
• Use of metadata to store volume configuration on disks
• OS-specific event log
• Error display inside the Fusion-MPT BIOS
8-1
Page 82

AOC-USAS-L8i Add-on Card User’s Manual
• SES status LED support for drives used in IS volumes
8-3 IS Description
The IS feature writes data across multiple disks instead of onto one disk. This is
accomplished by partitioning each disk’s storage space into 64-KB stripes. These
stripes are interleaved round-robin, so that the combined storage space is composed
alternately of stripes from each disk.
For example, as shown in Figure 8-1, segment 1 is written to disk 1, segment 2 is written
to disk 2, segment 3 is written to disk 3, and so on. When the system reaches the end of
the disk list, it continues writing data at the next available segment of disk 1.
Figure 8-1. Integrated Striping Example
LSI
Fusion-MPT
Controlle r
SAS
Disk 1 Disk 2 Disk 3 Disk 4
Segment 1
Segment 5
Segment 9
Segment 2
Segment 6
Segme nt 10
Segment 3
Segment 7
Segment 11
Segment 4
Segment 8
Segment 12
Figure 8-2 shows a logical view and a physical view of Integrated Striping configuration.
Figure 8-2. Integrated Striping – Logical and Physical Views
Logical View Physical View
Stripe 1
Stripe 2
Stripe 3
...
Stripe N
Stripe 1
Stripe 2
Stripe 3
...
Stripe N
Stripe 1
Stripe 2
+
Stripe 3
...
Stripe N
Stripe 1
Stripe 2
+
Stripe 3
...
Stripe N
The primary advantage of IS is speed, because it transfers data to or from multiple disks
at once. However, there is no data redundancy; therefore, if one disk fails, that data is
lost.
8-2
Page 83

Chapter 8: Integrated Striping
8-4 Integrated Striping Firmware
This section describes features of the Integrated RAID firmware.
Metadata Support
The firmware supports metadata, which describes the IS logical drive configuration
stored on each member disk. When the firmware is initialized, each member disk is
queried to read the stored metadata to verify the configuration. The usable disk space
for each IS member disk is adjusted down when the configuration is created, in order to
leave room for this data.
SMART Support
SMART is a technology that monitors hard disk drives for signs of future disk failure and
generates an alert if such signs are detected. The firmware polls each physical disk in
the volume at regular intervals. If the firmware detects a SMART ASC/ASCQ code on a
physical disk in the IS volume, it processes the SMART data and stores it in nonvolatile
memory. The IS volume does not support SMART directly, since it is just a logical
representation of the physical disks in the volume.
Disk Write Caching
Disk write caching is enabled by default on all IS volumes.
8-5 Fusion-MPT Support
The BIOS uses the LSI Fusion-MPT interface to communicate to the SAS controller and
firmware to enable IS. This includes reading the Fusion-MPT configuration to gain
access to the parameters that are used to define behavior between the SAS controller
and the devices connected to it. The Fusion-MPT drivers for all supported operating
systems implement the Fusion-MPT interface to communicate with the controller and
firmware.
8-6 IS Configuration Overview
You can use the SAS BIOS CU to create one or two IS volumes, with up to twelve drives
total, on an SAS controller. Each volume can have from two to ten drives. Disks in an IS
volume must be connected to the same SAS controller, and the controller must be in the
BIOS boot order.
Although you can use disks of different size in IS volumes, the smallest disk determines
the “logical” size of each disk in the volume. In other words, the excess space of the
larger member disk(s) is not used.
Usable disk space for each disk in an IS volume is adjusted down to leave room for
metadata. Usable disk space may be further reduced to maximize the ability to
interchange disks in the same size classification.
8-3
Page 84

AOC-USAS-L8i Add-on Card User’s Manual
The supported stripe size is 64 kilobytes. Refer to Section 8-2: "IS Features" on
page 8-1 for more information about Integrated Striping volumes.
8-7 Creating IS Volumes
The SAS BIOS CU is part of the Fusion-MPT BIOS. When the BIOS loads during boot
and you see the message about the Configuration Utility, press Ctrl-C to start it. After
you do this, the message changes to:
Please wait, invoking SAS Configuration Utility...
After a brief pause, the main menu of the SAS BIOS CU appears. On some systems,
however, the following message appears next:
LSI Configuration Utility will load following initialization!
In this case, the SAS BIOS CU will load after the system has completed its power-on
self test.
Follow the steps below to configure an Integrated Striping (IS) volume with the SAS
BIOS CU. The procedure assumes that the required controller(s) and disks are already
installed in the computer system. You can configure an IM/IME volume and an IS
volume on the same SAS controller.
8-4
Page 85

Chapter 8: Integrated Striping
Creating IS Volumes
1. On the ADAPTER LIST screen of the SAS BIOS CU, use the arrow keys to select a
SAS adapter.
2. Press E
NTER to go to the ADAPTER PROPERTIES screen (Figure 8-3).
Figure 8-3. Adapter Properties Screen
3. On the A
and press E
DAPTER PROPERTIES screen, use the arrow keys to select RAID PROPERTIES
NTER.
8-5
Page 86

AOC-USAS-L8i Add-on Card User’s Manual
4. When you are prompted to select a volume type, select CREATE IS VOLUME.
The CREATE NEW ARRAY screen (Figure 8-4) that appears shows a list of disks that
can be added to a volume.
Figure 8-4. Create New Array Screen
5. Move the cursor to the RAID D
N
O to YES by pressing the + key, - key, or SPACE bar.
ISK column. To add a disk to the volume, change the
As disks are added, the ARRAY SIZE field changes to reflect the size of the new
volume.
6. When you have added the desired number of disks to the array, press C and then
select S
AVE CHANGES. Then exit this menu to commit the changes.
The configuration utility pauses while the array is being created.
Be aware that there are several limitations when creating an IS (RAID 0) volume:
• All disks must be either SATA (with extended command set support) or SAS (with
SMART support).
• Disks must have 512-byte blocks and must not have removable media.
• There must be at least two and no more than ten drives in a valid IS volume. Hot
spare drives are not allowed.
8-6
Page 87

Chapter 8: Integrated Striping
8-8 Creating a Second IS Volume
SAS controllers allow you to configure two IS volumes, or an IS volume and an IM/IME
volume. If one volume is already configured, and if there are available disk drives, there
are two ways to add a second volume.
The first way to add a second volume is as follows:
1. In the configuration utility, select an adapter from the A
select the RAID P
This displays the current volume.
2. Press C to create a new volume.
3. Continue with step 4 of Section 8-7: "Creating IS Volumes" on page 8-4 to create a
second IS volume.
The other way in which to add a second volume is as follows:
1. On the A
2. Press ENTER to go to the ADAPTER PROPERTIES screen (Figure 8-3).
3. On the ADAPTER P ROPERTIES screen, use the arrow keys to select RAID PROPERTIES
and press E
4. Continue with step 4 of Section 8-7: "Creating IS Volumes" on page 8-4 to create a
second IS volume.
DAPTER LIST screen, use the arrow keys to select an SAS adapter.
ROPERTIES option.
NTER.
DAPTER LIST screen and then
8-9 Other Configuration Tasks
This section explains how to perform other configuration and maintenance tasks for IS
volumes.
Viewing IS Volume Properties
Follow these steps to view the properties of IS volumes:
1. In the configuration utility, select an adapter from the ADAPTER LIST screen. Select
the RAID P
The properties of the current volume are displayed.
2. If more than one volume is configured, press A
3. To manage the current array, press ENTER when the MANAGE ARRAY item is
selected.
ROPERTIES option.
LT+N to view the next array.
Activating an Array
An array can become inactive if, for example, it is removed from one controller or
computer and moved to another one. The A
reactivate an inactive array that has been added to a system. This option is only
available when the selected array is currently inactive.
CTIVATE ARRAY option allows you to
8-7
Page 88

AOC-USAS-L8i Add-on Card User’s Manual
Follow these steps to activate a selected array.
1. Select ACTIVATE ARRAY on the MANAGE ARRAY screen.
2. Press Y to proceed with the activation, or press N to abandon it.
After a pause, the array will become active.
Deleting an Array
WARNING: Before deleting an array, be sure to back up all data on the array that
you want to keep.
Follow these steps to delete a selected array:
1. Select DELETE ARRAY on the MANAGE ARRAY screen.
2. Press Y to delete the array, or press N to abandon the deletion.
After a pause, the firmware deletes the array.
NOTE: Once a volume has been deleted, it cannot be recovered. The master
boot records of all disks are deleted.
Locating a Disk in a Volume
You can use the SAS BIOS CU to locate and identify a specific physical disk drive by
flashing the drive’s LED. You can also use the SAS BIOS CU to flash the LEDs of all the
disk drives in a RAID volume. There are several ways to do this:
• When you are creating an IS volume, and a disk drive is set to Yes as part of the
volume, the LED on the disk drive is flashing. The LED is turned off when you have
finished creating the volume.
• You can locate individual disk drives from the SAS T
move the cursor to the name of the disk in the D
E
NTER. The LED on the disk flashes until the next key is pressed.
• You can locate all the disk drives in a volume by selecting the volume on the SAS
OPOLOGY screen. The LEDs flash on all disk drives in the volume.
T
OPOLOGY screen. To do this,
EVICE IDENTIFIER column and press
NOTE: The LEDs on the disk drives will flash as described above if the
firmware is correctly configured and the drives or the disk enclosure supports
disk location.
8-8
Page 89

Chapter 8: Integrated Striping
Selecting a Boot Disk
You can select a boot disk in the SAS TOPOLOGY screen. This disk is then moved to scan
ID 0 on the next boot, and remains at this position. This makes it easier to set BIOS boot
device options and to keep the boot device constant during device additions and
removals. There can be only one boot disk.
Follow these steps to select a boot disk:
1. In the SAS BIOS CU, select an adapter from the A
2. Select the SAS TOPOLOGY option.
The current topology is displayed. If the selection of a boot device is supported, the
bottom of the screen lists the A
LT+B option. This is the key for toggling the boot
device. If a device is currently configured as the boot device, the D
column on the SAS T
OPOLOGY screen will show the word Boot.
3. To select a boot disk, move the cursor to the disk and press ALT+B.
4. To remove the boot designator, move the cursor down to the current boot disk and
press A
LT+B. This controller will no longer have a disk designated as boot.
5. To change the boot disk, move the cursor to the new boot disk and press ALT+B.
The boot designator will move to this disk.
NOTE: The firmware must be configured correctly in order for the ALT+B
feature to work.
DAPTER LIST.
EVICE INFO
8-9
Page 90

AOC-USAS-L8i Add-on Card User’s Manual
Notes
8-10
Page 91

Chapter 9
Using the CFGGEN IR Configuration
Utility
This Chapter describes how to use the CFGGEN IR Configuration Utility to create
Integrated Mirroring (IM), Integrated Mirroring Enhanced (IME), and Integrated Striping
(IS) volumes on SAS controllers. CFGGEN is a command line utility that runs in the
DOS, Linux, EFI, and Windows Pre-Installation (WinPE) environments. CFGGEN is a
minimally interactive program that can be executed from a command line prompt or a
shell script.
NOTE: CFGGEN is intended for use only in the manufacturing environment.
End users can use the BIOS-based configuration utility to create IM, IME, and
IS volumes. (See Section 7-7: "Creating IM and IME Volumes" on page 7-6 and
Section 8-7: "Creating IS Volumes" on page 8-4)
9-1 Hardware and Software Requirement s
The CFGGEN IR Configuration Utility runs on any Intel IA-32 or IA64 compatible
platform. It works with storage devices that are compliant with existing SCSI standards.
CFGGEN supports the LSISAS1064/1064E, LSISAS1068/1068E, and LSISAS1078 LSI
SAS controller chips.
CFGGEN runs in the following operating environments:
• DOS – CFGGEN runs in any environment that is fully DOS compatible and has at
least 640-KB of memory. The system BIOS must support 32-bit BIOS services,
including the PCI BIOS services. CFGGEN uses these services to locate the
controller and its interface registers. CFGGEN must be able to directly access the
controller chip’s interface registers.
NOTE: You cannot run CFGGEN in a virtual DOS window from within Windows.
• EFI – CFGGEN runs in any environment that is fully EFI compatible.
• Linux – CFGGEN is a statically linked Linux application. Static linking prevents any
library version compatibility problems that might stop CFGGEN from working with a
specific release or distribution of Linux. Version 3.02.04 or newer of the LSI mptlinux
driver must be installed on the system. The required modules include mptbase.o,
mptscsih.o, and mptctl.o.
9-1
Page 92

AOC-USAS-L8i Add-on Card User’s Manual
WARNING: The modules mptbase.o, mptscsih.o and mptctl.o must be loaded
into the Linux kernel before CFGGEN will function correctly. They can be loaded
using the Linux modprobe command.
• WinPE – CFGGEN runs in Windows Pre-Installation Environment (WinPE) and is
statically compiled with the LSI MptLib Library (MptLib.lib). The WinPE environment
must have the appropriate LSI MPT Windows driver (Miniport or Storport) installed
and loaded in order to recognize and communicate with the I/O controller.
9-2 CFGGEN Interface Description
CFGGEN uses a command line interface. Commands are formatted as follows:
cfggen <controller #> <command> <parameters>
The program name, controller number, command, and parameters fields must be
separated by the ASCII space character. The parameter format is command specific, as
described in "CFGGEN Commands" below.
Information is passed between the user environment and CFGGEN via the command
line, the standard output and standard error interfaces, and the program return value.
The user can redirect the output streams. The return value is generated when the
program exits. A value of 0 is returned if the command is successful. Otherwise, a value
of 1 is returned.
9-3 CFGGEN Commands
CFGGEN has the following commands:
• CREATE
• DEFAULTS (called DELETE in the EFI version)
• DISPLAY
•FORMAT
• HOTSPARE
•STATUS
• SETOFFLINE (DOS, Linux, and WinPE versions only)
• SETONLINE (DOS, Linux, and WinPE versions only)
• AUTO (EFI version only)
• DISABLEIR (EFI version only)
• ENABLEIR (EFI version only)
• LIST (EFI version only)
CFGGEN is not case sensitive. You can type CFGGEN commands and parameters in
uppercase, lowercase, or a mixture of the two.
The following conventions are used in the command descriptions:
•Text in italics must be entered exactly as shown on the command line.
9-2
Page 93

Chapter 9: Using the CFGGEN IR Configuration Utility
• Text surrounded by <> must be replaced with a required parameter.
• Text surrounded by [ ] may be replaced by an optional parameter.
• Parameters surrounded by {} must be entered one or more times, as is appropriate
for the command being executed.
• The command line definition characters <>, [ ], and {} must not be entered on the
command line.
Common Command Line Parameters
This section describes CFGGEN command line parameters that are common to more
than one command.
• <controller #> – The unique controller number of a PCI function found in the
system, starting with controller # 0. For example, in a system containing two
SAS1068 controllers, controller # 0 references the first controller and controller # 1
references the other controller.
Valid controller number values are 0 to 255 (decimal).
• <SCSI ID> – The SCSI bus address of a peripheral device attached to an SAS
controller. The valid SCSI ID values for supported SAS controllers are 0 to 127
(decimal) per controller.
NOTE: With PBSRAM, the SAS1068/1068E controllers can support more than
128 devices.
• <Enclosure:Bay> – The Enclosure and bay/slot of a peripheral device attached to
the bus. The argument must use a colon (:) as a separator and must follow the
enclosure:bay format. This argument is only valid when used with the bay command
line argument. Valid numbers are 0 to 127 (decimal).
CREATE Command
The CREATE command creates IM, IME, and IS volumes on supported SAS controllers.
When a disk drive is added to an IM, IME, or IS volume, its entire storage capacity may
or may not be used, depending on drive capacity and volume capacity. For example, if
you add a 36-GB disk drive to a volume that only uses 9-GB of capacity on each disk
drive, the remaining 27-GB of capacity on the disk drive is unusable.
The disk identified by the first SCSI ID on the command line is assigned as the primary
disk drive when an IM volume is created. If the controller is allowed to resync the disk
drives, the data on the primary disk drive will be available when you access the newly
created volume.
9-3
Page 94

AOC-USAS-L8i Add-on Card User’s Manual
The following rules must be observed when creating IM, IME, and IS volumes and hot
spare disks:
1. All disks that are part of a volume, including global hot spares, must be on the same
SAS controller.
2. A maximum of two IM, IME, or IS volumes per controller can be created.
3. The total number of disks in a volume cannot exceed ten, and the total number of
disks combined for two volumes cannot exceed twelve. In addition, one or two hot
spare disks can be created per controller to support IM and IME volumes, for a
maximum of 14 supported disks per SAS controller. (Support for this number of
disks requires Integrated RAID firmware v1.20.00 or above.)
4. An IM volume must have exactly two disks.
5. An IME volume can have a minimum of three disks and a maximum of ten disks, as
long as rule 3 is not violated.
Command Line –
cfggen <controller #> create <volume type> <size>
{<SCSI ID>} [qsync] [noprompt]
cfggen <controller #> create <volume type> <size> bay
{<enclosure:bay>} [qsync] [noprompt]
Parameters –
• <controller #> – Number of the SAS controller targeted by this command.
• <volume type> – Volume type for the new volume to be created. Valid values are
IM or IME or IS.
• <size> – Size of the RAID volume in megabytes, or MAX for the maximum size
available.
• Bay – This option indicates that enclosure:bay values are specified instead of SCSI
ID values.
• <SCSI ID> – SCSI ID of a hard disk drive to be included in the RAID volume.
• <enclosure:bay> – The enclosure:bay value for the disk drive to be included in
the RAID volume. These values can be obtained from the output of the DISPLAY
command.
• qsync – If this optional parameter is specified, a quick synchronization of new
volume will be performed. If the volume type is IME or IS, a quick synchronization is
always performed even if qsync is not specified. A quick synchronization means that
the first 32-KB of the drives in the volume are cleared to 0.
• noprompt – Suppresses display of warnings and prompts.
Program Return Value –
0x00 SUCCESS: command completed successfully.
0x01 FAILURE: bad command line arguments or operational failure.
9-4
Page 95

Chapter 9: Using the CFGGEN IR Configuration Utility
DEFAULTS Command
NOTE: This command is called DELETE in the EFI version of CFGGEN.
The DEFAULTS (DELETE) command deletes any IM, IME, and IS volumes and hot
spare drives created by the CREATE and HOTSPARE commands. No other controller
configuration parameters are changed.
Command Line –
DOS, Linux, WinPE versions:
cfggen <controller #> defaults [noprompt]
EFI version:
cfggen <controller #> delete [noprompt]
Parameters –
• <controller #> – Number of the SAS controller targeted by this command.
• noprompt – Suppresses display of warnings and prompts.
Program Return Value –
0x00 SUCCESS: command completed successfully.
0x01 FAILURE: bad command line arguments or operational failure.
DISPLAY Command
The DISPLAY command displays configuration information for the supported SAS
controllers. The information includes controller type, firmware version, BIOS version,
volume information, and physical drive information. An example of the information that
will be output by this command is provided in Sample Output below.
NOTE: 1 megabyte = 1,048,576 bytes. All sizes displayed in megabytes are
rounded down to the nearest megabyte.
Command Line –
cfggen <controller #> display [filename]
Parameters –
• <controller #> – Number of the SAS controller targeted by this command.
• [filename] – Optional valid filename to store the output of the command to a file.
9-5
Page 96

AOC-USAS-L8i Add-on Card User’s Manual
Program Return Value –
0x00 SUCCESS: command completed successfully.
0x01 FAILURE: bad command line arguments or operational failure.
Sample Output –
The following example shows a sample output of the CREATE command when used to
create an IM configuration.
Read configuration has been initiated for controller 0
-----------------------------------------------------------Controller information
-----------------------------------------------------------Controller type : LSI1064/1068
BIOS version : 6.05.05.00
Firmware version : 0.07.01.00
SCSI channel description : 1 Serial Attached SCSI
Initiator IDs (SCSI ID) : 63
Maximum physical devices : 62
Concurrent commands supported : 511
Slot : 1
Bus : 2
Device : 2
Function : 0
-----------------------------------------------------------IR Volume information
-----------------------------------------------------------IR volume 1
Status of volume : Okay (OKY)
RAID level : 1
Size (in MB) : 34332
Physical hard disks (SCSI ID) : 10 7
-----------------------------------------------------------Enclosure information
-----------------------------------------------------------Enclosure # : 1
Enclosure WWN : 12345678:ABCDABCD
Start Slot : 1
Num Slots : 4
Start SCSI ID : 0
-----------------------------------------------------------Physical device information
-----------------------------------------------------------Initiator at SCSI ID 63
Target on SCSI ID 7
Enclosure # : 1
Slot # : 1
Device is a Hard disk
SCSI ID : 7
State : Online (ONL)
Size (in MB)/(in sectors) : 34732/71132958
9-6
Page 97

Chapter 9: Using the CFGGEN IR Configuration Utility
Manufacturer : MAXTOR
Model Number : ATLAS15K2_036SAS
Firmware Revision : BG31
Serial No : E204EY1K
Drive Type : SAS
Target on SCSI ID 8
Enclosure # : 1
Slot # : 2
Device is a Hard disk
SCSI ID : 8
State : Hot Spare (HSP)
Size (in MB)/(in sectors) : 35074/71833095
Manufacturer : MAXTOR
Model Number : ATLAS15K2_36SAS
Firmware Revision : BG34
Serial No : E207AY6K
Drive Type : SAS
Target on SCSI ID 9
Enclosure # : 1
Slot # : 3
Device is a Hard disk
SCSI ID : 9
State : Ready (RDY)
Size (in MB)/(in sectors) : 34732/71132959
Manufacturer : MAXTOR
Model Number : ATLAS15K2_036SAS
Firmware Revision : BG31
Serial No : E204ERCK
Drive Type : SAS
Target on SCSI ID 10
Enclosure # : 1
Slot # : 4
Device is a Hard disk
SCSI ID : 10
State : Online (ONL)
Size (in MB)/(in sectors) : 140299/287332383
Manufacturer : MAXTOR
Model Number : ATLAS15K2_147SAS
Firmware Revision : BG34
Serial No : E803YMCK
Drive Type : SAS
Logical drive status values are as follows:
• Okay (OKY) – Volume is Active and drives are functioning properly. User data is
protected if the volume is IM or IME.
• Degraded (DGD) – Volume is Active. User data is not fully protected due to a
configuration change or drive failure.
• Rebuilding (RBLD) – Data resync or rebuild may be in progress.
9-7
Page 98

AOC-USAS-L8i Add-on Card User’s Manual
• Inactive, Okay (OKY) – Volume is inactive and drives are functioning properly.
User data is protected if the current RAID level is RAID 1 (IM) or RAID 1E (IME).
• Inactive, Degraded (DGD) – Volume is inactive and the user’s data is not fully
protected due to a configuration change or drive failure; a data resync or rebuild
may be in progress.
Physical drive status values are as follows:
• Online (ONL) – Drive is operational and is part of a logical drive.
• Hot Spare (HSP) – Drive is a hot spare that is available to replace a failed drive in
an array.
• Ready (RDY) – Drive is ready for use as a normal disk drive; or it is available to be
assigned to a disk array or used as a hot spare.
• Available (AVL) – Drive may or may not be ready, and it is not suitable for use in
an array or as a hot spare. Possible reasons for this are: it is not spun up, its block
size is incorrect, or its media is removable.
• Failed (FLD) – Drive was part of a logical drive or was a hot spare drive, and it
failed. It has been taken offline.
• Standby (SBY) – This status is used to tag all non-hard disk drive devices.
FORMAT Command
The FORMAT command is used to perform a low-level format of a disk drive. The drive
cannot be a hot spare drive or a member of an IM, IME, or IS volume.
WARNING: A low-level format erases all data on the hard disk drive. The
FORMAT command cannot and should not be interrupted; doing so may result in
irreparable damage to the hard disk drive.
Warning messages are displayed during the formatting, unless the noprompt option is
included on the command line. If the user does not quickly respond to a series of
prompts, the command is aborted. The answers are case sensitive and must be entered
in upper case.
The FORMAT command does not complete and return to a shell prompt until the format
operation is complete. This may take a long time for a large disk drive.
Command Line –
cfggen <controller #> format <SCSI ID> [noprompt]
cfggen <controller #> format bay <enclosure:bay> [noprompt]
Parameters –
• <controller #> – Number of the controller targeted by this command.
• Bay – This option indicates that enclosure:bay values are specified instead of SCSI
ID values.
• <SCSI ID> – SCSI ID of the hard disk drive to be formatted.
• <enclosure:bay> – The enclosure:bay value for the disk drive to be formatted.
These values can be obtained from the output of the DISPLAY command.
9-8
Page 99

Chapter 9: Using the CFGGEN IR Configuration Utility
• noprompt – Suppresses display of warnings and prompts.
Program Return Value –
0x00 SUCCESS: command completed successfully.
0x01 FAILURE: command failed.
HOTSPARE Command
The HOTSPARE command creates a hot spare disk drive. One or two hot spare disk
can be created per controller. The capacity of a hot spare disk must be greater than or
equal to the capacity of the smallest disk in the logical drive. An easy way to verify this is
to use the DISPLAY command.
The following rules must be observed when creating hot spare disks:
1. A hot spare disk cannot be created unless at least one IM or IME volume is already
created.
2. CFGGEN does not allow adding a hot spare disk of a type (SAS/SATA) that is
different from the disk types in any of the volumes.
Command Line –
cfggen <controller #> hotspare <SCSI ID>
cfggen <controller #> hotspare bay <enclosure:bay>
Parameters –
• <controller #> – Number of the SAS controller targeted by this command.
• Bay – This option indicates that enclosure:bay values are specified instead of SCSI
ID values.
• <SCSI ID> – SCSI ID of the drive targeted by this command.
• <enclosure:bay> – The enclosure:bay value for the disk drive to use for the new
hot spare disk. These values can be obtained via the output of the DISPLAY
command.
Program Return Value –
0x00 SUCCESS: command completed successfully.
0x01 FAILURE: bad command line arguments or operational failure.
STATUS Command
The STATUS command displays the status of any volume synchronization operation
that is currently in progress on the controller. If no such operation is in progress,
CFGGEN displays a message indicating this before it exits. The STATUS command
adds the flag Inactive to the Volume State field, if the controller firmware marks the
volume as Inactive.
Command Line –
cfggen <controller #> status
9-9
Page 100

AOC-USAS-L8i Add-on Card User’s Manual
Parameters –
• <controller #> – Number of the SAS controller targeted by this command.
Program Return Value –
0x00 SUCCESS: command completed successfully.
0x01 FAILURE: command failed.
Sample Output –
Here is an example of the status information returned when a volume resynchronization
is in progress:
Background command progress status for controller 0...
IR Volume 1
Current operation : Synchronize
Volume ID : 6
Volume status : Enabled
Volume state : Degraded
Physical disk I/Os : Not quiesced
Volume size (in sectors) : 70311936
Number of remaining sectors : 68250624
Percentage complete : 2.93%
Here is an example of the status information returned when no background volume
operation is in progress:
Background command progress status for controller 0...
IR Volume 1
Current operation : None
Volume ID : 6
Volume status : Enabled
Volume state : Optimal
Physical disk I/Os : Not quiesced
The status fields in the data displayed can have the following values:
Current operation – Synchronize or None
Volume status – Enabled or Disabled
Volume state – [Inactive] Optimal, Degraded, or Failed
Physical disk I/Os – Quiesced or Not quiesced
SETOFFLINE Command
NOTE: The SETOFFLINE command is supported by the DOS, Linux, and
WinPE versions of CFGGEN only.
9-10
 Loading...