

Page 1

®
SUPER P6DBS
SUPER P6DBE
SUPER P6DBU
SUPER P6SBU
SUPER P6SBS
SUPER P6SBA
SUPER P6SBM
USER’S AND BIOS
MANUAL
Revision 4.0
SUPER
Page 2

The information in this User’s Manual has been carefully reviewed and is believed to be
accurate. The vendor assumes no responsibility for any inaccuracies that may be contained
in this document, makes no commitment to update or to keep current the information in this
manual, or to notify any person or organization of the updates.
Please Note: For the
most up-to-date version of this manual, please see our web site at
www.supermicro.com.
SUPERMICRO COMPUTER reserves the right to make changes to the product described in
this manual at any time and without notice. This product, including software, if any, and
documentation may not, in whole or in part, be copied, photocopied, reproduced, translated or
reduced to any medium or machine without prior written consent.
IN NO EVENT WILL SUPERMICRO COMPUTER BE LIABLE FOR DIRECT, INDIRECT,
SPECIAL, INCIDENTAL, OR CONSEQUENTIAL DAMAGES ARISING FROM THE USE OR
INABILITY TO USE THIS PRODUCT OR DOCUMENTATION, EVEN IF ADVISED OF THE
POSSIBILITY OF SUCH DAMAGES. IN PARTICULAR, THE VENDOR SHALL NOT HAVE
LIABILITY FOR ANY HARDWARE, SOFTWARE, OR DATA STORED OR USED WITH THE
PRODUCT, INCLUDING THE COSTS OF THE REPAIRING, REPLACING, INTEGRATING,
INSTALLING OR RECOVERING SUCH HARDWARE, SOFTWARE OR DATA.
Unless you request and receive written permission from SUPER MICRO COMPUTER, you
may not copy any part of this document.
Information in this document is subject to change without notice. Other products and
companies referred to herein are trademarks or registered trademarks of their respective
companies or mark holders.
Copyright © 1999 by SUPER MICRO COMPUTER INC.
All rights reserved.
Printed in the United States of America.
Page 3

Preface
About This Manual
This manual is written for system houses, PC technicians and
knowledgeable PC end users. It provides information for the installation and
use of the SUPER P6DBS/P6DBE/P6DBU/P6SBU/P6SBS/P6SBA/P6SBM
motherboard. The SUPER P6DBS/P6DBE/P6DBU/P6SBU/P6SBS/P6SBA/
P6SBM supports CeleronTM SEPP 266-433 MHz, Pentium® II 233-450 MHz
and 100 MHz FSB speed Pentium III processors up to 700 MHz. (*Note:
Currently, SUPER P6DBE/P6DBU/P6SBU/P6SBA motherboard supports CPU
speeds up to 1GHz with 100MHz FSB speed.)
Pentium III and II processors with the Dual Independent Bus Architecture are
housed in a new package technology called a Single Edge Contact Cartridge
(S.E.C.C.) . This cartridge package and its associated "Slot 1" infrastructure
will provide the headroom for future high-performance processors. Celeron
processors that are packaged in the SEPP (Single Edge Processor Package)
cartridge are also supported by these boards.
Manual Organization
Chapter 1, Introduction, describes the features, specifications and performance of the SUPER P6DBS/P6DBE/P6DBU/P6SBU/P6SBS/P6SBA/P6SBM
system board and provides detailed information about the chipset.
Refer to Chapter 2, Installation, for instructions on how to install the Pentium
III/II processor, the Universal Retention Mechanism and the heat sink support.
This chapter also provides you with instructions for handling static-sensitive
devices. Read this chapter when you want to install DIMMs and to mount the
system board in the chassis. Also refer to this chapter to connect the floppy
and hard disk drives, the parallel port and the serial ports as well as the cables
for the power supply, the reset button, the keylock/power LED, the speaker
and the keyboard.
iii
Preface
Page 4

If you encounter any problems, please see Chapter 3, Troubleshooting,
which describes troubleshooting procedures for the video, the memory and
the setup configuration stored in memory. For quick reference, a general
FAQ [Frequently Asked Questions] section is provided. Instructions are
also included for contacting technical support, returning merchandise for
service and for BIOS upgrades.
See Chapter 4 for configuration data and BIOS features.
iv
SUPER P6DBS/P6DBE/P6DBU/P6SBU/P6SBS/P6SBA/P6SBM Manual
Page 5

Table of Contents
v
Chapter 5 has information on running setup and includes the default settings for Standard Setup, Advanced Setup, Chipset Function, Power Management, PCI/PnP Setup and Peripheral Setup.
Appendix A offers information on BIOS error beep codes and messages.
Appendix B shows post diagnostic error messages.
Table of Contents
Preface
About This Manual ...................................................................................................... ii i
Manual Organization ................................................................................................... ii i
Jumper Quick Reference .......................................................................................... viii
Front Control Panel Connector ................................................................................... ix
Chapter 1: Introduction
1-1 Overview ......................................................................................................... 1-1
SUPER P6DBS Image ............................................................................... 1-4
SUPER P6DBS Motherboard Layout...................................................... 1-5
SUPER P6DBE Image ............................................................................... 1-6
SUPER P6DBE Motherboard Layout ...................................................... 1-7
SUPER P6DBU Image ............................................................................... 1-8
SUPER P6DBU Motherboard Layout...................................................... 1-9
SUPER P6SBU Image .............................................................................. 1-10
SUPER P6SBU Motherboard Layout..................................................... 1-11
SUPER P6SBS Image.............................................................................. 1-12
SUPER P6SBS Motherboard Layout..................................................... 1-13
SUPER P6SBA Image.............................................................................. 1-14
SUPER P6SBA Motherboard Layout .................................................... 1-15
SUPER P6SBM Image.............................................................................. 1-16
SUPER P6SBM Motherboard Layout .................................................... 1-17
440BX AGP Chipset: System Block Diagram ..................................... 1-18
Motherboard Features .......................................................................... 1-19
1-2 Chipset Overview......................................................................................... 1-21
1-3 PC Health Monitoring.................................................................................... 1-21
1- 4 Solo-1 PCI
Audio
Drive ................................................................................. 1-24
Page 6

SUPER P6DBS/P6DBE/P6DBU/P6SBU/P6SBS/P6SBA/P6SBM Manual
1-5 ACPI/PC 98 Features ................................................................................... 1-25
1-6 Wake-On-LAN ............................................................................................... 1-26
1-7 Power Supply ............................................................................................... 1-27
1- 8 Super I/O......................................................................................................... 1-27
1- 9 AIC 7895 SCSI Controller............................................................................. 1-28
1-10 AIC 7890 SCSI Controller............................................................................. 1-29
Chapter 2: Installation
2-1 Static-Sensitive Devices ............................................................................... 2-1
Precautions ............................................................................................... 2-1
Unpacking.................................................................................................. 2-1
2-2 Pentium III/II Processor Installation............................................................... 2-1
2- 3 Installation of the Universal Retention Mechanism ................................... 2-5
2-4 Special Instructions for the Celeron Processor ....................................... 2-5
2- 5 Explanation and Diagram of Jumper/Connector ........................................ 2-7
2- 6 Changing the CPU Speed .............................................................................. 2-7
2-7 Mounting the Motherboard in the Chassis ................................................. 2-8
2-8 Connecting Cables ......................................................................................... 2-8
Power Supply Connector ....................................................................... 2-8
Secondary Power Connector................................................................ 2-8
Infrared Connector ................................................................................... 2-8
PW_ON Connector .................................................................................... 2-9
Reset Connector ...................................................................................... 2-9
Hard Drive LED ........................................................................................ 2-9
Keylock/Power LED Connector ............................................................. 2-9
Speaker Connector................................................................................ 2- 10
Power Save State Select..................................................................... 2-10
ATX PS/2 Keyboard and Mouse Ports ............................................... 2-10
Universal Serial Bus.............................................................................. 2- 10
ATX Serial Ports .................................................................................... 2-11
CMOS Clear............................................................................................. 2-11
External Battery ..................................................................................... 2-11
Wake-On-LAN ........................................................................................ 2- 11
Fan Connectors ..................................................................................... 2-11
Chassis Intrusion ................................................................................... 2-12
PCI Audio
Drive
Connectors .................................................................. 2-12
SLED (SCSI LED) Indicator.................................................................... 2-12
JPWAKE.................................................................................................... 2-12
2-9 Installing DIMMs............................................................................................. 2-13
vi
Page 7

Table of Contents
DIMM Installation..................................................................................... 2-1 3
2-10 Connecting Parallel Port, Floppy and Hard Disk Drives ........................ 2-14
Parallel Port Connector ......................................................................... 2-15
Floppy Connector ................................................................................... 2-15
IDE Connectors ...................................................................................... 2-15
SCSI Connectors ..................................................................................... 2-16
Ultra II LVD SCSI 68-pin Connector ..................................................... 2-17
AGP Port ................................................................................................. 2-18
Chapter 3: Troubleshooting
3-1 Troubleshooting Procedures ........................................................................ 3-1
Before Power On .................................................................................... 3-1
Troubleshooting Flowchart .................................................................... 3-1
No Power .................................................................................................. 3-2
No Video ................................................................................................... 3-2
Memory Errors .......................................................................................... 3-2
Losing the System’s Setup Configuration ........................................... 3-3
3-2 Technical Support Procedures .................................................................... 3-3
3-3 Frequently Asked Questions........................................................................ 3-4
3-4 Returning Merchandise for Service............................................................ 3-8
Chapter 4: AMIBIOS
4- 1 Introduction....................................................................................................... 4-1
4- 2 BIOS Features .................................................................................................. 4-2
BIOS Configuration Summary Screen ................................................... 4 - 3
AMIBIOS Setup .......................................................................................... 4-3
Chapter 5: Running Setup
5- 1 Setup ................................................................................................................. 5-1
5-1-1 Standard Setup .............................................................................. 5-1
5-1-2 Advanced Setup ............................................................................ 5-3
5-1-3 Chipset Setup ................................................................................. 5 -7
5-1-4 Power Management..................................................................... 5-13
5-1-5 PCI/PnP Setup ............................................................................... 5-15
5-1-6 Peripheral Setup .......................................................................... 5-18
5-2 Security Setup............................................................................................... 5-20
5-2-1 Supervisor/User ........................................................................... 5-20
5- 3 Utility Setup .................................................................................................... 5-21
5-3-1 Anti-Virus ...................................................................................... 5-21
5-3-2 Language ...................................................................................... 5-21
vii
Page 8

SUPER P6DBS/P6DBE/P6DBU/P6SBU/P6SBS/P6SBA/P6SBM Manual
viii
P6DBS/P6DBE/P6SBS/P6SBA/P6SBM* P6DBU/P6SBU
Jumpers
JB1, JB2, JB3, JB4
JBT1
JP20
JL2
JA5
JA6
JOH
JP11
JPWAKE
Connectors
J17
J18
J19
J20
J21
J32
J34
J36
JBT2
JF1
JF2
JL1
SLED
JT1
JT2
JT3
WOL
Function Page
CPU/Bus Ratio Selection 2-7
CMOS Clear 2-11
Power Save State Select 2-10
Manufacturer Default 1-5
JA1, JA3, SCSI Termination
(default on as terminated) 1-5
JA2 SCSI Termination
(default on as terminated) 1-5
Overheat LED Header 1-5
Bus Speed 1-5
System Wake-up (P6SBM only) 2-12
Function Page
US B 2-10
US B 2-10
Parallel Port 2-15
COM 1 2-11
COM 2 2-11
Power Supply Connector 2-8
PS/2 KB and Mouse 2-10
Secondary Power Connector 2-8
External Battery (not on P6SBM) 2-11
IDE LED 2-9, 2-10
Keylock
Speaker
IR Connector 2-8, 2-9
PW_ON
Reset
Chassis Intrusion 2-12
SCSI LED 2-12
CPU 1 Fan 2-11
CPU 2 Fan 2-11
Thermal Control Fan 2-11
Wake-On-LAN 2-11
Jumpers
JB1, JB2, JB3, JB4
JBT1
JP20
S-TERM
JOH
JPS1
BZ_ON
JP11
Connectors
J17
J18
J19
J20
J21
J32
J34
J36
JA2
JA1
JA3
JBT2
JF1
JF2
JL1
SLED
JT1
JT2
JT3
WOL
Function Page
CPU/Bus Ratio Selection 2-7
CMOS Clear 2-11
Power Save State Select 2-10
SCSI Termination
(default on as terminated) 1-9
Overheat LED Header 1-9
PCI Audio Enable/Disable 1-9
Overheat Alarm Enable 1-9
Bus Speed 1-9
Function Page
US B 2-10
US B 2-10
Parallel Port 2-15
COM 1 2-11
COM 2 2-11
Power Supply Connector 2-8
PS/2 KB and Mouse 2-10
Secondary Power Connector 2-8
UW SCSI 2-16
Ultra II LVD/SE 2-17
Ultra SCSI 2-16
External Battery 2-11
IDE LED 2-9, 2-10
Keylock
Speaker
IR Connector 2-8, 2-9
PW_ON
Reset
Chassis Intrusion 2-12
SCSI LED 2-12
CPU 1 Fan 2-11
CPU 2 Fan 2-11
Thermal Control Fan 2-11
Wake-On-LAN 2-11
*Note: SCSI jumpers and connectors do not apply to the P6DBE,
P6SBA or P6SBM motherboards.
5-4 Default Settings ............................................................................................. 5-21
5-4-1 Optimal Defaults ........................................................................... 5-21
5-4-2 Fail-Safe Defaults ........................................................................ 5-21
Appendices:
Appendix A: BIOS Error Beep Codes and Messages ....................................... A - 1
Appendix B: AMIBIOS Post Diagnostic Error Messages .................................... B - 1
Jumper Quick Reference
Page 9
ix
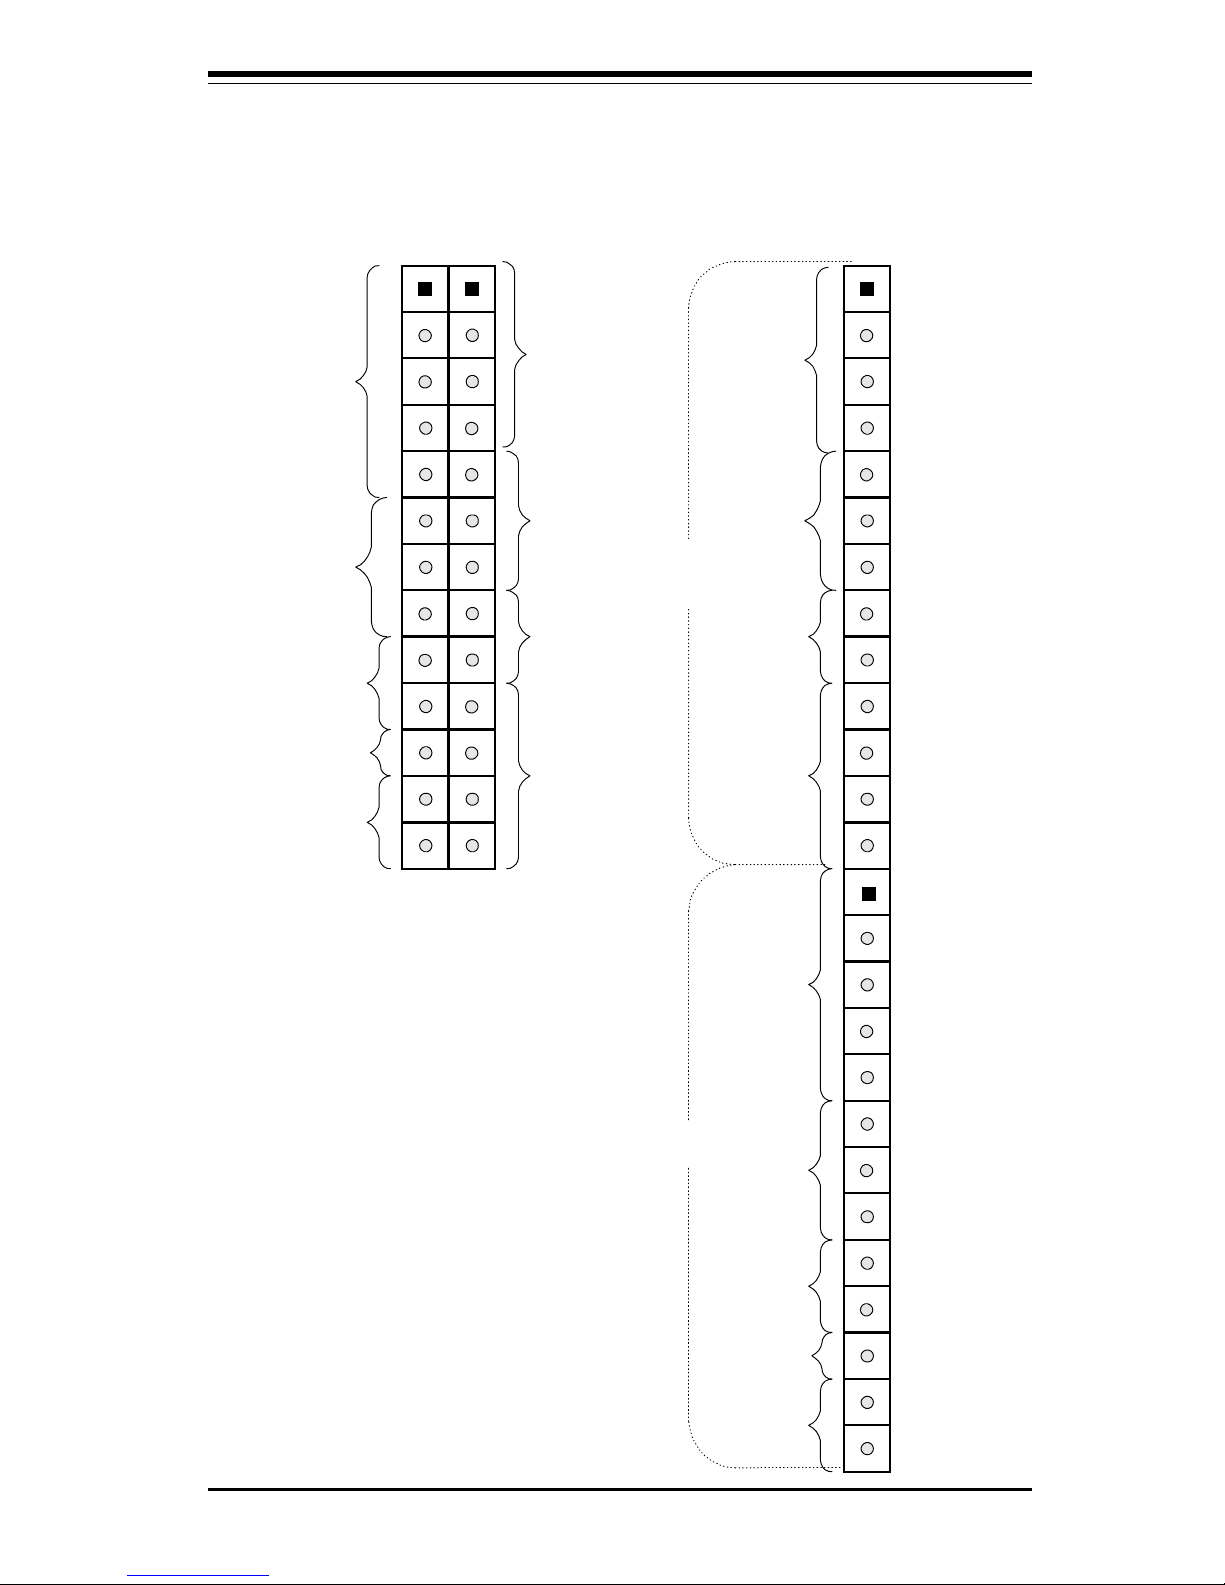
Front Control Panel Connector
Front Control Panel Connector
See pages 2-8 through 2-10
for pin definitions.
Hard Drive
LED
Keyboard
lock
Speaker
IR Conn
Power
LED
Power On
Reset
JF1
JF2
X
X
Keyboard
lock
Speaker
IR Conn
Power On
X
Reset
JF2 JF1
X
Power
LED
1
11
Hard
Drive LED
P6DBS/DBE/DBU/SBU/
SBS/SBM
P6SBA
Page 10

Notes
SUPER P6DBS/P6DBE/P6DBU/P6SBU/P6SBS/P6SBA/P6SBM Manual
Page 11

Chapter 1: Introduction
1-1
Chapter 1
Introduction
1-1 Overview
The SUPER P6DBS/P6DBE/P6DBU/P6SBU/P6SBS/P6SBA/P6SBM supports
Pentium II 233-333 MHz and Celeron 266-433 MHz processors at a 66 MHz
bus speed, Pentium II 350-450 MHz and Pentium III processors at a 100 MHz
FSB speed. The SUPER P6DBU/P6DBS/P6DBE supports dual Pentium II and
III processors, while the SUPER P6SBU/P6SBS/P6SBA/P6SBM supports a
single Pentium II or III processor*. All seven motherboards are based on
Intel’s 440BX chipset, which supports a 66/100 MHz front side bus speed,
an Accelerated Graphics Port (AGP), Wake-on-LANÔ , SDRAM, concurrent
PCI and a 33 MB/s Ultra DMA burst data transfer rate. (See notes below.)
While all of the motherboards are the ATX form factor, the P6DBU and
P6DBE have 5 PCI and 2 ISA slots with one shared. The SUPER P6DBS,
P6SBU, P6SBS and P6SBA have 4 PCI and 3 ISA slots with one shared, and
the SUPER P6SBM has 3 PCI and 1 ISA slots with one shared. All seven
motherboards have the AGP port and all but the P6SBM can support up to 1
GB EDO at 66 MHz or 512 MB unbuffered SDRAM or maximum of 1 GB
registered SDRAM memory in 4 168-pin DIMM sockets. The SUPER P6SBM
can accommodate 768 MB registered or 384 MB unbuffered SDRAM. All
these motherboards support both ECC and non-ECC type memory.
AGP reduces contention between the CPU and I/O devices by broadening
the graphics bandwidth to memory. It delivers a maximum of 532 MB/s in
the 2xAGP transfer mode, which is quadruple the PCI speed!
Wake-On-LAN allows for remote network management and configuration of
the PC, even in off-hours when the PC is turned off. This reduces the
complexity of managing the network.
Another feature that maximizes customer satisfaction and simplicity in managing the computer is support for the PC 98 and the Advanced Configuration and Power Interface (ACPI) standards. With PC Health Monitoring, you
can protect your system from problems before they even occur.
*Notes: 1. Celeron is single processor only.
2. Currently, the P6DBE/P6DBU/P6SBU/P6SBA motherboard
supports CPU speeds up to 1GHz with 100 MHz FSB.
Page 12

SUPER P6DBS/P6DBE/P6DBU/P6SBU/P6SBS/P6SBA/P6SBM Manual
1-2
Included I/O on all motherboards are 2 EIDE ports, a floppy port, an ECP/EPP
supported parallel port, PS/2 mouse and PS/2 keyboard ports, 2 serial ports,
an infrared port and 2 USB ports. The SUPER P6DBU and P6SBU provide an
onboard Adaptec 7890 Ultra II SCSI controller with data transfer rates of up
to 80 MB/s and an optional RAIDport III (ARO-1130U2). The SUPER P6DBS
and P6SBS have an integrated onboard Adaptec 7895 MultiChannel UW
SCSI controller. The dual channels enable a data transfer rate of 40 MB/s
per channel. In addition, these two motherboards have an onboard RAID
port to support the Adaptec ARO-1130SA/CA RAIDport II card for increased I/O performance and fault tolerance.
Page 13

Chapter 1: Introduction
1-3
Notes
Page 14
SUPER P6DBS/P6DBE/P6DBU/P6SBU/P6SBS/P6SBA/P6SBM Manual
1-4
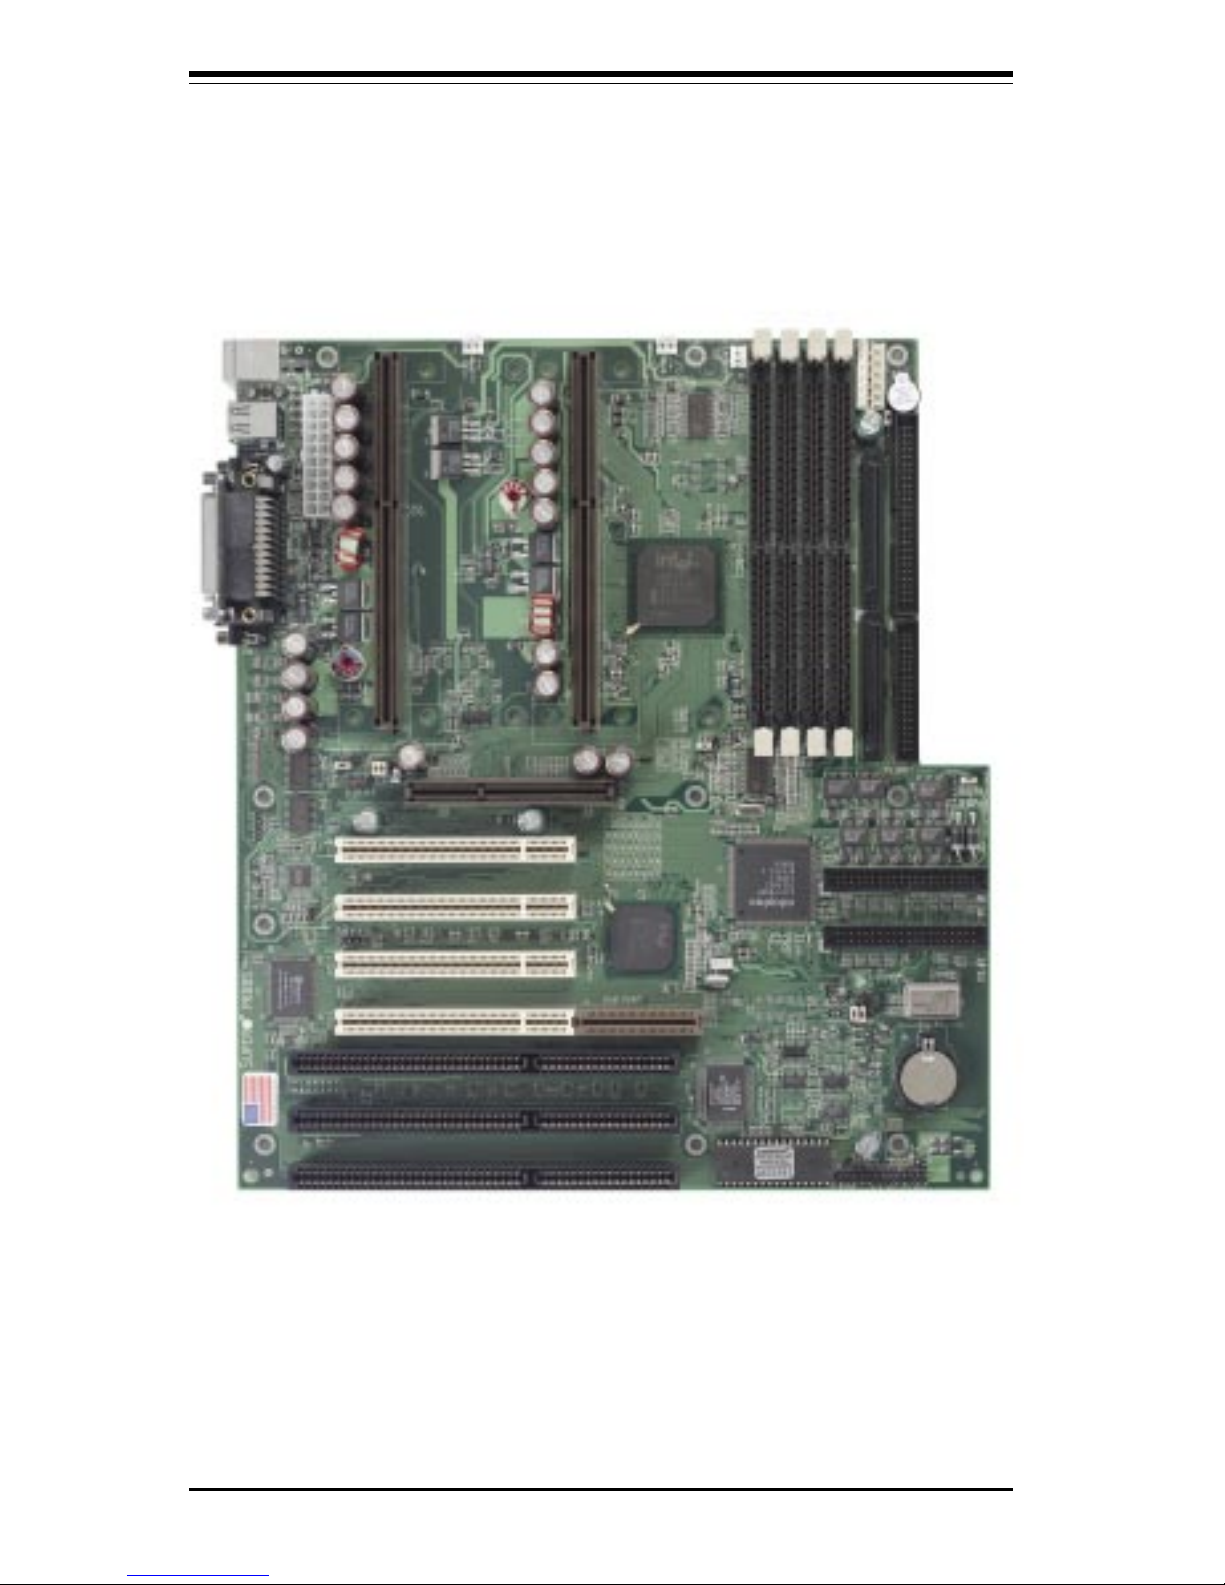
SUPER P6DBS
Figure 1-1. SUPER P6DBS Motherboard Image
Page 15
Chapter 1: Introduction
1-5
®
J21
COM2
J20
COM1
J32
ATX POWER
J9
J11
J12
1
J10
PW_ON
RESET
JF1
IDE LED/KEYLOCK/SPEAKER
IR CON
JF2
Bank3
FLO
P
PY
U38
U14
J8
1
J17, J18
USB
CPU 1
FAN
J2
J1
1
CPU 2
FAN
JT2
JT1
U2
Bank0
Bank1
Bank2
JT3
1
J22
1
SCSI
JA1
1
BIOS
JBT2
JBT1
JA6
1
BT2
B
A
T
T
E
R
Y
+
-
1
SCSI LED
WOL
UA1
JA4
PCI 1
PCI 2
PCI 3
PCI 4
RAID PORT
U48
JL1
Chassis
Intrusion
A
G
P
P
O
R
T
1
JP20
JB
1
JB2
JB3
JB4
U37
U15
JA5
JA5, JA6:
SCSI Termination
JBT1: CMOS Clear
JBT2: Ext Battery
JP11
UW SCSI
——–—— Manufacturer Settings —–———
JBT1: 1-2 (default)
2-3 CMOS Clear
* To clear the CMOS completely,
disconnect the power source.
JL1: OFF (default)
ON (intrusion)
JP11: 1-2 Auto (default)
2-3 66 MHz
OFF 100 MHz
JP20: 1-2 PIIX CTL PD State
2-3 BIOS CTL PD State (default)
JA5, JA6: SCSI Termination (on to enable termination)
WOL: Wake-on-LAN
——–———————–——–—–——–——–—
JTM
PIIX4E
BX
J19
Parallel
Port
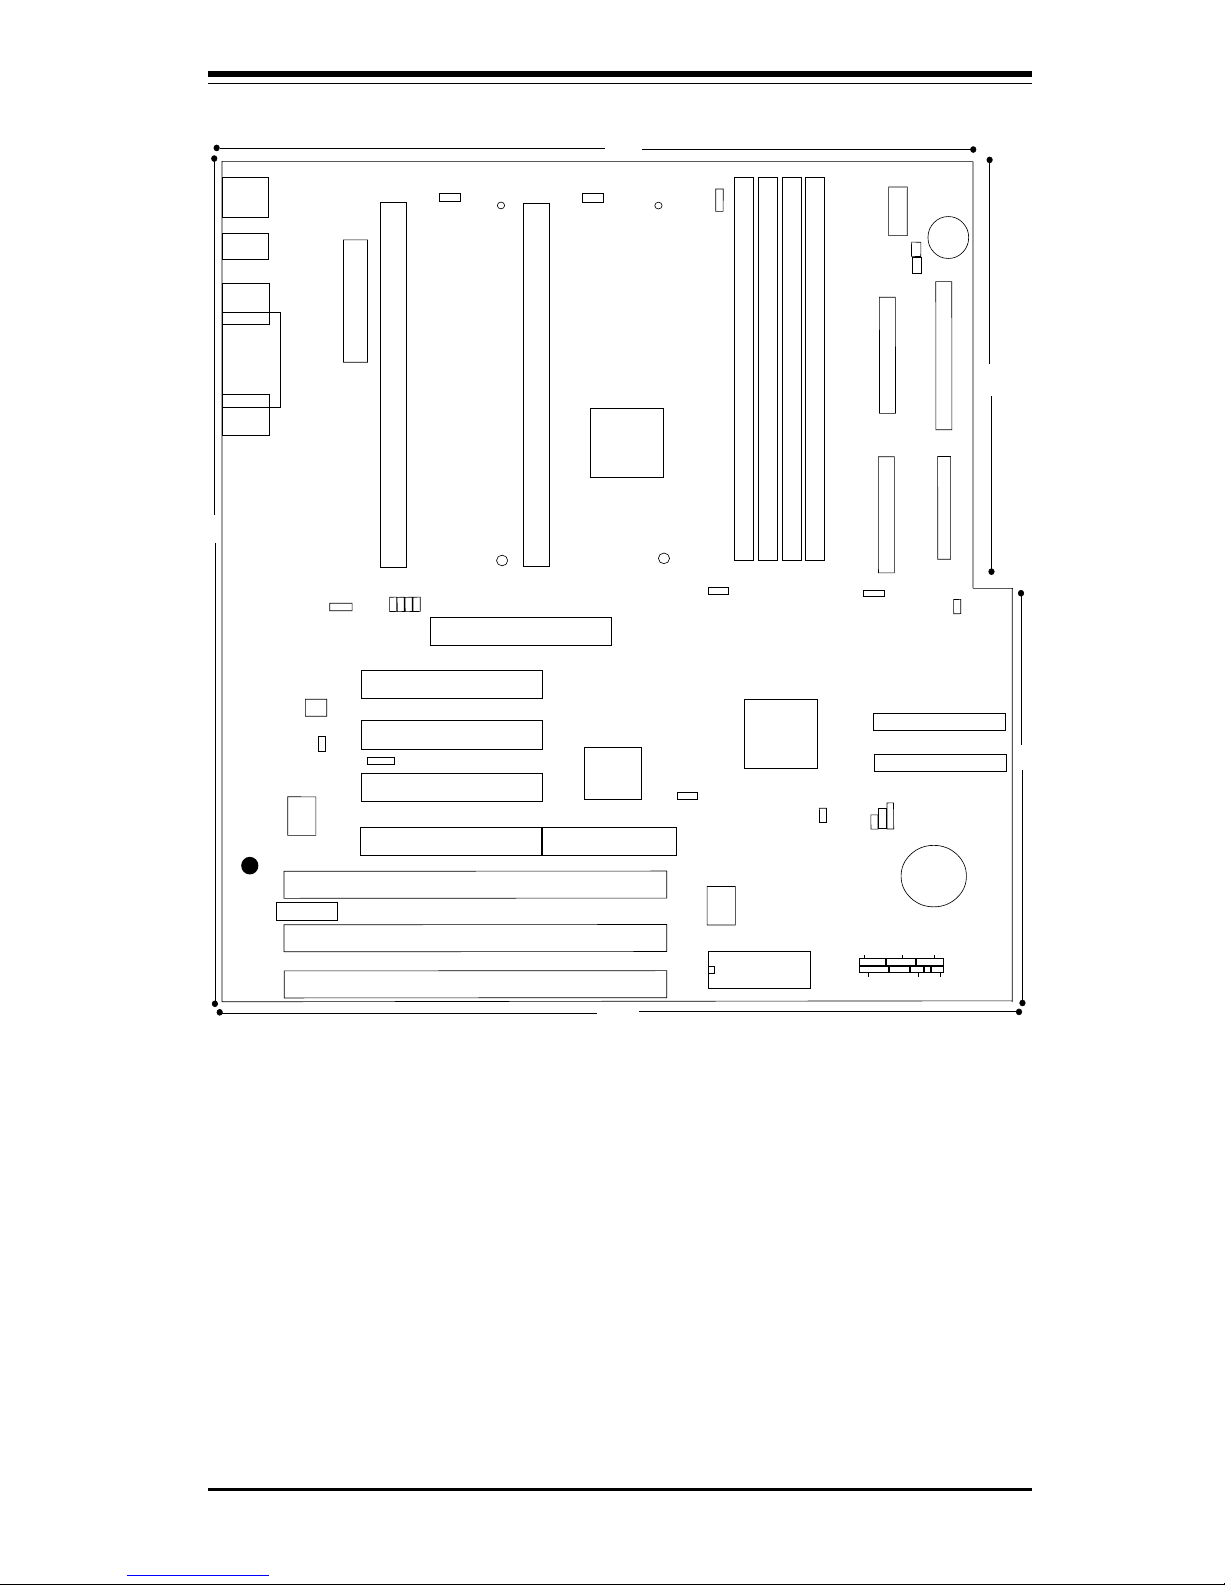
Figure 1-2. SUPER P6DBS Motherboard Layout
SUPER P6DBS
Note: To enable the overheat buzzer, place a
jumper on BZ_ON.
6"
6"
12"
9.65"
10.65"
ID
E 1
J15
1
IDE 2
J16
1
JA2
1
UW SCSI
BZ_ON
JOH
Overheat LED
PWR_SEC
1
J36
BZ
1
JA3
1
JA7
J13
J14
JJ14
SBLINK
1
————— CPU Core/Bus Ratio –—————
JB1 JB2 JB3 JB4
x3 ON OFF ON ON
x3.5 OFF OFF ON ON
x4 ON ON O FF ON
x4.5 OFF ON OFF ON
x5 ON OFF OFF ON
x5.5 OFF OFF OFF ON
x6 ON ON ON O FF
X6.5 OFF ON ON OFF
x7 ON OFF ON OFF
x7.5 OFF OFF ON OFF
x8 ON ON OFF OFF
——–—–————————————————
J34
PS/2 KB
(bottom)
PS/2 MOUSE
(top)
Note: Some CPU Core/Bus ratios cannot be
selected for processors that have fixed ratios.
CPU
CPU
Page 16
SUPER P6DBS/P6DBE/P6DBU/P6SBU/P6SBS/P6SBA/P6SBM Manual
1-6
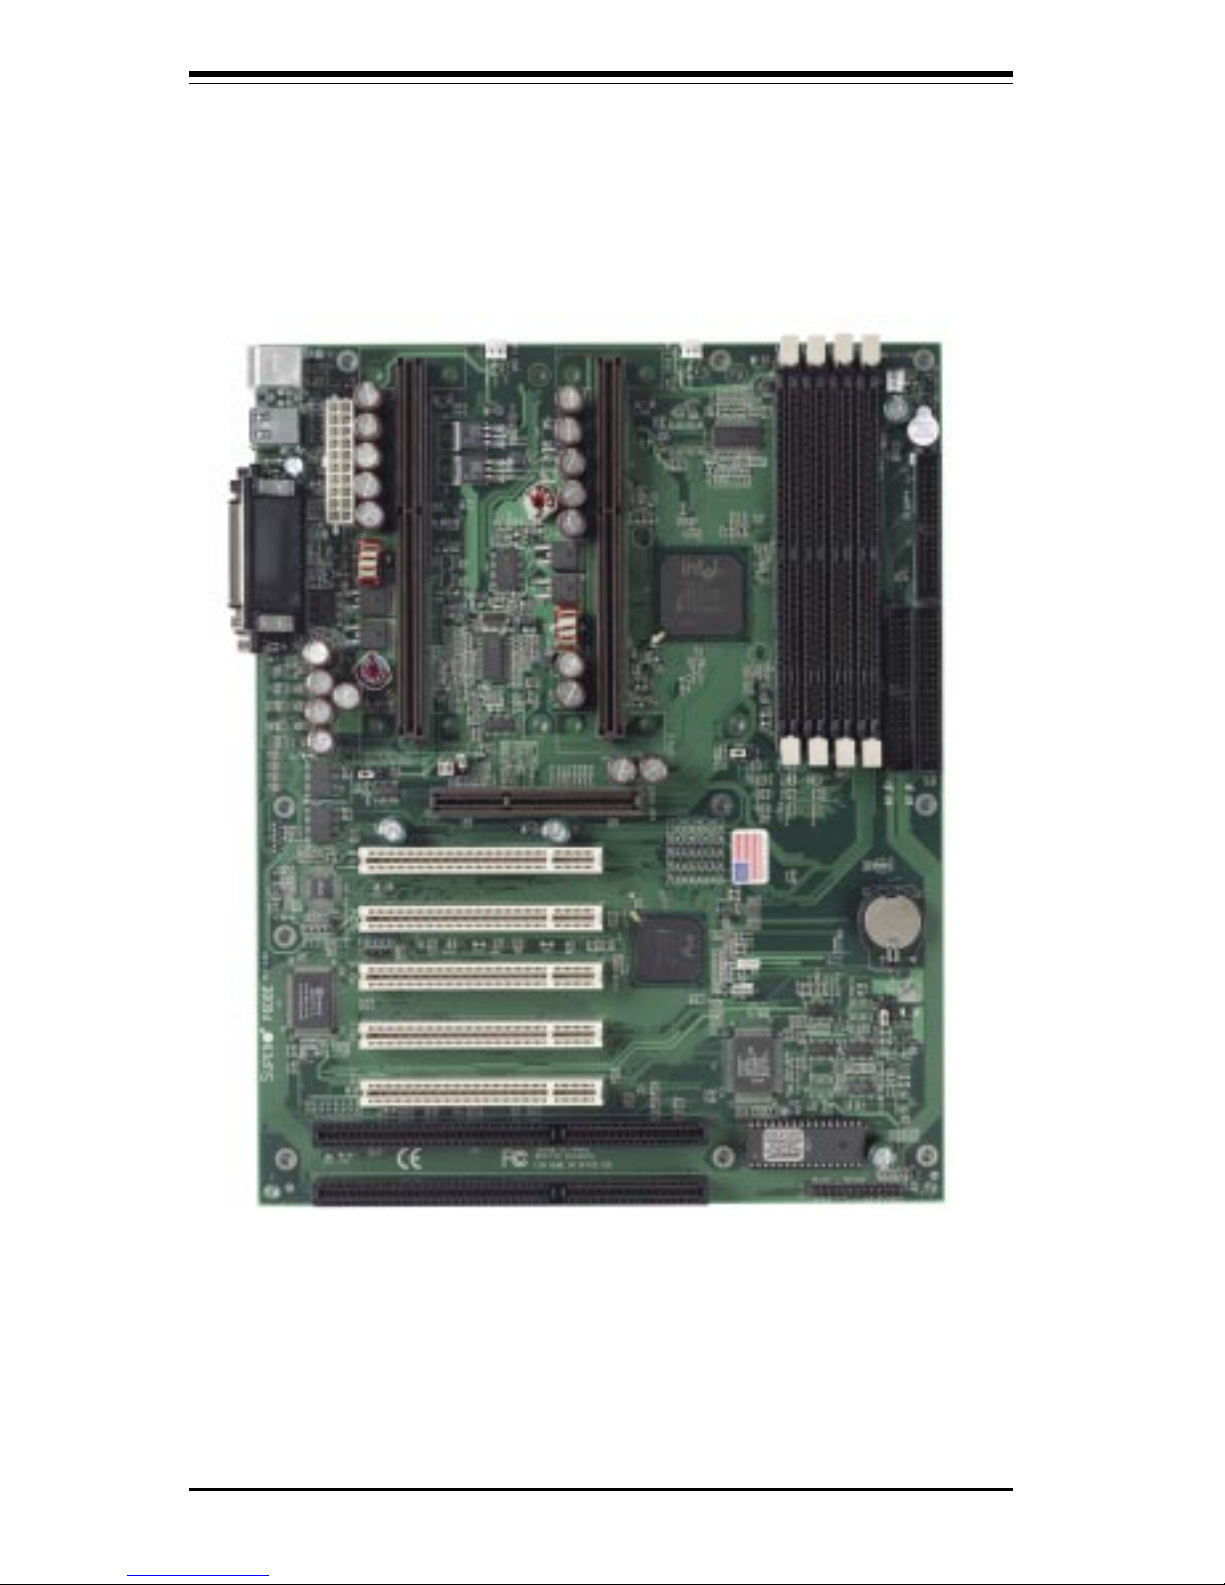
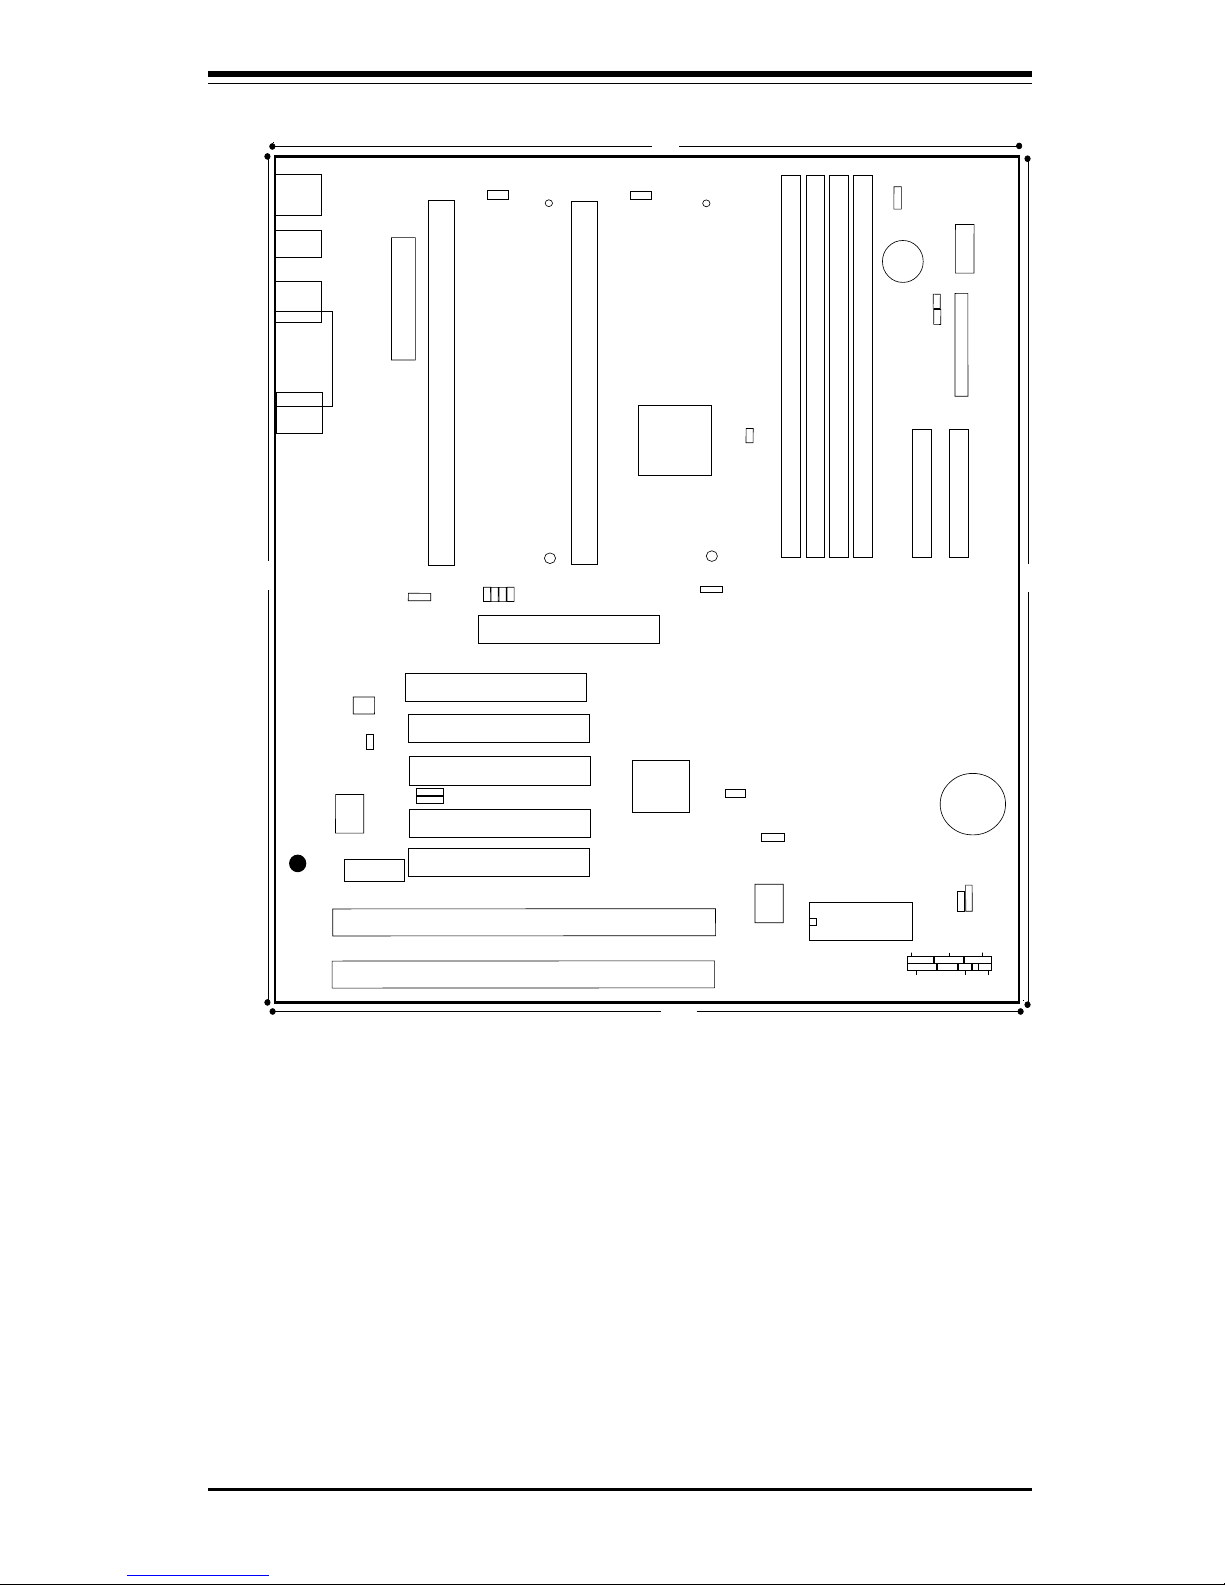
SUPER P6DBE
Figure 1-3. SUPER P6DBE Motherboard Image
Page 17
Chapter 1: Introduction
1-7
®
J19
Parallel
Port
J21
COM2
J20
COM1
J13
J32
ATX POWER
PW_ON
RESET
JF1
IDE LED/KEYLOCK/SPEAKER
IR CON
JF2
Bank3
IDE 2
ID
E
1
FLO
P
PY
U38
U14
J8
1
J17, J18
USB
CPU 1
FAN
J2
J1
1
CPU 2
FAN
JT2
JT1
U2
Bank0
B
ank1
Bank2
JT3
T
h
e
rm
a
l
C
o
ntro
l F
an
1
J15 J16
1
1
BIOS
1
BT2
B
A
T
T
E
R
Y
+
-
1
WOL
PCI 1
PCI 2
PCI 3
PCI 4
U48
JL1
Chassis
Intrusion
A
G
P
P
O
R
T
1
JP20
JB
1
JB2
JB3
JB4
U37
U15
JBT1: CMOS Clear
JBT2: Ext Battery
JP11
——–—— Manufacturer Settings —–———
JBT1: 1-2 (default)
2-3 CMOS Clear
To clear the CMOS completely,
disconnect the power source.
JL1: OFF (default)
ON (intrusion)
JP11: 1-2 Auto (default)
2-3 66 MHz
OFF 100 MHz
JP20: 1-2 PIIX CTL PD State
2-3 BIOS CTL PD State (default)
WOL: Wake-on-LAN
——–—–——————–———–——–——–—
BX
PIIX4E
Figure 1-4. SUPER P6DBE Motherboard Layout
SUPER P6DBE
Note: To enable the overheat buzzer, place a
jumper on BZ_ON.
J22
BZ_ON
JP16
J
B
T
2
JBT1
JP18
PCI 5
J35
J9
J10
J11
J12
BZ
PWR_SEC
J14
9.6"
9.6"
12"
12"
J36
1
Overheat LED
JOH1
1
SBLINK
1
JL2
1
1
JTM
J34
PS/2 KB
(bottom)
PS/2 MOUSE
(top)
Note: Some CPU Core/Bus ratios cannot be
selected for processors that have fixed ratios.
CPU
CPU
————— CPU Core/Bus Ratio –—————
JB1 JB2 JB3 JB4
x3 ON OFF ON ON
x3.5 OFF OFF ON ON
x4 ON ON O FF ON
x4.5 OFF ON OFF ON
x5 ON OFF OFF ON
x5.5 OFF OFF OFF ON
x6 ON ON ON O FF
X6.5 OFF ON ON OFF
x7 ON OFF ON OFF
x7.5 OFF OFF ON OFF
x8 ON ON OFF OFF
——–—–————————————————
Page 18
SUPER P6DBS/P6DBE/P6DBU/P6SBU/P6SBS/P6SBA/P6SBM Manual
1-8
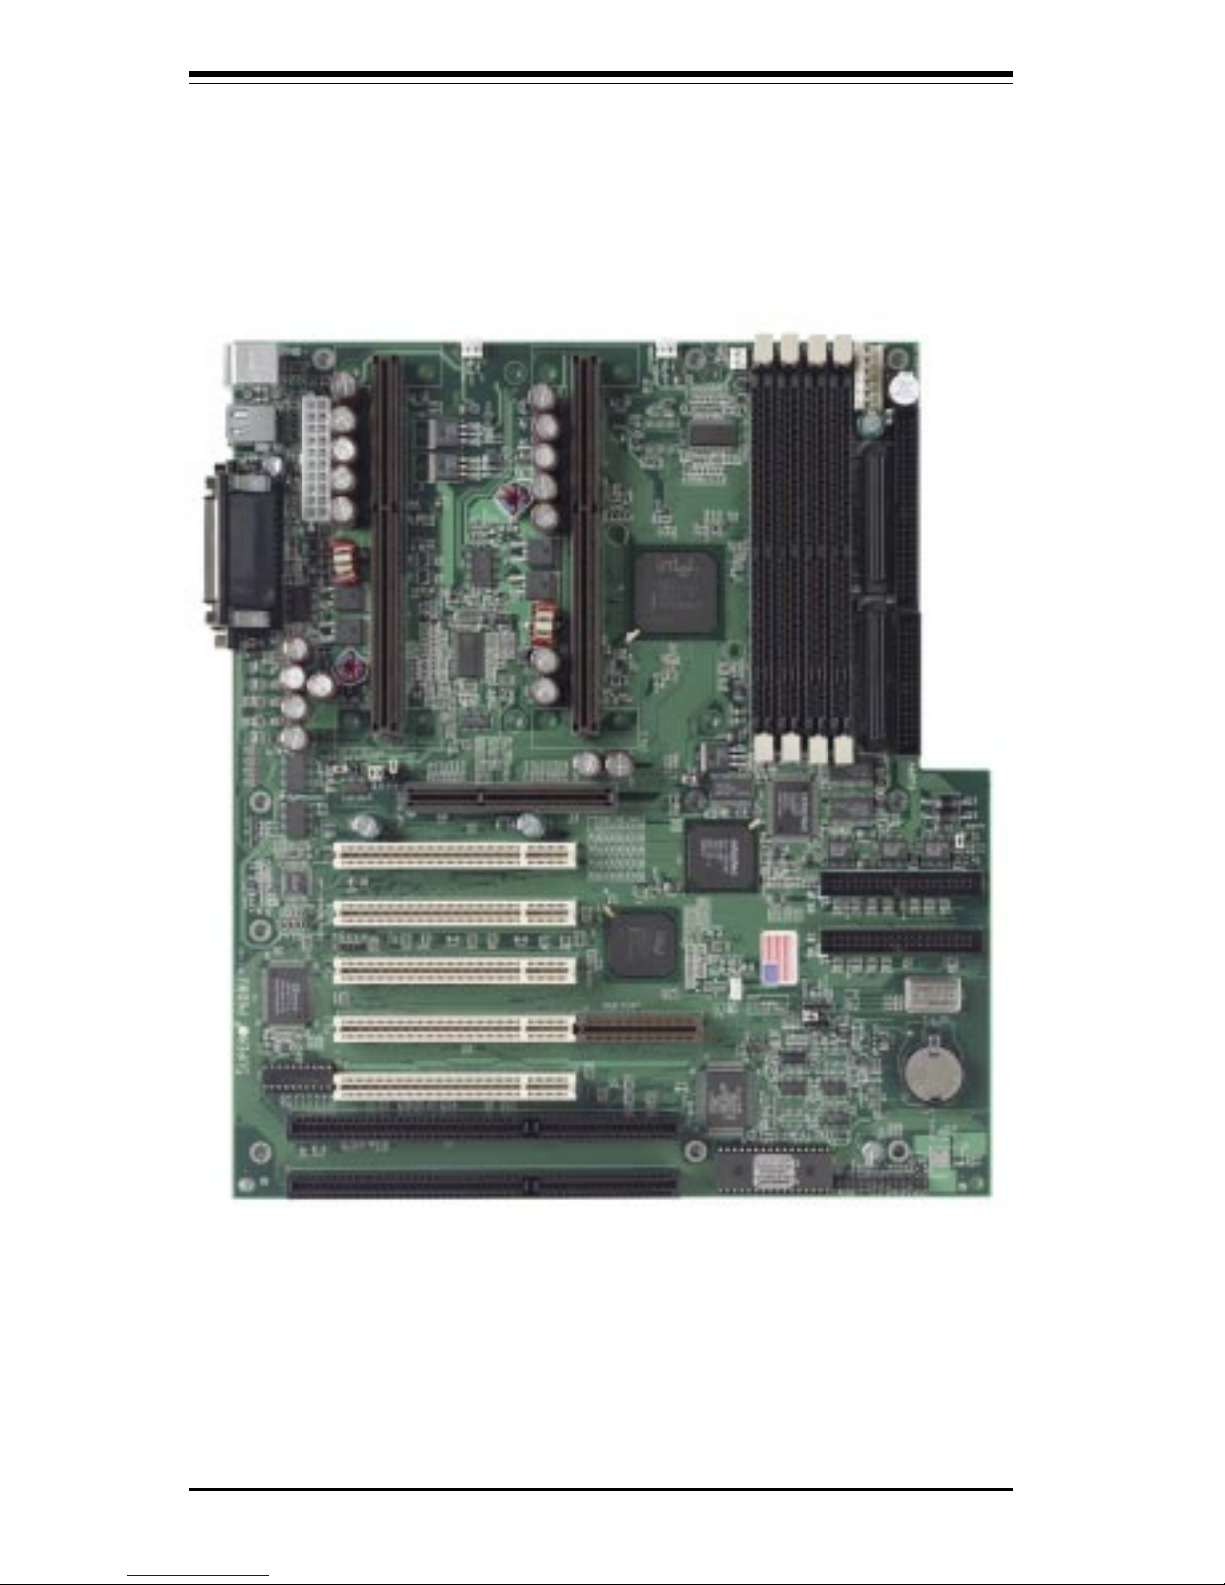
SUPER P6DBU
Figure 1-5. SUPER P6DBU Motherboard Image
Page 19
Chapter 1: Introduction
1-9
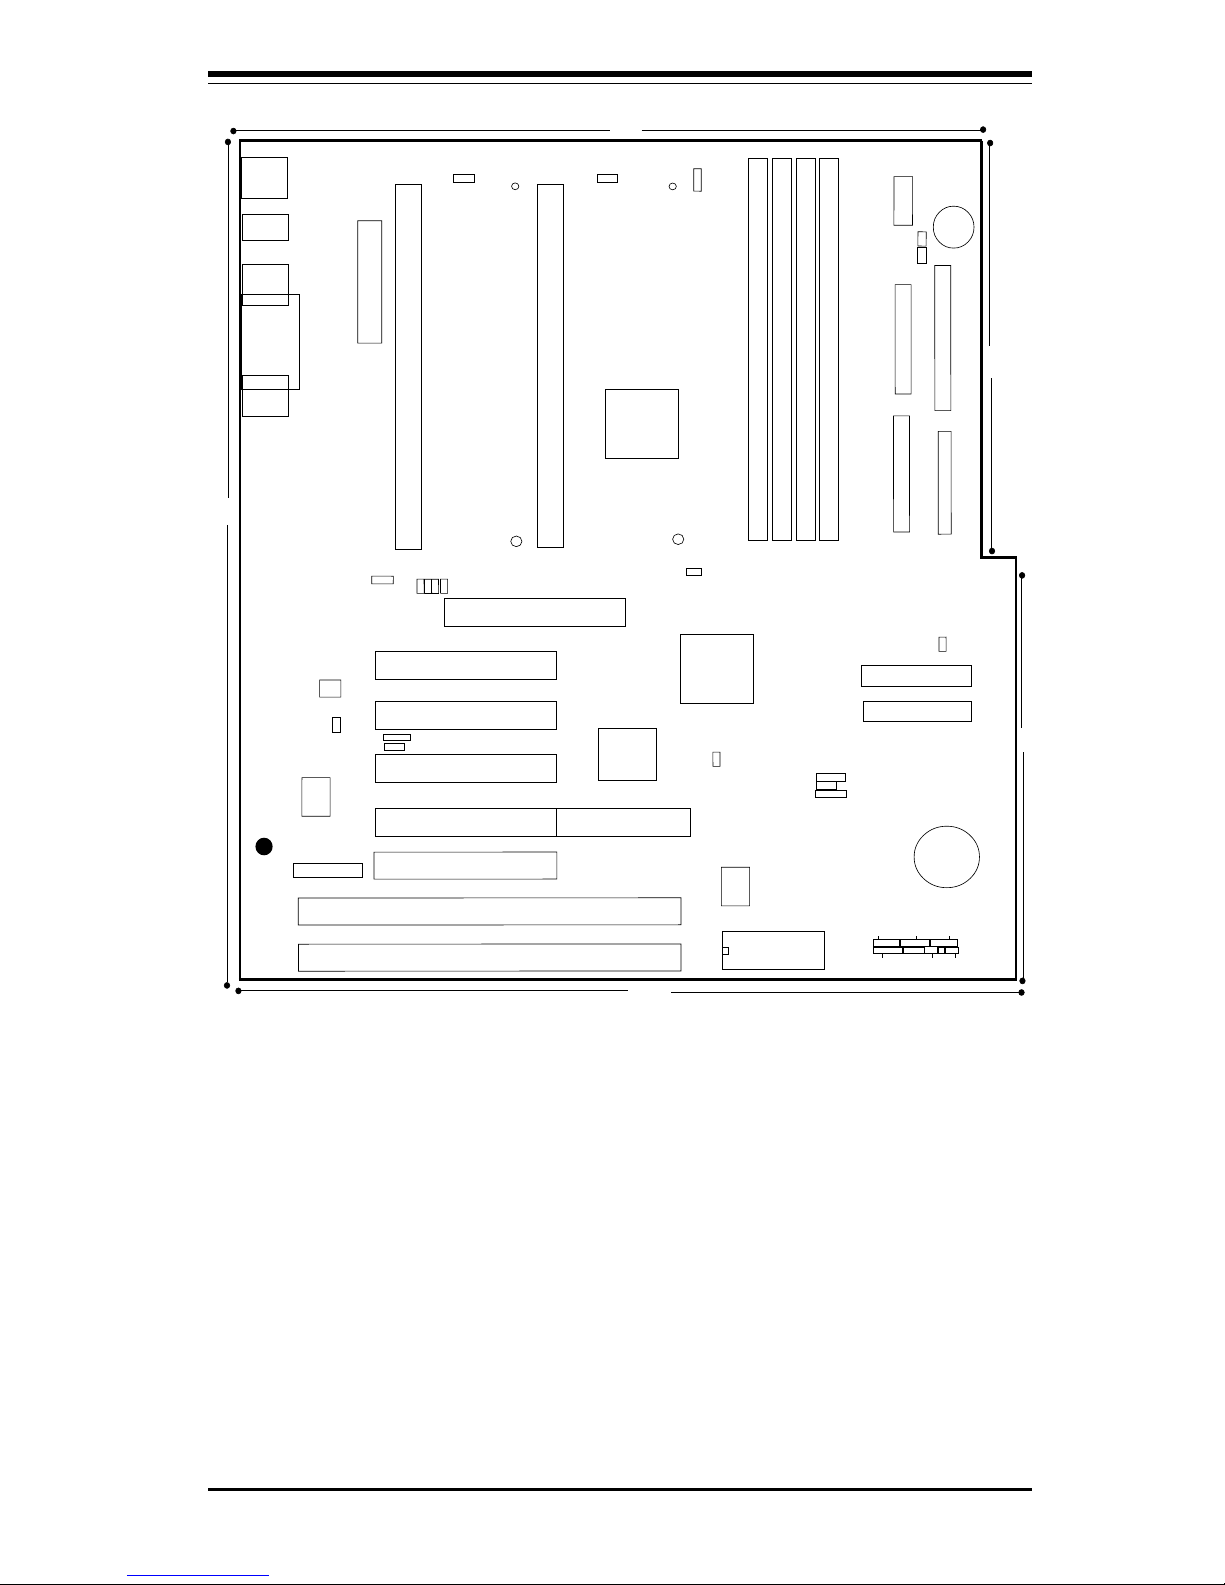
Figure 1-6. SUPER P6DBU Motherboard Layout
®
J21
COM2
J20
COM1
J14
J13
J32
ATX POWER
J9
J11
J12
J10
PW_ON
RESET
JF1
IDE LED/KEYLOCK/SPEAKER
IR CON
JF2
B
ank3
U38
U14
J8
1
J17, J18
USB
CPU 1
FAN
J2
J1
1
CPU 2
FAN
JT2
JT1
U2
Bank0
Bank1
B
ank2
SCSI
JA1
BIOS
BT2
B
A
T
T
E
R
Y
+
-
UA1
JA4
PCI 1
PCI 2
PCI 3
PCI 4
RAID PORT
U48
JL1
Chassis
Intrusion
A
G
P
P
O
R
T
U37
U15
JBT1: CMOS Clear
JBT2: Ext Battery
JP11
UW SCSI
Ultra II LVD/SE
SUPER P6DBU
——–—— Manufacturer Settings —–———
JBT1: 1-2 (default)
2-3 CMOS Clear
* To clear the CMOS completely,
disconnect the power source.
JL1: OFF (default)
ON (intrusion)
JP11: 1-2 Auto (default)
2-3 66 MHz
OFF 100 MHz
JP20: 1-2 PIIX CTL PD State
2-3 BIOS CTL PD State (default)
WOL: Wake-on-LAN
S-TERM: On: SCSI Termination Enabled
Off: Termination Disabled
——–———————–——–—–——–——–—
PIIX4E
BX
J19
Parallel
Port
J35
SBLINK
1
JL2
1
JTM
JB4
JB3
JB2
J
B
1
JP20
1
1
WOL
J16
J15
IDE 2
ID
E 1
1
1
1
FLO
PPY
J22
1
JBT1
JBT2
SLED
S-TER
M
Note: JA3 is optional
Note: To enable the overheat buzzer, place a
jumper on BZ_ON.
6"
6"
12"
10.65"
9.65"
JT3
T
he
rm
al
C
on
tro
l F
a
n
1
JA3
1
JA2
BZ_ON
JOH
Overheat LED
PWR_SEC
1
J36
BZ
1
PCI 5
J34
PS/2 KB
(bottom)
PS/2 MOUSE
(top)
Note: Some CPU Core/Bus ratios cannot be
selected for processors that have fixed ratios.
CPU
CPU
————— CPU Core/Bus Ratio –—————
JB1 JB2 JB3 JB4
x3 ON OFF ON ON
x3.5 OFF OFF ON ON
x4 ON ON O FF ON
x4.5 OFF ON OFF ON
x5 ON OFF OFF ON
x5.5 OFF OFF OFF ON
x6 ON ON ON O FF
X6.5 OFF ON ON OFF
x7 ON OFF ON OFF
x7.5 OFF OFF ON OFF
x8 ON ON OFF OFF
——–—–————————————————
Page 20
SUPER P6DBS/P6DBE/P6DBU/P6SBU/P6SBS/P6SBA/P6SBM Manual
1-10
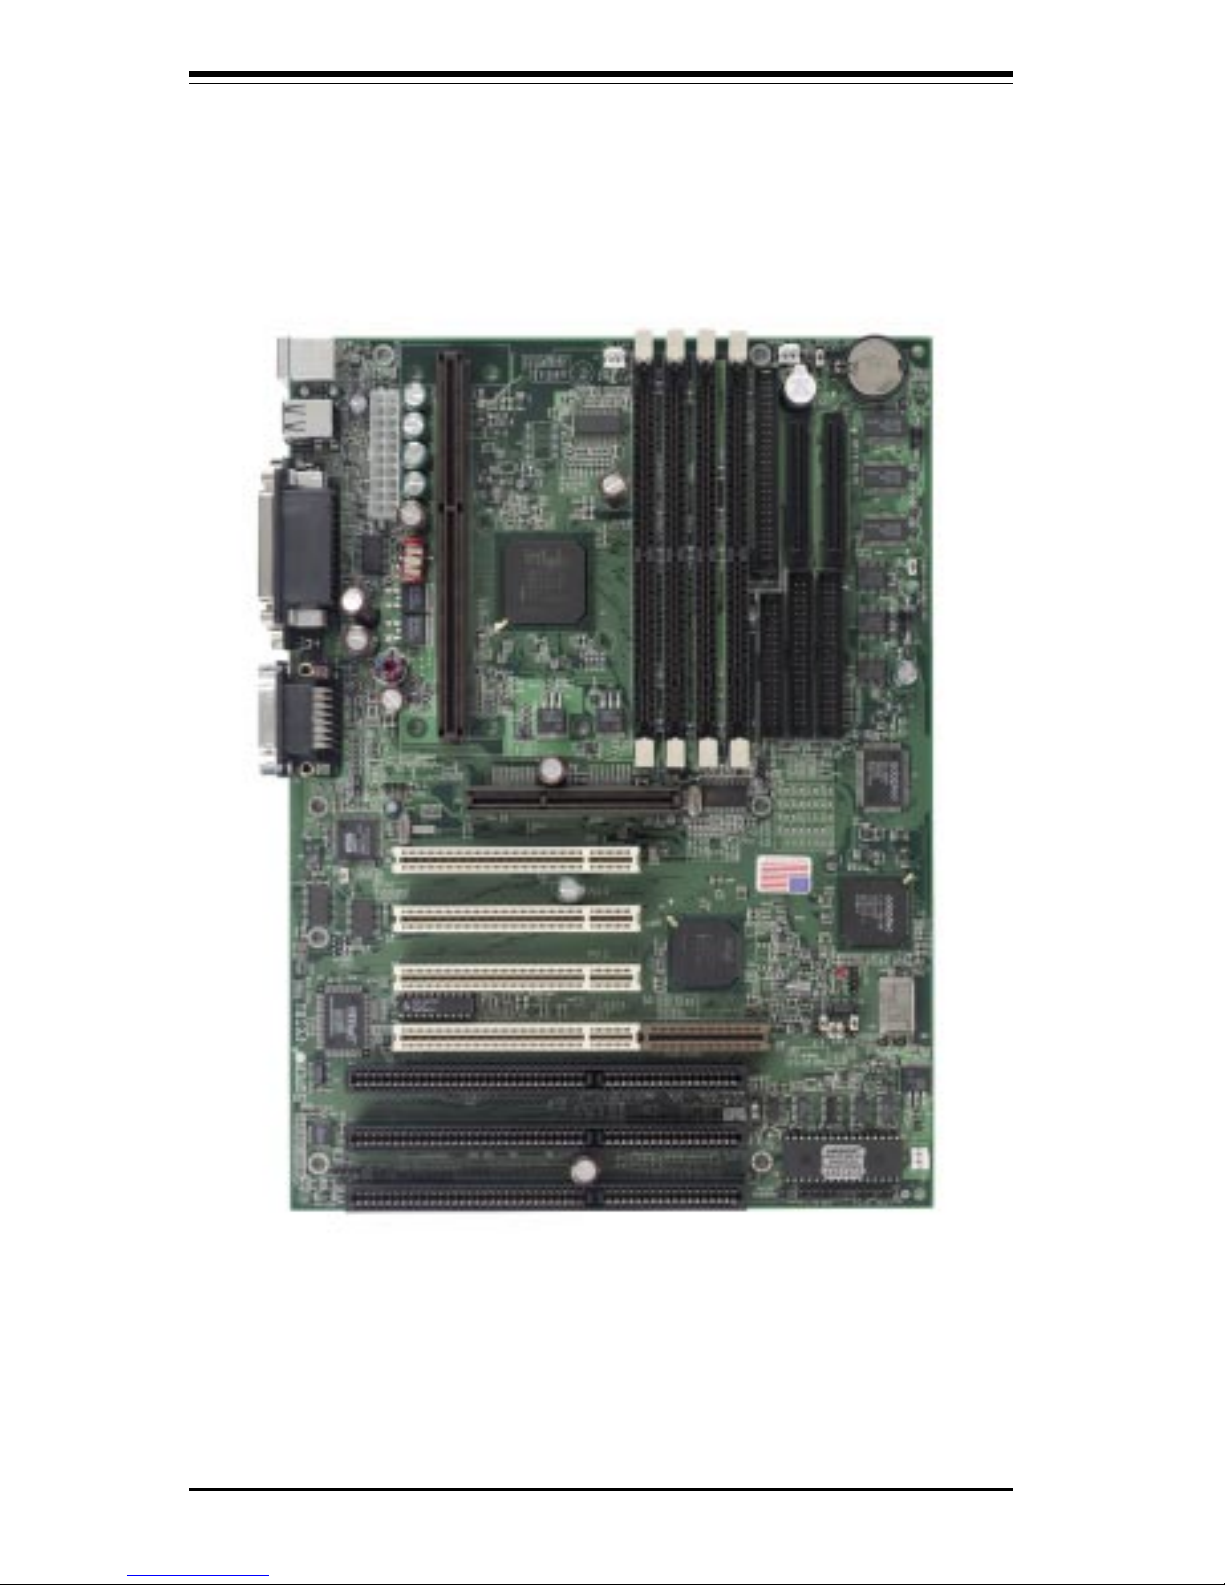
SUPER P6SBU
Figure 1-7. SUPER P6SBU Motherboard Image
Page 21
Chapter 1: Introduction
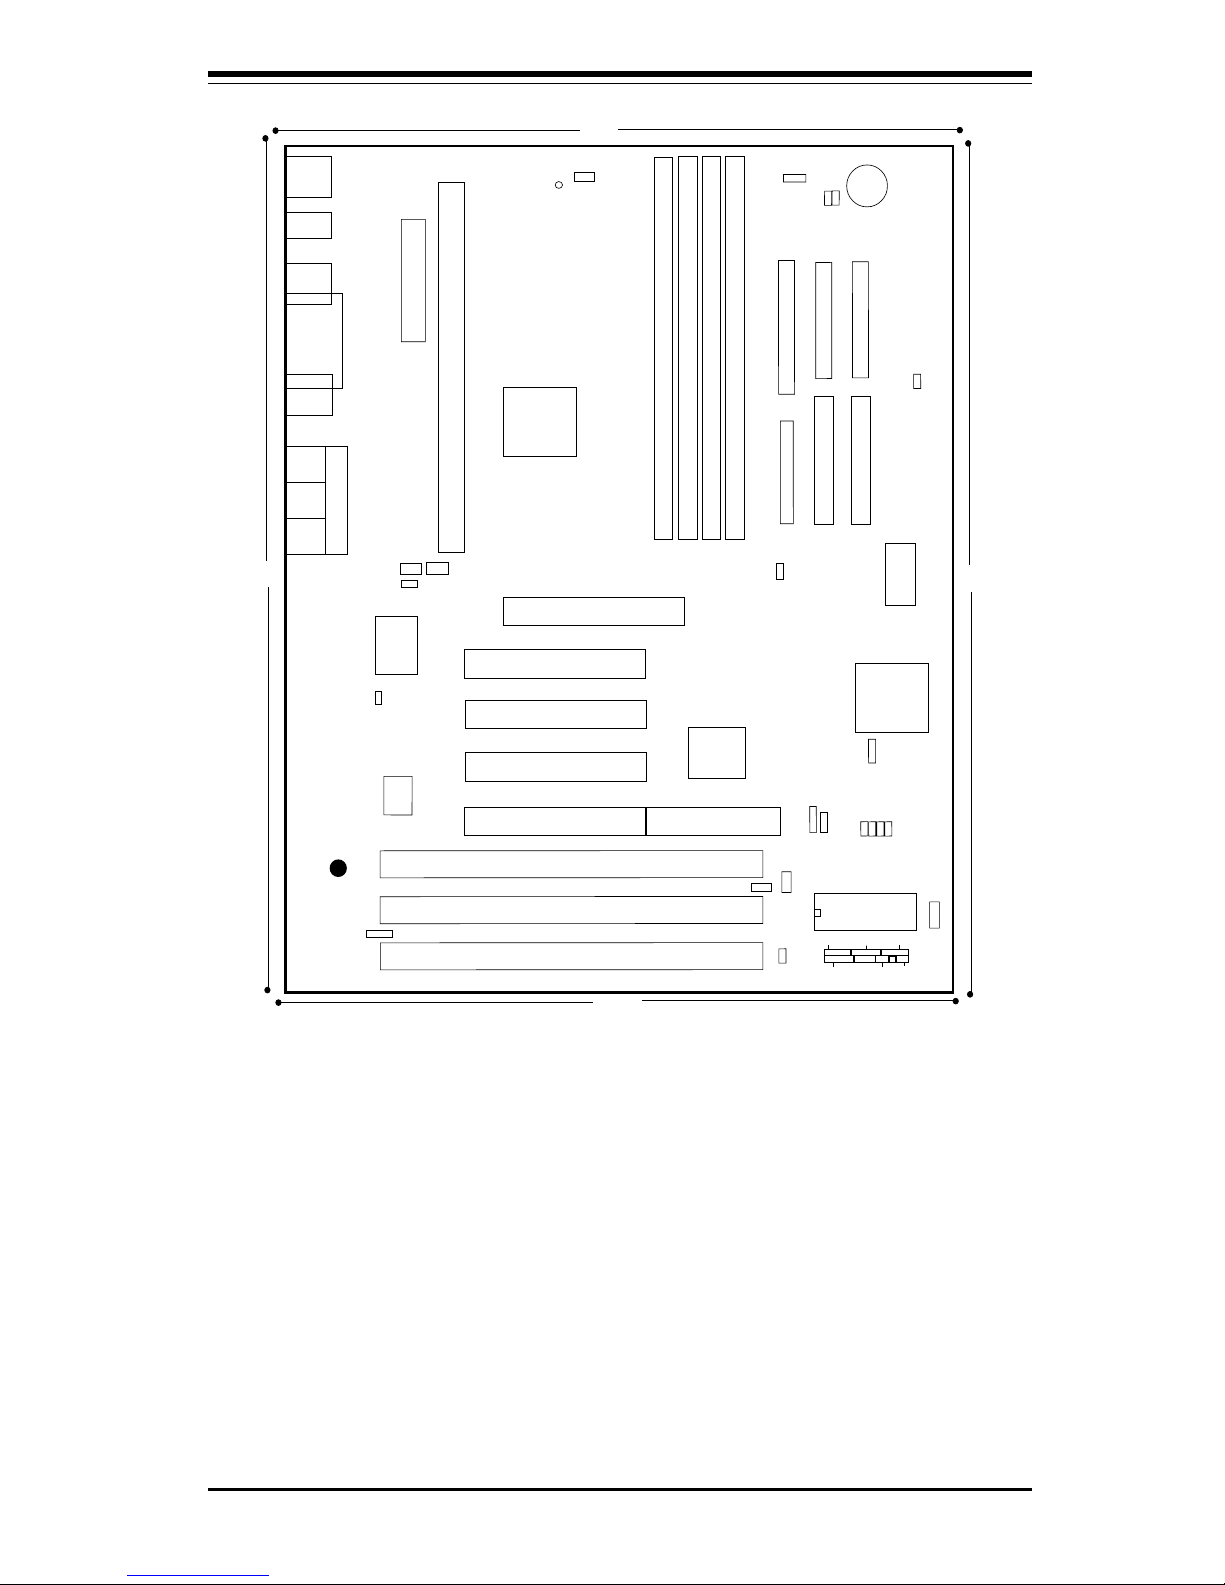
1-11
Figure 1-8. SUPER P6SBU Motherboard Layout
®
J21
COM2
J20
COM1
J32
ATX POWER
J9
J11
J12
J10
B
ank3
U14
J8
1
J17, J18
USB
CPU FAN
J1
JT1
U2
Bank0
B
ank1
B
ank2
JA4
PCI 1
PCI 2
PCI 3
PCI 4
RAID PORT
A
G
P
P
O
R
T
U56
SUPER P6SBU
JF1
JF2
U38
IR CON PW_ON
RESET
BIOS
IDE LED/KEYLOCK/SPEAKER
1
J22
J16
1
1
SCSI
FLOPPY
IDE 2
ID
E
1
1
1
1
1
JA3
J15
BZ_ON
JOH
JOH: Overheat LED
JT
3: T
h
erm
al C
o
ntrol F
an
JTM1
1
WOL
JBT2
JP11
JBT1: CMOS Clear
JBT2: Ext Battery
——–—— Manufacturer Settings —–———
JBT1: 1-2 (default)
2-3 CMOS Clear
To clear the CMOS completely,
disconnect the power source.
JL1: OFF (default)
ON (intrusion)
JP11: 1-2 Auto (default)
2-3 66 MHz
OFF 100 MHz
JP20: 1-2 PIIX CTL PD State
2-3 BIOS CTL PD State (default)
WOL: Wake-on-LAN
S-TERM: On: SCSI Termination Enabled
Off: Termination Disabled
——–———–————–———–——–——–—
Note: JA3 is optional
Note: To enable the overheat buzzer, place a
jumper on BZ_ON.
BZ
JT3
PIIX4E
BX
J19
Parallel
Port
UA10
JB1
JB2
JB3
JB4
1
JBT1
1
JP20
1
3860
JT2
1
SCSI LED
JL1
S-TERM
J37
J44
ESS
1938
7890
JJ14
J14
J13
1
JPSI
12"
12"
8.875"
8.875"
J39
J35
JA1
JA2
UW SCSI
Ultra II LVD/SE
J34
PS/2 KB
(bottom)
PS/2 MOUSE
(top)
Note: Some CPU Core/Bus ratios cannot be
selected for processors that have fixed ratios.
CPU
————— CPU Core/Bus Ratio –—————
JB1 JB2 JB3 JB4
x3 ON OFF ON ON
x3.5 OFF OFF ON ON
x4 ON ON O FF ON
x4.5 OFF ON OFF ON
x5 ON OFF OFF ON
x5.5 OFF OFF OFF ON
x6 ON ON ON O FF
X6.5 OFF ON ON OFF
x7 ON OFF ON OFF
x7.5 OFF OFF ON OFF
x 8 ON ON O FF O FF
——–—–————————————————
Page 22
SUPER P6DBS/P6DBE/P6DBU/P6SBU/P6SBS/P6SBA/P6SBM Manual
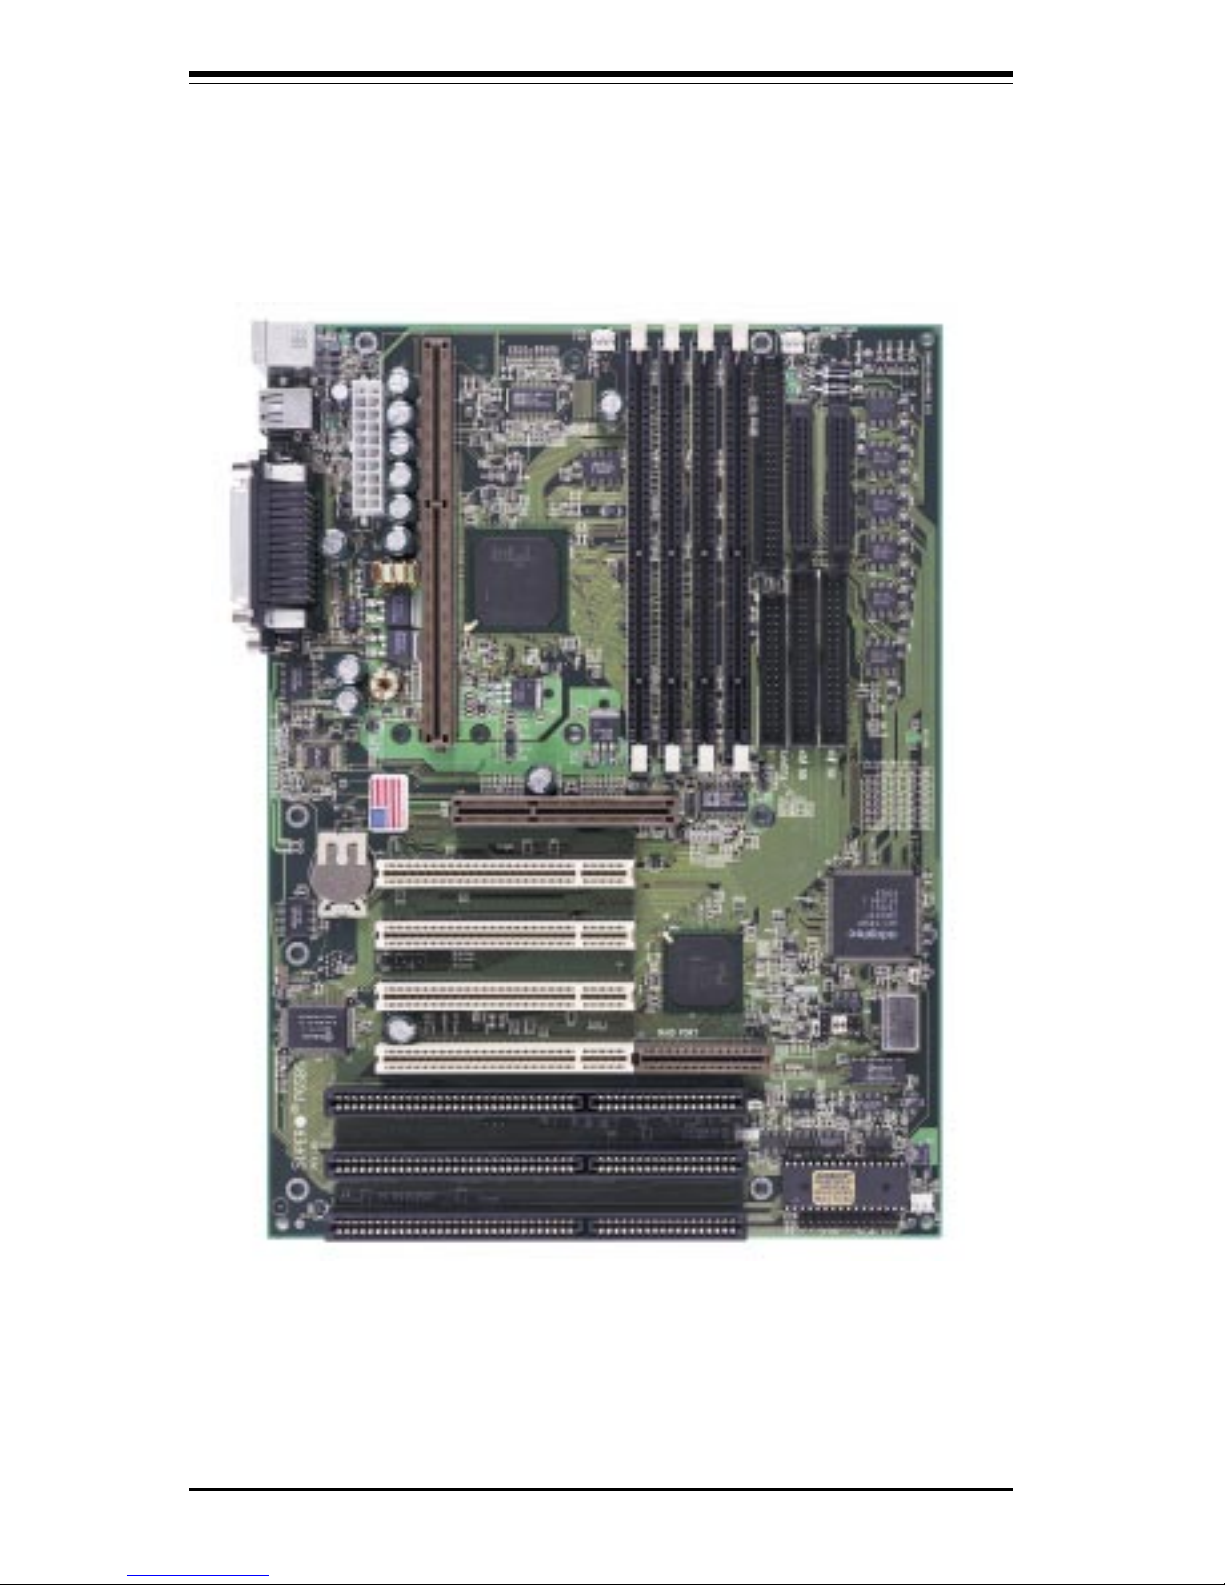
1-12
SUPER P6SBS
Figure 1-9. SUPER P6SBS Motherboard Image
Page 23
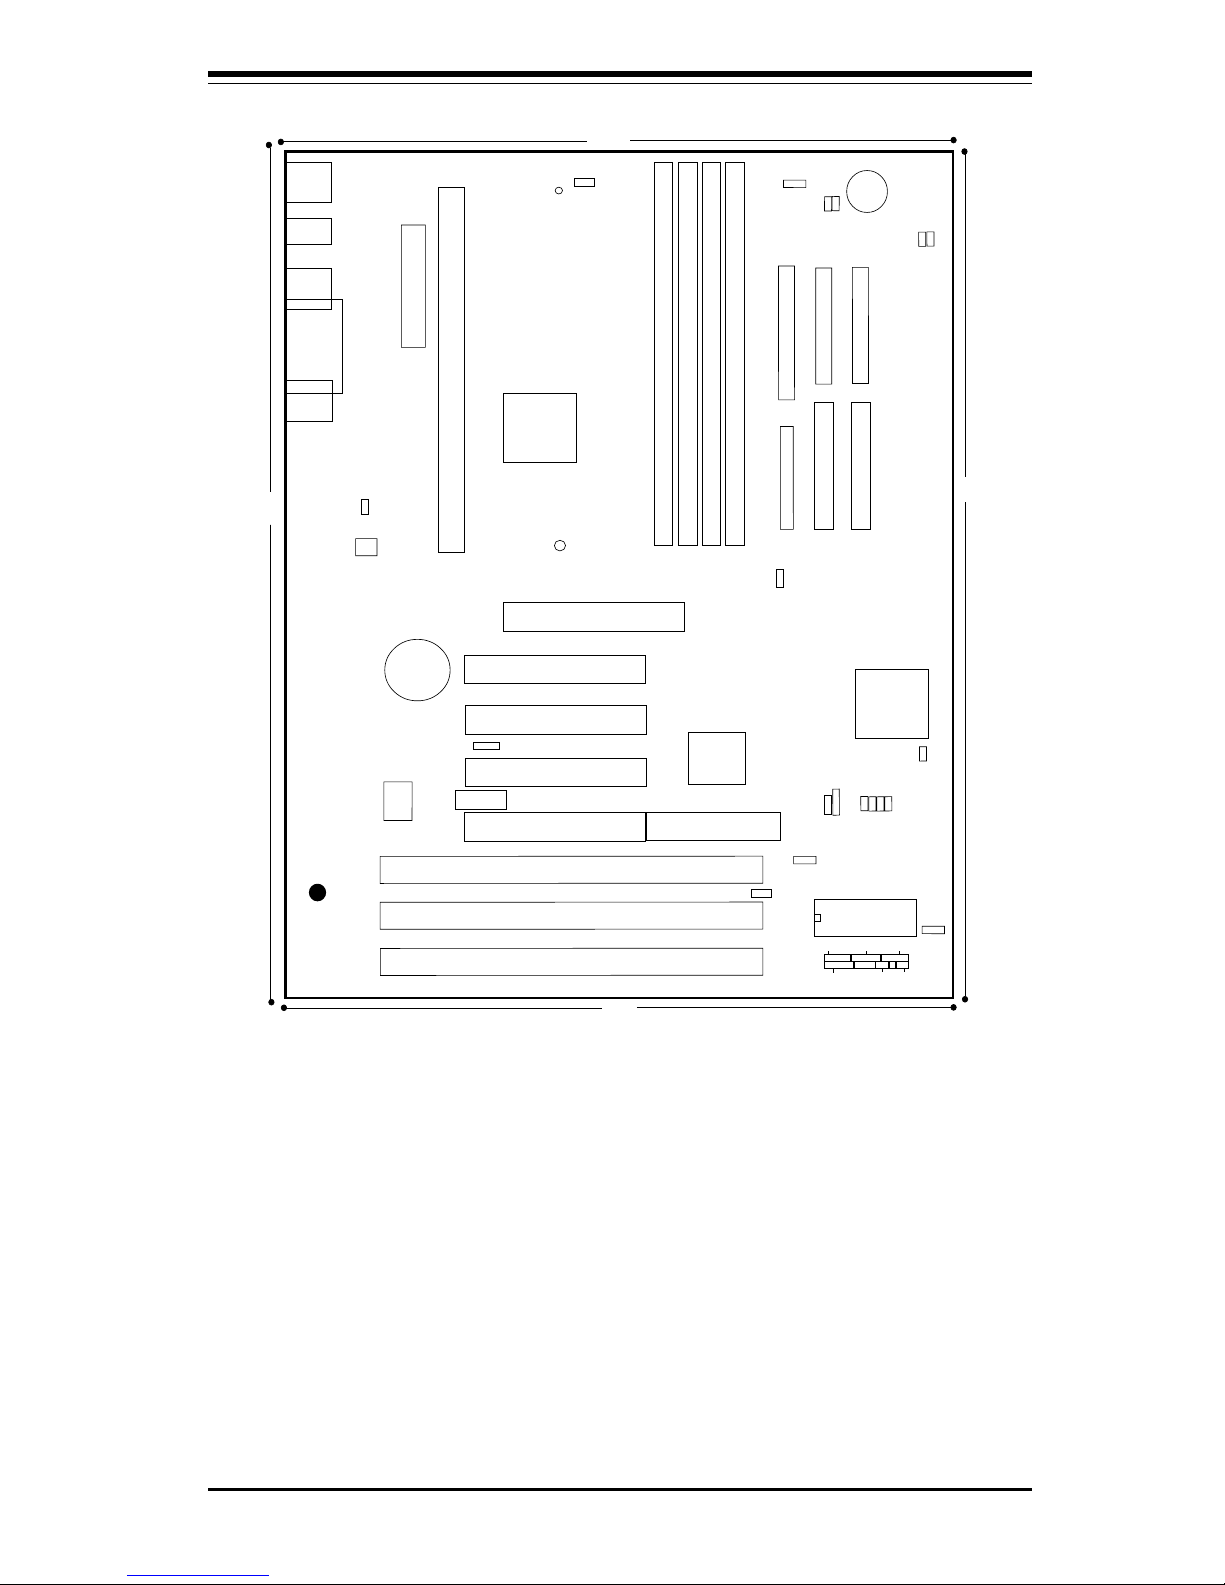
Chapter 1: Introduction
1-13
Figure 1-10. SUPER P6SBS Motherboard Layout
®
J21
COM2
J20
COM1
JJ14
J14
J13
J32
ATX POWER
J9
J11
J12
J10
B
ank3
U14
J8
1
J17, J18
USB
CPU FAN
J1
JT1
U2
Bank0
B
ank1
B
ank2
UA1
JA4
PCI 1
PCI 2
PCI 3
PCI 4
RAID PORT
U48
A
G
P
P
O
R
T
1
JP20
JB2
JB3
U56
SUPER P6SBS
JF1
JF2
U38
IR CON
PW_ON
RESET
BIOS
IDE LED/KEYLOCK/SPEAKER
1
JT2
1
J22
J16
1
1
SCSI
UW SCSI
UW SCSI
FLOPPY
IDE 2
IDE 1
1
1
JA1 JA2
11
JA3
J15
JA6
JA5
BZ_ON
JOH
JOH: Overheat LED
JT
3: T
h
erm
al C
ontrol F
an
JA5, JA6: SCSI Termination
1 JTM
1
WOL
BT2
B
A
T
T
E
R
Y
+
-
Chassis
Intrusion
JL1
JBT2
JBT1
1
1
JB
1
JB4
SCSI LED
JP11
JBT1: CMOS Clear
JBT2: Ext Battery
——–—— Manufacturer Settings —–———
JBT1: 1-2 (default)
2-3 CMOS Clear
To clear the CMOS completely,
disconnect the power source.
JL1: OFF (default)
ON (intrusion)
JP11: 1-2 Auto (default)
2-3 66 MHz
OFF 100 MHz
JP20: 1-2 PIIX CTL PD State
2-3 BIOS CTL PD State (default)
JA5, JA6: SCSI Termination (on to enable termination)
WOL: Wake-on-LAN
——–———–————–———–——–——–—
Note: To enable the overheat buzzer, place a
jumper on BZ_ON.
BZ
JT3
PIIX4E
BX
J19
Parallel
Port
12"
12"
8.875"
8.875"
SBLINK
1
J34
PS/2 KB
(bottom)
PS/2 MOUSE
(top)
Note: Some CPU Core/Bus ratios cannot be
selected for processors that have fixed ratios.
CPU
————— CPU Core/Bus Ratio –—————
JB1 JB2 JB3 JB4
x3 ON OFF ON ON
x3.5 OFF OFF ON ON
x4 ON ON O FF ON
x4.5 OFF ON OFF ON
x5 ON OFF OFF ON
x5.5 OFF OFF OFF ON
x6 ON ON ON O FF
X6.5 OFF ON ON OFF
x7 ON OFF ON OFF
x7.5 OFF OFF ON OFF
x 8 ON ON O FF O FF
——–—–————————————————
Page 24
SUPER P6DBS/P6DBE/P6DBU/P6SBU/P6SBS/P6SBA/P6SBM Manual
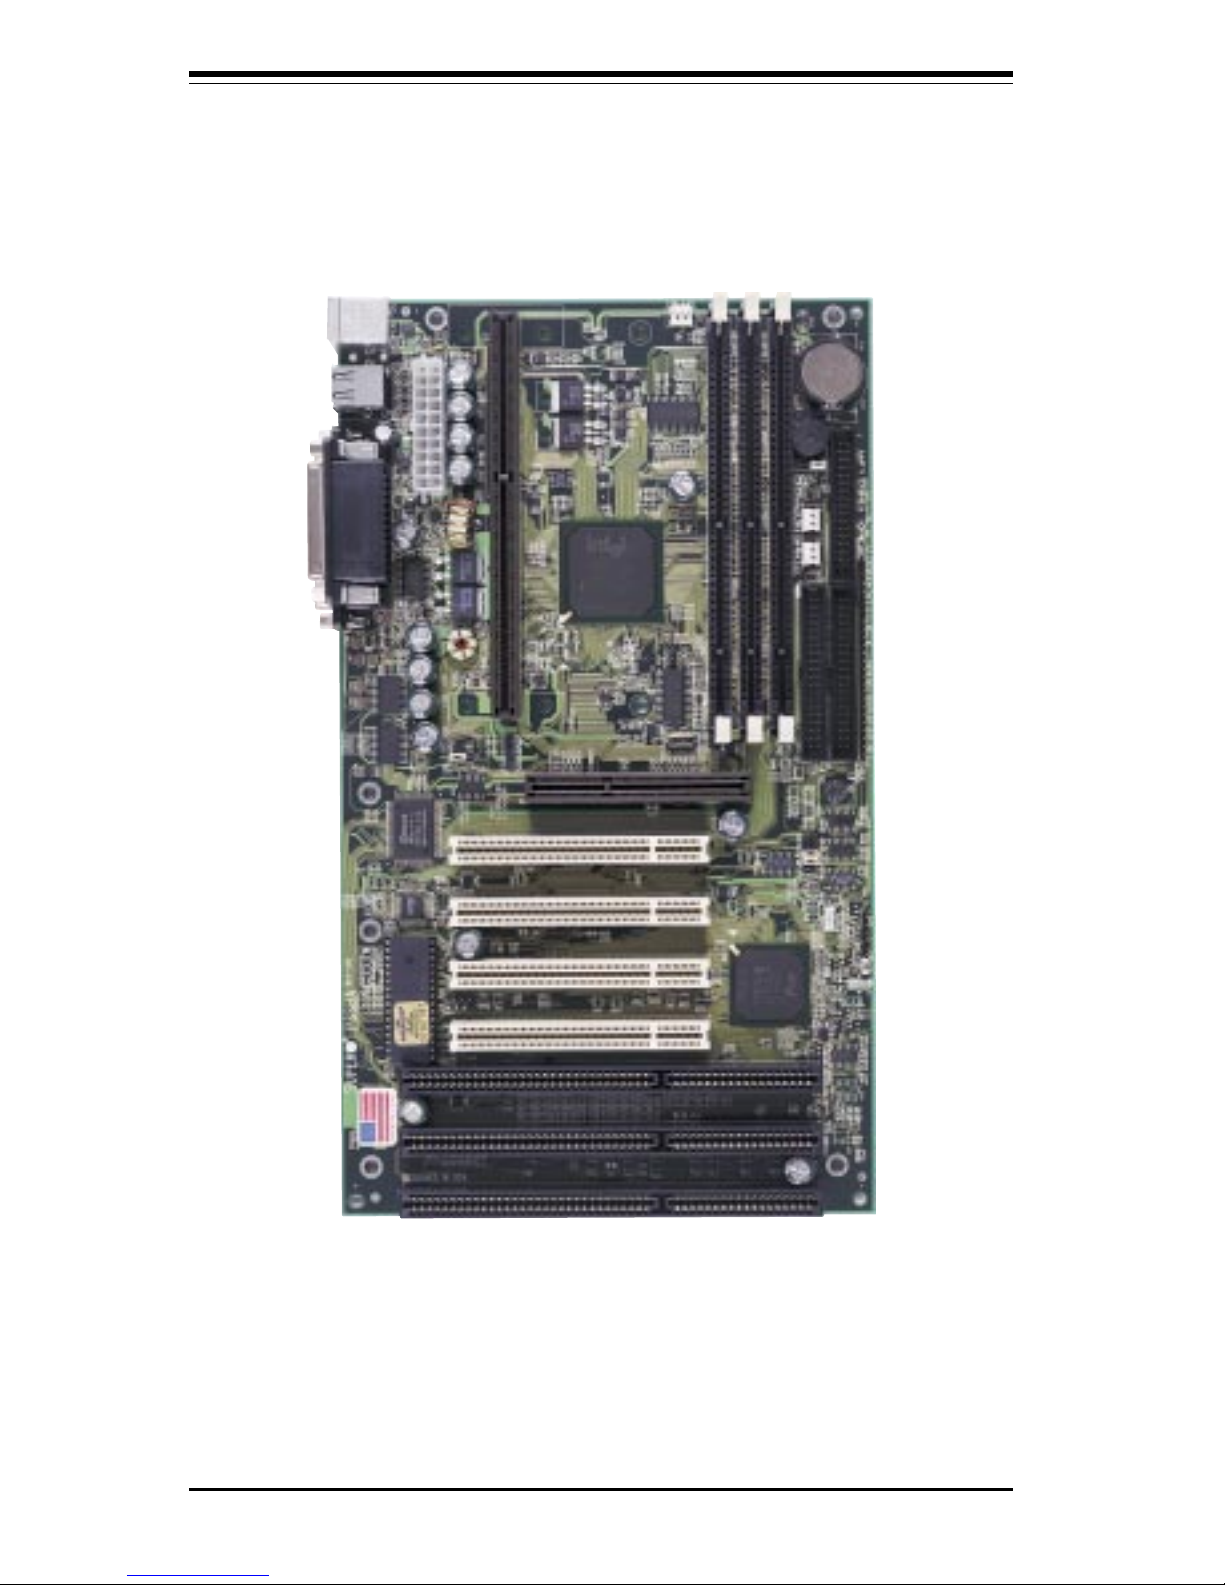
1-14
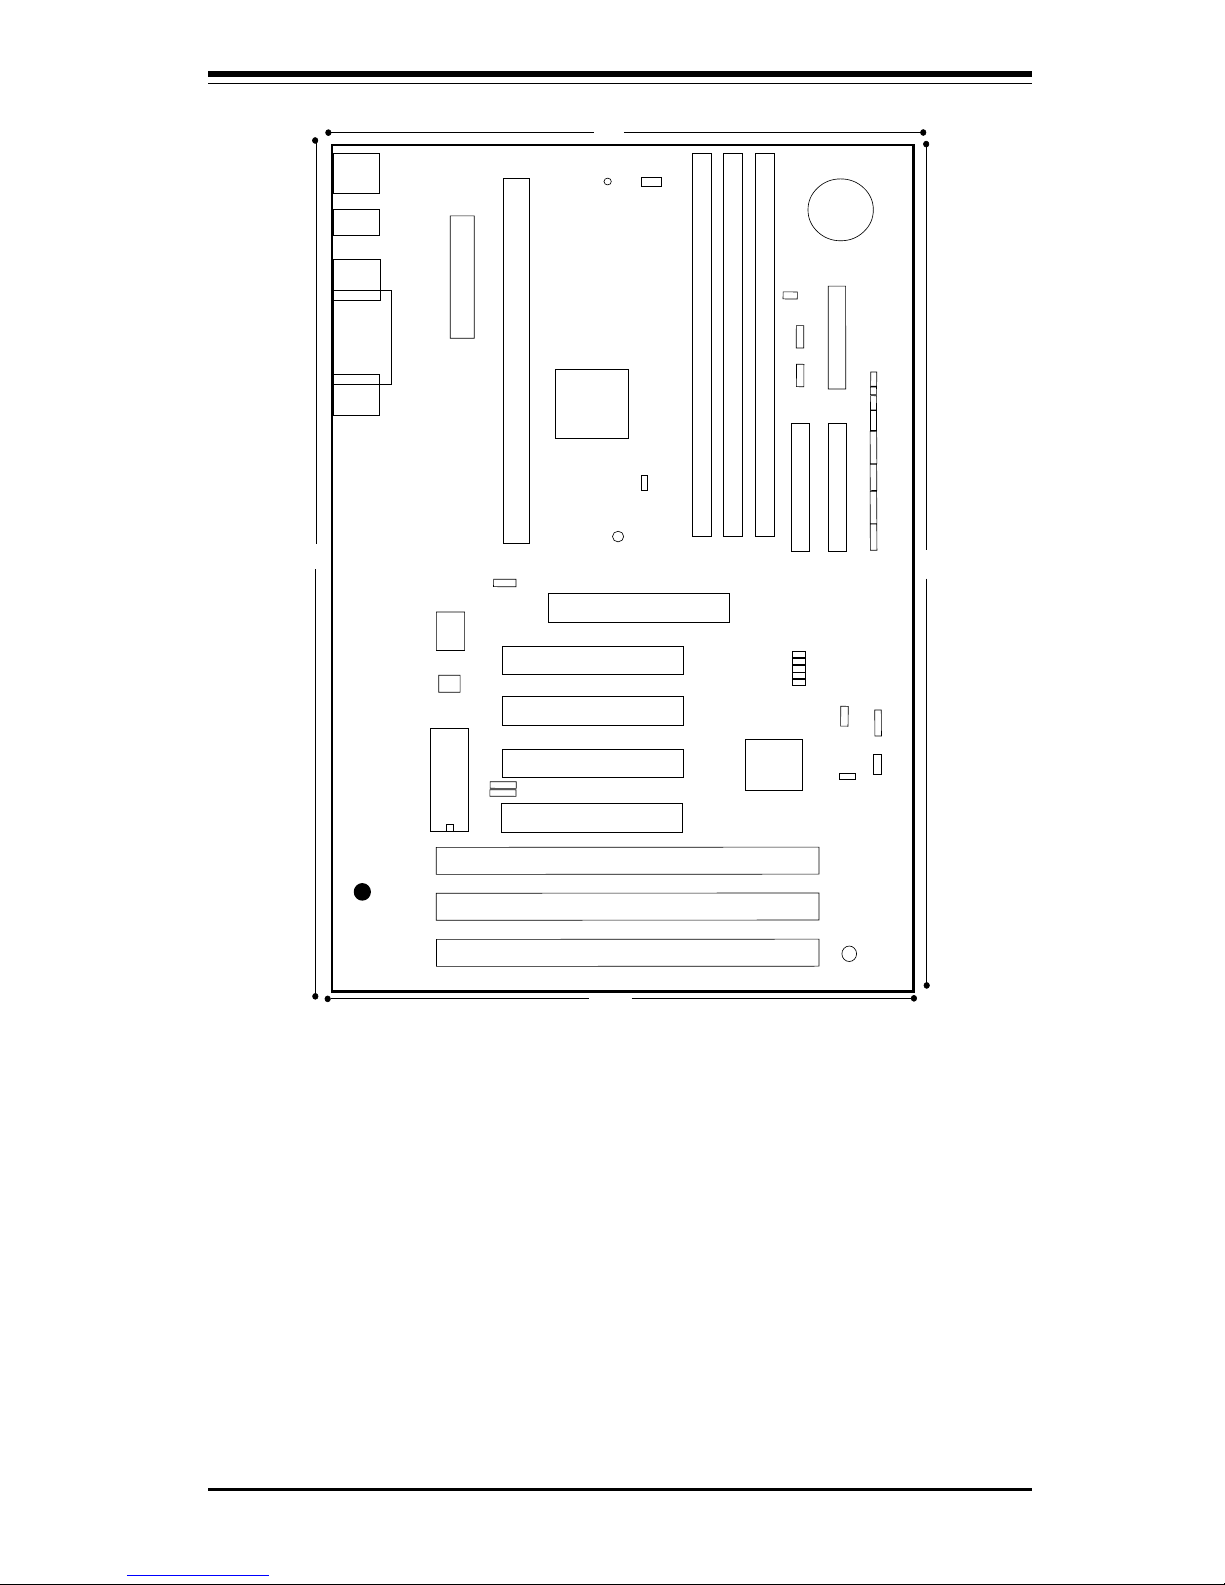
SUPER P6SBA
Figure 1-11. SUPER P6SBA Motherboard Image
Page 25
Chapter 1: Introduction
1-15
Figure 1-12. SUPER P6SBA Motherboard Layout
J9
J11
J12
J10
J8
Bank0
B
ank1
B
ank2
BT2
PCI 1
PCI 4
U34
A
G
P
P
O
R
T
1
JP20
U27
ATX POWER
J1
PCI 3
J22
J32
J17, J18
USB
J21
COM2
J20
COM1
BIOS
JJ14
J14
J13
U29
1
1
JBT2
JF1
IDE
LED
KEY
LOCK
SPEAKER
JF2
RESET
®
1
+
-
B
A
T
T
E
R
Y
1
1
JBT1
J16 J15
IDE 2
ID
E
1
FLO
P
PY
1
JT2
JT3
1
1
+
JOH
WOL
1
JB4
JB2
JB3
JL1
JB1
U14
IR
CON
PW_
ON
JOH: Overheat LED
JL1: Chassis Intrusion
JBT1: CMOS Clear
JBT2: Ext Battery
JP11
U9
CPU FAN
JT1
1
SUPER P6SBA
PCI 2
——–—— Manufacturer Settings —–———
JBT1: 1-2 (default)
2-3 CMOS Clear
To clear the CMOS completely,
disconnect the power source.
JL1: OFF (default)
ON (intrusion)
JP11: 1-2 Auto (default)
2-3 66 MHz
OFF 100 MHz
JP20: 1-2 PIIX CTL PD State
2-3 BIOS CTL PD State (default)
WOL: Wake-on-LAN
——–———————–———–—–—–——–—
PIIX4E
BX
J19
Parallel
Port
12"
12"
7"
7"
SW2
1
1
JL2
JTM
PW-LED
J34
PS/2 KB
(bottom)
PS/2 MOUSE
(top)
Note: Some CPU Core/Bus ratios cannot be
selected for processors that have fixed ratios.
CPU
————— CPU Core/Bus Ratio –—————
JB1 JB2 JB3 JB4
x3 ON OFF ON ON
x3.5 OFF OFF ON ON
x4 ON ON O FF ON
x4.5 OFF ON OFF ON
x5 ON OFF OFF ON
x5.5 OFF OFF OFF ON
x6 ON ON ON O FF
X6.5 OFF ON ON OFF
x7 ON OFF ON OFF
x7.5 OFF OFF ON OFF
x8 ON ON OFF OFF
——–—–————————————————
Page 26
SUPER P6DBS/P6DBE/P6DBU/P6SBU/P6SBS/P6SBA/P6SBM Manual
1-16
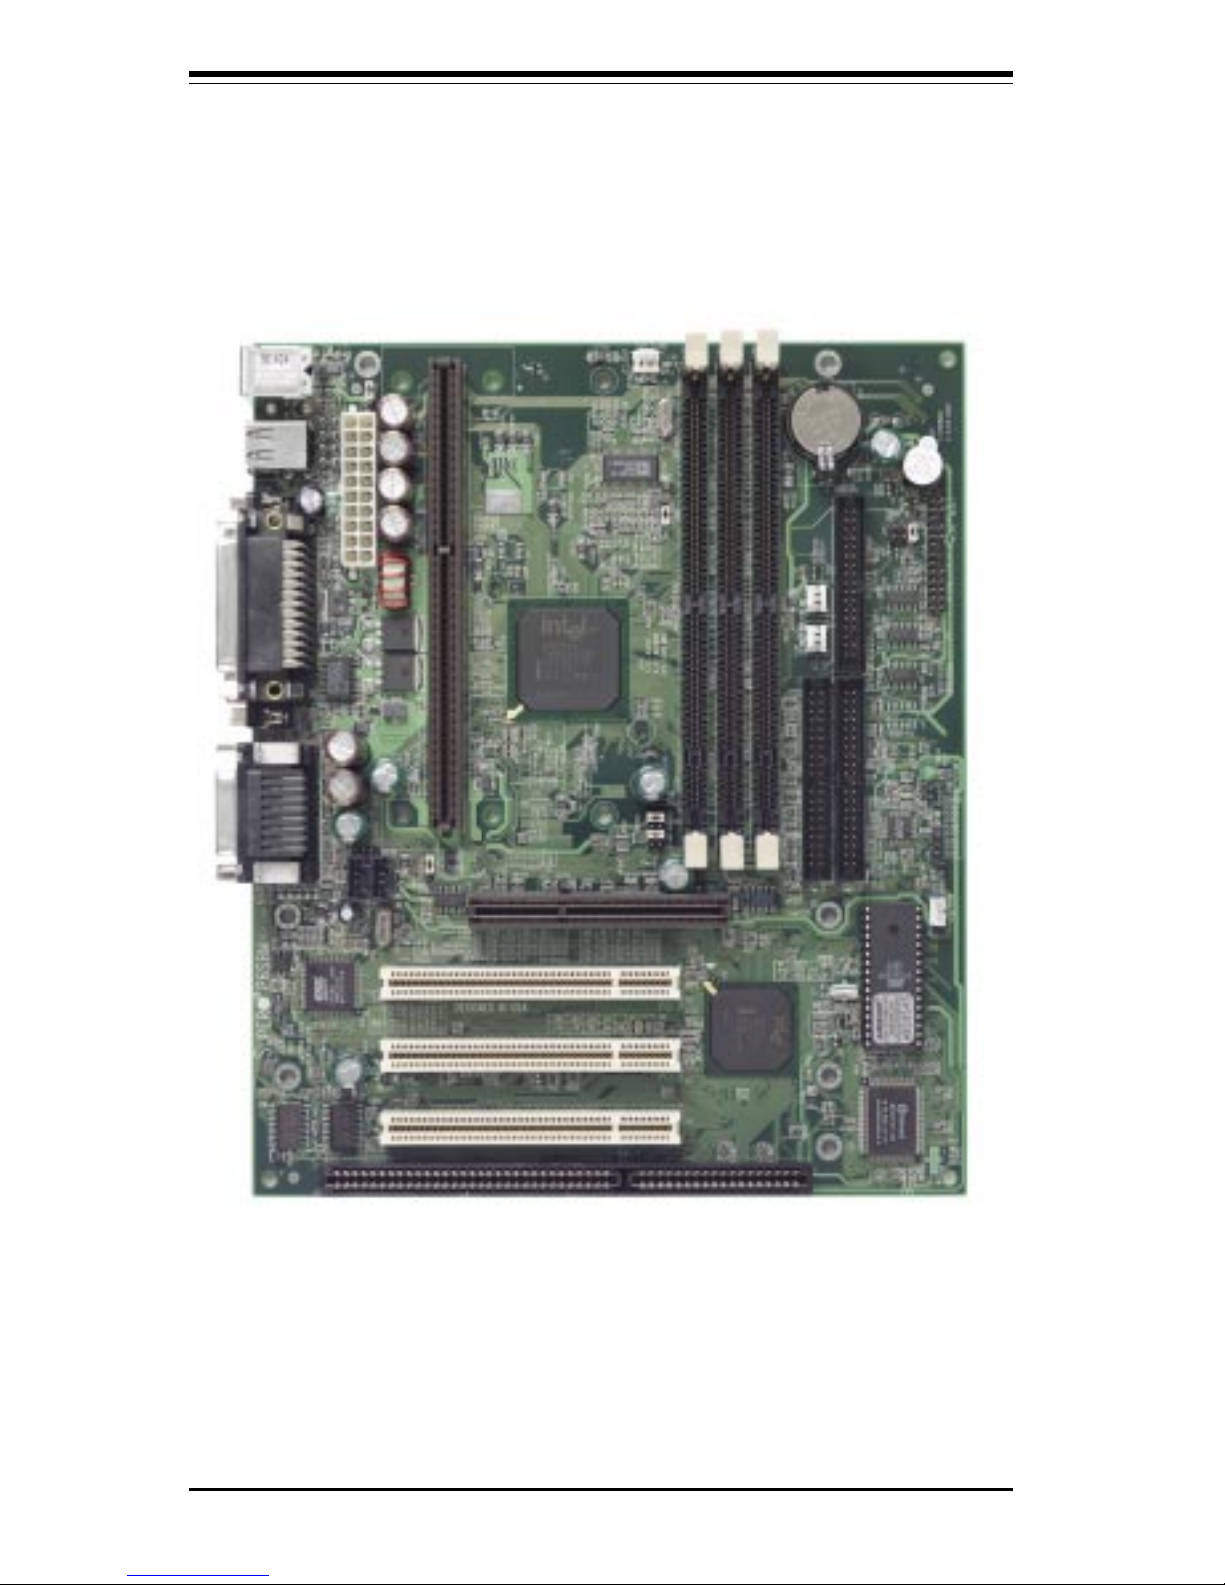
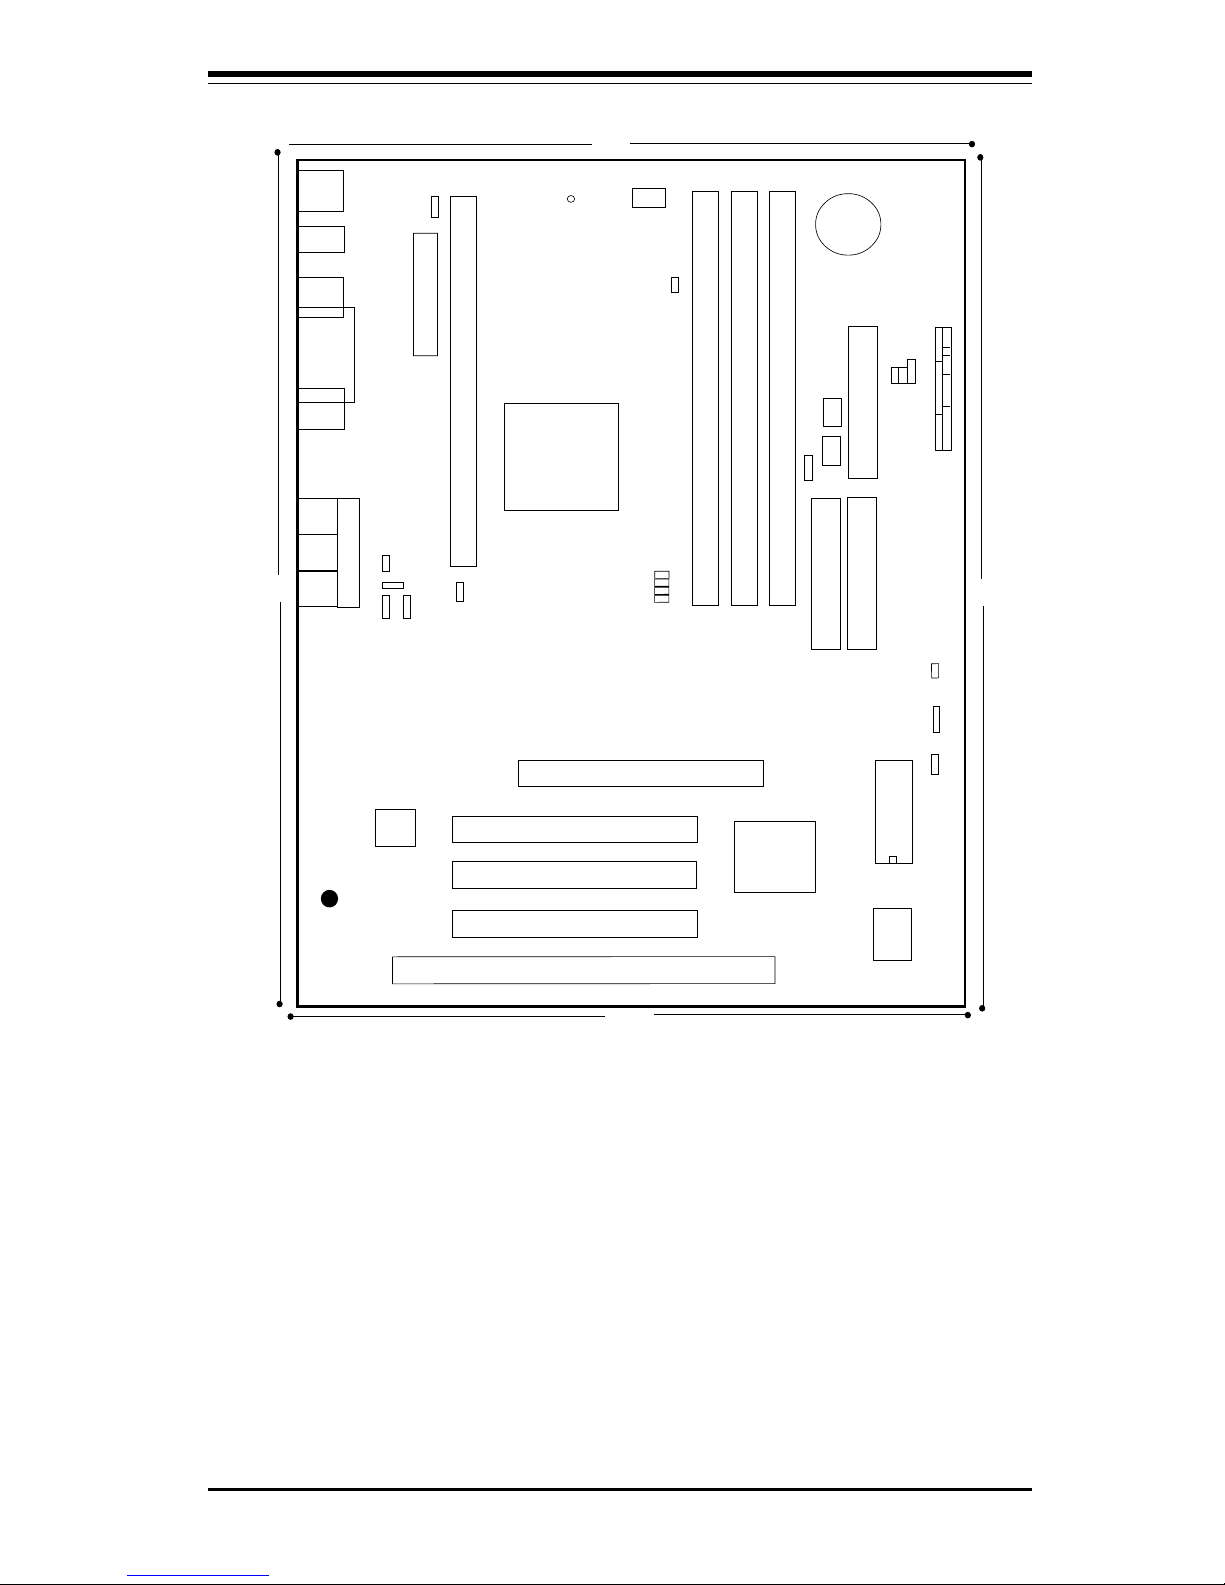
SUPER P6SBM
Figure 1-13. SUPER P6SBM Motherboard Image
Page 27
Chapter 1: Introduction
1-17
Figure 1-14. SUPER P6SBM Motherboard Layout
®
J20
COM1
J21
COM2
J32
ATX POWER
J11
J12
J10
U14
1
J17, J18
USB
CPU FAN
J1
JT1
U9
Bank0
Bank1
Bank2
PCI 1
PCI 2
PCI 3
A
G
P
P
O
R
T
U59
JF1
JF2
U29
IR CON PW_ON
RESET
BIOS
IDE LED/KEYLOCK/SPEAKER
1
J22
J16
FLO
PPY
IDE2
ID
E
1
1
1
J15
BZ_ON
JOH
JOH: Overheat LED
JT
3
: T
he
rm
al C
ontrol F
an
JTM
1
WOL
JP11
JBT1: CMOS Clear
JT2
PIIX4E
BX
J19
Parallel
Port
JB1
JB2
JB3
JB4
JBT1
JP20
1
JL1
J36
J8
JJ14
1
9.6"
8.050"
J4
J5 J6
BATTERY
JP12
JT3
BT2
U27
JPWAKE
1
1
——–—— Manufacturer Settings —–———
JBT1: 1-2 (default)
2-3 Clear CMOS
To clear CMOS completely,
disconnect the power source.
JL1: OFF (default)
ON (intrusion)
JP11: 1-2 Auto
2-3 66 MHz
OFF 100 MHz
JP20: 1-2 PIIX CTL PD State
2-3 BIOS CTL PD State (default)
JPWAKE: 1-2 Disabled
2-3 Enabled
WOL: Wake-On-LAN
——–———–————–———–——–——–—
AUDIO
1938
SUPER P6SBM
1
1
1
1
1
1
1
1
1
1
LINE
OUT
LINE
IN
MIC
CD
MPEG
MONO
CD
11
1
1
Note: There are two CD connectors of different sizes. Use the one that matches the size of the connector from your
CD player. The MPEG connector is for use with a DVD decoder card.
9.6"
8.050"
+
-
1
1
J34
PS/2 KB
(bottom)
PS/2 MOUSE
(top)
Note: Some CPU Core/Bus ratios cannot be
selected for processors that have fixed ratios.
CPU
————— CPU Core/Bus Ratio –—————
JB1 JB2 JB3 JB4
x3 ON OFF ON ON
x3.5 OFF OFF ON ON
x4 ON ON O FF ON
x4.5 OFF ON OFF ON
x5 ON OFF OFF ON
x5.5 OFF OFF OFF ON
x6 ON ON ON O FF
X6.5 OFF ON ON OFF
x7 ON OFF ON OFF
x7.5 OFF OFF ON OFF
x8 ON ON OFF OFF
——–—–————————————————
Page 28
SUPER P6DBS/P6DBE/P6DBU/P6SBU/P6SBS/P6SBA/P6SBM Manual
1-18
CPU
440BX
CPU
AGP
Port
IO
APIC
PIIX4E
Power
Mana
g
ement
SDRAM
Host Bus
PCI Slots
SMBus
USB
Ports
USB
IDE Ports
ISA Slots
BIOS
SIO
SCSI
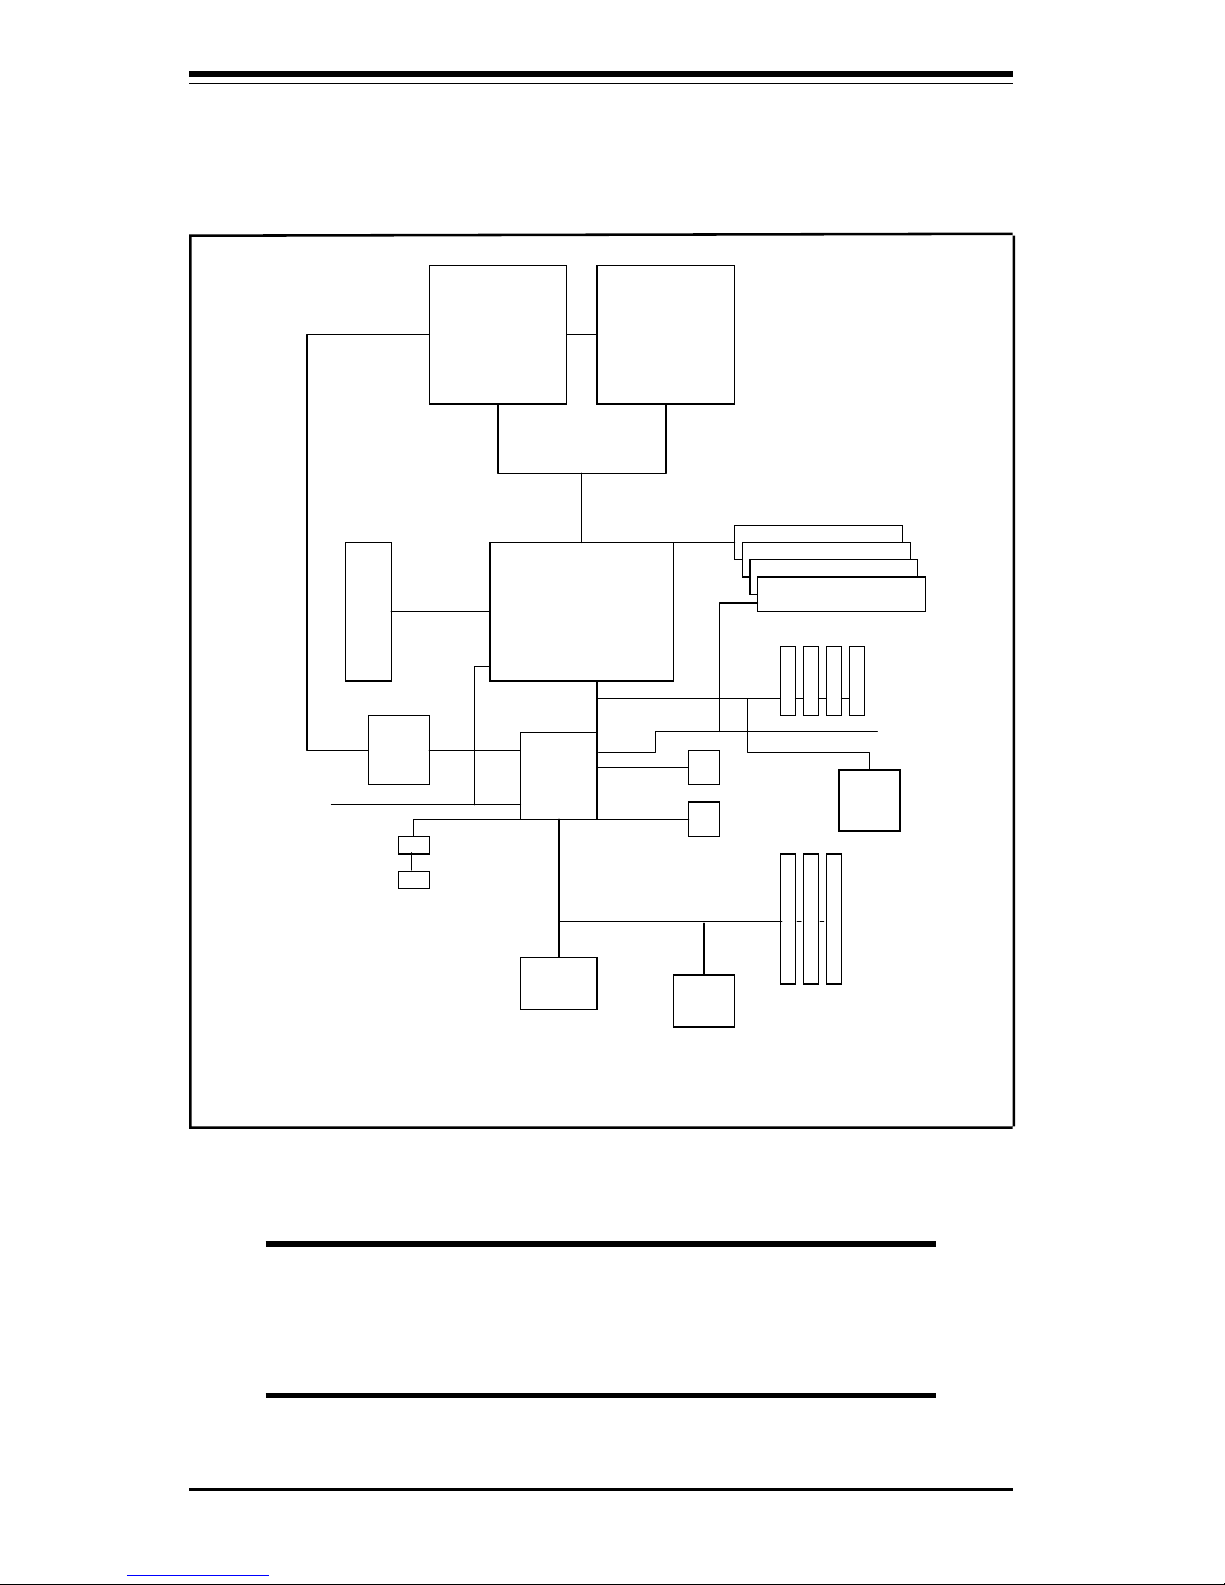
Figure 1-15. 440BX AGP Chipset:
System Block Diagram (Dual Processors)
NOTE: This is a general block diagram and may not
represent the number of slots/CPUs on your mother-
board. See the following page for the actual specifica-
tions of each motherboard.
Page 29

Chapter 1: Introduction
1-19
Features of the P6DBS, P6DBE, P6DBU, P6SBU, P6SBS,
P6SBA and P6SBM Motherboards
CPU
• Celeron SEPP 266-433 MHz or dual Pentium II 233-333 MHz at 66 MHz
bus speed or dual Pentium II 350-450 MHz or dual Pentium III processors at 100 MHz bus speed (Note: The P6SBU, P6SBS, P6SBA and P6SBM support
a single processor only.) (Also see note on processors - page 2-3.) (*Note: Currently, the
P6DBE/P6DBU/P6SBU/P6SBA motherboard supports CPU speeds up to 1GHz with 100 MHz
FSB speed.)
Memory
• Maximum of 1 GB EDO at 66 MHz or 512 MB unbuffered 3.3V SDRAM,
or 1 GB registered SDRAM (P6DBS/P6DBE/P6DBU/P6SBU/P6SBS only)
• 768 MB EDO, 768 MB registered DIMM or 384 MB SDRAM (P6SBA and
P6SBM only)
(Note: When the CPU bus is running at 100 MHz, the SDRAM must be PC-100 compliant
DIMMs.)
(Note: The maximum cacheable memory size depends on the processor capabilities.)
• ECC and non-ECC memory supported
Chipset
• Intel 440BX
Expansion Slots
P6DBS/P6SBU/P6SBS/P6SBA P6DBU/P6DBE P6SBM
• 4 PCI slots • 5 PCI slots • 3 PCI slots
• 3 ISA slots • 2 ISA slots • 1 ISA slot
One shared PCI/ISA slot
• 1 AGP slot • 1 AGP slot • 1 AGP slot
BIOS
• 2 Mb AMI® Flash BIOS
• APM 1.2, DMI 2.1, Plug and Play (PnP)
• Adaptec 7890 SCSI BIOS (P6DBU/P6SBU only)
• Adaptec 7895 SCSI BIOS (P6DBS/P6SBS only)
PC Health Monitoring
• Seven onboard voltage monitors for CPU core(s), CPU I/O, +3.3V, ±5V
and ±12V
• Three-fan status monitors with firmware/software on/off control
• Environmental temperature monitor and control
• CPU fan auto-off in sleep mode
• Chassis overheat alarm, LED and control
• Chassis intrusion detection
Page 30

SUPER P6DBS/P6DBE/P6DBU/P6SBU/P6SBS/P6SBA/P6SBM Manual
1-20
• System resource alert
• Hardware BIOS virus protection
• Auto-switching voltage regulator for the CPU core
• SUPERMICRO Super Doctor and (optional) Intel® LANDesk® Client
Manager (LDCM) support
ACPI/PC 98 Features
• Microsoft OnNow
• Slow blinking LED for suspend state indicator
• BIOS support for USB keyboard
• Real time clock wake-up alarm
• Main switch override mechanism
• External modem ring-on
Onboard I/O
• One (1) 68-pin 16-bit Ultra II LVD/SE SCSI connector, one (1) 68-pin
16-bit Ultra Wide SCSI connector and one (1) 50-pin 8-bit SCSI connector (P6DBU/P6SBU)
• Two (2) 68-pin 16-bit Dual Ultra-Wide SCSI connectors and one (1) 50pin 8-bit SCSI connector (P6DBS/P6SBS)
• RAIDport for Adaptec ARO-1130CA/SA RAIDport II card (P6DBS/P6SBS)
• RAIDport for Adaptec ARO-1130U2 RAIDport III card (P6DBU/P6SBU)
• 2 EIDE Bus Master interfaces support Ultra DMA/33 and Mode 4
• 1 floppy port interface
• 2 Fast UART 16550 serial ports
• 1 parallel port that supports EPP (Enhanced Parallel Port) and ECP
(Extended Capabilities Port)
• PS/2 mouse and PS/2 keyboard
• Infrared port
• 2 USB (Universal Serial Bus) ports
• Solo-1 PCI
Audio
Drive
®
(Standard on P6SBM, optional on P6SBU)
CD Utilities
• Intel LANDesk Client Manager for Windows NT® and Windows® 95
(optional)
• PIIX4E Upgrade Utility for Windows 95
• BIOS Flash Upgrade Utility
• Super Doctor Utility
• SCSI Utility manual and driver
Page 31

Chapter 1: Introduction
1-21
Dimensions
• SUPER P6DBS - ATX (12" x 9.65") * See board diagram for full measurements
• SUPER P6DBE - ATX (12" x 9.6")
• SUPER P6DBU - ATX (12" x 9.65") * See board diagram for full measurements
• SUPER P6SBU - ATX (12" x 8.875")
• SUPER P6SBS - ATX (12" x 8.875")
• SUPER P6SBA - ATX (12" x 7")
• SUPER P6SBM - MicroATX (9.6" x 8.05")
1-2 Chipset Overview
The 440BX chipset, developed by Intel, is the ultimate processor platform
targeted for 3D graphics and multimedia applications. Along with a Systemto-PCI bridge integrated with an optimized DRAM controller and data path,
this chipset supports the Accelerated Graphics Port (AGP) interface. AGP
is a high performance, component level interconnect targeted at 3D applications and based on a set of performance enhancements to PCI. The I/O
subsystem portion of the 440BX platform is based on the PIIX4E, a highly
integrated version of Intel's PCI-to-ISA bridge family.
The PCI/AGP and system bus interface controller (82443BX) supports up to
two Pentium II/III processors. It provides an optimized 72-bit DRAM interface
(64-bit data plus ECC) that supports 3.3V DRAM technology. The controller
provides the interface to a PCI bus operating at 33 MHz. This interface
implementation is compliant with the PCI Rev 2.1 Specification. The AGP
interface is based on AGP Specification Rev 1.0. It can support data trans-
fer rates of up to 133 MHz (532 MB/s).
1-3 PC Health Monitoring
This section describes the PC health monitoring features of the SUPER
P6DBU/P6DBS/P6DBE/P6SBU/P6SBS/P6SBA/P6SBM. All have an onboard
System Hardware Monitor chip that supports PC health monitoring.
Seven Onboard Voltage Monitors for the CPU Core(s),
CPU I/O, +3.3V,
±±
±±
±5V,
and
±±
±±
±12V
The onboard voltage monitor will scan these seven monitored voltages continuously. Once a voltage becomes unstable, it will give a warning or send
an error message to the screen. Users can adjust the voltage thresholds
to define the sensitivity of the voltage monitor.
Page 32

SUPER P6DBS/P6DBE/P6DBU/P6SBU/P6SBS/P6SBA/P6SBM Manual
1-22
Three-Fan Status Monitors with Firmware/Software On/Off
Control
The PC health monitor can check the RPM status of the cooling fans. The
onboard 3-pin CPU fan is controlled by the ACPI BIOS and the ACPI-enabled
operating system. The thermal fans are controlled by the overheat detection logic.
Environment Temperature Control
The thermal control sensor monitors the CPU temperature in real time and
will turn on a back-up fan whenever the CPU temperature exceeds a userdefined threshold. The overheat circuitry runs independently from the CPU.
It can continue to monitor for overheat conditions even when the CPU is in
sleep mode. Once it detects that the CPU temperature is too high, it will
automatically turn on the back-up fan to prevent any overheat damage to
the CPU. The onboard chassis thermal circuitry can monitor the overall
system temperature and alert users when the chassis temperature is too
high.
CPU Fan Auto-Off in Sleep Mode
The CPU fan activates when the power is turned on. It can be turned off
when the CPU is in sleep mode. When in sleep mode, the CPU will not run
at full power, thereby generating less heat. For power saving purposes,
the user has the option to shut down the CPU fan.
CPU Overheat Alarm, LED and Control in P6DBS/P6DBE/
P6DBU/P6SBU/P6SBS/P6SBM
This feature is available when the user enables the CPU overheat warning
function in the BIOS (see page 5-18). The overheat alarm will activate
when the CPU temperature exceeds the temperature configured by the
user. When the overheat alarm is activated, both the overheat fan and the
warning LED are triggered.
Chassis Intrusion Detection
The chassis intrusion circuitry can detect unauthorized intrusion to the system. The chassis intrusion connector is located on JL1. Attach a
microswitch to JL1. When the microswitch is closed, it means that the
chassis has been opened. The circuitry will then alert the user with a
Page 33

Chapter 1: Introduction
1-23
warning message when the system is turned back on. This feature is
available when the user is running Intel's LANDesk Client Manager and
SUPERMICRO's Super Doctor.
System Resource Alert
This feature is available when used with Intel's LANDesk Client Manager
(optional). It is used to notify the user of certain system events. For
example, if the system is running low on virtual memory and there is insufficient hard drive space for saving the data, you can be alerted of the
potential problem.
Hardware BIOS Virus Protection
The system BIOS is protected by hardware so that no virus can infect the
BIOS area. The user can only change the BIOS content through the flash
utility provided by SUPERMICRO. This feature can prevent viruses from
infecting the BIOS area and destroying valuable data.
Auto-Switching Voltage Regulator for the CPU Core
The switching voltage regulator for the CPU core can support up to 20A
current, with the auto-sensing voltage ID ranging from 1.4V to 3.5V. This
will allow the regulator to run cooler and thus make the system more stable.
Intel LANDesk® Client Manager (LDCM) Support
As the computer industry grows, PC systems become more complex and
harder to manage. Historically, only experts have been able to fully understand and control these complex systems. Today's users want manageable
systems that they can interact with automatically. Client Manager enables
both administrators and clients to:
• Review system inventory
• View DMI-compliant component information
• Back up and restore system configuration files
• Troubleshoot
• Receive notifications of system events
• Transfer files to and from client workstations
• Remotely reboot client workstations
Page 34
SUPER P6DBS/P6DBE/P6DBU/P6SBU/P6SBS/P6SBA/P6SBM Manual
1-24
1-4 Solo-1TM PCI
Audio
Drive
®
(Standard on P6SBM, OEM option on P6SBU)
The Solo-1 PCI
Audio
Drive feature implements a single-chip PCI audio solution to provide high quality audio processing while maintaining full legacy
DOS game compatibility. With a dynamic range of over 80 dB, the Solo-1
complies with the Microsoft PC 97/PC 98 specifications and meets WHQL
audio requirements.
The Solo-1 incorporates a microcontroller, an ESFM
TM
music synthesizer, a
3-D stereo effects processor, 16-bit stereo wave ADC and DAC, 16-bit
stereo music DAC, an MPU-401 UART mode serial port, a dual game port, a
hardware master volume control, a serial port interface to an external
wavetable music synthesizer, DMA control logic with FIFO and PCI bus
interface logic. There are three stereo inputs (LINE-IN, LINE-OUT, MIC IN)
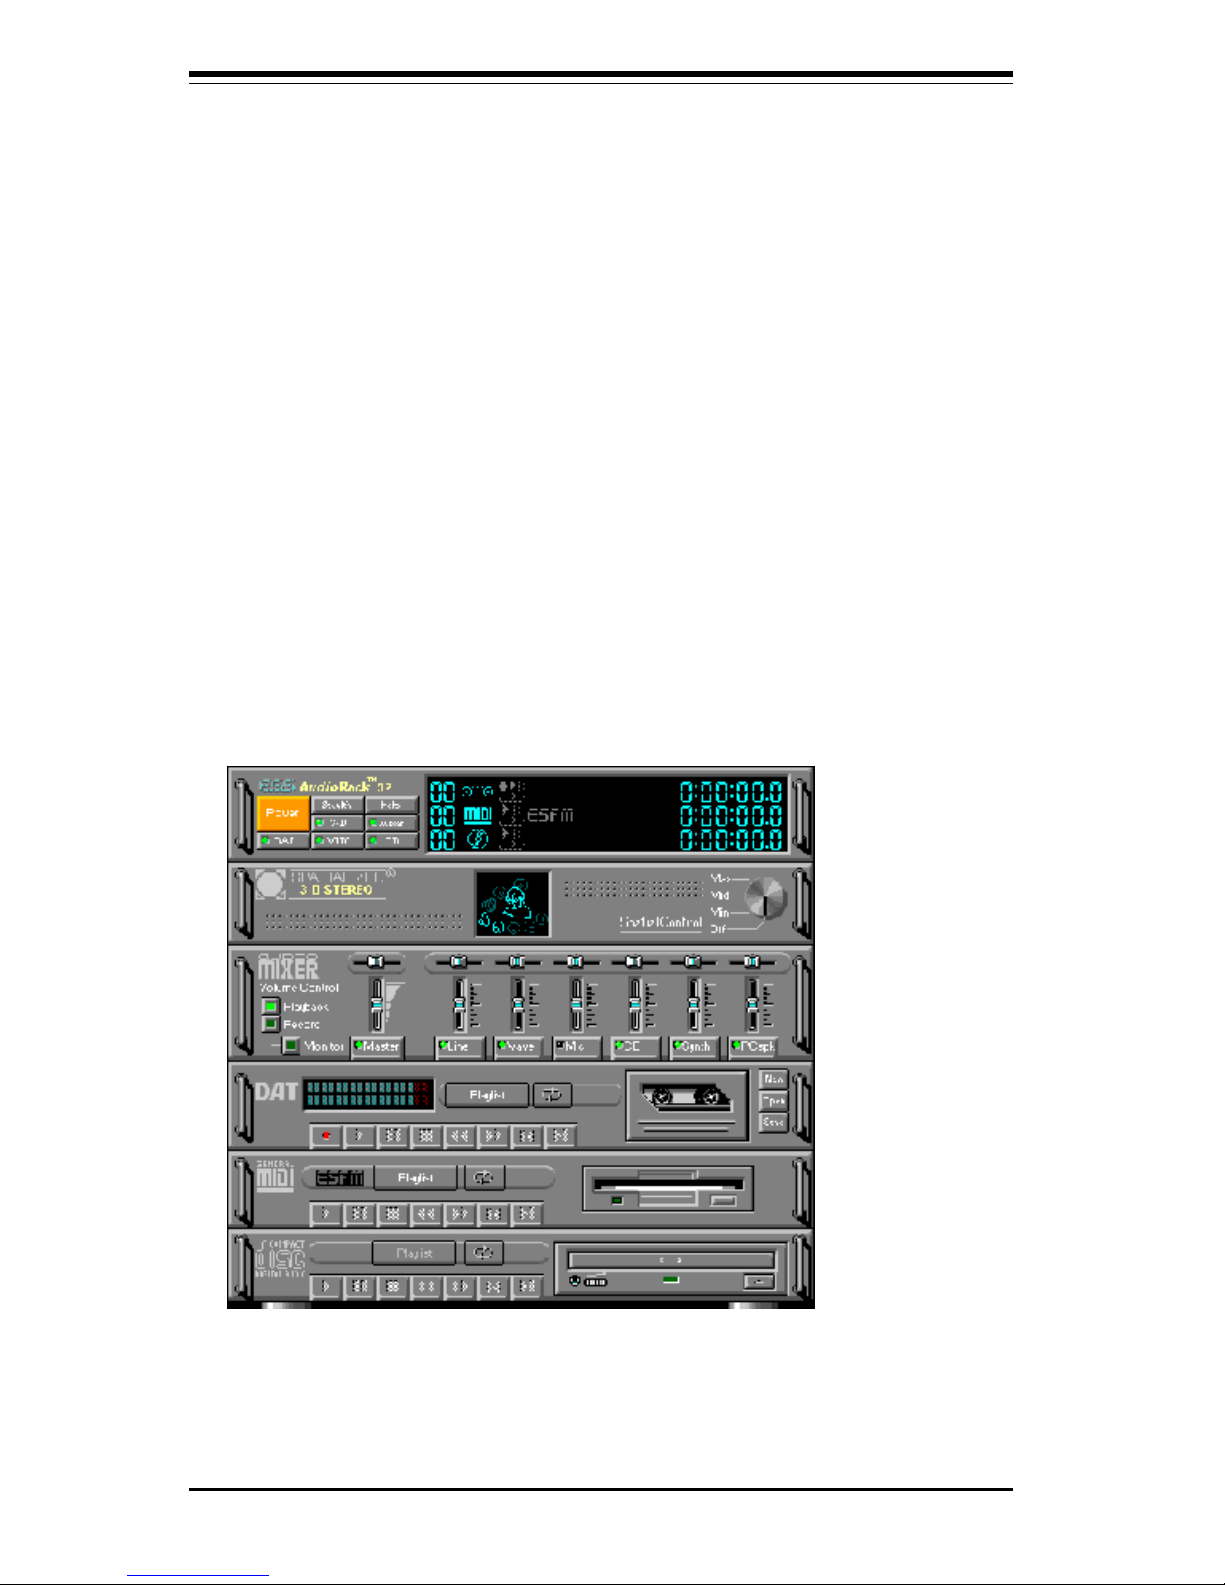
and a mono microphone input. For installation information, refer to page 37 in the FAQ section of this manual. When the AudioRack program is
succesfully installed, it will be displayed as shown in Figure 1-16.
Figure 1-16. AudioRack Display
Page 35

Chapter 1: Introduction
1-25
1-5 ACPI/PC 98 Features
ACPI stands for Advanced Configuration and Power Interface. The ACPI
specification defines a flexible and abstract hardware interface that provides a standard way to integrate power management features throughout
a PC system, including hardware, operating system and application software. This enables the system to automatically turn on and off peripherals
such as CD-ROMs, network cards, hard disk drives and printers.
In addition to enabling operating system-directed power management, ACPI
provides a generic system event mechanism for Plug and Play and an operating system-independent interface for configuration control. ACPI leverages the Plug and Play BIOS data structures while providing a processor
architecture-independent implementation that is compatible with Windows98.
In order to enable ACPI, the default APM mode must be disabled in BIOS
(see page 5-13). To install Windows 98 with ACPI, enter DOS and type
"setup /p j" at the CDROM prompt (usually D:\) with the Windows98 CD
loaded. (Make sure you include the spaces after "setup" and "p".) Then hit
<Enter>. You can check to see if ACPI has been properly installed by
looking for it in the Device Manager, which is located in the Control Panel in
Windows.
Microsoft OnNow
The OnNow design initiative is a comprehensive, system-wide approach to
system and device power control. OnNow is a term for a PC that is always
on but appears to be off and responds immediately to user or other requests.
Slow Blinking LED for Suspend-State Indicator
When the CPU goes into a suspend state, the power LED will start blinking
to indicate that the CPU is in suspend mode. When the user presses any
key, the CPU will wake-up and the LED will automatically stop blinking and
remain on.
BIOS Support for USB Keyboard
If the USB keyboard is the only keyboard in the system, the USB keyboard
will work like a normal keyboard during system boot-up.
Page 36

SUPER P6DBS/P6DBE/P6DBU/P6SBU/P6SBS/P6SBA/P6SBM Manual
1-26
Real Time Clock Wake-Up Alarm
Although the PC may be perceived to be off when not in use, it is still
capable of responding to preset wake-up events. In the BIOS, the user can
set a timer to wake-up the system at a predetermined time (see page 5-15).
Main Switch Override Mechanism
When an ATX power supply is used, the power button can function as a
system suspend button. When the user depresses on the power button,
the system will enter a SoftOff state. The monitor will be suspended and
the hard drive will spin down. Depressing the power button again will
cause the whole system to wake-up. During the SoftOff state, the ATX
power supply provides power to keep the required circuitry in the system
alive. In case the system malfunctions and you want to turn off the power,
just depress and hold the power button for 4 seconds. The power will turn
off and no power will be provided to the motherboard.
External Modem Ring-On
Wake-up events can be triggered by a device such as the external modem
ringing when the system is in the SoftOff state. Note that external modem
ring-on can only be used with an ATX 2.01 (or above) compliant power
supply.
1-6 Wake-On-LAN (WOL)
Wake-On-LAN is defined as the ability of a management application to remotely power up a computer that is powered off. Remote PC setup, updates and asset tracking can occur after hours and on weekends so that
daily LAN traffic is kept to a minimum and users are not interrupted.
The motherboards have a 3-pin header (WOL) to connect to the 3-pin
header on a Network Interface Card (NIC) that has WOL capability. Note
that Wake-On-Lan can only be used with an ATX 2.01 (or above) compliant
power supply.
Page 37

Chapter 1: Introduction
1-27
1-8 Super I/O
The disk drive adapter functions of the Super I/O chip include a floppy disk
drive controller that is compatible with industry standard 82077/765, a data
separator, write pre-compensation circuitry, decode logic, data rate selection, a clock generator, drive interface control logic and interrupt and DMA
logic. The wide range of functions integrated onto the Super I/O greatly
reduces the number of components required for interfacing with floppy disk
drives. The Super I/O supports four 360 K, 720 K, 1.2 M, 1.44 M or 2.88 M
disk drives and data transfer rates of 250 Kb/s, 500 Kb/s or 1 Mb/s.
It also provides two high speed serial communication ports (UARTs), one of
which supports serial infrared communication. Each UART includes a 16byte send/receive FIFO, a programmable baud rate generator, complete
modem control capability and a processor interrupt system. Both UARTs
provide legacy speed with baud rate of up to 115.2 Kbps as well as an
advanced speed with baud rates of 250 K, 500 K, or 1 Mb/s, which support
higher speed modems.
The Super I/O supports one PC-compatible printer port (SPP), Bi-directional
Printer Port (BPP) , Enhanced Parallel Port (EPP) or Extended Capabilities
Port (ECP). Extension FDD and Extension 2FDD Modes are also available
through the printer port interface pins to allow one or two external floppy
disk drives to be connected.
1-7 Power Supply
As with all computer products, a stable power source is necessary for
proper and reliable operation. It is even more important for Pentium II and III
processors that have high CPU clock rates of 300 MHz and above.
The SUPER P6DBS/P6DBE/P6DBU/P6SBU/P6SBS/P6SBA/P6SBM accommodates ATX power supplies. Although most power supplies generally meet
the specifications required by the CPU, some are inadequate.
It is highly recommended that you use a high quality power supply that
meets ATX power supply Specification 2.01. Additionally, in areas where
noisy power transmission is present, you may choose to install a line filter
to shield the computer from noise. It is recommended that you also install a
power surge protector to help avoid problems caused by power surges.
Page 38

SUPER P6DBS/P6DBE/P6DBU/P6SBU/P6SBS/P6SBA/P6SBM Manual
1-28
1-9 AIC-7895 MultiChannel
TM
Single-Chip UltraSCSI
The SUPER P6DBS/P6SBS has an onboard SCSI controller that is 100%
compatible with all major operating and hardware platforms. PCI 2.1 and
SCAM Level 1 compliance are assured. Two independent UltraSCSI channels provide a per channel data transfer rate of 40 MB/s. Connectors
include two 68-pin 16-bit Ultra Wide SCSI connectors (JA1/JA2) and a 50pin 8-bit Ultra SCSI connector (JA3). You can connect up to 15 devices
(seven 8-bit internal and eight 16-bit internal or external SCSI devices, or 15
wide internal and external SCSI devices).
When Fast SCSI devices are connected, the total length of all cables (internal and external) must not exceed 3 meters (9.8 ft) to ensure reliable operation. If no Fast SCSI devices are connected, the total length of all cables
must not exceed 6 meters (19.7 ft).
The AIC-7895 consolidates the functions of two SCSI chips, eliminating the
need of a PCI bridge. Reducing PCI bus loading allows you to expand your
system capabilities with additional PCI devices.
The AIC-7895 functions with Adaptec RAIDport II (ARO1130SA/CA) to
deliver RAID functionality. For information on installing onboard SCSI under
Windows NT, refer to pages 3-6 and 3-7 in the FAQ section of this manual.
The Super I/O provides functions that comply with ACPI (Advanced Configuration and Power Interface), which includes support of legacy and ACPI
power management through an SMI or SCI function pin. It also features
auto power management to reduce power consumption.
The Super I/O complies with the Microsoft PC98 Hardware Design
Guide. IRQs, DMAs and I/O space resources can flexibly adjust to meet
ISA PnP requirements. Moreover, it meets the specifications of PC98's
power management requirements: ACPI and APM (Advanced Power Management).
Page 39

Chapter 1: Introduction
1-29
1-10 AIC-7890 Ultra II SCSI
Note: If you are using a low voltage differential hard drive, it is recommended that you use an LVD/SE
Ultra II SCSI cable. LVD/SE cables offer increased length and can accommodate more devices.
The SUPER P6DBU/P6SBU has an onboard SCSI controller that is 100%
compatible with all major operating and hardware platforms. The AIC-7890
controller provides advanced PCI-to-SCSI Ultra II SCSI host adapter features
in a 272-pin Ball Grid Array (BGA) package, as well as containing an integrated dual mode (LVD/SE) transceiver. The AIC-7890 Ultra II SCSI chip
connects to a 32-bit PCI bus. It is PCI 2.1 compliant, it fully supports the
power management requirements specified in the Microsoft PC 97 guidelines and it provides SCAM level 2 support. The AIC-7890 functions with
Adaptec RAIDport III (ARO-1130U2) to deliver RAID functionality.
Ultra II SCSI enables faster data rates and longer cable lengths on the SCSI
bus. It doubles the data burst rate of Ultra Wide SCSI to 80 Mb/s for greater
system throughput. It also quadruples the maximum cable length of Ultra
Wide SCSI to 12 meters and allows up to 15 SCSI devices to be connected.
For information on installing onboard SCSI under Windows NT, refer to
pages 3-6 and 3-7 in the FAQ section of this manual.
Page 40

SUPER P6DBS/P6DBE/P6DBU/P6SBU/P6SBS/P6SBA/P6SBM Manual
1-30
Notes
Page 41

Chapter 2: Installation
2-1
Chapter 2
Installation
2-1 Static-Sensitive Devices
Static-sensitive electrical discharge can damage electronic components. To
prevent damage to your system board, it is important to handle it very carefully.
The following measures are generally sufficient to protect your equipment from
static discharge.
Precautions
• Use a grounded wrist strap designed to prevent static discharge.
• Touch a grounded metal object before you remove the board from the antistatic
bag.
• Handle the board by its edges only; do not touch its components, peripheral
chips, memory modules or gold contacts.
• When handling chips or modules, avoid touching their pins.
• Put the system board and peripherals back into their antistatic bags when not
in use.
• For grounding purposes, be sure your computer system’s chassis provides
excellent conductivity between its power supply, the case, the mounting fasteners and the system board.
Unpacking
The system board is shipped in antistatic packaging to avoid static damage.
When unpacking the board, be sure the person handling the board is staticprotected.
2-2 Pentium III/II Processor Installation
1. Check the Intel-boxed processor kit for the following items: the processor
with the fan/heat sink attached, two black plastic pegs, two black plastic
supports and one power cable.
When handling a Pentium III/II processor, avoid placing
direct pressure on the label area of the fan.
!
Page 42
2-2
SUPER P6DBS/P6DBE/P6DBU/P6SBU/P6SBS/P6SBA/P6SBM Manual
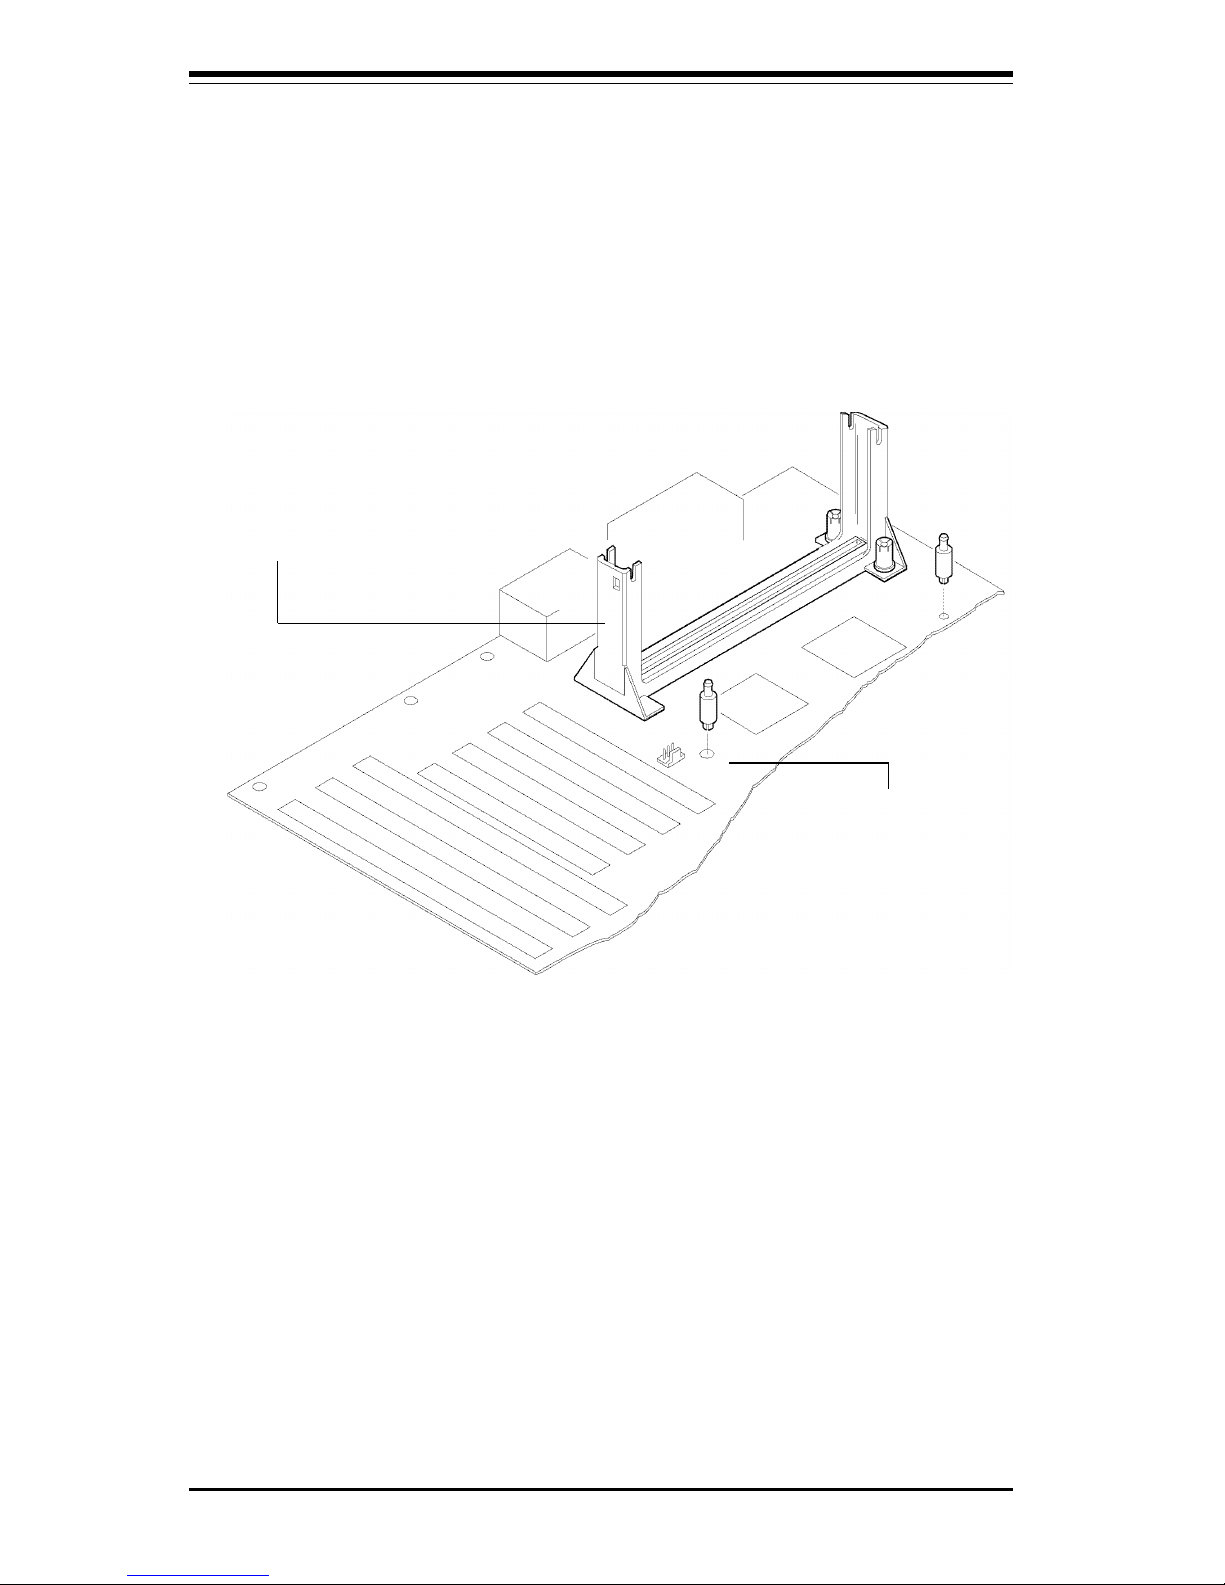
2. Install the retention mechanism attach mount under the motherboard. Do
this before mounting the motherboard in the chassis. Do not screw it in too
tight. Mount the two black plastic pegs onto the motherboard (Figure 2-1).
These pegs will be used to attach the fan/heat sink supports. Note that one
hole and the base of one peg are larger than the other hole and peg base.
Push each peg into its hole firmly until you hear it "click" into place.
Figure 2-1. Mounting the Pegs
Retention
Mechanism
Large peg and hole
3. Slide a black plastic support onto each end of the fan/heat sink making
sure that the hole and clip are on the outside edge of the support. If the
supports are reversed, the holes will not line up with the pegs on the
motherboard. Slide each support toward the center of the processor until
the support is seated in the outside groove in the fan housing.
4. Slide the clip (A) on each support toward the processor, exposing the
hole that will fit over the peg on the motherboard. Push the latches (B) on
the processor toward the center of the processor until they click into place.
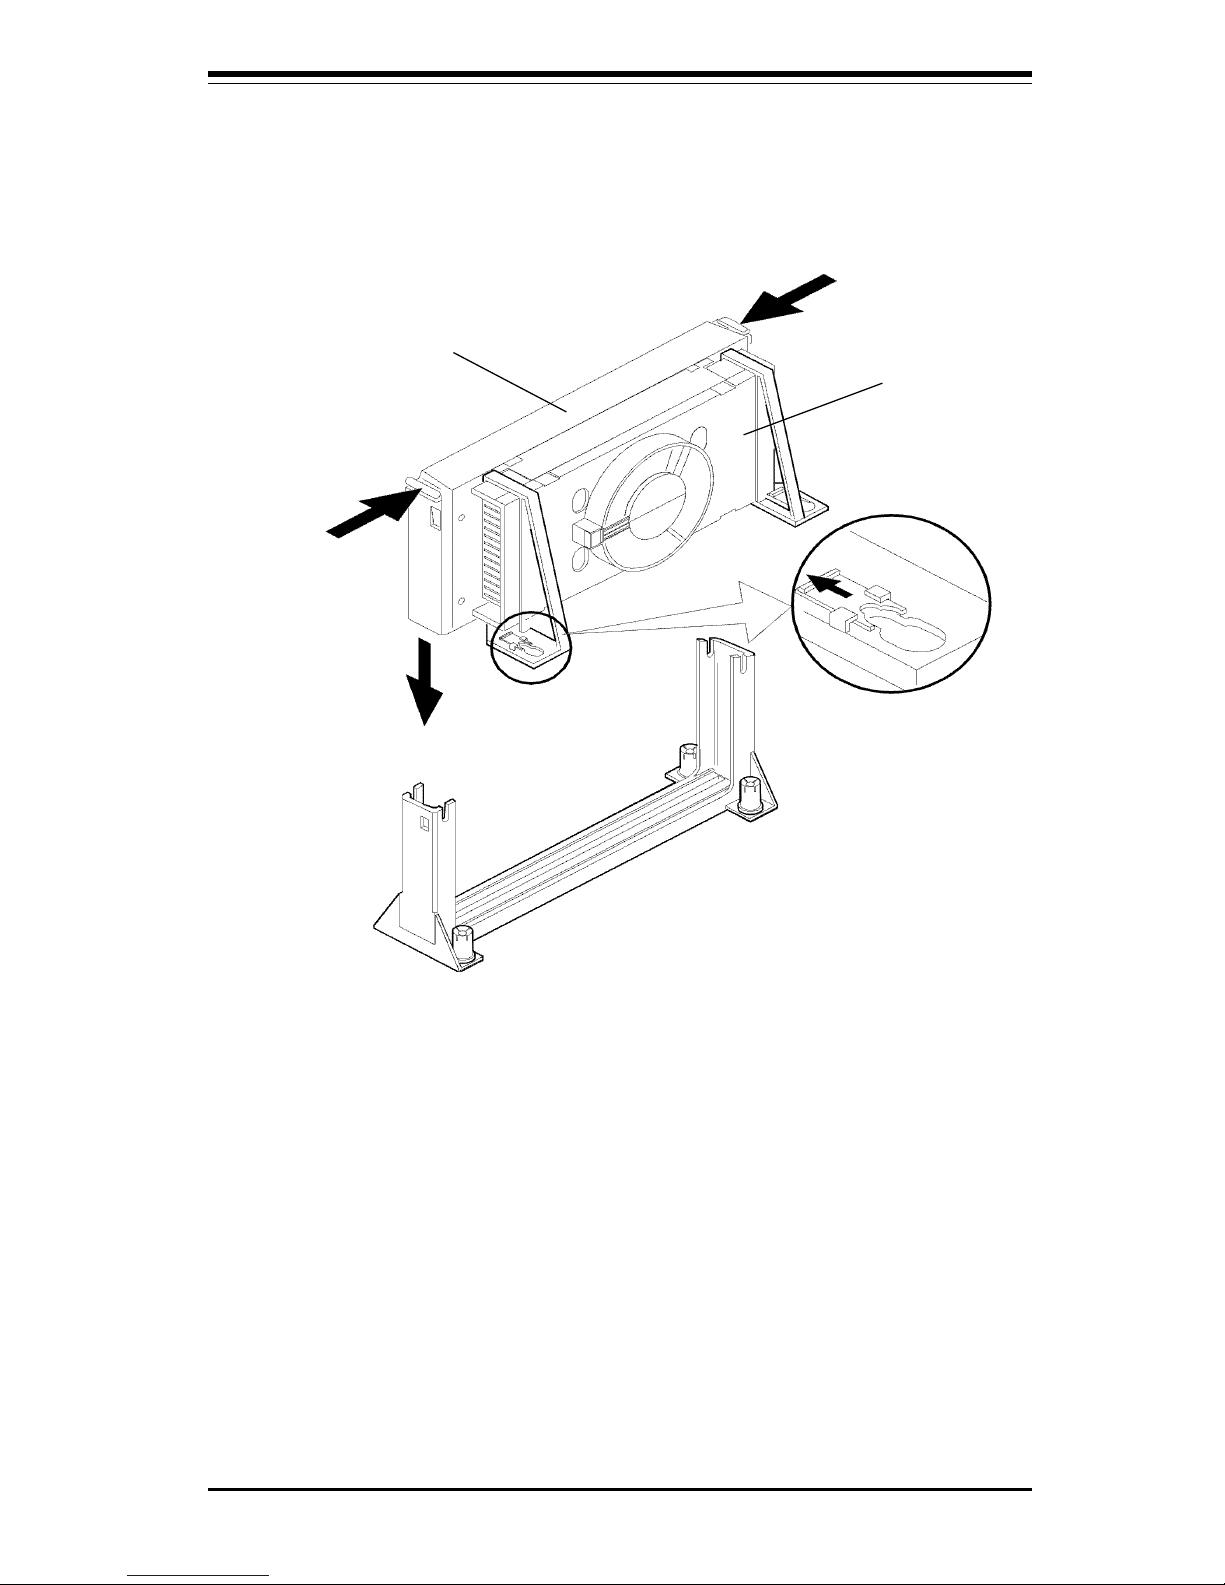
5. Hold the processor so that the fan shroud is facing toward the pegs on
the motherboard. Slide the processor (C in Figure 2-2) into the retention
mechanism and slide the supports onto the pegs. Ensure that the pegs on
the motherboard slide into the holes in the heat sink support and that the
Page 43
Chapter 2: Installation
2-3
alignment notch in the SECC cartridge fits over the plug in Slot 1. Push the
processor down firmly, with even pressure on both sides of the top, until it
is seated.
Figure 2-2. Retention Mechanism
Top of Processor
B
C
A
Do not screw in too tight!
6. Slide the clips on the supports (A) forward until they click into place to hold
the pegs securely. Apply slight pressure on the peg and push the peg toward
the clip while pushing the clip forward. Push the latches on the processor (B)
outward until they click into place in the retention mechanism. The latches must
be secured for the proper electrical connection of the processor.
Heat Sink
Note: New Pentium III 600E/600EB MHz and faster processors use the
0.18µm process and have a lower CPU core voltage. (“B” is to differenti-
ate 133 MHz front side bus processors from 100 MHz front side bus
processors of the same speed. “E” is to differentiate 0.18-micron from
0.25-micron processors of the same speed.)
Page 44
2-4
SUPER P6DBS/P6DBE/P6DBU/P6SBU/P6SBS/P6SBA/P6SBM Manual
B
C
A
When removing the Pentium III/II processor, avoid pressing down on the motherboard or components. Instead,
press down on the plastic connectors.
!
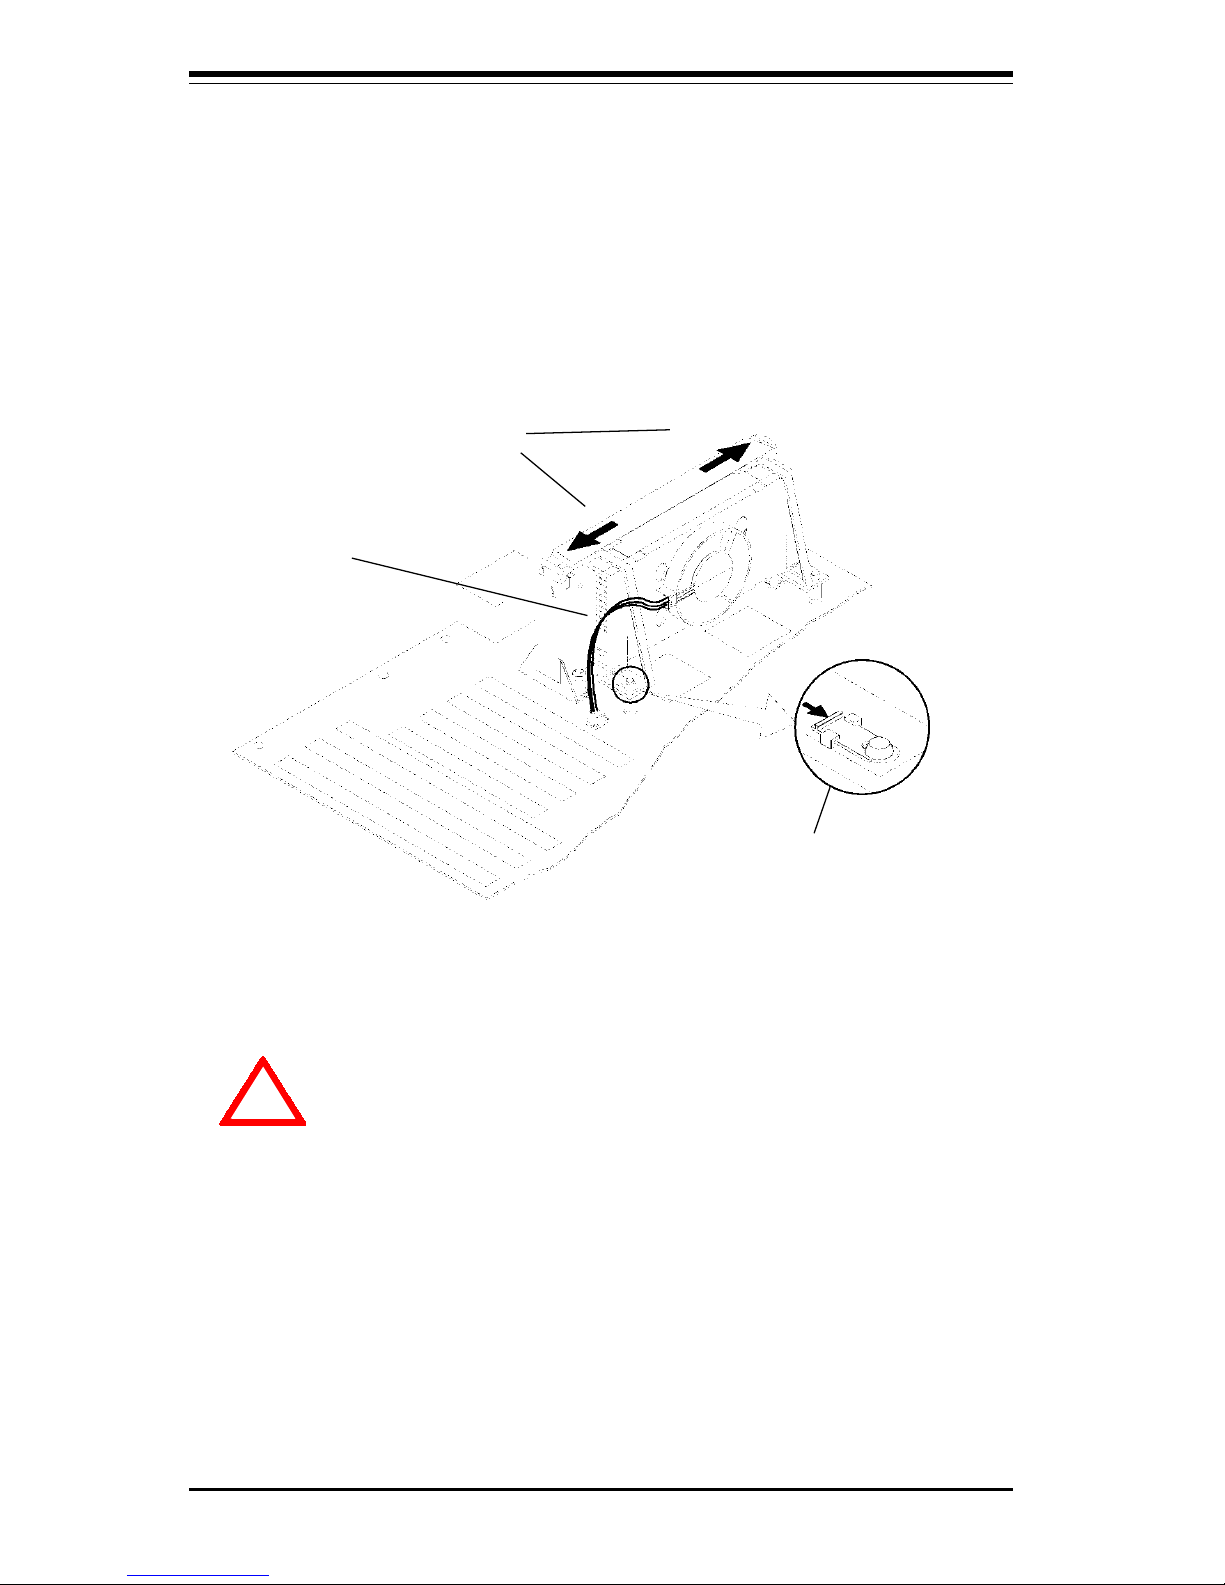
Figure 2-3. Attaching the Fan Power Cable
7. Attach the small end of the power cable (C in Figure 2-3) to the three-pin
connector on the processor, then attach the large end to the three-pin connector
on the motherboard.
Page 45

Chapter 2: Installation
2-5
2-3 Installation of the Universal Retention
Mechanism (URM)*
Please Note! Screws and washers attach from the bottom of the
board and must be installed before mounting the board to the
chassis. (See Figures 2-4 and 2-5.)
1. When installing the URM, be sure the
Left
(L) and
Right
(R) sides are
placed accordingly.**
2. Lift both arms upright and slide the processor into the socket, noting that
the notches need to line up.
*These directions may not apply to second source URMs
** Newer URMs are not left/right specific. Also, caps are only needed for SECC2 cartridges.
2-4 Special Instructions for the Celeron Processor
Please Note! The Celeron processor requires special caps to hold
it in place (these caps are bundled with the motherboard). (See
Figures 2-4 and 2-5.)
1. Lift both URM arms to their upright positions.
2. Slide the Celeron processor into the socket making sure that the
notches line up.
3. Slide the special Celeron caps over the ends of the retention arms.
Make sure the arrows face outward and that the
Left
(L) and
Right
(R)
caps are on the appropriate sides of the URM. The caps should snap
into place.
4. To remove the caps, pull out on the tab (arrows points to tab) and
then pull up.
Page 46
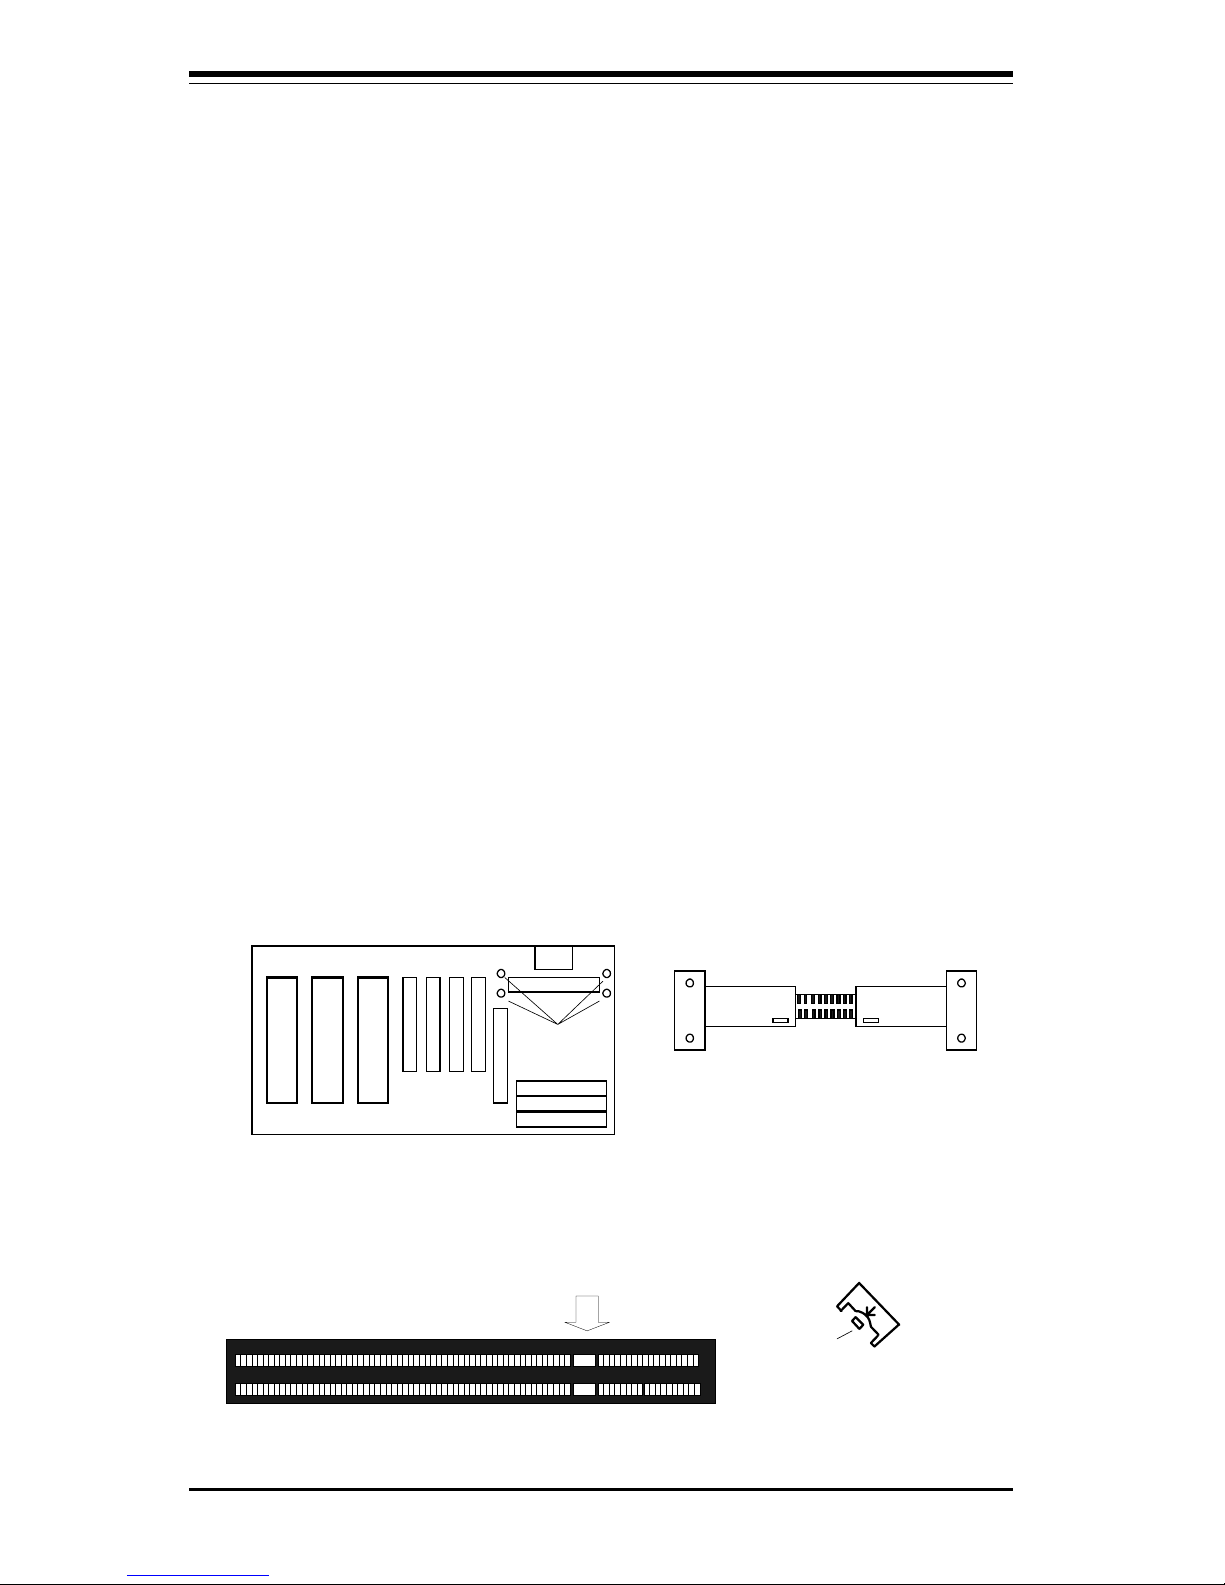
2-6
SUPER P6DBS/P6DBE/P6DBU/P6SBU/P6SBS/P6SBA/P6SBM Manual
Top view of Celeron cap
R
Tab
Note notch in socket
Screw holes for
retention
mechanism
Supero
LR
R
L
URM with arms folded
Note: Left and Ri
g
ht arms are defined
Figure 2-5. URM and Celeron Installation
Figure 2-4. Installing a Celeron Processor
Page 47
Chapter 2: Installation
2-7
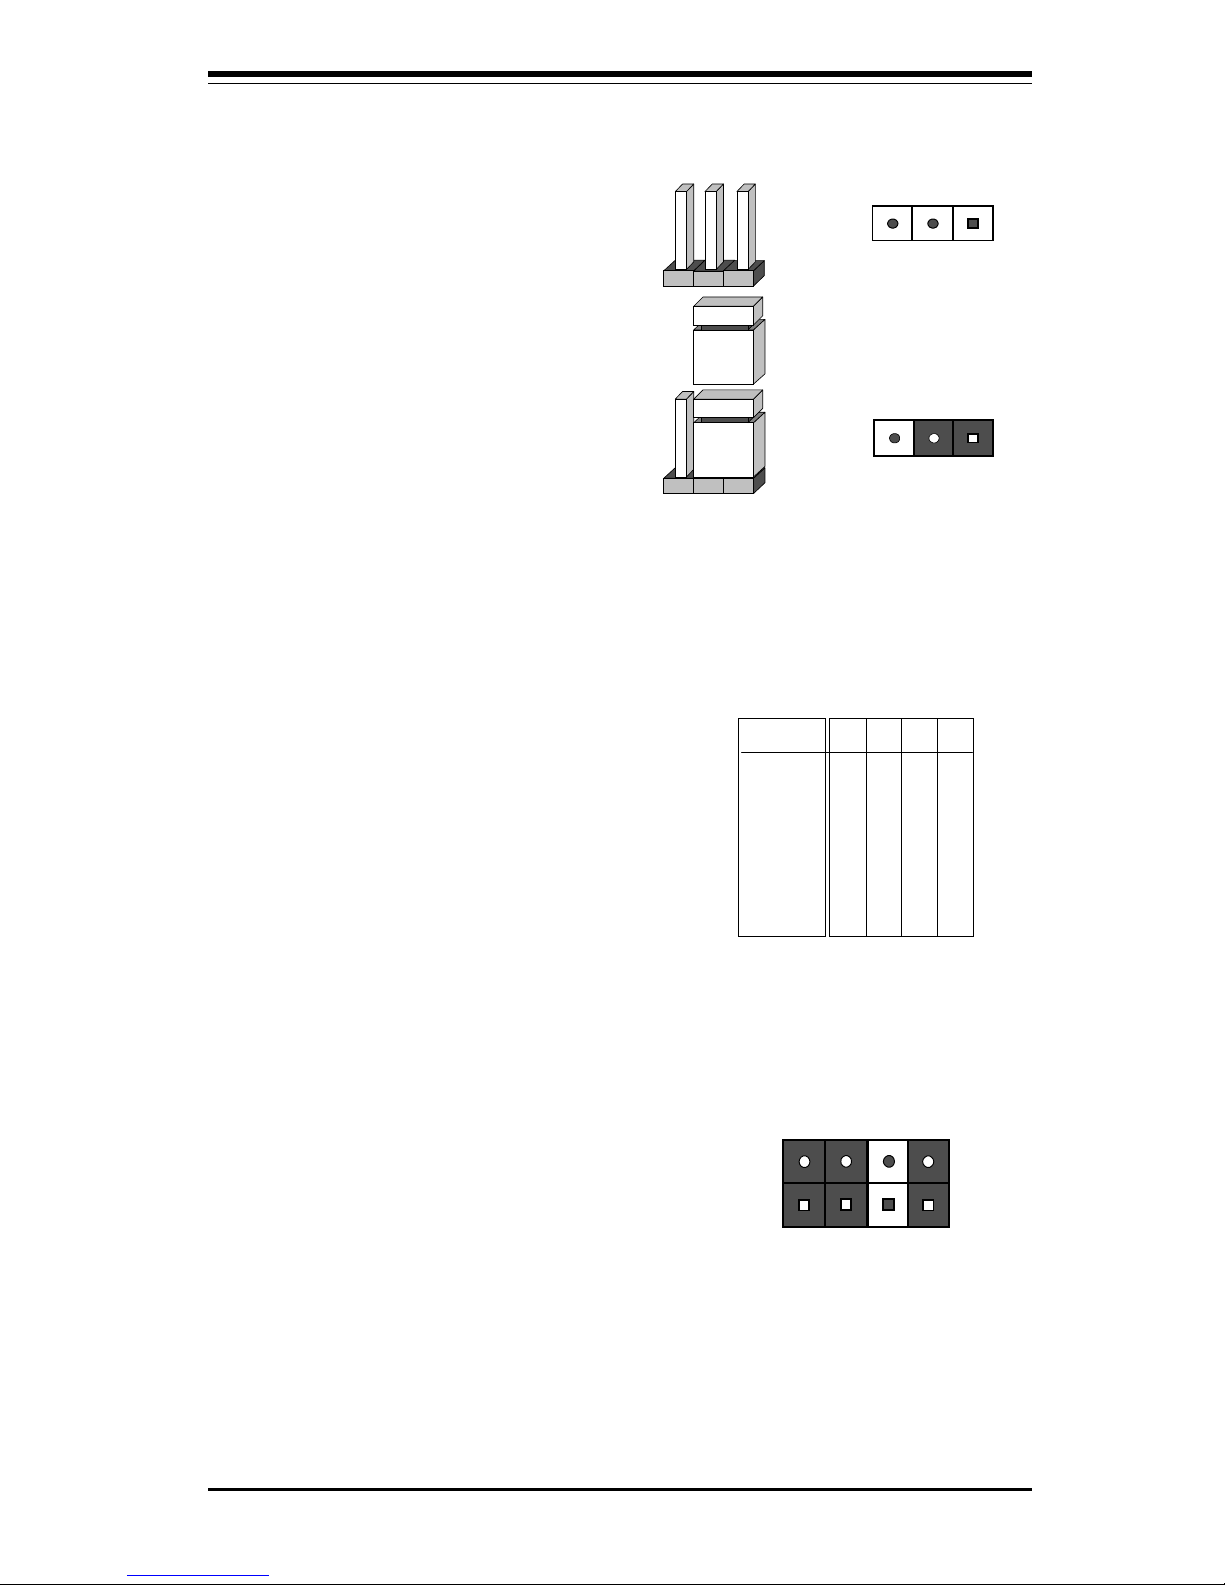
2-5 Explanation and
Diagram of Jumper/
Connector
To modify the operation of the
motherboard, jumpers can be used
to choose between optional settings. Jumpers create shorts between two pins to change the
function of the connector. Pin 1 is
identified with a square.
2-6 Changing the CPU
Speed
To change the CPU speed for a
Pentium III/II processor, change the
jumpers shown in Table 2-1. The
example on the right will show you
which CPU Core/Bus Ratio to use.
The general rule is to divide the
CPU speed by the bus speed (100
MHz in this example). If you have
a 400 MHz CPU, dividing it by 100
will give you a CPU Core/BUS Ratio of 4.0. After determining the
CPU Core/Bus Ratio, refer to Table
2-1 for the correct settings of JB1,
JB2, JB3 and JB4.
3 2 1
Connector
Pins
Jumper
Cap
Setting
Pin 1-2 short
400 MHz = 100 MHz x 4.0
CPU Speed = Bus Freq. x Ratio
Example of 4.0
CPU Core/Bus Ratio
JB1 JB2 JB3 JB4
ON ON OFF ON
CPU Core/
Bus Ratio
3.0
3.5
4.0
4.5
5.0
5.5
6.0
6.5
7.0
7.5
8.0
JB1
ON
OFF
ON
OFF
ON
OFF
ON
OFF
ON
OFF
ON
JB2
OFF
OFF
ON
ON
OFF
OFF
ON
ON
OFF
OFF
ON
JB3
ON
ON
OFF
OFF
OFF
OFF
ON
ON
ON
ON
OFF
JB4
ON
ON
ON
ON
ON
ON
OFF
OFF
OFF
OFF
OFF
Table 2-1
CPU Core/Bus Ratio Selection
Page 48

2-8
SUPER P6DBS/P6DBE/P6DBU/P6SBU/P6SBS/P6SBA/P6SBM Manual
2-7 Mounting the Motherboard in the Chassis
All the motherboards have standard mounting holes to fit different types of chassis. Chassis may come with a variety of mounting fasteners made of metal or
plastic. Although a chassis may have both metal and plastic fasteners, metal
fasteners are the most highly recommended because they ground the system
board to the chassis. Therefore, use as many metal fasteners as possible for
better grounding.
2-8 Connecting Cables
Power Supply Connector
After you have securely mounted
the motherboard to the chassis,
you are ready to connect the
cables. See page 1-27 for
power supply requirements.
Attach the ATX power supply
cables to J32. See Table 2-2 for
the pin definitions of an ATX
power supply.
Table 2-2
ATX Power Supply Connector
Pin Definitions for J32
Pin Number Definition
1 3.3V
2 3.3V3
3 Ground
4 5V
5 Ground
6 5V
7 Ground
8 PW-OK
9 5VSB
10 12V
Pin Number Definition
11 3.3V
12 -12V
13 Ground
14 PS - ON
15 Ground
16 Ground
17 Ground
18 -5 V
19 5 V
20 5 V
Infrared Connector
The infrared connector is located on
pins 1-5 of JF2. See Table 2-4 for pin
definitions.
Table 2-3
Secondary Power Connector
Pin Definitions for J36
Pin
Number Definition
1 Ground
2 Ground
3 Ground
4 +3.3V
5 +3.3V
6 +5V (keyed)
Secondary Power Connector
The Secondary Power Connector
is recommended when a heavy
load of peripherals has been
connected to the motherboard.
Note: Be sure to use a 1 X 6 pin connector
and check the power supply layout before
attaching it.
The Secondary Power
Connector is located on J36.
See Table 2-3 for pin definitions.
Pin
Number
1
2
3
4
5
Definition
+5V
Key
IRRX
Ground
IRTX
Table 2-4
Infrared Pin
Definitions
for JF2
Page 49

Chapter 2: Installation
2-9
PW_ON Connector
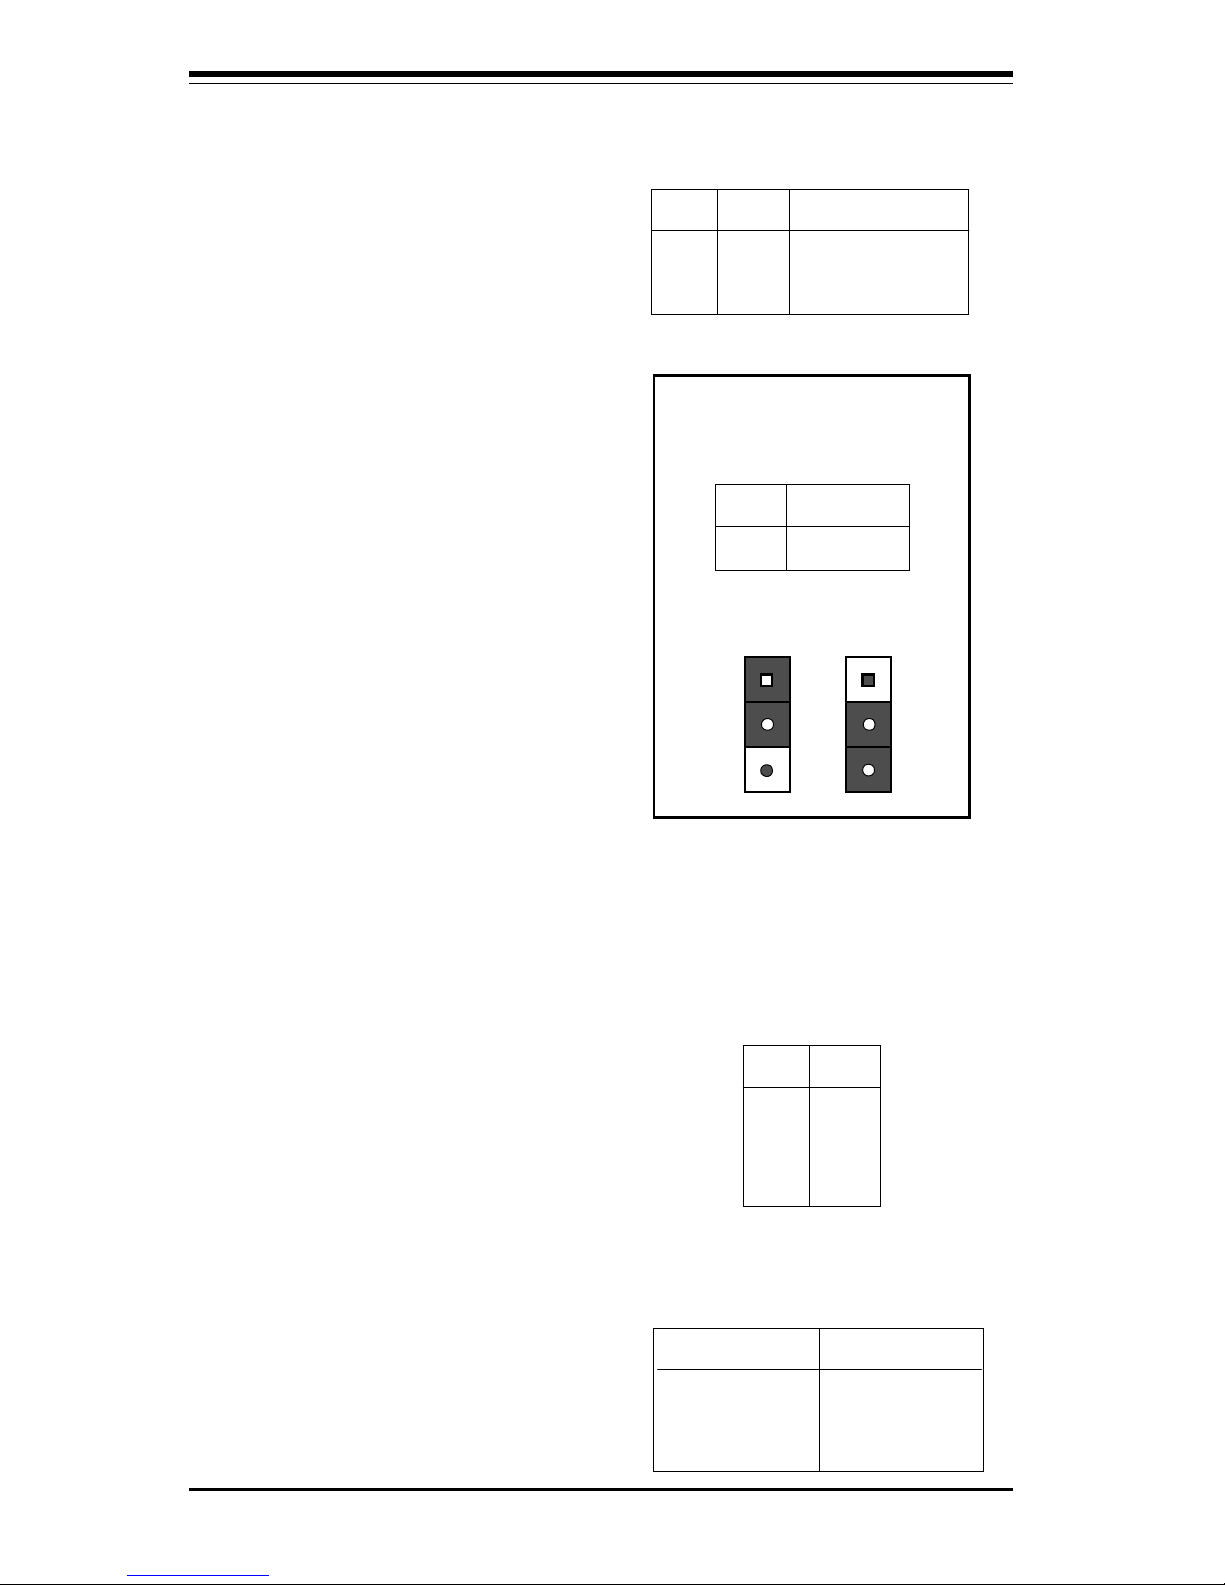
The PW_ON connector is located on
pins 9 and 10 of JF2. Momentarily
contacting both pins will power on/off
the system. The user can also configure this button to function as a
suspend button. (See the Power
Button Function in BIOS on page 5-
13.) To turn off the power when set
to suspend mode, hold down the
power button for at least 4 seconds.
See Table 2-5 for pin definitions.
Reset Connector
The reset connector is located on
pins 12 and 13 of JF2. This connector attaches to the hardware reset
switch on the computer case. See
Table 2-6 for pin definitions.
Pin
Number
9
10
Definition
PW_ON
Ground
Table 2-5
PW_ON Connector
Pin Definitions
for JF2
Table 2-7
Hard Drive LED Pin
Definitions
for JF1
Pin
Number
1
2
3
4
Definition
+5V
HD Active
HD Active
+5V
Pin
Number
12
13
Definition
Ground
Reset
Table 2-6
Reset Pin
Definitions
for JF2
Hard Drive LED
The hard drive LED is located on pins
1 to 4 of JF1. Attach the hard drive
LED cable to pins 1 and 2. See
Table 2-7 for pin definitions.
Keylock/Power LED
Connector
The keylock/power LED connector is
located on pins 5 to 9 of JF1. See
Table 2-8 for pin definitions. Pins 5
through 7 are for the power LED.
Pins 8 and 9 are for the keylock.
Note: SMC type I/O controllers do
not support the keylock function.
Pin
Number
5
6
7
8
9
Function
VCC +5V
VCC +5V
Ground
Ground
Table 2-8
Keylock/Power LED Pin Definition
for JF1
Definition
Red wire, LED power
Red wire, LED power
LED control
Keyboard inhibit
Black wire
Page 50
2-10
SUPER P6DBS/P6DBE/P6DBU/P6SBU/P6SBS/P6SBA/P6SBM Manual
Jumper
Position
1-2
2-3
Definition
PIIX4E Ctrl
Save PD State
Table 2-10
Power Save State Select
Pin Definitions
for JP20
Position
1-2
Position
2-3
PIIX4E Ctrl
Save PD State
Table 2-9
Speaker Connector Pin Definitions for
JF1
Pin
Number
10
11
12
13
Function
+
Key
Definition
Red wire, Speaker data
No connection
Key
Speaker data
Speaker Connector
The speaker connector is located on
pins 10 to 13 of JF1. See Table 2-9
for pin definitions.
Power Save State Select
Refer to Table 2-10 to set JP20. The
Power Save State Select is used
when you want the system to remain
in the power-off state when you first
apply power to the system or when
the system recovers from an AC
power failure. In this state, the
power will not come on unless you
hit the power switch on the motherboard. PIIX4E control is used if you
want the system to be in the poweron state the first time you apply
power to the system or when the
system recovers from an AC power
failure.
Table 2-11
ATX PS/2
Keyboard
and PS/2 Mouse
Pin Definitions
for J34
Pin
Number
1
2
3
4
5
6
Definition
Data
NC
Ground
VCC
Clock
NC
Table 2-12
Universal Serial Bus Pin Definitions
Pin
Number Definition
1 +5V
2 P0 3 P0+
4 Ground
5 N/A
Pin
Number Definition
1 +5V
2 P0 3 P0+
4 Ground
5 Key
J17
J18
ATX PS/2 Keyboard and
PS/2 Mouse Ports
The ATX PS/2 keyboard and the
PS/2 mouse are located on J34.
See Table 2-11 for pin definitions.
(PS/2 Keyboard: J35 bottom, PS/2
Mouse: J35 top)
Universal Serial Bus
The two Universal Serial Bus connectors are located on J17 and
J18. See Table 2-12 for pin definitions.
Page 51
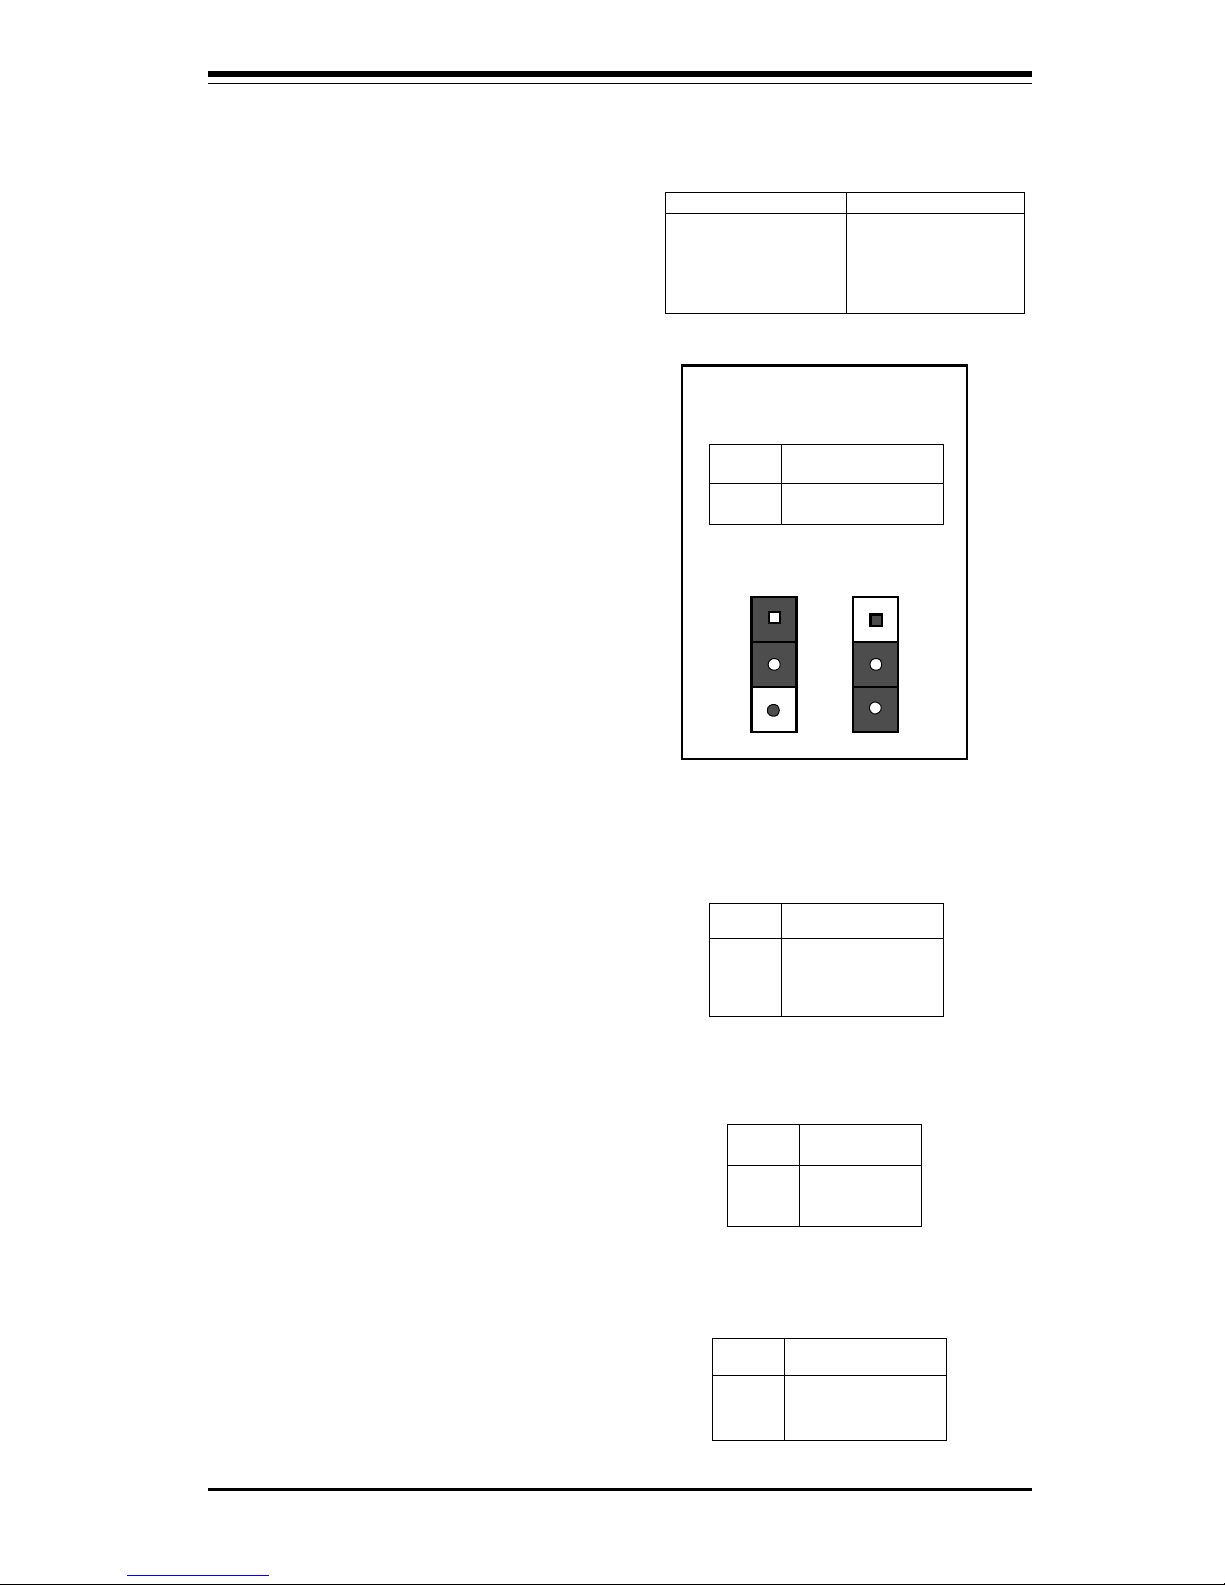
Chapter 2: Installation
2-11
Table 2-13
ATX Serial Port Pin Definitions
Pin Number Definition
1 D CD
2 DS R
3 Serial In
4 R T S
5 Serial Out
Pin Number Definition
6 C T S
7 DT R
8 RI
9 Ground
10 N C
J20
J21
Table 2-14
CMOS Clear Pin Definitions
for JBT1
Jumper
Position
1-2
2-3
Definition
Normal
CMOS Clear
Position
1-2
Position
2-3
Normal
CMOS Clear
Table 2-17
Fan Connector Pin Definitions
for JT1, JT2, JT3
Pin
Number
1
2
3
Definition
Ground (black)
+12V (red)
Tachometer
* Caution: These fan connectors
are DC direct.
Pin
Number
1
2
3
4
Definition
+3V
NC
NC
Ground
Table 2-15
External Battery Pin
Definitions
for JBT2
CMOS Clear
Refer to Table 2-14 for instructions
on how to clear CMOS. For an ATX
power supply, you must completely shut down the system,
then use JBT1 to clear CMOS. Do
not use the PW_ON connector to
clear CMOS. A second way of resetting the CMOS contents is by
pressing the <Ins> key and then
turning on the system power. Release the key when the power comes
on.
ATX Serial Ports
ATX serial port COM1 is located
on J20 and serial port COM2 is
located on J21. See Table 2-13
for pin definitions.
External Battery
Connect an external battery to JBT2.
Refer to Table 2-15 for pin definitions. (Not on P6SBM.)
Pin
Number
1
2
3
Definition
+5V Standby
Ground
Wake-up
Table 2-16
Wake-On-LAN Pin
Definitions (WOL)
Wake-On-LAN
The Wake-On-LAN connector is located on WOL. Refer to Table 2-16
for pin definitions.
Fan Connectors*
The thermal/overheat fan is located
on JT3. The CPU fans are located on
JT1 and JT2. Refer to Table 2-17 for
pin definitions.
Page 52

2-12
SUPER P6DBS/P6DBE/P6DBU/P6SBU/P6SBS/P6SBA/P6SBM Manual
Chassis Intrusion
The Chassis Intrusion Detector is
located on JL1. See the board layouts in Chapter 1 and the PC Health
Monitor section (page 1-22) for
more information. See Table 2-18
for pin definitions.
Pin
Number
1
2
Definition
Intrusion Input
Ground
Table 2-18
Chassis Intrusion Pin
Definitions for JL1
Open = Default, Closed = Intrusion
PCI Audio
Drive
Connectors (P6SBM, OEM option on P6SBU)
Boards with PCI Audio
Drive
have additional input jacks and connectors installed.
Three inputs, for MIC, LINE IN and LINE OUT, can be found under the game port
header at J36. Four connectors for using Audio
Drive
are located behind the
game port. These provide connections for mono sound, both large and small CD
audio player connectors (use the one that matches the size of your connector)
and an MPEG connector for use with a DVD decoder card. See the motherboard
layout on page 1-17 for locations.
SLED (SCSI LED) Indicator
The SLED connector is used to provide an LED indication of SCSI activity. Refer to Table 2-19 for connecting the SCSI LED.
Pin
Number
1
2
3
4
Definition
Positive
Negative
Negative
Positive
Table 2-19
SLED Pin Definitions
JPWAKE (P6SBM only)
The JPWAKE jumper is used in conjunction with the Keyboard Wake-Up
function in BIOS (see page 5-19).
Enable both the jumper and the
BIOS setting to allow the system to
be woken up by depressing a key on
the keyboard. See Table 2-20 for
jumper settings.
Jumper
Position
1-2
2-3
Definition
Disabled
Enabled
Table 2-20
JPWAKE Pin Definitions
Page 53
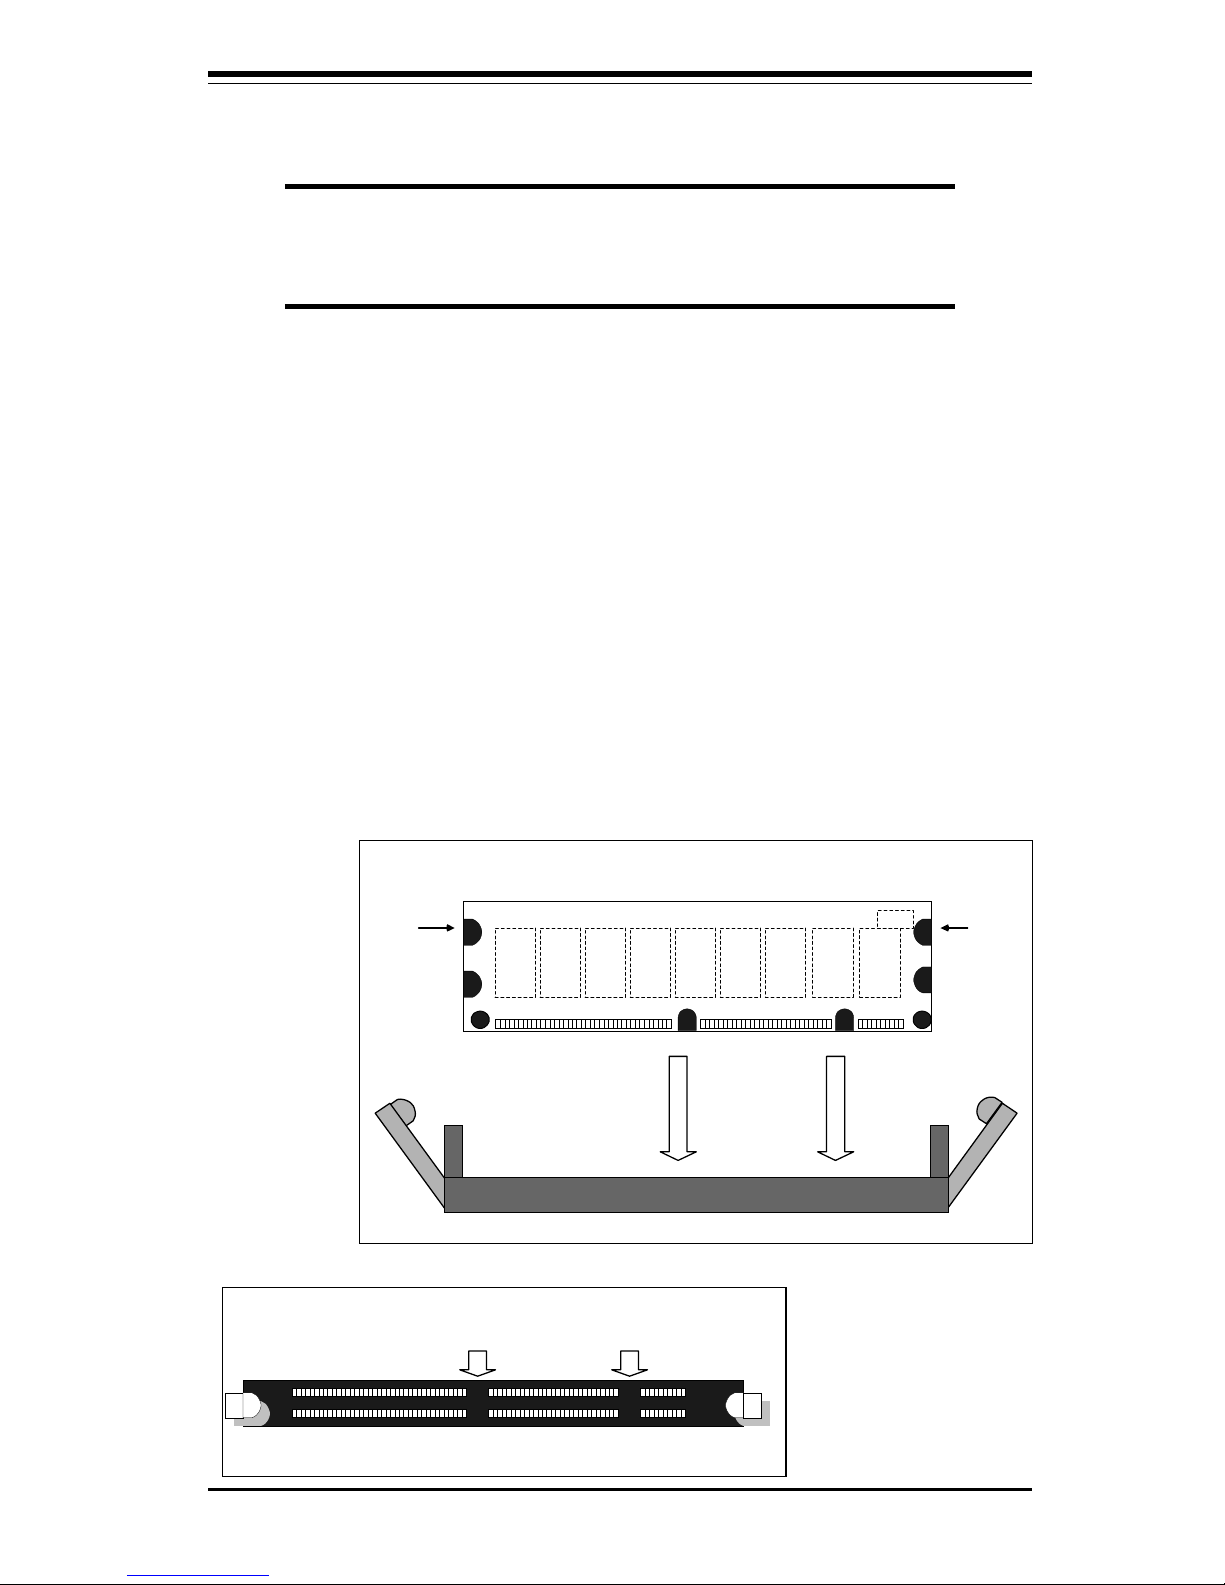
Chapter 2: Installation
2-13
Top View of DIMM Slot
Figure 2-6. DIMM Installation
To Install:
Insert
vertically,
press down
until it snaps
into place.
Pay attention
to the two
notches.
Note: Notches
should align
with the
receptive points
on the slot
DIMM Slot
Side View of DIMM Installation into Slot
DIMM
PC100
Notches
PC100
Notches
2-9 Installing DIMMs
CAUTION
Exercise extreme care when installing or removing the DIMM
modules to prevent any possible damage.
DIMM Installation (See Figure 2-6)
1. Insert DIMMs in Bank 0 through Bank 3 as required for the desired system
memory.
2. Insert each DIMM module vertically into its slot. Pay attention to the
two notches along the bottom of the module to prevent inserting the
DIMM incorrectly.
3. Gently press the DIMM module until it snaps upright into place in the
slot.
4. For best results, install DIMMs starting from Bank 0 (the DIMM slot
farthest from the BX chip).
To Remove:
Use your thumbs to
gently push near
the edge of both
ends of the module.
This should release
it from the slot.
Page 54

2-14
SUPER P6DBS/P6DBE/P6DBU/P6SBU/P6SBS/P6SBA/P6SBM Manual
2-10 Connecting Parallel Port, Floppy and Hard Disk
Drives
Use the following information to connect the floppy and hard disk drive cables.
• The floppy disk drive cable has seven twisted wires.
• A red mark on a wire typically designates the location of pin 1.
• A single floppy disk drive ribbon cable has 34 wires and two connectors to
provide for two floppy disk drives. The connector with twisted wires always
connects to drive A, and the connector that does not have twisted wires
always connects to drive B.
• An IDE hard disk drive requires a data ribbon cable with 40 wires, and a SCSI
hard disk drive requires a SCSI ribbon cable with 50 wires. A wide SCSI hard
disk drive requires a SCSI ribbon cable with 68 wires.
• A single IDE hard disk drive cable has two connectors to provide for two drives.
To select an IDE disk drive as C, you would normally set the drive select
jumper on the drive to DS1 (or Master). To select an IDE disk drive as D, you
would normally set the drive select jumper on the drive to DS2 (or Slave).
Consult the documentation that came with your disk drive for details on actual
jumper locations and settings.
• A single SCSI ribbon cable typically has three connectors to provide for two
hard disk drives and the SCSI adapter. (Note: most SCSI hard drives are
single-ended SCSI devices.) The SCSI ID is determined by jumpers or a
switch on the SCSI device. The last internal (and external) SCSI device
cabled to the SCSI adapter must be terminated.
Page 55

Chapter 2: Installation
2-15
IDE Connectors
There are no jumpers to configure the onboard IDE connectors
J15 and J16. Refer to Table 223 for pin definitions.
Pin Number Function
1 Reset IDE
3 Host Data 7
5 Host Data 6
7 Host Data 5
9 Host Data 4
11 Host Data 3
13 Host Data 2
15 Host Data 1
17 Host Data 0
19 GN D
21 DRQ3
23 I/O Write 25 I/O Read 27 IOCHRDY
29 DACK3 31 IRQ14
33 Addr 1
35 Addr 0
37 Chip Select 0
39 Activity
Pin Number Function
2 GND
4 Host Data 8
6 Host Data 9
8 Host Data 10
10 Host Data 11
12 Host Data 12
14 Host Data 13
16 Host Data 14
18 Host Data 15
20 K ey
22 GN D
24 GN D
26 GN D
28 BALE
30 GN D
32 IOCS16 34 GN D
36 Addr 2
38 Chip Select 1 40 GN D
Table 2-23
IDE Connector Pin Definitions
Pin Number Function
1 Strobe 3 Data Bit 0
5 Data Bit 1
7 Data Bit 2
9 Data Bit 3
11 Data Bit 4
13 Data Bit 5
15 Data Bit 6
17 Data Bit 7
19 A CK
21 BUSY
23 PE
25 SLCT
Pin Number Function
2 Auto Feed 4 Error 6 Init 8 SLCT IN 10 G N D
12 G N D
14 G N D
16 G N D
18 G N D
20 G N D
22 G N D
24 G N D
26 NC
Table 2-21
Parallel Port Pin Definitions for Connector J19
Parallel Port Connector
The parallel port is located on J19.
See Table 2-21 for pin definitions.
Pin Number Function
1 G N D
3 G N D
5 K ey
7 G N D
9 G N D
11 GN D
13 GN D
15 GN D
17 GN D
19 GN D
21 GN D
23 GN D
25 GN D
27 GN D
29 GN D
31 GN D
33 GN D
Pin Number Function
2 FDHDIN
4 Reserved
6 FDEDIN
8 Index 10 Motor Enable
12 Drive Select B 14 Drive Select A 16 Motor Enable
18 DIR 20 STEP 22 Write Data 24 Write Gate 26 Track 00 28 Write Protect 30 Read Data 32 Side 1 Select 34 Diskette
Table 2-22
Floppy Connector Pin Definitions for J22
Floppy Connector
The floppy connector is located on
J22. See Table 2-22 for pin definitions.
Page 56

2-16
SUPER P6DBS/P6DBE/P6DBU/P6SBU/P6SBS/P6SBA/P6SBM Manual
Pin Number Function
1 G N D
2 G N D
3 G N D
4 G N D
5 G N D
6 G N D
7 G N D
8 G N D
9 G N D
10 GN D
11 GN D
12 GN D
13 GN D
14 GN D
15 GN D
16 GN D
17 Termpwrd
18 Termpwrd
19 GN D
20 GN D
21 GN D
22 GN D
23 GN D
24 GN D
25 GN D
26 GN D
27 GN D
28 GN D
29 GN D
30 GN D
31 GN D
32 GN D
33 GN D
34 GN D
Pin Number Function
35 -DB (12)
36 -DB (13)
37 -DB (14)
38 -DB (15)
39 Parity H
40 -DB (0)
41 -DB (1)
42 -DB (2)
43 -DB (3)
44 -DB (4)
45 -DB (5)
46 -DB (6)
47 -DB (7)
48 Parity L
49 G N D
50 Termpwrd
51 Termpwrd
52 Termpwrd
53 N C
54 G N D
55 -A TT N
56 G N D
57 -BSY
58 -ACK
59 -RST
60 -MSG
61 -SEL
62 - C D
63 -REQ
64 -IO
65 -DB (8)
66 -DB (9)
67 -DB (10)
68 -DB (11)
Table 2-24
68-pin Single End SCSI Connector Pin
Pin Number Function
1 G N D
2 G N D
3 G N D
4 G N D
5 G N D
6 G N D
7 G N D
8 G N D
9 G N D
10 GN D
11 GN D
12 Reserved
13 Open
14 Reserved
15 GN D
16 GN D
17 GN D
18 GN D
19 GN D
20 GN D
21 GN D
22 GN D
23 GN D
24 GN D
25 GN D
Table 2-25
50-pin Wide SCSI Connector Pin Definitions
Pin Number Function
26 -DB (0)
27 -DB (1)
28 -DB (2)
29 -DB (3)
30 -DB (4)
31 -DB (5)
32 -DB (6)
33 -DB (7)
34 -DB (P)
35 G N D
36 G N D
37 Reserved
38 Termpwr
39 Reserved
40 G N D
41 -ATN
42 G N D
43 -BSY
44 -ACK
45 -RST
46 -MSG
47 -SEL
48 -C/D
49 -REQ
50 -I/O
SCSI Connectors
There are no jumpers to configure
the onboard Single End SCSI interface. Refer to Table 2-24 for pin definitions. Refer to Table 2-25 for the
Wide SCSI pin definitions.
Page 57

Chapter 2: Installation
2-17
Ultra II LVD SCSI
68-Pin Connector
Refer to Table 2-26 for
the Ultra II LVD SCSI
pin definitions.
Signal Names
+DB(12)
+DB(13)
+DB(14)
+DB(15)
+DB(P1)
+DB(0)
+DB(1)
+DB(2)
+DB(3)
+DB(4)
+DB(5)
+DB(6)
+DB(7)
+DB(P)
GROUND
DIFFSENS
TERMPWR
TERMPWR
RESERVED
GROUND
+ATN
GROUND
+BSY
+ACK
+RST
+MSG
+SEL
+C/D
+REQ
+I/O
+DB(8)
+DB(9)
+DB(10)
+DB(11)
Connector
Contact
Number
1
2
3
4
5
6
7
8
9
10
11
12
13
14
15
16
17
18
19
20
21
22
23
24
25
26
27
28
29
30
31
32
33
34
Signal Names
-DB(12)
-DB(13)
-DB(14)
-DB(15)
-DB(P1)
-DB(0)
-DB(1)
-DB(2)
-DB(3)
-DB(4)
-DB(5)
-DB(6)
-DB(7)
-DB(P)
GROUND
GROUND
TERMPWR
TERMPWR
RESERVED
GROUND
-ATN
GROUND
-BSY
-ACK
-RST
-MSG
-SEL
-C/D
-REQ
-I/O
-DB(8)
-DB(9)
-DB(10)
-DB(11)
Connector
Contact
Number
35
36
37
38
39
40
41
42
43
44
45
46
47
48
49
50
51
52
53
54
55
56
57
58
59
60
61
62
63
64
65
66
67
68
Table 2-26
68-pin Ultra II LVD SCSI Connector
Page 58

2-18
SUPER P6DBS/P6DBE/P6DBU/P6SBU/P6SBS/P6SBA/P6SBM Manual
Pin #
1
2
3
4
5
6
7
8
9
10
11
12
13
14
15
16
17
18
19
20
21
22
23
24
25
26
27
28
29
30
31
32
33
Pin #
34
35
36
37
38
39
40
41
42
43
44
45
46
47
48
49
50
51
52
53
54
55
56
57
58
59
60
61
62
63
64
65
66
B
Spare
5.0V
5.0V
USB+
GND
INTB#
CLK
REQ#
VCC3.3
ST0
ST2
RBF#
GND
Spare
SBA0
VCC3.3
SBA2
SB_STB
GND
SBA4
SBA6
KEY
KEY
KEY
KEY
AD31
AD29
VCC3.3
AD27
AD25
GND
AD_STB1
AD23
A
12V
Spare
Reserved*
USBGND
INTA#
RST#
GNT#
VCC3.3
ST1
Reserved
PIPE#
GND
Spare
SBA1
VCC3.3
SBA3
Reserved
GND
SBA5
SBA7
KEY
KEY
KEY
KEY
AD30
AD28
VCC3.3
AD26
AD24
GND
Reserved
C/BE3#
B
Vddq3.3
AD21
AD19
GND
AD17
C/BE2#
Vddq3.3
IRDY#
GND
VCC3.3
DEVSEL#
Vddq3.3
PERR#
GND
SERR#
C/BE1#
Vddq3.3
AD14
AD12
GND
AD10
AD8
Vddq3.3
AD_STB0
AD7
GND
AD5
AD3
Vddq3.3
AD1
SMB0
A
Vddq3.3
AD22
AD20
GND
AD18
AD16
Vddq3.3
Frame#
GND
VCC3.3
TRDY#
STOP#
Spare
GND
PAR
AD15
Vddq3.3
AD13
AD11
GND
AD9
C/BE0#
Vddq3.3
Reserved
AD6
GND
AD4
AD2
Vddq3.3
AD0
SMB1
Table 2-27
AGP Port Pin Definitions for J8
AGP Port
There are no jumpers to
configure the AGP port J8.
Refer to Table 2-27 for pin
definitions.
Page 59
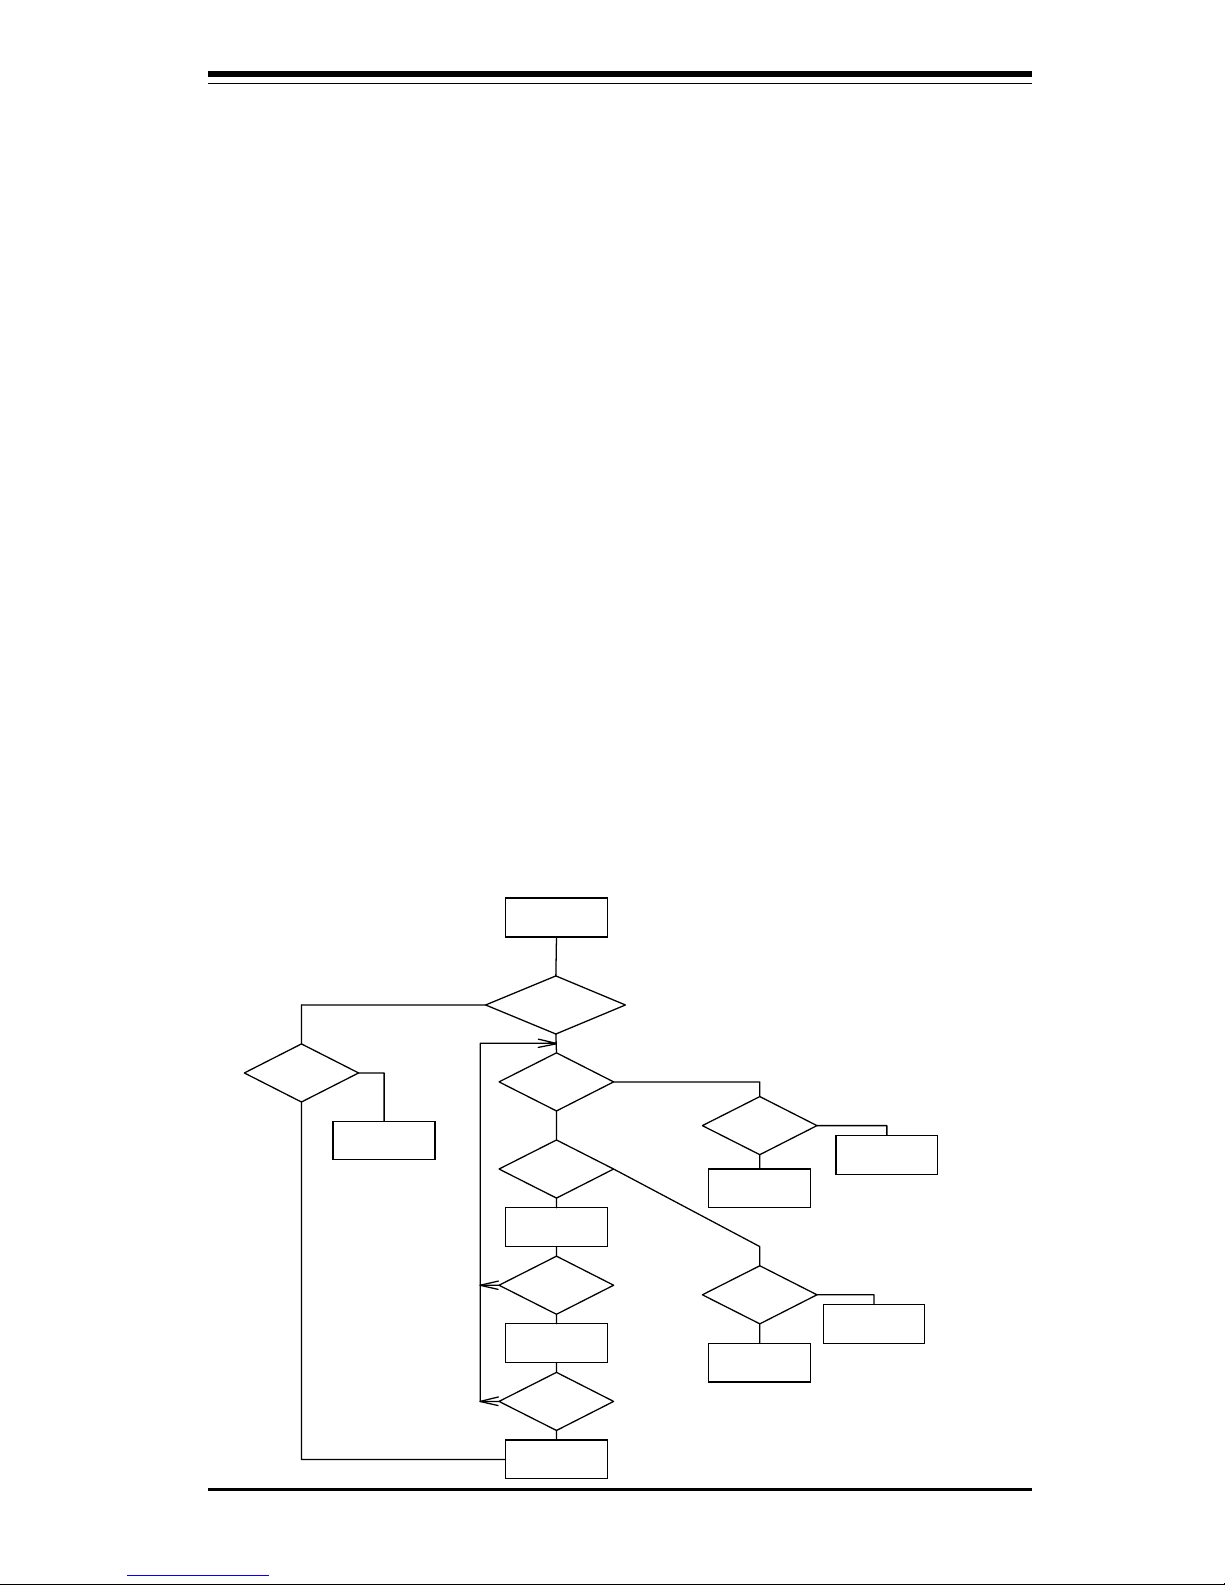
3-1
Chapter 3: Troubleshooting
Chapter 3
Troubleshooting
3-1 Troubleshooting Procedures
Use the following procedures and flowchart to troubleshoot your system.
If you have followed all of the procedures below and still need assistance,
refer to the ‘Technical Support Procedures’ and/or ‘Returning Merchandise
for Service’ section(s) in this chapter.
Before Power On
1. Make sure no short circuits exist between the motherboard and
chassis.
2. Disconnect all ribbon/wire cables from the motherboard.
3. Remove all add-on cards except the video/graphics card. (Be sure the
video/graphics card is inserted properly.)
4. Install a CPU and connect the chassis speaker and the power LED to
the motherboard. (Check all jumper settings as well.)
5. Install a memory module into Bank 0.
6. Check the power supply voltage monitor 115V/230V switch.
Power On
System Power
LED on?
System
Halts?
Speaker
Beeps?
Speaker
Beeps?
Number of
Beeps
Video
Display?
Power
Supply OK?
Speaker
Beeps?
Remove
Memory
Check CPU &
BIOS
Replace
Motherboard
Replace Power
Supply
Check BIOS
Settings &
Add-on Cards
Motherboard
Good
Memory
Problem:
Check Memory
Video Card
Problem
N
N
N
N
N
N
N
Y
Y
Y
Y
Y
6
8
Y
Y
See "Before Power On",
above, before proceedin
g
with these steps.
Figure 3-1. Troubleshooting Flowchart
Page 60

3-2
SUPER P6DBS/P6DBE/P6DBU/P6SBU/P6SBS/P6SBA/P6SBM Manual
No Power
1. Make sure that the default jumper is on and the CPU is correctly set
up.
2. Check the power supply voltage monitor. (Check the power supply
115V/230V switch.)
3. If the power is still not on, turn off the system power and move the
jumper setting on JP20 from 2-3 to 1-2.
4. Turn the power switch on and off to test the system.
5. If changing the jumper setting has not helped, clear CMOS.
No Video
Use the following steps for troubleshooting your system configuration.
1. If the power is on but you have no video, remove all the add-on cards and
cables.
2. Check for shorted connections, especially under the motherboard.
3. Check the jumpers settings, clock speed and voltage settings.
4. Use the speaker to determine if any beep codes exist. Refer to Appendix
A for details about beep codes.
NOTE
If you are a system integrator, VAR or OEM, a POST diagnostics
card is recommended. For port 80h codes, refer to Appendix B.
Memory Errors
If you encounter a memory error, follow the procedures below.
1. Check to determine if the DIMM modules are improperly installed.
2. Make sure that different types of DIMMs have not been installed in different
banks (e.g., a mixture of 2MB x 36 and 1 MB x 36 DIMMs in Bank 0).
3. Determine if different speeds of DIMMs have been installed and verify that
the BIOS setup is configured for the fastest speed of RAM used. It is
recommended to use the same RAM speed for all DIMMs in the system.
4. Check for bad DIMM modules or chips.
5. Try to install the minimum amount of memory first (a single bank).
Page 61

3-3
Chapter 3: Troubleshooting
Losing the System’s Setup Configuration
1. Check the setting of jumper JBT1. Ensure that you are using a high
quality power supply. A poor quality power supply may cause the
system to lose the CMOS setup information. Refer to page 1-27 for
details.
2. If the above step does not fix the Setup Configuration problem, contact
your vendor for repair.
3-2 Technical Support Procedures
1. Please go through the ‘Troubleshooting Procedures’ and 'Frequently Asked
Question' (FAQ) sections in this chapter of the manual or see our web site
FAQs (http://www.supermicro.com/TechSupport.htm) before contacting Technical Support.
2. Take note that as a motherboard manufacturer, SUPERMICRO does not
sell directly to end-users, so it is best to check with your distributor or
reseller for troubleshooting services. They should know of any possible problem(s) with the specific system configuration that was sold
to you.
3. BIOS upgrades can be downloaded from our web site at
http://www.supermicro.com/TECHSUPPORT/BIOS/bios.htm.
Note: Not all BIOS can be flashed depending on the modifications
to the boot block code.
4. If you still cannot resolve the problem, include the following information
when you e-mail SUPERMICRO for technical support:
•BIOS release date/version
•System board serial number
• Product model name
•Invoice number and date
•System configuration
Due to the volume of e-mail we receive and the time it takes to replicate
problems, a response to your question may not be immediately available.
Please understand that we do not have the resources to serve every enduser, however we will try our best to help all our customers.
5. Distributors: For immediate assistance, please have your account number
ready when placing a call to our technical support department.
Page 62

3-4
SUPER P6DBS/P6DBE/P6DBU/P6SBU/P6SBS/P6SBA/P6SBM Manual
3-3 Frequently Asked Questions
Question: I have a large IDE hard drive but it's only recognized as being
8 GB in size when I let the BIOS auto detect it. What's wrong?
Answer: The auto detect feature in WinBIOS only shows hard drives as having
a maximum capacity of 8 GB. This is a BIOS limitation, but will not impact your
system. If you go to the information status table, you will see that the correct
size of your hard disk drive has been recognized.
Question: What are the differences between the various memories that
the 440BX motherboard can support?
Answer: The 440BX integrates a main memory DRAM controller that sup-
ports a 64-bit or 72-bit (64 bit memory data plus 8 ECC bits.) DRAM from 8
MB to 512 MB for SDRAM and from 8 MB to 1 GB for EDO or registered
DIMM. The DRAM types supported are either Extended Data Out (EDO),
Synchronous DRAM (SDRAM) or Registered DIM modules.
*Note: EDO
DIMMs are not recommended for running at 100 MHz bus speed.
1. Mixing ECC and non-ECC memory will result in non-ECC operation.
EC/ECC is supported by the 440BX only if all the memory is 72 bits wide.
A system with a mixture of 64 and 72-bit wide memory will disable the
ECC mode.
2. EDO memory and SDRAM cannot be mixed.
3. Registered SDRAM and unbuffered SDRAM cannot be mixed.
4. Mixing PC/100 DIMMs with PC/66 DIMMs will result in an unexpected
memory count or system errors.
5. The user should populate the DIMMs starting with the DIMM slot located
farthest from the BX chip (U2 on P6DBS/P6DBE/P6SBS, U4 on P6DBU/
P6SBU or U9 on P6SBA).
6. If EDO memory is used, the CPU bus should be set to 66 MHz only.
Question: How do I update my BIOS?
Answer: It is recommended that you do not upgrade your BIOS if you are
experiencing no problems with your system. Updated BIOS files are located on
our web site at http://www.supermicro.com. Please check our BIOS warning
Page 63

3-5
Chapter 3: Troubleshooting
message and the info on how to update it on our web site. Also, check the
current BIOS revision and make sure it is newer than your BIOS before downloading. Select your motherboard model and download the BIOS file to your computer. Unzip the BIOS update file and you will find the readme.txt (flash instructions), the sm2flash.com (BIOS flash utility), and the BIOS image (xxxxxx.rom)
files. Copy these files onto a bootable floppy and reboot your system. It is not
necessary to set BIOS boot block protection jumpers on the motherboard. At the
DOS prompt, enter the command "sm2flash." This will start the flash utility and
give you an opportunity to save your current BIOS image. Flash the boot block
and enter the name of the update BIOS image file. NOTE: It is important to save
your current BIOS and rename it "super.rom" in case you need to recover from
a failed BIOS update. Select flash boot block, then enter the update BIOS image.
Select "Y" to start the BIOS flash procedure and do not disturb your system until
the flash utility displays that the procedure is complete. After updating your
BIOS, please clear the CMOS then load Optimal Values in the BIOS.
Question: After flashing the BIOS my system does not have video.
How can I correct this?
Answer: If the system does not have video after flashing your new BIOS,
it indicates that the flashing procedure failed. To remedy this, first clear
CMOS per the instructions in this manual and retry the BIOS flashing procedure. If you still do not have video, please use the following BIOS recovery
procedure. First, make sure the JPWAKE jumper is disabled (on P6SBM
only). Turn your system off and place the floppy disk with the saved BIOS
image file (see above FAQ) in drive A. Press and hold <CTRL> and <Home>
at the same time, then turn on the power with these keys pressed until your
floppy drive starts reading. Your screen will remain blank until the BIOS
program is done. If the system reboots correctly, then the recovery was
successful.
Question: I have memory problems. What is the correct memory
to use and which BIOS setting should I choose?
Answer: The correct memory to use on the SUPER P6DBS/P6DBE/P6DBU/
P6SBU/P6SBS/P6SBA is 168-pin DIMM 3.3v non-buffered SPD (Serial Present
Detection) SDRAM, SDRAM and EDO memory. SPD SDRAM is preferred but is
not necessary. IMPORTANT: Do not mix memory types; the results are
unpredictable. If your memory count is exactly half of the correct value, go
to the Chipset Setup in BIOS and set "SDRAM AUTOSIZING SUPPORT" to
Enabled
. Toggle between the available options until one setting correctly
displays the amount of memory installed.
Page 64

3-6
SUPER P6DBS/P6DBE/P6DBU/P6SBU/P6SBS/P6SBA/P6SBM Manual
Question: Which Operating System (OS) supports AGP?
Answer: At present, Windows 98 and Windows NT 5.0 are the only OS
that have built-in support for AGP. Some AGP video adapters can run
Windows 95 OSR2.1 with special drivers. Please contact your graphics
adapter vendor for more details.
Question: Do I need the CD that came with your motherboard?
Answer: The supplied compact disc has quite a few drivers and programs
that will greatly enhance your system. We recommend that you review the
CD and install the applications you need. Applications included on the CD
are PCI IDE Bus Master drivers for Windows 95 and Windows NT, 440BX
chipset drivers for Windows 95, and Super Doctor Monitoring software.
Question: How do I install an onboard SCSI device controller for my
P6DBS/P6SBS motherboard?
Answer: First, install the 3 NT installation disks and then follow the
onscreen instructions to complete the procedure. "Safe mode" is best for
this installation.
Question: Why can't I turn off the power using the momentary
power on/off switch?
Answer: The instant power off function is controlled by the BIOS. When
this feature is enabled in the BIOS, the motherboard will have instant off
capabilities as long as the BIOS has control of the system. When this
feature is disabled or when the BIOS is not in control, such as during
memory count (the first screen that appears when the system is turned on),
the momentary on/off switch must be held for more than four seconds to
shut the system down. This feature is required to implement the ACPI
features.
Question: I see some of my PCI devices sharing IRQs, but the system seems to be fine. Is this correct or not?
Answer: Some PCI Bus Mastering devices can share IRQs without perfor-
mance penalties. These devices are designed to work correctly while sharing IRQs.
Page 65

3-7
Chapter 3: Troubleshooting
Question: When I connect my Ultra II LVD hard drive on the JA1 SCSI
connection, the drive was not recognized by BIOS or it failed to boot. Do
I need a special cable?
Answer: Yes, for an Ultra II LVD hard drive you need a special 68-pin
cable with an active termination at the end of the cable, since Ultra II LVD
hard drives do not have termination on the drive.
Question: How do I install the sound driver for the built-in ES1938
AudioDrive?
Answer: Insert the Supermicro CD that came with the motherboard into your CD-
ROM drive. Double click on your CD-ROM icon (which can be found in "My
Computer") to access the CD, then double click on the red "S" icon named
"setup.exe". The Set Up menu will appear. From this menu, select "Set Up
Applications " and choose the program you wish to install. For WindowsNT
installation, see the readme file in the Set Up menu.
Question: I successfully installed the AudioDrive utility, but can only hear
sound from one of my speakers. What is the problem?
Answer: Go to the Advanced Settings in the volume control panel of the
utility and enable the "3D Effect" option. This should result in full stereo
sound.
Question: Why do I get the error message "Stop 0x0000007B Inaccessible
Boot Device" during the Windows NT 4.0 Hardware Detection Portion of Setup?
Answer: When you run Windows NT Setup, you may receive the following
error message during the hardware detection phase: STOP:0x0000007B
Inaccessible Boot Device. This behavior can occur if your computer contains a motherboard with an onboard Adaptec Dual-Channel Ultra Wide 7895
Small Computer System Interface (SCSI) controller. This controller is not on
the Windows NT Hardware Compatibility List (HCL) and is not detected
correctly by Windows NT Setup. To resolve this issue, follow these steps:
1. Insert the Windows NT Setup disk 1 in drive A and then turn on or restart
the computer.
2. When you are prompted to specify the mass storage devices, press S.
3. Provide the driver disks included with the motherboard.
Page 66

3-8
SUPER P6DBS/P6DBE/P6DBU/P6SBU/P6SBS/P6SBA/P6SBM Manual
Question: Do I need to change any settings to use a single processor on a dual processor board?
Answer: There are no jumpers or BIOS settings that need to be changed
when running a single CPU on a dual processor board. In addition, you can
use a single processor in either CPU slot.
3-4 Returning Merchandise for Service
A receipt or copy of your invoice marked with the date of purchase is
required before any warranty service will be rendered. You can obtain
service by calling your vendor for a Returned Merchandise Authorization
(RMA) number. When returning to the manufacturer, the RMA number
should be prominently displayed on the outside of the shipping carton, and
mailed prepaid or hand-carried. Shipping and handling charges will be applied for all orders that must be mailed when service is complete.
This warranty only covers normal consumer use and does not cover damages incurred in shipping or from failure due to the alteration, misuse, abuse
or the improper maintenance of products.
During the warranty period, contact your distributor first for any product
problems.
Page 67

Chapter 4: AMIBIOS
4-1
Chapter 4
AMIBIOS
4-1 Introduction
This chapter describes the AMIBIOS for the Intel 440BX Pentium II 233/266/
300/333/350/400/450 MHz and Pentium III MHz processors. The AMI ROM
BIOS is stored in the Flash EEPROM and can be easily upgraded using a
floppy disk-based program.
System BIOS
The BIOS is the Basic Input Output System used in all IBM® PC, XT™, AT®,
and PS/2® compatible computers. WinBIOS is a high-quality example of a
system BIOS.
Configuration Data
AT-compatible systems, also called ISA (Industry Standard Architecture)
must have a place to store system information when the computer is turned
off. The original IBM AT had 64 kbytes of non-volatile memory storage in
CMOS RAM. All AT-compatible systems have at least 64 kbytes of CMOS
RAM, which is usually part of the Real Time Clock. Many systems have 128
kbytes of CMOS RAM.
How Data Is Configured
AMIBIOS provides a Setup utility in ROM that is accessed by pressing <Del>
at the appropriate time during system boot. Setup configures data in CMOS
RAM.
POST Memory Test
Normally, the only visible POST routine is the memory test. The screen that
appears when the system is powered on is shown on the next page.
An AMIBIOS identification string is displayed at the left bottom corner of the
screen, below the copyright message.
Page 68
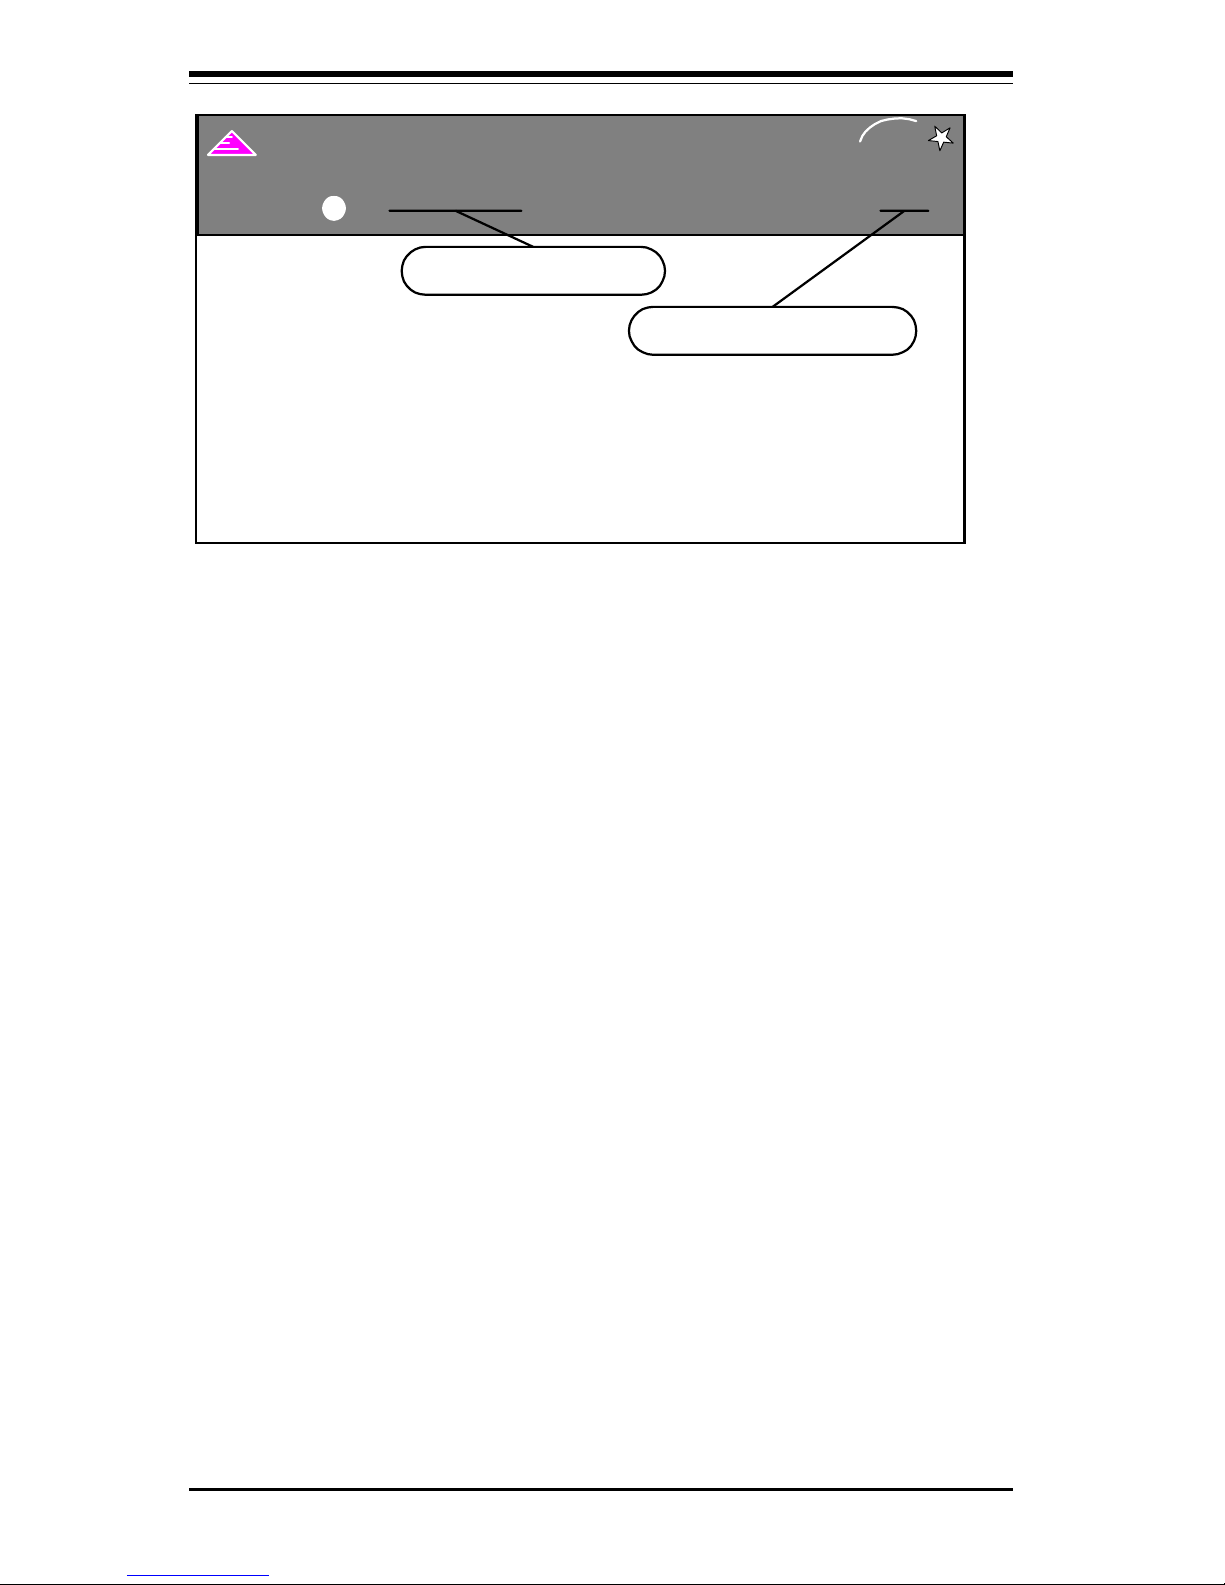
BIOS Manual
4-2
Checking NVRAM
xxxxx KB OK
Hit <DEL> if you want to run SETUP
(C) Super Micro Computer, Inc.,
XX-XXXX-XXXXXX-XXXXXXXX-XXXXXX-XXXX-X
4-2 BIOS Features
• Supports Plug and Play V1.0A and DMI 2.1
• Supports Intel PCI 2.1 (Peripheral Component Interconnect) local bus
specification
• Supports Advanced Power Management (APM) specification v 1.1
• Supports ACPI
• Supports Flash ROM
AMIBIOS supports the LS120 drive made by Matsushita-Kotobuki Electronics
Industries Ltd. The LS120:
• Can be used as a boot device
• Is accessible as the next available floppy drive
AMIBIOS supports PC Health Monitoring chips. When a failure occurs in a
monitored activity, AMIBIOS can sound an alarm and display a message. The
PC Health Monitoring chips monitor:
• CPU temperature
• Additional temperature sensors
• Chassis intrusion detector
American
Mega
Trends
S
UPER
AMIBIOS (c) 1997 American Megatrends, Inc.
0404981500 Pentium II Motherboard Made in USA R1.0
Energy
BIOS revision code
BIOS date code
Page 69

Chapter 4: AMIBIOS
4-3
AMIBIOS System Configuration (C) 1985-1997 American Megatrends Inc.,
Main Processor : Pentium(tm) II Base Memory Size : 640 KB
BIOS Configuration Summary Screen
AMIBIOS displays a screen that looks similar to the following when the
POST routines complete successfully.
Math Processor : Built-In Ext. Memory Size : 64512 KB
Floppy Drive A: : 1.44 MB, 31/
2
Display Type : VGA/EGA
Floppy Drive B: : None Serial Port(s) : 3F8, 2F8
AMI-BIOS Date : 7/15/95 Parallel Port(s) : 378
Processor Clock : 350MHz External Cache : 512 KB
PCI Devices
PCI Onboard PCI Bridge PCI Onboard Bridge Device
PCI Onboard USB Controller PCI Onboard IDE
PCI Onboard SCSI, IRQ 10 PCI Onboard SCSI, IRQ 10
PCI Slot 4 VGA, IRQ 11
AMIBIOS Setup
See the following page for examples of the AMIBIOS Setup screen, featuring
options and settings. Figure 4-1 shows the
Standard
option highlighted. To
highlight other options, use the arrow keys or the tab key to move to other
option boxes. Figure 4-2 shows the settings for the Standard setup.
Settings can be viewed by highlighting a desired option and pressing
<Enter>. Use the arrow keys to choose a setting. Note: Optimal settings
for all options can be set automatically. Go to the
Optimal
icon in the
default box and press <Enter>. Use the arrow keys to highlight
yes,
then
press <Enter>.
*Note: The picture above reflects a board equipped with SCSI, but may be taken as a general example.
• Five positive voltage inputs
• Two negative voltage inputs
• Three fan-speed monitor inputs
Page 70
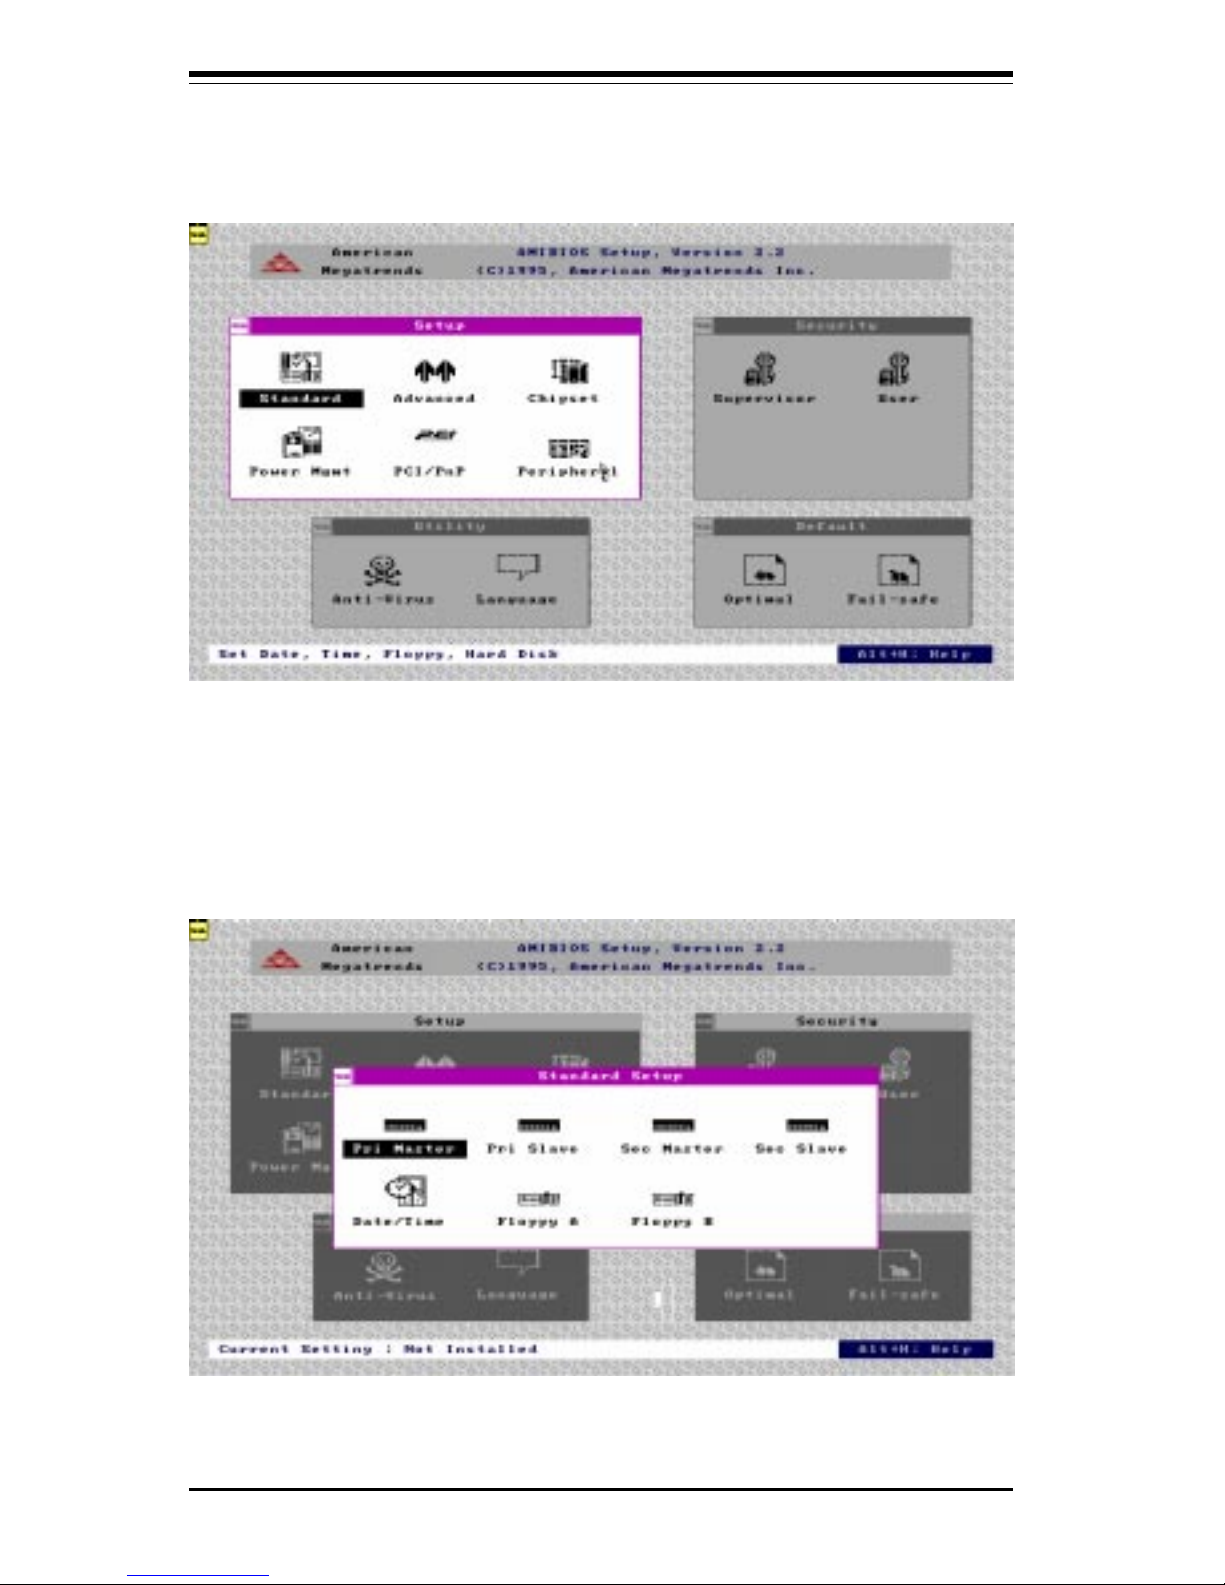
BIOS Manual
4-4
Figure 4-1. Standard Option Highlighted
Figure 4-2. Settings for Standard Setup
Page 71

Chapter 5: Running Setup
5-1
Chapter 5
Running Setup*
*Optimal and Fail-Safe default settings are bolded in text unless otherwise noted.
The WinBIOS Setup options described in this section are selected by
choosing the appropriate high-level icon from the Standard Setup screen. All
displayed icons are described in this section, although the screen display is
often all you need to understand how to set the options.
5-1 Setup
5-1-1 Standard Setup
Pri Master
Pri Slave
Sec Master
Sec Slave
Select these options to configure the drive named in the option. Select
Auto
Detect IDE
to let AMIBIOS automatically configure the drive. A screen with a
list of drive parameters appears. Click on OK to configure the drive.
Type How to Configure
SCSI Select
Type
. Select
Not Installed
on the drive
parameter screen. The SCSI drivers provided by
the SCSI manufacturer should allow you to configure
the SCSI drive.
IDE Select
Type
. Select
Auto
to let AMIBIOS determine
the parameters. Click on OK when AMIBIOS
displays the drive parameters. Select
LBA Mode
.
Select On if the drive has a capacity greater than
540 MB. Select the
Block Mode
. Select On to
allow block mode data transfers. Select the
32-bit
mode
. Select
On
to allow 32-bit data transfers.
Select
PIO mode
. Select On to allow AMIBIOS to
determine the PIO Mode. It is best to select
Auto
to
allow AMIBIOS to determinethe PIO mode. If you
select a PIO mode that is not supported by the IDE
Page 72

BIOS Manual
5-2
drive, the drive will not work properly. If you are
absolutely certain that you know the drive's PIO
mode, select PIO mode 0-4, as appropriate.
CD Select
Type
. Select
CDROM
. Click on OK when
ROM AMIBIOS displays the drive parameters.
Entering Drive Parameters
You can also enter the hard disk drive parameters. The drive parameters are:
Parameter Description
Type The number for a drive with certain identification parameters.
Cylinders The number of cylinders in the disk drive.
Heads The number of heads.
Write The size of a sector gets progressively smaller as the track
Precompensation diameter diminishes. Yet each sector must still hold 512 bytes.
Write precompensation circuitry on the hard disk compensates
for the physical difference in sector size by boosting the write
current for sectors on inner tracks. This parameter is the track
number where write precompensation begins.
Sectors The number of sectors per track. MFM drives have 17 sectors
per track. RLL drives have 26 sectors per track. ESDI drives
have 34 sectors per track. SCSI and IDE drive may have even
more sectors per track.
Capacity The formatted capacity of the drive is (Number of heads) x
(Number of cylinders) x (Number of sectors per track) x (512
bytes per sector)
Page 73

Chapter 5: Running Setup
5-3
Date and Time Configuration
Select the Standard option. Select the
Date/Time
icon. The current values
for each category are displayed. Enter new values through the keyboard.
Floppy A
Floppy B
Choose the Floppy Drive A or B icon to specify the floppy drive type. The
settings are
Not Installed, 360 KB 5¼ inch, 1.2 MB 5¼ inch, 720 KB 3½
inch, 1.44 MB 3½ inch
or
2.88 MB 3½ inch
.
Note: The Optimal and FailSafe settings for Floppy Drive A are 1.44 MB 3 1/2 inch and for Floppy
Drive B are Not Installed
.
5-1-2 Advanced Setup
Quick Boot
The Settings are
Disabled
or
Enabled
. Set to
Enabled
to permit AMIBIOS to
boot quickly when the computer is powered on. This option replaces the old
Above 1 MB Memory Test Advanced Setup option. The settings are:
Setting Description
Disabled
AMIBIOS tests all system memory. AMIBIOS waits
up to 40 seconds for a READY signal from the IDE
hard disk drive. AMIBIOS waits for .5 seconds after
sending a RESET signal to the IDE drive to allow the
IDE drive time to get ready again. AMIBIOS checks
for a <Del> key press and runs AMIBIOS Setup if
the key has been pressed.
Enabled
AMIBIOS does not test system memory above 1 MB.
AMIBIOS does not wait up to 40 seconds for a
READY signal from the IDE hard disk drive. If a
READY signal is not received immediately from the
IDE drive, AMIBIOS does not configure that drive.
AMIBIOS does not wait for .5 seconds after sending
a RESET signal to the IDE drive to allow the IDE
drive time to get ready again. In
Enabled,
the key
board will be bypassed.
Note: You cannot run AMIBIOS Setup at system boot, because there is
no delay for the Hit <Del> to run the Setup message
.
Page 74

BIOS Manual
5-4
Pri Master ARMD Emulated as
Pri Slave ARMD Emulated as
Sec Master ARMD Emulated as
Sec Slave ARMD Emulated as
Options for Pri Master ARMD Emulated as, Pri Slave ARMD Emulated as,
Sec Master ARMD Emulated as and Sec Slave ARMD Emulated as are
Auto, Floppy or Hard disk
.
1st Boot Device
2nd Boot Device
3rd Boot Device
The options for 1st Boot Device are
Disabled, 1st IDE-HDD, 2nd IDE-HDD,
3rd IDE-HDD, 4th IDE-HDD, Floppy, ARMD-FDD, ARMD-HDD, ATAPI CD
ROM, SCSI, Network
or
I20
. The options for 2nd Boot Device are
Disabled,
1st IDE-HDD, 2nd IDE-HDD, 3rd IDE-HDD, 4th IDE-HDD, Floppy, ARMD-FDD,
ARMD-HDD or ATAPI CD ROM
. The options for 3rd Boot Device are
Disabled, 1st IDE-HDD, 2nd IDE-HDD, 3rd IDE-HDD, 4th IDE-HDD, Floppy,
ARMD-FDD, ARMD-HDD or ATAPI CD ROM
.
1st IDE-HDD, 2nd IDE-HDD, 3rd IDE-HDD and 4th IDE-HDD are the four hard
disks that can be installed by the BIOS. 1st IDE-HDD is the first hard disk
installed by the BIOS, 2nd IDE-HDD is the second hard disk, and so on. For
example, if the system has a hard disk connected to Primary Slave and
another hard disk to Secondary Master, then 1st IDE-HDD will be referred to
as the hard disk connected to Primary Slave and 2nd IDE-HDD will be
referred to as the hard disk connected to the Secondary Master. 3rd IDEHDD and 4th IDE-HDD are not present. Note that the order of the initialization of the devices connected to the primary and secondary channels are
Primary Master first, Primary Slave second, Secondary Master third, and
Secondary Slave fourth.
The BIOS will attempt to read the boot record from 1st, 2nd, 3rd and 4th boot
device in the selected order until it is successful in reading the booting
record. The BIOS will not attempt to boot from any device which is not
selected as the boot device.
Try Other Boot Device
This option controls the action of the BIOS if all the selected boot devices
failed to boot. The settings for this option are
Yes
or No. If
Yes
is selected
and all the selected boot devices failed to boot, the BIOS will try to boot from
the other boot devices (in a predefined sequence) which are present but not
selected as boot devices in the setup (and hence not yet been tried for
Page 75

Chapter 5: Running Setup
5-5
booting). If selected as No and all selected boot devices failed to boot,
the BIOS will try not to boot from the other boot devices which may be
present but not selected as boot devices in setup.
Initial Display Mode
This option determines the display screen with which the POST is going to
start the display. The settings for this option are
BIOS
or
Silent
. If selected
as
BIOS,
the POST will start with the normal sign-on message screen. If
Silent
is selected, the POST will start with the silent screen.
Display Mode at Add-on ROM Init
This option determines the display mode during add-on ROM (except Video
add-on ROM) initialization. The settings for this option are
Force BIOS
or
Keep Current
. If selected as
Force BIOS,
the POST will force the display to
be changed to BIOS mode before giving control to any add-on ROM. If no
add-on ROM is found, then the current display mode will remain unchanged
even if this setup question is selected as
Force BIOS.
If selected as
Keep
Current,
then the current display mode will remain unchanged.
Floppy Access Control
The settings for this option are
Read-Write
or
Read-Only
.
Hard Disk Access Control
The settings for this option are
Read-Write
or
Read-Only
.
S.M.A.R.T. for Hard Disks
S.M.A.R.T. (Self-Monitoring, Analysis and Reporting Technology) is a
technology developed to manage the reliability of the hard disk by predicting
future device failures. The hard disk needs to be S.M.A.R.T. capable. The
settings for this option are
Disabled
or
Enabled
. *
Note: S.M.A.R.T. cannot
predict all future device failures. S.M.A.R.T. should be used as a
warning tool, not as a tool to predict the device reliability
.
Boot Up Num-Lock
Settings for this option are
On
or
Off
. When this option is set to On, the
BIOS turns off the Num Lock key when the system is powered on. This will
enable the end user to use the arrow keys on both the numeric keypad and
the keyboard.
PS/2 Mouse Support
Settings for this option are
Enabled
or
Disabled
. When this option is set to
Enabled
, AMIBIOS supports a PS/2-type mouse.
Page 76

BIOS Manual
5-6
Primary Display
This option specifies the type of display adapter card installed in the system.
The settings are
Absent, VGA/EGA, CGA40x25, CGA80x25
or
Mono
.
Password Check
This option enables the password check option every time the system boots
or the end user runs WinBIOS Setup. If
Always
is chosen, a user password
prompt appears every time the computer is turned on. If
Setup
is chosen,
the password prompt appears if WinBIOS Setup is executed.
Boot to OS/2
If DRAM size is over 64 MB, set this option to
Yes
to permit AMIBIOS to run
with IBM OS/2. The settings are No or
Yes
.
CPU Microcode Updation
Set this option to
Enabled
to permit the CPU to be updated on line. The
settings for this option are
Enabled
or
Disabled
.
Internal Cache
This option is for enabling or disabling the internal cache memory. The
settings for this option are
Disabled
or
WriteBack
.
System BIOS Cacheable
When set to
Enabled
, the contents of the F0000h system memory segment
can be read from or written to cache memory. The contents of this memory
segment are always copied from the BIOS ROM to system RAM for faster
execution. The settings are
Enabled
or
Disabled
.
Note: The Optimal
default setting is Enabled and the Fail-Safe default setting is Disabled.
Set this option to Enabled to permit the contents of F0000h RAM
memory segment to be written to and read from cache memory.
CPU ECC
The settings for this option are
Enabled
or
Disabled
. This option enables
Pentium II L2 cache ECC function.
Processor Serial Number
If you have a Pentium III processor, the serial number ID in the chip can
be disabled for privacy reasons. Set to
Enabled
to allow access to this
ID number and
Disabled
to block access to it. If you do not have a
Pentium III processor, this is not an issue and you will see
N/A
in the
setting options.
Page 77

Chapter 5: Running Setup
5-7
MPS Revision
The settings for this option are 1.1 or 1.4.
C000, 16K Shadow
C400, 16K Shadow
These options specify how the 32 KB of video ROM at C0000h is treated.
The settings are:
Disabled, Enabled or Cached
. When set to
Disabled,
the contents of the video ROM are not copied to RAM. When set to
Enabled,
the contents of the video ROM area from C0000h-C7FFFh are
copied (shadowed) from ROM to RAM for faster execution. When set to
Cached
, the contents of the video ROM area from C0000h-C7FFFh are
copied from ROM to RAM, and can be written to or read from cache
memory.
C800, 16K Shadow
CC00, 16K Shadow
D000, 16K Shadow
D400, 16K Shadow
D800, 16K Shadow
DC00, 16K Shadow
These options enable shadowing of the contents of the ROM area named in
the option. The ROM area not used by ISA adapter cards is allocated to PCI
adapter cards. The settings are:
Disabled, Enabled or Cached
. When set
to
Disabled,
the contents of the video ROM are not copied to RAM. When
set to
Enabled,
the contents of the video ROM area from C0000h-C7FFFh are
copied (shadowed) from ROM to RAM for faster execution. When set to
Cached,
the contents of the video ROM area from C0000h-C7FFFh are copied
from ROM to RAM and can be written to or read from cache memory.
5-1-3 Chip Set Setup
USB Function
The settings for this option are
Enabled
or
Disabled
. Set this option to
Enabled
to enable the USB (Universal Serial Bus) functions.
USB KB/Mouse Legacy Support
The settings for this option are
Keyboard, Auto, Keyboard+Mouse
or
Dis-
abled
. Set this option to
Enabled
to enable the USB keyboard and mouse.
SERR# (System Error)
The settings for this option are
Enabled
or
Disabled
. Set to
Enabled
to
enable the SERR# signal on the bus. BX asserts this signal to indicate a
system error condition. SERR# is asserted under the following conditions:
Page 78

BIOS Manual
5-8
- In an ECC configuration, the 82443BX asserts SERR#, for single bit (correctable) ECC errors or multiple
bit (non-correctable) ECC errors if SERR# signaling is enabled via the ERRCMD control register. Any
ECC errors received during initialization should be ignored.
- The 82443BX asserts SERR# for one clock when it detects a target abort during 82443BX
initiated PCI cycle
- The 82443BX can also assert SERR# when a PCI parity error occurs during the address or data phase
- The 82443BX can assert SERR# when it detects a PCI address or data parity error on AGP
- The 82443BX can assert SERR# upon detection of access to an invalid entry in the Graphics Aperature
Translation Table
- The 82443BX can assert SERR# upon detecting an invalid AGP master access outside of
AGP aperture and outside of main DRAM range (i.e. in the 640k - 1M range or above TOM)
- The 82443BX can assert SERR# upon detecting an invalid AGP master access outside of
AGP aperture.
- The 82443BX asserts SERR# for one clock when it detects a target abort during 82443BX
initiated AGP cycle
PERR#
This option signals data parity errors of the PCI bus. The settings are
Enabled
or
Disabled
. Set to
Enabled
to enable the PERR# signal.
WSC# Handshake (Write Snoop Complete)
This signal is asserted active to indicate that all the snoop activity on the
CPU bus on the behalf of the last PCI-DRAM write transaction is complete
and that it is safe to send the APIC interrupt message. The settings for this
option are
Enabled
or
Disabled
. Set to
Enabled
to enable handshaking for
the WSC# signal.
USWC Write Post
The settings for this option are
Enabled
or
Disabled
. This option sets the
status of USWC (Uncacheable, Speculative, Write-Combining) posted writes
and is used to combine several partial writes to the frame buffer into a single
write in order to reduce the data bus traffic. Set to
Enabled
to enable USWC
posted writes to I/O. Set to
Disabled
to disable USWC posted writes to I/O.
BX/GX Master Latency Timer (CLKs)
This option specifies the master latency timings (in PCI clocks) for devices in
the computer. It defines the number of PCI clocks a PCI master can own on
the bus after PCI central arbiter removes the grant signal. The settings are
Disabled, 32, 64, 96, 128, 160, 192
or
224
.
Page 79

Chapter 5: Running Setup
5-9
Multi-Trans Timer (Clks)
This option specifies the multi-trans latency timings (in PCI clocks) for
devices in the computer. It reduces overhead switching between different
masters. The settings are
Disabled, 32, 64, 96, 128, 160, 192
or
224
.
PCI1 to PCI0 Access
PCI1 refers to AGP in BX and LX chipsets. PCI0 is the normal PCI bus.
Note: Normally AGP master should not access to a PCI target
. The
settings for this option are
Enabled
or
Disabled
. Set to
Enabled
to enable
access between two different PCI buses (PCI1 and PCI0).
Memory Autosizing Support
The dynamic detection and sizing of SDRAM and EDO is performed by the
BIOS in a system populated with memory which has no SPD information.
When set to
Enable
, memory does not have the SPD information. The
settings for this option are
Auto
or
Enable
.
DRAM Integrity Mode
The settings for this option are
None, EC
or
ECC Hardware
.
Note: For ECC
memory only. See the table below to set the type of system memory
checking.
(Note: New BIOS versions automatically detect setting and do
not need to be set by user.)
Setting Description
None No error checking or error reporting is done.
EC Multibit errors are detected and reported as parity
errors. Single-bit errors are corrected by the
chipset. Corrected bits of data from memory are not
written back to DRAM system memory.
ECC Multibit errors are detected and reported as parity
Hardware errors. Single-bit errors are corrected by the
chipset and are written back to DRAM system
memory. If a soft (correctable) error occurs, writing
the fixed data back to DRAM system memory will
resolve the problem. Most DRAM errors are soft
errors. If a hard (uncorrectable) error occurs, writing
the fixed data back to DRAM system memory does
not solve the problem. In this case, the second time
the error occurs in the same location, a Parity Error
is reported, indicating an uncorrectable error. If ECC
Page 80

BIOS Manual
5-10
is selected, AMIBIOS automatically enables the
System Management Interface (SMI). If you do not
want to enable power management, set the Power
Management/APM option to
Disabled
and set all
Power Management Setup timeout options to
Disabled
. To enable power management, set Power
Management/APM to
Enabled
and set the power
management timeout options as desired.
DRAM Refresh Rate
This option specifies the interval between Refresh signals to DRAM
system memory. The settings for this option are
15.6 us
(micro-sec-
onds),
31.2 us, 62.4 us, 124.8 us
or
249.6 us
.
Memory Hole
This option specifies the location of an area of memory that cannot be
addressed on the ISA bus. The settings are
Disabled, 15 MB-16 MB
, or
512
KB-640 KB
.
SDRAM CAS# Latency
This option regulates the column address strobe. The settings are 2 SCLKs,
3 SCLKs or
Auto
.
SDRAM RAS# to CAS# Delay
This option specifies the length of the delay inserted between the RAS and
CAS signals of the DRAM system memory access cycle if SDRAM is
installed. The settings are
Auto
(AMIBIOS automatically determines the
optimal delay),
2 SCLKs
or
3 SCLKs
.
Note: The Optimal default setting is
Auto and the Fail-Safe default setting is 3 SCLKs
.
SDRAM RAS# Precharge
This option specifies the length of the RAS precharge part of the DRAM
system memory access cycle when Synchronous DRAM system memory is
installed in the computer. The settings are
Auto
(AMIBIOS automatically
determines the optimal delay),
2 SCLKs or 3 SCLKs
.
Note: The Optimal
default setting is Auto and the Fail-Safe default setting is 3 SCLKs.
Power Down SDRAM
BX supports SDRAM power down mode to minimize SDRAM power usage.
The settings for this option are
Enabled
or
Disabled
. The
Enabled
setting
enables the SDRAM Power Down feature.
Page 81

Chapter 5: Running Setup
5-11
ACPI Control Register
The settings for this option are
Enabled
or
Disabled
. Set this option to
Enabled
to enable the ACPI (Advanced Configuration and Power Interface)
control register.
Gated Clock
Signal GCLKEN enables internal dynamic clock gating in the 82443BX when
a AGPset "IDLE" state occurs. This happens when the 82443BX detects an
idle state on all its buses. The settings for this option are
Enabled
or
Disabled
. The
Enabled
setting enables the gated clock.
Graphics Aperture Size
This option specifies the amount of system memory that can be used by the
Accelerated Graphics Port (AGP). The settings are
4 MB, 8 MB, 16 MB, 32
MB, 64 MB, 128 MB
or
256 MB
.
Search for MDA (Monochrome Adapter) Range (B0000h-B7FFFh)
Resources
Legacy support requires the ability to have a second graphics controller
(monochrome) in the system. In an AGP system, accesses in the normal
VGA range are forwarded to the AGP bus. Since the monochrome adapter
may be on the PCI (or ISA) bus, the 82443BX must decode cycles in the
MDA range and forward them to PCI. The settings for this option are
Yes
or
No
. Set this option to
Yes
to let AMIBIOS search for MDA resources.
AGP Multi-Trans Timer (AGP Clks)
This option sets the AGP multi-trans timer. The settings are in units of AGP
clocks: 32, 64, 96,
128, 160, 192
, or
224
.
AGP Low-Priority Timer
This option controls the minimum tenure on the AGP for low priority data
transaction for both read and write. The settings are
Disabled, 32, 64, 96,
128, 160, 192 or 224
.
AGP SERR (Advanced Graphic Port System Error)
BX asserts this signal to indicate a AGP system error condition. The
settings for this option are
Enabled
or
Disabled
. Set to
Enabled
to enable
the AGP SERR# signal.
AGP Parity Error Response
The settings for this option are
Enabled
or
Disabled
. Set to
Enabled
to
enable the AGP (Accelerated Graphics Port) to respond to parity errors.
Page 82

BIOS Manual
5-12
8bit I/O Recovery Time
This option specifies the length of a delay inserted between consecutive 8-bit
I/O operations. The settings are
Disabled, 1 SYSCLK, 2 SYSCLKs, 3
SYSCLKs, 4 SYSCLKs, 5 SYSCLKs, 6 SYSCLKs, 7 SYSCLKs
or
8
SYSCLKs
.
16bit I/O Recovery Time
This option specifies the length of a delay inserted between consecutive 16bit I/O operations. The settings are
Disabled, 1 SYSCLK, 2 SYSCLKs, 3
SYSCLKs, 4 SYSCLKs, 5 SYSCLKs, 6 SYSCLKs, 7 SYSCLKs
or
8
SYSCLKs
.
PIIX4 SERR#
This signal is asserted to indicate a PIIX4 System Error condition. The
settings for this option are
Enabled
or
Disabled
. The
Enabled
option enables
the SERR# signal for the Intel PIIX4 chip.
USB Passive Release
BX releases USB bus when it is idle to maximize the USB bus usage. The
settings for this option are
Enabled
or
Disabled
. Set this option to
Enabled
to enable passive release for USB.
PIIX4 Passive Release
This option functions similarly to USB Passive Release. The settings for this
option are
Enabled
or
Disabled
. Set to
Enabled
to enable passive release
for the Intel PIIX4 chip.
PIIX4 Delayed Transaction
BX is capable of PIIX4 transaction to improve PIIX4 interrupt efficiency. The
settings for this option are
Enabled
or
Disabled
. Set this option to
Enabled
to enable delayed transactions for the Intel PIIX4 chip.
Type F DMA Buffer Control1
Type F DMA Buffer Control2
These options specify the DMA channel where Type F buffer control is
implemented. The settings are
Disabled, Channel-0, Channel-1, Channel-2
,
Channel-3, Channel-4, Channel-5, Channel-6
or
Channel-7
.
DMA0 Type
DMA1 Type
DMA2 Type
DMA3 Type
DMA5 Type
Page 83

Chapter 5: Running Setup
5-13
DMA6 Type
DMA7 Type
These options specify the bus that the specified DMA channel can be used
on. The settings are
PC/PCI, Distributed
, or
Normal ISA
.
Memory Buffer Strength
The settings for this option are
Strong
or
Auto
.
Manufacturer's Setting
Note: The user should always set this option to Mode 0. All other
modes are for factory testing only
.
5-1-4 Power Management
Power Management
The settings for this feature are:
APM, ACPI
or
Disabled
. Set to
APM
to
enable the power conservation feature specified by Intel and Microsoft INT 15h
Advance Power Management BIOS functions. Set to
ACPI
if your operating
system supports Microsoft's Advanced Configuration and Power Interface
(ACPI) standard.
Power Button Function
This option specifies how the power button mounted externally on the
computer chassis is used. The settings are:
Suspend
or
On/Off
. When set
to
On/Off
, pushing the power button turns the computer on or off. When set
to
Suspend
, pushing the power button places the computer in Suspend mode
or Full On power mode. (See the PWR_ON connector on page 2-9.)
Green PC Monitor Power State
This option specifies the power state that the green PC-compliant video
monitor enters when AMIBIOS places it in a power savings state after the
specified period of display inactivity has expired. The settings are
Standby
,
Suspend
or
Off. Note: The Optimal default setting for this option is
Suspend and the Fail-Safe setting is Standby
.
Video Power Down Mode
This option specifies the power conserving state that the VGA video subsystem enters after the specified period of display inactivity has expired. The
settings are
Disabled, Standby
, or
Suspend
.
Note: The Optimal default
setting for this option is Suspend and the Fail-Safe default setting is
Disabled
.
Page 84

BIOS Manual
5-14
Hard Disk Power Down Mode
This option specifies the power conserving state that the hard disk drive
enters after the specified period of hard drive inactivity has expired. The
settings are
Disabled, Standby
, or
Suspend
.
Note: The Optimal
default setting for this option is Suspend and the Fail-Safe
default setting is Disabled
.
Hard Disk Timeout (Minutes)
This option specifies the length of a period of hard disk drive inactivity. When
this length of time expires, the computer enters power-conserving state
specified in the Hard Disk Power Down Mode option. The settings are
Disabled
and
1 Min through 15 Min in 1 minute intervals
.
Power Saving Type
The settings for this option are
Sleep, Stop Clock or Deep Sleep
.
Standby/Suspend Timer Unit
This allows you to set the standby timeout and suspend timeout timer unit.
The settings are
32 secs, 4 msecs, 4 min
or
4 secs
.
Standby Timeout
This option specifies the length of a period of system inactivity while in full
power on state. When this length of time expires, the computer enters
standby power state. The settings are
Disabled
and
4 Min through 508 Min
in 4 minute intervals
.
Suspend Timeout (Minutes)
This option specifies the length of a period of system inactivity while in
standby state. When this length of time expires, the computer enters
suspend power state. The settings are
Disabled
and
4 Min through 508 Min
in 4 minute intervals
.
Slow Clock Ratio
The value of the slow clock ratio indicates the percentage of time the
STPCLK# signal is asserted while in the thermal throttle mode. The settings
are
Disabled, 0-12.5%
, 12.5-
25%
, 25-37.5%, 37.
5-50%, 50-62.5%, 62.5-75%
,
or
75-87.5%
.
Display Activity
This option specifies if AMIBIOS is to monitor display activity for power
conservation purposes. When this option is set to
Monitor
and there is no
Page 85

Chapter 5: Running Setup
5-15
display activity for the length of time specified in the Standby Timeout
(Minute) option, the computer enters a power savings state. The settings are
Monitor
or
Ignore
.
Device 6 (Serial port 1)
Device 7 (Serial port 2)
Device 8 (Parallel port)
Device 5 (Floppy disk)
Device 0 (Primary Master IDE)
Device 1 (Primary Slave IDE)
Device 2 (Secondary Master IDE)
Device 3 (Secondary Slave IDE)
When set to
Monitor
, these options enable event monitoring on the specified
hardware interrupt request line. If set to Monitor and the computer is in a
power saving state, AMIBIOS watches for activity on the specifies IRQ line.
The computer enters the Full On state if any activity occurs. AMIBIOS
reloads the Standby and Suspend timeout timers if activity occurs on the
specified IRQ line.
Note: The Optimal default setting for each option is
Ignore with the exception of Devices 0 (Primary Master IDE) and 6 (Serial
Port 1) which should be set to Monitor. The Fail-Safe default for each
option is Monitor.
LAN Wake-Up
RTC Wake-UP
Options for LAN Wake-Up and RTC Wake-Up are
Disabled
or
Enabled
.
When enabled, the Hour and Minute functions become available.
5-1-5 PCI/PnP Setup
Plug and Play-Aware OS
The settings for this option are No or
Yes
. Set this option to
Yes
if the
operating system in the computer is aware of and follows the Plug and Play
specification. AMIBIOS only detects and enables PnP ISA adapter cards
that are required for system boot. Currently, only Windows 95 is PnP-Aware.
Set this option to
No
if the operating system (such as DOS, OS/2, Windows
3.x) does not use PnP. You must set this option correctly. Otherwise, PnPaware adapter cards installed in the computer will not be configured properly.
PCI Latency Timer (PCI Clocks)
This option specifies the latency timings in PCI clocks for all PCI devices.
The settings are 32, 64, 96,
128, 160, 192, 224
, or
248
.
Page 86

BIOS Manual
5-16
PCI VGA Palette Snoop
The settings for this option are
Disabled or Enabled.
When set to
Enabled,
multiple VGA devices operating on different buses can handle data from the
CPU on each set of palette registers on every video device. Bit 5 of the
command register in the PCI device configuration space is the VGA Palette
Snoop bit (0 is disabled). For example: if there are two VGA devices in the
computer (one PCI and one ISA) and this option is disabled, data read and
written by the CPU is only directed to the PCI VGA device's palette registers.
If enabled, data read and written by the CPU is directed to both the PCI VGA
device's palette registers and the ISA VGA palette registers. This will permit
the palette registers of both devices to be identical. This option must be set
to
Enabled
if any ISA adapter card installed in the system requires VGA
palette snooping.
PCI IDE Busmaster
The settings for this option are
Disabled
or
Enabled
. Set to
Enabled
to
specify the IDE Controller on the PCI bus has bus mastering capabilities.
Under Windows 95, you should set this option to
Disabled
and install the
Bus Mastering driver.
Offboard PCI IDE Card
This option specifies if an offboard PCI IDE controller adapter card is installed
in the computer. The PCI expansion slot on the motherboard where the
offboard PCI IDE controller is installed must be specified. If an offboard PCI
IDE controller is used, the onboard IDE controller is automatically disabled.
The settings are
Auto
(AMIBIOS automatically determines where the offboard
PCI IDE controller adapter card is installed),
Slot 1, Slot 2, Slot 3, Slot 4,
Slot 5
or
Slot 6
.
This option forces IRQ14 and IRQ15 to a PCI slot on the PCI local bus. This
is necessary to support non-compliant ISA IDE controller adapter cards. If an
offboard PCI IDE controller adapter card is installed in the computer, you
must also set the Offboard PCI IDE Primary IRQ and Offboard PCI IDE
Secondary IRQ options.
Offboard PCI IDE Primary IRQ
Offboard PCI IDE Secondary IRQ
These options specify the PCI interrupt used by the primary (or secondary)
IDE channel on the offboard PCI IDE controller. The settings are
Disabled
,
Hardwired, INTA, INTB, INTC
, or
INTD
.
Page 87

Chapter 5: Running Setup
5-17
PCI Slot1 IRQ Priority
PCI Slot2 IRQ Priority
PCI Slot3 IRQ Priority
PCI Slot4 IRQ Priority
These options specify the IRQ priority for PCI devices installed in the PCI
expansion slots. The settings are
Auto, (IRQ) 3, 4, 5, 7, 9, 10, or 11, in
priority order
.
DMA Channel 0
DMA Channel 1
DMA Channel 3
DMA Channel 5
DMA Channel 6
DMA Channel 7
These DMA channels control the data transfers between the I/O devices
and the system memory. The chipset allows the BIOS to choose which
channels to do the job. The settings are
PnP or ISA/EISA.
IRQ3
IRQ4
IRQ5
IRQ7
IRQ9
IRQ10
IRQ11
IRQ12
IRQ14
IRQ15
These options specify which bus the specified IRQ line is used on and allow
you to reserve IRQs for legacy ISA adapter cards. If more IRQs must be
removed from the pool, the end user can use these options to reserve the
IRQ by assigning an
ISA/EISA
setting to it. Onboard I/O is configured by
AMIBIOS. All IRQs used by onboard I/O are configured as PCI/PnP.
IRQ14 and 15 will not be available if the onboard PCI IDE is enabled. If all
IRQs are set to
ISA/EISA
and IRQ14 and 15 are allocated to the onboard PCI
IDE, IRQ 9 will still be available for PCI and PnP devices. This is because at
least one IRQ must be available for PCI and PnP devices. The settings are
PCI/PnP or ISA/EISA.
Page 88

BIOS Manual
5-18
Reserved Memory Size
This option specifies the size of the memory area reserved for legacy ISA
adapter cards. The settings are
Disabled, 16K, 32K
or
64K
.
Reserved Memory Address
This option specifies the beginning address (in hex) of the reserved memory
area. The specified ROM memory area is reserved for use by legacy ISA
adapter cards. The settings are
C0000, C4000, C8000, CC000, D0000
,
D4000, D8000
or
DC000
.
Default Primary Video
This feature supports multiple displays. The settings are
AGP
or
PCI
.
5-1-6 Peripheral Setup
On-board SCSI
The settings for this option are
Enabled
or
Disabled
. When set to
Enable
this option enables the Adaptec 7895 BIOS on the P6DBS/P6SBS
motherboards or the Adaptec 7890 on the P6DBU/P6SBU motherboards.
Remote Power On
Microsoft's Memphis OS supports this feature which can wake-up the system
from SoftOff state through devices (such as an external modem) that are
connected to COM1 or COM2. The settings are
Disabled
or
Enabled
.
CPU Current Temperature
The current CPU temperature is displayed in this option.
CPU Overheat Warning
The settings for this option are
Enabled
or
Disabled.
When set to
Enabled
this option allows the user to set an overheat warning temperature.
CPU Overheat Warning Temperature
Use this option to set the CPU overheat warning temperature. The settings
are
25 °C through 75 °C in 1 °C intervals
.
Note: The Optimal and Fail-Safe
default settings are 55 °C
.
H/W Monitor In0 (CPU 1)
H/W Monitor In1 (CPU 2)
H/W Monitor In2 (+3.3V)
H/W Monitor In3 (+5V)
H/W Monitor In4 (+12V)
H/W Monitor In5 (-12V)
Page 89

Chapter 5: Running Setup
5-19
H/W Monitor In6 (-5V)
CPU1 Fan
CPU2 Fan
Thermal Control Fan
The above features are for PC Health Monitoring. The motherboards with
W83781D have seven on-board voltage monitors for the CPU core, CPU I/O,
+3.3V, +5V, -5V, +12V, and -12V, and three fan status monitors.
Power Loss Control
This option determines how the system will respond when power is lost and
then comes back. The settings are
Always Off, Always On
and
Previous
,
which returns the system to the state it was in before the power loss.
Keyboard Wake-Up Function
Use this option to determine which key will wake-up the system when
depressed. The settings are
Disabled, CTRL F1
and
Space
(spacebar).
On-Board FDC
This option enables the FDC (Floppy Drive Controller) on the motherboard.
The settings are
Auto
(AMIBIOS automatically determines if the floppy
controller should be enabled),
Disabled
, or
Enabled
.
On-Board Serial Port 1
This option specifies the base I/O port address of serial port 1. The settings
are
Auto
(AMIBIOS automatically determines the correct base I/O port
address),
Disabled, 3F8h/
COM1,
2F8h/COM2, 3E8h/COM3
or
2E8h/COM4
.
On-Board Serial Port 2
This option specifies the base I/O port address of serial port 2. The settings
are
Auto
(AMIBIOS automatically determines the correct base I/O port
address),
Disabled, 3F8h/COM1, 2F8h/COM2, 3E8h/COM3
or
2E8h/COM4
.
Serial Port 2 Mode
The settings for this option are
Normal, IrDA
or
ASK IR
. When set to
IrDA,
the IR Duplex Mode becomes available and can be set to either Half or Full.
When set to
ASK IR,
the IrDA Protocol becomes available and can be set to
1.6 us or 3/16.
On-Board Parallel Port
This option specifies the base I/O port address of the parallel port on the
motherboard. The settings are
Auto
(AMIBIOS automatically determines the
correct base I/O port address),
Disabled, 378, 278
or
3BC
.
Page 90

BIOS Manual
5-20
Parallel Port Mode
This option specifies the parallel port mode. The settings are
Normal, Bi-Dir
,
EPP
or
ECP
. When set to
Normal,
the normal parallel port mode is used.
Use
Bi-Dir
to support bidirectional transfers. Use
EPP
(Enhanced Parallel
Port) to provide asymmetric bidirectional data transfer driven by the host
device. Use
ECP
(Extended Capabilities Port) to achieve data transfer rates
of up to 2.5 Mbps. ECP uses the DMA protocol and provides symmetric
bidirectional communication.
Note: The Optimal default setting for this
option is ECP and the Fail-Safe setting is Normal
.
EPP Version
The settings are 1.7 or 1.9.
Note: The Optimal and Fail-Safe default
settings are N/A.
Parallel Port IRQ
This option specifies the IRQ to be used by the parallel port. The settings
are
Auto, 5
or 7.
Parallel Port DMA Channel
This option is only available if the setting of the parallel port mode option is
ECP
. The settings are 0, 1, 2, 3, 5, 6 or 7.
Note: This option is N/A
.
On-Board IDE
This option specifies the onboard IDE controller channels to be used. The
settings are
Disabled, Primary, Secondary
or
Both
.
5-2 Security Setup
5-2-1 Supervisor
User
The system can be configured so that all users must enter a password every
time the system boots or when the WINBIOS setup is executed. You can
set either a Supervisor password or a User password. If you do not want to
use a password, just press <Enter> when the password prompt appears.
The password check option is enabled in the Advanced Setup by
choosing either
Always
or
Setup
. The password is stored in CMOS RAM.
You can enter a password by typing the password on the keyboard,
selecting each letter via the mouse, or selecting each letter via the pen
stylus. Pen access must be customized for each specific hardware
platform.
Page 91

Chapter 5: Running Setup
5-21
When you select Supervisor or User, AMIBIOS prompts for a password.
You must set the Supervisor password before you can set the User
password. Enter a 1-6 character password. The password does not
appear on the screen when typed. Retype the new password as
prompted and press <Enter>. Make sure you write it down. If you forget
it, you must drain CMOS RAM and reconfigure.
5-3 Utility Setup
5-3-1 Anti-Virus
When this icon is selected, AMIBIOS issues a warning when any program
(or virus) issues a disk format command or attempts to write to the boot
sector of the hard disk drive. The settings are
Enabled
or
Disabled
.
5-3-2 Language
Note: The Optimal and Fail-Safe default settings for this option
are both
English.
5-4 Default Setting
Every option in WinBIOS Setup contains two default settings: a Fail-Safe
default, and an Optimal default.
5-4-1 Optimal Default
The Optimal default settings provide optimum performance settings for all
devices and system features.
5-4-2 Fail-Safe Default
The Fail-Safe default settings consist of the safest set of parameters. Use
them if the system is behaving erratically. They should always work but do
not provide optimal system performance characteristics.
Page 92

BIOS Manual
5-22
Notes
Page 93

Appendix A
BIOS Error Beep Codes & Messages
During the POST (Power-On Self-Test) routines, which are performed
each time the system is powered on, errors may occur.
Non-fatal errors are those which, in most cases, allow the system to
continue the boot-up process. The error messages normally appear on
the screen.
Fatal errors are those which will not allow the system to continue the
boot-up procedure. If a fatal error occurs, you should consult with your
system manufacturer for possible repairs.
These fatal errors are usually communicated through a series of audible
beeps. The numbers on the fatal error list, on the following page,
correspond to the number of beeps for the corresponding error. All
errors listed, with the exception of #8, are fatal errors.
Appendix A: BIOS Error Beep Codes
Page 94

BIOS User’s Manual
A-2
Beeps Error message Description
1 Refresh Failure The memory refresh circuitry on the
motherboard is faulty.
2 Parity Error A parity error was detected in the base
memory (the first 64 KB block) of the
system.
3 Base 64 KB Memory Failure A memory failure occurred within the
first 64 KB of memory.
4 Timer Not Operational A memory failure was detected in the
first 64 KB of memory, or Timer 1 is
not functioning.
5 Processor Error The CPU on the system board
generated an error.
6 8042 - Gate A20 Failure The keyboard controller (8042) contains
the Gate A20 switch which allows the
CPU to operate in virtual mode. This
error means that the BIOS cannot
switch the CPU into protected mode.
7 Processor Exception The CPU on the motherboard generated
Interrupt Error an exception interrupt.
8 Display Memory Read/Write The system video adapter is either
Error missing or its memory is faulty.
Please Note:
This is not a fatal error.
9 ROM Checksum Error The ROM checksum value does not
match the value encoded in the BIOS.
10 CMOS Shutdown Register The shutdown register for CMOS
Read/Write Error memory has failed.
Refer to the table on page A-3 for solutions to the error beep codes.
Page 95

A-3
Appendix A: BIOS Error Beep Codes
If it beeps... then ...
1, 2, 3 times reseat the DIMM memory. If the
system still beeps, replace the memory.
6 times reseat the keyboard controller chip. If it
still beeps, replace the keyboard
controller. If it still beeps, try a
different keyboard, or replace
the keyboard fuse, if the keyboard has one.
8 times there is a memory error on the
video adapter. Replace the video
adapter, or the RAM on the video
adapter.
9 times the BIOS ROM chip is bad.
The system probably needs a
new BIOS ROM chip.
4, 5, 7, the motherboard must be replaced.
or 10 times
Page 96

BIOS User’s Manual
A-4
Error Message Information
8042 Gate -- A20 Gate A20 on the keyboard controller (8042)
Error is not working. Replace the 8042.
Address Line Short! Error in the address decoding circuitry on
the motherboard.
C: Drive Error Hard disk drive C: does not respond. Run
the Hard Disk Utility to correct this problem.
Also, check the C: hard disk type in Standard
Setup to make sure that the hard disk type is
correct.
C: Drive Failure Hard disk drive C: does not respond.
Replace the hard disk drive.
Cache Memory Bad Cache memory is defective. Replace it. Do
Not Enable Cache!
CH-2 Timer Error Most ISA computers include two times.
There is an error in time 2.
CMOS Battery State Low CMOS RAM is powered by a battery. The
battery power is low. Replace the battery.
CMOS Checksum Failure After CMOS RAM values are saved, a
checksum value is generated for error
checking. The previous value is different from
the current value. Run WINBIOS Setup or
AMIBIOS Setup.
CMOS System Option The values stored in CMOS RAM are either
Not Set corrupt or nonexistent. Run WINBIOS
Setup or AMIBIOS Setup.
CMOS Display Type The video type in CMOS RAM does not
Mismatch match the type detected by the BIOS. Run
WINBIOS Setup or AMIBIOS Setup.
CMOS Memory Size The amount of memory on the motherboard is
Mismatch different than the amount in CMOS RAM.
Run WINBIOS Setup or AMIBIOS
Setup.
Page 97

A-5
Appendix A: BIOS Error Beep Codes
Error Message Information
CMOS Time and Run Standard Setup to set the date and time
Date Not Set in CMOS RAM.
D: Drive Error Hard disk drive D: does not respond. Run
the Hard Disk Utility. Also check the D: hard
disk type in Standard Setup to make sure that
the hard disk drive type is correct.
D: Drive Failure Hard disk drive D: does not respond.
Replace the hard disk.
Diskette Boot Failure The boot disk in floppy drive A: is corrupt. It
cannot be used to boot the computer. Use
another boot disk and follow the screen
instructions.
Display Switch Some compters require a video switch on the
Not Proper motherboard be set to either color or
monochrome. Turn the computer off, set the
switch, then power on.
DMA Error Error in the DMA controller.
DMA #1 Error Error in the first DMA channel.
DMA #2 Error Error in the second DMA channel.
FDD Controller Failure The BIOS cannot communicate with the
floppy disk drive controller. Check all
appropriate connections after the computer is
powered down.
HDD Controller Failure The BIOS cannot communicate with the hard
disk drive controller. Check all appropriate
connections after the computer is powered
down.
INTR #1 Error Interrupt channel 1 failed POST.
INTR #2 Error Interrupt channel 2 failed POST.
Page 98

BIOS User’s Manual
A-6
Error Message Information
Invalid Boot Diskette The BIOS can read the disk in floppy drive
A:, but cannot boot the computer. Use
another boot disk.
Keyboard Is Locked... The keyboard lock on the computer is
Unlock It engaged. The computer must be unlocked to
continue.
Keyboard Error There is a timing problem with the keyboard.
Set the
Keyboard
options in Standard Setup
to
Not Installed
to skip the keyboard post
routines.
KB/Interface Error There is an error in the keyboard connector.
No ROM BASIC Cannot find a bootable sector on either disk
drive A: or hard disk drive C:. The BIOS
calls INT 18h which generates this message.
Use a bootable disk.
Off Board Parity error in memory installed in an
Parity Error expansion slot. The format is:
OFF BOARD PARITY ERROR ADDR
(HEX) = (XXXX) XXXX is the hex
address where the error occurred. Run
AMIDiag to find and correct memory
problems.
On Board Parity error in motherboard memory. The
Parity Error format is:
ON BOARD PARITY ERROR ADDR
(HEX) = (XXXX) XXXX is the hex
address where the error occurred. Run
AMIDiag to find and correct memory
problems.
Parity Error???? Parity error in system memory at an unknown
address. Run AMIDiag to find and correct
memory problems.
Page 99

B-1
Appendix B: AMIBIOS POST Diagnostics Error Messages
Appendix B
AMIBIOS POST Diagnostic Error
Messages
This section describes the power-on self-tests (POST) port 80 codes for
the AMIBIOS.
Check
Point Description
00 Code copying to specific areas is done. Passing control
to INT 19h boot loader next.
03 NMI is Disabled. Next, checking for a soft reset or a
power-on condition.
05 The BIOS stack has been built. Next, disabling cache
memory.
06 Uncompressing the post code unit next.
07 Next, initializing the CPU init and the CPU data area.
08 The CMOS checksum calculation is done next.
0B Next, performing any required initialization before
keyboard BAT command is issued.
0C The keyboard controller I/B is free. Next, issuing the
BAT command to the keyboard controller.
0E The keyboard controller BAT command result has been
verified. Next, performing any necessary initialization
after the keyboard controller BAT command test.
0F The initialization after the keyboard controller BAT
command test is done. The keyboard command byte is
written next.
Page 100

BIOS User’s Manual
B-2
Check
Point Description
10 The keyboard controller command byte is written.
Next, issuing the pin 23 and 24 blocking and unblocking
commands.
11 Next, checking if the <End or <Ins> keys were pressed
during power on. Initializing CMOS RAM if the
Initialize CMOS RAM in every boot AMIBIOS POST
option was set in AMIBCP or the <End> key was
pressed.
12 Next, disabling DMA controllers 1 and 2 and interrupt
controllers 1 and 2.
13 The video display has been disabled. Port B has been
initialized. Next, initializing the chipset.
14 The 8254 timer test will begin next.
19 The 8254 timer test is over. Starting the memory refresh
test next.
1A The memory refresh test line is toggling. Checking the
15 second on/off time next.
23 Reading the 8042 input port and disabling the
MEGAKEY Green PC feature next. Making the
BIOS code segment writable and performing any
necessary configuration before initializing the interrupt
vectors.
24 The configuration required before interrupt vector
initialization has completed. Interrupt vector initialization
is done. Clearing the password if the POST DIAG
switch is on.
25 Interrupt vector initialization is done. Clearing the
password if the POST DIAG Switch is on.
27 Any initialization before setting video mode will be
done next.
 Loading...