

Supermicro SSH-C48QM, SSH-C48Q Quick Installation Manual
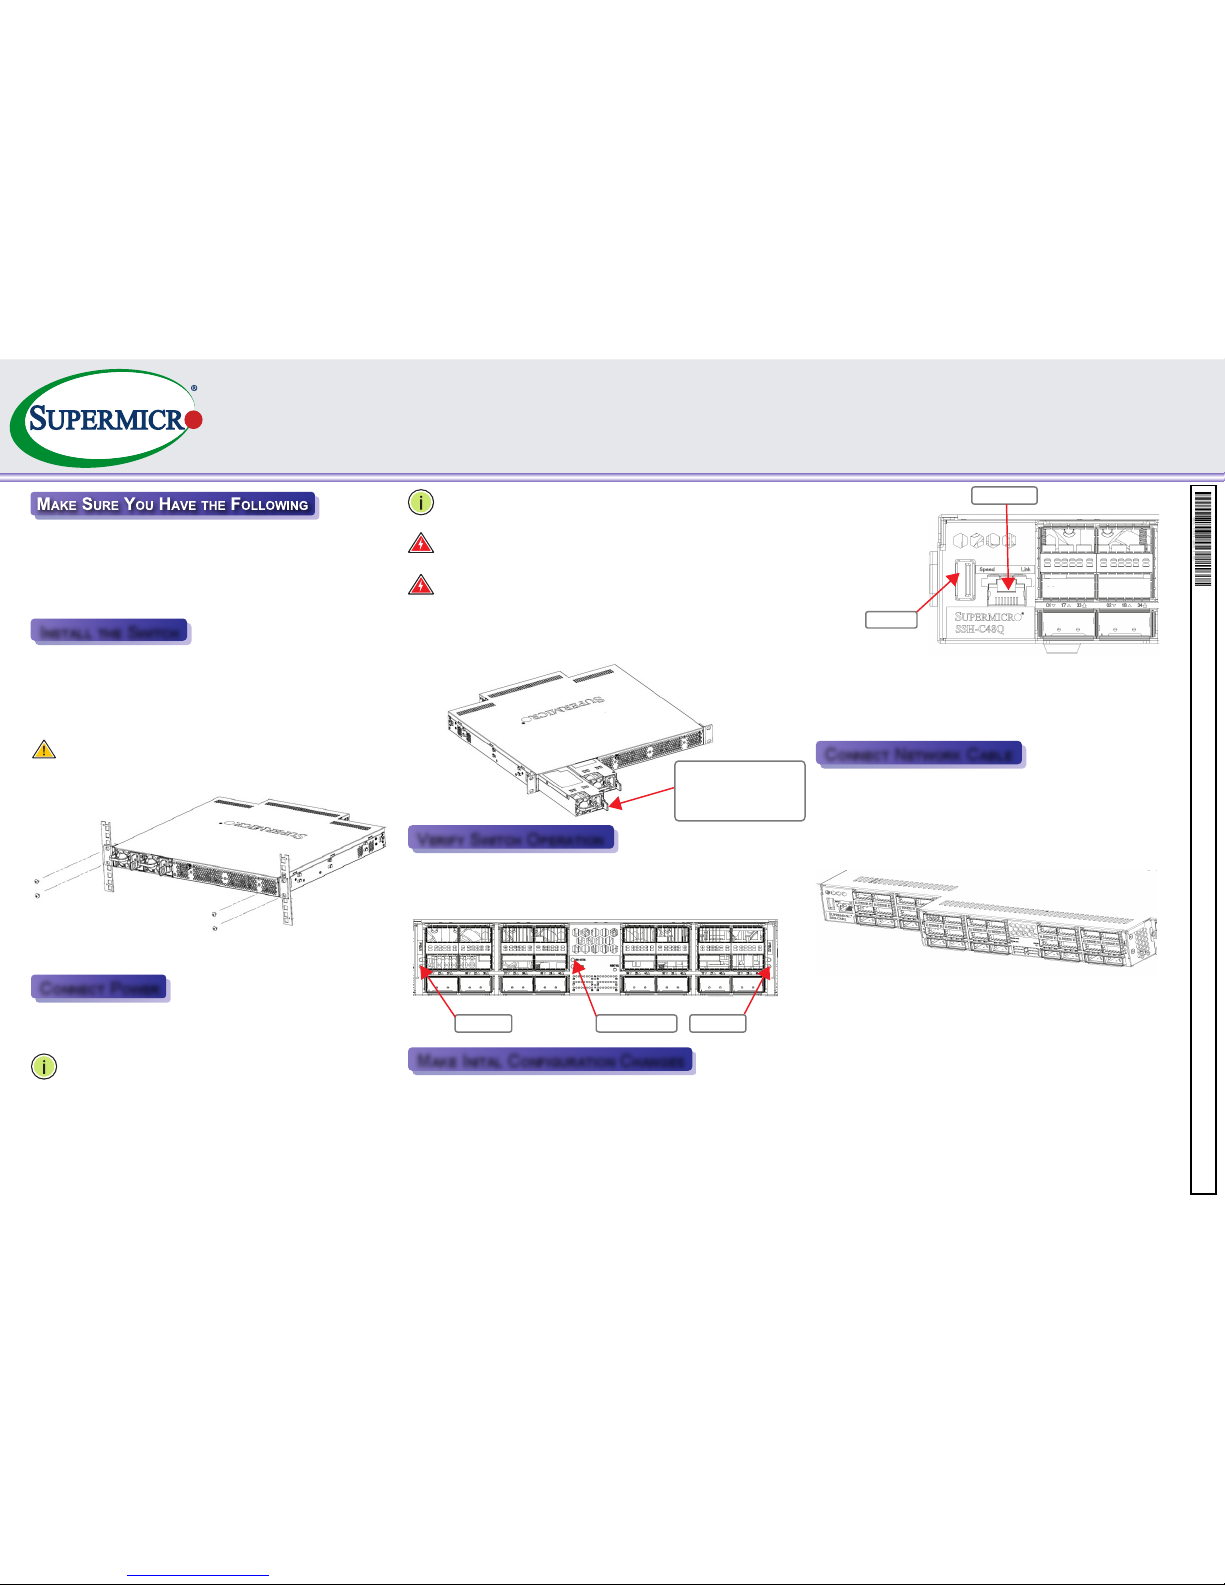
Install one or two universal
AC power modules in the
switch, connect an external
AC power source to the
modules.
QUICK INSTALLATION GUIDE
SSH-C48Q/C48QM
• OPA 100G 48-Port Top-of-Rack Switch
• Power Cords – 2
• Rack-mounting kit (two brackets and eight M4 screws)
• USB 2.0 Type A male to Type A male serial console cable
• Quick Installation Guide
Following your rack plan, mark the holes in the rack where the
switch will be installed. One person should lift the switch into the
rack so that it is aligned with the marked holes. A second person
should secure the switch in the rack, using four rack-mounting
screws (not provided).
Caution: Installing the switch in a rack requires two people.
One person should position the switch in the rack, while the
other secures it using the rack screws.
Install power modules, then power on. The switch supports up to
two PSUs.
Note: Install power modules before connecting power cords.
Disconnect power cords before removing power modules
Note: For electrical safety purposes, please pay attention to the
following warning notices, printed on the switch unit:
Warning: Disconnect the power cord from all power sources to
completely remove power from the device.
Warning: If the installation requires a different power cord than
the one supplied with the device, make sure you use a power
cord displaying the mark of the safety agency that defines the
regulations for power cords in your country. The mark is your
assurance that the power cord can be used safely with the
device
Verify basic switch operation by checking the system LEDs. When
operating normally, the PSU1/PSU2 and Mod Status should all be on
green.
At this point you may need to make a few basic switch configuration
changes by accessing CLI before connecting to the network. The CLI
can be accessed two ways (with optional management card):
1. Using the USB serial port.
2. Through Ethernet port, using Telnet or SSH.
For information on initial switch configuration, refer to the Switch
Installation Guide and the Switch User’s Guide at
https://www.supermicro.com/manuals/network/SSH-C48Q_Man
agement_GUI_User_Manual.pdf.
Connect DAC or AOC cables to the QSFP28 ports. Or first
install QSFP28 transceivers and then connect fiber optic cabling
to the transceiver ports.
As connections are made, check the port indicators to be sure
the links are valid.
INSTALL THE SWITCH
MAKE INITAL CONFIGURATION CHANGES
CONNECT NETWORK CABLE
CONNECT POWER
VERIFY SWITCH OPERATION
Ethernet Port
USB Port
Mod Status LEDPSU1 LED PSU2 LED
© 2016 Supermicro Computer Inc. All rights reserved. Reproduction of this document whether in part or in whole is strictly prohibited without Supermicro's written
consent. All Trademarks are property of their respective entities. All information provided is deemed accurate at the time of printing; however, it is not guaranteed.
MNL-1881-QRG 1.0b
Regulatory Compliance
Electromagnetic Emissions: FCC Class A, EN 55022 Class A, EN
61000-3-2/3-3, CISPR 22 Class A
Electromagnetic Immunity: EN 55032/CISPR 32, EN 55024/CISPR
24, (EN 61000-4-2, EN 61000-4-3, EN 61000-4-4, EN 61000-4-5, EN
61000-4-6, EN 61000-4-8, EN 61000-4-11)
EMC: FCC/CE/BSMI/VCCI/RCM (CLASS A)
Safety: CSA/EN/IEC/UL 60950-1 Compliant, UL or CSA Listed (USA
and Canada), CE Marking (Europe)
SSH-C48Q/C48QM
Rev 1.0b
Ports
48-Port 100-Gbps QSFP28
Network Interface
Ports 01~ 48: 100-Gbps QSFP28
Direct Attach Cables (copper) and Active Optical Cables are
supported
Weight: 7.26 kg (16 lbs), with two installed power supply modules
LEDs
System: PSU1, PSU2, Mod Status, Mod Attn (Attention), FM
(Fabric Management), M (Mgmt Present)
Ports 01~48 Indicators
Size: (W x D x H): 438 x 421.0 x 43.6 mm (17.2 x 16.6 x 1.72
inches)
Temperature:
Operating: 0°C to 40°C (32°F to 104°F)
Storage -40°C to 65°C (-40°F to 149°F)
Humidity: Operating: 5% to 85% (non-condensing)
AC Input: 100-127VAC ; 50-60Hz ; 9.5A
200-240VAC; 50-60Hz; 4.5A
DC Output: +12Vdc ;62.5A / +12Vsb; 2.1A ; Maximum 750W
(per module)
Power Supply (auto sensing, hot swappable):
100-127VAC ; 50-60Hz ; 9.5A
200-240 VAC; 50-60Hz; 4.5A
Power Consumption: 210 W (Copper); 380 (All max 3W Optical)
Warning: Only trained and qualified personnel should be
allowed to install, replace, or service this equipment.
Warning: This unit is intended for installation in restricted
access areas. A restricted access area can be accessed only
through the use of a special tool, lock and key, or other means
of security. (This warning does not apply to workstations).
Warning: When installing the product, use the provided or
designated connection cables, power cables and AC adaptors.
Using any other cables and adaptors could cause a
malfunction or a fire. Electrical Appliance and Material Safety
Law prohibits the use of UL or CSA -certified cables (that have
UL/CSA shown on the code) for any other electrical devices
than products designated by Supermicro only.
Warning: The system must be disconnected from all sources
of power and the power cord removed from the power supply
module(s) before accessing the chassis interior to install or
remove system components.
Warning: Hazardous voltage or energy is present on the
backplane when the system is operating. Use caution when
servicing.
Warning: Ultimate disposal of this product should be handled
according to all national laws and regulations.
Caution: Wear an anti-static wrist strap or take other suitable
measures to prevent electrostatic discharge when handling this
equipment.
Caution: Do not plug a phone jack connector in the RJ-45 port.
This may damage this device.
Caution: Use only twisted-pair cables with RJ-45 connectors
that conform to FCC standards.
 Loading...