

Page 1
SAVE THIS MANUAL
You will need this manual for safety instructions, operating procedures,
and warranty. Put it and the original sales invoice in a safe, dry place for
future reference.
CONSERVEZ CE GUIDE
Vous aurez besoin de ce guide pour les instructions de sécurité, les
procédures d’utilisation et la garantie. Conservez-le dans un endroit sûr et
sec pour référence future.
v
Model / Modèle : FCN50
060515
2” Flooring Cleat Nailer
Operator’s Manual (p.2)
Marteau cloueur à plancher 2 po
Guide d’utilisation (p.14)
Page 2

ENGLISHFRANÇAIS
2
IMPORTANT SAFETY INSTRUCTIONS
WARNING: When using pneumatic tools, basic
safety precautions should always be followed to
reduce the risk of personal injury.
READ ALL INSTRUCTIONS BEFORE USING THIS
TOOL
This tool was designed for installing 3/4” tongue and
groove hardwood ooring. We strongly recommend
that this tool not be modied and /or used for any
application other than that for which it was designed.
If you have any questions relative to its application, do
not use the tool until you have written us and we have
advised you.
SAFETY GLASSES: To prevent eye injuries, the
tool operator and all persons in the work area
must wear approved safety glassesto ANSIZ87.1
specications with permanently attached, rigid side
shields.
EAR PROTECTION: Wear ear protection to
safeguard against possible hearing loss.
DRESS SAFELY. Protective gloves and non-skid
footwear or safety shoes are recommended while
working with and operating this tool. Do not wear
loose clothing or jewelry. Contain long hair.
USE CLEAN, DRY, REGULATED, COMPRESSED
AIR at 70 to 90 psi / 488 to 621 kPa / 4.88 to 6.2
bar.
DO NOT CONNECT TOOL to pressure which
potentially exceeds 200 psi / 1379 kPa / 13.8 bar.
AIR HOSE: Use only hose that is rated for a
minimum working pressure of 150 psi or 150%
of the maximum system pressure, whichever is
greater. Check that connections are tight..
NEVER USE OXYGEN, CARBON DIOXIDE,
combustible gases or any other bottled gas as a
power source for this tool. Explosion and serious
personal injury could result.
COUPLINGS: Connect tool to air supply hose with
a 1/4” NPT coupling that removes all pressure from
the tool when the coupling is disconnnected.
DISCONNECT TOOL FROM AIR SUPPLY HOSE
before doing any disassembly, maintenance,
1.
2.
3.
4.
5.
6.
7.
8.
9.
Page 3

FRANÇAIS
ENGLISH
3
clearing a jammed fastener, leaving the work area,
moving the tool to another location, or handing the
tool to another person.
EXTENSION CORDS: Observe warnings that
accompany air compressors concerning the use
of the correct gauge and insulation on extension
cords used out of doors.
NEVER USE A TOOL that is leaking air, has
missing or damaged parts, or requires repair.
Make sure all screws and caps are securely
tightened.
CHECK FOR DAMAGED PARTS. Never use
a tool if safety, trigger, or spring are inoperable,
missing or damaged. Do not alter or remove
safety, trigger, or springs. Make daily inspections
for the free movement of trigger and safety
mechanism.
REPLACEMENT PARTS: When servicing, use
only identical Superior replacement parts and
fasteners recommended by us.
CONNECT TOOL TO AIR SUPPLY BEFORE
loading fasteners to prevent fasteners from
ring during connection. The fastener driving
mechanism may cycle when the tool is connected
to the air supply.
ALWAYS ASSUME THE TOOL CONTAINS
FASTENERS. Keep it pointed away from yourself
and others at all times. No horseplay. Respect the
tool as a working implement.
DO NOT LOAD FASTENERS with the hammer
face depressed. The tool may unintentionally re a
fastener.
DO NOT DEPRESS THE HAMMER FACE when
not driving fasteners. Never carry tool while
touching on the hammer face trigger mechanism:
tool may re an unwanted fastener.
DON’T OVERREACH. Keep proper footing and
balance at all times. Do not reach over or across
machines which are running.
GRIP TOOL FIRMLY to maintain control while
allowing the tool to recoil away from the work
surface as the fastener is driven.
10.
11.
12.
13.
14.
15.
16.
17.
18.
19.
IMPORTANT SAFETY INSTRUCTIONS
Page 4

ENGLISHFRANÇAIS
4
DO NOT DRIVE FASTENERS on top of other
fasteners, or with the tool at too steep an angle:
the fasteners can ricochet causing personal injury.
FIRE FASTENERS INTO WORK SURFACE
ONLY. Do not drive cleat nails nor attempt to do
so, into hard or brittle materials such as steel,
concrete, or tile.
DO NOT DRIVE FASTENERS too close to the
edge of the workpiece. The workpiece is likely to
split, allowing the fasteners to y free or ricochet
causing personal injury.
STAY ALERT. Keep hands and body away from
the path of any potential red fastener. Watch
what you are doing & use common sense. Don’t
operate any tool when you are tired or under the
inuence of drugs or alcohol. Check prescriptions
to determine if there could be a problem.
GUARD AGAINST ELECTRIC SHOCK. Prevent
body contact with grounded surfaces: pipes,
radiators, ranges, and refrigerator enclosures.
Before driving fasteners into walls, oors,
or wherever “live” electrical wires may be
encountered, try to ascertain whether there is a
danger of shock.
KEEP WORK AREA CLEAR of obstructions.
STORE IDLE EQUIPMENT. When the tool is not
being used, it should be cleaned, and stored in a
clean dry place out of the reach of children.
EMPLOYERS must enforce compliance with the
safety warnings and all other instructions in this
manual. Keep it available for use by everyone
assigned to use this tool.
WARNING: The warnings, cautions, and
instructions detailed in this manual cannot cover
all possible conditions and situations that occur. It
must be understood by the operator that COMMON
SENSE AND CAUTION ARE FACTORS that
cannot be built into this product, but MUST BE
SUPPLIED BY THE OPERATOR.
20.
21.
22.
23.
24.
25.
26.
27.
IMPORTANT SAFETY INSTRUCTIONS
Page 5

FRANÇAIS
ENGLISH
5
UNPACKING
Check immediately that all parts and accessories are
included:
Cleat Nailer 1
Hammer 1
Spacer for 1/2” ooring 1
S3 Hex Key 1
S4 Hex Key 1
S5 Hex Key 1
Air Tool Oil 1
Manual 1
If anything is missing or broken, contact your retailer
or call toll-free 1.888.267.7713.
SPECIFICATIONS
Shoots standard 15-1/2 ga. “L” shaped ooring
cleat nails minimum 1-1/2” (38mm) long to a
maximum length of 2” (50mm)
Operating pressure: 70-90 psi / 488 to 621 kPa /
4.88 to 6.2 bar (max. 120 psi / 827 kPa / 8.3 bar)
Air consumption: 5 cfm @ 80 psi / 552 kPa
Cleat nail capacity: 100
Air Inlet: 1/4” NPT
Tool weight: 5.2 kg (11.5 lb)
Pkg. weight: 10.5 kg (23.2 lb)
OPERATING PROCEDURES
SET UP
Your Superior FCN50 Cleat Nailer is fully assembled
when you receive it. See the recommended air
system setup below. Be sure that the couplers are set
up so that the air hose is depressurized when adding
or removing components from the system.
Cleat Nailer
Quick-Connector
Oiler Filter Air Supply
Air Hose
Regulator
Page 6
ENGLISHFRANÇAIS
6
AIR SOURCE
The FCN50 is designed to operate on clean, dry,
compressed air, regulated at 70 to 90 psi / 488 to
621 kPa / 4.9 to 6.1 bar. The preferred system
would include a lter, a pressure regulator, and
an automatic oiler located as close to the tool as
possible (within 5 meters (15 feet) is ideal). Do
not use bottled air or gases.
Determine if it is necessary to lubricate. All
compressed air contains moisture and other
contaminants that can harm the internal
components of the tool. An air line lter will
remove most of these and signicantly prolong the
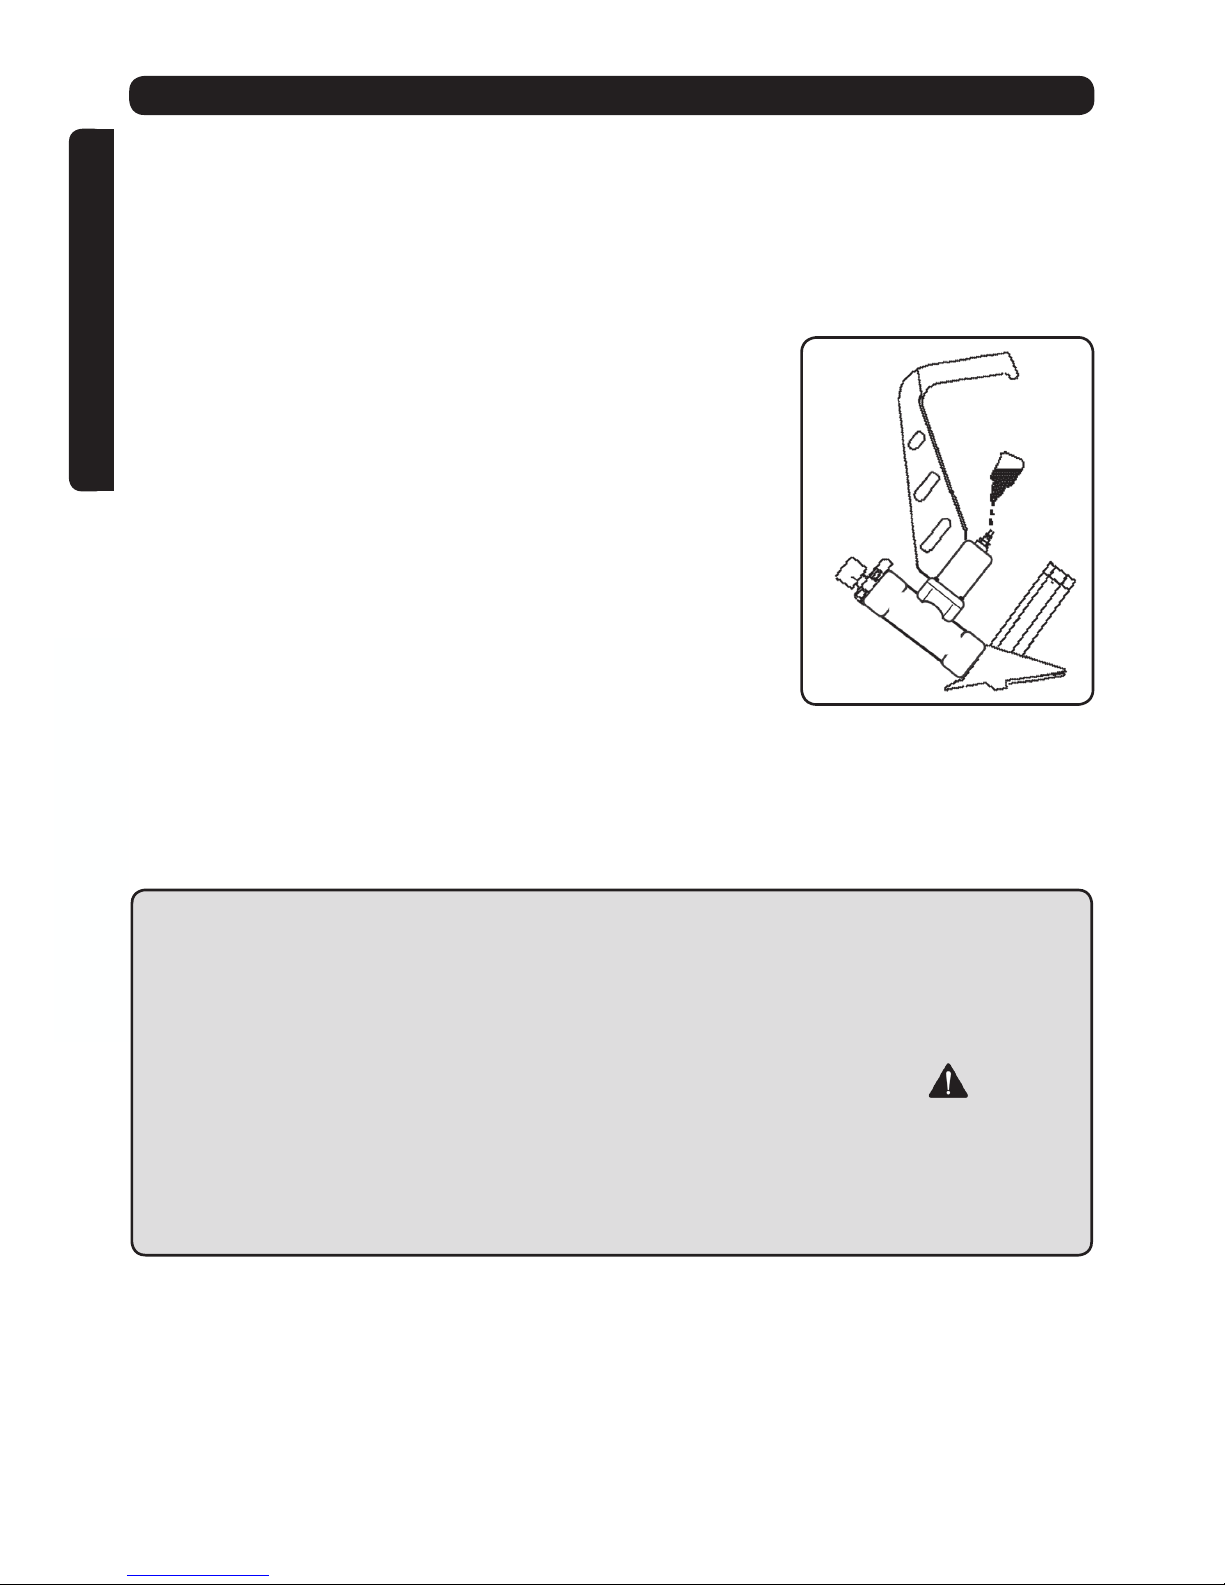
life of the tool. If you are using an in-line automatic
oiler, check and add oil if necessary. If an in-line
oiler is not available, place 2 drops of oil into the
tool’s Air Plug (FCN50-46) at the beginning of each
workday. More than this will be expelled from the
tool’s exhaust during ring.
Air Fitting: The FCN50 is equipped with a 1/4”
NPT male plug for a ‘quick connector’. To prevent
accidental cycling even though disconnected, the
tool must always be connected to the air supply
in such a way that all air pressure in it is released
when the coupling is disconnected.
CAUTION:
=All air line components (including hoses, pipe,
connectors, lters, & regulators, etc.) must
be rated for a minimum working pressure
of 150 psi / 1034 kPa / 10.3 bar or 150%
of the maximum system pressure, whichever
is greater.
=Disconnect the tool from the air supply before
performing maintenance, clearing a jammed
fastener, leaving the work area, moving the tool to
another location, or handing it to another person.
PREPARING THE TOOL
Be sure that the spacer (FCN50-25) attached to
your tool is suitable for the thickness of ooring.
The tool comes with a spacer attached designed
for 20 mm (25/32”) thick (nominally 3/4”) ooring.
If the ooring you are installing is 12.5 mm (1/2”)
thick, remove the three screws (FCN50-26) and
1.
2.
OPERATING PROCEDURES
Page 7
FRANÇAIS
ENGLISH
7
the spacer from the bottom of the shoe (FCN50-
24).
Replace the spacer with the other spacer included
and attach it with the three screws (FCN50-26).
After reading and understanding this entire
manual, connect tool to air supply.
Turn on the air compressor and adjust the
regulator to the proper pressure for the fastener
size you are using. (See Using the Tool, below
with regard to adjusting this.)
CAUTION:
=Keep the tool pointed away from yourself and
others at all times.
=Always connect the tool to air supply before
loading fasteners.
=Do not load fasteners with safety or trigger
depressed.
=Always wear approved safety glasses and
hearing protection when preparing or operating
this tool.
=Never use a tool that leaks air or needs repair.
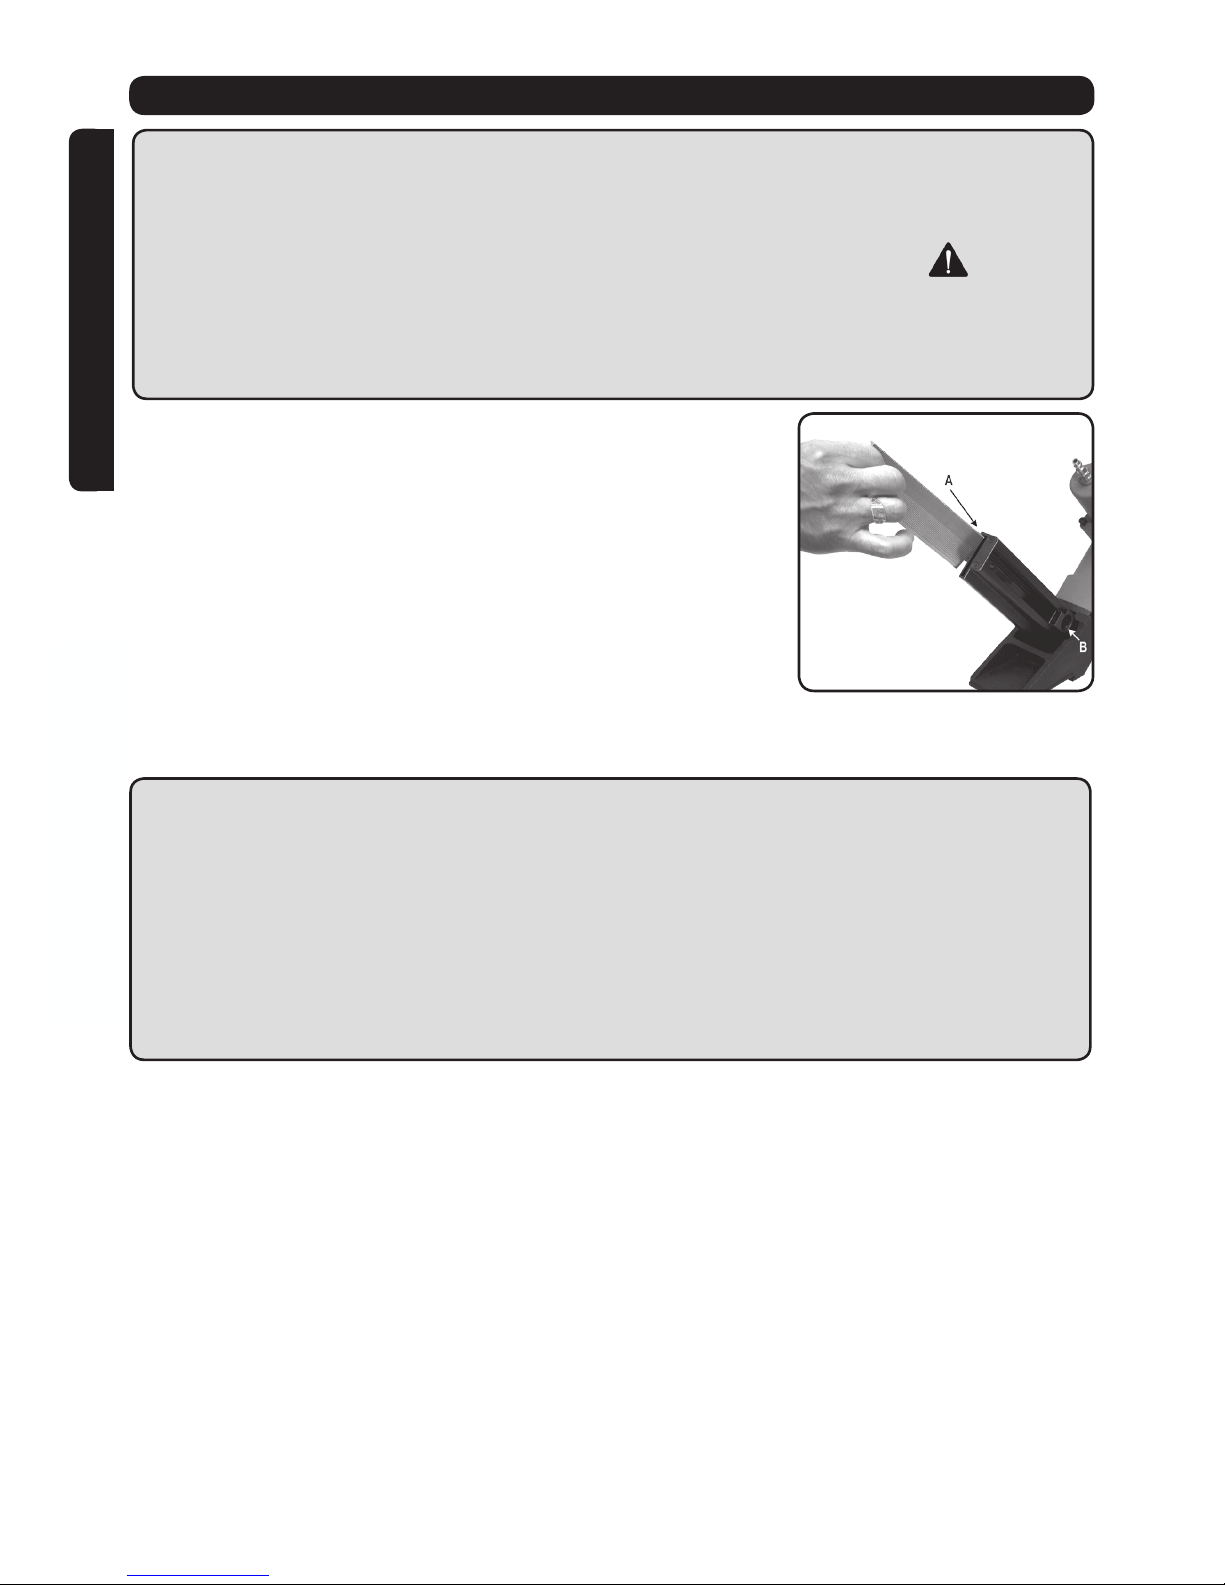
LOADING FASTENERS
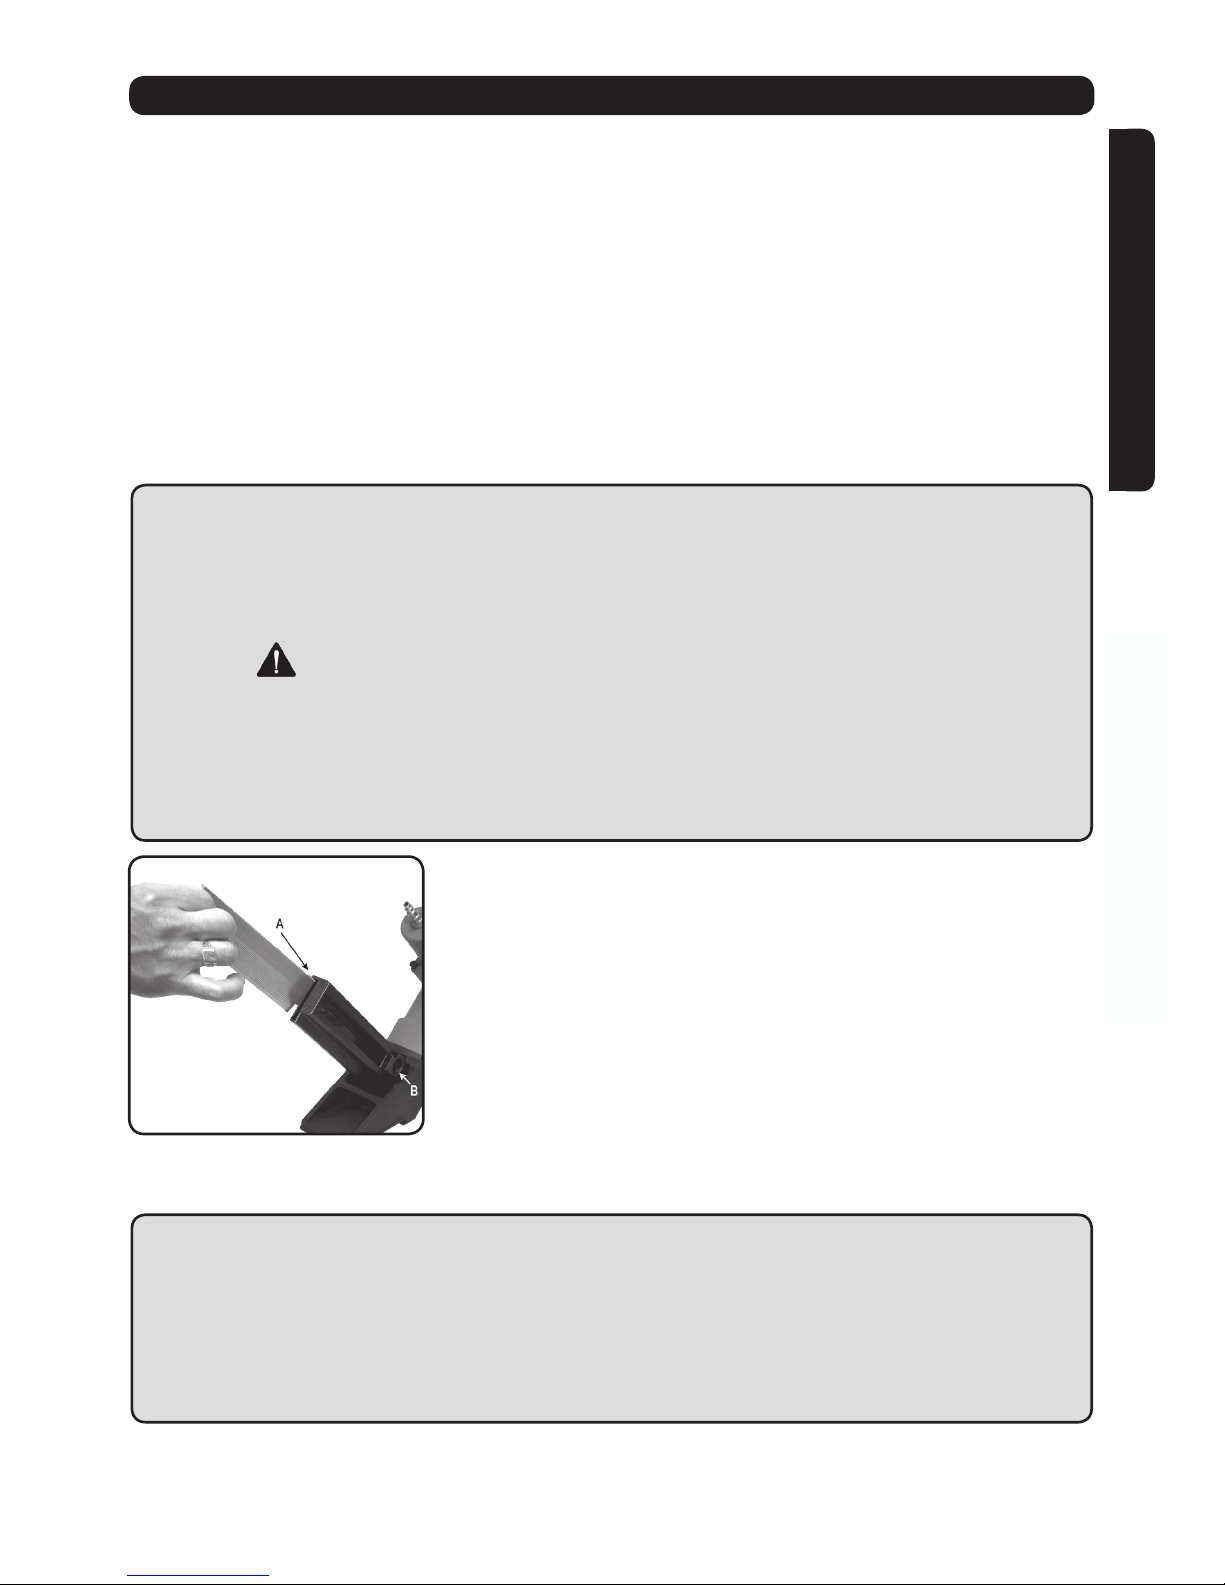
Drop a stick of cleat nails into the L-shaped hole
at the back of the magazine (A). Pull back the
slide (Bracket- FCN50-39) until the feeder shoe
(FCN50-41) clicks behind the cleat nails to hold
them against the front of the magazine with the
spring.
The tool is ready to operate.
USING THE TOOL
Complete all the steps in Preparing the Tool and
Loading Fasteners, above, before using the tool.
NOTE: Use care when installing pre-nished
ooring with this tool. It is designed to install
unnished ooring and may leave marks on the
nish of pre-nished ooring. Always test re
the FCN50 on a sample piece of ooring before
starting a new job to ensure it does not damage
the oor nish.
Connect the tool with the air supply. Make sure
the air pressure is within the range given in
SPECIFICATIONS above.
3.
4.
5.
1.
2.
1.
2.
3.
OPERATING PROCEDURES
Page 8
ENGLISHFRANÇAIS
8
The depth to which a cleat nail is driven is
determined by the supplied air pressure. Test re
a cleat nail into a sample of the material you will be
working on and check its driven depth.
If a change is desired, adjust the regulator to
supply air at a higher or lower pressure.
Test re another fastener and check depth again.
Adjust as necessary.
Tightly set a piece of ooring into position.
Position the tool against the edge of the ooring
where you want the cleat nail driven.
Hold the handle (FCN50-45 ARM in the parts list)
rmly with one hand, while swinging the mallet
(FCN50-47 HAMMER) with the other.
Strike the trigger button (FCN50-10 HAMMER
FACE) rmly with the mallet (FCN50-47
HAMMER). The blow will tap the oor board more
tightly into position, while at the same time, ring a
cleat nail at the correct angle into the edge of the
board.
Lift the tool off the work surface.
CAUTION:
=Keep tool pointed in a safe direction at all times.
=Never attempt to drive cleat nails into materials
too hard to penetrate, or at too steep an angle, or
too near the edge of the workpiece. The fastener
can ricochet causing personal injury.
=Disconnect tool from air supply before doing any
disassembly, maintenance, clearing a jammmed
fastener, leaving the work area, moving the tool
to another location, or handing the tool to another
person.
=Clean and inspect the tool daily. Carefully
check for proper operation of trigger and safety
mechanism. Do not use the tool unless both the
trigger and the safety mechanism are functional,
or if the tool is leaking air or needs any other
repair.
4.
5.
6.
7.
8.
9.
10.
11.
12.
OPERATING PROCEDURES
Page 9
FRANÇAIS
ENGLISH
9
MAINTENANCE
CLEARING A JAMMED CLEAT NAIL
CAUTION: Disconnect the tool from the air supply.
Pull back the slide (Bracket- FCN50-39) and tilt
the magazine so the stick of cleat nails slides back
with the feeder shoe (FCN50-41).
Push your index nger into the hole in the slide
(Bracket- FCN50-39) and with it depress the back
end of the feeder shoe. This will lift up the front
end of the feeder shoe and allow the fasteners
to slide past it and out the back. You may have
to depress the additional magazine spring piece
(FCN50-31). Gently allow the feeder shoe to move
back to the front of the magazine.
Use a slender, soft steel rod to push the drive
blade up the blade guide to its uppermost position.
If possible, remove the jammed fastener with
needle nose pliers through the magazine side slot,
taking care not to damage the spring.
If not, it may be necessary to remove the blade
guide (FCN50-22) to access the front of the
fastener slide.
Follow instructions in Preparing the Tool to reload
fasteners.
CLEAN AND INSPECT DAILY
CAUTION: Disconnect tool from air supply before
cleaning and inspection. Correct all problems
before putting the tool back in service.
Frequent, but not excessive lubrication is required
for the best performance. Oil added through the
air line connection will lubricatethe inside parts.
An automatic oiler is recommended, but 2 drops
of oil may be added manually into the tool’s Air
Plug (FCN50-46) at the beginning of each workday
and after about every hour of continuous use.
Only a few drops at a time are necessary. More
than this will pool inside the tool and be expelled
from the tool’s exhaust during ring. USE ONLY
PNEUMATIC TOOL OIL. Do not use detergent
oil or oil with other additives, as these can cause
accelerated wear on the seals.
Use a small amount of oil on external moving parts
and pivots.
1.
2.
3.
4.
5.
6.
7.
Page 10

ENGLISHFRANÇAIS
10
Dirt and water in the air supply are major causes
of pneumatic tool wear. Use a lter/oiler for better
performance and longer tool life. Ensure the lter
ow capacity is sufcient for the tool’s air volume
use.
Wipe tool clean and inspect for wear or damage.
Use non-amable cleaning solutions to wipe
exterior of tool only if necessary. Do Not Soak
tool with cleaning solutions. Such solutions can
damage internal parts.
Inspect trigger and safety mechanism to assure
system is complete and functional: no loose or
missing parts, no binding or sticking parts.
Keep all screws tight. Loose screws can cause
personal injury or damage the tool.
TROUBLESHOOTING
WARNING: Stop using the tool immediately if any
of the following problems occur. Serious personal
injury may result. Any repairs or replacements
must be done by qualied personnel or by an
authorized service centre only.
CAUTION:
=Disconnect the tool from air supply before
performing any service procedure.
=When inserting new or re-installing O-rings, make
sure they are clean and lubricated with an O-ring
lubricant.
MAINTENANCE
PROBLEM CAUSE SOLUTION
Air leaking in cylinder cap Loose screws in poppet
actuator (FCN50-14)
Tighten the screws and
re-check
Gasket (FCN50-17) is
cracked or worn
Replace gasket
Tool lacks power, slow to
cycle. Poor shooting and
returning performance
Tool is too dry
Add drops of lubricant as
advised
Air pressure is too low Check air supply equipment
Exhaust is blocked Clean exhaust channel
Page 11

FRANÇAIS
ENGLISH
11
Tool skips fasteners, res
intermittently
Damaged pusher spring Replace spring
Wrong size fastener Use correct fasteners: 15-
1/2 ga. L-shape cleat nails
Magazine or wear plate is
dirty
Clean magazine and nose.
Fastener is jammed in the
tool or magazine
Driver channel is worn Replace blade guide
(FCN50-22)
Driver is broken or worn Replace driver or piston
assembly (FCN50-8)
Fasteners are bent Use undamaged standard
fasteners
MAINTENANCE
SERVICE AND REPAIRS
All quality tools eventually require some servicing
or replacement parts due to wear from normal use.
If your tool requires service, ask your retailer or
call Superior Airco Wholesale at 1(888) 267-7713
for an authorized repair centre in your area. All
repairs made by local authorized repair centres
are fully guaranteed against defective material and
workmanship.
Some user-serviceable components are described
in the Troubleshooting section. We cannot
guarantee repairs made or attempted by anyone
other than authoized agencies.
Questions? Feel free to call our technical support
department toll-free at 1(888) 267-7713. In any
communication, please be prepared to give all the
information about your tool: model number, type,
serial number, etc.
Page 12

ENGLISHFRANÇAIS
12
PARTS LIST
Please refer to the Schematic Drawing on p. 25 for the
location of parts.
ITEM DESCRIPTION ITEM DESCRIPTION
FCN50-1 Plunger FCN50-24 Shoe
FCN50-2 O-Ring 15.9×1.8 FCN50-24a Pin
FCN50-3 O-Ring 19.2×1.8 FCN50-25 Spacer for 25/32"
FCN50-4 Poppet FCN50-25 Spacer for 1/2"
FCN50-5 O-Ring 17.5×2.6 FCN50-26 Screw
FCN50-6 O-Ring 42.5×5.4 FCN50-27 Spring Washer
FCN50-7 O-Ring 57.4×3.5 FCN50-28 Screw
FCN50-8 Piston Assembly FCN50-29 Rail
FCN50-9 Cylinder Bushing FCN50-30 Magazine
FCN50-10 Hammer Face FCN50-31 Spring Piece
FCN50-11 Screw FCN50-32 Nut
FCN50-12 Cylinder Cap FCN50-33 Screw
FCN50-13 O-Ring 54.2×3.5 FCN50-34 Washer
FCN50-14 Screw FCN50-35 Magazine Cap
FCN50-15 Spring Washer FCN50-36 Screw
FCN50-16 Poppet Actuator FCN50-37 Coil Spring
FCN50-17 Gasket FCN50-38 Spring Bracket
FCN50-18 Body FCN50-39 Bracket
FCN50-19 Bumper FCN50-40 Pin
FCN50-19a Screw FCN50-41 Feeder Shoe
FCN50-19b Spring Washer FCN50-42 Torsion Spring
FCN50-19c Bafe plate FCN50-43 Seal
FCN50-20 Nose FCN50-44 Screw
FCN50-21 Screw FCN50-45 Arm
FCN50-22 Blade Guide FCN50-46 Air Plug
FCN50-23 Spring Washer FCN50-47 Hammer
Page 13

FRANÇAIS
ENGLISH
13
WARRANTY
All products distributed by Airco Superior Clarke are
warranted against manufacturers’ faults and defects
for a period of one year from the date of purchase
by the end user. The Company will REPAIR OR
REPLACE, AT ITS OWN OPTION, merchandise
deemed by the company to be defective, provided
that is has not been misused, abused, altered, or
repaired by anyone other than an authorized repair
centre. Retain proof of purchase. Consumers should
return the defective product to the place of purchase
accompanied by the receipt.
This warranty does not extend to parts deemed
consumables, such as brad and staple gun driver
blades, grinding discs, welding contact tips, etc.
All warranty claims must have prior authorization
and must be shipped prepaid to the Richmond BC
warehouse, the Mississauga ON warehouse, or to an
authorized repair depot, accompanied by a copy of
the invoice specifying the date that the item was sold
to the end user.
WARNING: Repairs should be made by an
authorized repair centre. Opening this tool could
invalidate your warranty.
Page 14

ENGLISHFRANÇAIS
14
AVERTISSEMENT : Certaines consignes de
sécurité de base doivent toujours être respectées
lors de l’utilisation d’outils pneumatiques an de
réduire les risques de blessure.
LISEZ TOUTES LES CONSIGNES AVANT
D’UTILISER CET OUTIL
Cet outil a été conçu pour installer des planches de
bois franc à rainure et à languette de ¾ po. Nous
vous recommandons fortement de ne pas modier
cet outil et de ne pas l’utiliser à d’autres ns que
celle pour laquelle il a été conçu. Si vous avez des
questions quant à cette utilisation, n’utilisez pas l’outil
tant que vous n’en ayez pas obtenu réponse de notre
part.
LUNETTES DE PROTECTION : An de
se protéger contre des blessures aux yeux,
l’utilisateur de l’outil et les personnes présentes
dans l’aire de travail doivent porter des lunettes de
protections homologuées ANSIZ787.1 avec écrans
rigides latéraux xes.
PROTÈGE-OREILLES : Portez des protègeoreilles pour prévenir la perte de l’ouïe.
PORTEZ DES VÊTEMENTS APPROPRIÉS :
Des gants de protection et des chaussures
antidérapantes ou de sécurité sont recommandés
lors du travail avec cet outil. Ne portez pas de
vêtements lâches ni de bijoux. Attachez les
cheveux longs.
UTILISEZ DE L’AIR COMPRIMÉ PROPRE, SEC
ET CONTRÔLÉ entre 70 et 90 psi / 488 et 621
kPa / 4,88 et 6,2 bar.
NE BRANCHEZ PAS L’OUTIL à une pression
potentiellement plus grande que 200 psi / 1 379
kPa / 13,8 bar.
TUYAU PNEUMATIQUE : N’utilisez que le tuyau
calibré pour une pression fonctionnement minimale
de 150 psi ou 150 % de la pression maximale du
système, soit la plus élevée des deux. Vériez que
les branchements sont bien serrés.
N’UTILISEZ JAMAIS D’OXYGÈNE, DE GAZ
CARBONIQUE, de gaz à combustion ou tout
autre gaz embouteillé comme alimentation pour
1.
2.
3.
4.
5.
6.
7.
CONSIGNES DE SÉCURITÉ IMPORTANTES
Page 15

FRANÇAIS
ENGLISH
15
cet outil. Une explosion et de sérieuses blessures
pourraient en découler.
RACCORDS : Branchez l’outil au tuyau
d’alimentation pneumatique à l’aide d’un raccord
de 1/4 po TPN qui retire toute la pression de l’outil
lorsque débranché.
DÉBRANCHEZ L’OUTIL DU TUYAU
PNEUMATIQUE avant de le démonter, l’entretenir,
éliminer un clou bloqué, quitter l’aire de travail,
déplacer l’outil ou le donner à quelqu’un d’autre.
RALLONGES ÉLECTRIQUES : Respectez les
mises en garde accompagnant les compresseurs
d’air quant aux jauges et isolations appropriées
des rallonges électriques extérieures.
N’UTILISEZ JAMAIS UN OUTIL qui présente des
fuites, des pièces manquantes ou endommagées
ou qui nécessite une réparation. Assurez-vous
que toutes les vis et tous les bouchons sont bien
serrés.
VÉRIFIEZ L’ABSENCE DE DOMMAGE SUR LES
PIÈCES. N’utilisez jamais un outil si son dispositif
de sécurité, sa détente ou ses ressorts sont
manquants ou endommagés. Ne modiez pas le
dispositif de sécurité, la détente ou les ressorts.
Inspectez quotidiennement le mouvement libre de
la détente et le mécanisme de sécurité.
PIÈCES DE REMPLACEMENT : N’utilisez que
les pièces de remplacement et clous Superior
identiques que nous recommandons pour la
réparation.
BRANCHEZ L’OUTIL À LA CONDUITE
PNEUMATIQUE AVANT de charger les clous, an
d’éviter qu’ils ne s’éjectent au branchement. Le
mécanisme d’expulsion des clous peut effectuer
un cycle lorsqu’il est branché à la conduite
pneumatique.
PRÉSUMEZ TOUJOURS QUE L’OUTIL
CONTIENT DES CLOUS. Pointez toujours l’outil
loin de vous et des autres personnes. Cet outil
n’est pas un jouet. Considérez-le comme un outil
de travail.
NE CHARGEZ PAS LES CLOUS lorsque le
8.
9.
10.
11.
12.
13.
14.
15.
16.
CONSIGNES DE SÉCURITÉ IMPORTANTES
Page 16

ENGLISHFRANÇAIS
16
marteau est détendu. L’outil pourrait éjecter un
clou.
NE DÉTENDEZ PAS LE MARTEAU lorsque que
vous ne déchargez pas de clous. Ne transportez
jamais l’outil en touchant au mécanisme de
détente du marteau : il pourrait éjecter un clou non
désiré.
NE VOUS ÉTIREZ PAS INDÛMENT. Garder vos
pieds au sol et conservez votre équilibre en tout
temps. Ne vous étirez pas vers des machines en
fonctionnement.
AGRIPPEZ L’OUTIL FERMEMENT an de garder
le contrôle, tout en laissant l’outil s’éloigner de la
surface de travail quand le clou est enfoncé.
N’ENFONCEZ PAS LES CLOUS les uns pardessus les autres, ou à un angle trop aigu : les
clous pourraient rebondir et causer des blessures.
ÉJECTEZ LES CLOUS VERS LA SURFACE DE
TRAVAIL SEULEMENT. N’enfoncez pas de clou
dans un matériau dur ou friable tel l’acier, le ciment
ou la céramique.
N’ENFONCEZ PAS LES CLOUS trop près du
rebord du morceau à travailler. Le morceau
pourrait fendre, causant un ricochet du clou qui
risque d’entraîner des blessures.
SOYEZ VIGILANT. Gardez vos mains et votre
corps loin du chemin de tout clou potentiellement
éjecté. Regardez ce que vous faites et servezvous du gros bon sens. Ne faites fonctionner
aucun outil lorsque vous êtes fatigué, avez bu ou
consommé des drogues ou médicaments. Vériez
vos prescriptions médicales an de voir si des
médicaments peuvent causer des problèmes.
PROTÉGEZ-VOUS DES ÉLECTROCUTIONS.
Ne laissez pas l’habitacle entrer en contact
avec les surfaces mises à la terre : enceintes de
tuyaux, radiateurs, fours et réfrigérateurs. Avant
d’enfoncer les clous dans les murs, planchers ou
tout autre endroit où des ls électriques peuvent se
trouver, vériez s’il existe un risque d’électrocution.
GARDEZ L’AIRE DE TRAVAIL LIBRE de tout
obstacle.
17.
18.
19.
20.
21.
22.
23.
24.
25.
CONSIGNES DE SÉCURITÉ IMPORTANTES
Page 17

FRANÇAIS
ENGLISH
17
RANGEZ LES OUTILS INUTILISÉS. Lorsque
l’outil est inutilisé, il doit être nettoyé et rangé
dans un endroit sec et propre, hors de portée des
enfants.
LES EMPLOYEURS doivent s’assurer du respect
des consignes de sécurité et de toutes les autres
consignes de ce guide. Laissez ces consignes
accessibles à toute personne devant utiliser cet
outil.
AVERTISSEMENT : Les avertissements, mises
en garde et consignes de ce guide ne peuvent
couvrir toutes les situations et conditions possibles.
L’opérateur doit reconnaître que le BON SENS
ET LA PRÉCAUTION ne peuvent être intégrés au
produit, mais qu’IL DOIT LUI-MÊME EN FAIRE
PREUVE.
DÉBALLAGE
Vériez immédiatement que toutes les pièces et
accessoires sont compris.
Marteau cloueur 1
Marteau 1
Éspaceur pour planchers de 1/2 po 1
Clé hexagonale S3 1
Clé hexagonale S4 1
Clé hexagonale S5 1
Huile à outil pneumatique 1
Guide 1
S’il manque un article ou si un article est brisé,
contactez votre détaillant ou téléphonez sans frais au
1-888-267-7713.
FICHE TECHNIQUE
Éjecte des clous à plancher de calibre 15-1/2 en
forme de « L » d’une longueur minimale de 1-1/2
po (38 mm) et d’une longueur maximale de 2 po
(50 mm)
Pression de fonctionnement : 70 à 90 psi / 488 à
621 kPa / 4,88 à 6,2 bar (max. 120 psi / 827 kPa /
8,3 bar)
Consommation pneumatique : 5 pi/min @ 80 psi /
552 kPa
Capacité de clous : 100
26.
27.
CONSIGNES DE SÉCURITÉ IMPORTANTES
Page 18

ENGLISHFRANÇAIS
18
Entrée pneumatique : 1/4 po TPN
Poids de l’outil : 5,2 kg (11,5 lb)
Poids de l’emballage : 10,5 kg (23,2 lb)
PROCÉDURES D’UTILISATION
INSTALLATION
Votre marteau cloueur Superior FCN50 vous
parvient complètement assemblé. Consultez les
installations de système pneumatique recommandées
ci-dessous. Assurez-vous que les coupleurs sont
installés de façon à ce que le tuyau pneumatique soit
dépressurisé lorsque des composants sont ajoutés ou
retirés au système.
Tuyau pneumatique Régulateur
SOURCE PNEUMATIQUE
Le FNC50 est conçu pour fonctionner avec de
l’air comprimé propre et sec entre 70 et 90 psi /
488 et 621 kPa / 4,9 et 6,1 bar. Le système idéal
comprend un ltre, un régulateur de pression et
un huileur automatique situé aussi près de l’outil
que possible (idéalement à 15 pieds / 5 mètres).
N’utilisez pas d’air ou de gaz en bouteille.
Déterminez si une lubrication est nécessaire.
Tout air comprimé contient de l’humidité et autres
contaminants qui peuvent nuire aux composants
internes de l’outil. Un ltre pneumatique retirera
la plupart de ces éléments et prolongera la
durée de vie de l’outil. Si vous utilisez un huileur
automatique, vériez l’huile et ajoutez-en au
besoin. Si un huileur n’est pas disponible, versez
2 gouttes d’huile dans la che pneumatique
(FCN50-46) au début de chaque journée de travail.
Une quantité d’huile plus grande sera éjectée de
l’échappement de l’outil pendant le clouage.
Raccord pneumatique : Le FCN50 doit être doté
d’un « connecteur rapide » mâle de 1/4 po TPN.
FICHE TECHNIQUE
Marteau cloueur
Connecteur
rapide
Huileur
Filtre
Conduite
pneumatique
Page 19

FRANÇAIS
ENGLISH
19
An d’éviter tout cycle accidentel même lorsque
débranché, l’outil doit toujours être branché à la
conduite pneumatique de façon à ce que toute la
pression pneumatique à l’intérieur soit libérée au
débranchement du coupleur.
MISE EN GARDE :
=Toutes les conduites pneumatiques (y compris
les tuyaux, tubes, connecteurs, ltres,
régulateurs, etc.) doivent être calibrés pour une
pression de fonctionnement minimale de
150 psi / 1034 kPa / 10,3 bar ou 150 % de la
pression maximale du système, soit la plus
élevée des deux.
=Débranchez l’outil du tuyau pneumatique avant
de procéder à son entretien, à l’élimination d’un
clou bloqué, avant de quitter l’aire de travail, de
déplacer l’outil ou le donner à quelqu’un d’autre.
PRÉPARATION DE L’OUTIL
Vériez que l’espaceur (FCN50-25) sous la pied
de votre outil est conçu pour l’épaisseur de la
plancher. L’outil est muni d’un espaceur attaché
pour planchers de 20 mm (25/32 po.), 3/4 po.
nominale.
Si le plancher à installer a un épaisseur de 12.5
mm (1/2 po), retirez les 3 vis (FCN50-26) et
l’espaceur (FCN50-25) du pied (FCN50-24).
Remplacez l’espaceur avec l’autre inclus (FCN5025a) et l’attachez avec les trois vis (FCN50-26).
Après avoir lu et compris ce guide dans son
intégralité, branchez l’outil à la conduite
pneumatique.
Mettez le compresseur d’air en marche et ajustez
le régulateur à la pression adéquate pour la taille
de clou utilisée (voir Utilisation de l’outil ci-dessous
concernant ce réglage).
MISE EN GARDE :
=Pointez toujours l’outil loin de vous et des autres
personnes.
=Branchez toujours l’outil à l’alimentation
pneumatique avant de charger les clous.
1.
2.
3.
4.
5.
PROCÉDURES D’UTILISATION
Page 20
ENGLISHFRANÇAIS
20
MISE EN GARDE :
=Ne chargez pas les clous lorsque le marteau ou
la détente sont relâchées.
=Portez toujours des lunettes de sécurité et des
protège-oreilles lorsque vous préparez ou utilisez
cet outil.
=N’utilisez jamais un outil qui présente une fuite
d’air ou qui a besoin de réparations.
CHARGEMENT DES CLOUS
Déposez un tube de clous dans l’ouverture en
forme de « L » à l’arrière du magasin. Tirez sur
la glissière (Support – FCN50-39) jusqu’à ce que
le pied distributeur (FCN50-41) clique derrière les
clous, le ressort les retenant à l’avant du magasin.
L’outil est prêt à être utilisé.
UTILISATION DE L’OUTIL
Complétez toutes les étapes de la section
Préparation de l’outil et Chargement des clous
avant d’utiliser l’outil.
REMARQUE : Soyez prudent lorsque vous
installez un plancher préni à l’aide de cet outil.
Cet outil est conçu pour installer un plancher non
ni et il pourrait laisser des marques sur le vernis
du plancher préni. Testez toujours l’éjection de
clou de la FCN50 sur un échantillon du plancher
avant de commencer de nouveaux travaux, an de
vous assurer qu’il n’endommagera pas le vernis du
plancher.
Branchez l’outil à la conduite pneumatique.
Assurez-vous que la pression pneumatique se
situe à l’intérieur de l’échelle indiquée à la section
SPÉCIFICATIONS.
La profondeur d’enfoncement d’un clou est
déterminée par la pression pneumatique fournie.
Faites un essai avec un clou dans un échantillon
du matériau à travailler, et vériez sa profondeur
d’enfoncement.
Si une modication est souhaitée, ajustez le
régulateur pour qu’il fournisse l’air à une pression
plus ou moins élevée.
Faites un autre essai et revériez la profondeur.
1.
2.
1.
2.
3.
4.
5.
6.
PROCÉDURES D’UTILISATION
Page 21

FRANÇAIS
ENGLISH
21
Réglez au besoin.
Placez un morceau de plancher fermement en
place.
Placez l’outil contre le rebord du plancher, là où
vous désirez enfoncer le clou.
Tenez la poignée (BRAS FCN50-45 dans la liste
des pièces) fermement dans une main, tout en
abaissant le maillet (MARTEAU FCN50-47) de
l’autre.
Appuyez fermement sur le bouton de la détente
(FACE DU MARTEAU FCN50-10) à l’aide du
maillet (MARTEAU FCN50-47). Le coup frappera
sur la planche et la xera plus avant en position
tout en éjectant un clou au bon angle dans le
rebord de la planche.
Relevez l’outil.
MISE EN GARDE :
=Pointez toujours l’outil dans une direction sûre.
=N’enfoncez jamais de clou dans des matériaux
trop difciles à pénétrer, à un angle trop aigu ou
trop près du rebord du morceau. Le clou pourrait
rebondir et causer des blessures.
=Débranchez l’outil du tuyau pneumatique avant
de le démonter, l’entretenir, éliminer un clou
bloqué, quitter l’aire de travail, déplacer l’outil ou
le donner à quelqu’un d’autre.
=Nettoyez et inspectez l’outil à tous les jours.
Vériez que la détente et le mécanisme de
sécurité fonctionnent correctement. N’utilisez pas
l’outil à moins que la détente et le mécanisme de
sécurité soient fonctionnels. Ne l’utilisez pas s’il y
a une fuite d’air ou s’il doit être réparé.
ENTRETIEN
RETIRER UN CLOU BLOQUÉ
Mise en garde : Débranchez l’outil de la conduite
pneumatique.
Tirez sur la glissière (support – FCN50-39) et
inclinez le magasin de sorte que le tube de clous
glisse jusqu’au pied distributeur (FCN50-41).
Insérez votre index dans l’ouverture de la glissière
(support – FCN50-39) et détendez l’arrière du
7.
8.
9.
10.
11.
12.
1.
2.
3.
PROCÉDURES D’UTILISATION
Page 22

ENGLISHFRANÇAIS
22
pied distributeur, toujours à l’aide de l’index.
Ceci relèvera l’avant du pied distributeur et
permettra aux clous de glisser à l’arrière. Vous
devrez peut-être détendre le ressort de magasin
supplémentaire (FCN50-31). Laissez doucement
le pied distributeur reprendre sa place devant le
magasin.
À l’aide d’une tige métallique exible, poussez la
lame de pression dans le guide-lame, à sa position
supérieure.
Si possible, retirez le clou bloqué à l’aide de pinces
à épiler insérées dans la fente latérale du magasin,
en prenant soin de ne pas endommager le ressort.
Sinon, il pourrait être nécessaire de retirer le
guide-lame (FCN50-22) pour accéder au devant de
la glissière à clous.
Suivez les consignes de la section Préparation de
l’outil sur la recharge de clous.
MISE EN GARDE : Débranchez l’outil de la
conduite pneumatique avant le nettoyage et
l’inspection. Remédiez à tous les problèmes avant
de remettre l’outil en service.
Une lubrication fréquente mais non excessive
est nécessaire à une bonne performance.
L’huile ajoutée dans la connexion de la conduite
pneumatique lubriera les pièces internes.
Un huileur automatique est recommandé,
mais 2 gouttes d’huile peuvent être ajoutées
manuellement dans la che pneumatique (FCN50-
46) au début de chaque journée de travail et
après chaque heure d’utilisation continue. Seules
quelques gouttes à la fois sont nécessaires. Une
quantité d’huile plus grande sera accumulée
dans l’outil et éjectée de l’échappement de
l’outil pendant le clouage. N’UTILISEZ QUE DE
L’HUILE PNEUMATIQUE. N’utilisez pas d’huile à
détergent ou de l’huile contenant d’autre additifs :
ils pourraient accélérer l’usure des scellés.
Utilisez une petite quantité d’huile sur les pièces
externes mobiles et les pivots.
La saleté et l’eau de la conduite pneumatique
sont des causes majeures d’usure des outils
4.
5.
6.
7.
INSPECTION ET NETTOYAGE QUOTIDIENS
ENTRETIEN
Page 23

FRANÇAIS
ENGLISH
23
pneumatiques. Utilisez un ltre ou un huileur
pour une meilleure performance et une plus
grande durée de vie de l’outil. Assurez-vous que
la capacité de débit du ltre est sufsante pour le
volume d’air utilisé par l’outil.
Essuyez l’outil et inspectez-le pour toute usure
ou dommage. Utilisez une solution de nettoyage
ininammable pour essuyer l’extérieur de l’outil,
seulement si nécessaire. Ne trempez pas l’outil
dans un produit de nettoyage. De tels produits
peuvent endommager les pièces internes.
Inspectez la détente et le mécanisme de sécurité
an de vous assurer qu’ils sont complets et
fonctionnels : aucune pièce manquante ou lâche,
aucune pièce collante.
Serrez bien toutes les vis. Les vis lâches peuvent
causer des blessures ou endommager l’outil.
DÉPANNAGE
AVERTISSEMENT : Cessez immédiatement
d’utiliser l’outil si l’un des problèmes suivants
survient. Des blessures graves pourraient résulter
du défaut de respecter cette consigne. Toute
réparation ou remplacement doit être effectué par
le personnel qualié ou par un centre de service
agréé.
MISE EN GARDE :
=Débranchez l’outil de la conduite pneumatique
avant de procéder à tout entretien ou réparation.
=Lorsque vous insérez ou réinstallez des joints
toriques, assurez-vous qu’ils sont propres et
lubriés à l’aide d’un lubriant à joint torique.
ENTRETIEN
PROBLEM CAUSE SOLUTION
Fuite d’air dans le chapeau
de cylindre.
Vis déserrée dans le
champignon (FCN50-14)
Serrez la vis et vérier
Joint (FCN50-17) usé ou
endommagé
Remplacez le joint
Page 24

ENGLISHFRANÇAIS
24
L'outi fonctionne lentement
ou manque de puissance.
Lubrication insufsante Ajoutez gouttes d'huile tel
qu'indiqué
Alimentation d'air
insufsante
Vériez la source d'air
L'orice d'échappement du
chapeau de cylindre est
obstrué.
Nettoyez l'orice
d'échappement
L'outil saute des pièces de
xation.
Ressort (FCN50-17) du
poussoir est endommagé.
Remplacez le ressort du
poussoir.
Pièces de xation de la
mauvais dimension
Utilisez uniquement des
pièces reommandées :
clous à plancher en forme
de « L » de cal. 15-1/2
Saletés dan la plaque avant
ou magasin
Nettoyez la canal
d'entraînement de la plaque
avant et le magasin
Pièces de xation coincées
dans l'outil ou le magasin.
Le canal d'entraînement de
la plaque avant est usé ou
endommagé.
Remplacez la guide-lame
(FCN50-22)
La lame poussoir est
endommagé
Remplacez l'ensemble de
piston (FCN50-8)
Pièces de xation
endommagées.
Utilisez uniquement des
pièces reommandées et
non-endommmagées.
DEPANNAGE
SERVICE ET RÉPARATIONS
Tous les outils de qualité nécessitent
éventuellement un entretien ou un remplacement
de pièces, suite à une usure en cours d’utilisation
normale.
ENTRETIEN
Page 25

FRANÇAIS
ENGLISH
25
Si votre outil doit être réparé, adressez-vous
auprès de votre détaillant local ou téléphonez à
Superior Airco Wholesale au 1 (888) 267-7713
pour trouver le centre de réparation agréé de votre
secteur. Toutes les réparations effectuées par les
centres de réparation agréés sont entièrement
garanties contre toute défectuosité matérielle ou
de main-d’œuvre.
Certains composants pouvant être entretenus par
l’utilisateur sont décrits à la section Dépannage.
Nous ne pouvons garantir les réparations
effectuées par toute autre personnel que celui d’un
centre de réparation agréé.
Des questions? N’hésitez pas à téléphoner à notre
centre de soutien technique, au numéro sans frais
1 (888) 267-7713. Soyez toujours prêt à donner
les renseignements suivants concernant votre
outil : numéro du modèle, type, numéro de série,
etc.
GARANTIE
Tous les produits distribués par Airco Superior Clarke
sont garantis contre les défauts de fabrication et les
défectuosités pour une période d’un an à compter
de la date d’achat par l’utilisateur nal. La société
RÉPARERA OU REMPLACERA, À SA SEULE
DISCRÉTION, toute marchandise que la société
considère être défectueuse, pourvu qu’elle n’ait pas
subi un usage inapproprié ou abusif, et qu’elle n’a été
modiée ni réparée par une personne autre que le
personnel d’un centre de service autorisé. Conservez
la preuve d’achat. Le consommateur devrait retourner
le produit défectueux, accompagné du reçu de caisse,
au lieu d’achat.
Cette garantie ne s’applique pas aux pièces qui
doivent être remplacées périodiquement, telles
que les lames d’entraînement des agrafeuses et
des cloueuses, les disques à poncer, les becs de
soudage, etc. Toutes les demandes de réclamation
doivent avoir une autorisation préalable et les produits
doivent être expédiés, port payé, à l’entrepôt de
Richmond (Colombie-Britannique) ou de Mississauga
(Ontario), ou à un dépôt de service après-vente
autorisé, accompagné d’une copie de la facture
indiquant la date de vente de l’article à l’utilisateur
nal.
ENTRETIEN
Page 26

ENGLISHFRANÇAIS
26
LISTE DES PIÈCES
Consultez le schéma de la p.27 pour l’emplacement des pièces.
ARTICLE DESCRIPTION ARTICLE DESCRIPTION
FCN50-1 Plongeoir FCN50-24 Pied
FCN50-2 Joint torique 15.9 x 1.8 FCN50-24a Goupille
FCN50-3 Joint torique 19.2 x 1.8 FCN50-25 Espaceur (pour 25/32 po)
FCN50-4 Champignon FCN50-25a Espaceur (pour 1/2 po)
FCN50-5 Joint torique 17.5 x 2.6 FCN50-26 Vis
FCN50-6 Joint torique 42.5 x 5.4 FCN50-27 Rondelle ressort
FCN50-7 Joint torique 57.4 x 3.5 FCN50-28 Vis
FCN50-8 Ensemble de piston FCN50-29 Tranche
FCN50-9 Bague cylindrique FCN50-30 Magasin
FCN50-10 Face à marteau FCN50-31 Ressort
FCN50-11 Vis FCN50-32 Écrou
FCN50-12 Capuchon cylindrique FCN50-33 Vis
FCN50-13 Joint torique 54.2 x 3.5 FCN50-34 Rondelle
FCN50-14 Vis FCN50-35 Capuchon de magasin
FCN50-15 Rondelle ressort FCN50-36 Vis
FCN50-16 Actuateur de champignon FCN50-37 Fil à ressort
FCN50-17 Joint FCN50-38 Support à ressort
FCN50-18 Habitacle FCN50-39 Support
FCN50-19 Pare-choc FCN50-40 Goupille
FCN50-19a Vis FCN50-41 Pied distributeur
FCN50-19b Rondelle ressort FCN50-42 Ressort tordeur
FCN50-19c Plaque déecteur FCN50-43 Garde
FCN50-20 Bec FCN50-44 Vis
FCN50-21 Vis FCN50-45 Bras
FCN50-22 Guide-lame FCN50-46 Fiche pneumatique
FCN50-23 Rondelle ressort FCN50-47 Marteau
AVERTISSEMENT : Toutes les réparations doivent
être exécutées par le personnel d’un centre de
service autorisé. Si vous ouvrez cet outil, vous
risquez d’annuler la garantie.
Page 27

FRANÇAIS
ENGLISH
27
SCHEMATIC DRAWING / SCHÉMA
Superior Airco Wholesale Ltd., Richmond, BC, Canada V6X 1X5
Tel: 1-888-267-7713 www.superiorairco.com
 Loading...