

Page 1
SAVE THIS MANUAL
You will need this manual for safety instructions, operating procedures,
and warranty. Put it and the original sales invoice in a safe, dry place for
future reference.
CONSERVEZ CE GUIDE
Vous aurez besoin de ce guide pour les instructions de sécurité, les
procédures d’utilisation et la garantie. Conservez-le dans un endroit sûr et
sec pour référence future.
v
Model / Modèle : FCN1590
15
o
Framing Coil Nailer
Operator’s Manual (p.2)
Marteau pneumatique pour
clous en rouleau à 15 degrés
pour la charpente
Manuel de l’utilisateur (p.17)
060816
Page 2

ENGLISHFRANÇAIS
2
IMPORTANT SAFETY INSTRUCTIONS
WARNING: When using pneumatic tools, basic
safety precautions should always be followed to
reduce the risk of personal injury.
READ ALL INSTRUCTIONS BEFORE USING THIS
TOOL
We strongly recommend that this tool not be modied
and /or used for any application other than that for
which it was designed. If you have any questions
relative to its application, do not use the tool until you
have written or called us and we have advised you.
SAFETY GLASSES: To prevent eye injuries, the
tool operator and all persons in the work area
must wear approved safety glasses to ANSIZ87.1
specications with permanently attached, rigid side
shields.
EAR PROTECTION: Wear ear protection to
safeguard against possible hearing loss.
DRESS SAFELY. Protective gloves and non-skid
footwear or safety shoes are recommended while
working with and operating this tool. Do not wear
loose clothing or jewelry. Contain long hair.
USE CLEAN, DRY, REGULATED, COMPRESSED
AIR at 70 to 120 psi / 483 to 827 kPa / 4.8 to 8.3
bar.
DO NOT CONNECT TOOL to pressure which
potentially exceeds 180 psi / 1241 kPa / 12.4 bar.
AIR HOSE: Use only hose that is rated for a
minimum working pressure of 150 psi or 150%
of the maximum system pressure, whichever is
greater. Check that connections are tight.
NEVER USE OXYGEN, CARBON DIOXIDE,
combustible gases or any other bottled gas as a
power source for this tool. Explosion and serious
personal injury could result.
COUPLINGS: Connect tool to air supply hose with
a 1/4” NPT coupling that removes all pressure from
the tool when the coupling is disconnected.
DISCONNECT TOOL FROM AIR SUPPLY HOSE
before doing any disassembly, maintenance,
clearing a jammed fastener, leaving the work area,
moving the tool to another location, or handing the
tool to another person.
1.
2.
3.
4.
5.
6.
7.
8.
9.
Page 3

FRANÇAIS
ENGLISH
3
EXTENSION CORDS: Observe warnings that
accompany air compressors concerning the use
of the correct gauge and insulation on extension
cords used out of doors.
NEVER USE A TOOL that is leaking air, has
missing or damaged parts, or requires repair.
Make sure all screws and caps are securely
tightened.
CHECK FOR DAMAGED PARTS. Never use
a tool if safety, trigger, or spring are inoperable,
missing or damaged. Do not alter or remove
safety, trigger, or springs. Make daily inspections
for the free movement of trigger and safety
mechanism.
REPLACEMENT PARTS: When servicing, use
only identical Superior replacement parts and
fasteners recommended by us.
CONNECT TOOL TO AIR SUPPLY BEFORE
loading fasteners to prevent fasteners from
ring during connection. The fastener driving
mechanism may cycle when the tool is connected
to the air supply.
ALWAYS ASSUME THE TOOL CONTAINS
FASTENERS. Keep it pointed away from yourself
and others at all times. No horseplay. Respect the
tool as a working implement.
DO NOT LOAD FASTENERS with the hammer
face depressed. The tool may unintentionally re a
fastener.
DO NOT DEPRESS THE TRIGGER when not
driving fasteners. Never carry tool while touching
the trigger mechanism: tool may re an unwanted
fastener.
DON’T OVERREACH. Keep proper footing and
balance at all times. Do not reach over or across
machines which are running.
GRIP TOOL FIRMLY to maintain control while
allowing the tool to recoil away from the work
surface as the fastener is driven.
DO NOT DRIVE FASTENERS on top of other
fasteners, or with the tool at too steep an angle:
the fasteners can ricochet causing personal injury.
10.
11.
12.
13.
14.
15.
16.
17.
18.
19.
20.
IMPORTANT SAFETY INSTRUCTIONS
Page 4

ENGLISHFRANÇAIS
4
FIRE FASTENERS INTO WORK SURFACE
ONLY. Do not drive nails nor attempt to do so, into
hard or brittle materials such as steel, concrete, or
tile.
DO NOT DRIVE FASTENERS too close to the
edge of the workpiece. The workpiece is likely to
split, allowing the fasteners to y free or ricochet
causing personal injury.
STAY ALERT. Keep hands and body away from
the path of any potential red fastener. Watch
what you are doing & use common sense. Don’t
operate any tool when you are tired or under the
inuence of drugs or alcohol. Check prescriptions
to determine if there could be a problem.
GUARD AGAINST ELECTRIC SHOCK. Prevent
body contact with grounded surfaces: pipes,
radiators, ranges, and refrigerator enclosures.
Before driving fasteners into walls, oors,
or wherever “live” electrical wires may be
encountered, try to ascertain whether there is a
danger of shock.
KEEP WORK AREA CLEAR of obstructions.
STORE IDLE EQUIPMENT. When the tool is not
being used, it should be cleaned, and stored in a
clean dry place out of the reach of children.
EMPLOYERS must enforce compliance with the
safety warnings and all other instructions in this
manual. Keep it available for use by everyone
assigned to use this tool.
WARNING: The warnings, cautions, and
instructions detailed in this manual cannot cover
all possible conditions and situations that occur. It
must be understood by the operator that COMMON
SENSE AND CAUTION ARE FACTORS that
cannot be built into this product, but MUST BE
SUPPLIED BY THE OPERATOR.
UNPACKING
Check immediately that all parts and accessories are
included in the case:
FNC1590 Framing Coil Nailer 1
Safety Glasses (pr) 1
Air Tool Oil (bottle) 1
21.
22.
23.
24.
25.
26.
27.
n
n
n
IMPORTANT SAFETY INSTRUCTIONS
Page 5
FRANÇAIS
ENGLISH
5
S3 Hex Key 1
S4 Hex Key 1
S5 Hex Key 1
S6 Hex Key 1
Manual 1
If anything is missing or broken, contact your retailer
or call toll-free 1.888.267.7713.
SPECIFICATIONS
TOOL
Operating pressure: 70 - 120 psi / 483 to 827 kPa /
4.8 to 8.3 bar (max. 120 psi / 827 kPa / 8.3 bar)
Air consumption: 0.17 cu. ft. / cycle @ 100 psi /
(4.77 litres / cycle @ 690 kPa
Air Inlet: 1/4” NPT
Tool weight: 3.7 kg (8.2 lb)
Pkg. weight: 7 kg (15.4 lb)
FASTENERS
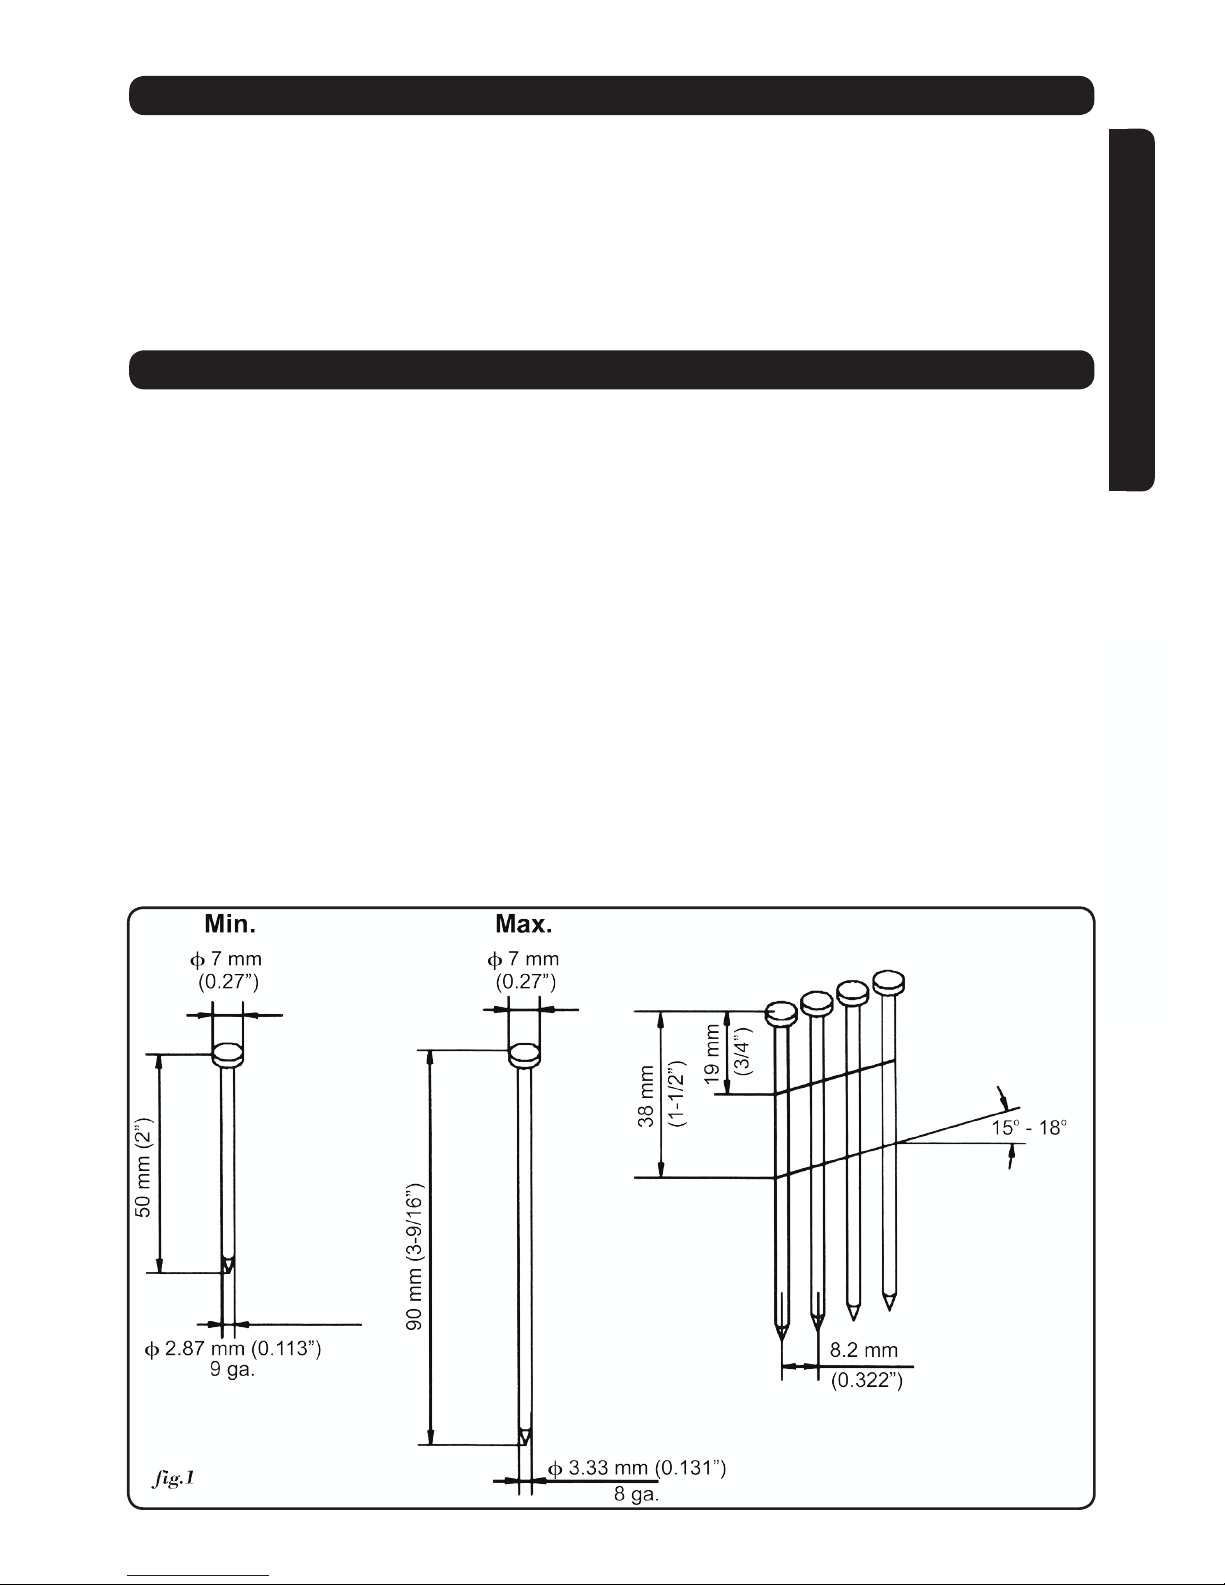
The FNC1590 is a light duty, coil fed, pneumatic
nailer, using compressed air as a power source. It is
designed to install 50 mm - 90 mm (2”– 3-9/16”) 9 ga.
to 8 ga. spiral, ring or smooth wire-collated nails with
a collation angle of 15 degrees (g.1). The tool is
made with a magnesium alloy body and cylinder cap
to provide light weight while maintaining high strength
and rigidity.
n
n
n
n
n
n
n
n
n
n
UNPACKING
Page 6

ENGLISHFRANÇAIS
6
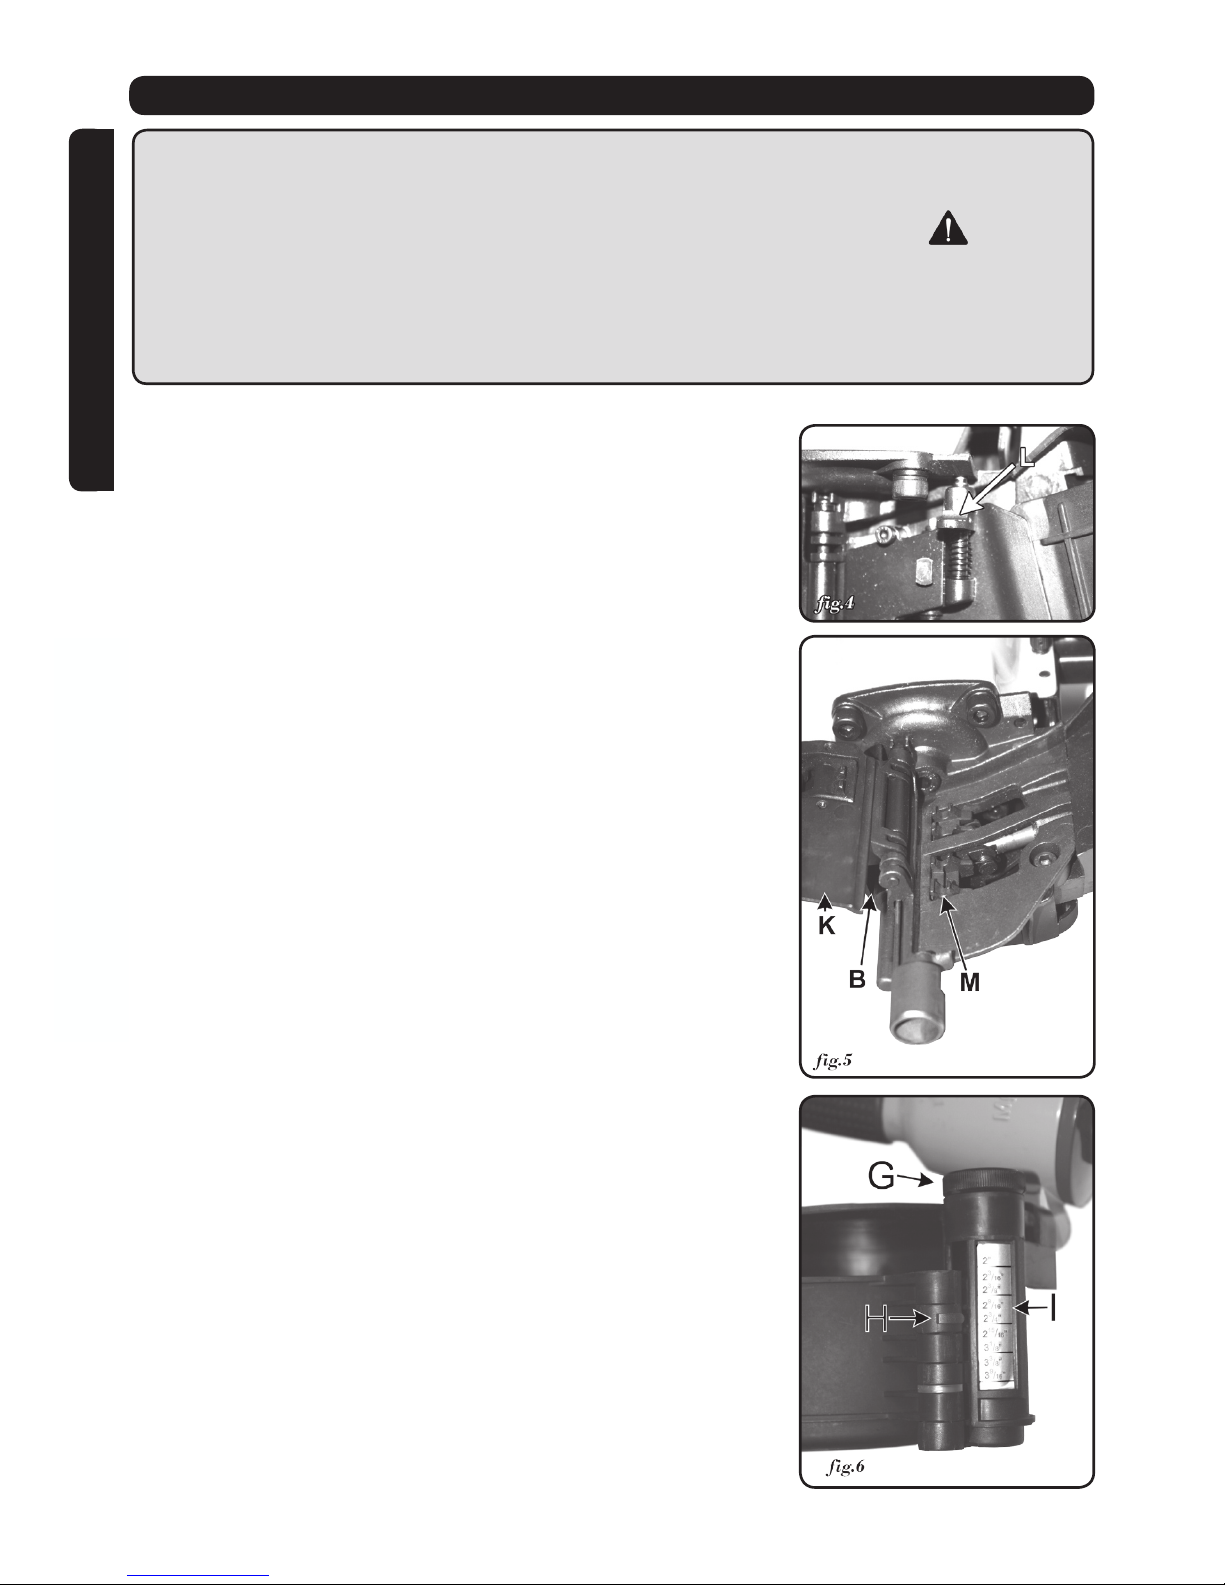
Figure 2 names the major components of the FNC1590:
A. Contact tip
B. Depth adjustment knob
C. 360 degree re-directable
exhaust port
D. Trigger mode selector
E. Trigger
F. Male quick-connect tting
G. Magazine height adjustment
knob
H. Magazine height indicator
I. Magazine height scale
J. Lower magazine
K. Feed cover plate
L. Cover plate latch
OPERATING PROCEDURES
SET UP
Your Superior FNC1590 Framing Coil Nailer is
fully assembled when you receive it. See the
recommended air system setup (g.3) below. Be sure
that the couplers are set up so that the air hose is
depressurized when adding or removing components
from the system.
AIR SOURCE
The FNC1590 is designed to operate on clean,
dry, compressed air, regulated at 70 - 120 psi /
483 to 827 kPa / 4.8 to 8.3 bar (max. 120 psi /
827 kPa / 8.3 bar). The preferred system (g.3)
would include a lter, a pressure regulator, and
an automatic oiler located as close to the tool as
possible (within 5 meters (15 feet) is ideal). Do not
use bottled air or gases.
Determine if it is necessary to lubricate. All
compressed air contains moisture and other
n
n
FUNCTIONAL DESCRIPTION
Nailer Air Hose Regulator Air Supply
FilterOiler
Page 7
FRANÇAIS
ENGLISH
7
contaminants that can harm the internal
components of the tool. An air line lter will
remove most of these and signicantly prolong the
life of the tool. If you are using an in-line automatic
oiler, check and add oil if necessary. If an in-line
oiler is not available, place 5 or 6 drops of oil into
the tool’s quick-connect tting (g 2, F) at the
beginning of each workday. More than this will be
expelled from the tool’s exhaust during ring.
PREPARING THE TOOL
Air Fitting: The FNC1590 is equipped with a 1/4”
NPT male plug for a ‘quick connector’. To prevent
accidental cycling even though disconnected, the
tool must always be connected to the air supply
in such a way that all air pressure in it is released
when the coupling is disconnected.
CAUTION:
All air line components (including hoses, pipe,
connectors, lters, & regulators, etc.) must be
rated for a minimum working pressure of 150 psi
/ 1034 kPa / 10.3 bar or 150% of the maximum
system pressure, whichever is greater. Please
try to use a hose of ID 3/8” connecting nailer with
compressor.
Do not connect this tool to a system with maxi-
mum potential pressure greater than 180 psi
(1241 kPa, 12.4 bar)
Disconnect your air line from your nailer using the
quick connect on the air hose. Do not unscrew
the air inlet from the nailer with your air hose connected.
Disconnect tool from air supply before performing
maintenance, clearing a jammed fastener, leaving work area, moving tool to another location, or
handing the tool to another person.
LOADING FASTENERS
1. After reading and understanding this entire
manual, connect tool to the air supply.
CAUTION:
Keep tool pointed away from yourself and others
at all times.
n
OPERATING PROCEDURES
Page 8
ENGLISHFRANÇAIS
8
Always connect tool to air supply before loading
fasteners
Do not load fasteners with trigger or safety
pressed.
Always wear approved safety glasses, and hear-
ing protection when preparing or operating the
tool.
Never use a tool that leaks air or needs repair.
2. Depress cover-plate latch (L, g.4).
3. Open cover plate (K, g.5)
4. Open the lower magazine (J, g.2).
5. Place a coil of nails in the lower magazine.
6. Rotate magzine height adjustment knob (G, g.6)
to adjust the lower magazine according to the
nails’ length. The highest position is used for 50
mm (2”) nails while the lowest position is used
for 90 mm (3-9/16”) nails. For all nails between
minimum and maximum, adjust lower magzine
accordingly.
7. Close lower magazine.
OPERATING PROCEDURES
Page 9
FRANÇAIS
ENGLISH
9
8. Draw the nails out and position the second nail on
to the feed hook (M, g.5).
9. Close cover-plate and latch (L, g.4).
10. Rotate the directional exhaust deector (C, g.2),
so that the exhaust air blast will be directed away
from the operator.
USING THE TOOL
Complete all of PREPARING THE TOOL and
LOADING FASTENERS before using.
This tool can be red in two different ways:
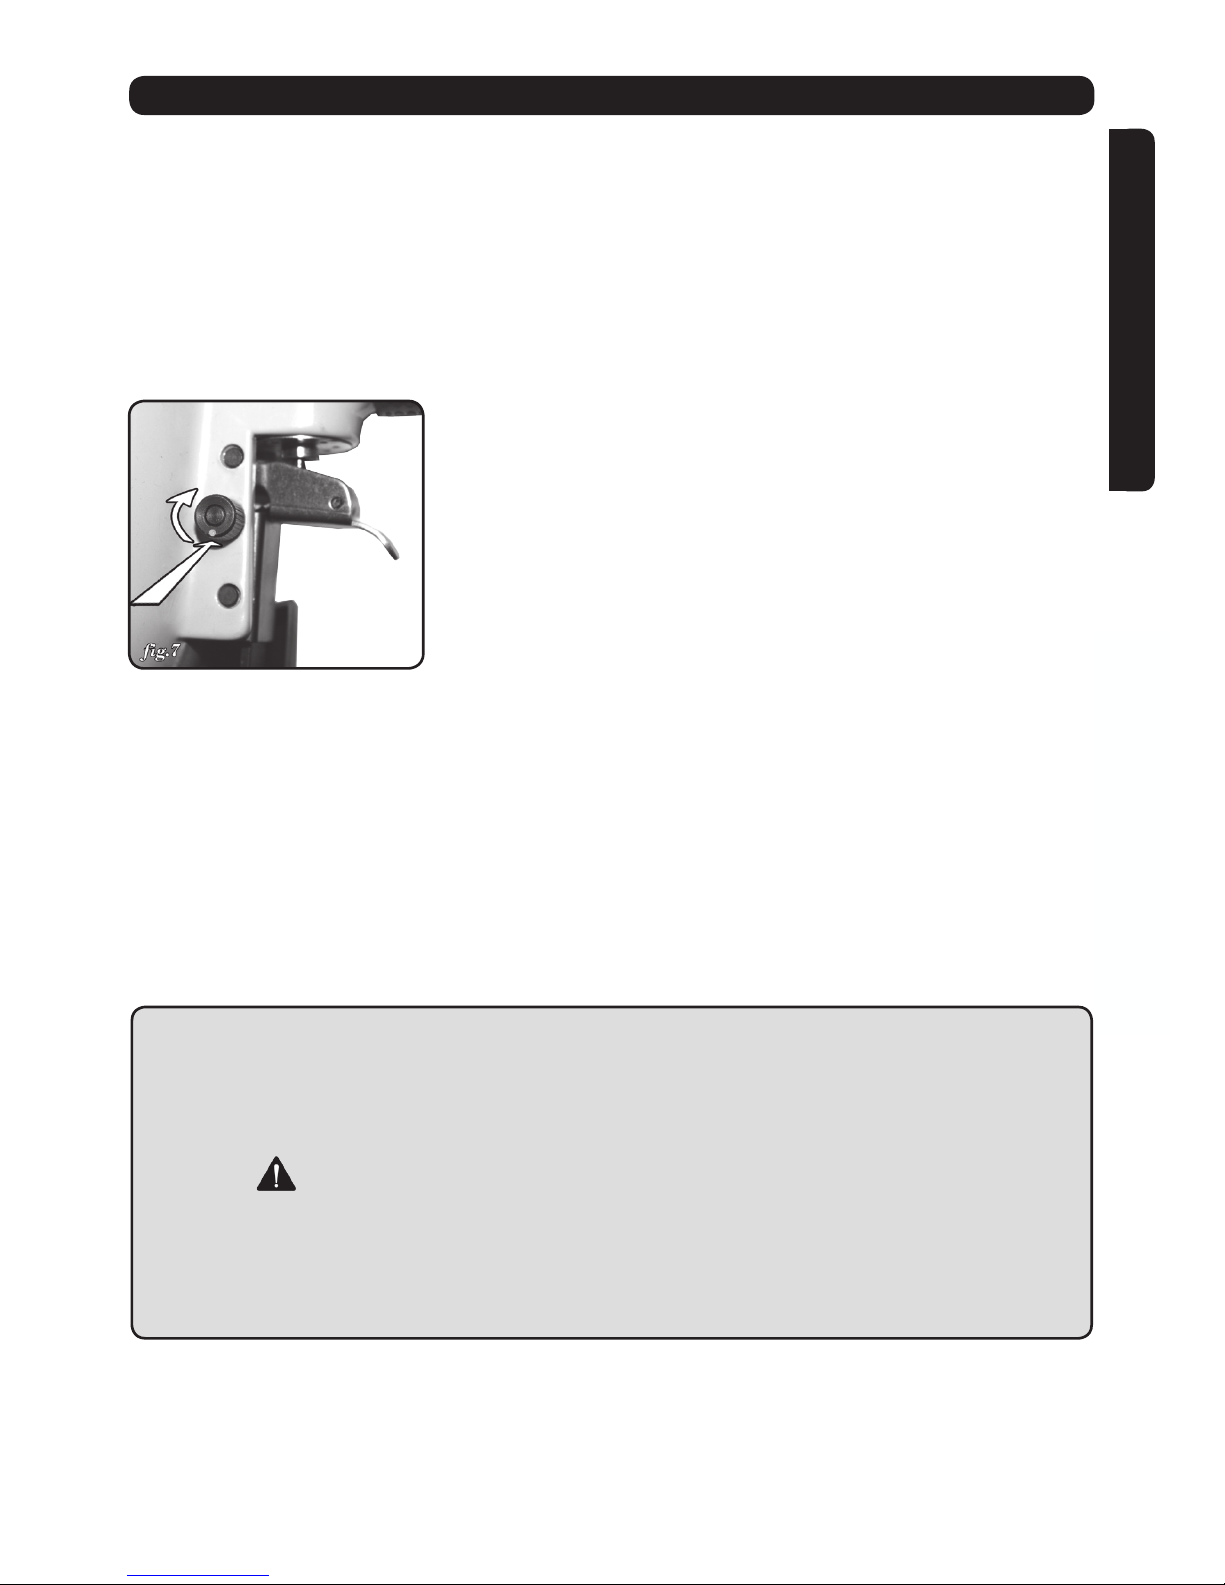
1. Sequential Fire:
Push in, then turn the trigger mode selector (D,
g.2) so the red dot is down.(g.7)
Put the contact tip (A, g.2) of the tool on the
working surface
Lightly push the tool toward the working surface
until the safety bracket is depressed
Press the trigger (E, g.2) to drive the fasteners.
This “trigger re” method provides the most
accurate fastener placement.
2. Bump Fire:
Push in, then turn the trigger mode selector (D,
g.2) so the red dot is up.(g.7)
Hold the contact tip (A, g.2) off the surface
Press the trigger
Keeping the trigger pressed, push the contact tip
(A, g.2) of the safety bracket against the working
surface. Once the bracket is pushed back enough,
the nail will re.
CAUTION:
Disconnect tool from air supply before performing
maintenance, clearing a jammed fastener, leaving
working area, moving tool to another location or
handing the tool to another person.
Clean and inspect tool daily. Carefully check for
proper operation of trigger and safety mechanism.
Do not use the tool unless both the trigger and the
safety mechanism are functional.
Do not use the tool if its leaking air or needs any
other repair.
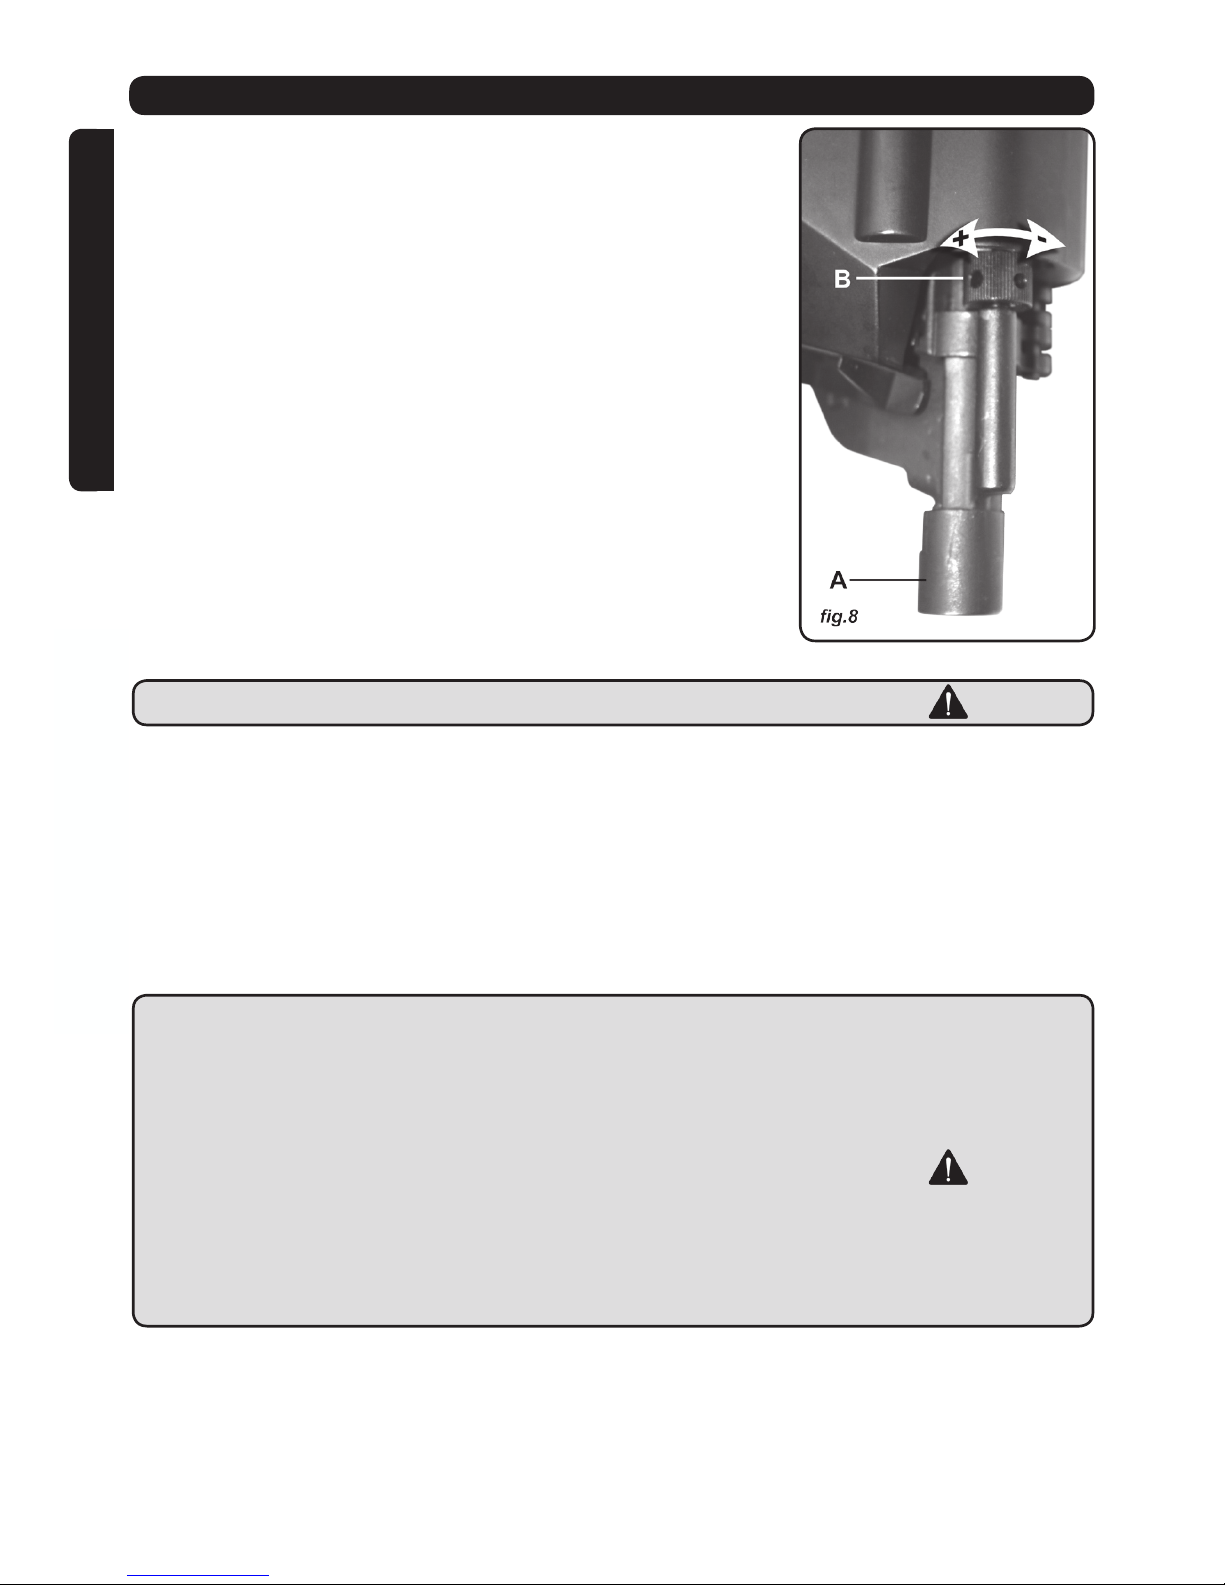
FASTENER DEPTH
Driving depth can be adjusted by rotating the depth
adjustment knob (B, g.2).
Test re a fastener into a scrap work piece and
check depth.
n
n
n
n
n
n
n
n
n
OPERATING PROCEDURES
Page 10
ENGLISHFRANÇAIS
10
If the nail is driven too deep, rotate the knob (B,
g.8) clockwise (when tool is upside-down) to
move the safety bracket downward.
If a greater depth is desired, rotate the knob
counter clockwise to adjust the safety bracket
upward.
Test re another fastener in a scrap work piece and
check the depth.
REPEAT AS NECESSARY UNTIL DESIRED
DEPTH IS ACHIEVED. The amount of air pressure
required will vary depending on the size of the
setting.
Determine the lowest setting that will consistently
perform the job at hand. Air pressure in excess of
that required can cause premature wear and/or
damage to the tool.
CLEARING A JAMMED FASTENER
CAUTION: Disconnect tool from air supply.
1. Open latch
2. Rotate lower magazine
3. Remove the nails from the magzine.
4. Use a slender; soft steel rod to drive the drive
blade to its uppermost position.
5. Use a pair of needle nose pliers to remove the
jammed fastener.
6. Follow instructions in PREPARING THE TOOL
BEFORE DRIVING to reload fasteners.
CAUTION:
Keep the tool pointed away from yourself and
others at all times.
Always connect the tool to air supply before
loading fasteners.
Do not load fasteners with safety or trigger
depressed.
Always wear approved safety glasses and
hearing protection when preparing or operating
this tool.
Never use a tool that leaks air or needs repair.
n
n
n
n
n
OPERATING PROCEDURES
Page 11

FRANÇAIS
ENGLISH
11
MAINTENANCE
CAUTION: Disconnect tool from air supply before
cleaning and inspecting the tool. Correct all problems
before operating.
CLEAN AND INSPECT DAILY
nAdd pneumatic tool oil into the oiler regularly to
assure that all moving. Frequent, but not excessive lubrication is required for the best performance. Oil added through the air line connection
will lubricate the inside parts. An automatic oiler
is recommended, but 2 drops of oil may be added
manually into the tool’s air intake at the male
quick-connect tting (F, g.1) at the beginning
of each workday and after about every hour of
continuous use. Only a few drops at a time are
necessary. More than this will pool inside the tool
and be expelled from the tool’s exhaust during
ring. USE ONLY PNEUMATIC TOOL OIL. Do
not use detergent oil or oil with other additives, as
these can cause accelerated wear on the seals.
nCheck the lter of the compressor weekly.
Open drain cock to drain all water and contaminants out of the air tank.
nWipe the tool clean.
nBlow the tool clean using high compressed air,
and then use non-ammable cleaning solutions to
wipe exterior of tool if necessary.
nDo not soak tool in cleaning solutions. Such solu-
tions can damage internal parts. The exposed
portion of the small piston rod and feed hook must
be kept clean.
nInspect trigger and safety mechanism daily to as-
sure system is complete and functional.
nKeep all screws tight. Loose screws can cause
personal injury or damage to the tool. Check if
there are worn and damaged parts. If any, please
replace immediately.
TROUBLESHOOTING
WARNING: Stop using the tool immediately if any
of the following problems occur. Serious personal
injury may result. Any repairs or replacements
must be done by qualied personnel or by an
authorized service centre only.
Page 12

ENGLISHFRANÇAIS
12
CAUTION:
Disconnect the tool from air supply before
performing any service procedure.
When inserting new or re-installing O-rings,
make sure they are clean and lubricated with an
O-ring lubricant.
TROUBLESHOOTING
PROBLEM CAUSE SOLUTION
Air leaking at trigger area 1.O-ring in trigger valve stem
is worn and damaged.
1. Check/replace O-ring &
lubricate
2. O-ring in trigger valve head
is worn or damaged
2. Check/replace O-ring &
lubricate
3. Contains foreigh matter 3. Clean the tool & lubricate
Air leaking from the lower
body and the nose
1. Screw is loose at
connection between nose and
body
1. Tighten screw & re-check
2. O-ring is damaged between
body and nose
2. Check/replace O-ring &
lubricate
3. Bumper is damaged Replace the bumper
4. Foreign matter at the
contact between bumper and
body
Disassemble & clean
Air leaking from the upper
body and the nose
1. Screw is loose at
connection between cylinder
and body
1. Tighten screw & re-check
2. O-ring is damaged 2. Check/replace O-ring &
lubricate
3. Gasket is damaged Replace the gasket
Failure to start tool 1. Tool dry, lack of lubrication 1. Use pneumatic tool oil
2. Spring in the cylinder cap is
damaged
2. Replace spring in the
cylinder cap
3. Valve sticks to cylinder cap 3. Disassemble, clean &
lubricate
Blade driving fasteners too
deeply
1. Safety bracket position is
incorrect
1. Rotate depth adjustment
know to move the safety
braket down
2. Air pressure is too high 2. Decrease air pressure
Tool skips fasteners, feeds
intermittently
1. Foreign matter between
the small piston and small
cylinderDamaged pusher
spring
3. Disassemble, clean &
lubricate
2. O-ring on the small piston is
worn and damaged
2. Check/replace O-ring &
lubricate
3. Tool dry, lack of lubrication 3. Use pneumatic tool oil
4. Spring on the small piston
is damaged
4. Replace small spring
5. Air pressure too low 5. Increase air pressure, but
don't exceed120 psi (827 kPa)
Page 13

FRANÇAIS
ENGLISH
13
TROUBLESHOOTING
PROBLEM CAUSE SOLUTION
6. Body/nose connecting
screw is loose
6. Tighten all screws
7. Stop hook can't stop
fasteners
7. Replace the taper spring on
the stop hook
8. Bent fasteners 8. Use recommended
fasteners
9. Wrong size fasteners 9. Use recommended
fasteners
10. Gasket is damaged 10. Replace gasket/tighten
screw
11. Small piston is dry 11. Open nail housing, place
several drops of pneumatic
tool oil into the end cover hole
of the small piston
12. Small piston bumper is
worn and damaged
12. Replace bumper and
lubricate small piston
13. Feed hook is binding Clean feed hook and torsion
spring
14. Nail length does not
correspond with height setting
on lower magazine
14. Adjust magazine height
adjusting knob on the lower
magazine
15. Weld-wires in nail coil
broken
15. Discard coil
Runs slowly or has power loss 1. Tool dry, lack of lubrication 1.Use pneumatic tool oil
2. Spring in cylinder cap
damaged
2. Replace spring in the
cylinder cap
3. Foreign matter between the
piston assembly and cylinder
3. Disassemble, clean &
lubricate
4. Cylinder is not assembled
to home position
4. Reassemble after
disassembling
5. O-ring on the valve is dry
after disassembly
5. Lubricate and reassemble
6. Air pressure too low 6. Increase air pressure, but
don't exceed120 psi (827 kPa)
7. Driver is worn 7. Replace the piston
assembly
8. Inner diameter of hose is
too small
Use larger diameter hose
(3/8" minimum)
Fastener are jammed 1. Fasteners are wrong size 1. Use recommended
fasteners
2. Weld-wires in nail coil
broken
2. Discard coil
Page 14

ENGLISHFRANÇAIS
14
PARTS LIST
Please refer to the Schematic Drawing on p. 34 for the
location of parts.
Item Description
FNC1590-1 Screw
FNC1590-2 Spring Washer
FNC1590-3 Bushing
FNC1590-4 Exhaust Cover
FNC1590-5 Seal
FNC1590-6 Screw
FNC1590-7 Spring Washer
FNC1590-8 Cylinder Cap
FNC1590-9 Gasket
FNC1590-10 Washer
FNC1590-11 Valve Seat
FNC1590-12 Spring
FNC1590-13 O-Ring 57.5 x 2.6
FNC1590-14 O-Ring 72.4 x 3.5
FNC1590-15 Valve
FNC1590-16 Screw
FNC1590-17 Cylinder Seal
FNC1590-18 Collar
FNC1590-19 O-Ring 54.4 x 4
FNC1590-20 Piston Assembly
FNC1590-21 Cylinder
FNC1590-22 O-Ring 67 x 3
FNC1590-23 O-Ring 60.25 x 2.5
FNC1590-24 Restrictive Seal
FNC1590-25 O-Ring 97.5 x 3.5
FNC1590-26 Bumper
FNC1590-27 Bumper
FNC1590-28 Body
FNC1590-29 O-Ring 62.3 x 1.8
FNC1590-30 Guide Washer
FNC1590-31 Nose
FNC1590-32 Spring Washer
FNC1590-33 Screw
Item Description
FNC1590-34 Spring
FNC1590-35 Bracket Assembly
FNC1590-36 Adjuster
FNC1590-37 Safety Bracket
FNC1590-38 Seal
FNC1590-39 Pin
FNC1590-40 Safety Guide
FNC1590-41 O-Ring 8.3 x 1.8
FNC1590-42 Rotating Shaft Pin
FNC1590-43 Spring
FNC1590-44 Rotating Shaft Bushing
FNC1590-45 Spring Pin
FNC1590-46 O-Ring 20.3 x 2.5
FNC1590-47 O-Ring 20.3 x 1.5
FNC1590-48 Valve Set
FNC1590-49 O-Ring 9.5 x 1.9
FNC1590-50 O-Ring 10.3 x 1.9
FNC1590-51 Trigger Valve Head
FNC1590-52 O-Ring 12.8 x 1.9
FNC1590-53 Spring
FNC1590-54 O-Ring 5.5 x 1.5
FNC1590-55 Trigger Valve Stem
FNC1590-56 O-Ring 24.8 x 2
FNC1590-57 Trigger Valve Guide
FNC1590-58 Trigger Spring
FNC1590-59 Trigger
FNC1590-60 Spring Pin
FNC1590-61 Washer
FNC1590-62 Locking Washer
FNC1590-63 Cover
FNC1590-64 Spring
FNC1590-65 Piston Bumper
FNC1590-66 O-Ring 28.3 x 3
Page 15

FRANÇAIS
ENGLISH
15
Item Description
FNC1590-67 Piston
FNC1590-68 Torsion Spring
FNC1590-69 Pin
FNC1590-70 Feed Hook
FNC1590-71 O-Ring 14.3 x 2.5
FNC1590-72 Screw
FNC1590-73 Pin
FNC1590-74 Plate
FNC1590-75 Guard
FNC1590-76 Clear Guard
FNC1590-77 Pin
FNC1590-78 Stop Hook
FNC1590-79 Taper Spring
FNC1590-80 Screw
FNC1590-81 Spring Washer
FNC1590-82 Block Plate
FNC1590-83 Spring
FNC1590-84 Pin
Item Description
FNC1590-85 Spring Pin
FNC1590-86 Handle
FNC1590-87 Nut
FNC1590-88 Washer
FNC1590-89 Pin
FNC1590-90 Lower Magazine
FNC1590-91 Seal
FNC1590-92 Adjusting Stem
FNC1590-93 Adjusting Bushing
FNC1590-94 Seal
FNC1590-95 Upper Magazine
FNC1590-96 Adjusting Knob
FNC1590-97 Screw
FNC1590-98 Screw
FNC1590-99 Soft Grip Sleeve
FNC1590-100
O-Ring 65.4 x 2.5
FNC1590-101
End Cap
FNC1590-102
Air Plug
PARTS LIST
Please refer to the Schematic Drawing on p. 34 for
the location of parts.
SERVICE AND REPAIRS
All quality tools eventually require some servicing
or replacement parts due to wear from normal use.
If your tool requires service, ask your retailer or
call Superior Airco Wholesale at 1(888) 267-7713
for an authorized repair centre in your area. All
repairs made by local authorized repair centres
are fully guaranteed against defective material and
workmanship.
Some user-serviceable components are described
in the Troubleshooting section. We cannot
guarantee repairs made or attempted by anyone
other than authoized agencies.
Questions? Feel free to call our technical support
department toll-free at 1(888) 267-7713. In any
communication, please be prepared to give all the
information about your tool: model number, type,
serial number, etc.
n
n
n
n
Page 16

ENGLISHFRANÇAIS
16
WARNING: Repairs should be made by an
authorized repair centre. Opening this tool could
invalidate your warranty.
WARRANTY
All products distributed by Airco Superior Clarke are
warranted against manufacturers’ faults and defects
for a period of one year from the date of purchase
by the end user. The Company will REPAIR OR
REPLACE, AT ITS OWN OPTION, merchandise
deemed by the company to be defective, provided
that is has not been misused, abused, altered, or
repaired by anyone other than an authorized repair
centre. Retain proof of purchase. Consumers should
return the defective product to the place of purchase
accompanied by the receipt.
This warranty does not extend to parts deemed
consumables, such as brad and staple gun driver
blades, grinding discs, welding contact tips, etc.
All warranty claims must have prior authorization
and must be shipped prepaid to the Richmond BC
warehouse, the Mississauga ON warehouse, or to an
authorized repair depot, accompanied by a copy of
the invoice specifying the date that the item was sold
to the end user.
Page 17

FRANÇAIS
ENGLISH
17
AVERTISSEMENT : Certaines consignes de
sécurité de base doivent toujours être respectées
lors de l’utilisation d’outils pneumatiques an de
réduire les risques de blessure.
LISEZ TOUTES LES CONSIGNES AVANT
D’UTILISER CET OUTIL
Nous vous recommandons fortement de ne pas
modier cet outil et de ne pas l’utiliser à d’autres ns
que celle pour laquelle il a été conçu. Si vous avez
des questions quant à cette utilisation, n’utilisez pas
l’outil tant que vous n’en ayez pas obtenu réponse de
notre part.
LUNETTES DE PROTECTION : An de
se protéger contre des blessures aux yeux,
l’utilisateur de l’outil et les personnes présentes
dans l’aire de travail doivent porter des lunettes de
protections homologuées ANSIZ787.1 avec écrans
rigides latéraux xes.
PROTÈGE-OREILLES : Portez des protègeoreilles pour prévenir la perte de l’ouïe.
PORTEZ DES VÊTEMENTS APPROPRIÉS :
Des gants de protection et des chaussures
antidérapantes ou de sécurité sont recommandés
lors du travail avec cet outil. Ne portez pas de
vêtements lâches ni de bijoux. Attachez les
cheveux longs.
UTILISEZ DE L’AIR COMPRIMÉ PROPRE, SEC
ET CONTRÔLÉ entre 70 et 120 psi / 483 et 827
kPa / 4,8 et 8,3 bar.
NE BRANCHEZ PAS L’OUTIL à une pression
potentiellement plus grande que 180 psi / 1 241
kPa / 12,4 bar.
TUYAU PNEUMATIQUE : N’utilisez que le tuyau
calibré pour une pression fonctionnement minimale
de 150 psi ou 150 % de la pression maximale du
système, soit la plus élevée des deux. Vériez que
les branchements sont bien serrés.
N’UTILISEZ JAMAIS D’OXYGÈNE, DE GAZ
CARBONIQUE, de gaz à combustion ou tout
autre gaz embouteillé comme alimentation pour
cet outil. Une explosion et de sérieuses blessures
pourraient en découler.
1.
2.
3.
4.
5.
6.
7.
CONSIGNES DE SÉCURITÉ IMPORTANTES
Page 18

ENGLISHFRANÇAIS
18
RACCORDS : Branchez l’outil au tuyau
d’alimentation pneumatique à l’aide d’un raccord
de 1/4 po TPN qui retire toute la pression de l’outil
lorsque débranché.
DÉBRANCHEZ L’OUTIL DU TUYAU
PNEUMATIQUE avant de le démonter, l’entretenir,
éliminer un clou bloqué, quitter l’aire de travail,
déplacer l’outil ou le donner à quelqu’un d’autre.
RALLONGES ÉLECTRIQUES : Respectez les
mises en garde accompagnant les compresseurs
d’air quant aux jauges et isolations appropriées
des rallonges électriques extérieures.
N’UTILISEZ JAMAIS UN OUTIL qui présente des
fuites, des pièces manquantes ou endommagées
ou qui nécessite une réparation. Assurez-vous
que toutes les vis et tous les bouchons sont bien
serrés.
VÉRIFIEZ L’ABSENCE DE DOMMAGE SUR LES
PIÈCES. N’utilisez jamais un outil si son dispositif
de sécurité, sa détente ou ses ressorts sont
manquants ou endommagés. Ne modiez pas le
dispositif de sécurité, la détente ou les ressorts.
Inspectez quotidiennement le mouvement libre de
la détente et le mécanisme de sécurité.
PIÈCES DE REMPLACEMENT : N’utilisez que
les pièces de remplacement et clous Superior
identiques que nous recommandons pour la
réparation.
BRANCHEZ L’OUTIL À LA CONDUITE
PNEUMATIQUE AVANT de charger les clous, an
d’éviter qu’ils ne s’éjectent au branchement. Le
mécanisme d’expulsion des clous peut effectuer
un cycle lorsqu’il est branché à la conduite
pneumatique.
PRÉSUMEZ TOUJOURS QUE L’OUTIL
CONTIENT DES CLOUS. Pointez toujours l’outil
loin de vous et des autres personnes. Cet outil
n’est pas un jouet. Considérez-le comme un outil
de travail.
NE CHARGEZ PAS LES CLOUS lorsque le
déclencheur est détendu. L’outil pourrait éjecter un
clou.
8.
9.
10.
11.
12.
13.
14.
15.
16.
CONSIGNES DE SÉCURITÉ IMPORTANTES
Page 19

FRANÇAIS
ENGLISH
19
NE DÉTENDEZ PAS LE DÉCLENCHEUR
lorsque que vous ne déchargez pas de clous.
Ne transportez jamais l’outil en touchant au
mécanisme du déclencheur : il pourrait éjecter un
clou non désiré.
NE VOUS ÉTIREZ PAS INDÛMENT. Garder vos
pieds au sol et conservez votre équilibre en tout
temps. Ne vous étirez pas vers des machines en
fonctionnement.
AGRIPPEZ L’OUTIL FERMEMENT an de garder
le contrôle, tout en laissant l’outil s’éloigner de la
surface de travail quand le clou est enfoncé.
N’ENFONCEZ PAS LES CLOUS les uns par-
dessus les autres, ou à un angle trop aigu : les
clous pourraient rebondir et causer des blessures.
ÉJECTEZ LES CLOUS VERS LA SURFACE DE
TRAVAIL SEULEMENT. N’enfoncez pas de clou
dans un matériau dur ou friable tel l’acier, le ciment
ou la céramique.
N’ENFONCEZ PAS LES CLOUS trop près du
rebord du morceau à travailler. Le morceau
pourrait fendre, causant un ricochet du clou qui
risque d’entraîner des blessures.
SOYEZ VIGILANT. Gardez vos mains et votre
corps loin du chemin de tout clou potentiellement
éjecté. Regardez ce que vous faites et servezvous du gros bon sens. Ne faites fonctionner
aucun outil lorsque vous êtes fatigué, avez bu ou
consommé des drogues ou médicaments. Vériez
vos prescriptions médicales an de voir si des
médicaments peuvent causer des problèmes.
PROTÉGEZ-VOUS DES ÉLECTROCUTIONS.
Ne laissez pas l’habitacle entrer en contact
avec les surfaces mises à la terre : enceintes de
tuyaux, radiateurs, fours et réfrigérateurs. Avant
d’enfoncer les clous dans les murs, planchers ou
tout autre endroit où des ls électriques peuvent se
trouver, vériez s’il existe un risque d’électrocution.
GARDEZ L’AIRE DE TRAVAIL LIBRE de tout
obstacle.
17.
18.
19.
20.
21.
22.
23.
24.
25.
CONSIGNES DE SÉCURITÉ IMPORTANTES
Page 20

ENGLISHFRANÇAIS
20
RANGEZ LES OUTILS INUTILISÉS. Lorsque
l’outil est inutilisé, il doit être nettoyé et rangé
dans un endroit sec et propre, hors de portée des
enfants.
LES EMPLOYEURS doivent s’assurer du respect
des consignes de sécurité et de toutes les autres
consignes de ce guide. Laissez ces consignes
accessibles à toute personne devant utiliser cet
outil.
AVERTISSEMENT : Les avertissements, mises
en garde et consignes de ce guide ne peuvent
couvrir toutes les situations et conditions possibles.
L’opérateur doit reconnaître que le BON SENS
ET LA PRÉCAUTION ne peuvent être intégrés au
produit, mais qu’IL DOIT LUI-MÊME EN FAIRE
PREUVE.
DÉBALLAGE
Vériez immédiatement que toutes les pièces et
accessoires sont compris.
FNC1590 Marteau pneumatique pour clous en
rouleau à 15 degrées pour la charpente 1
Lunettes de protection (paire) 1
Huile à outil pneumatique en bouteille 1
Clé hexagonale S3 1
Clé hexagonale S4 1
Clé hexagonale S5 1
Clé hexagonale S6 1
Guide 1
S’il manque un article ou si un article est brisé,
contactez votre détaillant ou téléphonez sans frais au
1-888-267-7713.
FICHE TECHNIQUE
Pression de fonctionnement : 70 à 120 psi / 483 à
827 kPa / 4,8 à 8,3 bar (max. 120 psi / 827 kPa /
8,3 bar)
Consommation d’air : 0.17 pi3/ cycle @ 100 lb/po2
(4.77 litres / cycle @ 690 kPa
Entrée pneumatique : 1/4 po TPN
Poids de l’outil : 3,7 kg (8,2 lb)
Poids de l’emballage : 7 kg (15,4 lb)
26.
27.
n
n
n
n
n
n
n
n
n
n
n
n
n
CONSIGNES DE SÉCURITÉ IMPORTANTES
Page 21

FRANÇAIS
ENGLISH
21
Éjecte des clous à plancher de calibre 15-1/2 en
forme de « L » d’une longueur minimale de 1-1/2
po (38 mm) et d’une longueur maximale de 2 po
(50 mm)
CLOUS
Le FNC1590 est un marteau cloueur pneumatique de
service léger et alimenté au rouleau, qui utilise l’air
comprimé comme source de puissance. Il est conçu
pour installer des clous de 2 po à 3 9/16 po (calibre
11-1/4 à calibre 10-1/4) vrillés, annelés ou lisses
avec un angle de regroupement de 15 degrés (g.1).
L’outil est fabriqué d’un boîtier et d’un capuchon de
cylindre en alliage de magnésium pour un poids léger
tout en conservant une forte résistance et la rigidité.
n
FICHE TECHNIQUE
Page 22

ENGLISHFRANÇAIS
22
DESCRIPTION DES FONCTIONS
La gure 2 identie les composantes
principales de la FNC1590:
A. Poussoir de contact
B. Molette à réglage de profondeur
C. Déecteur d’échappement ori-
entable à 360 degrés
D. Sélecteur de mode du
déclencheur
E. Déclencheur
F. Fiche pneumatique mâle
G. Molette de reglage de la maga-
sin
H. Indicateur de hauteur de la
magasin
I. Échelle de hauteur
J. Magasin inferieur
K. Plaque-couvercle d’alimentation
L. Cheville à ressort
PROCÉDURES D’UTILISATION
INSTALLATION
Votre marteau cloueur Superior FNC1590 vous
parvient complètement assemblé. Consultez les
installations de système pneumatique recommandées
ci-dessous (g.3). Assurez-vous que les coupleurs
sont installés de façon à ce que le tuyau pneumatique
soit dépressurisé lorsque des composants sont
ajoutés ou retirés au système.
Tuyau pneumatique Régulateur
SOURCE PNEUMATIQUE
Le FNC1590 est conçu pour fonctionner avec
de l’air comprimé propre et sec entre 70 et 120
psi / 483 et 827 kPa / 4,8 et 8,2 bar. Le système
idéal (g.2) comprend un ltre, un régulateur de
pression et un huileur automatique situé aussi
près de l’outil que possible (idéalement à 15 pieds
/ 5 mètres). N’utilisez pas d’air ou de gaz en
bouteille.
n
Marteau cloueur
Connecteur
rapide
Huileur
Filtre
Conduite
pneumatique
Page 23

FRANÇAIS
ENGLISH
23
PROCÉDURES D’UTILISATION
Déterminez si une lubrication est nécessaire.
Tout air comprimé contient de l’humidité et autres
contaminants qui peuvent nuire aux composants
internes de l’outil. Un ltre pneumatique retirera
la plupart de ces éléments et prolongera la
durée de vie de l’outil. Si vous utilisez un huileur
automatique, vériez l’huile et ajoutez-en au
besoin. Si un huileur n’est pas disponible, versez
5 ou 6 gouttes d’huile dans la che pneumatique
(F, g.2) au début de chaque journée de travail.
Une quantité d’huile plus grande sera éjectée de
l’échappement de l’outil pendant le clouage.
Raccord pneumatique : Le FNC1590 doit être doté
d’un « connecteur rapide » mâle de 1/4 po TPN.
An d’éviter tout cycle accidentel même lorsque
débranché, l’outil doit toujours être branché à la
conduite pneumatique de façon à ce que toute la
pression pneumatique à l’intérieur soit libérée au
débranchement du coupleur.
MISE EN GARDE :
Toutes les composantes en ligne (boyaux, con-
necteurs, ltres, régulateurs, etc.) doivent pouvoir
soutenir 150 % de la pression maximum du système. Essayez d’utiliser un boyau d’un diamètre
intérieur de 3/8 po pour connecter la cloueuse au
compresseur.
Ne connectez pas cet outil à un système avec une
pression maximale potentielle supérieure à 180
psi (1241 kPa, 12,3 bar).
Déconnectez la conduite d’air de la cloueuse à
l’aide du connecteur à action rapide du boyau
d’air. Ne dévissez pas la prise d’air de la cloueuse
avec le boyau d’air connecté.
Débranchez l’outil de la source d’alimentation d’air
avant de procéder à l’entretien, à l’enlèvement
d’un clou coincé et avant de quitter le lieu de tra-
vail, de déplacer l’outil d’un endroit à l’autre ou de
passer l’outil à une autre personne.
CHARGEMENT DES CLOUS
1. Après avoir lu attentivement ce guide au complet,
branchez l’outil à la source d’alimentation d’air.
MISE EN GARDE :
Ne dirigez jamais la sortie de l’outil vers vous-
même ou vers une autre personne.
n
n
Page 24

ENGLISHFRANÇAIS
24
PROCÉDURES D’UTILISATION
Débranchez toujours l’outil de la source
d’alimentation d’air avant de charger les clous
dans l’outil.
Ne chargez pas les clous quand le déclencheur ou
le dispositif de sécurité sont enfoncés.
Portez toujours des lunettes de protection et une
protection des oreilles approuvées en préparant
et en utilisant cet outil.
Ne pas utiliser l’outil s’il y a une fuite d’air ou s’il
requiert toute autre réparation.
2. Appuyer sur la cheville à ressort (L, g.4)
3. Ouvrir la plaque-couvercle d’alimentation (K,
g.5).
4. Ouvrir la magasin inferieur (J, g.2).
5. Placer le rouleau de clous à l’intérieur.
6. Pivoter la molette de reglage de la magasin (G,
g.6) pour régler le boîtier de clous inférieur à la
longueur des clous. La position la plus élevée
est utilisées pour les clous de 50 mm (2 po) et la
position la plus basse est utilisée pour les clous
de 90 mm (3 9/16 po). Pour tous les clous entre
2 po et 3 9/16 po, régler le boîtier inférieur en
conséquence.
7. Fermer le boîtier de clous.
Page 25

FRANÇAIS
ENGLISH
25
PROCÉDURES D’UTILISATION
8. Déroulez quelques clous du rouleau et placez la
deuxième sur la crochet d’alimentation (M, g.5).
9. Refermer la plaque-couvercle d’alimentation (K,
g.5).et le mécanisme de verrouillage (L, g.4)
10. Régler le déecteur directionnel de l’échappement
(C, g.2), pour diriger les soufes d’air de
l’échappement à l’écart de l’utilisateur.
UTILISATION DE L’OUTIL
Complétez toutes les étapes de la section
PRÉPARATION DE L’OUTIL et CHARGEMENT DES
CLOUS avant d’utiliser l’outil.
Cet outil peut être utilisé de deux façons :
1.
Coup par coup (séquentielle)
Appuyez, et puis tournez vers la bas, la pointe
rouge du sélecteur du déclencheur (D, g.2) pour
sélecter la mode coup par coup.(g.7)
Placez la pointe poussoir de contact (A, g.2) sur
la pièce.
Appuyez légèrement sur la cloueuse pour enfoncer
le dispositif de sécurité
Appuyez sur le déclencheur pour planter les clous.
La méthode de déclenchement manuel coup par
coup est la façon la plus précise de placer les
clous.
2.
Déclencheur gardé enfoncé et actionné par
coup
Appuyez, et puis tournez vers la haut, la pointe
rouge du sélecteur du déclencheur (D, g.2) pour
sélecter la mode. (g.7)
Tenez la pointe de contact (A, g.2) à l’écart de la
surface.
Appuyez sur le déclencheur
Puis d’enfoncer le dispositif de sécurité en
appuyant la pointe de la cloueuse (A, g.2)
sur la surface. Lorsque le dispositif de sécurité
est sufsamment enfoncé, la cloueuse sera
déclenchée et plantera un clou.
MISE EN GARDE :
Débranchez l’outil de la source d’alimentation d’air
avant de procéder à l’entretien, à l’enlèvement
d’un clou coincé et avant de quitter le lieu de travail, de déplacer l’outil d’un endroit à l’autre ou de
passer l’outil à une autre personne.
Nettoyez et inspectez l’outil à tous les jours.
Vériez soigneusement le fonctionnement du
déclencheur et du mécanisme de sécurité.
n
n
n
n
n
n
n
n
Page 26

ENGLISHFRANÇAIS
26
ENTRETIEN
N’utilisez pas l’outil si le déclencheur ou le mé-
canisme de sécurité ne fonctionne pas correctement
N’utilisez pas l’outil si l’outil a une fuite d’air ou s’il
doit être réparé.
PROFONDEUR DES CLOUS
La profondeur du clouage peut être réglée en pivotant
lla molette de réglage de la profondeur (B, g.2):
Décocher un clou d’essai dans un morceau de bois
de rebut et vériez la profondeur.
Si le clou est trop enfoncé, pivotez la molette dans
le sens des aiguilles d’une montre (quand l’outil
est à l’envers) pour déplacer le support de sécurité
vers le bas.
Si le clouage plus profond est requis, pivotez la
molette dans les sens contraire des aiguilles d’une
montre pour régler le support de sécurité vers le
haut.
Faites l’essai d’un clou dans un morceau de bois
de rebut pour vérier la profondeur.
RÉPÉTEZ L’AJUSTEMENT SI NÉCESSAIRE
JUSQU’À CE QUE VOUS ATTEIGNIEZ LA
PROFONDEUR DÉSIRÉE. La quantité de
pression d’air requise dépendra du réglage.
Déterminez le réglage minimum qui produira des
résultats constants. Une pression d’air supérieure
à celle réellement requise causera une usure
prématurée ou des dommages à la cloueuse.
DÉGAGEMENT D’UN CLOU COINCÉ
MISE EN GARDE : Déconnecter l’outil de la source
d’air comprimé.
1. Ouvrir le mécanisme de verrouillage
2. Pivoter le boîtier de clous inférieur
3. Retirer les clous hors du boîtier inférieur.
4. Utiliser une tige d’acier mince et douce pour
repousser la lame de commande à sa position
supérieure extrême.
5. Utiliser une paire de pinces pointues pour retirer le
clou coincé.
6. Observer les directives de la section PRÉPARATION DE L’OUTIL AVANT LE CLOUAGE pour
recharger les clous.
n
n
n
n
n
n
Page 27

FRANÇAIS
ENGLISH
27
ENTRETIEN
MISE EN GARDE :
Ne dirigez jamais la sortie de l’outil vers vous-
même ou vers une autre personne.
Branchez toujours l’outil à la source
d’alimentation d’air avant de charger les clous
dans l’outil.
Ne chargez pas les clous quand le déclencheur
ou le dispositif de sécurité sont enfoncés.
Portez toujours des lunettes de protection et une
protection des oreilles approuvées en préparant
et en utilisant cet outil.
Ne pas utiliser l’outil s’il y a une fuite d’air ou s’il
requiert toute autre réparation.
MISE EN GARDE : Débranchez l’outil de la conduite
pneumatique avant le nettoyage et l’inspection.
Remédiez à tous les problèmes avant de remettre
l’outil en service.
NETTOYEZ ET INSPECTEZ L’OUTIL À
TOUS LES JOURS.
Ajouter régulièrement une huile pour outil
pneumatique au huileur de l’outil pour assurer
que toutes les pièces mobiles de cet outil soient
adéquatement lubriées. Une lubrication
fréquente mais non excessive est nécessaire à
une bonne performance. L’huile ajoutée dans la
connexion de la conduite pneumatique lubriera
les pièces internes. Un huileur automatique est
recommandé, mais 2 gouttes d’huile peuvent être
ajoutées manuellement dans la che pneumatique
(F, g.2) au début de chaque journée de travail et
après chaque heure d’utilisation continue. Seules
quelques gouttes à la fois sont nécessaires. Une
quantité d’huile plus grande sera accumulée
dans l’outil et éjectée de l’échappement de
l’outil pendant le clouage. N’UTILISEZ QUE DE
L’HUILE PNEUMATIQUE. N’utilisez pas d’huile à
détergent ou de l’huile contenant d’autre additifs :
ils pourraient accélérer l’usure des scellés.
Vérier le ltre du compresseur sur une base
hebdomadaire.Ouvrir le robinet de vidange pour
vider l’eau et les contaminants hors du réservoir
d’air.
Essuyer l’outil pour le nettoyer.
Soufer l’outil pour le nettoyer en utilisant l’air
n
n
n
n
Page 28

ENGLISHFRANÇAIS
28
comprimé, utiliser ensuite une solution de
nettoyage ininammable pour essuyer l’extérieur
de l’outil si nécessaire.
Ne pas tremper l’outil dans la solution de
nettoyage. Ces liquides peuvent endommager les
pièces internes. La section exposée de la petite
tige de piston et le crochet d’alimentation doivent
être conservés propres.
Examiner la détente et le mécanisme de sécurité
quotidiennement pour vous assurer que le système
soit complet et fonctionnel.
Conserver toute les vis resserrées à fond. Des
vis relâchées peuvent causer des blessures
corporelles ou des dommages à l’outil. Vérier
l’outil pour des pièces usées et endommagées. Si
présentes, les remplacer immédiatement.
DÉPANNAGE
AVERTISSEMENT : Cessez immédiatement
d’utiliser l’outil si l’un des problèmes suivants
survient. Des blessures graves pourraient résulter
du défaut de respecter cette consigne. Toute
réparation ou remplacement doit être effectué par
le personnel qualié ou par un centre de service
agréé.
MISE EN GARDE :
=Débranchez l’outil de la conduite pneumatique
avant de procéder à tout entretien ou réparation.
=Lorsque vous insérez ou réinstallez des joints
toriques, assurez-vous qu’ils sont propres et
lubriés à l’aide d’un lubriant à joint torique.
n
n
n
ENTRETIEN
Page 29

FRANÇAIS
ENGLISH
29
DEPANNAGE
PROBLEM CAUSE SOLUTION
Fuite d’air autour de la détente. 1. Le joint torique de la tige de
soupape de détente est usé et/ou
endommagé.
1. Vérier et/ou remplacer le joint
torique / lubrier
2. Le joint torique de la soupape
de tête de la détente est usé et/ou
endommagé.
2. Vérier et/ou remplacer le joint
torique / lubrier
3. Renferme des corps étrangers. 3. Nettoyer l’outil / lubrier
Fuite d’air à la section inférieure
du boîtier et à la partie avant.
1. La vis est dévissée sur la
section de raccordement de la
partie avant et du boîtier.
1. Resserrer la vis / vérier de
nouveau.
2. Le joint torique entre la
partie avant et le boîtier est
endommagé.
2. Vérier et/ou remplacer le joint
torique / lubrier
3. Le butoir est endommagé 3. Remplacer le butoir.
4. Renferme des corps étrangers
à la section de contact entre le
butoir et le boîtier.
4. Désassembler et nettoyer.
Fuite d’air à la section supérieure
du boîtier et à la partie avant.
1. La vis est dévissée sur la
section de raccordement de la
partie avant et du boîtier.
1. Resserrer la vis / vérier de
nouveau.
2. Le joint torique est endommagé 2. Vérier / remplacer le joint
torique / lubrier.
3. Le joint étanche est
endommagé.
3. Remplacer le joint étanche.
Impossibilité d’actionner l’outil. 1. Outil sec, manque de
lubrication
1. Utiliser l’huile pour outil
pneumatique.
2. Le ressort du capuchon de
cylindre est endommagé.
2. Remplacer le ressort à
l’intérieur du capuchon de
cylindre.
3. La soupape est collée au
capuchon de cylindre.
3. Désassembler / vérier /
lubrier.
La lame enfonce les clous trop
profondément.
1. La position de support de
sécurité est incorrecte.
1. Pivoter le bouton de réglage
de profondeur pour déplacer le
support de sécurité vers le bas.
2. La pression d’air est trop
élevée.
2. Diminuer la pression d’air.
Manquement de clous /
alimentation intermittente.
1. Présence de corps étrangers
entre le petit piston et le petit
cylindre.
1. Désassembler / nettoyer /
lubrier.
2. Le joint torique sur le petit
piston est usé et endommagé.
2. Vérier / remplacer le joint
torique / lubrier.
3. Outil sec et manque de
lubrication.
3. Utiliser l’huile pour outil
pneumatique.
4. Le ressort sur le petit piston
est endommagé.
4. Remplacer le ressort du petit
piston.
Page 30

ENGLISHFRANÇAIS
30
PROBLEM CAUSE SOLUTION
5. Pression d’air trop basse. 5. Augmenter la pression d’air
sans excéder une pression de
120 lbf/po2 (8,3 bars).
6. La vis est dévissée sur la
section de raccordement de la
partie avant et du boîtier.
6. Resserrer toutes les vis.
7. Le crochet d’arrêt ne peut pas
retenir les clous.
7. Remplacer le ressort conique
du crochet d’arrêt.
8. Clous pliés. 8. Utiliser les clous
recommandés
9. Grosseur de clous incorrecte 9. Utiliser les clous
recommandés.
10. Le joint étanche est
endommagé.
10. Remplacer le joint étanche /
resserrer la vis.
11. Le petit piston est sec. 11. Ouvrir le boîtier de clous,
verser plusieurs gouttes d’huile
pour outil pneumatique dans
l’orice du couvercle du bout du
petit piston.
12. Le butoir du petit piston est
usé et endommagé
12. Remplacer le butoir et
lubrier le petit piston
13. Le crochet d’alimentation se
coince.
13. Nettoyer le crochet
d’alimentation et le ressort de
torsion.
14. La longueur de clou ne
correspond pas à l’espace de
chargement du boîtier des clous
14. Régler l’écrou de réglage
sur la partie inférieure du boîtier
de clous selon la longueur des
clous
15. Les ls de soudure du
rouleau de clous sont brisés.
15. Cesser l’usage.
Fonctionne lentement ou
éprouve des pertes depression.
1. L’outil est sec, manque de
lubrication.
1. Utiliser l’huile pour outil
pneumatique.
2. Le ressort à l’intérieur du
capuchon de cylindre est
endommagé.
2. Remplacer le ressort à
l’intérieur du capuchon de
cylindre.
3. Des corps étrangers ont
pénétré entre l’assemblage du
piston et le cylindre.
3. Désassembler / nettoyer /
lubrier.
4. Le cylindre n’est pas
assemblé à la position initiale.
4. Réassembler après le
désassemblage.
DEPANNAGE
Page 31

FRANÇAIS
ENGLISH
31
PROBLEM CAUSE SOLUTION
5. Le joint torique sur la soupape
est sec après le désassemblage.
5. Réassembler après la
lubrication.
6. La pression d’air est trop
basse.
6. Augmenter la pression d’air
sans excéder une pression de
120 lbf/po2 (8,3 bars).
7. Le marteau est usé. 7. Remplacer l’assemblage de
piston.
8. Le diamètre interne du boyau
pneumatique est trop petit.
8. Utiliser un boyau pneumatique
de diamètre interne plus gros.
Les clous sont coincés. 1. Les clous de dimensions
incorrectes.
1. Utiliser les clous
recommandés.
2. Les ls de soudure du rouleau
de clous sont brisés.
2. Cesser l’usage.
DEPANNAGE
LISTE DES PIÈCES
Consultez le schéma de la p.34 pour l’emplacement
des pièces.
ITEM DESCRIPTION
FNC1590-1 Vis
FNC1590-2 Rondelle à ressort
FNC1590-3 Douille
FNC1590-4 Couvercle d’échappement
FNC1590-5 Joint
FNC1590-6 Vis
FNC1590-7 Rondelle à ressort
FNC1590-8 Chapeau de cylindre
FNC1590-9 Joint statique
FNC1590-10 Rondelle
FNC1590-11 Siège de soupape
FNC1590-12 Ressort
FNC1590-13 Joint torique 57.5 x 2.6
FNC1590-14 Joint torique 72.4 x 3.5
FNC1590-15 Soupape
FNC1590-16 Vis
FNC1590-17 Joint de cylindre
FNC1590-18 Collet
FNC1590-19 Joint torique 54.4 x 4
ITEM DESCRIPTION
FNC1590-20 Ensemble de piston
FNC1590-21 Cylindre
FNC1590-22 Joint torique 67 x 3
FNC1590-23 Joint torique 60.25 x 2.5
FNC1590-24 Joint reducteur
FNC1590-25 Joint torique 97.5 x 3.5
FNC1590-26 Butoir
FNC1590-27 Butoir
FNC1590-28 Corps
FNC1590-29 Joint torique 62.3 x 1.8
FNC1590-30 Rondelle de guidage
FNC1590-31 Nez
FNC1590-32 Rondelle à ressort
FNC1590-33 Vis
FNC1590-34 Ressort
FNC1590-35 Ensemble de support
FNC1590-36 Organe de réglage
FNC1590-37 Support de sécurité
FNC1590-38 Joint
Page 32

ENGLISHFRANÇAIS
32
AVERTISSEMENT : Toutes les réparations doivent
être exécutées par le personnel d’un centre de
service autorisé. Si vous ouvrez cet outil, vous
risquez d’annuler la garantie.
ITEM DESCRIPTION
FNC1590-39 Goupille
FNC1590-40 Guide de sécurité
FNC1590-41 Joint torique 8.3 x 1.8
FNC1590-42 Goupille d'arbre tournant
FNC1590-43 Ressort
FNC1590-44 Douille d'arbre tournant
FNC1590-45 Goupille à ressort
FNC1590-46 Joint torique 20.3 x 2.5
FNC1590-47 Joint torique 20.3 x 1.5
FNC1590-48 Ensemble de soupape
FNC1590-49 Joint torique 9.5 x 1.9
FNC1590-50 Joint torique 10.3 x 1.9
FNC1590-51 Tête de la soupape déclencheur
FNC1590-52 Joint torique 12.8 x 1.9
FNC1590-53 Ressort
FNC1590-54 Joint torique 5.5 x 1.5
FNC1590-55 Tige de la soupape déclencheur
FNC1590-56 Joint torique 24.8 x 2
FNC1590-57 Guide de soupape du déclencheur
FNC1590-58 Ressort de déclencheur
FNC1590-59 Déclencheur
FNC1590-60 Goupille à ressort
FNC1590-61 Rondelle
FNC1590-62 Rondelle frein
FNC1590-63 Couvercle
FNC1590-64 Ressort
FNC1590-65 Butoir de piston
FNC1590-66 Joint torique 28.3 x 3
FNC1590-67 Piston
FNC1590-68 Ressort de torsion
FNC1590-69 Goupille
FNC1590-70 Crochet d'alimentation
ITEM DESCRIPTION
FNC1590-71 Joint torique 14.3 x 2.5
FNC1590-72 Vis
FNC1590-73 Goupille
FNC1590-74 Plaque
FNC1590-75 Protection
FNC1590-76 Protection transparent
FNC1590-77 Goupille
FNC1590-78 Crochet d'arrêt
FNC1590-79 Ressort conique
FNC1590-80 Vis
FNC1590-81 Rondelle à ressort
FNC1590-82 Plaque d'arrêt
FNC1590-83 Ressort
FNC1590-84 Goupille de verrouillage
FNC1590-85 Goupille à ressort
FNC1590-86 Butée effacable au pouce
FNC1590-87 Écrou
FNC1590-88 Rondelle
FNC1590-89 Goupille
FNC1590-90 Magasin inferieur
FNC1590-91 Joint
FNC1590-92 Tige de réglage
FNC1590-93 Douille de réglage
FNC1590-94 Joint
FNC1590-95 Magasin superieur
FNC1590-96 Écrou de réglage
FNC1590-97 Vis
FNC1590-98 Vis
FNC1590-99 Manchon de prise souple
FNC1590-100 Joint torique 65.4 x 2.5
FNC1590-101 Chapeau d’embout
FNC1590-102 Fiche pneumatique
LISTE DES PIÈCES
Page 33

FRANÇAIS
ENGLISH
33
SERVICE ET RÉPARATIONS
Tous les outils de qualité nécessitent
éventuellement un entretien ou un remplacement
de pièces, suite à une usure en cours d’utilisation
normale.
Si votre outil doit être réparé, adressez-vous
auprès de votre détaillant local ou téléphonez à
Superior Airco Wholesale au 1 (888) 267-7713
pour trouver le centre de réparation agréé de votre
secteur. Toutes les réparations effectuées par les
centres de réparation agréés sont entièrement
garanties contre toute défectuosité matérielle ou
de main-d’œuvre.
Certains composants pouvant être entretenus par
l’utilisateur sont décrits à la section Dépannage.
Nous ne pouvons garantir les réparations
effectuées par toute autre personnel que celui d’un
centre de réparation agréé.
Des questions? N’hésitez pas à téléphoner à notre
centre de soutien technique, au numéro sans frais
1 (888) 267-7713. Soyez toujours prêt à donner
les renseignements suivants concernant votre
outil : numéro du modèle, type, numéro de série,
etc.
GARANTIE
Tous les produits distribués par Airco Superior Clarke
sont garantis contre les défauts de fabrication et les
défectuosités pour une période d’un an à compter
de la date d’achat par l’utilisateur nal. La société
RÉPARERA OU REMPLACERA, À SA SEULE
DISCRÉTION, toute marchandise que la société
considère être défectueuse, pourvu qu’elle n’ait pas
subi un usage inapproprié ou abusif, et qu’elle n’a été
modiée ni réparée par une personne autre que le
personnel d’un centre de service autorisé. Conservez
la preuve d’achat. Le consommateur devrait retourner
le produit défectueux, accompagné du reçu de caisse,
au lieu d’achat.
Cette garantie ne s’applique pas aux pièces qui
doivent être remplacées périodiquement, telles
que les lames d’entraînement des agrafeuses et
des cloueuses, les disques à poncer, les becs de
soudage, etc. Toutes les demandes de réclamation
doivent avoir une autorisation préalable et les produits
doivent être expédiés, port payé, à l’entrepôt de
Richmond (Colombie-Britannique) ou de Mississauga
(Ontario), ou à un dépôt de service après-vente
autorisé, accompagné d’une copie de la facture
indiquant la date de vente de l’article à l’utilisateur
nal.
n
n
n
n
Page 34

ENGLISHFRANÇAIS
34
SCHEMATIC DRAWING / SCHÉMA
Superior Airco Wholesale Ltd., Richmond, BC, Canada V6X 1X5
Tel: 1-888-267-7713 www.superiorairco.com
 Loading...