

Page 1
INSTRUCTIONS FOR USE
ENGLISH
Article Number 10002125
Power supply 230-240 V ~ 50 Hz
Nominal consumption microwave oven 1200 Watt
Nominal consumption grill 1200 Watt
Rated convection input 2200 Watt
Power output 800 Watt
Electrical protection class I
Capacity 20 Liter
Net weight 10.5 kg
10 Microwave settings
2 Combination settings (grill + microwave)
4 Combination settings (convection + microwave)
Grill function
Convection function
8 Automatic programs & 1 defrost program (with weight indicator)
Digital display
95 Minute timer with end signal
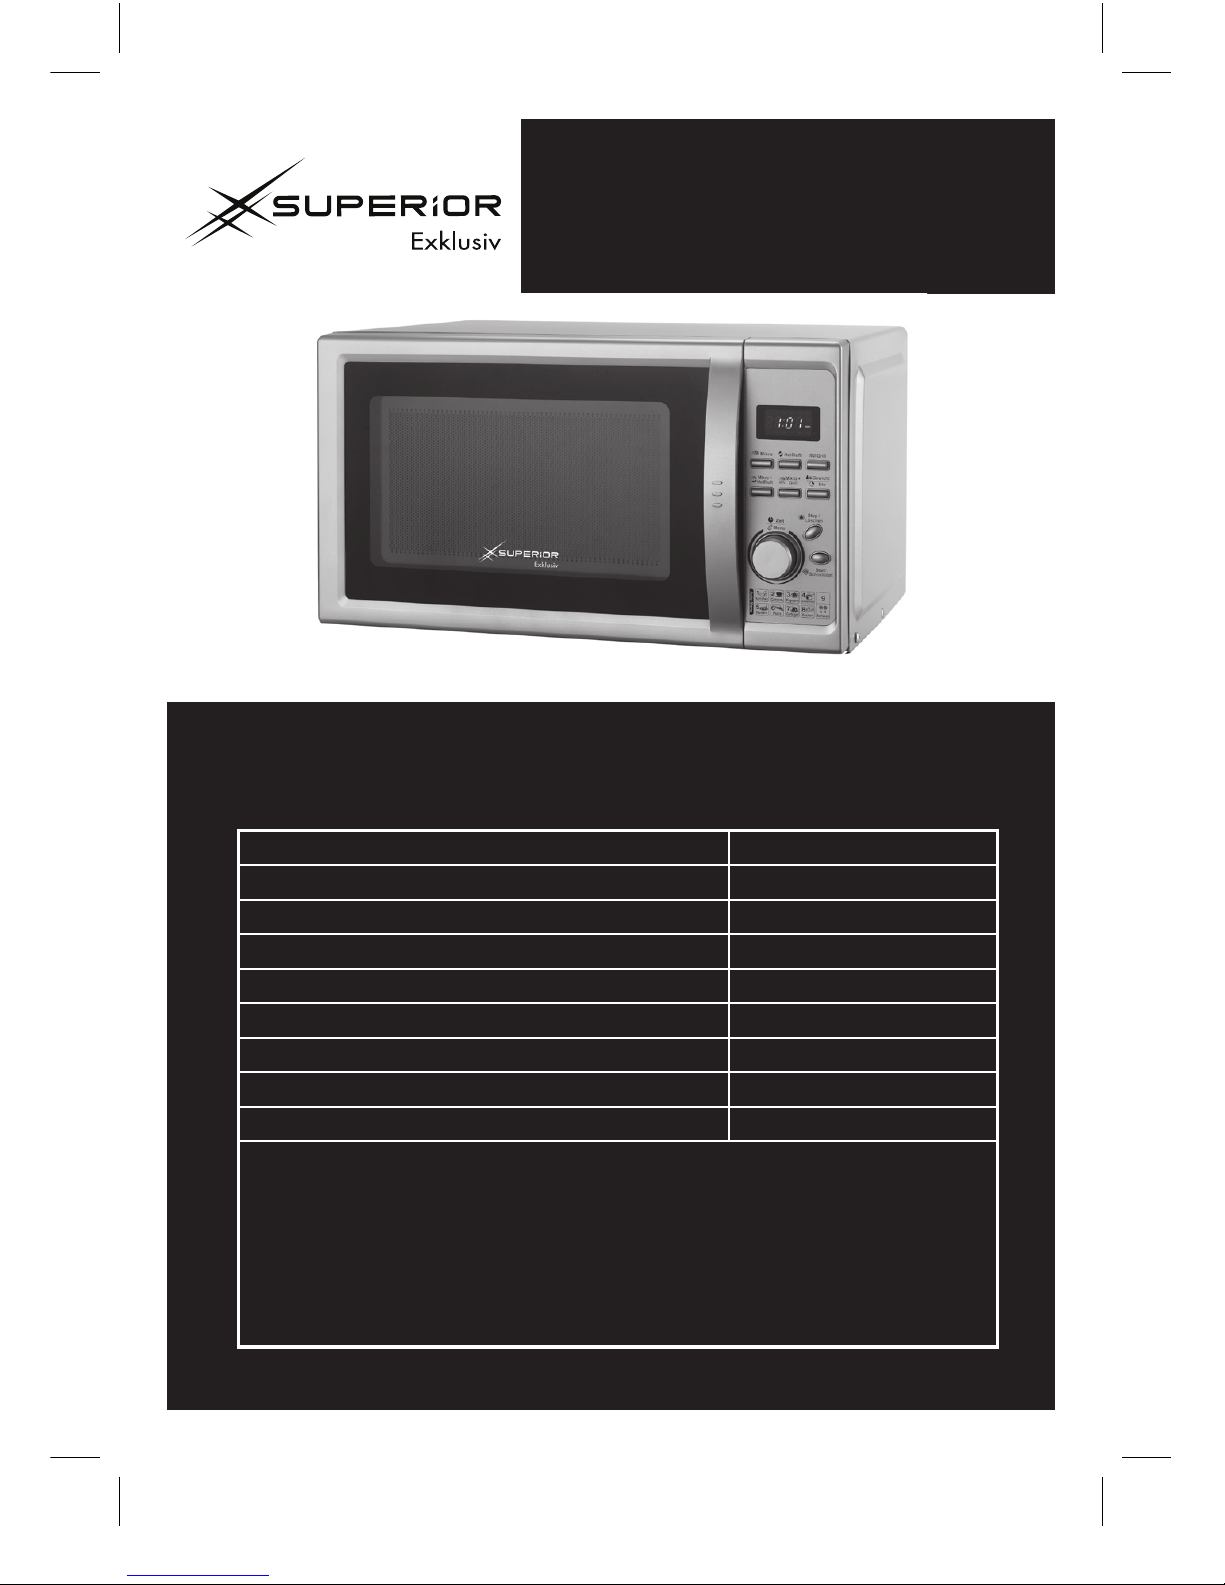
Microwave
with Grill and
Convection Oven
V02a
Page 2

2
TABLE OF CONTENTS
IMPORTANT SAFETY INSTRUCTIONS 03
SAFETY PRECAUTIONS TO PREVENT EXCESSIVE
MICROWAVE RADIATION 06
OVERVIEW OF DEVICE 07
SETTING UP THE DEVICE 08
RADIO INTERFERENCE 08
INFORMATION ON GROUNDING 09
CLEANING BEFORE FIRST USE 09
NOTES ON DISHES 09
COOKING BASICS 10
REMOVING THE BAKING TRAY FOR GRILL AND CONVECTION MODE 11
DEFROSTING FOOD 12
CONNECTING THE APPLIANCE TO THE POWER SUPPLY 12
SETTING THE HOUR MODE 12
SETTING THE CLOCK 12
MICROWAVE FUNCTION 13
• Function key MICRO 13
• Setting the Time 13
• Ending the Microwave Function 14
GRILL FUNCTION 14
• Function key GRILL 14
• Setting the Time 14
• Ending the Grill Function 14
CONVECTION FUNCTION 15
• Function key CONVECTION 15
• Convection without Preheating 15
• Convection with Preheating 15
COMBINATION MICROWAVE AND GRILL 16
COMBINATION MICROWAVE AND CONVECTION 16
AUTOMATIC PROGRAMS 17
COOKING IN SEVERAL STEPS 19
SPEEDCOOKING FUNCTION 20
CHILD SAFETY LOCK 20
CLEANING AND CARE 20
DISPOSAL 22
SERVICE / WARRANTY 22
Page 3
3
IMPORTANT SAFETY INSTRUCTIONS
When using electric devices, basic safety precautions must be
observed. To avoid the risk of burns, electric shocks, fire, and/or
personal injury, please read the instruction manual carefully before
using the device, and observe all of the instructions during the
operation of the device.
Store this manual carefully for further use.
Please include this manual when transferring the device to a third
party.
GENERAL INFORMATION
• Electric devices are not toys! Keep children away from this device!
• Use this device for its intended purpose only.
• This device is suitable for use in private households and not for
commercial use.
• Do not leave this device unattended during use or while it is plugged in.
• Switch the device off and pull the power plug when not in use, in case
of malfunction or when cleaning.
• Do not carry this device by its power cord.
• Keep this device clean and dust-free.
• Do not operate this device outdoors.
• Check the device regularly for visible damages. Do not use the device
under any circumstances if you discover damages, if it has fallen or if it
does not function properly. Do not try to repair the device yourself.
• Repairs may only be done by qualified professionals.
• The power outlet must be located near the device so that it can be
pulled out effortlessly in case of emergency.
RISKS FROM ELECTRICITY:
• The voltage of the device specified on the rating plate must match the
voltage of your electricity network.
• Connect the device to an approved installed outlet. Do not use table
power bars or extension cords.
• Do not operate this device with a timer or remote control.
• Never touch this device, the power cord or the power plug if your
hands are damp or wet or if you are standing on a wet floor.
• Do not pull the power cord over or through a sink.
• Do not immerse in water.
• There is a danger of electric shock from immersion in water or other
fluids!
• Keep the device, power cord and power plug away from hot surfaces,
open flame, direct sunlight and sharp edges. Make sure that the cord
is not clamped during use (e.g. in doors).
• When you pull the plug, always pull by the plug and never the cord.
Page 4

4
• If the power cord becomes damaged, it must be replaced by a
qualified professional in order to avoid hazards. The same applies for
the power plug.
HAZARDS TO PERSONS:
• This device is not meant for persons (including children) with reduced
physical, sensory or mental abilities or lack of experience and / or lack
of knowledge to be used, unless they are supervised by a person who
is responsible for their safety or have received instructions on how to
use this device.
• Children must be supervised in order to ensure that they do not play
with this device.
• Children do not recognise the dangers which could occur in dealing
with electric devices. Keep children away from this device. Be especially
careful when using this device if children are in your midst!
• Keep packaging materials such as plastic bags and polystyrene parts
out of reach of children. Danger of suffocation!
• Make sure when laying the power cord that it cannot be tripped over.
• Make sure that the device itself does not become a tripping hazard.
HAZARDS RELATED TO THIS SPECIFIC PRODUCT:
• Use this device only with the accessories included.
• Only this device and its accessory parts can be used together. Do
not use the accessory parts in the oven or in combination with other
devices.
• Always use this device on an even, anti-slip and heat-resistant surface!
• Do not place this device on cooktops!
• The microwave is not suitable for installation into a cupboard or rack.
• In order to ensure sufficient air circulation, there must be a distance
between the device and the physical boundaries (walls, cupboards,
racks, etc.)! Above the microwave, there should be a distance of at
least 20 cm, at least 10 cm at the back and at least 5 cm on the sides.
• The microwave must not be used in damp rooms!
• The microwave must not be used for storage purposes or the like. Do
not store any objects such as paper, cookware or the like in the oven.
• If you should discover smoke while using the microwave, turn the
device off and pull the power plug. Keep the door closed to suffocate
potential flames.
• Please note that the heating element (grill) can become very hot!
Always be careful when removing food and use oven mitts!
• Caution! Hot surfaces.
• The temperature of the surfaces which can be touched can be very
high during operation.
• This device must not be operated without contents.
• Do not cover the device while in use!
• All repair or maintenance work which requires opening up the
microwave, removing the cover or replacing parts may only be
carried out by suitably authorized personnel. Danger due to escaping
microwave radiation!
Page 5

5
• If the door or door seal is damaged, the cooking device must not be
operated before being repaired by a person who is suitably trained for
such repairs.
• Attention!
Children shall only be allowed to use this device without supervision
once they have received sufficient instruction, are able to use this
device safely and understand the dangers of improper use.
• Warning: If this device is used in combination operating mode,
children may only use this device under adult supervision due to the
temperatures which occur.
• Persons with heart pacemakers should ask their physician or the
manufacturer regarding any safety precautions related to using
microwave ovens.
• This product is an ISM device of Group 2 Class B. Group two includes
all ISM devices (industrial, scientific, medical) in which radio frequency
energy is generated and/or is used in the form electromagnetic
radiation to process materials as well as for electrical discharge
machining equipment. Class B covers devices for household use or
power supply networks which feed residential buildings.
• Do not use this device as a surface for decorative items such as vases
and the like which can be placed on the device.
• When warming or cooking foods which are in flammable materials
such as plastic or paper containers, the microwave oven must be
monitored due to the possibility of ignition.
• Use only microwaveable dishes and food containers.
• Do not use any heat-retaining packaging which could contain
aluminium foil. If you heat foods in plastic or paper containers, first
remove all previously existing seals, tie wires and the like. Make sure
that these containers do not ignite during heating.
• Any meal or food package lids or foils which are suitable for heating
in the oven must be pierced several times so that the steam can escape
and the package will not burst.
• Be aware that the warming or cooking time in the microwave oven is
often much shorter than on the cooktop or in the oven. Cooking times
which are too long could lead to drying out or ignition of the food.
• Liquids and foods must not be heated in sealed containers or glasses
because they could explode.
• Delayed overcooking could occur when heating liquids in the
microwave oven. Handle the containers with the required caution.
• The microwave oven is not suitable for roasting foods. Hot oil can
damage parts of the device and cookware as well as perhaps cause
skin burns.
• Eggs with shells or hard-cooked eggs must not be heated or cooked in
the microwave oven because they could explode or the egg yolk could
spray out once the microwave heating is complete.
• Foods with a firm skin or shell such as tomatoes, sausages, potatoes
with skins, whole pumpkins or apples must be pierced several times or
Page 6

6
nicked before cooking so that the steam build-up can escape and the
food will not explode.
• In order to prevent scalding, the contents of feeding bottles and jars
with baby food must be stirred or shaken before feeding and the
temperature must be checked in all cases.
• The food containers can become very hot due to the heat from the
heated foods. Dish towels or oven mitts should be used to remove
food containers from the oven area. Always open the door and
container in a direction away from the face and body. Danger of burns
from steam and scalding!
• Please clean the door seal, cooking area and their surrounding areas
carefully and regularly.
• Do not wash the device and accessories in the dishwasher.
• Dirt can damage the surfaces and reduce the lifetime of the device or
cause dangerous interference.
• Use this device only for the purposes described in these instructions.
Do not use any harsh chemicals or vapours in this device. This device
is only suitable for heating, boiling and cooking foods in private
households and not for use in laboratories.
SAFETY PRECAUTIONS TO PREVENT EXCESSIVE
MICROWAVE RADIATION
ATTENTION!
• The safety lock of the door must not be dismounted or modified.
• Never use this device if the door is open. Harmful microwaves can escape this
way.
• Do not place any objects between the front side of the device and the door.
Make sure that no dirt or residues from cleaning agents accumulate on the
seals.
• Do not use this device if it is damaged.
• The door of the device must close properly and must not show signs of any
damages or malformations. Make sure that the locking mechanism is in perfect
condition and that the door seals and seal surfaces do not show signs of any
damages or soiling.
• Damages or repairs to this device must be carried out by suitably qualified
professionals.
Page 7
7
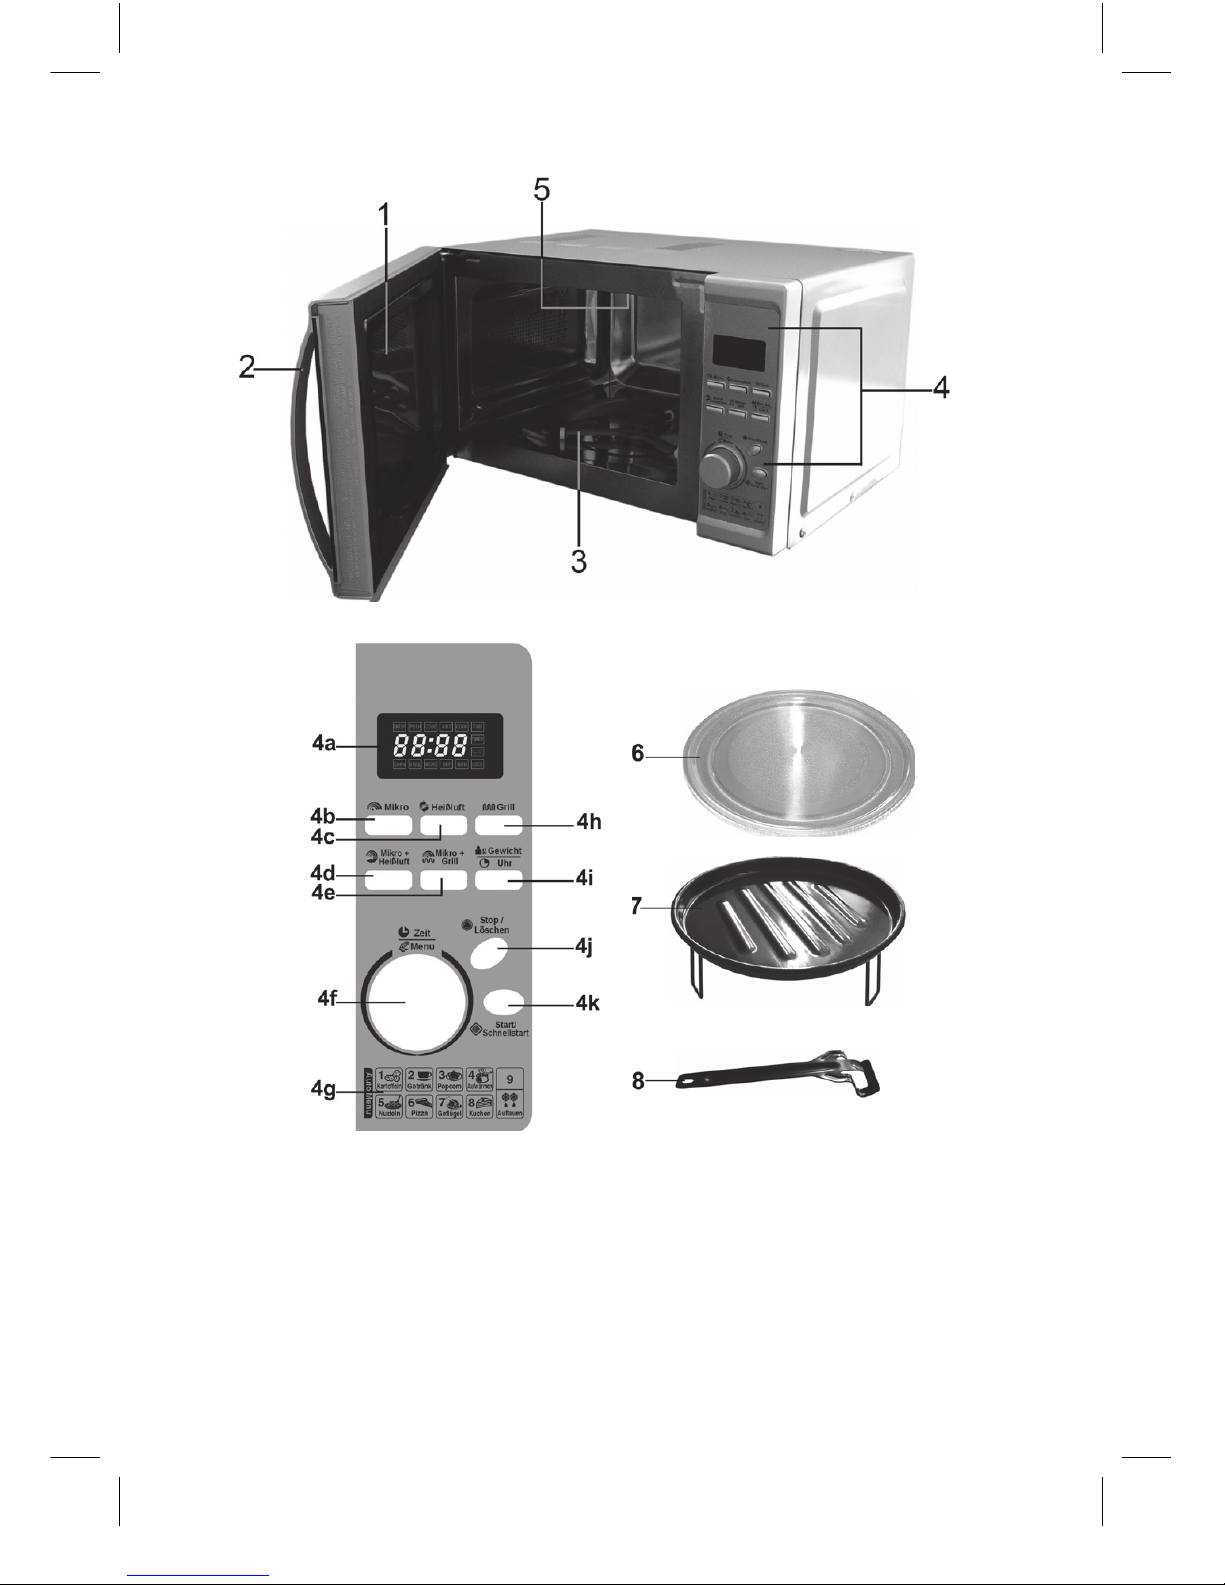
OVERVIEW OF DEVICE
1. Door with viewing window and safety lock
2. Handle
3. Turntable Support / Roller assembly
4. Control panel
4a) Display Screen
4b) MICRO Microwave function
4c) CONVECTION Convection function
4d) MICRO + CONVECTION Microwave and Convection
Page 8

8
4e) MICRO + GRILL Microwave and Grill
4f) TIME / MENU
4g) AUTOMENU List 1 – 9
4h) GRILL Grill function
4i) WEIGHT / CLOCK
4j) STOP / DELETE
4k) START / QUICK START
5. Heating element
6. Glass plate
7. Baking tray
8. Detachable handle
Not Shown: Power cord and power plug
SETTING UP THE DEVICE
• Remove all stains and packing materials as well as all liners from the device.
• ATTENTION! Check the device for any possible damages such as a poorly-
mounted or crooked door, damaged door seals and sealing surfaces, defects or
loose hinges and latches, dents on the inside or on the door. Also check for any
damages to the power cord / power plug. Do not use this device if damages are
present.
• The microwave may only be placed on an even, stable and heat-resistant
surface which is suitable for bearing the weight of the device.
• Do not place this device near sources of heat, near flammable or combustible
materials or in places where wetness or high humidity occurs.
• The device must be adequately ventilated for proper operation. Make sure that
there is a distance of 20 cm from above, 10 cm from the back and 5 cm on each
of both sides. The openings of the device must not be covered or obstructed.
The legs of the device must not be removed.
• Make sure that the power cord is undamaged and does not run under the
device or over hot or sharp-edged surfaces.
• The power outlet must be easily accessible so that the power plug can be pulled
out without effort in case of emergency.
• Do not use this device outdoors.
• Do not use this device without its approved, properly inserted
glass plate (6)
and
roller assembly (3)
.
RADIO INTERFERENCE
Operating this microwave device can lead to interference to your radio, television
or similar devices. These disturbances can be minimised or eliminated using the
following measures:
• Clean the door and sealing surfaces of the microwave device.
• Reorient the reception antenna of the device which has been disturbed by the
microwave.
Page 9

9
• Change the location of the microwave device or the device which is being
disturbed by the microwave.
• Connect the microwave device to another power outlet so that the microwave
device and the device being disturbed by the microwave are connected to
different power circuits.
INFORMATION ON GROUNDING
• This device must be grounded.
• This device must be connected only to an approved, properly installed,
grounded isolated receptacle power outlet. The power supply voltage must
correspond to the voltage specified on the name plate.
• Setting up a separate power circuit only for this device is recommended.
• Using high voltage is dangerous and can lead to fires, accidents resulting in
injuries or damage.
• Improper use can cause electric shock or fire.
Notes:
If you have any questions regarding the grounding instructions or electricity, please
contact and electrician.
Liability for damages caused by failure to comply with this information is excluded.
CLEANING BEFORE FIRST USE
In order to remove any potential residues from manufacturing, you should clean the
device before using it for the first time.
• Wipe the interior of the device carefully with a damp cloth.
• The
glass plate (6)
and the
roller assembly (3)
as well as the
baking tray (7)
may
be washed with water.
• Dry all parts thoroughly after rinsing.
• Replace the
roller assembly (3)
in the depression in the oven floor.
• Place the
glass plate (6)
grooved side down on the
turntable support / roller
assembly (3)
.
• Position the
glass plate (6)
in such a way that the centre of the plate bottom fits
exactly onto the drive.
• Never damp wipe the
heating element (5)
. When first using the grill /
convection function, you may notice a slight smoke or odour development,
owing to production residues burning off on the
heating element (5)
. This is a
normal process and not a defect.
NOTES ON DISHES
• Microwave dishes are microwave permeable and enable the energy of the
microwaves to penetrate through the container and heat the food.
• ATTENTION! Microwaves cannot penetrate metal. Therefore, no dishes with
metal or gold edges can be used when operating a microwave. Sparks or fire
can occur.
• When boiling or cooking in the microwave oven, do not use any products
Page 10

10
from recycled paper because they could contain small metal pieces
which could spark or start a fire.
• You should use round or oval cookware instead of square or long cookware
which overcooks food in the corners.
• Beside the microwave function, the device also has a grill function, a convection
function and a number of combination modes.
Please use the below table as a guide to help you select suitable cookware.
ATTENTION! Please note that certain cookware materials must not be used
in the preparation of foods in the microwave oven!
COOKING UTENSILS
MICROWAVE GRILL CONVECTION COMBINATION
Heat-resistant glass
Yes Yes Yes Yes
Non heat-resistant glass
No No No No
Heat and microwave resistant
ceramic
Yes Yes Yes Yes
Microwave safe plastic dishes
Yes No No No
Kitchen paper
Yes No No No
Metal insert
No Yes Yes No
Baking tray
No Yes Yes No
Aluminum foil & foil
containers
No Yes Yes No
COOKING BASICS
• ATTENTION! Never operate this device when it is empty or without the
glass
plate (6)
on the
roller assembly (3)
.
• The oven area must be clean when being used for the first time. The
glass
plate(6)
and the
the turntable support / roller assembly (3)
must be able to turn
freely during operation.
• Make sure that no food or vessels project out over the edge of the
glass
plate(6)
.
• Distribute the food evenly. Lay the thickest pieces on the outer edge of the
plate.
• Pay attention to boiling and cooking time. Choose the shortest boiling or
cooking time specified and then increase it as required. Foods which are heavily
overcooked can cause smoke or catch fire.
• Cover the food while it is cooking or boiling.
A microwaveable cover prevents spills, and avoids potential messes or damages
to the device. It also allows more even cooking. Furthermore, the moisture
remains in the foods which are being cooked.
• The microwaves do not heat the food evenly. Therefore, turn foods such as
Page 11

11
meat pieces over once to speed up cooking. Larger pieces of meat such as
roasts should be turned over several times.
• Once half of the cooking time is over, re-distribute any foods which are placed
on top of one another, e.g. meatballs. Do this by moving the foods on the top
to the bottom and the foods on the bottom to the top.
• Do not leave the device unattended during operation.
If you notice an unusual noise, overcooking of the food or smoke, stop the
cooking cycle immediately.
• Let the food stay in the oven area at the end of the cooking time. This way, the
heat distributes better into the food.
•
PLEASE NOTE:
To prevent burns, always wear oven mitts when removing cooked foods.
• Make sure not to touch the
heating element (5)
located at the top of the
cooking compartment after using the grill / convection function.
•
WARNING:
When using the grill function, the convection function or the combination
modes, all parts of the appliance, including the
door (1)
and the top of the
appliance, may become very hot. Should this be the case, do not touch the
appliance housing and use only the handles and buttons.
• Microwave function: Place the food on the
glass plate (6)
and close the
door (1)
.
Grill + Convection: Place the food on the
baking tray (7)
, put it on the
glass
plate (6)
and close the
door (1)
.
Combination functions:
Place the food on the
glass plate (6)
and close the
door (1)
.
ATTENTION:
1. The
baking tray (7)
must be removed in the microwave function
(including combination mode)!
2. When using the grill / convection function, make sure no food comes in
contact with the
heating element (5)
located at the top of the cooking
compartment.
REMOVING THE BAKING TRAY FOR GRILL AND
CONVECTION MODE
To prevent burns when preparing foods on the
baking tray (7)
and removing them
from the microwave, always use the
detachable handle (8)
.
Place the
detachable handle (8)
at a steep angle against the rim of the
baking tray (7)
as illustrated below. Do not twist the
detachable handle (8)
and make sure to keep it
straight!
Then carefully push the
detachable handle (8)
down.
ATTENTION: Be careful when positioning the
detachable handle (8)
and don't touch
the appliance. Risk of burns!
Page 12

12
Always place the
baking tray (7)
on a level, skid- and heat-resistant surface.
Disengage the
detachable handle (8)
by lifting it up again. Take care not to twist the
detachable handle (8)
!
DEFROSTING FOOD
When defrosting food in the microwave, remember that the food will be heated
unevenly. It may happen that food is still frozen at the centre, while the outside is
defrosted already. In order to defrost evenly, food must be heated in several steps,
and should be divided, stirred or turned in between.
Defrosting time will vary depending on the thickness of the frozen food. Food
should be turned over at least once to test whether it is sufficiently defrosted. Stop
defrosting once the food can be cut with a knife.
PLEASE NOTE:
Heat frozen food in original containers only until it can be transferred to another,
microwave safe container.
CONNECTING THE APPLIANCE TO THE POWER SUPPLY
As soon as the appliance is connected to the power supply, a signal tone sounds, and
the
screen (4a)
displays 1:00 and CLOCK.
SETTING THE HOUR MODE
You can choose to have the time displayed in 24 hour or 12 hour mode.
• Press and hold the
WEIGHT / CLOCK key (4i)
for approx. 3 seconds. A signal
tone will sound and the
screen (4a)
displays the symbol for 24 Hour Mode
(Hr 24).
• Press the
WEIGHT/ HOUR key (4i)
briefly again to switch to 12 Hour Mode. A
signal tone will sound and the
screen (4a)
displays the symbol for 12 Hour Mode
(HR 12).
SETTING THE CLOCK
Once you have selected the hour mode, you can set the time.
ATTENTION: The time can only be adjusted as long as Hr 12 or Hr 24 is
displayed on the
screen (4a)
!
• Turn the
TIME / MENU (4f)
dial to set the hours first. The
screen (4a)
displays
TIME and CLOCK as well as ENTER. You will also see the placeholders for the
hour input.
Page 13

13
• Set the correct hour by turning the
TIME / MENU (4f)
dial.
• Once the correct hour has been set, press the
WEIGHT / CLOCK (4i)
key
again to confirm the selection and to begin setting the minutes.
• The placeholders for the minute input will be displayed. Turn the
TIME /
MENU (4f)
dial again to set the minutes. Once the minutes have been set,
confirm by pressing the
WEIGHT / CLOCK (4i)
key.
• The
screen (4a)
displays the time with a blinking colon and the word
CLOCK.
MICROWAVE FUNCTION
FUNCTION KEY MICRO
• Begin by selecting the desired power setting.
• The microwave has 10 power settings and a 0% setting, which will heat
food at varying degrees of speed and temperature. The P-00 (0% power)
setting can be used to cool the microwave off.
• The power settings are selected by pressing the
MICRO (4b)
key and are
displayed on the
screen (4a)
:
Press Power/Display Description
1x
100%(P-HI) Full power for very fast heating
2x
90%(P-90)
3x
80%(P-80)
4x
70%(P-70)
5x
60%(P-60)
6x
50%(P-50) Medium power
7x
40%(P-40)
8x
30%(P-30)
9x
20%(P-20)
10x
10%(P-10)
11x
00%(P-00) May be used to cool off the microwave
SETTING THE TIME
After selecting the power setting, set the preparation / cooking time.
To do this, turn the
TIME / MENU (4f)
dial. The selected minutes are displayed on
the
screen (4a)
.
• Shortest time setting: 10 seconds.
• Longest time setting: 95 minutes.
• The time settings from 10 seconds to 5 minutes are divided into 10 second
increments.
Page 14

14
• From 5 minutes to 10 minutes the time can be set in 30 second increments.
• From 10 minutes to 30 minutes the time can be set in 1 minute increments.
• Beginning at 30 minutes, 5 minute increments can be selected up to the
maximum time of 95 minutes.
• To start press the
START / QUICK START (4k)
key.
• The microwave starts and the selected time is counted down.
ENDING THE MICROWAVE FUNCTION
• When the selected time has expired, the device turns itself off. The
screen (4a)
displays END and a signal tone sounds. If you press the
STOP / DELETE (4j)
key,
the
screen (4a)
will display the time.
• To interrupt the cooking process of the microwave, press the
STOP / DELETE (4j)
key once. The appliance will turn off temporarily. The
screen (4a)
will display
the time remaining. To start the microwave again, press the
START / QUICK
START (4k)
key.
• To stop the cooking process ahead of time, and to delete the setting, press the
STOP / DELETE (4j)
key twice. The
screen (4a)
will display the current time.
GRILL FUNCTION
FUNCTION KEY GRILL
Only the
heating elements (5)
located in the top of the cooking compartment are
turned on. This produces a golden brown crust, but bulky food may burn on the
surface while the centre is still completely raw. This setting is ideal for cooking
sausages, chicken thighs, cutlets, diced meat, sandwiches etc.
• Press the
Grill (4h)
key. The
screen (4a)
displays ENTER / COOK / TIME / GRILL.
• The colon of the time display flashes.
SETTING THE TIME
• Set the time.
• To set the cooking time in the grill mode, proceed as described in "SETTING THE
TIME" in section "MICROWAVE FUNCTION".
• To start press the
START / QUICK START (4k)
key.
• The grill mode always uses the highest power setting. This cannot be changed.
ENDING THE GRILL FUNCTION
• To end the grill mode, proceed as described in "ENDING THE MICROWAVE
FUNCTION" in section "MICROWAVE FUNCTION".
Page 15

15
CONVECTION FUNCTION
FUNCTION KEY CONVECTION
In the convection mode, hot air is introduced into the cooking compartment of the
appliance. Due to the circulating hot air, food browns and cooks evenly.
The convection mode can be programmed for 10 different temperature settings, with
or without preheating.
The cooking time can be adjusted from 2 minutes to 9 hours and 30 minutes.
CONVECTION WITHOUT PREHEATING
• Press the
CONVECTION (4c)
key. The
screen (4a)
displays CONV. as well as the
placeholders for the temperature setting.
• Press the
CONVECTION (4c)
key repeatedly to select a temperature setting
between 110 and 200°C. The
screen (4a)
will display the selected temperature
and CONV.
• Set the cooking time by turning the
TIME / MENU (4f)
dial.
• Then press the
START / QUICK START (4k)
key. The convection process begins.
PLEASE NOTE:
If you press the
CONVECTION (4c)
key during the cooking process, the selected
temperature will appear for a short time on the
screen (4a)
.
CONVECTION WITH PREHEATING
• Press the
CONVECTION (4c)
key. The
screen (4a)
displays CONV. as well as the
placeholders for the temperature setting.
• Press the
CONVECTION (4c)
key repeatedly to select a temperature setting
between 110 and 200°C. The
screen (4a)
will display the selected temperature
and CONV.
• Now press the
START / QUICK START (4k)
key
(without prior time selection)
.
• The microwave begins preheating. The
screen (4a)
flashes PREH and the
previously set time of 30 minutes.
• As soon as the selected temperature has been reached (the lower the
temperature, the shorter the time), a signal sounds. The appliance continues
running and maintains the selected temperature.
PLEASE NOTE:
If the selected temperature has not been reached after 30 minutes, the appliance
turns off automatically.
• As soon as the device has reached the desired temperature (signal), open the
door (1)
and place the foods on the
baking tray (7)
in the cooking compartment.
• After closing the door, the screen displays ENTER COOK TIME and CONV.
• Set the cooking time by turning the
TIME / MENU (4f)
dial.
• Then press the
START / QUICK START (4k)
key.
• The convection process begins.
Page 16

16
COMBINATION MICROWAVE AND GRILL
Attention!
For this function, just as for normal microwave operation, no metal objects (such as
baking sheets, metal bowls, dishes with gilt edging etc.) are permitted inside the
cooking compartment!
In this mode, the magnetron (microwave) and the
heating element (5)
alternately
receive power. Depending on the kind of food, you can use this combination of grill
and microwave to obtain optimal cooking results. You have 2 power settings at
your disposal:
1. COMBINATION 1:
30% of the time microwave and 70% of the time grill. This is an ideal setting for
the preparation of fish, sandwiches, or gratins.
• Press the
MICRO + GRILL (4e)
key once. The
screen (4a)
displays the number 1
and GRILL MICRO.
• Use the
TIME / MENU (4f)
dial to select the desired preparation time in the same
way as setting the time for the functions described earlier.
• Once you have entered the desired time, press the
START / QUICK START (4k)
key.
• The time entered is counted down.
• Once the time has expired, a signal tone sounds and the
screen (4a)
displays END.
The appliance turns off.
• Press the
STOP / DELETE (4j)
key.
2. COMBINATION 2:
55% of the time microwave and 45% of the time grill. Excellent for cooking
small chickens and meat.
• Proceed as described under COMBINATION 1, but press the
MIKRO + GRILL (4e)
key twice.
• The
screen (4a)
displays the number 2.
COMBINATION MICROWAVE AND CONVECTION
Attention!
For this function, just as for normal microwave operation, no metal objects (such as
baking sheets, metal bowls, dishes with gilt edging etc.) are permitted inside the
cooking compartment!
In the combined microwave and convection mode, you can select between 4
different temperatures (110° C, 140° C, 170°C, and 200° C). The cooking time can be
adjusted from 2 minutes to 9 hours and 30 minutes.
• To select one of the 4 possible temperature settings, press the
MICRO +
CONVECTION (4d)
key. Please note the table below:
Page 17

17
MICRO +
CONVECTION KEY
Display Temperature (displayed)
press 1x
CONV MICRO 200 °C
press 2x
CONV MICRO 170 °C
press 3x
CONV MICRO 140 °C
press 4x
CONV MICRO 110 °C
• Set the desired time by turning the
TIME / MENU (4f)
dial.
• Then press the
START / QUICK START (4k)
key. The combination process begins.
The
screen (4a)
displays "CONV", "MICRO" and "COOK". The time is counted
down.
PLEASE NOTE:
If you press the
MICRO + CONVECTION (4d)
key during the cooking process, the
selected temperature will be displayed for a short time.
AUTOMATIC PROGRAMS
Select a suitable automatic program for your food. The appliance automatically
controls the functions and power settings, as well as the cooking time. You do not
need to select power settings and cooking times.
Select the automatic program as described here and press the
START / QUICK START
(4k)
key to start the program.
PLEASE NOTE:
Food should be checked after half of the cooking time has elapsed, because
automatic programs are based on average preparation values only (duration and
power setting).
Interrupt the cooking time by pressing the Stop/Delete (4j) key, and rearrange the
food (from front to back and from top to bottom. See also: "COOKING BASICS ")
PLEASE NOTE:
The setting 09 indicates the defrost program!
1. Turn the
TIME / MENU (4f)
dial.
2. The
screen (4a)
displays automatic programs with the abbreviations 01 – 09.
Page 18

18
PROGRAM FOOD WEIGHT KEY COMMENT
01
For example
potatoes
(sliced)
1x = 4min
2x = 8min
3x = 12min
For a maximum of 230g
potatoes
02
Liquids
(such as soup,
coffee)
1x = 1min 30sec
2x = 2min 40sec
3x = 3min 50sec
For a maximum of 200ml
of liquid
03
Popcorn 1x = 95 min
(not recommended!)
2x = free choice of
time selection with
TIME/MENU
dial
(recommended!)
Always follow the
instructions of the
popcorn manufacturer!
04
Re-heating 1x = 200g
2x = 300g
3x = 400g
4x = 500g
5x = 600g
6x = 700g
7x = 800g
200g = 1min 30sec
300g = 2min 00sec
400g = 2min 30sec
500g = 3min 00sec
600g = 3min 30sec
700g = 4min 00sec
800g = 4min 30sec
05
For example
noodles
1x = 100g
2x = 200g
3x = 300g
100g = 22min
200g = 27min
300g = 32min
06
For example
pizza
1x = 150g
2x = 300g
3x = 450g
150g = 6min
300g = 7min
450g = 8min
07
For example
poultry
1x = 800g
2x = 1000g
3x = 1200g
4x = 1400g
800g = 27min 00sec
1000g = 30min 00sec
1200g = 33min 00sec
1400g = 36min 00sec
08
For example
cake
1x = 55 min
(not recommended!)
2x = free choice of
time selection with
TIME/MENU
dial
(recommended!)
Always follow the
instructions of the
recipe!
09: Defrosting Function:
The defrosting function gives you the possibility to select the weight of the food to be
defrosted in 100g increments with the
WEIGHT/CLOCK (4i)
key. The minimum weight
is around 100g, the maximum weight around 1800g.
Page 19

19
Depending on the weight selected, the resulting times will vary between 4 minutes 30
seconds and 38 minutes 30 seconds. In addition, the
screen (4a)
will display DEF.
1. The automatic program selected with the
TIME / MENU (4f)
dial is displayed.
2. By pressing the
WEIGHT / CLOCK (4i)
key, select the weight and/or the cooking
time according to the table. Every key press increases the weight / time.
3. Press the
START / QUICK START (4k)
key to start the selected automatic
program.
4. The time is counted down. In automatic program 07, a signal tone sounds after
half of the cooking time has elapsed to remind you to turn the food over /
rearrange it, if necessary.
5. Once the time has expired, a signal tone sounds and the
screen (4a)
displays
END.
6. Press the
STOP / DELETE (4j
) key.
PLEASE NOTE:
Popcorn
• Put the kernels into a large container. If you use a transparent container, you
can watch the corn popping! Put only just enough kernels into the container to
cover the bottom.
• Cover the container. Do not use microwave wrap as cover, because flying
popcorn may puncture it.
• The preparation time of popcorn varies with quantity and quality. The
automatic program is preset for an average cooking time, which is displayed on
the
screen (4a)
. If desired, a different preparation time may be selected.
• Always keep an eye on the popping corn. End the program if popping slows to
no more than one kernel every 2 to 3 seconds.
Pizza
The automatic program "Pizza" is designed to heat cold pizza (refrigerator
temperature). If you like your pizza crisp, use the "Convection" function after the
automatic program has ended to bake the pizza for a couple of minutes at 200° C.
Cake
Use only flat baking pans (no more than springform pan height). Do not use ceramic
baking pans (such as Gugelhupf).
COOKING IN SEVERAL STEPS
With this function, you can select up to three different methods of preparation to
run automatically in sequence.
For instance, you can defrost the food in the first step; cook it in the microwave as
the second step, and gratinate it as a third step.
• You can select between all functions, except automatic programs and the
speedcooking function.
• The defrost function can only be selected as the first step.
Page 20

20
• After entering the data for the first function, do not press the
START / QUICK
START (4k)
key, but immediately enter the second and, if desired, the third
function. Only then press the
START / QUICK START (4k)
key.
Example:
As a first step, you want to defrost a frozen gratin, cook it in the microwave as the
second step, and gratinate it in the third step.
• Select microwave function P-20 by pressing the
MICRO (4b)
key 9 times.
• Set the desired defrosting time by turning the
TIME / MENU (4f)
dial.
• Then repeatedly press the
MICRO (4b)
key again, until the desired power setting
for heating the gratin has been reached. The
screen (4a)
displays "MEM".
• Enter the cooking time by turning the
TIME / MENU (4f)
dial.
• Now press the
GRILL (4h)
key.
• Enter the cooking time for gratinating with the grill function by turning the
TIME /
MENU (4f)
dial.
• Then press the
START / QUICK START (4k)
key. The program sequence starts.
SPEEDCOOKING FUNCTION
With this function the power level of the microwave is always 100%. In
speedcooking mode, the times are preset and are selected and displayed by rapidly
pressing the
START / QUICK START (4k)
key.
The selected setting starts automatically after the last rapid pressing of the
START /
QUICK START (4k)
key.
The preset times are: 30 seconds, 1 minute, 2 minutes, 3 minutes etc. up to 10
minutes.
Example:
You want to cook for 2 minutes at 100% microwave power level.
• Rapidly press the
START / QUICK START (4k)
key 3 times.
• The cooking process begins.
CHILD SAFETY LOCK
• To activate the child safety lock, press and hold the
STOP / DELETE (4j)
key for
about 3 seconds.
• A signal tone will sound and the
screen (4a)
displays LOCK.
• The operating keys are now blocked, only the
door (1)
can be opened.
• To deactivate the child safety lock again, press the
STOP / DELETE (4j)
key again
for about 3 seconds.
• A signal sounds, the LOCK display goes out, and the operating keys can be used
again.
CLEANING AND CARE
ATTENTION! Before beginning cleaning, switch the device off and pull the power
plug from the wall socket.
• Keep the device clean. If sprinkles from food or shaken liquids stick to the walls
of the device, wipe them with a damp cloth. If the device is very dirty, a mild
detergent can be used. Avoid the use of spray or other harsh detergents which
could corrode, scratch or dull the surface of the
door (1)
.
Page 21

21
• The outer surfaces should be cleaned with a damp cloth. In order to avoid
damages to the operating parts in the interior of the device, water must not
reach the ventilation openings.
• Wipe the door with the
viewing window (1)
from both sides. Clean the
door
and the adjacent parts regularly with a damp cloth in order to remove any
residues or splashes. Do not use any abrasives.
• When cleaning the
control panel (4)
, make sure no moisture can get into the
interior of the appliance. Clean it with a soft damp cloth.
• Clean the
glass plate (6)
regularly with warm water and a commercial
detergent.
• The
turntable support (3)
and the bottom of the appliance interior should be
cleaned regularly to prevent malfunction and excessive noise. Wipe the bottom
of the cooking compartment with a mild cleaner. The
roller assembly (3)
may be
cleaned using a mild detergent and warm water. After cleaning, make sure to
replace the
roller assembly (3)
correctly.
• To remove odours from your device, put a cup of water with the juice and
grated skin of a lemon in a deep, microwaveable container and heat it for 5
minutes in the microwave oven. Then wipe out the device thoroughly with a
damp cloth and dry with a soft cloth.
• If the device’s lamp needs to be replaced, please refer to a retailer for the
proper lamp.
• Clean this device regularly and thoroughly remove all food residues. Stains like
burned-on fat can corrode the surfaces, impact the functions, have a negative
effect of the lifetime of the device and cause potential risks.
Page 22

22
DISPOSAL
USED ELECTRIC HOUSEHOLD DEVICES
• If you do not want to use your electrical appliance any longer,
return it free of charge to a recycling depot for used electric
appliances.
• Used electric devices do not belong in the household garbage (see
symbol).
FURTHER DISPOSAL INSTRUCTIONS
• Return the electrical appliance in such a condition that its later
re-use or recycling is not adversely affected. Batteries must be
removed in advance and the destruction of parts which contain
fluids must be avoided.
• Electrical appliances can contain harmful substances. Improper
handling or damage to the appliance can lead to health problems
or water or ground contamination, when the appliance is recycled
later.
SERVICE / WARRANTY
The warranty period covers 3 years and begins with the purchase date. For proof of
the purchase date please retain the receipt.
The warranty covers defects and malfunctions occurring with normal use during the
warranty period.
Warranty repairs are carried out free of charge.
The warranty is void in case of damages, alterations or improper use of the device,
where these are not the responsibility of the warranty provider. This applies
especially to the following cases:
• Interference with the device by unauthorized persons.
• Alterations on or in the device, removing or effacing the serial number, removal
or alteration of the device seal.
• Damages due to impact, dropping or external influence.
• Damages due to incorrect handling or improper use.
• Damages due to external causes, e.g. voltage overload, lightning strike.
• Commercial utilization of the device.
Your legal rights in the case of a defective device (replacement, return, reduction,
compensation) are not restricted by this warranty.
Please keep the original packaging in case of a return for repair.
Repaired or exchanged components are generally covered for the remaining
warranty period of the device.
Page 23

23
Should you have any questions relating to this product or to the manual or in case
you should find any deficiencies with this product, please contact our service hotline
directly to discuss further steps.
IMPORTANT NOTE:
Please do not send your device to our address without having been requested to.
Always contact our service hotline first.
SERVICE HOTLINE: Phone: +49(0)431 53 039 171
E-Mail: superior@zhg-online.de
ARTICLE NO.: 10002125
PRODUCED FOR:
ZENTRALE HANDELSGESELLSCHAFT - ZHG - MBH,
HANNS-MARTIN-SCHLEYER-STRASSE 2,
D-77656 OFFENBURG,
www.zhg-online.com
MADE IN CHINA
All images serve as illustrations only and do not always show exact representations
of the device.
All rights reserved.
 Loading...