

Sun-Tech ST-PRO101 PRO-ONE Operation Manual

Sun-Tech
OPERATION MANUAL
PRO-ONE AV CONTROLLER
Model:
ST-PRO101
Operation Manual Version: 5.1 Page 1 ~ 24
Page
1

This device complies with Part 15 of the FCC Rules. Operation is subject to the
following two conditions: (1) this device may not cause harmful interference, and (2)
this device must accept any interference received, including interference that may cause
undesired operation.
Warning: Changes or modifications to this unit not expressly approved by the party
responsible for compliance could void the user's authority to operate the equipment.
NOTE: This equipment has been tested and found to comply wi th the limits for a Class B
digital device, pursuant to Part 15 of the FCC Rules. These limits a re design ed to provide
reasonable protection against harmful interference in a residential installation. This
equipment generates, u ses and can radia te radi o freq uency en ergy and, i f not install ed and
used in accordance with the instructions, may cause harmful interference to radio
communications.
However, there is no gua rantee that i nterferen ce will no t occur in a particula r installati on.
If this equipment does cause harmful interference to radio or television reception, which
can be determined by t urning the equipment off and on, the user is encouraged to try to
correct the interference by one or more of the following measures:
Reorient or relocate the receiving antenna.
Increase the separation between the equipment and receiver.
Connect the equipment into an outlet on a circuit different fro m that to whi ch
the receiver is needed.
Consult the dealer or an experienced radio/TV technician for help.
Page
2

Welcome……
and thank you for purchasing this Sun-Tech PRO-ONE A/V Controller. This state of
the art system includes everything you need to experience high quality digital video
and audio in your multimedia learning environment. We have designed this system to
be easy to set up, and even easier to operate. But please, review this manual before
you operate your system; have it handy while you are setting the system up; and keep
it available for future reference, or in the unlikely event that you encounter any
unexpected problems. We have tried to keep this manual as simple as possible. It
begins with a description of the important controls on the main unit and the software
interface (only applicable to XCLASS Professional version). It then explains how to
connect the speakers, computer, monitors, projector, IR output, and all external
sources to the main unit. Finally, the detail instructions to operate the main unit and
the software control interface in XCLASS Professional version. If you follow the
instructions carefully, you can have the system up an operating in less than an hour.
This system was designed to provide you with many years of reliable operation with
minimum of care and maintenance. Every component in you system was in perfect
working condition when it left out factory. If you experience any problem with the set
up or operation of this system, please review the Trouble Shooting Guide at the end of
this manual.
Warnings, cautions and others
CAUTION
To reduce the risk of electrical shocks, fire, etc:
1. Do not remove screws, covers or cabinet.
2. Do not expose the appliance to rain or moisture.
3. Power off the unit before disconnecting the power cable.
4. Refer servicing to qualified service personnel only.
BEFORE CONNECTING TO AC POWER, PLEASE MAKE SURE YOU
HAVE SELECTED THE APPROPRIATE VOLTAGE SELECTION.
FAILURE TO DO SO WILL PERMANENTLY DAMAGE YOUR UNIT.
Notes.
The appliance coupler is used as a disconnect device and shall be
remain readily operable
Page
3

Page
4
Table of Contents
3
Index to Parts and Controls 4 ~ 5
Important Safeguards and Precautions 6
Features of this System 7
Important Information Regarding This Manual 7
1. Installations
8
1.1 Unpacking 8
1.2 Speaker System Connection 8 ~ 9
1.3 AV Equipments Input/Output Signal Connections 10 ~ 12
1.4 Teacher PC and Laptop Connections 13 ~ 15
1.5 Projector and Auxiliary Connections 16 ~ 17
1.6 AC Power Connection 17
2. Basic System Setup and Operations
18
2.1 Voltage Selection 18
2.2 Basic Operations 18
2.3 Microphone Input and Control 19
3. Settings and Adjustments
20
3.1 Programming the Infrared Controller 20
A. Additional Information
21
A.1 Troubleshooting 21
A.2 Technical Specifications 22

Index to Parts and Controls
Front Panel:
Refer to the pages indicated in parentheses for details.
1. Audio, Video Composite Inputs (page 12) 6. Master Treble Level Control (page 18)
2. Power ON/OFF Indicator (page 18) 7. Master Bass Level Control (page 18)
3. Infrared Receptor, Infrared Learning port (page 20) 8. Master Volume Level Control (page 18)
4. Mic. Input Jack (page 19) 9. Power ON/OFF (page 18)
5. Mic. Volume Level Control (page 19)
2
1
3
4 5
6
7
9
8
Page
5
9
8
7 6 5 4
3
2
1
Page
6
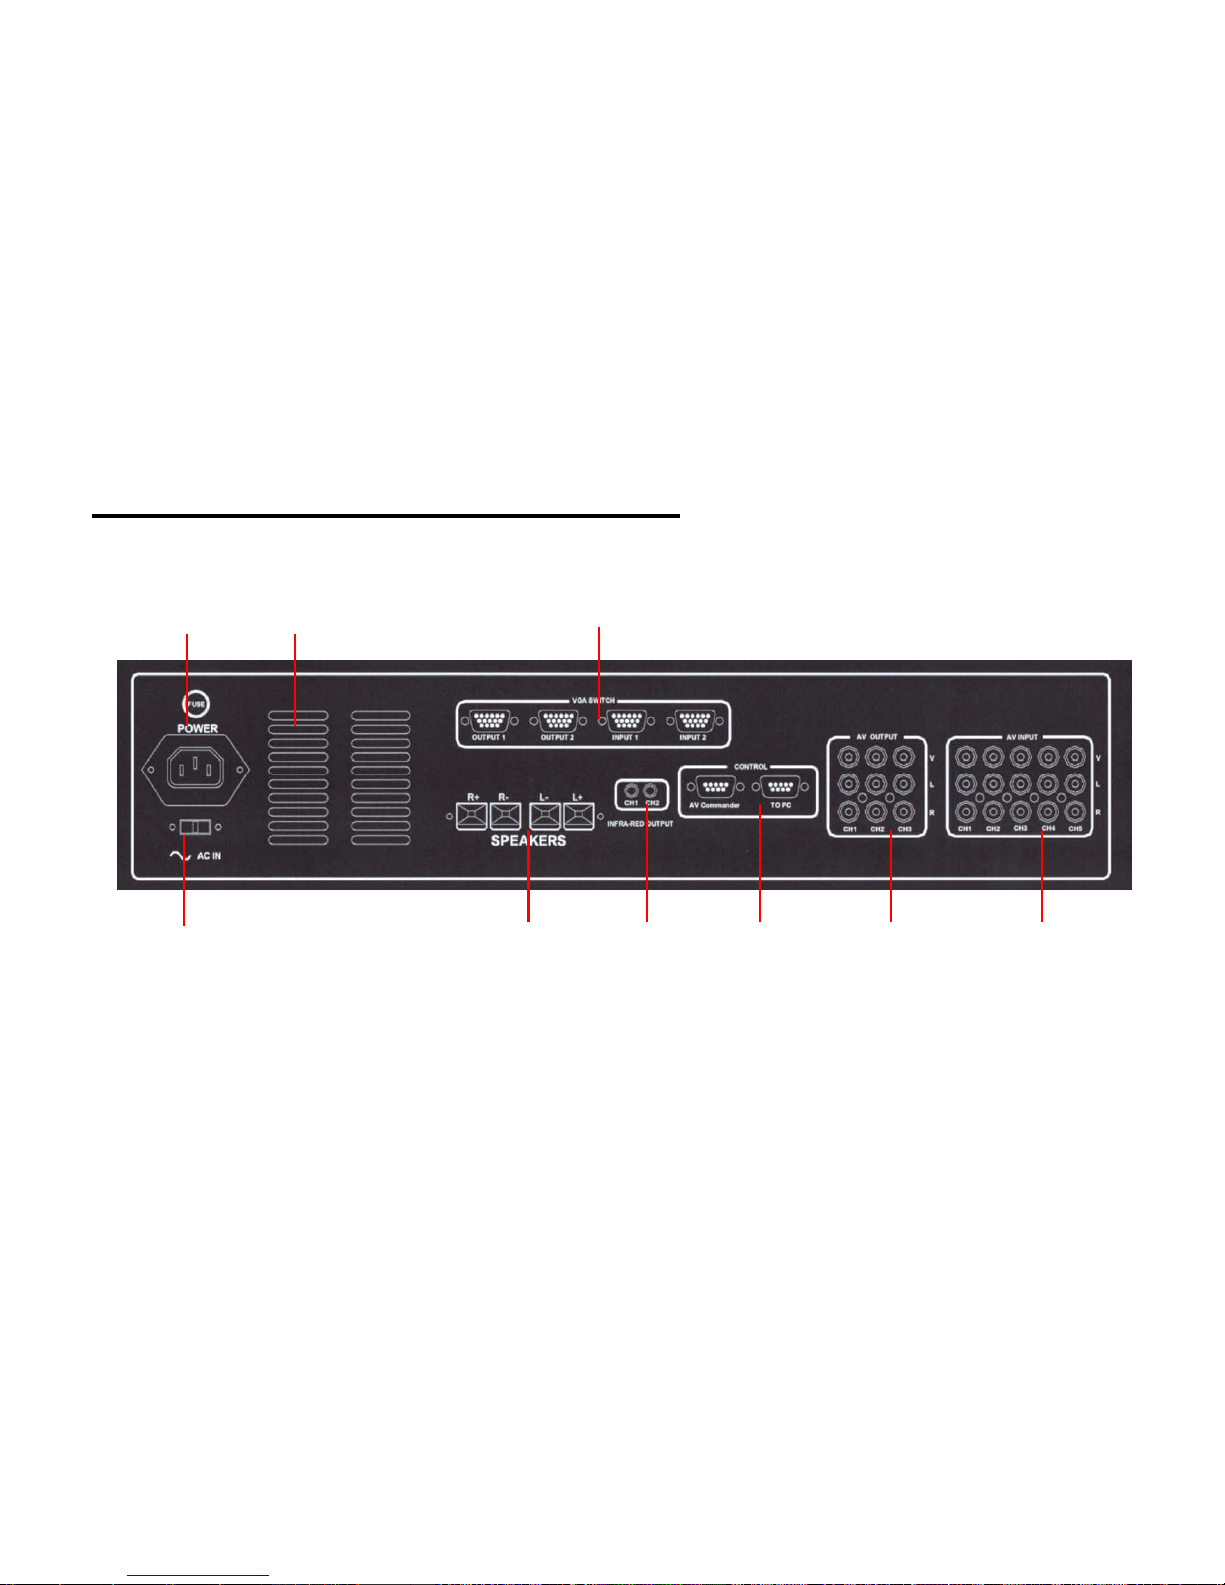
(page 14, 15, 17)
(page 11, 14, 17)
(page 11, 14, 15)
(page 14)
8. Audio, Video Composite Outputs
9. Audio, Video Composite Inputs
7. PRO-ONE Control Terminals
6. VGA Input/Output Terminals
Index to Parts and Controls (Continued)
(page 11, 17)
(page 18)
(page 17)
(page 6)
(page 8)
Rear Panel:
Refer to the pages indicated in parentheses for details.
4. SPEAKER Output Terminals
5. Infrared Output Jacks
1. Voltage Selector
2. AC Power Plug
3. Air Vents

Important Safeguards and Precautions
Power Cord Protection
To avoid any malfunction of the unit, and to protect against electric shock, fire or
personal injury, please observer the following:
Hold the plug firmly when connecting or disconnecting the AC power cord.
Keep the AC power cord away from heating appliances.
Never put any heavy object on the AC power cord.
Do not attempt to repair or reconstruct the AC power cord in any way.
Location and Handling
Air vents are provided in the cabinet to prevent excessive heat inside the unit.
Do not place this unit in closed space or anywhere blocking the vents.
Do not place this unit in direct sunlight, or near heat sources.
Keep this unit away from string magnetic objects.
Do not insert or drop anything into this unit through the air vents as this could
cause serious damage, possibly resulting in fire.
Do not place any object containing water or other liquids on this unit. In the
event that liquid should enter the cabinet, unplug this unit immediately and
contact the retailer or service center immediately.
Do not remove the cabinet. Touching parts inside the cabinet could result in
electric shock and / or damage to the unit.
Non-Use Periods
When the unit is not being used, turn the unit off.
When left unused for a long period of time, the unit should be unplugged from
the household AC outlet.
Stacking
Place the unit in a horizontal position, and do not place anything heavy on top
of it.
Condensation
Moisture may form inside the unit in the following conditions:
In a steamy or very humid room.
When the unit is suddenly moved from a cold environment to a warm one.
If moisture forms inside this unit, it may not operate properly. In this case, turn on the
power and wait about an hour for the moisture to evaporate.
On Adjusting Volume
Do not turn up the volume while listening to a portion with very low-level
inputs or no audio signals. If you do, the speakers may be damaged when a
peak level portion is played.
Service
Do not attempt to service the unit yourself.
Page
7

Features of This System
7-channel A/V input
3-channel A/V output
1-channel microphone input
2-channel VGA input
1-channel VGA output with VGA connector x 2 (splitter)
50 W power amplifier with speaker outputs
Programmable Infrared remote control (I/O)
Mic volume, Master volume, treble and bass level control
Power supply: 100-115/230V (user selectable)
Rack Mountable
Important Information Regarding This Manual
The drawings about the front and rear panel used in this Operation Manual are purely
for the purposes of explanation. The actual displays may slightly differ from what are
shown here.
Page
8
 Loading...