


Key Definitions............................................................... 4
Basic Functions .............................................................. 5
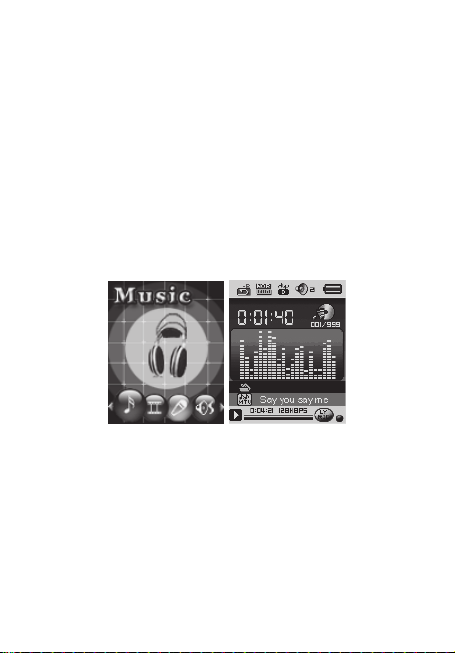
1. Play music.................................................................... 5
2. Play Videos.................................................................. 6
3. Record........................................................................... 6
4. Voice.............................................................................. 7
5. Using FM radio........................................................... 8
6. Photo Browsing......................................................... 9
7. Setup............................................................................. 9
9. Game...........................................................................10
10. Using USB Disk......................................................10
11. Other Settings .......................................................11
12. Battery Level ..........................................................12
13. Troubleshooting...................................................12
Technical Specifications............................................13
1
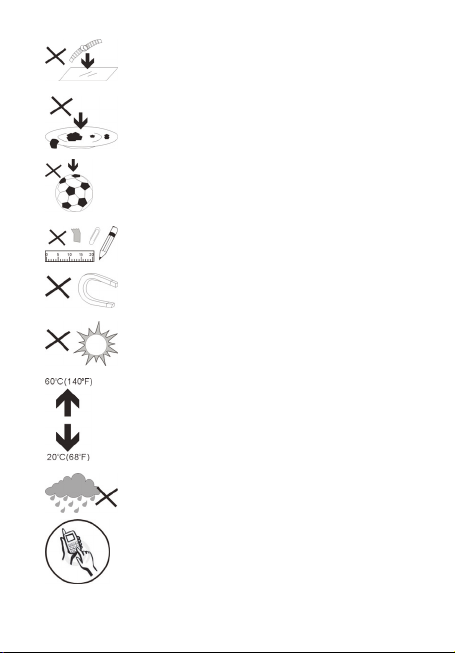
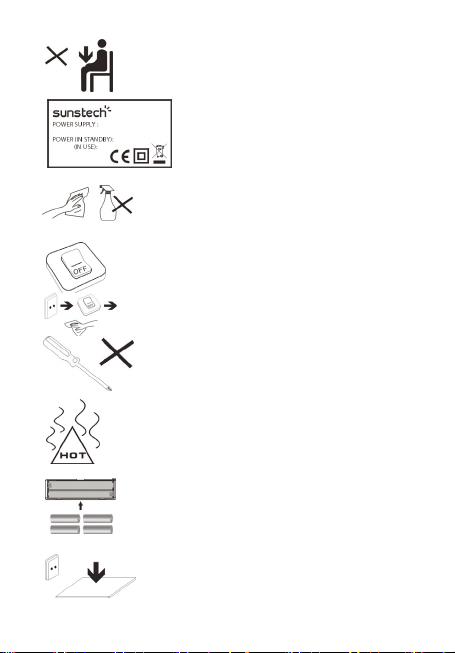
1. DO NOT place objects on top of the device, as
objects may scratch the device.
2. DO NOT expose the device to dirty or dusty
environments.
3. DO NOT place the device on an uneven or unstable
surface.
4. DO NOT insert any foreign objects into the
device.
5. DO NOT expose the device to strong magnetic or
electrical field.
6. DO NOT expose the device to direct sunlight as it
can damage the device. Keep it away from heat
sources.
7. DO NOT store your device in temperatures higher
than 40°C(104°F). The internal operating temperature for
this device is from 20°C(68°F) to 60°C(140°F).
8. DO NOT use the device in the rain.
9. Please check with your Local Authority or retailer
for proper disposal of electronic products.
2
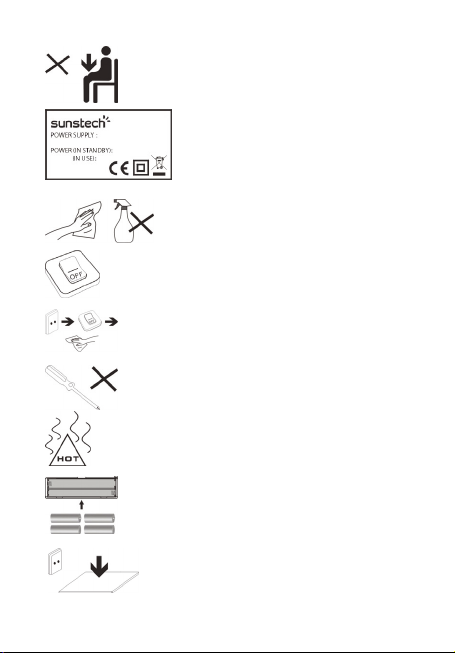
10. The device and adaptor may product some heat
during normal operation of charging. To prevent
discomfort or injury from heat exposure, DO NOT
leave the device on your lap.
11. POWER INPUT RATING: Refer to the
rating label on the device and be sure that
the power adaptor complies with the
rating. Only use accessories specified by
13. Always power off the device to install or remove
external devices that do not support hot-plug.
16. The device has apertures to disperse heat. DO NOT
block the device ventilation, the device may become hot
and malfunction as a result.
the manufacturer.
12. Clean the device with a soft cloth. If
needed, dampen the cloth slightly before
cleaning. Never use abrasives or cleaning
solutions.
14. Disconnect the device from an electrical outlet
and power off before cleaning the device.
15. DO NOT disassemble the device. Only a certified
service technician should perform repair.
17. Risk of explosion if battery replaced by an
incorrect type. Dispose of used batteries according
to the instruction.
18. PLUGGABLE EQUIPMENT: the socket-outlet
shall be installed near the equipment and shall
be easily accessible.
3
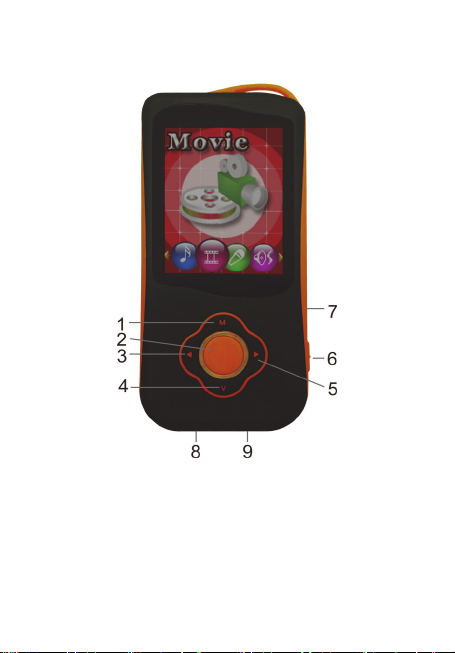
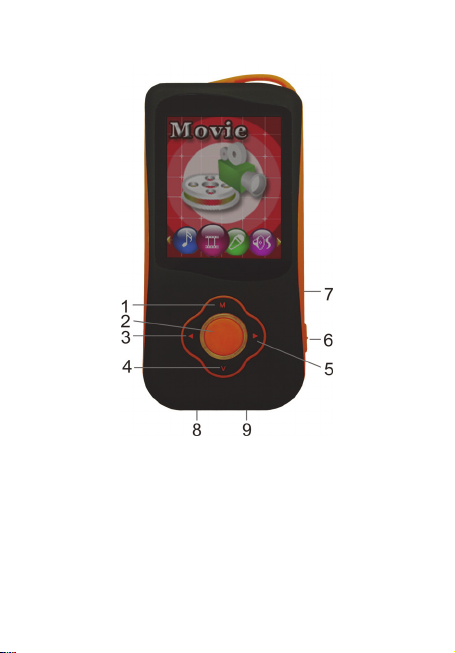
Key Definitions
1. MODE/MENU: Entry main menu or exit from current menu
2. PLAY: Play/Pause button
3. LAST: Previous Music/
4. Volume: Volume Adjustment
5. NEXT: Next Music/ Forward/ Fast-Forward
6. ON/OFF: Power switch
7. micro SD Card (TF C ard)
8. USB slot (mini 5PIN)
9. Standard Earphone output
Backward/ Rewind
4
Basic Functions
● Volume Adjust
Press the VOL key to enter the volume selection, short press Next /
Last button to increase or decrease the volume.
● Switch on/off
Press and hold Play to switch on when the player is off.
Press and hold Play to switch off when the player is on.
● Play & Pause; exit from submenu
On music mode, Press Play to play music.
When playing music, press Play to pause; press and hold to stop
playing.
1. Play music
● Simple actions
1. Enter Music Mode and press PLAY to play music.
2. Select a Track: LAST: Previous Track;
NEXT: Next Track.
● Equalizer Mode
1. When playing music, Press MODE to enter in the submenu.
2. Push NEXT choosing Equalizer Mode;
3. Press MODE to enter ‘Equalizer Mode’ submenu.
4. Detail of each equalizer (EQ):
Natural, Rock, Pop, Classic, Soft, Jazz, DBB
5. Push NEXT to select an EQ and press MODE to confirm.
5

● Synchronize Lyric Display
The player supports lyric files with *.LRC suffix, and displays
simultaneously.
How to use lyric files?
Please make sure the lyrics file has the same name as the music file.
Press MODE and hold for a few seconds.
For exa mple:
Music file: Journey.mp3
Lyric file: Journey.lrc
2. Play Videos
1. Enter main menu, press NEXT scrolling to “Video” (Only available
to AMV files).
2. Press MODE to enter:
3. Press PLAY to start video.
1). When in the interface of ‘Movies stop’.
2). Press MODE to enter submenu.
Local Folder, Delete file, Delete all, Repeat (Normal, repeat one,
Folder, Repeat Folder, Repeat all, Random ,intro ) , Exit.
3. Record
● Recording in “Record mode”
1. Enter the main menu:
2. Push NEXT scroll to Record mode.
3. Push MODE to select Record mode, screen will display as be low:
6
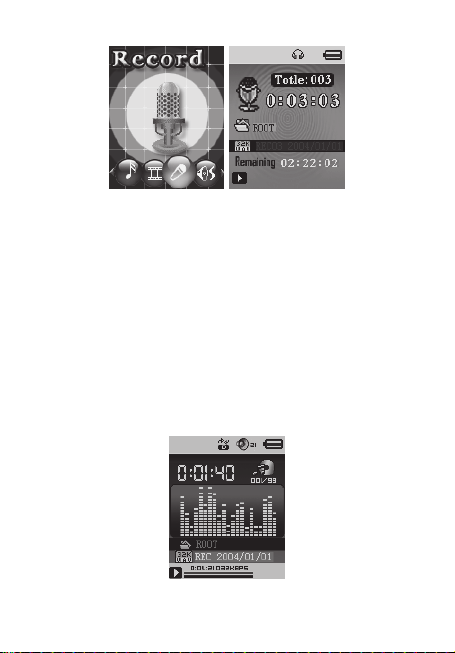
4. Press PLAY to start / pause recording.
5. Press MODE for a few seconds to save the recording.
● Select Record Type
1. Press MODE to enter record submenu.
2. Push NEXT scrolling into ‘REC type’ submenu then presses MODE
to select it.
3. Press NEXT to choose the appropriate type and press MODE to
select it.
4. . Press PLAY to s tart recording.
4. Voice
1. Enter main menu
2. Push NEXT to choose ‘Play mode’
3. Push MODE to enter playing interface
4. Press PLAY again to play the file.
7
5. Choose voice record files:
LAST: Select previous file;
NEXT: Select the next file;
6. When in the interface of ‘Voice stop’
7. Press MODE to enter submenu.
Local Folder , Delete file ,Delete all , Exit.
8. When in the interface of ‘Voice play’
9. Press MODE to enter submenu.
Repeat, Replay mode , Exit.
5. Using FM radio
1. Enter main menu;
2. Push NEXT scrolling “FM Mode”
3. Push MODE to enter
4. Auto search “20 presets maximum”
Hold LAST/NEXT 2 seconds to start the channel search in 100 KHz
interval upwards or downwards. To stop tuning, push LAST/NEXT.
5. Manual tuning
Push LAST: Downward 100 KHz
Push NEXT: Upward 100 KHz
6. Save current channel:
Push MODE to enter FM submenu
Press MODE again to save channel.
7. Listening to a saved channel:
You can pr ess PLAY to choose a saved channel.
8. Record.
A. Press PLAY to star t recording.
8
B. Press MODE for a few seconds to save the record.
C. When in the interface of ‘Record stop’
D. Press MODE to enter record submenu
6. Photo Browsing
This function is only available for JPG and BMP format.
1. In the main menu, press LAST/NEXT choosing Browsing
pictures.
2. Press MODE to enter corresponding submenu.
3. Press LAST or NEXT choosing the document you want to read,
then press PLAY to play it.
4. In stop mode we have a submenu.
Local folder, Playback set (Manual play, autoplay), delete file ,delete
all, exit.
7. Setup
● Enter Settings
You can set system performances here, options may vary in
different versions of the firmware.
1. Entry main menu.
2. Push NEXT Scrolling into “Settings”.
3. Press MODE to entry.
● Options introduction:
Clock Setting system date and time
LCD set Screensaver setting
9
Language Choosing different languages
Power off
Online mode
Memory info
Firmware Version Version of player’s firmware
Firmware upgrade Use for upgrade firmware
Exit Exit from Setting interface
Setting a count down time in minutes, the
player will shut off when time out.
Multiply driver
Normal only
Encrypted only
Card only
Show memory capacity and used
percentage
9. Game
Enter main menu.
10. Using USB Disk
The player is also a standard USB disk. Supported by Windows /
Mac/XP.
The player supports USB power supply, can be used without using
the battery when connected to a PC. To enter, when in’ waiting
mode’ press MODE return to main menu and choose the operation
you need.
When connected to PC, The player works on the three modes
below:
10
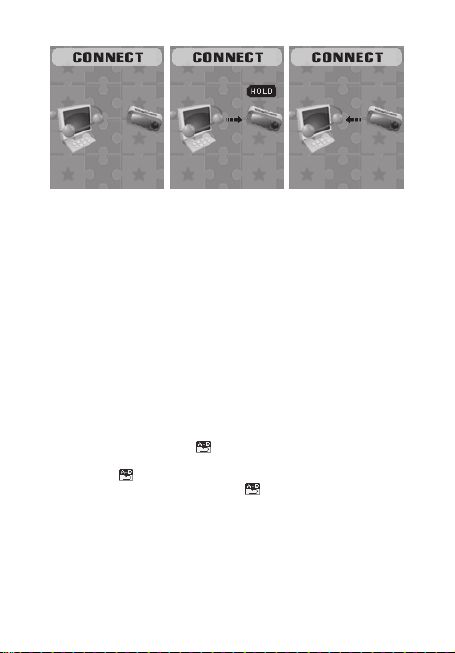
1. Waiting 2. Downloading 3. Uploading
11. Other Settings
● Play mode (Play s ubmenu)
You can choose different play mode ( repeat, shuffle) when playing
music or recorded files.
The first option on Play submenu is ‘Play mode’.
○ REPEAT: Normal, Repeat One, Folder, Repeat Folder, Repeat All,
Random, Intro.
● Replay mode (Play submenu)
Enter from Play submenu:
○ A-B Re peat
1. When play music or recorder.
2. Push MODE to entry play submenu.
3. Push NEXT scrolling into ‘Repeat Mode’ option.
4. Push MODE to enter:
Repeat Mode: ‘A’ of Symbol
5. Push NEXT to select ‘A’:
‘B’ of symbol
6. Push NEXT to select B. Symbol
between A-B, while playing, you can push LAST to reset A point.
● Replay times (Play submenu)
Please consult into ‘Replay mode’.
Replay time determines the times of play A-B repeat until exit.
flashes, waiting ender B.
flashes, waiting for star ter A
fixed and starting repeat
11
12. Battery Level
The power displays full. With the increase in the use of time,
the battery indicator will be reduced.
When the battery is almost /completely run out. The battery
icon will be completely white and the unit should be charged to
through of the mini USB.
Needs to be charged, you must turn the power switch for
charging. Otherwise, the player will not be able to respond to
the charge task.
Without the use of the player, please try to turn off the
power.
13. Troubleshooting
No Power Make sure you have switched the player on.
No Sound Make sure the volume is not at 0 and that the
Strange characters
on display
FM has bad
performance
Cannot Download
Music
earphones are connected correctly.
Please make sure the earphone jack is clean.
Damaged MP3 files may have background
noise and may not even play.
Make sure you have chosen the correct
language.
Adjust place of player and earphone.
Switch off nearby power appliance.
Earphone is used as antenna.
Check USB cable, and make sure the player is
properly connected to the PC.
Check if the driver has been well installed.
Make sure there is sufficient memory.
12
Technical Specifications
Dimension 40mm x 87mm x 10.5mm
Screen 1.8 TFT (128*160)
Connecting to PC High Speed USB2.0 (micro 5PIN)
Memory 4GB Flash
Voice Recorder Format WAV
Music Formats MP3, WMA
MP3, WMA
FM radio
Photo Format JPG, BMP
Operate
Tem pe ra tu re
Multi-Languages
Display
Supported
Systems
Please note: Design and characters may change without prior
notice.
Max. Output (L) 10mW
MP3 Bit rate 8K bps – 320K bps
WMA Bit rate 5K bps – 384K bps
Receiver
frequency
range
Storage units 20 + 20
Maximum
headphone
output
Signal to noise
ratio
5 to 40 degree
English, Spanish, French, Portuguese, Italian,
German…
Windows / Ma c, etc.
(32K , 64K,128K ,256Kbps)
+ (R)10mW (32Ohm)
76MHz – 90MHz
/ 87MHz – 108MHz
(L) 10mW + (R)10mW
(32Ohm)
45dB
Made in China
13
- The warranty of this product is for 2 years since the
purchase date.
- The warranty will exclude breakdowns caused by bad
use of the product, wrong installation or installation in not
desirable places for a proper maintenance of the product,
rips, updates of the products that are not the supplied by
the brand, pieces wore away for its use or for not domestic
or inappropriate use. Also are excluded breakdowns
caused for manipulations of the products by people or
companies alien to our company.
- For any request regarding the warranty terms, the
purchase receipt must be attached.
Warranty conditions
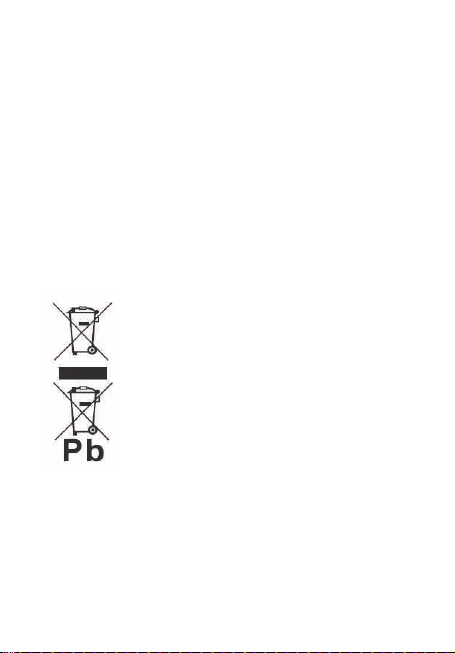
Correct disposal of this Product
Waste Electrical & Electronic Equipment
(WEEE)
Your product is designed and manufactured
with high quality materials and components
which can be recycled and reused.
This symbol means that electrical and
electronic equipment, at their endof-life
should be disposed of separately from your
household waste.
Please dispose of this equipment at your
centre.
In the European Union there are separate collection
systems for used electrical and electronic products.Please
help us to conserve the environment we live in !
local community waste collection/ recycling
14

DECLARATION OF CONFORMITY
Council Directive(s) to which conformity is declared:
Directive (2011/65/EU recasting 2002/95/EC) – RoHS
Manufacturer’s name: AFEX SUNS, S.A.
Manufacturer’s address: C/Pallars 189, 08005 Barcelona
Type of equipment: MP4
Trade: SUNSTECH
Model no.: GAIA
We, the undersigned, hereby declare under our sole
conformity with the above Directive(s) and Standard(s)
Directive (2004/108/EC) - EMC
Application of the Standards:
EN 61000-3-2:2006+A1:2009+A2:2009
EN 61000-3-2:2008
EN 55022:2010
EN 55024:2010
IEC 62321:2008
PLAYER
responsibility that the specified equipment is in
Place: Barcelona
Date: 17 - March - 2015
(Signature)
Víctor Planas Bas
15
(Full name)
General Manager
(Position)


Definiciones Principales.............................................. 4
Funciones Básicas ......................................................... 5
1. Reproducir música ................................................... 5
2. Reproducir Videos.................................................... 6
3. Registro ........................................................................7
4. Voz.................................................................................. 7
5. Usar el Radio FM........................................................ 8
6. Navegación de Fotos............................................... 9
7. Configuración .......................................................... 10
9. Juego...........................................................................10
10. Usar Memoria USB ............................................... 11
11. Otras Definiciones ...............................................11
12. Nivel de la batería ................................................12
13. Solución de problemas......................................12
Especificaciones Técnicas......................................... 14
1

1. NO coloque objetos encima del aparato porque
podrían rayarlo.
2. NO exponga el aparato a entornos sucios o
polvorientos.
3. NO coloque el aparato en una superficie desigual o
inestable.
4. NO introduzca ningún objeto extraño en el
aparato.
5. NO exponga el aparato a un campo magnético o
eléctrico fuerte.
6. NO exponga el aparato directamente a la luz del
sol porque podría dañarlo. Manténgalo apartado de
superficies calientes.
7. NO guarde el aparato a temperaturas superiores a
los 40 ºC (104 ºF). La temperatura interna de
funcionamiento de este aparato es de 20 °C (68 °F) a 60
°C (140 °F).
8. NO utilice el aparato bajo la lluvia.
9. Consulte con su ayuntamiento o vendedor para
saber cómo eliminar de forma correcta los aparatos
electrónicos.
2
10. El aparato y el adaptador pueden producir algo de
calor durante el funcionamiento normal de la carga.
Para evitar la incomodidad o un daño debido a la
exposición al calor NO deje el aparato en su regazo.
11. CAPACIDAD DE LA POTENCIA DE
ENTRADA: Véase la etiqueta del aparato y
asegúrese de que el adaptador de
potencia corresponde a la capacidad.
Utilice únicamente los accesorios
especificados por el fabricante.
12. Limpie el aparato con un paño suave. Si fuera
necesario, humedezca ligeramente el paño
abrasivas o productos de limpieza.
antes de limpiar. No utilice nunca mezclas
13. Apague siempre el aparato para instalar o quitar
dispositivos externos que no aguanten la conexión en
caliente.
14. Desconecte el aparato de la toma de corriente
eléctrica y apáguelo antes de limpiarlo.
15. NO desmonte el aparato. Sólo un técnico de
servicio autorizado debe realizar las reparaciones.
16. El aparato tiene aperturas para liberar calor. NO
bloquee la ventilación del aparato, el aparato puede
calentarse y comenzar a funcionar mal.
17. Riesgo de explosión en caso de sustitución de la
batería por otra de un tipo incorrecto. Tire las
baterías usadas siguiendo las instrucciones.
18. EQUIPAMIENTO ENCHUFABLE: el enchufe
debe estar instalado cerca del equipo y tener un
acceso fácil.
3
Definiciones Principales
1. MODO/MENÚ: Entrar en el menú principal o salir del menú
actual
2. PLAY: Botón Play/Pause
3. ÚLTIMA Música Anterior/ Backward/ Retroceder
4. Volumen: Ajuste del Volumen
5. SIGUIENTE: Música Siguiente/ Forward/ Avanzar
6. Encendido/Apagado: Interruptor de encendido
7. Tarjeta micro SD (Tarjeta TF)
8. Ranura USB (mini 5PIN)
9. Salida de Auriculares Standard
4

Funciones Básicas
● Ajuste del Volumen
Presione la tecla VOL para entrar en la selección de volumen,
presione brevemente el botón Siguiente / Última para aumentar o
reducir el volumen.
● Encender/Apagar
Pulse detenidamente el botón Play para encender el lector cuando
está apagado.
Pulse detenidamente el botón Play para apagar el lector cuando
está encendido.
● Play & Pause; salir del submenú
En el modo música, pulse Play para reproducir música.
Durante la reproducción de la música, pulse Play para pausar;
pulse detenidamente para parar la reproducción.
1. Reproducir música
● Acciones simples
1. Entre en el Modo Música y pulse PLAY para reproducir música.
2. Seleccione una pista: ÚLTIMA: Pista previa;
SIGUIENTE: Pista siguiente.
● Modo Ecualizador
1. Durante la reproducción de la música, pulse MODE (modo) para
entrar en el submenú.
2. Pulse NEXT (siguiente) cuando elige el Modo Ecualizador;
3. Pulse MODE para entrar en el submenú 'Modo Ecualizador'.
5

4. Detalle de cada ecualizador (EQ):
Natural, Rock, Pop, Clásica, Soft, Jazz, DBB
5. Pulse NEXT para seleccionar EQ y pulse MODE para confirmar.
● Sincronizar Presentación de Letras
El reproductor soporta archivos de letras en formato *.LRC y los
muestra de forma simultánea.
¿Cómo utilizar archivos de letras?
Certifíquese de que la letra tiene el mismo nombre que el fichero
de música. Presione MODE y mantenga presionado durante
algunos segundos.
Por ejemplo:
Archivo de música: Journey.mp3
Archivo de letras: Journey.lrc
2. Reproducir Videos
1. Entre en el menú principal, presione NEXT deslizando para
“Video” (solo disponible para ficheros AMV):
2. Presione MODE para entrar:
3. Pulse PLAY para iniciar el vídeo.
1). Cuando esté en la interface de “Videos”, pare.
2). Presione MODE para entrar en el submenú.
Carpeta Local, Eliminar fichero, Eliminar todos, Repetir (Normal,
Repetir una, Carpeta, Repetir Carpeta, Repetir Todas, Aleatorio,
Intro), Salir.
6

3. Registro
● Grabar en el “Modo Grabación”
1. Entre en el menú principal:
2. Pulse NEXT y deslice para el modo Grabación.
3. Presione MODE para seleccionar el Modo Grabación, la pantalla
será presentada conforme abajo:
4. Presione PLAY para iniciar o poner en pausa la grabación.
5. Presione MODE durante algunos segundos para guardar la
grabación.
● Seleccione el Tipo de Grabación
1. Presione MODE para entrar en el submenú de grabación.
2. Presione NEXT (siguiente) deslizando para el submenú “Tipo de
grabación” y, en seguida, presione MODE para seleccionarlo.
3. Presione NEXT para escoger el tipo adecuado y presione MODE
para seleccionarlo.
4. . Presione PLAY para iniciar la grabación.
4. Voz
1. Entre en el menú principal
2. Presione NEXT para escoger el "Modo Reproducción"
3. Presione MODE para entrar en la interface de reproducción.
4. Presione PLAY nuevamente para reproducir el fichero.
7

5. Escoja los ficheros de grabación de voz:
ÚLTIMA: Seleccione el fichero anterior;
SIGUIENTE: Seleccione el fichero siguiente;
6. Cuando esté en la interface de “Voz”, pare
7. Presione MODE para entrar en el submenú.
Carpeta Local, Eliminar fichero, Eliminar todos, Salir.
8. Cuando esté en la interface de “Voz”, pare
9. Presione MODE para entrar en el submenú.
Repetir, Modo Repetición, Salir.
5. Usar el Radio FM
1. Entre en el menú principal;
2. Presione NEXT deslizando para “Modo FM”
3. Presione MODE para entrar
4. Autobúsqueda con “20 predefiniciones máximo”
Mantenga presionado el botón LAST/NEXT (último/siguiente) 2
8

segundos para iniciar la búsqueda de canales en intervalos de 100
KHs para arriba o para abajo. Para parar la sintonía presione
LAST/NEXT.
5. Sintonía manual
Presio ne LAST: 100 KHz para abajo
Presio ne NEXT: Ascendente 100kHz
6. Guardar el canal actual:
Presio ne MODE para entrar en el submenú FM
Presio ne MODE nuevamente para guardar el canal.
7. Escuchar un canal guardado:
Puede presionar PLAY para escoger un canal grabado.
8. Grabación.
A. Presione PLAY para iniciar la grabación.
B. Presione MODE durante algunos segundos para guardar la
grabación.
C. Cuando esté en la interface de “Grabación”, pare
D. Presion e MODE para entrar en el submenú de grabación
6. Navegación de Fotos
Esta función solo se encuentra disponible en los formatos JPG y
BMP.
1. En el menú principal, presione LAST/NEXT escogiendo
imágenes de la Galería.
2. Presione MODE para entrar en el submenú correspondiente:
3. Presione LAST o NEXT escogiendo el documento que desea leer
y, seguidamente, presione PLAY para reprod ucirlo.
4. En el modo de parada, tenemos un submenú.
9

Carpeta local, Conjunto de reproducción(reproducción manual,
auto), eliminar fichero, eliminar todos, salir.
7. Configuración
● Entrar en Definiciones
Puede definir los desempeños del sistema aquí, las opciones
pueden variar conforme las diferentes versiones del firmware.
1. Entrar en el menú principal.
2. Presione NEXT deslizando para “Definiciones”.
3. Pulse MODE para entrar.
● Opciones de introducción
Reloj Definir fecha y hora del sistema
Configuración LCD Definición del protector de pantalla
Idioma Escoger diferentes idiomas
Apagado
Modo online
Información de la
Memoria
Vers ión de
firmware
Actualización de
firmware
Salir Salga de la interface Definiciones
Definir un período de contaje decreciente en
minutos, el lector irá desconectarse después
de ese período.
Driver de multiplicación
Sólo normal
Sólo codificado
Sólo tarjeta
Enseñar capacidad de memoria y
porcentaje utilizada
Versión del firmware del lector
Usar para actualizar firmware
9. Juego
Entre en el menú principal.
10

10. Usar Memoria USB
El lector también es una memoria estándar USB. Compatible con
Windows / Mac/XP.
El lector soporta fuente de alimentación por USB, puede ser usado
sin usar la batería cuando es conectado a un PC. Para entrar,
estando en el 'modo de espera', presione MODE para regresar al
menú principal y escoja la operación que desea.
Cuando conectado al PC, el lector funciona en los tres modos
abajo:
1. Esperando 2. Descargando 3. Cargando
11. Otras Definiciones
● Modo de reproducción (Submenú de reproducción)
Puede elegir distintos modos de reproducción (repetir, aleatorio) al
reproducir música o ficheros grabados
La primera opción en el Submenú de reproducción es 'Modo de
11

reproducción.
○ REPEAT: Normal, Repetir uno, Carpeta, Repetir carpeta, Repetir
o, Aleatorio, Intro.
tod
● Modo de repetición (submenú Play)
Entrar desde el submenú Play:
○ Repetir A-B
1. Al reproducir música o grabador
ulse MODE para entrar en el submenú de reproducción
2. P
3. P
ulse NEXT y deslice para la opción 'Modo repetición'
resione MODE para entrar:
4. P
Modo Repetición: 'A' del símbolo
inicializador A
5. Pulse NEXT para seleccionar 'A':
'B' do símbolo
Pulse NEXT para seleccionar B. Símbol o
6.
repetición entre A-B, durante la reproducción, puede pulsar
LAST (último) pa ra redefinir el punto A.
● Número de repeticiones (submenú de reproducción)
Consulte o modo 'Repetición'.
Número de repeticiones determina el número de veces de la
repetición de reproducción A-B hasta salir.
parpadea, esperando por finalizador B.
.
.
parpadea, esperando por
fijo e iniciar la
.
12. Nivel de la batería
La carga indica estar completa. Con el aumento del uso en el
tiempo, el indicador de batería será reducido.
Cuando la batería está casi / completamente descargada. El
ícono de batería quedará completamente en blanco y la unidad
deberá reca rgarse mediante un cable mini USB.
Necesita carga, hay que encender el interruptor de conexión
para cargar. Si no, el lector no podrá contestar a la tarea de
carga.
Sin usar el lec tor, intente desconectar la corriente.
13. Solución de problemas
Sin Corriente Verifique que conectó el lector.
12

Sin sonido Verifique que el volumen no está en 0 y que los
Caracteres
extraños en
el visor
FM tiene un
mal
desempeño
No es Posible
Descargar
Música
auriculares están correctamente conectados.
Verifique que la ficha del auricular está limpia.
Los ficheros MP3 dañados pueden tener ruido
de fondo y puede ser que no sean reproducidos.
Verifique que escogió el idioma correcto.
Ajuste el lugar del lector y auricular.
Desconecte los aparatos que se encuentran
cerca.
El auricular es usado como una antena.
Verifique el cable USB y verifique que el lector
está correctamente conectado al PC.
Confirme que el driver fue bien instalado.
Verifique que existe memoria suficiente.
13

Especificaciones Técnicas
T
T
Dimensión 40mm x 87mm x 10,5mm
Panta lla 1.8 TFT (128*160)
Conexión al PC USB2.0 de Alta Velocidad (micro 5PIN)
Memoria 4GB Flash
Grabador de Voz Form ato WAV ( 32K , 64K,128K ,256Kbps)
Formatos de
Música
MP3, WMA
Radio FM
Foto Format o JPG, BMP
emperatura de
Funcionamiento
Presentación de
Múltiples
Idiomas
Sistemas
Soportados
Atención que: El diseño y los caracteres pueden alterarse sin aviso
previo.
MP3, WMA
Salida Máx. (L) 10mW + (R)10mW (32Ohm)
Índice bit MP3 8K bps – 320K bps
asa de bits
WMA
Rango de
frecuencia del
receptor
Unidades de
almacenaje
Salida máxima
dos auriculares
Relación
señal-ruido
5 a 40 grados
Inglés, Español, Francés, Portugués, Italiano,
Alemán…
Windows / Ma c, etc.
5K bps – 384K bps
76MHz – 90MHz / 87MHz –
108MHz
20 + 20
(L) 10mW + (R)10mW (32Ohm)
45dB
Hecho en China
14

- Este equipo tiene garantía de 2 años a partir de la fecha
original de compra.
- Serán exentas de la garantía las averías producidas por
un uso incorrecto del aparato, malainstalación o
instalados en lugares inapropiados para su buena
conservación, roturas,actualizaciones de software que no
sean los facilitados por la marca, piezas desgastadas por
supropio uso o por un uso no doméstico o inadecuado,
así como, por manipulación por personas otalleres ajenos
a nuestra empresa.
- Para que la garantía tenga validez, se deberá adjuntar la
factura o tíquet de caja que corrobore la adquisición y
fecha de venta de este producto.
El desechado correcto de este producto
El desechado correcto de este producto
(equipamiento electrico y electronico de
desecho) (WEEE).
Su producto ha sido disenado y fabricado
con materiales de alta calidad y
componentes que pueden ser reciclados y
reutilizados.
Este simbolo indica que, al final de su vida
util, el equipamiento electrico y electronico
deben ser desechados por separado y no
debe hacerse junto con los desperdicios
Condiciones de Garantía
Por favor, deseche este equipo en su punto de reciclado
local/recogida de desperdicios.
En la Union Europea hay sistemas de recogida especificos
para los desechos electricos y electronicos
usados. !Colabore en la proteccion de nuestro medio
ambiente!
domesticos.
15

DECLARACIÓN DE CONFORMIDAD
Directiva(s) del Consejo con la(s) que se declara conformidad:
Directive (2011/65/EU recasting 2002/95/EC) – RoHS
icante: AFEX SUNS, S.A.
Fabr
Dirección: C/Pallars 189, 08005 Barcelona
Tipo de equipo: MP4 PLAYER
Marca: SUNSTECH
Modelo.: GAIA
Nosotros, los ab
exclusiva responsabilidad que el equipo especificado cumple
Directive (2004/108/EC) - EMC
Aplicación de las Normas:
EN 61000-3-2:2006+A1:2009+A2:2009
EN 61000-3-2:2008
EN 55022:2010
EN 55024:2010
IEC 62321:2008
ajo firmantes, declaramos bajo nuestra
con la(s) Directiva(s) y Norma(s) mencionadas
Lugar: Barcelon a
Fecha: 17 - Marzo - 2015
(Firma)
Víctor Planas Bas
16
(Nombre)
Director General
(Cargo)


Definitions clées ............................................................ 4
Fonctions de base......................................................... 5
1. Lecturer de la musique........................................... 5
2. Lecturer des vidéos.................................................. 6
3.Enregistrement........................................................... 7
4. Voix ................................................................................ 7
5. Utilisation de la radio FM....................................... 8
6. Consultation des photos........................................ 9
7. Réglage ......................................................................10
9. Jeux.............................................................................. 10
10. Utilisation du disque USB.................................. 11
11. Autres paramètres ............................................... 11
12. Niveau de la batterie........................................... 12
13. Dépannage............................................................. 13
Caratéritiques Techniques .......................................14
1

1. NE PAS mettre d'objets au-dessus de l'appareil, car
ces objets peuvent le rayer.
2. NE PAS exposer l'appareil à un environnement sale
ou poussiéreux.
3. NE PAS placer l'appareil sur une surface non plane
ou instable.
4. NE PAS introduire d'objets étrangers dans
l'appareil.
5. NE PAS exposer l'appareil à un champ magnétique
ou électrique trop
6. NE PAS exposer l'appareil en plein soleil car vous
risquez de l'endommager.
Veuillez le maintenir éloigné des sources de chaleur.
7. NE PAS laisser votre appareil sous une température
supérieure à 40° C (104° F). La température interne de
fonctionnement de cet appareil est comprise entre 20 °C
(68 °F) et 60 °C (140
8. NE PAS utiliser cet appareil sous la pluie.
9. Veuillez vous renseigner auprès des Autorités Locales
ou de votre détaillant concernant la mise au rebus des
produits électroniques.
2

10. L'appareil et l'adaptateur peuvent produire de la
chaleur au cours d'un chargement dans des
conditions normales. Afin d'éviter toute gêne ou
blessure due à une exposition à la chaleur, veuillez
NE PAS laisser l'appareil sur vos genoux.
11. PUISSANCE D'ENTREE Reportez-vous à
l'étiquette apposée sur l'appareil et
assurez-vous que l'adaptateur secteur est
approprié. Veuillez utiliser uniquement les
accessoires spécifiés par le fabricant.
12. Nettoyez l'appareil à l'aide d'un chiffon
doux. Si nécessaire, humidifiez légèrement
le chiffon avant de nettoyer. Veuillez ne
jamais utiliser de produits abrasifs ou
nettoyants.
13. Veuillez toujours éteindre l'appareil pour installer
ou retirer des périphériques qui ne supportent pas
les branchements à chaud.
14. Débranchez l'appareil de la prise électrique et
éteignez-le avant de le nettoyer.
15. NE PAS démonter l'appareil. Seul un technicien
qualifié est habilité à effectuer les réparations.
16. L'appareil est doté d'ouvertures pour disperser la
chaleur.
NE PAS bloquer la ventilation de l'appareil, sinon il
risque de surchauffer de donc de mal fonctionner.
17. Risque d'explosion si la pile est remplacée
par un modèle inadapté. Débarrassez-vous des piles
conformément aux instructions.
18. APPAREIL ENFICHABLE : La prise de courant
doit être installée près de l'appareil et doit être
facilement accessible.
3

Definitions clées
1. MODE/MENU: Entrée du menu principal ou recul du menu actuel
2. LERTURE: Bouton de Lecture/ Pause
3. DERNIER:
4. VOLUME: Réglage du volume
5. NEXT: Musique suivante/ Avance/Avance rapide
6. ON/OFF: Interrupteur d'alimentation
7. Carte micro TF
8. Fente USB(mini 5PIN)
9. Sortie standard de l’écouteur
Musique Précédent /Reculer / Réembobiner
4

Fonctions de base
● Réglage du volume
Appuyer sur la clé VOL pour entrer dans la selection du volume,
appuyer rapidement sur le bouton Next / Last(suivant/dernier)
pour augmenter ou diminuer le volume.
● Interrupteur d'alimentation: ON/OFF
Appuyer sur et maintenir LECTURE pour allumer lorsque le lecteur
est éteint.
Appuyer sur et maintenir LECTURE pour éteindre lorsque le lecteur
est allumé.
● Lecture & Pause; Recul du sous-menu
En mode de musique, appuyer pour lecturer de la musique
Lors de la lecture de la musique, appuyer sur LECTURE pour faire
pauser; appuyer et maintenir pour arrêter la musique.
1. Lecturer de la musique
● Actions simples
1. Entrer dans la mode de Musique et appuyer sur LECTURE pour
lecturer de la musique.
2. Sélectionner une piste: DERNIER: Piste précédente;
SUIVANT: Piste suivante.
● Mode Equalizer
1. Lors la lecture de la musique, appuyer sur MODE pour entrer
dans le sous-menu.
2. Appuyer sur SUIVANT et choisir le Mode Equalizer;
5

3. Appuyer sur MODE pour entrer dans le sous menu de ‘Mode
Equalizer’.
4. Détails de chaque équalizer (EQ):
Naturel, Rock, Pop, Classique, Douce, Jazz, DBB
5. Appuyer sur NEXT pour sélectionner un EQ et appuyer sur
MODE pour confirmer.
● Synchroniser l’affichage Lyrique
Le lecteur supporte les fichiers lyrique avec le suffixe*.LRC et
l’affiche simultanément. Comment utiliser les fichiers lyrique?
S’il vous plaît assurez que le fichier lyrique a le même nom que le
fichier de la musique. Appuyez sur MODE et maintenez pendant
quelques secondes.
Par exemple:
Fichie r de musiq ue: Journe y.mp3
Fichier lyrique: Journey.lrc
2. Lecturer des vidéos
1. Entrer dans le menu principal, appuyer sur SUIVANT en défilant
à “Vidéo” (Disponible uniquement pour les fichiers AMV).
2. Appuyer sur MODE pour entrer:
3. Appuyer sur LECTURE pour démarrer la vidéo.
1). Lorsque dans l’interface de’ arrêt de Films’ (‘Movies stop’).
2). Appuyer sur MODE pour entrer dans le sous-menu.
Dossier local, Supprimer le fichier, Supprimer tout, Repéter(Normal,
reprise une, dossier, Repéter le dossier, Repéter tout, aléatoire,
Intro), Quitter.
6

3.Enregistrement
● Enregitrer en “mode d’Enregistrement”
1. Entrer dans le menu principal:
2. Appuyer sur SUIVANT défilant en mode enregistrement.
3.Appuyer sur MODE pour sélectionner le mode d’enregistrement,
l’écran affichera comme suivant:
4. Appuyer sur LECTURE pour démarrer/faire pauser
l’enregistrement .
5.Appuyer sur MODE pendant quelques seconds pour sauvegarder
l’enregistrement .
● Sélectionner le type d’enregistrement.
1. Appuyer sur MODE pour entrer dans le sous-menu
d’enregistrement .
2. Appuyer sur SUIVANT en défilant au sous-menu ‘type REC’ puis
appuyer sur MODE pour la sélection.
3. Appuyer sur SUIVANT pour choisir le type approprié et appuyer
sur MODE pour la sélection.
4. Appuyer sur Lecture pour démarrer l’enregistrement.
4. Voix
1. Entrer dans le menu principal
2. Appuyer sur SUIVANT pour choisir le ‘mode de lecture’
3. Appuyer sur MODE pour entrer dans l’interface de lecture
4. Appuyer sur LECTURE de nouveau pour lire le fichier.
7

5. Choisir les fichiers vocaux d’enregistrement:
DERNIER: Sélectionner le fichier précédent;
SUIVANT: Sélectionner le fichier suivant;
6. Lorsque dans l’ interface de ‘Arrêt de voix’
7. Appuyer sur MODE pour entrer dans le sous-menu.
Dossier local, Supprimer le fichier, Supprimer tout, Quitter
8. Lorsque dans l’ interface de ‘Lecture de voix ’
9. Appuyer sur MODE pour entrer dans le sous-menu.
Repéter, Mode de repétition, Quitter.
5. Utilisation de la radio FM
1. Entrer dans le menu principal
2. Appuyer sur SUIVANT en défilant en “Mode FM”
3. Appuyer sur MODE pour entrer
4. Recherche automatique “20 préréglages maximals”
Maintenir DERNIER/SUIVANT pendant 2 secondes pour démarrer
8

la recherche des chaînes dans intervalle 100 KHz vers le haut ou
vers le bas. Pour arrêter la recherche, appuyer sur
DERNIER/SUIVANT
5. Manuel de réglage
Appuyer sur DERNIER: 100 KHz vers le bas
Appuyer sur SUIVANT: 100 KHz vers le haut
6. Sauvegarder la chaîne actuelle
Appuyer sur MODE pour entrer dans le sous-menu FM
Appuyer sur MODE de nouveau pour sauvegarder la chaîne.
7.Ecouter d’une chaine enregistrée
Vous pouvez appuyer sur LECTURE pour choisir une chaîne
enregistrée
8. Enregistrement
A. Appuyer sur LECTURE pour démarrer l’enregistrement
B. Appuyer sur MODE pendant quelques secondes pour
sauvegarder l’enregistrement
C. Lorsque dans l’ interface de ‘Arrêt d’enregistremen t’.
D. Appuyer sur MODE pour entrer dans le sous-menu
d’enregistrement
6. Consultation des photos
Cette fonction est disponible uniquement pour les formats JPG
and BMP.
1. Dans le menu pricipal, appuyer sur DERNIER/SUIVANT en
choisissant le parcours des photos.
2. Appuyer sur MODE pour entrer dans le sous-menu
correspon dant.
9

3. Appuyer sur DERNIER ou SUIVANT en choisissant le document
que vous souhaitez lire, puis appuyer sur LECTURE pour le lecturer.
4. Nous avons obtenu le sous-menu en mode d’Arrêt
Dossier local, Réglage de la lecture (Lecture manuel, Lecture
automatique), Supprimer le fichier, Supprimer tout, Quitter.
7. Réglage
● Paramètres d’entrée
Vous pouvez définir les performances du système ici, les options
peuvent varier en fontion de different versions du micrologiciel.
1. Entrer dans le menu principal
2. Appuyer sur SUIVANT en défilant “Paramètres”.
3. Appuyer sur MODE pour entrer
● Introduction des options:
Horloge Système du réglage de la date et l’heure
Assortiement LCD Réglage de l’ économiseur d’ écran
Language Choisir different languages
Eteindre
Mode en ligne
Information de la
mémoire
Vers ion du
Micrologiciel
Mise à niveau du
Micrologiciel
Quitter Quitter de l’interface du réglage
Déterminer un temps compte à rebours en
minutes, le lecteur s’arrêtera lorsque le temps
termine.
Pilote Multiplié
Normal uniquement
Crypté seulement
Carte unique
Montrer la capacité de la mémoire et le
pourcenntage utilisé
Version du micrologiciel du lecteur
Utiliser pour la mise à niveau du Micrologiciel
9. Jeux
Entrer dans le menu principal
10

10. Utilisation du disque USB
Le lecteur est également un disque USB standard. Supporté par
Windows / Mac/XP.
Le lecteur prend en charge l’alimentation USB, peut être utilisé
sans l’aide de la batterie lorsqu’il est connecté à un PC. Pour entrer,
quand en mode “attente”, appuyer sur MODE pour revenir au
menu principal et choisir l’opération dont vous avez besoin.
Lorsqu’il est connecté à un PC, le lecteur fonctionne sur les trois
modes comme ci-dessous:
1. Attente 2. Téléversement 3. Téléchargement
11. Autres paramètres
● Mode de lecture(Sous-menu de lecture)
Vous pouvez choisir les différents modes de lecture( répétition,
aléatoire) lors de la lecture de la musique ou des fichiers
enregistrés.
La première option sur le sous-menu de lecture est le“mode de
11

lecture”.
○ REPETITION: Normal, Répétition une, Dossier, Dossier Répété,
Répéter tout , Aléatoire, Intro.
● Mode de Répétition (Sous-menu de lecture)
Entrer dans le sous-menu de lecture:
○ A-B Répétition
1. Lors de la lecture de la musique ou l’enregistrement
2. Appuyer sur MODE pour entrer dans le sous-menu de lecture.
3. Appuyer sur SUIVANT en défilant à l’options de ‘Mode de
répétition’.
4. Appuyer sur MODE pour entrer:
Mode de répétition: ‘A’ du Symbole
démarrer ‘A’
5. Appuyer sur SUIVANT pour sélectionner ‘A’:
‘B’ du symbole
6. Appuyer sur SUIVANT to sélectionner B. Le symbole
commence à répéter entre A-B, tout en lecturant, vous pouvez
appuyer sur DERNIER pour réinitialiser un point.
●Nombre de Répétition(Sous-menu de lecture)
Veuillez consulter dans le ‘mode de répétition’.
Le nombre de répétition détermine le nombre de lecture A-B
répétées ju squ’ au re cul.
éclaire, attendre pour terminer B.
éclaire, attendre pour
fixe and
12. Niveau de la batterie
La puissance affichée est complète. Avec l’augmentation du
nombre d’utilisation, l’indicateur de la batterie sera réduit.
Lorsque la batterie est presque/complètement épuisée, l'icône
de la batterie sera complètement blanc et l'unité doit être chargée
à travers de la mini-USB.
Doit être chargée, vous devez activer l'interrupteur
d'alimentation pour le rechargement. Sinon, le lecteur ne sera pas
en mesure de répondre à la tâche d e charge
Sans l'utilisation du lecteur, s’ il vous plaît essayez de couper
l'alimentation.
12

13. Dépannage
Pas d'alimentation Assurez-vous que vous avez activé le lecteur.
Pas de son Assurez-vous que le volume n’est pas à 0 et que
Des caratères
étrangers sur l’écran
FM est de mauvaise
performance
Ne pas pouvoir
télécharger de la
musique
les écouteurs sont connectés
correctement.Please make sure the earphone
jack is clean.
Un fichiers MP3 endommagé peut avoir des
bruits de fond et ne peut même pas lecturer.
Assurez-vous que vous avez choisi la bonne
langue.
Ajustez l’emplacement du lecteur et des
écouteurs.
Eteignez l'appareil électrique à proximité.
Écouteurs sont utilisés comme antenne.
Vérifiez le câble USB, et assurez-vous que le
lecteur est correctement connecté au PC.
Vérifiez si le pilote a été bien installé.
Assurez-vous que la mémoire est suffisante.
13

Caratéritiques Techniques
Dimension 40mm x 87mm x 10.5mm
Ecran 1.8 TFT (128*160)
Connection to PC Haut vitesse USB2.0 (micro 5PIN)
Mémoire 4GB Flash
Enregistreur vocal Format WAV ( 32K , 64K,128K ,256Kbps)
Les formats de
musique
MP3, WMA
Radio FM
Photo Format JPG, BMP
Tem pe ra tu re de
fonctionnement
Affichage
Multi-Languages
Systems Supportés Windows / Mac, etc.
Veuillez noter: La conception et les caractères peuvent changer
sans préavis.
MP3, WMA
Max. Output (L) 10mW + (R)10mW (32Ohm)
MP3 taux Bit 8K bps – 320K bps
WMA tauxBit 5K bps – 384K bps
Rang du
récepteur de
la fréquence
Module du
stockage
Sortie des
écouteurs
Maximale.
Signal pour
le ratio du
son
5 to 40 degrée
Anglais,Espanol,Français, Portugais, italien,
allemand
Fabriqué en Chine.
76MHz – 90MHz
/ 87MHz – 108MHz
20 + 20
(L) 10mW + (R)10mW (32Ohm)
45dB
14

- Ce produit est garanti 2 ans à compter de la date d’achat.
- La garantie ne comprend pas les pannes dues à une
mauvaise utilisation du produit, unemauvaise installation
ou une installation dans des endroits non adaptés pour la
bonnemaintenance du produit, des défauts, mises à jour
des produits qui ne sont pas fournis par lamarque, les
pièces mal utilisées ou qui ne sont pas destinées à une
utilisation domestique ou sontutilisées de manière
inappropriée.
Sont également non comprises dans la garantie les
pannes dues à des manipulations des produitspar des
personnes physiques ou morales autres que notre société.
- Pour toute réclamation concernant les termes de la
garantie, le ticket de caisse doit être joint.
Condition de la garantie
Se débarrasser correctement de ce Produit
Déchets d'équipements électriques et
électroniques (WEEE)
Votre produit est conçu et fabriqué avec des
matériaux et des composants de haute
qualité qui peuvent être recyclés et
réutilisés.
Ce symbole signifie que l'équipement
électrique et électronique, une fois usagé,
doit être traités séparément des déchets
ménagers.
Veuillez déposer cet équipement dans le
point de collecte/ recyclage des déchets de
Au sein de l'Union Européenne, il existe des systèmes de
collecte séparés pour les produits électriques et
électroniques usagés. Merci de nous aider à protéger
l'environnement dans lequel nous vivons !
votre quartier.
15

DÉCLARATION DE CONFORMITÉ
Directive du Conseil auxquelles la conformité est déclarée :
Directive (2011/65/EU recasting 2002/95/EC) – RoHS
Nom du fabricant : AFEX SUNS, S.A.
Adresse du fabricant : C/Pallars 189,
Type d'équipement : MP4 PLAYER
Marque Commerciale : SUNSTECH
Modèle no. : GAIA
Nous, soussignés, déclarons so
que l'appareil spécifié est conforme aux directives et normes
Directive (2004/108/EC) - EMC
Application des normes :
EN 61000-3-2:2006+A1:2009+A2:2009
EN 61000-3-2:2008
EN 55022:2010
EN 55024:2010
IEC 62321:2008
08005 Barcelona
us notre seule responsabilité
ci-dessus
Lieu: Barcelona
Date: le 17 Mars 2015
(Signature)
Víctor Planas Bas
16
(Nom complet)
Directeur général
(Fonction)


Definições Principais.................................................... 5
Funções Básicas............................................................. 6
1. Reproduzir música ................................................... 6
2. Reproduzir Vídeos.................................................... 7
3. Gravação...................................................................... 8
4. Voz.................................................................................. 8
5. Usar o Rádio FM ........................................................ 9
7. Configuração............................................................ 11
9. Jogo.............................................................................11
11. Outras Definições................................................. 12
12. Nível de bateria..................................................... 13
13. Resolução de problemas...................................14
Especificações Técnicas.............................................15
1

1. NÃO coloque objetos em cima do aparelho, uma
vez que estes o podem riscar.
2. NÃO exponha o aparelho a ambientes sujos ou
com pó.
3. NÃO coloque o aparelho numa superfície
desnivelada ou instável.
4. NÃO introduza objetos estranhos no aparelho.
5. NÃO exponha o aparelho a campos magnéticos
ou elétricos fortes.
6. NÃO exponha o aparelho à luz direta do sol, uma
vez que isto o pode danificar.
Mantenha o aparelho afastado de fontes de
calor.
7. NÃO guarde o aparelho em zonas com temperatura
superior a 40º C (104º F). A temperatura interna de
funcionamento deste aparelho é de 20ºC (68 °F) a 60 °C
(140 °F).
8. NÃO use o aparelho à chuva.
9. Consulte as autoridades locais ou o revendedor
2

relativamente à eliminação correta de aparelhos eletrónicos.
10. O aparelho e o adaptador podem produzir calor
durante o seu normal funcionamento de carga.
Para evitar o desconforto ou lesões causados pela
exposição ao calor, NÃO deixe o aparelho no seu
colo.
11. CAPACIDADE DA POTÊNCIA DE
ENTRADA: Consulte a etiqueta de
voltagem do aparelho e assegure-se que o
adaptador de corrente respeita a tensão.
Use apenas acessórios especificados pelo
fabricante.
12. Limpe o aparelho com um pano suave. Se
necessário humedeça ligeiramente o pano
antes de proceder à limpeza. não use nunca
soluções abrasivas ou detergentes.
13. Desligue sempre o aparelho antes de proceder à
instalação ou remoção de aparelhos que não suportem
hot-plug.
14. Desligue o aparelho da tomada elétrica antes
de o limpar.
15. NÃO desmonte o aparelho. Só um técnico de
serviço autorizado deve proceder a reparações.
16. O aparelho dispõe de aberturas destinadas a libertar
calor.
NÃO bloqueie a ventilação do aparelho, uma vez que
este pode aquecer e avariar-se.
17. A substituição da bateria por um tipo incorreto
comporta um risco de explosão. Retire as baterias
usadas de acordo com as instruções.
18. EQUIPAMENTO LIGÁVEL: a tomada deve estar
instalada perto do equipamento e deve ser de
3

fácil acesso.
4

Definições Principais
1. MODO/MENU: Entrar no menu principal ou sair do menu atual
2. Reproduzir Botão Play/Pause
3. ÚLTIMA: Música Anterior/ Backward/ Retroceder
4. Volume: Ajuste de Volume
5. SEGUINTE: Música Seguinte/ Forward/ Avançar
6. Ligado/Desligado: Interruptor de alimentação
7. Cartão micro SD (Cartão TF)
8. Ranhura USB (mini 5PIN)
9. Saída de Auscultadores Standard
5

Funções Básicas
● Ajuste de Volume
Prima a tecla VOL para entrar na seleção de volume, prima
rapidamente o botão Seguinte / Última para aumentar ou reduzir o
volume.
● Interruptor on/off (ligar/desligar)
Prima e mantenha premido o botão Play para ligar o leitor quando
este está desligado.
Prima e mantenha premido o botão Play para desligar o leitor
quando este está ligado.
● Play & Pause; sair do submenu
No modo música, prima Play para reprodu zir música.
Durante a reprodução da música, prima Play para fazer pausa;
prima e mantenha premido para parar a reprodução.
1. Reproduzir música
● Ações simples
1. Entre no Modo Música e prima PLAY para reproduzir música.
2. Selecione uma faixa: ÚLTIMA: Faixa anterior:
SEGUINTE: Faixa seguinte.
● Modo Equalizador
1. Durante a reprodução da música, prima MODE (modo) para
entrar no submenu.
2. Pressione NEXT (seguinte) ao escolher o Modo Equalizador;
3. Prima MODE para entrar no submenu 'Modo Equalizador'.
6

4. Detalhe de cada equalizador (EQ):
Natural, Rock, Pop, Clássica, Suave, Jazz, DBB
5. Prima NEXT para selecionar um EQ e prima MODE para
confirma r.
● Sincronizar Apresentação de Letras
O leitor suporta ficheiros de letras com sufixo *.LRC e apresenta de
forma simultânea.
Como usar ficheiros de letras?
Certifique-se de que o ficheiro da letra tem o mesmo nome que o
ficheiro de música. Prima MODE e mantenha premido durante
alguns segundos.
Por exemplo:
Fichei ro de músic a: Journe y.mp3
Ficheiro de letras: Journey.lrc
2. Reproduzir Vídeos
1. Entre no menu principal, prima NEXT deslizando para “Vídeo”
(Apenas disponível para ficheiros AMV ):
2. Prime MODE para entrar
3. Prima PLAY para iniciar o vídeo.
1). Quando estiver na interface de “Vídeos”, pare.
2). Prima MODE para entrar no submenu.
Pasta Local, Eliminar ficheiro, Eliminar todos, Repetir (Normal,
Repetir uma, Pasta, Repetir Pasta, Repetir Todas, Aleatório, Intro),
Sair.
7

3. Gravação
● Gravar no “Modo Gravação”
1. Entre no menu principal:
2. Pressione NEXT e deslize para o modo Gravação.
3. Prima MODE para selecionar o Modo Gravação, o ecrã será
apresentado conforme abaixo:
4. Prima PLAY para iniciar/pausar a gravação.
5. Prima Mode durante alguns segundos para guardar a gravação.
● Selecione o Tipo de Gravação
1. Prima MODE para entrar no submenu de gravação.
2. Prima SEGUINTE deslizando para o submenu “Tipo de gravação”
e, em seguida, prima MODE para o selecionar.
3. Prima NEXT para escolher o tipo adequado e prima MODE para o
selecionar.
4. . Prima PLAY para iniciar a gravação
4. Voz
1. Entre no menu principal
2. Prima NEXT para escolher o “Modo Reprodução”.
3. Prima MODE para entrar na interface de reprodução.
4. Prima PLAY novamente para reproduzir o ficheiro.
8

5. Escolha os ficheiros de gravação de voz:
ÚLTIMA: Selecione o ficheiro anterior;
SEGUINTE: Selecione o ficheiro seguinte;
6. Quando estiver na interface de “Voz”, pare
7. Prima MODE para entrar no submenu.
Pasta Local, Eliminar ficheiro, Eliminar todos, Sair.
8. Quando estiver na interface de “Voz”, pare
9. Prima MODE para entrar no submenu.
Repetir, Modo Repetição, Sair.
5. Usar o Rádio FM
1. Entre no menu principal;
2. Prima NEXT deslizando para “Modo FM”
3. Prima MODE para entrar.
4. Auto busca com “20 predefinições máximo”
Mantenha premindo o botão LAST/NEXT (último/seguinte) para
9

iniciar a busca de canais em intervalos de 100 KHs para cima ou
para baixo. Para parar a sintonização prima LAST/NEXT.
5. Sintonia manual
Prima LAST: 100 KHz para baixo
Prima NEXT: Ascendente 100kHz
6. Guardar o canal atual:
Prima Mode pa ra entrar no submenu FM
Prima MODE novamente para guardar o canal.
7. Ouvir um canal guardado:
Pode p remir PLAY para escolher um canal gravado.
8. Gravação.
A. Prima PLAY para iniciar a gravação.
B. Prima Mode durante alguns segundos para guardar a gravação.
C. Quando estiver na interface de “Gravação”, pare
D. Pri ma MODE para entrar no submenu de gravação
6. Navegação de Fotos
Esta função só se encontra disponível nos formatos JPG e BMP.
1. No menu principal, prima LAST/NEXT escolhendo imagens da
Galeria.
2. Prima MODE para entrar no submenu correspondente:
3. Prima LAST ou NEXT escolhendo o documento que deseja ler e,
em seguida, prima PLAY para o reproduzir.
4. No modo de paragem, temos um submenu.
Pasta local, Conjunto de reprodução (reprodução manual, auto),
eliminar ficheiro, eliminar todos, sair.
10

7. Configuração
● Entrar em Definições
Pode definir os desempenhos do sistema aqui, as opções podem
variar conforme as diferentes versões do firmware.
1. Entrar no menu principal.
2. Prima NEXT deslizando para “Definições”.
3. Prima MODE para entrar.
● Opções de introdução
Relógio Definir data e hora do sistema
Definição LCD Definição do protetor de ecrã
Idioma Escolher diferentes línguas
Desligar
Modo online
Informações da
Memória
Versão do firmware Versão do firmware do leitor
Atualização de
firmware
Sair Saia da interface Definições
Definir um período de contagem
decrescente em minutos, o leitor irá
desligar-se após esse período de tempo.
Driver de multiplicação
Apenas normal
Apenas codificado
Apenas cartão
Mostrar capacidade de memória e
percentagem utilizada
Usar para atualizar firmware
9. Jogo
Entre no menu principal.
11

10. Usar Memória USB
O leitor também é uma memória standard USB. Compatível com
Windows / Mac/XP.
O leitor suporta fonte de alimentação por USB, pode ser usado sem
usar a bateria quando conectado a um PC. Para entrar, quando no
'modo de espera', prima Mode para regressar ao menu principal e
escolha a operação que precisa.
Quando conectado ao PC, o leitor funciona nos três modos abaixo:
1. A aguardar 2. A transferir 3. A carregar
11. Outras Definições
● Modo de reprodução (Submenu de reprodução)
Pode escolher diferentes modos de reprodução (repetir, aleatório)
ao reproduzir música ou ficheiros gravados
A primeira opção no Submenu de reprodução é 'Modo de
reprodução' .
○ REPEAT (repetir): Normal, Repetir uma, Pasta, Repetir pasta,
Repetir tudo, Aleatório, Intro.
● Modo de repetição (submenu Play)
Entrar a partir do submenu Play:
○ Repetição A-B
1. Ao reproduzir música ou gravador.
2. Pressione MODE para entrar no submenu de reprodução.
3. Prima NEXT e deslize para a opção 'Modo repetição'.
12

4. Prima MODE para entrar:
Modo Repetição: "A" do símbolo
inicializador A
5. Prima NEXT para selecionar "A":
'B' do símbolo
6. Prima NEXT para selecionar B. Símbolo
repetição entre A-B, durante a reprodução, pode pressionar
LAST (último) para redefinir o ponto A.
● Número de repetições (submenu de reprodução)
Consulte o modo "Repetição".
Número de repetições determina o número de vezes da repetição
de reprodução A-B até sair.
pisca, a aguardar por finalizador B.
pisca, a aguardar por
fixo e iniciar a
12. Nível de bateria
A carga indica estar completa. Com o aumento do uso no
tempo, o indicador de bateria será reduzido.
Quando a bateria está quase / completamente descarregada. O
ícone de bateria ficará completamente a branco e a unidade
deverá ser recarregada através de um cabo mini USB.
Precisa ser recarregado, tem que ligar o interruptor de
ligação para carregar. Caso contrário, o leitor não conseguirá
responder à t arefa de carregamento.
Sem usar o leitor, tente desligar a corrente.
13

13. Resolução de problemas
Sem Corrente Cer tifique-se de que ligou o leitor.
Sem Som Certifique-se de que o volume não está em 0 e
Caracteres
estranhos no
visor
FM tem um
mau
desempenho
Não é Possível
Descarregar
Música
que os auriculares estão corretamente
conectad os.
Certifique-se que a ficha do auricular está limpa.
Os ficheiros MP3 danificados podem ter ruído de
fundo e podem mesmo não ser reproduzidos.
Certifique-se de que escolheu o idioma correto.
Ajuste o local do leitor e auscultador.
Desligue os aparelhos que se encontram nas
proximidades.
O auricular é usado como uma antena.
Verifique o cabo USB e certifique-se de que o
leitor está corretamente conectado ao PC.
Confirme que o driver foi bem instalado.
Certifique-se de que existe memóri a suficiente.
14

Especificações Técnicas
Dimensão 40mm x 87mm x 10.5mm
Ecrã 1.8 TFT (128*160)
Conexão ao PC USB2.0 de Alta Velocidade (micro 5PIN)
Memória 4GB Flash
Gravador de
Voz
Formatos de
Música
MP3, WMA
Rádio FM
Foto Formato JPG, BMP
Temperatura de
Funcionamento
Apresentação
de Múltiplos
Idiomas
Sistemas
Suportados
Tenha em atenção que: O design e os caracteres podem alterar-se
sem aviso prévio
Format o WAV (32K , 64K,128K ,256Kbps)
MP3, WMA
Saída Máx. (L) 10mW + (R)10mW (32Ohm)
Taxa bit MP3 8K bps – 320K bps
Taxa de bits
WMA
Intervalo de
frequência do
recetor
Unidades de
armazenamento
Saída máxima
dos
auscultadores
Relação
sinal-ruído
5 a 40 graus
Inglês,Espanhol,Francês, Português, Italiano,
Alemão…
Windows / Ma c, etc.
Fabricado em China
5K bps – 384K bps
76MHz – 90MHz
/ 87MHz – 108MHz
20 + 20
(L) 10mW + (R)10mW (32Ohm)
45dB
15

Condições de Garantía
- Este equipamento tem garantia de 2(dois) anos a partir
da data original de compra.
- Estaram isentas da garantía as avarías causadas pelo uso
incorrecto do aparelho, má instalação oucolocação em
lugares inapropriados para a sua boa conservação,
pancadas, actualizações desoftware que não sejão os
facilitados pela marca, peças desgastadas pelo seu
proprio uso ou porum uso não doméstico ou inadequado,
assim como, por manipulação por pessoas ou oficinas
deassistência tecnica alheios à nossa empresa.
- Para que a garantía tenha validade, deverá juntar a
factura ou tícket de caixa que corrobore/validea aquisição
e data de venda deste producto.
Descarte correto deste Produto
Descarte de Equipamentos Elétricos e
Eletrônicos - WEEE).
Seu produto foi projetado e fabricado com
materiales de alta qualidade e componentes
que podem ser reciclados e reutilizados.
Este símbolo significa que equipamentos
elétricos e eletrônicos, no fim de sua vida
útil, devem ser descartado separadamente
do lixo doméstico.
Por favor, descarte esse equipamento em
centro de reciclagem.
Na União Europeia existem sistemas de coleta separados
para produtos elétricos e eletrônicos. Por favor, nos ajude
a conservar o meio ambiente em que vivemos!
um posto de coleta adequado ou em um
16

DECLARAÇÃO DE CONFORMIDADE
Diretiva do Conselho relativamente à qual é declarada
conformidade:
Directive (2011/65/EU recasting 2002/95/EC) – RoHS
N
ome do fabricante: AFEX SUNS, S.A.
E
ndereço do fabricante: C/Pallars 189, 08005 Barcelona
Tipo de equipamento: MP4 PLAYER
mércio: SUNSTECH
Co
M
odelo no.: GAIA
Nós, abaixo
exclusiva responsabilidade que o equipamento especificado
Directive (2004/108/EC) - EMC
Aplicação das Normas:
EN 61000-3-2:2006+A1:2009+A2:2009
EN 61000-3-2:2008
EN 55022:2010
EN 55024:2010
IEC 62321:2008
-assinados, pela presente declaramos por nossa
está conforme à Diretiva e às Normas supra
Local: B arcelona
Date: 17 - Março - 2015
(Assinatura)
Víctor Planas Bas
Diretor-Geral
17
(Nome completo)
(Cargo)


 Loading...