


1. Overview
DEDALO
Quick Start Guide
- The warranty of this product is for 2 years since the purchase date.
- The warranty will exclud e breakdowns caused by bad use of the product, wrong installation or
installation in not desirable places for a proper maintenance of the product, rips, updates of the
products that are not the supplied by the brand, pieces wore away for its use or for not domestic
or inappropriate use. Also are excluded breakdowns caused for manipulations of the products
by people or companies alien to our company.
- For any request regarding the warranty terms, the purchase receipt must be attached.
Correct disposal of this Product
(Waste Electrical & Electronic Equipment(WEEE)
Your product is designed and manufactured with high quality materials and
components which can be recycled and reused.
This symbol means that electrical and electronic equipment, at their end oflife should be disposed of separately from your household waste.
Please dispose of this equipment at your local community waste collection/
recycling centre.
In the European Union there are separate collection systems for used
electrical and electronic products.Please help us to conserve the
environment we live in!
2. Music Play
2.1 Switch the On/Off switch to turn on the player . After entering Main Menu page,
select Music and press MODE button to enter Playing Song mode.
2.2 Press Play/Pause button to start playing the selected song.
2.3 Press MODE long to show the lyric and press MODE again to return it.
2.4 Press Previous / Next buttons to jump to the previous or next song.
2.5 Hold Previous / Next buttons long to
2.6 Press Vol buttons then to adjust the volume by pressing Previous/Next button .
2.7 Hold MODE button long to back to the Main Menu.
4. Recording Play Back(Voice)
4. Voice Play
4.1 After entering Main Menu page,
Voice and press MODE button to enter Playing Recorded Voice
4.2 Press Previous / Next buttons to select your desired voice.
4.3 Press Play/Pause button to start playing the selected voice file.
4.4 Press Previous / Next buttons to jump to the previous or next recorded voice.
4.5 Hold Previous / Next buttons long to
Press Vol buttons then to adjust the volume by pressing Previous/Next button
4.6
Hold MODE button long to back to the Main Menu.
4.7
6. E-book
6.1 After entering Main Menu page, press Previous/Next buttons to select E-book,
and press MODE button to enter E-book menu page.
6.2 Press Previous/Next button to select a Text mode and press Mode button to confirm.
6.3 Replay mode setting:
6.3.1 When reading a Text file, press Mode button to enter the submenu, press the
Previous/Next button to select the Replay mode, press mode button to confirm,
and Press Previous/Next button to select the Manual Replay or Auto Reply.
6.4 Hold Mode button for 3 seconds to back to the main menu.
8. Other
8.1 Files List
8 .1.1 Folder M anagement
8 .1.2 Folder N avigation
8.1.2.1 In the Stop mode, p ress the MODE button an d se lect Local folder.
8.1.2.2 The crea ted folder names in the first layer are listed on the
d isplay. Choose your des ired folder nam e by pushing
P revious / Nex t buttons, a nd pre ss ing M key, y ou will select the
8 .1.3 S ub-folder
8.2 R epea t Mode S et
8 .2.1 In P LAY ING mode, press MOD E button to enter the sub-menu. S elect
8.3 E Q M ode Set
8 .3.1 In PLAY ING mode, press MO DE button to enter the sub-men u. Then p ress
8.4 Delete files
8 .4.1 In S T OP mode, press M ODE button to enter the deletion function.
8 .4.2 Exit this function by holding MO DE button long.
folder,and press M ODE button to selec t it.
8.1 .3.1 You may enter e ach folder in order to lo cate y our desired sub folder. Then press MO DE button for confirmation.
Repea t, an d pres s MO DE button to enter the repeat mode selection
screen . 7 repe at modes are ava ilable: Normal , Repea t One, Folder,
Repea t Folder, Repea t All, R andom and Intro.
Press Previous / N
and press MODE button to confirm.
Nex t to sele ct Equaliz er, a nd press M ODE button to enter the E Q m ode
selection sc reen. 7 E Q modes are availa ble: Natural , Rock, Pop, Classic,
Soft, Jazz a nd D BB . Press Previous / Next buttons to selec t an E Q m ode
and press MOD E b utton to confirm the setting.
Press N ext to select Delete, and press M ODE to confirm y ou selection.
Then pre ss Previous / Nex t buttons to selec t the file y ou want to de lete,
and press MOD E b utton to confirm.
Selec t “YE S ” or “No” by pressi ng Previous / Next buttons. Then p ress
MO DE button to con
move your song forward or rewind it.
press Previous / Next buttons to
move your voice forward or rewind it.
ext buttons to selec t your des ired Repeat mode,
firm.
select
mode.
ON
OFF
DEDALO 4GB
MODE button
Next button
USB port
MIC
Microphone
Previous button
Earphone jack
Play/Pause button
M
M
VOL
Volumn
3. Record
3.1 After entering Main Menu page,
and press MODE button to enter Recording Voice mode.
3.2 Press Play/Pause button to start recording.
3.3 Press Play/Pause button to pause or continue recording.
3.4 Hold MODE button long till “Saving” appear on the display to save the recorded
voice when you finish recording.
3.5 Hold MODE button long to back to the Main Menu.
press Previous / Next buttons to
select Record
5. Radio FM
5.1 After entering the main menu page, press Previous/Next button to select the
Radio menu and press Mode to enter the FM function
5.2 You can press Previous/Next button to change the frequency by 0.1MHZ.
5.3 Hold Previous/Next long to start the FM auto search function. It will stop when
an FM channel is detected.When you press PLAY key , your MP3 player will
advance through preset, but if you press the next key , your player will advance
till the next DIAL preset,either previosly preset or not.
5.4 Press MODE button to enter FM setting menu, AUT O SEARCH can be selected.
After auto search finish, press PLAY button to choose preset frequencies.
7. System Set
7.1 After entering Main Menu page, press
And press MODE button to enter System Set Function menu page.
7.2 Clock
7.2.1 After entering System Set Function menu page, Select Clock and press
MODE button to enter the Clock Setting Screen.
7.2.2 Press Vol button to move among
Year : Month : Day : Hour : Minute : Second.
And press Previous / Next buttons to adjust their values.
Press MODE button to confirm after finish setting clock.
7.3 Language Selection
7.3.1 After entering System Set Function menu page, press Next then MODE to
enter the language options list. Press Previous / Next buttons to select
your preferred language and press MODE button to confirm.
7.4 Power Off Set
7.4.1 After entering System Set Function menu page, press Previous / Next
buttons to select Power of f. Press MODE button to confirm.
7.4.2 You can set the of f time and the sleep time. In the STOP mode, the player
will be of f or in Sleep Mode automatically based on the duration you set.
You may set “0” to disable these function.
7.5 Online Device Set
7.5.1 Press Previous / Next buttons to select Online device on the System Set
menu page, and press MODE button to confirm.
7.5.2 If you set the player as Media Device, then you can synchronize songs
from PC to the player. If you set the player as USB disk, then you can
drag and drop files from PC to the player .
7.6 Memory Information
7.6.1 Press Previous / Next buttons to select Memory Info, and press MODE
button to see the current memory information of the player .
Previous / Next but tons
to select Setup.
USB
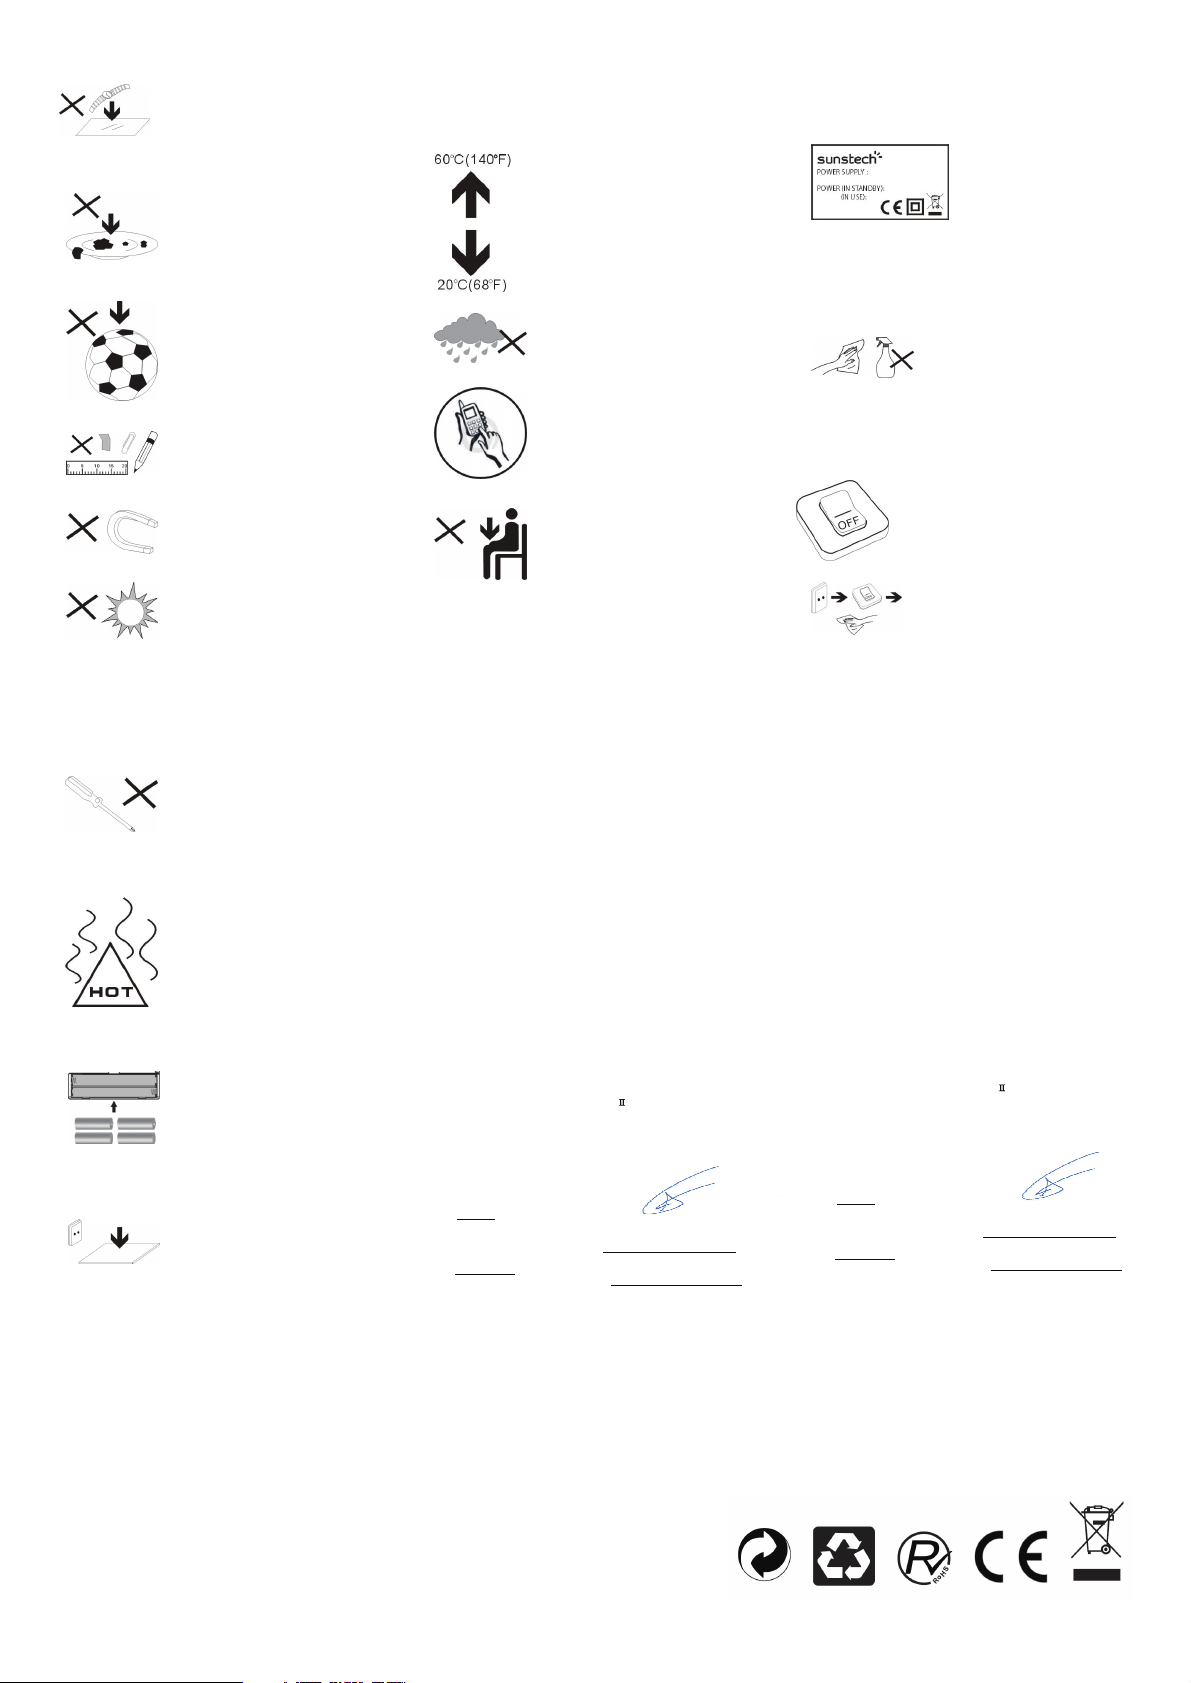
1. DO NOT place objects on top of the
device, as objects may scratch the
device.
2. DO NOT expose the device to dirty
or
dusty environments.
3. DO NOT place the device on an
uneven
or unstable surface.
4. DO NOT insert any foreign objects
into the device.
5. DO NOT expose the device to strong
magnetic or electrical field.
6. DO NOT expose the device to direct
sunlight as it can damage the device. Keep it away from
heat sources.
7. DO NOT store your device in
temperatures higher than 40°C(104°F).
The internal operating temperature for
this device is from 20°C(68°F) to
60°C(140°F).
8. DO NOT use the device in the rain.
9. Please check with your Local
Authority or retailer for proper
disposal of electronic products.
10. The device and adaptor may
product some heat during normal
operation of charging. To prevent
discomfort or injury from heat exposure, DO NOT leave
the device on your lap.
11. POWER INPUT RATING:
Refer to the rating label on the
device and be sure that the
power adaptor complies with
the rating. Only use accessories specified by the
manufacturer.
12. Clean the device with a soft cloth.
If needed, dampen the cloth slightly
before cleaning. Never use abrasives or cleaning
solutions.
13. Always power off the device to install
or remove external devices that do not
support hot-plug.
14. Disconnect the device from an
electrical outlet and power off before cleaning the
device.
15. DO NOT disassemble the device.
Only a certified service technician
should perform repair.
16. The device has apertures to
disperse heat. DO NOT block the
device ventilation, the device may
become hot and malfunction as a
result.
17. Risk of explosion if battery
replaced by an incorrect type. Dispose
of used batteries according to the
instruction.
18. PLUGGABLE EQUIPMENT: the
socket-outlet shall be installed near
the equipment and shall be easily
accessible.
Manufacturer’s name: AFEX SUNS, S.A.
Manufacturer’s address: C/Pallars 189, 08005 Barcelona
Type of equipment: MP3 PLAYER
Trade: SUNSTECH
Model no.: DEDALO
We, the undersigned, hereby declare under our sole responsibility that the
specified equipment is in conformity with the above Directive(s) and Standard(s)
(Signature)
Víctor Planas Bas_________
(Full name)
Date: 21 - June - 2014
(Position)
DECLARATION OF CONFORMITY
Council Directive(s) to which conformity is declared:
Directive (2004/108/EC) - EMC
Directive (2011/65/EU recasting 2002/95/ EC) - RoHS
Application of the Standards:
EN 55013: 2001+A1: 2003+A2: 2006
EN 55020: 2007
EN 55022: 2006+A1: 2007
EN 55024: 1998+A1: 2000+A2: 2003
EN 61000-3-2: 2006
EN 61000-3-3: 1995+A1: 2001+A2: 2005
IEC 62321: 2008
General Manager __
______________________________ anolecraB :ecalP
EN 55022: 2010
EN 55024: 2010
EN 61000-3-2: 2006+A1: 2009+A2: 2009
EN 61000-3-3: 2008
EN 61000-4-2: 2009
EN 61000-4-3: 2006+A1: 2008+A2: 2010
Manufacturer’s name: AFEX SUNS, S.A.
Manu
Type of equipment: Earphones
Trade: SUNSTECH
Model no.: DEDALO
We, the undersigned, hereby declare under our sole responsibility that the
specified equipment is in conformity with the above Directive(s) and Standard(s)
(Signature)
Víctor Planas Bas_________
(Full name)
Date: 21 - June - 2014
(Position)
DECLARATION OF CONFORMITY
Council Directive(s) to which conformity is declared:
Directive (2004/108/EC) - EMC
Directive (2011/65/EU) - RoHS
facturer’s address: C/Pallars 189, 08005 Barcelona
Application of the Standards:
EN 61000-4-4: 2012
EN 61000-4-5: 2006
EN 61000-4-6: 2009
EN 61000-4-8: 2010
EN 61000-4-11: 2004
IEC 62321: 2008
General Manager __
______________________________ anolecraB :ecalP
Made in China

1. Visión General
DEDALO
Guía Rápida
- Este equipo tiene garantía de 2 años a partir de la fecha original de compra.
- Serán exentas de la garantía las averías producidas por un uso incorrecto del aparato, malainstalación
o instalados en lugares inapropiados para su buena conservación, roturas,actualizaciones de software
que no sean los facilitados por la marca, piezas desgastadas por supropio uso o por un uso no doméstico
o inadecuado, así como, por manipulación por personas otalleres ajenos a nuestra empresa.
- Para que la garantía tenga validez, se deberá adjuntar la factura o tíquet de caja que corrobore la
adquisición y fecha de venta de este producto.
El desechado correcto de este producto
(equipamiento electrico y electronico de desecho) (WEEE).
Su producto ha sido disenado y fabricado con materiales de alta calidad y
componentes que pueden ser reciclados y reutilizados.
Este simbolo indica que, al final de su vida util, el equipamiento electrico y
electronico deben ser desechados por separado y no debe hacerse junto con los
desperdicios domesticos.
Por favor, deseche este equipo en su punto de reciclado local/recogida de
desperdicios.
En la Union Europea hay sistemas de recogida especificos para los desechos
electricos y electronicos usados. !Colabore en la proteccion de nuestro medio
ambiente!
2. Reproducción de música
2.1 Desilce el botón On/Off para encender el reproductor. Después de entrar en el men
principal, seleccione Music y presione el botón de MODO para entrar en el modo de
reproducción de canciones.
2.2 Presione el botón Play/Pause para comenzara reproducir la canción seleccionada.
2.3 Presione y mantenga a pretado MODO para mostrar las letras, y presione MODO de
nuevo para regresar.
2.4 Presione los botones Previo/Siguiente para saltar a la canción previa a la siguiente canción;
2.5 Mantenga a pretados los botones Previo/Siguiente para o rebobionar la canción
adelante o atrás.
2.6 Presione los botones de Vol para ajustar el volumen presionando el botón Previo/Siguiente.
2.7 Mantenga apretado el botón MODO para mostrar de nuevo el menú principal.
.
ú
Micrófono
3. Grabación
3.1
Después de entrar en el menú principal, presione los botones Previo/Siguiente
para seleccionar Record (grabación) y presione el botón MODO para entrar en
el modo de grabación de voz.
3.2
Presione el botón PLAY/P AUSA para comenzar la grabación.
3.3
Presione el botón PLAY/P AUSA para pausar o continuar la grabación.
3.4
Presione y mantenga apretado el botón MODO hasta que "Saving" (guardando)
aparezca en pantalla, para guardar la voz grabada al finalizar.
3.5
Mantenga apretado el botón MODO para mostrar de nuevo el menú principal.
ON
OFF
MIC
Botón de Previo
Ranura de auriculares
DEDALO 4GB
Botón Play/Pausa
M
M
VOL
Volumen
Botón MODO
USB
Botón de Siguiente
Puerto USB
4. Reproducci n de Grabaci n(Voz) ó ó
4.1 Después de entrar en el menú principal, presione los botones Previo/Siguiente para
seleccionar Voz, y presione el botón MODO para entrar en el modo de
4.2 Presione los botones Previo/ Siguiente para seleccionar la voz deseada.
4.3 Presione el botón Play/Pausa para comenzar a reproducir el archivo de voz
4.4 Presione los botones Previo/ Siguiente para saltar a la voz grabada previa o a
4.5 Mantenga apretados los botones Previo/Siguiente para o rebobinar la voz
4.6 Presione los botones de Vol para ajustar el volumen presionando el botón
4.7 Mantenga apretado el botón MODO para mostrar de nuevo el menú principal.
Grabación de Voz
seleccionado.
la siguiente.
adelante o atrás.
Previo/Siguiente.
6. E-book
6.1 Después de entrar en el menú principal, presione los botones previo/siguiente para
seleccionar la opción e-Book y presiones el botón MODO para entrar en modo e-Book.
6.2 Presione los botones previo/siguiente para seleccionar el archivo de texto y presione
el botón MODO para confirmar su selección
6.3 Establecer modo repetición:
6.3.1 Cuando este leyendo el fichero de texto, presione el botón MODO para entrar en
el sub-menú, presione los botones previo/siguiente para seleccionar Manual o
Automática repetición.
6.4-Mantenga presionado 3 segundos el botón MODO para mostrar de nuevo el menú principal.
8. Otros
8.1 Lista de archivos
8.1.1 Administrac ión de arc hivos
8.1.2 Navegación por carpetas
8.1.2.1 E n el modo S top, pres ione el botón de MOD O y seleccione la carpe
8.1.2.2 Los nombres de las carpe tas creada s e n la primera capa s e lista n
e n pantalla. Es coja s u ca rpeta desea da presiona ndo los botones
8.1.3 Subcarpeta
8.2 Configura ción del Modo de Repetición
8.2.1 E n modo re producción, presione el botón de MODO para entrar en el s ubmenú.
8.3 Configuración del Modo de Ecualización
8.3.1 E n modo re producción, presione el botón de MODO para entrar en el s ubmenú.
8.4 Borrar archivos
8.4.1 En modo ST OP, presione el botón de MODO para entrar e n la función de
8.4.2 P ara salir de esta función, pres ione y mantenga apretado el botón MO DO .
P revio / S iguiente y s elecc ione la c arpeta pres ionando la tecla M.
8.1. 3.1 Puede ac ceder a cada ca rpeta para localiza r s u subcarpeta
dese ada. Pres ione e l botón M
Repea t (repetir), y pres ione el botón MO DO pa ra entrar en la
re petición.
repetir todo, a leatorio, intro.
ca rpeta,
e l modo de
D espués presione Siguiente para selecciona r el Ec ualiza dor,
7 modos de ecualiza dor dis ponibles: Na tura l,
Pres ione los botones Previo/
y presione el botón
e l botón Siguiente pa ra s elec cionar Delete (borra r), y
c onfirmar su se lección. Presione los botones
arc hivo que des ea eliminar, y pre sione
Se leccione "Y ES " o "No" presionando los bo
Des pués presione el botón MODO para confirmar.
Ha y 7 modos de repetición disponibles :
tición que desea, y pres ione e l botón
re pe
MO DO para entrar en la pantalla de s elección
S iguiente para seleccionar un
MO DO para confirmar.
OD O pa ra c onfirmar.
Pres ione los botones Previo/
el botón MO DO para confirmar.
N ormal, repetir una,
MO DO para c onfirmar.
del modo E Q (ecualiz ador).Ha y
R ock, Pop, C lásic o, Sua ve, J azz y DBB
presione el botón MODO para
Previo/S iguiente pa ra s elecciona r el
tones Previo / Siguiente.
pa nta lla del
Siguie nte para se lecciona r
y pre sione e
modo de ec ualiza dor
-ta local.
Se leccione
modo de
c arpeta, repetir-
l botón
borrado.Presione
5. Radio FM
Después de entrar en el menú principal, presione los botones Previo / Siguiente
5.1
para seleccionar el menú de Radio, y presione el botón de MODO para iniciar
la función FM.
Puede p resionar el botón PREV IO/SIGUIEN TE para c ambiar la frecue ncia 0 .1MH Z
5.2
5.3 Presione y mantenga apretado el botón Previo / Siguiente para iniciar la función
de autobúsqueda. Se detendrá cuando se detecte una emisora FM.Su reproduc
-tor avanzará de Presintonía, si usted presiona la tecla PLA Y, pero si usted
presiona la tecla siguiente, su reproductor avanzará hasta la siguiente sintonía
del DIAL indiferentemente de si está presintonizada o no.
Su reproductor avanzará de Presintonía, si usted presiona la tecla PLAY,pero
5.4
si usted presiona la tecla siguiente, su reproductor avanzará hasta la siguiente
sintonía del DIAL indiferentemente de si está presintonizada o no.
7. Configuración del Sistema
7.1 Después de entrar e n el menú principal, pres ione los
para selec cionar S etup(configuración)y pres ione el botón MODO para entrar
en la página de Fu nción de Configura ción de Sistema ( Syste m Set).
7.2 Reloj
7 .2. 1 Des pués de entrar e n la pág ina de Función de Configuración d e Sistema,
se leccio ne Relo j (clock) y pres ione e l botón MODO para entrar en la pantalla
de Configuración de Hora .
7 .2. 2 Pres ione el botón VOL para move rse po r
Año : Mes : D ía : Hora : Minuto : Segundo
Pr esione l os bo tones Previo/Siguiente para ajustar sus valores .
Pr es ione el botón MODO para confirmar después de configurar el re loj.
7.3 Selección de idioma
7 .3. 1 Después de entrar en la página de Configuración de Sistem a, presione
Siguiente y desp ués M ODO para acceder a la lista de op ciones de idioma.
Presione l os bo tones Previo/Siguiente pa ra seleccionar e l idioma deseado,
y p resione el botón de MODO para confirmar.
7.4 Configuración de Apagad o
7 .4. 1 Después de entrar en la página de Configuración de S istem a, pre
botones Previo / Siguien te para seleccio nar Desconexión ( Power Off).
Pres ione el botón MODO para confirmar.
7 .4. 2 Puede seleccionar la hora de desconexión y de modo de espera .
En el m odo ST OP, el reproductor se a pagará o entrará en Modo de Espera
au tomáticamente, bas ándose en la duración que determine .
Pu ede configura r esta función a "0" pa ra deshab ilitarla.
7.5 Configuración d e Dispos itivo Online
7 .5. 1 Pres ione los botones Previo/ Siguiente pa ra selec cionar Online Dev ice
(dispos itivo online) en la página de configuración de sistema,y presione
el botón de MOD O para confirmar.
7 .5. 2 Si configura el reproductor como M edia Device,puede sincroniza r canciones
del PC al reproductor.Si configura el rep roductor como disco USB , puede
arr astrar y soltar archivos del PC al reproductor.
7.6 Información de memoria
7 .6. 1 Pres ione l os botones Prev io/ Siguiente para selecciona r Memory Info
(informa ción de memoria); pr esione el botón MODO para ver la información
so
bre el estado de memoria del reproductor.
botones Prev io/Siguiente
sione los

1. NO coloque objetos encima del
aparato porque podrían rayarlo.
2. NO exponga el aparato a entornos
sucios o polvorientos.
3. NO coloque el aparato en una
superficie desigual o inestable.
Manténgalo apartado de superficies calientes.
7. NO guarde el aparato a temperaturas
superiores a los 40 ºC (104 ºF). La
temperatura interna de funcionamiento
de este aparato es de 20 °C (68 °F) a 60 °C
(140 °F).
8. NO utilice el aparato bajo la lluvia.
exposición al calor NO deje el aparato en su regazo.
11. CAPACIDAD DE LA
POTENCIA DE ENTRADA: Véase
la etiqueta del aparato y
asegúrese de que el adaptador
de potencia corresponde a la capacidad. Utilice
únicamente los accesorios especificados por el
fabricante.
4. NO introduzca ningún objeto
extraño en el aparato.
podría dañarlo.
14. Desconecte el aparato de la toma
de corriente eléctrica y apáguelo antes
de limpiarlo.
15. NO desmonte el aparato. Sólo un
técnico de servicio autorizado debe
realizar las reparaciones.
16. El aparato tiene aperturas para
liberar calor.
NO bloquee la ventilación del
aparato, el aparato puede calentarse y
comenzar a funcionar mal.
17. Riesgo de explosión en caso de
sustitución de la batería por otra de un
tipo incorrecto. Tire las baterías usadas
siguiendo las instrucciones.
5. NO exponga el aparato a un campo
magnético o eléctrico fuerte.
6. NO exponga el aparato
directamente a la luz del sol porque
9. Consulte con su ayuntamiento o
vendedor para saber cómo eliminar de
forma correcta los aparatos
electrónicos.
10. El aparato y el adaptador pueden
producir algo de calor durante el
funcionamiento normal de la carga.
Para evitar la incomodidad o un daño debido a la
Fabricante: AFEX SUNS, S.A.
Dirección: C/Pallars 189, 08005
Tipo de equipo: MP3 PLAYER
Marca: SUNSTECH
Modelo.: DEDALO
Nosotros, los abajo firmantes, declaramos bajo nuestra exclusiva responsabilidad
que el equipo especificado cumple con la(s) Directiva(s) y Norma(s) mencionadas
(Firma)
Víctor Planas Bas_________
(Nombre)
Fecha: 21 - Junio - 2014
(Cargo)
DECLARACIÓN DE CONFORMIDAD
Directiva(s) del Consejo con la(s) que se declara conformidad:
Directiva (2011/65/EU refundición 2002/95/ EC) - RoHS
Directiva (2004/108/EC) - EMC
Aplicación de las Normas:
EN 55013: 2001+A1: 2003+A2: 2006
EN 55020: 2007
EN 55022: 2006+A1: 2007
EN 55024: 1998+A1: 2000+A2: 2003
EN 61000-3-2: 2006
EN 61000-3-3: 1995+A1: 2001+A2: 2005
IEC 62321: 2008
Barcelona
Director General ________
______________________________ anolecraB :raguL
12. Limpie el aparato con un paño
suave. Si fuera necesario,
humedezca ligeramente el paño antes de limpiar.
No utilice nunca mezclas abrasivas o productos
de limpieza.
13.
13. Apague siempre el aparato para
instalar o quitar dispositivos externos
que no aguanten la conexión en caliente.
EN 55022: 2010
EN 55024: 2010
EN 61000-3-2: 2006+A1: 2009+A2: 2009
EN 61000-3-3: 2008
EN 61000-4-2: 2009
EN 61000-4-3: 2006+A1: 2008+A2: 2010
Fabricante: AFEX SUNS, S.A.
Direcci
Tipo de equipo: Auricurales
Marca: SUNSTECH
Modelo.: DEDALO
Nosotros, los abajo firmantes, declaramos bajo nuestra exclusiva responsabilidad
que el equipo especificado cumple con la(s) Directiva(s) y Norma(s) mencionadas
(Firma)
Víctor Planas Bas_________
(Nombre)
Fecha: 21 - Junio - 2014
(Cargo)
DECLARACIÓN DE CONFORMIDAD
Directiva(s) del Consejo con la(s) que se declara conformidad:
Directiva (2004/108/EC) - EMC
Directiva (2011/65/EU) - RoHS
ón: C/Pallars 189, 08005 Barcelona
Aplicación de las Normas:
EN 61000-4-4: 2012
EN 61000-4-5: 2006
EN 61000-4-6: 2009
EN 61000-4-8: 2010
EN 61000-4-11: 2004
IEC 62321: 2008
Director General ________
______________________________ anolecraB :raguL
18. EQUIPAMIENTO ENCHUFABLE: el
enchufe debe estar instalado cerca del
equipo y tener un acceso fácil.
Hecho en China

DEDALO
Guide de Démarrage Rapide
- Ce produit est garanti 2 ans à compter de la date d’achat.
- La garantie ne comprend pas les pannes dues à une mauvaise utilisation du produit, unemauvaise
installation ou une installation dans des endroits non adaptés pour la bonnemaintenance du produit,
des défauts, mises à jour des produits qui ne sont pas fournis par lamarque, les pièces mal utilisées ou qui
ne sont pas destinées à une utilisation domestique ou sontutilisées de manière inappropriée.
Sont également non comprises dans la garantie les pannes dues à des manipulations des produitspar des
personnes physiques ou morales autres que notre société.
- Pour toute réclamation concernant les termes de la garantie, le ticket de caisse doit être joint.
2. Lecture de la musique
2.1 Appuyez sur le bouton ON/ OFF pour allumer le lecteur. Une fois que vous êtes sur la page
du Menu Principal, sélectionnez Musique et appuyez sur le bouton MODE pour entrer dans
le mode Ecouter des Chansons.
2.2 Appuyez sur le bouton Lecture/ Pause pour commencer à écouter la chanson sélectionnée.
2.3 Appuyez quelques instants sur MODE pour voir les paroles puis appuyez à nouveau sur
MODE pour les retirer.
2.4 Appuyez sur Précédent / Suivant pour passer à la chanson précédente ou suivante.
2.5 Maintenez les boutons Précédent / Suivant appuyés pour faire avancer ou reculer la chanson.
2.6
Appuyez sur les boutons Vol. puis, pour régler le volume, appuyez sur le bouton Précédent/ Suivant.
2.7 Maintenez le bouton MODE appuyé pour revenir au Menu Principal.
4. Enregistrement Play-back (Voix)
4. Voice Play
4.1 Une fois que vous êtes sur la page du Menu Principal, appuyez sur les boutons Précédent /
Suivant pour sélectionner Voix puis appuyez sur le bouton MODE pour atteindre le mode
Lecture des Voix Enregistrées.
4.2 Appuyez sur les boutons Précédent/ Suivant pour sélectionner la voix souhaitée.
4.3 Appuyez sur le bouton Lecture/ Pause pour commencer à lire le fichier voix sélectionné.
4.4
Appuyez sur les boutons Précédent/ Suivant pour passer à la voix enregistrée précédente ou suivante.
4.5 Maintenez les boutons Précédent / Suivant appuyés pour faire avancer ou reculer votre voix.
4.6
Appuyez sur les boutons Vol. puis, pour régler le volume, appuyez sur le bouton Précédent/ Suivant
4,7 Maintenez le bouton MODE appuyé pour revenir au Menu Principal.
6. E-book
6.1 Une fois que vous êtes sur la page du Menu Principal, appuyez sur les boutons Précédent /
Suivant pour sélectionner E-book et appuyez sur le bouton MODE pour atteindre la page
du menu E-book.
6.2 Appuyez sur les boutons Précédent/ Suivant pour sélectionner un mode Texte puis appuyez
sur le bouton Mode pour confirmer.
6.3 Réglage du mode Répéter
6.3.1 Quand vous lisez un fichier Texte, appuyez sur le bouton Mode pour entrer dans le
sous-menu, appuyez sur le bouton Précédent/ Suivant pour sélectionner le mode Répéter,
appuyez sur le bouton Mode pour confirmer, puis appuyez sur le bouton Précédent/
Suivant pour sélectionner la Répétition Manuelle ou la Répétition Automatique.
6.4 Maintenez le bouton Mode appuyé pendant 3 secondes pour revenir au menu principal.
8. Other
8.1 Liste de fichiers
8.1.1 Gestion de dossiers
8.1.2 Navigation dans le Dossier
8.1.2.1 Une fois dans le mode Stop, appuyez sur le bouton MODE et sélectionner le dossier Local.
8.1.2.2. Les noms de dossiers créés dans la première couche sont affichés à l’écran. Veuillez choisir
le nom de dossier souhaité en appuyant sur les boutons Précédent / Suivant et en appuyant
sur la touche M, vous pouvez sélectionner le dossier et appuyer sur la bouton MODE pour
le sélectionner.
8.1.3 Sous-dossier
8.1.3.1. Vous pouvez entrer dans chaque dossier afin d’y trouver le sous-dossier de votre choix. Puis
appuyez sur le bouton MODE pour confirmer.
8.2 Réglage du Mode Répéter
8.2.1 En mode LECTURE, appuyez sur le bouton MODE pour atteindre le sous-menu. Sélectionner
Répétez, puis appuyez sur le bouton MODE pour atteindre l’écran permettant de
sélectionner le mode répéter. 7 modes Répéter sont disponibles : Normal, Répéter Un
Dossier, Répéter Dossier, Répéter Tout, Aléatoire et Intro.
Appuyez sur les boutons Précédent/ Suivant pour sélectionner le mode Répéter de
votre choix, puis appuyez sur le bouton MODE pour confirmer.
8.3 Réglage du mode d’égaliseur
8.3.1 En mode LECTURE, appuyez sur le bouton MODE pour atteindre le sous-menu. Puis appuyez
sur Suivant pour sélectionner l’Egaliseur, et appuyez sur le bouton MODE pour atteindre
l’écran de sélection du mode Egaliseur. 7 modes Egaliseur sont disponibles Naturel, Rock,
Rock, Pop, Classic, Soft, Jazz et DBB. Appuyez sur les boutons Précédent/ Suivant pour
sélectionner un mode Egaliseur puis appuyez sur le bouton MODE pour confirmer le réglage.
8.4 Supprimer des fichiers
8.4.1 En mode STOP, appuyez sur le bouton MODE pour atteindre la fonction suppression.
Appuyez sur Suivant pour sélectionner Supprimer, puis appuyez sur MODE pour confirmer
votre sélection.
Ensuite appuyez sur les boutons Précédant / Suivant pour sélectionner le fichier que vous
souhaitez supprimer, puis appuyez sur le bouton MODE pour confirmer.
Sélectionnez « OUI » ou « NON » à l’aide des boutons Précédent/ Suivant. Puis appuyez sur le
bouton MODE pour confirmer.
8.4.2 Quitter cette fonction en maintenant le bouton MODE appuyé pendant quelques instants.
Se débarrasser correctement de ce Produit
Déchets d'équipements électriques et électroniques (WEEE)
Votre produit est conçu et fabriqué avec des matériaux et des composants
de haute qualité qui peuvent être recyclés et réutilisés.
Ce symbole signifie que l'équipement électrique et électronique, une fois
usagé, doit être traités séparément des déchets ménagers.
Veuillez déposer cet équipement dans le point de collecte/ recyclage des
déchets de votre quartier.
Au sein de l'Union Européenne, il existe des systèmes de collecte séparés
pour les produits électriques et électroniques usagés. Merci de nous aider à
protéger l'environnement dans lequel nous vivons !
1. Présentation
ON
OFF
DEDALO 4GB
Bouton MODE
USB
Bouton Suivant
Port USB
MIC
Microphone
Bouton Précédent
Prise jack pour
écouteurs
Bouton Lecture/ Pause
M
M
VOL
Volume
3. Enregistrer
3.1 Une fois que vous êtes sur le page du Menu Principal, appuyez sur les boutons Précédent/
Suivant pour sélectionner Enregistrer puis appuyez sur le bouton MODE pour atteindre le
mode Enregistrement de Voix.
3.2 Appuyez sur le bouton Lecture/ Pause pour commencer l’enregistrement.
3.3 Appuyez sur le bouton Lecture/ Pause pour mettre en pause ou poursuivre l’enregistrement.
3.4 Maintenez le bouton MODE appuyé pendant quelques instants jusqu’à ce que
« Sauvegarder » s’affiche pour sauvegarder l’enregistrement de voix une fois que vous avez
terminé l’enregistrement.
3,5 Maintenez le bouton MODE appuyé pour revenir au Menu Principal.
5. Radio FM
5.1 Une fois que vous êtes sur le page du Menu Principal, appuyez sur les boutons Précédent/
Suivant pour sélectionner le menu Radio puis appuyez sur Mode pour atteindre la fonction FM.
5.2
Vous pouvez appuyez sur les boutons Précédent/ Suivant pour changer la fréquence de 0,1 MHZ.
5.3 Maintenez le bouton Précédent/ Suivant pendant quelques instants pour démarrer la
fonction de recherche automatique de la FM. Il s’arrêtera lorsqu’une chaîne FM est détectée.
Quand vous appuyez sur la touche Lecture, votre lecteur MP3 va avancer de manière
prédéfinie, mais si vous appuyez sur la touche Suivant, votre lecteur avancera jusqu’à la liste
de présélection suivante, qu’elle soit ou non prédéfinie.
5.4 Appuyez sur le bouton MODE pour atteindre le menu de réglage FM, la RECHERCHE
AUTOMATIQUE peut être sélectionnée. Une fois que la recherche automatique est terminée,
appuyez sur le bouton LECTURE pour choisir les fréquences prédéfinies.
7. Configuration Système
7.1 Une fois que vous avez atteint la page du Menu Principal, appuyez sur les boutons
Précédent/ Suivant pour sélectionner la configuration. Puis appuyez sur le bouton MODE
pour atteindre la page du menu Fonction de Configuration du Système.
7.2 Horloge
7.2.1 Une fois que vous avez atteint la page du Menu Fonction de Configuration du Système,
Sélectionnez Horloge, puis appuyez sur le bouton MODE pour atteindre l’écran de
Réglage de l’Horloge.
7.2.2 Appuyez sur le bouton Vol pour vous y déplacer
Année : Mois : Jour : Heure : Minute : Seconde :
Puis appuyez sur les boutons Précédent/ Suivant pour régler leurs valeurs.
Appuyez sur le bouton MODE pour confirmer une fois que le réglage de l’horloge est terminé.
7.3 Sélection de la langue
7.3.1 Une fois que vous avez atteint la page du menu Fonction de Configuration du Système,
appuyez sur Suivant puis sur MODE pour atteindre la liste des choix de langues. Appuyez
sur les boutons Précédent/ Suivant pour sélectionner votre langue favorite puis appuyez
sur le bouton MODE pour confirmer.
7.4 Réglage pour éteindre
7.4.1 Une fois que vous avez atteint la page du menu Fonction de Configuration du Système,
appuyez sur Suivant puis sur MODE pour sélectionnez Eteindre. Appuyez sur le bouton
MODE pour confirmer.
7.4.2 Vous pouvez configurer l’heure à laquelle l’appareil s’éteint et de la mise en veille. En
mode STOP, le lecteur s’éteindra ou se mettra en veille automatiquement conformément
à la durée que vous aurez configurée.
Vous pouvez régler sur « 0 » pour désactiver cette fonction.
7.5 Réglage de l’appareil en ligne
7.5.1 Appuyez sur les boutons Précédent/ Suivant pour sélectionner l’appareil En Ligne sur la
page du menu de Configuration du Système, puis appuyez sur le bouton MODE pour
confirmer.
7.5.2 Si vous configurez le lecteur en tant qu’Appareil Média, vous pourrez alors synchroniser
des chansons à partir d’un PC vers le lecteur. Si vous configurez le lecteur en tant que
disque USB, vous pourrez alors faire glisser et déposer des fichiers à partir d’un PC vers le
lecteur.
7.6 Informations Mémoire
7.6.1 Appuyez sur les boutons Précédent/ Suivant pour sélectionner les Infos Mémoire, puis
appuyez sur le bouton MODE pour voir les informations actuelles de la mémoire du
lecteur.

fort.
1. NE PAS mettre d'objets au-dessus de
l'appareil, car ces objets peuvent le
rayer.
2. NE PAS exposer l'appareil à un
environnement sale ou poussiéreux.
3. NE PAS placer l'appareil sur une
surface non plane ou instable.
4. NE PAS introduire d'objets
étrangers dans l'appareil.
5. NE PAS exposer l'appareil à un
champ magnétique ou électrique trop
6. NE PAS exposer l'appareil en plein
soleil car vous risquez de l'endommager.
Veuillez le maintenir éloigné des sources de chaleur.
7. NE PAS laisser votre appareil sous une
température supérieure à 40° C (104° F).
La température interne de
fonctionnement de cet appareil est
comprise entre 20 °C (68 °F) et 60 °C (140
°F).
8. NE PAS utiliser cet appareil sous la
pluie.
9. Veuillez vous renseigner auprès des
Autorités Locales ou de votre détaillant
concernant la mise au rebus des
produits électroniques.
10. L'appareil et l'adaptateur peuvent
produire de la chaleur au cours d'un
chargement dans des conditions normales.
Afin d'éviter toute gêne ou blessure due à une
exposition à la chaleur, veuillez NE PAS laisser l'appareil
sur vos genoux.
11. PUISSANCE D'ENTREE
Reportez-vous à l'étiquette
apposée sur l'appareil et
assurez-vous que l'adaptateur
secteur est approprié. Veuillez utiliser uniquement les
accessoires spécifiés par le fabricant.
12. Nettoyez l'appareil à l'aide d'un
chiffon doux. Si nécessaire,
humidifiez légèrement le chiffon avant de nettoyer.
Veuillez ne jamais utiliser de produits abrasifs ou
nettoyants.
13. Veuillez toujours éteindre l'appareil
pour installer ou retirer des
périphériques qui ne supportent pas les
branchements à chaud.
14. Débranchez l'appareil de la prise
électrique et éteignez-le avant de le
nettoyer.
15. NE PAS démonter l'appareil. Seul un
technicien qualifié est habilité à
effectuer les réparations.
16. L'appareil est doté d'ouvertures pour
disperser la chaleur.
NE PAS bloquer la ventilation de
l'appareil, sinon il risque de surchauffer
de donc de mal fonctionner.
17. Risque d'explosion si la pile est
remplacée par un modèle inadapté.
Débarrassez-vous des piles
conformément aux instructions.
18. APPAREIL ENFICHABLE : La prise de
courant doit être installée près de
l'appareil et doit être facilement
accessible.
Nom du fabricant : AFEX SUNS, S.A.
Adresse du fabricant : C/Pallars 189, 08005 Barce
Type d'équipement : MP3 PLAYER
Marque Commerciale : SUNSTECH
Modèle no. : DEDALO
Nous, soussignés, déclarons sous notre seule responsabilité que l'appareil spécifié
Signature : …
Víctor Planas Bas_________
(Nom complet)
Date : le 21 Juin 2014
(Fonction)
DÉCLARATION DE CONFORMITÉ
Directive du Conseil auxquelles la conformité est déclarée :
Directive (2004/108/EC) - EMC
Directive (2011/65/EU refonte 2002/95/ EC) - RoHS
est conforme aux directives et normes ci-dessus
Application des normes :
EN 55013: 2001+A1: 2003+A2: 2006
EN 55020: 2007
EN 55022: 2006+A1: 2007
EN 55024: 1998+A1: 2000+A2: 2003
EN 61000-3-2: 2006
EN 61000-3-3: 1995+A1: 2001+A2: 2005
IEC 62321: 2008
lona
Directeur général __
______________________________ enolecraB : ueiL
EN 55022: 2010
EN 55024: 2010
EN 61000-3-2: 2006+A1: 2009+A2: 2009
EN 61000-3-3: 2008
EN 61000-4-2: 2009
EN 61000-4-3: 2006+A1: 2008+A2: 2010
Nom du fabricant : AFEX SUNS, S.A.
Adresse
Type d'équipement : Écouteurs
Marque Commerciale : SUNSTECH
Modèle no. : DEDALO
Nous, soussignés, déclarons sous notre seule responsabilité que l'appareil spécifié
Signature : …
Víctor Planas Bas_________
(Nom complet)
Date : le 21 Juin 2014
(Fonction)
DÉCLARATION DE CONFORMITÉ
Directive du Conseil auxquelles la conformité est déclarée :
Directive (2004/108/EC) - EMC
Directive (2011/65/EU) - RoHS
du fabricant : C/Pallars 189, 08005 Barcelona
est conforme aux directives et normes ci-dessus
Application des normes :
EN 61000-4-4: 2012
EN 61000-4-5: 2006
EN 61000-4-6: 2009
EN 61000-4-8: 2010
EN 61000-4-11: 2004
IEC 62321: 2008
Directeur général __
______________________________ enolecraB : ueiL
Fabriqué en Chine

1. Visão Geral
DEDALO
Guia Rápido
- Este equipamento tem garantia de 2(dois) anos a partir da data original de compra.
- Estaram isentas da garantía as avarías causadas pelo uso incorrecto do aparelho, má instalação
oucolocação em lugares inapropriados para a sua boa conservação, pancadas, actualizações desoftware
que não sejão os facilitados pela marca, peças desgastadas pelo seu proprio uso ou porum uso não
doméstico ou inadequado, assim como, por manipulação por pessoas ou oficinas deassistência tecnica
alheios à nossa empresa.
- Para que a garantía tenha validade, deverá juntar a factura ou tícket de caixa que corrobore/validea
aquisição e data de venda deste producto.
Descarte correto deste Produto
Descarte de Equipamentos Elétricos e Eletrônicos - WEEE).
Seu produto foi projetado e fabricado com materiales de alta
qualidade e componentes que podem ser reciclados e reutilizados.
Este símbolo significa que equipamentos elétricos e eletrônicos, no
fim de sua vida útil, devem ser descartado separadamente do lixo doméstico.
Por favor, descarte esse equipamento em um posto de coleta
adequado ou em um centro de reciclagem.
Na União Europeia existem sistemas de coleta separados para
produtos elétricos e eletrônicos. Por favor, nos ajude a conservar o
meio ambiente em que vivemos!
2. Reprodução de Música
2.1 Deslize o botão On/Off para ligar o leitor. Despois de entrar no ménu principal, seleccione
Musica e pressione o botão de MODO para entrar no modo de reprodução.
2.2 Pressione o botão Play/Pause para começar a reproduzir a faixa seleccionada.
2.3 Mantenha pressionado o botão MODO para mostrar as letras, pressione de novo o botão
MODO
2.4
Pressione os botões Retroceder / Seguinte para mudar de faixa.
2.5 Para rebobinar a faixa eja para a frente seja para trás mantenha pressionado os botões
2.6 Pressione o botão de Vol e para ajustar pressione os botões Retroceder/Seguinte.
2.7 Para retornar ao ménu Principal mantenha pressionado o botão MODO.
para retornar.
Retroceder/Seguinte .
4. Reprodução de Gravação (VOZ)
4.1 Despois de entrar no ménu principal, pressione os botões Retroceder/Seguinte para
selecciojnar Voz e pressione ao botão MODO para entrar no modo de gravação de voz
4.2 Pressione os botões Retroceder / Seguinte para seleccionar a voz desejada.
4.3 Pressione o botão Play/pause para começar a reproduzir o arquivo de voz seleccionado.
4.4 Pressione os botões Retroceder / Seguinte para passar a voz gravada ou a seguinte.
4.5 Mantenha os botões pressionados Retroceder / Seguinte para rebobinar a voz seja para
frente, seja para trás
4.6 Pressione os botões de Vol para ajustar o volume pressionando os botões Retroceder /
Seguinte.
4.7 Mantenha pressionado o botão MODO para retornar ao ménu principal.
6. E-book
6.1 Depois de entrar no ménu principal, pressione os botões Retroceder / Seguinte para
seleccionar E-Book e pressione o botão MODO para confirmar.
6.2 Pressione os botões Retroceder / Seguinte e seleccione o modo Texto e pressione o botão
MODO para confirmar.
6.3 Modo de Replay:
6.3.1 Enquanto o dispositivo lê um ficheiro de texto, pressione o botão MODO para entrar no
submenú, pressione o botão Retroceder/ Seguinte e seleccione Replay, pressione o
botão MODO para confirmar e pressione o botão Retroceder / Seguinte para
seleccionar o Manual Replay ou Auto Replay
6.4 Manter o botão MODO pressionado durante 3 segundos para voltar ao Menu.
8. Outros
8.1 Lista de Arquivos
8.1.1 Adminstração de Arquivos
8.1.1.1 Por baixo do directório ROOT ( raiz ) pode criar uma pasta para administrar as conções
para facilitar a administração e navegação
8.1.2 Navegação por pastas
8.1.2.1 No modo STOP pressione o botão MODO e seleccione a pasta local.
8.1.2.2 Os nomes das pastas que primeiramente foram creadas apareceram no ecrã.
8.1.3 SubPasta
8.2 Configuração do modo de Repetição
8.2.1 No modo de repetição pressione o botão MODO para entrar no subménu, Seleccione
8.3 Configuração do Modo de Equalização
8.3.1 No modo de reprodução pressione o botão MODO para entrar no subménu
8.4 Eliminar Arquivos
8.4.1 Em modod STOP pressione o botão MODO para entrar na função de eliminar. Pressione o
8.4.2 Para sair desta função, mantenha pressionado o botão MODO.
Escolha a sua pasta pressionando so botões Retroceder / Seguinte.
8.1. 3.1 Pode aceder a cada pasta para localizar a subpasta desejada. Pressione o botão
MODO para confirmar.
Repeat ( repetir ) e pressione o botão MODO para entrar no modo de repetição. Há 7
modos de repetição disponiveis: normal, repetir uma , pasta, repetir pasta, repetir tudo,
aleatório, intro. Pressione os botões Retroceder / Seguinte para seleccionar o modo de
repetição que deseja e pressione o botão MODO para confirmar.
Depois pressione Seguinte para seleccionar o equalizador e pressione o botão MODO
para entrar no mode de EQ ( equalizador ). Há 7 modos de equalizador disponiveis:
Natural , Rock , POP, Classico , Suave , Jazz e DBB. Pressione os botões Retroceder/
Seguinte para seleccionar o modo de equalização desejada e pressione o botão MODO
para confirmar.
botão Seguinte para seleccionar Delete ( eliminar) e pressione o botão MODO para
confirmar. Pressione os botões Retroceder / Seguinte para seleccionar o arquivo que
deseja eliminar e pressione o botão MODO para confirmar.
Seleccione YES ou No pressionando os botões Retroceder / Seguinte
Depois pressione o botão MODO para confirmar
ON
OFF
DEDALO 4GB
M
M
Retroceder
Entrada de Auriculares
MIC
Micrófone
Botón Play/Pausa
VOL
Volume
Botão MODO
Seguinte
3. Gravação
3.1
Depois de entrar no ménu principal, pressione os botões Retroceder/Seguinte para
seleccionar RECORD ( gravação ) e pressione o botão MODO para entrar no modo de
gravação por voz.
3.2
Pressione o botão Play/Pause para iniciar a gravação..
3.3
Pressione o botão Play/Pause para parar ou continuar a gravação.
3.4
Mantenha pressionado o botão MODO até que apareça “SAVING” ( guardar ) no ecrã
para que possa guardar a gravação de voz.
Para voltar ao ménu principal mantenha pressionado o botão MODO.
3.5
5. Rádio FM
Depois de entrar no mení principal pressione os botões Retroceder/Seguinte para
5.1
seleccionar o ménu de Rádio e pressione o botão MODO para inciar a função FM.
Pode pressionar o botão Retroceder/Seguinte para trocar a frequência 0,1MHZ.
5.2
5.3 Pressione e mantenha pressionado o botão Retroceder / Seguinte pra iniciar a função
de busca
automática. Pára quando detecta uma emissão FM.
Su reproductor avanzará de Presintonía, si usted presiona la tecla PLAY,pero
5.4
si usted presiona la tecla siguiente, su reproductor avanzará hasta la siguiente
sintonía del DIAL indiferentemente de si está presintonizada o no.
7. Configuração do Sistema
7.1 Depois de entrar no ménu principal, pressione os botões Retroceder/Seguinte para
seleccionar SETUP ( configuração) e pressione o botão MODO para entrar na
pagina de
configuração de Sistema (System Set).
7.2 Relógio
7 .2.1 Depois de entrar na página de Função de Configuração de Sistema, seleccione
Relogio ( clock) e pressione o botão MODO para entrar na configuração da hora.
7 .2.2 Pressione o botão VOL para puder mover por
7.3 Selecção do Idioma
7.4 Desligar Automaticamente
7.5 Configuração do Dispositivo Online
7.6 Informação de memória
Ano; Mês ; Dia ; Hora ; Minuto ; Segundo
Pressione os botões Retroceder/Seguinte para ajustar
Quando terminada a configuração do relogio, pressione o botão MODO para
confirmar
7 .3.1 Depois de entrar na página de Configuração de Sistema, pressione Seguinte e
depois MODO para aceder a lista de opções dos idiomas.
Pressione os botões Retroceder/Seguinte para seleccionar o idioma desejado e
pressione o botão MODO para confirmar.
7 .4.1 Depois de entrar na pagina de configuração de sistema, pressione os botões
Retroceder/Seguinte para seleccionar desconecção ( power off ).
7 .4.2 Pode seleccionar a hora e o modo de espera
No modo STOP, o leitor apagar-se-a ou entrará em modo de Espera
automaticamente, baseando-se na duração seleccionada.
Pode configurar esta função a “0” para reinicia-la.
7 .5.1 Pressione os botões Retroceder/Seguinte para seleccionar Online Device
(disp ositivo online) na pagina de configuração do sistema e pressione o botão
MODO para confirmar
7 .5.2 Se configurar o leitor como Media Device pode sincronizar as musicas do PC ao
leitor. Se configurar como disco USB pode passar os arquivos do PC para o Leitor.
7 .6.1 Pressione os botões Retroceder/Seguinte para seleccionar Memory Info
(informação de memória ); pressione o botão MODO para ver a informação sobre o
estado de memória do leitor.
USB
Entrada USB

1. NÃO coloque objetos em cima do
aparelho, uma vez que estes o podem
riscar.
2. NÃO exponha o aparelho a
ambientes sujos ou com pó.
3. NÃO coloque o aparelho numa
superfície desnivelada ou instável.
4. NÃO introduza objetos estranhos
no aparelho.
5. NÃO exponha o aparelho a campos
magnéticos ou elétricos fortes.
6. NÃO exponha o aparelho à luz
direta do sol, uma vez que isto o pode
danificar.
Mantenha o aparelho afastado de fontes de calor.
7. NÃO guarde o aparelho em zonas com
temperatura superior a 40º C (104º F). A
temperatura interna de funcionamento
deste aparelho é de 20ºC (68 °F) a 60 °C
(140 °F).
8. NÃO use o aparelho à chuva.
9. Consulte as autoridades locais ou o
revendedor relativamente à
eliminação correta de aparelhos
eletrónicos.
10. O aparelho e o adaptador podem
produzir calor durante o seu normal
funcionamento de carga.
Para evitar o desconforto ou lesões causados pela
exposição ao calor, NÃO deixe o aparelho no seu colo.
11. CAPACIDADE DA POTÊNCIA
DE ENTRADA: Consulte a
etiqueta de voltagem do
aparelho e assegure-se que o
adaptador de corrente respeita a tensão. Use apenas
acessórios especificados pelo fabricante.
12. Limpe o aparelho com um pano
suave. Se necessário humedeça
ligeiramente o pano antes de proceder à limpeza. não
use nunca soluções abrasivas ou detergentes.
13. Desligue sempre o aparelho antes de
proceder à instalação ou remoção de
aparelhos que não suportem hot-plug.
instruções.
acesso.
14. Desligue o aparelho da tomada
elétrica antes de o limpar.
15. NÃO desmonte o aparelho. Só um
técnico de serviço autorizado deve
proceder a reparações.
16. O aparelho dispõe de aberturas
destinadas a libertar calor.
NÃO bloqueie a ventilação do
aparelho, uma vez que este pode
aquecer e avariar-se.
17. A substituição da bateria por um
tipo incorreto comporta um risco
de explosão. Retire as baterias
usadas de acordo com as
18. EQUIPAMENTO LIGÁVEL: a
tomada deve estar instalada perto
do equipamento e deve ser de fácil
Nome do fabricante: AFEX SUNS, S.A.
Endereço do fabricante: C/Pallars 189,
Tipo de equipamento: MP3 PLAYER
Comércio: SUNSTECH
Modelo no.: DEDALO
responsabilidade que o equipamento especificado está conforme à Diretiva e às
(Assinatura)
Víctor Planas Bas_________
(Nome completo)
Data: 21 de Junho de 2014
(Cargo)
DECLARAÇÃO DE CONFORMIDADE
Diretiva do Conselho relativamente à qual é declarada conformidade:
Diretiva (2011/65/EU reformulação 2002/95/ EC) - RoHS
Nós, abaixo-assinados, pela presente declaramos por nossa exclusiva
Diretiva (2004/108/EC) - EMC
Aplicação das Normas:
EN 55013: 2001+A1: 2003+A2: 2006
EN 55020: 2007
EN 55022: 2006+A1: 2007
EN 55024: 1998+A1: 2000+A2: 2003
EN 61000-3-2: 2006
EN 61000-3-3: 1995+A1: 2001+A2: 2005
IEC 62321: 2008
08005 Barcelona, Espanha
Normas supra
Diretor-Geral __
______________________________ anolecraB :lacoL
EN 55022: 2010
EN 55024: 2010
EN 61000-3-2: 2006+A1: 2009+A2: 2009
EN 61000-3-3: 2008
EN 61000-4-2: 2009
EN 61000-4-3: 2006+A1: 2008+A2: 2010
Nome do fabricante: AFEX SUNS, S
Endereço do fabricante: C/Pallars 189, 08005 Barcelona, Espanha
Tipo de equipamento: Auscultadores
Comércio: SUNSTECH
Modelo no.: DEDALO
responsabilidade que o equipamento especificado está conforme à Diretiva e às
(Assinatura)
Víctor Planas Bas_________
(Nome completo)
Data: 21 de Junho de 2014
(Cargo)
DECLARAÇÃO DE CONFORMIDADE
Diretiva do Conselho relativamente à qual é declarada conformidade:
Diretiva (2004/108/EC) - EMC
Diretiva (2011/65/EU) - RoHS
Nós, abaixo-assinados, pela presente declaramos por nossa exclusiva
Aplicação das Normas:
EN 61000-4-4: 2012
EN 61000-4-5: 2006
EN 61000-4-6: 2009
EN 61000-4-8: 2010
EN 61000-4-11: 2004
IEC 62321: 2008
Normas supra
Diretor-Geral __
.A.
______________________________ anolecraB :lacoL
Fabricado em China
 Loading...