


Bluetooth MP3 Player with Sport Clip
DEDALO2BT
Quick Guide
Before operating your MP3 Player, please read this guide
thoroughly and keep it for future reference.
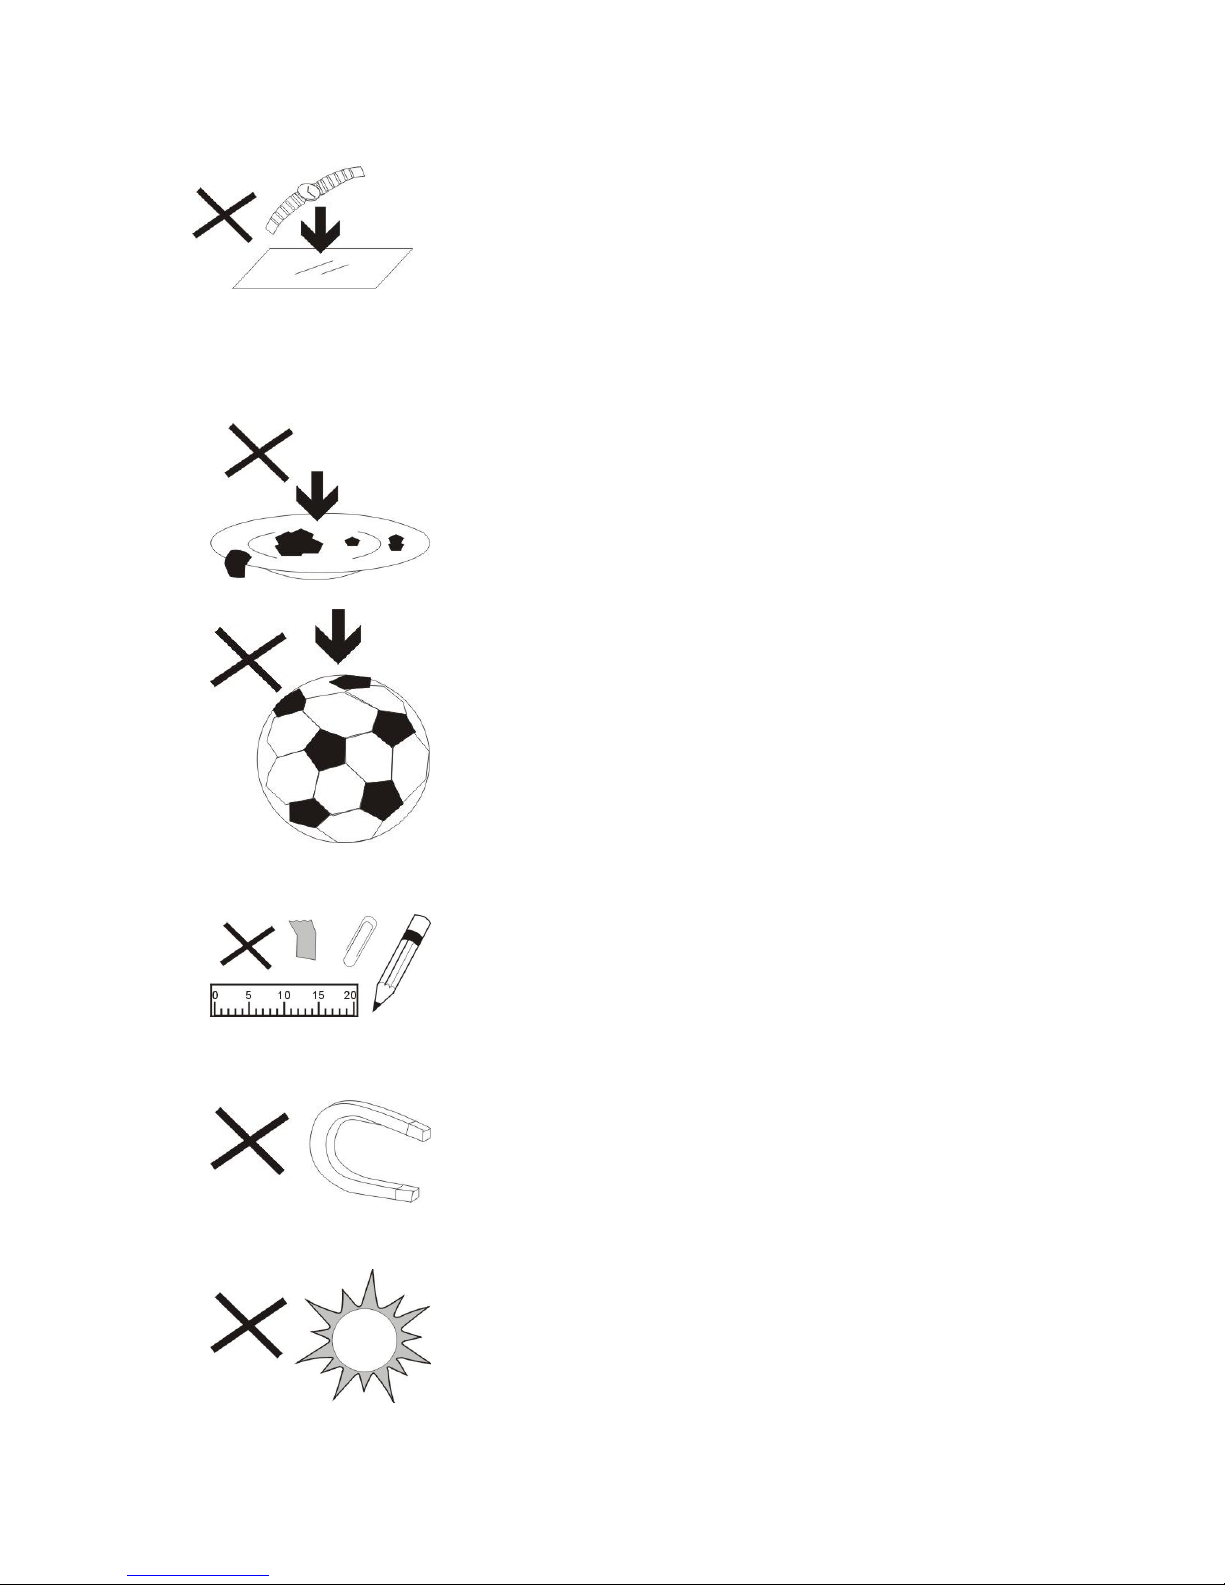
1. DO NOT place objects on top of the
device, as objects may scratch the
device.
2. DO NOT expose the device to dirty or
dusty environments.
3. DO NOT place the device on an
uneven
or unstable surface.
4. DO NOT insert any foreign objects
into the device.
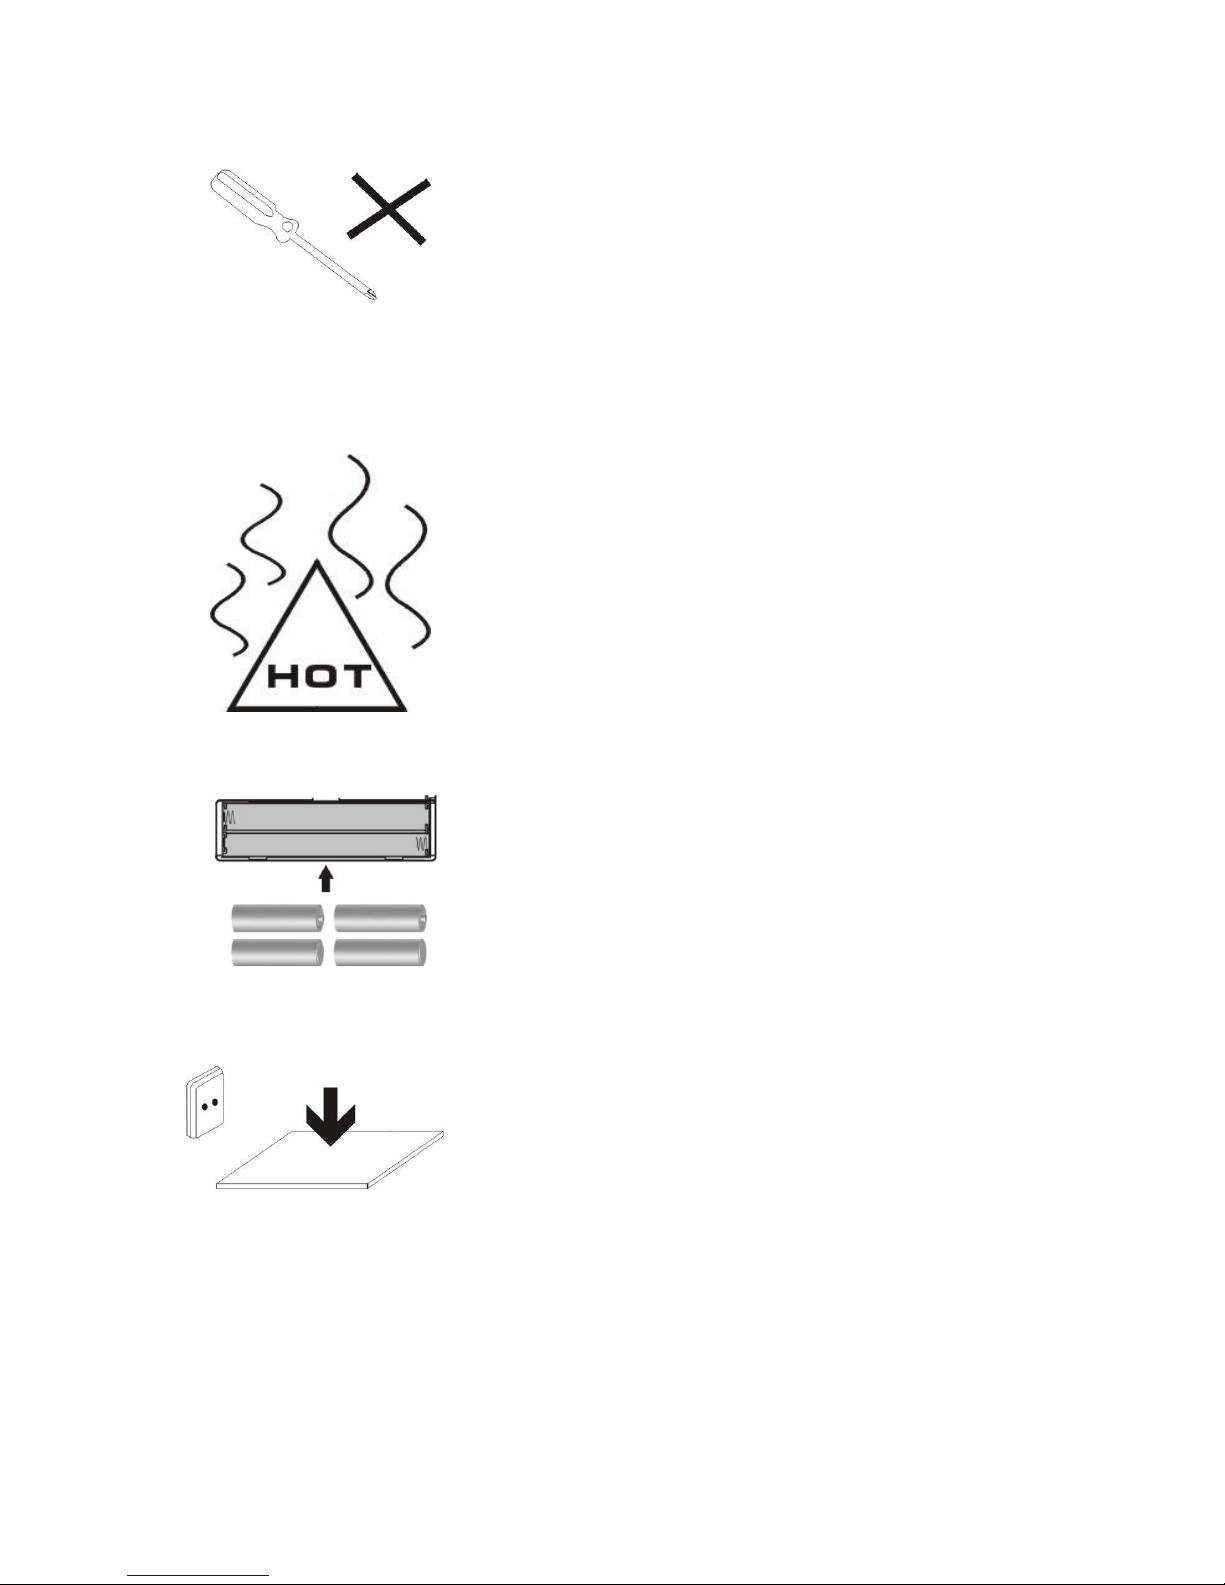
5. DO NOT expose the device to strong
magnetic or electrical field.
6. DO NOT expose the device to direct
sunlight as it can damage the device.
1

Keep it away from heat sources.
7. DO NOT store your device in
temperatures higher than 40 C(104 F).
The internal operating temperature for
this device is from 20 C(68 F) to
60 C(140 F).
8. DO NOT use the device in the rain.
9. Please check with your Local
Authority or retailer for proper disposal
of electronic products.
10. The device and adaptor may
product some heat during normal
operation of charging. To prevent
discomfort or injury from heat exposure, DO NOT leave
the device on your lap.
2

11. POWER INPUT RATING:
Refer to the rating label on the
device and be sure that the
power adaptor complies with
the rating. Only use accessories specified by the
manufacturer.
12. Clean the device with a soft cloth. If
needed, dampen the cloth slightly before
cleaning. Never use abrasives or cleaning solutions.
13. Always power off the device to install
or remove external devices that do not
support hot-plug.
14. Disconnect the device from an
electrical outlet and power off before
cleaning the device.
3
15. DO NOT disassemble the device.
Only a certified service technician
should perform repair.
16. The device has apertures to
disperse heat. DO NOT block the device
ventilation, the device may become hot
and malfunction as a result.
17. Risk of explosion if battery replaced
by an incorrect type. Dispose of used
batteries according to the instruction.
18. PLUGGABLE EQUIPMENT: the
socket-outlet shall be installed near
the equipment and shall be easily
accessible.
4

Appearance and Controls
Key instructions
1. Master power switch: Power on / off.
2. Display.
3. MENU: Short press to enter sub menu, long press to lock/unlock the keypad.
4. Previous9: Last function or file / Last song / Long press for fast rewind during
playing interface / decrease volume during volumn adjustment interface.
5. R/V: Short press to return. Long press to to enter volume adjustment.
6. Next :: Next function or file / Next song / Long press for fast forward during
playing interface / increase volume during volumn adjustment interface.
7. “PLAY” : Short press to play / pause /enter, long press to power on/off
8. Earphone jack: 3.5 mm earphone jack.
9. USB: Mini USB socket.
5

Switch on/off
1. Adjust Power key “ON” or long press “PLAY” key to Switch on
2. Long press “PLAY” to switch off or adjust power key to ‘OFF’.
3. When the idle time of the system reaches 1 minute by default, the player will
automatically be turned off.
4. When the battery power is low, the prompt screen will appear and then the
player will automatically shut down. It should then be charged instead of
restarting it.
Note: When charging the player, be sure to switch the power switch to the ON
position, or charging will not occur.
Bluetooth
Select
Bluetooth
on the main interface, and press key to enter the Bluetooth
submenu.
Select ‘BT Control’ and press key to enter the next submenu,
Select ‘Turn BT On’ and press key to activate the Bluetooth function,
Press R/V button and return to previous Bluetooth submenu, then select ‘Search
Device’ and press key to search all Bluetooth devices available,
Select the Bluetooth device from the ‘Device’s List’ and press key to pair it,
Press R/V button and return to previous Bluetooth submenu, select ‘All Music’ and
press key to enter the music list,
Select a song, press to start playing it via the Bluetooth device,
Press and hold the R/V button to enter the Volume adjustment mode, and then
press 9and : to adjust the sound volume, ranging from 0-31.
6

Music
Select
Music
on the main interface, and press key to enter the music play
interface. Press key to switch modes between Play and Pause. Press 9 and :
keys to choose the previous file or next file. Hold 9 and : key to Fast Forward or
Fast Reverse.
Press the R/V key to enter the Volume adjustment mode, and then press 9and :
to adjust the sound volume, ranging from 0-31.
Note:At full volume, prolonged listening to the portable
audio device may damage the user’s hearing. SUNSTECH device is
with ‘max volume limit’ function, because listening music with
high volume may harm your hearing; you can press the ‘M’
button to cancel this volume limit in case you may really need to.
Recordings
Select Recordings on the main interface and press
to enter submenu. Select
‘Start voice recording’ and press again to start/pause/restart and continue the
recording. Press V key and it will remind you to save the current recording content
or not, and be ready for new recording.
If the low-power signal appears in the process of pause mode, the system will
automatically save the recording content and go back to the recording function
interface. Press to select the other submenu options, including ‘Recordings
Library’ (To play the recorded files), ‘Record Format’(supports MP3 and WAV
formats), Record Settings (To select bitrate between 512kbps, 768kbps, 1024kbps,
1536kbps )
7

FM Radio
Note: Headset needs to be plugged in as an antenna for reception.
Select FM Radio on the main interface and press to enter submenu.
1. Presets: The preset frequency points of radio station are displayed with 30
frequency points reserved at most.
2. Users: The frequency points of radio station are displayed with 30 frequency
points displayed at most.
3. Manual tune: Press key to enter, press 9 and : to adjust the frequency
manually.
4. Auto tuning: “Do you want to auto-tune the radio?” is displayed after pressing
key to enter automatic tuning, automatic channel searching starts after
choosing “Yes”, options of menu returns after choosing “No”.
5. FM Recording: To play the voice recording and the FM recording in the memory.
Options of menu:
Select a frequency point of radio station, press M key to show the options:
1. Start FM radio recording.
2. Save to preset
3. Clear preset.
4. Auto tune.
5. FM Recording.
6. Playing through Bluetooth: To play the current radio station via your Bluetooth
device.
File Manager
Select
Folder view
on the main interface, and press key to enter to view all of
the folders and files in memory. Music files can be selected and press key to
play directly, press M key to enter submenu to delete folders or files.
8

System Settings
Select Set on the main interface, and press key to enter the setting interface.
1. Sleep timer: Set the auto shutdown time, the device will automatically
shutdown within the customized time with the range of 0-99
minutes, and the step interval of 1 minute.
2. Display settings: Including ‘brightness’ and ‘backlight timer ’ (10s, 20s, 30s,
always on) settings.
3. Language: Select the language according to different customer’s request.
4. Information: Including ‘Player information ’ (Firmware version information),
‘Disk space’ , ‘File type supported’
Audio formats supported:
MP3: Bitrate: 32Kbps-320Kbps, sampling rate: 8KHz-48KHz
WMA: Bitrate: 5Kbps-384Kbps, sampling rate: 8KHz-48KHz
FLAC: Bitrate: L0-L8(1000Kbps-1200Kbps) sampling rate:8KHz-48KHz
APE: Bitrate: Fast/Normal, bitrate: 800Kbps-1000Kbp
sampling rate:8KHz-48KHz
AAC: Bitrate:8Kbps-320Kbps, sampling rate:8KHz-48KHz
WAV: Bitrate:32Kbps-448Kbps, sampling rate: 8KHz-48KHz
5. Factory settings: To restore default factory settings.
Troubleshooting
1. Media player does not work or LCD does not display contents
.
- Check the battery power.
2. Power key does not work.
- The battery is depleted.
3. Unable to download files
- Check the connection between computer's USB port and USB cables.
- Format the media player.
Made in China
9

10

DECLARATIONOFCONFORMITY
CouncilDirective(s)towhichconformityisdeclared:
Directive(1999/5/EC)-R&TTE
Directive(2004/108/EC)-EMC
Directive(2006/95/EC)-LVD
Directive(2011/65/EU)-RoHS
ApplicationoftheStandards:
EN62479:2010
EN60950-1:2006+A11:2009+A1:2010+A12:2011+A2:2013
EN301489-1V1.9.2
EN301489-17V2.2.1
EN300328V1.8.1
EN55022:2010
EN55024:2010
EN61000-3-2:2006+A1:2009+A2:2009
EN61000-3-3:2013
EN62321:2009
Manufacturer’sname: AFEXSUNS,S.A.
Manufacturer’saddress: c/Metall6-8,08110,MontcadaiReixac
Typeofequipment: MP3PLAYER
Trade: SUNSTECH
Modelno.: DEDALO2BT
(Serialnumberrange:170200001-170201010)
We,theundersigned,herebydeclareunderoursoleresponsibilitythatthe
specifiedequipmentisinconformitywiththeaboveDirective(s)and
Standard(s)
Place:Barcelona
______________________________
(Signature)
VíctorPlanasBas_________
(Fullname)
Date:10 -January-2017
GeneralManager __
(Position)
11

ReproductorMP3Bluetoothconpinzaparahacer
deporte
DEDALO2BT
Guíarápida
AntesdeutilizarsureproductorMP3,porfavor,leaestaguía
detenidamenteyguárdelaparafuturasconsultas.

1. NO coloque objetos encima del
aparato porque podr an rayarlo.
2. NO exponga el aparato a entornos
sucios o polvorientos.
3. NO coloque el aparato en una
superficie desigual o inestable.
4. NO introduzca ning n objeto extra o
en el aparato.
5. NO exponga el aparato a un campo
magn tico o el ctrico fuerte.
6. NO exponga el aparato directamente
a la luz del sol porque podr a da arlo.
Mant ngalo apartado de superficies calientes.
1

7. NO guarde el aparato a temperaturas superiores a los
40 C (104 F). La temperatura interna de
funcionamiento de este aparato es de 20 C (68 F) a 60
C (140 F).
8. NO utilice el aparato bajo la lluvia.
9. Consulte con su ayuntamiento o
vendedor para saber c mo eliminar de
forma correcta los aparatos
electr nicos.
10. El aparato y el adaptador pueden
producir algo de calor durante el
funcionamiento normal de la carga.
Para evitar la incomodidad o un da o debido a la
exposici n al calor NO deje el aparato en su regazo.
11.CAPACIDAD DE LA POTENCIA
DE ENTRADA: V ase la etiqueta
2

del aparato y aseg rese de que el adaptador de potencia
corresponde a la capacidad. Utilice nicamente los
accesorios especificados por el fabricante.
Limpie el aparato con un pa o
suave. Si fuera necesario,
humedezca ligeramente el pa o antes de limpiar.
No utilice nunca mezclas abrasivas o productos de
limpieza.
13.Apague siempre el aparato para
instalar o quitar dispositivos externos que
no aguanten la conexi n en caliente.
14.Desconecte el aparato de la toma de
corriente el ctrica y ap guelo antes de
limpiarlo.
15.NO desmonte el aparato. S lo un
3

t cnico de servicio autorizado debe realizar las
reparaciones.
16. El aparato tiene aperturas para
liberar calor.
NO bloquee la ventilaci n del
aparato, el aparato puede calentarse y
comenzar a funcionar mal.
17.Riesgo de explosi n en caso de
sustituci n de la bater a por otra de un
tipo incorrecto. Tire las bater as usadas
siguiendo las instrucciones.
18.EQUIPAMIENTO ENCHUFABLE: el
enchufe debe estar instalado cerca del
equipo y tener un acceso f cil.
4

Apariencia y controles
Instrucciones de las teclas
1. Interruptor de conexión principal: Encender/apagar
2. Pantalla.
3. MENÚ: Pulse con brevedad para entrar en el submenú, pulse detenidamente
para bloquear/desbloquear el teclado.
4. Anterior9: Última función o fichero/Última canción/Pulsación prolongada para
retroceder rápidamente en la interfaz de reproducción/Bajar el volumen en la
interfaz de ajuste del volumen.
5. R/V: Pulse con brevedad para volver. Pulse detenidamente para entrar en el
ajuste del volumen.
6. Siguiente :: Siguiente función o fichero/Siguiente canción/Pulse
detenidamente para avanzar rápidamente en la interfaz de reproducción/Subir
volumen durante la interfaz de ajuste del volumen.
7. “PLAY” : Pulse con brevedad para reproducir/pausar/entrar, pulse
detenidamente para encender/apagar
8. Clavija de los auriculares: clavija de auriculares de 3,5 mm.
9. USB: toma del mini-USB.
5

Interruptor on/off (encender/apagar)
1. Coloque el interruptor en la posición “ON” (encendido) o pulse detenidamente
la tecla “PLAY” (reproducir) para encender el aparato
2. Para apagar el aparato, pulse detenidamente “PLAY” o coloque el
interruptor en la posición “OFF” (apagar).
3. Por defecto, cuando el tiempo de inactividad del sistema llegue a 1 minuto, el
reproductor se apagará automáticamente.
4. Cuando la batería esté baja, aparecerá la pantalla de diálogo y el reproductor se
apagará automáticamente. Entonces, deberá cargar el aparato, no reiniciarlo.
Nota: Al cargar el reproductor, asegúrese de que el interruptor de corriente está
en la posición “ON” o no cargará.
Bluetooth
Seleccione
Bluetooth
en la interfaz principal y pulse la tecla para entrar en el
submenú Bluetooth.
Seleccione “Control BT” y pulse la tecla para entrar en el submenú siguiente.
Seleccione “Conectar BT” y pulse la tecla para activar la función Bluetooth.
Pulse el botón “R/V” para volver al submenú Bluetooth anterior, a continuación,
seleccione “Buscar dispositivo” y pulse la tecla para buscar todos los
dispositivos Bluetooth disponibles.
Seleccione el dispositivo Bluetooth en la “Lista de dispositivos” y pulse la tecla
para o emparejarlo.
Pulse el botón “R/V” para volver al submenú Bluetooth anterior, seleccione “Toda
la música” y pulse la tecla para entrar en la lista de música.
Seleccione una canción, pulse para iniciar la reproducción mediante el
dispositivo Bluetooth.
Pulse y mantenga pulsado el botón “R/V” para entrar en modo de ajuste del
volumen y, a continuación, pulse 9y: para ajustar el volumen de 0 a 31.
6

Música
Seleccione
Música
en la interfaz principal y pulse la tecla para entrar en la
interfaz de reproducción de música. Pulse la tecla para alternar los modos de
Reproducción y Pausa. Pulse 9 las : teclas para elegir el fichero anterior o el
fichero siguiente. Pulse y mantenga pulsada9 la : tecla para avanzar rápido y
retroceder rápido.
Pulse la tecla “R/V” para entrar en el modo de ajuste del volumen y, a
continuación, pulse 9y: para ajustar el volumen de 0 a 31.
Nota: Al máximo de volumen, la escucha prolongada, del
dispositivo de audio portátil puede perjudicar la audición del
usuario. El dispositivo SUNSTECH cuenta con una función de que
limita el nivel máximo de volumen, ya que escuchar música a un
volumen muy alto puede dañar el oído. Puede pulsar el botón “M”
para cancelar esta limitación en caso necesario.
Grabaciones
Seleccione Grabaciones en la interfaz principal y pulse
para entrar en el
submenú. Seleccione “Iniciar grabación de voz” y pulse de nuevo para
iniciar/pausar/reiniciar y seguir la grabación. Pulse la tecla V y le recordará que
debe guardar el contenido de la grabación actual o no y estará listo para nueva
grabación.
Si aparece la señal de baja potencia durante proceso del modo de pausa, el
sistema guardará automáticamente el contenido de la grabación y volverá a la
interfaz de la función de grabación. Pulse para seleccionar las otras opciones
de submenú, incluida la “Biblioteca de grabaciones” (para reproducir los ficheros
grabados), “Formato de grabaci ón” (soporta formatos MP3 y WAV), Configuración
de la grabación (para seleccionar la tasa binaria entre 512 kbps, 768 kbps,
1024 kbps y 1536 kbps )
7

Radio FM
Nota : Los auriculares deben estar enchufados como una antena para que pueda
llevarse a cabo la recepción.
Seleccione Radio FM en la interfaz principal y pulse para entrar en el
submenú.
1. Presintonía: Los puntos de frecuencia presintonizados de la emisora de radio se
muestran con 30 puntos de frecuencia reservados como máximo.
2. Usuarios: Los puntos de frecuencia de la emisora de radio se presentan con 30
puntos de frecuencia como máximo.
3. Sintonización manual: Pulse la tecla para entrar, pulse 9 y: para ajustar la
frecuencia manualmente.
4. Sintonización automática: La frase “¿Desea sintonizar la radio
automáticamente?” aparecerá tras haber pulsado la tecla para entrar en
sintonización automática, la búsqueda automática de canales empieza tras
haber elegido “Sí”, las opciones del menú vuelven tras haber elegido “No”.
5. Grabación FM: Reproducir la grabación de voz y la grabación de FM en la
memoria.
Opciones de menú:
Seleccione el punto de frecuencia de una emisora de radio, pulse la tecla M para
mostrar las opciones:
1. Iniciar grabación de radio FM.
2. Guardar como presintonizado
3. Borrar presintonizado.
4. Sintonización automática.
5. Grabación FM.
6. Reproducción por Bluetooth: Reproducir la emisora de radio actual a través de
su dispositivo Bluetooth.
8

Gestor de Ficheros
Seleccione
Ver carpetas
en la interfaz principal y pulse
la tecla para entrar y
visualizar todas las carpetas y ficheros en la memoria. Puede seleccionar los
ficheros de música, pulsar la tecla para reproducir directamente y pulsar la
tecla M para entrar en el submenú y eliminar carpetas o ficheros.
Configuración del sistema
Seleccione Configuración en la interfaz principal y pulse la tecla para entrar
en la interfaz de configuración.
1. Apagado automático: Defina el tiempo para apagar automáticamente el
aparato y este se apagará automáticamente un el tiempo
seleccionado de 0 a 99 minutos en incrementos de 1 minuto.
2. Configuración de la pantalla: Incluye la configuración de “brillo” y “temporizador
de la luz de fondo” (10 s, 20 s, 30 s y siempre encendida).
3. Idioma: Seleccione el idioma de acuerdo con los distintos requisitos del cliente.
4. Información: Incluye la “Información sobre el reproductor“ (información sobre
la versión de Firmware).
“Espacio de disco”, “Tipo de fichero soportado”
Formatos de audio soportados:
MP3: Tasa binaria: 32 Kbps-320 Kbps, tasa de muestreo: 8KHz-48KHz
WMA: Tasa binaria: 5 Kbps-384 Kbps, tasa de muestreo: 8KHz-48KHz
FLAC: Tasa binaria: L0-L8 (1000 Kbps-1200 Kbps) tasa de muestreo:
8 KHz-48 KHz
APE: Tasa binaria: Rápido/Normal, tasa binaria: 800 Kbps-1000 Kbp
tasa de muestreo: 8 KHz-48 KHz
AAC: Tasa binaria: 8 Kbps-320 Kbps, tasa de muestreo: 8 KHz-48 KHz
WAV: Tasa binaria: 32 Kbps-448 Kbps, tasa de muestreo: 8KHz-48KHz
5. Configuración de fábrica: Para restablecer la configuración de fábrica.
9

Resolución de problemas
1. El reproductor multimedia no funciona o la LCD no muestra contenidos
.
- Comprobar la carga de la batería.
2. El interruptor no funciona.
- La batería está agotada.
3. No es posible bajar ficheros
- Compruebe la conexión entre el puerto USB del ordenador y los cables USB.
- Formatee el reproductor multimedia.
Hecho en China
10

11

DECLARACIÓNDECONFORMIDAD
Directiva(s)delConsejoconla(s)quesedeclaraconformidad:
Directiva(1999/5/EC)-R&TTE
Directiva(2004/108/EC)-EMC
Directiva(2006/95/EC)-LVD
Directiva(2011/65/EU)-RoHS
AplicacióndelasNormas:
EN62479:2010
EN60950-1:2006+A11:2009+A1:2010+A12:2011+A2:2013
EN301489-1V1.9.2
EN301489-17V2.2.1
EN300328V1.8.1
EN55022:2010
EN55024:2010
EN61000-3-2:2006+A1:2009+A2:2009
EN61000-3-3:2013
EN62321:2009
Nomedofabricante: AFEXSUNS,S.A.
Endereçodofabricante: c/Metall6-8,08110,MontcadaiReixac
Tipodeequipo: ReproductordeMP3
Marca: SUNSTECH
Modelo.: DEDALO2BT
(rangodenúmerosdeserie:170200001-170201010)
Nosotros,losabajofirmantes,declaramosbajonuestraexclusiva
responsabilidadqueelequipoespecificadocumpleconla(s)Directiva(s)y
Norma(s)mencionadas
Lugar:Barcelona
______________________________
(Firma)
VíctorPlanasBas_________
(Nombre)
Fecha:10-Enero-2017
GeneralManager __
(Cargo)
12

LecteurBluetoothavecpincesport
DEDALO2BT
Guiderapide
Veuillezlireentièrementceguideavantd'utiliser
votrelecteurMP3etconservez-lepourdesconsultationsfutures.
1

1. NE PAS mettre d'objets au-dessus de
l'appareil, car ces objets peuvent le rayer.
2. NE PAS
exposer l'appareil un
environnement sale ou
poussi reux.
3. NE PAS placer l'appareil sur une
surface non plane ou instable.
4. NE PAS introduire d'objets trangers
dans l'appareil.
5. NE PAS exposer l'appareil un
champ magn tique ou lectrique trop
fort.
6. NE PAS exposer l'appareil en plein
2

soleil car vous risquez de l'endommager.
Veuillez le maintenir loign des sources de chaleur.
7. NE PAS laisser votre appareil sous une
temp rature sup rieure 40 C (104 F).
La temp rature interne de
fonctionnement de cet appareil est
comprise entre 20 C (68 F) et 60 C (140
F).
8. NE PAS utiliser cet appareil sous la
pluie.
9. Veuillez vous renseigner aupr s des
Autorit s Locales ou de votre d taillant
concernant la mise au rebus des
produits lectroniques.
10. L'appareil et l'adaptateur peuvent
produire de la chaleur au cours d'un
3

chargement dans des conditions normales.
Afin d' viter toute g ne ou blessure due une
exposition la chaleur, veuillez NE PAS laisser l'appareil
sur vos genoux.
11.PUISSANCE D'ENTREE
Reportez-vous l' tiquette
appos e sur l'appareil et
assurez-vous que l'adaptateur
secteur est appropri . Veuillez utiliser uniquement les
accessoires sp cifi s par le fabricant.
12.Nettoyez l'appareil l'aide d'un
chiffon doux. Si n cessaire, humidifiez
l g rement le chiffon avant de nettoyer. Veuillez ne
jamais utiliser de produits abrasifs ou nettoyants.
13.Veuillez toujours teindre l'appareil
pour installer ou retirer des p riph riques
4

qui ne supportent pas les branchements chaud.
14.D branchez l'appareil de la prise
lectrique et teignez-le avant de le
nettoyer.
15.NE PAS d monter l'appareil. Seul un
technicien qualifi est habilit
effectuer les r parations.
16. L'appareil est dot d'ouvertures pour
disperser la chaleur.
NE PAS bloquer la ventilation de
l'appareil, sinon il risque de surchauffer de
donc de mal fonctionner.
17.Risque d'explosion si la pile est
remplac e par un mod le inadapt .
D barrassez-vous des piles
5

Apparence et commandes
Instructions clés
1. Commutateur principal : Alimentation on/off
2. Affichage
3. MENU : Appui court pour accéder au sous-menu, appui long pour
verrouiller/déverrouiller le clavier.
4. Previous [Précédant]9 : Fonction ou fichier précédant / Chanson précédente /
Appui long pour rembobinage rapide en étant sur l'interface de lecture /
diminution de volume en étant sur l'interface de réglage de volume.
5. R/V : Appui court pour revenir. Appui long pour accéder au réglage de volume.
6. Next [Suivant] : : Fonction ou fichier suivant / Chanson suivante / Appui long
pour avance rapide en étant sur l'interface de lecture / augmentation de
volume en étant sur l'interface de réglage de volume.
7. “PLAY [LECTURE]” : Appui court pour lire / pauser / accéder, appui long pour
alimentation on/off
8. Prise d'écouteur : Pour fiche d'écouteur de 3,5 mm
9. USB : Port Mini USB.
6

Commutateur on/off
1. Mettez le commutateur d'alimentation sur “ON” ou faites un appui long sur la
touche “PLAY [LECTURE]” pour mettre en marche
2. Appui long sur “PLAY [LECTURE]” pour éteindre ou mettre le commutateur
d'alimentation sur ‘OFF’.
3. Le lecteur s'éteindra automatiquement s'il est inactif pendant 1 minute par
défaut.
4. Quand la batterie est faible, un écran guide s'affichera et le lecteur s'éteindra
automatiquement. Le lecteur doit être alors chargé et non remis en marche.
Remarque : Lors de la charge du lecteur, assurez-vous de mettre le commutateur
d'alimentation sur ON, sinon la charge n'aura pas lieu.
Bluetooth
Sélectionnez
Bluetooth
sur l'interface principale, et appuyez sur la touche
pour accéder au sous-menu Bluetooth.
Sélectionnez ‘BT Control’ et appuyez sur la touche pour accéder au sous-menu
suivant,
Sélectionnez ‘Turn BT On’ et appuyez sur la touche pour activer la fonction
Bluetooth,
Appuyez sur le bouton R/V et revenez au menu Bluetooth précédant, puis
sélectionnez ‘Search Device [Rechercher appareil]’ et appuyez sur la touche
pour rechercher tous les appareils Bluetooth disponibles,
Sélectionnez l'appareil Bluetooth sur la ‘Device’s List [Liste des appareils]’ et
appuyez sur la touche pour l'appairer,
Appuyez sur le bouton R/V et revenez au menu Bluetooth précédant, puis
sélectionnez ‘All Music [Toutes les musiques]’ et appuyez sur la touche pour
accéder à la liste des musiques,
Sélectionnez une chanson, appuyez sur pour la lire de l'appareil Bluetooth,
Maintenez appuyé le bouton R/V pour accéder au réglage de volume, puis
appuyez sur 9 et sur :pour régler le volume sonore entre 0 et 31.
7

Musique
Sélectionnez
Music (Musique]
sur l'interface principale, et appuyez sur la touche
pour accéder à l'interface de lecture de musique. Appuyez sur la touche
pour passer de Play [Lecture] à PAuse et vice-versa. Appuyez sur les touches 9
et : pour choisir le fichier suivant ou précédent. Maintenez appuyées les
touches 9 et : pour avancer rapidement ou rembobiner rapidement.
Appuyez sur la touche R/V pour accéder au réglage de volume, puis appuyez sur
9 et sur :pour régler le volume sonore entre 0 et 31.
Remarque:À plein volume, une écoute prolongée de
l'appareil audio portable peut endommager l'ouïe de l'utilisateur.
L'appareil SUNSTECH comporte une fonction 'limitation de volume
max.' parce qu'écouter de la musique à haut volume peut
endommager votre ouïe; vous pouvez appuyer sur le bouton 'M'
pour annuler cette limitation de volume si vous en avez
vraiment besoin.
Enregistrements
Sélectionnez Recordings [Enregistrements] sur l'interface principale, et appuyez
sur
pour accéder au sous-menu. Sélectionnez ‘Start voice recording
[Commencer enregistrement vocal]’ et appuyez de nouveau sur pour
commencer/pauser/recommencer et continuer l'enregistrement. Appuyez sur la
touche V et l'appareil vous rappellera d'enregistrer ou non le contenu enregistré
actuel et être prêt pour un nouvel enregistrement.
Si le signal de batterie faible s'affiche durant le mode pause, le système
enregistrera automatiquement le contenu enregistré et reviendra à l'interface
d'enregistrement. Appuyez sur
pour sélectionner un autre sous-menu
comprenant ‘Recordings Library [Bibliothèque d'enregistrements]’ (Pour lire des
fichiers enregistrés), ‘Record Format [Format d'enregistrement]’ (prend en charge
les formats MP3 et WAV), Record Settings [Paramètres d'enregistrement (Pour
sélectionner le débit binaire parmi 512kbps, 768kbps, 1024kbps, 1536kbps)
8

Radio FM
Remarque : L'écouteur doit être branché pour servir d'antenne de réception.
Sélectionnez Radio FM sur l'interface principale, et appuyez sur pour
accéder au sous-menu.
1. Préréglages : Les fréquences radio préréglées sont affichées avec au maximum
30 fréquences réservées.
2. Users [Utilisateurs] : Les fréquences radio sont affichées avec au maximum 30
fréquences réservées.
3. Accord manuel : Appuyez sur la touche pour accéder, appuyez sur 9 et :
pour vous accorder manuellement sur une fréquence.
4. Accord automatique : “Do you want to auto-tune the radio? [Voulez-vous
accorder manuellement la radio ?]” est affiché après un appui sur la touche
pour accéder à l'accord automatique, la recherche automatique de canaux
commence après avoir choisi “Yes [Oui]”, retour au menu d'options si vous
choisissez “No [Non]”.
5. Enregistrement FM : Pour lire les enregistrements vocaux et les enregistrement
de FM en mémoire.
Menu d'options :
Sélectionnez une fréquence radio, appuyez sur la touche M pour afficher les
options :
1. Commence l'enregistrement de radio FM.
2. Enregistrer comme pré réglage
3. Supprimer le pré réglage.
4. Accord automatique
5. Enregistrement FM.
6. Lecture via Bluetooth : Pour écouter la station de radio actuelle avec votre
appareil Bluetooth.
9

Gestionnaire de fichiers
Sélectionnez
Folder view [Répértoires]
sur l'nterface principale et appuyez sur la
touche
pour afficher tous les répertoires et fichiers en mémoire. Vous
pouvez sélectionner des fichiers de musique puis appuyer sur la touche pour
les lire directement, appuyez sur la touche M pour accéder au sous-menu de
suppression de répertoires ou fichiers.
Configuration de système
Sélectionnez Set (Configurer] sur l'interface principale, et appuyez sur la touche
pour accéder à l'interface de configuration.
1. Minuteur de veille : Règle le temps avant l'arrêt automatique, l'appareil
s'éteindra automatiquement après le temps paramétré entre 0 et
99 minutes avec un pas de 1 minute.
2. Configuration d'affichage : Comprenant 'Brightness [Luminosité]' et 'Backlight
Timer [Minuteur de rétroéclairage]' avec les paramètres (10 s,
20 s, 30 s et 'Always On [Toujours allumé].
3. Langue : Sélectionnez la langue voulue.
4. Informations : Comprenant ‘Player information [Informations sur le lecteur] ’
(Information de version de micrologiciel),
‘Disk space [Espace libre sur disque]’ , ‘File type supported
[Types de fichier pris en charge]’
Formats audio pris en charge :
MP3 : Débit binaire : 32 Kbps - 320 Kbps, Taux d'échantillonnage : 8KHz-48KHz
WMA : Débit binaire : 5 Kbps - 384 Kbps, Taux d'échantillonnage : 8KHz-48KHz
FLAC : Débit binaire : L0-L8 (1.000 Kbps - 1.200 Kbps), Taux d'échantillonnage :
8KHz-48KHz
APE : Débit binaire : Rapide/Normal, Débit binaire : 800 Kbps-1000 Kbps
Taux d'échantillonnage : 8KHz-48KHz
AAC : Débit binaire : 8 Kbps - 320 Kbps), Taux d'échantillonnage : 8KHz-48KHz
WAV : Débit binaire : 32 Kbps - 320 Kbps, Taux d'échantillonnage : 8KHz-48KHz
5. Configuration d'usine : Pour revenir à la configuration d'usine.
10

Dépannage
1. Le lecteur média ne fonctionne pas ou l'écran LCD n'affiche pas les
contenus
.
- Vérifiez la puissance de la batterie.
2. La touche d'alimentation ne fonctionne pas.
- La batterie est à plat.
3. Impossible de télécharger des fichiers.
- Vérifiez le raccordement du câble USB au port USB de l'ordinateur.
- Formatez le lecteur média.
Fabriqué en Chine
11

12

DÉCLARATIONDECONFORMITÉ
DirectiveduConseilauxquelleslaconformité estdéclarée:
Directive(1999/5/EC)-R&TTE
Directive(2004/108/EC)-EMC
Directive(2006/95/EC)-LVD
Directive(2011/65/EU)-RoHS
Applicationdesnormes:
EN62479:2010
EN60950-1:2006+A11:2009+A1:2010+A12:2011+A2:2013
EN301489-1V1.9.2
EN301489-17V2.2.1
EN300328V1.8.1
EN55022:2010
EN55024:2010
EN61000-3-2:2006+A1:2009+A2:2009
EN61000-3-3:2013
EN62321:2009
Nomdufabricant: AFEXSUNS,S.A.
Adressedufabricant: c/Metall6-8,08110,MontcadaiReixac
Typed'équipement: LecteurMP3
MarqueCommerciale: SUNSTECH
Modèlen°: DEDALO2BT
(gammedenombresdesérie:170200001-170201010)
Nous,soussignés,déclaronssousnotreseuleresponsabilité quel'appareil
spécifié estconformeauxdirectivesetnormesci-dessus
Lieu:Barcelone
______________________________
(Signature)
VíctorPlanasBas_________
(Nomcomplet)
Date:le10Janvier2017
Directeurgénéral __
(Fonction)
13

LeitorMP3BluetoothcomClipeparaDesporto
DEDALO2BT
GuiaRápido
AntesdeutilizaroseuLeitorMP3,agradecemosqueleiaesteguia
cuidadosamenteeoguardeparafuturasconsultas.
1

1. N O coloque objetos em cima do
aparelho, uma vez que estes o podem
riscar.
2. N O exponha o aparelho a
ambientes sujos ou com p .
3. N O coloque o aparelho numa
superf cie desnivelada ou inst vel.
4. N O introduza objetos estranhos no
aparelho.
5. N O exponha o aparelho a campos
magn ticos ou el tricos fortes.
6. N O exponha o aparelho luz direta
do sol, uma vez que isto o pode
2

danificar.
Mantenha o aparelho afastado de fontes de calor.
7. N O guarde o aparelho em zonas com
temperatura superior a 40 C (104 F). A
temperatura interna de funcionamento
deste aparelho de 20 C (68 F) a 60 C
(140 F).
8. N O use o aparelho chuva.
9. Consulte as autoridades locais ou o
revendedor relativamente elimina o
correta de aparelhos eletr nicos.
10. O
aparelho e o
adaptador
podem produzir calor
durante o
seu normal
3

funcionamento de carga.
Para evitar o desconforto ou les es causados pela
exposi o ao calor, N O deixe o aparelho no seu colo.
11.CAPACIDADE DA POT NCIA
DE ENTRADA: Consulte a
etiqueta de voltagem do
aparelho e assegure-se que o
adaptador de corrente respeita a tens o. Use apenas
acess rios especificados pelo fabricante.
12.Limpe o aparelho com um pano
suave. Se necess rio humede a
ligeiramente o pano antes de proceder limpeza. n o
use nunca solu es abrasivas ou detergentes.
13.Desligue sempre o aparelho antes de
proceder instala o ou remo o de
aparelhos que n o suportem hot-plug.
4

14.Desligue o aparelho da tomada
el trica antes de o limpar.
15.N O desmonte o aparelho. S um
t cnico de servi o autorizado deve
proceder a repara es.
16. O aparelho disp e de aberturas
destinadas a libertar calor.
N O bloqueie a ventila o do
aparelho, uma vez que este pode
aquecer e avariar-se.
17. A substitui o da bateria por
um tipo incorreto comporta um
risco de explos o. Retire as baterias
usadas de acordo com as instru es.
18. EQUIPAMENTO LIG VEL: a
tomada deve estar instalada perto do
equipamento e deve ser de f cil acesso.
5

Aparência e Controlos
Instruções de Tecla
1. Interruptor de Ligação Principal: Ligar/desligar alimentação.
2. Ecrã.
3. MENU: Prima brevemente para entrar no submenu, prima longamente para
bloquear/debloquear o teclado.
4. Anterior9: Última função ou ficheiro / Última música / Prima longamente para
recuo rápido durante a interface de reprodução / reduzir volume durante a
interface de regulação do volume.
5. R/V: Prima brevemente para retroceder. Prima longamente para entrar na
regulação do volume.
6. Seguinte :: Função ou ficheiro seguinte / Música seguinte / Prima longamente
para avanço rápido durante a interface de reprodução / aumentar volume
durante a interface de regulação do volume.
7. “PLAY” : Prima brevemente para reproduzir / pausa /entrar, prima
longamente para ligar/desligar
8. Ficha de auscultadores: ficha de auscultadores de 3.5 mm.
9. USB: mini tomada USB.
6

Interruptor on/off (ligar/desligar)
1. Posicione a tecla de corrente em “ON” (ligar) ou prima longamente a tecla
“PLAY” para ligar
2. Prima longamente “PLAY” para desligar ou posicione a tecla de corrente em
‘OFF’ (desligar).
3. Quando o tempo de inatividade do sistema atinge 1 minuto por defeito, o leitor
desligar-se-á automaticamente.
4. Quando a bateria está fraca, será apresentado um ecrã imediato e então o leitor
desligar-se-á automaticamente. Neste caso, deverá ser recarregado em vez de
reiniciado.
Nota: Ao carregar o leitor, certifique-se que coloca o interruptor de corrente na
posição ON (ligar) ou o carregamento não será efetuado.
Bluetooth
Selecione
Bluetooth
na interface principal e prima a tecla para entrar no
submenu Bluetooth.
Selecione ‘Controlo BT’ e prima a tecla para entrar no submenu seguinte,
Selecione ‘Ligar BT’ e prima a tecla para ativar a função Bluetooth,
Prima o botão R/V e regresse ao submenu Bluetooth anterior e, em seguida,
selecione ‘Procurar Dispositivo’ e prima a tecla para procurar todos os
dispositivos Bluetooth disponíveis,
Selecione o dispositivo Bluetooth a partir da ‘Lista de Dispositivos’ e prima a tecla
para o emparelhar,
Prima o botão R/V e regresse ao submenu Bluetooth anterior, selecione ‘Todas as
Músicas’ e prima a tecla para entrar na lista de músicas,
Selecione uma música, prima para iniciar a reprodução através do dispositivo
Bluetooth,
Prima e mantenha premido o botão R/V para entrar no modo de regulação do
Volume e, em seguida, prima 9e: para ajustar o volume do som, variando de
0-31.
7

Música
Selecione
Música
na interface principal e prima a tecla para entrar na
interface de reprodução de música. Prima a tecla para alternar entre os modos
de Reprodução e Pausa. Prima as teclas 9 e : para escolher o ficheiro anterior
ou o ficheiro seguinte. Mantenha premida9 e : para Avançar Rápido e Recuo
Rápido.
Prima a tecla R/V para entrar no modo de regulação do volume e, seguida, prima
9e: para ajustar o volume de som, variando de 0-31.
Nota: No volume máximo, a escuta prolongada, do
dispositivo de áudio portátil pode danificar a audição do utilizador.
O dispositivo SUNSTECH dispõe de uma função de limite máximo
de volume, uma vez que a audição de música numa volume
muito alto pode danificar o ouvido; pode premir o botão "M" para
cancelar o limite de volume caso tenha necessidade.
Gravações
Selecione Gravações na interface principal e prima
para entrar no submenu.
Selecione ‘Iniciar gravação de voz’ e prima novamente para
iniciar/pausar/retomar e continuar a gravação. Prima a tecla V e será relembrado
para guardar o conteúdo da gravação atual ou não e ficar pronto para nova
gravação.
Caso o sinal de carga fraca seja apresentado no processo do modo de pausa, o
sistema irá guardar automaticamente o conteúdo da gravação e voltar à interface
da função de gravação. Prima para selecionar as outras opções de submenu,
incluindo ‘Biblioteca de Gravações’ (para reproduzir os ficheiros gravados),
‘Formato de Gravação’ (suporta formatos MP3 e WAV), Definições de Gravação
(para selecionar a bitrate entre 512kbps, 768kbps, 1024kbps, 1536kbps )
8

Rádio FM
Nota: Os auscultadores precisam estar conectados como uma antena para
receção.
Selecione Rádio FM na interface principal e prima para entrar no submenu.
1. Predefinições: Os pontos de frequência predefinidos da estação de rádio são
apresentados com 30 pontos de frequência reservados no máximo.
2. Utilizadores: Os pontos de frequência de estação de rádio são apresentados
com 30 pontos de frequência apresentados no máximo.
3. Sintonia manual: Prima a tecla para entrar, prima 9 e: para ajustar a
frequência manualmente.
4. Sintonia automática: “Deseja sintonizar o rádio automaticamente?” é
apresentado depois de ter premido a tecla para entrar em sintonia
automática, a busca automática de canais começa depois de ter escolhido “Sim”,
regressa às opções do menu após ter escolhido “Não”.
5. Gravação FM: Para reproduzir a gravação de voz e a gravação de FM na
memória.
Opções de menu:
Selecione um ponto de frequência de estação de rádio, prima a tecla M para
mostrar as opções:
1. Iniciar gravação de rádio FM.
2. Guardar como predefinido
3. Apagar predefinido.
4. Sintonia automática.
5. Gravação FM.
6. Reprodução através de Bluetooth: Para reproduzir a atual estação de rádio
através do seu dispositivo Bluetooth.
9

Gestor de Ficheiros
Selecione
vista de Pasta
na interface principal e prima a tecla
para entrar e
visualizar todas as pastas e ficheiros na memória. Os ficheiros de música podem
ser selecionados e prima a tecla para reproduzir diretamente, prima a tecla
M
para entrar no submenu para eliminar pastas ou ficheiros.
Definições do Sistema
Selecione Definir na interface principal e prima a tecla
para entrar na
interface de definições.
1. Temporizador de desligamento: Defina o tempo de desligamento automático, o
dispositivo desligar-se-á automaticamente no prazo personalizado
com o intervalo de 0 a 99 minutos em incrementos de 1 minuto.
2. Definições de visor: Inclui as definições de ‘luminosidade’ e ‘temporizador da luz
de fundo’ (10s, 20s, 30s, sem ligada).
3. Idioma: Selecione o idioma de acordo com os diferentes requisitos do cliente.
4. Informações: Inclui as ‘Informações do Leitor’ (informações sobre a versão de
Firmware),
‘Espaço de disco’, ‘Tipo de ficheiro suportado’
Formatos áudio suportados:
MP3: Bitrate: 32Kbps-320Kbps, taxa de amostragem: 8KHz-48KHz
WMA: Bitrate: 5Kbps-384Kbps, taxa de amostragem: 8KHz-48KHz
FLAC: Bitrate: L0-L8(1000Kbps-1200Kbps) taxa de amostragem: 8KHz-48KHz
APE: Bitrate: Rápido/Normal, bitrate: 800Kbps-1000Kbp
taxa de amostragem:8KHz-48KHz
AAC: Bitrate: 8Kbps-320Kbps, taxa de amostragem: 8KHz-48KHz
WAV: Bitrate:32Kbps-448Kbps, taxa de amostragem: 8KHz-48KHz
5. Definições de fábrica: Para restaurar as predefinições de fábrica.
10

Resolução de problemas
1. O leitor multimédia não funciona ou LCD não apresenta conteúdos
.
- Verificar a carga da bateria.
2. A tecla de ligar não funcionar.
- A bateria está gasta.
3. Não é possível descarregar ficheiros
- Verifique a ligação entre a porta USB do computador e os cabos USB.
- Formate o leitor multimédia.
Fabricado na China
11

12

DECLARAÇÃODECONFORMIDADE
DiretivadoConselhorelativamente à qual é declaradaconformidade:
Directiva(1999/5/EC)-R&TTE
Diretiva(2004/108/EC)- EMC
Diretiva(2006/95/EC)- LVD
Diretiva(2011/65/EU)-RoHS
AplicaçãodasNormas:
EN62479:2010
EN60950-1:2006+A11:2009+A1:2010+A12:2011+A2:2013
EN301489-1V1.9.2
EN301489-17V2.2.1
EN300328V1.8.1
EN55022:2010
EN55024:2010
EN61000-3-2:2006+A1:2009+A2:2009
EN61000-3-3:2013
EN62321:2009
Nomedofabricante: AFEXSUNS,S.A.
Endereçodofabricante: c/Metall6-8,08110,MontcadaiReixac
Tipodeequipamento: MP3player
Comércio: SUNSTECH
Modelon.º: DEDALO2BT
(faixadenúmeroserial:170200001-170201010)
Nós,abaixo-assinados,pelapresentedeclaramospornossaexclusiva
responsabilidadequeoequipamentoespecificadoestá conforme à Diretivaeàs
Normassupra
Local:Barcelona
______________________________
(Assinatura)
VíctorPlanasBas_____
(Nomecompleto)
Data:10-Janeiro-2017
Diretor-Geral
(Cargo)
13

 Loading...