

Page 1
Mp3
Mp3
INSTRUCTION MANUAL
FM ST EREO RA DIO WITH P LL TUNIN G
CD/ MP3/AU X /USB/ IPOD
CRUD 386i
PORTABLE RADIO CD PLAYER
Page 2
Fo
r Customer U
se
Ent
er below th
e Ser i
al No. w
h
ic
h is lo cate
d
O
n the b o
t
to
m of t
he ca
b
i
ne
t
. R
eta
i
n thi
s
In
f
or
ma
t
io
n for fu
tu
r
e r
ef
er
enc
e.
M
o
d
e No
.
:
Serial N
o
.
:
EN- 2
PREPARATION FOR USE
Unpa ckin g and Set up
* Care fully r emove th e unit fr om the di splay c arton a nd remo ve all pa cking m ateri al from t he unit i tself.
* Rem ove any de scrip tive la bels th at may be fo und on ei ther th e front o r top cab inet of t he unit. D o not
remo ve any lab els loc ated on e ither t he back o r butto n cabin et of the u nit.
* Pres s the CD do or OPEN B utton to o pen the C D compa rtme nt door. The re is a whi te card i n the CD
comp artm ent whi ch is inte nded to p reven t the CD pi ckup fr om movin g duri ng ship ment of th e produ ct,
Rem ove this c ard fro m the CD com part ment be fore use .
Usin g AC power
1.C heck if t he power v oltag e, as sho wn on the t ype pla te locat ed on the b ottom o f the set ,
cor respon ds to you r local A C power su pply. If i t does no t , consu lt your d ealer o r serv ice cent re.
2.Co nnec t the powe r cord to t he AC inl et and th e wall ou tlet. th e power s upply i s nowsoc ket
conn ecte d and read y for use .
3.To sw itch of f compl etely, u nplug t he power c ord fro m the wall o utlet .
Unp lug the p ower cor d from th e wall out let to pr otect y our set d uring h eavy th under storm s.
,
,
,
,
,
,
,
,
Batt eries ( not inc luded )
Ope n the bat tery co mpart ment an d inser t bat teries , type LR 14, UM -2 or C-c ells,
(pre ferab ly Alka line) w ith the c orrec t polar ity as i ndica ted by the + a nd - symb ols
ins ide the co mpar tment
Batt eries c ontai ns chem ical su bstan ces, so th ey shou ld be dis posed o f prope rly.
Inc orrec t use of ba tteri es can ca use ele ctrol yt leak age and w ill cor rode th e compa rtmen t or
cau se the ba tterie s to burs t. There fore:
Do no t mix bat tery ty pes: e. g. alka line wi th carb on Zinc . Only us e batte ries of t he same
typ e for the s et.
When i nsert ing new b atter ies, do n ot try to m ix old ba tteri es with n ew ones .
Rem ove the ba tteri es if the s et is not b e used fo r a long ti me.
six
Powe r Suppl y
RISK O F ELECT RIC SHO CK
DO NOT OP EN
CAUTION
CAUTIO N:TO RE DUCE THE R ISK OF EL ECTRI C SHOCK ,DO NOT
REMOV E COVER (OR B ACK). NO USER -SERV ICEAB LE PARTS
INSID E.REF ER SERV ICING TO QUA LIFIE D SERVI CE PERS ONNEL .
1. DO NO T place o bject s on top of t he
devi ce, as ob jects m ay scra tch the
devi ce.
2. DO NO T expos e the dev ice to dir ty
or dus ty envi ronme nts.
3. DO NO T place t he devi ce on an
unev en or uns table s urfa ce.
4. DO NO T inser t any for eign obj ects
into t he devi ce.
5. DO NO T expos e the dev ice to str ong
magn etic or e lect rical f ield.
6. DO NO T expos e the dev ice to dir ect
sunl ight as i t can dam age the d evice .
Keep i t away fr om heat s ources .
7. DO NO T store yo ur devi ce in
temp eratu res hig her tha n 40°C( 104°F ).
The in terna l opera ting te mperat ure for
this d evice i s from 20 °C(68 °F) to
60°C (140° F).
8. DO NO T use the d evice i n the rai n.
9. Ple ase che ck with y our Loc al
Auth ority o r retai ler for p roper
disp osal of e lect ronic pr oduc ts.
10. The d evice a nd adap tor may p roduc t
some h eat dur ing nor mal ope ratio n of
char ging. To pre vent di scomfo rt or in jury
from h eat exp osure, D O NOT lea ve the
devi ce on you r lap.
11. PO WER INP UT RATIN G:
Refe r to the ra ting la bel on th e devic e and
be sur e that th e power a dapto r compli es
with t he rati ng. Onl y use acc essor ies
spec ified b y the man ufac turer.
12. Cl ean the d evice w ith a sof t clot h. If
need ed, dam pen the c loth sl ightl y befor e
clea ning. N ever us e abras ives or cl eanin g
solu tions .
13. Al ways po wer off t he devi ce to inst all
or rem ove ext ernal d evice s that do n ot
supp ort ho t-plu g.
14.D iscon nect t he devi ce from an e lectr ical
outl et and po wer off b efore cl eanin g the
devi ce.
15. DO N OT disa ssemb le the de vice. On ly a
cer tifie d servi ce tech nicia n shoul d perf orm
repa ir.
16. The d evice h as aper tures t o dispe rse hea t.
DO NOT b lock th e devic e ventil ation , the
devi ce may be come ho t and mal funct ion as a
resu lt.
17. R isk of ex plosi on if batt ery re place d by an
inco rrect t ype. Di spose o f used ba tteri es
acco rding t o the ins truct ion.
18. PLU GGAB LE EQUI PMENT: t he sock et-ou tlet
shal l be inst alled n ear the e quipm ent and s hall
be eas ily acc essib le.
Page 3
EN- 3
EN- 4
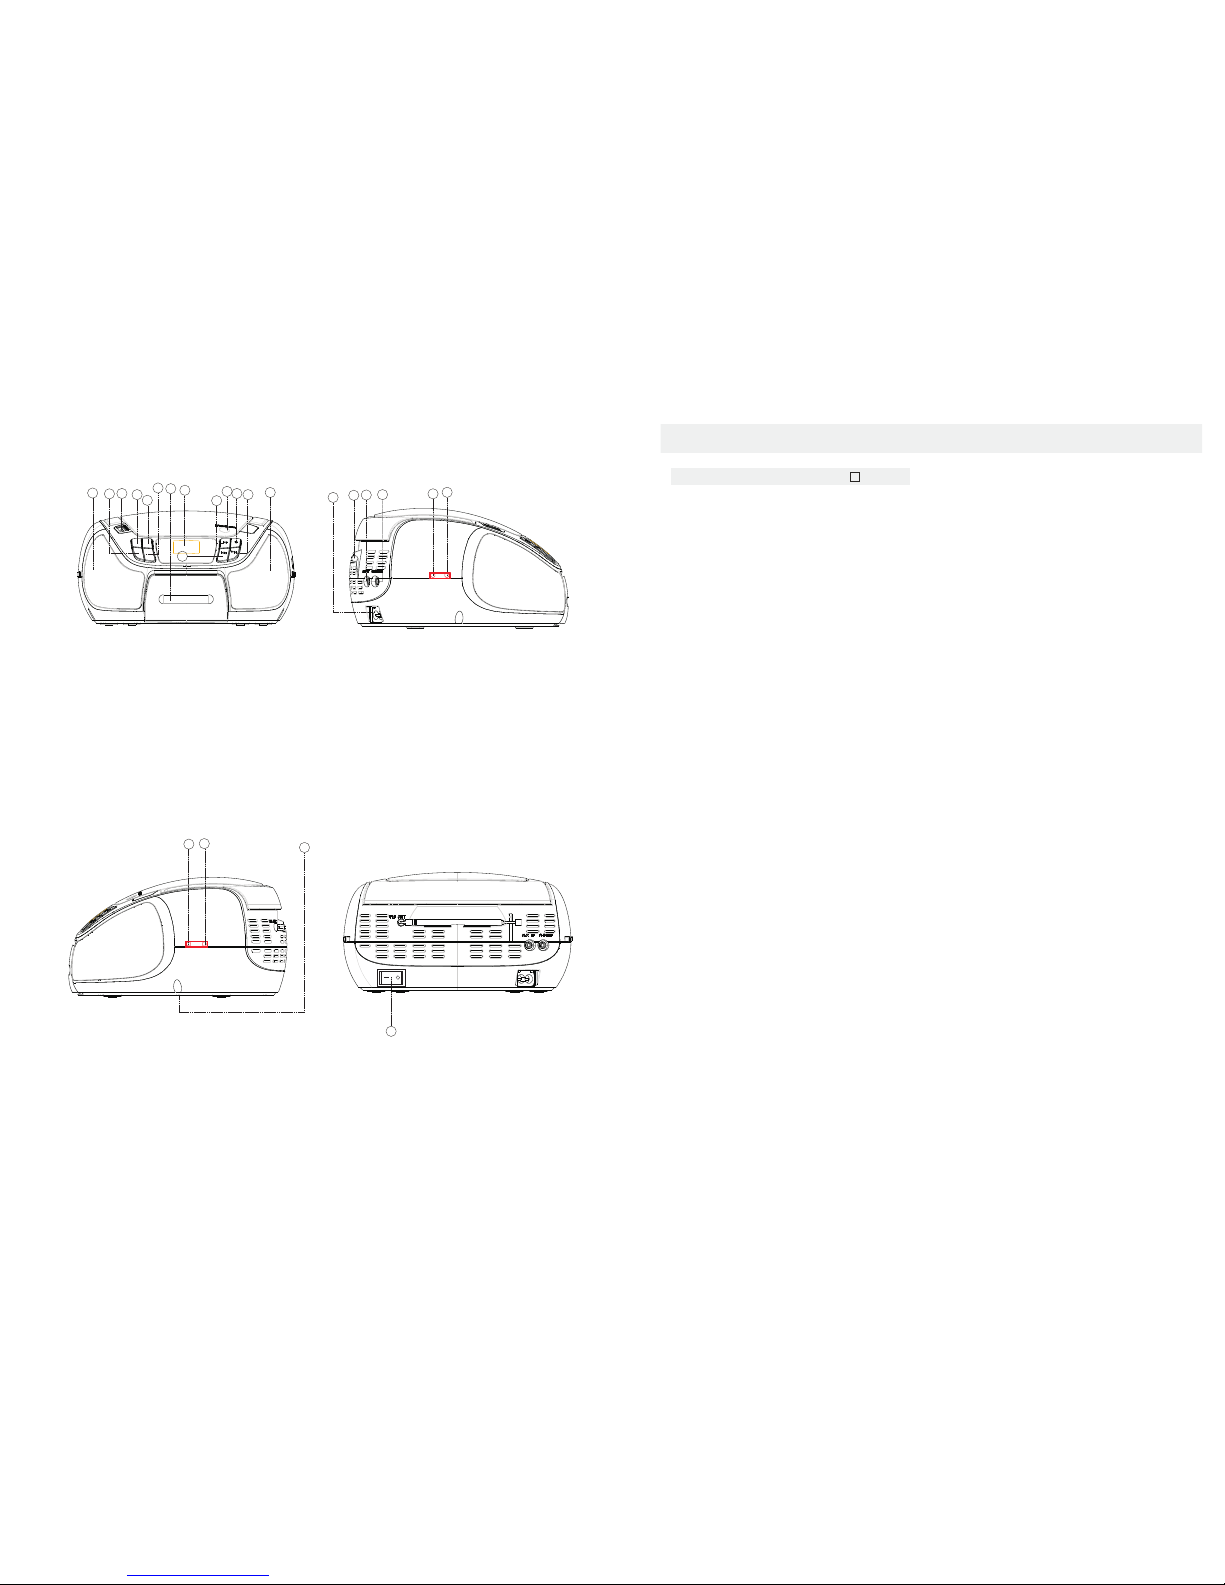
1
1
2
3
4
5
6
7
8
9
10
11
12
13
14
15
16
17
18
19
1. LEF T&RI GHT SPE AKER
2. REP EAT BUTTO N
3. USB J ACK
4. EQ BU TTON
5.FU NCTI ON SELE CT
6.PR OGRA M BUTTO N
7. IPO D JACK
8.LCD D ISPLAY
9.PL AY/PAUSE B UTTO N
10. CD D OOR OPE N/C LOSE BUT TON
11. ST OP BUT TON
12. NE XT BUT TON
13. BA CK BUT TON
14. AC S OCKET
15. FM A NTENN A
16. AU X JACK
17. PH ONES JAC K
18. VO LUME+ BU TTON
19. VO LUME- BU TTON
1. LEF T&RI GHT SPE AKER
2. REP EAT BUTTO N
- Rep eat a trac k CD/MP 3/USB /IPOD p rogra m.
- Rep eat mode : n ormal ->rep eat 1-> repea t all->
repe at albu m ->nor mal
3. USB J ACK
-To liste n to your U SB flas h memor y stic k with
Mp3 m usic fi les.
4. EQ BU TTON
-Pre ss the bu tton to c hange E Q CD/MP3 /USB/ IPOD
/RA DIO's m usic st yle.
-Whe n playi ng the mu sic, pre ss this b utton
is in th e class ica-r ock-p opula r-jaz z-FLR .
5. FUN CTION S ELEC T
-Se lect so urce of so und CD/ USB/
IPOD (AUX)/ RADI O.
6.PR OGRAM B UTTO N
-Pro gram an d review p rogra mmed tr ack num bers.
-In t he work ing sta tus, pu sh down th is butt on can on
CD/M P3/US B/RA DIO for pr ogram ming.
7.IP OD JACK
-To liste n to your I POD wit h Mp3 mus ic file s.
8. LCD DI SPLAY
- Show t he FM dia l frequ ency.
- Show t he numb er of tra cks.
9.PL AY/PAUSE BU TTON
- Star t or pau se MP3/ CD/US B/IPO D play.
-In t he radi o mode, pr ess the p lay/p ause bu tton en ter
the au tomat ic chan nel sca n mode.
10. CD D OOR OPE N/CLOS E BUTTO N
- Pres s here to op en/cl ose the C D door.
11. STO P BUTTO N
- Stop C D/MP3 /USB/ IPOD pl aybac k;
eras e a CD prog ram.
12.N EXT BU TTON
- Sel ect NEX T track .
- Pres s and hol d more th an 1.5 s ec forw ard sea rch
intr a track .
- In th e radio m ode, pre ss NEXT w ill ent er the
high -end m anual c hanne l scan mo de.
13.B ACK BUT TON
- Sele ct BACK t rack.
- Pres s and hold m ore tha n 1.5 se c BACK
sear ch intr a track.
-In th e radio m ode, pre ss BACK w ill ente r
the lo w end of th e manua l channe l scan mo de.
14. AC SO CKET
- Inle t for powe r cord.
15. FM AN TENNA
- To improv e FM recep tion.
16. AUX J ACK
-Pre ss FUNC TION bu tton , sel ect AUX s tation .
play M P3、DISC MAN、 WALKMA N AUX
inse rt.
inse rt whe n no disc.
NOTE :Ple ase take o ut the CD d isc.
17. PHO NES JAC K
- 3.5 mm s tereo h eadpho ne jack .
18.V OLUME+ B UTTON
19. VOLU ME- BUT TON
20. PRE -DN BU TTON
-In th e radio m ode, pre ss PRE- DN butt on to
choo se the ba ck chan nel.
-In th e mp3 mod e, press P RE-DN b utton t o
ente r the bac k folder.
21. PRE -UP BU TTON
-In th e radio m ode, pre ss PRE- UP butt on to
choo se the ne xt chan nel.
-In th e mp3 mod e, press P RE-UP b utton
ente r into the n ext fol der.
22.B ATTERY D OOR
-To open ba ttery c ompar tment .
23. POW ER SWITC H
-To cont rol the u nit ele ctric al
sou rce on/o ff.
1
20
21
22
23
20.P RE- DN BU TTON
21.P RE- UP BU TTON
22.B ATTERY D OOR
23.P OWER SW ITCH
ON
OFF
Top an d fr on t panels( Se e )
CONTROLS
POWER SUPPLY
English
Page 4

EN- 6
EN- 5
Rad io recep tion
1. FUNC TION se lect R ADIO .
2.Tun e to requ ired st ation by p ress BA CK/TU NE DN or NE XT/ TUNE U P
Man ual Tunin g: BACK o r NEXT an d then re lease w ithin 1 s ec.
Auto Tun ing:
Pres et Chan nel:( FM 30 Pres et memo ries)
(1) Pr ess BACK /TU NE-D N or NEXT /TU NE-U P Selec t desir ed stat ion.
(2) Pr ess PRO GRAM bu tton on ce , The MEMO RY numb er indi cator b egins s teady i n the dis play.
(3) Pr ess PRE SET-UP O R PRESE T DOWN bu ttons t o selec t the des ired nu mber.
(4) Pr ess PRO GRAM bu tton to s ave that s tatio n.
(5) R epeat st eps (1) t o (4) pro cedure s for oth er stat ions.
3.Af ter end o f progr am. pre ss PRE- UP or PRE -DN to sta rt pla y the fre quenc y that yo u selec ted.
4.
5.Ex tend TE LESCOP IC ANTE NNA to it s full le ngth if y ou are lis tenin g to FM bro adcas ting.
6.Tur n off the r adio by p ress FU NCTI ON butto n selec t othe r mode or p ress pow er butt on to off t he unit .
7.Sw itch on a gain af ter shu t down, th e memor y frequ ency s till ex ists.
Pres s butt on mode
Pres s the pla y/pau se butto n enter t he auto matic c hanne l
mode , and to be p ut auto matic ally se ts.
Pres s [VOL- ]or [V OL +] to ad just th e volum e.
Pres s
scan
PRO GRAM ME THOD
(1)
-The PR G icon an d P01 wil l blink a t 2 sec. Thi s prompt s the use r to ente r the fir st song s in the
prog ram PLAY li st.
(2) the us er can se lect t he desi re track s by usin g keys .
Once t hese ke ys are pr essed, t he Disp lay wil l show th e selec ted tra ck.
1.Af ter selec t the desire d track, pre ss [PROGR AM] key again a nd it will be stor ed in the memor y.
Mp3 M aximu m 99 Ma ximum 2 0 tracks c an be pro gramm ed when R epeat
step s (2) to (3 ) proce dures.
2.I f press th e [STOP ] key dur ing the p rogram m ode, th en the se lecte d TRACKs w ill be st ored
in the m emor y and ret urn to STO P mode (C ontinu ous Pla y mode)
3.I f press th e [PLAY ] key dur ing the p rogram m ode, it w ill sta rt the p rogram P LAY mode.
PLAY st art fro m P01 Track
Pres s the (PR OGRAM ) key at STO P mode, s ystem w ill go to PR OGRA M mode.
CD/U SB PROG RAM Pre- dn / Pre -up
and CD
Eras ing a pro gram
You can e rase the c onten t of the me mory by :
- While p layin g, pres s STOP but ton twi ce.
- Open ing the C D door
- Sel ect the o ther mo de.
、 、 .
To list en mus ic wit h a mp3 disc man walk man
1. Conn ect to th e AUX .
2. pres s func tion se lecto r to AUX, th e sound s ource o f the mp3
or dis cman or w alkm an will o utput f rom the un it.
- the vol ume con trol to a djust t he volum e.
-T he unit c an't c ontrol t he play er.
Pres s
USE AU X
USE I POD
To listen to your IPOD with Mp3 music files.
1.Conn ect to the IPOD .
2.Press func tion selector to IPOD/AUX to supply powe r and play IPOD.
-Press PLAY/PAUSE button to play or pause playback;
-Press STOP button to stop playback;
- BACK or NEXT to select tracks of the iPod;
- and hold on BACK or NEXT more than 1.5 sec to forward or backward
search fast intra track;
- REPEAT button to repeat 1 track or repeat all tracks of the iPod.
NOTE: BACK button once briefly to return to the beginnin g of the current track.
While using the IPOD, it cha rges through connec tion base.
Press
Press
Press
Press
RAD IO
Page 5

EN- 7
EN- 8
This C D-pl ayer can p lay Aud io Disc s,MP3 CD -R.
Do n ot t ry to play CD-R OM,CD i,VCD, DVD or
comp uter CD.
1.
、wi th the pr inted si de
faci ng up and p ress CD d oor gen tly to cl ose.
4Pre ss play /paus e on the se t to star t playb ack.
5.
note : CD/MP 3 play wi ll also s top whe n:
-you o pen the c d compa rtmen t;
-you s elect r adio so und sou rce;
-the C D/MP3 h as reac hed to th e end.
sele ctin g a differ ent tra ck.
dur ing play back yo u can use b ack or ne xt to
sele ct a par ticul ar trac k.
If you h ave sel ected a t rack nu mber in t he
stop o r pause p ositi on, pre ss play t o start
play back .
nex t once br iefly f or the ne xt trac k,
or pre ss repe atedl y until t he desi red trac k
numb er appe ars in th e displ ay.
bac k once br iefly t o retur n to the
begi nning o f a curre nt trac k.
bac k more th an once b riefl y for a
prev ious tr ack.
find ing a pas sage wi thin a tr ack
1. a nd hold d own bac k or next .
The CD is p layed a t high sp eed.
2.Wh en you re cogni ze the pas sage yo u want
rele ase bac k or next .
nor mal play back re sumes .
diff erent p lay mod es:rep eat
repe at-pl ay the cu rrent t rack con tinuo usly.
repe at all- plays t he enti re cd cont inuou sly.
play ing tra cks in ra ndom or der aft er pres s
the ra ndom bu tton, t he trac ks will b e playe d
in ran dom ord er.
Pres s funct ion but ton to CD s tate.
2.To op en the cd d oor, pres s cd open b utton .
3.I nsert a M P3/CD o r CD-R
Pres s the pau se butt on to pau se play, pr ess
the pl ay butt on back p layin g.
6.To st op CD play back , pr ess sto p.
Pres s
Pres s
Pres s
Pres s
CD/MP3 PLAYER
CD/ MP3 Play er
Play ing a CD/ MP3
Note: at the mode of CD/M P3/USB ,the lcd will
display the num ber of song or the song playing tim e.
If at the mode of ipod/a ux, the lcd will display the
symbol of ipod (au x),or the unit time.
-The un it don' t su ppor t the HDD a ll and th e
por tion us b with mp 3 playe r.
USB Au dio fun ction s
1)Pr ess fun ction b utton o r stop us b butto n to
choo se the us b state .
2) PLAY /PAUSE
3) NEX T, BACK Sk ip sear ch
4) Pro gram Track (MP3 99 Tra ck CD 20 Trac k )
5) MODE : n ormal ->rep eat 1-> repea t all->
->no rmal
6) Ma ximum Fo lder : 99 Fo lders
7) Ma ximum Fi le : 999 Fil es
*Not ice :
-Whe n the uni t has not t he disc ,ins erti ng the
usb ca rd will a utoma tical ly read U SB card,
it rea d the USB f irst wh ile hav ing the U SB.
REPE AT
repe at albu m
Play ing a USB
Whe n the uni t idle on C D or USB mo de over 10
min . Then the u nit wil l switch to the Power O ff
Ala rm mode a utomatically. At Power Off Alar m
mod e, the unit will ale rt you to s witch o ff the
uni t by 10 sec. “Beep” sound and p eriodic ally
by ever y 10 min. for savi ng energy.”
POW ER OFF AL ARM
Keys : PRDN/ PRUP le t you sur f betw een
fold ers. On ly in USB /CD.
Prec autio n & Gener al Main tenan ce
•Plac e the set o n a hard an d flat su rfac e so that th e
syst em does n ot tilt .
•Do no t expos e the set , batter ies or CD s to humi dity,
rain , sand or e xcess ive hea t cause d by heati ng
equ ipmen t or direc t sunl ight.
•Do no t cover th e set. Ade quate v entil ation w ith
a min imum ga p of 6 bet ween the
vent ilati on hole s and sur round ing sur face s is
nece ssar y to preve nt heat b uild- up.
cent imete rs
•The me chani cal par ts of th e set con tain se lf lub ricat ing bea rings a nd must n ot be oil ed or
lub ricate d.
•To clea n the set ,use a so ft dry c loth. Do not us e any
cle aning a gents co ntain ing alc ohol, a mmoni a,
ben zene or ab rasiv es as the se may ha rm the ho using .
•The le ns of the C D playe r shoul d never b e touch ed!
•Sud den cha nges in t he surro undin g tempe ratur e can cau se cond ensat ion to for m and the
len sof your C D playe r to clou d over.Pl aying a C D is then n ot poss ible. Do not at tempt to
cle an the le ns but le ave the se t in a warm e nviro nment u ntil the m oistu re evap orate s.
•Alwa ys clos e the CD do or to kee p the CD co mpart ment du st-fr dd. To clean , dust th e
comp artm ent wit h a soft dr y clot h.
•
To clea n the CD, wi pe in a str aight l ine fro m the cent re towa rds the e dge usi ng a soft ,
lin t-free c loth. D o not use c leani ng agen ts as the y may dam age the d isc.
•Neve r write o n a CD or att ach any s ticke rs to it.
It is n ecess ary to cl ean you r CD lens a fter so me use. U se a CD len s clean ing set ( not inc luded )
This wi ll help t he unit t o recog nize th e Audio CD , MP3 CD' s.
Note : Sytec h will no t be resp onsib le for a po or maint enanc e of the Op tical l ens.
CD pl ayer and C D handi ng
MAINTENANCE & SAFETY
Page 6

EN- 9
EN- 10
Ins ert a CD, MP3, CD -R.
No CD /MP3 in serte d
CD/ MP3/ USB p layba ck does n ot work
CD/ MP3/ USB b adly sc ratche d/dir ty
Rep lace/ clean C D/MP3 /USB
(se e maint enanc e)
The CD /MP3 sk ips tra cks
CD/ MP3 dam aged or d irty
Rep lace or cl ean CD/ MP3
- CD- R、is b lank or t he disc i s
not f inali zed
Use a f inali zed CD- R.
TECHNICAL SPECIFICATIONS
GEN ERAL
Powe r Requi rement . ..... ..... ..... ..... ..... ..... ..... ..... ..... ..... ..... ..... ..... ..... ..... ..... ..... AC :110 /220V ~50/6 0Hz
Powe r consum ption . ..... ..... ..... ..... ..... ..... ..... ..... ..... ..... ..... ..... ..... ..... ..... ..... ..... ..... ..... ..... ..AC 13 .5 Watts
Dim ensio ns.... ..... ..... ..... ..... ..... ..... ..... ..... ..... ..... ..... ..... ..... Appro .215 x mm(L) 208x mm (W ) 113x mm (H)
Ope ration t emper ature ..... ..... ..... ..... ..... ..... ..... ..... ..... ..... ..... ..... ..... ..... ..... ..... ..... ..... ..... ..... +5 ℃ - +35℃
REC EIVER S ECTIO N
Rec eivin g Bands. ..... ..... ..... ..... ..... ..... ..... ..... ..... ..... ..... ..... ..... ..... ..... ..... ..... ..... ..... ..... ..... ..... ..... ..... FM ST.
Tuni ng Rang e.... ..... ..... ..... ..... ..... ..... ..... ..... ..... ..... ..... ..... ..... ..... ..... ..... ..... ..... ..... ..... ... FM:8 7.5-1 08MHz
COMPAC T DISC SE CTIO N
Opt ical Pic kup.. ..... ..... ..... ..... ..... ..... ..... ..... ..... ..... ..... ..... ..... ..... ..... ..... ..... ..... ..... ..... . .3-Be am Lase r
Freq uency R espon se... ..... ..... ..... ..... ..... ..... ..... ..... ..... ..... ..... ..... ..... ..... ..... ..... ..... ....1 00Hz - 16 KH z
AUDI O SECT ION
Powe r outpu t ..... ..... ..... ..... ..... ..... ..... ..... ..... ..... ..... ..... ..... ..... ..... ..... ..... ..... ..... ..... Maxim um 1 Watt x 2
Hea dphon e Imped ance .. ..... ..... ..... ..... ..... ..... ..... ..... ..... ..... ..... ..... ..... ..... ..... ..... ...4 ~ 32 O hms
ACCE SSORI ES
Ins truct ion Boo klet ..... ..... ..... ..... ..... ..... ..... ..... ..... ..... ..... ..... ..... ..... ..... ..... ..... ..... ..... ..1
Ac lin e cord. ..... ..... ..... ..... ..... ..... ..... ..... ..... ..... ..... ..... ..... ..... ..... ..... ..... ..... ..... ..... ..... ..... .1
-Pow er cord no t secur ely con neted
No di sc indi catio n
Conn ect th e AC POWER c ord pro perly
TROUBLESHOOTING
Troub lesho oting
If a fa ult occ urs,fi rst che ck the po ints li sted be low bef ore tak ing the s et for rep air.
Do no t open th e set as th ere is a ri sk of ele ctric s hock.
If yo u are unab le to rem edy a pro blem by fo llowi ng thes e hints ,cons ult your d ealer o r serv ice
cent er.
WARNI NG: Und er no cir cumst ances s hould y ou try to r epair t he set yo ursel f,as
thi s will inv alida te the wa rrant y.
-Pro blem
·Sol ution
No sou nd /pow er
-Vol ume not a djust ed
·Adju st the VOLU ME
-Ba tteri es dead /incor rect ly inse rted
·Ins ert(f resh) batte ries co rrect ly
Dis play do es not fu nctio n prope rly/N O
reac tion t o operat ion of an y of the co ntrol s
-El ectro stati c disch arge
·
aft er a few sec onds
Swit ch off an d unplu g the set .Reco nnect
-CD b adly sc ratch ed or dir ty
·Repl ace/ cl ean CD. see Mai ntenan ce
-La ser len s steam ed up
·
temp eratu re
Wait un til len s has adj usted t o room
-Pro gram is a ctive
·Quit P rogra m mode( s)
Env ironme ntal in forma tion
We ha ve d on e our b est to re duce th e packa ging an d make it e asy to se parat e into 3 ma teria ls:
car dboar d,pap er pulp a nd expa ndabl e polye thyle ne.
Your s et co nsist s of mate rials w hich ca n be recy cled if d isass emble d by a spec ializ ed comp any.
Ple ase obs erve th e local r egula tions r egard ing the d ispos al of pac kagin g,dea d batte ries an d
old e quipm ent.
Page 7
Warrant y condi tions
-The warran ty of thi s produ ct is for 2 years si nce the p urchase date.
-The warranty w ill exclude br eakdowns cau sed by ba d use of th e product,
wrong instal latio n or inst allation in not de sirab le places fo r a prope r
mai ntenance of th e produ ct, rips, update s of the products that are not th e
sup plied by the brand, piece s wore away for its use o r for not domest ic or
ina ppropriate u se. Also are excluded b reakdowns ca used for manipul ation s
of th e products by peop le or com panie s alien to our com pany.
Correct disposal of this Product
(Waste Electrical & Electronic Equipment(WEEE)
Your product is designed and manufactured with high quality materials and
components which can be recycled and reused.
This symbol means that electrical and electronic equipment, at their endof-life should be disposed of separately from your household waste.
Please dispose of this equipment at your local community waste collection/
recycling centre.
In the European Union there are separate collection systems for used
electrical and electronic products.Please help us to conserve the
environment we live in!
EN- 11
Page 8

Mp3
Mp3
MANUAL DE INSTRUCCIONES
RAD IO FM ESTÉ REO COM S INTONI ZACIÓ N PLL
CD/ MP3/AU X /USB/ IPOD
CRUD 386i
LECTOR DE CD/RADIO PORTÁTIL
Page 9

P
ar
a e
l c
l
ie
n
te
I
n
tro
du
z
c
a e
l n.º d e s
er
ie s
i
t
u
a
d
o en l
a
par
t
e inf
eri
o
r de
l a
r
mar i
o. Gu
a
r
d
e e
s
ta
i
n
f
or
mac ió
n par
a fu
tur
as co
n
sul
t
a
s
.
N.
º Mo
d
e
l
o:
N.
º Ser ie
:
ES- 2
PREPARACIÓN PARA LA UTILIZACIÓN
Des embal ar y conf igurar
* Ret ire cuid adosa mente l a unida d de la caj a de pres entac ión y ret ire todo e l mater ial de la u nidad .
* Ret ire cual quier e tique ta desc ript iva que se p uedan e ncont rar en la p arte f rontal o s uperi or del ar mario
de la u nidad. N o retir e ningu na etiq ueta lo caliz ada en la p arte tr asera o i nferi or del
arm ario de l a unida d.
* Puls e el botó n ABRIR p uert a de CD par a abrir l a puert a del com part imento d e CD. En el co mpar timen to
del C D hay un car tón bl anco qu e impid e que la ra nura del C D se muev a duran te el tra nspor te del
prod ucto. R etire e se cart ón del co mpar timen to del CD an tes de us arlo.
Uso de cor rient e CA
1. Compruebe s i la tensión de alim entac ión, in dicad a en la pla ca de
esp ecifi cacio nes sit uada en l a parte inf erior d el conjunto, corr espon de a su
fue nte de aliment ación C A local. Si no es así, consulte c on su revended or o
centro de as isten cia.
2. Conecte el ca ble de al iment ación a l a entrada de la to ma CA y al
enc hufe de pared. La fuent e de alim entación está co nectada y l ista pa ra
su us o.
3. Para de scone ctar por completo el aparat o, desench úfelo.
·Des enchu fe el aparato pa ra protege rlo durante grandes tor menta s.
Pil as (no in cluid as)
Abra el comp artimento d e las pil as e introduzc a seis pi las, tipo LR14 ,
UM- 2 o C, (pre ferentem ente alcalin as) res petan do la pol arida d según
ind ican lo s símbo los “+” y “-” en el inter ior del compartimento
RISCO DE D ESCAR GA ELÉC TRICA
NO ABRIR
Fuen te de ali menta ción
Las p ilas co ntienen sust ancia s quími cas, po r eso deb erán elimi narse
ade cuada mente.
Una u tiliz ación i ncorrecta de las pil as pued e producir una fug a de elec tróli tos
que c orroerá el com partimento o hará ex plota r las pil as. Por ta nto:
No me zcle tipos de pila s: por ej emplo, alcal inas y de z inc-carbo no. Utilice so lo
pil as del mi smo tip o para el a parato.
·Cuando ponga p ilas nu evas, no mezcl e pilas v iejas con nuevas.
Si no v a a utili zar el ap arato durante un larg o perio do de tie mpo, quite l as pila s.
·
PROD UCTO LÁ SER
DE CL ASE 1
ES- 1
Fa mil i ar í ce s e con e sto s
símbolos de seguridad
CUIDADO : PARA RED UCIR EL R IESGO D E DESCA RGA ELÉ CTRI CA, NO
QUITE LA C UBIER TA (NI LA PART E TRASER A). NO EX ISTEN P IEZAS
REPARAB LES POR E L USUARI O EN EL INT ERIOR . LAS REPAR ACION ES
DEBE REA LIZAR LAS PER SONAL TÉ CNICO CUA LIFI CADO.
CUIDADO
1.NO co loque o bjeto s encim a del
apar ato por que pod rían ra yarlo.
2.NO ex ponga e l apara to a ento rnos
suci os o polv orien tos.
3. NO co loque e l apara to en una
supe rfic ie desi gual o in estab le.
4.NO in trodu zca nin gún obj eto
ext raño en e l aparat o.
5.NO ex ponga e l apara to a un cam po
magn ético o e léctr ico fue rte.
6.NO ex ponga e l apara to
dire ctame nte a la lu z del sol p orque
podr ía daña rlo.M antén galo ap artad o
de sup erfi cies ca lient es.
7.NO gu arde el a parat o a tempe ratura s
supe riore s a los 40 ºC ( 104 ºF) . La
temp eratu ra inte rna de fu ncion amien to
de est e apara to es de 20 ° C (68 °F) a 6 0 °C
(14 0 °F).
8.NO ut ilice e l apara to bajo l a lluvi a.
9.Con sulte c on su ayu ntami ento o
vend edor pa ra sabe r cómo el imina r de
form a corre cta los a parat os elec tróni cos.
10.El a parat o y el adap tador p ueden
prod ucir al go de cal or dura nte el
func ionam iento n ormal d e la carg a.Para
evit ar la inc omodi dad o un da ño debi do a la
expo sició n al calo r NO deje e l apara to en su
rega zo.
11.CA PACIDAD D E LA POTEN CIA DE
ENTR ADA: Véas e la etiq ueta de l apara to y
aseg úrese d e que el ad aptad or de pot encia
corr espon de a la cap acida d. Util ice úni ca
ment e los acc esori os espe cific ados po r el
fabr icant e.
12.L impie e l apara to con un p año
suav e. Si fue ra neces ario,
hume dezca l igera mente e l paño an tes de li m
piar. N o utili ce nunc a mezcl as abra sivas o
prod uctos d e limpi eza.
13.Ap ague si empre e l apara to para
inst alar o qu itar di sposi tivos e xtern os
que no a guant en la con exión e n calie nte.
14.D escone cte el a parato d e la toma
de cor rient e eléc trica y a págue lo antes
de lim piarl o.
15.NO d esmon te el apa rato. Só lo un
técn ico de se rvic io auto rizad o debe
real izar la s repar acion es.
16. El a parat o tiene a pert uras par a liber ar calo r.
NO blo quee la v entil ación d el
apar ato, el ap arato p uede ca lenta rse y
come nzar a fu ncion ar mal.
17.R iesgo d e explo sión en c aso de su stitu ción
de la ba tería p or otra d e untip o incor recto. Ti re
las ba tería s usada s sigui endo la s instr uccio nes.
18.EQ UIPAMIE NTO ENC HUFABLE : el ench ufe
debe e star in stala do cerc a del equ ipo y ten er
un acc eso fác il.
ES- 1
Page 10

ES- 3
ES- 4
1
1
2
3
4
5
6
7
8
9
10
11
12
13
14
15
16
17
18
19
1. ALTAVOZ IZ QUIER DO Y DEREC HO
2. BOTÓ N REPE TIR
3. CLAV IJA USB
4. BOTÓ N EQ
5. SEL ECCIO NAR FUN CIÓN
6. BOTÓ N PROGR AMA
7. CLAV IJA IPO D
8. PANTAL LA LCD
9. BOTÓ N PLAY/PAUS E
10. BO TÓN ABRI R/CER RAR PUE RTA CD
11. BO TÃO STOP
12. BO TÃO SEGUI NTE
13. BO TÃO ANTER IOR
14. TOM ADA AC
15. AN TENA FM
16. FI CHA AUX
17. FI CHA DE AU SCULTADOR ES
18. BO TÃO VOLUME +
19. BO TÃO VOLUME -
1. ALTAVOZ IZQ UIERD O Y DERECH O
2. BOTÓ N REPET IR
- Rep etir una p ista pr ogram ada de CD /MP3/ USB/I POD.
- Mod o de repet ición : norma l->re petir 1 ->rep etir to das->
repe tir álb um ->no rmal
3. CLAV IJA USB
- Para e scuch ar su dis posit ivo de mem oria f lash US B con
arch ivos Mp 3.
4. BOTÓ N EQ
- Puls e el botó n para ca mbiar e l estil o de músi ca EQ de
CD/M P3/US B/IPO D/RA DIO.
- Dura nte la re produ cción d e la músic a, puls e este bo tón
para s elecc ionar c lásic a-roc k-pop ular- jazz- FLR.
5. SEL ECCIO NAR FUN CIÓN
- Sel eccion ar la fue nte de so nido CD /USB/ I POD(AU X)
/RA DIO.
6. BOTÓ N PROGR AMA
- Prog ramar y re visar l os núme ros de pi stas pr ogram adas.
- Dura nte el fu ncion amien to, puls e este bo tón en CD /MP3
/USB /RAD IO para la p rogra mació n.
7. CLAV IJA IPO D
- Escu char su I POD con a rchiv os de mús ica Mp3 .
8. PANTAL LA LCD
- Mos trar la fr ecuen cia del d ial FM.
- Mos trar el nú mero de p istas .
9. BOTÓ N PLAY/PAUSE
- Ini ciar o pa usar la re produ cción d e MP3/C D/USB /IPOD.
- En el mo do radi o, puls e el botó n play/p ause pa ra acce der
al mod o de busc a autom ática d e canal es.
10. BO TÓN ABRI R/CER RAR PUE RTA CD
- Puls e aquí pa ra abri r/cer rar la pu erta de l CD.
11. BO TÓN STOP
- Para r la repro ducci ón de CD/ MP3/U SB/IP OD. Borr ar un
prog rama de l CD.
12. BO TÓN SIGU IENTE
- Sel eccion ar pist a SIGUI ENTE.
- Mant enga pu lsado d urant e más de 1, 5 segun dos par a
avan zar den tro de la p ista.
- En el mo do radi o, al pul sar SIG UIENT E entrar á en el lím ite
supe rior de l modo de b úsque da manu al de can al.
13. BOT ÓN ANTER IOR
- Sele ccion ar pist a ANTERI OR.
- Mant enga pu lsado d urante m ás de 1,5 s egundo s
para r etroce der den tro de la pi sta.
- En el mo do radi o, pulsa ndo ANT ERIOR en trará e n el
lími te infe rior del m odo de bú squed a manua l de
cana l.
14. TOMA C A
- Entr ada par a el cable d e alime ntaci ón.
15. AN TENA FM
- Para me jorar l a recepc ión de FM .
16. CL AVIJA AUX
- Puls e el botón F UNCIÓ N, sele ccion e la estac ión
AUX. R eprodu cir MP3 , DISCMA N, WALKMA N en la
entr ada AUX.
inse rtar c uando no h ay disc o.
NOTA: Por f avor, ret ire el dis co CD.
17. CL AVIJA DE AU RICULA RES
- clav ija de au ricul ares est éreo de 3, 5 mm.
18. BOT ÓN VOLUMEN +
19. BOT ÓN VOLUMEN -
20. BOT ÓN PRE-D N
- En el mo do radi o, pulse e l botón P RE-DN pa ra
sele ccion ar el can al anter ior.
- En el mo do mp3, p ulse el b otón PRE -DN par a
acce der a la ca rpeta a nterio r.
21. BOT ÓN PRE-U P
- En el mo do radi o, pulse e l botón P RE-UP pa ra
sele ccion ar el can al sigui ente.
- En el mo do mp3, p ulse el b otón PRE -UP par a
acce der a la ca rpeta s iguien te.
22. PU ERTA DE LAS P ILAS
- Para ab rir el co mpart iment o de las pi las.
23. IN TERRU PTOR DE EN CENDI DO
- Para co ntrol ar el ence ndido /apag ado de la f uente
eléc trica d e la unid ad.
1
20
21
22
23
20. BO TÓN PRE- DN
21. BO TÓN PRE- UP
22. PU ERTA DE LA S PILAS
23. IN TERRU PTOR DE E NCEND IDO
ON
OFF
Inglés
CONTROLES
FUENTE DE ALIMENTACIÓN
Pan eles su perio r y fronta l (Ver )
Page 11

ES- 6
ES- 5
Rece pción d e la radi o
1. Pul se el bot ón FUNC IÓN y sel eccio ne el mod o RADIO.
2. Sin tonic e la emis ora des eada pu lsand o ANTER IOR/T UNE DN o SI GUIEN TE/TU NE UP
Sint oniza ción ma nual: P ulse AN TERIO R o SIGUI ENTE y su elte en un 1 s eg.
Sint oniza ción au tomát ica: Pu lse el bo tón play /paus e para ac ceder a l modo de b úsque da auto mátic a de cana les y
para d efini r autom ática mente .
Pred efini r Canal : (FM 30 mem orias p redef inida s)
(1) Pr ima ANT ERIOR /TUNE -DN o SIG UIENT E/TUN E-UP pa ra sele ccion ar la emi sora de seada .
(2) Pu lse el bo tón PRO GRAMA u na vez. E l indic ador de n úmero de l a MEMOR IA perm anece f ijo en la p antal la.
(3) Pu lse los b otone s PRESE T-UP o PRE SET DOW N para se lecci onar el n úmero d esead o.
(4) Pu lse el bo tón PRO GRAMA p ara gua rdar est a emiso ra.
(5) R epita l os pasos ( 1) a (4) pa ra otra s emiso ras.
3. Tras fi naliz ar la pro grama ción, p ulse PR E-UP o PR E-DN pa ra comen zar a rep roduc ir la fre cuenc ia sele ccion ada.
4. Pul se [VO L-] o [VO L +] para a justa r el volu men.
5. Ex tiend a la ANTE NA TELES CÓPICA p or comp leto en c aso de qu e esté es cucha ndo una e misor a FM.
6. De sconec te la rad io puls ando el b otón FU NCIÓN p ara sel eccio nar otr o modo o pu lse el bo tón para a pagar l a
unid ad.
7. Cua ndo se en ciend e el apar ato, la fr ecuen cia de la m emori a todav ía se man tiene.
MÉTODO DE PROGRAMACIÓN
(1) Pu lse la te cla (PR OGRAM A) en el mo do STOP, el sis tema pas ará par a al modo P ROGRA MA.
- El ico no PRG y P0 1 parpa deará c ada 2 seg . Enton ces el us uario p uede in troduc ir las pr imera s canci ones en l a lista
de rep roduc ción de l progra ma.
(2) PR OGRAM A CD/US B, el usu ario pu ede sel eccio nar las p istas d esead as util izand o las tec las Pre -dn/P re-up ..
Una ve z pulsa das est as tecl as, el vi sor mos trará l a pista s elecci onada .
1. De spués de s elecc ionar l a pista d esead a, puls e la tecl a [PROG RAMA] d e nuevo y s e guarda rá en la me moria .
Con lo s pasos d e repet ición ( 2) y (3) se p ueden p rogram ar un máx imo de 99 p istas d e MP3 y un má ximo de 2 0
pist as de CD.
2. Si pu lsa la te cla [ST OP] dura nte el mo do de pro grama ción, e ntonce s las PIS TAS sele cciona das se gu ardar án en la
memo ria y se vo lverá a l modo STO P (modo d e repro ducci ón conti nua)
3. Si pu lsa la te cla [PL AY] dur ante el mo do de pro grama ción, c omien za el mod o de repro ducci ón prog ramad a.
Ini cio de la re produ cción a p arti r de la pis ta P01
Borr ar un pro grama
Pued e borra r el cont enido d e la memo ria:
- Dura nte la re produ cción, p ulse el b otón ST OP dos vec es.
- Abri r la puer ta del C D
- Sel eccion ar otro m odo.
Para e scuch ar músi ca con un m p3, dis cman, wa lkma n.
1. Con ecte a AU X.
2. Se leccio ne la fun ción AU X, la fue nte de son ido del m p3 o disc man o wal kman s erá repr oduci do por la
unid ad.
- Puls e el cont rol de vol umen pa ra ajus tar o vol umen.
- La uni dad no pu ede con trola r el lect or.
USAR AUX
USAR EL IPOD
Para e scuch ar músi ca en arch ivo Mp3 e n su IPOD .
1. Con ecte al I POD.
2. Pul se el sel ector d e la func ión IPO D/AUX p ara cone ctar l a corri ente y par a la repr oducc ión del I POD.
- Puls e el botó n PLAY/PAUSE p ara la re produ cción o p ara una p ausa;
- Puls e el botó n STOP par a inter rumpi r la repr oducci ón;
- Puls e ANTER IOR o SIG UIENT E para se lecci onar pi stas de l iPod;
- Puls e y mante nga pre siona do ANTE RIOR o SI GUIEN TE más de 1 ,5 segu ndos pa ra avanz ar o retr ocede r dentro d e la pist a;
- Puls e el botó n REPET IR para r epeti r 1 pista o r epeti r todas l as pist as del iPo d.
NOTA: Pu lse el bo tón ANT ERIOR u na vez bre vemen te para re gresa r al inic io de la pi sta act ual.
Dura nte el us o del IPO D, este se c arga a tr avés de la b ase de co nexió n.
RAD IO
Page 12

ES- 7
ES- 8
·
·
·
·
→
Este l ector d e CD pued e repro ducir d iscos d e audio,
MP3 CD -R.
No int ente re produc ir CD- ROM, CD i, VCD, DVD o C D de
comp utado r.
1. Pul se el bot ón de la fu nción p ara obt ener el e stado
del CD .
2. Par a abrir l a tapa de l cd, puls e el botó n de abri r cd.
3. In troduz ca un MP3 /CD o CD- R, con el l ado imp reso
haci a arri ba y tape s uaveme nte.
4. Pul se play /paus e para in iciar l a reprod ucció n.
5. Pul se el bot ón de pau sa para p ausar l a reprod ucció n,
puls e el botó n de play p ara con tinua r la repro ducci ón.
6. Par a parar l a reprod ucció n del CD, pu lse sto p.
nota : La repr oducc ión del C D/MP3 i rá a para r cuand o:
- abre e l compa rtim iento de l cd;
- sele ccion a la fuen te de son ido de ra dio;
- el CD/ MP3 ha fi naliz ado.
sele ccion ando un a pista d ifere nte.
dura nte la re produ cción, p uede us ar ante rior o
sigu iente p ara esc oger un a deter minad a pista .
Se sele ccion ó un núme ro de pis ta en la po sició n de
para da o paus a, puls e play pa ra inic iar la re produc ción.
Pulse s iguien te una ve z breve mente pa ra tene r la
pist a sigui ente, o r epeti damen te hasta q ue el núm ero
de la pi sta des eada ap arezc a en la pan talla .
Pulse a nterio r una vez b revem ente par a regre sar al
inic io de la pi sta ac tual.
Pulse a nterio r más de un a vez bre vemen te para ir a
la pis ta ante rior.
enco ntrar u n pasaj e dentr o de una pi sta
1. Pul se y mant enga pr esion ado ante rior o si guien te.
El CD es r eprod ucido a a lta vel ocida d.
2. Cua ndo rec onoce e l pasaj e, suelt e el botó n de
ante rior o si guien te.
reini cia la rep roduc ción no rmal.
dife rente s modos d e reprod ucció n: Repe tir
repe tir - rep roduc e la pist a actua l conti nuame nte.
repe tir tod as - repr oduce to do el cd co ntinu ament e.
En la re produ cción d e pista s en orde n aleato rio
desp ués de pr esion ar el bot ón alea torio, l as pist as
será n repro ducid as en ord en aleat orio.
LECTOR CD/MP3
Rep roduc ir un CD/ MP3
- La unidad no sopor ta todos los HDD y la parte usb con
lector de mp3.
Nota: en el modo CD/M P3/USB, el lcd indicará el núm ero
de la canción o la canci ón que será reproducida en ese
momento.
Si está en el modo ipod/ aux, el lcd exhibirá el símbo lo de
ipod (aux), o la unida d de tiempo.
Func iones d e Audio US B
1) Pul se el bot ón de fun ción o el b otón pa rar usb p ara
esco ger el es tado de u sb.
2) REP RODUC IR/PAUS A
3) SIG UIENT E, ANTE RIOR Sa ltar bú squed a
4) Pis ta Progr amada ( 99 pist as MP3 y 20 p istas C D)
5) MOD O REPE TICIÓ N: norm al->r epeti r 1->rep etir
toda s-> rep etir ál bum ->n ormal
6) Can tidad M áxima d e Carpe tas: 99 C arpet as
7) Can tidad M áxima d e Fiche ros: 999 F icher os
*Avi so:
- Cuan do la uni dad no ti ene el di sco, int roduc iendo l a
tarj eta usb l eerá au tomát icame nte la ta rjeta U SB,
leye ndo el US B prime ro al col ocar el U SB..
Rep roduc ir un USB
Cuando la unid ad qued a parada en modo
CD o US B durante más de 1 0 min, la
uni dad pas ará entonces p ara el mo do de
Ala rma de Ap agado a utomáticamente.
En el m odo de Al arma de A pagad o, la
uni dad le al ertará para apagar el ap arato
a través de un s onido “Bi p” de 10 seg. y,
per iódic ament e, cada 10 min. pa ra
aho rrar en ergía.”
ALA RMA DE APAG ADO
Tecla s: PRDN /PRUP l e permi te naveg ar entr e las
car petas. A penas e n USB/C D.
Pre cauci ones y Ma ntenim iento G enera l
• Colo que el ap arato s obre un a super ficie d ura y pla na, de
modo a q ue no se in cline .
No exp onga el a parat o, pilas o C Ds a la hum edad, l luvia ,
aren a o calor e xcesi vo causa do por eq uipos d e
cale ntami ento o lu z solar d irect a.
No cub ra el apa rato. Es n ecesa ria una v entil ación
adec uada co n una sep araci ón míni ma de 6cm e ntre os
huec os de ven tilac ión y las s uper ficie s cercan as para e vitar
la acu mulac ión de ca lor.
Las pi ezas me cánic as del ap arato c ontie ne arro llado s auto
lubr icant es y no deb en ser lu brica dos ni se l es debe c oloca r
acei te.
Para l impia r el apar ato, uti lice un p año suav e y seco. No
use ag entes d e limpi eza que c onten gan alc ohol, am oniac o,
benz ina o abr asivo s ya que pu eden da ñar la es truct ura
ext erior.
•
•
•
•
•
•
•
•
•
Nunc a deber á tocar e n el lent e del lec tor de CD !
Los ca mbios b rusco s de temp eratu ra ambie nte pue den cau sar la fo rmaci ón de con densa ción y el l ente de l lecto r
de CD po drá emp añars e. En ese c aso no es p osibl e repro ducir un C D. No lim pie el le nte, dej e el apar ato en un
ambi ente cá lido ha sta que l a humed ad se eva pore.
Cier re siem pre la ta pa del CD p ara man tener e l compar timi ento de l CD sin po lvo. Para l impia r, limpi e el
comp arti mient o con un pañ o suave y s eco.
Para l impia r el CD, lim pie en lí nea rec ta a part ir del ce ntro ha cia el bo rde con u n paño su ave y sin pe los. No u se
agen tes de li mpiez a pues pu eden da ñar el di sco.
Nunc a escri ba en un CD n i ponga p egati nas o adh esivo s.
Es nec esari o limpi ar el len te del CD d espué s de algú n uso. Use u n conju nto de li mpiez a de lent es de CD
(no in cluid o).
Eso ay udar a la u nidad a r econo cer el CD Au dio, CD s de MP3.
Nota : Sytec h no se resp onsa biliz a por un ma l manten imien to del Le nte ópt ica.
Lec tor de CD y u so del CD
Lec tor CD/ MP3
MANTENIMIENTO Y SEGURIDAD
Page 13

ES- 9
ES- 10
La rep roduc ción de C D/MP3 /USB no f uncio na
- CD/M P3/US B rayad o/suc io
Sust ituir o l impia r el CD/M P3/US B
(con sulte m anten imient o)
El CD/ MP3 sal ta pist as
- CD/M P3 daña do o suci o
Sust ituir o l impia r el CD/M P3
- CD- R en blan co o el dis co no está f inali zado
Use un C D-R fi naliz ado.
ESPECIFICACIONES TÉCNICAS
GEN ERALE S
Req uisit os de Pote ncia
Cons umo de en ergía
Dim ensio nes Apr. 21 5x mm(L )208x m m(A) 11 3x mm(A)
Tempe ratur a de func ionam iento
SECC IÓN REC EPTOR
Ban das rece pcion adas
Alc ance de Si ntoni zació n
SECC IÓN DE DI SCO COMPAC TO
Ban das de rec epció n
Frec uenci a de resp uesta
SECC IÓN AUDI O
Pote ncia de s alida
Imp edanc ia de los A udífon os
ACCE SORIO S
Man ual de In struc cione s
Cabl e de líne a AC
... ..... ..... ..... ..... ..... ..... ..... ..... ..... ..... .. .AC : 110/2 20V~5 0/60H z
... ..... ..... ..... ..... ..... ..... ..... ..... ..... ..... .. ... ...AC 1 3.5 Watt s
... ..... ..... ..... ..... ..... ..... ..... ..... ...
... ..... ..... ..... ..... ..... ..... ..... ..... ..... ..... .. .+5 ℃ - + 35℃
... ..... ..... ..... ..... ..... ..... ..... ..... ..... ..... .. ... ..... ....F M ST.
... ..... ..... ..... ..... ..... ..... ..... ..... ..... ..... .. .. FM: 87.5- 108MH z
... ..... ..... ..... ..... ..... ..... ..... ..... ..... ..... ..... ..... ..... .. .3-B eam Las er
... ..... ..... ..... ..... ..... ..... ..... ..... ..... ..... ..... ...10 0Hz - 16K Hz
... ..... ..... ..... ..... ..... ..... ..... ..... ..... ..... ..... ..... ..... ...Ma ximum 1 Wat t x 2
... ..... ..... ..... ..... ..... ..... ..... ..... ..... ..... ..... ..4 ~ 32 Oh ms
... ..... ..... ..... ..... ..... ..... ..... ..... ..... ..... ..... ..... ..... .1
... ..... ..... ..... ..... ..... ..... ..... ..... ..... ..... ..... ..... ..... .1
Ind icaci ón de que n o tiene d isco
SOLUCIÓN DE PROBLEMAS
Sol ución d e probl emas
Si ocu rre una a nomal ía, ver ifiqu e prime ro los pu ntos li stado s más aba jo antes d e lleva r el apar ato par a ]
repa ració n.
No abr a el apar ato pue s exist e el ries go de cho que elé ctric o.
Caso n o logre r esolve r un prob lema si guien do esta s suger encia s, consu lte su re vende dor o cen tro de
asis tenci a.
AVISO :Bajo ni nguna c ircun stanc ia debe i ntenta r repar ar el apa rato po r su inic iativ a, pues i nvalid ará
la gar antía .
- Prob lema
·Sol ución
Sin so nido/ corri ente
- El vol umen no e stá reg ulado
- El cab le de ali menta ción no e stá bie n conec tado
·Cone cte el ca ble de al iment ación C A corre ctame nte
- Pila s gasta s/ inco rrect ament e introd ucida s
·Int roduci r las pil as (nue vas) co rrect ament e
·Ajus tar el VOLU MEN
La pan talla n o funci ona cor recta mente / S in reac ción
a la ope ració n de algu no de los c ontro les
- Des carga el ectro státi ca
y ence nder de spués d e algun os segu ndos
·Apag ue y desc onect e el apar ato. Vuel va a cone ctar
- Nin gún CD/ MP3 ha si do intro ducid o
- El CD es tá raya do o suci o
·Subs tituy a/lim pie el CD , consul te Mant enimi ento
·Int roduzc a un CD, MP3 , CD-R .
Inf ormac ión amb iental
Nos es forza mos par a reduc ir el emb alaje y q ue sea fá cil de se parar e n 3 mater iales : cartó n, past a de pape l y
poli etile no expa ndibl e.
Su apa rato es c ompue sto por m ateri ales qu e puede n ser reci clado s una vez d esmon tados p or una em presa
espe ciali zada.
Por fa vor, teng a en cuen ta las re glame ntaci ones lo cales re feren tes a la el imina ción de l embal aje, pil as gast adas
y equi po anti guo.
- Lent e láser e mpaña do
·Espe re hast a que el le nte se aj uste a la
temp eratu ra ambi ente
- Prog rama es tá acti vo
·Sali r del (de l os) mo do(s) Pr ogram a
Page 14

Condiciones de Garantía
- Este equipo tiene garantía de 2 años a partir de la fecha original de compra.
- Serán exentas de la garantía las averías producidas por un uso incorrecto del aparato, mala
instalación o instalados en lugares inapropiados para su buena conservación, roturas,
actualizaciones de software que no sean los facilitados por la marca, piezas desgastadas por su
propio uso o por un uso no doméstico o inadecuado, así como, por manipulación por personas o
talleres ajenos a nuestra empresa.
- Para que la garantía tenga validez, se deberá adjuntar la factura o tíquet de caja que corrobore la
adquisición y fecha de venta de este producto.
ES- 11
Page 15

Mp3
Mp3
MANUEL D'INSTRUCTIONS
RAD IO FM STE REO AVEC SYNTO NISEU R PLL
CD/ MP3/AU X /USB/ IPOD
CRUD 386i
LECTEUR RADIO CD PORTABLE
Page 16

R
é
s
e
r
v
é à l'U
sa
g
e du C
lien
t
V
eu
il
le
z sa
i
sir c
i
-d
e
s
s
o
u
s l
e N
° de Sé
rie q
ui
fi
gur
e en b
as du b
oît i
er. Veuill
ez co ns
er
ver
cet te in
f
or
ma
t
i
on po
u
r un be
s
o
i
n ul
térieur
.
N° de M
o
d
e
:
N° d
e Série
:
FR- 2
PREPARATION D'UTILISATION
Déb allag e et confi gurat ion
* Veuil lez ret irer dé licate ment l' appar eil du ca rton d 'embal lage pu is reti rer tou s les élé ments d e
l'e mball a ge de l'a pparei l.
* Veuil lez ret irer to utes les é tique ttes de scrip tives q ui se tro uvent s ur le deva nt ou le ha ut du boî tier
de l' appar eil. Veui llez ne p as retir er les ét iquet tes qui s e trouv ent à l'a rrière o u sur le bo uton du
boî tier de l 'appa reil.
* App uyez sur l e bouto n d'OUV ERTUR E du comp arti ment CD p our l'o uvrir. Le c arto n blanc q ui se
tro uve à l'in térie ur du com part iment C D sert à év iter qu e le micr o CD ne bou ge pend ant le tra nspor t
de l' appar eil.
Veui llez re tirer ce c arto n du comp artim ent CD av ant tou te utili satio n.
Uti lisati on de l'a limen tatio n AC
1. Veui llez vé rifie r si la ten sion, t elle qu 'indi quée su r la plaq ue sign aléti que sit uée au ba s de
l'a ppare il corre spond b ien à l'a limen tatio n secte ur loca le.
Si te l n'est pa s le cas, v euill ez cont acter vo tre rev endeu r ou le ser vice ap rès-v ente.
2. Veui llez br anche r le cord on d'al iment ation de l 'entr ée de a pri se sect eur à la pr ise mur ale ;
l'a limen tatio n est alo rs branc hée et l' appar eil peu t fonct ionne r.
3. Pou r l'éte indre co mplèt ement , veuil lez déb ranch er le cord on de la pr ise mu rale.
·Déb ranch ez le cord on d'al iment ation d e la pris e mural e pour pr otége r votre ap parei l en
cas d 'orage .
Pile s (non fo urnie s)
Veui llez ou vrir le c ompar time nt pour pi les et in sérer s ix pile s, de typ e LR14, U M-2 ou Ce llule C ( de
pré férenc e Alcal ine) da ns le sen s de pola rité in diqué p ar les sy mbole s "+" et "- " à l'int érieu r du
com parti ment.
RISQU E DE DECH ARGE
ELEC TRIQU E NE PAS OUVR IR
CLA SSE 1
PRO DUIT LA SER
Ali mentat ion éle ctri que
Les pi les con tienn ent des s ubsta nces chi mique s et doiv ent don c être mi ses
au reb ut sépa rémen t.
Une m auvai se util isatio n des pil es peut p rovoq uer une f uite él ectro lytiq ue et end ommag er le
comp arti ment vo ire fair e explo ser les p iles. C 'est po urquoi :
·Veui llez ne p as méla nger le s types d e piles : Pa r exemp le des pi les alc aline a vec des p iles zi nc-ca rbone .
Veui llez n' utili ser que d es pile s de même t ype pou r cet app areil.
·Qua nd vous in sérez d e piles n euves , veille z à ne pas mé lange r les pil es usag ées ave c les neu ves.
Ret irez les p iles si l 'appa reil va r ester s ans uti lisat ion pen dant un e pério de prolo ngée.
FR- 1
Veui l lez r e ten i r ces
symboles de dang er
ATTENTION
ATTENTI ON : POUR L IMITE R LE RISQ UE DE DEC HARGE
ELECT RIQUE , VEUILL EZ NE PAS RET IRER LE CO UVERC LE (OUL E DOS
DE L'APPAREIL ). AUCUN E PIECE R EPARAB LE PAR L'UTIL ISATEUR
DANS L'APPARE IL. VEUI LLEZ FAIR E APPEL A DES TECH NICIE NS
QUALIF IES.
1.NE PAS me ttre d' objet s au-de ssus de
l'ap parei l, car ce s objet s peuve nt le
raye r.
2.NE PAS ex poser l 'appa reil à un
envi ronne ment sa le ou pou ssiér eux.
3.NE PAS pl acer l' appar eil sur u ne
sur face no n plane o u insta ble.
4.NE PAS in trodu ire d'o bjets é trang ers
dans l 'appa reil.
5.NE PAS ex poser l 'appa reil à un c hamp
magn étiqu e ou élec triq ue trop fo rt.
6.NE PAS ex poser l 'appa reil en p lein
sole il car vo us risq uez de l' endo
mmag er.Veui llez le m ainte nir élo igné
des so urces d e chale ur.
7.NE PAS la isser v otre ap parei l sous un e
temp ératu re supé rieur e à 40° C (10 4° F).
La tem pérat ure int erne de
fonc tionn ement d e cet app areil e st
comp rise en tre 20 °C ( 68 °F) et 6 0 °C
(140 °F ).
8.NE PAS ut ilise r cet app areil s ous la
plui e.
9.Veu illez vo us rens eigne r auprè s des
Auto rités L ocale s ou de votr e détai llant
conc ernan t la mise a u rebus d es
prod uits él ectro nique s.
10.L'ap parei l et l'ad aptat eur peu vent pro duire
de la ch aleur a u cours d 'un cha rgeme nt dans
des co nditi ons nor males .Afin d 'évit er toute
gêne o u bless ure due à u ne expo sitio n à la
chal eur, veu illez N E PAS laiss er l'ap parei l sur
vos ge noux.
11.PU ISSAN CE D'EN TREE Re port ez-vo us à
l'ét iquet te appo sée sur l 'appa reil et as sure zvous q ue l'ad aptat eur sec teur es t appro prié.
Veui llez ut ilise r uniqu ement l es acces soire s
spéc ifiés p ar le fab rican t.
12.Ne ttoye z l'app areil à l 'aide d 'un chi ffon
doux . Si néce ssair e, humi difie z légère ment
le chi ffon av ant de ne ttoyer. Veu illez n e
jama is util iser de p rodui ts abra sifs ou
nett oyant s.
13.Ve uille z toujou rs étei ndre l' appar eil
pour i nstal ler ou re tirer d es
pér iphér iques q ui ne sup porte nt pas le s
bran cheme nts à cha ud.
14.D ébranc hez l'a ppare il de la pr ise
élec triq ue et éte ignez -le avan t de le
nett oyer.
15.NE PAS d émont er l'ap parei l. Seul u n
tech nicie n quali fié est h abili té à effe ctuer l
es rép arati ons.
16. L'ap parei l est dot é d'ouve rtur es pour
disp erser l a chale ur.
NE PAS blo quer la v entil ation d e
l'ap parei l, sino n il risq ue de sur chauf fer
de don c de mal fo nctio nner.
17.R isque d 'explo sion si l a pile es t rempl acée
par un m odèle i nadap té. Déb arras sez-v ous
des pi les con formé ment au x instr uctio ns.
18.AP PAREIL EN FICHA BLE : La pr ise de
cour ant doi t être in stall ée près d e
l'ap parei l et doit ê tre fac ileme nt
acce ssibl e.
Page 17

FR- 3
FR- 4
1
1
2
3
4
5
6
7
8
9
10
11
12
13
14
15
16
17
18
19
1. HAU T-PARLEU R GAUCHE E T DROIT
2. BOU TON REP ETER
3. PRI SE USB
4. BOU TON EQ
5. SEL ECTI ON FONC TION
6. BOU TON PRO GRAMM E
7. PRI SE IPOD
8. AFF ICHAG E LCD
9. BOU TON LEC TURE/ PAU SE
10. BO UTON OU VERTU RE/ FER METUR E
DU COM PARTIME NT CD
11. BO UTON STO P
12. BO UTON SU IVANT
13. BO UTON PR ECEDE NT
14. PR ISE AC
15. AN TENNE F M
16. PR ISE AUX
17. PR ISE CAS QUE
18. BO UTON VOLU ME+
19. BO UTON VOLU ME-
1. HAUT- PARLEUR G AUCHE E T DROIT
2. BOU TON REP ETER
- Rép éter un mo rceau d u progra mme CD/ MP3/U SB/IP OD.
- Mod e répéte r : norma l->ré péter 1 -> répé ter tout ->
répé ter alb um ->no rmal
3. PRI SE USB
- Pour é coute r des fic hiers M P3 avec vo tre car te flas h
mémo ire USB .
4. BOU TON EQ
- Appu yez sur l e bouto n pour ch anger l 'Egal iseur d u
sty le de mus ique CD /MP3/ USB /IP OD/RA DIO.
- Pend ant la le cture d 'un mor ceau de mu sique , appuy ez
sur ce b outon p our sél ectio nner cl assiq ue-r ock-p opula irejazz -folk lore.
5. SEL ECTI ON FONC TION
- Sél ectio nnez la s ource de s on CD/U SB/ IPO D(AUX )/RAD IO.
6. BOU TON PROG RAMM E
- Prog rammat ion et éc oute de s numér os de pis tes
prog rammé es.
- En mod e march e, appu yez vers l e bas de ce b outon
pour p rogra mmer CD /MP3/ USB/R ADIO.
7. PR ISE IPO D
- Pour é coute r sur votr e IPOD de s fichi ers mus ique MP 3.
8. AFF ICHAG E LCD
- Mont rer la fr équen ce de la ba nde FM.
- Mont rer le nu méro de s piste s.
9. BO UTON LEC TURE / PAUSE
- Dém arrer ou m ettre e n pause l a lectu re de MP3 /CD
/USB /IPOD .
- En mod e radio , appuye z sur le bo uton le cture / pause
pour a ccéde r au mode d e balay age aut omati que
de can al.
10. BO UTON OU VERTU RE/ FER METUR E DU
COMPAR TIMEN T CD
- Appu yez ici p our ouv rir/ fe rmer le c ompar timen t CD.
11. BO UTON STO P
- Arrê ter la le cture d u CD/MP 3/USB /IPOD ; e fface r un
prog ramme C D.
12. BO UTON SU IVANT
- Sél ectio nner la p iste SU IVANTE.
- Mai ntenez a ppuyé p endan t plus de 1 ,5 seco nde en av ance
rapi de pour e ffect uer une r echer che dan s la pist e.
- En mod e radio , si vous ap puyez s ur SUIVA NT, vous at teind rez
le mod e de bala yage ma nuel de s canau x de plus h aute fr équen ce.
13. BO UTON PRE CEDEN T
- Séle ction ner la pi ste PRE CEDEN TE.
- Main tenez a ppuyé pe ndant p lus de 1, 5 second e en
RETO UR rapi de pour ef fectu er une re cherch e dans la
pist e.
- En mod e radio, s i vous ap puyez su r PRECE DENT,
vous a tteind rez le mo de de bal ayage ma nuel de s
cana ux de plu s haute f réquen ce.
14. PR ISE AC
- Pris e du cordo n d'ali menta tion.
15. AN TENNE F M
- Pour a mélior er la réce ption F M.
16. PR ISE AUX
- Appu yez sur l e bouton F ONCT ION, et sé lecti onnez
la fon ction AU X. lect ure MP3 , insére r un DISC MAN,
BALA DEUR AUX .Insé rez en l' absenc e de disq ue.
REMA RQUE : Veui llez re tirer le d isque C D.
17. PR ISE CAS QUE
- Pris e casqu e stéréo d e 3,5 mm.
18. BO UTON VOLUM E+
19. BO UTON VOLUM E-
20. BO UTON PRE -DN
- En mod e radio, a ppuye z sur le bou ton PRE CEDEN T
pour s élect ionne r le cana l précéd ent.
- En mod e MP3, sé lecti onnez l e bouton P RECED ENT
pour a ccéde r au dossi er préc édent.
21. BO UTON PRE -UP
- En mod e radio, a ppuye z sur le bou ton SUI VANT
pour s élect ionne r le cana l suivan t.
- En mod e MP3, sé lecti onnez l e bouton S UIVANT
pour a ccéde r au dossi er suiv ant.
22. COM PARTIME NT PILE S
- Pour o uvrir le c ompar timen t pour pi les.
23. IN TERRU PTEUR
- Pour co ntrôl er la sou rce d'al iment ation él ectri que
de l'a ppare il.
1
20
21
22
23
20. BO UTON PR E-DN
21. BO UTON PR E-UP
22. CO MPARTIM ENT PIL ES
23. IN TERRU PTEUR
ON
OFF
Français
COMMANDES
ALIMENTATION
Pan neaux s upéri eur et av ant (Voi r )
Page 18

FR- 6
FR- 5
Réce ption R adio.
1. App uyez su r la touc he FONC TION po ur séle ction ner le mo de RAD IO.
2. Syn tonis ez jusq u'à la st ation s ouhai tée en ap puyan t sur SYNT ONISATI ON PREC EDENT E ou SYNTO NISATIO N
SUIVA NTE.
Synt onisat ion man uelle : A ppuye z sur PRE CEDEN T ou SUIVA NT puis r elâche z au bout d 'une se conde .
Synt onisa tion Au tomati que : App uyez su r le bout on lect ure/ pa use pou r accéd er au mod e autom atique d e
bala yage de s fréqu ences, e t pour ef fectu er les pr ogram matio ns auto matiq ues.
Stat ions pr éselé ction nées : (3 0 stati ons FM sé lecti onnée s en mémo ire)
(1) Ap puyez s ur PREC EDENT /SYNTO NISATIO N ou SUIVA NT/SY NTONIS ATION pou r sélec tion ner la st ation d e votre
choi x.
(2) Ap puyez s ur le bou ton PRO GRAMM E une foi s, et l'in dicat eur du nu méro en M EMOIR E se fixe à l 'écran .
(3) Ap puyez s ur les bo utons P RESEL ECTI ON-UP O U PRESE LECTI ON-DO WN pour s élec tionn er le num éro de vot re
choi x.
(4) Ap puyez s ur le bou ton PRO GRAMM E pour en regis trer la st ation .
(5) R épétez l es étap es (1) à (4 ) pour pr éséle ction ner d'a utres s tatio ns.
3. Une f ois la pr ogram matio n termin ée, app uyez su r PRE-U P or PRE- DN pour c ommen cer à écou ter la fr équen ce
que vo us avez s élect ionné e.
4. App uyez su r [VOL- ]ou [V OL +] pou r régle r le volu me.
5. Dé ployez e ntièr ement l 'ANTENN E TELESC OPIQU E si vous é coutez l a FM.
6. Ete ignez l a radio e n appuy ant sur l e bouto n FONCT ION, pu is séle ctio nnez un a utre mod e ou appu yez sur l e
bout on pour é teind re l'ap parei l.
7. App uyez à no uveau a près avo ir étei nt, la fr équen ce est res tée en mé moire .
METHODE DE PROGRAMMATION
(1) Ap puyez s ur la tou che (PR OGRAM ME) en mo de STOP, et le sy stème p asse en m ode PRO GRAMM ATION.
- L'icôn e PRG et P0 1 clign otent a u bout de 2 s econde s. Cela s ignif ie que l' utili sateu r peut ent rer les p remiè res
chan sons da ns la lis te de pro gramm ation .
(2) CD /USB PR OGRAM ME : l'ut ilisa teur pe ut séle ctio nner le s pistes s ouhai tées à l' aide de s touch es Pre- dn / Pre -up.
Une fo is que vo us avez ap puyé su r ces tou ches, l a piste sé lect ionné e s'aff iche à l' écran.
1. Une f ois que l a piste s ouhai tée a été s élect ionné e, appu yez à nouv eau sur l a touch e [PROG RAMME ] pour la
mett re en mém oire.
Un max imum de 9 9 MP3 et 20 C D peut êt re prog rammé e n répéta nt les ét apes de l a procé dure (2 ) à (3).
2. Si vo us appu yez sur l a touch e [STOP] e n mode pr ogram matio n, les PI STES sé lecti onnée s seront a lors mi ses en
mémo ire et vo us repa sserez e n mode ST OP.
3. Si vo us appu yez sur l a touch e [LECT URE] en m ode pro gramm ation , le mode L ECTUR E de prog ramma tion
déma rrera . LA LEC TURE dé marre à l a piste P 01
Effa cer une p rogram matio n
Vous p ouvez ef facer l e conte nu de la mé moire e n :
- Appu yant à de ux repr ises su r le bout on STOP en c ours de l ectur e
- Ouvr ant le co mpar timen t CD
- Sél ectio nnant u n autre m ode.
Pour é coute r de la mus ique à pa rtir d' un lect eur MP3 , d'un di scman o u d'un ba ladeu r.
1. Bra nchez -le à la pr ise AUX .
2. App uyez su r le séle cteur d e fonct ion AUX , et la sou rce sono re du lec teur MP 3, du dis cman ou d u balad eur
sor tira de l 'appa reil.
- Appu yez sur l a comma nde vol ume pou r régler l e volum e.
- Cet ap parei l ne peut p as cont rôler le l ecte ur.
UTILISATION DES AUX
UTILISATION DE L'IPOD
Pour é coute r les fic hiers M P3 de votr e IPOD
1. Bra nchez l 'IPOD .
2. App uyez su r le séle ction neur de f oncti on IPOD /AUX po ur mett re sous te nsion e t écout er l'IP OD.
- Appu yez sur l e bouto n LECT URE/ PAUSE p our lir e ou mett re en pau se.
- Appu yez sur l e bouto n STOP pou r arrêt er la lec ture ;
- Appu yez sur P RECED ENT ou SU IVANT po ur séle ction ner les p istes d e l'IPO D ;
- Mai ntenez l es bout ons PRE CEDEN T ou SUIVA NT appu yés pen dant pl us d'1, 5 second e pour av ancer o u
recu ler rap ideme nt à l'in térie ur d'un e piste ;
- Appu yez sur l e bouto n REPET ER pour r épéte r 1 piste o u répéte r toute s les pis tes de l' IPOD.
REMA RQUE : Ap puyez b riève ment un e fois pou r reven ir au déb ut de la pi ste en co urs.
En cou rs d'ut ilisa tion, l 'IPOD s e charg e via le br anche ment de b ase.
RAD IO
Page 19

FR- 7
FR- 8
·
·
·
·
→
Ce Lec teur- CD peu li re des di sques A udio, de s MP3
CD- R.
N'es sayez p as de lir e un CD-R OM, CDi , VCD, DVD ou C D
d'or dinat eur.
1. App uyez su r le bout on fonc tion ju squ'à é tat du CD.
2. Pou r ouvri r le comp artim ent CD, ap puyez s ur le
bout on ouve rture d e CD.
3. In sérez un M P3/ CD ou u n CD-R a vec la fac e impri mée
ori entée ve rs le hau t et appu yez dou cemen t sur la po rte
du com part iment C D pour le re ferme r.
4. App uyez su r Lectu re/ Paus e de l'ap parei l pour
déma rrer la l ectu re.
5. App uyez su r le bout on Pause p our met tre la le cture
en pau se, app uyez su r le bout on Lect ure pour r epren dre
la lec ture.
6. Pou r arrêt er la lec ture du C D, appuy ez sur Sto p.
Rem arque : La l ectu re du CD/ MP 3 s'arr ête éga lemen t
si :
- vous o uvrez l e compa rtime nt CD ;
- vous s élect ionne z une sou rce son ore rad io ;
- le CD/ M P3 est te rminé .
Sél ectio nner un e piste d iffére nte.
Au cou rs de la le cture v ous pou vez sél ectio nner un e
pist e en par ticul ier à l'a ide des b outon s Précéd ent ou
Suiv ant.
Si vous av ez séle ction né un num éro de pi ste en
mode S top ou Pa use, app uyez su r Lectu re pour l ancer
la lec ture.
Appuy ez une foi s brièv ement p our obt enir la p iste
suiv ante, o u appuy ez à plus ieurs re prise s jusqu 'à ce le
numé ro de la pi ste sou haité e s'aff iche à l' écran .
Appuy ez briè vement u ne fois p our rev enir au d ébut
de la pi ste en co urs.
Appuy ez à plus ieurs re prise s sur Pré céden t pour
atte indre u ne pist e précéd ente.
Trouve r un pass age au se in d'un e piste
1. Ma intene z le bout on Précé dent ou S uivan t
appu yé.
La lect ure du CD p asse à gr ande vi tesse.
2. Une f ois que v ous avez r econn u le pass age que
vous s ouhai tez éco uter, rel âchez l e bouto n
Préc édent o u Suivan t.
La lect ure nor male re prend.
Diff érent s modes d e lectu re Répé ter
Répé ter la le cture d e la pist e en cour s en cont inu.
Répé ter la le cture d e toute s les pis tes du CD e n
cont inu.
Lect ure des p istes e n mode Al éatoi re.
·
LECTEUR CD/MP3
Lire u n CD/MP 3
- Cet appareil n'est pa s compatible avec les disqu es durs et l
a partie de la clé USB avec lec teur MP3.
Remarque : En mode CD / MP3/ USB, l'écran affiche le nu méro
du morceau ou la durée du morc eau.
En mode IPOD/ AUX, l'éc ran affiche le symbole de l' IPOD
(AUX) ou la durée du dispos itif.
Fonc tions U SB Audi o
1) App uyez su r le bout on Fonc tion ou l e bouton S top
USB po ur choi sir le mo de USB.
2) LEC TURE / PAUSE
3) Re cherch e SUIVAN T, PRECED ENT
4) Pro gramm ation de s Piste s (99 pis tes MP3 , 20 pist es
CD)
5) MOD E REPE TER : nor mal-> répéte r 1-> rép éter to ut->
répé ter alb um ->no rmal
6) Nom bre Max imum de D ossie r : 99 Doss iers
7) Nom bre Max imum de F ichie rs : 999 Fic hiers
* Rem arque :
- Qua nd aucu n disqu e n'est i nséré d ans l'a ppare il,
si vo us insé rez une c lé USB, e lle ser a
aut omati queme nt lue. L 'appa reil li t premi èreme nt
la cl é USB.
Lir e une clé U SB
Qua nd l'ap pareil est inactiv é en mode
CD ou U SB pend ant plu s de 10 min utes,
l'a ppareil se mettr a automatiqu ement
hor s tensi on en mod e Alarm e. En mode
de veille Alar me, l'appare il vous
avert ira qu'il faut éteindre l 'appa reil au
bou t de 10 en ém ettan t un "Bip s onore,
pui s à nouveau tout es les 10 m inutes
pou r des éco nomie s d'énergi e".
ETE INDRE L'ALARM E
Touch es : PRDN /PRUP vo us per metten t de navi guer
au sei n des dos siers . Uniqu ement e n mode US B/ CD
Pré cauti ons d'em ploi et E ntret ien Gén éral
• Plac ez l'ap parei l sur une s urfa ce dure et p lane de
sor te qu'i l ne s'in cline p as.
Veui llez ne p as expo ser l'a pparei l, les pi les et le s CDs à
l'hu midit é, la plu ie, au sa ble, ou à un e fort e chale ur
éman ant d'u n appar eil cha uffan t ou en ple in sole il.
Ne pas c ouvri r l'app areil . Il est né cessa ire de res pect er une
vent ilati on d'un é cart d 'au moi ns 6 centi mètre s entre l es
ori fices de v entil ation e t les sur faces e nviro nnant es afin
d'év iter l' accum ulati on de cha leur.
Les pi èces mé caniq ues de l' appar eil cont ienne nt des
élém ents au tolub rifia nts et ne d oiven t donc pa s être
huil ées ou gr aissé es.
Ser vez-v ous d'u n chiffo n doux et s ec pour n ettoy er
l'ap parei l. N'ut ilise z pas de pr oduit s nettoy ants
cont enant d e l'alc ool, de l 'ammo niaqu e, du benz ène ou
des ab rasif s car ils p ourra ient en domma ger le bo îtier.
•
•
•
•
•
•
•
•
•
Ne jam ais tou cher à la l entil le de lec teur CD !
Des ch angem ents br utaux d e la temp ératu re ambi ante pe uvent en traîn er la for matio n de cond ensati on et ain si
embu er la len tille d e votre l ecteu r CD. La lec ture d' un CD dev ient al ors imp ossib le. Ne te ntez pas d e netto yer la
lent ille ma is lais sez l'a ppare il dans u n endro it chau d jusqu 'à ce que l 'humi dité s'é vapor e.
Ferm ez touj ours le co mpar timen t CD pour l e maint enir à l' abri de l a pouss ière. Se rvez -vous d' un chif fon dou x et
sec po ur nett oyer, dé pouss iérer le c ompar time nt CD.
Pour n ettoye z le CD, fro ttez en l igne dr oite du ce ntre ve rs les bo rds à l'a ide d'u n chiffo n doux sa ns pelu ches.
N'ut ilise z pas de pr oduit s netto yants c ar il pou rraie nt endo mmage r le disq ue.
N'éc rivez j amais s ur un CD ou n e posez j amais d 'auto colla nts des sus.
Il co nvient d e netto yer la le ntille C D au bout d 'un cer tain t emps. U tilis ez un kit d e netto yage de l entill e
(non f ourni ).
Cela p ermet tra à l'a ppare il de rec onnaît re les CD A udio, le s MP3 et CD s.
Rema rque : Sy tech ne s aurait ê tre ten u pour re spons able d' un entr etien n églig é de la lent ille Op tique .
Lec teur CD /MP3
ENTRETIEN & SECURITE
Page 20

FR- 9
FR- 10
La lec ture d u CD/ MP3 / USB ne fon ctio nne pas.
- Le CD/ M P3/ USB e st rayé/ s ale
Remp lacez / netto yez le CD/ M P3/ USB
(voi r Entre tien)
Le CD/ M P3 saut e les pis tes
- Le CD / MP3 est e ndomm agé ou sa le
Remp lacez o u netto yez le CD/ M P3
- Le CD- R est vid e ou le dis que n'e st pas fi nalis é
Util isez un C D-R fi nalis é.
CARACTERISTIQUES TECHNIQUES GENERALES
GEN ERAL
Alim entat ion éle ctri que
Cons ommat ion d'é nergi e
Dim ensio ns Envi ron 215 x mm(L) 208x mm (l) 113 x mm(H)
Tempé rature e n cours d 'util isati on
PARTI E RECEP TEUR
Réc eptio n des ban des
Deg ré de synt onisa tion
PARTI E COMPACT D ISQUE
Pris e optiq ue 3- Fai sceau La ser
Rép onse en Fr équen ce
PARTI E AUDIO
Puis sance d e sort ie Maxi mum 1 Watt x 2
Imp édanc e du casq ue
ACCE SSOIR ES
Liv ret d'in struc tion s
Cord on d'al iment ation A C
... ..... ..... ..... ..... ..... ..... ..... ..... ..... ..... ...AC :1 10/22 0V~50 /60H z
... ..... ..... ..... ..... ..... ..... ..... ..... ..... ..... ..... ...AC 13 .5 Watts
... ..... ..... ..... ..... ..... ..... ..... ..... ...
... ..... ..... ..... ..... ..... ..... ..... ..... ..... ..... ...+5 ℃ - + 35℃
... ..... ..... ..... ..... ..... ..... ..... ..... ..... ..... ..... ..... ....FM S T.
... ..... ..... ..... ..... ..... ..... ..... ..... ..... ..... .... FM: 87.5- 108MH z
... ..... ..... ..... ..... ..... ..... ..... ..... ..... ..... ..... ..... ..... .. .
... ..... ..... ..... ..... ..... ..... ..... ..... ..... ..... ..... ...10 0Hz - 16K Hz
... ..... ..... ..... ..... ..... ..... ..... ..... ..... ..... ..... ..... ..... ...
... ..... ..... ..... ..... ..... ..... ..... ..... ..... ..... ..... ..4 ~ 32 Oh ms
... ..... ..... ..... ..... ..... ..... ..... ..... ..... ..... ..... ..... ..... .1
... ..... ..... ..... ..... ..... ..... ..... ..... ..... ..... ..... ..... ..... .1
Aucu n disqu e n'est d étect é.
DEPANNAGE
Dép annag e
En cas d e panne , veuil lez tou t d'abo rd vérif ier les p oints c i-de ssous m entio nnés ava nt de fai re appe l à un
répa rateu r.
N'ou vrez pa s l'app areil c ar il exi ste un ri sque de c hoc éle ctriq ue.
Si vou s n'ête s pas en me sure de ré soudr e le prob lème en s uivan t ces cons eils, v euill ez cons ulter vo tre
reve ndeur o u un ser vice apr ès-ve nte.
AVERT ISSEM ENT :Veui llez en a ucune m anièr e essaye r de répa rer l'a ppare il par vo us-mê me, sino n cela
annu lera la g arant ie.
- Prob lème
·solu tion
Pas de s on/ d'a limen tatio n
- Le vol ume n'es t pas rég lé
- Le cor don d'a limen tation e st mal br anché .
·Bran chez le c ordon d 'alim entat ion AC cor recte ment.
- Pile s usagé es/ mal i nséré es
·Ins érez (ch angez ) les pil es corr ectem ent
·Rég lez le VOLU ME
L'affi chage n e fonct ionne p as corr ectem ent
/ les co mmand es ne rép onden t pas
- Déc harge él ectro stati que
au bou t de quel ques se conde s
·Etei gnez pu is débr anche z l'app areil. R ebran chez- le
- Aucu n CD/ MP3 n 'est in séré
- Le CD es t rayé ou s ale
·Rem placez / n ettoy ez le CD, vo ir Entre tien
·Ins érez un CD , MP3, CD -R.
Inf ormation s relat ives à l'e nvironne ment
Nous a vons fa it tout n otre po ssibl e pour li miter l' embal lage et v ous fac ilite r le tri de 3 m atéri aux : Car ton,
pâte à p apier, e t polyé thylèn e expan sé.
Votre a ppare il est co mposé d e matér iaux qu i peuve nt être re cyclé s s'ils s ont dés assem blés pa r une
entr epris e spéci alisé e.
Veui llez res pect er la régl ement ation l ocale r elati ve à la mis e au rebut d es emba llage s, des pi les usa gées
et des a ppare ils hor s d'usa ge.
- La len tille L aser es t embué e
·Veui llez at tendre j usqu' à ce que la l entil le ait
atte int la te mpéra ture amb iante
- La pro gramm ation e st acti ve
·Quit ter le mo de Prog rammat ion
Page 21

que n otre so ciété.
Se débarrasser correctement de ce Produit
Déchets d'équipements électriques et électroniques (WEEE)
Votre produit est conçu et fabriqué avec des matériaux et des composants
de haute qualité qui peuvent être recyclés et réutilisés.
Ce symbole signifie que l'équipement électrique et électronique, une fois
usagé, doit être traités séparément des déchets ménagers.
Veuillez déposer cet équipement dans le point de collecte/ recyclage des
déchets de votre quartier.
Au sein de l'Union Européenne, il existe des systèmes de collecte séparés
pour les produits électriques et électroniques usagés. Merci de nous aider à
protéger l'environnement dans lequel nous vivons !
FR- 11
Page 22

Mp3
Mp3
MANUAL DE INSTRUÇÕES
RÁD IO FM ESTÉ REO COM S INTONI ZAÇÃO
PLL C D/MP3 /AUX /US B/IPO D
CRUD 386i
LEITOR DE CD/RÁDIO PORTÁTIL
Page 23

Para U
so do C
li
ent
e
In
tr
odu
z
a o N
º d
e Sér ie q
ue se enc
o
n
tr
a
l
oca li
zad o na p
art e in
ferio
r d
o a
rmár
io
. G
uar d
e
e
s
t
as info
rm
ações p
a
r
a futu
ra
s con su
lta
s
.
M
o
d
e No
.
Serial N
o
.
PT-2
PREPARAÇÃO PARA UTILIZAÇÃO
Dese mbala r e Confi gurar
* Ret ire cuid adosa mente a u nidad e da caix a de apre senta ção e remo va todo o m ateri al da pró pria un idade.
* Rem ova quai squer e tique tas des criti vas que s e possa m encon trar na p arte fr ontal o u super ior do
arm ário da u nidad e. Não rem ova qua isque r etiqu etas lo caliz adas na p arte tr aseir a ou infe rior do a rmári o
da uni dade.
* Prim a o Botão A BRIR po rta de C D para ab rir a por ta do com part imento d e CD. Tem um car tão bra nco no
comp arti mento d o CD, que se d estin a a imped ir que a ra nhura d o CD se mova d urant e o trans porte d o
prod uto, rem ova est e cartã o do comp arti mento d o CD antes d e usar.
Usar cor rente AC
1. Verifiqu e se a tensão de alime ntaçã o, confo rme ind icada n a placa d e
esp ecifi caçõe s local izada n a parte inferior do co njunto, corresp onde à
sua fonte de a limentação AC local. Se e sse não for o caso, consu lte o seu
revended or ou centro de as sistê ncia.
2. Conecte o cab o de alim entaç ão à entrada da to mada CA e à tomada de
parede. A fonte d e alime ntaçã o está ag ora conectada e pronta para s er
usa da.
3. Para de sliga r compl etame nte, desli gue o cab o de alim entaç ão da
tom ada de pa rede.
Des conec te o cabo d e alime ntaçã o da toma da de parede par a proteger o
apa relho durant e tempestades pe sadas.
Pil has (nã o inclu ídas)
Abra o compa rtimento da s pilha s e insira seis pilh as, tipo LR14, UM- 2 ou
cél ulas C, ( de preferência alca linas ) com a pol arida de correta con forme
ind icada p elos sí mbolo s “+” e “-” no interior d o compart iment o
Fa mi l ia r iz e -s e c om estes
símbol os de seguran ça
CUIDAD O: PARA RE DUZIR O R ISCO DE DE SCARG A ELÉC TRICA ,
NÃO TIRE A TAMPA (OU N A PARTE TRA SEIRA ). NÃO EXI STEM
PEÇAS R EPARÁVEI S PELO UTI LIZAD OR NO INT ERIOR . REME TA
AS REPARA ÇÕES A PES SOAL TÉC NICO QUAL IFICA DO.
RISCO D E CHOQU E
ELÉC TRICO NÃ O ABRIR
PROD UTO LAS ER
DE CL ASSE 1
Font e de Alim entaç ão
As pi lhas contê m subst ância s quími cas, po r isso, de verão se r
eli minad as adeq uadam ente.
A uti lizaç ão inco rrect a das pil has pod e causa r a fuga de e lectrólitos e ir á
cor roer o compartimen to ou fazer com qu e as pilh as esto urem. Po r
con segui nte:
Não m isture tipos de pi lhas: p or exemplo, alcalin as e de car bono zi nco.
Uti lize ap enas pi lhas do m esmo ti po para o conjun to.
Qua ndo int roduzir pilhas n ovas, não te nte misturar p ilhas v elhas com
novas.
Rem ova as pilhas, c aso não v á utili zar o apa relho durante um longo
per íodo de t empo.
PT-1
CAUTION
1.NÃO c oloqu e objet os em cim a do
apar elho, u ma vez que e stes o po dem
ris car.
2.NÃO e xponh a o apare lho a
ambi entes s ujos ou c om pó.
3.NÃO c oloqu e o apare lho num a
supe rfíc ie desn ivela da ou ins tável
4.NÃO i ntrod uza obj etos es tranho s
no apa relho .
5.NÃO e xponh a o apare lho a cam pos
magn ético s ou elét ricos f ortes .
6.NÃO e xponh a o apare lho à luz
dire ta do sol , uma vez q ue isto o p ode
dani ficar.
Mant enha o ap arelh o afast ado de f
onte s de calo r.
7.NÃO g uarde o a parel ho em zona s
com te mpera tura su perio r a 40º C (10 4º
F). A te mpera tura in terna d e
func ionam ento de ste apa relho é d e 20ºC
(68 ° F) a 60 °C (1 40 °F).
8.NÃO u se o apar elho à ch uva.
9.Con sulte a s autor idade s locai s ou o
reve ndedo r relat ivame nte à
elim inaçã o corre ta de apa relho s
elet rónic os.
10.O ap arelh o e o adapt ador po dem
prod uzir ca lor dur ante o se u norma l
func ionam ento de c arga.
Para e vitar o d escon forto o u lesõe s causa dos
pela e xposi ção ao ca lor, NÃO d eixe o apa relho
no seu c olo.
11.C APACIDAD E DA POTÊN CIA DE EN TRADA :
Cons ulte a et iquet a de volt agem do a parel ho
e asse gure -se que o adapt ador de c orrent e
resp eita a te nsão. Us e apena s acess órios
espe cific ados pe lo fabr icant e.
12.Li mpe o apa relho c om um pan o suave.
Se ne cessár io hume deça li geira mente o
pano a ntes de p roced er à limp eza. nã o use
nunc a soluç ões abr asiva s ou dete rgente s.
13.D eslig ue sempr e o apare lho ant es de
proc eder à in stala ção ou re moção d e
apar elhos q ue não su port em hot-p lug.
14.D esligu e o apare lho da to mada el étric a
ante s de o limp ar.
15.NÃ O desmo nte o apa relho. S ó um técn ico
de ser viço a utori zado de ve proce der a
repa raçõe s.
16. O ap arelh o dispõ e de aber tura s desti nadas
a libe rtar c alor.
NÃO bl oquei e a venti lação d o
apar elho, u ma vez que e ste pod e
aque cer e ava riar- se.
17.A su bstit uição d a bater ia por
um tip o incor reto co mport a um
ris co de expl osão. R etire a s bateri as
usad as de aco rdo com a s instr uções.
18.EQ UIPAMEN TO LIGÁVE L: a
toma da deve e star in stala da per to
do equ ipame nto e dev e ser de fá cil
aces so.
Page 24

PT-3
PT-4
1
1
2
3
4
5
6
7
8
9
10
11
12
13
14
15
16
17
18
19
1. ALTIFAL ANTE ES QUERD O & DIREI TO
2. BOTÃO R EPETI R
3. FIC HA USB
4. BOTÃO E Q
5. SEL ECCIO NAR FUN ÇÃO
6. BOTÃO P ROGRA MA
7. FIC HA IPOD
8. VIS OR LCD
9. BOTÃO P LAY/PAUSE
10. BO TÃO ABRIR /FECH AR PORTA CD
11. BO TÃO STOP
12. BO TÃO SEGUI NTE
13. BO TÃO ANTER IOR
14. TOM ADA AC
15. AN TENA FM
16. FI CHA AUX
17. FI CHA DE AU SCULTADOR ES
18. BO TÃO VOLUME +
19. BO TÃO VOLUME -
1. ALTIFAL ANTE ES QUERD O & DIREI TO
2. BOTÃO R EPETI R
- Rep etir uma f aixa pr ogram ada de CD /MP3
/USB /IPOD .
- Mod o de repet ição: n ormal ->rep etir 1- >repe tir
toda s-> rep etir ál bum ->n ormal
3. FIC HA USB
- Ouvi r o seu dis posit ivo de me mória f lash US B
com fi cheir os Mp3.
4. BOTÃO E Q
- Prim a o botão p ara mud ar o esti lo de mús ica EQ
de CD/ MP3/U SB /IPO D/RA DIO.
- Dura nte a rep roduç ão da mús ica, pr ima est e
botã o para fi car em cl ássic a-roc k-pop ular- jazz- FLR.
5. SEL ECCIO NAR FUN ÇÃO
- Sel eccion ar a font e de som CD /USB/ I POD(AU X)
/RA DIO.
6. BOTÃO P ROGRA MA
- Prog ramar e re ver os nú meros d e faixa p rogram ada.
- No est ado de fu ncion ament o, prim a este bo tão em
CD/M P3/US B/RA DIO para a p rogra mação.
7. FIC HA IPOD
- Ouvi r o seu IPO D com fic heiro s de músi ca Mp3.
8. VIS OR LCD
- Mos trar a fre quênc ia do sel ector F M.
- Mos trar o núm ero de fa ixas.
9. BOTÃO P LAY/PAUSE
- Ini ciar ou p ausar a re produ ção de MP 3/CD/ USB
/IPO D.
- No mod o rádio , prima o b otão pl ay/pa use para e ntrar
no mod o de busc a autom ática d e canai s.
10. BO TÃO ABRIR /FECH AR PORTA CD
- Prim a aqui pa ra abri r/fec har a por ta do CD.
11. BO TÃO STOP
-Par ar a repro dução d e CD/MP 3/USB /IPOD ; apaga r
um pro grama d o CD.
12. BO TÃO SEGUI NTE
- Sel eccion ar faix a SEGUI NTE.
- Prim a e mante nha pre mido du rante ma is de 1,5
segu ndos pa ra avan çar na bu sca den tro da fa ixa.
- No mod o rádio , premin do SEGU INTE en trará n o limit e
supe rior do m odo de bu sca de ca nal man ual.
13. BO TÃO ANTERI OR
- Sele ccion ar faix a ANTERI OR.
- Prim a e manten ha prem ido dur ante
mais d e 1,5 seg undos p ara retr oceder
na bus ca dent ro da faix a.
- No mod o rádio, p remin do ANTER IOR
entr ará no li mite inf erior d o modo de
busc a de cana l manua l.
14. TOMA DA AC
-Ent rada pa ra o cabo de a limen tação.
15. AN TENA FM
- Para me lhora r a recepç ão de FM.
16. FI CHA AUX
- Prim a o botão F UNÇÃO, se lecci one
a esta ção AUX. R eprod uzir MP 3,
DISC MAN, WALKM AN na ent rada AUX .
inse rir qua ndo não t em disco .
NOTA: Por f avor, ret ire o disc o CD.
17. FI CHA DE AUS CULTADORE S
- fich a de ausc ultad ores est éreo de 3 ,5 mm.
18. BO TÃO VOLUME +
19. BO TÃO VOLUME -
20. BO TÃO PRE-DN
- No mod o rádio, p rima o bo tão PRE -DN para
esco lher o ca nal ante rior.
- No mod o mp3, pr ima o bot ão PRE- DN para
entr ar na pas ta anter ior.
21. BO TÃO PRE-UP
- No mod o rádio, p rima o bo tão PRE -UP para
esco lher o ca nal seg uinte.
- No mod o mp3, pr ima o bot ão PRE- UP para
entr ar na pas ta segui nte.
22. PO RTA DAS PIL HAS
- Para ab rir o com parti mento d as pilh as.
23. IN TERRU PTOR DE LI GAÇÃO
- Para co ntrol ar o ligar /desl igar da f onte
eléc trica d a unida de.
1
20
21
22
23
20. BO TÃO PRE-D N
21. BO TÃO PRE-U P
22. PO RTA DAS PI LHAS
23. IN TERRU PTOR DE L IGAÇÃO
ON
OFF
Inglês
CONTROLOS
FONTE DE ALIMENTAÇÃO
Pai néis su perio r e fronta l (Ver )
Page 25

PT-6
PT-5
Rece pção de r ádio
1. Pri ma o botã o FUNÇÃ O e selec cione o m odo RÁD IO.
2. Sin toniz e a estaç ão dese jada pr emind o ANTER IOR/T UNE DN ou S EGUIN TE/ TUNE U P
Sint oniza ção Man ual: Pr ima ANT ERIOR o u SEGUI NTE e dep ois sol te no esp aço de 1 se g.
Sint oniza ção Aut omáti ca: Prim a o botão p lay/p ause pa ra entr ar no mod o de busc a autom ática d e
cana is e para d efini r autom atica mente .
Pred efini r Canal : (FM 30 Pre set mem ories )
(1) Pr ima ANT ERIOR /TUNE -DN ou SE GUINT E/TUN E-UP pa ra sele ccion ar a esta ção des ejada .
(2) Pr ima o bot ão PROG RAMA um a vez. O in dicad or de núm ero da MEM ÓRIA é ap resen tado no v isor.
(3) Pr ima os bo tões PR ESET-U P ou PRES ET DOW N para sel eccio nar o núm ero des ejado.
(4) Pr ima o bot ão PROG RAMA pa ra guar dar est a estaç ão.
(5) R epita os p assos ( 1) a (4) pa ra outr as esta ções.
3. Apó s o final d a progr amaçã o, prima P RE-UP o u PRE-D N para co meçar a r eprod uzir a fre quênc ia que
sele ccion ou.
4. Pri ma [VO L-] ou [V OL +] par a ajust ar o volu me.
5. Est enda a AN TENA TEL ESCÓP ICA à sua e xtens ão comp leta ca so este ja a ouvi r a trans missã o FM.
6. De sligu e o rádio pr emind o o botão F UNÇÃO p ara sel eccio nar out ro modo ou p rima o bo tão par a
desl igar a un idade .
7. Lig ue nova mente a pós o des ligam ento, a fr equên cia de me mória a inda se m antém .
MÉTODO DE PROGRAMAÇÃO
(1) Pr ima a tec la (PRO GRAMA ) no modo S TOP, o sistem a passa rá para o mo do PROG RAMA.
- O ícon e PRG e P01 p iscar á a cada 2 se g. Isto s olici ta ao uti lizad or que in troduz a as prim eiras m úsica s na list a de
repr oduçã o do prog rama.
(2) PR OGRAM A CD/US B, o util izado r pode se lecci onar as f aixas d eseja das usa ndo as te clas Pre -dn / Pre -up.
Uma ve z que est as tecl as são pr emida s, o viso r mostra rá a faix a selec ciona da
1. Apó s selec ciona r a faixa d eseja da, pri ma a tecl a [PROG RAMA] n ovame nte e será g uarda da na
memó ria.
Máx imo de 99 f aixas M P3 e Máxi mo de 20 fa ixas de C D podem s er progr amada s para os p assos d e Repet ição
(2) e (3 ).
2. Se p remir a te cla [ST OP] dura nte o mod o de prog ramaç ão, entã o as FAIXAS s elecc ionad as
serã o guard adas na m emóri a e regre ssa ao mo do STOP (m odo de Re produ ção Cont ínua)
3. Se p remir a te cla [PL AY] dura nte o mod o de prog ramaç ão, o modo d e repro dução p rogram ada ser á inici ado.
Iní cio da rep roduç ão a par tir da Fai xa P01
Apag ar um pro grama
Pode a pagar o c onteúd o da memó ria:
- Dura nte a rep roduç ão, prem indo o bo tão STOP d uas vez es.
- Abri ndo a por ta do CD
- Sel eccion ando ou tro mod o.
Para o uvir mú sica co m um mp3, d iscma n, walk man.
1. Con ecte a AU X.
2. Pri ma o sele ctor de f unção p ara AUX , a fonte de s om do mp3 o u discm an ou wal kman se rá
prod uzido p ela uni dade.
- Prim a o contr olo de vol ume par a ajust ar o volu me.
- A unid ade não p ode con trola r o leito r.
USAR AUX
USAR O IPOD
Para o uvir o se u IPOD co m fiche iros de mú sica M p3.
1. Con ecte ao I POD.
2. Pri ma o sele ctor de f unção p ara IPO D/AUX pa ra liga r a corre nte e rep roduzi r IPOD.
- Prim a o botão P LAY/PAUSE p ara repr oduzi r ou paus ar a repr oduçã o;
- Prim a o botão S TOP para i nterr omper a r eprod ução;
- Prim a ANTER IOR ou SE GUINT E para se lecci onar fa ixas do i Pod;
- Prim a e mante nha pre mido AN TERIO R ou SEGU INTE ma is de 1,5 s egund os para av ançar o u retro ceder n a busca
dent ro da fai xa;
- Prim a o botão R EPETI R para re petir 1 f aixa ou r epeti r todas a s faixa s do iPod.
NOTA: Pr ima o bot ão ANTE RIOR um a vez brev ement e para reg ressa r ao iníc io da fai xa actu al.
Dura nte a uti lizaç ão do, es te é carre gado at ravés d a base de l igaçã o.
RÁD IO
Page 26

EN- 7
EN- 8
·
·
·
·
→
Este l eitor d e CD pode r eprod uzir di scos de áu dio,
MP3 CD -R.
Não te nte rep roduz ir CD-R OM, CDi , VCD, DVD ou
CD de co mputa dor.
1. Pri ma o botã o de funç ão para o bter o es tado do
CD.
2. Par a abrir a p orta do c d, prim a o botão d e abrir
CD.
3. In sira um M P3/CD o u CD-R, c om o lado i mpress o
volt ado par a cima e pr ima a por ta do CD
deli cadam ente pa ra fech ar.
4. Pri ma play /paus e no apar elho pa ra inic iar a
repr oduçã o.
5. Pri ma o botã o de paus a para pa usar a re produ ção,
pri ma o botão d e play pa ra reto mar a rep roduçã o.
6. Par a parar a re produ ção do CD, p rima st op.
nota : A repro dução d o CD/MP 3 irá par ar quan do:
- abr ir o compa rtim ento do c d;
- sele ccion ar a font e de som de r ádio;
- o CD/M P3 tive r chega do ao fim .
sele ccion ando um a faixa d ifere nte.
dura nte a rep roduç ão, pode u sar ant erior o u
segu inte pa ra sele ccion ar uma de termi nada fa ixa.
Se sele ccion ou um núm ero de fa ixa na po sição
de par agem ou p ausa, p rima pl ay para i nicia r a
repr oduçã o.
Prima s eguint e uma vez b revem ente par a a faixa
segu inte, o u repet idame nte até qu e o númer o da
faix a desej ada apa reça no v isor.
Prima a nterio r uma vez b revem ente par a
regr essar a o iníci o da faix a actua l.
Prima a nterio r mais qu e uma vez b revem ente
para i r para a fa ixa ant erior.
enco ntrar u ma pass agem de ntro de u ma faix a
1. Pri ma e mant enha pr emido a nterio r ou
segu inte.
O CD é rep roduz ido a alt a veloc idade.
2. Qua ndo rec onhec er a pass agem, l iber te
o botã o de ante rior ou s eguin te.
reini cia a repr oduçã o norma l.
dife rente s modos d e reprod ução: r epeti r
repe tir - rep roduz a f aixa ac tual
cont inuam ente.
repe tir tod as - repr oduz tod o o cd
cont inuam ente.
Na rep roduç ão de fai xas em or dem ale atóri a
após p remir o b otão al eatór io, as fai xas ser ão
repr oduzi das por o rdem al eatór ia.
LEITOR CD/MP3
Repr oduzi r um CD/M P3
Nota: no modo de CD/M P3/USB, o lcd indicará o
número da músic a ou a música a ser reproduzida no
momento.
Se estiver no modo de ipo d/aux, o lcd exibirá o símbol o
de ipod (aux), ou a unid ade de tempo.nit time.
- A unid ade não s upor ta todo s os HDD e a pa rte usb
com le itor de m p3.
Funçõ es de Áud io USB
1) Pri ma o botã o de funç ão ou o bot ão para r usb
para e scolh er o esta do de usb .
2) REP RODUZ IR/PAUS A
3) SEG UINTE , ANTER IOR Sal tar bus ca
4) Faix a Progra mada (9 9 Faixas M P3 e 20 Faix as
CD)
5) MOD O REPE TIÇÃO : norma l->rep etir 1- >repe tir
toda s-> rep etir ál bum ->n ormal
6) Nº M áximo d e Pastas : 99 Pasta s
7) Nº M áximo d e Fichei ros: 99 9 Fichei ros
*Avi so:
- Quan do a unid ade não t em o disc o, intro duzin do o
car tão usb l erá aut omati camen te o cart ão USB,
lend o o USB pri meiro a o coloc ar o USB. .
Rep roduz ir um USB
Quando a unidade fica parada em
modo CD ou USB durante mais 10
min, então a unidade passará para o
modo de Alarme de Desligamento
automaticamente. No modo de
Alarme de Desligamento, a unidade
irá alertá-lo para desligar o aparelho
através de um som “Bip” de 10 seg.
e, periodicamente, a cada 10 min.
para poupar energia.”
POWER OFF ALARM
Tecla s: PRDN /PRUP p ermit e-lhe n avega r entre
as pa stas. Ap enas em U SB/CD .
Pre cauçõe s e Manu tençã o Geral
• Colo que o apa relho s obre um a super fície d ura e pla na, de
form a a que não s e incli ne.
Não ex ponha o a parel ho, pil has ou CD s à humid ade, chu va,
arei a ou calo r exces sivo cau sado po r
equi pamen tos de aq uecim ento ou l uz sola r direc ta.
Não cu bra o apa relho. É n ecess ária um a venti lação
adeq uada co m uma sep araçã o mínim a de 6cm en tre os
furo s de vent ilaçã o e as supe rfíc ies circ undan tes par a evita r
a acum ulaçã o de calo r.
As peç as mecâ nicas d o apare lho con têm rola mento s auto
-lub rific antes e n ão deve m ser ole ados ou l ubrif icado s.
Para l impar o a parelh o, util ize um pa no maci o e seco.
Não us e agent es de lim peza qu e conte nham ál cool, am ónia,
benz ina ou ab rasiv os vist o que est es pode m danif icar a
estr utura e xteri or.
•
•
•
•
•
•
•
•
•
Nunc a dever á tocar n a lente d o leito r de CD!
Muda nças br uscas n a tempe ratur a ambie nte pod em caus ar a form ação de co ndens ação e a le nte do
leit or de CD po derá em bacia r. Repro duzir u m CD não se rá entã o possí vel. Não t ente li mpar a le nte, mas
deix e o apare lho num a mbien te quent e até que a h umida de se eva pore.
Fech e sempre a p orta d o CD para m anter o co mpar timen to do CD li vre de pó. Pa ra limp ar, limp e o
comp arti mento co m um pano m acio e se co.
Para l impar o C D, limpe e m linha r ecta a pa rtir do c entro p ara a bor da com um p ano mac io e sem fi apos.
Não us e agent es de lim peza po is este s podem d anifi car o dis co.
Nunc a escre va num CD n em colo q uaisq uer aut ocola ntes.
É nece ssári o limpa r a sua len te do CD de pois de a lgum us o. Use um co njunt o de limp eza de le ntes de C D
(não i ncluí do).
Isso i rá ajud ar a unid ade a rec onhec er o CD Áudi o, CDs de M P3.
Nota : Sytec h não será r espon sável p or uma fra ca man utençã o da Lent e óptic a.
CD pl ayer and C D handi ng
Lei tor CD/MP3
MANUTENÇÃO E SEGURANÇA
Page 27

PT-9
PT-1 0
CD/ MP3/ USB p layba ck does n ot work
CD/ MP3/ USB b adly sc ratche d/dir ty
Rep lace/c lean CD /MP3/ U SB
(se e mainte nance )
The C D/MP3 s kips tr acks
CD/ MP3 dam aged or d irty
Rep lace or c lean CD /MP3
- CD- R em bran co ou o dis co não es tá fina lizad o
Use u m CD-R fi naliz ado.
ESPECIFICAÇÕES TÉCNICAS
GER AIS
Req uisit os de Potê ncia
Cons umo de en ergia
Dim ensõe s
Tempe ratur a de func ionam ento
SEÇ ÃO RECEP TOR
Ban das rece pcion adas
Alc ance de Si ntoni zação
SEÇ ÃO DE COMPAC T DISC
Rec olha Óp tica
Freq uênci a de resp osta
SEÇ ÃO ÁUDIO
Potê ncia de s aída
Imp edânc ia dos Au scult adores
ACES SÓRIO S
Man ual de In struç ões
Cabo d e linha A C
t ... ..... ..... ..... ..... ..... ..... ..... ..... ..... ..... ...AC :1 10/22 0V~50 /60H z
... ..... ..... ..... ..... ..... ..... ..... ..... ..... ..... ..... ...AC 13 .5 Watts
... ..... ..... ..... ..... ..... ..... ..... ..... ...Ap pro. 215 x mm(L) 208x mm (W) 1 13x mm( H)
... ..... ..... ..... ..... ..... ..... ..... ..... ..... ..... ...+5 ℃ - + 35℃
... ..... ..... ..... ..... ..... ..... ..... ..... ..... ..... ..... ..... ....FM S T.
... ..... ..... ..... ..... ..... ..... ..... ..... ..... ..... ..... FM :87.5 -108M Hz
... ..... ..... ..... ..... ..... ..... ..... ..... ..... ..... ..... ..... ..... .. .3-B eam Las er
... ..... ..... ..... ..... ..... ..... ..... ..... ..... ..... ..... ...10 0Hz - 16K H z
... ..... ..... ..... ..... ..... ..... ..... ..... ..... ..... ..... ..... ..... ...Ma ximum 1 Wat t x 2
... ..... ..... ..... ..... ..... ..... ..... ..... ..... ..... ..... ..4 ~ 32 Oh ms
... ..... ..... ..... ..... ..... ..... ..... ..... ..... ..... ..... ..... ..... .1
... ..... ..... ..... ..... ..... ..... ..... ..... ..... ..... ..... ..... ..... .1
Ind icaçã o de nenh um disc o
RESOLUÇÃO DE PROBLEMAS
Res oluçã o de prob lemas
Se oco rrer um a anoma lia, ve rifiq ue prim eiro os p ontos l istad os abai xo antes d e levar o a parel ho para
repa ração.
Não ab ra o apar elho vi sto que e xiste o r isco de c hoque e léctr ico.
Caso n ão cons iga res olver u m proble ma segu indo es tas sug estõe s, cons ulte o se u revend edor ou
cent ro de ass istên cia.
AVISO :Em nenh uma cir cunst ância d eve tent ar repa rar o apa relho p or sua in iciat iva,
vist o que iss o irá inv alida r a garan tia.
- Prob lema
·solu ção
Sem s om/cor rente
- O volu me não es tá regu lado
·Ajus tar o VOLU ME
- O cabo d e alime ntaçã o não est á bem con ectad o
·Cone cte o cab o de alim entaç ão CA cor recta mente
- Pilh as gast as/ inc orrec tamen te inse ridas
·Ins erir pi lhas (n ovas) co rrect ament e
O vis or não fu ncion a corre ctame nte / Sem
rea cção à op eraçã o de qual quer um d os cont rolos
- Des carga e lectr ostát ica
·Des ligue e d escon ecte o ap arelh o. Volte a l igar
apó s algun s segun dos
- Nen hum CD/ MP3 ins erido
·Ins ira um CD , MP3, CD -R.
-O CD e stá arr anhad o ou sujo
·Sub stitu a/lim pe o CD, co nsult e Manut enção
Inf ormaç ão ambi ental
Dem os o nosso m elhor p ara red uzir a em balag em e torn á-la fá cil de se parar e m 3 mater iais: c artão , pasta d e papel
e poli etile no expa nsíve l.
O seu ap arelh o é compo sto por m ateri ais que p odem se r recicl ados se d esmon tados p or uma em presa
espe ciali zada.
Por fa vor, obse rve as re gulam entaç ões loc ais rel ativa s à elimi nação d a embal agem, p ilhas g astas e
equi pamen to anti go.
-La ser len s steame d up
·Wait u ntil len s has adj usted t o room
temp eratu re
-Pro mgram i s activ e
Quit P rogra m mode( s)·
Page 28

Condiç ões de Ga rantía
Est e equip ament o tem gara ntia de 2 (dois ) anos a pa rtir d a data or igina l de compra.
Est aram is entas d a garantía a s avarí as caus adas pe lo uso in correcto d o apare lho, má
ins talaç ão ou col ocaçã o em luga res ina propriad os para a s ua boa co nserv ação, p ancad as,
act ualiz ações d e soft ware que n ão sejã o os faci litad os pela m arca, p eças de sgast adas
pel o seu pro prio us o ou por um u so não do mésti co ou ina dequa do, assi m como, por
man ipula ção por p essoa s ou ofic inas de a ssist ência t ecnic a alhei os à noss a empresa.
Para q ue a gara ntía te nha val idade, dev erá juntar a f actur a ou tíck et de cai xa que
cor robore/v alide a a quisi ção e dat a de venda des te prod ucto.
Des carte c orreto d este Prod uto
Des carte de E quipam entos E létricos e E letrônicos - W EEE).
Seu p roduto f oi projet ado e fab ricado c om materiales de a lta
qua lidade e c ompo nentes q ue podem ser re cicla dos e reutiliz ados.
Este s ímbo lo sign ifica q ue equi pamen tos elé tr icos e eletrôn icos, no
fim de s ua vida útil, d evem ser d esca rtado s eparada mente do l ixo
dom éstico.
Por favor, desca rte esse eq uipam ento em um p osto de c oleta
ade quado ou em um c entro de r ecic lagem .
Na Un ião Europeia e xistem s istemas de c oleta se parad os para
produtos e létricos e e letr ônicos. Por f avor, nos a jude a conservar o
meio a mbie nte em que v ivemos!
PT-11
 Loading...