

Page 1
Workshop Manual
ELITE XS 3 & 4 WHEEL,
ONYX
ENGLISH
Scooters
Page 2

Page 3

ELITE XS, ONYX
WORKSHOP MANUAL
The ELITE XS range is a rear wheel drive, three or four - wheeled electric powered
scooter with pneumatic tyres, rake adjustable
tiller, upholstered seat with folding back and flip up-wid th adjust able
armrests, shopping basket, horn, battery gauges
and security key on/off switch.
Sunrise Medical is ISO 9001 certified, which ensures quality at all stages of the
development and production of this Scooter.
This product is manufactured to comply with the requirements of
EEC directives 89/336/EEC
CE
TITLE CONTENTS P AGES
Safety 1 to 2
Recommended T ools 3
Service & Inspection 4
T echnical S pecifications 5 to 7
Programme 8
Bumper, Brakes & Wheels
Front Bumper (3W). 9
Front Wheel & Brake (3W) 10 to 12
Rear Wheel Elite XS 13 to 14
Front Wheel Onyx, XL8 15
Rear Wheel Onyx, XL8 16
T yres & Tube Onyx, XL8 17 to 19
T yres & Tube Elite 20
Front Brake Elite (4W), Onyx, XL8 21 to 22
Seat, Batteries & Rear Panel
Seat Removal (All) 23
Seat Post Removal (All) 24
Seat Assembly (All) 25 to 29
Batteries & Battery Charger (All) 30 to 31
Rear Panel (All) 32
Rear Lights & Indicators 33 to 35
Rear Chassis
Brake Lever/Loom 36
Panels & Bolts 37 to 40
Transaxle 41 to 43
Suspension Struts 44
Struts/Stabilisers 45
Stabilisers/Bumper 46
Bumper/Frame 47
Main Fuse 48
Main Fuse/Fuse Panel/Programme Skt. 49
Main Control Box 50 to 51
Page 4

IMPORTANT
It is potentially hazardous to fit or use any parts other than genuine
Sunrise Medical parts.
The company disclaims all liability for the consequences of such use,
which in addition voids the machine warranty .
This scooter is for the carriage of
ONE PERSON
And must not be used for any other purpose.
ELITE XS, ONYX
WORKSHOP MANUAL
TITLE CONTENTS P AGES
Tiller Fascia Panel 52
Tiller Fascia Panel & Tiller Back Panel 53 to 54
Hand Brake & Tiller Front Panel 55
Tiller Front & Top Panel 56
Tiller Horn & Reflector 57
Tiller-Indicators-Bulbs 58
Tiller Charging Socket 59
Tiller Loom 60
Tiller Adjustment & Weld Assy. 61 to 62
Tiller Bracket 63
H’lamps, Fnt Body Panel & Main Loom
Gaiter & Front Bumper 64
Headlamp & Bulb (4-Wheel) 65 to 66
Headlamp (3-Wheel) 67
Fnt. Body Panel (4-Wheel) 68
Fnt. Body Panel (3-Wheel) 69
Main Loom 70 to 72
Front Suspension & Steering
Stub Axles 73 to 75
Steering Rods 76 to 77
Front Suspension Struts 78
Swinging Arm 79
Steering Head (4-Wheel) 80 to 81
Steering Head & Forks 82 to 83
Page 5

Page 6

SAPPHIRE
GENER AL SAFETY
Whilst working on powered mobility products, it is essential to observe good
working practice.
Below are a series of safety guidelines and recommendations.
Please note that these precautions are intended to serve only as a guide and are
not intended to supersede or replace any safety statute, NHS or other safety
regulations.
General
•
Always wear suitable protective clothing when handling batteries.
•
Always wear s u it a b le e ye protection w h e n d r illin g or inspec tin g .
•
When safe to do s o, wear p rote ctive gloves whe n h and ling the run n ing gea r
or batteries, as these parts are exposed to paths, parks etc.
•
If the drive wheels have to be raised of the floor, always use a pair of axle
stands to secure the vehicle correctly.
Batteries
All work carried out on batteries or battery boxes should demand a degree of
extra caution.
•
Always make sure that the batteries are disconnected from the vehicle before
commen cing work.
•
Always check that the battery charger is disconnected from the vehicle /
batteries before comm encing work.
•
Do not smoke.
•
Keep batteries away from all sources of ignition.
•
Do not place objects on the battery tops.
•
Always try to k e ep so m e o n e within e ar shot of your work area so that they
may come to your assistance if needed.
•
Always wear personnel protection when handling batteries including, eye /
face protection and gloves.
•
Make sure there is easy acce ss to soap and wa ter in case of acid spills.
•
Avoid touching eyes or unprotected parts of the body while working on
batteries.
•
Remember that none sealed batteries can contaminate any packaging,
housing, or boxes they may have been transported in, so handle all
packaging with care especially when disposing of.
•
If battery acid should come into contact with bare skin or clothing, be sure to
wash immediately using plenty of soap and water. If battery acid enters the
•
eyes, flush with running cold water for as long as possible while medical help
is sought.
ELITE/ONYX
SAFETY
1
Page 7

SAPPHIRE
GENERAL SAFETY
Batteries
· When the tops of batteries are exposed, take extra care when working on or around the
terminals.
· Do not allow metal tools to drop on to or touch the exposed terminals of the batteries or
other exposed connections as this could cause a short circuit, which may result in an
explosion.
· Remove personnel items of jewellery such as rings, watches, chains etc. before
commencing work on batteries. If such items were to cause short circuit whist being
worn, very serious burns would result.
· Batteries are constructed using very heavy materials, because of this it is essential that
correct lifting techniques be employed when moving batteries around. It is also
recommended that safety footwear be worn.
· When disposing of old batteries, please ensure that correct disposal procedures are
followed. Contact your local authority for their recommendations.
Battery Chargers
· Remember battery chargers are Mains Driven Units.
· Always observe all guidelines and laws relating to mains-connected installations and
equipment.
· Never operate the battery charger in wet or damp conditions.
· If you suspect that the charger has been exposed to water or excessive damp, do not
use it. Return the unit back to the dealer/supplier for inspection.
· If the battery charger is suspected of being defective or is visibly damaged, return the
unit back to the dealer for inspection.
2
ELITE/ONYX
SAFETY
Page 8

RECOMMENDED TOOLS
1. Metric socket set.
2. Imperial socket set.
3. Hexagon wrenches, (imperial & metric).
4. 3.5 - 8mm flat screwdriver.
5. No. 0 cross-head screwdriver.
6. No. 1 cross-head screwdriver.
7. No. 2 cross-head screwdriver.
8. Metric combination spanner set 5 - 25mm
9. Imperial combination spanner set 1/8 - 1”
10. Mole grips.
11. Long nose pliers.
12. Adjustable S panner .
13. Combination pliers.
14. Ciclip pliers.
15. Hammer , (small & large).
16. Soft hammer,(rubber , hide or nylon).
17. Feeler gauges, (metric & imperial).
18. St anley knife.
19. Pin punches.
20. Electric drill, (mains/battery).
21. Drill bits, (metric & imperial).
22. Hacksaw , (standard & junior).
23. T oque wrench.
24. Steel engineering rule.
25. Tape measure.
26. T yre pump.
27. Tyre pressure gauge.
28. Personal safety gear.
29. Wire strippers/cutters.
30. Tag crimper .
31. Multi-meter.
32. Battery tester.
33. Hand held electronic programmers.
34. Parts manuals & wokshop manuals.
35. Tyre levers.
3
Page 9

Service & Inspection
ANNUAL
Controller Electrical
• On/off Switch • Loom
• PCB Plug Connections • Connections
• Operation • Lights/Indicators
• Dynamic Braking
• Programmable Settings, (where applicable).
• T est Run
Drive
Batteries • Forwards
• Reverse
• Physical Inspection . • Emergency Stop
• Connections • Left Turn
• Discharge T est • Right Turn
• Up/Down Slope • Over Obstacles
• Parking Brake
Wheels & Tyres
• Wear
• Pressure, (Pneumatic Only).
• Bearings, (Where appropriate).
• Wheel Nuts
• Castors, (Where appropriate).
• Stub Axles
Motors
• Wiring
• Noise
• Connections
• Brake
• Brushes.
Chassis
• Condition, (W elded Joints etc.).
• Steering, (T wists etc.).
Upholstery / Seat
• Seat
• Back
• Arm pads
• Seat Slide Mechanism, (where fitted).
• Set Post Assy .
4
Page 10

TECHNICAL SPECIFICATIONS
maximum range* 57 km
forward speed maximum 12 km/h
reverse speed maximum 5 km/h
turning circle 115 cm
incline 1:4 (25%), max. user weight 115 kg
incline 1:5 (20%), max. user weight 150 kg
total weight (excl. batteries) 82 kg
total length 138 cm
total width 67 cm
weight heaviest part 64 kg
batteries 74 AH
weight batteries each (74 AH) 26.5 kg
adjustable seat height 48 - 55 cm
backrest height 52 cm
seat depth 43 cm
seat width 51 cm
Elite XS 3-Wheel
* Range is calculated under test conditions. Weight, terrain and weather conditions can
affect range and speed.
5
Page 11

maximum range* 57 km
forward speed maximum 12 km/h
reverse speed maximum 5 km/h
turning circle 162 cm
incline 1:4 (25%), max. user weight 115 kg
incline 1:5 (20%), max. user weight 150 kg
total weight (excl. batteries) 87 kg
total length 138 cm
total width 67 cm
weight heaviest part 69 kg
batteries 74 AH
weight batteries each (74 AH) 26.5 kg
adjustable seatheight 48 - 55 cm
backrest height 52 cm
seat depth 43 cm
seat width 51 cm
Elite XS 4-Wheel
* Range is calculated under test conditions. Weight, terrain and weather conditions can
affect range and speed.
TECHNICAL SPECIFICATIONS
6
Page 12

TECHNICAL SPECIFICATIONS
ONYX
*Range given represents test conditions. Please note that temperature,
user weight, terrain and battery capacity may affect overall performance.
Overall Length 54" / 138 cm
Overall Width 26" / 67 cm
Max.user weight 330 lbs / 150 kg / 23.5 st
Max.Gradient (1) 14 degrees - 115 kg user weight
Max.Gradient (2) 11 degrees - 150 kg user weight
Range* 24 m / 37 km
Speed 8 mph / 12 kph
T urning Radius 63" / 162 cm
Weight (excluding batteries) 190 lbs / 87 kg
Battery Capacity 50 AH
Adjustable seat height 19" - 23" / 48 cm - 58 cm
Front wheel diameter 12" / 31 cm
Rear wheel diameter 12" / 31 cm
7
Page 13

Function Fast Slow 8kph 6kph
Forward acceleration 25 25
Forward deceleration 15 15
Reverse acceleration 20 20
Reverse deceleration 20 20
Forward speed with 2K5 resistor 100 100 66 50
Reverse speed 35 35
Invert throttle polarity yes
Power down timer 0 m
Accessible only with SP1b v2.2
Current limit 1 10A 1 10A
Motor compensation 60m&! 60m&!
Hold factor/hold comp 180% 180%
Mid current 0s
mid time 0%
Brake time 15
ISO tests on **
Bridge hold time 20
Throttle gain 100
Pulse reverse alarm yes
Wig-wag throttle yes
Low battery flash inhibit yes
Soft stop yes
Throttle deadband 10%
Output voltage 25V
Trucharge cable resist ance 40m&!
Trucharge cal 100
Max charge amps 30
Min charge amps *
Accessible only with SP1e To p Bottom
Profile 1 80
PROGRAMME FOR ELITE, ONYX
Accessible with SP1
8
Page 14

ELITE-ONYX
FRONT BUMPER ELITE XS (3W)
1. The front bumper is secured at
each end by two hex stud bolts.
2. The nuts are between the outer
chassis member and the edge of the
foot board.
3. Use a 10.00mm open spanner and
a 5.00mm hex key , to undo the bolts.
4. Remove all four bolts.
5. Finally , remove the bumper.
6. Note that the bumper has a smooth
curved profile on the top surface and
an angled profile underneath.
9
Page 15

ELITE-ONYX
FRONT WHEEL/BRAKE ELITE XS (3W)
1. With the bumper removed it is
easier to access the front brake.
2. Use a 4.00mm hex driver to release
the brake anchor stud.
3. The Brake Anchor Stud & W ashers. 4. Turn the brake adjuster and locking
wheel to align their slots with the slot
in the bracket.
5. Pull the brake cable cap out of the
adjuster.
6. Drop the cable through the slots.
10
Page 16

ELITE-ONYX
11
FRONT WHEEL/BRAKE ELITE XS (3W)
7. Free the cable & it’s spring from
the bracket.
8. Aline the cable with the slot in the
actuator lever.
9. Pull the brake cable & nipple out of
the actuator lever.
10. Use a 10.00mm cranked hex key
to loosen the front axle.
1 1. Use a 19.00mm. socket to secure
the other end of the front axle.
12. Once the axle is loosened, jack the
front wheel up until it clears the floor.
Page 17

ELITE-ONYX
12
FRONT WHEEL/BRAKE ELITE XS (3W)
13. Undo the dome nut and washer
using finger pressure.
14. Turn the other side ant-clockwise
and pull the axle slowly out.
15. Be careful not to lose the two shim
washers as the axle retreats through
the wheel.
16. Remove the large spacer as the
axle withdraws from the wheel and
fork.
17. With the axle removed, lift the
front wheel clear of the forks.
18. Lift the brake assembly out from
the centre of the wheel.
Page 18

ELITE-ONYX
REAR WHEELS ELITE XS
1. Use a small flat-blade screw driver
to get under the hub cap tag.
2. Carefully prize the hub cap off.
3. Use a 19.00mm socket to loosen
the hub nut.
4. Use a jack or blocks to lift the rear
wheel. Note that the jack should only
be placed under the chassis box
sections, not the flat panels.
5. Use the socket with hand pressure,
to undo the hub nut fully .
6. Remove the hub nut.
13
Page 19

ELITE-ONYX
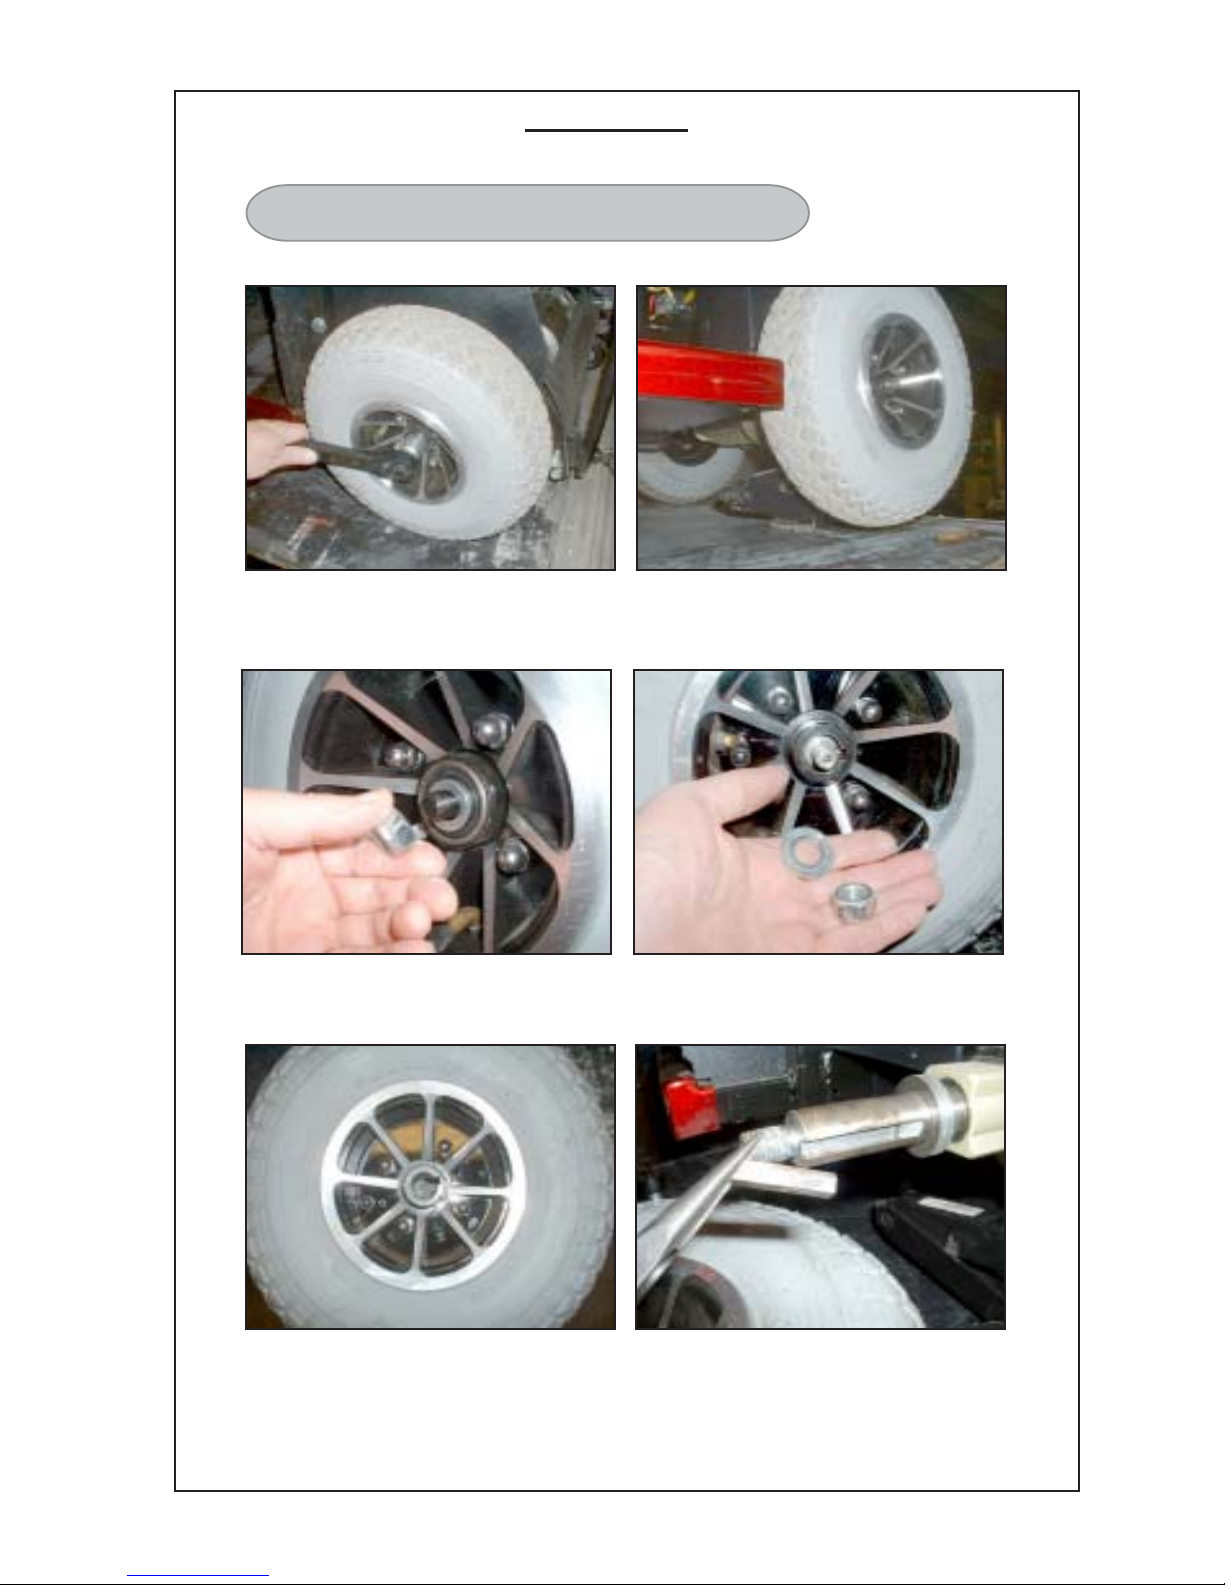
REAR WHEELS ELITE XS
7. Remove the large washer.
8. Because the rear wheel is keyed to
the drive shaft, a small ammount of
force may be carefully applied to
loosen the wheel.
9. Remove the wheel. 10. Remove the drive key .
1 1. Remove the spacer . Note that
there is a rebate cut into the end of the
inside face of the spacer .
12. The locating circlip that the spacer
rebate encloses. This circlip correctly
positions the rear wheel on the drive
shaft.
14
Page 20

ELITE-ONYX
15
FRONT WHEELS ONYX
1. View of the front wheel.
2. With the wheel on the ground, use
a 19.00mm socket to loosen the
centre self-locking nut
3. Once the centre nut is loosened,
raise the wheel using a jack or axle
stands/blocks.
4. Remove the centre nut using finger
pressure only .
5. Remove the washer.
6. Carefully remove the wheel.
Page 21
ELITE-ONYX
16
REAR WHEELS ONYX
1. Using a 19.00mm socket, loosen
the rear wheel while it is still on the
ground.
2. Use a jack or axle stands/blocks, to
elevate the wheel.
3. Use finger pressure to remove the
centre nut.
4. Remove the nut and washer.
5. Note that there is a key way cut in
the centre of the rear wheel.
6. Remove the corresponding key
from the drive shaft.
Page 22

ELITE-ONYX
17
TYRES & TUBES ONYX
1. Remove the dust cap from the tyre
valve.
2. Depress the valve pin. T o release
as much of the air as possible,
squeeze the tyre.
3. Using a soft face hammer , carefully
tap around the circumference of the
back of the tyre.
4. Then tap around the front. This
action helps to break the seal on the
rims to aid removal.
5. The front face of the wheel has
4-dome nuts securing the hub.
6. The rear face of the wheel has 4 corresponding captured studs.
Page 23

ELITE-ONYX
18
TYRES & TUBES ONYX
7. With the air out, loosen the four hub
nuts using the opposites sequence,
but don’t take them off.
8. Once the hub nuts are loosened,
use the socket shaft and finger pressure to fully remove them.
9. Remove the hub nuts.
10. Remove the washers.
1 1. Turn the wheel over . 12. Lift the hub away from the rims.
Page 24

ELITE-ONYX
19
TYRES & TUBES ONYX
13. Lift the inner rim away from the
tyre. A non-corrosive release agent
will help.
14. Turn the wheel over and repeat for
the outer rim. Note; Be careful if using
metal tyre levers as excessive force
on the rim edge may cause fracture.
15. With the rims removed, reach into
the tyre and gently pull the tube out.
16. The Hub, Hub Nuts, W ashers and
Centre Wheel nut.
17. The Outer & Inner Rims.
18. The Tyre & T ube.
Page 25

ELITE-ONYX
TYRES & TUBES ELITE XS
1. The five rim studs are accessed
from the back of the wheel.
The Elite XS has different types of wheel rims to the Onyx. The outer rim has
an integrated hub, but the basic process is the same.
2. Remove the valve dust cap and deflate the tyre as previously described.
3. Squeeze as much of the air out of
the tyre as is possible. At this st age,
use a non-corrosive releasing agent
between the tyre & rim.
4. Remove the five recessed rim
studs using a 4.00 mm hex key/driver.
5. Remove the inner rim from the tyre.
6. Lift the outer rim from the tyre & proceed as before to remove the tube. Note
that the outer rim has an integrated hub.
20
Page 26

ELITE-ONYX
21
FRONT BRAKE ELITE XS(4) & ONYX
1. With the wheel removed the front
brake can be accessed.
2. Locate the brake actuator lever.
3. Push the brake actuator lever, so
that it releases the tension on the
cable.
4. Push the Nipple on the end of the brake
cable, out of the actuator lever.
5. Carefully turn the brake adjuster
until the slots line up with the slot in
the bracket.
6. Release the end of the brake cable.
Page 27

ELITE-ONYX
22
FRONT BRAKE ELITE XS(4) & ONYX
7. The brake assembly is secured by
two bolts either side. The nuts are
visible from the front.
8. The bolt heads are accessed from
behind the brake assembly .
9. Use a 13.00mm open spanner on
the nuts.
10. Use a 13.00mm ring spanner on
the bolt heads.
1 1. Access is easier if the fingers are
used when the nuts are loose enough
to remove. Repeat for the other side.
12. Finally , remove the brake assembly
from the stub axle.
Page 28

ELITE-ONYX
23
SEAT ASSEMBLY REMOVAL ELITE XS & ONYX
The seat removal process is the same for the Onyx and the Elite XS seats.
1. Lift the armrests up. 2. Pull the backrest lever up.
3. Fold the backrest forward.
4. Stand behind the seat, lif t the seat
swivel lever up and lift the seat off the
seat post.
5. The complete seat assembly
removed.
Page 29

ELITE-ONYX
SEAT POST REMOVAL ELITE XS & ONYX
2. Remove the seat and rear panel to
access the seat post bolt, (see previous
and next page).
1. The seat post in situ.
3. Use two 17.00 mm spanners to
loosen the seat post bolt.
4. T ake the nut and washer of f using
finger pressure.
5. Hold the top of the seat stem to
prevent it from falling when the bolt is
withdrawn.
6. Lift the seat stem out. Note the
height positioning holes in the seat
stem.
24
Page 30

ELITE-ONYX
25
SEAT ASSEMBLY ELITE XS & ONYX
1. Turn the seat over to access the two
armrest width adjuster knobs.
2. Loosen both knobs.
3. Withdraw the armrests.
4. There are four nuts securing the
seat plate assembly .
5. Use a 13.00 mm socket to undo the
four seat plate securing nuts.
6. Lift the seat plate assembly off the
four seat rail studs.
Page 31

ELITE-ONYX
SEAT ASSEMBLY ELITE XS & ONYX
7. The seat plate assembly removed.
8. There are four hex bolts securing
the two seat rails top and bottom.
9. Slide the seat rails forward to
expose the bottom bolts and use a
5.00 mm hex key to undo them.
10. Depress the seat slide and slide
the rail back to expose the top two
bolts. Note that the other rail slides
freely .
1 1. Undo the top two bolts.
12. Lift the seat rails off the seat
assembly .
26
Page 32

ELITE-ONYX
27
SEAT ASSEMBLY ELITE XS & ONYX
CAUTION!
The seat swivel lever assembly uses a strong locating spring. When
working on this assembly , always wear suitable eye protection.
13. The seat swivel lever showing the
position of the spring.
14. For safety , use a strong tie wrap to
secure the spring as shown above.
15. Use a second tie wrap, adjusted
slightly looser to catch the spring if it
flies up.
16. Use a 5.00 mm hex key and a
13.00 mm socket, to undo the fulcrum
nut.
17. Carefully remove the fulcrum bolt.
18. With the fulcrum bolt removed, cut
the first tie wrap.
Page 33

ELITE-ONYX
SEAT ASSEMBLY ELITE XS & ONYX
19. Lift up the lever to relieve the
spring pressure and then cut the
second tie wrap.
20. Remove the spring by pulling the
two coiled sections off the lever fulcrum.
21. The lever & spring assembly .
22. The lever can be fitted to either
side of the seat plate, providing left or
right-hand operation.
23. The lever & spring showing the
correct orientation of the spring ready
for refitting.
24. Squeeze the two ends of the
spring into the two holes whilst holding
the lever vertically . The angled end of
the lever should face away from the
seat post.
28
Page 34

ELITE-ONYX
SEAT ASSEMBLY ELITE XS & ONYX
25. Ease the lever down so that the
fulcrum lines up with the pressing on
the seat plate. Use a screwdriver to
line up the holes.
26. Hold the lever steady and insert the
fulcrum bolt.
27. Drive the bolt through the fulcrum
using a hex driver.
28. Tighten the nut & bolt, but do not
over-tighten.
29. The angle on the lever head
should be facing downwards, towards
the seat plate.
30. Operate the lever several times to
ensure it does not stick. If it is stiff,
loosen the fulcrum nut and bolt slightly
until a smooth action is obtained.
29
Page 35

ELITE-ONYX
BATTERIES & CHARGER ELITE XS & ONYX
1. Unlock the boot using the ignition
key .
2. Lift out the battery charger and cords.
3. Lift up the two plastic battery cover
clips.
4. Carefully lift the rear panel tags out
of the two location slots in the floor
panel.
5. Pull the panel forwards. 6. Finally , lift the panel away from the
scooter.
30
Page 36

ELITE-ONYX
31
BATTERIES & CHARGER ELITE XS & ONYX
7. The two batteries. Note that the
battery size is 50A/h on the Onyx &
74A/h on the Elite.
8. Disconnect the two Anderson
battery connectors.
9. Undo each of the velcro retaining
straps.
10. Use the correct lifting technique to
remove the batteries.
1 1. Remove the batteries one at a time.
12. The battery compartment.
Page 37

ELITE-ONYX
32
REAR PANEL REMOVAL ELITE XS & ONYX
1. Unscrew the Parking Brake knob.
2. The rear panel is held in place by
two screws.
3. Remove the two screws.
4. Lift the front of the panel up to
access the rear lighting loom plugs.
5. Unplug the rear lighting loom.
6. Lift the panel clear of the scooter .
Page 38

ELITE-ONYX
33
REAR LIGHTS & INDICATORS ELITE XS & ONYX
1. Remove the rear panel as described earlier.
2. Flip the pane up to expose the
underside and loom.
3. Cut the small tie wrap located on
the bottom of the storage compartment.
4. Cut the next tie wrap situated just
below the first.
5. Cut the tie wrap next to the right
hand light cluster.
6. Cut the tie wrap next to the left hand
cluster.
Page 39

ELITE-ONYX
34
REAR LIGHTS & INDICATORS ELITE XS & ONYX
7. The two rubber bulb holders at the
back of the light cluster.
8. T wist and turn the holder to remove
it from the back of the light cluster.
9. Carefully pull the bulb out of the
holder. All rear bulbs are 24V - 5W
Capless type.
10. Both bulb holders removed.
1 1. The rear lighting loom removed. 12. View of the flexi-clip on the light-
ing cluster body ..
Page 40

ELITE-ONYX
REAR LIGHTS & INDICATORS ELITE XS & ONYX
13. Use a flat blade screwdriver to
gently prise the flexi-clip through the
panel.
14. Lift the light cluster part way out.
15. Withdraw the light cluster taking
care not to break the straight locating
tab.
35
Page 41

ELITE-ONYX
REAR CHASSIS - BRAKE LEVER/LOOM
1. The brake lever is secured to the
motor brake handle.
2. Use an 8.00mm socket & X-head
screw driver to undo the nut and bolt.
3. Lift the brake lever out of the bottom
mount.
4. Slide the top of the brake lever out
the “P” clip.
5. Unplug the small white molex plug.
6. Unplug the main motor loom plug
from main control box.
36
Page 42

REAR CHASSIS - PANELS & CHASSIS BOLTS
1. Undo the two screws on the rear
splash panel.
2. Remove the splash panel.
3. Repeat for the other side. Note that
the upper screws are larger than the
lower screws.
4. Remove the rear wheel as previously
described.
5. This exposes the rear wheel back
panel.
6. Undo the screws.
37
ELITE-ONYX
Page 43

ELITE -ONYX
REAR CHASSIS - PANELS & CHASSIS BOLTS
7. Loosen the nut and bolt but do not
remove it yet.
8. It is a good idea to place the screws
back into the frame for safe keeping.
9. There are two bolts found at each
side of the rear frame.
10. Use a 17.00mm socket & spanner
to remove the nuts.
1 1. Note that the bolt will not normally
come out of the frame using the
socket.
12. Use a soft faced hammer to carefully tap the bolts through the frame.
38
Page 44

ELITE-ONYX
REAR CHASSIS - PANELS & CHASSIS BOLTS
13. Be aware that there is a washer
between the left & right, rear chassis
struts.
14. The top chassis bolt.
15. Use a 10.00mm hex key &
19.00mm spanner , to undo and
remove the top bolt.
16. Carefully pull the drive assembly
away from the main chassis.
17. Retrieve the washers & don’t
forget to fit them back when reassembling the scooter.
18. Place the drive assembly on a work
bench for easier access.
39
Page 45

ELITE-ONYX
REAR CHASSIS - PANELS & CHASSIS BOLTS
19. Lift the splash panels out of the
bottom bolts taking care not to break
the slots.
20. Remove the two self-tapping
screws from the rear valance.
21. Remove the rear valance by
carefully feeding the brake release
lever through the slot in the valence.
22. It’s a good idea to put the screws
back in the frame for safe keeping.
23. There are four , transaxle mounting
bolts. T wo on the left hand side.
24. T wo on the right hand side.
40
Page 46

ELITE-ONYX
REAR CHASSIS - TRANSAXLE
1. View of the four nylok transaxle
securing nuts, located on top of the
assembly.
2. View of the four transaxle securing
studs, located under the assembly .
3. For easy access to the nuts &
studs, turn the drive assembly so that
it rests on the stabiliser wheels.
4. Use a 13.00mm socket & 6.00mm
hex key to loosen the studs, but do not
remove them yet.
5. Repeat for the lower stud. 6. Turn the drive assembly around to
access the other set of studs.
41
Page 47

ELITE-ONYX
REAR CHASSIS - TRANSAXLE
7. Repeat for the upper stud. 8. And finally , the lower stud.
9. Remove the nuts using finger pressure.
10. Don’t forget to remove the washers also.
1 1. Some studs may drop out of the
frame quite easily .
12. Some studs may require tapping
out with a soft face hammer .
Caution! The transaxle may suddenly move when the studs are removed. Ensure that the drive assembly is in a stable work area and that
your fingers are clear of the frame & work top.
42
Page 48

ELITE-ONYX
REAR CHASSIS - TRANSAXLE
13. Lift the “U” brackets off the
transaxle.
14. Carefully lift the transaxle out of the
drive assembly frame.
Caution! The transaxle is heavy. Use proper lifting techniques. When
resting the transaxle on the bench, be sure that fingers & thumbs are
clear of the assembly .
15. Remove the spacers.
16. Note that two of the transaxle
mounting studs cannot be removed at
this stage, due to a clash with the
suspension struts.
17. The transaxle removed from the
drive assembly frame.
18. It is a good idea to put the studs/
brackets back onto the frame for safe
keeping.
43
Page 49

ELITE-ONYX
REAR CHASSIS - SUSPENSION STRUTS
1. The two rear suspension struts.
2. The struts are adjustable by turning
the large adjustment wheel with mole
grips. Both struts must be evenly
tensioned.
3. The struts are secured by two
concentric studs. Use two 5.00mm
hex keys/drivers, to undo them.
4. Repeat the process for the top studs.
5. Note the use of thread-lock on the
inner concentric studs.
6. Withdraw the outer concentric stud.
This process can be carried out with the transxle still in place, if required.
44
Page 50

ELITE-ONYX
REAR CHASSIS - STRUTS & STABILISERS
7. Drop the strut out of the top mounting.
8. Remove the lower concentric stud.
9. Lift the suspension strut out of the
frame, (the transaxle stud described
previously , can now be removed).
10. The stabiliser wheels are secured
by a nylok nut.
1 1. Use 8.00mm hex key ........
12. and a 17.00mm socket to undo the
axle studs.
45
Page 51

ELITE-ONYX
REAR CHASSIS - STABILISERS & BUMPER
13. Remove the nut. 14. Slide the stabiliser wheel off the
axle stud.
15. Slide the spacer off the axle stud. 16. Withdraw the axle stud from the
frame. Repeat the process for the
other stabiliser .
17. The rear bumper is secured by the
stabiliser axle studs, (that have just
been removed), and a further two
studs.
18. Use the 8.00mm hex key and
17.00mm socket to undo these studs.
46
Page 52

ELITE-ONYX
REAR CHASSIS - BUMPER & FRAME
19. Remove the studs on both sides. 20. Lift the bumper off.
21. Use a 17.00mm socket and a
13.00mm spanner , to undo the rear
frame pivot bolts.
22. T ake extra care when loosening/
removing the pivot bolts as the frame
can drop down suddenly .
23. Lift the two halves of the frame
apart.
24. The two halves of the rear frame.
47
Page 53

ELITE-ONYX
MAIN FUSE
1. Disconnect & remove the batteries
to expose the main 150A fuse holder .
2. Be careful when removing the
plastic fuse cover as it is easy to
break the four locating lugs.
3. Use an 8.00mm socket/spanner to
undo the fuse ring-tag connectors.
4. Remove the ring tags.
5. The main fuse is held on the two
studs.
6. Use fingers to remove the main fuse.
48
Page 54

ELITE-ONYX
MAIN FUSE, FUSE PANEL & PROGRAM SKT.
7. The main 150A fuse and cover.
8. Fuses for the lights, indicators, front
remote control and battery charger, are
located under the black plastic cover.
9. Carefully unclip the cover and
remove it to access the fuses.
10. There are six blade fuses in total,
each have the rating in amps marked
on the body .
1 1. T o remove the fuse, carefully pull
the body using finger force only ,
(not pliers). always replace fuses with
the correct value and type.
12. The programming socket is located
next to the fuse panel on the Elite only .
The Onyx is programmed directly into the
Egis main control box.
49
Page 55

ELITE-ONYX
MAIN CONTROL BOX
1. The main control box is located
behind the fuse panel.
2. Disconnect the main loom plug.
3. Remember to squeeze the locking
tab to release the plug. Be careful not
to pull the wires.
4. Release the square molex programming plug next.
5. Use the locking tag to release the
programming plug.
6. Finally , squeeze the end tabs to
release the power & motor looms.
50
Page 56

ELITE-ONYX
MAIN CONTROL BOX
7. The main control box is secured by
two screws located in a recess at
each side.
8. Use a cross-head screwdriver to
undo the screws.
9. Be careful when withdrawing the
screws as white compound may cover
the ends of the thread.
10. Carefully pull the main control box
away from the rear of the fuse panel
plate.
1 1. The rear of the main control box is coated with sticky white heatsink compound.
Avoid contact with the skin and clothing.
It is important that more heatsink compound is applied when fitting a new main control box.
The heatsink compound is available from electronics stockists, ( RS Components, Maplin).
51
Page 57

ELITE-ONYX
TILLER FASCIA PANEL
1. Carefully lift the base of the T iller
Fascia Panel using a flat blade
screwdriver. It is a push fit.
2. Lift the fascia up to expose the
plugs on the underside.
3. Locate the large white molex plug.
4. Press the plastic catch on the plug
to remove it from the PCB.
5. Next, locate the smaller white and
orange plugs.
6. Press the catch down on these two
plugs to remove them from the PCB.
52
Page 58

ELITE-ONYX
TILLER FASCIA PANEL & TILLER BACK PANEL
7. Remove the two plugs.
8. Use the same procedure to remove the blue plug.
9. When the plugs are disconnected,
remove the fascia and store it in a
safe place for reuse, or fit new one.
10. Location of tiller back panel screws.
1 1. Unscrew the Tiller Adjust Handle &
remove it.
12. Undo the six screws in the tiller
back panel.
53
Page 59

ELITE-ONYX
TILLER BACK PANEL
13. Lift away the tiller back panel to
expose the looms behind it.
14. Unclip and disconnect the orange
plug.
15. Do the same with the green plug.
16. Finally , unclip and disconnect the
white plug.
17. Remove the tiller back panel.
54
Page 60

ELITE-ONYX
HAND BRAKE & TILLER FRONT PANEL
1. Loosen the hand brake, but do not
remove it yet.
2. Squeeze the hand brake, grab the
brake cable, let the brake handle go
and at the same time pull firmly on the
cable.
3. The brake cable should pop out of
the location groove.
4. It may be easier to rotate the hand
brake to gain access to the cable
retaining rebate.
5. Release the brake nipple from the
handle.
6. Feed the brake cable back through
the hole in the tiller front panel. Remove the Handbrake if required.
55
Page 61

ELITE-ONYX
TILLER FRONT & TOP PANEL
1. Undo the two Basket Bracket
screws.
2. Remove the Basket Bracket.
3. Undo the two Tiller T op Panel
screws.
4. Withdraw the Tiller T op Panel.
5. Make sure all of the remaining plugs
are disconnected & remove the Tiller
Front Panel.
6. The three tiller panels removed.
56
Page 62

ELITE-ONYX
TILLER - HORN & REFLECTOR
1. The Horn or Audible Warning Device, (AWD), is located on the T iller
Front Panel.
2. The horn, (AWD), is secured by one
of the Reflector fixing screws.
3. Undo the screw to remove the Horn,
(AWD).
4. Undo the remaining three screws.
5. Lift the Reflector off the mounting
posts.
6. The AWD & Reflector .
Note that the longer screw secures the horn.
57
Page 63

ELITE-ONYX
TILLER - INDICATORS - BULBS
1. The front Indicators are retained by
plastic clips on the Tiller Front Panel.
2. There are two retaining clips per
indicator, acting as a bayonet fixing.
3. T o release the Indicator unit, twist
the indicator body untill the clips align
with the square cut out section.
4. Feed the whole assembly through
the cut out in the panel.
5. The bulb holder is a push-fit, simply
pull it out from the lense.
6. The bulb is also a push-fit, to release it, carefully pull on the glass
bulb. 24V 5W Capless.
58
Page 64

ELITE-ONYX
TILLER - CHARGING SOCKET
1. The Charging Socket is located on
the front of the Tiller Front Panel.
2. Slide the socket cover over to the
side to expose the two mounting
screws for removal.
3. The sprung cover screw is located
at the back of the socket, unscrew this
with care as it could pop out suddenly .
4. Carefully remove the Charging
Socket from the front of the panel.
5. Be careful not to lose the tiny spring. 6. The Charging Socket and screw .
59
Page 65

ELITE-ONYX
TILLER LOOM.
1. Unclip the metal cable tag located
half way up the Tiller stem.
2. Undo the Rubber Gaiter securing
screw.
3. Carefully roll the rubber gaiter back
to expose the tiller bracket.
4. Note that the lower cable tag holds
the loom clear of the mobile joint.
5. Release the cable tag. 6. Check the cables for chaffing or splits.
60
Page 66

ELITE-ONYX
TILLER ADJUSTMENT & WELD ASSY.
1. Use 6.0mm Hex key to partially
undo the top cylinder mounting studs.
2. With the studs still together but
screwed almost out, gently tap the
standard stud to push through the
sleeved stud.
3. Remove the standard stud and
carefully lower the cylinder. Remove
the sleeved stud.
4. The lower cylinder bracket.
5. The lower cylinder bracket requires
a 12.0mm and a 10.0mm spanner /
socket to undo it.
6. Lift the Cylinder T iller Adjuster away .
61
Page 67

ELITE-ONYX
TILLER ADJUSTMENT & WELD ASSY.
7. Unclip any remaining loom ties.
8. Unplug any remaining connectors.
9. Move the cables clear of the Tiller
Bracket.
10. Use a 12.0mm socket & 10.0mm
spanner to undo the T iller Bracket
bolts.
1 1. Carefully lift the T iller Weld Assembly out of the Tiller Bracket.
12. Remove the Tiller W eld Assy .
62
Page 68

ELITE-ONYX
TILLER BRACKET
1. Unplug any remaining connectors
that may be under the rubber gaiter.
2. Remove any disconnected looms.
3. Clear the remaining looms out of
the way to expose the Tiller Bracket
Fixing Stud.
4. Use a 13.0mm socket to undo the
stud, but be aware that the steering
may turn onto the steering stop.
5. Lift the T iller Bracket out from the
Steering Head.
6. Note the serrations at the bottom of
the bracket assy . When refitting the
bracket, ensure the steering is
aligned parallel and straight ahead.
63
Page 69

ELITE-ONYX
GAITER & FRONT BUMPER (4-Wheel)
1. Carefully feed the rubber gaiter
over the remaining looms and brake
cables to remove it.
2. Cut the last remaining plastic tie wrap.
3. The two Front Bumper fixing studs
are located directly beneath the
bumper mounting bracket.
4. Use a 5.0mm hex key to undo the
two studs.
5. Remove the Front Bumper.
64
Page 70

ELITE-ONYX
HEADLAMP & BULB - (4-Wheel)
1. Access to the headlamp is improved if the left-hand, front wheel, is
removed.
2. The headlamp is secured by two
hex studs.
3. Use a 5.0mm hex key or driver, to
undo the two studs.
4. Carefully remove the Headlamp unit
taking care not to damage the rubber
beading attached to the panel.
5. When refitting, slide the headlamp
unit tight up against the rubber beading. Note the mounting bracket has
elongations to facilitate this.
6. The headlamp bulb is accessed
through the back plastic cover at the
rear of the headlamp unit.
65
Page 71

ELITE-ONYX
HEADLAMP & BULB - (4-Wheel)
7. Press the clip down on the re-useable tie wrap to release it and pull the
black rubber cover back to expose the
lamp holder.
8. There may be two redundant wires
inside the rubber cover, these are not
used, but check that they are insulated.
9. The bulb holder is a bayonet type.
Twist and pull to release it.
10. Withdraw the bulb. 24V - 15W.
1 1. The Headlamp unit components.
66
Page 72

ELITE-ONYX
HEADLAMP - (3-Wheel)
1. Undo the two screws located just
above the headlamp.
2. The Headlamp can then be withdrawn from the cowling as a complete
unit. Don’t forget to disconnect the
headlight loom from the main loom.
3. Unclip the reusable tie wrap. 4. Pull the rubber cover back.
5. T wist and turn the bayonet-fit terminal cover.
6. Remove the 24V - 15W bulb.
67
Page 73

ELITE-ONYX
FRONT BODY PANEL (4-Wheel)
1. Undo the two self-tapping screws
at the front of the body panel.
.
.
.
.
2. There are four further screws located
in the foot mat.
3. Unscrew all four self tapping screws.
4. Lift the body panel up from the front.
5. Note that there is a velcro pad
under each wheel arch and corresponding chassis member.
6. The 4-wheel Front Body Panel.
68
Page 74

ELITE-ONYX
FRONT BODY PANEL (3-Wheel)
Remove the Tiller using the same procedure as the 4-wheel scooter .
Remove the bumper as previously described.
Please note that the photographs below do not show the foot mat.
The screws can be accessed without removing the foot mat, exactly
the same as the 4-wheel version.
1. Unscrew the left-hand front self
tapping screw
2. and the right-hand screw.
3. Undo the two self tapping screws
at the rear of the foot board.
.
.
.
.
4. Lift the Footboard clear of the frame.
69
Page 75

ELITE-ONYX
MAIN LOOM
1. Start at the back of the scooter .
2. Unclip the two square molex plugs.
3. Unclip the small molex plug. 4. Cut the plastic tie wrap.
5. Unclip any remaining plugs.
6. Make sure the loom is free of cable
ties and connections.
70
Page 76

MAIN LOOM
7. Prop up the back of the scooter
frame.
8. The lower splash guard has to be
removed.
9. Undo the two screws located directly below the splash guard.
10. Remove the splash guard.
1 1. It is a good idea to screw the
screws back into the frame for safe
keeping.
12. Release the cable clip at the base
of the flat form loom.
71
ELITE-ONYX
Page 77

ELITE-ONYX
MAIN LOOM
13. Turn the chassis on it’ s side for
easier access.
14. Start by undoing the wire clip at
the rear end of the loom.
15. The loom runs inside a metal
channel. There are a further three
clips to undo along this channel.
16. The final clip is located at the front
of the channel.
17. Gently feed the loom out of the
channel.
18. The Main Loom.
72
Page 78

STUB AXLE (4-Wheel)
1. The S tub Axle assembly can be
removed with or without dismantling
the Steering rods first. This example
shows removal with the steering still
in place.
2. Use a 6.0mm hex key on the securing stud.
3. Use a 13.0mm socket on the nut
below the securing stud.
4. With the nut removed, unscrew the
securing stud, as it is threaded inside
the bracket.
5. Use a 19.0mm spanner on the top
stub axle bolt.
6. Use a 19.0mm socket on the lower
stub axle nut.
73
ELITE-ONYX
Page 79

STUB AXLE
7. After removing the locking nut, use
a 19.0mm spanner to release the
second securing nut.
8. The plain nut is refitted first, followed by the self-locking nut.
9. Use care when lifting the pivot bolt
out, as there are bushes and spacers
which can fall out of the assembly .
10. Remove the Stub Axle, again
taking care not to lose the spacers
and bushes.
1 1. The top and bottom brass spacer
bushes.
12. The top sleeved bush.
74
ELITE-ONYX
Page 80

STUB AXLE
13. Remove the bottom sleeved bush.
14. Finally , remove the internal spacer .
15. The Stub Axle assembly .
16. View of the bushing order; Brass Bush,
Sleeved Bush, Spacer , Sleeved Bush and
Brass Bush.
17. The stub axle component parts.
18. The remaining stub axle is a
“mirror image” of the previous one and
is removed using the same process.
75
ELITE-ONYX
Page 81

STEERING RODS
1. Use an 8.0mm hex key and a
17mm spanner , to release the steering rod outer stud.
2. It is only possible to remove the
lock nut not the stud.
3. Lift the steering rod up, until the stud
is clear of the stub axle.
4. The second nut is permanently
attached to the stud and acts as a
spacer.
5. The other end of the steering rod is
connected to the Steering Head.
6. Use an 8.0mm hex key and a
17mm spanner , to release the steering rod inner stud in exactly the same
way .
76
ELITE-ONYX
Page 82

STEERING RODS
7. The steering rod removed.
8. Use exactly the same process for
the other steering rod.
9. If the stub axle has been removed
before the steering rod, the stub axle
pivot bracket will have to be removed
from the steering rod.
10. Note that the two Steering Rods
are identical.
1 1. Each end of the steering rods have grease nipples to aid the application of lubricant.
77
ELITE-ONYX
Page 83

FRONT SUSPENSION STRUTS
1. The lower strut studs require two
5.0mm hex keys for removal. Because of interference with the swinging arm, a ball-end 5.0mm key is
required on the outside stud.
2. View of a ball-end hex key .
3. The studs are concentric and thread
into each other. The blue colour is
thread-lock.
4. The upper studs are removed in the
same way as the lower studs.
5. Remove the front suspension strut
and repeat the process for the other
strut if required.
6. One of the Front Suspension Strut s
showing the concentric studs. Note
that the strut can be adjusted using the
tension ring at the bottom.
78
ELITE-ONYX
Page 84

SWINGING ARM
1. The swinging arm is secured to the
main chassis by a pivot bolt.
2. Use a 13.0mm socket and a
13.0mm open spanner , to release the
pivot bolt.
3. Withdraw the long pivot bolt.
5. There is a bush in each end of the
swinging arm pivot.
4. There is an inner sleeve within the
swinging arm. Use long nose pliers to
pull this out.
6. The Swinging Arm assembly .
79
ELITE-ONYX
Page 85

STEERING HEAD (4-Wheel)
1. Use an adjustable spanner to
loosen the steering head securing
nut.
2. It is a good idea to wedge the
bottom of the steering head to stop it
turning, here a screw driver is used.
3. The steering head securing nut
should loosen quite easily .
4. As the steering head has a fine
thread it is quicker to remove the
securing nut, using the fingers.
5. Next, remove the spacer ring.
6. Again, use an adjust able spanner to
release the Steering bearing retaining
nut.
80
ELITE-ONYX
Page 86

STEERING HEAD (4-Wheel)
7. Again, use finger pressure to undo
the nut.
8. Removing the nut, exposes the top
steering bearing race.
9. Use thin nose pliers to lift the top
bearings out.
10. With the top bearings removed,
lower the steering head to expose the
bottom bearing race.
1 1. Feed the lower bearing race, up
and over the top of the steering head.
12. The 4-Wheel Steering Head Assy .
81
ELITE-ONYX
Page 87

STEERING HEAD & FORKS (3-Wheel)
1. Use an adjustable spanner to loosen
the steering head nut.
2. As this nut has a fine thread, it is
better to use fingers to undo it all the
way .
3. Remove the nut and the washer.
4. The steering bearing nut.
5. Use the adjustable spanner to
loosen the steering bearing nut also.
6. Undo the nut the rest of the way
using finger pressure.
82
ELITE-ONYX
Page 88

STEERING HEAD & FORKS (3-Wheel)
7. The top steering bearings usually
come away with the nut.
8. Steering top bearing and retaining
nut.
9. Withdraw the front fork assembly
from the steering head.
10. The lower steering bearing will
come away with the fork assembly .
1 1. View of the S teering bearings,
retaining nut and Front Fork assembly .
83
ELITE-ONYX
Page 89

NOTES
 Loading...