

Page 1

Sun Blade™X6275 Server Module
Windows Operating System
Installation Guide
Sun Microsystems, Inc.
www.sun.com
Part No. 821-0081-10
September 2009, Revision A
Submit comments about this document by clicking the Feedback[+] link at: http://docs.sun.com
Page 2

Copyright © 2009 Sun Microsystems, Inc., 4150 Network Circle, Santa Clara, California 95054, U.S.A. All rights reserved.
This distribution may include materials developed by third parties.
Sun, Sun Microsystems, the Sun logo, Sun Blade, Sun Blade X6275 Server Module and Sun company logo are trademarks or registered
trademarks of Sun Microsystems, Inc. or its subsidiaries, in the U.S. and other countries.
Intel, Intel(R) Xeon(R), and Intel Inside are trademarksor registered trademarks of Intel Corporation or its subsidiaries in the United States and
other countries.
DOCUMENTATION IS PROVIDED "AS IS" AND ALL EXPRESS OR IMPLIED CONDITIONS, REPRESENTATIONS AND WARRANTIES,
INCLUDING ANYIMPLIED WARRANTYOF MERCHANTABILITY,FITNESS FORA PARTICULAR PURPOSEOR NON-INFRINGEMENT,
ARE DISCLAIMED, EXCEPT TO THE EXTENT THAT SUCH DISCLAIMERS ARE HELD TO BE LEGALLY INVALID.
Copyright © 2009 Sun Microsystems, Inc., 4150 Network Circle, Santa Clara, California 95054, États-Unis. Tous droits réservés.
Cette distribution peut inclure des éléments développés par des tiers.
Sun, Sun Microsystems, le logo Sun, Sun Blade, Sun Blade X6275 Server Module et Sun company logo sont des marques de fabrique ou des
marques enregistrées de Sun Microsystems, Inc. ou ses filiales, aux États-Unis et dans d’autres pays.
Intel, Intel(R) Xeon(R), and Intel Inside sont des marques de fabrique ou des marques enregistrées d’Intel Corporation ou de ses filiales, aux
États-Unis et dans d’autres pays.
LA DOCUMENTATION EST FOURNIE "EN L’ÉTAT" ET TOUTES AUTRES CONDITIONS, DECLARATIONS ET GARANTIES EXPRESSES
OU TACITES SONT FORMELLEMENTEXCLUES,DANS LAMESUREAUTORISEE PAR LALOI APPLICABLE, YCOMPRIS NOTAMMENT
TOUTE GARANTIE IMPLICITE RELATIVE À LA QUALITE MARCHANDE, À L’APTITUDE À UNE UTILISATION PARTICULIERE OU À
L’ABSENCE DE CONTREFAÇON.
Page 3

Contents
Preface v
1. Overview 1
Installing the Windows OS onto a Sun Blade X6275 Server Module 1
Prerequisites 2
Things You Must Decide 2
What to Do Next 2
Using a Remote Control Application (RKVM) 3
▼ To Mount a DVD or Equivalent ISO Image 3
Dongle Cable Connections 4
▼ To Connect the Dongle for a Local Installation 4
2. Installing Windows Server 2008 Operating System 7
Task Map for the Windows Server 2008 Installation 8
Installing Windows Server 2008 Using
Local or Remote Media 9
▼ To Install Windows Server 2008 Using Local or Remote Media 9
Installing Windows Server 2008 Using a PXE Network 14
Before You Begin 14
▼ To Install Windows Server 2008 Using PXE 15
iii
Page 4

3. Post Installation 17
Downloading Server-Specific Drivers 18
▼ To Download the Server-Specific Drivers 18
Installing Server-Specific Device Drivers 19
▼ To Install the Server-Specific Device Drivers 20
Installing Supplemental Software 22
▼ Install the Supplemental Software 22
A. Incorporate Sun Blade Server Drivers Into WIM 25
Adding Drivers to a WIM Image 25
Before you Begin 25
▼ To Add Drivers to the WIM Image 26
Index 29
iv Sun Blade X6270 Server Module Windows Operating System Installation Guide • September 2009
Page 5

Preface
This guide contains instructions for installing the Windows Server 2008 64-bit
Service Pack 2 (SP2) onto the Sun Blade X6275 Server Module.
Product Updates
For product updates that you can download for the Sun Blade™ X6275 Server
Module, visit the following web site:
http://www.sun.com/download/
Find the Hardware Drivers section and click x64 Servers & Workstations. The Sun
Blade X6275 Server Module site contains updates for firmware and drivers, as well as
DVD-ROM ISO images.
Related Documentation
The documents listed in the following table are available online at:
http://docs.sun.com/app/docs/prod/blade.X6275
v
Page 6

Title Content Part Number Format
Sun Blade X6275 Server
Module Product Notes
Sun Blade X6275 Server
Module Getting Started Guide
Late-breaking information
about the server module
Basic installation information
for setting up the server
820-6853 PDF
HTML
820-6847 PDF
Print
module
Sun Blade X6275 Server
Module Installation Guide
Sun Blade X6275 Server OS
Installation Guide
Detailed installation
information for setting up the
server module
Installation instructions for
the Linux, VMware, and
820-6977 PDF
HTML
Print
820-6848 PDF
HTML
Solaris operating systems
Sun Blade X6275 Server
Module Windows Operating
System Installation Guide
Sun Installation Assistant for
Linux and Windows User’s
Guide
(This document) Installation
instructions for the Windows
Server operating system
Instructions for using the Sun
Installation Assistant (SIA)
when installing a Windows or
821-0081 PDF
HTML
820-3357 PDF
HTML
Linux operating system
Sun Blade X6275 Server
Module Service Manual
Information and procedures
for maintaining and
820-6849 PDF
HTML
upgrading the server module
x64 Servers Utilities Reference
Manual
Information for using
applications and utilities
820-1120 PDF
HTML
common to x64 servers and
server modules
Sun x64 Servers Diagnostics
Guide
Information about how to use
the diagnostic software tools
820-6750 PDF
HTML
provided with x64 servers
Sun Integrated Lights Out
Manager 2.0 User’s Guide
ILOM features and tasks that
are common to servers and
820-1188 PDF
HTML
server modules that support
ILOM
Sun Integrated Lights Out
Manager Supplement for Sun
ILOM information that is
specific to the server module
820-6851 PDF
HTML
Blade X6275 Server Module
Important Safety Information
for Sun Hardware Systems
Multilingual hardware safety
and compliance information
816-7190 Print
for all Sun hardware systems
vi Sun Blade X6270 Server Module Windows Operating System Installation Guide • September 2009
Page 7

Translated versions of some of these documents are available at the web site
described above in French, Simplified Chinese, and Japanese. English documentation
is revised more frequently and might be more up-to-date than the translated
documentation.
Documentation, Support, and Training
Sun Function URL
Sun Documentation http://docs.sun.com
Support http://www.sun.com/support/
Training http://www.sun.com/training/
Sun Welcomes Your Comments
Sun is interested in improving its documentation and welcomes your comments and
suggestions. You can submit your comments by going to:
http://www.sun.com/hwdocs/feedback
Please include the title and part number of your document with your feedback:
Sun Blade X6275 Server Module Windows Operating System Installation Guide, part
number 821-0081-10
Preface vii
Page 8

viii Sun Blade X6270 Server Module Windows Operating System Installation Guide • September 2009
Page 9

CHAPTER
1
Overview
This chapter provides instructions for tasks you must complete before you begin
installing the Windows Server 2008 64-bit operating system onto a Sun Blade X6275
server module.
This chapter includes the following topics:
■ “Installing the Windows OS onto a Sun Blade X6275 Server Module” on page 1
■ “Prerequisites” on page 2
■ “Things You Must Decide” on page 2
■ “What to Do Next” on page 2
■ “Using a Remote Control Application (RKVM)” on page 3
■ “To Mount a DVD or Equivalent ISO Image” on page 3
■ “Dongle Cable Connections” on page 4
■ “To Connect the Dongle for a Local Installation” on page 4
The Sun Blade X6275 server module consists of two nodes, each with its own service
processor (SP), and each capable of supporting its own operating system. These
nodes are fully independent of each other, and must be managed as if they were
separate servers. Therefore, for each server module, you must perform a separate
operating system installation on each node.
Installing the Windows OS onto a Sun Blade X6275 Server Module
Before installing the Windows OS onto your Sun Blade X6275 server module, review
the following sections for an understanding of the prerequisites and the decisionmaking process.
1
Page 10

Prerequisites
Complete the following tasks before you begin the installation.
■ Install the server hardware.
■ (Optional) Configure the service processor.
■ Gather needed information, such as IP address and netmask.
Things You Must Decide
■ Where will you install the OS? You can install an OS using the flash module,
which is similar to a hard drive. See the Sun Blade X6275 Server Module Service
Manual for instructions to access the flash module.
Note – The Sun Blade X6275 server module supports industry-standard RKVM with
devices connected to it through a USB port or the service processor. For information
about setting up USB connections to your system, see “Using a Remote Control
Application (RKVM)” on page 3.
■ Do you need to update the operating system and drivers?
For information on updating your software, see Chapter 3, “Post Installation” on
page 17.
For a full list of supported operating systems, see
http://www.sun.com/servers/blades/x6275/
What to Do Next
The chapters in this guide provide detailed installation information.
You should also gather the installation, administration, and configuration
documentation distributed with the operating system. These documents generally
accompany the distribution media as printed manuals or are included as PDF files
on the medium itself. In many cases, the latest versions of such documents are also
downloadable from the web site of the OS vendor.
2 Sun Blade X6270 Server Module Windows Operating System Installation Guide • September 2009
Page 11

Using a Remote Control Application (RKVM)
The Sun Blade X6275 server module supports industry-standard RKVM with devices
connected to it through the service processor. This ability allows you to mount and
boot from a remote DVD, or an ISO file image.
▼ To Mount a DVD or Equivalent ISO Image
1. Locate your installation DVD or the equivalent ISO images.
2. To connect to the ILOM:
a. Open a web browser and use the ILOM IP address as a URL.
b. Enter an ILOM user name and password.
The Versions screen appears.
3. Click the Remote Control tab.
The Remote Control screen appears.
4. Click the Launch Redirection button.
The ILOM remote console appears.
5. On the Devices menu, select the following:
■ CD-ROM if you are using a physical DVD.
■ CD-ROM Image if you are using an ISO file.
Depending on your selection, a dialog directs you to select either a DVD drive or
a file.
6. Select the DVD drive or the ISO file.
The distribution media (or ISO file) is now mounted. When you power on the
server module, it appears in the BBS popup (boot list) menu as Virtual DVD.
For more information about setting up a remote RKVM connection to your server
with the ILOM Remote Console application, see the Sun Integrated Lights Out
Manager 2.0 User’s Guide or Sun Integrated Lights Out Manager 3.0 User ’s Guide.
Chapter 1 Overview 3
Page 12
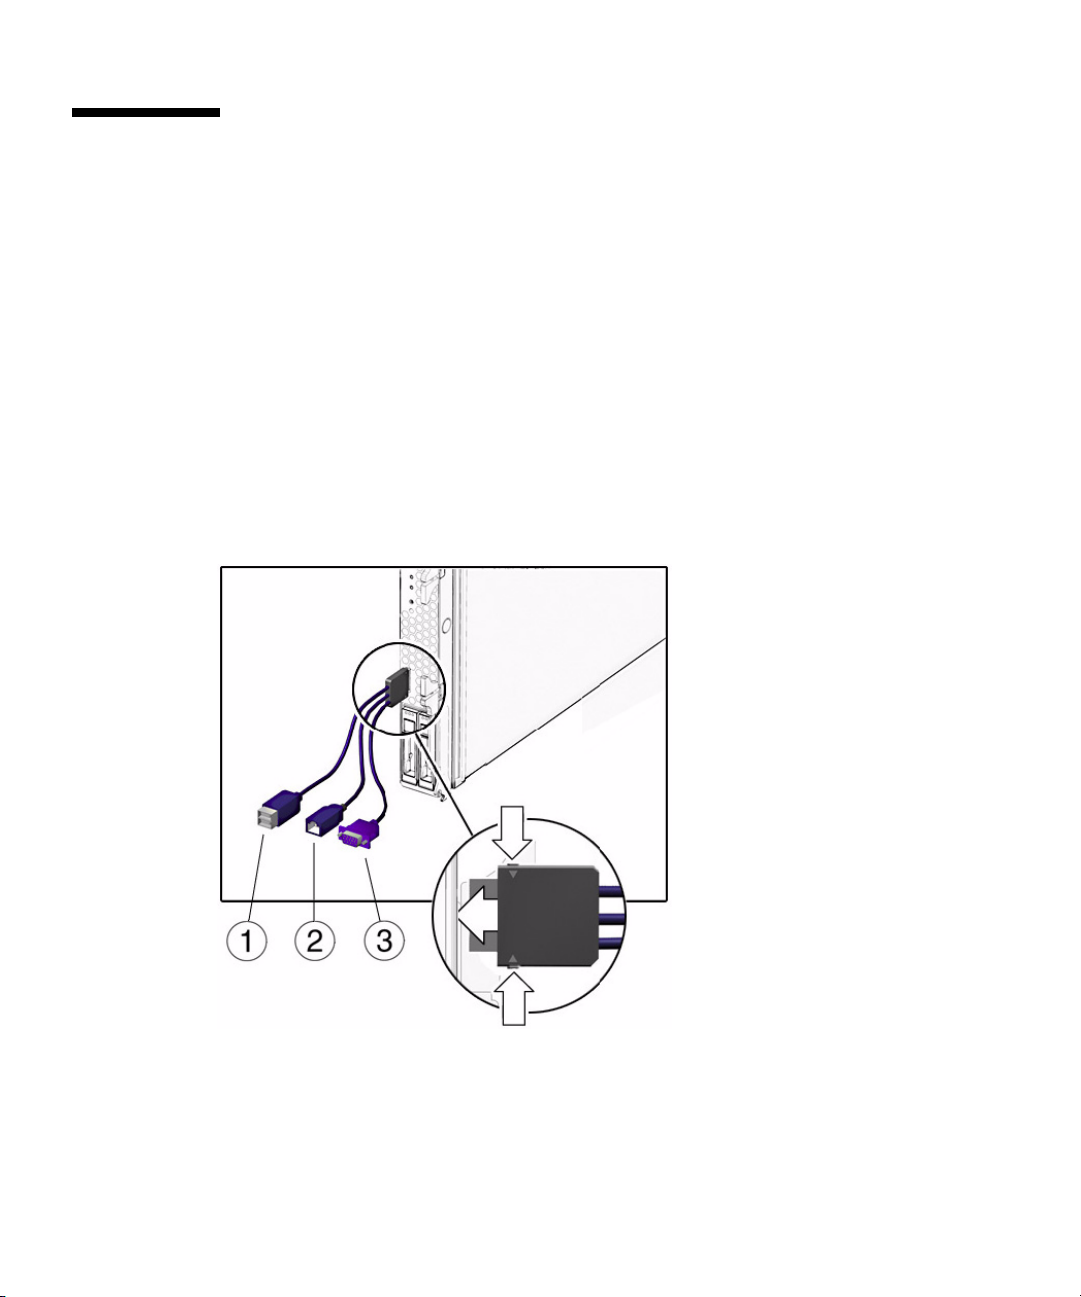
Dongle Cable Connections
If you choose to do a local installation, you must connect a dongle cable directly to
the server module.
▼ To Connect the Dongle for a Local Installation
1. Connect a USB hub to one of the USB connectors on the dongle. See FIGURE 1-1.
2. Connect a keyboard, mouse, and DVD drive to the USB hub or to the other
USB connector.
3. Connect a monitor to the VGA port.
FIGURE 1-1 Dongle Cable Connections
4 Sun Blade X6270 Server Module Windows Operating System Installation Guide • September 2009
Page 13

Figure Legend
Dual USB connectors.
1
RJ-45 connector. This connector provides serial access to the ILOM.
2
VGA video connector.
3
Chapter 1 Overview 5
Page 14

6 Sun Blade X6270 Server Module Windows Operating System Installation Guide • September 2009
Page 15

CHAPTER
2
Installing Windows Server 2008 Operating System
This chapter provides information about installing the Windows Server 2008
Operating System (OS).
This chapter includes the following topics:
■ “Task Map for the Windows Server 2008 Installation” on page 8
■ “Installing Windows Server 2008 Using Local or Remote Media” on page 9
■ “Installing Windows Server 2008 Using a PXE Network” on page 14
7
Page 16

Task Map for the Windows Server 2008 Installation
Use TABLE 2-1 to preview the installation process defined as a series of tasks. The
table defines the required tasks, describes them, and provides pointers to the
instructions for performing that task.
TABLE 2-1 Task Map for the Windows 2008 Installation
Step Task Description Relevant Topic(s)
1
Review installation
prerequisites
2
Gather the Windows
installation media
3
Perform the Windows
2008 OS installation
4
Install driver(s) and
supplemental software
post installation, if
applicable.
Verify that all applicable requirements are
met for installing an operating system to
a server.
The Windows OS is shipped with the CD
and DVD media and documentation that
you will need to install the Windows OS.
Follow the instructions in this chapter to
install the Windows 2008 operating
system.
If necessary, install the updated serverspecific drivers and the server
supplemental software.
• “Prerequisites” on page 2
• You can download or order the
media for Windows 2008 at
http://www.microsoft.co
m
• “Installing Windows Server
2008 Using Local or Remote
Media” on page 9
• “Installing Windows Server
2008 Using a PXE Network” on
page 14
• “Post Installation” on page 17
Note – The complete Microsoft Windows operating system installation process is
not documented in this section. This section walks you through the steps for booting
the Windows Server 2008 media, installing drivers (if necessary) at boot, and
partitioning the drive. For additional information, consult the Microsoft’s Windows
2008 Product Documentation at
http://www.microsoft.com/windowsserver2008/en/us/product-
documentation.aspx
8 Sun Blade X6270 Server Module Windows Operating System Installation Guide • September 2009
Page 17

Installing Windows Server 2008 Using Local or Remote Media
The following procedure describes how to boot the Windows Server 2008 operating
system from local or remote media. It assumes you are booting the Windows
installation media from one of the following sources:
■ Windows 2008 CD or DVD (internal or external DVD)
■ Windows 2008 ISO image (network repository)
Note – If you are booting the installation media from a PXE environment, refer to
“Installing Windows Server 2008 Using a PXE Network” on page 14 for instructions.
Before You Begin
Prior to performing the installation, the following requirements must be met:
■ All applicable installation prerequisites for installing an operating system should
have been met. For further information about these prerequisites, see
“Prerequisites” on page 2.
■ An installation method (for example: console, boot media, and installation target)
should have been chosen and established prior to performing the installation.
After completing this procedure, you will need to perform the post installation tasks
as described in “Post Installation” on page 17.
▼ To Install Windows Server 2008 Using Local or
Remote Media
1. Ensure that the installation media is available to boot.
For example:
■ For distribution media. Insert the Windows Server 2008 Distribution media
(CD labeled #1 or the single DVD) into the local or remote USB DVD-ROM
drive.
■ For ISO image. Ensure that the ISO images are available and that the ILOM
Remote Console application is aware of the first ISO image location.
2. Reset or power on the server.
For example:
Chapter 2 Installing Windows Server 2008 Operating System 9
Page 18

■ From the ILOM web interface, select Reset on the Remote Power Control tab.
■ From the local server, press the Power button on the front panel of the server
to power off the server, then press the Power button again to power-on server.
■ From the ILOM CLI on the server SP, type: reset /SYS
■ From the ILOM CLI on a CMM, type: reset /CH/BLn/SYS
Where n is the number of server module in chassis.
The BIOS screen appears.
3. When the Press F8 for BBS POPUP message appears on the BIOS POST
screen, press F8 to select a boot device.
The Boot Device dialog appears.
Note – The dialog that appears in your installation may be different depending the
type of disk controller installed in your server.
4. In the Boot Device dialog, select the menu item according to the Windows
media installation method you elected to use and press Enter.
For example:
■ If you elected to use the Windows Local delivery method, select CD/DVDW.
■ If you elected to use the Sun ILOM Remote Console delivery method, select
Virtual CDROM.
5. When prompted with Press any key to boot from CD, press any key.
The Windows installation wizard starts.
Continue the Windows installation wizard until the Installation Type dialog
appears.
10 Sun Blade X6270 Server Module Windows Operating System Installation Guide • September 2009
Page 19

6. In the Installation Type dialog, click Custom (advanced).
The Where Do You Want to Install Windows dialog appears:
7. In the Where do you want to Install Windows dialog, do one of the following:
■ If you do not want to override the Windows Default partition information,
click Next then skip to Step 9.
Chapter 2 Installing Windows Server 2008 Operating System 11
Page 20

■ If you do want to override the Windows default partition information, click
the Driver Options (advanced) option and proceed to Step 8.
Caution – Formatting or re-partitioning a pre-existing partition will destroy all data
on the partition.
The Where do you want to Install Windows dialog appears:
12 Sun Blade X6270 Server Module Windows Operating System Installation Guide • September 2009
Page 21

8. In the Where to Install Windows dialog, do the following:
a. Click Delete to delete the existing partition.
A confirmation window appears.
b. Click OK to confirm the partition deletion.
c. Click New to create the new partition.
d. Change partition size settings as needed, and then click Apply.
The partition is created.
e. Click Next and proceed to the next step.
The Windows installation begins.
The server will reboot multiple times during the installation process. This
process could take several minutes.
9. When the Windows installation is complete, Windows starts and prompts you
to change the user password.
10. In the user password dialog, click OK and set up the initial user login account.
Note – Windows Server 2008 enforces stronger password schemes for user accounts.
Password standards include restrictions on length, complexity and history. For more
details, click the Accessibility link at the account creation page.
After the initial user account is created, the Windows Server 2008 desktop
appears.
11. Proceed to “Post Installation” on page 17.
Chapter 2 Installing Windows Server 2008 Operating System 13
Page 22

Installing Windows Server 2008 Using a PXE Network
This section explains the initial information you will need to install the Windows
Server 2008 operating system over an established PXE-based network via a
customer-provided Windows Deployment Services (WDS) image.
Topics included in this section:
■ “Before You Begin” on page 14
■ “To Install Windows Server 2008 Using PXE” on page 15
Note that the procedure presented in this section documents the initial steps to
install Windows 2008 over the network using a Windows Deployment Services
(WDS) image. Specifically, it explains the steps for selecting the server PXE network
interface card that will be communicate with your WDS installation server. For
further information about using a WDS image to install the Windows Server 2008
operating system, see Microsoft’s Windows Deployment Services documentation.
After completing this procedure, you will need to perform the post installation tasks
as described in “Post Installation” on page 17.
Before You Begin
■ To use PXE to boot the installation media over the network, you must:
■ Configure the network (NFS, FTP, HTTP) server to export the installation tree.
■ Configure the files on the TFTP server that are necessary for PXE booting.
■ Configure the Sun server MAC network port address to boot from the PXE
configuration.
■ Configure DHCP.
■ To use a WIM image to perform the installation, you must:
■ Create the WIM installation image.
Follow the WIM installation instructions in the Windows Server 2008
documentation.
■ Add the required system device drivers to the WIM installation image.
For instructions, see Appendix A “Incorporate Sun Blade Server Drivers Into
WIM” on page 25.
■ Obtain the WIM Administrator password.
14 Sun Blade X6270 Server Module Windows Operating System Installation Guide • September 2009
Page 23

▼ To Install Windows Server 2008 Using PXE
1. Reset or power on the server, for example:
■ From the ILOM web interface, select Reset on the Remote Power Control tab.
or
■ Press the Power button (approximately 1 second) on the front panel of the
blade to turn off the blade, then press the Power button again to turn on the
blade.
The BIOS screen appears.
Note – The next events occur very quickly; therefore, focused attention is needed
for the following steps. Watch carefully for these messages as they appear on the
screen for a brief time. You might want to enlarge the size of your screen to eliminate
scroll bars.
2. Press F8 to specify a temporary boot device.
The Please Select Boot Device menu appears.
3. In the Please Select Boot Device menu, select the appropriate PXE installation
boot device and press Enter.
The PXE installation boot device is the physical network port configured to
communicate with your network installation server.
Chapter 2 Installing Windows Server 2008 Operating System 15
Page 24

The Boot Agent dialog appears:
4. Continue the normal Windows Server 2008 WDS network installation. For
additional information, consult Microsoft’s Windows Deployment Services
product documentation.
5. Proceed to “Post Installation” on page 17.
16 Sun Blade X6270 Server Module Windows Operating System Installation Guide • September 2009
Page 25

CHAPTER
3
Post Installation
After completing the Windows Server installation and rebooting the operating
system, you should review the following post installation tasks and, if necessary,
perform the tasks that are applicable to your system.
■ “Downloading Server-Specific Drivers” on page 18
■ “Installing Server-Specific Device Drivers” on page 19
■ “Installing Supplemental Software” on page 22
17
Page 26

Downloading Server-Specific Drivers
This section describes how to download the server-specific driver packages needed
for Windows Server installations.
Note – The Sun Blade X6275 Tools and Drivers DVD contains all of the server-
specific drivers required for Windows Server installations. If you are using the Tools
and Drivers DVD, you can you can skip this section and proceed to “Installing
Server-Specific Device Drivers” on page 19. You can also obtain the latest version of
the Tools and Drivers DVD for the Sun Blade X6275 Server Module by downloading
the updated Tools and Driver DVD image at:
http://www.sun.com/servers/blades/downloads.jsp
▼ To Download the Server-Specific Drivers
1. Download the drivers for the Sun Blade X6275 Server Module at:
http://www.sun.com/servers/blades/downloads.jsp
2. Choose one of the following download options:
■ If you are installing the server-specific drivers using media, download
Sun_Blade_X6275_Windows_SWx.x.x_build#.zip to a hard drive
location or media that will be accessible during the installation. Extract the
following sub-packages contained in Windows.zip:
■ InstallPack_x_x_x.exe for Windows Server 2008 installations —
Contains a program to install all server-specific device drivers after
installing Windows Server 2008. You will use this file to install all post
installation server-specific drivers.
■ DriverPack_x_x_x.zip for expert Windows Server WIM users only —
Contains server-specific driver archive for Windows Server, English. You
can use the contents of this zip file if you want to incorporate Sun server
drivers into a Windows Imaging Format (WIM) image. For instructions, see
Appendix A.
■ OptPack_x_x_x.zip for PXE expert users only — Contains supplemental
software archive. Download this zip file if you want to incorporate the
supplemental software into a PXE installation.
■ If you are installing server-specific drivers using a PXE server (advanced
installation), extract the contents of the DriverPack_x_x_x .zip file on to
the PXE server.
18 Sun Blade X6270 Server Module Windows Operating System Installation Guide • September 2009
Page 27

Note – The _x_x_x number identifies the version of the package (for example,
FloppyPack_1_1_4.zip).
3. Proceed to “Installing Server-Specific Device Drivers” on page 19.
Installing Server-Specific Device Drivers
Sun provides a wizard to install Sun server-specific device drivers and supplemental
software.
The Sun Server Installation Package wizard may be started from one of the
following locations:
■ The main menu of your server’s Tools and Drivers DVD.
■ The InstallPack_x_x_x.exe executable file.
Note – Using a recently downloaded InstallPack_x_x_x.exe to update the
drivers ensures that you update the server-specific drivers with the latest versions
available.
Chapter 3 Post Installation 19
Page 28

▼ To Install the Server-Specific Device Drivers
1. Start the Sun Installation Package software using one of the following
methods:
■ Access the Tools and Drivers DVD or ISO using RKVM, remote DVD drive,
or a USB DVD drive.
The DVD will automatically start.
At the main menu, select Install Drivers and Supplemental Software.
Or
■ If you downloaded the InstallPack_x_x_x.exe file from the Sun
download site, ensure that it has been copied to a local drive on the server,
and then run the InstallPack_x_x_x.exe application.
The Sun Server Installation Package dialog box (shown below) appears.
2. In the Install Pack dialog box, click Next to accept the default installable items.
Note – You should always accept the “platform-specific drivers” to ensure that the
most recent versions of the drivers are installed.
The Install Pack notice dialog box appears.
20 Sun Blade X6270 Server Module Windows Operating System Installation Guide • September 2009
Page 29

3. In the Install Pack notice dialog box, read the message then click Next.
4. In the End User License Agreement page, select “I accept this agreement”, and
then click Next.
The platform-specific drivers are installed. A green check mark verifies that each
driver has been successfully installed.
5. In the Driver Installation Pack dialog box, click Finish.
The System Settings Change dialog box appears.
Chapter 3 Post Installation 21
Page 30

Note – If you plan on installing Supplemental Software (highly recommended), do
not restart your system at this time. Once the Supplemental Software has been
installed, you will be prompted to restart the system.
6. Perform one of the following:
■ If you accepted the default installable settings in Step 2, click No to proceed to
“Installing Supplemental Software” on page 22.
■ If you are not installing the Supplemental Software, click Yes to restart your
computer.
Installing Supplemental Software
During the supplemental software installation wizard, you can choose to install all
the supplemental software on your system by choosing a Typical installation; or,
you can individually select the supplemental software to install by choosing a
Custom installation. For instructions for installing the supplemental software, see
“Install the Supplemental Software” on page 22.
▼ Install the Supplemental Software
Note – If you have already installed the supplemental software, running the
installation again will not necessarily reinstall the supplemental software. It may
result in the components being removed. Carefully review the dialog boxes during
supplemental software installation to ensure that the results are as expected.
1. Do one of the following:
■ If you did not select the Supplemental Software when you ran the procedure
“Installing Server-Specific Device Drivers” on page 19, refer back to that
procedure and run it again, but this time accept the default settings in Step 2
(the default is to install the supplemental software), and select No in Step 6.
The Supplemental Software dialog box appears. Proceed the next step.
22 Sun Blade X6270 Server Module Windows Operating System Installation Guide • September 2009
Page 31

■ If you did select Supplemental Software at the Sun Server Installation Package
dialog box in Step 2 of “Installing Server-Specific Device Drivers” on page 19,
and selected No in Step 6, the supplemental software dialog box appears.
Proceed to the next step.
2. In the Install Pack Supplement Software dialog box, click Next to accept the
Typical settings, or select Custom to choose the options to install.
The Component installation wizard will guide you through the installation of
each of the selected supplemental software components.
3. After the supplemental software has been installed, click Finish.
4. Click Yes at the System Setting Change dialog box to restart your system.
If you ran the Sun Server Installation Package software from the Tools and
Drivers DVD, remove the DVD from your system now.
Chapter 3 Post Installation 23
Page 32

24 Sun Blade X6270 Server Module Windows Operating System Installation Guide • September 2009
Page 33

APPENDIX
A
Incorporate Sun Blade Server Drivers Into WIM
This appendix is intended for advanced system administrators who need to
incorporate the server-specific drivers into a Windows Imaging Format (WIM) image.
■ WIM files are installed using Windows Deployment Services (WDS).
For more information on WDS, refer to Microsoft documentation.
Adding Drivers to a WIM Image
The procedures in the section assume the Windows Deployment Services are running
on Windows Server 2008.
Before you Begin
Before creating your WIM image, you need to do the following:
■ Locate Driver Pack_x_x_x.zip
You can obtain the DriverPack_x_x_x.zip from the Tools & Drivers DVD or
you can download it from the Sun download site. For download instructions, see
“Downloading Server-Specific Drivers” on page 18.
25
Page 34

▼ To Add Drivers to the WIM Image
1. Extract the contents of Windows Server 2008 DriverPack_x_x_x.zip to a
network share (for example: \\yourshare\share\DriverPack), making sure to
maintain the directory structure.
2. Select the service image to update and export the image.
a. Click Start, click Administrative Tools, and then click Windows Deployment
Services.
b. Find the image to service. Right-click the image and then click Disable.
c. Right-click the image and select Export Image. Follow the Wizard directions
to export the image to the location of your choice.
3. Mount the Windows image you just exported. For example,
imagex /mountrw C:\windows_distribution\sources\install.wim 1
C:\win_mount
The first Windows image in the Install.wim file is mounted to C:\wim_mount.
4. Use Windows System Image Manager (Windows SIM) to create an answer file
that contains the paths to the device drivers that you intend to install.
See the Microsoft documentation for the Windows Automated Installation Kit
(AIK) for the details of starting the Windows SIM application.
5. Add the Microsoft-Windows-PnpCustomizationsNonWinPE component to
your answer file in the offlineServicing pass.
6. Expand the Microsoft-Windows-PnpCustomizationsNonWinPE node in the
answer file. Right-click DevicePaths, and then select Insert New
PathAndCredentials.
A new PathAndCredentials list item appears.
7. In the Microsoft-Windows-PnpCustomizationsNonWinPE component,
specify the path to the architecture folder in the DriverPack folder on the
network share, and the credentials used to access the network share.
For example, the path and credentials for a 64-bit image might be:
<Path>\\yourshare\share\DriverPack\amd64</Path>
<Credentials>
<Domain>MyDomain</Domain>
<Username>MyUserName</Username>
<Password>MyPassword</Password>
</Credentials>
26 Sun Blade X6270 Server Module Windows Operating System Installation Guide • September 2009
Page 35

8. Save the answer file and exit Windows SIM. The answer file must be similar to
the following sample. The sample assumes the architecture is 64-bit.
<?xml version="1.0" ?>
<unattend xmlns="urn:schemas-microsoft-com:asm.v3" xmlns:wcm=
"http://schemas.microsoft.com/WMIConfig/2002/State">
<settings pass="offlineServicing">
<component name="Microsoft-Windows-PnpCustomizationsNonWinPE"
processorArchitecture="amd64" publicKeyToken="31bf3856ad364e35"
language="neutral" versionScope="nonSxS">
<DriverPaths>
<PathAndCredentials wcm:keyValue="1">
<Path>\\yourshare\share\DriverPack\amd64</Path>
<Credentials>
<Domain>MyDomain</Domain>
<Username>MyUserName</Username>
<Password>MyPassword</Password>
</Credentials>
</PathAndCredentials>
</DriverPaths>
</component>
</settings>
</unattend>
9. Use Package Manager to apply the unattended installation answer file to the
mounted Windows image. Specify a location for the log file to create. For
example:
pkgmgr /o:"C:\wim_mount\;C:\wim_mount\Windows" /n:"C:\
unattend.xml" /l:"C:\pkgmgrlogs\logfile.txt"
The .inf files referenced in the path in the answer file are added to the Windows
image. A log file is created in the directory C:\Pkgmgrlogs\.
For more information about using Package Manager, see the Microsoft Windows
AIK documentation.
10. Review the contents of the %WINDIR%\Inf\ directory in the mounted Windows
image to ensure that the .inf files were installed.
Drivers added to the Windows image are named oem*.inf. This is to ensure
unique naming for new drivers added to the computer. For example, the files
MyDriver1.inf and MyDriver2.inf are renamed oem0.inf and oem1.inf.
11. Unmount the .wim file and commit the changes. For example:
imagex /unmount /commit C:\wim_mount
12. Replace the service image and enable the image.
Appendix A Incorporate Sun Blade Server Drivers Into WIM 27
Page 36

a. If the Windows Deployment Services snap-in is not running, click Start, click
Administrative Tools, and then click Windows Deployment Services.
b. Locate the image to service. Right-click the image and select Replace Image.
Follow the Wizard directions to replace the service image with the Windows
image that was updated.
c. Right-click the service image and select Enable.
The service image is now available and all the server-specific drivers are added to
the image.
28 Sun Blade X6270 Server Module Windows Operating System Installation Guide • September 2009
Page 37

Index
D
dongle cable, 4
driver updates, v
DVD ISO image, 3
F
firmware updates, v
I
installation task map
Windows 2008, 8
installing an operating system
overview, 1
ISO image, 3
L
Local Media, Install Using, 9
P
prerequisites for OS installation, 2
product updates, v
R
remote access via RKVM, 2, 3
Remote Media, Install Using, 9
RKVM, 2, 3
V
VGA port, 4
W
Windows Server 2008 installation
using local or virtual media, 9
WindowsServer 2008 OperatingSystem using aPXE
Network, 14
U
USB device connection, 5
29
Page 38

30 Sun Blade X6270 Server Module Windows Operating System Installation Guide • September 2009
 Loading...