

Page 1

Sun Fire
X4200 Servers System
TM
X4100 and Sun Fire
Management Guide
Sun Microsystems, Inc.
www.sun.com
Part No. 819-1160-11
December 2005, Revision 01
Submit comments about this document at: http://www.sun.com/hwdocs/feedback
Page 2

Copyright 2005Sun Microsystems,Inc., 4150Network Circle, SantaClara, California95054, U.S.A.All rightsreserved.
Sun Microsystems,Inc. hasintellectual property rightsrelating totechnology thatis describedin thisdocument. Inparticular, andwithout
limitation, theseintellectual propertyrights may include one ormore ofthe U.S.patents listedat http://www.sun.com/patentsand oneor
more additionalpatents orpending patentapplications inthe U.S.and inother countries.
This documentand theproduct towhich itpertains are distributedunder licensesrestricting theiruse, copying,distribution, and
decompilation. Nopart ofthe productor ofthis documentmay bereproducedin anyform byany meanswithout priorwritten authorizationof
Sun andits licensors,if any.
Third-party software, includingfont technology,is copyrightedand licensedfrom Sun suppliers.
Parts ofthe productmay bederived from BerkeleyBSD systems,licensed fromthe Universityof California.UNIX isa registered trademarkin
the U.S.and inother countries,exclusively licensedthrough X/OpenCompany, Ltd.
Sun, Sun Microsystems,the Sunlogo, Java,AnswerBook2, docs.sun.com,Ultra 40,and Solarisaretrademarks orregistered trademarksof Sun
Microsystems, Inc.in theU.S. andin othercountries.
All SPARCtrademarks areused underlicense andare trademarks or registered trademarksof SPARCInternational, Inc.in theU.S. andin other
countries. Productsbearing SPARCtrademarks are basedupon anarchitecture developed by Sun Microsystems,Inc.
The OPENLOOK andSun™ GraphicalUser Interfacewas developedby SunMicrosystems, Inc.for itsusers andlicensees. Sun acknowledges
the pioneeringefforts ofXerox in researchingand developingthe conceptof visualor graphicaluser interfacesfor thecomputer industry.Sun
holds anon-exclusive licensefrom Xerox tothe XeroxGraphical UserInterface, whichlicense alsocovers Sun’slicensees whoimplement OPEN
LOOK GUIsand otherwisecomply withSun’s writtenlicense agreements.
U.S. GovernmentRights—Commercial use.Government usersare subject to the Sun Microsystems, Inc.standard licenseagreement and
applicable provisionsof theFAR andits supplements.
DOCUMENTATION IS PROVIDED "AS IS" AND ALL EXPRESS OR IMPLIED CONDITIONS, REPRESENTATIONS AND WARRANTIES,
INCLUDING ANYIMPLIED WARRANTY OFMERCHANTABILITY, FITNESSFOR A PARTICULAR PURPOSEOR NON-INFRINGEMENT,
ARE DISCLAIMED, EXCEPT TO THE EXTENT THAT SUCH DISCLAIMERS ARE HELD TO BE LEGALLY INVALID.
Copyright 2005Sun Microsystems,Inc., 4150Network Circle, SantaClara, Californie95054, Etats-Unis.Tous droitsréservés.
Sun Microsystems,Inc. ales droits depropriété intellectuelsrelatants à la technologie qui est décritdans ce document. Enparticulier,et sansla
limitation, cesdroits depropriété intellectuels peuvent inclure unou plusdes brevetsaméricains énumérésà
http://www.sun.com/patents et un oules brevetsplus supplémentaires oules applicationsde breveten attentedans lesEtats-Unis et
dans lesautres pays.
Ce produitou documentest protégé parun copyrightet distribuéavec deslicences quien restreignent l’utilisation,la copie,la distribution,et la
décompilation. Aucunepartie dece produitou documentne peutêtre reproduite sousaucune forme,par quelquemoyen quece soit,sans
l’autorisation préalableet écritede Sunet deses bailleursde licence,s’il yen a.
Le logicieldétenu pardes tiers,et quicomprend latechnologie relative auxpolices decaractères, estprotégépar uncopyright etlicencié pardes
fournisseurs deSun.
Des partiesde ceproduit pourront êtredérivées dessystèmes BerkeleyBSD licenciéspar l’Universitéde Californie.UNIX estune marque
déposée auxEtats-Unis etdans d’autrespays etlicenciée exclusivementpar X/OpenCompany, Ltd.
Sun, SunMicrosystems, lelogo Sun,Java, AnswerBook2,docs.sun.com, Untra40, etSolaris sontdes marques defabrique oudes marques
déposées deSun Microsystems,Inc. auxEtats-Unis etdans d’autres pays.
Toutes lesmarques SPARC sont utilisées sous licence et sont des marques defabrique oudes marquesdéposées deSPARC International,Inc.
aux Etats-Uniset dansd’autres pays.Les produits portantles marquesSPARC sont baséssur unearchitecture développéepar Sun
Microsystems, Inc.
L’interfaced’utilisation graphiqueOPEN LOOKet Sun™a étédéveloppée parSun Microsystems, Inc.pour sesutilisateurs etlicenciés. Sun
reconnaît lesefforts de pionniers de Xeroxpour larecherche et le développement du concept des interfaces d’utilisation visuelle ou graphique
pour l’industriede l’informatique.Sun détientune licensenon exclusivede Xeroxsur l’interfaced’utilisation graphiqueXerox,cette licence
couvrant égalementles licenciéesde Sunqui mettenten placel’interface d’utilisation graphiqueOPEN LOOKet quien outrese conforment
aux licencesécrites deSun.
LA DOCUMENTATION EST FOURNIE "EN L’ÉTAT" ET TOUTES AUTRES CONDITIONS, DECLARATIONS ET GARANTIES EXPRESSES
OU TACITES SONT FORMELLEMENTEXCLUES, DANSLA MESUREAUTORISEE PARLA LOIAPPLICABLE, YCOMPRIS NOTAMMENT
TOUTE GARANTIE IMPLICITE RELATIVE A LA QUALITE MARCHANDE, A L’APTITUDE A UNE UTILISATION PARTICULIERE OU A
L’ABSENCE DE CONTREFAÇON.
Page 3

Contents
Preface xiii
1. System Management and ILOM Overview 1–1
1.1 About System Management and ILOM 1–1
1.1.1 Classes of System Management 1–1
1.1.2 Sun N1 System Manager 1–2
1.1.3 Integrated Lights Out Manager (ILOM) Interfaces 1–2
1.1.4 Common Tasks That You Can Perform With ILOM 1–3
2. Interfaces 2–1
2.1 About the Sun N1 System Manager 2–1
2.1.1 Sun N1 System Manager 2–1
2.2 About SNMP 2–2
2.2.1 How SNMP Works 2–2
2.2.2 SNMP MIB Files 2–3
2.2.3 MIBs Integration 2–3
2.2.4 SNMP Messages 2–4
2.3 How to Configure SNMP on the SP 2–4
2.3.1 What to Do 2–4
2.3.2 Integrating the MIBs 2–5
iii
Page 4

2.3.3 Adding Your Server to Your SNMP Environment 2–6
2.3.4 Configuring Receipt of SNMP Traps 2–6
2.4 About IPMI 2–6
2.4.1 IPMItool 2–6
2.5 IPMI Reference Information 2–8
2.5.1 Supported IPMI 2.0 Commands 2–8
2.5.2 Sensors 2–11
3. SP Initial Setup 3–1
3.1 About Initial Setup and Configuration of the Service Processor 3–1
3.1.1 Task Map 3–3
3.1.2 ILOM Default Settings 3–4
3.2 How To Configure ILOM Using a Serial Connection 3–4
3.2.1 Before You Begin 3–4
3.2.2 What To Do 3–5
3.3 How To Configure ILOM Using an Ethernet Connection 3–6
3.3.1 Before You Begin 3–7
3.3.2 What To Do 3–8
3.4 How to Update Your ILOM Firmware 3–11
3.4.1 Before You Begin 3–11
3.4.2 What to Do 3–12
3.5 How to Configure ILOM Using a Static IP Address 3–12
3.5.1 Before You Begin 3–12
3.5.2 Configuring ILOM With the CLI and a Serial Connection 3–13
3.5.3 Configuring ILOM With the CLI and an Ethernet Connection 3–
13
3.5.4 Configuring ILOM With the Web GUI and an Ethernet
Connection 3–14
4. Remote Console Application 4–1
iv Sun Fire X4100 and Sun Fire X4200 Servers System Management Guide • December 2005
Page 5

4.1 About ILOM and the Remote Console Application 4–1
4.1.1 Server (Host) Installation Requirements 4–1
4.1.2 Client Installation Requirements 4–2
4.2 How to Launch the Remote Console Application 4–2
4.2.1 How to Launch the Remote Console Application From the ILOM
Web Interface 4–3
4.2.2 How to Launch the Remote Console Application From a Java Web
Start Web Page 4–5
4.2.3 How to Launch the Remote Console Application From a Java Web
Start Web Page Using a Shortcut 4–6
4.3 How to Redirect Keyboard, Video, Mouse, or Storage Devices 4–6
4.3.1 How to Redirect Keyboard Devices 4–7
4.3.2 How to Redirect Mouse or Pointing Devices 4–8
4.3.3 How to Redirect Storage Devices 4–9
5. Command Line Interface Overview 5–1
5.1 About the ILOM Service Processor CLI 5–1
5.1.1 Connecting to the CLI 5–1
5.1.2 Using the CLI 5–2
6. Command Line Interface Reference 6–1
6.1 ILOM Service Processor CLI Quick Reference 6–1
7. Command Line Interface Tasks 7–1
7.1 How to Log In to the ILOM Service Processor CLI 7–1
7.1.1 What to Do 7–1
7.2 About LDAP 7–3
7.2.1 How LDAP Works 7–3
7.2.2 How LDAP Servers Organize Directories 7–3
7.2.3 How LDAP Clients and Servers Work 7–5
7.3 How to Configure LDAP 7–6
Contents v
Page 6

7.3.1 Before You Begin 7–6
7.3.2 What to Do 7–6
7.3.3 What Next 7–8
7.4 How to Manage Access to the Service Processor 7–8
7.4.1 Displaying Access Settings 7–8
7.4.2 Configuring Access Settings 7–9
7.4.2.1 Syntax 7–9
7.4.2.2 Targets, Properties, and Values 7–9
7.4.2.3 Examples 7–9
7.5 How to Manage the Host State 7–10
7.5.1 Managing the Host 7–10
7.5.2 Managing the Host Console 7–10
7.6 How to Manage ILOM Network Settings 7–10
7.6.1 Displaying Network Settings 7–11
7.6.2 Configuring Network Settings 7–11
7.6.2.1 Syntax 7–11
7.6.2.2 Targets, Properties, and Values 7–11
7.6.2.3 Examples 7–12
7.7 How to Manage ILOM Serial Port Settings 7–12
7.7.1 Displaying Serial Port Settings 7–12
7.7.2 Configuring Serial Port Settings 7–12
7.7.2.1 Syntax 7–13
7.7.2.2 Targets, Properties, and Values 7–13
7.7.2.3 Example 7–13
7.8 How to Manage ILOM User Accounts 7–13
7.8.1 Adding a User Account 7–14
7.8.2 Deleting a User Account 7–14
7.8.3 Displaying User Accounts 7–14
vi Sun Fire X4100 and Sun Fire X4200 Servers System Management Guide • December 2005
Page 7

7.8.4 Configuring User Accounts 7–14
7.8.4.1 Syntax 7–14
7.8.4.2 Targets, Properties, and Values 7–15
7.8.4.3 Examples 7–15
7.9 How to Manage SNMP User Accounts 7–15
7.9.1 Adding a User Account 7–15
7.9.2 Deleting a User Account 7–16
7.9.3 Configuring User Accounts 7–16
7.9.3.1 Syntax 7–16
7.9.3.2 Targets, Properties, and Values 7–16
7.9.3.3 Examples 7–17
7.10 How to Manage ILOM Alerts 7–17
7.10.1 Displaying Alerts 7–17
7.10.2 Configuring Alerts 7–17
7.10.2.1 Syntax 7–17
7.10.2.2 Targets, Properties, and Values 7–18
7.10.2.3 Examples 7–18
7.11 How to Manage Clock Settings 7–18
7.11.1 Displaying Clock Settings 7–18
7.11.2 Configuring the Clock to Use NTP Servers 7–18
7.11.2.1 Syntax 7–19
7.11.2.2 Targets, Properties, and Values 7–19
7.11.2.3 Example 7–19
7.12 How to Display Information About the Service Processor 7–19
7.13 Displaying Version Information 7–20
7.13.1 Displaying CLI Commands 7–20
7.13.2 Displaying Active Sessions 7–20
7.13.3 Displaying Available Targets 7–20
Contents vii
Page 8

7.14 How to Update the Service Processor Firmware 7–20
7.14.1 Updating the Service Processor Firmware 7–21
7.14.2 Example 7–21
8. Sun ILOM Web GUI 8–1
8.1 Overview of the Sun ILOM Web GUI 8–1
8.1.1 Browser and Software Requirements 8–2
8.1.2 Common Tasks Performed With the ILOM Web GUI 8–2
8.1.3 Features of the ILOM Web GUI 8–3
8.2 How to Log In and Out of the Sun ILOM Web GUI 8–4
8.2.1 Before You Begin 8–4
8.2.2 What to Do 8–5
8.3 To log out of the ILOM web GUI: 8–6
8.3.1 What Next 8–7
9. System Monitoring and Maintenance Using the SP GUI 9–1
9.1 How to Upgrade the SP Firmware 9–1
9.1.1 Before You Begin 9–1
9.1.2 What to Do 9–2
9.2 How to Reset the SP 9–5
9.2.1 Before You Begin 9–5
9.2.2 What to Do 9–5
9.3 How to Reset the SP and BIOS Passwords 9–6
9.3.1 What to Do 9–7
9.4 How to View Replaceable Component Information 9–7
9.4.1 Before You Begin 9–7
9.4.2 What to Do 9–7
9.5 How to View Temperature, Voltage, and Fan Sensor Readings 9–8
9.5.1 Before You Begin 9–9
viii Sun Fire X4100 and Sun Fire X4200 Servers System Management Guide • December 2005
Page 9

9.5.2 What to Do 9–9
9.6 How to Configure Alerts and View Alert Destinations 9–13
9.6.1 Before You Begin 9–13
9.6.2 What to Do 9–13
9.7 How to View and Clear the System Event Log 9–16
9.7.1 Before You Begin 9–16
9.7.2 What to Do 9–16
9.7.3 Interpreting the SEL Time Stamps 9–17
9.8 How to Enable SNMP Settings and View SNMP Users 9–18
9.8.1 Before You Begin 9–19
9.8.2 What to Do 9–19
9.9 How to Control the Server Locator Indicator 9–21
9.9.1 Before You Begin 9–22
9.9.2 What to Do 9–22
10. Managing Redirection and Remote Control Using the SP GUI 10–1
10.1 About the Remote Console Software and Redirection 10–1
10.1.1 CD and Floppy Redirection Operational Model 10–1
10.2 How to Control Power on the Host Server 10–3
10.2.1 Before You Begin 10–3
10.2.2 What to Do 10–3
10.3 How to Change the Mouse Mode 10–4
10.3.1 Before You Begin 10–5
10.3.2 What to Do 10–5
10.4 How to Start and Stop Console Redirection 10–6
10.4.1 Before You Begin 10–6
10.4.2 What to Do 10–7
10.5 How to Start and Stop CD-ROM Drive Redirection 10–9
10.5.1 Before You Begin 10–9
Contents ix
Page 10

10.5.2 What to Do 10–10
10.5.2 To Redirect a CD-ROM Drive 10–10
Note – To redirect a CD-ROM image: 10–10
10.5.3 Host and Client Device Configuration 10–11
10.6 How to Start and Stop Floppy Drive Redirection 10–12
10.6.1 Before You Begin 10–12
10.6.2 What to Do 10–13
10.6.2 To Redirect a Floppy Drive 10–13
Note – To redirect a Floppy Drive image: 10–13
10.6.3 Host and Client Device Configuration 10–14
10.7 How to Start and Stop Keyboard and Mouse Redirection 10–14
10.7.1 Before You Begin 10–15
10.7.2 What to Do 10–15
10.7.3 Troubleshooting Keyboard and Mouse Redirection 10–16
11. System Configuration Using the SP GUI 11–1
11.1 How to Set the SP Session Time-Out 11–1
11.1.1 Before You Begin 11–1
11.1.2 What to Do 11–1
11.2 How to Configure the SP Serial Port 11–2
11.2.1 Before You Begin 11–3
11.2.2 What to Do 11–3
11.3 How to Set the SP Clock 11–4
11.3.1 Before You Begin 11–4
11.3.2 What to Do 11–5
11.3.3 Interpreting SP Clock Settings 11–6
11.4 How to Configure Network Settings 11–6
11.4.1 Before You Begin 11–7
11.4.2 What to Do 11–7
x Sun Fire X4100 and Sun Fire X4200 Servers System Management Guide • December 2005
Page 11

11.5 How to Upload a New SSL Certificate 11–8
11.5.1 Before You Begin 11–9
11.5.2 What to Do 11–9
11.6 How to Enable HTTP or HTTPS Web Access 11–10
11.6.1 Before You Begin 11–10
11.6.2 What to Do 11–10
12. Managing System Information Using the SP GUI 12–1
12.1 How to Find SP Hardware, Firmware, and IPMI Versions 12–1
12.1.1 Before You Begin 12–1
12.1.2 What to Do 12–1
12.2 How to View Active Connections to the SP 12–2
12.2.1 Before You Begin 12–2
12.2.2 What to Do 12–2
13. Managing Users Using the SP GUI 13–1
13.1 How to Add an SP User Account 13–1
13.1.1 User Roles and Privileges 13–1
13.1.2 Before You Begin 13–2
13.1.3 What to Do 13–2
13.2 How to Modify an SP User Account 13–4
13.2.1 User Roles and Privileges 13–4
13.2.2 Before You Begin 13–4
13.2.3 What to Do 13–5
13.3 How to Change the SP User Account Password 13–7
13.3.1 Before You Begin 13–7
13.3.2 What to Do 13–7
13.4 How to Remove an SP User Account 13–9
13.4.1 Before You Begin 13–9
Contents xi
Page 12

13.4.2 What to Do 13–9
13.5 How to View and Modify LDAP Settings 13–10
13.5.1 Before You Begin 13–10
13.5.2 What to Do 13–11
Glossary Glossary–1
Index Index–1
xii Sun Fire X4100 and Sun Fire X4200 Servers System Management Guide • December 2005
Page 13

Preface
This Sun Fire X4100 and Sun Fire X4200 Servers System Management Guide provides
instructions for managing the Sun Fire X4100 and Sun Fire X4200 Servers.
Product Updates
For product updates that you can download for the Sun Fire X4100 or X4200 servers,
please visit the following Web site:
http://www.sun.com/servers/entry/x4100/downloads.jsp
This site contains updates for firmware and drivers, as well as CD-ROM .iso
images.
Sun Welcomes Your Comments
Sun is interested in improving its documentation and welcomes your comments and
suggestions. You can submit your comments by going to:
http://www.sun.com/hwdocs/feedback
Please include the title and part number of your document with your feedback:
Sun Fire X4100 and Sun Fire X4200 Servers System Management Guide, part number
819-1160-11
xiii
Page 14

Related Documentation
For the most up-to-date information on the Sun Fire™ X4100 server, go to this site:
http://www.sun.com/products-n-solutions/hardware/docs/Servers/
Workgroup_Servers/x4100/index.html
For the most up-to-date information on the Sun Fire X4200 server, go to this site:
http://www.sun.com/products-n-solutions/hardware/docs/Servers/
Workgroup_Servers/x4200/index.html.
Information Title and Format Part Number
Safety information Important Safety Information About Sun
Hardware (included in system box)
Safety notices and
international compliance
certification statements
Server setup, including
rack installation
Pre-Installed Solaris 10
instructions
Operating system
installation
System management System Management (PDF and HTML) 819-1160
Server and software
setup
Troubleshooting and
diagnostics
Late-breaking
information and issues
Diagnostic software SunVTS 6.0 User’s Guide (HTML) 817-7664
Diagnostic software
patch information
Safety and Compliance Guide (PDF and HTML) 819- 1161
Setup Guide (included in system box, PDF, and
HTML)
Sun Fire X4100 and Sun Fire X4200 Servers
Guide for Pre-Installed Solaris 10 Operating
System (PDF and HTML)
Operating System Installation (PDF and HTML) 819-1158
Setup and Maintenance Guide (PDF and HTML) 819-1157
Troubleshooting Guide (PDF and HTML) 819-3284
Sun Fire X4100 and Sun Fire X4200 Server
Release Notes (PDF and HTML)
SunVTS 6.0 Patch Set Documentation Supplement
for x86 Platforms (HTML)
819- 7190
819-1155
819-4153
819-1162
819-2948
Translated versions of some of these documents are available at the web sites described
above in French, Simplified Chinese, Traditional Chinese, Korean, Japanese, and German.
Note that the English documentation is revised more frequently and might therefore be
more up-to-date than the translated documentation.
xiv Sun Fire X4100 and Sun Fire X4200 Servers System Management Guide • December 2005
Page 15

Using UNIX Commands
This document might not contain information about basic UNIX®commands and
procedures such as shutting down the system, booting the system, and configuring
devices. Refer to the following for this information:
■ Software documentation that you received with your system
■ Solaris™ Operating System documentation, which is at:
http://docs.sun.com
Third-Party Web Sites
Sun is not responsible for the availability of third-party web sites mentioned in this
document. Sun does not endorse and is not responsible or liable for any content,
advertising, products, or other materials that are available on or through such sites
or resources. Sun will not be responsible or liable for any actual or alleged damage
or loss caused by or in connection with the use of or reliance on any such content,
goods, or services that are available on or through such sites or resources.
Preface xv
Page 16

Typographic Conventions
*
Typeface
AaBbCc123 The names of commands, files,
AaBbCc123 What you type, when contrasted
AaBbCc123 Book titles, new words or terms,
* The settings on your browser might differ from these settings.
Meaning Examples
Edit your.login file.
and directories; on-screen
computer output
with on-screen computer output
words to be emphasized.
Replace command-line variables
with real names or values.
Use ls -a to list all files.
% You have mail.
su
%
Password:
Read Chapter 6 in the User’s Guide.
These are called class options.
Yo u must be superuser to do this.
To delete a file, type rm filename.
xvi Sun Fire X4100 and Sun Fire X4200 Servers System Management Guide • December 2005
Page 17

CHAPTER
1
System Management and ILOM Overview
1.1 About System Management and ILOM
Whether you are managing your server as a stand-alone server or as a component in
a more comprehensive data center environment, Sun offers multiple classes of
system management solutions.
1.1.1 Classes of System Management
There are two classes of system management technology available for your server:
■ Multiple-enclosure system management – If you plan to manage your server as
one resource in a comprehensive data center management solution, you can
integrate it with the Sun N1 System Manager. This software suite provides
advanced virtualization features that enable you to monitor, maintain, and
provision multiple Solaris™, Linux, and Microsoft Windows servers in your data
center.
■ Single-enclosure system management – If you need to manage your server apart
from a data center solution, you can take advantage of the Integrated Lights Out
Manager (ILOM) product that is preinstalled on your server. ILOM is a powerful
combination of hardware, the ILOM Service Processor, and software, the ILOM
software suite, that provides flexible, industry-standard interfaces and features.
1-1
Page 18

1.1.2 Sun N1 System Manager
The Sun N1 System Manager is available to download from www.sun.com or you
can install it from the Sun N1 System Manager DVD. This software suite is installed
on a dedicated server in your data center and allows one or more remote
management clients to perform the following tasks on multiple managed servers:
■ Manage multiple servers – Configure, provision, deploy, manage, monitor, patch,
and update from one to thousands of Sun Fire X4100 or Sun Fire X4200 servers.
■ Monitor system information – System manufacturer, make, model, serial number,
management MAC addresses, disk information, expansion slot information, and
platform CPU and memory information.
■ Manage power remotely – Power off, power on, power reset, and power status.
■ Manage service processors and BIOS – Information about system service
processor firmware, version, and status. You can also perform remote upgrades to
firmware on system service processors.
■ Manage system boot commands and options – Remote boot control via IPMI and
remote mapping of boot devices and boot options.
■ Manage remote system health checks – Information about the status of a server.
■ Manage operating systems – Deploy, monitor, and patch both Solaris and Linux
operating systems.
■ Perform bare-metal discovery.
To learn more about this suite of powerful data center management tools, see
http://www.sun.com/software/products/system_manager/.
1.1.3 Integrated Lights Out Manager (ILOM) Interfaces
The Integrated Lights Out Manager (ILOM) product that ships with your server
consists of service processor hardware and integrated system management software.
You do not need to install additional hardware or software to begin managing your
server with ILOM.
ILOM offers four industry-standard management interfaces:
■ Intelligent Platform Management Interface (IPMI) v2.0 – Using a Secure Shell
(SSH), you can interact with the ILOM Service Processor to do the following:
establish secure remote control of your server, monitor the status of hardware
components remotely, monitor system logs, receive reports from replaceable
components, and redirect the service processor console.
■ Web user interface – The ILOM Service Processor also provides a powerful, yet
easy-to-use browser interface. Once you log in to the service processor browser
interface from your local web browser, you can perform IPMI tasks and system
monitoring. ILOM also enables you to redirect your server's graphical console to
1-2 Sun Fire X4100 and Sun Fire X4200 Servers System Management Guide • December 2005
Page 19

a remote web browser running on your workstation or laptop. You can configure
your workstation or laptop mouse and keyboard to act as the server mouse and
keyboard. You can even configure the floppy disk drive or CD-ROM drive on
your workstation or laptop as a device virtually connected to your Sun Fire X4100
or Sun Fire X4200 server.
■ Simple Network Management Protocol (SNMP) interface – ILOM also provides an
SNMP v3.0 interface (with limited support for SNMP v1 and SNMP v2c) for
external data center management applications such as Sun N1 System Manager,
IBM Tivoli, and Hewlett-Packard OpenView.
■ Command-line interface (CLI) – You can use the ILOM command-line interface to
send the service processor specific commands.
Which ILOM interface you use depends on your overall system management plan
and the specific tasks that you wish to perform.
1.1.4 Common Tasks That You Can Perform With ILOM
Using one or more of these system management interfaces, you can perform the
following system management tasks easily and reliably.
TABLE 1-1
Task
Redirect the system graphical console to a remote
client browser.
Connect a remote floppy disk drive to the system as a
virtual floppy disk drive.
Connect a remote CD-ROM drive to the system as a
virtual CD-ROM drive.
Monitor system fans, temperatures, and voltages
remotely.
Monitor system BIOS messages remotely. Yes Yes Yes
Monitor system operating system messages remotely. Yes Yes Yes
Interrogate system components for their IDs and/or
serial numbers.
Redirect the system serial console to a remote client. Yes
Monitor system status (health check) remotely. Yes Yes Yes Yes
Interrogate system network interface cards remotely
for MAC addresses.
Chapter 1 System Management and ILOM Overview 1-3
Web
Interface CLI IPMI SNMP
Ye s
Ye s
Ye s
Ye s Ye s Ye s Yes
Ye s Ye s Yes
Ye s Ye s Ye s
Page 20

TABLE 1-1
Task
Web
Interface CLI IPMI SNMP
Manage service processor user accounts remotely. Yes Yes Yes
Manage system power status remotely (power on,
Ye s Ye s Ye s
power off, power reset).
Monitor and manage environmental settings for key
Yes Yes Yes Monitor
system components (CPUs, motherboards, fans).
only
1-4 Sun Fire X4100 and Sun Fire X4200 Servers System Management Guide • December 2005
Page 21

CHAPTER
2
Interfaces
2.1 About the Sun N1 System Manager
If you plan to manage your server as one resource in a comprehensive data center
management solution, you can integrate it with the Sun N1™System Manager. This
software suite provides advanced virtualization features that enable you to monitor,
maintain, and provision multiple Solaris™, Linux, and Microsoft Windows servers
in your data center.
2.1.1 Sun N1 System Manager
The Sun N1 System Manager is distributed separately from your server and
available to download from
http://www.sun.com/software/products/system_manager/. This software
suite is installed on a dedicated server in your data center and enables one or more
remote management clients to perform the following tasks on multiple managed
servers:
■ Monitor system information – System manufacturer, make, model, serial number,
management MAC addresses, disk information, expansion slot information, and
platform CPU and memory information.
■ Manage power remotely – Power off, power on, power reset, and power status.
■ Manage service processors and BIOS – Information about system service
processor firmware, version, and status. You can also perform remote upgrades to
firmware on system service processors.
■ Manage system boot commands and options – Remote boot control via IPMI and
remote mapping of boot devices and boot options.
■ Manage remote system health checks – Information about the status of a server.
2-1
Page 22

■ Manage serial-over-LAN connections – Via the Intelligent Platform Management
Interface (IPMI).
To learn more about this suite of powerful data center management tools, see
http://www.sun.com/software/products/system_manager/.
2.2 About SNMP
The Sun Fire X4100 or Sun Fire X4200 server supports the Simple Network
Management Protocol (SNMP) interface, versions 1, 2c, and 3. SNMP is an open
technology that enables the management of networks and devices, or nodes,
connected to the network. SNMP messages are sent over IP using the User Datagram
Protocol (UDP). Any management application that supports SNMP can manage your
server.
2.2.1 How SNMP Works
Utilizing SNMP requires two components, a network management station and a
managed node. Network management stations host management applications,
which monitor and control managed nodes. Managed nodes are any number of
devices, including servers, routers, and hubs, which host SNMP management agents
responsible for carrying out the requests from management stations. The
management station monitors nodes by polling management agents for the
appropriate information using queries. Managed nodes can also provide unsolicited
status information to a management station in the form of a trap. SNMP is the
protocol used to communicate management information between the management
stations and agents.
The SNMP agent is preinstalled and runs on the service processor, so all SNMP
management of the server should occur through the service processor. To utilize this
feature, your operating system must have an SNMP client application. See your
operating system vendor for more information.
The SNMP agent on your service processor provides the following capabilities:
inventory management, and sensor and system state monitoring.
2-2 Sun Fire X4100 and Sun Fire X4200 Servers System Management Guide • December 2005
Page 23
2.2.2 SNMP MIB Files
The base component of an SNMP solution is the Management Information Base
(MIB). A MIB is a text file that describes a managed nodes' available information and
where it is stored. When a management station requests information from a
managed node, the agent receives the request and retrieves the appropriate
information from the MIBs. The Sun Fire X4100 or Sun Fire X4200 server supports
the following SNMP classes of Management Information Base (MIB) files. Download
and install the product-specific MIB files from your Resource CD.
■ The system group and SNMP group from RFC1213 MIB
■ SNMP-FRAMEWORK-MIB
■ SNMP-USER-BASED-MIB
■ SNMP-MPD-MIB SUN-PLATFORM-MIB
■ ENTITY-MIB
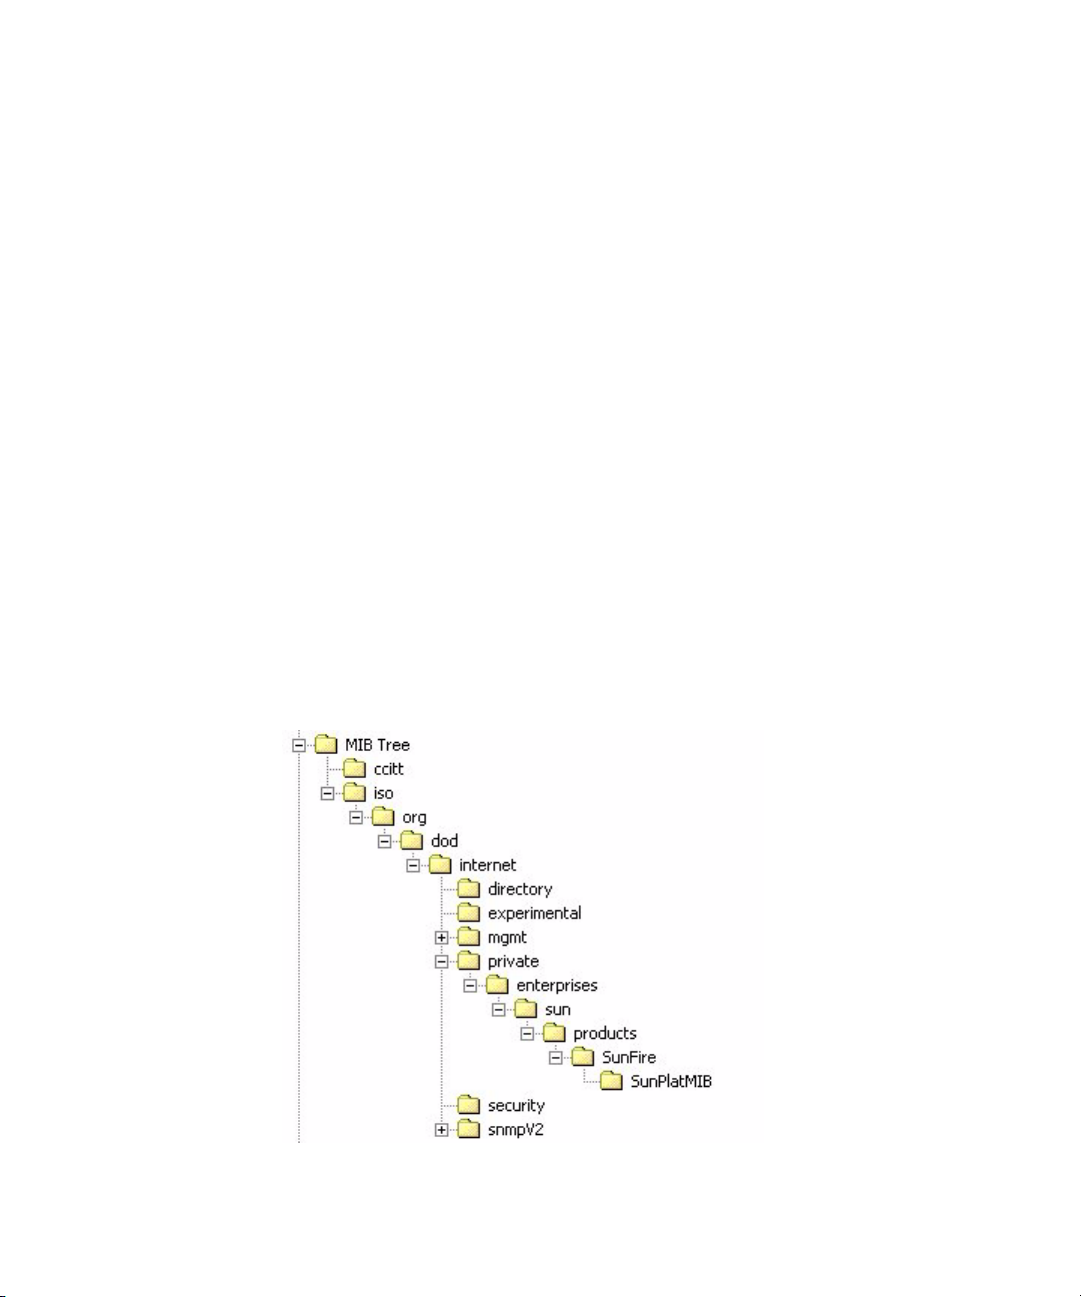
2.2.3 MIBs Integration
Use the server's MIBs to integrate the management and monitoring of the server into
SNMP management consoles. The MIB branch is a private enterprise MIB, located at
MIB object iso(1).org (3). dod (6). internet (1). private (4). enterprises (1). sun (42).
products (2). The standard SNMP port 161 is used by the SNMP agent on the service
processor.
FIGURE 2-1 Sun Fire X4100 or Sun Fire X4200 server MIB Tree
Chapter 2 Interfaces 2-3
Page 24

2.2.4 SNMP Messages
SNMP is a protocol, not an operating system so you need some type of application
to use SNMP messages. Your SNMP management software may provide this
functionality, or you can use an open source tool like net-SNMP, which is available at
http://net-snmp.sourceforge.net/.
Both management stations and agents use SNMP messages to communicate.
Management stations can send and receive information. Agents can respond to
requests and send unsolicited messages in the form of a trap. There are five
functions that management stations and agent use:
Get
GetNext
GetResponse
Set
Trap
By default, port 161 is used for SNMP messages and port 162 is used to listen for
SNMP traps.
2.3 How to Configure SNMP on the SP
The Sun™ Integrated Lights Out Manager (ILOM) Service Processor has a
preinstalled SNMP agent that supports trap delivery to an SNMP management
application.
2.3.1 What to Do
To use this feature, you must integrate the platform-specific MIBs into your SNMP
environment, tell your management station about your server, then configure the
specific traps.
2-4 Sun Fire X4100 and Sun Fire X4200 Servers System Management Guide • December 2005
Page 25
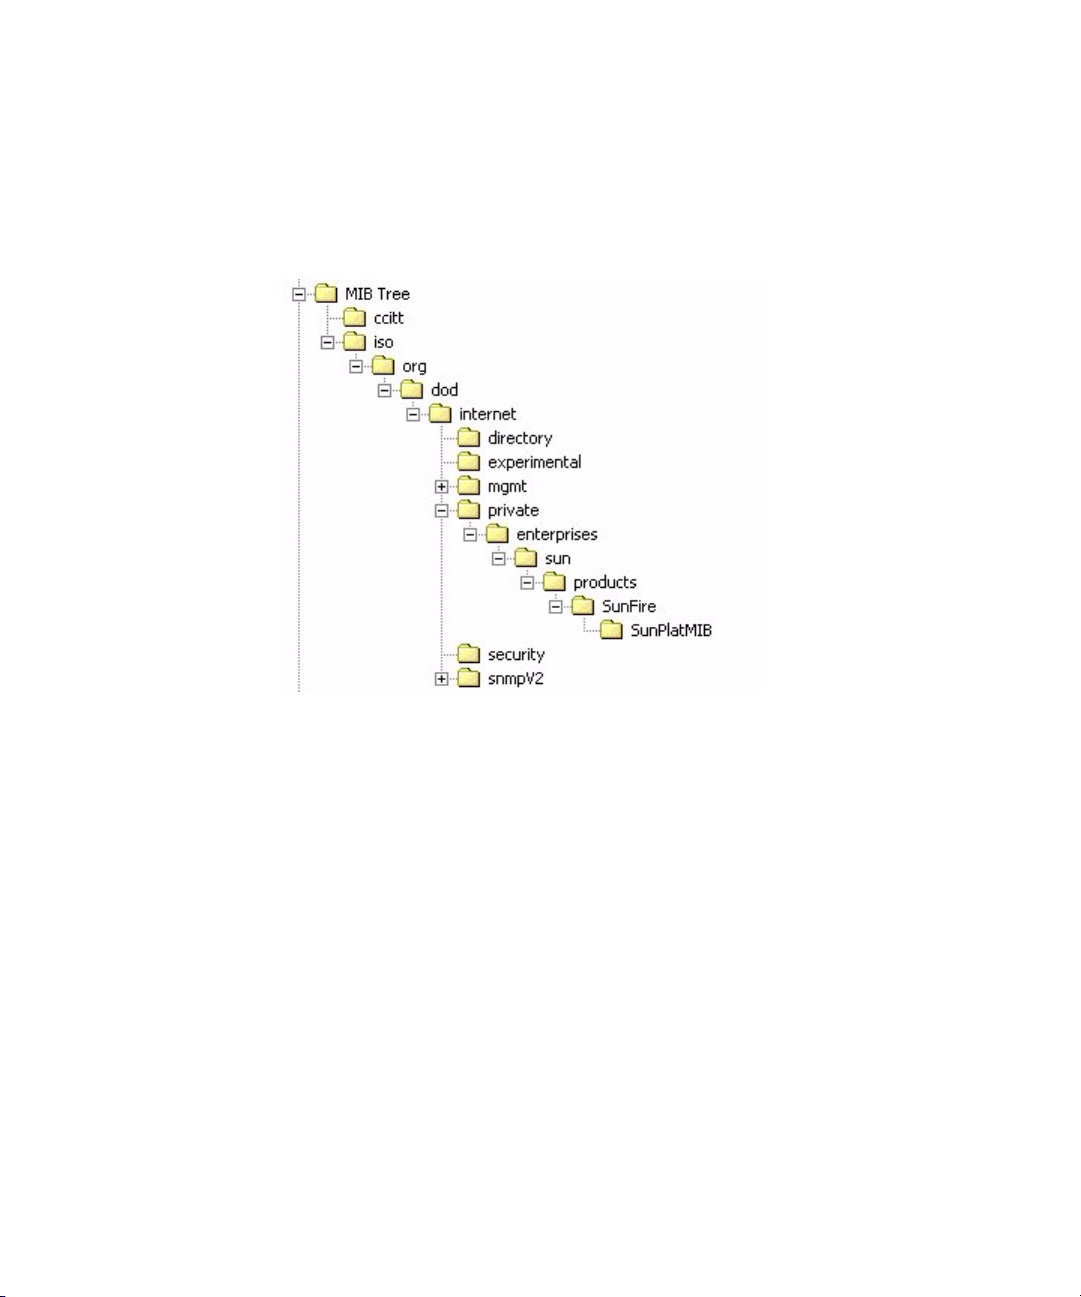
2.3.2 Integrating the MIBs
Use the MIBs to integrate the management and monitoring of the server into SNMP
management consoles. The MIB branch is a private enterprise MIB, located at MIB
object iso(1).org (3). dod (6). internet (1). private (4). enterprises (1). sun (42).
products (2).
FIGURE 2-2 Sun Fire X4100 or Sun Fire X4200 server MIB Tree
This example shows how to use SNMP with a third-party MIB browser.
1. From the Manager Preferences menu, choose Load/Unload MIBS: SNMP.
2. Locate and select the SUN-PLATFORM-MIB.mib.
The SUN-PLATFORM-MIB is available on your Resource CD.
3. Click Load.
4. Specify the directory where server MIBs are placed and click Open.
5. Repeat Steps 2 through 4 to load other MIBs.
6. Exit the Manager Preferences menu.
7. Open an SNMP MIB browser.
The SNMP standard tree displays in the MIB browser.
8. Locate the Sun branch located under private.enterprises.
Verify that the SUN-PLATFORM_MIB is integrated.
Chapter 2 Interfaces 2-5
Page 26

2.3.3 Adding Your Server to Your SNMP Environment
Add your Sun Fire X4100 or Sun Fire X4200 server as a managed node using your
SNMP management application. See your SNMP management application
documentation for further details.
2.3.4 Configuring Receipt of SNMP Traps
Configure a trap in your ILOM service processor. See How to Manage ILOM Alerts
using the CLI, or How to Configure Alerts and View Alert Destinations, using the
GUI.
2.4 About IPMI
The Intelligent Platform Management Interface (IPMI) is an open-standard hardware
management interface specification that defines a specific way for embedded
management subsystems to communicate. IPMI information is exchanged though
baseboard management controllers (BMCs), which are located on IPMI-compliant
hardware components. Using low-level hardware intelligence instead of the
operating system has two main benefits: first, this configuration allows for out-ofband server management, and second, the operating system is not burdened with
transporting system status data.
Your ILOM Service Processor is IPMI v2.0 compliant. You can access IPMI
functionality through the command line with the IPMItool utility either in-band or
out-of-band. Additionally, you can generate an IPMI-specific trap from the web
interface, or manage the server's IPMI functions from any external management
solution that is IPMI v1.5 or v2.0 compliant. For more information about the IPMI
v2.0 specification, go to
http://www.intel.com/design/servers/ipmi/spec.htm#spec2.
2.4.1 IPMItool
IPMItool is a simple command-line interface that is useful for managing IPMIenabled devices. You can use this utility to perform IPMI functions with a kernel
device driver or over a LAN interface. IPMItool enables you to manage system fieldreplaceable units (FRUs), monitor system health, and monitor and manage system
2-6 Sun Fire X4100 and Sun Fire X4200 Servers System Management Guide • December 2005
Page 27

environmentals, independent of the operating system. Download this tool from
http://ipmitool.sourceforge.net/, or locate IMPItool and its related
documentation on your server Resource CD.
Chapter 2 Interfaces 2-7
Page 28

2.5 IPMI Reference Information
2.5.1 Supported IPMI 2.0 Commands
TABLE 2-1 Supported IPMI 2.0 Commands
General Commands
Get Device ID
Cold Reset
Warm Reset
Get Self Test Results
Set/Get ACPI Power State
Reset/Set/Get Watchdog Timer
Set/Get BMC Global Enables
Clear/Get Message Flags
Enable Message Channel Receive
Get/Send Message
Read Event Message Buffer
Get Channel Authentication Capabilities
Get Session Challenge
Activate/Close Session
Set Session Privilege Level
Get Session Info
Set/Get Channel Access
Get Channel Info Command
Set/Get User Access Command
Set/Get User Name
Set User Password Command
Master Write-Read
Set/Get Chassis Capabilities
Get Chassis Status
2-8 Sun Fire X4100 and Sun Fire X4200 Servers System Management Guide • December 2005
Page 29

TABLE 2-1 Supported IPMI 2.0 Commands
Chassis Control
Chassis Identify
Set Power Restore Policy
Get System Restart Cause
Set/Get System Boot Options
Set/Get Event ReceiverIPMI
System Interface Support
• KCS
•BT
Serial Over LAN
RCMP
Multiple Payloads
Enhanced Authentication
Encryption
PEF and Alerting Commands
Get PEF Capabilities
Arm PEF Postpone Timer
Set/Get PEF Configuration Parameters
Set/Get Last Processed Event ID
Alert Immediate
PET Acknowledge
Sensor Device Commands
Get Sensor Reading Factors
Set/Get Sensor Hysteresis
Set/Get Sensor Threshold
Set/Get Sensor Event Enable
Get Sensor Reading
Set Sensor Type
FRU Device Commands
Chapter 2 Interfaces 2-9
Page 30

TABLE 2-1 Supported IPMI 2.0 Commands
Get FRU Inventory Area Info
Read/Write FRU Data SDR Device Commands
Get SDR Repository Info
Get SDR Repository Allocation
Reserve SDR Repository
Get/Add SDR
Partial Add SDR
Clear SDR Repository
Get SDR Repository Time
Enter/Exit SDR Repository Update
Run Initialization Agent
SEL Device Commands
Get SEL Info
Get SEL Allocation Info
Reserve SEL
Get/Add SEL Entry
Clear SEL
Set/Get SEL Time
LAN Device Commands
Get LAN Configuration Parameters
Suspend BMC ARPs
Serial/Modem Device Commands
Set/Get Serial Modem Configuration
Set Serial Modem MUX
Get TAP Response Codes
Serial/Modem Connection Active
Callback
Set/Get User Callback Options
2-10 Sun Fire X4100 and Sun Fire X4200 Servers System Management Guide • December 2005
Page 31

TABLE 2-1 Supported IPMI 2.0 Commands
Event Commands
Get Event Count
Set/Get Event Destination
Set/Get Event Reception State
Send ICMB Event Message
2.5.2 Sensors
TABLE 2-2 Common Prefix Mapping
Prefix Path Description
fp. /SYS/FIOBD/ Front Panel
bp. /SYS/BIOBD/ Back Panel
mb. /SYS/MB/ Mainboard
pdb. /SYS/PDB/ Power Distribution Board
ps0. /SYS/PS0/ Power Supply 1
ps1. /SYS/PS1/ Power Supply 2
p0. /SYS/MB/P0/ CPU0
p1. /SYS/MB/P1/ CPU1
io. /SYS/SASBP/ I/O Board
TABLE 2-3 Temperature Sensors
Name Path Description
pdb.t_amb /SYS/PDB/T_AMB Power Supply Ambient Temp
fp.t_amb /SYS/FIOBD/T_AMB Front Ambient Temp
mb.t_amb /SYS/MB/T_AMB MB Ambient Temp
p0.t_core /SYS/MB/P0/T_CORE CPU0 die Temp
p1.t_core /SYS/MB/P1/T_CORE CPU1 die Temp
io.t_amb /SYS/SASBP/T_AMB I/O and Fan Board Temp
Chapter 2 Interfaces 2-11
Page 32

TABLE 2-4 Mainboard Voltage Sensors
Name Path Description
mb.v_bat /SYS/MB/BAT/V_BAT 3.0V Bat
mb.v_+3v3stby /SYS/MB/V_+3V3STBY 3.3V Aux
mb.v_+3v3 /SYS/MB/V_+3V3 3.3V Main
mb.v_+5v /SYS/MB/V_+5V 5V Main
mb.v_+12v /SYS/MB/V_+12V 12V
mb.v_-12v /SYS/MB/V_-12V -12V
TABLE 2-5 CPU Voltage Sensors
Name Path Description
p0.v_+1v5 /SYS/MB/V0_+1V5 1.5V CPU0
p0.v_+2v5core /SYS/MB/V0_+2V5 2.5VCore CPU0
p0.v_+1v25core /SYS/MB/V0_+1V251.25VCore CPU0
p1.v_+1v5 /SYS/MB/V1_+1V5 1.5V CPU1
p1.v_+2v5core /SYS/MB/V1_+2V5 2.5VCore CPU1
p1.v_+1v25core /SYS/MB/V1_+1V251.25VCore CPU1
TABLE 2-6 Sun Fire X4100 Fan Sensors
Name Path Description
ft0.fm0.f0.speed /SYS/FT0/FM0/F0/SPEED Fan 0A Tach
ft0.fm0.f1.speed /SYS/FT0/FM0/F1/SPEED Fan 0B Tach
ft0.fm1.f0.speed /SYS/FT0/FM1/F0/SPEED Fan 1A Tach
ft0.fm1.f1.speed /SYS/FT0/FM1/F1/SPEED Fan 1B Tach
ft0.fm2.f0.speed /SYS/FT0/FM2/F0/SPEED Fan 2A Tach
ft0.fm2.f1.speed /SYS/FT0/FM2/F1/SPEED Fan 2B Tach
ft1.fm0.f0.speed /SYS/FT1/FM0/F0/SPEED Fan 3A Tach
2-12 Sun Fire X4100 and Sun Fire X4200 Servers System Management Guide • December 2005
Page 33

TABLE 2-6 Sun Fire X4100 Fan Sensors
Name Path Description
ft1.fm0.f1.speed /SYS/FT1/FM0/F1/SPEED Fan 3B Tach
ft1.fm1.f0.speed /SYS/FT1/FM1/F0/SPEED Fan 4A Tach
ft1.fm1.f1.speed /SYS/FT1/FM1/F1/SPEED Fan 4B Tach
ft1.fm2.f0.speed /SYS/FT1/FM2/F0/SPEED Fan 5A Tach
ft1.fm2.f1.speed /SYS/FT1/FM2/F1/SPEED Fan 5B Tach
TABLE 2-7 Sun Fire X4200 Fan Sensors
Name Path Description
ft0.fm0.f0.speed /SYS/FT0/FM0/F0/SPEED Fan 0 Tach
ft0.fm1.f0.speed /SYS/FT0/FM1/F0/SPEED Fan 1 Tach
ft0.fm2.f0.speed /SYS/FT0/FM2/F0/SPEED Fan 2 Tach
ft1.fm0.f0.speed /SYS/FT1/FM0/F0/SPEED Fan 3 Tach
ft1.fm1.f0.speed /SYS/FT1/FM1/F0/SPEED Fan 4 Tach
ft1.fm2.f0.speed /SYS/FT1/FM2/F0/SPEED Fan 5 Tach
io.f0.speed /SYS/SASBP/FO/SPEED I/O Fan Tach
TABLE 2-8 Power Supply Sensors
Name Path Description
ps0.prsnt /SYS/PS0/PRSNT PS0 Present
ps0.pwrok /SYS/PS0/FF_POK PS0 Power OK
ps0.vinok /SYS/PS0/P_PWR PS0 Voltage Input OK
ps1.prsnt /SYS/PS1/PRSNT PS1 Present
ps1.pwrok /SYS/PS1/FF_POK PS1 Power OK
ps1.vinok /SYS/PS1/P_PWR PS1 Voltage Input OK
Chapter 2 Interfaces 2-13
Page 34

TABLE 2-9 Switch Sensors
Name Path Description
bp.locate.btn /SYS/LOCATE/BTN Back Panel Locate Button
fp.locate.btn /SYS/FIOBD/LOCATE/BTN Front Panel Locate Button
sys.intsw /SYS/INTSW Chassis Intrusion Switch
sys.nmi /SYS/DIAG/BTN NMI Button
TABLE 2-10 Presence Sensors
Name Path Description
fp.prsnt /SYS/FIOBD/PRSNT Front IO Board Present
fp.ledbd.prsnt /SYS/LEDBD/PRSNT LED Board Present
io.id0.prsnt /SYS/SASBP/ID0/PRSNT 2 Disk Backplane Present
io.id1.prsnt /SYS/SASBP/ID1/PRSNT 4 Disk Backplane Present
sys.id /SYS/ID System ID
io.f0.prsnt /SYS/SASBP/FO/PRSNT I/O Fan Present
TABLE 2-11 System Failure Sensors
Name Path Description
sys.fanfail /SYS/FAN_FAULT/FF_FAIL Fan Failure
sys.tempfail /SYS/TEMP_FAULT/FF_FAIL Over Temperature Failure
sys.psfail /SYS/PSU_FAULT/FF_FAIL Power Supply Failure
fp.usbfail /SYS/FIOBD/FF_USB2 Front USB Over Current Failure
TABLE 2-12 CPU Failure Sensors
Name Path Description
p0.fail /MB/P0/FF_FAIL CPU0 Failure
p1.fail /MB/P1/FF_FAIL CPU1 Failure
2-14 Sun Fire X4100 and Sun Fire X4200 Servers System Management Guide • December 2005
Page 35

TABLE 2-13 Memory Failure Sensors
Name Path Description
p0.d0.fail /MB/P0/D0/FF_FAIL CPU0 DIMM0 Failure
p0.d1.fail /MB/P0/D1/FF_FAIL CPU0 DIMM1 Failure
p0.d2.fail /MB/P0/D2/FF_FAIL CPU0 DIMM2 Failure
p0.d3.fail /MB/P0/D3/FF_FAIL CPU0 DIMM3 Failure
p1.d0.fail /MB/P1/D0/FF_FAIL CPU1 DIMM0 Failure
p1.d1.fail /MB/P1/D1/FF_FAIL CPU1 DIMM1 Failure
p1.d2.fail /MB/P1/D2/FF_FAIL CPU1 DIMM2 Failure
p1.d3.fail /MB/P1/D3/FF_FAIL CPU1 DIMM3 Failure
TABLE 2-14 Disk Failure Sensors
Name Path Description
io.hdd0.fail /SYS/SASBP/HDD0/FF_FAIL Disk 0 Failure
io.hdd1.fail /SYS/SASBP/HDD1/FF_FAIL Disk 1 Failure
io.hdd2.fail /SYS/SASBP/HDD2/FF_FAIL Disk 2 Failure
io.hdd3.fail /SYS/SASBP/HDD3/FF_FAIL Disk 3 Failure
TABLE 2-15 Fan Failure Sensors
Name Path Description
ft0.fm0.fail /FT0/FM0/FF_FAIL Fan Tray 0 Module 0 Failure
ft0.fm1.fail /FT0/FM1/FF_FAIL Fan Tray 0 Module 1 Failure
ft0.fm2.fail /FT0/FM2/FF_FAIL Fan Tray 0 Module 2 Failure
ft1.fm0.fail /FT1/FM0/FF_FAIL Fan Tray 1 Module 0 Failure
ft1.fm1.fail /FT1/FM1/FF_FAIL Fan Tray 1 Module 1 Failure
ft1.fm2.fail /FT1/FM2/FF_FAIL Fan Tray 1 Module 2 Failure
io.f0.fail /SYS/SASBP/F0/FF_FAIL I/O Fan Failure
Chapter 2 Interfaces 2-15
Page 36

TABLE 2-16 CPU LED Locators
Name Path Description
p0.led /MB/P0/SERVICE CPU0 Fail LED
p1.led /MB/P1/SERVICE CPU1 Fail LED
TABLE 2-17 Memory LED Locators
Name Path Description
p0.d0.led /MB/P0/D0/SERVICE CPU0 DIMM0 Fail LED
p0.d1.led /MB/P0/D1/SERVICE CPU0 DIMM1 Fail LED
p0.d2.led /MB/P0/D2/SERVICE CPU0 DIMM2 Fail LED
p0.d3.led /MB/P0/D3/SERVICE CPU0 DIMM3 Fail LED
p1.d0.led /MB/P1/D0/SERVICE CPU1 DIMM0 Fail LED
p1.d1.led /MB/P1/D1/SERVICE CPU1 DIMM1 Fail LED
p1.d2.led /MB/P1/D2/SERVICE CPU1 DIMM2 Fail LED
p1.d3.led /MB/P1/D3/SERVICE CPU1 DIMM3 Fail LED
TABLE 2-18 Disk LED Locators
Name Path Description
io.hdd0.led /SYS/DISKBD/HDD0/SERVICE Disk 0 Fail LED
io.hdd1.led /SYS/DISKBD/HDD1/SERVICE Disk 1 Fail LED
io.hdd2.led /SYS/DISKBD/HDD2/SERVICE Disk 2 Fail LED
io.hdd3.led /SYS/DISKBD/HDD3/SERVICE Disk 3 Fail LED
2-16 Sun Fire X4100 and Sun Fire X4200 Servers System Management Guide • December 2005
Page 37

TABLE 2-19 Fan LED Locators
Name Path Description
ft0.fm0.led /FT0/FM0/SERVICE Fan Tray 0 Module 0 Fail LED
ft0.fm1.led /FT0/FM1/SERVICE Fan Tray 0 Module 1 Fail LED
ft0.fm2.led /FT0/FM2/SERVICE Fan Tray 0 Module 2 Fail LED
ft1.fm0.led /FT1/FM0/SERVICE Fan Tray 1 Module 0 Fail LED
ft1.fm1.led /FT1/FM1/SERVICE Fan Tray 1 Module 1 Fail LED
ft1.fm2.led /FT1/FM2/SERVICE Fan Tray 1 Module 2 Fail LED
io.fo.led /SYS/SASBP/FO/SERVICE I/O Fan Fail LED
TABLE 2-20 Back Panel LED Locators
Name Path Description
bp.power.led /SYS/ACT Back Power LED
bp.locate.led /SYS/LOCATE Back Locate LED
bp.alert.led /SYS/SERVICE Back Alert LED
TABLE 2-21 Front Panel LED Locators
Name Path Description
fp.power.led /SYS/FIOBD/ACT Front Power LED
fp.locate.led /SYS/FIOBD/LOCATE Front Locate LED
fp.alert.led /SYS/FIOBD/SERVICE Front Alert LED
sys.fanfail.led /SYS/FAN_FAULT/SERVICE Front Fan Fail LED
sys.tempfail.led /SYS/TEMP_FAULT/SERVICE Front Over Temperature LED
sys.psfail.led /SYS/PSU_FAULT/SERVICE Front Power Supply Fail LED
Chapter 2 Interfaces 2-17
Page 38

TABLE 2-22 System LED Locators
Name Path Description
sys.power.led /SYS/ACT Power LED (front+back)
sys.locate.led /SYS/LOCATE Locate LED (front+back)
sys.alert.led /SYS/SERVICE Alert LED (front+back)
TABLE 2-23 Service Processor FRUs (Field Replaceable Units)
Name Path Description
sp.fru /SP/SEEPROM SP FRU
sp.net0.fru /SP/NET0/SEEPROM SP Network Port 0 FRU
TABLE 2-24 Power Distribution Board FRUs
Name Path Description
pdb.fru /SYS/PDB/SEEPROM Power Distribution Board FRU
TABLE 2-25 Mainboard FRUs
Name Path Description
mb.fru /SYS/MB/SEEPROM Mainboard FRU
mb.bios.fru /SYS/MB/BIOS/SEEPROM Mainboard BIOS FRU
TABLE 2-26 Network Port FRUs
Name Path Description
mb.net0.fru /SYS/MB/NET0/SEEPROM Network Port 0 and 1
mb.net1.fru /SYS/MB/NET1/SEEPROM Network Port 2 and 3
2-18 Sun Fire X4100 and Sun Fire X4200 Servers System Management Guide • December 2005
Page 39

TABLE 2-27 Network Port FRUs
Name Path Description
mb.net0.fru /SYS/MB/NET0/SEEPROM Network Port 0 and 1
mb.net1.fru /SYS/MB/NET1/SEEPROM Network Port 2 and 3
TABLE 2-28 CPU FRUs
Name Path Description
p0.fru /SYS/MB/P0/SEEPROM CPU0 FRU
p1.fru /SYS/MB/P1/SEEPROM CPU1 FRU
TABLE 2-29 Memory FRUs
Name Path Description
p0.d0.fru /SYS/MB/P0/D0/SEEPROM CPU0 DIMM0 FRU
p0.d1.fru /SYS/MB/P0/D1/SEEPROM CPU0 DIMM1 FRU
p0.d2.fru /SYS/MB/P0/D2/SEEPROM CPU0 DIMM2 FRU
p0.d3.fru /SYS/MB/P0/D3/SEEPROM CPU0 DIMM3 FRU
p1.d0.fru /SYS/MB/P1/D0/SEEPROM CPU1 DIMM0 FRU
p1.d1.fru /SYS/MB/P1/D1/SEEPROM CPU1 DIMM1 FRU
p1.d2.fru /SYS/MB/P1/D2/SEEPROM CPU1 DIMM2 FRU
p1.d3.fru /SYS/MB/P1/D3/SEEPROM CPU1 DIMM3 FRU
Chapter 2 Interfaces 2-19
Page 40

2-20 Sun Fire X4100 and Sun Fire X4200 Servers System Management Guide • December 2005
Page 41

CHAPTER
3
SP Initial Setup
This chapter describes how to do the Service Processor initial setup.
3.1 About Initial Setup and Configuration of the Service Processor
The Sun™ Integrated Lights Out Manager (ILOM) provides powerful tools for
managing your Sun Fire X4100 or Sun Fire X4200 server. ILOM consists of four
components, three on your host server and one on client systems accessing the server:
ILOM consists of four components, three of which are on your host server and one
that is on the client system that accesses your host server. The four components are
as follows:
■ ILOM SP hardware. Your server is equipped with a Graphics Redirect and
Service Processor (GRASP) board that performs the following functions:
■ Monitors the status and configuration of field-replaceable components of your
server, such as fans, disk drives, and power supplies.
■ Provides serial and Ethernet connections to external terminals or local area
networks (LANs).
■ ILOM SP firmware. Preinstalled on the GRASP board is a library of system
management firmware applications. This ILOM firmware is operating system
independent. These firmware applications provide the following system
management interfaces into your server:
3-1
Page 42

■ A web-based graphical interface
FIGURE 3-1 Integrated Lights Out Manager Login Page
■ A Secure Shell (SSH) command-line interface
FIGURE 3-2 SSH Command-Line Interface
■ An IPMI v2.0 command interface
■ A Simple Network Management Protocol (SNMP) v1, v2c, or v3 interface
These interfaces call the same underlying system management functions on your
GRASP board, so you can choose to work with one or more of these ILOM
interfaces to integrate with the other management interfaces running in your data
center.
3-2 Sun Fire X4100 and Sun Fire X4200 Servers System Management Guide • December 2005
Page 43

■ Remote Console application. When you install Solaris or Linux on your Sun Fire
X4100 or Sun Fire X4200 server, the installation manager also copies OS-specific
drivers and applications from the Sun Fire X4100 and X4200 Resource CD to your
system hard drive. The Remote Console application is a piece of layered software
that allows remote clients to view the graphical console of your Sun Fire X4100 or
Sun Fire X4200 server as though they were directly attached to the video, mouse,
and keyboard ports of your Sun Fire X4100 or Sun Fire X4200 server.
Note – The Remote Console application requires that you install the Sun Java
runtime environment Version 5.0 or more recent. You can download Java for free
from http://java.com.
■ Client-side Secure Shell application. To access the ILOM SP through a remote
Secure Shell (SSH), you must install a Secure Shell communications application on
the remote client system (server, workstation, or laptop). Many Secure Shell
communications applications are available from commercial or open-source
distribution. Refer to http://www.openssh.org for information about opensource client-side SSH applications.
3.1.1 Task Map
There are two ways to connect to your ILOM Service Processor to perform initial
setup and configuration.
TABLE 3-1 SP Connection Methods
Connection to the ILOM
Service Processor Task–Refer To Sections:
Serial connection
from a PC or
terminal
Ethernet connection Section 3.3, “How To Configure ILOM Using an Ethernet
Section 3.2, “How To Configure ILOM Using a Serial
Connection” on page 3-4
and Section 3.5, “How to Configure
ILOM Using a Static IP Address” on page 3-12
Connection” on page 3-6
and Section 3.5, “How to Configure
ILOM Using a Static IP Address” on page 3-12
Remote Console
application
Section 4.1, “About ILOM and the Remote Console
Application” on page 4-1
Chapter 3 SP Initial Setup 3-3
Page 44

3.1.2 ILOM Default Settings
Sun™has configured the ILOM hardware and firmware on your server to reflect the
most common default settings used in the field. It is unlikely that you will need to
change these defaults.
TABLE 3-2 ILOM Default Settings
System Component Default Status Action Required
ILOM Service Processor card Preinstalled None
ILOM Service Processor
firmware
ILOM IPMI interface Enabled None
ILOM web GUI Enabled None
ILOM command-line interface
(CLI)
ILOM SNMP interface Enabled None
Preinstalled None
Enabled None
3.2 How To Configure ILOM Using a Serial Connection
You can configure the ILOM SP at any time by connecting a terminal or PC running
terminal emulation software to the SP RJ-45 serial port on the GRASP board. Use
this procedure to establish a serial connection to the ILOM SP and to perform initial
configuration of ILOM firmware.
3.2.1 Before You Begin
1. Verify that your terminal, laptop, or terminal server is operational.
2. Configure that terminal device or the terminal emulation software running on a
laptop or PC to the following settings:
■ 8N1: eight data bits, no parity, one stop bit
■ 9600 baud
■ Disable hardware flow control (CTS/RTS)
3-4 Sun Fire X4100 and Sun Fire X4200 Servers System Management Guide • December 2005
Page 45

3. Unpack your server and connect the system power cable to a power source.
Refer to the Sun Fire X4100 and Sun Fire X4200 Servers Setup Guide (819-1155 for
instructions on installing the hardware, cabling, and powering on.
3.2.2 What To Do
1. Connect a serial cable from the RJ-45 SERIAL MGT port on the server’s back
panel to a terminal device. See
FIGURE 3-3 Serial Management Port
Note – The serial port on the ILOM Service Processor requires that the serial cable
connected to it use the same pin assignments as the serial cable connector for the
Sun Advanced Lights Out Manager (ALOM) or Remote System Control (RSC). See
TABLE 3-3.
FIGURE 3-3.
TABLE 3-3 Serial Management Port Pinouts
Pin Signal Description
1 Request To Send (RTS)
2 Data Terminal Ready (DTR)
3 Transmit Data (TXD)
4 Ground
5 Ground
6 Receive Data (RXD)
7 Data Carrier Detect (DCD)
8 Clear To Send (CTS)
2. Press Enter on the terminal device to establish a connection between that terminal
device and the ILOM SP.
Chapter 3 SP Initial Setup 3-5
Page 46

Note – If you are connecting to the serial port on the SP before it has been powered
up or during its power up sequence, you will see bootup messages displayed.
The ILOM SP eventually displays a login prompt.
SUNSP0003BA84D777 login:
The first string in the prompt is the default host name for the ILOM SP. It consists of
the prefix SUNSP and the MAC address of the ILOM SP. The MAC address for each
ILOM SP is unique.
3. Log in to the ILOM SP and type the default user name, root, with the default
password, changeme.
Once you have successfully logged in, the SP displays its default command prompt:
->
4. Type ILOM Service Processor commands to monitor and configure your server.
For example, to display status information about the motherboard in your server,
type the following command:
-> show /SYS/MB
To start the serial console, type the following commands:
cd /SP/console
start
Note – You can switch back to the ILOM SP command-line interface (CLI) from the
serial console by entering the Escape-( key sequence.
Note – For more information about using the ILOM Service Processor CLI to set
configuration options, see Section 5.1, “About the ILOM Service Processor CLI” on
page 5-1.
3.3 How To Configure ILOM Using an Ethernet Connection
ILOM offers several interfaces to support system management on your server. Before
you take advantage of those interfaces over your Ethernet local area network (LAN),
you must do the following:
3-6 Sun Fire X4100 and Sun Fire X4200 Servers System Management Guide • December 2005
Page 47

■ Establish an Ethernet connection between your server and your Ethernet LAN.
■ Determine the IP address assigned to your ILOM SP by your Dynamic Host
Configuration Protocol (DHCP) server.
Once you have determined the IP address of the ILOM SP (the GRASP board), you
can access its firmware applications through a secure command shell (SSH) or a web
browser.
Establishing an Ethernet management connection involves assigning a static or
dynamic IP address to the RJ-45 Ethernet Management port. DHCP is one way to
have an IP address dynamically and automatically assigned to the ILOM Service
Processor by a DHCP server in your data center.
Use this procedure to configure the ILOM SP and the DHCP server in your data
center to support DHCP connections.
3.3.1 Before You Begin
1. Verify that your DHCP server is configured to accept new media access control
(MAC) addresses.
2. Unpack your server and connect the system power cable to a power source.
Refer to the Sun Fire X4100 and Sun Fire X4200 Servers Setup Guide (819-1155) for
instructions on installing the hardware, cabling, and powering on.
3. Obtain the ILOM SP (GRASP board) MAC address from one of the following
locations. MAC addresses are 12-digit hexadecimal strings in the format
xx:xx:xx:xx:xx:xx where x represents a single hexadecimal letter (0-9, A-F, a-f). Write
down that address for future reference.
■ The SP has a serial port to which you can attach a terminal device. If you log in to
the SP and enter the command show /SP/network, the SP displays the current
Mac address.
■ The SP label attached to the GRASP board. You need to open the cover of the
server to view this label.
■ The Customer Information Sheet shipped with your server.
■ The system BIOS setup screen. Choose Advanced - IPMI 2.0 Configuration - Set
LAN Configuration - MAC address.
■ Command-line interface. Log in to the service processor via the CLI and type the
command show /SP/network to display the MAC address.
4. Obtain the ILOM SSP IP address from one of the following locations. Record the
IP address for future reference.
■ The system BIOS setup screen. Choose Advanced - IPMI 2.0 Configuration - Set
LAN Configuration - IP address.
Chapter 3 SP Initial Setup 3-7
Page 48

■ Command-line interface. Log in to the service processor via the CLI and type the
command show /SP/network to display the IP address.
■ DHCP server log files.
3.3.2 What To Do
This procedure explains how to establish an Ethernet connection between your
server and an Ethernet local area network supporting a DHCP server.
1. Connect an Ethernet cable to the RJ-45 NET MGT Ethernet port. See
FIGURE 3-4.
If the ILOM SP is not using static IP addresses, it broadcasts a DHCPDISCOVER
packet with the ID of its MAC address. A DHCP server on your LAN returns a
DHCPOFFER packet containing an IP address and other information. The ILOM SP
then manages its “lease” of that IP address assigned to it by the DHCP server.
FIGURE 3-4 Ethernet Management Port
2. Log in to your DHCP server and view its DHCP log file.
Note – Different DHCP server applications running on different operating systems
store these log files in different locations. Consult your DHCP system administrator
to locate the correct path to the log file.
3. Identify the IP address in the log file that corresponds to the MAC address of your
ILOM SP.
Typically, DHCP log file entries are individual lines with the following commaseparated fields:
ID, Date, Time, Description, IP Address, Host Name, MAC Address
Locate the MAC address of your ILOM SP in the MAC Address (seventh) field of
the correct DHCP file entry and record the corresponding value of the IP Address
(fifth) field. This is the IP address that you must use to access the system
management firmware applications on your ILOM SP.
3-8 Sun Fire X4100 and Sun Fire X4200 Servers System Management Guide • December 2005
Page 49

4. Open a session to the ILOM SP using the IP address that you obtained in the
Before You Begin procedure.
Each ILOM SP firmware application requires a different browser or shell.
■ To establish a Secure Shell (SSH) connection to the ILOM SP command-line
interface (CLI) or IPMItool, type the appropriate connection command in the SSH
application. For example, to connect to the SP with the DHCP-assigned IP address
of 129.144.82.20, type the following command:
# ssh -l root 129.144.82.20
FIGURE 3-5 Opening a Session With an SSH Command-Line Interface
Once you have entered the default password for the SP, changeme, you can enter
commands to manage user accounts or to monitor the status of devices on your
server. See the example in
FIGURE 3-6.
Chapter 3 SP Initial Setup 3-9
Page 50

FIGURE 3-6 Sample Command in SSH Terminal
■ To establish a connection to the ILOM SP web GUI, type the IP address of the
ILOM SP in the browser locator box and press Enter. For example, assuming that
the IP address for your ILOM SP is 129.144.02.20, see the example in
FIGURE 3-7 Opening a Session With a Web GUI
FIGURE 3-7.
5. Enter the default user name, root, with the default password, changeme, at the
CLI or GUI prompt to log in to the ILOM SP.
FIGURE 3-8 Integrated Lights Out Manager Login Page
3-10 Sun Fire X4100 and Sun Fire X4200 Servers System Management Guide • December 2005
Page 51

6. Type ILOM SP commands in the CLI or navigate to ILOM GUI pages to configure
your ILOM SP. See the example in
FIGURE 3-9 Integrated Lights Out Manager Page
FIGURE 3-9.
3.4 How to Update Your ILOM Firmware
Sun Microsystems regularly updates the version of firmware that is available for the
ILOM Service Processor. It is likely that the firmware images that are available for
download from the SunSolve Online web site are more current than the image
installed on your service processor at the factory.
3.4.1 Before You Begin
1. Verify the current version number of your preinstalled ILOM firmware.
2. Download the latest firmware image from Sun’s software download site:
http://www.sun.com/download/
Chapter 3 SP Initial Setup 3-11
Page 52

3.4.2 What to Do
1. Log in to the ILOM Service Processor via SSH or web GUI.
2. Update the ILOM firmware image using one of the following methods:
■ From the CLI, use the load command.
See Section 7.14, “How to Update the Service Processor Firmware” on page 7-20
■ From the web GUI, choose the Maintenance tab, then Firmware Upgrade.
See Section 9.1, “How to Upgrade the SP Firmware” on page 9-1.
3.5 How to Configure ILOM Using a Static IP Address
The most common approach to configuring the ILOM Service Processor is to use
DHCP and Ethernet. For more information about configuring ILOM this way, see
Section 3.3, “How To Configure ILOM Using an Ethernet Connection” on page 3-6.If
you have limited DHCP services at your site or no DHCP services, you can also
configure ILOM using a static IP address.
This can be accomplished in one of three ways:
■ CLI serial connection
■ CLI Ethernet connection
■ Web GUI Ethernet
.
3.5.1 Before You Begin
1. Unpack your server and connect the system power cable to a power source.
Refer to the Sun Fire X4100 and Sun Fire X4200 Servers Setup Guide (819-1155) for
instructions on installing the hardware, cabling, and powering on.
2. Obtain the ILOM SP IP address from one of the following locations. Record the IP
address for future reference.
■ The system BIOS setup screen. Choose Advanced - IPMI 2.0 Configuration - Set
LAN Configuration - IP address.
■ Command-line interface. Log in to the service processor via the CLI and type the
command show /SP/network to display the IP address.
3-12 Sun Fire X4100 and Sun Fire X4200 Servers System Management Guide • December 2005
Page 53

3.5.2 Configuring ILOM With the CLI and a Serial Connection
To set a static IP address for the ILOM Service Processor using the ILOM CLI and a
serial line connection, do the following.
1. Establish a serial connection to the ILOM Service Processor.
Note – See Section 3.2, “How To Configure ILOM Using a Serial Connection” on
page 3-4 for detailed instructions about connecting to it and logging into ILOM.
2. Log in to the ILOM Service Processor.
3. Type the following command to set the working directory.
cd /SP/network
4. Type the following commands to specify a static Ethernet configuration.
Note – The following values are examples only. You must specify the IP address,
netmask, and gateway appropriate for your ILOM Service Processor and network
configuration.
set pendingipaddress=129.144.82.26
set pendingipnetmask=255.255.255.0
set pendingipgateway=129.144.82.254
set commitpending=true
5. Log out of the ILOM Service Processor.
3.5.3 Configuring ILOM With the CLI and an Ethernet Connection
1. Log into the ILOM SP using Secure Shell (SSH) over the network, or by
connecting a terminal to the serial port.
To establish a Secure Shell (SSH) connection to the ILOM SP CLI or IPMItool, type
the appropriate connection command in the SSH application. For example, to
connect to the SP with the DHCP-assigned IP address of 129.144.82.20, type the
following command:
# ssh -l root 129.144.82.20
Chapter 3 SP Initial Setup 3-13
Page 54

2. Type the following command to set the working directory.
cd /SP/network
3. Type the following commands to specify a static Ethernet configuration.
Note – The following values are samples only. You must specify the IP address,
netmask, and gateway appropriate for your ILOM Service Processor and network
configuration.
set pendingipaddress=129.144.82.26
set pendingipnetmask=255.255.255.0
set pendingipgateway=129.144.82.254
set pendingipdiscovery=static
set commitpending=true
4. Log out of the ILOM SP.
3.5.4 Configuring ILOM With the Web GUI and an Ethernet Connection
To set a static IP address for the ILOM SP using the web GUI, do the following.
1. Obtain the ILOM SP IP address from one of the following locations. Record the IP
address for future reference.
■ The system BIOS setup screen. Choose Advanced - IPMI 2.0 Configuration - Set
LAN Configuration - IP address.
■ Command-line interface. Log in to the service processor via the CLI and type the
command show /SP/network to display the IP address.
■ DHCP server log files.
2. Connect to the ILOM SP through a web browser running on a remote system.
3. Log in to the web GUI using the default user name, root, and the default
password, changeme.
4. Choose the Configuration tab and its Network tab to display information about
the current network configuration of your ILOM SP. See
5. Click the Use the Following IP Address option. See
3-14 Sun Fire X4100 and Sun Fire X4200 Servers System Management Guide • December 2005
FIGURE 3-10.
FIGURE 3-10.
Page 55

FIGURE 3-10 Integrated Lights Out Manager Network Settings Page
6. Modify the displayed settings as required and click save.
Chapter 3 SP Initial Setup 3-15
Page 56

3-16 Sun Fire X4100 and Sun Fire X4200 Servers System Management Guide • December 2005
Page 57

CHAPTER
4
Remote Console Application
4.1 About ILOM and the Remote Console Application
The Sun Integrated Lights Out Manager (ILOM) supports a powerful software
application that allows you to access the graphical console of your Sun Fire X4100 or
Sun Fire X4200 server remotely. This service is commonly known as RKVMS, remote
keyboard, video, mouse, and storage access. The ILOM Remote Console application
provides the following features:
■ Remote redirection and control of the server's console keyboard
■ Remote redirection and control of the server's console video output
■ Remote redirection and control of the server's console mouse
■ Remote access to the server console from storage devices such as CD/DVD drives
and floppy disk drives
This section introduces general requirements for installing the Remote Console
application and options for launching the Remote Console application.
4.1.1 Server (Host) Installation Requirements
The Remote Console application uses Java technology. For each operating system
supported by the Sun Fire X4100 or Sun Fire X4200 server, there are one or more OSspecific binary files that you must install and configure. For detailed information
about OS-specific application software and OS-specific installation procedures, see
the appropriate System Management — Remote Console Application sections.
4-1
Page 58

4.1.2 Client Installation Requirements
There are no OS-specific drivers or helper applications that you need to install on
your client system in order to run the ILOM Remote Console application. If your
client system has JRE 1.5 and a compatible web browser, you are ready to use the
ILOM Remote Console application.
TABLE 4-1 Client Installation Requirements
Client OS
Microsoft Windows XP Pro JRE 1.5 (Java 5.0) Internet Explorer 6.0 and
Red Hat Linux 3.0 and 4.0
Desktop and Workstation
Editions
Solaris 9 JRE 1.5 (Java 5.0) Mozilla 1.7.5
Solaris 10 JRE 1.5 (Java 5.0) Mozilla 1.7.5
SUSE Linux 9.2 JRE 1.5 (Java 5.0) Mozilla 1.7.5
Java Runtime Environment
Including Java Web Start Browser(s)
later
Mozilla 1.7.5 or later
Mozilla Firefox 1.0
JRE 1.5 (Java 5.0) Mozilla 1.7.5 or later
Mozilla Firefox 1.0
Note – To download the Java 1.5 runtime environment, see http://java.com.
4.2 How to Launch the Remote Console Application
You can launch the Remote Console application in the following ways:
■ ILOM Web Interface — You can launch the Remote Console application from the
ILOM web interface by choosing Remote Control — Redirection.
■ Java Web Start — You can also launch the Remote Console application from a
local web page that calls the Java Web Start application. See
http://java.sun.com/j2se/1.5.0/docs/guide/javaws/ for detailed
information about setting up this local web page.
4-2 Sun Fire X4100 and Sun Fire X4200 Servers System Management Guide • December 2005
Page 59

4.2.1 How to Launch the Remote Console Application From the ILOM Web Interface
Use the following procedure to launch the Remote Console application from the
ILOM web interface.
1. Type the IP address of the ILOM Service Processor in the browser locator box and
press ENTER.
FIGURE 4-1 URL Sample
2. Enter the default user name (root) with the default password (changeme) at the
GUI prompts to log in to the ILOM Service Processor.
FIGURE 4-2 Login Screen
3. Click the Mouse Mode Settings tab to set the mouse mode.
4. Click the Remote Control tab to display remote control options in the ILOM GUI
interface.
Chapter 4 Remote Console Application 4-3
Page 60

FIGURE 4-3 Remote Control Options
5. Click the Redirection tab to display initial console redirection options.
6. Set the appropriate color configuration for your client display.
7. Click the Launch Redirection button to start Java Web Start and the Remote
Console application.
FIGURE 4-4 Java Web Start
4-4 Sun Fire X4100 and Sun Fire X4200 Servers System Management Guide • December 2005
Page 61

8. Type the default user name (root) and password (changeme), and select the
maximum bandwidth at the Remote Console application Login screen then click
OK.
The Remote Console Login screen appears. Console redirection and keyboard
redirection are enabled automatically.
FIGURE 4-5 Remote Console Login Screen
9. Choose menu options in the Remote Console application to enable or disable
remote keyboard, video, mouse, or storage options.
For details on the Remote Console application, see See Chapter 10.
4.2.2 How to Launch the Remote Console Application From a Java Web Start Web Page
Java Web Start is a helper application that gets associated with a web browser. When
you click a link in a web page that points to a special launch file (.jnlp file), your
browser launches Java Web Start, which then automatically downloads, caches, and
runs the Remote Console application.
See http://java.sun.com/j2se/1.5.0/docs/guide/javaws/ for detailed
information about setting up this web page.
Use the following procedure to launch the Remote Console application from the Java
Web Start page.
1. Open your web browser.
2. Navigate to the web page containing the link to the Java Web Start launch file, for
example jrconsole.jnlp.
3. Click the link to launch the Remote Console application.
Chapter 4 Remote Console Application 4-5
Page 62

4. Type the default user name (root) and password (changeme) and select the
maximum bandwidth to initiate the remote session.
The Remote Console screen appears. Console redirection and keyboard redirection
are enabled automatically.
5. Choose menu options in the Remote Console application to enable or disable
remote keyboard, video, mouse, or storage options.
For details on the Remote Console application, see See Chapter 10.
4.2.3 How to Launch the Remote Console Application From a Java Web Start Web Page Using a Shortcut
If your client workstation or laptop is running client versions of Windows operating
system or the Gnome 2.0 operating environment, you can launch the Remote
Console application by creating a desktop shortcut to Java Web Start and the Java
Web Start launch file.
See http://java.sun.com/j2se/1.5.0/docs/guide/javaws/ for detailed
information about setting up these desktop shortcuts.
Use the following procedure to launch the Remote Console application using a
desktop shortcut.
1. Double-click the desktop shortcut icon to launch Java Web Start and the Remote
Console application.
2. Enter the default user name (root) and password (changeme), and select maximum
bandwidth to initiate the remote session.
The Remote Console screen appears. Console redirection and keyboard redirection
are enabled automatically.
3. Choose menu options in the Remote Console application to enable or disable
remote keyboard, video, mouse, or storage options.
For details on the Remote Console application, see See Chapter 10.
4.3 How to Redirect Keyboard, Video, Mouse, or Storage Devices
The Remote Console application supports the redirection of the following types of
devices:
4-6 Sun Fire X4100 and Sun Fire X4200 Servers System Management Guide • December 2005
Page 63

■ Keyboard devices — Standard keyboards
■ Video devices — Standard video display devices
■ Mouse devices — Standard mouse or other pointing devices
■ Storage devices — CD/DVD drives or floppy disk drives
4.3.1 How to Redirect Keyboard Devices
Use the following procedure to redirect a server console keyboard device to your
local workstation or laptop. ilom_javaRConsole4a.jpg
1. Launch the Remote Console application.
The Remote Console screen appears. Console redirection and keyboard redirection
are automatically enabled. For details on the Remote Console application, see See
Chapter 10.
FIGURE 4-6 Redirection Selected
2. (Optional) Choose the Keyboard menu to set specific keyboard options or to send
specific keyboard events to the server console.
Chapter 4 Remote Console Application 4-7
Page 64

FIGURE 4-7 Keyboard Options
4.3.2 How to Redirect Mouse or Pointing Devices
Use the following procedure to redirect server mouse events to your local
workstation or laptop mouse.
1. Launch the Remote Console application.
The Remote Console screen appears. Console redirection and keyboard redirection
are automatically enabled. For details on the Remote Console application, see See
Chapter 10.
FIGURE 4-8 Redirection Selected
2. Choose Redirection — Start Redirection to begin or to restart redirection between
the ILOM Service Processor console and your local workstation or laptop.
4-8 Sun Fire X4100 and Sun Fire X4200 Servers System Management Guide • December 2005
Page 65

FIGURE 4-9 Start Redirection
3. Choose Devices — Mouse to enable mouse redirection.
FIGURE 4-10 Mouse Selected
4.3.3 How to Redirect Storage Devices
Use the following procedure to enable a storage device attached to your local
workstation or laptop to serve as a storage device for a server. You can use this
option to install software on a local CD/DVD drive to multiple remote servers.
1. Launch the Remote Console application.
The Remote Console screen appears. Console redirection and keyboard redirection
are automatically enabled. For details on the Remote Console application, see See
Chapter 10.
2. Choose Devices — CD-ROM or Devices — Floppy to enable a local storage device
to connect to the remote server as though it were a storage device attached directly
to that remote server.
Chapter 4 Remote Console Application 4-9
Page 66

FIGURE 4-11 CD-ROM Selected
4-10 Sun Fire X4100 and Sun Fire X4200 Servers System Management Guide • December 2005
Page 67

CHAPTER
5
Command Line Interface Overview
5.1 About the ILOM Service Processor CLI
The ILOM Service Processor command-line interface (CLI) is based on the
Distributed Management Task Force, Inc. (http://www.dmtf.org/standards)
Server Management Command-Line Protocol Specification, version 11.0a.8 Draft.
The DMTF CLP model offers a management interface for one or many servers
regardless of server state, method of access, or installed operating system. The basic
concept of this model is that a small number of command verbs operate on a large
namespace of targets, which can be modified by options and properties.
5.1.1 Connecting to the CLI
You can access the service processor command line through the serial port or
remotely through a Secure Shell (SSH) connection.
■ Serial port – The serial port provides access to the service processor CLI and to
the system console. IPMI terminal mode and PPP mode are not available on the
serial port.
■ SSH – Secure Shell connections are enabled by default.
The service processor supports a maximum of 10 active sessions, including serial,
SSH, and web interface sessions. You can view active sessions by entering the
command show /SP/sessions.
Note – Telnet connections to the service processor are not supported.
5-1
Page 68

5.1.2 Using the CLI
There are two privilege levels available for service processor users: Administrator
and Operator. Administrators have full access to service processor functionality and
Operators have read-only access to service processor information.
Syntax
The syntax of a command is: <verb><options><target><properties>
Command Verbs
The service processor CLI supports the following DMTF CLP command verbs.
TABLE 5-1 CLI Command Verbs
Command Description
cd Navigates the object namespace.
create Sets up an object in the namespace.
delete Removes an object from the namespace.
exit Terminates a session to the CLI.
help Displays Help information about commands and targets.
load Transfers a file from an indicated source to an indicated target.
reset Resets the state of the target.
set Sets target properties to the specified value.
show Displays information about targets and properties.
start Starts the target.
stop Stops the target.
version Displays the version of service processor firmware running.
Object Namespace
The DMTF CLP model focuses on a hierarchical namespace, which is a predefined
tree that contains every managed object in the system. This namespace defines the
targets for each command verb. The service processor can access two namespaces:
the /SP namespace and the overall system namespace /SYS. In the /SP namespace
you manage and configure the service processor. In the /SYS namespace you access
sensors and other information for managed system hardware.
5-2 Sun Fire X4100 and Sun Fire X4200 Servers System Management Guide • December 2005
Page 69

Below is a diagram of the /SP namespace. Your /SYS namespace diagram is
determined by the managed hardware devices in your server. You can view your
/SYS namespace by entering the show /SYS command from the service processor
command line.
FIGURE 5-1 SP Namespace
Options
The service processor CLI supports the following options. All options are not
supported for all commands. See a specific command section for the options that are
valid with that command. The help and examine options can be used with any
command.
TABLE 5-2 CLI Options
Option Long Form Short Form Description
-default Causes the verb to perform only its default functions.
-destination Specifies the destination for data.
-display -d Shows the data the user wants to display.
-examine -x Examines the command but does not execute it.
-force -f Causes an immediate action instead of an orderly
shutdown.
-help -h Displays Help information.
Chapter 5 Command Line Interface Overview 5-3
Page 70

TABLE 5-2 CLI Options
Option Long Form Short Form Description
-level -l Executes the command for the current target and all
targets contained through the level specified.
-output -o Specifies the content and form of command output.
-script Skips warnings or prompts normally associated with
the command.
-source Indicates the location of a source image.
Targets
Every object in your namespace is a target. All targets are not supported for all
commands. Each command section lists the valid targets for that command.
Properties
Properties are the configurable attributes specific to each object. An object can have
one or more properties. Each command section lists the valid properties for each
target.
5-4 Sun Fire X4100 and Sun Fire X4200 Servers System Management Guide • December 2005
Page 71

CHAPTER
6
Command Line Interface Reference
6.1 ILOM Service Processor CLI Quick Reference
This chapter contains the most common ILOM Service Processor commands you use
to administer your Sun Fire X4100 or Sun Fire X4200 server from the command-line
interface (CLI).
TABLE 6-1 Command Syntax and Usage
Content Typeface Description
Your input Fixed-width
bold
On screen output Fixed-width
regular
Variable Italic Replace these with a name or value you
Square brackets, [ ] Text in square brackets is optional.
Vertical bars, | Text separated by a vertical bar represents
Text that you type into the computer. Type
it in exactly as shown.
Text that the computer displays
choose.
the only available values. Select one.
6-1
Page 72

TABLE 6-2 General Commands
Description Command
Show all valid targets. help targets
Log out of the service processor CLI. exit
Display the version of the ILOM firmware
version
running on the service processor.
Display service processor clock information. show /SP/clock
Display all of the CLI commands. show /SP/cli/commands
Display the active service processor sessions. show /SP/sessions
Display information about commands and
help
targets.
Display information about a specific command. help create
Update the service processor and BIOS
load -source tftp://newSPimage
firmware.
Display a list of the service processor event logs. show /SP/logs/event/list
TABLE 6-3 User Commands
Description Command
Add a local user. create /SP/users/user1 password=password role=
administrator|operator
Delete a local user. delete /SP/users/user1
Change a local user's properties. set /SP/users/user1 role=operator
Display information about all local
users.
Display information about LDAP
show -display [targets|properties|all] -level
[value|all] /SP/users
show /SP/clients/ldap
settings.
Change LDAP settings. set /SP/clients/ldap binddn=proxyuser bindpw=
proxyuserpassword defaultrole=administrator|operator
ipaddress=ipaddress
6-2 Sun Fire X4100 and Sun Fire X4200 Servers System Management Guide • December 2005
Page 73

TABLE 6-4 Network and Serial Port Setting Commands
Description Command
Display network
configuration information.
Change network properties
for the service processor.
Changing certain network
properties, like the IP
address, will disconnect
your active session.
Display information about
the external serial port.
Change the external serial
port configuration.
Display information about
the serial connection to the
host.
Change the host serial port
configuration.
Note: This speed setting
must match the speed
setting for serial port 0,
COM1 or /dev/ttyS0 on the
host operating system.
show /SP/network
set /SP/network pendingipaddress=ipaddress pendingipdiscovery=
dchp|static pendingipgateway=ipgateway pendingipnetmask=ipnetmask
commitpending=true
show /SP/serial/external
set /SP/serial/external pendingspeed=integer commitpending=true
show /SP/serial/host
set /SP/serial/host pendingspeed=integer commitpending=true
TABLE 6-5 Alert Commands
Description Command
Display information about
show /SP/alert/rules/1...15
PET alerts. You can configure
up to 15 alerts.
Change alert configuration. set /SP/alert/rules/1...15 destination=ipaddress
level=down|critical|major|minor
Chapter 6 Command Line Interface Reference 6-3
Page 74

TABLE 6-6 System Management Access Commands
Description Command
Display information
show /SP/services/http
about HTTP settings.
Change HTTP
settings, such as
set /SP/services/http port=portnumber secureredirect enabled|disabled
servicestate=enabled|disabled
enabling automatic
redirection to HTTPS.
Display information
show /SP/services/https
about HTTPS access.
Change HTTPS
set /SP/services/https port=portnumber servicestate=enabled|disabled
settings.
Display SSH DSA key
show /SP/services/ssh/keys/dsa
settings.
Display SSH RSA key
show /SP/services/ssh/keys/rsa
settings.
TABLE 6-7 SNMP Commands
Description
Display information about
SNMP settings. By default,
the SNMP port is 161 and v3
is enabled.
Command
show /SP/services/snmp engineid=snmpengineid
port=snmpportnumber sets=enabled|disabled v1=enabled|disabled
v2c=enabled|disabled v3=enabled|disabled
Display SNMP users. show /SP/services/snmp/users
Add an SNMP user. create /SP/services/snmp/users/snmpusername
authenticationpassword=password
authenticationprotocol=MD5|SHA permissions=rw|ro
privacypassword=password privacyprotocol=none|DES
Delete and SNMP user. delete /SP/services/snmp/users/snmpusername
Display information about
show /SP/services/snmp/communities/public
SNMP public (read-only)
communities.
Add this device to an SNMP
create /SP/services/snmp/communities/public/comm1
public community.
Delete this device from an
delete /SP/services/snmp/communities/public/comm1
SNMP public community.
6-4 Sun Fire X4100 and Sun Fire X4200 Servers System Management Guide • December 2005
Page 75

TABLE 6-7 SNMP Commands
Description
Display information about
SNMP private (read-write)
communities.
Add this device to an SNMP
private community.
Delete this device from an
SNMP private community.
TABLE 6-8 Host System Commands
Description Command
Start the host system. start /SYS
Stop the host system. stop /SYS
Reset the host system. reset /SYS
Start a session to connect to the
host console.
Stop the session connected to the
host console.
Command
show /SP/services/snmp/communities/private
create /SP/services/snmp/communities/private/comm2
delete /SP/services/snmp/communities/private/comm2
start /SP/console
stop /SP/console
TABLE 6-9 Clock Settings
Description Command
Set the service processor
set /SP/clients/ntp/servers/1 address=ntpIPaddress
clock to synchronize with a
primary NTP server.
Set the service processor
clock to synchronize with a
set /SP/clients/ntp/servers/2 address=
ntpIPaddress2
secondary NTP server.
Chapter 6 Command Line Interface Reference 6-5
Page 76

6-6 Sun Fire X4100 and Sun Fire X4200 Servers System Management Guide • December 2005
Page 77

CHAPTER
7
Command Line Interface Tasks
7.1 How to Log In to the ILOM Service Processor CLI
You can access the service processor command line through the serial port or
remotely through a Secure Shell (SSH) connection.
■ Serial port – The serial port provides access to the service processor CLI and to
the system console. IPMI terminal mode and PPP mode are not available on the
serial port.
■ SSH – Secure Shell connections are enabled by default.
The service processor supports a maximum of 10 active sessions, including serial,
SSH, and web interface sessions. You can view active sessions by entering the
command show /SP/sessions.
Note – Telnet connections to the service processor are not supported.
7.1.1 What to Do
To log in using SSH:
1. Start your SSH client, type this command to log in to your service processor:
$ ssh root@SPipaddress
2. Type your password when prompted.
7-1
Page 78

Note – Note - For your ILOM Service Processor, the default user name is root, and
the default password is changeme.
For example:
$ ssh root@192.168.25.25
root@192.168.25.25's password:
Sun (TM) Integrated Lights Out Manager
Version 1.0
Copyright 2005 Sun Microsystems, Inc. All rights reserved.
Warning: password is set to factory default.
->
To log in from the serial port:
1. Configure your terminal device or the terminal emulation software running on a
laptop or PC to the following settings:
■ 8N1: eight data bits, no parity, one stop bit
■ 9600 baud
■ Disabled software flow control (CTS/RTS)
2. Connect a serial cable from the RJ-45 Serial Mgt port on your ILOM Service
Processor to a terminal device.
3. Press ENTER on the terminal device to establish a connection between that
terminal device and the ILOM Service Processor.
You should see the following prompt:
SUNSP0003BA84D777 login:
4. Log in to the service processor and type the default user name, root, with the
default password, changeme.
Note – Once you have logged in to the service processor as root, change the default
password for increased security.
7-2 Sun Fire X4100 and Sun Fire X4200 Servers System Management Guide • December 2005
Page 79

7.2 About LDAP
The ILOM Service Processor supports Lightweight Directory Access Protocol
(LDAP) authentication for users, based on the OpenLDAP software. LDAP is a
general-purpose directory service. A directory service is a centralized database for
distributed applications designed to manage the entries in a directory. Thus,
multiple applications can share a single user database. For more detailed
information on LDAP, see http://www.openldap.org/.
7.2.1 How LDAP Works
LDAP is based on a client-server model. LDAP provides the directory, and the
clients use the directory service to access entries. The data stored in a directory can
be distributed among several LDAP servers.
7.2.2 How LDAP Servers Organize Directories
Data in LDAP is organized hierarchically, starting at a root and branching down into
individual entries. Entries at the top level of the hierarchy represent larger
organizations, and under the larger organizations are entries for smaller
organizations. At the bottom of the hierarchy are entries for individual people or
resources.
Chapter 7 Command Line Interface Tasks 7-3
Page 80

FIGURE 7-1 LDAP Directory Structure
Each entry is uniquely identified by a distinguished name (dn). A distinguished
name consists of a name that uniquely identifies the entry at that hierarchical level
and a path that traces the entry back to the root of the tree.
For example, the distinguished name for jsmith is:
dn: uid=jsmith, ou=people, dc=sun.com
Here, uid represents the user ID of the entry, ou represents the organizational unit
in which the entry belongs, and dc represents the larger organization in which the
entry belongs. The following diagram shows how distinguished names are used to
identify entries uniquely in the directory hierarchy.
7-4 Sun Fire X4100 and Sun Fire X4200 Servers System Management Guide • December 2005
Page 81

FIGURE 7-2 LDAP Distinguished Names
7.2.3 How LDAP Clients and Servers Work
In the LDAP client-server model, LDAP servers make information about people,
organizations, and resources accessible to LDAP clients. Clients make changes to the
LDAP database using a client utility, usually bundled with the LDAP server. When a
change is made to the LDAP database, all client applications see the change
immediately so there is no need to update each distributed application. An LDAP
client can perform these operations, among others:
■ Search for and retrieve entries from the directory.
■ Add new entries to the directory.
■ Update entries in the directory.
■ Delete entries from the directory.
■ Rename entries in the directory.
For example, to update an entry in the directory, an LDAP client submits the
distinguished name of the entry with updated attribute information to the LDAP
server. The LDAP server uses the distinguished name to find the entry and performs
a modify operation to update the entry in the directory. The updated information is
immediately available to all the distributed applications using that LDAP server.
To perform any of these LDAP operations, an LDAP client needs to establish a
connection with an LDAP server. LDAP specifies the use of TCP/IP port number
389, although servers may run on other ports.
Chapter 7 Command Line Interface Tasks 7-5
Page 82

Your Sun Fire X4100 or Sun Fire X4200 server can be a client of an LDAP server. In
order to use LDAP authentication, you need to create a user on your LDAP server
that your Sun Fire X4100 or Sun Fire X4200 server can authenticate, or bind to, so the
client has permission to search the proper directory on the LDAP server.
For more information, see Section 7.3, “How to Configure LDAP” on page 7-6.
7.3 How to Configure LDAP
The ILOM Service Processor supports Lightweight Directory Access Protocol
(LDAP) authentication for users. To use this feature, you must configure your LDAP
server, according to your LDAP server's documentation, and your ILOM Service
Processor, using either the service processor command line or the web interface.
7.3.1 Before You Begin
You should have Administrator access privileges to, and detailed knowledge of,
your LDAP server configuration. You should gather basic network information
about your LDAP server, including its IP address.
7.3.2 What to Do
Note – This task is similar to configuring LDAP as a name service for Linux or
Solaris.
To configure your LDAP server you must:
1. Ensure that all users authenticating to the ILOM Service Processor have
passwords stored in crypt or MD5 crypt.
The service processor only supports LDAP authentication for passwords in these
two formats.
7-6 Sun Fire X4100 and Sun Fire X4200 Servers System Management Guide • December 2005
Page 83

2. Add object classes posixAccount and shadowAccount, and populate the
required property values for this schema (RFC 2307).
TABLE 7-1 LDAP Property Values
Required Property Notes
uid User name for logging in to your ILOM Service Processor.
uidNumber Any unique number.
gidNumber Any unique number.
userPassword Password.
homeDirectory Any value (this property is ignored by the ILOM Service Processor).
loginShell Any value (this property is ignored by the ILOM Service Processor).
3. Provide the service processor access to user accounts on your LDAP server.
Either enable your LDAP server to accept anonymous binds, or create a proxy user
on your LDAP server that has read-only access to all user accounts that will
authenticate through the ILOM Service Processor.
See your LDAP server documentation for further details.
To configure your ILOM Service Processor you must:
1. Enter the proxy user name and password.
From the service processor command line, type: set /SP/clients/ldap
binddn=cn=proxyuser, ou=sales, dc=sun, dc=com bindpw=password
2. Enter the IP address of the LDAP server.
From the service processor command line, type: set /SP/clients/ldap
ipaddress=ldapipaddress
3. Assign the port used to communicate with the LDAP server; the default port is
389.
From the service processor command line, type:
set /SP/clients/ldap port=ldapport
4. Enter the distinguished name of the branch of your LDAP tree that contains users
and groups.
This is the location in your LDAP tree that you want to search for user
authentication.
From the service processor command line, type:
set /SP/clients/ldap searchbase="ou=people, ou=sales, dc=sun, dc=com"
Chapter 7 Command Line Interface Tasks 7-7
Page 84

5. Set the state of the LDAP service to enabled.
From the service processor command line, type:
set /SP/clients/ldap state=enabled
7.3.3 What Next
Verify that LDAP authentication is working by attempting to log in to the service
processor using an LDAP user name and password.
Note – The ILOM Service Processor searches local users before LDAP users. If an
LDAP user name exists as a local user, ILOM uses the local account for
authentication.
7.4 How to Manage Access to the Service Processor
You can display or configure HTTP, HTTPS, and Secure Shell (SSH) services from the
service processor command-line interface. By default, HTTPS access is enabled.
7.4.1 Displaying Access Settings
Type this command to display HTTP settings:
show /SP/services/http
Type this command to display HTTPS settings:
show /SP/services/https
Type these commands to display SSH key settings:
show /SP/services/ssh/keys/dsa
show /SP/services/ssh/keys/rsa
7-8 Sun Fire X4100 and Sun Fire X4200 Servers System Management Guide • December 2005
Page 85

7.4.2 Configuring Access Settings
Use the set command to change properties and values for HTTP and HTTPS
services.
7.4.2.1 Syntax
set target [propertyname=value]
7.4.2.2 Targets, Properties, and Values
These targets, properties, and values are valid for HTTP, HTTPS, and SSH services.
Target Property Value Default
/SP/services/http port
secureredirect
servicestate
/SP/services/https port
servicestate
/SP/services/ssh/keys/dsa fingerprint
length
publickey
/SP/services/ssh/keys/rsa fingerprint
length
publickey
<port number>
true|false
enabled|disabled
<port number>
enabled|disabled
80
true
disabled
443
enabled
7.4.2.3 Examples
To configure automatic redirection from HTTP to HTTPS:
set /SP/services/http secureredirect=true
To change the HTTPS port to 445 type:
set /SP/services/https port=445
Chapter 7 Command Line Interface Tasks 7-9
Page 86

7.5 How to Manage the Host State
You can change the host's state and access the host console from the service
processor.
7.5.1 Managing the Host
Type this command to power on the host:
start /SYS
Type this command to power off the host:
stop /SYS
Type this command to reset the host:
reset /SYS
Note – Entering reset /SYS does not affect the power state of the host.
7.5.2 Managing the Host Console
Type this command to start a session to the server console:
start /SP/console
Type this command to terminate a server console session started by another user:
stop /SP/console
7.6 How to Manage ILOM Network Settings
You can display or configure the service processor network settings from the service
processor command-line interface.
7-10 Sun Fire X4100 and Sun Fire X4200 Servers System Management Guide • December 2005
Page 87

7.6.1 Displaying Network Settings
Type this command to display network settings:
show /SP/network
7.6.2 Configuring Network Settings
Use the set command to change properties and values for network settings.
Network settings have two sets of properties: pending and active. The active settings
are the settings currently in use by the service processor. These settings are readonly. If you want to change settings, enter the updated settings as the pending
settings (pendingipaddress or pendingipgateway), then set the commitpending
property to true. This prevents accidental disconnections for both port and network
settings.
Note – Ensure that the same IP address is always assigned to an SP by either
assigning a static IP address to your service processor after initial setup, or
configuring your DHCP server to always assign the same IP address to an SP. This
enables an SP to be easily located on the network for performing critical operations
including service processor upgrades and booting from remote media.
7.6.2.1 Syntax
set target [propertyname=value]
7.6.2.2 Targets, Properties, and Values
These targets, properties, and values are valid for service processor network settings.
Target Property Value Default
/SP/network
commitpending
pendingipaddress
pendingipdiscovery
pendingipgateway
pendingipnetmask
true|(none)
<ipaddress|none>
dhcp|static
<ipaddress|none>
<ipdotteddecimal>
Chapter 7 Command Line Interface Tasks 7-11
(none)
none
dhcp
none
255.255.255.255
Page 88

7.6.2.3 Examples
To change the IP address for the service processor, type:
set /SP/network ipaddress=192.168.77.21 commitpending=true
Note – Changing the IP address will disconnect your active session if you are
connected to the service processor via a network.
To change the network settings from DHCP to static assigned settings, type:
set /SP/network pendingipdiscovery=static pendingipaddress=
192.168.77.21 pendingipgateway=192.168.77.100 pendingipnetmask=
255.255.255.255 commitpending=true
7.7 How to Manage ILOM Serial Port Settings
You can display or configure the service processor serial port settings from the
service processor command-line interface. The service processor has two serial ports:
an internal "host" port that interfaces directly with the host server using the start
/SP/console command, and an external port that is exposed on back of the server.
7.7.1 Displaying Serial Port Settings
Type this command to display settings for the external serial port:
show /SP/serial/external
Type this command to display settings for the host serial port:
show /SP/serial/host
7.7.2 Configuring Serial Port Settings
Use the set command to change properties and values for serial port settings. Port
settings have two sets of properties: pending and active. The active settings are the
settings currently in use by the service processor. These settings are read-only. If you
7-12 Sun Fire X4100 and Sun Fire X4200 Servers System Management Guide • December 2005
Page 89

want to change settings, enter the updated settings as the pending settings, then set
the commitpending property to true. This prevents accidental disconnections for
both port and network settings.
7.7.2.1 Syntax
set target [propertyname=value]
7.7.2.2 Targets, Properties, and Values
These targets, properties, and values are valid for service processor serial ports.
Target Property Value Default
/SP/serial/external
/SP/serial/host
commitpending
flowcontrol
pendingspeed
speed
commitpending
pendingspeed
speed
true|(none)
none
<decimal>
9600
true|(none)
<decimal>
9600
(none)
none
9600
9600
(none)
(none)
9600
7.7.2.3 Example
To change the speed (baud rate) for the host serial port from 9600 to 57600, type:
set /SP/serial/host pendingspeed=56000 commitpending=true
Note – The speed of the host serial port must match the speed setting for serial port
0, COM1, or /dev/ttys0 on the host operating system for the service processor to
communicate properly with the host.
7.8 How to Manage ILOM User Accounts
You can add, delete, view, or configure user accounts from the service processor
command-line interface. The service processor supports 10 local user accounts —
you can configure 8 of these accounts, the other two are reserved for use by the
Chapter 7 Command Line Interface Tasks 7-13
Page 90

system. Additionally, you can configure the service processor to use LDAP
authentication if you need to grant more users access to the service processor. For
more information, see Section 7.3, “How to Configure LDAP” on page 7-6.
7.8.1 Adding a User Account
Type this command to add a local user account:
create /SP/users/username password=password role=
administrator|operator
7.8.2 Deleting a User Account
Type this command to delete a local user account:
delete /SP/users/username
7.8.3 Displaying User Accounts
Type this command to display information about all local user accounts:
show /SP/users
7.8.4 Configuring User Accounts
Use the set command to change passwords and roles for configured user accounts.
7.8.4.1 Syntax
set target [propertyname=value]
7-14 Sun Fire X4100 and Sun Fire X4200 Servers System Management Guide • December 2005
Page 91

7.8.4.2 Targets, Properties, and Values
These targets, properties, and values are valid for local user accounts.
Target Property Value Default
/SP/users/username permissions
password
administrator|operator
<string>
7.8.4.3 Examples
When changing the role for user1 from Administrator to Operator type:
set /SP/users/user1 role=operator
To change user1's password type:
set /SP/users/user1 password
Changing password for user /SP/users/user1/password...
Enter new password:********
Enter new password again:********
New password was successfully set for user /SP/users/user1
operator
Note – You must have Administrator privileges to change user properties.
7.9 How to Manage SNMP User Accounts
You can add, delete, or configure SNMP user accounts from the service processor
command-line interface. By default, SNMP v3 is enabled, and SNMP v1 and v2c are
disabled.
7.9.1 Adding a User Account
Type this command to add an SNMP v3 read-only user account:
create /SP/services/snmp/users/<username> authenticationpassword=
password
Chapter 7 Command Line Interface Tasks 7-15
Page 92

Type this command to add an SNMP v1/v2c user account:
create /SP/services/snmp/communities/<communityname>
7.9.2 Deleting a User Account
Type this command to delete an SNMP v3 user account:
delete /SP/services/snmp/users/<username>
Type this command to delete an SNMP v1/v2c user account:
delete /SP/services/snmp/communities/<communityname>
7.9.3 Configuring User Accounts
Use the set command to configure SNMP user accounts.
7.9.3.1 Syntax
set target [propertyname=value]
7.9.3.2 Targets, Properties, and Values
These targets, properties, and values are valid for SNMP user accounts.
Target Property Value Default
/SP/services/snmp/communities/
communityname
/SP/services/snmp/users/username
* If the privacyprotocol property has a value other than none, then a privacypassword must be set.
7-16 Sun Fire X4100 and Sun Fire X4200 Servers System Management Guide • December 2005
permissions ro|rw ro
authenticationprotocol
authenticationpassword
permissions
privacyprotocol
privacypassword
MD5|SHA
<string>
ro|rw
none|DES
<string>
MD5
(null string)
ro
none*
(null string)
Page 93

7.9.3.3 Examples
When changing the parameters of SNMP users, you must set values for all of the
properties, even if you are not changing all of the values. For example, to change
user al's privacyprotocol to DES you must type:
set /SP/services/snmp/users/al privacyprotocol=DES
privacypassword=password authenticationprotocol=SHA
authenticationpassword=password
Your changes would be invalid if you only typed:
set /SP/services/snmp/users/al privacyprotocol=DES
Note – You can change SNMP user permissions without resetting the privacy and
authentication properties.
7.10 How to Manage ILOM Alerts
You can display or configure alerts from the service processor command-line
interface. You can configure up 15 alerts that can be sent to an IP address. Only IPMI
PET alerts are supported. The default value for alerts is disable. To enable an alert,
set the alert's value to something other than "disable".
7.10.1 Displaying Alerts
Type this command to display alerts:
show /SP/alert/rules
7.10.2 Configuring Alerts
Use the set command to change properties and values for alerts.
7.10.2.1 Syntax
set target [propertyname=value]
Chapter 7 Command Line Interface Tasks 7-17
Page 94

7.10.2.2 Targets, Properties, and Values
These targets, properties, and values are valid for service processor PET alerts.
Target Property Value Default
/SP/alert/rules/1...15
destination
level
<ipaddress>
disable|information|warning|critical|non-recoverable
(none)
disable
7.10.2.3 Examples
To configure an alert, type:
set /SP/alert/rules/1 destination=128.145.77.21 level=critical
To change an alert level to critical, type:
set /SP/alert/rules/1 level=warning
To turn off an alert, type:
set /SP/alert/rules/1 level=disable
7.11 How to Manage Clock Settings
You can display clock settings or configure your service processor clock to
synchronize with one or two NTP servers. If you do not configure an NTP server, the
service processor time is set by the system BIOS.
7.11.1 Displaying Clock Settings
Type this command to display clock settings:
show /SP/clock
7.11.2 Configuring the Clock to Use NTP Servers
Use the set command to change properties and values for NTP servers.
7-18 Sun Fire X4100 and Sun Fire X4200 Servers System Management Guide • December 2005
Page 95

7.11.2.1 Syntax
set target [propertyname=value]
7.11.2.2 Targets, Properties, and Values
These targets, properties, and values are valid for NTP servers.
Target Property Value Default
/SP/clients/ntp/server/1
/SP/clients/ntp/server/2
address <ipaddress> (none)
address <ipaddress> (none)
7.11.2.3 Example
To configure your service processor clock to synchronize with an NTP server, type:
set /SP/clients/ntp/server/1 address=125.128.84.20
Then enable the NTP service by typing:
set /SP/clock/usentpserver=enabled
Note – Once you enable the NTP service, it can take up to five minutes for the
service processor clock to synchronize.
7.12 How to Display Information About the Service Processor
You can display active session, current versions, and other information about the
service processor using the command-line.
Chapter 7 Command Line Interface Tasks 7-19
Page 96

7.13 Displaying Version Information
Type this command to display the current service processor version:
version
7.13.1 Displaying CLI Commands
Type this command to display all of the service processor CLI commands:
show /SP/cli/commands
7.13.2 Displaying Active Sessions
Type this command to display the active service processor sessions:
show /SP/sessions
7.13.3 Displaying Available Targets
Type this command to display the available vaild targets:
help targets
7.14 How to Update the Service Processor Firmware
You can update the service processor firmware from the command-line interface.
Updating the service processor from the command line enables you to update both
the SP firmware and the BIOS at the same time. See the load command page for
more information.
7-20 Sun Fire X4100 and Sun Fire X4200 Servers System Management Guide • December 2005
Page 97

7.14.1 Updating the Service Processor Firmware
Type this command to update the service processor:
load -source URI
7.14.2 Example
-> load -source tftp://archive/newmainimage
Note – A firmware upgrade will cause the server and ILOM to be reset. It is
recommended that a clean shutdown of the server be done prior to the upgrade
procedure. An upgrade takes about 20 minutes to complete. ILOM will enter a
special mode to load new firmware. No other tasks can be performed in ILOM until
the firmware upgrade is complete and ILOM is reset.
Are you sure you want to load the specified file (y/n)? y
File upload is complete. Firmware image verification is
complete.
Do you want to update the ILOM OS image (y/n)? n
Do you want to update the host BIOS (y/n)? n
Do you want to preserve the configuration (y/n)?n
Updating firmware in flash RAM:
.
Firmware update is complete.
Chapter 7 Command Line Interface Tasks 7-21
Page 98

7-22 Sun Fire X4100 and Sun Fire X4200 Servers System Management Guide • December 2005
Page 99

CHAPTER
8
Sun ILOM Web GUI
This chapter describes the Sun ILOM Web GUI and provides instructions for logging
in and logging out.
8.1 Overview of the Sun ILOM Web GUI
The Sun™ Integrated Lights Out Manager (ILOM) graphical user interface (GUI)
enables you to monitor and manage local and remote systems. The GUI is designed
for easy use. Using a standard Internet browser, you can expect to be up and
running the ILOM web GUI in less than five minutes.
ILOM is a powerful combination of the ILOM Service Processor (SP) hardware and
the ILOM software suite. Together, this hardware and software provide control of,
and access to, the server's system management features. The SP functions
independently of the server's main CPU using dedicated management ports,
enabling you to manage the attached server even when the server's operating system
(OS) is down.
One of the most powerful features of ILOM is the ability to redirect the server's
graphical console to a remote workstation or laptop system. When you redirect the
host console, you can configure the remote system's keyboard and mouse to act as
the server's mouse and keyboard. You can also configure the floppy disk drive or
CD-ROM drive on the remote system as a device virtually connected to the Sun Fire
X4100 or Sun Fire X4200 server. You can also redirect floppy disk images (.img) and
CD-ROM images (.iso) for remote access.
8-1
Page 100

8.1.1 Browser and Software Requirements
The ILOM product comes preinstalled on the Sun Fire X4100 or Sun Fire X4200
server. There are no operating system installation or Java™ software requirements to
run the ILOM web GUI when you are not redirecting the console. The ILOM web
GUI has been tested successfully with Mozilla 1.7.5, Firefox 1.0, and Internet
Explorer 6.0 web browsers, and may be compatible with other web browsers.
The ILOM web GUI is organized as a group of web pages that enable you to manage
the SP functions. The base web server supports both secure (HTTPS) and non-secure
(HTTP) access. Secure access is enabled by default. Non-secure access is disabled by
default. The SP can have up to 10 active sessions, including serial, Secure Shell
(SSH), and the ILOM web GUI.
When you install Solaris™, Linux, or Microsoft Windows software on the Sun Fire
X4100 or Sun Fire X4200 server, the installation manager also copies operating
system-specific drivers and applications from the Sun Fire X4100 and X4200
Resource CD to the system hard drive. To enable console redirection, the ILOM web
GUI launches the Java Remote Console application. The Remote Console application
is a piece of layered software that enables remote clients to view the graphical
console of the Sun Fire X4100 or Sun Fire X4200 server as though they were
connected directly to the video, mouse, and keyboard of the Sun Fire X4100 or Sun
Fire X4200 server. Remote Console software is implemented using an OS-specific
Java application that is invoked by Java Web Start. You need to install the Java
runtime environment Version 5.0 or later on the remote client to enable the client to
run Java Remote Console. You can download the Java runtime environment at
http://www.java.com.
8.1.2 Common Tasks Performed With the ILOM Web GUI
After you log in to the ILOM web GUI, you can perform basic software provisioning,
Intelligent Platform Management Interface (IPMI) tasks, and system monitoring.
There can be up to 10 user accounts on the SP. However, you cannot delete the root
or anonymous accounts. Therefore, you can configure eight accounts for the SP. Each
account has an associated user name and role. Using the GUI, you can define a user
account role as an Administrator, which provides access to all SP functionality and
commands, or as an Operator, which provides limited access to the SP functionality
and commands.
Some of the common tasks you can perform using the ILOM web GUI include:
■ Redirect the system's graphical console to a remote client browser.
■ Connect a remote floppy disk drive or floppy disk image to the system as a
virtual floppy disk drive.
8-2 Sun Fire X4100 and Sun Fire X4200 Servers System Management Guide • December 2005
 Loading...